1
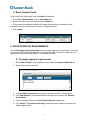
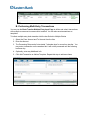
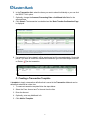
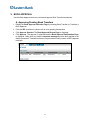
Eastern Bank TreasuryConnect Book Transfer User’s Manual This user’s manual provides instructions for accessing services found within the Book Transfer Group. The services available are: Book Approval Requirements (only available to the Corporate Administrators) Book Transfer Input Book Transfer Report Book Approval August 2012 1 Table of Contents I. BOOK TRANSFER PERMISSIONS TO OTHER USERS .................................................. 3 A. B. C. II. BOOK TRANSFER SERVICE PERMISSION ............................................................................ 3 BOOK TRANSFER ACCOUNTS ............................................................................................ 3 BOOK TRANSFER LIMITS ................................................................................................... 4 BOOK APPROVAL REQUIREMENTS .............................................................................. 4 A. III. A. B. C. D. IV. TO ASSIGN APPROVAL REQUIREMENTS .............................................................................. 4 BOOK TRANSFER INITIATION..................................................................................... 5 INITIATING A BOOK TRANSFER ........................................................................................... 5 PERFORMING MULTI-ENTRY TRANSACTIONS ...................................................................... 7 CREATING A TRANSACTION TEMPLATE............................................................................... 8 SETTING UP A RECURRING TRANSFER ............................................................................... 9 BOOK TRANSFER REPORT SERVICE .......................................................................11 A. VIEW OR EXPORT BOOK TRANSFER REPORT ........................................................................11 V. BOOK APPROVAL...........................................................................................................12 A. APPROVING PENDING BOOK TRANSFERS ..........................................................................12 2 I. Book Transfer PERMISSIONS to other users The Corporate Administrator will grant access to the Book Transfer service, accounts and limits to other users within the company. A. Book Transfer Service Permission 1. To grant the Book service permission, choose User Administration in the drop down list. Click on the User Admin tab. 2. Select the User from the User list and click on the Services link. 3. In the User Service Permissions column select Book Transfer to assign all permissions or select which permissions the user should have. 4. Click Submit. B. Book Transfer Accounts If still on the User Admin page, click the Permissions link otherwise: 1. Go to User Administration, click on User Admin tab 2. Select the User from the User list and click on the Permissions link. 3. Click on the accounts that should be assigned to Book transfer. 4. Click Submit. 3 C. Book Transfer Limits If still on the User Admin page, click the Limits link otherwise: 1. Go to User Administration, click on User Admin tab 2. Select the User from the list and click on the Limits link. 3. Either accept the predefined defaults or change the account type, transaction entry, transaction per day or the maximum number of transfers per day. 4. Click submit II. BOOK APPROVAL REQUIREMENTS Use the Book Approval Requirements service to assign approval requirements to users and accounts for Book Transfer transactions. You can define users to require one approver or no approvers for transactions they perform on individual accounts. A. To assign approval requirements 1. Select Book Transfer in the drop down list and select the Approval Required tab 2. Select a user from the User list 3. In the Available Accounts list, choose one or more accounts, or All Accounts. 4. Click Hold Selected. The selected Available Accounts are copied to the Selected Accounts list. 5. Choose the approval level in the Set Default Approval Levels area. 6. Click Submit. The Update Levels Page is displayed with the defined accounts and default approval level. 4 7. Optionally, change the Approval Level for individual accounts 8. Select the approval level and click the Save button 9. Receive an information box on page to verify the change: III. BOOK TRANSFER INITIATION A. Initiating a Book Transfer To initiate a Book Transfer, go to Book Transfer and click on the Book Input tab: 1. Select a From Account and a To Account from the Account selection boxes. The accessible balance is displayed with the account. Note** If you have several accounts you have the option to sort the accounts in the order you would like them. Click on the Account Preferences box. Choose which account or accounts to move into the sorted accounts box. Use the arrow key to move the account up or down. If you check the Limit account to display list box they will be the only accounts that display when you choose the Book input. Click Save. 5 2. Enter the required transfer information and Additional Info if so desired 3. The Processing Date can be future dated 7 calendar days for a one time transfer. You may enter a transaction on the weekend and the Same Day balance report will reflect the transfer. 4. If you want to clear entered information click on reset 5. Click on Submit 6. The system will respond with a confirmation. Read the Response message to determine if the transactions was processed or not processed. 7. If a transaction is future dated it will be warehoused until the processing date. During this period if you want to cancel the warehoused transaction go to the Book Report and click on Delete for the transaction. 6 B. Performing Multi-Entry Transactions You can use the Book Transfer Multiple Entry Input Page to define and submit transactions with multiple one-account-to-one-account transfers. You can also save transactions as templates. To initiate multiple-entry book transfers click the box Switch to Multiple Entries 1. Select the From Account and To Account from the lists. 2. Enter the Amount 3. The Processing Date can be future dated 7 calendar days for a one time transfer. You may enter a transaction on the weekend but it will not be processed until the following business day. 4. Optionally, enter any Additional Info. 5. Click Add Transaction or Add as Template. Repeat this step to add more items 7 6. In the Transaction List, select the items you want to submit individually or you can click the SELECT ALL option. 7. Optionally, change the Amount, Processing Date or Additional Info fields for the selected items. 8. Click Submit. The transaction is submitted and the Book Transfer Confirmation Page is displayed. 9. If a transaction is future dated it will be warehoused until the processing date. During this period if you want to cancel the warehoused transaction go to the Book Report and click on Delete for the transaction. C. Creating a Transaction Template A template is simply a transaction definition that is saved in the Transaction List and can be edited and submitted at a later time. 1. To create a transaction template follow the steps below: 2. Select the From Account and To Account from the lists. 3. Enter the Amount 4. Optionally, enter any Additional Info. 5. Click Add As Template. 8 D. Setting up a Recurring Transfer Use Recurring Book Transfer to schedule a one time, weekly or a monthly transaction. To set up a Weekly transfer: 1. Select a From Account and a To Account from the Account selection boxes 2. Click on the drop down list in the Transfer Information section and choose weekly. 3. Choose the number of weeks (1-99) you would like the weekly transfer to take place. 4. Choose the day of the week to schedule this transfer. Note: If a Sunday or Saturday is chosen the transfer will be processed on the next business day. 9 To set up a Monthly transfer: 1. Select a From Account and a To Account from the Account selection boxes 2. Click on the drop down list in the Transfer Information section and choose monthly. You have 3 different options for monthly transfers. 3. You can setup a transfer to be done once a month on a certain date of the month, every month or a designated period of time, such as the 1st of every 3 months. 4. You can schedule a recurring transfer to be done twice a month every month or a designated period of time such as 1st and 15th of every other month. 5. You can schedule a recurring transfer to be done on a particular week and day within the month or a designated monthly period such as 3rd Wednesday of every 4 months. You are able to view all the recurring book transfers you have setup on the Book input page. The transfers can be exported in either a CSV or a PDF format. If you wish to delete a scheduled transfer, click on the icon to delete the transaction. 10 IV. BOOK TRANSFER REPORT SERVICE The Book Transfer Report service allows Users to view or export the status of transfers for specific accounts or multiple accounts within the requested date range. A. View or Export Book Transfer Report 1. Select the Book Report tab 2. Select which accounts to view or export or leave on default All Accounts 3. Select query type (Entry or Processing) and report dates 4. Select amount range or leave at default for all amounts 5. Select a bank trace number range , customer trace number range or leave at default for all trace numbers 6. Select report sort characteristic (by from account, by to account, by amount, by processing date) 7. Click Submit to view report or choose either CSV or PDF format to export report. If you chose to first view the report you still have the option to export the report in either CSV or PDF format. Each column on this report can be sorted. You also have the opportunity to delete a pending transfer while viewing this report 11 V. BOOK APPROVAL Use the Book Approval service to review and approve Book Transfer transactions. A. Approving Pending Book Transfers 1. Display the Book Approval Selection Page by choosing Book Transfer (or Transfers) > Book Approval. 2. Click the SEL checkbox to choose one or more pending transactions. 3. Click Approve Selected. The Book Approval Review Page is displayed. 4. Click Approve. The approval is submitted and the Book Approval Confirmation Page is displayed. Make sure you read the response message since the book transfer is not always processed. Transactions that are not processed usually contain a RED response message. 12