1
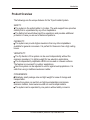
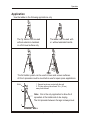
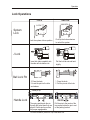
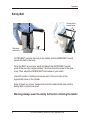
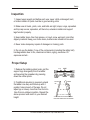
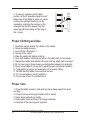
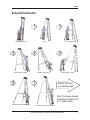
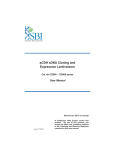
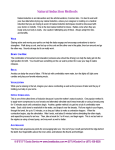
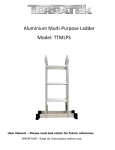
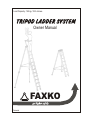
Load Capacity: 150 kg / 23.5 stones.
Owner Manual
FAXKO
go higher safely
Patented
Table of Contents
Introduction
Product Overview ............................................................................ 3
Terminology ..................................................................................... 4
Specification .................................................................................... 5
Operation Instruction
Application ....................................................................................... 6
Lock Operation ................................................................................ 7
Safety Belt ....................................................................................... 8
Safety
Inspection ....................................................................................... 9
Proper Set-up ................................................................................. 9
Proper Climbing and Use .............................................................. 10
Proper Care ................................................................................... 10
Setup Demonstration ..................................................................... 11
DANGER
DANGER
ELECTROCUTION HAZARD
Failure to read and
follow all instructions
on this ladder,
including those on the
extension parts may
result in injuries or
Death
2
WATCH FOR
WIRE
THIS LADDER
CONDUCTS
ELECTRICITY
For more information, please visit http://www.faxko.com
Introduction
Product Overview
The followings are the unique features for the Tripod Ladder System.
SAFETY:
The system is the safest ladder in its class. The wide support base provides
stability that is unparalleled by any other stepladders.
The Safety belt would allow hand free operations and provides additional
protection in case you are out of balanced positions.
CAPABILITY:
The system can provide higher elevations than any other stepladders
available for general consumers. It is perfect for those who has a high ceiling
house.
VERSATILITY:
The Fly Section of the system can be used independently without the
extension members. It is lighter weight for low elevation applications.
The 3 independently adjustable LEGS can be used on uneven surfaces.
The feature is convenient for outdoor applications.
Also the system can be adjusted to use for against-wall applications. It is
safer than using a traditional extension ladder.
CONVENIENCE:
Relatively small package size and light weight for ease of storage and
transportation.
Since the system can perform as high/low stepladders and replace
extension ladders, home owners would not need multiple ladders.
The system can be operated by one person without safety concerns.
For more information, please visit http://www.faxko.com
3
Introduction
Terminology
Safety Belt
Handle
Top Cap
Handle Lock
Upper Ladder
Upper
Support Leg
Rungs
Spreaders
Side Rails
Ball Lock Pin
System
Lock
Lower
Support Leg
(Extension Leg)
J Lock
Lower Ladder
(Extension Ladder)
Fly Section is the upper ladder section without the
extension members
4
For more information, please visit http://www.faxko.com
Introduction
Specification
Models
Dimensions
Descriptions
A
Highest Standing Level
(3.69M)
(3.11M)
B
C
Max. Reach *
Storage Length
(5.67M)
(5.09M)
(2.62M)
(2.31M)
Weight
Fly Section
Total System
Equivalent Traditional Stepladder Size
28.6 lb (13.0 kg)
48.0 lb (21.8 kg)
16 ft.
26.2 lb (11.9 kg)
43.8 lb (19.9 kg)
14 ft.
Load Capacity: 150kg per EN131
Elevation Adjustment Resolution
Ladder: 12 inches
Support Legs: ~ 3 inches
For more information, please visit http://www.faxko.com
5
Operation
Application
Use the ladder in the following applications only
The Fly Section can be used
without extension members
on a firm level surface only
The ladder can be used with
or without extended handle
The full ladder system can be used on even and uneven surfaces.
All the 3 spreaders must be level before use for open space applications.
WALL
2
1. Support leg shoes contact with the wall
2. The top cap must be at least 10 in. (25 cm)
away from the wall
Note: this is the only application to allow the 2
spreaders at the ladder side to be sloping.
The 3rd spreader between the legs is always level.
1
AGAINST WALL
6
For more information, please visit http://www.faxko.com
Operation
Lock Operations
UNLOCK
LOCK
UNLOCK
LOCK
System
Lock
PUSH
Lock the system at close position
Push up the lock mechanism
to unlock the system
Insert lock tabs completely into
the side rail hole before use
Pull the lock tab out and twist
slightly
Support Leg
2
1
Ball Lock Pin
1. Press the knob
2. Insert the pin into the hole
and release
Support Leg
J Lock
2
1
1. Press the knob
2. Pull the pin out of the hole
visible pin tip
Handle Lock
LOCK
The spring would push the pin
through the holes when they are
aligned. Visible pin tips confirm
the proper engagements.
UNLOCK
Pull the pins to the center of the
top cap and rotate the pin to rest
on the parking bracket.
For more information, please visit http://www.faxko.com
7
Operation
Safety Belt
Secure at the
handle holes
Side body
center line
OUTER BELT secures the body to the ladder and the INNER BELT would
secure the belt to the body.
Wrap the BELT around your waist and adjust the OUTER BELT so that
each of the end clip is approximately 16 inches from the center of the side
body. Then, adjust the INNER BELT and buckle on your waist.
Use both hands in climbing and secure each of the end clips at the
appropriate holes on the handle.
Note: At least one of your hands must hold the ladder all the time until the
Safety Belt is properly secured.
Warning:Always wear the safety belt before climbing the ladder
8
For more information, please visit http://www.faxko.com
Safety
Inspection
1. Inspect upon receipt and before each use: never climb a damaged, bent,
or broken ladder. All parts must be in good working order
2. Make sure all rivets, joints, nuts, and bolts are tight; steps, rungs, spreaders
and top cap secure; spreaders, all the locks, extension ladder and support
legs function properly.
3. Keep ladder clean, free from grease, oil, mud, snow, wet paint, and other
slippery material. Keep your shoes clean, leather soles should not be used.
4. Never make temporary repairs of damaged or missing parts.
5. Do not use the ladder, if one of the components (including the safety belt)
has degradation due to fire, chemical corrosion, aging, excessive UV
exposure and etc..
Proper Setup
1. Release the ladder system locks, pull the
support legs divergently from the ladder
and securing the spreaders by pressing
down the center pivots.
2. If additional elevation is required, extend
the ladder one step and follow up with 4
position holes at each of the legs. Do not
adjust (up or down) more than one foot at a
time from an optimum position. Repeat the
above process until reach to your desired
height.
Level
LOCK
UNLOCK
SUPPORT
LEG
LADDER
4 POSITIONS ON THE SUPPORT LEG
PER ONE LADDER STEP ADJUSTMENT
For more information, please visit http://www.faxko.com
9
Safety
3. To have an optimum (most stable)
position, all the 3 spreaders must be level *
before use. If the ladder is setup on a level
surface, the optimum positions can be
reached by matching the number on the
extension leg that first appear from the
upper leg with the number on the rung at
the J Locks.
2
UPPER
LEG
UPPER LADDER
3
H
TC
MA
4
LOWER LADDER
4
3
J Lock
5
2
Proper Climbing and Use
1. Read this manual and all the Labels on the ladder.
2. Setup the ladder properly.
3. Level all the 3 Spreaders. *
4. Secure all the Locks.
5. Wear the safety belt before climbing.
6. Uses both hands in climbing and secure the safety belt on the handle.
7. Always face ladder and maintain firm grip until the safety belt is secured.
8. Do not over reach. Always keep your bellybutton between the side rails.
9. Never use a ladder if you are not in good physical and mental condition.
10. Total weight (a person and materials) not to exceed 150kg.
11. NEVER use this ladder near electrical current.
12. Do not use ladder in windy conditions.
13. Do not use in front of unlocked doors
Proper Care
1. Store the ladder system in safe and dry place. Keep away from direct
sun light.
2. Properly secure and support ladder while in transit.
3. Never store materials on ladder.
4. Keep ladder clean and free of all foreign materials.
5. Lubricate all the moving parts regularly.
* exception for the Against Wall applications (see page 6).
10
For more information, please visit http://www.faxko.com
Safety
Setup Demonstration
1
5
4
Extend 4 holes at Leg1
Extend 1step at Ladder
6
Level Spreaders
Open
Release system Lock
3
2
7
Extend 8 holes at Leg2
Repeat until reach
your desired height
Note: The images showed
extending the height by 2 ft.
(i.e. 2 ladder steps).
Extend additional 4 holes at Leg1
Extend additional 1 step at Ladder
For more information, please visit http://www.faxko.com
11
FAXKO LLC
www.faxko.com
Updated: September 9, 2011
P/N: MU-01