1
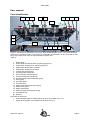
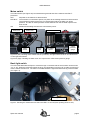
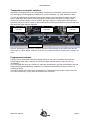
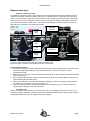
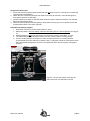
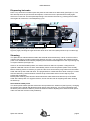
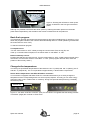
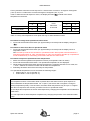
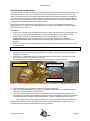
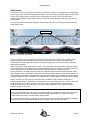
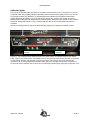
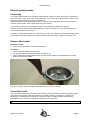
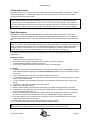
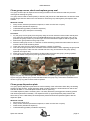
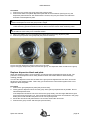
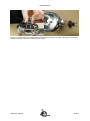
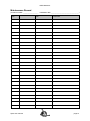
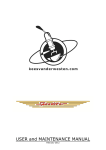
User manual Spirit Document ID: Sup-Rum-Eng [Typ hier] Date of issue: October 22, 2015 [Typ hier] Revision date: May 8, 2015 [Typ hier] CONTENTS User manual ........................................................................................................................................... 2 Parts identification ............................................................................................................................... 2 Mains switch ........................................................................................................................................ 3 Back light switch .................................................................................................................................. 3 Temperature controller switches ......................................................................................................... 4 Programmed volumes ......................................................................................................................... 4 Touchpad ............................................................................................................................................. 5 Program brew volumes.................................................................................................................... 5 Program hot water timer .................................................................................................................. 6 Automatic back-flush program ......................................................................................................... 6 Bastone auto-stop ............................................................................................................................... 7 Program brew volumes.................................................................................................................... 7 Program hot water timer .................................................................................................................. 8 Automatic back-flush program ......................................................................................................... 8 Dispensing hot water ........................................................................................................................... 9 Steaming.............................................................................................................................................. 9 Set maximum steam power ............................................................................................................. 9 Back-flush program ........................................................................................................................... 10 Touchpad version .......................................................................................................................... 10 Bastone-autostop version .............................................................................................................. 10 Change boiler temperatures .............................................................................................................. 10 Switch boiler temperatures with Störk ST25-Eco controllers ........................................................ 10 Procedure to change from operational to Eco-mode .................................................................... 11 Procedure to return from Eco- to operational mode ...................................................................... 11 Procedure to adjust the operational boiler temperature ................................................................ 11 Set hot water temperature ................................................................................................................. 12 Shot timers......................................................................................................................................... 13 Indicator lights ................................................................................................................................... 14 Daily to weekly routine ........................................................................................................................ 15 Clean body ........................................................................................................................................ 15 Remove filter basket .......................................................................................................................... 15 Clean filter holder .............................................................................................................................. 15 Clean steam wand ............................................................................................................................. 16 Back flush group ................................................................................................................................ 16 Clean group screen, check and replace group seal .......................................................................... 17 Clean group dispersion plate ............................................................................................................. 17 Replace dispersion block and plate ................................................................................................... 18 Procedure ...................................................................................................................................... 18 Recommended maintenance scheme ............................................................................................... 20 Maintenance Record ........................................................................................................................... 21 Maintenance ......................................................................................................................................... 22 Contact information ............................................................................................................................ 22 Spirit User manual page 1 WELCOME User manual Parts identification 9 10 11 12 14 13 15 16 17 A 8 7 6 B 5 4 3 2 1 Figure 1. Showing main operational parts of the Spirit Duette Bastone version. The Spirit Triplette is wider since it has three groups but its functions are identical to the Duette. On the Touchpad version, the group brewing lever units are replaced with touchpads (see Table 1). 1. 2. 3. 4. 5. 6. 7. 8. 9. 10. 11. 12. 13. 14. 15. 16. 17. A. B. Mains switch Coffee boiler PID temperature controller (right group) Coffee boiler heating on-off switch (right group) Steam boiler temperature controller Steam boiler heating on-off switch Volume switch (left group) Program button (left group) Group indicator light (left group) Group brewing lever (left group) Pressure gauge coffee boiler (left group) Group (left) Hot water spout Hot water lever Steam power adjustment lever (right) Steam lever (right) Steam wand (right) Steam tip (right, with protective cap) Cup warmer tray Drip tray Not visible on this photo: Green indicator lights for heating spirals (one for each spiral; see p. 14) Switch for illumination of transparent back panel (see p. 3). Spirit User manual page 2 USER MANUAL Mains switch The mains switch (see Figure 2a) is located at the right hand side of the machine and has 3 positions: OFF NO HEAT ON All power to the machine is disconnected. The machine is connected to power, but power to the heating elements is disconnected. The machine functions but there is no heat and thus neither hot water nor steam pressure. The lack of steam pressure means that flow from the hot water spout is less than normal. Machine and heating elements are connected to power. brew lever steam lever mains switch hot water lever steam wand hot water spout coffee pressure gauge Figure 2a (left). Showing mains switch with its 3 positions, the right hand brew lever and steam lever on the right steam wand. Figure 2b (right). Showing hot water lever and -spout and a coffee boiler pressure gauge. Back light switch The LED’s that illuminate the Spirit or customers logo on the back side of the machine can be turned “on” or “off”. When the machines leaves the shop, the illumination is turned “off” to make sure that you use the switch at least once. The switch is located behind the right hand side front leg of the machine (see Figure 3). back light switch Figure 3. Showing the switch that turns the back LED’s on and off (lever pointing down is "off"). Spirit User manual page 3 USER MANUAL Temperature controller switches Each boiler is equipped with its own temperature controller and on/off switch (see Figure 4) so that you can engage and disengage the heating of any group individually, e.g. when business is slow. You may also disengage the steam/hot water boiler heating if only espressos are made. However, keep in mind that in this case the heat exchangers are immersed in cold water so that the water flowing into the coffee boilers is not pre-heated. With high output, the coffee boiler heating element (900 Watt) may not be able to keep up with the demand and brewing temperatures may fluctuate more than when the steam boiler is engaged. coffee boiler controller steam boiler controller coffee boiler controller on/off switches Figure 4. Showing the temperature controllers with their on/off switches for the steam boiler and the two groups on a Spirit Duette. Switches are in the “off” position with levers pointing down, displays are unlit. Programmed volumes A group valve of a Spirit will close automatically after a pre-set amount of water has passed the corresponding water meter. However, the amount of water that will end up in the cup may vary considerably. The most significant cause is a variance in coffee bed characteristics (ground coffee particle size and distribution and packing/tamping). A difference in coffee bed characteristics is likely to result in a deviating shot time. A machine related cause arises from the difference in coffee boiler pressure at the start of the brew. This can be reduced by a (very short) flush before each new brew. Spirit User manual page 4 USER MANUAL Touchpad Each group is operated by a touchpad and each touchpad has 5 buttons with internal LED’s (see figure in Table 1). The left hand side touchpad has some functions which are not available on the other touchpad(s). On/off The upper button (larger circle) is an on/off group switch with programming function. Press this button briefly to open the group valve and activate the pump, the LED in the button will light up. Press it briefly again to deactivate the pump and close the group valve, the LED will go off. special functions left pad TOUCHPAD normal operation special function all pads program doses 1-4 # #5 program all doses # on / off continuous #4 clean dose 4 #3 open/close fill valve while brewing dose 3 #2 dose 2 #1 dose 1 keep button pressed while switching machine “ON” press briefly to start # keep button pressed until upper LED flashes Table 1. Listing the functions of the 5-button touchpads. Program brew volumes You can program up to 8 different volume doses in a Duette, and up to 12 different doses in a Triplette. Keep the upper button (#5) pressed for 6 seconds (until the upper LEDs of all touchpads start flashing) to enter the programming mode of the selected touchpad. You may now program any one of the lower 4 buttons. Press the selected button briefly to activate the group, the LED in the selected button will light up (the upper LEDs of all touchpads will also be lit). When the desired volume for the selected button is reached, press the button briefly again 1. The “dosing” LED will go off and the programmed volume for that button is stored in the memory of the controller. While the controller is in programming mode the upper LEDs of all touchpads return to flashing, this lasts for 4-5 seconds after you have last touched any button. When water flows through a coffee system, the flow meter in that group sends pulses to the controller. The controller actually stores the amount of pulses from the flow meter between activation and deactivation of the group. During the programming phase of a group, all other groups, even hot water, remain disabled. 1 Take into account that none of the solenoid valves in the machine can be open for longer than 2 minutes continuously. Spirit User manual page 5 USER MANUAL Left hand rules Attention: Programming the left hand touchpad overrides the stored volumes of the other touchpad(s). If you want different volumes on each group, start by programming the left hand touchpad, then program the other touchpad(s). Program hot water timer The left hand touchpad also governs the hot water timer. Programming is similar to dosing the coffee buttons. Keep the top button (#5) on the left hand touchpad pressed until the upper LEDs of all touchpads start flashing (about 6 seconds). Briefly press down the hot water lever (see Figure 2b) to start water flow. Press again briefly when the desired amount of hot water is reached. The controller actually stores the amount of seconds between activation and de-activation of the hot water distribution. Automatic back-flush program The left hand touchpad is also used to start the automatic back-flush program (see also Table 1). To start the back-flush program: 1. Switch machine “OFF”. 2. Turn the mains switch to “NO HEAT” or “ON” while pressing the 4th button (from below) on the left touchpad. The cleaning program pressurises and de-pressurises all groups simultaneously for 8 times in a row. 3. When the cleaning program is finished, the machine will automatically return to normal operation (if mains switch is in position “ON”). Note! The controller incorporates several functions which you may accidently address while trying to start the automatic back flush program. Function Press when mains switch is turned from “OFF” to “NO HEAT” start automatic back-flush button 4 of 1st group program steam boiler fill-up during brewing button 3 of 1st group possible (CORRECT) steam boiler fill-up during brewing button 3 of 1st group not possible (FALSE) engage steam boiler pump button 1&4 of 1st group during fill-up (CORRECT) disengage steam boiler pump button 2&4 of 1st group during fill-up (FALSE) disengage coffee boiler pump button 2&3 of 1st group with hot water (CORRECT) engage coffee boiler pump button 1&3 of 1st group with hot water (FALSE) NB: buttons are numbered from bottom to top, see Table 1. Spirit User manual Visual signal no signal LED 5 of 1st group LED 3&5 of 1st group LED 1&4 of 1st group LED 2&4 of 1st group LED 2&3 of 1st group LED 1&3 of 1st group page 6 USER MANUAL Bastone auto-stop (bastone = Italian for stick) The Bastone auto-stop version is very similar to the touchpad version but the touchpads have been replaced by bastone units that include a brew lever, an indicator light, a push button and a two-way switch. The push button underneath each brew lever is the continuous (“on/off”) switch for that group. Each brew lever can be configured to deliver 2 pre-set volumes according to the position of the twoway switch underneath the push button. The indicator light will light up when the group is active, or flash when the controller is in programming mode. start/stop volumes brew lever indicator light push button on/off group (program) 2-way switch volume 1 ← → volume 2 Figure 5a (left). Components of the right hand side bastone unit. Figure 5b (right). Functions of the different bastone components. Program brew volumes 1. Press and hold the push button underneath the brew lever to be programmed for 6 seconds (until all indicator lights starts flashing), then release the button. The main controller is now in programming mode. 2. Within the next 4 seconds, press the brew lever briefly down to start the flow (the indicator light will be lit continuously). 3. When the desired amount of water is reached, briefly press the lever down again to stop the flow (the indicator lights will flash again). 4. Within 5 seconds (as long as the indicator light is flashing): continue to program another volume (re-position two-way switch, or go to next group) , or … 5. Wait 6 seconds (until the indicator light is dim) before touching any lever or button to store the programmed volume(s) in the main controller. Left hand rules When you program a volume for the left hand group, the other group(s) will copy this volume. If you want the right (and, if present, middle) group to be programmed differently from the left group, start by programming the left group, then program the other group(s). Spirit User manual page 7 USER MANUAL Program hot water timer 1. Press and hold the program button underneath the left brew lever for 6 seconds, then release (all indicator lights start flashing). 2. Within the next 4 seconds: press the hot water lever briefly to start flow. The indicator lights of both groups will be lit continuously. 3. Press hot water lever again to stop flow when amount of water wanted is reached. The indicator lights will start flashing again. 4. Wait 6 seconds (until the indicator lights go dim) before touching any lever or button to store the programmed volume in the main controller. Automatic back-flush program 1. Shut down machine by turning mains switch to “OFF”. 1. Make sure that the two-way switch under the left hand group is in the left position (see Figure 6). 2. While pressing the left group lever down, turn the mains switch to “NO HEAT” or “ON”. 3. The back-flush program will start (if it does not start, check position of 2-way switch). 4. As soon as the program has ended, the main controller will return to normal operation (provided that the mains switch is in position “ON”). It may take a while for the boilers to reach the programmed temperatures as a lot of cold water has flown into the system during backflushing. Figure 6. The two-way switch under the left hand brew lever is positioned to the left. Spirit User manual page 8 USER MANUAL Dispensing hot water Place a cup under the hot water spout and press the hot water lever down briefly (see Figure 7). The flow will stop when the pre-set time has elapsed, or when the lever is pressed down briefly again, whichever comes first. An interrupted dispensing is not stored in the memory, pressing the hot water lever again will commence a new dispensing cycle. lever lever spout wand hot water steam Figure 7 (left) showing the hot water lever and spout. Figure 8 (right). Showing the right hand side steam lever and wand (with protective cap on steam tip). Steaming The Spirit has two identical steam wands with solenoid valves activated by a lever on the front of the machine (see Figure 8) and/or optional foot pedal on the floor. You may reduce the maximum steam power of an individual steam wand by adjusting the horizontal handle adjacent to the cup warming tray on top the machine (see Figure 9). Close to its most downwards position, the steam valve lever will lock in position. Lifting the lever upwards a little will unlock it so that it automatically returns to the rest position (steam valve closed). Before steaming milk it is necessary to open the valve for a short while to purge water from the steam wand and heat up the wand and valve. The purged water is condensate from steam coming in contact with the cold tubing, valve and wand. Position the tip of the steam wand over the drip tray when purging the condensate. Directly after steaming milk, flush the steam wand with a little steam and clean the tip of the steam wand with a damp cloth. For hygienic reasons, do not use this cloth for anything other than cleaning the steam tip. Set maximum steam power The steam power handle operates a ball valve incorporated in the steam line (see Figure 9). Changing the position of the handle will adjust the steam power at the steam tip. You cannot completely close the steam power with the handle to protect the solenoid. Before adjusting the maximum steam power, make sure that the machine is fully heated up. Spirit User manual page 9 USER MANUAL steam power handle more power Figure 9. Showing the left exterior steam power handle. Positioned to the front gives maximum power. Although it is possible to decrease the steam power by reducing the steam pressure in the boiler (lower boiler temperature), this will reduce the amount of steam that can be produced. Back-flush program The back-flush program pressurises and de-pressurises all groups simultaneously for 8 times in a row. When the program is finished, the machine will automatically return to normal operation (provided that the mains switch is set to “ON”). To start the back-flush program: Touchpad version Turn the mains switch to “OFF”. While pressing the second button from the top (#4, see Table 1) on the left hand touchpad, turn the mains switch to “NO HEAT” or “ON”. Bastone-autostop version Position left hand two-way switch to left. Turn the mains switch to “OFF”. While pressing the left group lever down, turn the mains switch to “NO HEAT” or “ON”. (If the program does not start, check the position of the two-way switch.) Change boiler temperatures The factory set operational temperatures of the boilers are 93 °C (coffee) and 125 °C (steam) (199 °F and 257 °F) respectively. 125 °C is equivalent to approximately 1.35 Bar steam overpressure. Switch boiler temperatures with Störk ST25-Eco controllers Your machine is equipped with Störk ST25-Eco controllers which allow you to easily change the temperature of the corresponding boiler to a second (lower) setpoint. This way you can save energy during the night or set a coffee-boiler on “stand-by” during slow periods while preserving a relatively short start-up time. indicator dot Figure 10. The Störk ST25-Eco controller. (Left) The lit indicator dot signifies that the heating element is activated. (Right) the controller in ECO-mode. Spirit User manual page 10 USER MANUAL Factory standard is that the second setpoint for a steam-boiler controller is 70 degrees Centrigrade (158 °F) and for a coffee-boiler controller 50 degrees Centigrade (122 °F), see Table 2. While the second setpoint is active, the display will read “ ” instead of the actual temperature in the boiler. Operational °C °F Steam boiler 125 257 Coffee boiler 93 199 Display example Eco-mode ← Press SET/ECO 6 seconds → ← Turn power off and on °C °F 70 158 50 122 Table 2. Factory set temperatures in the Spirit and way to switch between modes. Procedure to change from operational to Eco-mode 1. Press and hold the SET/ECO button (for approximately 6 seconds) until the display changes to “”. Procedure to return from Eco- to operational mode 1. Press and hold the SET/ECO button (for approximately 6 seconds) until the display shows a temperature value. NB: The start-up mode of the controller is “operational mode”. When power is discontinued for a short time (mains switch to “OFF” and then back to “ON”), all controllers will start up in operational mode simultaneously. A momentary power-failure will have the same result. Procedure to adjust the operational boiler temperature 1. Make sure that the operational temperature is active (a temperature value is visible) 2. Press and hold the SET/ECO button. The operational temperature is now displayed. 3. While holding the SET/ECO button pressed and before the controller switches to Eco-mode, the and buttons are used to increase and decrease the temperature. 4. Releasing all buttons will enforce the newly set temperature. The operational temperatures can be set within the following ranges: Steam boiler: 0-130 °C (32-266 °F). Coffee boiler: 0-100 °C (32-212 °F). Notes! The temperature sensor of the steam-boiler is placed above the water-level for quick response to steam withdrawal. At temperatures below 110 °C (230 °F) the sensor will not register a change in (water) temperature quickly. For that reason, the steam-boiler temperature may be up to 4 °C higher than the Eco-setpoint at the moment you switch from Eco to operational mode. Do not adjust the temperature of the hot water dispense by changing the temperature of the steam/hot water boiler. You can adjust the hot water dispense temperature by changing the pressure of the steam/hot water pump. Spirit User manual page 11 USER MANUAL Set hot water temperature Hot water from the steam/hot water boiler is mixed with some cold water before it is dispensed. Water temperature at the hot water spout depends on the temperature and amount of the mixed-in cold water. The temperature of the incoming water differs from place to place and possibly on season as well. The amount of cold water inflow is related to the inflow pressure and can thus be adjusted by changing the (outgoing) pressure of the steam/hot water boiler pump. Increasing the pump pressure decreases the temperature at the spout and vice versa. With incoming water temperature of approximately 10 °C (50 °F) and a steam/hot water boiler temperature of 125 °C (257 °F) and a pump pressure of 8.5 Bar, the water at the hot water spout is approximately 95 °C (203 °F). Procedure 1. Wait for the machine to be completely warmed up: at least “ON” and heating for 25 minutes and used (as if) to make coffee and dispense hot water at least 5 times over the last 5 minutes. 2. Get the main controller in adjusting mode (to get a long lasting flow of hot water): Touchpad: press and hold the upper button on the left hand touchpad for 6 seconds; Bastone auto-stop: press and hold the programming button below the left group lever for 6 seconds. 3. Within 5 seconds, activate water dispensing by shortly pressing the hot water lever down. Water will start flowing. Note! Work swiftly: the boiler quickly empties when hot water is dispensed continuously. 4. Measure the temperature of the outflowing water with a quick-response temperature sensor* and de-activate the hot water by shortly pressing the lever again. The water temperature should be around 95 °C (203 °F). 5. See Figure 11. If the temperature is too low: decrease pump pressure of the steam/hot water boiler pump (turn set screw counter-clockwise). If the temperature is too high: increase pump pressure (turn set screw clockwise). steam boiler pump decrease temperature increase temperature Figure 11. Adjust hot water temperature by changing the pump pressure of the steam boiler pump. 6. After adjusting the pump pressure, measure the temperature again. 7. When the required temperature is reached, re-set the hot water timer to the desired amount of water (see section “program hot water timer”). 8. When the required temperature cannot be reached, the fixed restrictor in the mixblock can be exchanged for one with a larger diameter (to obtain a lower temperature at equal pump pressure) or smaller diameter (to obtain a higher temperature). Contact a qualified technician for this. * If you do not have a quick response temperature sensor, decrease the pump pressure until boiling water is flowing from the spout (flow will sputter instead of dispensing a calm flow). Then increase the pump pressure a little until a calm flow is obtained. Spirit User manual page 12 USER MANUAL Shot timers The timers on top of each group (see Figure 12) measure the time in seconds that the corresponding group valve is open and thus indicate the brew-time. As soon as the group valve opens the time is set to zero and counting starts. The timer stops counting when the group valve is closed and the measured time between opening and closing of the group valve is displayed until the group valve is opened again. The shot time gives an excellent indication of the brew process and can assist the trained barista to refine that process. shot timers Figure 12. The Spirit shot timers. A pre-set amount of water will pass through the machine when the brew process is started. Pump pressure and diameter of smallest duct in the set-up (generally the restrictor in between heat exchanger and coffee boiler) determine the “free flow” rate (the flow rate when no filter holder with coffee bed is locked in). When a filter holder with coffee bed is locked in, the combination of pump pressure, respective sizes of the restrictors and the coffee bed characteristics determine the pre-infusion. The starting pressure in the coffee boiler may fluctuate between 9 and 12 Bar and has some influence as well. During extraction, it is mainly pump pressure and coffee bed characteristics that determine the flow rate. Variables in the coffee bed are numerous, the most important depend on the grinder (amount of coffee particles and particle size distribution) and the barista (leveling and tamping of coffee and thus packing of particles). Other variables in the coffee bed are: roasting grade, freshness and air humidity. During “free flow” the timer gives an indication of the condition of the smallest restrictor in the espresso machine which, depending on individual set-up, has an opening of 0.5 – 0.8 mm. With such small openings, even a minor divergence can cause quite a large difference in free flow rate. Production variances of the restrictors are known to cause a difference in free-flow “shot time” between groups of up to 15%. Notes! Measuring the free flow time will only give a rough indication of (smallest) restrictor size and will give no information about infusion. Only with a filled and tamped filter holder in the group can timing measurements be used to give information about infusion. The coffee-bed in the filter is completely dominant in terms of flow rate and any production variations in restrictor sizes are completely swamped by the restrictive effect of the coffee-bed. Spirit User manual page 13 USER MANUAL Indicator lights Two groups of indicator lights are found on the bottom of the electronics box, see Figure 13. The set on the left hand side (3 lights) indicate if the steam boiler heating element gets power or not. The set on the right consists of 2 (Duette) or 3 (Triplette) lights and indicate if the individual coffee-boiler heating elements get power or not. If the machine is functioning correctly, the 3 lights on the left (steam boiler heating) should always light up simultaneously, the lights on the right show more erratic behaviour. All lights should be “in sync” with the indicator dot on the corresponding temperature controller. If there is a problem with the machine, these indicator lights help to determine possible causes. lower - middle – upper STEAM left – right COFFEE Figure 13. The heating element indicator lights on a Spirit Duette, left indicator lights for the steam boiler, right for the coffee boilers. The indicator dot on the left hand coffee boiler controller is lit and the corresponding indicator light (left light of right set) as well. The indicator dot on the steam boiler controller is lit, as are all steam boiler indicator lights (left set). The right coffee boiler controller is in ECO mode and the indicator dot is not lit, the corresponding indicator light (right light of right set) is off. Spirit User manual page 14 USER MANUAL Daily to weekly routine Clean body The outside of the machine can be cleaned with window cleaner in a hand spray flask in combination with a soft, clean, cotton cloth. When the machine is turned “ON” it will be warm and you have to work swiftly to prevent stripes: spray and immediately rub. Resistant smudges on high gloss panels may be removed with silver polish and a soft cloth (these surfaces scratch easily, even copper polish may leave marks). Lift the drip tray grill from the machine and clean it with washing up liquid and a sponge. Activate the groups (without filter holder locked in) or let the hot water run for a moment and use a brush to push remains into the drain. As often as needed (with regular use once every day), pour one teaspoon of coffee dissolving powder into the drain and flush it with some hot water down the drain to prevent clogging of the drain hose. Remove filter basket Materials needed Group screen extractor (or back end of teaspoon) Procedure 1. Remove the filter holder from the group. 2. Pry the filter basket from the filter holder (see Figure 14). 3. When remounting the filter basket, make sure the spring remains in the indentation of the filter holder and grabs the basket. Figure 14. Pry filter basket from filter holder with the group screen extractor. Clean filter holder Remove the filter basket from the filter holder and clean the filter basket with a little washing up liquid and plastic scouring pad. Soak the metal part of the filter holder for 10 minutes in a solution of 1 tablespoon of coffee dissolving powder in 0.5 litre hot water. The plastic handle will eventually disintegrate in this solution and should thus be kept out of the solution. Caution! Never clean the filter holder in a dish washer as dish washer detergent will ruin it. Spirit User manual page 15 USER MANUAL Clean steam wand Milk easily bakes to the hot inner and outer surfaces of the steam wand and tip. Therefore, the steam wand and tip should be cleaned with a damp cloth directly after each use. Do not use this cloth for anything else than the steam wand. Note! Immediately after steaming milk you should purge the steam wand with a little steam. This will prohibit milk creeping into the pipe, and even into the valve house, through so called capillary rise. Flushing also prevents clogging of the 4 holes in the tip. In the event that clogging occurs, place the end of the steam wand and tip for several minutes in a glass of hot water. The remains will soften and can be wiped off easily. NEVER scrape, grind or cut the steam wand or tip since it leads to damage. Back flush group Back flushing cleans the group and conduits from coffee residue which influences the taste of the extraction since fresh (hot) water is transported to the coffee bed through these parts. It is advised to back flush the groups at least once a day and when the machine is intensively used several times per day. Note! The automatic cleaning program is best performed at the end of the day and is very useful as there is no need to repeatedly engage-disengage each group individually. You should run the program twice: first with cleaning powder, then rinse the blind filter baskets and run the program again without cleaning powder. In this second run you quickly empty a blind filter in between pressurising of the groups, when the groups have depressurised you do the same with the next group, etc. Described next is the procedure for an individual group in which the other group(s) remain(s) operational. Materials needed Plastic group brush (included in shipment) Blind filter (looks like a filter basket but has no holes, included in shipment) Coffee dissolving powder (included in shipment) Group screen extractor (included in shipment, or back end of teaspoon) Procedure 1. Remove all filter holders, activate the pump: shortly press the upper button (Touchpad) or shortly push the button below the group lever (Bastone-autostop) and flush the group for approximately 5 seconds. 2. Clean the group screen and group seal with the plastic group brush. 3. Pry the filter basket (e.g. with the group screen extractor) from the filter holder (see Figure 14) and replace it with the blind filter. 4. Scoop 1 teaspoon of coffee dissolving powder in the blind filter and place the filter holder in the group. 5. Activate the group until full 9 Bar pressure is reached, 6. and then de-activate the group. 7. Wait for approximately 3 seconds then activate the group again for approximately 5 seconds. 8. Repeat steps 5 to 7 eight times (wait 3 seconds, activate group 5 seconds), or use the automatic back-flush program (see page 10). 9. Remove the filter holder from the group, clean the blind filter by flushing it under the tap, activate the group for approximately 5 seconds to remove possible powder from the group screen. 10. Lock filter holder in group, activate pump for about 5 seconds, de-activate pump, remove filter holder and pour out remaining liquids. 11. Repeat step 10 four times (or use the automatic back-flush program). 12. Pry the blind filter from the filter holder and replace the filter basket. Warning! Finishing the back flush routine without cleaning powder is essential to prevent remnants of cleaning powder settling between the plunger and housing of the 3-way group valve. Spirit User manual page 16 USER MANUAL Clean group screen, check and replace group seal The group screen helps to disperse the incoming hot water onto the coffee bed and also prevents coffee grinds entering the group. The group seal is made of rubber (black) or silicone (red) and in time will deteriorate, the silicone seals will last longer than the rubber ones. We advise to check the group seal regularly and replace when needed. Materials needed Group screen extractor (included in shipment, or back end of a fork or spoon) Plastic brush (included in shipment) Coffee dissolving powder (included in shipment) Replacement group seal (when necessary) Procedure 1. Pry the group screen gently from the group using the screen extractor levered under the bayonetring. Place the pointed edge of the tool in the rim of the group screen (see Figure 15a), do not puncture the group screen. Pry left and right, the screen will fall out together with the group seal. 2. Remove the group seal from the group screen. 3. Soak the metal group screen in a solution of coffee dissolving powder and warm water for about 5 minutes. Rinse under streaming water. 4. Check the group seal for cracks and/or hardening, replace if necessary. 5. One side of the group seal has a somewhat more rounded surface. When replacing the group seal on the group screen, make sure the rounded side of the ring is inserted into the group (facing upwards, see Figure 15b). 6. Place group screen with group seal on the filter holder and insert into group, pushing upwards. 7. Turn filter holder in bayonet to press group seal into the group. Figure 15a (left). Pry left and right with screen extractor to remove group screen and group seal. Figure 15b (right). Mount group screen with filter holder and group ring. Inset shows schematic cross section of group ring with rounded surface upwards. Clean group dispersion plate The group (lower) dispersion plate ensures uniform wetting of the coffee bed. When dirty, the wetting will become less uniform. As the dispersion plate is made of POM, it is heat neutral such that no oils and fats will bake on. The POM plate remains clean for quite long. The POM dispersion plate is a wearing item. It is slowly affected by the aggressive cleaning powder and needs replacement eventually. The dispersion block (or upper dispersion plate) wears at the same rate (or even a little faster) as the dispersion plate and should be replaced together with the dispersion plate. Materials needed Short screw driver no.2 Group screen extractor (included in shipment, or back end of a fork or spoon) Plastic brush (included in shipment) Coffee dissolving powder (included in shipment) Spirit User manual page 17 USER MANUAL Procedure 1. Remove group screen with group seal (see previous item). 2. Remove two bolts from plastic dispersion plate with short screwdriver (see Figure 16), the dispersion plate will fall out. Be careful with the screws, they may be custom fit to match the thickness of the dispersion plate. Caution! The dispersion block remains in the group. With the bolts removed, the connection between the dispersion block and group head is fragile. 3. Clean dispersion plate with plastic brush. When necessary, put dispersion plate in a solution of coffee dissolving powder and warm water for about 5 minutes. Rinse under streaming water Caution! Do not scrub the dispersion plate with a metal brush or Scotch-pad as it will scratch easily and dirt adheres more easily on a scratched surface. 4. When re-installing, do not over-tighten the bolts that hold the group dispersion plate. 5. Remount group screen and group seal (see previous section). Figure 16a (left). Dispersion plate mounted in group head. Figure 16b (right). Dispersion plate removed from group. The dispersion block remains in the group. Replace dispersion block and plate When the dispersion plate is to be renewed, you should renew the dispersion block as well. The protrusion on the dispersion block easily breaks off when the POM material is deteriorated (by cleaning powder). The fit of the dispersion block into the base of the group has changed a little over time, as has the thickness of the dispersion plate. That is why you should receive new screws together with a new dispersion block and plate. Procedure 1. Remove the group dispersion plate (see previous item). 2. Gently pull the dispersion block from the group head, pull as perpendicular as possible. Do not twist the dispersion block. If the dispersion block does not come off from the group easily, use two longer M5 bolts to get a grip on the block (see Figure 17). If the protrusion breaks from the block and remains in the group head, pull out with needle nose pliers or even use a (wood) screw 3. Mount the new block and plate with the new screws, discard the old screws. 4. Remount the group screen and seal (see previous item). Spirit User manual page 18 USER MANUAL Figure 17. How to remove the dispersion block if it does not come out easily. The picture on the right clearly shows the protrusion on the dispersion block. Spirit User manual page 19 USER MANUAL Recommended maintenance scheme Daily (see user manual) Clean filter holder Clean steam wand Back flush group Weekly (see user manual) Clean group screen Clean group dispersion plate Monthly (see user manual) Check the functioning of your water treatment system Check pump pressure Check and replace if necessary: group seal group screen filter basket filter holder clip Every 3 months Grease brewing, steam and hot water lever mechanisms with copper-ease Grease steam wand ball with food-safe grease and check play between nut and ball of steam wand; replace nut if necessary Check anti-vacuum valve for leakage Check safety-valve on steam boiler for leakage Check operation of expansion valves on inlet manifold Every 6 months Check dispersion plate and block Check tube from mix-block to hot water outlet for scale build-up Every 12 months Clean level probe and safety probe Replace: group screen filter basket filter holder clip Replace anti-vacuum valve Every 5 years Replace all solenoid valves For maintenance procedures, we refer to the maintenance manual on the USB-stick Spirit User manual page 20 USER MANUAL Maintenance Record (machine number: __________________ , installation date:_________________________________ ) Date Spirit User manual Task Comments page 21 INFORMATION Maintenance Warning! Maintenance on the Spirit should be done by a qualified technician. Parts of the machine can reach a temperature of close to 130 °C (266 °F). The steam/hot water boiler contains water and pressurised steam of 125 °C at 1.35 Bar overpressure (257 °F at 20 PSI), temperature and pressure in the coffee system may reach up to 96 °C at 12 Bar overpressure (205 °F at 175 PSI). When servicing the machine it is sometimes necessary to keep the Spirit connected to the AC power outlet and the machine switched “on”. In both cases there is a possibility that you touch a live wire. Danger We cannot be held responsible for damage and/or injuries resulting from actions performed on our machines by non-qualified personnel. Any qualified technician working on the Spirit is urged to thoroughly read the latest editions of “Maintenance manual”, “Technical specifications” and “Problem solving”. which can be obtained via: [email protected] Contact information Kees van der Westen ~ Espressonistic Works B.V. Van Elderenlaan 6 5581WJ WAALRE The Netherlands Telephone +31 40 2223433 Email [email protected] Website www.keesvanderwesten.com Ordering replacement parts Check our website if the webshop is already up and running. If not, order via: [email protected] Spirit User manual page 22