1
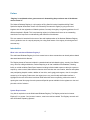
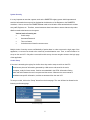
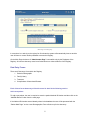
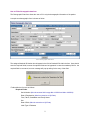
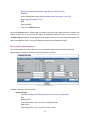
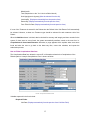
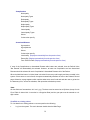
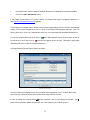
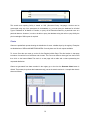
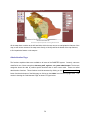
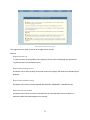
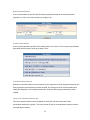
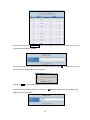
Web Based National Diabetes Registry
User Manual
Shazia Naz Subhani
Technical Specialist, Head-Registries Core Facility
Biostatistics, Epidemiology and Scientific Computing Department
King Faisal Specialist Hospital & Research Centre
January 03, 2006
Table of Contents
PREFACE ....................................................................................................................... 4
INTRODUCTION............................................................................................................. 4
WHAT IS THE WEB-BASED DIABETES REGISTRY? .......................................................................... 4
SYSTEM REQUIREMENTS ...................................................................................................... 4
HOW TO OBTAIN ACCESS TO THE REGISTRY ................................................................................ 5
PRINCIPLE FEATURES AND FUNCTIONS .................................................................. 5
HOME PAGE OF THE REGISTRY............................................................................................... 5
SYSTEM SECURITY ............................................................................................................. 6
COOKIE SETUP .................................................................................................................. 6
LOGGING IN TO THE REGISTRY ......................................................................................... 7
DATA ENTRY FORMS: ..................................................................................................... 8
EACH OF THESE FORMS DATA ENTRY WILL BE DISCUSSED IN DETAIL IN THE FOLLOWING SECTION. ................ 8
ADD A NEW PATIENT ............................................................................................................ 8
How to Fill the Demographic data form .................................................................... 9
How to Fill the Family History form......................................................................... 10
How to Fill the Treatment data form ....................................................................... 12
How to Fill the Complications Data form ................................................................ 13
VIEW/EDIT AN EXISTING PATIENT ........................................................................................... 14
SEARCHING THE REGISTRY ........................................................................................... 16
CHARTS ...................................................................................................................... 18
GIS MAPS ................................................................................................................... 19
ADMINISTRATION PAGE ................................................................................................. 20
REPORTS....................................................................................................................... 21
Registry Access Log .............................................................................................. 21
Report of the pending records................................................................................ 21
Report of the validated records .............................................................................. 21
Report on no follow up data ................................................................................... 21
Date Dependent Reports ....................................................................................... 22
Common Error Reports .......................................................................................... 22
Transferred Patients Report ................................................................................... 22
Yearly Cross Tabulation Reports (All) .................................................................... 22
Yearly Cross Tabulation Reports (Hospital) ........................................................... 23
DATA EXPORT.............................................................................................................. 23
All Data export........................................................................................................ 23
Selected Data export.............................................................................................. 24
UPDATE TABLES .......................................................................................................... 24
Add/Edit Users ....................................................................................................... 24
Add/Edit Cities/Town Names.................................................................................. 25
2
Add/Edit Participating Hospitals ............................................................................. 27
Add/Edit Oral Hypoglycemic Agents ...................................................................... 27
Add/Edit Initials of the users................................................................................... 27
MAIN PAGE .................................................................................................................. 27
LOG OUT ..................................................................................................................... 27
3
Preface
“Registry is considered to be a great resource in determining the prevalence rate of the disease
and to control it.”
The National Diabetes Registry is a joint project of King Saud University Hospital and King Faisal
Specialist Hospital & Research Center. As indicated by the name this registry is going to be used
kingdom wide for the registration of diabetic patients. Currently the registry is registering patients from 15
different hospitals in Riyadh. This is a pioneering registry in its field and will serve as an outstanding
central source to improve the understanding and treatment of the disease.
This user manual is intended for the users of the web-implementation of the National Diabetes Registry
since it guides the user in a step-by-step way into using each feature of the registry in its designed and
accurate way.
Introduction
What is the web-based Diabetes Registry?
The web-based Diabetes Registry is a future central source where researchers can obtain patient-related
data associated with this disease.
The Registry boasts of features included in a standard national web-based registry, namely: New Patient
entry, retrieval, editing and deletion; Patient Reporting on all vital variables of the database; Charting
facility on critical variables; Data Export features including individual table exports or table join exports or
exports by various criteria; Administrative features which includes new user creation, deletion and update,
new participating hospital creation, addition of new cities, oral hypoglycemic agents, view of a complete
access log of the registry Furthermore, the registry has a very user-friendly and flexible interface. It
highlights to the user which forms have been filled and which forms are pending, without the need of
opening the actual form page. Annual reports and Special reports available for the registrars to view and
print with a click of a button.
System Requirements
Very little is required to use the Web-based Diabetes Registry. The Registry works best in Internet
Explorer 5.0 or greater. Your browser, however, must have cookies enabled. The Registry can work well
with all Windows Operating Systems.
4
How to obtain access to the registry
To obtain access to the Diabetes Registry, make a request to the following address for a regular
username and password:
The Registrar
Diabetes Center
King Saud University
Kingdom of Saudi Arabia.
Tel#: 477-5575 Ext's: 108, 604, 610
E-mail: [email protected]
Fax#: 477-5696
After you get the username and password, a user cookie needs to be setup. Once this is done, the user
can successfully login to the registry with his/her credentials supplied.
Principle Features and Functions
Home Page of the Registry
The URL to access the registry is: http://www.diabetes.org.sa
Home Page of the Registry
From the home page, the user can either login directly to the registry (if he/she has already setup a
cookie on their PC); otherwise they can go on to the cookie setup page.
5
System Security
It is very important to note that a system such as the DIABETES registry system holds important and
sensitive information that may only be disclosed at the discretion of the Registrar or the DIABETES
committee. Hence, access to the DIABETES data needs to be limited to those authorized such as data
entry staff, Registrar, etc. Therefore, several measures have been taken to ensure data security and to
disallow unauthorized access to the system.
Various levels of security are:
•
Cookie setup
•
Username/Password
•
Time-out feature
•
Limited access of data for common users.
Multiple levels of security ensure confidentiality of patient data. In order to access the login page of the
application, a user account needs to be created by an administrative user. Then, a cookie needs to be
set-up on the user’s PC. Only after a successful cookie set-up, the user can gain access to the login page
of the application.
Cookie Setup
If the user is accessing the registry for the first time, they need to setup a cookie on their PC.
Cookies are pieces of information generated by a Web server and stored in the user's
computer, ready for future access. Cookies are embedded in the HTML information flowing
back and forth between the user's computer and the servers. Whenever the server wants to
withdraw user specific information, cookies are accessed from the user’s PC.
To setup a cookie, click on the “Setup” button from the home page. The user will then be directed to the
following cookie setup page.
Cookie setup page
6
The steps to follow are:
1. Enter the First Name
2. Enter the Last Name
3. Enter Login ID (Provided by the registrar)
4. Enter Setup Password (Provided by the registrar)
5. Click on the Continue button.
If the setup password is entered correctly then a successful cookie setup message will pop up. The
user can then click on the Proceed link to move to the login page.
Logging in to the registry
Once the cookie password is setup correctly and the user clicks on the Continue button the user can see
a login screen with his/her login ID and Hospital Name pre-selected. The user is now required to fill the
form with the password supplied by the registrar. Furthermore, the user will choose his/her Registration
Place from the drop down list in case he/she is authorized to enter data for more than one hospital. Press
the “Enter” button to login to the registry. A sample login page is shown as follows:
Login page of the registry
The username and password protection that is used on the web-based applications is improved through
an advanced password encryption mechanism (MD5 Encryption Algorithm with advanced features, MD5
is a way to verify data integrity, and is much more reliable than many other commonly used methods).
Once successfully logged into the Registry, the user's browser should show the Main Page as illustrated
below:
7
Main Page of the Registry
In case there is no activity on the registry for 60 minutes the system will automatically time-out and the
user will have to re-enter his/her password to access the Registry.
On the Main Page the button of “Administrator Page” is accessible only by the Registrars of the
Registry. All common data entry users have limited access to various features of the Registry.
Data Entry Forms:
There are 4 Data entry forms within the Registry.
1. Patient’s Demographic
2. Family History
3. Treatment
4. Complications & Associated Disease.
Each of these forms data entry will be discussed in detail in the following section.
Add a new patient
To add a new patient, the user is required to enter the patient National ID Number and then click on the
“Add/Edit Record” button from the main page.
If the National ID Number entered already exists in the database the user will be presented with the
“Patient Main Page” or else a new Demographics Form will show up for the data entry.
8
How to Fill the Demographic data form
The Demographic Data form allows the user to fill in only the demographic information of the patient.
A sample new demographic form is shown as follow:
Form1: Demographic Data Form
The assigned National ID Number should appear in the field of National ID # within the form. User should
enter the required fields, however the optional fields can be bypassed. In case the mandatory field i.e. the
required field is not entered, an error message will pop-up asking for the entry of that field.
Fields within the form are as follows:
Required Fields:
Serial Number (Must be entered within range Min=1000000 and Max= 9000000)
Date of Registration (Must be entered as a Hijri Date)
First, Father, Grandfather and Family Name
Sex
Date of Birth (Must be entered as a Hijri Date)
Initial Type of Diabetes
9
Date of Initial Diagnosis (Must be entered as a Hijri Date)
Interview By (To be selected from the drop down list)
Entered By (To be selected from the drop down list)
Form Filled On Date (Automatically displays the current date in Gregorian)
Optional Fields:
MRN
Residence Region (To be selected from the list)
Marital Status
Address
P.O.Box
Blood Group
Email Address
Town/City (To be selected from the list)
Postal Code
Telephone Number
Mobile Number
Once all information is completely entered in the form, the user then must click on the Add New button.
In case of any error in data entry, an html page appears showing errors in data entry. The user is asked
to go back to the data entry form, by pressing Back to Data Entry Form button and correct the mistakes
and then re-submit the form.
If all fields were entered correctly, the system automatically transfers control to the Diabetes
Status/Family history form.
How to Fill the Family History form
The Family History form allows the user to fill in information related to the Family History of the patient.
The Patient's Current Diabetes Status and Family History data is recorded on a "Diabetes Registry VISIT
DATA form". This is a part of the follow up visits of the patient to the centre/clinic.
A Sample Diabetes Status/ Family History Data Form is shown as follows:
10
Form2: Family History Data Form
Variables captured in the form include:
Required Fields:
Visit Date (Must be a Hijri date and cannot be less than the Registration date)
Current Type of Diabetes
Date of Current Diagnosis (Must be entered as a Hijri Date)
Family History of Diabetes
Others
Interview By (Displays automatically from the previous form)
Entered By (Displays automatically from the previous form)
Form Filled On Date (Automatically displays the current date in Gregorian)
Optional Fields:
Height (Must be entered between range Min=50.0 and Max= 250.0)
11
Weight (Must be entered between range Min=2.0 and Max= 250.0)
Smoking
Control Fasting Blood Sugar (Must be entered within the range 0.1 and 70.0)
HbA1c (Maximum Range = 20.0)
RBS
Patient's Status
•
Click on the Add New button
When the Add New button is clicked, data is checked for accuracy and integrity and then recorded in the
system. If there are no errors found, the system automatically transfers the user to the next form i.e.
Treatment Form. Otherwise, a page appears which explains what errors were found and directs the user
back to the data entry form to correct the mistakes and repeat the submission process.
How to Fill the Treatment data form
The Treatment Data form allows the user to fill in information related to the Treatment given to the
Diabetic patient. A Sample Treatment Data Form is shown as follows:
Form3: Treatment Data Form
Variables captured in the form include:
Required Fields:
Visit Date (Displays automatically from the previous form Visit Date Field)
Diet
Regular Insulin
Total (Dependent on the “Yes” choice of Regular Insulin)
NPH Insulin
Total (Dependent on the “Yes” choice of NPH Insulin)
12
Mixed Insulin
Total (Dependent on the “Yes” choice of Mixed Insulin)
Oral Hypoglycemic Agent(s) (Must be selected from the list)
Interview By (Displays automatically from the previous form)
Entered By (Displays automatically from the previous form)
Form Filled On Date (Displays automatically from the previous form).
If none of the Treatment is entered for the Patient then the Default Value "Not Entered" will automatically
be selected. However, at least one Treatment type should be selected for each treatment visit of the
Patient.
When the Add New button is clicked, data is checked for accuracy and integrity and then recorded in the
system. If there were no errors found, the system automatically transfers control to the next form i.e.
Complications & Associated Diseases. Otherwise, a page appears which explains what errors were
found and asks the user to go back to the data entry form, correct the mistakes, and repeat the
submission process.
How to Fill the Complications Data form
The Complications Data form allows the user to fill in information related to the Complications of the
Diabetic patient. A sample Complications Form is shown as follow:
Form4: Complications Data Form
Variables captured in the form include:
Required Fields:
Visit Date (Displays automatically from the previous form Visit Date Field)
13
Complications
Neuropathy
Neuropathy Types
Retinopathy
Retinopathy Types
Nephropathy
Nephropathy Types
Vasculopathy
Vasculopathy Types:
Others
If others then specify
Associated Disease
Hypertension
Hyperlipidemia
Others
If others then specify
Interview By (Displays automatically from the previous form)
Entered By (Displays automatically from the previous form)
Form Filled On Date (Displays automatically from the previous form).
If none of the Complications or Associated Disease radio buttons are selected, then the Default Value
"Not Entered" will automatically be selected. However, at least one Complication and one Associated
Disease should be selected for each Complication & Associated Disease visit of the Patient.
When the Add New button is clicked, data is checked for accuracy and integrity and then recorded in the
system. If there were no errors found, the system automatically transfers the user to the Patient’s Record
page. Otherwise, a page appears which explains what errors were found and asks the user to go back to
the data entry form, correct the mistakes, and repeat the submission process.
Note:
All date fields are formatted as: dd / mm / yyyy. The date must be entered as a Hijri date (except for the
Form Filled On date which is recorded as a Gregorian Date) and the year part must be entered as a 4digit number.
View/Edit an existing patient
To view data for an existing patient a user must perform the following:
•
Log in to the system. The user's browser should show the Main Page.
14
•
In the Main Page, enter the patient's National ID Number or a Medical Record Number (MRN)
•
Click on the Add / Edit Record button.
If the patient record exists in the on-line registry, the Patient Data page is displayed. Otherwise, a
new Patient's Demographic Data form appears.
In the Patient's record page, data is divided into four parts corresponding to the four forms of the Diabetes
registry. The first part corresponds to Form 1, which is the Patient's Demographic data form. Form 2 is
Family History form, Form 3 is Treatment form and Form 4 is Complications & Associated Disease form.
In case of a complete data entry in the form a
no data entry in any of the forms a
green bullet appears next to the form name. In case of
red bullet will appear next to the form. This helps in going back
and editing the forms in case of incomplete data entry.
A Sample Patient's Record Page is shown as follows:
Patient Record Page
From the Patient's record page a user can enter New Follow-up data for Form 2, 3 and 4. Each of the
new follow-ups is listed as a new visit for these forms, along with the visit date.
In case of editing the forms the button
can be pressed to view or edit individual forms data. The
button can be pressed to delete the particular visit of the Patient for the 3 follow up forms.
15
Under the Visit Date is an option available to edit the Visit Dates by clicking on the button
. Any change
in the visit dates will reflect the change in all the follow-up forms.
A new Patient Record can be entered from this page by clicking the
Also navigation to other patient's record using
and
button.
arrows can be done from the Patient's record
page.
Searching the Registry
To search the registry for a specific record or a group of records, the user must first go to the Search
Page. Clicking on the “Search Registry” button from the Main Page can activate this facility. The Search
Page is shown as follows:
Search Page
To perform a search, the user must specify search criteria.
16
To specify search criteria, the user must either enter search conditions, such as DOB on & after
'12/6/1312' and/or select one of the multiple choice criteria such as Sex = Male or Initial Type of Diabetes
= II
All search conditions are combined to compile a single search string on which the registry database is
queried.
The query will return either a null response or a set of records as shown in an example below:
Search Results
From the resulting number of records, the registrar can then click the Edit button
to access the
complete record page of the Patient. However, a common registry user cannot access the complete
record page but can only view the search results. This restriction is for the sake of data security.
To perform a new search, or to modify the most recent search, the user may click on the link at top of the
page to go back to the search page. Alternatively, the user can click on the Back button of his/her
browser.
Within the search facility is another, more sophisticated type of reporting available to query the database.
This again is only accessible to the Registry Registrars. A common user will not see this part of the
search page on his/her computer screen.
17
This search and reporting facility is based on SQL (Structured Query Language). Queries can be
constructed using any of the parameters in the database, e.g. one can query the database for all Initial
Type of Diabetes for all Males or Females, or query all the Records entered by a particular user at a
particular date etc. However, in order to be able to query the database using this ad hoc query facility the
prior knowledge of SQL syntax is required.
Charts
Charts are predefined reports showing the distribution of some variables kept by the registry. Examples
are distributions of SEX and HOME/TOWN AREA. Currently there are 22 such reports available.
To view a Chart the user must go to the On-Line Registry's Main Page. The third section in that page
includes a form with a list of selections and a button. The user must select a chart type from the list and
then click on the button Chart. The result is a new page with a table and a chart representing the
requested distribution.
Charts are generated from data recorded in the registry up to the time the Generate Chart button is
clicked. That means, they show data instantaneously, just as the search results do. A sample bar chart is
shown as follows:
Chart display page
18
Chart FX is the charting software used to display the chart. The users as per their requirement can
manipulate this chart display. The Menu at the top of the chart display can be used to change the Chart
Types, 3-dimensional display, to save or print the charts etc.
GIS Maps
The registry data can be viewed in the form of maps as well. For this purpose a sophisticated mapping
software from ESRI namely, ARCIMS has been incorporated within the Diabetes Registry, which allows
the registrars to be able to see the pre-defined queries as maps. The available maps are as follows:
On clicking any of the above item will result in the display of the selected query as map in a new browser
window as shown below:
Map showing total count of diabetic patients per region
The second last map from the list above, allows the registrar to define a query within the map to view the
results displayed geographically as well as in the form of a table.
19
A custom map with queries on the right hand side
All the maps have a toolbox at the left hand side, which the user can use to manipulate the features of the
map, to see various extents of the maps more clearly, to identify and list the details of the map features,
to find a particular feature on the map etc.
Administration Page
The functions explained above are available to all users of the DIABETES system. Currently, users are
classified in one of three categories: data entry staff, registrar, and system administrator. The last two
categories should be able to perform special functions that no other users could. These are called
administrative functions. These functions could be accessed by clicking on the Go to Administrator Page
button found at the bottom of the Main page or clicking on the Admin icon from the top right menu. This
results in showing the "Administrator Page" as shown in Figure below.
20
Administration Page of the Registry
This page has a main menu on the top of the page, which includes
Reports
Registry Access Log
In order to monitor the accessibility of the registry by various users the Registrar can generate the
Log-Access report from the Reports menu.
Report of the pending records
Generates a list of all the pending records that exists in the Registry and needs to be validated by the
Registrar.
Report of the validated records
Generates a list of all the records validated with details like Validated By, Validated Date etc.
Report on no follow up data
Generates a list of all the records for individual follow up forms that had not been entered for a
particular patient having demographics form entered.
21
Date Dependent Reports
A set of reports based on the Start and End dates generating information for the administrative
purposes e.g. count of records entered by an employee etc.
Common Error Reports
A set of reports generating records, which satisfy specific error criteria. This is usually required before
generating annual reports to clear up the data in error.
Transferred Patients Report
Diabetes is a national registry and at some point in time might have records of patients whose file has
been requested to be transferred to another hospital. This report gives a list of all the patients that
initially got registered in one hospital and then their electronic data file got transferred to another
hospital.
Yearly Cross Tabulation Reports (All)
This report generates data for all the hospitals for each year with total counts and column
percentages distributed by gender. There are around 45 various cross tabulation reports as listed in
a sample page as follows:
22
List of all the available annual reports
Yearly Cross Tabulation Reports (Hospital)
Same as above with a condition of reports generated for the individual Hospital only.
Data Export
All Data export
This page allows the administrative users to export data in various ways. Data can be exported either
from each table individually, or from all the tables.
23
In addition, the form includes selection fields for Serial Numbers, Pop-ups for Regions, Place of
Registration, so that a user may include all records or choose a range of records to include in the
export file.
Each export request results in a “|” delaminated text file that can be saved anywhere as per user’s
choice to be used in any statistical software for analysis or for reporting purposes.
A sample export page is shown as follows:
Export page of the registry
Selected Data export
This export page consists of a form used for selecting which tables and/or fields to include in the
export file. In addition, the form includes selection fields for Serial Numbers, Pop-ups for Regions,
Place of Registration so that a user may include all records or choose a range of records to include in
the export file.
Update Tables
Add/Edit Users
There are several levels of user access to the registry. The registrar of the Diabetes Registry
can creates new users, assign them a unique User ID and Password and can set the level of
permission to access the registry from the User Setup form as shown below:
24
User setup page
Add/Edit Cities/Town Names
A facility has been provided for the Registry registrars to add/edit cities within the Cities table of the
Diabetes Database. This table is used as a Pop-up menu within the Demographic Data Form. A
registrar must select the Region name from the pop-up menu in which the new city is to be added or
edited. A sample screen of City Add/Edit is shown below:
Once a region is selected and the button Add/Edit City is clicked a screen is displayed with a list of all
the cities under that selected Region Name. Each City is accessible by its City Code. A sample list of
Cities is shown below:
25
At the top of a list is the Add New City button, which directs the user to a new screen where a new
City for a selected Region is added.
The user can delete a city from the given list of cities by clicking button
This will result in a Pop
screen for the confirmation of deletion as follows:
Clicking on Yes will permenantly delete the selected city from the list
In order to edit the exisitng City the user can click on .
as shown in the Figure below.
26
to view the Edit Screen of the selected city
Add/Edit Participating Hospitals
Participating hospitals can be added and modified only by the Super Registrar of the registry from the
Diabetes Centre. This option allows the super registrar to view / modify the existing hospitals or in
case of a new hospital add the participating hospital code and name by clicking on the “Add new
Participating Hospital” button.
As soon as the hospital is added to the existing list, the name of the super registrar is automatically
added in the users list. This allows the super registrar to be able to login to the registry by selecting
the newly added hospital from the login page and adds new users and their initials from the admin
page.
Add/Edit Oral Hypoglycemic Agents
Same as Cities add/edit feature
Add/Edit Initials of the users
The initials of the users are selected at the time of data entry from the drop down lists in various data
entry forms. These initials can have a status “Active” or “In-Active”. If a user no longer exists for the
data entry or supervision purposes on the registry the initial can be de-activated by the super registrar
for that user from this Add/Edit Initial option, however since the initial of that user was used in the
data entry it cannot be deleted from the database due to database constraints and also for the
administrative reports it is required to know who entered the record initially and when. An In-Active
user will show always as the last entry within the drop down list of the data entry forms.
From the list of the database initials the super registrar can see the names of all active or in-active
users. Also he/she can update the status of the initials using the “Edit” option from the displayed list.
Main Page
This option can be clicked to return to the Main Page of the Registry.
Log Out
At any point in time if the user wants to log off from the Registry the Log out button can be clicked to end
the session.
27