1
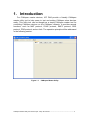
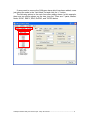
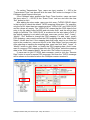
CANopen Master Utility
Warranty
All products manufactured by ICP DAS are warranted
against defective materials for a period of one year from
the date of delivery to the original purchaser.
Warning
ICP DAS assume no liability for damages consequent
to the use of this product. ICP DAS reserves the right to
change this manual at any time without notice. The
information furnished by ICP DAS is believed to be
accurate and reliable. However, no responsibility is
assumed by ICP DAS for its use, nor for any infringements
of patents or other rights of third parties resulting from its
use.
Copyright
Copyright 2011 by ICP DAS. All rights are reserved.
Trademark
The names used for identification only maybe registered
trademarks of their respective companies.
CANopen Master Utility user manual (ver. 2.00) Jan/31/2011 ---------------------------------------------------- 1
Tables of Content
CANopen Master Utility .................................................................................1
1. Introduction.............................................................................................3
2. About CPMUtility ....................................................................................4
3. Features...................................................................................................5
4. Start CPMUtility.......................................................................................6
4.1.
Module ..........................................................................................6
4.2.
Add Node & Load EDS.................................................................7
4.3.
Master Part ...................................................................................9
4.4.
Node Part ....................................................................................10
4.5.
SYNC Part ................................................................................... 11
4.6.
EMCY Part...................................................................................12
4.7.
SDO Part .....................................................................................13
4.8.
RxPDO Part.................................................................................14
4.9.
TxPDO Part .................................................................................16
CANopen Master Utility user manual (ver. 2.00) Jan/31/2011 ---------------------------------------------------- 2
1. Introduction
For CANopen master devices, ICP DAS provide a friendly CANopen
master utility tool to help users to test and setting CANopen slave devices
easily. This utility tool can be thought as a simply CANopen master tool for
controlling CANopen devices on the CANopen network. It provides several
functions, such as NMT protocol, SYNC protocol, EMCY protocol, SDO
protocol, PDO protocol, and so forth. The operation principle will be addressed
in the following section.
Figure 1.1
CANopen Master Utility
CANopen Master Utility user manual (ver. 2.00) Jan/31/2011 ---------------------------------------------------- 3
2. About CPMUtility
The CANopen master utility (CPMUtility.exe) now supports CE5.0 and
Win2K/XP/Vista/7 with 32-bit system. In CE5.0, there are I-8123W and I-87123,
in Windows 32-bit system, there is PISO-CPM100(U) (the firmware and driver
of all above CANopen master products need version 2.00 later).
The new version CPMUtility (v2.00 later) is different from the old version
(v1.xx). This document is only for the new version CPMUtility. About the old,
please refer to the web:
http://ftp.icpdas.com/pub/cd/fieldbus_cd/canopen/master/piso-cpm100/oldver.
The version information of the CPMUtility can be checked in the about
dialog as the figure 2.1.
CANopen Master Utility user manual (ver. 2.00) Jan/31/2011 ---------------------------------------------------- 4
3. Features
1. Auto-scan all the CANopen master that the CPMUtility has supported.
2. Auto-scan all the CANopen slave devices on the CANopen network.
3. Support EDS file.
4. Dynamic PDO object setting easily.
5. Node Guarding Event and Heartbeat Event detection.
6. EMCY message receiving.
7. Maximum 5 SYNC message producers per CANopen master.
8. Support I-8123W, I-87123, and PISO-CPM100(U) for version 2.00 later.
9. Support OS: WinCE5.0, and Win2K/XP/Vista/7 with 32-bit system.
CANopen Master Utility user manual (ver. 2.00) Jan/31/2011 ---------------------------------------------------- 5
4. Start CPMUtility
4.1. Module
The first step after executing the CPMUtility, users need to click the
“Module” item on the toolbar. Then the utility will show all the CANopen
master devices that the utility has supported now on the host device (such as
PC or WinPAC).
Users can select the CANopen master and baud rate that want to be
activated and click the“>” button. Then the CANopen master device will be
initialized with the communication baud rate and list on the “Config Status” list.
If users want to remove the activated CANopen master device, users just
select the CANopen master on the “Config Status” list and click the “<” button.
CANopen Master Utility user manual (ver. 2.00) Jan/31/2011 ---------------------------------------------------- 6
4.2. Add Node & Load EDS
After initializing the CANopen master device, users can click “Add Node”
or “Load EDS” item to add CANopen slaves to the master.
When users use “Add Node”, the master will scan its CANopen network
first and list all the slaves at “Total Node” list on the network. Then users can
select which slaves want to use and click “>” to add.
If users use “Load EDS” function, it will list 127 nodes for selecting. When
users select a node and click “>”, it will pop up a windows for select the node’s
EDS file.
CANopen Master Utility user manual (ver. 2.00) Jan/31/2011 ---------------------------------------------------- 7
If users want to remove the CANopen slave which has been added, users
just select the node in the “Add Node” list and click the “<” button.
The following picture is the main form after adding slaves. In this example,
there are two slaves shown on the tree view list. There are 7 parts, Master,
Node, SYNC, EMCY, SDO, RxPDO, and TxPDO below.
CANopen Master Utility user manual (ver. 2.00) Jan/31/2011 ---------------------------------------------------- 8
4.3. Master Part
Selecting the Master item such as “Board 1: CPM100U: …” in the tree list,
the right dialog will show all the related driver and firmware version. Users can
check the driver or firmware version of their master device if necessary.
CANopen Master Utility user manual (ver. 2.00) Jan/31/2011 ---------------------------------------------------- 9
4.4. Node Part
Selecting the Node item such as “Node: 001 …” in the tree list, the right
dialog will show the NMT service tab of the slave node.
In the NMT service tab, users can get the slave state in “Slave State” text
box. And if users want to change the slave state, just select the state combo
box and click “Change State” to set it. There are five states, Operational State,
Pre-operational State, Stop State, Node Reset, and Communication Reset in
state combo box for selects.
The NMT service tab provides two NMT Error Control protocol, Node
Guarding and Heartbeat. Users can click “Set Guarding Protect” button to start
Node Guarding protect or click “Set Heartbeat Protect” to start Heartbeat
protect. If one of these two protect mechanisms has been used, the protect
status will show in the “Protect Status” text box. And if the Node Guarding
Event or Heartbeat Event has occurred, the event will store in the “NMT protect
event list” list.
CANopen Master Utility user manual (ver. 2.00) Jan/31/2011 ---------------------------------------------------- 10
4.5. SYNC Part
In this part, users can send SYNC message and change SYNC ID.
If users want to change the SYNC ID for the node, input the new SYNC ID
in the “Cob ID” text box and click “Change New ID” button, the SYNC COB-ID
will be updated.
Key in the SYNC timer in the “SYNC Timer” text box and times in the
“SYNC Times” text box, then click “Send SYNC” to send SYNC message. If
the “SYNC Timer” is 0, the SYNC message will be stopped. If the “SYNC
Timer” is more than 0, the function will send SYNC message per “SYNC Timer”
millisecond until finish the parameter “SYNC Times”. When the “SYNC Times”
is set to 0, the function will send SYNC message continuously until set “SYNC
Timer” to 0. Users can set at most 5 SYNC messages with different SYNC ID
per master device to be sent cyclically.
CANopen Master Utility user manual (ver. 2.00) Jan/31/2011 ---------------------------------------------------- 11
4.6. EMCY Part
The EMCY part can list the EMCY messages and change EMCY ID.
If users want to change the EMCY ID for the node, input the new EMCY ID
in the “Cob ID” text box and click “Change New ID” button, the EMCY COB-ID
will be updated.
All the EMCY message produces from the slave node will be show in the
EMCY list.
CANopen Master Utility user manual (ver. 2.00) Jan/31/2011 ---------------------------------------------------- 12
4.7. SDO Part
The SDO Communication page has two functions, “Read Data” and “Write
Data”. After editing the “Index” and “Sub-index” text box, users can click “Read
Data” to read the object data with the index and sub-index object address, or
click “Write Data” to write the data of the “Write data” text box to the object.
Note that, the data will be parted with space in the “Write data” text box. For
example, if the data “1 2” in the “Write data” text box, it will be detected that first
data byte is 0x01 and second data byte is 0x02. But if the data “12” in the
“Write data” text box, it will be detected to only one data byte 0x12.
CANopen Master Utility user manual (ver. 2.00) Jan/31/2011 ---------------------------------------------------- 13
4.8. RxPDO Part
The CPM Utility is divided into two forms, Main Form and Child Form, in
this part. And the descriptions for these two forms are as below.
Main Form
Selecting the “RxPDO Object” item in the tree list and the RxPDO main
form will show on the right dialog. In main form, users can click “New PDO”
button to add a new RxPDO with the “Cob ID” in the “RxPDO No.” RxPDO
object or users can click “Remove PDO” button to remove an original RxPDO
with the “Cob ID”. For example, if users input “333” in “Cob ID” text box and “5”
in “RxPDO No.” text box then click “New PDO” button. The slave node will add
a new RxPDO with COB-ID 0x333 in 5th RxPDO object. And if users input
“333” in “Cob ID” text box then click “Remove PDO” button. The COB-ID 0x333
of RxPDO will be removed. Besides, all the RxPDO messages of the slave
node will be shown on the “RxPDO Message List” of the main form list.
Child Form
Selecting the “RxPDO COB-ID” item (such as “0x201”) in the tree list and
the RxPDO child form will show on the right dialog. In child form, users can
change COB-ID, Transmission Type, PDO mapping list, and send message for
the RxPDO object.
For changing COB-ID, users input a new COB-ID into the “Cob ID” text box
such as “444” and click “Change ID” button. The original RxPDO COB-ID
0x201 will be changed to 0x444.
CANopen Master Utility user manual (ver. 2.00) Jan/31/2011 ---------------------------------------------------- 14
For setting Transmission Type, users can input number 1 ~ 255 in the
“Transmission Type” text box and click the near “Set” button to change it if the
CANopen slave supports this type.
After adding the slave node, users can click every RxPDO COB-ID object
in the tree list to check the default RxPDO mapping information. For example,
only the 0x201 object has two mapping entry, “6200-01:08” and “6200-02:08”,
and others are empty. The “6200-01:08” means that the PDO object’s first
entry is for the object index 0x6200 and sub-index 0x01, and the entry’s data
length is 0x08 bits. The “6200-02:08” is as above but the sub-index is 0x02. If
the default mapping is not satisfy with use, users can use the “Add”, “Insert”,
“Modify”, “Del” buttons to change the PDO mapping. For add, insert, modify
PDO mapping, users need to select the PDO mapping data in the “Map Object
Select” combo box first. But if the mapping data that users want to use is not in
the combo box, users can input it in the “Map Object” text box manually. After
select or input the mapping data, users can click “Add”, “Insert”, or “Modify”
button to add, insert, or modify the PDO mapping data. And if users want to
remove a PDO mapping data from the PDO object, select the mapping data in
the “PDO mapping status” list and click “Del” button to remove it.
If users need to send an RxPDO data message, input the data in the “Send
Data” text box and click the “Send Data” button to send it. Note that the data
length of the send data must equal to the PDO object. For example, the PDO
object has two mapping entries and the total data length are 16-bit (2-bytes),
so the sending data must has two bytes which is parted with space.
CANopen Master Utility user manual (ver. 2.00) Jan/31/2011 ---------------------------------------------------- 15
4.9. TxPDO Part
The CPM Utility is divided into two forms, Main Form and Child Form, in
this part. And the descriptions for these two forms are as below.
Main Form
Selecting the “TxPDO Object” item in the tree list and the TxPDO main
form will show on the right dialog. In main form, users can click “New PDO”
button to add a new TxPDO with the “Cob ID” in the “TxPDO No.” TxPDO
object or users can click “Remove PDO” button to remove an original TxPDO
with the “Cob ID”. For example, if users input “222” in “Cob ID” text box and “5”
in “TxPDO No.” text box then click “New PDO” button. The slave node will add
a new TxPDO with COB-ID 0x222 in 5th TxPDO object. And if users input “222”
in “Cob ID” text box then click “Remove PDO” button. The COB-ID 0x222 of
TxPDO will be removed. Besides, all the TxPDO messages of the slave node
will be shown on the “TxPDO Message List” list of the main form.
Child Form
Selecting the “TxPDO COB-ID” item (such as “0x181”) in the tree list and
the TxPDO child form will show on the right dialog. In child form, users can
change COB-ID, Transmission Type, Event Timer, PDO mapping list, and send
message for the TxPDO object.
For changing COB-ID, users input a new COB-ID into the “Cob ID” text box
such as “234” and click “Change ID” button, the original TxPDO COB-ID 0x181
will be changed to 0x234.
CANopen Master Utility user manual (ver. 2.00) Jan/31/2011 ---------------------------------------------------- 16
For setting Transmission Type, users can input number 1 ~ 255 in the
“Transmission Type” text box and click the near “Set” button to change it if the
CANopen slave supports this type.
If the CANopen slave supports the Event Timer function, users can input
the timer value (1 ~ 65535) in the “Event Timer” text box and click the near
“Set” button to set it.
After adding the slave node, users can click every TxPDO COB-ID object
in the tree list to check the default TxPDO mapping information. For example,
only the 0x181 object has two mapping entries, “6000-01:08” and “6000-02:08”,
and the others are empty. The “6000-01:08” means that the PDO object’s first
entry is for the object index 0x6000 and sub-index 0x01, and the entry’s data
length is 0x08 bits. The “6000-02:08” is as above but the sub-index is 0x02. If
the default mapping is not satisfy with use, users can use the “Add”, “Insert”,
“Modify”, “Del” buttons to change the PDO mapping. For add, insert, modify
PDO mapping, users need to select the PDO mapping data in the “Map Object
Select” combo box first. If the mapping data that users want to use does not
exist in the combo box, users can input it in the “Map Object” text box manually.
After selecting or inputting the mapping data, users can click “Add”, “Insert”, or
“Modify” button to add, insert, or modify the PDO mapping data. And if users
want to remove a PDO mapping data from the PDO object, select the mapping
data in the “PDO mapping status” list and click “Del” button to remove it.
If users want to get a TxPDO data message, need to click the “Remote
Data” button to send a remote PDO message, and then the TxPDO message
will be shown on the data list when the CANopen master received it.
CANopen Master Utility user manual (ver. 2.00) Jan/31/2011 ---------------------------------------------------- 17