1
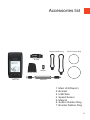
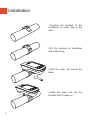
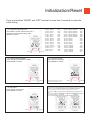
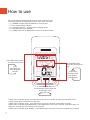
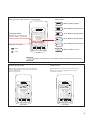
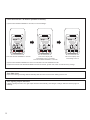
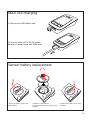
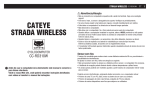
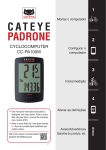
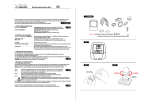
USER MANUAL
Raptor V1.0
2.4G Digital Wireless System
Thank you for choosing Shanren products
We focus on developing intelligent professional cycling equipment
This manual includes instructions for the installation and use of the Shanren intelligent bicycle
accessories as well as the warranty information. Please read this carefully and save it for future
reference. If you do not understand the information in this manual or you have a question about our
product that this manual does not cover, please contact us.
Contents
·Safety and general guidelines
·Accessories List
·Installation
·Screen illustrations
·Initialization/Reset
·How to use
·Specifications
·Warranty Card
General guidelines and warning
·Please read the safety instructions carefully and keep it for future reference.
·Be aware of all warnings and instruction signs marked on the products.
·In order to protect your eyes, do not look directly into any light.
·Keep out of the reach of children.
·Always keep the product away from moisture or getting wet.
·Take ample care to never drop the product.
·Always keep this product away from all kinds of heat sources.
·In order to avoid electric shock, do not use any kind of plug without it being earthed.
·Do not insert objects or pour liquid into this product through any apertures on bezels.
·Do not attempt to repair the product yourself or by any other unqualified person.
·Contact a dealer near you for service.
·Ware a helmet and reflective vest while riding. Always comply to local laws and regulations.
·As a precaution, always inform others of your intended whereabouts before setting out.
1
Accessories list
Bracket Rubber Ring
Sensor Rubber Ring
Bracket
Magnet
Speed Sensor
Main Unit
USB Wire
1. Main Unit(Raptor)
2. Bracket
3. USB Wire
4. Speed Sensor
5. Magnet
6. Sensor Rubber Ring
7. Bracket Rubber Ring
2
Installation
1.Position the bracket to the
handlebar on either side of the
stem
2.Fit the bracket on handlebar
with rubber ring
3.Aim the main unit toward the
base
Click!
3
4.Slide the main unit into the
bracket until it snaps up
5.Mount the wheel sensor on the fork blade
6.Remove the magnet and install on the spoke, facing the
'sensor' mark.
7.Adjust the magnet until it is 3-5mm from the sensor, then
tighten it.
4
Screen illustrations
Time and calorie symbols
Time and calorie display
Hour
K calorie
Speed and distance symbols
Speed and distance unit
Battery power indicator
Charging indicator
Bicycle light work mode indicator
Speed and distance display
5
Initialization/Reset
Press and hold the “MODE” and “SET” buttons for more than 2 seconds to enter the
initial setting
ETRTO
47-305
47-406
37-540
47-507
37-584
37-590
40-559
42-559
47-559
50-559
54-559
57-559
57-584
28-630
32-630
40-635
(1)Set wheel circumference:
Press SET to preset values.There are 4
presets for each wheel setting, press
MODE to confirm.
Select
C(mm)
1272
1580
1948
1900
2086
2100
2030
2025
2050
2075
2100
2120
2128
2174
2220
2265
Confirm
(2)Select kilometers/miles:
Press SET and select KM/H or MPH;
press MODE to confirm.
Select
Tire size
16x1.90
20x1.75
24x13/8
24x1.75
26x13/8
26x13/8
26x1.50
26x1.60
26x1.75
26x2.00
26x2.10
26x2.25
271/2x2.25
27x11/4
27x11/4
28x11/2
ETRTO
32-622
35-622
37-622
37-622
40-622
42-622
47-622
50-622
54-622
57-622
60-622
23-571
18-622
20-622
23-622
25-622
28-622
Tire size
28x1.25, 700x32C
28x1.35, 700x35C
28x1.40, 700x35C
28x1.40, 700x37C
28x1.50, 700x38C
28x1.60, 700x40C
28x1.75
29x2.00
29x2.10
29x2.25
29x2.35
650x23C
700x18C
700x20C
700x23C
700x25C
700x28C
C(mm)
2170
2185
2200
2200
2220
2230
2250
2280
2295
2288
2330
1973
2102
2100
2125
2135
2150
(3)Set body weight:
Press SET to set weight,
press MODE to confirm.
Confirm
*Choose KM/H the body weight unit is KG,
select MPH the body weight unit is LB.
Select
Confirm
(5)Searching for speed sensor:
The sensor was synchronized with this unit before shipment, search the sensor ID
only when a sensor is used or after sensor battery (CR2032) replacement.
Press MODE button to complete setting, the main unit start to work.
The screen will display ‘Pair’ when the main unit is waiting for the speed sensor
signal.
① If it connects successfully, the screen will display ‘SUCC’and main unit will start
performing its functions
② If the connection times out, the main unit will enter the working state.
(4)Set clock:
Press SET to set the time,
press MODE to confirm.
Select
Confirm
Connecting
Connected
6
How to use
Press and hold the ON/OFF button for more than 3 second to start.
The screen flashes the following data when main unit is in motion:
(1) [SPEED] Current speed is updated on every second
(2) Five stages battery indicator.
(3) Charging indicator: Indicates when charging status
(4) Bike light work mode indicator.
(5) [TIME] Clock time is displayed as ‘hh:mm:ss’ 24 hours format.
Press SET button switch
the measurement data
Press MODE button
switch the measurement
data
Clock
Trip riding time
Total riding time
Calories
Speed
Top speed
Average speed
Trip distance
Total distance
Press ON/OFF button switch the
bicycle light mode
High Low Off
*
1.When main unit display [TRIP], press SET button more than 2 seconds, trip riding time,trip distance and
average speed data are cleared at the same time.
2.When main unit display [CAL],press SET button more than 2 seconds, calories data is cleared.
3.When main unit display [TRIP DISTANCE], press MODE button more than 2 seconds, trip distance data, trip
riding time, average speed are cleared at the same time.
4.When main unit display [TOP SPEED],press MODE button more than 2 seconds, top speed data is cleared.
7
Bike light work mode / battery / charging status
Battery status
Battery capacity≥90%
90%> Battery capacity≥70%
Charging status
70%> Battery capacity≥50%
Main unit can be charged by 5V
1A power adapter or power bank.
50%> Battery capacity≥30%
30%> Battery capacity≥10%
Bike light work mode
High
Battery capacity <10%
Low
If battery capacity<10%, icon flashes, please recharge main unit in time.
Power saving mode
Power on/off
Main unit will go into power saving mode ,clock and battery
status are displayed,which has not received any signal from
sensor for 240 seconds.
Press any key to restart.
Press ON/OFF button more than 3 seconds, main unit power
off.
If main unit power off, press ON/OFF button more than 3
seconds,main unit restart.
8
Press and hold SET & MODE operation summary
(1)Press and hold SET & MODE in 2 seconds, turn on/off backlight.
Press and hold SET & MODE in 2 seconds
LCD screen display ‘ON’
and backlight turns on constantly
Press and hold SET & MODE in 2 seconds
LCD screen display ‘OFF’
and backlight turns off
(2)Press and hold SET & MODE more than 2 seconds,main unit enter initialization mode.
(3)Special note:Press and hold SET & MODE more than 8 seconds, system reset, main unit restore factory settings.
Auto data store
Raptor saves setting and riding data automatically,data will not be lost even when battery power is lost.
Auto lighting output decrease
If battery capacity less than 10%, light output decreases automatically ,avoid danger of riding in darkness cause by light off
suddenly.
9
Main unit charging
1.Open micro USB rubber pad.
2.Connect main unit to 5V/1A power
adapter or power bank with USB wire.
Sensor battery replacement
1.Open the battery case cover
anticlockwise.
2.Replace a new lithium
battery(CR2032) with (+) side facing
upward.
3.Tighten the battery case cover
clockwise.
10
Specifications
·Model Number: SR-BLC10
·Light source: Cree white LED*2
·Light output: 300lm
·Rechargeable Li-ion Battery: 2600mAh
·Work mode: High - Low - Off
·Bike light running time: 3 / 6 Hours
·Recharge time: about 4 Hours
·Current/Average/Maximum speed:0.00~99.99 km/h (0.00-62.13m/h)
·Trip/Total distance: 0.00~99999 km (0.00-62139m)
·Clock: 00:00:00~23:59:59 (24-hour system)
·Trip riding time: 00:00’~9999:59’
·Total riding time: 0~999999 Hours
·Calories: 0~999999 kcal
·Tire size: 100mm~3999mm (default 2095mm)
·Sensor battery: Lithium battery CR2032 x 1(Working time: About 12 months,if used
for 1 hour/day)
·Charging Interface: Micro USB
·Working temperature: 0℃~40℃(32°F~104°F)
·Backlight: Supported
·Bike computer with 2.4G wireless sensor
·Weight: 120g
11
Warranty Card
Limited warranty 1 Year main unit and speed sensor.
Accessories and battery consumption excluded.
Each product unit is warranted to be free of factory defects for 1 Year from original
purchase.If the product fails to work through normal usage, we will repair or replace
the defect at no charge. Service must be performed by an authorized Shanren
dealer or an authorized Shanren retailer. To return the product, enclose its warranty
card together with details about its dysfunction.Please type your name and address
clearly on the warranty card.
Insurance and transportation charges shall be borne by the party requesting service.
Thanks for understanding!
User name:
Address:
Telephone:
Purchasing address:
Retail price:
Odd numbers:
Commodity name and specification:
Dealer name:
Purchasing date:
12
SHANREN, is an intelligent cycling accessory &
outdoor sports brand, full of creative passion
and vitality in approach. We have a diverse
team, embracing scores of different cultures and
viewpoints.
We have responsible attitude when it comes to
R&D and manufacturing. Building the best
product is integral to everything we do, from
environmentally responsible manufacturing, to
the active involvement with the communities we
live in.
We all share a passion for discovery; innovation
is who we are. We keep evolving towards a
smarter, safer, greener, healthier and more
enjoyable world.
Shanren Technology USA Inc
Shanren International Co.,Ltd
[email protected]
www.shanrentech.com