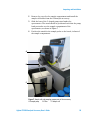
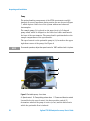
1
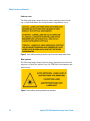
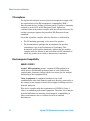
Agilent FTIR Oil Analysis Accessory User’s Guide Notices © Agilent Technologies, Inc. 2008, 2010-2013 No part of this manual may be reproduced in any form or by any means (including electronic storage and retrieval or translation into a foreign language) without prior agreement and written consent from Agilent Technologies, Inc. as governed by United States and international copyright laws. Manual Part Number 8510248600 Edition Sixth edition, May 2013 Printed in Malaysia Agilent Technologies, Inc. Warranty The material contained in this document is provided “as is,” and is subject to being changed, without notice, in future editions. Further, to the maximum extent permitted by applicable law, Agilent disclaims all warranties, either express or implied, with regard to this manual and any information contained herein, including but not limited to the implied warranties of merchantability and fitness for a particular purpose. Agilent shall not be liable for errors or for incidental or consequential damages in connection with the furnishing, use, or performance of this document or of any information contained herein. Should Agilent and the user have a separate written agreement with warranty terms covering the material in this document that conflict with these terms, the warranty terms in the separate agreement shall control. Technology Licenses The hardware and/or software described in this document are furnished under a license and may be used or copied only in accordance with the terms of such license. Restricted Rights Legend If software is for use in the performance of a U.S. Government prime contract or subcontract, Software is delivered and licensed as “Commercial computer software” as defined in DFAR 252.227-7014 (June 1995), or as a “commercial item” as defined in FAR 2.101(a) or as “Restricted computer software” as defined in FAR 52.227-19 (June 1987) or any equivalent agency regulation or 2 contract clause. Use, duplication or disclosure of Software is subject to Agilent Technologies’ standard commercial license terms, and nonDOD Departments and Agencies of the U.S. Government will receive no greater than Restricted Rights as defined in FAR 52.227-19(c)(1-2) (June 1987). U.S. Government users will receive no greater than Limited Rights as defined in FAR 52.227-14 (June 1987) or DFAR 252.227-7015 (b)(2) (November 1995), as applicable in any technical data. Safety Notices CAUTION A CAUTION notice denotes a hazard. It calls attention to an operating procedure, practice, or the like that, if not correctly performed or adhered to, could result in damage to the product or loss of important data. Do not proceed beyond a CAUTION notice until the indicated conditions are fully understood and met. WARNING A WARNING notice denotes a hazard. It calls attention to an operating procedure, practice, or the like that, if not correctly performed or adhered to, could result in personal injury or death. Do not proceed beyond a WARNING notice until the indicated conditions are fully understood and met. Agilent FTIR Oil Analysis Accessory User’s Guide Contents Contents 1. Safety Practices and Hazards 7 General 8 Electrical hazards 8 Laser safety Labeling Laser aperture locations 10 11 13 Other precautions 13 Warning and caution messages 14 Information symbols 15 Color coding 15 CE compliance 16 Electromagnetic Compatibility 16 EN55011/CISPR11 ICES/NMB-001 2. Introduction 16 17 19 Specifications Power Weights and dimensions 20 20 21 Installation requirements 21 Training 22 Documentation 22 Conventions Agilent FTIR Oil Analysis Accessory User’s Guide 23 3 Contents 3. Inspecting and Installation Inspecting 25 Installation space requirement 27 Setting up 27 Spectrometer Pump Sample probe Zinc selenide sample cell Sampling plumbing Installing Resolutions Pro Help 27 30 32 32 34 36 37 4. Operation 39 Power connections 40 Peristaltic pump(s) 40 Spectrometer warm-up 40 Loading samples 41 Cleaning the cell 42 Starting the software 43 Turning off the system 44 5. Advanced Autosampler 45 Installation space requirement 46 Setting up 47 Checking 50 Bottle numbering convention 4 25 52 Agilent FTIR Oil Analysis Accessory User’s Guide Contents 6. Maintenance 53 Routine 54 Cleaning 55 Spare parts 55 7. Troubleshooting 57 Agilent FTIR Oil Analysis Accessory User’s Guide 5 Contents This page is intentionally left blank. 6 Agilent FTIR Oil Analysis Accessory User’s Guide Safety Practices and Hazards 1. Safety Practices and Hazards General Electrical hazards Laser safety Other precautions Warning and caution messages Information symbols Color coding CE compliance Electromagnetic Compatibility 8 8 10 13 14 15 15 16 16 Your Agilent FTIR Oil Analysis accessory has been carefully designed so that when used properly you have an accurate, fast, flexible and safe system. If the equipment is used in a manner not specified by the manufacturer, the protection provided by the equipment may be impaired. Information about safety practices appears throughout the documentation (both hard copy and online) provided with your instrument and accessories. Before using the Agilent Oil Analysis accessory, you must thoroughly read these safety practices and the ‘Safety Practices and Hazards’ section in the manual supplied with your Agilent FTIR spectrometer. Observe all relevant safety practices at all times. Agilent FTIR Oil Analysis Accessory User’s Guide 7 Safety Practices and Hazards General Operation of an Agilent Cary FTIR spectrometer fitted with an Oil Analysis accessory involves the use of high voltage energy, hazardous materials, and a helium-neon Class 2 laser operating in the visible region at 632.8 nanometers. Careless, improper, or unskilled use of your spectrometer or its accessories can cause death or serious injury to personnel, and/or severe damage to equipment and property. The Oil Analysis accessory is used in conjuntion with an Agilent 600 series FTIR spectrometer. This manual covers the Oil Analysis accessory. For information regarding the spectrometer or the Resolutions Pro software, please see the User’s Guide that came with your instrument. These safety practices are provided to help you operate the instrument safely. Read each safety topic thoroughly before attempting to operate the instrument and always operate the spectrometer and its accessories in accordance with these safety practices. Electrical hazards The Agilent Oil Analysis accessory and other ancillary equipment contain electrical circuits, devices, and components operating at dangerous voltages. Contact with these circuits, devices, and components can cause death, serious injury, or painful electrical shock. Good grounding/earthing is essential to avoid a potentially serious electric shock hazard. Ensure that there is an integral ground connection between the metal base of the instrument and accessories and the 3-pin earth-grounded mains-socket outlet. Consult the manual(s) and/or product labels supplied with your computer, monitor and printer for the relevant grounding requirements. 8 Agilent FTIR Oil Analysis Accessory User’s Guide Safety Practices and Hazards NOTE This model is Equipment Class I. Application of the wrong supply voltage can create a fire hazard and a potentially serious shock hazard, and could seriously damage the FTIR spectrometer, its accessories and any attached ancillary equipment. NOTE The optional Advanced Autosampler, has a universal power supply that adapts to the supply voltage. However, care must be taken to ensure that a suitable AC (alternating current) voltage is used. The peristaltic pump that is supplied with the Oil Analysis accessory, or the optional Advanced Autosampler (see Chapter 5), is designed for 100-240 VAC; 50-60 Hz operation. CAUTION If an FTIR Oil Analyzer and this accessory is to be relocated to another site that has a different VAC supply, Agilent recommends that you contact your local representative to ensure you have the correct power cables and ensure you meet any requirement for a grounded converter or transformer for the pump(s) on the system. Consult the manual(s) supplied with your computer, monitor and printer for their specific voltage requirements. Replace blown fuses with fuses of the size and rating as stipulated in the text adjacent to the fuse holder or refer to the specification cited in the corresponding manual. Do not use power cords with faulty or frayed insulation. CAUTION Use of controls or adjustments or performance or procedures other than those specified in this manual, may result in hazardous radiation exposure. Agilent FTIR Oil Analysis Accessory User’s Guide 9 Safety Practices and Hazards Laser safety The Agilent Cary 600 Series FTIR spectrometers use a helium-neon laser operating in the visible region at 632.8 nanometers. The spectrometer is a Class 2 laser product, powerful enough to warrant caution in its use. Agilent Cary 600 Series FTIR spectrometers and microscopes comply with FDA and CE standards for light emitting products. An attenuated portion of the laser beam passes into and through the spectrometer sample compartment. Although not powerful enough to harm your skin should your hand intercept it, the laser light could cause retinal (eye) damage during prolonged direct viewing. This is not possible given the normal optical layout of the spectrometer. However, if a highly reflective surface such as a mirror is allowed to intercept the beam, the beam could be redirected out of the sample compartment resulting in on-axis or direct viewing. Care must be taken to avoid this. The laser in the spectrometer is operating when the green power indicator of the spectrometer is active. The Agilent Cary 600 Series FTIR spectrometers incorporate an interlock switch that automatically turns off power to the laser if the interferometer compartment cover is opened. No maintenance of the spectrometer or microscope by users is required to maintain specifications, proper operation, and compliance with FDA and CE standards for light-emitting products. 10 Agilent FTIR Oil Analysis Accessory User’s Guide Safety Practices and Hazards Labeling Laser safety labels are located on the rear of the Agilent Cary 600 Series FTIR spectrometer and underneath the top cover. Figure 1. Laser safety label locations on the rear of the Agilent Cary 600 Series FTIR spectrometer The laser safety warning just above the Purge and Air Bearing connections states ‘Laser radiation. Do not stare into beam. Class 2 laser product. (IEC 60825-1/2007). Max. output: 1 mW/600-700 nm. If the spectrometer is purchased where a local language is supported, the localized warning will be present next to, or near, the English version. Agilent FTIR Oil Analysis Accessory User’s Guide 11 Safety Practices and Hazards Under top cover The following image shows the laser safety warning located on the top of, and underneath, the interferometer compartment cover. Figure 2. Laser safety warning located on top of internal compartment cover Near apertures The following image shows the laser safety warning located near all apertures on both the Agilent Cary 600 FTIR Series instruments and microscopes. Figure 3. Laser safety warning located near apertures 12 Agilent FTIR Oil Analysis Accessory User’s Guide Safety Practices and Hazards Laser aperture locations WARNING Laser Hazard Avoid exposure – laser light may be emitted from this aperture. The laser light could cause retinal (eye) damage if prolonged direct viewing occurs. This is a Class 2 laser product. It is not powerful enough to harm your skin should your hand intercept it. The optical design of the 600 Series spectrometer and the 610 FTIR microscope normally precludes this. Always wear appropriate safety equipment and clothing. Figure 4. Laser aperture locations indicated by circles on image above Other precautions Do not block the ventilation grills on the instrument. Consult the manual(s) supplied with your computer, monitor and printer for their specific ventilation requirements. Use of the Oil Analysis accessory may involve materials, solvents and solutions which are flammable, corrosive, toxic or otherwise hazardous. Agilent FTIR Oil Analysis Accessory User’s Guide 13 Safety Practices and Hazards Careless, improper, or unskilled use of such materials, solvents and solutions can create explosion hazards, fire hazards, toxicity and other hazards which can result in death, serious personal injury, and damage to equipment and property. Always ensure that laboratory safety practices governing the use, handling and disposal of such materials are strictly observed. These safety practices should include the wearing of appropriate safety clothing and safety glasses. Use only spare parts from Agilent with your instrument. Warning and caution messages Carefully read all warnings and cautions and observe them at all times. A Warning message is used in the text when failure to observe instructions or precautions could result in death or injury. Warnings have the following format: WARNING Hazard Type Nature of the hazard, information on how to avoid the hazard, and possible consequences if you don’t. The triangular symbols that appear in conjunction with warnings are outlined in the next section. A Caution message is used when failure to observe instructions could result in damage to equipment (Agilent-supplied and/or other associated equipment). Cautions have the following format: CAUTION 14 Caution information appears here. Agilent FTIR Oil Analysis Accessory User’s Guide Safety Practices and Hazards Information symbols Review the User’s Guide that came with your spectrometer for additional information symbols and their meanings. The following symbol may be used on warning labels attached to the accessory. When you see this symbol, refer to the relevant operation or service manual for the correct procedure referred to by that warning label. The following symbols may also appear on the instrument or in the documentation: I Mains power on. 0 Mains power off. When attached to the rear of the instrument, indicates that the product complies with the requirements of one or more EU directives. When attached to the rear of the product, indicates that the product has been certified (evaluated) to CSA 61010.1 and UL 61010-1. Color coding The various indicator lights appearing on Agilent instruments and associated accessories are color-coded to represent the status of the instrument or accessory. A green light indicates the instrument is in normal or standby mode. A yellow light indicates that the instrument needs attention. A blue light indicates that operator intervention is required. Agilent FTIR Oil Analysis Accessory User’s Guide 15 Safety Practices and Hazards CE compliance The Agilent Oil Analysis accessory has been designed to comply with the requirements of the Electromagnetic Compatibility (EMC) Directive and the Low Voltage (electrical safety) Directive (commonly referred to as the LVD) of the European Union. Agilent has confirmed that each product complies with the relevant directives by testing a prototype against the prescribed EN (European Norm) standards. Proof that a product complies with the directives is indicated by: The CE marking appearing on the rear of the product. The documentation package that accompanies the product, containing a copy of the Declaration of Conformity. This declaration is the legal declaration by Agilent that the product complies with the directives and also shows the EN standards to which the product was tested to demonstrate compliance. Electromagnetic Compatibility EN55011/CISPR11 Group 1 ISM equipment: group 1 contains all ISM equipment in which there is intentionally generated and/or used conductively coupled radio- frequency energy which is necessary for the internal functioning of the equipment itself. Class A equipment is equipment suitable for use in all establishments other than domestic and those directly connected to a low voltage power supply network which supplies buildings used for domestic purposes. This device complies with the requirements of CISPR11, Group 1, Class A as radiation professional equipment. Therefore, there may be potential difficulties in ensuring electromagnetic compatibility in other environments, due to conducted as well as radiated disturbances. 16 Agilent FTIR Oil Analysis Accessory User’s Guide Safety Practices and Hazards Operation is subject to the following two conditions: 1 This device may not cause harmful interference. 2 This device must accept any interference received, including interference that may cause undesired operation. If this equipment does cause harmful interference to radio or television reception, which can be determined by turning the equipment off and on, the user is encouraged to try one or more of the following measures: 1 Relocate the radio or antenna. 2 Move the device away from the radio or television. 3 Plug the device into a different electrical outlet, so that the device and the radio or television are on separate electrical circuits. 4 Make sure that all peripheral devices are also certified. 5 Make sure that appropriate cables are used to connect the device to peripheral equipment. 6 Consult your equipment dealer, Agilent Technologies, or an experienced technician for assistance. Changes or modifications not expressly approved by Agilent Technologies could void the user’s authority to operate the equipment. ICES/NMB-001 This ISM device complies with Canadian ICES- 001. Cet appareil ISM est conforme à la norme NMB-001 du Canada. Agilent FTIR Oil Analysis Accessory User’s Guide 17 Safety Practices and Hazards This page is intentionally left blank. 18 Agilent FTIR Oil Analysis Accessory User’s Guide Introduction 2. Introduction Specifications Installation requirements Training Documentation 20 21 22 22 This manual contains the information required to successfully get started using the Agilent Oil Analysis accessory with your Agilent Cary FTIR spectrometer. Additional information on the optional Advanced Autosampler is included in Chapter 5. An FTIR Oil Analysis accessory comprises: The Oil Analysis accessory (includes Oil Analyzer software) Advanced Autosampler (optional for a fully-automated system) The FTIR Oil Analysis accessory is optimized for sampling and analyzing synthetic and petroleum-based lubricant and hydraulic fluids. The accessory is designed to meet the needs of the U.S. Department of Defense Joint Oil Analysis Program (JOAP) as well as commercial applications. The accessory and spectrometer are controlled by a computer running the Oil Analyzer software, which is a Resolutions Pro interface dedicated to controlling an FTIR spectrometer fitted with an Oil Analysis accessory and the optional Advanced Autosampler. Sample fluids are pumped through a filter and tubing outside the optics and electronics area of the spectrometer and then through a zinc selenide (ZnSe) flow-through cell. The Oil Analysis accessory mounts the cell within the sample compartment of the spectrometer, where the fluid is analyzed. Agilent FTIR Oil Analysis Accessory User’s Guide 19 Introduction The following sequence describes how samples are measured and analyzed: 1 A background spectrum of an empty, clean sample cell is collected. 2 The sample probe is inserted into a bottle containing the oil to be analyzed. This is achieved manually for manual and semiautomated analyses but the optional Advanced Autosampler facilitates automated analysis of multiple samples. 3 A peristaltic pump pulls the sample through a 38- μm (400-mesh) filter element and then into the 100-μm pathlength, flow-through cell. 4 The infrared absorbance spectrum of the sample is collected and interpreted by the computer. 5 A report comparing the sample spectrum with JOAP standards is generated. 6 The peristaltic pump is used to remove the sample from flowthrough cell and then solvent is drawn through the sample flow path to clean the system. Refer to the User’s Guide that shipped with your Agilent Cary 600 Series FTIR spectrometer for additional information. Specifications The Oil Analysis accessory is designed to function within the same environmental conditions as your Agilent Cary 600 series FTIR spectrometer. See the User’s Guide shipped with your spectrometer for suitable environmental requirements. The User’s Guide can be downloaded from the Agilent website. Power The power specifications for your Agilent FTIR Oil Analysis accessory are: 20 Peristaltic pumps: 3.15 A at 115 VAC; 1.6 A at 230 VAC Advanced Autosampler (optional): 4 A maximum at 100-240 VAC; 50-60 Hz Agilent FTIR Oil Analysis Accessory User’s Guide Introduction Dedicated, clean 10-A power circuit with 3-pin earth-grounded mains socket-outlets. No other instruments, machinery or appliances should be powered from the same circuit. Each of the system components —peristaltic pump(s) and Advanced Autosampler (optional)— requires an earth-grounded mains socket-outlet. It is useful to have at least two additional sockets available for additional peripheral devices or spectrometer accessories. Depending on the computer options, monitor, peripherals, and spectrometer accessories chosen, it is possible that a second dedicated clean power circuit be required. See the vendor’s documentation that came with the computer, monitor, and printer for the power requirements of each device. Fuse information on the rear of the instrument is the most up-todate. Weights and dimensions Table 1. Agilent Cary 600 Series FTIR Oil Analyzer weights and dimensions Unit Width (cm, in) FTIR spectrometer See the Agilent Cary 600 Series FTIR Spectrometer Site Preparation Guide for these specifications Depth(cm, in) Height (cm, in) Weight (kg, lb) Peristaltic pump 18, 7.25 35, 14 18, 7.25 N/A Advanced Autosampler 43, 17 58.5, 23 55, 21.5 N/A Installation requirements You will have received an Agilent Cary 600 Series FTIR spectrometers Site Preparation Guide which describes the environmental and operating requirements of the system. You must prepare your laboratory according to these instructions before the Agilent FTIR Oil Analysis accessory can be installed. You should keep the Site Preparation Guide for future reference. If you have misplaced your copy, you can obtain a replacement from your local Agilent office. Agilent FTIR Oil Analysis Accessory User’s Guide 21 Introduction Installation of an Agilent Oil Analysis accessory on an existing Agilent Cary FTIR spectrometer may require reorientation of your instrument by 90 degrees, such that the sample compartment faces to the side when you view the spectrometer from in front of the bench. This rotation ensures that the stand used to position the sample probe is located away from the edge of the worktable, as shown in Chapter 3, and that the (optional) Advanced Autosampler can be plumbed in correctly, see Chapter 5. Consult your Agilent representative for further information. Training The Resolutions Pro software, which is provided with the Agilent Cary 600 Series FTIR spectrometer, is accompanied by a Help system that provides detailed information on the FTIR Oil Analysis accessory. The Agilent representative will demonstrate the basic operating procedures during Familiarization (unless this option was deleted). The Agilent representative, however, is not necessarily experienced in complex analytical routines and is not authorized to conduct extensive training. To ensure that your operators benefit the most from attending Familiarization, operator training should be completed before your equipment is installed. It is strongly recommended that you take advantage of the special training courses that are conducted at various locations by the Agilent customer support and sales organization. In some areas, it may be possible to arrange for operator training to be carried out after the installation, using your own instrument. To investigate this possibility, contact your local Agilent sales and service office. Documentation This User’s Guide provides basic instructions for installing, operating and maintaining your Oil Analysis accessory. Chapter 5 of this manual contains information on how to set up and use the optional Agilent Advanced Autosampler. 22 Agilent FTIR Oil Analysis Accessory User’s Guide Introduction Further information and instruction for the Resolutions Pro software, analysis methodology, operating procedures, and details and instruction for various accessories is provided in the Help and electronic manuals loaded onto your computer hard drive during software installation. Conventions The following conventions have been used in procedures throughout the documentation: Bolded items indicate an action. For example, ‘click OK’ and ‘From the Edit menu, choose Copy’. ALL CAPITALS indicate keyboard commands. For example, ‘press ENTER’ and ‘press SHIFT+F8’. Agilent FTIR Oil Analysis Accessory User’s Guide 23 Introduction This page is intentionally left blank. 24 Agilent FTIR Oil Analysis Accessory User’s Guide Inspecting and Installation 3. Inspecting and Installation Inspecting Installation space requirement Setting up Installing Resolutions Pro 25 27 27 36 This chapter includes information on the hardware and installation of the Agilent FTIR Oil Analysis accessory, which allows you to reconfigure your existing FTIR spectrometer. NOTE Chapter 5 of this manual contains information on how to set up and use the optional Agilent Advanced Autosampler. Inspecting As soon as the shipment arrives: 1 NOTE Locate the shipping list documentation and check that you have received all of the items listed. If any of the listed items are missing, stop immediately and call your Agilent representative. 2 Carefully check the exterior of the shipping containers for any external damage. (Stains on the containers may indicate exposure to water.) Agilent FTIR Oil Analysis Accessory User’s Guide 25 Inspecting and Installation CAUTION CAUTION 26 Do not open the shipping containers at this time unless otherwise instructed by your Agilent representative. 3 If the shipping container(s) appear to be damaged (water damage, crushed package, and so on), contact Agilent and the carrier within five days. Do not accept packages with obvious puncture damage. All other damage should be noted on the shipping document and signed by the delivery agent. 4 If you are sure that all boxes have been delivered and appear to be undamaged, place them where their contents can come to room temperature. Do not unpack any additional boxes or packages or the spectrometer or microscope unless othwerwise instructed by your Agilent representative. Your Agilent representative will complete the unpacking and installation of your Agilent Oil Analysis accessory. If unpacked incorrectly, equipment may become damaged. Agilent FTIR Oil Analysis Accessory User’s Guide Inspecting and Installation Installation space requirement 90 cm (3 ft) You must provide bench space of at least 150 centimeters across by 90 centimeters deep (5 feet by 3 feet) to hold the spectrometer and FTIR Oil accessory including the computer, with enough room to use the keyboard and mouse. Bench space 150 cm (5 ft) Figure 5. Space required for an Agilent Cary FTIR spectrometer and Oil Analysis accessory Setting up This section describes how to physically set up an Agilent Oil Analysis accessory on your FTIR spectrometer. Spectrometer This section describes the procedure for setting up your FTIR spectrometer for use with the Oil Analysis accessory. Without the optional Advanced Autosampler, the spectrometer and accessory are arranged as illustrated in Figure 6. Agilent FTIR Oil Analysis Accessory User’s Guide 27 Inspecting and Installation A B C D E F Figure 6. External view of an Agilent FTIR Oil Analysis accessory without an Advanced Autosampler and Cary 600 Series FTIR Spectrometer. A: Sample pump B: Spectrometer C: Sample probe D: Sample cell E: Sample F: Cell drain line To set up the spectrometer for use as an FTIR Oil analyzer: 1 WARNING 28 Put the FTIR spectrometer to the left side of the assigned space, with its sample compartment oriented to the right as you are facing it from the bench. Heavy Weight Hazard Danger to hands and feet. Incorrect handling of the spectrometer can lead to injury and/or damage to the instrument. The Agilent 600 Series FTIR spectrometers weigh approximately 85 kg (187 lb). Always use a suitable lifting device and proper lifting techniques when moving the instrument. Do not attempt to lift the spectrometer unassisted. Agilent FTIR Oil Analysis Accessory User’s Guide Inspecting and Installation 2 Remove the cover for the sample compartment and install the sample cell holder from the Oil Analysis accessory. 3 Slide the base of the C-shaped pump stand under the spectrometer. The stand should be positioned such that the pump head protrudes over the sample compartment of the spectrometer, as shown in Figure 7. 4 Position the stand for the sample probe on the bench, in front of the sample compartment. A B C Figure 7. Sample cell and pumping components of the accessory A: Sample pump B: Filter C: Sample cell Agilent FTIR Oil Analysis Accessory User’s Guide 29 Inspecting and Installation Pump The main plumbing components of the FTIR spectrometer and Oil Analysis accessory important during routine use are shown in Figure 7, which depicts a side view of the system without an Advanced Autosampler. The sample pump (A) is placed on the upper level of a C-shaped pump stand, which is designed so the lower level slides underneath the base of the spectrometer. The pump head is positioned above the sample compartment of the spectrometer. The speed control on the peristaltic pump is (A) located on the upper right front corner of the pump. See Figure 8. NOTE For manual operation, adjust the speed control to ‘8.00’ and then lock it in place. A B C Figure 8. Peristaltic pump – front view A: Speed control B: Pump tubing release lever C: Power and direction switch Located below the speed control, the three-position switch (C) determines whether the pump is active (or not) and the direction in which the peristaltic flow is induced. 30 Agilent FTIR Oil Analysis Accessory User’s Guide Inspecting and Installation Table 2. Function of each position of the switch on the sample pump Position Function Left (counterclockwise) Pump pumps sample or solvent through the filter and into the flow-through cell. Center Pump is off. Right (clockwise) Pump draws fluid from the sample cell back through the filter and to the probe. NOTE Orientations referred to in Table 2 assume you are facing the front of the pump. Using the release lever (B), the upper part of the pump head can be raised to remove tubing. The pump head is raised typically if: WARNING NOTE The FTIR Oil accessory and spectrometer will not be used for a while Tubing requires replacement Moving Parts Hazard Danger to hands. To avoid exposing moving parts, always operate your peristaltic pump with the tubing installed and the pump head lowered. While the peristaltic pump is running, do not put your hands on, or near, the pump head. During routine operation of your system, the three-position switch is the only component of the pump that you need to manipulate. All the measuring, monitoring, system checks, and report generation functions of the accessory and spectrometer are automatically controlled by the Oil Analyzer software. Agilent FTIR Oil Analysis Accessory User’s Guide 31 Inspecting and Installation Sample probe Liquid (either a sample or wash solvent) is taken up by the sample probe and it then passes through the filter assembly into the flowthrough cell. When performing oil analysis manually or in semiautomated mode the sample probe is held in position by a stand that can accommodate differently sized sample containers. WARNING Eye Hazard Samples and solvents used when performing oil analysis are hazardous and pose a danger to eyes. Always ensure you wear appropriate personal protective equipment. Zinc selenide sample cell The zinc selenide (ZnSe) sample cell has a flow-through design and a transmission pathlength of 100 micrometers. The stainless-steelprotected cell is placed into the sample-cell holder, which mounts within the sample compartment as illustrated in Figure 10. The input and output connections are made to the flow-through cell using plastic tubing. WARNING 32 Noxious Gas Hazard Zinc selenide reacts with acids to form toxic hydrogen selenide gas (H2Se). Do not use acid during sample preparation of samples that are to be introduced to ZnSe cells. Agilent FTIR Oil Analysis Accessory User’s Guide Inspecting and Installation Figure 9. Zinc selenide flow-through cell Figure 10. Flow-through cell located in cell holder Agilent FTIR Oil Analysis Accessory User’s Guide 33 Inspecting and Installation The peristaltic pump draws fluid to be analyzed through a filter assembly and then into the flow-through cell. From the output of the sample cell, any waste fluid is directed to a bottle. Alternatively, by reversing the pump direction, fluid can be pumped back through the filter assembly to a waste bottle at the sample probe location. Sampling plumbing This section describes how to set up and check the sampling plumbing for your system. When operating, the Oil Analysis accessory pulls samples through a metal mesh filter and then the ZnSe sample cell, finally to a waste container. To plumb the Oil Analysis accessory: NOTE 34 1 Locate the ZnSe sample cell. The interior of this flow-through cell should appear clear, with a yellow-gold color. Check the cell for any cracks in the windows. 2 Slide the sample cell onto the guides located in the sampling slot on the sample-cell holder. The inlet and outlet tubes should be in front of the cell as it is placed onto the guides. Gently move the sample cell up and down whilst sliding it into the slot, until the ball lock engages. The cell should be completely in the sample-cell holder, with only the black metal tab and the inlet and outlet tubes outside. 3 Ensure that the peristaltic pump is switched off, by making sure its switch is in the center position. 4 Rotate the pump tubing release lever fully counterclockwise to raise the pump head. 5 Route the sample tubing, which connects the inlet of the flowthrough cell to sample probe, through the pump head. Loop the yellow tubing up and over the rollers, so that the probe end is to the right of the pump head. You may need to lift the black, spring-loaded retainers while routing the yellow tubing through the pump head. Agilent FTIR Oil Analysis Accessory User’s Guide Inspecting and Installation Figure 11. Sample pump with pump head raised and tubing in place 6 NOTE CAUTION Holding tension on the two sides of the tubing in the pump head, rotate the pump tubing release lever fully clockwise to close the pump head, until it latches. Before lowering the pump head, ensure that the tubing is centered correctly between the retainers. 7 Connected to the outlet of the sample cell, the ends of both lengths of tubing should be placed into the opening of an approved waste container. 8 Position the ends of the tubings above the level of the used oils and solvents that will be collected in the waste container, as lower would allow effluent to be pulled back into the flowthrough cell when reversing the pump. To avoid system contamination, the waste container should be located > 30 cm (12 in) below the level of the bench on which the accessory and spectrometer are supported. You are now ready to check the sampling system plumbing. Agilent FTIR Oil Analysis Accessory User’s Guide 35 Inspecting and Installation To check the plumbing of the Oil Analysis accessory: 1 Ensure that the peristaltic pump is connected to the power supply. 2 Move the switch on the pump housing to the left position. The pump drive head should start rotating counterclockwise. 3 Immerse the end of the sample probe in a small amount of wash solvent, either heptane or hexane, in a beaker or similar container. Verify that the liquid is pulled up the sample tubing, through the filter, and into the sample cell. 4 Keep the beaker/container under the sampling probe and move the three-position switch to the far right position. Confirm that the wash solvent is pumped from the sample cell back into the beaker. 5 Remove the end of the sample probe from the liquid. 6 Move the switch back to the left position and allow air to be pulled through the system for about 15 seconds. 7 Move the switch to its center position to stop the sample pump. The sample plumbing is now ready for operation. Installing Resolutions Pro Dedicated software is used to control the Agilent Oil Analyzer, which will be installed by your Agilent representative at the same time as the Resolutions Pro software that is required to control your FTIR spectrometer. However, should you need to re-install the software (for example, if the computer has been replaced), instructions are provided in the Resolutions Pro Software Installation Manual. NOTE 36 The computer must meet the minimum requirements stated in the Site Preparation Guide for the Agilent Cary 600 Series FTIR Spectrometer. For the most recent list of minimum requirements see the Agilent website, www.agilent.com If you are unsure of the requirements, consult your Agilent representative to confirm that you have the correct specifications required for the Resolutions Pro software to correctly operate. Agilent FTIR Oil Analysis Accessory User’s Guide Inspecting and Installation CAUTION Before installing or upgrading Resolutions Pro software, ensure your spectrometer is not connected to the computer. After the Resolutions Pro software is installed (including the sample data and Help), connect the USB cable to your spectrometer to the computer. Your FTIR spectrometer and Oil Analysis accessory are ready to be used. NOTE There is a 60-day trial period to use the Resolutions Pro software. However, to enable the Oil Analyzer Software, you must register your software with Agilent immediately. Details on how to do this are found in the Resolutions Pro Software Installation Manual. Help The Help for Resolutions Pro software is provided on a separate disk. Resolutions Pro Help is installed on your computer after the Resolutions Pro software installation. In addition to content on the Agilent Cary FTIR Oil Analysis accessory, the Resolutions Pro Help includes information and instructions on: Safety Hardware Software menus and document types How to perform a collect, process and manipulate the data Create scripts to automate data collection, processing and manipulation How to install hardware accessories and components Maintenance and troubleshooting Agilent FTIR Oil Analysis Accessory User’s Guide 37 Inspecting and Installation Click the ‘Help’ button in Oil Analyzer software to display information that relates to the Oil Analyzer software, which contains links to additional content on the Oil Analysis accessory. You can also access Resolutions Pro Help through the Resolutions Pro software. 38 Agilent FTIR Oil Analysis Accessory User’s Guide Operation 4. Operation Power connections Spectrometer warm-up Loading samples Cleaning the cell Starting the software Turning off the system 40 40 41 42 43 44 For additional hardware information, see the Resolutions Pro Help. To access the FTIR Oil Analyzer section of the Help: 1 Start the Oil Analyzer software. 2 Click Help on the toolbar to display the Help. 3 Click the Contents tab if necessary. 4 Click the plus (+) icon next to ‘About Your FTIR Systems’ to expand it. 5 Click the plus (+) icon next to ‘Agilent 600 FTIR Series’ to expand it for hardware information on your spectrometer, or click the plus icon next to ‘FTIR Oil Analyzer’ for hardware information on your system. Alternatively: NOTE 1 Start the Resolutions Pro software. 2 Press F1 on the keyboard to display the Help. 3 Follow Steps 3 to 5 above. For additional information, refer to the manual(s) supplied with your FTIR spectrometer. Agilent FTIR Oil Analysis Accessory User’s Guide 39 Operation Power connections Peristaltic pump(s) Power is connected to the peristaltic pump(s) on the rear panel of the pump. To connect power to a peristaltic pump: 1 Make sure the power switch on front of the pump is in the off (0) position. 2 Connect the power cord to the socket at the rear of the pump. 3 Connect the other end of the power cable to the electrical power outlet. Spectrometer warm-up If the FTIR Oil Analysis accessory and spectrometer have been turned off, you will need to turn on the spectrometer and allow it sufficient time to warm up. Refer to the User’s Guide supplied with your spectrometer for detailed instructions. The lifetime of the electrical and optical components can be extended by keeping the spectrometer on and warm. It is unnecessary to turn the spectrometer off overnight or when it is not being used, unless this will be for an extended period. To reinitialize an FTIR spectrometer that has been turned off: NOTE 40 1 Turn on the power switch located on the back of the spectrometer. 2 Wait at least 30 minutes for the infrared source in the spectrometer to reach its operating temperature. If the spectrometer has been turned off for an extended period, any data you collect before the spectrometer has reached its operating temperature may not be accurate. Agilent FTIR Oil Analysis Accessory User’s Guide Operation Loading samples A peristaltic pump is used to draw either liquids (oil or wash solvent) or air through the flow-through cell of the Oil Analysis accessory, which is mounted in a cell holder within the sample compartment of the spectrometer. There are two ways that the sample pump can be operated: Continuous pumping in manual or semi-automated mode Pulse pumping (automated sampling using the Advanced Autosampler only) In continuous pumping, an oil sample is drawn through the sample probe and into the flow-through cell using the peristaltic pump. The Oil Analyzer software monitors the absorption of light by the contents of the sample cell and uses that measurement to determine if the cell is completely full. Sample data is not acquired until the flow-through cell is full, which is defined within the administrator settings. Pulse pumping is useful for automated applications that analyze low-viscosity oils or when there is only a small amount of sample available for analysis. Using continuous pumping could result in the complete sample being drawn through the sample cell before the analyzer is ready to collect data. Using pulse pumping, an automated method transports an aliquot of oil with air gaps either side. The size of the aliquot is the result of pre-determined timings in the lowering and raising of the sample probe by the Advanced Autosampler. NOTE When using the Advanced Autosampler (optional) there are two pumps in operation: the sample pump, which delivers oil samples to the flow-through cell; and a wash pump, which rinses the sample probe and automates cell cleaning. Agilent FTIR Oil Analysis Accessory User’s Guide 41 Operation Cleaning the cell Depending on your hardware, and the acquisition mode selected in the software, cleaning the sample cell involves either the manual or automatic pumping of wash solvent from a reservoir into and through the sample cell. Air is then drawn through the cell to remove residual solvent. NOTE The Oil Analyzer software monitors the cleanliness of the sample cell and will continue pumping wash solvent into the cell until it is sufficiently clean. The cleanliness standard for the sample cell is defined within the administrator settings. For additional information on cleaning your ZnSe sample cell and either of the pumping modes used for sampling, see the Resolutions Pro Help. To access the Troubleshooting section of the Help: 1 Start the Oil Analyzer software. 2 Click Help on the toolbar to display the Help. 3 Click the Contents tab if necessary. 4 Click the ‘plus’ (+) icon next to ‘About Your FTIR Systems’ to expand it. 5 Click the ‘plus’ (+) icon next to ‘FTIR Oil Analyzer’ for hardware information on your system. Alternatively: 42 1 Start the Resolutions Pro software. 2 Press F1 on the keyboard to display the Help. 3 Follow Steps 3 to 5 above. Agilent FTIR Oil Analysis Accessory User’s Guide Operation Starting the software To start the Oil Analyzer software click Start > Programs > Agilent Resolutions > Oil Analyzer. If you are doing the same type of analysis as the most recent run and you do not need to modify any of acquisition or processing of data, you may proceed to analyze your oil samples. If this is the first analysis since your FTIR Oil Analysis accessory was installed, or you need to modify the acquisition or data processing parameters, you need to login to the Oil Analyzer software as an administrator to configure your system. To log on as an administrator: NOTE 1 From the Oil Analyzer software main window, click Administration. The password dialog window will appear. 2 Enter your password. Click OK. The default password set up during installation is ‘Agilent’, typed without the single quotation marks. 3 You are now logged in as an administrator. The ‘General Options’ dialog box will appear. See the Help for detailed information on the Oil Analyzer software. To access the Oil Analyzer Software section of the Help: 1 Start the Oil Analyzer software. 2 Click Help on the toolbar to display the Help. Alternatively: 1 Start the Resolutions Pro software. 2 Press F1 on the keyboard to display the Help 3 Click the Contents tab if necessary. 4 Click the ‘plus’ (+) icon next to ‘Software’ to expand it. 5 Click Oil Analyzer Software. Agilent FTIR Oil Analysis Accessory User’s Guide 43 Operation Turning off the system Unless the system will be idle for some time or will be moved, Agilent recommends that the spectrometer be left turned on. The peristaltic pump(s), autosampler (if you have one) and the computer (along with its peripherals) can be turned off. NOTE Agilent recommends that you disable the screen saver because it may interfere with long data collections. To shut down the computer: 44 1 Click Exit to close Oil Analyzer software. 2 Rotate the peristatic pump head release lever counterclockwise to increase the lifetime of the tubing. 3 Close all other applications. 4 Select Shut down from the Start menu and remember to switch off your monitor. 5 If necessary, turn off the spectrometer. Agilent FTIR Oil Analysis Accessory User’s Guide Advanced Autosampler 5. Advanced Autosampler Installation space requirement Setting up Checking 46 47 50 This chapter describes how to: Connect the Agilent Advanced Autosampler to your Oil Analysis accessory. Confirm operation of your FTIR spectrometer and Oil Analysis accessory as a fully automated system. Figure 12. FTIR Oil Analyzer with an Advanced Autosampler The Advanced Autosampler consists of an X-Y-Z robotic arm that moves a sampling probe capable of accessing bottles held within a sampling space of 470 millimeters (X) by 200 millimeters (Y) by 115 millimeters (Z). Sample bottles are held in individual, interchangeable racks and are pinned so that the rack can only be correctly positioned on the spill tray in one orientation. The spill tray is pinned so that it can only be orientated on the Advanced Autosampler in one position, which ensures reproducible bottle placement. Agilent FTIR Oil Analysis Accessory User’s Guide 45 Advanced Autosampler The Agilent Advanced Autosampler includes an integral, high efficiency wash station with a software-enabled option of returning excess wash solvent to a wash reservoir or to waste. Two computercontrolled, variable-speed (6 to 600 revolutions per minute) peristaltic pumps supply the samples and wash solvent to the FTIR spectrometer. Pump speeds can be adjusted to supply samples at maximum speed or at slower speeds to minimize sample-volume requirements and reduce solvent usage. Installation space requirement 75 cm (31 in.) 18 cm (7¼ in.) Sample Pump Wash Pump Advanced Autosampler 58.5cm (23 in.) Spectrometer 75 cm (31 in.) 70 cm (28 in.) You must provide bench space of at least 220 centimers across by 120 centimeters deep (7 feet by 4 feet) to hold the FTIR spectrometer and accessories, including the computer, with enough room to use the keyboard and mouse. 43 cm (17 in.) Figure 13. Schematic view of FTIR spectrometer with autosampler 46 Agilent FTIR Oil Analysis Accessory User’s Guide Advanced Autosampler Setting up This section describes how to set up the Advanced Autosampler to work with an FTIR spectrometer. To connect your Advanced Autosampler to your spectrometer: NOTE CAUTION 1 Ensure that your sample pump is turned off and that your computer is not running the Oil Analyzer software. 2 Place the additional peristaltic pump and the Advanced Autosampler to the right side of the spectrometer, as shown in Figure 13. The tray of the autosampler faces towards the sample compartment of the spectrometer. The ‘wash pump’ supplies wash solvent to the wash station located at the sample probe’s ‘Home’ position. The wash pump is identical to the sample pump already on the system but is controlled separately by the Oil Analyzer software. 3 Remove the two screws holding the top cover on the back of the autosampler. Lift and remove the cover and remove any shipping restraint from the sample probe carriage. 4 Replace the top cover. Ensure the wash pump and autosampler are switched off, and then plug in the power cables. Do not turn on the power. 5 Using the supplied RS-232 cable, connect the COM 1 port on your computer to the autosampler port labeled ‘Computer’ (or ‘AA Port’). 6 Plug the bifurcated, pump-control cable into the autosampler port labeled ‘Auxiliary’ (or ‘Prep Station’). 7 Connect the DB-9 connectors labeled ‘Sample’ and ‘Wash’ to the sample and wash pumps respectively. Switch both of the pumps to the ‘Remote’ setting. 8 Place the spill tray on the autosampler, taking care that the tray fits on the locating pins. Agilent FTIR Oil Analysis Accessory User’s Guide 47 Advanced Autosampler 9 Slide the metal sample probe through the head of the probe holder and locate it into the hole on the bottom guide. Figure 14. Sample probe positioned too high. NOTE If the head of the sample probe is positioned too high for the probe to go through the bottom guide plate, the head should be carefully lowered in to position by hand. 10 When the sample probe is positioned correctly, that is, such that the end of the sample probe extends 3 to 4 millimeter (0.12-0.16 inch) below the bottom guide plate, tighten the knurled knobs on the holder to secure the probe in place. CAUTION The autosampler will jam if you do not have the probe located through the bottom guide plate. 11 Take the length of waste tubing and attach it to the lower barbed fitting on the wash station of the autosampler. 48 Agilent FTIR Oil Analysis Accessory User’s Guide Advanced Autosampler NOTE CAUTION This is the waste line for excess wash solvent. The tubing can be routed to a waste container. This waste line, like those attached to the flow-through cell, should be located into the mouth of the waste container but above the level of the liquid. Doing this will prevent waste from being pulled back into wash station when reversing the direction of the wash pump. 12 Take the supplied wash tubing assembly, terminated at one end by a hollow weighted fitting, and attach the tubing to the top barbed fitting of the wash station. A spare clamp is supplied to do this. 13 Rotate the pump tubing release lever fully counterclockwise to raise the pump head. Route the tubing through the left side of the pump head, around the rotor, and out the right side. 14 Holding tension on the two sides of the tubing in the pump head, rotate the pump tubing release lever fully clockwise to close the pump head, until it latches. 15 The weighted end of this tubing assembly should be placed into the wash-solvent container, so that it is kept beneath the level of the liquid. CAUTION To prevent siphoning, the reservoir of wash solvent should be in a container that is located > 30 cm (12 in) below the level of the bench supporting spectrometer and accessory. 16 Adjust the speed control on the sample pump to ‘7.00’ and that on the wash pump to ‘2.00’. Lock the dials in place. NOTE Depending on the viscosity of your oil samples, you may need to adjust these settings for optimal performance of the system. Agilent FTIR Oil Analysis Accessory User’s Guide 49 Advanced Autosampler Checking This section describes the procedures for checking that your Advanced Autosampler is correctly operating and ready to use. The ‘Autosampler Tests’ dialog box allows an administrator to test the individual functions of the Autosampler: to ensure that the pump controls are operational, to verify rack definitions, and to run the autosampler through some preliminary checks. Before proceeding with an ‘Autosampler Test’ you must: WARNING 1 Place one of your sample racks on the spill tray of the autosampler, checking that the pins seat properly in the index holes of the rack 2 Turn on the autosampler. The power button is located on the left side of the rear panel. 3 Ensure that the pump heads on the pumps are lowered and locked in place, and that the switch on the rear panel of each pump is in the ‘Remote’ position. Moving Parts Hazard Danger to hands. To avoid exposing moving parts, always operate your peristaltic pump with the tubing installed and the pump head lowered. While the peristaltic pump is running, do not put your hands on, or near, the pump head. 4 NOTE 50 Switch both the sample and wash pumps on to the far left position, that is, so that the pump heads will rotate counterclockwise. You may confirm this by temporarily switching the pump to Local. 5 If it is not already running, turn on the computer and start the Oil Analysis software. 6 Log on as an Administrator. Agilent FTIR Oil Analysis Accessory User’s Guide Advanced Autosampler You are now ready to check your Advanced Autosampler is functioning correctly by performing a number of tests: CAUTION Raise and lower the sample probe. Send the sample probe to its ‘home’ position. Send the sample probe to bottle #X. Start and stop the wash/sample pump. Be careful when performing the autosampler tests. Avoid damage to your autosampler, by ensuring that the appropriate rack type is selected and that the racks are empty or sample appropriately sized bottles are in place. To check the performance of your Autosampler: 1 Click the arrow to the right of the ‘Administration’ button, and click Autosampler Test. 2 From the Autosampler Tests dialog box, you can perform a number of tests to confirm that the Advanced Autosampler is correctly operating. See the Help for further information of the individual tests. Agilent FTIR Oil Analysis Accessory User’s Guide 51 Advanced Autosampler Bottle numbering convention Figure 15 shows how sample bottles are assigned numbers within a rack. The example shown is of a 4 x 10-rack arrangement but the numbering system is the same for all racks. Home 4 3 2 1 8 7 6 5 12 11 10 9 16 15 14 13 20 19 18 17 24 23 22 21 28 27 26 25 32 31 30 29 36 35 34 33 40 39 38 37 Figure 15. Bottle numbering convention for autosampler rack 52 Agilent FTIR Oil Analysis Accessory User’s Guide Maintenance 6. Maintenance Routine Cleaning Spare parts 54 55 55 This chapter includes information on how to access the spectrometer and accessory maintenance procedures that may be carried out by an operator. Any maintenance procedures not specifically mentioned should be carried out only by Agilent-trained, Agilent-qualified or Agilent-authorized representatives. WARNING Electrical Shock Hazard Death, serious injury, or electrical shock can result by contact with these circuits, devices and components. This instrument contains electrical circuits, devices and components operating at dangerous voltages. Always switch off the power to the system and disconnect the power cords before proceeding with any maintenance procedure that risks exposure to this hazard. WARNING Hot Surface Hazard Close contact with an operating or recently used infrared source can result in severe heat burns to the skin. Allow hot parts to cool before proceeding with any maintenance procedure. Agilent FTIR Oil Analysis Accessory User’s Guide 53 Maintenance WARNING Moving Parts Hazard Danger to hands. To avoid exposing moving parts, always operate your peristaltic pump with the tubing installed and the pump head lowered. While the peristaltic pump is running, do not put your hands on, or near, the pump head. WARNING Laser Hazard This is a Class 2 laser product. Although not powerful enough to harm your skin should your hand intercept it, the laser light could cause retinal (eye) damage if prolonged direct viewing occurs. Always wear appropriate safety equipment and clothing. NOTE You should refer to your computer and printer manuals for their maintenance procedures and to Resolutions Pro Help for the maintenance procedures for any other accessories you ordered for use on your spectrometer. Routine Routine maintenance information is provided in the Resolutions Pro Help. To access the Maintenance section of the Help: 54 1 Start the Oil Analyzer software. 2 Click Help on the toolbar to display the Help. 3 Click the Contents tab if necessary. 4 Click the plus (+) icon next to ‘Maintenance’ to expand it. 5 Click FTIR Oil Analyzer. Agilent FTIR Oil Analysis Accessory User’s Guide Maintenance Alternatively: 1 Start the Resolutions Pro software. 2 Press F1 on the keyboard to display the Help. 3 Follow Steps 3 to 5 above. Cleaning Any spills in the sample compartment or on the FTIR Oil Analyzer should be immediately wiped up. The exterior surfaces of the instrument should be kept clean. All cleaning should be done with a soft cloth. If necessary, this cloth can be dampened with water or a mild detergent. Do not use organic solvents or abrasive cleaning agents. Spare parts For spare parts and consumables ordering information, refer to the Agilent website, www.agilent.com Agilent FTIR Oil Analysis Accessory User’s Guide 55 Maintenance This page is intentionally left blank. 56 Agilent FTIR Oil Analysis Accessory User’s Guide Troubleshooting 7. Troubleshooting For troubleshooting advice, refer to the Agilent Resolutions Pro Help. To access the Troubleshooting section of the Help: 1 Start the Oil Analyzer software. 2 Click Help on the toolbar to display the Help. 3 Click the Contents tab if necessary. 4 Click the ‘plus’ (+) icon next to ‘Troubleshooting’ to expand it. 5 Click FTIR Oil Analyzer. Alternatively: 1 Start the Resolutions Pro software. 2 Press F1 on the keyboard to display the Help. Follow Steps 3 to 5 above. Agilent FTIR Oil Analysis Accessory User’s Guide 57 Troubleshooting This page is intentionally left blank. 58 Agilent FTIR Oil Analysis Accessory User’s Guide www.agilent.com In This Guide The guide describes the following: Safety Practices and Hazards Introduction Unpacking and Installation Operation Advanced Autosampler Maintenance Troubleshooting © Agilent Technologies 2008, 20102013 Printed in Malaysia 05/13 *8510248600* *8510248600* 8510248600 Issue 6