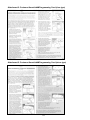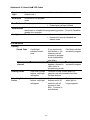
1
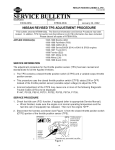
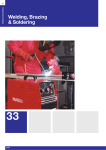
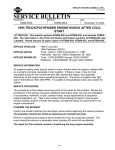
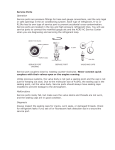
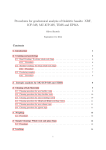
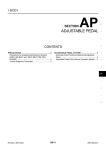
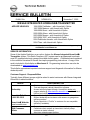
Classification:
Reference:
EL99-012a
Date:
NTB99-067a
November 7, 2003
NISSAN INTEGRATED HOMELINKâ
â TRANSMITTER
APPLIED VEHICLES:
1996-2004 Pathfinder - with HomeLinkâ Option
1997-2004 Maxima - with HomeLinkâ Option
1999-2004 Quest - with HomeLinkâ Option
2000-2004 Altima - with HomeLinkâ Option
2003-2004 Murano - with HomeLinkâ Option
2003-2004 350Z - with HomeLinkâ Option
2004 Pathfinder Armada - with HomeLinkâ Option
2004 Titan - with HomeLinkâ Option
This document amends NTB99-067 and supercedes NTB96-014a. Please discard all paper copies
of NTB99-067 and NTB96-014a.
SERVICE INFORMATION
Some of the Applied Vehicles, as an option, feature the Nissan Integrated HomeLinkâ
â
Transmitter system. This Radio Frequency (RF) system can be programmed to activate
most RF-operated electronic garage doors and security gates. A laminated card contained
in the vehicle's Literature Kit covers the simple programming instructions. A copy of this
card is included in this bulletin as Attachment II. Programming instructions can also be
downloaded at www.homelink.com
This bulletin summarizes important customer support and diagnostic information for Nissan
dealership staff.
Customer Support - Responsibilities
Typically, three different groups might be asked to assist customers with Nissan Integrated
HomeLinkâ related incidents:
GROUP
RESPONSIBILITIES
Dealership
-
HomeLinkâ
â Hotline:
1-800-355-3515
-
HomeLinkâ
â Website:
www.homelink.com
-
NNA Consumer
Affairs
-
Orient customer on transmitter use (delivery/service)
Test and diagnose (vehicle) HomeLinkâ systems
Access technical support through: HomeLinkâ dealer-only
support website @ www.dealerlink.homelink.com or HomeLinkâ
Hotline (see below).
Support dealership with HomeLinkâ related technical assistance
Support dealership and customer with answers to garage door
system questions
Supply HomeLinkâ “Fix Kits” to customer for non-compatible
systems (if available).
Respond to customer inquiries about transmitter programming.
Coordinate client contacts to HomeLinkâ Hotline (except
customer or dealer initiated)
Administer related support policies
1/10
Essential Tool Already Released
To assist in diagnosing the Nissan Integrated HomeLink™ System, a Nissan Integrated
HomeLinkâ Tester Kit was released in 2001 as an Essential Tool (Kent-Moore J-41540).
The Tester Kit consists of the following components:
•
Integrated HomeLinkâ Tester
•
Hand Held (Test) Transmitter
•
12v Power Supply
•
12v Power Adapter
•
Plastic Case and die cut foam
This kit will support Functionality Testing, Range Testing, and Programming Testing as
described in Attachment I of this bulletin. These instructions are also included in the
Tester Kit, and should be used with this bulletin to accurately diagnose the system.
Service Procedure
The basic procedure for handling service needs on the Nissan Integrated HomeLinkâ
Transmitter system is as follows:
1. Customer contacts dealership (or dealership receives a Consumer Assistance
Request).
2. Dealership reviews customer concern:
A. Verify correct transmitter programming (with customer).
B. Review diagnostics.
C. Verify (if known) that the home garage door system is compatible by contacting the
HomeLinkâ Hotline.
NOTES:
•
A copy of the Nissan Integrated HomeLinkâ “programming card” is included as
Attachment II. This can be reviewed with the customer to verify proper
programming. Additional programming cards can be ordered from Dyment
Distribution Service by calling 440-572-0725 and requesting Dyment Part Number
NHL-2.
•
Detailed programming instructions are also available at www.homelink.com.
•
Nissan Integrated HomeLinkâ LED Indicator Meanings are provided as Attachment
III. Common Questions & Answers are also provided as Attachment IV.
3. If the customer has programmed the system correctly, but a problem still exists, the
dealership should use the Nissan Integrated HomeLinkâ Tester Kit Essential Tool
(Kent-Moore J-41540), to verify the system is transmitting a signal(s). (Also see step 6,
page 3).
4. If the Nissan Integrated HomeLinkâ unit fails prescribed testing, the unit should be
replaced.
2/10
5. If the unit passes the prescribed tests and a problem still exists, then the HomeLinkâ
Hotline (1-800-355-3515) should be contacted for assistance. The HomeLinkâ Hotline
will provide technical support.
The Hotline, for example, can determine if the customer’s hand-held transmitter is
HomeLinkâ compatible.
6. If the customer’s hand-held transmitter is non-compatible, HomeLinkâ Hotline
personnel will research the garage door system and may make available a “Fix Kit” if
necessary. The Nissan customer pays for the “Fix Kit” interface and applies it to their
(home) garage door system.
Other Important Considerations
1. Pre-1982 Garage Door Systems
In 1982, Federal Safety Standards mandated that manufacturers of garage door
openers equip their systems with the safety stop and reverse features if they did not
already do so. Those systems that do not have these features cannot be enhanced
with the “Fix Kit” in the event that they do not program to HomeLinkâ.
If these pre-1982 garage door openers are defective in any way, they cannot be
serviced, and, in some states (New York, California, Minnesota, and Indiana) the
openers must be totally disabled by the garage door opener service technician and the
technician must notify the owner of the need to upgrade that system.
2. Fix Kit
The Fix Kit will, based on HomeLinkâ Hotline advice, allow most non-compatible
garage door systems to work with the Nissan Integrated HomeLinkâTransmitter. The
Fix Kit is a customer billable item. Fix Kits will not be supplied for pre-1982 garage
door opening systems.
3. Additional HomeLinkâ
â Compatible Products (details available at
www.homelink.com)
•
•
•
•
HomeLinkâ Lighting Package and other Lighting and Appliance Modules.
Entry door locks.
Estate/Community Gates.
Security Systems.
NOTE: None of these kits, nor any similar kits are covered by any Nissan support
program or warranty. The customer should refer any concerns/questions about the
HomeLinkâ Home Lighting Kit to the HomeLinkâ Hotline directly. Questions about
support for the other kits shown here or other such kits on the market should be
directed to their respective suppliers.
3/10
Attachment I: INTEGRATED HOMELINKâ
â TESTER OPERATING INSTRUCTIONS
NOTE: Read all instructions carefully before testing the vehicle HomeLinkâ. It is very
important to follow all instructions in the proper sequence.
Terminology
•
HomeLinkâ
â Test Kit (Kent Moore P/N J41540): Includes the HomeLinkâ Tester,
Hand-Held Transmitter, and Power Supply
•
HomeLinkâ
â Tester: The Tester with indicator lights 1, 2, 3, and Programmed
•
Hand Held Transmitter: The transmitter included in the tester kit
•
Power Supply: The 120VAC to 12VDC Power supply
•
Vehicle HomeLinkâ
â: The permanent multi-button transmitter in the vehicle
•
Default Mode: The operating mode of the Vehicle HomeLinkâ that contains factory
installed default codes in memory
•
Normal Mode: The operating mode of the Vehicle HomeLinkâ that does not contain
any default codes in memory
NOTE: Before performing any tests, verify the customer's transmitter was manufactured
after 1982. Garage door openers manufactured prior to 1982 may not be compatible with
the HomeLinkâ system.
HomeLinkâ
â Functionality Test
1. While in the driver seat, plug the HomeLinkâ Tester into the vehicle's cigarette lighter
using the cigarette lighter adapter supplied in the kit.
2. Verify that when first plugged in, all of the indicator lights on the HomeLinkâ Tester
illuminate for approximately two seconds. If the power light is on and any of the other
tester lights fail to illuminate, the HomeLinkâ Tester is faulty. (Call Tech-Mate at 1-800662-2001 for instructions on unit repair or replacement).
3. Push any button on the Vehicle HomeLinkâ to verify that it is receiving power from the
vehicle's battery. If the indicator light on the Vehicle HomeLinkâ does not activate,
diagnose the cause of the power loss. (Refer to the appropriate Nissan service manual
for a power supply diagram.)
4/10
4. Clear the Vehicle HomeLinkâ and place it in default mode by using the following
procedure:
Hold the two outer buttons of the Vehicle HomeLinkâ. The red light on the Vehicle
HomeLinkâ will be steady for about twenty seconds then will flash rapidly for another
ten seconds. When the red light goes out, release the outer buttons of the Vehicle
HomeLinkâ. The system is now placed in the default mode.
All customer transmitter codes have now been cleared from the system and will have
to be input at the end of the diagnostic procedure.
5. Check each signal of the Vehicle HomeLinkâ by pressing all three buttons one at a
time.
•
When Vehicle HomeLinkâ button 1 is pressed, the #1 red light on the tester should
also light.
•
When Vehicle HomeLinkâ button 2 is pressed, the #2 red light on the tester should
also light.
•
When Vehicle HomeLinkâ button 3 is pressed, the #3 red light on the tester should
also light.
If any of the lights fail to light, the Vehicle HomeLinkâ needs to be replaced. After
replacement, repeat the HomeLinkâ functionality test.
6. Verify that the hand-held transmitter operates correctly. This is performed by pointing
the hand-held transmitter supplied in the HomeLinkâ Test Kit at the HomeLinkâ Tester.
As the transmitter button is pushed, the green "Program" light on the tester should
illuminate. If the light does not illuminate, make sure the batteries in the hand-held
transmitter are good and retest.
HomeLinkâ
â Range Test
1. Position the HomeLinkâ Tester between 50 and 100 feet from the vehicle. Make sure
the indicator lights on the tester are visible from the vehicle’s driver seat. Plug the tester
into a wall outlet using the power supply included in the HomeLinkâ Test Kit. Turn on
the tester.
2. Take the hand-held transmitter and these instructions and return to the driver's seat.
3. Repeat step 5 from the HomeLinkâ Functionality Test.
5/10
HomeLinkâ
â Programming Test
1. Program any button on the Vehicle HomeLinkâ using the hand-held transmitter
supplied with the tester by using the following procedure. (This procedure is the same
as described on the Nissan Integrated HomeLinkâ Transmitter Quick Reference Card
each customer received at vehicle delivery).
A. Select which of the three Vehicle HomeLinkâ channels you want to program.
B. Hold the end of the hand-held transmitter supplied with the HomeLinkâ Test Kit
against the bottom surface of the Vehicle HomeLinkâ so that you can still see the
red indicator light.
C. Press the desired button on the Vehicle HomeLinkâ until the red indicator light
flashes slowly (this will take about 20 seconds). While still holding this button, press
that hand-held transmitter button.
D. Hold down both buttons and continue to hold until the red indicator light on the
Vehicle HomeLinkâ light starts to flash rapidly. This may take up to 60 seconds.
Release both buttons. The rapid flash means that the Vehicle HomeLinkâ has been
successfully programmed to match the hand-held transmitter.
2. Verify that the Vehicle HomeLinkâ has been properly programmed by pressing the
button you just programmed. As the button is depressed, the green "Program" light
should illuminate on the HomeLinkâ Tester.
NOTE: By verifying the programmability of one channel, we have verified that all three
channels will program correctly.
3. The Vehicle HomeLinkâ is now in "normal" mode and the customer’s transmitter
code(s) can be programmed into the Vehicle HomeLinkâ. You will also notice that
when you push the programmed button on the Vehicle HomeLinkâ the indicator light
will steadily illuminate. This shows that it has been programmed. When the remaining
buttons that have not been programmed are pressed, the red indicator light will slowly
flash showing that these channels are clear.
4. If the Program light fails to illuminate, verify that the hand-held transmitter batteries are
good. After battery replacement, repeat the programming process. If the Program light
fails to illuminate after battery replacement, the Vehicle HomeLinkâ is faulty. (You can
also test the hand-held transmitter by aiming it towards the HomeLinkâ Tester and
pressing the button. If the "Program" light illuminates, the hand-held transmitter is good
and the Vehicle HomeLinkâ should be replaced).
6/10
Trouble Diagnosis Tips
If a customer has installed a HomeLinkâ Lighting Kit in their home, it may be necessary to
reprogram the customer’s Vehicle HomeLinkâ for proper operation. In order for the
HomeLinkâ Lighting Kit to function properly, the Vehicle HomeLinkâ must be placed and
remain in "Default" mode. Following step #4 in the HomeLinkâ Functionality Test easily
performs this. After the Vehicle HomeLinkâ is placed in default mode, simply program the
customer's hand-held transmitter(s) as shown in step 1 of the HomeLinkâ Programming
Test. The Vehicle HomeLinkâ is now ready to use.
If a customer has a transmitter manufactured prior to 1982, or if the customer's transmitter
will not program properly after repeated attempts, they may have a transmitter that is not
compatible with the HomeLinkâ Transmitter. A "Fix" kit may be available from HomeLinkâ
to allow for proper compatibility, on post 1982 units.
HomeLinkâ
â Transmitter Troubleshooting Guide
•
Make sure the batteries in the hand held transmitter are not dead. Replace them if
necessary.
•
Make sure you are holding both buttons for the duration of the programming without
interruption.
•
Rotate the hand held transmitter "end-over-end" and try again. For best results, place
the end that is opposite the battery compartment against the HomeLinkâ Transmitter
when programming.
•
Press any button. Make sure that the LED begins to flash slowly. This indicates that
the channel is cleared and ready to program. If the LED gives a solid light, clear the
channel by pressing both outside buttons (#1 and #3) for 20 seconds, just until the light
begin to flash slowly. (Step #1 in the instructions). Then proceed with the remainder of
the programming process.
•
If the original transmitter to which you are programming was made in Canada, it may be
necessary to repress the button on the ORIGINAL transmitter every two seconds until
the HomeLinkâ Transmitter is programmed. This is because many Canadian garage
door opener transmitters stop transmitting a signal after 2 seconds of operation.
•
If programming fails after repeated attempts, test the HomeLinkâ Transmitter using the
HomeLinkâ Tester.
7/10
Attachment II: Customer HomeLinkâ
â Programming Card (visor type)
Attachment II: Customer HomeLinkâ
â Programming Card (mirror type)
8/10
Attachment III: HomeLinkâ
â LED Codes
Constant
Light
HomeLinkâ is in transmit mode (this can be either a learned signal or a
default code.)
Slow Blink
HomeLinkâ is in program
mode.
• HomeLinkâ has just programmed
• Codes have just been cleared
Double Blink Indicates that hand-held transmitter has “timed out” and needs to be
reactivated to complete the programming process. (Found in Canadian
garage door openers.)
One of two possibilities:
No Light
• No power to HomeLinkâ
Fast Blink
One of two possibilities:
•
HomeLinkâ has just reloaded the
default codes
LED Indicators
Training
Stored Code
A solid light
indicates stored
code
If you continue to
Fast blink indicates
hold button, in 20
successful program
seconds unit will
proceed to program
mode (indicated by
slow blink).
If a slow blink
Fast blink indicates
appears, channel is successful program
clear and is in
programming mode.
Continue to hold buttons and in 20
seconds unit will proceed to fast blink.
Release buttons.
Clear
channel
Clearing Codes
Hold down outside
buttons, solid light
will appear
Reloading Default
Codes
Hold down outside
buttons, solid light
will appear
Continue to hold
buttons and in 20
seconds unit will
proceed to fast
blink. Continue to
hold buttons.
9/10
Release buttons
when light no
longer appears.
Attachment IV: HomeLinkâ
â Common Q & A
Q: What is the Nissan Integrated HomeLinkâ
â Transmitter?
A. It's an attractive, integrated replacement for up to three of your customer's current hand
held transmitters including garage door openers, gates, and security systems. It can
also be used with an aftermarket accessory lighting package that will allow the customer
to activate the lights in their house from the comfort of their new Nissan.
Q: Who should program the system?
A. Programming is easy. By merely pushing two buttons, the unit can be programmed in
about a minute. Although programming is easy enough for the customers to do it
themselves, we recommend that you program the customer's hand-held transmitters as
part of the vehicle delivery process.
Q: Will the HomeLinkâ
â Transmitter program to every Garage Door Opener
Transmitter?
A. The HomeLinkâ Transmitter will program to most transmitters, including Stanley,
Chamberlain, Genie, and most other brands. There are a few exceptions (an estimated
2-3%) when the transmitter does not operate within the legally allowed frequency range
for Garage Door Opener transmitters (286 MHz - 399 MHz). These are mostly very old
openers.
Q: What should be done if the customer’s unit doesn’t program?
A. Reference the troubleshooting section of Attachment I to this bulletin. If the unit still
doesn't program after several attempts, help is available from the HomeLinkâ hotline at
1-800-355-3515.
Q: Once the customer has a HomeLinkâ
â Transmitter, do they still need to keep their
original hand-held transmitter?
A. Yes. Although they no longer need to carry the old transmitter in their car, they should
still keep the transmitter. When they sell or trade in their vehicle, they will need the
original transmitter to re-program their new HomeLinkâ transmitter. (If the customer
has misplaced their hand-held transmitter, they can usually purchase additional handheld transmitters from the manufacturer of their Garage Door Opener).
Q: How can the customer turn on home lights?
A. In order to activate their home lights, the customer will need an accessory HomeLinkâ
Lighting package. The package is specifically designed to work with the HomeLinkâ
Transmitter and is easily installed with no wiring. The package is available directly from
HomeLinkâ (1-800-355-3515). Special dealer programs are also available.
10/10