1
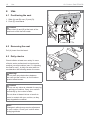
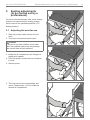
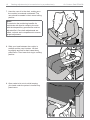
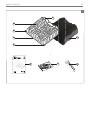
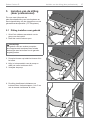
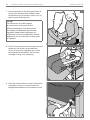
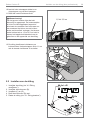
USER MANUAL AIR CONTOUR SEAT ROHO® GEBRUIKERSHANDLEIDING SEDEO CONTOUR R EN NL 1017471A 2 3 English........................................................................................... 4 Nederlands .................................................................................. 20 4 Air Contour Seat ROHO® English © 2014 Handicare All rights reserved. The information provided herein may not be reproduced and/or published in any form, by print, photoprint, microfilm or any other means whatsoever (electronically or mechanically) without the prior written authorization of Handicare. The information provided is based on general data concerning the construction known at the time of the publication of this manual. Handicare and ROHO, Inc. have a policy of continual product improvement and reserve the right to amend this document. A current version of this document is available at www.handicare.com. Illustrations contained in the manual may deviate from the configuration of your product. The information made available has been prepared with all possible diligence, but Handicare cannot be held liable for any errors contained in the information or the consequences thereof. Handicare accepts no liability for loss resulting from work executed by third parties. Names, trade names, trademarks etc. used by Handicare may not, as per the legislation concerning the protection of trade names, be considered as being available.The following are trademarks and registered trademarks of ROHO, Inc.: ROHO®, DRY FLOATATION®, shape fitting technology®. Product components described in this manual may be covered by one or more U.S. and foreign patents and trademarks. For further details, please refer towww.handicare.com and www.roho.com. Air Contour Seat ROHO® Table of contents 5 1 Introduction 1.1 This manual 1.2 Symbols used in this manual 6 6 6 2 Safety 2.1 Proper inflation 2.2 Instability and fall hazard 2.3 Puncture 2.4 Heat / flame 2.5 Product use 2.6 Ozone generators 7 7 7 7 7 7 7 3 General description 3.1 Product description and intended use 3.2 Main parts 8 8 8 4 Use 4.2 Removing the seat 4.3 Daily checks 10 10 10 5 Seating adjustments (to be carried out by a professional) 5.1 Adjusting the seat for use 5.2 Adjusting the seat 11 11 13 6 Maintenance 6.1 Cleaning your seat 6.2 Washing the cover 6.3 Disinfecting the cushion insert 6.4 Sterilizing your seat 6.5 Disposal 14 14 14 14 15 15 7 Troubleshooting 7.1 Pressure loss 7.2 Discomfort/instability 16 16 16 8 Specifications 8.1 CE declaration of conformity 8.2 Material specifications 8.3 Field of application 8.4 Technical specifications 17 17 17 17 17 9 Provisions of warranty 9.1 Warranty period 18 18 6 1 Introduction Introduction Congratulations on choosing a Handicare seat. Handicare’s high-quality mobility products are designed to enhance independence and make your everyday life easier. 1.1 This manual This user manual will help you to use and maintain your seating system safely. This user manual is a supplement to Handicare’s seating system user manual. Where necessary this user manual refers to this manual as shown below: Seating system: Refers to the user manual of the seating system. Read this user manual and the other user manuals referred to carefully before using the product. If one of the user manuals was not included with your wheelchair, please contact your dealer immediately. CONTACT HANDICARE IF YOU HAVE A VISUAL IMPAIRMENT. Air Contour Seat ROHO® 1.2 Symbols used in this manual Note! Pointing out possible problems to the user. Caution! Advice for the user to prevent damage to the product. Warning! Warnings for the user to prevent personal in jury. Not following these instructions may result in physical injury, damage to the product or damage to the environment! Air Contour Seat ROHO® 2 Safety Warning! Always follow the instructions given next to the warning symbols! Failure to follow these instructions may result in physical injury, damage to the seat or damage to the environment. Where possible the warning symbols have been placed in the applicable paragraphs. Caution! Please study this manual carefully before using the seat. 2.1 Proper inflation Warning! Do not use an under-inflated seat cushion. Doing so reduces or eliminates the seat’s benefits, increasing risk to the skin and other soft tissue. If your seat cushion appears under-inflated or does not appear to be holding air, check to make sure that the valves are closed by turning the inflation valves clockwise. If your seat cushion is still not holding air, contact your clinical caregiver or dealer immediately. Warning! Do not use an over-inflated seat cushion. Doing so will not allow you to sink into the seat cushion and will reduce or eliminate the cushion’s benefits increasing risk to the skin and other soft tissue. Caution! The use of any other inflation device other than the supplied hand pump may damage the cushion and void the warranty. Safety 7 2.2 Instability and fall hazard Warning! Do not use your seat in conjunction with any other products or materials, except as indicated in “3.1 Product description and intended use”. Doing so may add to user instability resulting in falls. Consult with your clinician for proper usage. 2.3 Puncture Caution! Keep your seat away from sharp objects, which may puncture the air cells and cause it to deflate. 2.4 Heat / flame Caution! Do not expose your cushion to high heat, open flames or hot ashes. 2.5 Product use Warning! Do not use your seat cushion as a water flotation device (e.g., a Life Preserver). 2.6 Ozone generators Caution! The U.S. Environmental Protection Agency, Health Canada, and other government agencies have issued warnings regarding the use of ozone generators (e.g. air cleaners). Prolonged exposure to ozone will degrade rubber, fabrics, and other materials used in the manufacture of your product and may affect the performance of your product and void the product warranty. 8 General description 3 General description 3.1 Product description and intended use Air Contour seat ROHO is a therapeutic cushioning device intended for users of any weight*, who require low to moderate postural and positioning support, and/or who are at moderate to high risk for skin breakdown. The air filled, adjustable, cellular design ROHO® DRY FLOATATION® cushion inside the seat is designed to conform to a user’s seated shape. Handicare recommends that a clinician such as a physician or therapist experienced in seating and positioning be consulted to determine if the seat is appropriate for the user’s particular seating needs. *Cushion must be properly sized to client. Warning! The cushion should be correctly sized to the user. Only if the product has been correctly sized to the user there is no limit on the user weight. Air Contour Seat ROHO® 3.2 Main parts A. Cushion insert Cushion insert composed of Individual interconnected air pockets. B. Inflation valves Used to open and close your cushion’s airway. Both air compartments have an inflation valve. C. Comfort foam pan Comfort foam rear pan. Some models also have a front pan. D. Seat board Firm seat base. E. Cover Used to protect cushion. F. User manual Your instructions on adjustment, care, warranty and other important information about your seat. G. Repair kit Patch kit for small repairs. H. Hand pump Used to inflate your cushion. Key to symbols Loosen by one turn with torx Tighten by one turn with torx 1 , 2 Step 1, 2 etc. An arrow, as part of an illustration, indicates that the component in question moves or needs to be moved in the direction indicated. Notes on "Key to symbols" Each illustration includes icons and numbering to indicate what needs to be done and in which order. Caution! Do not use a pump, cover, or repair kit other than those provided by Handicare. Doing so may void your product’s warranty. To order replacement parts call your local Handicare dealer. General description Air Contour Seat ROHO® 9 1 C A B E D B F G H 10 Use 4 Use Air Contour Seat ROHO® 2 4.1 Positioning the seat 1. Slide (A) and (B) over (C) and (D). 2. Push (E) downwards. 2 Caution! Ensure that (A) and (B) at the back of the seat hook under the bolt heads. A E C D C B 1 A 4.2 Removing the seat 3 Pull (A) loose from the board. 4.3 Daily checks Check inflation at least once a day! In case of doubt, ask a professional to check and/or readjust your seat cushion (see “5.1 Adjusting the seat for use”). In daily use also take into consideration the following areas of concern. Warning! Do not place any obstructions between the user and the cushion, as it will reduce product effectiveness. Caution! Do not use any valve as a handle for carrying or pulling your cushion. Carry your cushion exclusively by the cushion’s base Do not allow oil-based lotions or lanolin to come in contact with your cushion, as they may degrade the material. Note! Changes in altitude may require adjustment to your cushion. Check your cushion when changing altitude. A Air Contour Seat ROHO® 5 Seating adjustments (to be carried out by a professional) Seating adjustments (to be carried out by a professional) 11 4 For more information please refer to the seating system user manual and the seating system service manual for qualified specialists. ( Seating system) 5.1 Adjusting the seat for use 1. Slide the pump’s rubber nozzle over the valve. 2. Turn valve counterclockwise to open. Caution! The use of any other inflation device other than the supplied hand pump may damage the cushion and void the warranty. 5 3. Inflate the air compartment until it begins to slightly arch upward. 4. Pinch the pump’s nozzle and turn clockwise to close. 5. Remove pump. 6. The seat has two air compartments and valves. Repeat steps 1 to 5 to inflate the second air compartment. 6 12 Seating adjustments (to be carried out by a professional) 7. Have the user sit in the chair, making sure the cushion is centered underneath. The user should be seated in their normal sitting position. Air Contour Seat ROHO® 7 Note! To maximize the positioning benefits for individuals with a pelvic obliquity, the side with the deepest bony prominence must be adjusted first. Once both adjustments are made, recheck each compartment to ensure proper adjustment. 8. Slide your hand between the cushion’s surface and the user’s bottom. Lift their leg slightly and feel for their lowest bony prominence. Then lower their leg to a sitting position. 8 9. Open valve to let out air, while keeping your hand under the person’s lowest bony prominence. 9 Air Contour Seat ROHO® Seating adjustments (to be carried out by a professional) 10 10.Release air until you can barely move your finger tips. 11. Turn valve to close. Warning! Do not sit on an improperly inflated seat cushion. Under-inflation and over-inflation of the cushion or one of the air compartments, reduce or eliminate the seat’s benefits and could increase risk to the skin and other soft tissue. The cushion is most effective when there is 1.5 cm to 2.5 cm of air between the user’s deepest bony prominenceand the seating surface. 13 1.5 to 2.5 cm 12.The seat has two air compartments and valves. Repeat steps 8 to 11 to adjust the second air compartment. 11 5.2 Adjusting the seat 12 B 4x L+R 1. Remove the seat (see “4.2 Removing the seat”). 2. Remove the screws (B). 3. Move (C) and (D). 4. Tighten the screws (B). 5. Replace the seat (see “4.1 Positioning the seat”). 2 3 4 D 2x C 2x 14 Maintenance 6 Maintenance Product must be cleaned, disinfected, and checked for proper functioning between use by different individuals. 6.1 Cleaning your seat Clean the seat using a damp cloth and household soap. Then rub dry using a soft, dry cloth. 6.2 Washing the cover Remove the cover. Follow the washing instructions on the cover. Caution! Do not chemically clean. Do not iron or spindry. 6.3 Disinfecting the cushion insert Remove the cover. Remove the air filled cushion component and clean / disinfect the cushion in two steps. First clean the cushion. Close valves and place in large sink. Handicare and ROHO, Inc. recommend using a mild, hand washing liquid dish washing or laundry detergent or other multipurpose detergents used for general cleaning. Dilute following product label directions for surface cleaning. Use a soft plastic bristle brush, sponge or washcloth to gently scrub all cushion surfaces. Rinse with fresh water and air dry. Second disinfect the cushion. Repeat cleaning instructions above using a solution of 125 ml household liquid bleach per liter of warm water. Keep the clean product wet with bleach solution for 10 minutes. Rinse thoroughly with fresh water and air dry. Air Contour Seat ROHO® 13 Stretch Rubber 58% Knitted Polyester 42 % FR Polyurethane Fabric Backing 100% Polyester Coating 100% PVC Care instructions Do not use cleaning materials that contain solvents 40 Air Contour Seat ROHO® Caution! Do not use organic solvents such as thinner, benzine, white spirit, petroleum, acetone ,toluene, methyl ethyl ketone (MEK), naphta, dry cleaning fluids, adhesive removers, etc. Do not machine wash or machine dry the air filled cushion component. Do not use abrasives such as steel wool or scouring pads. Do not allow water or cleaning solution to enter the air filled cushion component. Do not expose the product to ultraviolet light or ozone gas cleaning methods. Do not use oil-based lotions, lanolin, or phenolic-based disinfectants on your product, as they may compromise the integrity of the material. Do not use caustic, automatic dishwasher detergents. Do not expose to direct sunlight. Note! Follow safety guidelines on bleach container. Most germicidal disinfectants are safe if used following the disinfectant manufacturer’s dilution directions. Maintenance 15 6.4 Sterilizing your seat Your seat is not packaged in a sterile condition, nor intended or required to be sterilized prior to usage. Follow Cleaning and Disinfection guidelines above. High temperatures accelerate aging and may cause damage to the product assembly. If institution protocol demands sterilization, sterilize components separately. For air filled cushion component, open the valves and use the lowest temperature possible for the shortest time possible. Gas sterilization is preferable to steam autoclave, but neither are recommended. In any process using pressure, ensure all valves are open to prevent damage to the product. Handicare and ROHO, Inc. highly discourage sterilization methods using temperatures greater than 93° C. Caution! This product is not intended to be sterilized. 6.5 Disposal When properly used and disposed, there are no known environmental hazards associated with the components of this product. Dispose of the product and/or components in accordance with the applicable regulations in your jurisdiction. Note! Do not incinerate the air filled cushion component. 16 Troubleshooting 7 Troubleshooting If there is a problem with your seat, do not hesitate to contact your dealer. 7.1 Pressure loss • • • • First, make sure all valves are closed tightly by turning valves clockwise. If still not holding air, visibly check for holes. If no holes are visible, close the valve and immerse an inflated section in sink or tub of water and look for air bubbles. If ‘pin-hole,’ sized holes are found, use the repair kit that came with your product and follow the repair kit instructions. If large holes or other leaks are found, see “9 Provisions of warranty”. 7.2 Discomfort/instability • • • Make sure cushion is not over-inflated. (see “5.1 Adjusting the seat for use”). Make sure cushion is not too big or too small for the wheelchair. Allow the user to sit on the cushion for at least one hour to get use to the texture of the product’s surface and immersion into the air cells. Air Contour Seat ROHO® Air Contour Seat ROHO® 8 17 Specifications 8.1 CE declaration of conformity The product is in conformity with the provisions of the Medical Devices Directive and carries the CE mark. The product also meets the following requirements and standards. This has been verified by independent test organizations. 1. EN-ISO 10993-5 (1999-11) Biological evaluation of medical devices. Tests for in vitro cytotoxicity. 2. EN-ISO 10993-10 (1999-11) Biological evaluation of medical devices. Tests for irritation and skin sensitization. 3. EN 1021 1,2 Assessment of the ignitability of upholstered furniture. Ignition source: smouldering cigarette/match flame equivalent. 8.2 Material specifications The inflatable cushion insert is made of neoprene rubber with nickel plated brass valves. 8.3 Field of application This product is suitable for use in Braden scale Low, Middle and High / pressure ulcers of all categories I to IV. The seat can be used in case of pelvic obliquity up to a maximum of 2,5 cm and to correct pelvic obliquity. The seat can also be used in case of pelvic tilt to prevent slouching. 8.4 Technical specifications Suitable for users of any weight, without limitation on the maximum user weight provided that the cushion has been correctly sized to the user. Name Width Length # transversal cells # longitudinal cells Air Contour Seat ROHO® 42x50 42 cm 50 cm 9 10 Air Contour Seat ROHO® 42x54 42 cm 54 cm 9 11 Air Contour Seat ROHO 42x58 42 cm 58 cm 9 11 Air Contour Seat ROHO® 46x50 46 cm 50 cm 10 10 Air Contour Seat ROHO® 46x54 46 cm 54 cm 10 11 Air Contour Seat ROHO® 46x58 46 cm 58 cm 10 11 Air Contour Seat ROHO® 50x50 50 cm 50 cm 11 10 Air Contour Seat ROHO® 50x54 50 cm 54 cm 11 11 Air Contour Seat ROHO® 50x58 50 cm 58 cm 11 11 Air Contour Seat ROHO® 54x50 54 cm 50 cm 12 10 Air Contour Seat ROHO® 54x54 54 cm 54 cm 12 11 Air Contour Seat ROHO® 54x58 54 cm 58 cm 12 11 ® Front pan 18 Provisions of warranty 9 Provisions of warranty The provisions of warranty and liability applicable to the seat are identical to those incorporated in the seating system manual. (( Seating system) 9.1 Warranty period The warranty period for Air Contour seats ROHO® is 24 months and for seat covers 40 days. Warranty period starts from the date the product was originally purchased. Air Contour Seat ROHO® Air Contour Seat ROHO® Global mailing address 1501 S. 74th St. Belleville, IL 62223-5900 USA Corporate address 100 N. Florida Ave. Belleville, IL 62221-5429 USA www.roho.com Provisions of warranty 19 Air Contour seating ROHO® is a product developed by Handicare and ROHO®, Inc. and is in conformity with the provisions of the medical devices directive concerning class l medical devices. The air filled cushion component is a patended product produced by ROHO® 20 Sedeo Contour R Nederlands © 2014 Handicare Alle rechten voorbehouden. De verstrekte informatie mag geenszins worden verveelvoudigd en/of openbaar gemaakt op welke wijze en met welke middelen dan ook (elektronisch of mechanisch), zonder voorafgaande, uitdrukkelijke en schriftelijke toestemming van Handicare. De verstrekte informatie is gebaseerd op algemene gegevens aangaande de ten tijde van verschijnen bekende opbouw. Handicare en ROHO®, Inc voeren een beleid van voortdurende productverbetering, en behouden het recht om dit document aan te passen. De laatste actuele versie van dit document is beschikbaar op www.handicare.com. De getoonde afbeeldingen kunnen afwijken van de configuratie van uw product.. De beschikbare informatie is met alle mogelijke zorg samengesteld, maar Handicare kan niet aansprakelijk worden gesteld voor eventuele fouten in de informatie of voor de gevolgen daarvan. Handicare kan niet aansprakelijk gesteld worden voor schade voortvloeiend uit werkzaamheden die door derden zijn uitgevoerd. De door Handicare gehanteerde gebruiksnamen, handelsnamen, handelsmerken, etc. mogen krachtens de wetgeving inzake de bescherming van handelsmerken niet als vrij worden beschouwd. De volgende namen zijn handelsmerken en geregistreerde handelsmerken van ROHO, Inc.: ROHO®, DRY FLOATATION®, shape fitting technology®. Productcomponenten beschreven in deze handleiding zijn mogelijk gedekt door een of meer Amerikaanse en buitenlandse octrooien en handelsmerken. Voor meer details verwijzen wij u naar www.handicare.com en www.roho.com. Sedeo Contour R Inhoudsopgave 21 1 Voorwoord 1.1 Deze gebruikershandleiding 1.2 Gebruikte symbolen in deze handleiding 22 22 22 2 Veiligheid 2.1 Correct oppompen 2.2 Instabiliteit en valgevaar 2.3 Doorprikken 2.4 Hitte / vlammen 2.5 Productgebruik 2.6 Ozongeneratoren 23 23 23 23 23 23 23 3 Algemene beschrijving 3.1 Productbeschrijving en bedoeld gebruik 3.2 Belangrijkste onderdelen 24 24 24 4 Gebruik 4.2 Zitting verwijderen 4.3 Dagelijkse controle 26 26 26 5 Instellen van de zitting (door professional) 5.1 Zitting instellen voor gebruik 5.2 Instellen van de zitting 27 27 29 6 Onderhoud 6.1 Zitting reinigen 6.2 Hoes wassen 6.3 Inlegkussen desinfecteren 6.4 Zitting steriliseren 6.5 Afvalverwijdering 30 30 30 30 31 31 7 Storingen 7.1 Drukverlies 7.2 Ongemak of instabiliteit 32 32 32 8 Specificaties 8.1 CE-verklaring 8.2 Materiaalgegevens 8.3 Toepassingsgebied 8.4 Technische gegevens 33 33 33 33 33 9 Garantiebepalingen 9.1 Garantieperiode 34 34 22 Voorwoord 1 Voorwoord Gefeliciteerd met de keuze van uw Handicare zitting. De hoogwaardige mobiliteitsproducten van Handicare dragen bij aan een grotere onafhankelijkheid en maken het dagelijkse leven gemakkelijker. 1.1 Deze gebruikershandleiding Met deze gebruikershandleiding kunt u de zitting op veilige wijze gebruiken en onderhouden. Deze gebruikershandleiding vormt een aanvulling op de algemene handleiding van het Handicare zitsysteem. Deze gebruikershandleiding verwijst daar waar nodig naar deze handleiding zoals hieronder aangegeven: Zitsysteem: Verwijst naar de gebruikershandleiding van het zitsysteem. Lees deze gebruikershandleiding en de andere handleidingen waar naar verwezen wordt zorgvuldig door, voordat u het product in gebruik neemt. Indien één van de handleidingen niet met het product meegeleverd is, neem dan direct contact op met uw dealer. NEEM CONTACT OP MET HANDICARE IN GEVAL VAN EEN VISUELE HANDICAP. Sedeo Contour R 1.2 Gebruikte symbolen in deze handleiding Let op! Gebruiker attent maken op mogelijke problemen. Voorzichtig! Adviezen voor gebruiker ter voorkoming van beschadigingen aan het product. Waarschuwing! Waarschuwingen voor gebruiker ter voorkoming van persoonlijk letsel. Het niet met de nodige voorzichtigheid opvolgen van deze instructies kan leiden tot lichamelijk letsel of tot schade aan het product of het milieu! Sedeo Contour R 2 Veiligheid Waarschuwing! Volg altijd de instructies op bij de waarschuwingen! Als de instructies niet worden opgevolgd, kan dit lichamelijk letsel, schade aan de zitting of aan het milieu tot gevolg hebben. Daar waar mogelijk zijn de waarschuwingen geplaatst in de relevante hoofdstukken. Voorzichtig! Bestudeer de inhoud van deze handleiding zorgvuldig voordat u de zitting in gebruik neemt. 2.1 Correct oppompen Waarschuwing! Gebruik geen onvoldoende opgepompt kussen. Een te zacht opgepompt kussen verliest zijn werking en vergroot de risico’s voor de huid en ander zacht weefsel. Indien uw kussen slap lijkt of lucht lijkt te verliezen, draai dan de luchtventielen rechtsom om te controleren of deze goed zijn dichtgedraaid. Als uw kussen lek lijkt, neem dan onmiddellijk contact op met uw medische verzorger of dealer. Veiligheid 23 2.2 Instabiliteit en valgevaar Waarschuwing! Gebruik uw zitting niet bovenop of samen met andere producten of materialen, behalve zoals aangegeven in ”3.1 Productbeschrijving en bedoeld gebruik”. Indien u dit wel doet, kan de instabiliteit voor de gebruiker toenemen, wat kan leiden tot vallen. Neem contact op met uw arts of therapeut voor het juiste gebruik. 2.3 Doorprikken Voorzichtig! Houd uw kussen weg bij scherpe voorwerpen die de luchtcellen kunnen doorprikken en het kussen doen leeglopen. 2.4 Hitte / vlammen Voorzichtig! Stel uw zitkussen niet bloot aan hoge temperaturen, open vuur of hete as. Waarschuwing! Gebruik geen te hard opgepompt kussen. Een te hard opgepompt kussen verliest zijn werking omdat u onvoldoende wegzinkt in het kussen en vergroot de risico’s voor de huid en ander zacht weefsel. 2.5 Productgebruik Voorzichtig! Het gebruik van een andere pomp dan meegeleverde pomp kan schade toebrengen aan het kussen en de garantie doen vervallen. 2.6 Ozongeneratoren Waarschuwing! Gebruik uw kussen niet om mee op het water te drijven (bijv. als reddingsboei). Voorzichtig! Overheidsinstellingen zoals het Amerikaans Bureau voor Milieubescherming en Canadese Ministerie van Volksgezondheid hebben waarschuwingen uitgevaardigd m.b.t. ozongeneratoren (o.a. luchtreinigers). Langdurige ozonblootstelling kan gebruikte materialen aantasten en de productprestaties beïnvloeden. Bij ozonblootstelling vervalt de garantie. 24 Algemene beschrijving 3 Algemene beschrijving 3.1 Productbeschrijving en bedoeld gebruik Sedeo Contour R is een therapeutisch kussen bedoeld voor gebruikers van alle gewichten* , die een matige tot een gemiddelde houdingsen positioneringsondersteuning vereisen, en/ of die een gemiddeld tot hoog risico lopen op huidbeschadiging. Het aanpasbare ROHO DRY FLOATATION® inlegkussen met luchtcellen is ontworpen om zich aan te passen aan de zitvorm van de gebruiker Handicare adviseert een medisch deskundige, zoals een arts of therapeut met ervaring in zitten en positioneren, te raadplegen om te bepalen of het ROHO DRY FLOATATION kussen geschikt is voor de specifieke zitbehoeften van de gebruiker. *Het kussen moet het formaat hebben dat past bij de klant. Waarschuwing! Het kussen moet de juiste maat hebben voor de gebruiker. Alleen als het kussen de juiste maat heeft voor de gebruiker, bestaat er geen beperking ten aanzien van het gebruikersgewicht. Legenda Sedeo Contour R Toelichting “Legenda” In elke illustratie is met iconen en een nummering aangegeven wat u in welke volgorde moet doen. 3.2 Belangrijkste onderdelen A. Inlegkussen Inlegkussen van individuele, onderling verbonden luchtcellen. B. Oppompventielen Hiermee opent en sluit u de luchttoevoer van uw kussen. Beide luchtkamers hebben een oppompventiel. C. Comfortfoam drempel Comfortfoam achterdrempel. Sommige modellen hebben ook een voordrempel. D. Zitplank Vormvaste zitbasis. E. Hoes Ter bescherming van uw kussen. F. Gebruikershandleiding Uw instructies voor het instellen, de verzorging en de garantie van uw zitting en andere belangrijke informatie. G. Reparatieset Reparatieset voor kleine reparaties. H. Handpomp Voor het opblazen van uw kussen. Draai 1 slag los met torx Draai 1 slag vast met torx 1 , 2 Actie 1, 2 enz. Pijlen in illustraties geven aan dat het betreffende onderdeel in de aangegeven richting beweegt of bewogen moet worden. Voorzichtig! Gebruik geen andere pomp, hoes of reparatieset dan die zijn meegeleverd. Dit kan de garantie van uw product ongeldig maken. Neem voor het bestellen van reserveonderdelen contact op met uw leverancier. 25 Sedeo Contour R 1 C A B E D B F G H 26 Gebruik 4 Gebruik Sedeo Contour R 2 4.1 Zitting plaatsen 1. Schuif (A) en (B) over (C) en (D). 2. Druk (E) omlaag. 2 Voorzichtig! Zorg dat de zitting aan de achterzijde met (A) en (B) onder de boutkoppen haakt. A E C D B 1 4.2 Zitting verwijderen C A Trek (A) los van de plaat. 4.3 Dagelijkse controle 3 Controleer ten minste eenmaal per dag of het kussen voldoende is opgepompt. Laat bij twijfel een professional uw zitting controleren en/of opnieuw instellen (zie “5.1 Zitting instellen voor gebruik”). Houd in het dagelijks gebruik ook op volgende aandachtspunten. Waarschuwing! Plaats geen enkele belemmering tussen uzelf als gebruiker en het kussen. Dit vermindert de doeltreffendheid van het product. Voorzichtig! Gebruik de ventielen niet als handvat om uw kussen te dragen of om het weg te trekken. Draag uw kussen alleen aan de basis van het kussen. Zorg ervoor dat uw kussen niet in aanraking komt met lotions / oplossingen op basis van olie of lanoline. Dit kan het materiaal aantasten. Let op! Reizen naar gebieden op grotere of lagere hoogte / luchtdruk vereist bijstelling van uw kussen. Controleer uw kussen in dergelijke gevallen. A Sedeo Contour R 5 Instellen van de zitting (door professional) Instellen van de zitting (door professional) 27 4 Zie voor meer informatie de gebruikershandleiding van het zitsysteem en servicehandleiding van het zitsysteem voor de gekwalificeerde specialist. ( Zitsysteem) 5.1 Zitting instellen voor gebruik 1. Schuif het rubberen aanzetstuk van de pomp over het ventiel. 2. Draai het ventiel linksom open. Voorzichtig! Het gebruik van een andere pomp dan de meegeleverde handpomp kan schade toebrengen aan het kussen en de garantie ongeldig maken. 5 3. Pomp het kussen op totdat het kussen licht bol staat. 4. Knijp in het aanzetstuk van de pomp en draai het ventiel rechtsom dicht. 5. Verwijder de pomp. 6. De zitting heeft twee luchtkamers en luchtventielen. Herhaal stappen 1 t/m 5 om ook de tweede luchtkamer te vullen. 6 28 Instellen van de zitting (door professional) 7. Laat de gebruiker in de stoel gaan zitten en zorg ervoor dat het kussen midden onder de gebruiker ligt. De persoon moet in zijn of haar normale houding zitten. Sedeo Contour R 7 Let op! Om het kussen zo goed mogelijk te positioneren voor personen met bekkenscheefstand, moet de kant met het diepste botuitsteeksel eerst worden ingesteld. Nadat beide instellingen zijn uitgevoerd, moet elk compartiment worden nagekeken om te controleren of deze goed is ingesteld. 8. Schuif uw hand tussen de bovenkant van het kussen en het zitvlak van de gebruiker. Til zijn of haar been enigszins op en zoek het onderste botuitsteeksel. Zet het been vervolgens terug in de zithouding. 8 9. Draai het ventiel linksom om de lucht te laten ontsnappen, terwijl u uw hand onder het laagste botuitsteeksel van de persoon houdt. 9 Sedeo Contour R Instellen van de zitting (door professional) 10.Laat de lucht ontsnappen totdat u uw vingertoppen nog net kunt bewegen. 11. Draai het ventiel rechtsom dicht. Waarschuwing! Ga niet op een kussen zitten dat niet behoorlijk is opgepompt. De kussensecties te licht of te hard oppompen beperkt of elimineert de voordelen van het kussen en kan eventueel het risico voor de huid en ander zacht weefsel verhogen. Het kussen werkt het best als er 1,5 tot 2,5 cm lucht is tussen het laagste botuitsteeksel van de gebruiker en het oppervlak van de zitting. 29 10 1,5 tot 2,5 cm 12.De zitting heeft twee luchtkamers en luchtventielen. Herhaal stappen 8 t/m 11 om ook de tweede luchtkamer in te stellen. 11 5.2 Instellen van de zitting 12 1. Verwijder de zitting (zie “4.2 Zitting verwijderen”). 2. Verwijder de schroeven (B). 3. Verplaats (C) en (D). 4. Draai de schroeven (B) vast. 5. Plaats de zitting (zie “4.1 Zitting plaatsen”). B 4x L+R 2 3 4 D 2x C 2x 30 Onderhoud 6 Onderhoud Bij hergebruik door andere personen moet het kussen voor elk gebruik door een andere persoon worden gereinigd, ontsmet en gecontroleerd op goede werking. 6.1 Zitting reinigen Reinig de zitting met een vochtige doek en huishoudzeep. Wrijf daarna droog met een zachte doek. 6.2 Hoes wassen Rits de hoes van de zitting. Volg de wasinstructies op de hoes. Voorzichtig! Reinig de bekleding niet chemisch. Strijk of centrifugeer de bekleding niet. 6.3 Inlegkussen desinfecteren Rits de hoes van de zitting. Verwijder het inlegkussen en reinig / desinfecteer het kussen in twee stappen. Stap 1 is het reinigen van het inlegkussen. Sluit de ventielen en plaats het kussen in een grote wasbak. Handicare en ROHO®, Inc. raden het gebruik van afwasmiddel, wasmiddel of een ander universeel reinigingsmiddel voor algemeen gebruik aan. Verdun het middel volgens de aanwijzingen voor oppervlaktereiniging op het productlabel. Gebruik een zachte plastic borstel, spons of doek om alle oppervlakken van het kussen af te nemen. Spoel af met water en laat aan de lucht drogen. Desinfecteer in stap 2 het inlegkussen. Herhaal de bovenstaande reinigingsinstructies met warm water waaraan per liter 125 ml bleekmiddel is toegevoegd. Volg de veiligheidsinstructies die op het productlabel van het bleekmiddel staan. Houd het schone kussen gedurende 10 minuten vochtig met de bleekmiddeloplossing. Spoel grondig met water af en laat aan de lucht drogen. Sedeo Contour R 13 Stretch Rubber 58% Knitted Polyester 42 % FR Polyurethane Fabric Backing 100% Polyester Coating 100% PVC Care instructions Do not use cleaning materials that contain solvents 40 Sedeo Contour R Voorzichtig! Gebruik geen organische oplosmiddelen als thinner, wasbenzine, terpentine petroleum, aceton, tolueen, methylethylketon (MEK), nafta, dry clean schoonmaakmiddelen, lijmof stickerverwijderaars, enz. Was of droog het inlegkussen niet in de wasmachine Gebruik geen schuurmiddelen, zoals staalwol of schuursponsjes. Laat geen water of reinigingsmiddel in het inlegkussen komen. Stel het product niet bloot aan ultraviolet licht of reinigingsmethoden met ozongas. Gebruik geen op olie gebaseerde lotions, lanoline of ontsmettingsmiddelen op basis van fenol op het inlegkussen, aangezien deze de integriteit van het materiaal kunnen aantasten. Gebruik geen bijtende, middelen voor vaatwasmachines. Niet blootstellen aan direct zonlicht. Onderhoud 6.4 Zitting steriliseren Uw zitting is niet verpakt in een steriele toestand, noch bedoeld voor of verplicht tot sterilisatie voorafgaand aan het gebruik. Volg de bovenstaande richtlijnen voor reiniging en ontsmetting. Hoge temperaturen versnellen het verouderingsproces en kunnen schade veroorzaken aan de productassemblage. Indien de voorschriften van een zorginstelling sterilisatie voorschrijven, opent u de ventielen bij de laagst mogelijke temperatuur en gedurende de kortst mogelijke tijd. Sterilisatie door middel van een gas wordt verkozen boven stoomautoclaveren, maar geen van beide wordt aanbevolen. Zorg er bij alle methoden die gebruik maken van druk voor dat alle ventielen geopend zijn om schade aan het product te voorkomen. Handicare en ROHO®, Inc. ontmoedigen zeer sterilisatiemethoden met temperaturen van meer dan 93° C. Voorzichtig! Dit product is niet bedoeld om gesteriliseerd te worden. 6.5 Afvalverwijdering Let op! Volg de veiligheidsrichtlijnen op de verpakking van het bleekmiddel. De meeste desinfectansen zijn veilig indien de aanwijzingen voor verdunning van de fabrikant worden gevolgd. 31 Indien op de juiste wijze gebruikt en weggeworpen, zijn er geen milieugevaren bekend van de onderdelen van dit product. Gooi het product en/of de onderdelen ervan weg met inachtneming van de toepasselijke regelgeving in uw rechtsgebied. Let op! Inlegkussen niet verbranden. 32 Storingen 7 Storingen Neem contact op met uw dealer indien u een probleem heeft met uw zitting. 7.1 Drukverlies • • • • • Draai in de eerste plaats de ventielen rechtsom om te controleren of ze goed dicht zitten. Als er dan nog steeds lucht ontsnapt, controleert u het kussen op gaatjes. Als u geen gaatjes ziet, sluit u het ventiel en dompelt u een opgeblazen sectie in een wasbak of tobbe met water onder en kijkt u of u luchtbelletjes ziet ontsnappen. Als er gaatjes ter grootte van een speldenprik blijken te zijn, gebruik dan de bij uw product geleverde reparatieset en volg de reparatie-instructies op. Als het om grote gaten of andere lekkage gaat, raadpleeg dan “9 Garantiebepalingen”. 7.2 Ongemak of instabiliteit • • • Controleer of het kussen niet te hard is opgepompt (zie “5.1 Zitting instellen voor gebruik”). Controleer of het kussen niet te groot of te klein is voor de rolstoel. Laat de gebruiker gedurende minstens een uur op het kussen zitten zodat hij kan wennen aan de textuur van het oppervlak van het product en het wegzinken in de luchtcellen. Sedeo Contour R Sedeo Contour R 8 33 Specificaties 8.1 CE-verklaring Het product voldoet aan de bepalingen van de richtlijn voor Medische Hulpmiddelen en is voorzien van CE-markering. Het product voldoet verder aan onderstaande normen en eisen. Deze worden gecontroleerd door onafhankelijke testinstellingen. 1. EN-ISO 10993-5 (1999-11) Biologische evaluatie van medische hulpmiddelen. Beproeving op invitro cytotoxiciteit 2. EN-ISO 10993-10 (1999-11) Biologische evaluatie van medische hulpmiddelen. Beproevingen voor het opsporen van irritatie en vertraagd type overgevoeligheid. 3. EN 1021 1,2 Evaluatie van de ontbrandbaarheid van beklede meubelen. Ontstekingsbron: equivalent van smeulende sigaret/lucifervlam. 8.2 Materiaalgegevens Het opblaasbaar inlegkussen is gemaakt van neopreen rubber met ventielen van vernikkeld messing. 8.3 Toepassingsgebied Dit product is geschikt voor gebruik in Bradenschaal laag, middel en hoog / bij decubituswonden van alle categorieën I t/m IV. De zitting kan gebruikt worden bij een bekkenscheefstand tot maximaal 2,5 cm en voor correctie van de bekkenscheefstand. De zitting kan ook worden gebruikt bij een achterover gekanteld bekken om onderuitzakken te voorkomen. 8.4 Technische gegevens Geschikt voor gebruikers van alle gewichten, zonder begrenzing van het maximale gebruikersgewicht onder voorwaarde dat het kussen de juiste maat heeft voor de gebruiker. Breedte Lengte # cellen in dwarsrichting # cellen in langsrichting Sedeo Contour R 42x50 42 cm 50 cm 9 10 Sedeo Contour R 42x54 42 cm 54 cm 9 11 Sedeo Contour R 42x58 42 cm 58 cm 9 11 Sedeo Contour R 46x50 46 cm 50 cm 10 10 Sedeo Contour R 46x54 46 cm 54 cm 10 11 Sedeo Contour R 46x58 46 cm 58 cm 10 11 Sedeo Contour R 50x50 50 cm 50 cm 11 10 Sedeo Contour R 50x54 50 cm 54 cm 11 11 Sedeo Contour R 50x58 50 cm 58 cm 11 11 Sedeo Contour R 54x50 54 cm 50 cm 12 10 Sedeo Contour R 54x54 54 cm 54 cm 12 11 Sedeo Contour R 54x58 54 cm 58 cm 12 11 Naam Voordrempel 34 Garantiebepalingen 9 Garantiebepalingen De garantiebepalingen voor de zitting zijn identiek aan en opgenomen in de handleiding van het zitsysteem. ( Zitsysteem) 9.1 Garantieperiode De garantieperiode voor Sedeo Contour R zittingen bedraagt 24 maanden en voor kussenhoezen 40 dagen. De garantieperiode begint op de datum van aankoop van het product. Sedeo Contour R Sedeo Contour R Correspondentieadres 1501 S. 74th St. Belleville, IL 62223-5900 USA Hoofdkantoor 100 N. Florida Ave. Belleville, IL 62221-5429 USA www.roho.com Garantiebepalingen 35 Sedeo Contour R is een product ontwikkeld door Handicare en ROHO®, Inc. en voldoet aan de van toepassing zijnde essentiële eisen van de richtlijn medische hulpmiddelen voor een klasse I medisch hulpmiddel. Het inlegkussen is een gepatenteerd product gefabriceerd door ROHO®. Dealer: Serial number:


![32.393 [WT] Fogger manual 6Tnew](http://vs1.manualzilla.com/store/data/006164516_1-6119f057c045d3e31d2ffb4326e242f0-150x150.png)