1
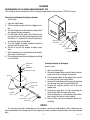
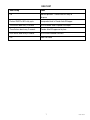
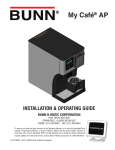
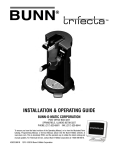
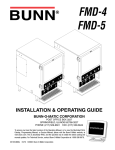
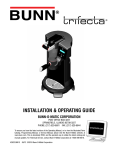
POWDER
AUTO FILL
For ULTRA-2
INSTALLATION & OPERATING GUIDE
BUNN-O-MATIC CORPORATION
POST OFFICE BOX 3227
SPRINGFIELD, ILLINOIS 62708-3227
PHONE: (217) 529-6601 FAX: (217) 529-6644
To ensure you have the latest revision of the Operating Manual, or to view the Illustrated Parts
Catalog, Programming Manual, or Service Manual, please visit the Bunn-O-Matic website, at
www.bunn.com. This is absolutely FREE, and the quickest way to obtain the latest catalog and
manual updates. For Technical Service, contact Bunn-O-Matic Corporation at 1-800-286-6070.
29793.0001E 06/09 ©2002 Bunn-O-Matic Corporation
BUNN-O-MATIC COMMERCIAL PRODUCT WARRANTY
Bunn-O-Matic Corp. (“BUNN”) warrants equipment manufactured by it as follows:
1) All equipment other than as specified below: 2 years parts and 1 year labor.
2) Electronic circuit and/or control boards: parts and labor for 3 years.
3) Compressors on refrigeration equipment: 5 years parts and 1 year labor.
4) Grinding burrs on coffee grinding equipment to grind coffee to meet original factory screen sieve analysis:
parts and labor for 3 years or 30,000 pounds of coffee, whichever comes first.
These warranty periods run from the date of installation BUNN warrants that the equipment manufactured by
it will be commercially free of defects in material and workmanship existing at the time of manufacture and
appearing within the applicable warranty period. This warranty does not apply to any equipment, component or
part that was not manufactured by BUNN or that, in BUNN’s judgment, has been affected by misuse, neglect,
alteration, improper installation or operation, improper maintenance or repair, damage or casualty. This warranty is
conditioned on the Buyer 1) giving BUNN prompt notice of any claim to be made under this warranty by telephone
at (217) 529-6601 or by writing to Post Office Box 3227, Springfield, Illinois 62708-3227; 2) if requested by
BUNN, shipping the defective equipment prepaid to an authorized BUNN service location; and 3) receiving prior
authorization from BUNN that the defective equipment is under warranty.
THE FOREGOING WARRANTY IS EXCLUSIVE AND IS IN LIEU OF ANY OTHER WARRANTY, WRITTEN OR
ORAL, EXPRESS OR IMPLIED, INCLUDING, BUT NOT LIMITED TO, ANY IMPLIED WARRANTY OF EITHER
MERCHANTABILITY OR FITNESS FOR A PARTICULAR PURPOSE. The agents, dealers or employees of BUNN
are not authorized to make modifications to this warranty or to make additional warranties that are binding on
BUNN. Accordingly, statements by such individuals, whether oral or written, do not constitute warranties and
should not be relied upon.
If BUNN determines in its sole discretion that the equipment does not conform to the warranty, BUNN, at its
exclusive option while the equipment is under warranty, shall either 1) provide at no charge replacement parts
and/or labor (during the applicable parts and labor warranty periods specified above) to repair the defective
components, provided that this repair is done by a BUNN Authorized Service Representative; or 2) shall replace
the equipment or refund the purchase price for the equipment.
THE BUYER’S REMEDY AGAINST BUNN FOR THE BREACH OF ANY OBLIGATION ARISING OUT OF THE SALE OF
THIS EQUIPMENT, WHETHER DERIVED FROM WARRANTY OR OTHERWISE, SHALL BE LIMITED, AT BUNN’S
SOLE OPTION AS SPECIFIED HEREIN, TO REPAIR, REPLACEMENT OR REFUND.
In no event shall BUNN be liable for any other damage or loss, including, but not limited to, lost profits, lost sales,
loss of use of equipment, claims of Buyer’s customers, cost of capital, cost of down time, cost of substitute
equipment, facilities or services, or any other special, incidental or consequential damages.
BrewWISE, BrewLOGIC, BrewMETER, BrewWIZARD, Bunn Gourmet, BUNN Gourmet Ice, BUNN Pour-O-Matic, BUNN,
Bunn-OMatic, Bunn-O-Matic, BUNNlink, BUNNserve, BUNNSERVE, BUNN Espress, Cool Froth, DBC, Dr. Brew, Dual, EasyClear, EasyGard, Easy Pour, FlavorGard, Gourmet Ice, Gourmet Juice, High Intensity, IMIX, Infusion Series, Intellisteam,
Quality Beverage Equipment Worldwide, The Mark of Quality in Beverage Equipment Worldwide, My Café, PowerLogic,
Safety-Fresh, Scale-Pro, Silver Series, Single, Smart Funnel, Smart Hopper, SmartWAVE, Soft Heat, SplashGard, System
III, ThermoFresh, 392, AutoPOD, AXIOM, Beverage Profit Calculator, Beverage Bar Creator, BUNNsource, Coffee At Its
Best, Digital Brewer Control, Nothing Brews Like a BUNN, Pouring Profits, Pulse Wave, Signature Series, Smart Heat,
Tea At Its Best, The Horizontal Red Line, Titan, Ultra, are either trademarks or registered trademarks of Bunn-O-Matic
Corporation.
2
29793.1 012609
INTRODUCTION
This equipment supplies a liquid mix to the hoppers on the ULTRA-2 dispenser. It is for indoor use only on a
sturdy counter or shelf.
INITIAL SET-UP
1.
2.
3.
4.
5.
6.
7.
8.
9.
10.
10.
11.
12.
13.
Loosen auger motor cover screws.
Remove rear plastic plug from trim strip between hopper drip trays.
Install support rod into hole in trim strip.
Place PAF platform assembly on top of motor covers.
Tighten support rod from top of platform.
Retighten motor cover screws.
Plug RCA cord into ULTRA base unit.
Install hopper seal and press firmly into place on the flange of the cooling drum.
Align the auger shaft with the flat fin of the auger. Push the augers as far as they will go and rotate them
so the flat fin is facing up.
Place level probes in notch in rim of hoppers and install hoppers.
Install PAF units onto hoppers and platform.
Plug PAF power cord into rear of platform.
Plug PAF platform power cord into proper electrical outlet.
Attach a flexible water line to the .25” flare fitting on the back panel of the Powder Auto-Fill.
NOTE: A water strainer assembly (BUNN-O-MATIC #23820.1000) should be installed in line prior to the flexible
water line.
NOTE - Water pipe connections and fixtures directly connected to a potable water supply shall be sized, installed
and maintained in accordance with federal, state and local codes.
USER NOTICES
Carefully read and follow all notices on the equipment and in this manual. They were written for your protection.
All notices are to be kept in good condition. Replace any unreadable or damaged labels.
This equipment must be installed to comply
with the International Plumbing Code of the
International Code Council and the Food
Code Manual of the Food and Drug Administration (FDA). For models installed outside
the U.S.A., comply with the applicable
Plumbing /Sanitation Code.
00656.0000
00824.0000
Push back until fully latched
before removing or manually
filling chilled product hopper.
37881.0000
00986.0000
34561.0000
3
29793.1 061009
OPERATING INSTRUCTIONS
8. If the Powder Auto-Fill fails to fill the ULTRA hopper
in 5 minutes, the following will occur:
a) The Powder Auto-Fill will stop dispensing product.
b) The door lamp will flash 4 times about every 2
seconds.
9. After checking the ULTRA and Powder Auto-Fill
set-up, the 5 minute refill fault may be cleared by
simply opening and closing the Powder Auto-Fill
door.
10.Once the product level in the ULTRA covers the
auger, make the following switch settings at the
ULTRA control panel:
a) AUGER - “1”.
b) ICE/OFF/CHILL - “ICE” or “CHILL” as appropriate
for the granita product.
11.From this point onward, the Powder Auto-Fill will
continue to automatically refill the ULTRA hopper,
maintaining the ULTRA product at an approximate
2 gallon level.
12.When the Powder Auto-Fill powder level falls low, the
door lamp will cycle ON and OFF, but will continue
to dispense product for a preset period. When this
period expires, the Powder Auto-Fill will continue
to cycle the door lamp ON and OFF and will stop
dispensing product.
13.To clear the low product fault, simply refill the
powder as follows:
a) Open the Powder Auto-Fill door.
b) Close the hopper slide gate.
c) Remove the product hopper.
d) Refill the product hopper with powdered granita
mix.
e) Replace the hopper.
f) Push the slide gate on the hopper ejector elbow
to the OPEN position.
g) Close the Powder Auto-Fill door.
1. On the Ultra touch pad, make the following settings:
a) POWER- “ON”
b) DAY/NIGHT- “DAY”
2. Pull the Powder Auto-Fill fully forward on its support rails and open the door.
3. Fill the Powder Auto-Fill product hopper as follows:
a) Pull the slide gate closed on the Powder Auto-Fill
product hopper elbow and remove the hopper from
the Powder Auto-Fill.
b) Remove the lid from the product hopper and fill
the hopper with a powdered granita mix.
c) Install the product hopper into the Powder AutoFill. Insure hopper is fully seated behind retainer
plates.
d) Push the slide gate on the hopper ejector elbow
to the open position.
4. Place the ON/OFF switch at the Powder Auto-Fill
whipper panel to “ON”.
5. After allowing 5 seconds for the Powder Auto-Fill
to initialize, observe the door lamp. The door lamp
should not be lit. If the door lamp is lit, consult the
fault list located on the decal placed on the back of
the door. Clear the fault before proceeding.
NOTE: If the Powder Auto-Fill is being used for the first
time with the selected granita mix, perform an adjustment as described in ADJUSTMENTS.
6. Close the Powder Auto-Fill door and observe the
following:
a) The door lamp lights steadily.
b) The Powder Auto-Fill begins dispensing liquid
granita product.
7. The Powder Auto-Fill will continue to fill the ULTRA
product hopper until the liquid level in the ULTRA
hopper reaches the product level probe or for 5
minutes, which ever occurs first.
4
29793.1 021202
ADJUSTMENTS
When using the Powder Auto-Fill with a new powdered granita mix, follow the procedure outlined below to
adjust the Powder Auto-Fill to produce the correct recipe.
1. Determine the mix ratio of powdered granita mix.
Convert the recipe so that it is expressed in terms of
weight units [grams (g), dry ounces (oz), or pounds
(lbs)] of powdered granita mix to fluid ounces (fl.
oz.) of water [1 gallon (gal) = 128 fl.oz.; 1 liter (l)
= 33.8 fl.oz.].
2. The delivery rate of the water ingredient is factory
preset to 1 fl.oz. per second. Therefore, it is only
necessary to adjust the delivery rate of the powdered granita mix. Adjustment is accomplished as
follows:
a) Place the Powder Auto-Fill on top of a fully assembled ULTRA taking care to align the Powder
Auto-Fill guide rails over the rollers on the platform
guide rails.
b) Connect the Powder Auto-Fill power cord to the
outlet located on the ULTRA auger motor cover.
c) Attach a flexible water line to the .25” flare fitting
on the back panel of the Powder Auto-Fill.
i) Remove the hole plug on the whipper panel. Using
a screwdriver, set potentiometer to approximately
mid range.
j) Remove the mixing chamber from the Powder
Auto-Fill and place a small container, such as a cup,
under the product hopper ejector elbow.
k) Push the slide gate on the product hopper ejector
elbow to the OPEN position.
l) Momentarily set the TEST/SERVICE switch on
the whipper panel to the TEST position.
m) The hopper motor will run and dispense powdered granita mix for 10 seconds.
n) After the Powder Auto-Fill has finished the 10
second throw test, weigh the dispensed product.
o) Determine the dispense rate of the powdered
product (weight units per second) by dividing the
measured weight by 10.
p) Compare the measured dispense rate with the
mix ratio in step 1.
q) Adjust the MIN/MAX control clockwise to increase
the dispense rate or counterclockwise to decrease
the dispense rate of the powdered granita mix.
r) Repeat steps l through q as necessary until proper
mix ratio is achieved.
s) Replace the mixing chamber removed in step j.
Replace hole plug.
3. Once the mix ratio has been adjusted, the Powder
Auto-Fill can be run with the door open to allow the
user to catch dispensed product for brix testing as
follows:
a) Hold a container under the dispense tip of the
Powder Auto-Fill.
b) Hold the TEST/SERVICE switch on the whipper
panel to the SERVICE position.
c) When the container is filled to the desired level,
release the TEST/SERVICE switch.
d) Measure the brix using the appropriate measuring device.
e) Remove the hole plug. Using a screwdriver,
adjust the potentiometer clockwise to increase the
brix or counterclockwise to decrease the brix of the
product. Replace the hole plug.
NOTE: A water strainer assembly (BUNN-O-MATIC
#23820.1000) should be installed in line prior to the
flexible water line.
d) On the ULTRA touch pad, make the following
settings:
i) POWER- “ON”
ii) DAY/NIGHT- “DAY”
e) Pull the Powder Auto-Fill fully forward on its
support rails
f) Fill the Powder Auto-Fill product hopper as follows:
i) Pull the slide gate closed on the Powder AutoFill product hopper elbow and remove the product
hopper from the Powder Auto-Fill.
ii) Remove the lid from the product hopper and
fill the hopper with a powdered granita mix.
iii) Install the product hopper into the Powder
Auto-Fill.
g) Place the ON/OFF switch at the Powder Auto-Fill
whipper panel to “ON”.
h) After allowing 5 seconds for the Powder Auto-Fill
to initialize, observe the door lamp on the whipper
panel. The door lamp should not be lit. If the door
lamp is lit, consult the fault list and clear the fault
before proceeding.
5
29793.1 021202
CLEANING
RECOMMENDED DAILY CLEANING AND MAINTENANCE TIPS
This should be done in conjunction with the recommended weekly cleaning of your ULTRA-2 machine.
Removing and cleaning the whipper chamber
(once a day):
1. Open the cabinet door.
2. Pull the mixing chamber out of the whipper chamber.
3. Twist the whipper chamber clockwise and pull it off
the whipper chamber receptacle.
4. Pull the frother off the motor shaft. Notice the flat
keyway on the shaft and the matching keyway inside
the frother. It is important that these two keyways
are lined up when reassembling.
5. Twist the whipper chamber receptacle clockwise
and pull it off the motor shaft.
6. Slip the O-ring off the whipper chamber receptacle.
7. Wash components in a mild solution of dish detergent using a bristle brush.
8. Rinse thoroughly and allow to dry before reinstalling
in the machine.
Mixing Chamber
Whipper Chamber
Receptacle
O-ring
Frother
Dispense Tip
Whipper Chamber
Thorough cleaning of the hopper
(once a week):
Wiper Blade
Shaft
Wiper Blade
1. Open the cabinet door.
2. Remove the hopper/base assembly from the cabinet,
remove the cover and empty the contents.
3. Pull the ejector elbow off the hopper base; remove
the slide gate from the ejector elbow.
4. Remove the wiper blade and drive gear by removing
the retaining ring from the wiper blade shaft.
5. Remove the auger by pulling it out of the front
hopper base.
6. Remove the auger drive shaft by unscrewing the
drive bracket from the auger drive shaft.
7. Wash components in a mild solution of dish detergent using a bristle brush when needed.
8. Rinse and dry each item thoroughly before reassembling.
Wiper Drive Gear
Spacer
Hopper Base
Auger Drive
Shaft
Auger Drive
Bracket
Retaining
Ring
Auger
Ejector Elbow
Slide Gate
NOTICE
The cleaning instructions noted above are for nondairy sugar based food products. When dispensing any
other food product, the cleaning cycle for the whipping chamber assembly and ejector elbow must be performed
daily.
6
29793.1 061009
FAULT LIST
Door Lamp
Fault
ON
Normal operation - Powder Auto-Fill ready to
dispense
Flashes ON/OFF at 50% duty cycle
Low product level in Powder Auto-Fill hopper
Two flashes about every 2 seconds
ULTRA/Powder Auto-Fill probe circuit open
Three flashes about every 2 seconds
Powder Auto-Fill hopper not in place
Four flashes about every 2 seconds
ULTRA refill exceeded 5 minutes
OFF
Door not closed
7
29793.1 021202