1
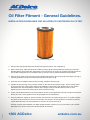
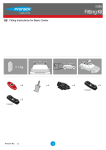
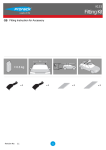
Oil Filter Fitment - General Guidelines.
INSTALLATION GUIDELINES FOR AN ACDELCO SPIN-ON OIL FILTER*
Example of ACDelco Spin-On Oil Filter
1. Always wear appropriate Personal Protective Equipment (eyes, skin, respiratory).
2. With a clean cloth, wipe and clean the oil filter housing base plate after the engine pan has been drained (always ensure that the used engine oil is poured into an empty oil container and along with the old oil filter is disposed of in accordance with your local council, state and federal requirements).
3. Using clean oil, apply a film to the gasket of the new filter (always ensure that the old filter gasket has been completely removed).
4. Screw on the new filter by hand until contact is made with the gasket and base plate
5. Once contact is made with the gasket and base plate hand tighten the filter as detailed on your specific ACDelco Filter carton. Please note that the amount of “hand” turn required to tighten varies by filter (typically 2/3 turn or 3/4 turn or 1 turn). Do not use an oil filter wrench to install the filter as this could over tighten the filter or damage it.
6. Check vehicle Manufacturer’s recommendations for the correct grade and volume of engine oil and then fill the pan with correct grade of oil to the specified volume requirement.
7. Once installed run engine for several minutes and check for any oil leaks using a torch. Turn off the engine and allow several minutes for the oil to drain back into the pan. Check dipstick in accordance with the vehicle Manufacturer’s recommendations to confirm the correct level of oil.
ACD130715 - 1
*Oil filter removal and installation can differ greatly between vehicles, so you must refer to your vehicle Manufacturer’s service manual for vehicle specific instructions.
1800 ACDelco
acdelco.com.au
Oil Filter Fitment - General Guidelines.
INSTALLATION GUIDELINES FOR AN ACDELCO CARTRIDGE OIL FILTER*
Example of ACDelco Cartridge Oil Filter
1. Always wear appropriate Personal Protective Equipment (eyes, skin, respiratory).
2. With a clean cloth, wipe and clean the oil filter housing cap and thread after the engine pan has been drained (always ensure that the used engine oil is poured into an empty oil container and along with the old oil filter is disposed of in accordance with your local council, state and federal requirements).
3. Apply a film of clean oil to the new O-ring supplied and install on the housing cap ensuring the O-ring is correctly positioned and is not twisted (do not reuse the old O-ring).
4. Once the new cartridge is placed in the housing, install the housing cap.
5. Tighten the housing cap using a torque wrench to the recommend torque range - this is usually noted on the housing cap. If the torque range is not detailed on the housing cap please refer to the vehicle Manufacturer’s recommendations. Please note a torque wrench must be used as under or over tightening may cause the housing cap to seize onto the housing.
6. Check vehicle Manufacturer’s recommendations for the correct grade and volume of engine oil and then fill the pan with correct grade of oil to the specified volume requirement.
7. Once installed run engine for several minutes and check for any leaks using a torch. Turn off the engine and allow several minutes for the oil to drain back into the pan. Check dipstick in accordance with the vehicle Manufacturer’s recommendations to confirm the correct level of oil.
ACD130715 - 2
*Oil filter removal and installation can differ greatly between vehicles, so you must refer to your vehicle Manufacturer’s service manual for vehicle specific instructions.
1800 ACDelco
acdelco.com.au