Transcript
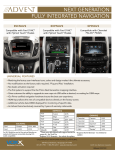
Advent EXPNAV2 / 2015 Ford F150 Installation Manual.
Realease 1 2/06/2015
This manual shows a typical installation. Your vehicle may vary.
Use caution and if unsure seek proffesional assitance. Dash
dissassembly is specific to the 2015 Ford F150.
+ USB Ext
Cover all surfaces with tape or plastic protection film to protect
against scratching and damage. Advent / Voxx is in no way
responsible for any damage incurred during installation.
This product has been validated in the vehicles listed on the
application guide only. Consult Technical support at 800-323-4815
if you have any questions.
5
3
1
Remove the Sync
Module from the rear
of the panel.
7
Secure with the screws
provided in the kit.
This cable will NOT be used in this
application. Tape and scure to insure no
rattles.
9
Find a suitable mounting location. Clean the area with
alcohol and use a strong double sided tape to attache the
antenna to the dash.
2: carefully route the antenna cable to the GPS Module.
Insure you do not interfere with any airbags or other saftey
systems in the vehicle. Do not pinch or pull on the antenna
cable as this can damage it.
(NOT INCLUDED)
4
Note: This dash connector is
NOT used in this application.
2
Prior to Installation:
Not Used
Care must be taken when installing this accessory to ensure damage does not
Map
Card
Remove mounting
screws, then remove
the screen
occur to the vehicle. The installation of this accessory should follow approved
guidelines to ensure a quality installation. Read entire instructions thoroughly before
starting.
•
Vehicle Protection (use of covers and blankets, cleaning chemicals, etc.).
•
Vehicle Disassembly/Reassembly (panel removal, part storage, etc.).
Electrical Component Disassembly/Reassembly (battery disconnection,
connector removal, etc.)
•
NOTES:
Removed Parts: Inspect the vehicle for any damage.
11
Place all removed parts on a protected surface in an area where they will not be
damaged.
from dash - NOT
USED.
Connectors: When disconnecting connectors, do not pull on the wires; pull on
the connectors.
Vehicle Preparation and Protection
Find a suitable location for the HDMI and USB jacks. These
should be located together in order to use HDMI phone adapters.
Drill a 1.25" hole for each. Insert from the front and route the usb
cable to the Nav module location under the radio and Connect to
the module. Route the HDMI cable to the Sync Module location.
Vehicle harness
13
Connect all cables to the
Sync Module and
Connection points and reinstall the panel.
CAUTION!
Be sure ignition key is in the OFF position during install. Do not disconnect ANY
consult the OEM service manual.
Connect to vehicle
dash controls - NOT
USED
HDMI
Removing vehicle trim panels in extreme hot and cold climate could result in some
vehicle damage. Use care when removing all vehicle trim.
Using tape on vehicle trim panels could help limit any scratches and or marring.
Use plastic trim panel removal tools whenever possible.
The instructions included in this kit are current at the time of printing. It is designed
as a guide to help make the installation of this product successful. Always use
caution and ask for assistance if you are not sure how to proceed. Voxx
International is not responsible for any damage that may occur during installation
or any changes to the vehicle interior.
Connect to
Sync Module
8
Route the cables behind the radio
chassis to the area below the
chassis.
Installation of the GPS antenna inside the vehicle passenger compartment may interfere
with reception/ If you must install it inside the vehicle insure it is not blocked by metal and
has a clear view of the sky. If reception is poor try another location.
10
The Radio mounted Media control will not
exit navigation.
This page left intentionally blank
EXPNAV2
Installation Instructions
2015 Ford F150
airbag connectors or indicators. Doing so may result in activating a diagnostic
be charged a dealer fee. If you are unsure of any vehicle trim removal process
Attach the connection unit
to the panel as shown.
This page left intentionally blank
5A
Do not touch the positive terminal with any tool when removing battery cables.
code. These codes will require the dealer to perform the reset procedure and may
Use caution: Damaged or bent
connector pins will NOT be
covered under warranty.
Attach the Sync
Module to the
connection unit using
the OEM screws.
NOTE: Due to dash configuration changes the
Navigation mode can be switch in and out of
by using the Steering wheel mounted Source
button or when in Navigation select Exit >
Minimize to return to the More menu or Sync.
Not Used
This document covers such items as:-
6
12
Attached the double
sided tape to the
module.
Connect all cables and attach
to the underside / top of or
behind the radio chassis
where possible.
14
Test the system and make all
needed settings. Re-install all
dash trim and you are finished.