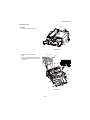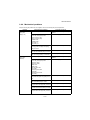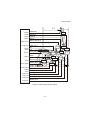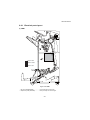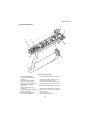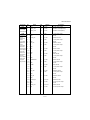
1
DF-790
MT-730
BF-730
AK-730
PH-7A/7C/7D
SERVICE
MANUAL
Published in March 2011
843NB110
3NBSM060
First Edition
CAUTION
RISK OF EXPLOSION IF BATTERY IS REPLACED BY AN INCORRECT TYPE. DISPOSE
OF USED BATTERIES ACCORDING TO THE INSTRUCTIONS.
It may be illegal to dispose of this battery into the municipal waste stream. Check with your
local solid waste officials for details in your area for proper disposal.
ATTENTION
IL Y A UN RISQUE D’EXPLOSION SI LA BATTERIE EST REMPLACEE PAR UN MODELE
DE TYPE INCORRECT. METTRE AU REBUT LES BATTERIES UTILISEES SELON LES
INSTRUCTIONS DONNEES.
Il peut être illégal de jeter les batteries dans des eaux d’égout municipales. Vérifiez avec les
fonctionnaires municipaux de votre région pour les détails concernant des déchets solides
et une mise au rebut appropriée.
Revision history
Revision
Date
Replaced pages
Remarks
This page is intentionally left blank.
Safety precautions
This booklet provides safety warnings and precautions for our service personnel to ensure the safety of
their customers, their machines as well as themselves during maintenance activities. Service personnel
are advised to read this booklet carefully to familiarize themselves with the warnings and precautions
described here before engaging in maintenance activities.
Safety warnings and precautions
Various symbols are used to protect our service personnel and customers from physical danger and
to prevent damage to their property. These symbols are described below:
DANGER: High risk of serious bodily injury or death may result from insufficient attention to or incorrect
compliance with warning messages using this symbol.
WARNING: Serious bodily injury or death may result from insufficient attention to or incorrect compliance
with warning messages using this symbol.
CAUTION: Bodily injury or damage to property may result from insufficient attention to or incorrect compliance with warning messages using this symbol.
Symbols
The triangle (
) symbol indicates a warning including danger and caution. The specific point of attention is
shown inside the symbol.
General warning.
Warning of risk of electric shock.
Warning of high temperature.
indicates a prohibited action. The specific prohibition is shown inside the symbol.
General prohibited action.
Disassembly prohibited.
indicates that action is required. The specific action required is shown inside the symbol.
General action required.
Always ground the copier.
Remove the power plug from the wall outlet.
1. Installation Precautions
WARNING
• Do not use a power supply with a voltage other than that specified. Avoid multiple connections to
one outlet: they may cause fire or electric shock. When using an extension cable, always check that
it is adequate for the rated current. .....................................................................................................
• Connect the ground wire to a suitable grounding point. Not grounding the copier may cause fire or
electric shock. Connecting the earth wire to an object not approved for the purpose may cause
explosion or electric shock. Never connect the ground cable to any of the following: gas pipes, lightning rods, ground cables for telephone lines and water pipes or faucets not approved by the proper
authorities. ..........................................................................................................................................
CAUTION:
• Do not place the copier on an infirm or angled surface: the copier may tip over, causing injury. .........
• Do not install the copier in a humid or dusty place. This may cause fire or electric shock. .................
• Do not install the copier near a radiator, heater, other heat source or near flammable material. This
may cause fire. ...................................................................................................................................
• Allow sufficient space around the copier to allow the ventilation grills to keep the machine as cool
as possible. Insufficient ventilation may cause heat buildup and poor copying performance. ............
• Always handle the machine by the correct locations when moving it. .................................................
• Always use anti-toppling and locking devices on copiers so equipped. Failure to do this may cause
the copier to move unexpectedly or topple, leading to injury. ..............................................................
• Avoid inhaling toner or developer excessively. Protect the eyes. If toner or developer is accidentally
ingested, drink a lot of water to dilute it in the stomach and obtain medical attention immediately.
If it gets into the eyes, rinse immediately with copious amounts of water and obtain medical attention. .....................................................................................................................................................
• Advice customers that they must always follow the safety warnings and precautions in the copier’s
instruction handbook. .........................................................................................................................
2. Precautions for Maintenance
WARNING
• Always remove the power plug from the wall outlet before starting machine disassembly. ................
• Always follow the procedures for maintenance described in the service manual and other related
brochures. ..........................................................................................................................................
• Under no circumstances attempt to bypass or disable safety features including safety mechanisms
and protective circuits. ........................................................................................................................
• Always use parts having the correct specifications. ............................................................................
• Always use the thermostat or thermal fuse specified in the service manual or other related brochure
when replacing them. Using a piece of wire, for example, could lead to fire or other serious accident. ...................................................................................................................................................
• When the service manual or other serious brochure specifies a distance or gap for installation of a
part, always use the correct scale and measure carefully. ..................................................................
• Always check that the copier is correctly connected to an outlet with a ground connection. ...............
• Check that the power cable covering is free of damage. Check that the power plug is dust-free. If it
is dirty, clean it to remove the risk of fire or electric shock. .................................................................
• Never attempt to disassemble the optical unit in machines using lasers. Leaking laser light may
damage eyesight. ...............................................................................................................................
• Handle the charger sections with care. They are charged to high potentials and may cause electric
shock if handled improperly. ...............................................................................................................
CAUTION
• Wear safe clothing. If wearing loose clothing or accessories such as ties, make sure they are safely
secured so they will not be caught in rotating sections. ......................................................................
• Use utmost caution when working on a powered machine. Keep away from chains and belts. ..........
• Handle the fixing section with care to avoid burns as it can be extremely hot. ..................................
• Check that the fixing unit thermistor, heat and press rollers are clean. Dirt on them can cause
abnormally high temperatures. ...........................................................................................................
• Do not remove the ozone filter, if any, from the copier except for routine replacement. ......................
• Do not pull on the AC power cord or connector wires on high-voltage components when removing
them; always hold the plug itself. ........................................................................................................
• Do not route the power cable where it may be stood on or trapped. If necessary, protect it with a
cable cover or other appropriate item. ................................................................................................
• Treat the ends of the wire carefully when installing a new charger wire to avoid electric leaks. ..........
• Remove toner completely from electronic components. .....................................................................
• Run wire harnesses carefully so that wires will not be trapped or damaged. ......................................
• After maintenance, always check that all the parts, screws, connectors and wires that were
removed, have been refitted correctly. Special attention should be paid to any forgotten connector,
trapped wire and missing screws. .......................................................................................................
• Check that all the caution labels that should be present on the machine according to the instruction
handbook are clean and not peeling. Replace with new ones if necessary. .......................................
• Handle greases and solvents with care by following the instructions below: ......................................
· Use only a small amount of solvent at a time, being careful not to spill. Wipe spills off completely.
· Ventilate the room well while using grease or solvents.
· Allow applied solvents to evaporate completely before refitting the covers or turning the power
switch on.
· Always wash hands afterwards.
• Never dispose of toner or toner bottles in fire. Toner may cause sparks when exposed directly to
fire in a furnace, etc. ...........................................................................................................................
• Should smoke be seen coming from the copier, remove the power plug from the wall outlet immediately. ...................................................................................................................................................
3. Miscellaneous
WARNING
• Never attempt to heat the drum or expose it to any organic solvents such as alcohol, other than the
specified refiner; it may generate toxic gas. ........................................................................................
• Keep the machine away from flammable liquids, gases, and aerosols. A fire or an electric shock
might occur. ........................................................................................................................................
This page is intentionally left blank.
3NB/3ND/3N0/3NK
CONTENTS
1-1 Specifications
1-1-1 Specifications ........................................................................................................................ 1-1-1
1-1-2 Parts names .......................................................................................................................... 1-1-3
(1) Document Finisher ........................................................................................................... 1-1-3
(2) Center-folding unit,Mail box(option) ................................................................................. 1-1-4
(3) Bridge unit ........................................................................................................................ 1-1-5
1-1-3 Machine cross section ........................................................................................................... 1-1-6
1-2 Installation
1-2-1 Installation environment......................................................................................................... 1-2-1
1-2-2 Unpacking.............................................................................................................................. 1-2-2
(1) Unpacking......................................................................................................................... 1-2-2
(2) Removing the tapes and pads.......................................................................................... 1-2-7
1-3 Maintenance Mode
1-3-1 Maintenance mode ................................................................................................................ 1-3-1
(1) Executing a maintenance item ......................................................................................... 1-3-1
(2) Maintenance modes item list ............................................................................................ 1-3-2
1-4 Troubleshooting
1-4-1 Paper misfeed detection ........................................................................................................ 1-4-1
(1) Paper misfeed indication .................................................................................................. 1-4-1
(2) Paper misfeed detection condition ................................................................................... 1-4-2
1-4-2 Self-diagnostic function ....................................................................................................... 1-4-11
(1) Self-diagnostic function .................................................................................................. 1-4-11
(2) Self diagnostic codes...................................................................................................... 1-4-12
1-4-3 Electric problems ................................................................................................................. 1-4-26
1-4-4 Mechanical problems........................................................................................................... 1-4-32
1-5 Assembly and disassembly
1-5-1 Precautions for assembly and disassembly........................................................................... 1-5-1
(1) Precautions....................................................................................................................... 1-5-1
1-5-2 Document finisher section ..................................................................................................... 1-5-2
(1) Detaching and refitting the PF main PWB ........................................................................ 1-5-2
(2) Detaching and refitting the Staple unit.............................................................................. 1-5-4
1-6 Requirements on PWB Replacement
1-6-1 Remarks on finisher PWB replacement................................................................................. 1-6-1
1-6-2 Remarks on centerfold main PWB replacement.................................................................... 1-6-2
2-1 Mechanical Construction
2-1-1 Bridge unit section ................................................................................................................. 2-1-1
2-1-2 Paper insertion,feedshift and left sub tray eject sections ...................................................... 2-1-3
(1) Feedshift operation to left sub tray or prosessing section ................................................ 2-1-4
2-1-3 Prosessing section ................................................................................................................ 2-1-5
(1) Relief drum operation ....................................................................................................... 2-1-7
(2) Bundle discharge operation.............................................................................................. 2-1-9
2-1-4 Eject tray section ................................................................................................................. 2-1-10
3NB/3ND/3N0/3NK
(1) Main tray elevation operation ......................................................................................... 2-1-12
(2) ........................................................................................................................................ 2-1-12
2-1-5 Center-folding unit section (option)...................................................................................... 2-1-13
(1) Paper centerfold operation(center-folding,tri-folding) ..................................................... 2-1-15
2-1-6 Mailbox (option) ................................................................................................................... 2-1-18
(1) Eject operation to mailbox tray ....................................................................................... 2-1-20
2-1-7 Punch unit(Option)............................................................................................................... 2-1-21
2-2 Electrical Parts Layout
2-2-1 Electrical parts layout ............................................................................................................ 2-2-1
(1) PWBs................................................................................................................................ 2-2-1
(2) Switches and sensors....................................................................................................... 2-2-2
(3) Motors............................................................................................................................... 2-2-4
(4) Solenoids and cluch ......................................................................................................... 2-2-5
(5) Bridge section................................................................................................................... 2-2-6
(6) Center-folding unit (option) ............................................................................................... 2-2-7
(7) Mailbox (option) ................................................................................................................ 2-2-9
(8) Punch unit(Option).......................................................................................................... 2-2-10
2-3 OperatIOn Of the PWBs
2-3-1 DF maIn PWB........................................................................................................................ 2-3-1
2-3-2 Centerfold main PWB .......................................................................................................... 2-3-10
2-3-3 Mailbox main PWB .............................................................................................................. 2-3-14
2-3-4 Bridge PWB ......................................................................................................................... 2-3-17
2-3-5 Punch unit PWB .................................................................................................................. 2-3-19
2-4 Appendixes
2-4-1 Appendixes ............................................................................................................................ 2-4-1
(1) Wiring diagram ................................................................................................................ 2-4-1
3NB/3ND/3N0/3NK
1-1 Specifications
1-1-1 Specifications
Document Finisher
Item
Specifications
Type
Floor model
Number of trays
Paper weight
Main Try
(Try A)
Tray capacity
Sub Try left
(Try B)
Sub Try right
(Try C)
Stapling capacity
Paper weight 90 g/m2 or less
Power source
Dimensions (W × D × H)
Weight
Three tray
45 to 300 g/m2
A3, B4, Ledger, Legal, 8K: 1500 sheets
A4, A4R, B5, Letter, LetterR,16K: 4000 sheets
A5R, B6R,Statement R:500 sheets
A3, B4, Ledger, Legal, 8K
A4R, LetterR
A4, B5,Letter, 16K:200 sheets
LetterR: 350 sheets(35-70 sets)
A4,A4R, B5,B5R,A6R,Letter,Letter R, 16K:100 sheets
A3, B4, Ledger, Legal, 8K: 30 sheets(80 g/m2)
A4, A4R, B5,Letter,Letter R, 16K
: 65 sheets(90 g/m2)
70 sheets(64 g/m2)
Electrically connected to the machine
607.2 ×668.5 ×1061.3 mm
23 29/32 × 26 5/16 × 41 25/32”
Approx. 40 kg / Approx. 88.2 lb or less
Center-folding unit (option)
Item
Specifications
Foldable sizes
Foldable
number of
sheets
Maximum
number for
storage
Paper weight
A3, B4,A4R, Ledger, Legal,LetterR,8K
Center-folding
Center-folding
60 to 90 g/m2 : 16 sheets
91 to 120 g/m2 : 13 sheets
Centerfold-stapling
60 to 90 g/m2 : 5 sheets
91 to120 g/m2 : 3 sheets
121 to 256 g/m2 : 1 sheet
Tri-folding
60 to 90 g/m2 : 5 sheets
91 to120 g/m2 : 3 sheets
Center-folding
5 or less copies in a set: 30 sets
6 to 10 copies in a set: 20 sets
11 to 16 copies in a set: 10 sets
Tri-folding
1 or less copies in a set: 30 sets
2 to 5 copies in a set: 5 sets
Center-folding
60 to 256 g/m2
Tri-folding
60 to 120 g/m2
1-1-1
3NB/3ND/3N0/3NK
Mail box (option)
Item
Number of trays
Paper size
Specifications
7 trays
A3, B4, A4, A4R, B5, B5R, A5R, Folio, Ledger, Legal, Letter, LetterR, statementR, 8K, 16K, 16KR
A3, B4, Folio, Ledger, Legal
60 to 105 g/m2: 50 sheets
106 to 163 g/m2: 25 sheets
Maximum number for storage
Dimensions
Weight
A4, A4R, B5, B5R, A5R, Letter, LetterR, statementR, 8K, 16K,
16KR
60 to 105 g/m2: 100 sheets
106 to 163 g/m2: 50 sheets
510 (W) x 400 (D) x 470 (H) mm
20 1/16” (W) x 15 3/4” (D) x 18 1/2” (H)
10 kg or less/22 lbs or less
Punch unit (option)
Item
Tray capacity
Main Try
(Try A)
When not stapling
Paper weight
Specifications
A3, B4, Ledger, Legal,Statement R, Folio, A4, A4R, B5, B5R, Letter, LetterR,12×18",8K,16K,16KR
45 to 300 g/m2
NOTE: These specifications are subject to change without notice.
1-1-2
3NB/3ND/3N0/3NK
1-1-2 Parts names
(1) Document Finisher
1
6
2
4
5
Figure 1-1-1
1. DF Main tray(tray A)
2. DF left sub tray(tray B)
3. DF right sub tray(tray C)
4. DF upper front cover
5. DF lower front cover
6. DF operation panel
1-1-3
3
3NB/3ND/3N0/3NK
(2) Center-folding unit,Mail box(option)
6
7
8
5
4
3
2
1
Figure 1-1-2
Centerfold unit(option)
1. Centerfold unit release lever
2. Centerfold tray
3. Centerfold unit top cover
4. Staple cartridge holder
5. Staple cartridge holder
6. Centerfold bridge unit
Mailbox (option)
7. Trays 1 - 7
8. Mailbox cover
1-1-4
3NB/3ND/3N0/3NK
(3) Bridge unit
1
4
3
2
5
Figure 1-1-3
1. Bridge eject cover
2. Bridge conveying unit
3. Bridge conveying cover
4. Bridge drive unit
5. Bridge entry unit
1-1-5
3NB/3ND/3N0/3NK
1-1-3 Machine cross section
9
1
2 10
6
3
4
5
8
Paper path
7
Figure 1-1-4
1. DF processing section
2. Right sub tray eject section
3. Left sub tray eject section
4. Main tray eject section
5. Staple unit
6. Bridge unit section
7. Center-folding bridge unit
8. Center-folding unit (option)
9. Mailbox (option)
10. Punch unit (Option)
1-1-6
3NB/3ND/3N0/3NK
1-2 Installation
1-2-1 Installation environment
Installation location (Be based on the machine establishment place.)
Avoid direct sunlight or bright lighting. Ensure that the photoconductor will not be exposed to direct sunlight or
other strong light when removing paper jams.
Avoid locations subject to high temperature and high humidity or low temperature and low humidity; an abrupt
change in the environmental temperature; and cool or hot, direct air.
Avoid places subject to dust and vibrations.
Choose a surface capable of supporting the weight of the machine.
Place the machine on a level surface (maximum allowance inclination: 1°).
Avoid air-borne substances that may adversely affect the machine or degrade the photoconductor, such as
mercury, acidic of alkaline vapors, inorganic gasses, NOx, SOx gases and chlorine-based organic solvents.
Select a well-ventilated location.
1-2-1
3NB/3ND/3N0/3NK
1-2-2 Unpacking
(1) Unpacking
Document Finisher
8
5
7
6
4
21
22
15
17 18 19 20
12 13
16
14
23
9
23
23
1
11
10
3
23
23
2
23
Figure 1-2-1
1. Skid
2. Bottom right pad
3. Bottom left pad
4. Document Finisher
5. Plastic sheet
6. Outer case
7. Upper right pad
8. Upper left pad
9. Spacer A
10. Finisher tray
11. Spacer B
12. Earth connection plate
13. Earth spring
14. Wire guide
15. Staple cartridge
16. Eject guide
17. M4 x 8 screw
18. M4 x 10 screw(black)
1-2-2
19. M4 x 30 screw
20. Upper earth plate
21. Connecting plate
22. Installation guide,etc.
23. Hinge joints
3NB/3ND/3N0/3NK
Bridge unit
23
18 19 20 21 22
13
15
12 11
10
14
16
17
7
9
8
5
4
3
6
2
1
Figure 1-2-2
7. Spacer A
1. Outer case
8. Spacer B
2. Bottom spacer
9. Top spacer
3. Bridge conveying unit
10. Left connevtion cover
4. Bridge entry unit
11. Upper front cover
5. Bridge drive unit
12. Left scanner cover
6. Bridge eject unit
13. Lower connevtion
cover
14. Left cover
15. Front left stay
16. Rear left stay
17. Upper left cover
1-2-3
18. Edging
19. Wire stopper
20. M4 x 8 screw
21. M4 x 20 screw
22. P Tite screw M3 x 8
23. Installation guide,etc.
3NB/3ND/3N0/3NK
Center-folding Unit
12
23 24
25 26
27
29
28
11
20
10
22
9
16
8
21
19
15
18
7
6
5
14
17
13
4
3
2
1
Figure 1-2-3
1-2-4
3NB/3ND/3N0/3NK
1. Outer case
2. Bottom spacer
3. Spacer A
4. Spacer B
5. Center-folding unit
6. Plastic sheet
7. Top spacer
8. Spacer C
9. Center-folding bridge unit
10. Spacer D
11. Spacer E
12. CF tray
13. Spacer F
14. Front rail
15. Rear rail
16. Guide
17. Spacer G
18. CF stock tray
19. Spacer H
20. Output stopper
1-2-5
21. Front side cover
22. Rear side cover
23. Pin
24. M4 x 8 screw
25. M4 x 10 screw
26. M4 x 12 screw
27. Lock plate
28. Binding band
29. Installation guide,etc.
3NB/3ND/3N0/3NK
Mail box
11
16
17
13
14
15
10
12
8
9
7
1
6
4
5
5
4
3
2
Figure 1-2-4
1. Mailbox
2. Outer case
3. Inner case
4. Bottom pad A
5. Bottom pad B
6. Plastic sheet
7. Inner pad
8. Side spacer
9. Accessory case
10. Trays
11. Plastic bag
12. Plastic bag
See the Installation Guide for installation.
1-2-6
13. Front mounting plate cover
14. Rear mounting plate cover
15. M4 x 12 screw
16. Tray name label
17. Installation guide,etc.
3NB/3ND/3N0/3NK
(2) Removing the tapes and pads
Document Finisher
Procedure
1. Remove tape from the finisher try.
Tape
Figure 1-2-5
2. Remove five tapes from the document
finisher.
Tape
Tape
Tape
Tape
Tape
Figure 1-2-6
1-2-7
3NB/3ND/3N0/3NK
3. Open the DF upper front cover.
DF upper front cover
Figure 1-2-7
4. Remove three tapes and pad.
Tape
Pad
Tape
Tape
Figure 1-2-8
1-2-8
3NB/3ND/3N0/3NK
5. Remove tape from the DF upper rear
cover.
DF Upper rear cover
Tape
Figure 1-2-9
6. Remove the lid rear cover and then
remove tape.
Tape
Lid rear cover
Figure 1-2-10
1-2-9
3NB/3ND/3N0/3NK
Bridge unit
Tape
Procedure
1. Remove tape from the bridge entry unit.
Figure 1-2-11
2. Remove five tapes from bridge conveying unit.
Tapes
Tape
Tapes
Figure 1-2-12
1-2-10
3NB/3ND/3N0/3NK
3. Remove two tapes from the bridge eject
unit.
Tape
Tape
Figure 1-2-13
4. Remove three tapes and two pads.
Tape
Pad
Pad
Tape
Tape
Figure 1-2-14
1-2-11
3NB/3ND/3N0/3NK
5. Remove tape from the bridge drive unit.
Tape
Figure 1-2-15
1-2-12
3NB/3ND/3N0/3NK
Center-folding Unit
Tape
Procedure
1. Remove two tapes and paper.
Tape
Paper
Figure 1-2-16
2. Remove nine tapes and pad.
Note
Remove the tapes from the wire guide
during installation. Refer to the installation guide.
Wire guide
Tape
Tape
Tape
Tape
Tape
Tape
Tape
Pad
Tape
Tape
Tape
Figure 1-2-17
1-2-13
3NB/3ND/3N0/3NK
3. Remove tape and pad.
Tape
Pad
Figure 1-2-18
1-2-14
3NB/3ND/3N0/3NK
Mail box
Procedure
1. Remove two tapes.
Tape
Tape
Figure 1-2-19
2. Remove five tapes and paper.
Tape
Tape
Tape
Tape
Paper
Tape
Figure 1-2-20
1-2-15
3NB/3ND/3N0/3NK
This page is intentionally left blank.
1-2-16
3NB/3ND/3N0/3NK
1-3 Maintenance Mode
1-3-1 Maintenance mode
The machine is equipped with a maintenance function which can be used to maintain and service the
machine.
(1) Executing a maintenance item
Start
Enter “10871087” using
the numeric keys.
Maintenance mode is entered.
Enter the maintenance item
number using the cursor up/down keys
or numeric keys.
The maintenance item is selected.
Press the start key.
The selected maintenance item is run.
Press the stop key.
Yes
Repeat the same
maintenance item?
No
Yes
Run another maintenance
item?
No
Enter 001 using the cursor
up/down keys or numeric keys
and press the start key.
Maintenance mode is exited.
End
1-3-1
3NB/3ND/3N0/3NK
(2) Maintenance modes item list
Section
Item
No.
Content of maintenance item
Initial setting
General
U019
Displaying the ROM version
Operation
panel and
support
equipment
U234
Setting punch destination
U237
Setting finisher stack quantity
-
U240
Checking the operation of the finisher
-
U241
Checking the operation of the finisher
-
U246
Setting the finisher
Others
U905
Inch (Inch)/Europe Metric (Metric)
Finisher
0/0/0/0/0/0/0/0
Booklet
0/0/0/0/0/0/0/0/0
Checking counts by optional devices
1-3-2
-
3NB/3ND/3N0/3NK
Contents of the maintenance mode items
Item No.
U019
Description
Displaying the ROM version
Description
Displays the part number of the ROM fitted to each PWB.
Purpose
To check the part number or to decide, if the newest version of ROM is installed.
Method
1. Press the start key. The ROM version are displayed.
2. Change the screen using the cursor up/down keys.
Display
Description
Main
Main ROM
MMI
Operation ROM
Browser
Browser ROM
Engine
Engine ROM
Engine Boot
Engine booting
Scanner
Scanner ROM
Scanner Boot
Scanner booting
RFID
RFID ROM
IH CPU
IH CPU ROM
IH CPU Boot
IH CPU booting
Motor CPU
Motor CPU ROM
Motor CPU Boot
Motor CPU booting
Dictionary
-
Option Language
Optional language ROM
PDF1.7 Resource
PDF1.7 resource ROM
Solution Framework
Framework ROM
FMU
FMU ROM
Weekly Timer
Weekly Timer ROM
Color Table1(Copy)
Color table 1 (copy) ROM
Color Table2(Copy)
Color table 2 (copy) ROM
Color Table1(Prn)
Color table 1 (printer) ROM
Color Table2(Prn)
Color table 2 (printer) ROM
DP
Document processor ROM
DP Boot
Document processor booting
PF1
Paper feeder / Large capacity feeder ROM
PF1 Boot
Paper feeder / Large capacity feeder booting
Side PF
SMT paper feeder /Side feeder ROM
1-3-3
3NB/3ND/3N0/3NK
Item No.
Description
U019
Display
Description
Side PF Boot
SMT paper feeder /Side feeder booting
PF2
Side paper feeder / Side large capacity feeder ROM
PF2 Boot
Side paper feeder / Side large capacity feeder booting
DF
1000-sheet finisher / 4000-sheet finisher ROM
DF Boot
1000-sheet finisher / 4000-sheet finisher booting
PH
Punch unit ROM
PH Boot
Punch unit booting
MT
Mailbox ROM
MT Boot
Mailbox booting
BF
Center-folding unit ROM
BF Boot
Center-folding unit booting
Fax APL1
Fax APL 1
Fax Boot1
Fax booting 1
Fax IPL1
Fax IPL 1
Fax APL2
Fax APL 2 (dual Fax)
Fax Boot2
Fax booting 2 (dual Fax)
Fax IPL2
Fax IPL 2 (dual Fax)
Completion
Press the stop key. The screen for selecting a maintenance item No. is displayed.
1-3-4
3NB/3ND/3N0/3NK
Item No.
U234
Description
Setting punch destination
Description
Sets the destination of punch unit of 1000-sheet finisher or 4000-sheet finisher.
Purpose
To be set when installing a different punch unit from the destination of the machine.
Setting
1. Press the start key.
2. Select the destination.
Display
Description
Auto
Conforms to destination settings.
Japan Metric
Metric (Japan) specifications
Inch
Inch (North America) specifications
Europe Metric
Metric (Europe) specifications
Sweden
Sweden specifications
Initial setting: Inch (Inch specifications)/Europe Metric (Metric specifications)
3. Press the start key. The setting is set.
4. Turn the main power switch off and on. Allow more than 5 seconds between Off and On.
1-3-5
3NB/3ND/3N0/3NK
Item No.
U237
Description
Setting finisher stack quantity
Description
Sets the number of sheets of each stack on the main tray and on the middle tray in 4000-sheet
finisher.
Purpose
To change the setting when a stack malfunction has occurred.
Method
1. Press the start key.
2. Select the item to be set.
Display
Description
Main Tray
Number of sheets of stack on the main tray
Middle Tray
Number of sheets of stack on the middle tray for staple mode
Setting: [Main Tray]
1. Change the setting using the +/- keys or numeric keys.
Display
Description
0
Number of sheets of stack on the main tray: 4000 sheets
1
Number of sheets of stack on the main tray: 1500 sheets
Initial setting: 0
2. Press the start key. The setting is set.
3. Turn the main power switch off and on. Allow more than 5 seconds between Off and On.
Setting: [Middle Tray]
1. Change the setting using the +/- keys or numeric keys.
Display
Description
0
Number of sheets of stack on the middle tray for staple mode:
50 sheets
1
Number of sheets of stack on the middle tray for staple mode:
30 sheets
Initial setting: 0
Number of sheets of stack on the internal tray for non-staple copying: 10 sheets
2. Press the start key. The setting is set.
3. Turn the main power switch off and on. Allow more than 5 seconds between Off and On.
1-3-6
3NB/3ND/3N0/3NK
Item No.
U240
Description
Checking the operation of the finisher
Description
Turns each motor and solenoid of 1000-sheet finisher or 4000-sheet finisher ON.
Purpose
To check the operation of each motor and solenoid of the 1000-sheet finisher or 4000-sheet finisher.
Method
1. Press the start key.
2. Select the item to be checked.
Display
Description
Motor
Checking the motor of the document finisher
Solenoid
Checking the solenoid of the document finisher
Mail Box
Checking the motor of the mailbox
Booklet
Checking the motor of the center-folding unit
Method: [Motor]
1. Select the item to be operated.
2. Press the start key. The operation starts.
Display
Description
Feed In(H)
DF paper entry motor (DFPEM) is turned on at high speed
Feed In(L)
DF paper entry motor (DFPEM) is turned on at low speed
Middle(H)
DF middle motor (DFMM) is turned on at high speed
Middle(L)
DF middle motor (DFMM) is turned on at low speed
Eject(H)
DF eject motor (DFEM) is turned on at high speed
Eject(L)
DF eject motor (DFEM) is turned on at low speed
Save(H)
DF drum motor (DFDRM) is turned on at high speed
Save(L)
DF drum motor (DFDRM) is turned on at low speed
Tray
DF tray motor (DFTM) is turned on
Staple Move
DF slide motor (DFSLM) is turned on
Staple
DF staple motor (DFSTM) is turned on
Width Test(A3)
DF side registration motor 1, 2 (DFSRM1, 2) is turned on
Width Test(LD)
DF side registration motor 1, 2 (DFSRM1, 2) is turned on
Beat
DF paddle motor (DFPDM) is turned on
Eject Unlock(HP)
DF eject release motor (DFERM) is turned on to home position
Sort Test
DF shift motor 1, 2 (DFSFM1, 2) is turned on
Eject Unlock(30)
DF eject release motor (DFERM) drive position 30-sheet stack
Eject Unlock(50)
DF eject release motor (DFERM) drive position 50-sheet stack
Eject Unlock(Fix)
DF eject release motor (DFERM) fixed drive position
1-3-7
3NB/3ND/3N0/3NK
Item No.
Description
U240
Method: [Solenoid]
1. Select the item to be operated.
2. Press the start key. The operation starts.
Display
Description
Sub Tray
DF feedshift solenoid (DFFSSOL) is turned on
Save Drum
DF drum solenoid (DFDRSOL) is turned on
Booklet
DF center fold solenoid (DFCFSOL) is turned on
Punch
Punch solenoid (PUSOL) is turned on
Three Fold
CF feedshift solenoid (CFFSSOL) is turned on
Method: [Mail Box]
1. Select the item to be operated.
2. Press the start key. The operation starts.
Display
Description
Conv
Mailbox drive motor (MBDM) is turned on at paper conveying
Branch
Mailbox drive motor (MBDM) is turned on at feedshift operation
Method: [Booklet]
1. Select the item to be operated.
2. Press the start key. The operation starts.
Display
Description
Folding
CF main motor (CFMM) is turned on
Blade
CF blade motor (CFBM) is turned on
Bundle Up
CF adjustment motor 2 (CFADM2) is turned on
Bundle Down
CF adjustment motor 1 (CFADM1) is turned on
Staple
CF staple motor (CFSTM) is turned on
Width Test(A3)
CF side registration motor 1, 2 (CFSRM1, 2) is turned on
Width Test(LD)
CF side registration motor 1, 2 (CFSRM1, 2) is turned on
Feed In
CF paper entry motor (CFPEM) is turned on
Completion
Press the stop key. The screen for selecting a maintenance item No. is displayed.
1-3-8
3NB/3ND/3N0/3NK
Item No.
U241
Description
Checking the operation of the switches of the finisher
Description
Displays the status of each switches and sensors of 1000-sheet finisher or 4000-sheet finisher.
Purpose
To check the operation of each switches and sensors of the 1000-sheet finisher or 4000-sheet
finisher.
Method
1. Press the start key.
2. Select the item to be checked.
Display
Description
Finisher
Checking the switch and sensor of the document finisher
Mail Box
Checking the switch and sensor of the mailbox
Booklet
Checking the switch and sensor of the center-folding unit
Punch
Checking the switch and sensor of the punch unit
Method: [Finisher]
1. Turn each switch or sensor on and off manually to check the status.
When the on-status of a switch or sensor is detected, that switch or sensor is displayed in
reverse.
Display
Front Cover
Description
DF front cover switch (DFFCSW)
MPT
Top Cover
DF top cover switch (DFTCSW)
Tray U-Limit
DF tray upper limit sensor (DFTULS)
Tray HP2
Tray Middle
DF tray middle sensor (DFTMS)
Tray L-Limit
DF tray upper limit sensor (DFTLLS)
Tray L-Limit(BL)
DF tray center hold sensor (DFTCFS)
Tray Top
DF tray upper surface sensor (DFTUSS)
HP
DF paper entry sensor (DFPES)
Sub Tray Eject
DF sub eject sensor (DFSES)
Middle Tray Eject
DF middle eject sensor (DFMES)
Drum
DF drum sensor (DFDRS)
Staple HP
DF slide sensor (DFSLS)
Middle Tray
DF middle tray sensor (DFMTS)
Width Front HP
DF side regstration sensor 1 (DFSRS1)
Width Tail HP
DF side regstration sensor 2 (DFSRS2)
Bundle Eject HP
DF bundle discharge sensor (DFBDS)
1-3-9
3NB/3ND/3N0/3NK
Item No.
Description
U241
Method: [Mail Box]
1. Turn each switch or sensor on and off manually to check the status.
When the on-status of a switch or sensor is detected, that switch or sensor is displayed in
reverse.
Display
Description
Eject
MB eject sensor (MBES)
Cover
MB cover open/close switch (MBCOCSW)
Over Flow1
MB overflow sensor 1 (MBOFS1)
Over Flow2
MB overflow sensor 2 (MBOFS2)
Over Flow3
MB overflow sensor 3 (MBOFS3)
Over Flow4
MB overflow sensor 4 (MBOFS4)
Over Flow5
MB overflow sensor 5 (MBOFS5)
Over Flow6
MB overflow sensor 6 (MBOFS6)
Over Flow7
MB overflow sensor 7 (MBOFS7)
Motor HP
MB paper entry sensor (MBPES)
1-3-10
3NB/3ND/3N0/3NK
Item No.
U241
Description
Method: [Booklet]
1. Turn each switch or sensor on and off manually to check the status.
When the on-status of a switch or sensor is detected, that switch or sensor is displayed in
reverse.
Display
Description
HP
CF paper entry sensor (CFPES)
Eject
CF eject sensor (CFES)
Paper
CF paper sensor (CFPS)
Tray Full
CF tray full sensor (CFTFS)
Bundle Up HP
CF adjustment sensor 1 (CFADS1)
Bundle Down HP
CF adjustment sensor 2 (CFADS2)
Width Up HP
CF side registration sensor 1 (CFSRS1)
Width Down HP
CF side registration sensor 2 (CFSRS2)
Blade HP
CF blade sensor (CFBLS)
Tray
CF tray switch (CFTSW)
Set
CF set switch (CFSSW)
Left Guide
CF left guide switch (CFLGSW)
Vertical Feed
CF paper conveying sensor (CFPCS)
Method: [Punch]
1. Turn each switch or sensor on and off manually to check the status.
When the on-status of a switch or sensor is detected, that switch or sensor is displayed in
reverse.
Display
Description
Punch HP
Punch home position sensor (PUHPS)
Edge Face1
Punch paper edge sensor (PUPES)
Edge Face2
Punch paper edge sensor (PUPES)
Edge Face3
Punch paper edge sensor (PUPES)
Edge Face4
Punch paper edge sensor (PUPES)
Tank
Punch tank set switch (PUTSSW)
Tank Full
Punch tank full sensor (PUTFS)
Completion
Press the stop key. The screen for selecting a maintenance item No. is displayed.
1-3-11
3NB/3ND/3N0/3NK
Item No.
U246
Description
Setting the finisher
Description
Provides various settings for the 1000-sheet finisher or 4000-sheet finisher, if furnished.
Purpose
Adjustment of registration stop timing in punch mode
Adjust if skewed paper conveying occurs or if the copy paper is Z-folded in punch mode.
Adjustment of paper stop timing in the punch mode
To adjust this item when the position of a punch hole is different from the specified one.
Adjustment of center position timing in the punch mode
Adjusts the center position of a punch hole in punch mode if the position is not proper.
Adjustment of front/rear side registration home position
Provides optimization when paper jam occurs due to an inferior fitting of the side registration
guides to paper.
Adjustment of front/rear shift home position
Performed when alighment is lost with the ejected paper
Adjusting of front/back stapling home position
Adjusts the stapling position in the staple mode if the position is not proper.
Adjustment of upper/lower side registration home position
Provides optimization when paper jam occurs due to an inferior fitting of the side registration
guides to paper.
Adjustment of booklet stapling position
Adjusts the booklet stapling position in the stitching mode if the position is not proper.
Adjustment of center folding position
Adjusts the center folding position in the stitching mode if the position is not proper.
Adjustment of tri- folding position
Adjusts the tri-folding position in the stitching mode if the position is not proper.
Method
1. Press the start key.
2. Select the item to set.
Display
Description
Finisher
Adjustment of 1000-sheet finisher and 4000-sheet finisher
Booklet
Adjustment of center-folding unit
Method: [Finisher]
1. Select the item to set.
Display
Description
Punch Regist
Adjustment of registration stop timing in punch mode
Punch Feed
Adjustment of the paper stop timing in punch mode
Punch Width
Adjustment of the center position timing in punch mode
Width Front HP
Adjustment of front side registration home position
Width Tail HP
Adjustment of rear side registration home position
Shift Front HP
Adjustment of front shift home position
Shift Tail HP
Adjustment of rear shift home position
Staple HP
Adjustment of front and back stapling home position
1-3-12
3NB/3ND/3N0/3NK
Item No.
U246
Description
Setting: [Punch Regist]
1. Select [Punch Regist].
2. Change the setting value using the +/- keys or numeric keys.
Description
Setting
range
Adjustment of registration stop timing
-20 to 20
Initial
setting
0
Change in
value per step
0.25 mm
If skewed paper conveying occurs (sample 1), increase the setting value. If the copy paper is
Z-folded (sample 2), decrease the setting value.
Sample 1
Sample 2
Figure 1-3-1
3. Press the start key. The value is set.
Setting: [Punch Feed]
1. Select [Punch Feed].
2. Change the setting value using the +/- keys or numeric keys.
Description
Setting
range
Adjustment of the paper stop timing
-10 to 10
Initial
setting
0
Change in
value per step
0.52 mm
If the distance of the position of a punch hole is smaller than the specified value A, increase
the setting value. If the distance is larger than the value A, decrease the setting value.
A
Preset value A: 13 mm (metric)
9.5 mm (inch)
Figure 1-3-2
3. Press the start key. The value is set.
1-3-13
3NB/3ND/3N0/3NK
Item No.
U246
Description
Setting: [Punch Width]
1. Select [Punch Width].
2. Change the setting value using the +/- keys or numeric keys.
Description
Setting
range
Initial
setting
Adjustment of the punch center position timing -4 to 4
0
Change in
value per step
0.52 mm
If the punch hole is too close to the front of the machine, increase the setting value. If the
punch hole is too close to the rear of the machine, decrease the setting value.
Center line
(within ± 0.5 mm)
Sample 1
Sample 2
Figure 1-3-3
3. Press the start key. The value is set.
Setting: [Width Front HP/Width Tail HP]
1. Select [Width Front HP] or [Width Tail HP].
2. Change the setting value using the +/- keys or numeric keys.
Description
Setting
range
Initial
setting
Change in
value per step
Adjustment of front side registration home position
-15 to 15
0
0.19 mm
Adjustment of rear side registration home position
-15 to 15
0
0.19 mm
3. Press the start key. The value is set.
4. Press the stop key. The screen for selecting a maintenance item No. is displayed.
5. Enter maintenance mode U240 and select [Motor], then [Width Test(A3)].
The width guides of the middle tray will move to A3-size position.
6. Pull the middle tray, insert paper between the guides and check that paper is abut the guides.
7. Repeat the above adjustment until paper is properly in position.
Setting: [Shift Front HP/Shift Tail HP]
1. Select [Shift Front HP] or [Shift Tail HP].
2. Change the setting value using the +/- keys or numeric keys.
Description
Setting
range
Initial
setting
Change in
value per step
Adjustment of front shift home position
-15 to 15
0
0.19 mm
Adjustment of rear shift home position
-15 to 15
0
0.19 mm
3. Press the start key. The value is set.
4. Press the stop key. The screen for selecting a maintenance item No. is displayed.
5. Enter maintenance mode U240 and select [Motor], then [Sort Test].
6. Repeat the above adjustment until eject paper is properly in position.
1-3-14
3NB/3ND/3N0/3NK
Item No.
U246
Description
Setting: [Staple HP]
1. Select [Staple HP].
2. Change the setting value using the +/- keys or numeric keys.
Description
Setting
range
Adjustment of front and back stapling home position -15 to 15
Initial
setting
Change in
value per step
0
0.19 mm
When staple positions are off toward the front side of the machine (sample 1), increase the
setting value. When staple positions are off toward the rear side of the machine (sample 2),
decrease the setting value.
Sample 2
Sample 1
Figure 1-3-4
3. Press the start key. The value is set.
Method: [Booklet]
1. Select the item to set.
Display
Description
Width Up HP
Adjustment of upper side registration home position
Width Down HP
Adjustment of lower side registration home position
Staple Pos1
Adjustment of booklet stapling position for A4/Letter size
Staple Pos2
Adjustment of booklet stapling position for B4/Legal size
Staple Pos3
Adjustment of booklet stapling position for A3/Ledger size
Booklet Pos1
Adjustment of center folding position for A4/Letter size
Booklet Pos2
Adjustment of center folding position for B4/Legal size
Booklet Pos3
Adjustment of center folding position for A3/Ledger size
Three Fold
Adjustment of tri-folding position
1-3-15
3NB/3ND/3N0/3NK
Item No.
U246
Description
Setting: [Width Up HP/Width Down HP]
1. Select [Width Up HP] or [Width Down HP].
2. Change the setting value using the +/- keys or numeric keys.
Description
Setting
range
Initial
setting
Change in
value per step
Adjustment of upper side registration home position
-15 to 15
0
0.34 mm
Adjustment of lower side registration home position
-15 to 15
0
0.34 mm
3. Press the start key. The value is set.
4. Press the stop key. The screen for selecting a maintenance item No. is displayed.
5. Enter maintenance mode U240 and select [Booklet], then [Width Test(A3)].
The width guides of the center-folding unit will move to A3-size position.
6. Pull the center-folding unit, insert paper between the guides and check that paper is abut the
guides.
7. Repeat the above adjustment until paper is properly in position.
Setting: [Staple Pos]
1. Select [Staple Pos1], [Staple Pos2] or [Staple Pos3].
2. Change the setting value using the +/- keys or numeric keys.
Description
Setting
range
Initial
setting
Change in
value per step
Adjustment of booklet stapling position for
A4/Letter size
-15 to 15
0
0.32 mm
Adjustment of booklet stapling position for
B4/Legal size
-15 to 15
0
0.32 mm
Adjustment of booklet stapling position for
A3/Ledger size
-15 to 15
0
0.32 mm
When staples are placed too far right (sample 1), decrease the preset value. When staples
are placed too far left (sample 2), increase the preset value.
Reference value: within ± 2 mm
2 mm
Sample 1
Figure 1-3-5
3. Press the start key. The value is set.
1-3-16
2 mm
Sample 2
3NB/3ND/3N0/3NK
Item No.
U246
Description
Setting: [Booklet Pos]
1. Select [Booklet Pos1], [Booklet Pos2] or [Booklet Pos3].
2. Change the setting value using the +/- keys or numeric keys.
Description
Setting
range
Initial
Change in
setting value per step
Adjustment of center folding position for A4/Letter size
-15 to 15 0
0.32 mm
Adjustment of center folding position for B4/Legal size
-15 to 15 0
0.32 mm
Adjustment of center folding position for A3/Ledger size
-15 to 15 0
0.32 mm
When the centerfold position too far right (sample 1), increase the preset value. When the
centerfold position too far left (sample 2), decrease the setting value.
Reference value A: A4, Letter: Length of paper × 1/2 ±2 mm
A3, Ledger, B4: Length of paper × 1/2 ±3 mm
A
Sample 1
Center line
Sample 2
Figure 1-3-6
3. Press the start key. The value is set.
Setting: [Three Fold]
1. Select [Three Fold].
2. Change the setting value using the +/- keys or numeric keys.
Description
Setting
range
Adjustment of tri-folding position
-15 to 15
Initial
setting
Change in
value per step
0
0.32 mm
When the tri-fold position too far right (sample 1), increase the preset value. When the tri-fold
position too far left (sample 2), decrease the setting value.
Reference value A: 7.0 ±2 mm
A
Sample 1
Sample 2
Figure 1-3-7
3. Press the start key. The value is set.
Completion
Press the stop key. The screen for selecting a maintenance item No. is displayed.
1-3-17
3NB/3ND/3N0/3NK
Item No.
U905
Description
Checking counts by optional devices
Description
Displays the counts of DP, 1000-sheet or 4000-sheet finisher.
Purpose
To check the use of DP, 1000-sheet or 4000-sheet finisher.
Method
1. Press the start key.
2. Select the device, the count of which is to be checked.
The count of the selected device is displayed.
Display
Description
DP
Counts of DP
DF
Counts of 1000-sheet or 4000-sheet finisher
Method: [DP]
Display
Description
ADP
No. of single-sided originals that has passed through the DP
RADP
No. of double-sided originals that has passed through the DP
CIS
No. of dual scan originals that has passed through the DP
Method: [DF]
Display
Description
Sorter
No. of copies that has passed
Staple
Frequency the stapler has been activated
Punch
Frequency the punch has been activated
Stack*
Frequency the stacker has been activated
Saddle*
Frequency the saddle eject has been activated
Fold*
Frequency the center holding has been activated
Three Fold*
Frequency the tri-holding has been activated
* : 4000-sheet finisher only
Completion
Press the stop key. The screen for selecting a maintenance item No. is displayed.
1-3-18
3NB/3ND/3N0/3NK
This page is intentionally left blank.
1-3-19
3NB/3ND/3N0/3NK
1-4 Troubleshooting
1-4-1 Paper misfeed detection
(1) Paper misfeed indication
When a paper misfeed occurs, the machine immediately stops printing and displays the paper misfeed message on the operation panel. To remove paper misfeed in the machine, pull out the cassette, open the paper
conveying unit or paper conveying cover.
J
G
J
J
H
J
J
I
H
F
F
J
D
D
C
J
J
A
E
B
C
E
C
K
K
L
K
L L
L
Figure 1-4-1 Paper misfeed indication
A. Misfeed in cassette 1
B. Misfeed in cassette 2
C. Misfeed in cassette 3 or 4 (option)
D. Misfeed in the MP tray
E. Misfeed in paper conveying unit, paper conveying
cover or PF paper conveying cover
F. Misfeed in the fuser section
G. Misfeed in document processor (option)
H. Misfeed in job separator (option)
I. Misfeed in bridge unit (option)
J. Misfeed in document finisher
K. Misfeed in cassette 5 (option)
L. Misfeed in cassette 6 or 7 (option)
1-4-1
3NB/3ND/3N0/3NK
(2) Paper misfeed detection condition
TEJS
TOFSW1
1
TOFSW2
TOFSW3
TOFSW4
TOFSW5
TOFSW6
TOFSW7
TEJS
DFSES
BRES
DFDRS
DFPES
BRCS2
DFMTS
DFMES
CFPCS
CFPES
CFES
Figure 1-4-2 Paper jam location
1-4-2
BRCS1
3NB/3ND/3N0/3NK
Code
Contents
Conditions
Jam
location*
0114
Bridge cover open
The bridge cover is opened during printing.
I
0115
Bridge eject cover open
The bridge eject cover is opened during printing.
I
4901
Bridge conveying sensor 1
non arrival jam
Bridge conveying sensor 1 (BRCS1) does not
turn on during paper feed from cassette 1.
F
4902
Bridge conveying sensor 1 (BRCS1) does not
turn on during paper feed from cassette 2.
F
4903
Bridge conveying sensor 1 (BRCS1) does not
turn on during paper feed from cassette 3 (paper
feeder).
F
4904
Bridge conveying sensor 1 (BRCS1) does not
turn on during paper feed from cassette 4 (paper
feeder).
F
4905
Bridge conveying sensor 1 (BRCS1) does not
turn on during paper feed from cassette 5 (SMT
paper feeder).
F
4906
Bridge conveying sensor 1 (BRCS1) does not
turn on during paper feed from cassette 6 (side
paper feeder).
F
4907
Bridge conveying sensor 1 (BRCS1) does not
turn on during paper feed from cassette 7 (side
paper feeder).
F
4908
Bridge conveying sensor 1 (BRCS1) does not
turn on during paper feed from duplex section.
F
4909
Bridge conveying sensor 1 (BRCS1) does not
turn on during paper feed from MP tray.
F
Bridge conveying sensor 1 (BRCS1) does not
turn off during paper feed from cassette 1.
I
4912
Bridge conveying sensor 1 (BRCS1) does not
turn off during paper feed from cassette 2.
I
4913
Bridge conveying sensor 1 (BRCS1) does not
turn off during paper feed from cassette 3 (paper
feeder).
I
4914
Bridge conveying sensor 1 (BRCS1) does not
turn off during paper feed from cassette 4 (paper
feeder).
I
4915
Bridge conveying sensor 1 (BRCS1) does not
turn off during paper feed from cassette 5 (SMT
paper feeder).
I
4916
Bridge conveying sensor 1 (BRCS1) does not
turn off during paper feed from cassette 6 (side
paper feeder).
I
4911
Bridge conveying sensor 1
stay jam
*: Refer to figure 1-4-1 for paper misfeed indication (see page 1-4-1).
1-4-3
3NB/3ND/3N0/3NK
Code
Contents
Conditions
Jam
location*
Bridge conveying sensor 1 (BRCS1) does not
turn off during paper feed from cassette 7 (side
paper feeder).
I
4918
Bridge conveying sensor 1 (BRCS1) does not
turn off during paper feed from duplex section.
I
4919
Bridge conveying sensor 1 (BRCS1) does not
turn off during paper feed from MP tray.
I
Bridge conveying sensor 2 (BRCS2) does not
turn on during paper feed from cassette 1.
I
5002
Bridge conveying sensor 2 (BRCS2) does not
turn on during paper feed from cassette 2.
I
5003
Bridge conveying sensor 2 (BRCS2) does not
turn on during paper feed from cassette 3 (paper
feeder).
I
5004
Bridge conveying sensor 2 (BRCS2) does not
turn on during paper feed from cassette 4 (paper
feeder).
I
5005
Bridge conveying sensor 2 (BRCS2) does not
turn on during paper feed from cassette 5 (SMT
paper feeder).
I
5006
Bridge conveying sensor 2 (BRCS2) does not
turn on during paper feed from cassette 6 (side
paper feeder).
I
5007
Bridge conveying sensor 2 (BRCS2) does not
turn on during paper feed from cassette 7 (side
paper feeder).
I
5008
Bridge conveying sensor 2 (BRCS2) does not
turn on during paper feed from duplex section.
I
5009
Bridge conveying sensor 2 (BRCS2) does not
turn on during paper feed from MP tray.
I
Bridge conveying sensor 2 (BRCS2) does not
turn off during paper feed from cassette 1.
I
5012
Bridge conveying sensor 2 (BRCS2) does not
turn off during paper feed from cassette 2.
I
5013
Bridge conveying sensor 2 (BRCS2) does not
turn off during paper feed from cassette 3 (paper
feeder).
I
5014
Bridge conveying sensor 2 (BRCS2) does not
turn off during paper feed from cassette 4 (paper
feeder).
I
5015
Bridge conveying sensor 2 (BRCS2) does not
turn off during paper feed from cassette 5 (SMT
paper feeder).
I
4917
5001
5011
Bridge conveying sensor 1
stay jam
Bridge conveying sensor 2
non arrival jam
Bridge conveying sensor 2
stay jam
*: Refer to figure 1-4-1 for paper misfeed indication (see page 1-4-1).
1-4-4
3NB/3ND/3N0/3NK
Code
Contents
Conditions
Jam
location*
Bridge conveying sensor 2 (BRCS2) does not
turn off during paper feed from cassette 6 (side
paper feeder).
I
5017
Bridge conveying sensor 2 (BRCS2) does not
turn off during paper feed from cassette 7 (side
paper feeder).
I
5018
Bridge conveying sensor 2 (BRCS2) does not
turn off during paper feed from duplex section.
I
5019
Bridge conveying sensor 2 (BRCS2) does not
turn off during paper feed from MP tray.
I
Bridge eject sensor (BRES) does not turn on during paper feed from cassette 1.
I
5102
Bridge eject sensor (BRES) does not turn on during paper feed from cassette 2.
I
5103
Bridge eject sensor (BRES) does not turn on during paper feed from cassette 3 (paper feeder).
I
5104
Bridge eject sensor (BRES) does not turn on during paper feed from cassette 4 (paper feeder).
I
5105
Bridge eject sensor (BRES) does not turn on during paper feed from cassette 5 (SMT paper
feeder).
I
5106
Bridge eject sensor (BRES) does not turn on during paper feed from cassette 6 (side paper
feeder).
I
5107
Bridge eject sensor (BRES) does not turn on during paper feed from cassette 7 (side paper
feeder).
I
5108
Bridge eject sensor (BRES) does not turn on during paper feed from duplex section.
I
5109
Bridge eject sensor (BRES) does not turn on during paper feed from MP tray.
I
Bridge eject sensor (BRES) does not turn off during paper feed from cassette 1.
I
5112
Bridge eject sensor (BRES) does not turn off during paper feed from cassette 2.
I
5113
Bridge eject sensor (BRES) does not turn off during paper feed from cassette 3 (paper feeder).
I
5114
Bridge eject sensor (BRES) does not turn off during paper feed from cassette 4 (paper feeder).
I
5115
Bridge eject sensor (BRES) does not turn off during paper feed from cassette 5 (SMT paper
feeder).
I
5016
5101
5111
Bridge conveying sensor 2
stay jam
Bridge eject sensor non
arrival jam
Bridge eject sensor stay jam
*: Refer to figure 1-4-1 for paper misfeed indication (see page 1-4-1).
1-4-5
3NB/3ND/3N0/3NK
Code
Contents
Conditions
Jam
location*
Bridge eject sensor (BRES) does not turn off during paper feed from cassette 6 (side paper
feeder).
I
5117
Bridge eject sensor (BRES) does not turn off during paper feed from cassette 7 (side paper
feeder).
I
5118
Bridge eject sensor (BRES) does not turn off during paper feed from duplex section.
I
5119
Bridge eject sensor (BRES) does not turn off during paper feed from MP tray.
I
DF paper entry sensor (DFPES) turns on before
the eject signal is output from the machine (4000sheet finisher).
J
DF paper entry sensor (DFPES) turns on before
the eject signal is output from the machine (1000sheet finisher).
J
DF front upper cover is opened during operation
(4000-sheet finisher)
J
DF front cover is opened during operation (1000sheet finisher)
J
5116
6000
Bridge eject sensor stay jam
DF paper entry error
6001
6020
DF front cover open
6021
6041
DF top cover open
DF top cover is opened during operation (1000sheet finisher)
J
6050
CF eject cover open
CF eject cover is opened during operation (4000sheet finisher)
J
6060
MB cover open
MB cover is opened during operation (4000-sheet
finisher)
J
6070
Center folding unit open
Center folding unit is opened during operation
(4000-sheet finisher)
J
6080
CF left guide open
CF left guide is opened during operation (4000sheet finisher)
J
6100
DF paper entry sensor non
arrival jam
DF paper entry sensor (DFPES) is not turned on
even if a specified time has elapsed after the
machine eject signal was received (4000-sheet
finisher).
J
DF paper entry sensor (DFPES) is not turned on
even if a specified time has elapsed after the
machine eject signal was received (1000-sheet
finisher).
J
6101
*: Refer to figure 1-4-1 for paper misfeed indication (see page 1-4-1).
1-4-6
3NB/3ND/3N0/3NK
Code
6110
Contents
DF paper entry sensor stay
jam
6111
6120
DF paper entry sensor
remaining jam
6121
Conditions
Jam
location*
DF paper entry sensor (DFPES) is not turned off
within specified time of its turning on (4000-sheet
finisher).
J
DF paper entry sensor (DFPES) is not turned off
within specified time of its turning on (1000-sheet
finisher).
J
DF paper entry sensor (DFPES) does turned on
when the power is turned on or cover close
(4000-sheet finisher).
J
DF paper entry sensor (DFPES) does turned on
when the power is turned on or cover close
(1000-sheet finisher).
J
6200
DF sub eject sensor non
arrival jam
DF sub eject sensor (DFSES) does not turn on
within specified time of DF paper entry sensor
(DFPES) turning on.
J
6210
DF sub eject sensor stay jam
DF sub eject sensor (DFSES) is not turned off
within specified time of its turning on.
J
6220
DF sub eject sensor remaining jam
DF sub eject sensor (DFSES) does turned on
when the power is turned on or cover close.
J
6300
DF middle eject sensor non
arrival jam
DF middle eject sensor (DFMES) does not turn
on within specified time of DF paper entry sensor
(DFPES) turning on (4000-sheet finisher).
J
DF middle eject sensor (DFMES) does not turn
on within specified time of DF paper entry sensor
(DFPES) turning on (1000-sheet finisher).
J
DF middle eject sensor (DFMES) is not turned off
within specified time of its turning on (4000-sheet
finisher).
J
DF middle eject sensor (DFMES) is not turned off
within specified time of its turning on (1000-sheet
finisher).
J
DF middle eject sensor (DFMES) does turned on
when the power is turned on or cover close
(4000-sheet finisher).
J
DF middle eject sensor (DFMES) does turned on
when the power is turned on or cover close
(1000-sheet finisher).
J
DF tray upper surface sensor (DFTUSS) does not
turn on within specified time of DF middle eject
sensor (DFMES) turning on (4000-sheet finisher).
J
DF tray upper surface sensor (DFTUSS) does not
turn on within specified time of DF middle eject
sensor (DFMES) turning on (1000-sheet finisher).
J
6301
6310
DF middle eject sensor stay
jam
6311
6320
DF middle eject sensor
remaining jam
6321
6400
6401
DF tray upper surface sensor
non arrival jam
*: Refer to figure 1-4-1 for paper misfeed indication (see page 1-4-1).
1-4-7
3NB/3ND/3N0/3NK
Code
Contents
6410
DF tray upper surface sensor
stay jam
6411
6420
DF tray upper surface sensor
remaining jam
6421
Conditions
Jam
location*
DF tray upper surface sensor (DFTUSS) is not
turned off within specified time of its turning on
(4000-sheet finisher).
J
DF tray upper surface sensor (DFTUSS) is not
turned off within specified time of its turning on
(1000-sheet finisher).
J
DF tray upper surface sensor (DFTUSS) does
turned on when the power is turned on or cover
close (4000-sheet finisher).
J
DF tray upper surface sensor (DFTUSS) does
turned on when the power is turned on or cover
close (1000-sheet finisher).
J
6500
DF bundle discharge sensor
non arrival jam
DF bundle discharge sensor (DFBDS) does not
turn on within specified time of DF middle eject
sensor (DFMES) turning on.
J
6510
DF bundle discharge sensor
stay jam
DF bundle discharge sensor (DFBDS) is not
turned off since the bundle discharge starts
(4000-sheet finisher).
J
DF bundle discharge sensor (DFBDS) is not
turned off since the bundle discharge starts
(1000-sheet finisher).
J
6511
6600
DF drum sensor non arrival
jam
DF drum sensor (DFDRS) does not turn on within
specified time of DF paper entry sensor (DFPES)
turning on.
J
6610
DF drum sensor stay jam
DF drum sensor (DFDRS) is not turned off within
specified time of its turning on.
J
6620
DF drum sensor remaining
jam
DF drum sensor (DFDRS) does turned on when
the power is turned on or cover close.
J
6710
Center folding unit stay jam
During paper conveying to center folding unit, DF
drum sensor (DFDRS) is not turned off within
specified time of its turning on.
J
6810
DF side registration sensor 1
stay jam
DF side registration sensor 1 (DFSRS1) is not
turned off within specified time after driving the
DF side registration motor 1 (DFSRM1) (4000sheet finisher).
J
DF side registration sensor 1 (DFSRS1) is not
turned off within specified time after driving the
DF side registration motor 1 (DFSRM1) (1000sheet finisher).
J
6811
*: Refer to figure 1-4-1 for paper misfeed indication (see page 1-4-1).
1-4-8
3NB/3ND/3N0/3NK
Code
6910
Contents
DF side registration sensor 2
stay jam
6911
7000
DF staple operation error
7001
Conditions
Jam
location*
DF side registration sensor 2 (DFSRS2) is not
turned off within specified time after driving the
DF side registration motor 2 (DFSRM2) (4000sheet finisher).
J
DF side registration sensor 2 (DFSRS2) is not
turned off within specified time after driving the
DF side registration motor 2 (DFSRM2) (1000sheet finisher).
J
DF staple sensor (DFSTS) is not turned on within
specified time after driving the DF staple motor
(DFSTM) (4000-sheet finisher).
J
DF staple sensor (DFSTS) is not turned on within
specified time after driving the DF staple motor
(DFSTM) (1000-sheet finisher).
J
7100
CF paper entry sensor non
arrival jam
CF paper entry sensor (CFPES) is not turned on
even if a specified time has elapsed after the
machine eject signal was received.
J
7110
CF paper entry sensor stay
jam
CF paper entry sensor (CFPES) is not turned off
within specified time of its turning on.
J
7120
CF paper entry sensor
remaining jam
CF paper entry sensor (CFPES) does turned on
when the power is turned on or cover close.
J
7200
CF eject sensor non arrival
jam
CF eject sensor (CFES) is not turned on within
specified time since centerfold operation starts.
J
7210
CF eject sensor stay jam
During centerfold operation, CF eject sensor
(CFES) is not turned off within specified time of its
turning on.
J
7220
CF eject sensor remaining
jam
CF eject sensor (CFES) does turned on when the
power is turned on or cover close.
J
7300
CF eject sensor non arrival
jam
CF eject sensor (CFES) is not turned on within
specified time since three fold operation starts.
J
7310
CF eject sensor stay jam
During three fold operation, CF eject sensor
(CFES) is not turned off within specified time of its
turning on.
J
7400
CF side registration sensor 2
non arrival jam
CF side registration sensor 2 (CFSRS2) is not
turned on within specified time after driving the
CF side registration motor 2 (CFSRM2).
J
7500
CF side registration sensor 1
non arrival jam
CF side registration sensor 1 (CFSRS1) is not
turned on within specified time after driving the
CF side registration motor 1 (CFSRM1).
J
7600
CF staple operation error
CF staple sensor (CFSTS) is not turned on within
specified time after driving the CF staple motor
(CFSTM).
J
*: Refer to figure 1-4-1 for paper misfeed indication (see page 1-4-1).
1-4-9
3NB/3ND/3N0/3NK
Code
Contents
Conditions
Jam
location*
7720
CF paper sensor remaining
jam
CF paper sensor (CFPS) does turned on when
the power is turned on or cover close.
J
7800
MB eject sensor non arrival
jam
MB eject sensor (MBES) is not turned on even if
a specified time has elapsed after the machine
eject signal was received.
J
7810
MB eject sensor stay jam
MB eject sensor (MBES) is not turned off within
specified time of its turning on.
J
7820
MB eject sensor remaining
jam
MB eject sensor (MBES) does turned on when
the power is turned on or cover close.
J
7950
Paper interval error jam
An illegal inter-page or inter-copy interval has
occurred (4000-sheet finisher).
J
An illegal inter-page or inter-copy interval has
occurred (1000-sheet finisher).
J
7951
*: Refer to figure 1-4-1 for paper misfeed indication (see page 1-4-1).
1-4-10
3NB/3ND/3N0/3NK
1-4-2 Self-diagnostic function
(1) Self-diagnostic function
This machine is equipped with self-diagnostic function. When a problem is detected, the machine stops printing and display an error message on the operation panel. An error message consists of a message prompting
a contact to service personnel and a four-digit error code indicating the type of the error.
1-4-11
3NB/3ND/3N0/3NK
(2) Self diagnostic codes
If the part causing the problem was not supplied, use the unit including the part for replacement.
Check procedures/
corrective measures
Code
Contents
Causes
8010
Punch motor error 1
When the punch motor is
driven, punch home position
sensor does not turn on within
200 ms.
Defective connector cable or poor
contact in the connector (4000-sheet
finisher).
Reinsert the connector. Also check for continuity within the connector cable. If none,
replace the cable.
Punch motor and punch PWB (YC4)
Punch home position sensor and punch
PWB (YC8)
Punch PWB (YC1) and DF main PWB (YC7)
Defective connector cable or poor
contact in the connector (1000-sheet
finisher).
Reinsert the connector. Also check for continuity within the connector cable. If none,
replace the cable.
Punch motor and punch PWB (YC4)
Punch home position sensor and punch
PWB (YC8)
Punch PWB (YC1) and DF main PWB (YC8)
Defective punch
Replace the punch home position sensor.
home position sensor.
8020
Punch motor error 2
Home position is not obtained
in 3 seconds after home position is initialized or in standby.
Defective punch
motor.
Replace the punch motor.
Defective PWB.
Replace the punch PWB or DF main PWB
and check for correct operation.
Defective connector cable or poor
contact in the connector (4000-sheet
finisher).
Reinsert the connector. Also check for continuity within the connector cable. If none,
replace the cable.
Punch motor and punch PWB (YC4)
Punch PWB (YC1) and DF main PWB (YC7)
Defective connector cable or poor
contact in the connector (1000-sheet
finisher).
Reinsert the connector. Also check for continuity within the connector cable. If none,
replace the cable.
Punch motor and punch PWB (YC4)
Punch PWB (YC1) and DF main PWB (YC8)
Defective punch
motor.
Replace the punch motor.
Defective PWB.
Replace the punch PWB or DF main PWB
and check for correct operation.
1-4-12
3NB/3ND/3N0/3NK
Code
8030
8090
Contents
Punch motor error 3
Home position does not turn
from On to Off in 50 ms after
home position has been initialized.
DF paddle motor error
When the DF paddle motor is
driven, DF paddle sensor
does not turn on within 1 s.
Causes
Check procedures/
corrective measures
Defective connector cable or poor
contact in the connector (4000-sheet
finisher).
Reinsert the connector. Also check for continuity within the connector cable. If none,
replace the cable.
Punch motor and punch PWB (YC4)
Punch PWB (YC1) and DF main PWB (YC7)
Defective connector cable or poor
contact in the connector (1000-sheet
finisher).
Reinsert the connector. Also check for continuity within the connector cable. If none,
replace the cable.
Punch motor and punch PWB (YC4)
Punch PWB (YC1) and DF main PWB (YC8)
Defective punch
motor.
Replace the punch motor.
Defective PWB.
Replace the punch PWB or DF main PWB
and check for correct operation.
(see page 1-5-2)
Defective connector cable or poor
contact in the connector (4000-sheet
finisher).
Reinsert the connector. Also check for continuity within the connector cable. If none,
replace the cable.
DF paddle motor and DF main PWB (YC15)
DF paddle sensor and DF main PWB
(YC22)
Defective connector cable or poor
contact in the connector (1000-sheet
finisher).
Reinsert the connector. Also check for continuity within the connector cable. If none,
replace the cable.
DF paddle motor and DF main PWB (YC11)
DF paddle sensor and DF main PWB
(YC20)
Defective DF paddle sensor.
Replace the DF paddle sensor.
Defective DF paddle motor.
Replace the DF paddle motor.
Defective DF main
PWB.
Replace the DF main PWB and check for
correct operation.(see page 1-5-2)
1-4-13
3NB/3ND/3N0/3NK
Check procedures/
corrective measures
Code
Contents
Causes
8100
DF eject release motor error
When the DF eject release
motor is driven, DF bundle
discharge sensor does not
turn on within 1 s.
Defective connector cable or poor
contact in the connector (4000-sheet
finisher).
Reinsert the connector. Also check for continuity within the connector cable. If none,
replace the cable.
DF eject release motor and DF main PWB
(YC12)
DF bundle discharge sensor and DF main
PWB (YC22)
Defective connector cable or poor
contact in the connector (1000-sheet
finisher).
Reinsert the connector. Also check for continuity within the connector cable. If none,
replace the cable.
DF eject release motor and DF main PWB
(YC10)
DF bundle discharge sensor and DF main
PWB (YC20)
Defective DF bundle discharge sensor.
Replace the DF bundle discharge sensor.
Defective DF eject
release motor.
Replace the DF eject release motor.
Defective DF main
PWB.
Replace the DF main PWB and check for
correct operation.(see page 1-5-2)
Defective connector cable or poor
contact in the connector.
Reinsert the connector. Also check for continuity within the connector cable. If none,
replace the cable.
DF shift motor 1 and DF main PWB (YC14)
DF shift sensor 1 and DF main PWB (YC23)
Defective DF shift
sensor 1.
Replace the DF shift sensor 1.
Defective DF shift
motor 1.
Replace the DF shift motor 1.
Defective DF main
PWB.
Replace the DF main PWB and check for
correct operation.(see page 1-5-2)
Defective connector cable or poor
contact in the connector.
Reinsert the connector. Also check for continuity within the connector cable. If none,
replace the cable.
DF shift motor 2 and DF main PWB (YC14)
DF shift sensor 2 and DF main PWB (YC23)
Defective DF shift
sensor 2.
Replace the DF shift sensor 2.
Defective DF shift
motor 2.
Replace the DF shift motor 2.
Defective DF main
PWB.
Replace the DF main PWB and check for
correct operation.(see page 1-5-2)
8110
8120
DF shift motor 1 error
When the DF shift motor 1 is
driven, DF shift sensor 1 does
not turn on within 160 ms.
DF shift motor 2 error
When the DF shift motor 2 is
driven, DF shift sensor 2 does
not turn on within 160 ms.
1-4-14
3NB/3ND/3N0/3NK
Check procedures/
corrective measures
Code
Contents
Causes
8130
DF shift release motor error
When the DF shift release
motor is driven, DF shift
release sensor does not turn
on within 1 s.
Defective connector cable or poor
contact in the connector.
Reinsert the connector. Also check for continuity within the connector cable. If none,
replace the cable.
DF shift release motor and DF main PWB
(YC14)
DF shift release sensor and DF main PWB
(YC23)
Defective DF shift
release sensor.
Replace the DF shift release sensor.
Defective DF shift
release motor.
Replace the DF shift release motor.
Defective DF main
PWB.
Replace the DF main PWB and check for
correct operation.(see page 1-5-2)
Defective connector cable or poor
contact in the connector (4000-sheet
finisher).
Reinsert the connector. Also check for continuity within the connector cable. If none,
replace the cable.
DF tray motor and DF main PWB (YC16)
DF tray sensor 1 and DF main PWB (YC22)
DF tray upper surface sensor and DF main
PWB (YC21, YC13)
Defective connector cable or poor
contact in the connector (1000-sheet
finisher).
Reinsert the connector. Also check for continuity within the connector cable. If none,
replace the cable.
DF tray motor and DF main PWB (YC14)
DF tray sensor 1 and DF main PWB (YC20)
DF tray upper surface sensor and DF main
PWB (YC18)
Defective sensor.
Replace DF tray sensor 1 or DF tray upper
surface sensor.
Defective DF tray
motor.
Replace the DF tray motor.
Defective DF main
PWB.
Replace the DF main PWB and check for
correct operation.(see page 1-5-2)
8140
DF tray motor error 1
When the main tray has
started ascending, DF tray
sensor 1 or DF tray upper surface sensor does not turn on
within 20 s.
1-4-15
3NB/3ND/3N0/3NK
Check procedures/
corrective measures
Code
Contents
Causes
8150
DF tray motor error 2
When the main tray has
descended, DF tray sensor 1
or DF tray upper surface sensor does not turn off within
5 s.
Defective connector cable or poor
contact in the connector (4000-sheet
finisher).
Reinsert the connector. Also check for continuity within the connector cable. If none,
replace the cable.
DF tray motor and DF main PWB (YC16)
DF tray sensor 1 and DF main PWB (YC22)
DF tray upper surface sensor and DF main
PWB (YC21, YC13)
Defective connector cable or poor
contact in the connector (1000-sheet
finisher).
Reinsert the connector. Also check for continuity within the connector cable. If none,
replace the cable.
DF tray motor and DF main PWB (YC14)
DF tray sensor 1 and DF main PWB (YC20)
DF tray upper surface sensor and DF main
PWB (YC18)
Defective sensor.
Replace DF tray sensor 1 or DF tray upper
surface sensor.
Defective DF tray
motor.
Replace the DF tray motor.
Defective DF main
PWB.
Replace the DF main PWB and check for
correct operation.(see page 1-5-2)
Defective connector cable or poor
contact in the connector (4000-sheet
finisher).
Reinsert the connector. Also check for continuity within the connector cable. If none,
replace the cable.
DF tray motor and DF main PWB (YC16)
DF tray sensor 3 and DF main PWB (YC23)
Defective connector cable or poor
contact in the connector (1000-sheet
finisher).
Reinsert the connector. Also check for continuity within the connector cable. If none,
replace the cable.
DF tray motor and DF main PWB (YC14)
DF tray sensor 3 and DF main PWB (YC20)
Defective DF tray
sensor 3.
Replace DF tray sensor 3.
Defective DF tray
motor.
Replace the DF tray motor.
Defective DF main
PWB.
Replace the DF main PWB and check for
correct operation.(see page 1-5-2)
8160
DF tray motor error 3
When the main tray has
descended, DF tray sensor 3
does not turn on within 20 s.
1-4-16
3NB/3ND/3N0/3NK
Check procedures/
corrective measures
Code
Contents
Causes
8170
DF side registration motor 1
error 1
When initial operation, DF
side registration sensor 1
does not turn on within 3 s.
Defective connector cable or poor
contact in the connector (4000-sheet
finisher).
Reinsert the connector. Also check for continuity within the connector cable. If none,
replace the cable.
DF side registration motor 1 and DF main
PWB (YC15)
DF side registration sensor 1 and DF main
PWB (YC22)
Defective connector cable or poor
contact in the connector (1000-sheet
finisher).
Reinsert the connector. Also check for continuity within the connector cable. If none,
replace the cable.
DF side registration motor 1 and DF main
PWB (YC11)
DF side registration sensor 1 and DF main
PWB (YC20)
Defective DF side
registration sensor
1.
Replace DF side registration sensor 1.
Defective DF side
registration motor
1.
Replace DF side registration motor 1.
Defective DF main
PWB.
Replace the DF main PWB and check for
correct operation.(see page 1-5-2)
Defective connector cable or poor
contact in the connector (4000-sheet
finisher).
Reinsert the connector. Also check for continuity within the connector cable. If none,
replace the cable.
DF side registration motor 1 and DF main
PWB (YC15)
DF side registration sensor 1 and DF main
PWB (YC22)
Defective connector cable or poor
contact in the connector (1000-sheet
finisher).
Reinsert the connector. Also check for continuity within the connector cable. If none,
replace the cable.
DF side registration motor 1 and DF main
PWB (YC11)
DF side registration sensor 1 and DF main
PWB (YC20)
Defective DF side
registration sensor
1.
Replace DF side registration sensor 1.
Defective DF side
registration motor
1.
Replace DF side registration motor 1.
Defective DF main
PWB.
Replace the DF main PWB and check for
correct operation.(see page 1-5-2)
8180
DF side registration motor 1
error 2
JAM6810 is detected twice.
1-4-17
3NB/3ND/3N0/3NK
Check procedures/
corrective measures
Code
Contents
Causes
8190
DF side registration motor 2
error 1
When initial operation, DF
side registration sensor 2
does not turn on within 3 s.
Defective connector cable or poor
contact in the connector (4000-sheet
finisher).
Reinsert the connector. Also check for continuity within the connector cable. If none,
replace the cable.
DF side registration motor 2 and DF main
PWB (YC15)
DF side registration sensor 2 and DF main
PWB (YC22)
Defective connector cable or poor
contact in the connector (1000-sheet
finisher).
Reinsert the connector. Also check for continuity within the connector cable. If none,
replace the cable.
DF side registration motor 2 and DF main
PWB (YC11)
DF side registration sensor 2 and DF main
PWB (YC20)
Defective DF side
registration sensor
2.
Replace DF side registration sensor 2.
Defective DF side
registration motor
2.
Replace DF side registration motor 2.
Defective DF main
PWB.
Replace the DF main PWB and check for
correct operation.(see page 1-5-2)
Defective connector cable or poor
contact in the connector (4000-sheet
finisher).
Reinsert the connector. Also check for continuity within the connector cable. If none,
replace the cable.
DF side registration motor 2 and DF main
PWB (YC15)
DF side registration sensor 2 and DF main
PWB (YC22)
Defective connector cable or poor
contact in the connector (1000-sheet
finisher).
Reinsert the connector. Also check for continuity within the connector cable. If none,
replace the cable.
DF side registration motor 2 and DF main
PWB (YC11)
DF side registration sensor 2 and DF main
PWB (YC20)
Defective DF side
registration sensor
2.
Replace DF side registration sensor 2.
Defective DF side
registration motor
2.
Replace DF side registration motor 2.
Defective DF main
PWB.
Replace the DF main PWB and check for
correct operation.(see page 1-5-2)
8200
DF side registration motor 2
error 2
JAM6910 is detected twice.
1-4-18
3NB/3ND/3N0/3NK
Code
Contents
Causes
Check procedures/
corrective measures
8210
DF slide motor error
When initial operation, DF staple sensor does not turn on
within 3 s.
Defective connector cable or poor
contact in the connector (4000-sheet
finisher).
Reinsert the connector. Also check for continuity within the connector cable. If none,
replace the cable.
DF slide motor and DF main PWB (YC12)
DF staple sensor and DF main PWB (YC22)
Defective connector cable or poor
contact in the connector (1000-sheet
finisher).
Reinsert the connector. Also check for continuity within the connector cable. If none,
replace the cable.
DF slide motor and DF main PWB (YC10)
DF staple sensor and DF main PWB (YC20)
Defective DF staple sensor.
Replace the DF staple sensor.
Defective DF slide
motor.
Replace the DF slide motor.
Defective DF main
PWB.
Replace the DF main PWB and check for
correct operation.(see page 1-5-2)
Defective connector cable or poor
contact in the connector (4000-sheet
finisher).
Reinsert the connector. Also check for continuity within the connector cable. If none,
replace the cable.
Staple unit and DF main PWB (YC17)
Defective connector cable or poor
contact in the connector (1000-sheet
finisher).
Reinsert the connector. Also check for continuity within the connector cable. If none,
replace the cable.
Staple unit and DF main PWB (YC11)
Defective DF staple sensor.
Replace the staple unit.
8230
DF staple motor error
JAM7000 is detected twice.
Defective DF staple motor.
8300
Center-folding unit communication error
Communication with the center-folding unit is not possible.
Defective DF main
PWB.
Replace the DF main PWB and check for
correct operation.(see page 1-5-2)
Defective connector cable or poor
contact in the connector.
Reinsert the connector. Also check for continuity within the connector cable. If none,
replace the cable.
CF main PWB (YC7) and DF main PWB
(YC9)
Defective CF set
sensor.
Replace the CF set sensor.
Defective PWB.
Replace the CF main PWB or the DF main
PWB and check for correct operation.
1-4-19
3NB/3ND/3N0/3NK
Check procedures/
corrective measures
Code
Contents
Causes
8310
CF side registration motor 2
error
When initial operation, CF
side registration sensor 2
does not turn on within 1 s.
Defective connector cable or poor
contact in the connector.
Reinsert the connector. Also check for continuity within the connector cable. If none,
replace the cable.
CF side registration motor 2 and CF main
PWB (YC10)
CF side registration sensor 2 and CF main
PWB (YC20)
Defective CF side
registration sensor
2.
Replace CF side registration sensor 2.
Defective CF side
registration motor
2.
Replace CF side registration motor 2.
Defective CF main
PWB.
Replace the CF main PWB and check for
correct operation.
Defective connector cable or poor
contact in the connector.
Reinsert the connector. Also check for continuity within the connector cable. If none,
replace the cable.
CF adjustment motor 1, 2 and CF main PWB
(YC10)
CF adjustment sensor 1, 2 and CF main
PWB (YC20)
Defective CF
adjustment sensor
1, 2.
Replace CF adjustment sensor 1, 2.
Defective CF
adjustment motor
1, 2.
Replace CF adjustment motor 1, 2.
Defective CF main
PWB.
Replace the CF main PWB and check for
correct operation.
Defective connector cable or poor
contact in the connector.
Reinsert the connector. Also check for continuity within the connector cable. If none,
replace the cable.
CF blade motor and CF main PWB (YC15)
CF blade sensor and CF main PWB (YC20)
Defective CF blade
sensor.
Replace the CF blade sensor.
Defective CF blade
motor.
Replace the CF blade motor.
Defective CF main
PWB.
Replace the CF main PWB and check for
correct operation.
8320
8330
CF adjustment motor error
When initial operation, CF
adjustment sensor does not
turn on within 2.5 s.
CF blade motor error
When initial operation, CF
blade sensor does not turn on
within 1.5 s.
1-4-20
3NB/3ND/3N0/3NK
Code
8340
Contents
CF staple motor error
JAM7600 is detected twice.
Causes
Check procedures/
corrective measures
Defective connector cable or poor
contact in the connector.
Reinsert the connector. Also check for continuity within the connector cable. If none,
replace the cable.
CF staple unit and CF main PWB (YC13)
Defective CF staple sensor.
Replace the CF staple unit.
Defective CF staple motor.
8350
8360
CF side registration motor 1
error
When initial operation, CF
side registration sensor 1
does not turn on within 1 s.
CF main motor error
During driving the motor, lock
signal is detected for 1 s continuously.
Defective CF main
PWB.
Replace the CF main PWB and check for
correct operation.
Defective connector cable or poor
contact in the connector.
Reinsert the connector. Also check for continuity within the connector cable. If none,
replace the cable.
CF side registration motor 1 and CF main
PWB (YC10)
CF side registration sensor 1 and CF main
PWB (YC20)
Defective CF side
registration sensor
1.
Replace CF side registration sensor 1.
Defective CF side
registration motor
1.
Replace CF side registration motor 1.
Defective CF main
PWB.
Replace the CF main PWB and check for
correct operation.
Defective connector cable or poor
contact in the connector.
Reinsert the connector. Also check for continuity within the connector cable. If none,
replace the cable.
CF main motor and CF main PWB (YC16)
Defective CF main
motor.
Replace the CF main motor.
Defective CF main
PWB.
Replace the CF main PWB and check for
correct operation.
1-4-21
3NB/3ND/3N0/3NK
Check procedures/
corrective measures
Code
Contents
Causes
8410
Punch slide motor error 1
The punch slide sensor won’t
turn On when home position
has been moved by 30 mm.
Defective connector cable or poor
contact in the connector (4000-sheet
finisher).
Reinsert the connector. Also check for continuity within the connector cable. If none,
replace the cable.
Punch slide motor and punch PWB (YC3)
Punch slide sensor and punch PWB (YC6)
Punch PWB (YC1) and DF main PWB (YC7)
Defective connector cable or poor
contact in the connector (1000-sheet
finisher).
Reinsert the connector. Also check for continuity within the connector cable. If none,
replace the cable.
Punch slide motor and punch PWB (YC3)
Punch slide sensor and punch PWB (YC6)
Punch PWB (YC1) and DF main PWB (YC8)
Defective slide
sensor.
Replace the punch slide sensor.
Defective punch
slide motor.
Replace the punch slide motor.
Defective PWB.
Replace the punch PWB or DF main PWB
and check for correct operation.
(see page 1-5-2)
Defective connector cable or poor
contact in the connector (4000-sheet
finisher).
Reinsert the connector. Also check for continuity within the connector cable. If none,
replace the cable.
Punch slide motor and punch PWB (YC3)
Punch PWB (YC1) and DF main PWB (YC7)
Defective connector cable or poor
contact in the connector (1000-sheet
finisher).
Reinsert the connector. Also check for continuity within the connector cable. If none,
replace the cable.
Punch slide motor and punch PWB (YC3)
Punch PWB (YC1) and DF main PWB (YC8)
Defective punch
slide motor.
Replace the punch slide motor.
Defective PWB.
Replace the punch PWB or DF main PWB
and check for correct operation.
(see page 1-5-2)
8420
Punch slide motor error 2
In detection of paper edges,
the paper edge cannot be
detected in 30 mm move.
1-4-22
3NB/3ND/3N0/3NK
Check procedures/
corrective measures
Code
Contents
Causes
8430
Punch unit communication
error
Communication with the
punch unit is not possible.
Defective connector cable or poor
contact in the connector (4000-sheet
finisher).
Reinsert the connector. Also check for continuity within the connector cable. If none,
replace the cable.
Punch PWB (YC1) and DF main PWB (YC7)
Defective connector cable or poor
contact in the connector (1000-sheet
finisher).
Reinsert the connector. Also check for continuity within the connector cable. If none,
replace the cable.
Punch PWB (YC1) and DF main PWB (YC8)
Defective PWB.
Replace the punch PWB or the DF main
PWB and check for correct operation.
(see page 1-5-2)
Defective connector cable or poor
contact in the connector.
Reinsert the connector. Also check for continuity within the connector cable. If none,
replace the cable.
MB main PWB (YC3) and DF main PWB
(YC6)
Defective PWB.
Replace the MB main PWB or the DF main
PWB and check for correct operation.
(see page 1-5-2)
Defective connector cable or poor
contact in the connector.
Reinsert the connector. Also check for continuity within the connector cable. If none,
replace the cable.
MB conveying motor and MB main PWB
(YC5)
MB home position sensor and MB main
PWB (YC2)
8500
8510
Mailbox communication
error
Communication with the mailbox is not possible.
MB conveying motor error 1
When initial operation, MB
home position sensor does
not turn on within 5 s.
Replace the MB home position sensor.
Defective MB
home position sensor.
Defective MB conveying motor.
Replace the MB conveying motor.
Defective MB main
PWB.
Replace the MB main PWB and check for
correct operation.
1-4-23
3NB/3ND/3N0/3NK
Code
Contents
Causes
8520
MB conveying motor error 2
When standby operation, MB
home position sensor does
not turn off within 1 s.
Defective connector cable or poor
contact in the connector.
Check procedures/
corrective measures
Reinsert the connector. Also check for continuity within the connector cable. If none,
replace the cable.
MB conveying motor and MB main PWB
(YC5)
MB home position sensor and MB main
PWB (YC2)
Replace the MB home position sensor.
Defective MB
home position sensor.
8800
8900
Document finisher communication error
Communication with the document finisher is not possible.
Document finisher backup
error
Read and write data does not
match 3 times in succession.
Defective MB conveying motor.
Replace the MB conveying motor.
Defective MB main
PWB.
Replace the MB main PWB and check for
correct operation.
Defective connector cable or poor
contact in the connector (4000-sheet
finisher).
Reinsert the connector. Also check for continuity within the connector cable. If none,
replace the cable.
DF main PWB (YC4) and engine PWB
(YC18)
Defective connector cable or poor
contact in the connector (1000-sheet
finisher).
Reinsert the connector. Also check for continuity within the connector cable. If none,
replace the cable.
DF main PWB (YC7) and engine PWB
(YC18)
Defective PWB.
Replace the DF main PWB or the engine
PWB and check for correct operation.
(see page 1-5-2)
Defective connector cable or poor
contact in the connector (4000-sheet
finisher).
Reinsert the connector. Also check for continuity within the connector cable. If none,
replace the cable.
DF main PWB (YC4) and engine PWB
(YC18)
Defective connector cable or poor
contact in the connector (1000-sheet
finisher).
Reinsert the connector. Also check for continuity within the connector cable. If none,
replace the cable.
DF main PWB (YC7) and engine PWB
(YC18)
Improper installation EEPROM.
Check the installation of the EEPROM and
remedy if necessary.
Defective DF main
PWB.
Replace the DF main PWB and check for
correct operation.(see page 1-5-2)
1-4-24
3NB/3ND/3N0/3NK
Check procedures/
corrective measures
Code
Contents
Causes
8930
Center-folding unit backup
error
Read and write data does not
match 3 times in succession.
Defective connector cable or poor
contact in the connector.
Reinsert the connector. Also check for continuity within the connector cable. If none,
replace the cable.
CF main PWB (YC7) and DF main PWB
(YC9)
Improper installation EEPROM.
Check the installation of the EEPROM and
remedy if necessary.
Defective CF main
PWB.
Replace the CF main PWB and check for
correct operation.
1-4-25
3NB/3ND/3N0/3NK
1-4-3 Electric problems
If the part causing the problem was not supplied, use the unit including the part for replacement.
Troubleshooting to each failure must be in the order of the numbered symptoms.
Problem
Causes
Check procedures/corrective measures
(1)
DF paper entrance
motor does not
operate.
1. Defective connector
cable or poor contact in the connector.
Reinsert the connector. Also check for continuity within the
connector cable. If none, replace the cable.
DF paper entrance motor and DF main PWB (YC12)
(2)
DF middle motor
does not operate.
2. Defective drive trans- Check if the rollers and gears rotate smoothly. If not,
mission system.
grease the bushes and gears. Check for broken gears and
replace if any.
3. Defective motor.
Replace the DF paper entrance motor.
4. Defective PWB.
Replace the DF main PWB and check for correct operation.
(see page 1-5-2)
1. Defective connector
cable or poor contact in the connector.
Reinsert the connector. Also check for continuity within the
connector cable. If none, replace the cable.
DF middle eject motor and DF main PWB (YC12)
2. Defective drive trans- Check if the rollers and gears rotate smoothly. If not,
mission system.
grease the bushes and gears. Check for broken gears and
replace if any.
(3)
DF paddle motor
does not operate.
3. Defective motor.
Replace the DF middle eject motor.
4. Defective PWB.
Replace the DF main PWB and check for correct operation.
(see page 1-5-2)
1. Defective connector
cable or poor contact in the connector.
Reinsert the connector. Also check for continuity within the
connector cable. If none, replace the cable.
DF paddle motor and DF main PWB (YC15)
2. Defective drive trans- Check if the rollers and gears rotate smoothly. If not,
mission system.
grease the bushes and gears. Check for broken gears and
replace if any.
(4)
DF eject release
motor does not
operate.
3. Defective motor.
Replace the DF paddle motor.
4. Defective PWB.
Replace the DF main PWB and check for correct operation
(see page 1-5-2).
1. Defective connector
cable or poor contact in the connector.
Reinsert the connector. Also check for continuity within the
connector cable. If none, replace the cable.
DF eject release motor and DF main PWB (YC12)
2. Defective drive trans- Check if the rollers and gears rotate smoothly. If not,
mission system.
grease the bushes and gears. Check for broken gears and
replace if any.
3. Defective motor.
Replace the DF eject release motor.
4. Defective PWB.
Replace the DF main PWB and check for correct operation.
(see page 1-5-2)
1-4-26
3NB/3ND/3N0/3NK
Problem
(5)
DF eject motor
does not operate.
Causes
Check procedures/corrective measures
1. Defective connector
cable or poor contact in the connector.
Reinsert the connector. Also check for continuity within the
connector cable. If none, replace the cable.
DF eject motor and DF main PWB (YC12)
2. Defective drive trans- Check if the rollers and gears rotate smoothly. If not,
mission system.
grease the bushes and gears. Check for broken gears and
replace if any.
(6)
DF side registration motor 1,2 does
not operate.
(7)
DF drum motor
does not operate.
3. Defective motor.
Replace the DF eject motor.
4. Defective PWB.
Replace the DF main PWB and check for correct operation
(see page 1-5-2).
1. Defective connector
cable or poor contact in the connector.
Reinsert the connector. Also check for continuity within the
connector cable. If none, replace the cable.
DF side registration motor 1,2 and DF main PWB (YC15)
2. Defective drive trans- Check if the rollers and gears rotate smoothly. If not,
mission system.
grease the bushes and gears. Check for broken gears and
replace if any.
3. Defective motor.
Replace the DF side registration motor 1,2.
4. Defective PWB.
Replace the DF main PWB and check for correct operation
(see page 1-5-2).
1. Defective connector
cable or poor contact in the connector.
Reinsert the connector. Also check for continuity within the
connector cable. If none, replace the cable.
DF drum motor and DF main PWB (YC18)
2. Defective drive trans- Check if the rollers and gears rotate smoothly. If not,
mission system.
grease the bushes and gears. Check for broken gears and
replace if any.
(8)
DF tray motor does
not operate.
3. Defective motor.
Replace the DF drum motor.
4. Defective PWB.
Replace the DF main PWB and check for correct operation(see page 1-5-2).
1. Defective connector
cable or poor contact in the connector.
Reinsert the connector. Also check for continuity within the
connector cable. If none, replace the cable.
DF tray motor and DF main PWB (YC19)
2. Defective drive trans- Check if the rollers and gears rotate smoothly. If not,
mission system.
grease the bushes and gears. Check for broken gears and
replace if any.
3. Defective motor.
Replace the DF tray motor.
4. Defective PWB.
Replace the DF main PWB and check for correct operation
(see page 1-5-2).
1-4-27
3NB/3ND/3N0/3NK
Problem
(9)
DF shift release
motor does not
operate.
(10)
DF shift motor 1,2
does not operate.
Causes
Check procedures/corrective measures
1. Defective connector
cable or poor contact in the connector.
Reinsert the connector. Also check for continuity within the
connector cable. If none, replace the cable.
DF shift release motor and DF main PWB (YC14)
2. Defective drive trans- Check if the rollers and gears rotate smoothly. If not,
mission system.
grease the bushes and gears. Check for broken gears and
replace if any.
3. Defective motor.
Replace the DF shift release motor.
4. Defective PWB.
Replace the DF main PWB and check for correct operation.
(see page 1-5-2)
1. Defective connector
cable or poor contact in the connector.
Reinsert the connector. Also check for continuity within the
connector cable. If none, replace the cable.
DF shift motor 1,2 and DF main PWB (YC14)
2. Defective drive trans- Check if the rollers and gears rotate smoothly. If not,
mission system.
grease the bushes and gears. Check for broken gears and
replace if any.
(11)
DF staple motor
does not operate.
3. Defective motor.
Replace the DF shift motor 1,2.
4. Defective PWB.
Replace the bridge PWB and check for correct operation.
(see page 1-5-2)
1. Defective connector
cable or poor contact in the connector.
Reinsert the connector. Also check for continuity within the
connector cable. If none, replace the cable.
DF staple motor and DF main PWB (YC17)
2. Defective drive trans- Check if the rollers and gears rotate smoothly. If not,
mission system.
grease the bushes and gears. Check for broken gears and
replace if any.
(12)
DF slide motor
does not operate.
3. Defective motor.
Replace the DF staple unit.(see page 1-5-4)
4. Defective PWB.
Replace the DF main PWB and check for correct operation.
(see page 1-5-2)
1. Defective connector
cable or poor contact in the connector.
Reinsert the connector. Also check for continuity within the
connector cable. If none, replace the cable.
DF slide motor and DF main PWB (YC12)
2. Defective drive trans- Check if the rollers and gears rotate smoothly. If not,
mission system.
grease the bushes and gears. Check for broken gears and
replace if any.
(13)
DF feedshift solenoid 1,2,3 does not
operate.
3. Defective motor.
Replace the DF slide motor
4. Defective PWB.
Replace the DF main PWB and check for correct operation.
(see page 1-5-2)
1. Defective connector
cable or poor contact in the connector.
Reinsert the connector. Also check for continuity within the
connector cable. If none, replace the cable.
DF feedshift solenoid 1,2,3 and DF main PWB (YC18)
2. Defective solenoid.
Replace the DF feedshift solenoid 1,2,3.
3. Defective PWB.
Replace the DF main PWB and check for correct operation
(see page 1-5-2).
1-4-28
3NB/3ND/3N0/3NK
Problem
(14)
DF eject clutch
does not operate.
(15)
Bridge conveying
motor1,2 does not
operate.
(16)
Bridge solenoid
does not operate.
(17)
CF main motor
does not operate.
Causes
Check procedures/corrective measures
1. Defective connector
cable or poor contact in the connector.
Reinsert the connector. Also check for continuity within the
connector cable. If none, replace the cable.
DF eject clutch and DF main PWB (YC14)
2. Defective solenoid.
Replace the DF eject clutch.
3. Defective PWB.
Replace the DF main PWB and check for correct operation
(see page 1-5-2).
1. Defective connector
cable or poor contact in the connector.
Reinsert the connector. Also check for continuity within the
connector cable. If none, replace the cable.
Bridge conveying motor1,2 and bridge PWB (YC7)
2. Defective drive trans- Check if the rollers and gears rotate smoothly. If not,
mission system.
grease the bushes and gears. Check for broken gears and
replace if any.
3. Defective motor.
Replace the bridge conveying motor1,2.
4. Defective PWB.
Replace the bridge PWB and check for correct operation.
1. Defective connector
cable or poor contact in the connector.
Reinsert the connector. Also check for continuity within the
connector cable. If none, replace the cable.
Bridge solenoid and engine PWB (YC20)
2. Defective solenoid.
Replace the bridge solenoid.
3. Defective PWB.
Replace the engine PWB and check for correct operation.
1. Defective connector
cable or poor contact in the connector.
Reinsert the connector. Also check for continuity within the
connector cable. If none, replace the cable.
CF main motor and CF main PWB (YC16)
2. Defective drive trans- Check if the rollers and gears rotate smoothly. If not,
mission system.
grease the bushes and gears. Check for broken gears and
replace if any.
(18)
CF adjustment
motor 1,2 does not
operate.
(19)
CF side registration motor 1,2 does
not operate.
3. Defective motor.
Replace the CF main motor.
4. Defective PWB.
Replace the CF main PWB and check for correct operation.
1. Defective connector
cable or poor contact in the connector.
Reinsert the connector. Also check for continuity within the
connector cable. If none, replace the cable.
CF adjustment motor 1,2 and CF main PWB (YC10)
2. Defective drive trans- Check if the rollers and gears rotate smoothly. If not,
mission system.
grease the bushes and gears. Check for broken gears and
replace if any.
3. Defective motor.
Replace the CF adjustment motor 1,2.
4. Defective PWB.
Replace the CF main PWB and check for correct operation.
1. Defective connector
cable or poor contact in the connector.
Reinsert the connector. Also check for continuity within the
connector cable. If none, replace the cable.
CF side registration motor 1,2 and CF main PWB (YC10)
2. Defective drive trans- Check if the rollers and gears rotate smoothly. If not,
mission system.
grease the bushes and gears. Check for broken gears and
replace if any.
3. Defective motor.
Replace the CF side registration motor 1,2.
4. Defective PWB.
Replace the CF main PWB and check for correct operation.
1-4-29
3NB/3ND/3N0/3NK
Problem
(20)
CF paper entry
motor does not
operate.
(21)
CF staple motor
does not operate.
Causes
Check procedures/corrective measures
1. Defective connector
cable or poor contact in the connector.
Reinsert the connector. Also check for continuity within the
connector cable. If none, replace the cable.
CF paper entry motor and CF main PWB (YC10)
2. Defective drive trans- Check if the rollers and gears rotate smoothly. If not,
mission system.
grease the bushes and gears. Check for broken gears and
replace if any.
3. Defective motor.
Replace the CF paper entry motor.
4. Defective PWB.
Replace the CF main PWB and check for correct operation.
1. Defective connector
cable or poor contact in the connector.
Reinsert the connector. Also check for continuity within the
connector cable. If none, replace the cable.
CF staple motor and CF main PWB (YC13)
2. Defective drive trans- Check if the rollers and gears rotate smoothly. If not,
mission system.
grease the bushes and gears. Check for broken gears and
replace if any.
(22)
CF feedshift solenoid does not operate.
(23)
Mailbox drive
motor does not
operate.
(24)
Punch motor does
not operate.
3. Defective motor.
Replace the CF staple motor.
4. Defective PWB.
Replace the CF main PWB and check for correct operation.
1. Defective connector
cable or poor contact in the connector.
Reinsert the connector. Also check for continuity within the
connector cable. If none, replace the cable.
CF feedshift solenoid and DF main PWB (YC17)
2. Defective solenoid.
Replace the CF feedshift solenoid.
3. Defective PWB.
Replace the CF main PWB and check for correct operation.
1. Defective connector
cable or poor contact in the connector.
Reinsert the connector. Also check for continuity within the
connector cable. If none, replace the cable.
Mailbox drive motor and CF main PWB (YC5)
2. Defective drive trans- Check if the rollers and gears rotate smoothly. If not,
mission system.
grease the bushes and gears. Check for broken gears and
replace if any.
3. Defective motor.
Replace the Mailbox drive motor.
4. Defective PWB.
Replace the Mailbox main PWB and check for correct operation.
1. Defective connector
cable or poor contact in the connector.
Reinsert the connector. Also check for continuity within the
connector cable. If none, replace the cable.
Punch motor and Punch PWB (YC4)
2. Defective drive trans- Check if the rollers and gears rotate smoothly. If not,
mission system.
grease the bushes and gears. Check for broken gears and
replace if any.
3. Defective motor.
Replace the Punch motor.
4. Defective PWB.
Replace the Punch PWB and check for correct operation.
1-4-30
3NB/3ND/3N0/3NK
Problem
Causes
Check procedures/corrective measures
(25)
Punch slide motor
does not operate.
1. Defective connector
cable or poor contact in the connector.
Reinsert the connector. Also check for continuity within the
connector cable. If none, replace the cable.
Punch slide motor and Punch PWB (YC3)
2. Defective drive trans- Check if the rollers and gears rotate smoothly. If not,
mission system.
grease the bushes and gears. Check for broken gears and
replace if any.
(26)
A paper jam is indicated when the
main power switch
is turned on.
(27)
[Out of staples.
Add staples.] is
displayed when the
main power switch
is turned on.
3. Defective motor.
Replace the Punch slide motor.
4. Defective PWB.
Replace the Punch PWB and check for correct operation.
1. A piece of paper torn Check visually and remove it, if any.
from paper is caught
around sensor.
Bridge to DF
Bridge conveying
sensor1,2 or bridge
eject sensor,DF
paper entrance
sensor, DF middle
sensor, DF eject
paper sensor, DF
sub eject sensor, DF
drum sensor
Center-folding unit
CF paper conveying
sensor,CF paper
entry sensor CF
eject sensor
Mail box
Tray overflow switch
1 to 7,Tray eject sensor
2. Defective sensor.
Replace the bridge conveying sensor1,2 or bridge eject
sensor,DF paper entrance sensor, DF middle sensor, DF
eject paper sensor, DF sub eject sensor, DF drum sensor(Bridge,DF),CF paper conveying sensor,CF paper entry
sensor CF eject sensor(Center-folding unit),Tray overflow
switch 1 to 7 or Tray eject sensor(Mail box).
1. Defective connector
cable or poor contact in the connector.
Reinsert the connector. Also check for continuity within the
connector cable. If none, replace the cable.
Stapler empty sensor and DF main PWB (YC12)
2. Defective stapler
empty sensor.
Replace the staple unit.
(see page 1-5-4)
3. Defective PWB.
Replace the DF main PWB and check for correct operation.
(see page 1-5-2)
1-4-31
3NB/3ND/3N0/3NK
1-4-4 Mechanical problems
If the part causing the problem was not supplied, use the unit including the part for replacement.
Problem
(1)
Paper jams.
(Bridge unit)
(2)
Paper jams.
(Finisher)
Causes/check procedures
Paper outside specifications is used.
Corrective measures
Use only paper conforming to the specifications.
Check if the surfaces of the following roll- Clean with isopropyl alcohol.
ers are dirty with paper powder.
Paper conveying roller
Paper conveying pulley
Feedshift roller
Feedshift pulley
Eject roller 1,2
Eject pulley 1,2
Check if the contact between the paper
conveying roller and paper conveying
pulley is correct.
Check visually and remedy if necessary.
Check if the contact between the feedshift roller and feedshift pulley is correct.
Check visually and remedy if necessary.
Check if the contact between the eject
roller 1,2 and eject pulley 1,2 is correct.
Check visually and remedy if necessary.
Paper outside specifications is used.
Use only paper conforming to the specifications.
Check if the surfaces of the following roll- Clean with isopropyl alcohol.
ers are dirty with paper powder.
Paper entry roller
Paper entry pulley
Middle roller
Middle pulley
Main tray eject roller
Eject pulley
Left sub tray feed roller
Feed pulley
Left sub tray eject roller
Eject pulley
Check if the contact between the paper
entry roller and paper entry pulley is correct.
Check visually and remedy if necessary.
Check if the contact between the middle
roller and middle pulley is correct.
Check visually and remedy if necessary.
Check if the contact between the Main
Check visually and remedy if necessary.
tray eject roller and eject pulley is correct.
Check if the contact between the left sub Check visually and remedy if necessary.
tray feed roller and feed pulley is correct.
Check if the contact between the Left sub Check visually and remedy if necessary.
tray eject roller and eject pulley is correct.
1-4-32
3NB/3ND/3N0/3NK
Problem
(3)
Paper jams.
(Center-folding unit)
Causes/check procedures
Paper outside specifications is used.
Corrective measures
Use only paper conforming to the specifications.
Check if the surfaces of the following roll- Clean with isopropyl alcohol.
ers are dirty with paper powder.
CF paper conveying roller 1
CF paper conveying pulley
CF paper conveying roller 2
CF paper conveying pulley
CF paper entry roller
CF paper entry pulley
CF paper conveying roller 3
CF paper conveying pulley
CF eject roller
CF eject pulley
Check if the contact between the CF
paper conveying roller 1,2,3 and CF
paper conveying pulley is correct.
Check visually and remedy if necessary.
Check visually and remedy if necessary.
Check if the contact between the CF
paper entry roller and CF paper entry pulley is correct.
Check if the contact between the CF
Check visually and remedy if necessary.
eject roller and CF eject pulley is correct.
(4)
Paper jams.
(Mail box)
Abnormal noise is
heard.
Paper outside specifications is used.
Use only paper conforming to the specifications.
Check if the surfaces of the following roll- Clean with isopropyl alcohol.
ers are dirty with paper powder.
Paper conveying rollers
Paper conveying pulleys
Eject roller
Eject pulley
Check if the contact between the Paper
conveying rollers and Paper conveying
pulleys is correct.
Check visually and remedy if necessary.
Check if the contact between the Eject
roller and Eject pulley is correct.
Check visually and remedy if necessary.
Check if the rollers, pulleys and gears
operate smoothly.
Grease the bushes and gears.
1-4-33
3NB/3ND/3N0/3NK
This page is intentionally left blank.
1-4-34
3NB/3ND/3N0/3NK
1-5 Assembly and disassembly
1-5-1 Precautions for assembly and disassembly
(1) Precautions
Before starting disassembly, press the Power key on the operation panel to off. Make sure that the Power
lamp is off before turning off the main power switch. And then unplug the power cable from the wall outlet.
When handling PWBs (printed wiring boards), do not touch parts with bare hands.
The PWBs are susceptible to static charge.
Do not touch any PWB containing ICs with bare hands or any object prone to static charge.
When removing the hook of the connector, be sure to release the hook.
Take care not to get the cables caught.
To reassemble the parts, use the original screws. If the types and the sizes of screws are not known, refer to
the PARTS LIST.
1-5-1
3NB/3ND/3N0/3NK
1-5-2 Document finisher section
(1) Detaching and refitting the PF main PWB
Procedure
1. Remove screw and then remove the lid
rear cover.
Lid rear cover
Screw
Figure 1-5-1
2. Remove three screws and then remove
the DF upper rear cover.
DF Upper rear cover
Screw
Screw
Screw
Figure 1-5-2
1-5-2
3NB/3ND/3N0/3NK
3. Remove all connectors from the DF
main PWB.
4. Remove six screws.
5. Remove the DF main PWB.
6. Check or replace the DF main PWB
and refit all the removed parts.
CAUTION:when replacing the DF main
PWB, remove the EEPROM (U2) from
the DF main PWB that has been
removed and then reattach it to the new
DF main PWB.
Screw
Screw
Screw
Screw
Screw
DF main PWB
Screw
1
1
13
1
13
4
20
YC18
YC12
1
YC17
2
YC16
1
YC3
YC19
19
6 14
YC21
YC14
6
1
4
1
YC20
12
1
YC4
YC8
YC7
2
YC15
1 7
12
YC5
1
1
1
1
1
30
1
YC9
16
5
YC22
YC6
YC11
1
8
15
11
6
1
YC10
4 YC13
YC1
1
5
1
1
5
YC23
X1
Figure 1-5-3
1-5-3
1
1
U2
YC2
18
3NB/3ND/3N0/3NK
(2) Detaching and refitting the Staple unit
Procedure
1. Open the DF upper front cover.
DF upper front cover
Figure 1-5-4
Staple cover
2. Insert a flat screwdriver under the lever
of the staple cover. Lift the lever
upwards to open.
3. Remove two connectors.
Connectors
Lever
Figure 1-5-5
1-5-4
3NB/3ND/3N0/3NK
4. Raise the front of the staple unit and
pull the staple unit frontwards.
5. Check or replace the Staple unit and
refit all the removed parts.
Hook
Figure 1-5-6
1-5-5
3NB/3ND/3N0/3NK
This page is intentionally left blank.
1-5-6
3NB/3ND/3N0/3NK
1-6 Requirements on PWB Replacement
1-6-1 Remarks on DF main PWB replacement
When replacing the DF main PWB, remove the EEPROM (U2) from the DF main PWB that has been removed
and then reattach it to the new DF main PWB.
DF main PWB
EEPROM
U2
Figure 1-6-1
1-6-1
3NB/3ND/3N0/3NK
1-6-2 Remarks on CF main PWB replacement
When replacing the CF main PWB, remove the EEPROM (U2) from the CF main PWB that has been removed
and then reattach it to the new CF main PWB.
EEPROM
U2
Figure 1-6-2
1-6-2
3NB/3ND/3N0/3NK
2-1 Mechanical Construction
2-1-1 Bridge unit section
The bridge unit section consists of the parts shown in figure below and discharges paper conveyed from the
machine to the document finisher or DF right sub tray.
13
12
2 5
2
5
2
11
10
8
9
7
6
1
4
1
3 1
Figure 2-1-1 Bridge unit section
1. Paper conveying roller
2. Paper conveying pulley
3. Bridge conveying sensor1 (BRCS1)
4. Bridge conveying sensor2 (BRCS2)
5. Actuator(Bridge conveying sensor)
6. Eject roller 1
7. Eject pulley 1
8. Feedshift roller
9. Feedshift pulley
10. Bridge eject sensor (BRES)
11. Actuator(Bridge eject sensor)
12. Eject roller 2
13. Eject pulley 2
2-1-1
3NB/3ND/3N0/3NK
BRPWB
YC20
YC1
YC20
YC3
BRIDGE2_B/,A/,B,A
EXIT_SENS
EXIT_SOL_REM
EXIT_SOL_RET
YC20-12,13
YC20-17
EPWB
BRIDGE_SENS2
BRIDGE1_B/,A/,B,A
YC7-5,6,7,8
YC4-2
YC7-1,2,3,4
BRIDGE_SENS1 YC6-2
BRSOL
BRES
BRCM
2
BRCM
1
BRCS2
BRCS1
Figure 2-1-2 Bridge unit section block diagram
2-1-2
3NB/3ND/3N0/3NK
2-1-2 Paper insertion,feedshift and DF left sub tray eject sections
The paper insertion section inserts paper from the machine into the finisher and then conveys it to the feedshift section.In addition, the paper insertion section switches the paper path to operate feedshift guide 3 and
ejects paper to the DF left sub tray or prosessing section.
7
9
8
6
11
10
4
5
2
3
1
Figure 2-1-3 Paper insertion,feedshift and DF left sub tray eject sections
1. Paper entry roller
2. Paper entry pulley
3. Feedshift guide 3
4. Left sub tray feed roller
5. Feed pulley
6. Left sub tray eject roller
7. Eject pulley
8. Sub eject sensor
9. Actuator(sub eject sensor)
10. DF paper entry sensor(DFPES)
11. DF left sub tray
STRY EJE SENS SIG
DFSES
STRY FULL SENS SIG
DFSTFS
EJECT MOT 2B,1B,2A,1A
DFEM
DFPES
DFFSSOL
ENTRY SENS SIG
SUB_MID SOL ACT
SUB_MID SOL KEEP
ENTRY MOT 2B,
1B,2A,1A
DFPEM
DFMPWB
YC21-3
YC21-6
YC12-5,6,7,8
YC21-9
YC18-12,13
YC12-13,14,
15,16
Figure 2-1-4 Paper insertion,feedshift and left sub tray eject sections block diagram
2-1-3
3NB/3ND/3N0/3NK
(1) Feedshift operation to DF left sub tray or prosessing section
Feedshift guide 3 operates by feedshift solenoid 3, switches the paper path carried to the feedshift section,
and conveys paper to the left sub tray or prosessing section. In addition, DF sub eject sensor detects paper
jam when ejecting to the DF left sub tray.
DF sub eject sensor
DF left sub tray
Right sub tray eject roller
DF feedshift solenoid 3
Feedshift guide 3
Feedshift to relief drum or prosessing section
Figure 2-1-5
2-1-4
3NB/3ND/3N0/3NK
2-1-3 Prosessing section
The processing section consists of the parts shown in figure below and discharges paper conveyed from the
bridge section to the eject tray. Also this section performs processing in the bundle discharge mode and the
staple mode.
In addition, the relief drum section switches the paper path with the operation of Feedshift guide 1 and Feedshift guide 2 and conveys paper to optional center-folding unit when centerfolding the paper
13 14 16,17
15
10 11 9
6 8 4
7
1
2
12
3
5
18
19
Figure 2-1-6 Processing section
1. Relief drum
2. Conveying pulley
3. Conveying pulley
4. Feedshift guide 1
5. Feedshift guide 2
6. DF drum sensor(DFDRS)
7. Actuator(df drum sensor)
8. DF middle sensor (DFMS)
9. Actuator(df middle sensor)
10. Middle roller
11. Middle pulley
12. Main tray eject roller
13. Eject pulley
14. DF eject paper sensor (DFMTS)
15. Bundle discharge unit
16. DF adjustment sensor 1 (DFSRS1)
17. DF adjustment sensor 2 (DFSRS2)
18. Staple unit
19. DF slide sensor (DFSLS)
2-1-5
3NB/3ND/3N0/3NK
DFMPWB
YC18-1,2,3,4
YC18-6,7
YC20-6
DRM MOT 2B,1B,2A,1A
SUB_DRM SOL ACT
SUB_DRM SOL KEEP
MID EJE SENS SIG
YC12-9,10, MIDDLE MOT 2B,1B,2A,1A
11,12
ADJUST SENS SIG
YC22-24
YC12-17,18,
19,20
YC15-1,2,3,4
YC20-26
YC22-27
EJE RELS MOT
2B,1B,2A,1A
PADDLE MOT
2B,1B,2A,1A
EJE PAP SENS SIG
BUNDLE SENS SIG
YC20-3 DRM SENS SIG
SIDE REG F SENS SIG
SIDE REG R SENS SIG
YC22-9,12
PADDLE SENS SIG
YC22-21
YC15-5,6,7,8
9,10,11,12
YC22-6
YC12-1,2,3,4
DFERM
SIDE REG R MOT
2B,1B,2A,1A
SIDE REG F MOT
2B,1B,2A,1A
DFADS
DFPDM
DFMM
DFEPS
DFDRSOL
DFBDS
DFDRS
DFMES
DFSRS1,2
DFPDS
DFSRM
1,2
DFCFSOL
DFSTM
DFSLM
STAPLE SENS SIG
DFSLS
ST MOV MOT
2B,1B,2A,1A
YC17-1,2,3,4, STP MOT OUT1,OUT2
5,6,7,8 SUB_BF SOL ACT
SUB_BF SOL KEEP
YC18-9,10
Figure 2-1-7 Processing section block diagram
2-1-6
DFDRM
3NB/3ND/3N0/3NK
(1) Relief drum operation
When more than one copy of A4 size paper are handled using the inner tray, feeding of the first and second
pages of the next job is sustained until the third page is fed in order to retain the time during which paper feeding is progressed.
1. Feedshift guide 1 operates by feedshift
solenoid 1, switches the paper path carried to the feedshift section and first
page of next group is carried to the
relief section.
2. In the same way, second page of next
group is carried to the relief drum.
DF feedshift solenoid 1
Feedshift guide 1
Relief drum
Figure 2-1-8
3. When third page of next group is carried
to the relief drum section, third page is
conveyed to prosessing section with
first and second pages.
At this time, paper conveying path is
switched with the operation of the feedshift guide 1.
Prosessing
section
Feedshift guide 1
Figure 2-1-9
2-1-7
3NB/3ND/3N0/3NK
4. Paper is fed into the center-folding unit
by steering the paper within the relief
drum as the DF feedshift solenoid 2 are
energized respectively.
DF feedshift solenoid 2
Feedshift guide 2
Center-folding unit
Figure 2-1-10
2-1-8
3NB/3ND/3N0/3NK
(2) Bundle discharge operation
1. Paper is fed to the processing section
by rotation of the paper entry roller and
middle roller. When the paper is conveyed into the processing section, the
DF eject release motor is driven to raise
the bundle discharge unit.
Bundle discharge unit
DF eject release motor
Middle roller
2. When the trailing edge of paper passes
through the middle roller, the paper conveying guide lowers and the paper is
fed to the adjustment tray by paddle.
DF adjustment motors 1 and 2 activate
the adjustment guide to adjust the
paper.
DF paddle motor
Paper conveying guide
Paddle
Adjustment tray
DF adjustment motor 1,2
3. When adjustment of the last sheet of
the bundle is completed, the Main tray
eject roller rotate to discharge the bundle of paper to the eject tray.
DF main tray
Main tray eject roller
Figure 2-1-11
2-1-9
3NB/3ND/3N0/3NK
2-1-4 Eject tray section
In the sort mode or staple mode, paper is ejected to the main tray. In addition, by selecting the destination
stack to the main tray, the paper is delivered to the main tray.
.
9
10 14
11,12
13
1
2,3
4
5
6
8
7
Figure 2-1-12 Eject tray section
1. DF eject clutch(DFCL)
2. DF tray surface sensor 1 (DFTUSS1)
3. DF tray surface sensor 2 (DFTUSS2)
4. DF tray sensor1(DFTS1)
5. DF tray sensor2(DFTS2)
6. DF tray sensor3(DFTS3)
7. DF tray sensor4(DFTS4)
8. DF tray sensor5(DFTS5)
9. DF Main tray(Tray A)
10. Side shift guide
11. DF shift sensor1(DFSFS1)
12. DF shift sensor2(DFSFS2)
13. DF shift set sensor(DFSFSS)
14. DF shift release sensor(DFSFRS)
2-1-10
3NB/3ND/3N0/3NK
DFMPWB
YC14-9
YC13-3
YC21-19
YC19-1,2,3,4
YC22-3
YC20-18
YC23-9
YC23-12
YC23-15
EJECT CL
DFECL
TRY U SENS SIG K
BRAKE,DIR,CLK,ENABLE
DFTUSS1,2
DFTM
MTRY HP1 SENS SIG
TRY HP2 SENS SIG
TRY HALF SENS SIG
MTRY BF SENS SIG
MTRY FULL SENS SIG
Figure 2-1-13 Eject tray section block diagram
2-1-11
DFTS1
DFTS2
DFTS3
DFTS5
DFTS4
3NB/3ND/3N0/3NK
(1) Main tray elevation operation
The main tray lowers when paper is stacked on it. Once stacking has completed and paper has been
removed, the main tray rises and stops at the home position. The main tray lowers and rises by the forward
and backward rotation of the main tray motor, respectively. The position of the main tray for elevation is
detected by the DF tray upper surface sensor 1/2 as they sense the top surface of the paper loaded on the
main tray. In addition, a paper empty state is detected by the main tray upper limit detection sensor as it
senses the upper most (home) position of the main tray.
DF Main tray
DF tray surface sensor 1,2
DF tray sensor 1
DF tray sensor 2
Figure 2-1-14
(2) Collation
Collation is achieved by laterally sliding the printed pages as the shift guide, which is recessed during collation
is not engaged, is set in position to slide the pages by the DF shift release motor, and subsequently put in
motion by the motors 1 and 2.
DF shift motor 1,2
DF shift release motor
Side shift guide
Figure 2-1-15
2-1-12
3NB/3ND/3N0/3NK
2-1-5 Center-folding unit section (option)
The center-folding unit delivers pages into the centerfold tray after center-fold or tri-fold the page by the centerfold blade.
It also delivers the pages in the centerfold tray after the paper is center-folded as well as stapled by the centerfold staple unit.
1
3
2
22
26
21 17 16
19 18 14
15
5
4
6
8
7
25
20
23
9
24
13 1211 10
Figure 2-1-16 Center-folding unit
1. CF paper conveying roller 1
2. CF paper conveying pulley
3. CF paper conveying sensor(CFPCS)
4. CF paper conveying roller 2
5. CF paper conveying pulley
6. CF paper entry roller
7. CF paper entry pulley
8. CF paper entry sensor (CFPES)
9. CF paper detection sensor (CFPS)
10. CF blade
11. CF blade sensor (CFBS)
12. CF right roller
13. CF left roller
14. CF upper roller
15. CF staple unit
16. CF eject sensor (CFES)
17. CF paper conveying roller 3
18. CF paper conveying pulley
19. CF feedshift guide
20. CF eject roller
21. CF eject pulley
22. CF tray paper full sensor (CFTFS)
23. Ejected paper holding arm
24. CF lower sliding plate
25. CF upper sliding plate
26. CF tray
2-1-13
3NB/3ND/3N0/3NK
DFMPWB
YC20-15
YC20-26
YC20-29
YC20-21
YC10-9,10,11,12
YC13-6,7,9,10
TRANS PORT
CFPCS
BULOW_HP
CARRY_IN
WDU_HP
CINMOT_2B,1B,2A,1A
STMOT_OUT1,2
CFPEM
OUT
YC20-12
YC20-9 FULL
3FSOL_ATT
3FSOL_HLD
YC17-2,3
YC20-18
YC20-6
YC10-17,18,19,20
YC10-13,14,15,16
YC20-24
YC20-3
YC10-1,2,3,4
YC16-1,2,3,4
YC15-1,2,3,4
YC10-5,6,7,8
CFADS2
CFES
CFTFS
CFFSSOL
STMMOT_2B,1B
STMMOT_2A,1A
EXCMOT_2B,1B
EXCMOT_2A,1A
CFSRS2
CFSTM
PAPER
WDL_HP
CFPES
CFPS
CFADM
2
CFADS1
CFSRS1
CFSRM
1
CFADM
1
CFBS
BLD_HP
BDLFT_HP
EXTMOT_2B,1B
EXTMOT_2A,1A
FLDMOT_DIR,ALM,CLK,EN
BLDMOT_DIR,ALM,CLK,EN
MDLMOT_2B,1B
MDLMOT_2A,1A
Figure 2-1-17 Center-folding unit block diagram
2-1-14
CFBM
CFMM
CFSRM
2
3NB/3ND/3N0/3NK
(1) Paper centerfold operation(center-folding,tri-folding)
Center-folding
1. The paper stuck at the center-folding unit is proceeded to the position at which it is centerfolded as driven
by CF adjustment motor 1 and 2.
2. Paper is aligned width wise as CF side registration motors 1 and 2.
CF lower sliding plate
CF upper sliding plate
CF adjustment motor 2
CF side registration
motor 1
CF adjustment motor 1
CF side registration
motor 2
Figure 2-1-18
3. With the drive of the CF blade motor, the CF blade pushes up the center of the paper and crowds CF left
and right rollers.
4. Center-folded paper is ejected to the CF tray with the operation of CF right and left rollers and CF eject
roller.
CF left roller
CF right roller
CF eject roller
Figure 2-1-19
2-1-15
CF blade
3NB/3ND/3N0/3NK
Tri-folding
1. The paper at the center-folding unit proceeds to the position at which it is center-folded as driven by CF
adjustment motors 1 and 2.
2. The sheets are aligned with each other width wise as the CF blade pushes the center of the paper
upwards and crowds the CF left and right rollers.
3. CF feedshift guide is operated by the CF feedshift solenoid which switches the paper path and conveys
the paper to the relief section.
CF feedshift solenoid
CF feedshift guide
Relief section
Figure 2-1-20
4. When the paper is stuck in the parking bay, its flexure is pinched between the right-side and top centerfolding rollers so that the paper is folded inward.
CF upper roller
Figure 2-1-21
2-1-16
3NB/3ND/3N0/3NK
5. The tri-folded paper is ejected to the CF tray as the CF paper conveying roller 3 and CF eject roller operate.
CF paper conveying roller 3
CF tray
Figure 2-1-22
2-1-17
3NB/3ND/3N0/3NK
2-1-6 Mailbox (option)
The mailbox ejects and stacks to specified tray 1 to 7.
8
9
10
11
12
13
14
4
4
4
4
4
4
4
3
3
7
3
7
2
3
1
7
3
7
2
3
1
7
3
7
2
1
7
5
Figure 2-1-23 Mailbox
1. Paper conveying pulleys
2. Paper conveying rollers
3. Eject pulleys
4. Eject rollers
5. Lower paper entry guide
6. Upper paper entry guide
7. Feedshift claws
8. Tray 1
9. Tray 2
10. Tray 3
11. Tray 4
12. Tray 5
13. Tray 6
14. Tray 7
2-1-18
6
3NB/3ND/3N0/3NK
TEJS
TEJS
YC1-18
TOFSW1
OFS1
TOFSW2
OFS2
YC1-5
TOFSW3
OFS3
YC1-8
YC1-2
MBMPWB
TOFSW4
OFS4
YC2-2
TOFSW5
OFS5
YC2-5
TOFSW6
OFS6
YC2-8
TOFSW7
OFS7
YC2-11
MBDM
MOTOR _A,A,B,_B
TEJS
MHPSW
LED
YC2-14
HP SIG
YC2-16
Figure 2-1-24 Mailbox block diagram
2-1-19
YC5-1,2,3,4
3NB/3ND/3N0/3NK
(1) Eject operation to mailbox tray
When the belt retainer that moves on the belt passes through the feedshift claw lever, the feedshift claw is
activated to switch the paper path for ejection to each tray. In addition, the tray eject sensor detects paper jam.
Tray eject sensor
Belt
Feedshift claw
Belt retainer
Tray eject sensor
Feedshift claw
lever
Figure 2-1-25
2-1-20
3NB/3ND/3N0/3NK
2-1-7 Punch unit(Option)
The punch unit is installed on the paper insertion section of the finisher. It stops paper conveyance and
punches paper.
.
1
4
5
2
3
Figure 2-1-26 Punch unit
1. Punch cam
2. Punch cutter
3. Punch waste box
4. Punch home position sensor(PUHPS)
5. Punch plus sensor(PUPS)
2-1-21
3NB/3ND/3N0/3NK
PUNPWB
PHMOT_N,P
PUM
PHMOT_HP
PUHPS
PHMOT_PLS
PUPS
PUTFS
PUSOL
PUPES2
PUSLS
PUPES1
PUSLM
YC1-1,3
YC8-6
YC1
YC2-2
24V2
YC8-3
PHTNK_FUL YC5-10
PHSOL_PUL,RET
YC5-2,3
PHPES_DET
YC7-1
PHADJ_HP
YC6-3
PHLED_A,B,C,D YC5-2,3,4,5
PHADJ_MOT 2B,1B
2A,1A YC3-1,2,3,4
YC7
YC8
DFMPWB
Figure 2-1-27 Punch unit block diagram
2-1-22
3NB/3ND/3N0/3NK
2-2 Electrical Parts Layout
2-2-1 Electrical parts layout
(1) PWBs
2
Machine front
1
Machine inside
Machine rear
Figure 2-2-1 PWBs
1. DF main PWB (DFMPWB).................... Controls electrical components.
2. Staple relay PWB (STRPWB) ............... Relay the staple unit control signal.
2-2-1
3NB/3ND/3N0/3NK
(2) Switches and sensors
19,20
18
25
17
15,16
22
6
3
1
23
7
2
8
4,5
21
24
9
14
10
11
Machine front
Machine inside
Machine rear
13
12
Figure 2-2-2 Switches and sensors
1. DF paper entrance sensor (DFPES) ..... Detects a paper misfeed in the entrance section.
2. DF middle sensor (DFMES).................. Detects a paper misfeed in the conveying section.
3. DF eject paper sensor (DFMTS) ........... Detects a paper in the eject section.
4. DF side registration sensor 1
(DFSRS1) ............................................ Detects the front registration plate in the home position.
5. DF side registration sensor 2
(DFSRS2) ............................................. Detects the rear registration plate in the home position.
2-2-2
3NB/3ND/3N0/3NK
6. DF adjustment sensor (DFADS) ........... Detects the adjustment unit in the home position.
7. DF bundle discharge unit sensor
(DFBDS) ............................................... Detects the position of the bundle discharge unit.
8. DF paddle sensor (DFPDS) .................. Detects the position of the paddle.
9. DF tray sensor 1 (DFTS1)..................... Detects the eject tray reaching the home position.
10. DF tray sensor 2 (DFTS2)..................... Detects the eject tray reaching the home position.
11. DF tray sensor 3 (DFTS3)..................... Detects the eject tray reaching the middle position.
12. DF tray sensor 4 (DFTS4)..................... Detects the eject tray reaching the lower limit.
13. DF tray sensor 5 (DFTS5)..................... Detects the eject tray reaching the lower limit.*1
14. DF slide sensor (DFSLS) ...................... Detects the slide position of the staple unit.
15. DF tray upper surface sensor 1
(DFTUSS1) ........................................... Detects upper surface of paper in the DF main tray.
16. DF tray upper surface sensor 2
(DFTUSS2) ........................................... Detects upper surface of paper in the DF main tray.
17. DF shift set sensor(DFSFSS) ............... Detects the side shift guide in the home position.
18. DF shift release sensor(DFSFRS) ........ Detects the side shift guide in the release position.
19. DF shift sensor1(DFSFS1).................... Detects the front side shift plate in the home position.
20. DF shift sensor2(DFSFS2).................... Detects the rear side shift plate in the home position.
21. DF sub try eject sensor(DFSES)........... Detects ejection of paper to the DF left sub tray.
22. DF sub try full sensor(DFSTFS)............ Detected overflow of ejected to the DF left sub tray.
23. DF drum sensor(DFDRS) ..................... Detects a paper in the relief drum section.
24. DF front cover sw (DFFCSW) ............... Detects opening/closing of the DF front cover.
25. DF eject cover sw (DFECSW) .............. Detects opening/closing of the DF eject cover.
*1: when optional center-folding unit of the machine is installed.
2-2-3
3NB/3ND/3N0/3NK
(3) Motors
11,12
8
4
10
1
2
3
7
5,6
9
13
14
Machine front
Machine inside
Machine rear
Figure 2-2-3 Motors
1. DF paper entrance motor (DFPEM)...... Drives the paper entrance roller.
2. DF middle motor (DFMM) ..................... Drives the middle roller.
3. DF paddle motor (DFPDM) ................... Drives the paddle.
4. DF eject release motor(DFERM) .......... Drives the eject release roller.
5. DF side registration motor 1
(DFSRM1)............................................ Drives the front registration plate.
6. DF side registration motor 2
(DFSRM2)............................................. Drives the rear registration plate.
7. DF drum motor (DFDRM) ..................... Drives the relief drum.
8. DF eject motor (DFEM)......................... Drives the eject roller.
9. DF tray motor (DFTM)........................... Raises and lowers the eject tray.
10. DF shift release motor (DFSFRM) ........ Drives the side shift plate.
11. DF shift motor1 (DFSFM1).................... Drives the front side shift plate.
12. DF shift motor2 (DFSFM2).................... Drives the rear side shift plate.
13. DF staple motor (DFSTM)..................... Drives the staple.
14. DF slide motor (DFSLM) ....................... Drives the staple unit.
2-2-4
3NB/3ND/3N0/3NK
(4) Solenoids and clutch
1
3
4
2
Machine front
Machine inside
Machine rear
Figure 2-2-4 Solenoids and clutch
1. DF feedshift solenoid 1 (DFDRSOL)..... Operates feedshift guide 1.
2. DF feedshift solenoid 2 (DFCFSOL) ..... Operates feedshift guide 2.
3. DF feedshift solenoid 3 (DFFSSOL) ..... Operates feedshift guide 3.
4. DF eject clutch (DFECL) ....................... Drives the eject roller.
2-2-5
3NB/3ND/3N0/3NK
(5) Bridge section
6
9
4
8
7
3
Machine front
5
2
1
Machine inside
Machine rear
Figure 2-2-5 Bridge section
1. Bridge PWB (BRPWB).......................... Controls the paper conveying section.
2. Bridge conveying sensor1 (BRCS1) ..... Detects a paper misfeed in the bridge section.
3. Bridge conveying sensor2 (BRCS2) ..... Detects a paper misfeed in the bridge section
4. Bridge eject sensor (BRES) .................. Detects a paper misfeed in the bridge eject section
5. Bridge conveying unit switch
(BRCUSW)........................................... Detects opening/closing of the bridge cover.
6. Bridge eject cover switch
(BRECSW)........................................... Detects opening/closing of the bridge eject cover.
7. Bridge conveying motor1 (BRCM1) ...... Drives the paper conveying section.
8. Bridge conveying motor2 (BRCM2) ...... Drives the paper conveying section.
9. Bridge solenoid (BRSOL)...................... Operates the feedshift guide.
2-2-6
3NB/3ND/3N0/3NK
(6) Center-folding unit (option)
11
Machine front
Machine inside
Machine rear
13
21
10
8
22
20
23
18
3
5
2
7
9
19 17 4
6
12
15
16
14
1
Figure 2-2-6 Center-folding unit
1. CF main PWB (CMPWB) ...................... Controls electric components of center-folding unit.
2. CF paper detection sensor(CFPS)........ Detection of paper in the center-folding unit.
3. CF left cover switch (CFLCSW) ............ Detects opening/closing of the CF left cover.
4. CF blade sensor (CFBS)....................... Detects home position of the CF blade.
5. CF adjustment sensor 1 (CFADS1) ..... Detects home position of the CF lower sliding plate.
6. CF adjustment sensor 2 (CFADS2) ...... Detects home position of the CF upper sliding plate.
7. CF side registration sensor 1
(CFSRS1) ............................................ Detects home position of the CF lower side registration guides.
8. CF side registration sensor 2
(CFSRS2) ............................................. Detects home position of the CF upper side registration guides.
9. CF tray switch (CFTSW) ....................... Detects opening/closing of the CF tray.
10. CF eject sensor (CFES)........................ Detects ejection of the paper to the CF tray.
11. CF paper conveying sensor (CFPCS) .. Detection of paper in the CF bridge unit.
12. CF paper entry sensor (CFPES) ........... Detects insertion of paper in the center-folding unit.
13. CF tray full sensor (CFTFS).................. Drives paper conveying section of the center-folding unit.
14. CF unit set switch (CFSSW) ................. Detects setting of the CF tray.
15. CF main motor (CFMM) ........................ Drives paper conveying section of the center-folding unit.
16. CF blade motor (CFBM)........................ Drives CF blade.
17. CF adjustment motor 1(CFADM1) ........ Drives CF lower sliding plate.
18. CF adjustment motor 2(CFADM2) ........ Drives CF upper sliding plate.
19. CF side registration motor 1
(CFSRM1)............................................. Drives CF lower side registration guides.
20. CF side registration motor 2
(CFSRM2)............................................. Drives CF upper side registration guides.
21. CF paper entry motor (CFPEM) ............ Drives CF entry roller.
22. CF staple motor (CFSTM)..................... Drives the CF staple.
23. CF feedshift solenoid (CFFSSOL) ........ Operates CF feedshift guide.
2-2-7
3NB/3ND/3N0/3NK
(7) Mailbox (option)
2
9
3
1
4
5
6
7
8
13
11
10
12
Machine front
Machine inside
Machine rear
Figure 2-2-7 Mailbox
1. Mailbox main PWB (MBMPWB)............ Controls electric components of mailbox.
2. Tray overflow switch 1 (TOFSW1) ........ Detected overflow of ejected to tray 1.
3. Tray overflow switch 2 (TOFSW2) ........ Detected overflow of ejected to tray 2.
4. Tray overflow switch 3 (TOFSW3) ........ Detected overflow of ejected to tray 3.
5. Tray overflow switch 4 (TOFSW4) ........ Detected overflow of ejected to tray 4.
6. Tray overflow switch 5 (TOFSW5) ........ Detected overflow of ejected to tray 5.
7. Tray overflow switch 6 (TOFSW6) ........ Detected overflow of ejected to tray 6.
8. Tray overflow switch 7 (TOFSW7) ........ Detected overflow of ejected to tray 7.
9. Tray eject sensor (TEJS) ...................... Detection of paper jam.
10. Tray eject sensor (TEJS) ...................... Radiates the pulse of LED.
11. Mail home position switch (MHPSW).... Controls mailbox drive motor.
12. Mailbox cover open/close switch
( MCOSW)............................................... Detects the mailbox cover is open.
13. Mailbox drive motor (MBDM) ................ Drives paper conveying section of mailbox.
2-2-8
3NB/3ND/3N0/3NK
(8) Punch unit(Option)
9
4
2
11
7
5
3
6
10
8
1
Figure 2-2-8 Bridge section
1. Punch PWB (PUNPWB) ....................... Controls electric components of punch unit.
2. Punch home position sensor
(PUHPS) ............................................... Detects home position of the punch cam.
3. Punch pulse sensor (PUPS) ................. Controls the rotation of punch cam.
4. Punch slide sensor (PUSLS) ................ Detects the slide position of the punch unit.
5. Punch tank full sensor (PUTFS) ........... Detects when the punch waste tank is full.
6. Punch paper edge sensor1
(PUPES1) ............................................ Detects the side edge position of the paper.
7. Punch paper edge sensor2
(PUPES2) ............................................ Detects the side edge position of the paper.
8. Punch tank set switch (PUTSSW) ........ Detects the punch waste tank is installed.
9. Punch motor (PUM) .............................. Drives the punch.
10. Punch slide motor (PUSLM) ................. Drives the punch unit.
11. Punch solenoid (PUSOL)...................... Switches the punch position.
2-2-9
3NB/3ND/3N0/3NK
This page is intentionally left blank.
2-2-10
3NB/3ND/3N0/3NK
2-3 OperatIOn Of the PWBs
2-3-1 DF maIn PWB
1
1
13
1
13
4
20
YC18
YC12
1
YC17
2
YC16
1
YC3
YC19
19
6 14
YC21
YC14
6
1
4
1
YC20
12
YC4
YC8
YC7
2
YC15
1 7
12
YC5
1
1
1
1
1
1
30
1
1
YC9
16
5
YC22
YC6
YC11
8
15
11
6
1
YC10
4 YC13
YC1
1
5
1
1
YC23
5
X1
1
Figure 2-3-1 DF main PWB silk-screen diagram
2-3-1
1
U2
YC2
18
3NB/3ND/3N0/3NK
Connector
Pin
YC3
1
24V1
O
24 V DC
24 V DC power output to DFFCSW
Connected to
the DF front
cover sw and
DF eject
2
FRONT COV SIG
I
0/24 V DC
DFFCSW: On/Off
3
EJECT COV
SOURCE
O
24 V DC
24 V DC power output to DFECSW
4
EJECT COV SIG
I
0/24 V DC
DFECSW: On/Off
YC4
1
GND
-
-
Ground
Connected to
machine
2
GND
-
-
Ground
3
ENG RDY
O
0/3.3 V DC
Ready signal
4
ENG SEL
I
0/3.3 V DC
Select signal
5
ENG CLK
I
0/3.3 V DC(pulse) Serial communication clock signal
6
ENG DI
I
0/3.3 V DC(pulse) Serial communication data signal
input
7
ENG DO
O
0/3.3 V DC(pulse) Serial communication data signal
output
YC5
1
GND
-
-
Ground
Connected to
machine
2
GND
-
-
Ground
3
24V1
I
24 V DC
24 V DC power input from Machine
4
24V1
I
24 V DC
24 V DC power input from Machine
YC6
1
GND
-
-
Ground
Connected to
the mailbox
main PWB
2
GND
-
-
Ground
3
GND
-
-
Ground
4
5V
O
5 V DC
5 V DC power output
5
24V1
O
24 V DC
24 V DC power output
6
24V1
O
24 V DC
24 V DC power output
7
MT DO
O
0/5 V DC(pulse)
Serial communication data signal
output
8
MT DIN
I
0/5 V DC(pulse)
Serial communication data signal
input
9
MT CLK
O
0/5 V DC(pulse)
Serial communication clock signal
10
MT SEL
O
0/5 V DC
Select signal
11
MT RDY
I
0/5 V DC
Ready signal
cover sw
Signal
I/O
Voltage
2-3-2
DescrIption
3NB/3ND/3N0/3NK
Connector
Pin
Signal
I/O
Voltage
YC7
1
5V
O
5 V DC
5 V DC power output
Connected to
the punch
PWB
2
3.3V
O
3.3 V DC
3.3 V DC power output
3
3.3V
O
3.3 V DC
3.3 V DC power output
4
GND
-
-
Ground
5
GND
-
-
Ground
6
PHPES REM
I
0/3.3 V DC
PUPES: On/Off
7
PHMOT REM
O
0/3.3 V DC
PUM: On/Off
8
PU RDY
I
0/3.3 V DC
Ready signal
9
PU SEL
O
0/3.3 V DC
Select signal
10
PU CLK
O
0/3.3 V DC
Clock signal
11
PU DI
I
0/3.3 V DC
Serial communication data signal
input
12
PU DO
O
0/3.3 V DC
Serial communication data signal
output
YC8
1
GND
-
-
Ground
Connected to
the punch
PWB
2
24V2
O
24 V DC
24 V DC power output
YC9
1
BF DO
O
0/3.3 V DC
Serial communication data signal
output
Connected to
the CF main
PWB
2
BF DI
I
0/3.3 V DC
Serial communication data signal
input
3
BF CLK
O
0/3.3 V DC
Clock signal
4
BF SEL
O
0/3.3 V DC
Select signal
5
BF RDY
I
0/3.3 V DC
Ready signal
YC10
1
3.3V
O
3.3 V DC
3.3 V DC power output
Connected to
the CF main
PWB
2
GND
-
-
Ground
3
GND
-
-
Ground
4
5V
O
5 V DC
5 V DC power output
5
GND
-
-
Ground
6
GND
-
-
Ground
7
24V2
O
24 V DC
24 V DC power output
8
24V2
O
24 V DC
24 V DC power output
2-3-3
DescrIption
3NB/3ND/3N0/3NK
Connector
Pin
YC12
1
Connected to
the DF Staple
motor, DF
eject
motor,DF
middle
motor,DF
paper
entrance
motor and DF
eject release
I/O
Voltage
ST MOV MOT 2B
O
0/24 V DC(pulse)
DFSLM control signal
2
ST MOV MOT 1B
O
0/24 V DC(pulse)
DFSLM control signal
3
ST MOV MOT 2A
O
0/24 V DC(pulse)
DFSLM control signal
4
ST MOV MOT 1A
O
0/24 V DC(pulse)
DFSLM control signal
5
EJECT MOT 2B
O
0/24 V DC(pulse)
DFEM control signal
6
EJECT MOT 1B
O
0/24 V DC(pulse)
DFEM control signal
7
EJECT MOT 2A
O
0/24 V DC(pulse)
DFEM control signal
8
EJECT MOT 1A
O
0/24 V DC(pulse)
DFEM control signal
9
MIDDLE MOT 2B
O
0/24 V DC(pulse)
DFMM control signal
10
MIDDLE MOT 1B
O
0/24 V DC(pulse)
DFMM control signal
11
MIDDLE MOT 2A
O
0/24 V DC(pulse)
DFMM control signal
12
MIDDLE MOT 1A
O
0/24 V DC(pulse)
DFMM control signal
13
ENTRY MOT 2B
O
0/24 V DC(pulse)
DFPEM control signal
14
ENTRY MOT 1B
O
0/24 V DC(pulse)
DFPEM control signal
15
ENTRY MOT 2A
O
0/24 V DC(pulse)
DFPEM control signal
16
ENTRY MOT 1A
O
0/24 V DC(pulse)
DFPEM control signal
17
EJE RELS MOT 2B
O
0/24 V DC(pulse)
DFERM control signal
18
EJE RELS MOT 1B
O
0/24 V DC(pulse)
DFERM control signal
19
EJE RELS MOT 2A
O
0/24 V DC(pulse)
DFERM control signal
20
EJE RELS MOT 1A
O
0/24 V DC(pulse)
DFERM control signal
YC13
1
TRY U SENS K
I
0/3.3 V DC
DFTUSS2: On/Off
Connected to
the DF tray
upper surface
2
GND
-
-
Ground
3
TRY U SENS SIG
I
0/3.3 V DC
DFTUSS2: On/Off
4
3.3V
O
3.3 V DC
3.3 V DC power output
YC14
1
SFT F MOT 2B
O
0/24 V DC(pulse)
DFSFM1 control signal
Connected to
the DF shift
sensor1,2,DF
eject clutch
and DF shift
release motor
2
SFT F MOT 1B
O
0/24 V DC(pulse)
DFSFM1 control signal
3
SFT F MOT 2A
O
0/24 V DC(pulse)
DFSFM1 control signal
4
SFT F MOT 1A
O
0/24 V DC(pulse)
DFSFM1 control signal
5
SFT R MOT 2B
O
0/24 V DC(pulse)
DFSFM2 control signal
6
SFT R MOT 1B
O
0/24 V DC(pulse)
DFSFM2 control signal
7
SFT R MOT 2A
O
0/24 V DC(pulse)
DFSFM2 control signal
8
SFT R MOT 1A
O
0/24 V DC(pulse)
DFSFM2 control signal
9
EJECT CL
O
0/24 V DC
DFECL: On/Off
10
24V2
I
24 V DC
24 V DC power output
11
SFT RELS MOT 2B
O
0/24 V DC(pulse)
DFSFRM control signal
12
SFT RELS MOT 1B
O
0/24 V DC(pulse)
DFSFRM control signal
13
SFT RELS MOT 2A
O
0/24 V DC(pulse)
DFSFRM control signal
motor
sensor 2
Signal
2-3-4
DescrIption
3NB/3ND/3N0/3NK
Connector
Pin
Signal
I/O
Voltage
DescrIption
14
SFT RELS MOT 1A
O
0/24 V DC(pulse)
DFSFRM control signal
YC15
1
PADDLE MOT 2B
O
0/24 V DC(pulse)
DFPDM control signal
Connected to
the DF paddle
motor and DF
side registra-
2
PADDLE MOT 1B
O
0/24 V DC(pulse)
DFPDM control signal
3
PADDLE MOT 2A
O
0/24 V DC(pulse)
DFPDM control signal
4
PADDLE MOT 1A
O
0/24 V DC(pulse)
DFPDM control signal
tion motor 1,2
5
SIDE REG R MOT
2B
O
0/24 V DC(pulse)
DFSRM2 control signal
6
SIDE REG R MOT
1B
O
0/24 V DC(pulse)
DFSRM2 control signal
7
SIDE REG R MOT
2A
O
0/24 V DC(pulse)
DFSRM2 control signal
8
SIDE REG R MOT
1A
O
0/24 V DC(pulse)
DFSRM2 control signal
9
SIDE REG F MOT
2B
O
0/24 V DC(pulse)
DFSRM1 control signal
10
SIDE REG F MOT
1B
O
0/24 V DC(pulse)
DFSRM1 control signal
11
SIDE REG F MOT
2A
O
0/24 V DC(pulse)
DFSRM1 control signal
12
SIDE REG F MOT
1A
O
0/24 V DC(pulse)
DFSRM1 control signal
YC17
1
STP_MOT OUT2
O
0/24 V DC(pulse)
DFSTM control signal
Connected to
2
STP_MOT OUT2
O
0/24 V DC(pulse)
DFSTM control signal
the staple unit
3
STP_MOT OUT2
O
0/24 V DC(pulse)
DFSTM control signal
4
STP_MOT OUT2
O
0/24 V DC(pulse)
DFSTM control signal
5
STP_MOT OUT1
O
0/24 V DC(pulse)
DFSTM control signal
6
STP_MOT OUT1
O
0/24 V DC(pulse)
DFSTM control signal
7
STP_MOT OUT1
O
0/24 V DC(pulse)
DFSTM control signal
8
STP_MOT OUT1
O
0/24 V DC(pulse)
DFSTM control signal
9
GND
-
-
Ground
10
LS
I
0/5 V DC
Staple unit LS signal
11
READY
I
0/5 V DC
Staple unit READY signal
12
5V
O
5 V DC
5 V DC power output
13
HP
I
0/5 V DC
Staple unit HP signal
2-3-5
3NB/3ND/3N0/3NK
Connector
Pin
Signal
I/O
Voltage
YC18
1
DRM MOT 2B
O
0/24 V DC(pulse)
DFDRM control signal
Connected to
the DF drum
motor and DF
Feedshift
2
DRM MOT 1B
O
0/24 V DC(pulse)
DFDRM control signal
3
DRM MOT 2A
O
0/24 V DC(pulse)
DFDRM control signal
4
DRM MOT 1A
O
0/24 V DC(pulse)
DFDRM control signal
solenoid 1,2,3
5
24V2
O
24 V DC
24 V DC power output
6
MID_DRM SOL ACT
O
0/24 V DC
DFDRSOL: On/Off
7
MID_DRM SOL
KEEP
O
0/24 V DC
DFDRSOL: On/Off
8
24V2
O
24 V DC
24 V DC power output
9
DRM_BF SOL ACT
O
0/24 V DC
DFCFSOL: On/Off
10
DRM_BF SOL KEEP
O
0/24 V DC
DFCFSOL: On/Off
11
24V2
O
24 V DC
24 V DC power output
12
SUB_MID SOL ACT
O
0/24 V DC
DFFSSOL: On/Off
13
SUB_MID SOL
KEEP
O
0/24 V DC
DFFSSOL: On/Off
YC19
1
BRAKE
O
0/24 V DC
3.3 V DC power output to DFEPS
Connected to
the DF tray
2
DIR
O
0/24 V DC
3.3 V DC power output to DFSLS
3
CLK
O
0/24 V DC(pulse)
Ground
4
ENABLE
I
0/24 V DC
DFSLS: On/Off
5
GND
-
-
Ground
6
24V2
O
24 V DC
24 V DC power output
YC20
1
DRM SENS A
O
3.3 V DC
3.3 V DC power output to DFDRS
Connected to
the DF drum
sensor and
DF middle
2
GND
-
-
Ground
3
DRM SENS SIG
I
0/3.3 V DC
DFDRS: On/Off
4
MID EJE SENS A
O
3.3 V DC
3.3 V DC power output to DFMES
sensor
5
GND
-
-
Ground
6
MID EJE SENS SIG
I
0/3.3 V DC
DFMES: On/Off
motor
2-3-6
DescrIption
3NB/3ND/3N0/3NK
Connector
Pin
YC21
1
STRY EJE SENS A
O
3.3 V DC
3.3 V DC power output to DFSES
Connected to
the DF sub try
eject sensor,DF sub try
full sensor,DF paper
entrance
sensor,DF
operation
PWB and DF
tray upper
surface sensor 1
2
GND
-
-
Ground
3
STRY EJE SENS
SIG
I
0/3.3 V DC
DFSES: On/Off
4
3.3V
O
3.3 V DC
3.3 V DC power output
5
GND
-
-
Ground
6
STRY FULL SENS
SIG
0/3.3 V DC
DFSTFS: On/Off
7
STRY FULL SENS
PLS
8
GND
-
-
Ground
9
ENTRY SENS SIG
I
0/3.3 V DC
DFPES: On/Off
10
3.3V
O
3.3 V DC
3.3 V DC power output
11
LED1
O
0/3.3 V DC
LED output
12
LED2
O
0/3.3 V DC
LED output
13
LED3
O
0/3.3 V DC
LED output
14
LED4
O
0/3.3 V DC
LED output
15
KEY1
I
0/3.3 V DC
Key input
16
KEY2
I
0/3.3 V DC
Key input
17
GND
-
-
Ground
18
3.3V
O
3.3 V DC
3.3 V DC power output
19
TRY U SENS K
O
0/3.3 V DC
DFTUSS1: On/Off
YC22
1
MTRY HP1 SENS A
O
3.3 V DC
3.3 V DC power output to DFTS1
Connected to
the DF tray
sensor 1,2,DF
slide
sensor,DF
side registration sensor
1,2,DF eject
paper
sensor,DF
paddle
sensor,DF
adjustment
sensor,DF
bundle discharge unit
sensor and
DF shift set
2
GND
-
-
Ground
3
MTRY HP1 SENS
SIG
I
0/3.3 V DC
DFTS1: On/Off
4
STAPLE SENS A
O
3.3 V DC
3.3 V DC power output to DFSLS
5
GND
-
-
Ground
6
STAPLE SENS SIG
I
0/3.3 V DC
DFSLS: On/Off
7
SID REG R SENS A
O
3.3 V DC
3.3 V DC power output to DFSRS2
8
GND
-
-
Ground
9
SID REG R SENS
SIG
I
0/3.3 V DC
DFSRS2: On/Off
10
SID REG F SENS A
O
3.3 V DC
3.3 V DC power output to DFSRS1
11
GND
-
-
Ground
12
SID REG F SENS
SIG
I
0/3.3 V DC
DFSRS1: On/Off
13
GND
-
-
Ground
14
PAP SENS SIG
I
0/3.3 V DC
DFMTS: On/Off
sensor
Signal
I/O
Voltage
2-3-7
DescrIption
3NB/3ND/3N0/3NK
Connector
Pin
Signal
I/O
Voltage
DescrIption
15
3.3V
O
3.3 V DC
3.3 V DC power output
16
MTRY HP2 SENS A
O
3.3 V DC
3.3 V DC power output to DFTS2
17
GND
-
-
Ground
18
MTRY HP2 SENS
SIG
I
0/3.3 V DC
DFTS2: On/Off
19
PADDLE SENS A
O
3.3 V DC
3.3 V DC power output to DFPDS
20
GND
-
-
Ground
21
PADDLE SENS SIG
I
0/3.3 V DC
DFPDS: On/Off
22
ADJUST SENS A
O
3.3 V DC
3.3 V DC power output to DFADS
23
GND
-
-
Ground
24
ADJUST SENS SIG
I
0/3.3 V DC
DFADS: On/Off
25
BUNDLE SENS A
O
3.3 V DC
3.3 V DC power output to DFBDS
26
GND
-
-
Ground
27
BUNDLE SENS SIG
I
0/3.3 V DC
DFBDS: On/Off
28
SFT SET SENS A
O
3.3 V DC
3.3 V DC power output to DFSFSS
29
GND
-
-
Ground
30
SFT SET SENS SIG
I
0/3.3 V DC
DFSFSS: On/Off
YC23
1
SFT F HP SENS A
O
3.3 V DC
3.3 V DC power output to DFSFS1
Connected to
the DF shift
sensor1,2,DF
tray sensor
3,4,5 and DF
shift release
2
GND
-
-
Ground
3
SFT F HP SENS SIG
I
0/3.3 V DC
DFSFS1: On/Off
4
SFT R HP SENS A
O
3.3 V DC
3.3 V DC power output to DFSFS2
5
GND
-
-
Ground
6
SFT R HP SENS
SIG
I
0/3.3 V DC
DFSFS2: On/Off
7
MTRY HALF SENS
A
O
3.3 V DC
3.3 V DC power output to DFTS3
8
GND
-
-
Ground
9
MTRY HALF SENS
SIG
I
0/3.3 V DC
DFTS3: On/Off
10
MTRY BF SENS A
O
3.3 V DC
3.3 V DC power output to DFTS5
11
GND
-
-
Ground
12
MTRY BF SENS SIG
I
0/3.3 V DC
DFTS5: On/Off
13
MTRY FULL SENS A
O
3.3 V DC
3.3 V DC power output to DFTS4
14
GND
-
-
Ground
15
MTRY FULL SENS
SIG
I
0/3.3 V DC
DFTS4: On/Off
16
SFT RELS SENS A
O
3.3 V DC
3.3 V DC power output to DFSFRS
17
GND
-
-
Ground
sensor
2-3-8
3NB/3ND/3N0/3NK
Connector
Pin
18
Signal
SFT RELS SENS
SIG
I/O
I
Voltage
0/3.3 V DC
2-3-9
DescrIption
DFSFRS: On/Off
3NB/3ND/3N0/3NK
2-3-2 CF main PWB
YC15
YC11
6
1
YC16
7
12
2
16
1
15
1
YC14
U20
U15
U16
30
1 YC18
6
13
19
1
U19
YC13
YC12
U18
1
10
1
1
YC20
U17
U2
U9
U11
U8
5
1
1
1
U10
YC2
5
3
YC17
1
U12
X1
1
U1
YC1
1
U14
YC10
U6
4
20
U13
YC7
7
1
2
1
2
1
12
1
YC4
7
YC9
YC8
1
1
YC6
U7
YC19
4
1
YC3
4
1
YC5
Figure 2-3-2 CF main PWB silk-screen diagram
2-3-10
3NB/3ND/3N0/3NK
Connector
Pin
YC3
1
GND
-
-
Ground
Connected to
the DF main
2
GND
-
-
Ground
3
24V
I
24 V DC
24 V DC power input from Machine
4
24V
I
24 V DC
24 V DC power input from Machine
YC4
1
24V1
I
24 V DC
24 V DC power input from Machine
Connected to
the CF left
2
I
DC0V/24V
CFLCSW: On/Off
PWB
Signal
I/O
Voltage
DescrIption
cover switch
YC5
1
3.3V
I
3.3 V DC
3.3 V DC power input from Machine
Connected to
the DF main
2
GND
-
-
Ground
3
GND
-
-
Ground
4
5V
I
5 V DC
5 V DC power input from Machine
YC6
1
24V
O
24 V DC
24 V DC power output
Connected to
the CF unit
set switch
and CF tray
2
I
DC0V/24V
CFSSW: On/Off
O
24 V DC
24 V DC power output
I
DC0V/24V
CFTSW: On/Off
PWB
3
24V
4
switch
YC7
1
GND
-
-
Ground
Connected to
the DF main
2
GND
-
-
Ground
3
ENG_RDY
I
0/3.3 V DC
Ready signal
4
ENG_SEL
O
0/3.3 V DC
Select signal
5
ENG_CLK
O
0/3.3 V DC
Clock signal
6
ENG_DI
I
0/3.3 V DC
Serial communication data signal
input
7
ENG_DO
O
0/3.3 V DC
Serial communication data signal
output
YC10
1
EXTMOT_2B
O
0/24 V DC(pulse)
CFADM2 control signal
Connected to
the CF
adjustment
motor 1,2,CF
side registration motor
1,2 and CF
paper entry
motor
2
EXTMOT_1B
O
0/24 V DC(pulse)
CFADM2 control signal
3
EXTMOT_2A
O
0/24 V DC(pulse)
CFADM2 control signal
4
EXTMOT_1A
O
0/24 V DC(pulse)
CFADM2 control signal
5
MDLMOT_2B
O
0/24 V DC(pulse)
CFSRM2 control signal
6
MDLMOT_1B
O
0/24 V DC(pulse)
CFSRM2 control signal
7
MDLMOT_2A
O
0/24 V DC(pulse)
CFSRM2 control signal
8
MDLMOT_1A
O
0/24 V DC(pulse)
CFSRM2 control signal
9
CINMOT_2B
O
0/24 V DC(pulse)
CFPEM control signal
10
CINMOT_1B
O
0/24 V DC(pulse)
CFPEM control signal
11
CINMOT_2A
O
0/24 V DC(pulse)
CFPEM control signal
PWB
2-3-11
3NB/3ND/3N0/3NK
Connector
Pin
Signal
I/O
Voltage
12
CINMOT_1A
O
0/24 V DC(pulse)
CFPEM control signal
13
EXCMOT_2B
O
0/24 V DC(pulse)
CFADM1 control signal
14
EXCMOT_1B
O
0/24 V DC(pulse)
CFADM1 control signal
15
EXCMOT_2A
O
0/24 V DC(pulse)
CFADM1 control signal
16
EXCMOT_1A
O
0/24 V DC(pulse)
CFADM1 control signal
17
STMMOT_2B
O
0/24 V DC(pulse)
CFADM2 control signal
18
STMMOT_1B
O
0/24 V DC(pulse)
CFADM2 control signal
19
STMMOT_2A
O
0/24 V DC(pulse)
CFADM2 control signal
20
STMMOT_1A
O
0/24 V DC(pulse)
CFADM2 control signal
YC13
1
5V
O
5 V DC
5 V DC power output
Connected to
the CF sta-
2
STLS2
I
0/5 V DC
Staple unit LS2 signal
3
GND
-
-
Ground
4
STLS1
I
0/5 V DC
Staple unit LS1 signal
5
STHP
I
0/5 V DC
Staple unit HP signal
6
STMOT_OUT1
O
0/5 V DC(pulse)
CFSTM control signal
7
STMOT_OUT1
O
0/5 V DC(pulse)
CFSTM control signal
8
FGND
-
-
Ground
9
STMOT_OUT2
O
0/5 V DC(pulse)
CFSTM control signal
10
STMOT_OUT2
O
0/5 V DC(pulse)
CFSTM control signal
YC15
1
FLDMOT_BRK
O
0/24 V DC(pulse)
CFBM control signal
Connected to
the CF blade
motor
2
FLDMOT_DIR
O
0/24 V DC(pulse)
CFBM control signal
3
FLDMOT_CLK
O
0/24 V DC(pulse)
CFBM control signal
4
FLDMOT_EN
O
0/24 V DC(pulse)
CFBM control signal
5
GND
-
-
Ground
6
24V2
O
24 V DC
24 V DC power output
YC16
1
FLDMOT_DIR
O
0/24 V DC(pulse)
CFMM control signal
Connected to
the CF main
motor
2
FLDMOT_ALM
O
0/24 V DC(pulse)
CFMM control signal
3
FLDMOT_CLK
O
0/24 V DC(pulse)
CFMM control signal
4
FLDMOT_EN
O
0/24 V DC(pulse)
CFMM control signal
5
N.C.
-
-
Not used
6
GND
-
-
Ground
7
24V2
O
24 V DC
24 V DC power output
ple motor
2-3-12
DescrIption
3NB/3ND/3N0/3NK
Connector
Pin
YC17
1
24V2
O
24 V DC
24 V DC power output
Connected to
the CF feedshift solenoid
2
3FSOL_ATT
O
24 V DC
CFFSSOL: On/Off(activate)
3
3FSOL_HLD
O
24 V DC
CFFSSOL: On/Off(return)
YC20
1
5V
O
5 V DC
5 V DC power output
Connected to
the CF
adjustment
sensor
1,2,CF side
registration
sensor
1,2,CF tray
full sensor,
CF eject sensor,CF paper
conveying
sensor, CF
paper detection sensor,CF blade
sensor and
CF paper
2
GND
-
-
Ground
3
BDLFT_HP
I
0/5 V DC
CFADS1: On/Off
4
5V
O
5 V DC
5 V DC power output
5
GND
-
-
Ground
6
WDL_HP
I
0/5 V DC
CFSRS1: On/Off
7
5V
O
5 V DC
5 V DC power output
8
GND
-
-
Ground
9
FULL
I
0/5 V DC
CFTFS: On/Off
10
5V
O
5 V DC
5 V DC power output
11
GND
-
-
Ground
12
OUT
I
0/5 V DC
CFES: On/Off
13
5V
O
5 V DC
5 V DC power output
14
GND
-
-
Ground
15
TRANSPORT
I
0/5 V DC
CFPCS: On/Off
16
5V
O
5 V DC
5 V DC power output
17
GND
-
-
Ground
18
PAPER
I
0/5 V DC
CFPS: On/Off
19
5V
O
5 V DC
5 V DC power output
20
GND
-
-
Ground
21
WDU_HP
I
0/5 V DC
CFSRS2: On/Off
22
5V
O
5 V DC
5 V DC power output
23
GND
-
-
Ground
24
BLD_HP
I
0/5 V DC
CFSRS2: On/Off
25
GND
-
-
Ground
26
BULOW_HP
I
0/3.3 V DC
CFADS2: On/Off
27
3.3V
O
3.3 V DC
3.3 V DC power output
28
GND
-
-
Ground
29
CARRY_IN
I
0/3.3 V DC
CFPES: On/Off
30
3.3V
O
3.3 V DC
3.3 V DC power output
entry sensor
Signal
I/O
Voltage
2-3-13
DescrIption
3NB/3ND/3N0/3NK
2-3-3 Mailbox main PWB
1
2
5
1
2
20
YC7
19
YC1
13
12
1
YC2
U2
X1
U1
11
U4
YC6
7
YC3
1
3
1
U3
1
YC4
U5
YC5
1
4
Figure 2-3-3 Mailbox main PWB silk-screen diagram
2-3-14
3NB/3ND/3N0/3NK
Connector
Pin
Signal
I/O
Voltage
YC1
1
GND
-
-
Ground
Connected to
the tray overflow switch 1
to 5 and tray
eject sensor
2
OFS1
I
0/5 V DC
TOFSW1: On/Off
3
5V
O
5 V DC
5 V DC power output
4
GND
-
-
Ground
5
OFS2
I
0/5 V DC
TOFSW2: On/Off
6
5V
O
5 V DC
5 V DC power output
7
GND
-
-
Ground
8
OFS3
I
0/5 V DC
TOFSW3: On/Off
9
5V
O
5 V DC
5 V DC power output
10
GND
-
-
Ground
11
OFS4
I
0/5 V DC
TOFSW4: On/Off
12
5V
O
5 V DC
5 V DC power output
13
GND
-
-
Ground
14
OFS5
I
0/5 V DC
TOFSW5: On/Off
15
5V
O
5 V DC
5 V DC power output
16
LED
O
0/5 V DC
LED signal
17
GND
-
-
Ground
18
TEJS
I
5/0 V DC (pulse)
TEJS: Off/On (receiving)
19
5V
O
5 V DC
5 V DC power output
YC2
1
5V
O
5 V DC
5 V DC power output
Connected to
the tray eject
sensor, mail
home position switch
and tray
overflow
switch 6/7
2
LED
O
5/0 V DC (pulse)
TEJS (emitting)
3
GND
-
-
Ground
4
HP SIG
I
0/5 V DC
MPESW: On/Off
5
5V
O
5 V DC
5 V DC power output
6
GND
-
-
Ground
7
OFS6
I
0/5 V DC
TOFSW6: On/Off
8
5V
O
5 V DC
5 V DC power output
9
GND
-
-
Ground
10
OFS7
I
0/5 V DC
TOFSW7: On/Off
11
5V
O
5 V DC
5 V DC power output
12
GND
-
-
Ground
13
NC
-
-
Not used
14
5V
O
5 V DC
5 V DC power output
2-3-15
DescrIption
3NB/3ND/3N0/3NK
Connector
Pin
Signal
I/O
Voltage
YC3
1
GND
-
-
Ground
Connected to
the DF main
PWB
2
GND
-
-
Ground
3
GND
-
-
Ground
4
5V
I
5 V DC
5 V DC power input
5
24V
I
24 V DC
24 V DC power input
6
24V
I
24 V DC
24 V DC power input
7
SDI
I
0/5 V DC (pulse)
Mailbox serial communication data
signal
8
SDO
O
0/5 V DC (pulse)
Mailbox serial communication data
signal
9
SCLK
I
0/5 V DC (pulse)
Mailbox clock signal
10
SEL
I
0/5 V DC
Mailbox select signal
11
READY
O
0/5 V DC
Mailbox ready signal
YC4
1
R24V
I
24 V DC
24 V DC power input
Connected to
the mailbox
cover open/
close switch
3
24V
O
24 V DC
24 V DC power output
YC5
1
MOTOR _A
O
0/24 V DC (pulse) MBDM drive control signal
Connected to
the mailbox
drive motor
2
MOTOR A
O
0/24 V DC (pulse) MBDM drive control signal
3
MOTOR B
O
0/24 V DC (pulse) MBDM drive control signal
4
MOTOR _B
O
0/24 V DC (pulse) MBDM drive control signal
2-3-16
DescrIption
3NB/3ND/3N0/3NK
2-3-4 Bridge PWB
7
1
8
4
YC6
YC8
1
8
YC7
1
1
YC1
YC5
6
1
1
13
1
10
YC3
YC2
3
1
YC4
Figure 2-3-4 Bridge PWB silk-screen diagram
Connector
Pin
YC1
1
+24V
I
24V DC
24 V DC power input from machine
Connected to
the machine
2
+24V
I
24V DC
24 V DC power input from machine
3
GND
-
-
Ground
4
GND
-
-
Ground
5
+5V
I
5V DC
5 V DC power input from machine
6
GND
-
-
Ground
1
BRIDGE_SENS 1
O
0/5V DC
BRCS1: On/Off
2
BRIDGE OPEN
O
0/5V DC
BRCUSW: On/Off
3
BRIDGE_SENS 2
O
0/5V DC
BRCS2: On/Off
4
BRIDGE1 DIR
I
0/5V DC
BRCM1 control signal
5
BRIDGE1 PD
I
0/5V DC
BRCM1 control signal
6
BRIDGE1 CLK
I
0/5V DC(pulse)
BRCM1 clock signal
7
BRIDGE1 MODE
I
0/5V DC
BRCM1 mode signal
8
BRIDGE1 REM
I
0/5V DC
BRCM1: On/Off
9
BRIDGE2 DIR
I
0/5V DC
BRCM2 control signal
10
BRIDGE2 PD
I
0/5V DC
BRCM2 control signal
11
BRIDGE2 CLK
I
0/5V DC(pulse)
BRCM2 clock signal
12
BRIDGE2 MODE
I
0/5V DC
BRCM2 mode signal
13
BRIDGE2 REM
I
0/5V DC
BRCM2: On/Off
YC3
Connected to
the machine
Signal
I/O
Voltage
2-3-17
Description
3NB/3ND/3N0/3NK
Connector
Pin
Signal
I/O
Voltage
YC4
1
GND
-
-
Ground
Connected to
the bridge
conveying
sensor 2
2
BRIDGE_SENS 2
I
0/5V DC
BRCM2: On/Off
3
+5V
O
5V DC
5 V DC power output to BRCS2
YC6
1
GND
-
-
Ground
Connected to
the bridge
conveying
sensor 2 and
bridge cover
switch
2
BRIDGE_SENS 1
I
0/5V DC
BRCS1: On/Off
3
+5V
O
5V DC
5 V DC power output to BRCS1
4
GND
-
-
Ground
5
BRIDGE_OPEN
I
0/5V DC
BRCUSW: On/Off
6
+5V
O
5V DC
5 V DC power output to BRCUSW
7
NC
-
-
Not used
YC7
1
BRIDGE1_B/
O
0/24V DC(pulse)
BRCM1 control signal
Connected to
the bridge
conveying
motor1,2
2
BRIDGE1_A/
O
0/24V DC(pulse)
BRCM1 control signal
3
BRIDGE1_B
O
0/24V DC(pulse)
BRCM1 control signal
4
BRIDGE1_A
O
0/24V DC(pulse)
BRCM1 control signal
5
BRIDGE2_B/
O
0/24V DC(pulse)
BRCM2 control signal
6
BRIDGE2_A/
O
0/24V DC(pulse)
BRCM2 control signal
7
BRIDGE2_B
O
0/24V DC(pulse)
BRCM2 control signal
8
BRIDGE2_A
O
0/24V DC(pulse)
BRCM2 control signal
2-3-18
Description
3NB/3ND/3N0/3NK
2-3-5 Punch unit PWB
YC5
4
1
1
YC4
3
1
YC3
YC1
1
1
YC10
4
12
1
YC9
2
1
YC8
6
1
2
2
1
YC7 YC6
3
YC2
1
11
YC11
1
5
Figure 2-3-5 Punch unit PWB silk-screen diagram
Connector
Pin
Signal
I/O
Voltage
YC1
1
PH_SDI
I
0/3.3V DC(pulse)
Serial communication data signal input
Connected to
the machine
2
PH_SDO
O
0/3.3V DC(pulse)
Serial communication data signal output
3
PH_CLK
I
0/3.3V DC(pulse)
Serial communication clock signal
4
PH_SEL
I
0/3.3V DC
Select signal from the machine
5
PH_RDY
O
0/3.3V DC
Ready signal to the machine
6
PHMOT_REQ
I
0/3.3V DC
PUM: On/Off
7
PHPES_REQ
O
0/3.3V DC
PUPES: On/Off
8
GND
-
-
Ground
9
GND
-
-
Ground
10
3.3V
I
3.3V DC
3.3 V DC power input from machine
11
3.3V
I
3.3V DC
3.3 V DC power input from machine
12
5.0V
I
5V DC
3.3 V DC power input from machine
YC2
1
GND
-
-
Ground
Connected to
the machine
2
24V2
I
24V DC
24 V DC power input from machine
2-3-19
Description
3NB/3ND/3N0/3NK
Connector
Pin
Signal
I/O
Voltage
YC3
1
PHADJ_MOT
2B
O
0/24V DC(pulse)
PUSLM drive control signal
Connected to
the punch
slide motor
2
PHADJ_MOT
1B
O
0/24V DC(pulse)
PUSLM drive control signal
3
PHADJ_MOT
2A
O
0/24V DC(pulse)
PUSLM drive control signal
4
PHADJ_MOT
1A
O
0/24V DC(pulse)
PUSLM drive control signal
YC4
1
PHMOT_N
O
0/24V DC(pulse)
PUM drive control signal
Connected to
the punch
motor
2
NC
-
-
Not used
3
PHMOT_P
O
0/24V DC(pulse)
PUM drive control signal
YC5
1
24V2
O
24V DC
24 V DC power output to PUSOL
Connected to
the punch
solenoid,
punch paper
edge
sensor1 and
punch tank
full sensor
2
PHSOL_PUL
O
0/24V DC
PUSOL: On/Off (activate)
3
PHSOL_RET
O
0/24V DC
PUSOL: On/Off (return)
4
PHLED_A
O
0/3.3V DC
PUPES1_A: On/Off
5
PHLED_B
O
0/3.3V DC
PUPES1_B: On/Off
6
PHLED_C
O
0/3.3V DC
PUPES1_C: On/Off
7
PHLED_D
O
0/3.3V DC
PUPES1_D: On/Off
8
PHLED_3.3V
O
3.3V DC
3.3 V DC power output to PUPES1
9
5.0V
O
5V DC
5 V DC power output to PUTFS
10
PHTNK_FUL
I
0/5V DC
PUTFS: On/Off
11
GND
-
-
Ground
YC6
1
SEN
O
3.3V DC
3.3 V DC power output to PUSLS
Connected to
the punch
slide sensor
2
GND
-
-
Ground
3
PHADJ_HP
I
0/3.3V DC
PUSLS: On/Off
YC7
1
PHPES_DET
I
0/3.3V DC
PUPES2: On/Off
Connected to
the punch
paper edge
sensor 2
2
GND
-
-
Ground
YC8
1
SENS3.3V
O
3.3V DC
3.3 V DC power output to PUPS
Connected to
the punch
plus sensor
and punch
home position sensor
2
GND
-
-
Ground
3
PHMOT_PLS
I
0/3.3V DC
PUPS: On/Off
4
SENS3.3V
O
3.3V DC
3.3 V DC power output to PUHPS
5
GND
-
-
Ground
6
PHMOT_HP
I
0/3.3V DC
PUHPS: On/Off
2-3-20
Description
3NB/3ND/3N0/3NK
Connector
Pin
Signal
I/O
Voltage
YC9
1
PHTNK_SET
I
0/3.3V DC
PUTSSW: On/Off
Connected to
the punch
tank set
switch
2
GND
-
-
Ground
2-3-21
Description
3NB/3ND/3N0/3NK
This page is intentionally left blank.
2-3-22
3NB/3ND/3N0/3NK
2-4 Appendixes
2-4-1 Appendixes
(1) Wiring diagram
4
3
3
4
1
2
3
4
YC3
1
24V1
2
FRONT COV SIG
3.3V
TXD
RXD
N.C.
GND
1
2
2
1
YC1
1
2
3
4
5
2
1
3
4
3.3V
SWCLK
SWDO
RESET
GND
2
1
2
1
YC2
1
2
3
4
5
DFFCSW
2
1
1
2
3
4
5
6
7
YC4
1
2
3
4
5
6
7
YC5
1
2
3
4
GND
GND
24V1
24V1
GND
GND
ENG RDY
ENG SEL
ENG CLK
ENG DI
ENG DO
EJECT COV SOURCE
EJECT COV SIG
DFECSW
A7
A6
A5
A3
A1
A2
A4
1
2
3
4
MACHINE
A7
A6
A5
A3
A1
A2
A4
B8
B9
A8
A9
GND
GND
GND
5V
24V1
24V1
MT DO
MT DIN
MT CLK
MT SEL
MT RDY
5V
3.3V
3.3V
GND
GND
PHPES REM
PHMOT REM
PU RDY
PU SEL
PU CLK
PU DI
PU DO
YC6
1
2
3
4
5
6
7
8
9
10
11
YC7
1
2
3
4
5
6
7
8
9
10
11
12
1
2
3
4
5
6
7
8
9
10
11
1
2
3
4
5
6
7
8
9
10
11
12
12
11
10
9
8
7
6
5
4
3
2
1
12
11
10
9
8
7
6
5
4
3
2
1
BF RDY
BF SEL
BF CLK
BF DI
BF DO
12
11
10
9
8
7
6
5
4
3
2
1
1
2
3
4
5
6
7
8
9
10
11
12
B8
B9
A8
A9
MAIL
BOX
YC1
PUNCH
UNIT
YC2
YC9
5
4
3
2
1
24V2
24V2
GND
GND
GND
24V2
5
4
3
2
1
YC10
8
7
6
5
5V
GND
GND
3.3V
YC8
1
2
1
2
3
4
5
8
7
6
5
4
3
2
1
1
2
5
4
3
2
1
8
7
6
5
4
3
2
1
1
2
1
2
3
4
5
6
7
8
7
6
5
4
3
2
1
1
2
1
2
3
4
5
6
7
4
3
2
1
4
3
2
1
YC7
YC3
4
3
2
1
4
3
2
1
FOLDING
UNIT
4
3
2
1
GND
SI RDY
SI SEL
SI CLK
SI DI
SI DO
YC5
YC11
1
2
3
4
5
6
SIDE REG R MOT 2B
SIDE REG R MOT 1B
SIDE REG R MOT 2A
SIDE REG R MOT 1A
YC15
PADDLE MOT 2B
PADDLE MOT 1B
PADDLE MOT 2A
PADDLE MOT 1A
SFT RELS MOT 2B
SFT RRLS MOT 1B
SFT RELS MOT 2A
SFT RELS MOT 1A
24V2
EJECT CL
SFT R MOT 2B
SFT R MOT 1B
SFT R MOT 2A
SFT R MOT 1A
YC14
SFT F MOT 2B
SFT F MOT 1B
SFT F MOT 2A
SFT F MOT 1A
YC13
TRY U SENS K
GND
TRY U SENS SIG
3.3V
EJE RELS MOT 2B
EJE RELS MOT 1B
EJE RELS MOT 2A
EJE RELS MOT 1A
ENTRY MOT 2B
ENTRY MOT 1B
ENTRY MOT 2A
ENTRY MOT 1A
MIDDLE MOT 2B
MIDDLE MOT 1B
MIDDLE MOT 2A
MIDDLE MOT 1A
EJECT MOT 2B
EJECT MOT 1B
EJECT MOT 2A
EJECT MOT 1A
YC12
ST MOV MOT 2B
ST MOV MOT 1B
ST MOV MOT 2A
ST MOV MOT 1A
9
10
11
12
5
6
7
8
1
2
3
4
11
12
13
14
10
9
5
6
7
8
1
2
3
4
1
2
3
4
17
18
19
20
13
14
15
16
9
10
11
12
5
6
7
8
1
2
3
4
9
10
11
12
5
6
7
8
1
2
3
4
11
12
13
14
10
9
5
6
7
8
1
2
3
4
1
2
3
4
17
18
19
20
13
14
15
16
9
10
11
12
5
6
7
8
1
2
3
4
4
3
2
1
8
7
6
5
4
3
2
1
4
3
2
1
8
7
6
5
4
3
2
1
5
6
7
8
1
2
3
4
1
2
3
4
5
6
7
8
1
2
3
4
1
2
3
4
4
3
2
1
4
3
2
1
4
3
2
1
4
3
2
1
3
2
1
4
3
2
1
4
3
2
1
4
3
2
1
4
3
2
1
4
3
2
1
4
3
2
1
4
3
2
1
4
3
2
1
4
3
2
1
4
3
2
1
4
3
2
1
4
3
2
1
3
2
1
4
3
2
1
4
3
2
1
1
2
3
4
4
3
2
1
4
3
2
1
4
3
2
1
4
3
2
1
4
3
2
1
DFSRM1
DFSRM2
DFSFRM
DFECL
DFSFM2
DFSFM1
DFTUSS2
DFERM
DFPEM
DFMM
DFEM
DFSLM
-
DFSTM
+
Staple
DFPDM
SIDE REG F MOT 2B
SIDE REG F MOT 1B
SIDE REG F MOT 2A
SIDE REG F MOT 1A
1
2
1
2
3
4
YC16
TRY MOT OUT1
TRY MOT OUT2
1
2
3
4
DFDRM
9
8
7
6
4
3
2
1
DFDRSOL
9
8
7
6
4
3
2
1
1
2
3
DFCFSOL
FFC
1
2
3
4
5
6
7
8
9
10
11
12
13
1
2
3
4
3
2
1
1
2
3
DFFSSO L
1
2
3
5
4
YC17
STP MOT OUT2
STP MOT OUT2
STP MOT OUT2
STP MOT OUT2
STP MOT OUT1
STP MOT OUT1
STP MOT OUT1
STP MOT OUT1
GND
LS
READY
5V
HP
1
2
3
4
5
6
7
3
2
1
1
2
3
1
2
3
5
4
YC18
DRM MOT 2B
DRM MOT 1B
DRM MOT 2A
DRM MOT 1A
5
6
7
8
9
10
3
2
1
5
4
3
1
2
24V2
MID_DRM SOL ACT
MID_DRM SOL KEEP
8
9
10
11
12
13
5
4
3
1
2
24V2
DRM_BF SOL ACT
DRM_BF SOL KEEP
11
12
13
13
12
11
10
9
8
7
6
5
4
3
2
1
24V2
SUB_MID SOL ACT
SUB_MID SOL KEEP
DFMPWB
3.3V
GND
STRY FULL SENS SIG
STRY FULL SENS PLS
YC21
STRY EJE SENS A
GND
STRY EJE SENS SIG
MID EJE SENS A
GND
MID EJE SENS SIG
YC20
DRM SENS A
GND
DRM SENS SIG
YC19
BRAKE
DIR
CLK
ENABLE
GND
24V2
8
9
10
4
5
6
7
1
2
3
4
5
6
1
2
3
1
2
3
4
5
6
8
9
10
4
5
6
7
1
2
3
4
5
6
1
2
3
1
2
3
4
5
6
3
2
1
4
3
2
1
3
2
1
6
5
4
1
2
3
1
2
3
4
4
5
6
1
2
3
3
2
1
4
3
2
1
3
2
1
3
2
1
3
2
1
7
6
5
4
3
2
1
3
2
1
4
3
2
1
3
2
1
3
2
1
3
2
1
7
6
5
4
3
2
1
DFPES
DFSTFS
DFSES
DFMES
DFDRS
DFTM
GND
ENTRY SENS SIG
3.3V
11
12
13
14
15
16
17
18
19
11
12
13
14
15
16
17
3
2
1
2
1
9
8
7
6
5
4
3
1
2
3
8
9
1
2
3
4
5
6
7
3
2
1
3
2
1
7
6
5
4
3
2
1
3
2
1
1
2
3
1
2
3
4
5
6
7
DFTS1
DFTUSS1
DFLPWB
LED1
LED2
LED3
LED4
KEY1
KEY2
GND
18
19
1
2
3
7
6
5
4
3
2
1
3.3V
TRY U SENS K
1
2
3
DFSLS
7
6
5
4
3
2
1
YC22
MTRY HP1 SENS A
GND
MTRY HP1 SENS SIG
3
2
1
DFSRS1
3
2
1
3
2
1
DFMTS
1
2
3
3
2
1
3
2
1
DFTS2
3
2
1
3
2
1
3
2
1
DFPDS
4
5
6
4
5
6
3
2
1
3
2
1
DFADS
4
5
6
6
5
4
7
8
9
3
2
1
3
2
1
DFBDS
STAPLE SENS A
GND
STAPLE SENS SIG
10
11
12
3
2
1
1
2
3
3
2
1
3
2
1
DFSFSS
DFSRS2
13
14
15
3
2
1
1
2
3
4
3
2
1
3
2
1
DFSFS1
3
2
1
SID REG F SENS A
10
GND
11
SID REG F SENS SIG 12
16
17
18
4
3
2
1
3
2
1
3
2
1
DFSFS2
3
2
1
13
14
15
19
20
21
3
2
1
3
2
1
1
2
3
MTRY HP2 SENS
16
17
GND
MTRY HP2 SENS SIG 18
22
23
24
1
2
3
3
2
1
DFTS3
9
8
7
19
20
21
25
26
27
6
5
4
4
5
6
3
2
1
DFTS5
7
8
9
PADDLE SENS A
GND
PADDLE SENS SIG
22
23
24
1
2
3
3
2
1
3
2
1
3
2
1
DFTS4
7
8
9
ADJUST SENS A
GND
ADJUST SENS SIG
4
5
6
28 28
29 29
30 30
25
26
27
7
8
9
3
2
1
3
2
1
DFSFRS
SID REG R SENS A
GND
SID REG R SENS SIG
BUNDLE SENS A
GND
BUNDLE SENS SIG
1
2
3
10
11
12
3
2
1
3
2
1
MTRY BF SENS A
GND
MTRY BF SENS SIG
GND
PAP SENS SIG
3.3V
SFT SET SENS A
GND
SFT SET SENS SIG
4
5
6
13
14
15
3
2
1
1
2
3
MTRY HALF SENS A 7
GND
8
MTRY HALF SENS SIG 9
YC23
SFT F HP SENS A
GND
SFT F HP SENS SIG
10
11
12
16
17
18
3
2
1
MTRY FULL SENS A 13
14
GND
MTRY FULL SENS SIG 15
SFT R HP SENS A
GND
SFT R HP SENS SIG
16
17
18
SFT RELS SENS A
GND
SFT RELS SENS SIG
2-4-1
3NB/3ND/3N0/3NK
BRES
5V
Vout
GND
1
2
3
1
2
3
BRECSW
1
2
1
2
BRSOL
RET
ACT
COM
BRCS2
GND
Vout
5V
3
2
1
3
2
1
1
2
3
1
2
3
BRCS1
GND
Vout
5V
3
2
1
3
2
1
1
2
3
1
2
3
GND
BRIDGE_SENS 1
+5V
BRCUSW
1
2
1
2
4
5
6
7
4
5
6
7
GND
BRIDGE_OPEN
+5V
NC
5
4
3
1
2
3
Relay
1
2
3
GND
BRIDGE_SENS2
+5V
YC6
YC7
BRCM1
/B
/A
B
A
4
3
2
1
4
3
2
1
1
2
3
4
1
2
3
4
BRIDGE1_B/
BRIDGE1_A/
BRIDGE1_B
BRIDGE1_A
BRCM2
/B
/A
B
A
4
3
2
1
4
3
2
1
5
6
7
8
5
6
7
8
BRIDGE2_B/
BRIDGE2_A/
BRIDGE2_B
BRIDGE2_A
19
18
17
16
15
14
13
12
11
19
18
17
16
15
14
13
12
11
N.C
+5V
EXIT_SENS
GND
EXIT_COV_OPEN
GND
EXIT_SOL_RET
EXIT_SOL_REM
+24V1
10
9
8
7
6
5
4
3
2
1
10
11
12
13
14
15
16
17
18
19
10
9
8
7
6
5
4
3
2
1
10
9
8
7
6
5
4
3
2
1
DECAL_DIR
DECAL_PD
DECAL_CLK
DECAL_PH
DECAL_REM
GUIDE_DIR
GUIDE_PD
GUIDE_CLK
GUIDE_REM
DECAL_HP_SENS
1
2
3
4
5
6
19
18
17
16
15
14
38
37
36
35
34
33
+24V1
+24V1
GND
GND
5V
GND
7
8
9
10
11
12
13
14
15
16
17
18
19
13
12
11
10
9
8
7
6
5
4
3
2
1
32
31
30
29
28
27
26
25
24
23
22
21
20
BRIDGE_SENS 1
BRIDGE_OPEN
BRIDGE_SENS 2
BRIDGE1 DIR
BRIDGE1 PD
BRIDGE1 CLK
BRIDGE1 PH
BRIDGE1 REM
BRIDGE2 DIR
BRIDGE2 PD
BRIDGE2 CLK
BRIDGE2 PH
BRIDGE2 REM
YC2
DECAL DIR
DECAL PD
DECAL CLK
DECAL MODE
DECAL REM
GUIDE DIR
GUIDE PD
GUIDE CLK
GUIDE REM
DECAL_HP_SENS
1
2
3
4
5
6
7
8
9
10
YC1
+24V
+24V
GND
GND
+5V
GND
1
2
3
4
5
6
1
2
3
4
5
6
19
18
17
16
15
14
1
2
3
4
5
6
7
8
9
10
11
12
13
1
2
3
4
5
6
7
8
9
10
11
12
13
13
12
11
10
9
8
7
6
5
4
3
2
1
Connector holder
YC4
1
2
3
4
5
6
7
8
9
Connector holder
Relay
19
18
17
16
15
14
13
12
11
Relay
3
2
1
YC20
4
5
Connector holder
2
1
YC3
YC8
1
2
3
4
NC
GND
DECAL_HP_SENS
+5V
YC5
1
2
3
4
DECAL_B/
DECAL_A/
DECAL_B
DECAL_A
5
6
7
8
GUIDE_B/
GUIDE_A/
GUIDE_B
GUIDE_A
BRIDGE_SENS 1
BRIDGE OPEN
BRIDGE_SENS 2
BRIDGE1 DIR
BRIDGE1 PD
BRIDGE1 CLK
BRIDGE1 MODE
BRIDGE1 REM
BRIDGE2 DIR
BRIDGE2 PD
BRIDGE2 CLK
BRIDGE2 MODE
BRIDGE2 REM
BRPWB
BRIDGE UNIT
EPWB
MACHINE
2-4-2
3NB/3ND/3N0/3NK
YC1
1
2
3
4
5
YC2
1
2
3
4
5
2
1
CFLCSW
2
1
CFSSW
2
1
2
1
CFTSW
2
1
2
1
1
2
1
2
3.3V
SWCLK
SWDIO
RESET
GND
1
2
YC4
1
24V1
2
FRONT COV SIG
1
2
YC6
1
24V
2
FRONT COV SIG
1
2
3
4
3
4
YC7
1
2
3
4
5
6
7
1
2
DFMPWB
YC9
5
4
3
2
1
5
4
3
2
1
1
2
3
4
5
5
4
3
2
1
1
2
3
4
5
6
7
YC10
8
7
6
5
8
7
6
5
8
7
6
5
8
7
6
5
4
3
2
1
4
3
2
1
4
3
2
1
4
3
2
1
4
3
2
1
4
3
2
1
3.3V
TXD
RXD
N.C.
GND
YC3
4
3
2
1
YC5
4
3
2
1
24V
EJECT COV SIG
YC10
EXTMOT_ 2B
EXTMOT_1B
EXTMOT_2A
EXTMOT_1A
1
2
3
4
1
2
3
4
4
3
2
1
4
3
2
1
CFADM2
MDLMOT_ 2B
MDLMOT_1B
MDLMOT_2A
MDLMOT_1A
5
6
7
8
5
6
7
8
4
3
2
1
4
3
2
1
CFSRM2
CINMOT_ 2B
CINMOT_1B
CINMOT_ 2A
CINMOT_1A
9
10
11
12
9
10
11
12
4
3
2
1
4
3
2
1
CFPEM
EXCMOT_2B
EXCMOT_1B
EXCMOT_2A
EXCMOT_1A
13
14
15
16
13
14
15
16
8
7
6
5
1
2
3
4
4
3
2
1
4
3
2
1
CFADM1
STMMOT_2B
STMMOT_1B
STMMOT_2A
STMMOT_1A
17
18
19
20
17
18
19
20
8
7
6
5
1
2
3
4
4
3
2
1
4
3
2
1
CFSRM1
GND
GND
ENG_RDY
ENG_SEL
ENG_CLK
ENG_DI
ENG_DO
24V
24V
GND
GND
5V
GND
GND
3.3V
YC13
5V
STLS2
GND
STLS1
STHP
STMOT_OUT1
STMOT_OUT1
FGND
STMOT_OUT2
STMOT_OUT2
1
2
3
4
5
6
7
8
9
10
1
2
3
4
5
6
7
8
9
10
1
2
3
1
2
3
10
9
8
7
6
5
4
3
2
1
10
9
8
7
6
5
4
3
2
1
3
2
1
1
2
3
CFSTM
YC17
24V2
3FSOL_ATT
3FSOL_HLD
3
2
1
1
2
3
CFMPWB
2-4-3
CFFSSOL
YC15
BLDMOT_BRK
BLDMOT_DIR
BLDMOT_CLK
BLDMOT_EN
GND
24V2
1
2
3
4
5
6
1
2
3
4
5
6
YC16
FLDMOT_DIR
FLDMOT_ALM
FLDMOT_CLK
FLDMOT_EN
N.C
GND
24V2
1
2
3
4
5
6
7
1
2
3
4
5
6
7
7
6
5
4
3
2
1
7
6
5
4
3
2
1
6
5
4
3
6
5
4
3
2
1
2
1
CFBM
CFMM
YC20
5V
GND
BDLFT_HP
1
2
3
6
5
4
1
2
3
3
2
1
1
2
3
CFADS1
5V
GND
WDL_HP
4
5
6
3
2
1
4
5
6
3
2
1
1
2
3
CFSRS1
5V
GND
FULL
7
8
9
6
5
4
1
2
3
3
2
1
1
2
3
CFTFS
5V
GND
OUT
10
11
12
3
2
1
4
5
6
3
2
1
1
2
3
CFES
5V
GND
TRANS PORT
13
14
15
3
2
1
1
2
3
3
2
1
1
2
3
CFPCS
5V
GND
PAPER
16
17
18
3
2
1
1
2
3
3
2
1
1
2
3
CFPS
5V
GND
WDU_HP
19
20
21
3
2
1
1
2
3
3
2
1
1
2
3
CFSRS2
22
23
24
3
2
1
1
2
3
3
2
1
1
2
3
CFBS
GND
BULOW_HP
3.3V
25
26
27
3
2
1
1
2
3
3
2
1
1
2
3
CFADS2
GND
CARRY_IN
3.3V
28
29
30
3
2
1
1
2
3
3
2
1
1
2
3
CFPES
5V
GND
BLD_HP
22
23
24
3NB/3ND/3N0/3NK
YC3
YC1
TOFSW1
3
2
1
3
2
1
1
2
3
1
2
3
GND
OFS1
5V
TOFSW2
3
2
1
3
2
1
4
5
6
4
5
6
GND
OFS2
5V
TOFSW3
3
2
1
3
2
1
7
8
9
7
8
9
GND
OFS3
5V
TOFSW4
3
2
1
3
2
1
10
11
12
10
11
12
GND
OFS4
5V
TOFSW5
3
2
1
3
2
1
13
14
15
13
14
15
GND
OFS5
5V
GND
GND
GND
5V
24V
24V
SDI
SDO
SCLK
SEL
READY
1
2
3
4
5
6
7
8
9
10
11
12
12
11
10
9
8
7
6
5
4
3
2
1
YC7
1
2
3
4
5
6
7
8
9
10
11
1
2
3
4
5
6
7
8
9
10
11
GND
GND
GND
5V
24V
24V
MT DO
MT DIN
MT CLK
MT SEL
MT RDY
DFMPWB
MBMPWB
1
4
1
3
2
3
2
2
3
4
16
17
18
19
16
17
18
19
1
1
LED
GND
TEJS
5V
YC2
YC5
5V
MOTOR _A
MOTOR A
MOTOR B
MOTOR _B
2
3
1
1
2
2
LED
TEJS
1
2
3
4
4
3
2
1
1
2
3
4
4
3
2
1
MBDM
1
3
1
3
1
2
1
2
MCOSW
YC4
MHPSW
3
2
1
3
2
1
3
4
5
3
4
5
GND
HP SIG
5V
TOFSW6
3
2
1
3
2
1
6
7
8
6
7
8
GND
OFS6
5V
TOFSW7
3
2
1
3
2
1
9
10
11
9
10
11
GND
OFS7
5V
12
13
14
12
13
14
GND
NC
5V
R24V
24V
2-4-4
3NB/3ND/3N0/3NK
YC8
PGND
24V2
1
2
1
2
1
2
YC7
PU_DO
PU_DI
PU_CLK
PU_SEL
PU_RDY
PUMOT_EN
PUPES_EN
SGND
SGND
3.3V
3.3V
5.0V
YC4
YC2
1
2
GND
24V2
1
2
3
1
2
3
4
3
2
1
4
3
2
1
1
2
3
4
1
2
3
4
PHADJ_MOT_A
PHADJ_MOT_B
PHADJ_MOT_An
PHADJ_MOT_Bn
PUSLM
1
2
3
1
2
3
3
2
1
3
2
1
SENS3.3V
GND
PHADJ_HP
PUSLS
24V2
PHSOL_PUL
PHSOL_RET
1
2
3
1
2
3
24V2
PHSOL_PUL
PHSOL_RET
PUSOL
PHLED_A
PHLED_B
PHLED_C
PHLED_D
PHLED_3.3V
4
5
6
7
8
4
5
6
7
8
5
4
3
2
1
5
4
3
2
1
5.0V
PHTNK_FUL
GND
9
10
11
9
10
11
3
2
1
3
2
1
1
2
1
2
2
1
2
1
SENS3.3V
GND
PHMOT_PLS
1
2
3
1
2
3
3
2
1
3
2
1
SENS3.3V
GND
PHMOT_PLS
PUPS
SENS3.3V
GND
PHMOT_HP
4
5
6
4
5
6
3
2
1
3
2
1
SENS3.3V
GND
PHMOT_HP
PUHPS
1
2
2
1
1
2
1
2
PHTNK_SET
GND
PUTSSW
PHMOT_N
NC
PHMOT_P
12
11
10
9
8
7
6
5
4
3
2
1
1
2
3
4
5
6
7
8
9
10
11
12
1
2
3
4
5
6
7
8
9
10
11
12
PH_SDI
PH_SDO
PH_CLK
PH_SEL
PH_RDY
PHMOT_REQ
PHPES_REQ
GND
GND
3.3V
3.3V
5.0V
DFMPWB
2
PHMOT_N
1
1
PHMOT_P
PUM
YC3
YC1
12
11
10
9
8
7
6
5
4
3
2
1
2
PHADJ_MOT
PHADJ_MOT
PHADJ_MOT
PHADJ_MOT
1A
2A
1B
2B
YC6
SENS3.3V
GND
PHADJ_HP
YC5
3
2
1
Reray
conector
1
2
3
YC1
DUCUMENT FINISHER
YC10
1
2
3
4
1
2
3
4
1
2
3
4
5
1
2
3
4
5
3.3V
GND
RESET
MODE
PHLED_A
PHLED_B
PHLED_C
PHLED_D
PHLED_3.3V
5.0V
PHTNK_FUL
GND
PULPWB1
PUTFS
YC11
3.3V
DBG_TX
DBG_RX
NC
GND
PUPWB
YC7
PHPES_DET
GND
YC1
PHPES_DET
GND
PULPWB2
YC8
YC9
PHTNK_SET
GND
PUNCH UNIT
2-4-5
2011
2011