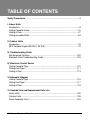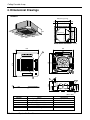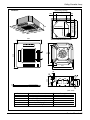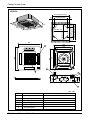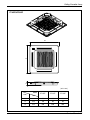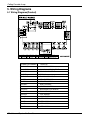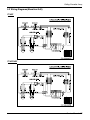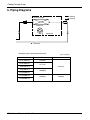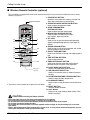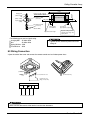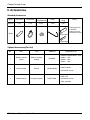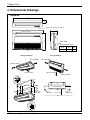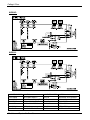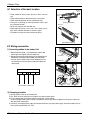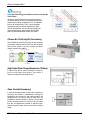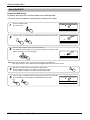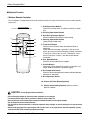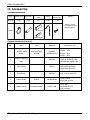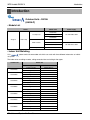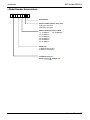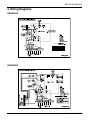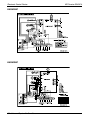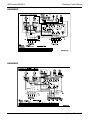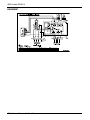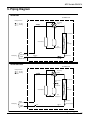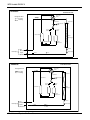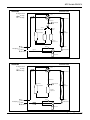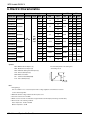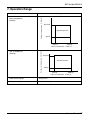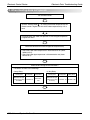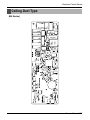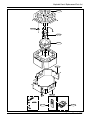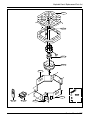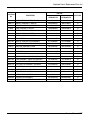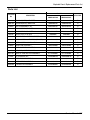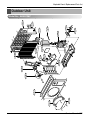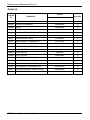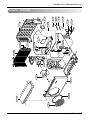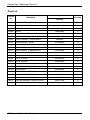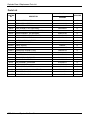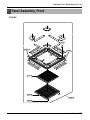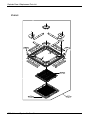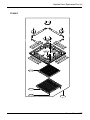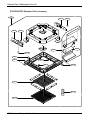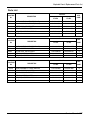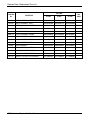
1
website http://www.lgservice.com
e-mail http://www.lgeservice.com/techsup.html
LG
LG
Universal System
Air Conditioner
SERVICE MANUAL
CAUTION
• BEFORE SERVICING THE UNIT, READ THE SAFETY
PRECAUTIONS IN THIS MANUAL.
• ONLY FOR AUTHORIZED SERVICE PERSONNEL.
TABLE OF CONTENTS
Safety Precautions ...................................................................................................3
I. Indoor Units
Introduction..............................................................................................................8
Ceiling Cassette 4-way ..........................................................................................10
Ceiling & Floor .......................................................................................................37
Ceiling concealed Duct..........................................................................................54
II. Outdoor Units
Introduction............................................................................................................76
MPS Variable Single A(AUUH-C, R410A) .............................................................78
III. Troubleshooting Guide
Self-diagnosis Function .......................................................................................102
Electronic Parts Troubleshooting Guide ..............................................................103
IV. Electronic Control Device
Ceiling Cassette Type..........................................................................................110
Ceiling Duct Type.................................................................................................111
Ceiling & Floor .....................................................................................................113
V. Schematic Diagram
Ceiling Cassette Type..........................................................................................116
Ceiling Duct Type.................................................................................................117
Ceiling & Floor .....................................................................................................118
VI. Explode View and Replacement Parts List
Indoor Units .........................................................................................................120
Outdoor Units ......................................................................................................139
Panel Assembly, Front .........................................................................................153
2 Universal System Air Conditioner
I. Indoor Units
Introduction.......................................................................................................8
Ceiling Cassette 4-way...................................................................................10
Ceiling & Floor ................................................................................................37
Ceiling Concealed Duct..................................................................................54
Service Manual 7
Introduction
Introduction
• Models List
Model name
Nominal capacity [Btu/h(kW)]
Indoor unit
Type
Chassis
Refrigerant
name
TE
Ceiling
Cassette
4-Way
Ceiling & Floor
Ceiling
Concealed
Duct
R410A
12,000
18,000
(3.5)
(5.3)
ATNH
ATNH
126ELFC 186ELFC
30,000
(8.8)
36,000
(10.6)
48,000
(14.1)
60,000
(17.6)
-
-
-
-
-
-
-
-
ATNH
ATNH
246FLFC 306FLFC
TF
-
-
TD
-
-
-
-
VE
AVNH
126ELAC
-
-
-
VB
-
VK
-
-
-
VL
-
-
-
BH
-
BG
-
-
-
BR
-
-
-
ABNH
ABNH
186HLAC 246HLAC
-
-
-
-
-
-
AVNH
366KLAC
-
-
-
-
-
-
8 Universal System Air Conditioner
ABNH
ABNH
306GLAC 366GLAC
-
Power
Supply
ATNH
ATNH
ATNH
366DLFC 486DLFC 606DLFC
-
AVNH
AVNH
AVNH
186BLAC 246BLAC 306BLAC
R410A
R410A
24,000
(7.0)
-
AVNH
AVNH
486LLAC 606LLAC
-
-
-
-
ABNH
ABNH
486RLAC 606RLAC
1Ø, 220-240V,
50Hz
Introduction
• Model Number Nomenclature
Indoor unit
A T N H 1 8 6 E L F C
Serial Number
Functions
A : Basic
B : Low Ambient
C : Plasma Filter
E : Elevation Grille
F : Elevation Grille + Plasma Filter
H : Plasma Filter + Low Ambient
L : Nano Plasma
M : Nano Plasma + Elevation Grille
Look
L : Basic
Chassis Name
E : E Chassis
F : F Chassis
D : D Chassis
Electrical Ratings
6:1Ø,220V~240V,50Hz
8:3Ø,380V~415V,50Hz
Nominal Cooling Capacity in Btu/h
Ex) 18 -> 18,000 Btu/h, 48 -> 48,000 Btu/h
Model Type
C : Cooling Only
H : Heat Pump
Indicates that this is a indoor unit for R410A
ATN : Ceiling cassette type indoor unit
ABN : Ceiling concealed duct type indoor unit
AVN : Convertible type indoor unit
Decoration panel(For Ceiling Cassette Models)
P T - H E C
Functions
A : Basic
E : Elevation Grille
C : Plasma Air Purifier
F : Elevation Grille + Plasma Air Purifier
Indoor Unit Chassis
E : E Chassis
F : F Chassis
D : D Chassis
Model Type
C : Cooling Only
H : Heat Pump
Decoration Panel of Ceiling Cassette Type Indoor Unit
Service Manual 9
Ceiling Cassette 4-way
Ceiling Cassette 4-way
Ceiling Cassette 4-way
(R410A·Indoor Units)
ATNH-EL/FL/DL
Contents
1. Features & Benefits ..............................................................................11
2. List of Functions....................................................................................15
3. Specifications........................................................................................16
4. Dimensional Drawings ..........................................................................18
5. Wiring Diagrams ...................................................................................22
6. Piping Diagrams....................................................................................24
7. Operating Instructions...........................................................................25
8. Installation.............................................................................................29
9. Accessories ..........................................................................................36
10 Universal System Air Conditioner
Ceiling Cassette 4-way
1. Features & Benefits
■ Convenience
• Auto elevation grille(Accessory)
• Tele control(Accessory)
• LCD wired remote control
• Group control
• Central control(Accessory)
• Weekly progam
■ Cleanness
■ Easy Installation
• Plasma air purifying system
• Hygienic and easy to clean filter
• Compact design & easy installation
• High ceiling corresponding operation
• High head drain pump(700mm)
■ Comfort & Reliability
• Low noise with 3-dimensional turbo fan
• 2-Thermistor control(Main body & Remote control)
• Zero stanby power consumption
• Jet cool
• Swirl swing
• Space control
Compact Design and Easy Installation
Only about 269mm height in the ceiling is sufficient for
installation space.
A smaller size than a Textile(600X600) is very convenient for installation.
(18k Btu/h model)
Low Noise with 3-dimensional
turbo fan
The most advanced low-noise design.
The adoption of turbo-fan and round type heat
exchanger provides the quietest operation.
Hygienic and Easy-to-Clean Filter
Washable and anti bacteria filter is adopted.
It is easy to open grille and replace clean filter.
Service Manual 11
Ceiling Cassette 4-way
Plasma Air Purifying System
The PLASMA Air Purifying Function not only removes microscopic contaminants and dust, but also removes house
mites, pollen, and pet fur helps to prevent allergic diseases
like asthma.
Dust electrode discharge
Dust particles
Ionizer
Photo-Catalyst Coated Mesh
+4.8KV discharge
+
+
+
Polluted Air
Purified fresh Air
+
Generating plasma
Odour
Odour molecule
High Head Drain Pump(700mm)
Built-in Drain Pump drains out water automatically.
A standard drain-head height of up to 700 mm is possible, creating the ideal solution for perfect water drainage.
Pipe fixture
Slope 1/50~1/100
Maximum 700mm
Flexible drain hose
Hard Tube(ex.PVC)
Drain Pump
Drain Pan
Ceiling Board
High-Ceiling Corresponding Operation
According to the height of the installation, it provides variability of indoor fan motor rpm. If the height of installation is
low then you can adjust low rpm of indoor fan motor. On
the other hand if the height of the installation is high you
can adjust high rpm of indoor fan motor. Selection of
speed can be done by slide switch at the back of the LCD
wired remote.
Switch selection
Ceiling Height
Low Ceiling
Less than 2.7m
Standard
2.7~3.3m
High Ceiling
Over than 3.3m
Tele Control (Accessory)
- It provides you ease of control. Air conditioner
can be switched on/off by the telephone. It
saves time & energy.
ON
OFF ON
In Advance by Telephone
Before Coming Home...
12 Universal System Air Conditioner
OFF
In case of Going out
Without Turning off the
Air Conditioner...
Ceiling Cassette 4-way
Child Lock Function
-It prevents the children or others from tampering
with the control buttons. Unit can be controlled by
the wireless remote controller. This can be easily set
by pressing timer key & Min key simultaneously.
After child lock is set, pressing any key will display
CL on the LCD for 3 seconds and all the keys will be
ineffective.
CHILD LOCK
-Display
Auto Elevation Grille(Accessory)
-Auto Elevation Grille is automatically down to height
of max. 3.1 m. So it enables to install the Indoor unit
at high ceiling space. And Auto Elevation Grille
makes you cleaning the filter easily.
Swirl Swing
4- Open(Conventional)
Comparison of Floor
Temp. Distribution(20°C)
Swirl Swing(New)
- It is the function for comfort cooling/heating operation.
- The diagonal two louvers are opened the
more larger than the other louvers.
After one minute, it is opposite.
2.4%
100% Improved
4.8%
Comparison of Air Flow Types
4- Open(Conventional)
Swirl Swing(New)
Vane 1 Open
Vane 1 Close
Vane 2 Open
Vane 2 Open
Vane 3 Open
Vane 3 Close
Vane 4 Open
Vane 4 Open
Close
Time
Vane 2
Close
Open
Close
Open
Close
Open
Open
Close
Open
Close
Open
71
Close
Open
Open
Close
Vane 3
Vane 1
Time
Vane 4
Space Control
Vanes angle can be controlled by pair, considering its
installation environment.
- For example direct drafts can be annoying, leading
to discomfort and reduced productivity vane control
helps to eliminate this problem.
- Easily controlled by wired remote control.
- Air Flow can be controlled easily regarding any
space environment.
Service Manual 13
Ceiling Cassette 4-way
Weekly Program
- On/Off schedule of operation for a period of ONE
week.
No need to turn the unit On/OFF manually during
working days. On/Off time is scheduled in micom of
the wired remote control.
Operation Time Table (Example)
Setting
Mon
Temp.
25°C 25°C
Tue
Wed
Thu
25°C 25°C
Fri
Sat
Sun
25°C
On
09:00 08:00 09:00 08:00 09:00
Off
12:00 17:00 12:00 12:00 12:00
OFF
10mm
10mm
Auto Restart Operation
- Whenever there is electricity failure to the unit, and after resumption of the power, unit will start in the same
mode prior to the power failure. Memorized condition are on / off condition, operating mode (cooling/heating),
set temperature and fan speed.The unit will memorize the above conditions and start with same memorized
condition.
Two Thermistor Control
- There may be a significant difference between the temperature taken at the installed product and indoor temperature. Two thermistor control provides option to control temperature by referring any of the two temperatures. With the help of the slide switch at the back of the LCD wired remote controller, selection of the desired
thermistor for controlling the unit can be done. One thermistor is in the Indoor unit & the other one is in the
LCD wired remote.
1
2
........
16
Group Control
- It enables to control as much as 16 units with the
help of one wired remote controller. All the units will
follow same setting of temperature & other sub functions.
........
Central Control(Accessory)
- It enables to control 16 x 8 = 128 units with the help
of 8 controllers. All units can be put on and off from
one Central Room.For Setting Temperature, Fan
Speed and other sub functions, access the respective LCD wired remote controller of each unit.
❈ Sub PI485(with wire assembly) should be purchased as optional.
14 Universal System Air Conditioner
Main
PCB
Controller
#1
M
1
M
2
M
16
M
17
M
18
M
128
Sub
1
Sub
2
Sub
16
Sub
17
Sub
18
Sub
128
Controller
#2
Controller
#8
Ceiling Cassette 4-way
2. List of Functions
Function
Air Discharge Outlet
Airflow Direction control (left & right)
Airflow Direction control (up & down)
Airflow Steps(Fan / Cool /Heat)
Auto Changeover
Auto Elevation Grille
Auto Operation
Auto Restart Operation
Auto Swing
Central Control
CHAOS Wind (Auto wind)
Child Lock Function
Cooling & Fan Operation(Cooling Only)
Cooling, heating & Fan Operation(Heat Pump)
Defrost / Deicing
Deodorizing Filter
Drain Pump
E.S.P. Control
Electric Heater
Environment Friendly Refrigerant
Fire Alarm Function
Forced Operation
Group Control
High Ceiling Operation
Hot Start
Jet Cool
Plasma Air Purifier
Prefilter(Washable / Anti-fungus)
Self Diagnosis
Sleep Mode
Soft Dry Operation
Swirl Swing
Space Control
Tele Control
Temperature Control
Test Function
Time Delay Safety function
Timer (weekly)
Two Thermistor Control
Wired LCD Remote Control
Wireless Remote Control
Zero Standby Power
ATNH-EL
4
Auto
3/4/3
O
Accessory
O
O
O
Accessory
O
O
O
O
O
O
O
O
O
O
O
O
O
O
O
O
O
Accessory
O
O
O
O
O
O
Accessory
O
Ceiling Cassette-4way
ATNH-FL
4
Auto
3/4/3
O
Accessory
O
O
O
Accessory
O
O
O
O
O
O
O
O
O
O
O
O
O
O
O
O
O
Accessory
O
O
O
O
O
O
Accessory
O
ATNH-DL
4
Auto
3/4/3
O
Accessory
O
O
O
Accessory
O
O
O
O
O
O
O
O
O
O
O
O
O
O
O
O
O
Accessory
O
O
O
O
O
O
Accessory
O
Notes :
O : Basic
Optional : Factory-Installed
Accessory : Field-Installed
- : Not available on this system
Service Manual 15
Ceiling Cassette 4-way
3. Specifications
Indoor Unit Type
Model
Ceiling Cassette 4-way
ATNH126ELFC
ATNH186ELFC
ATNH246FLFC
PT-HEC(F)
PT-HEC(F)
PT-HFC(F)
kcal/h(W)
3024(3517)
4536(5275)
6048(7033)
12000
18000
24000
Btu/h
3326(3869)
4990(5803)
6653(7738)
Nominal Heating Capacity
kcal/h(W)
13200
19800
26400
Btu/h
Air Circulation
H/M/L
CMM(CFM) 9.5/8/7(336/283/247) 13/12/11(459/424/388) 15/14/13(523/494/459)
Setting temperature range(cool/heat)
°C
18~30 / 16~30
18~30 / 16~30
18~30 / 16~30
18.3
22.4
40.3
Fan motor
Output
W
IC-9630LGAE
IC-9630LGAC
OBM-350292
Model
6
6
6
No. of Poles
75
90
121
Input
W
0.35
0.43
0.53
Running Current
A
2.5/440
2.5/440
4/440
Capacitor
µF/Vac
Turbo Fan
Turbo Fan
Turbo Fan
Fan
Type
1/13.0(330)
1/13.0(330)
1/15.0(382)
No. Used / Diameter EA/inch(mm)
Noise Level
38 / 35 / 32
41/39/37
43/41/39
H/M/L
dB(A)
(Sound Press,1.5m)
Thermistor
Thermistor
Thermistor
Temperature controller
0.275(7)
0.275(7)
0.275(7)
Coil
Tube Size (OD)
inch(mm)
19
19
21
Fins per inch
2R,11C
2R11C
2R12C
No. of Rows & Column
1.2
2.4
3
Dehumidification Rate
l/h
Dimensions
Indoor Unit
inch(mm) 22.4*10.5*22.4(570*269*570) 22.4*10.5*22.4 (570*269*570) 29.3*11.5*29.4 (744*292*744)
26.4*1.2*26.4(670*30*670) 26.4*1.2 *26.4(670*30*670) 33.5*1.2 *33.5(850*30*850)
(W*H*D)
Decoration Panel
inch(mm)
Net Weight
Indoor Unit
kg(lbs)
19(41.9)
19(41.9)
24(52.9)
3(6.6)
3(6.6)
3(6.6)
Decoration Panel
kg(lbs)
1/4 (6.35)
1/4 (6.35)
1/4 (6.35)
Piping Connection Liquid
inch(mm)
3/8 (9.52)
1/2 (12.7)
1/2 (12.7)
Gas
inch(mm)
1.26(32)
1.26(32)
1.26(32)
Drain hose (ID Ø)
inch(mm)
Packing Dimension Indoor Unit
inch(mm) 25.2*13.0*25.2(640*330*640) 25.2*13.0*25.2(640*330*640) 32.6*14.4*32.6(828*365*828)
29.5*3.1*29.5(750*80*750) 29.5*3.1*29.5(750*80*750) 36.8*3.5*36.8(935*90*935)
(W*H*D)
Decoration Panel
inch(mm)
Stuffing Quantity
Without S/Parts
20/40ft
189/378
189/378
84/168
Indoor Unit
Decoration Panel
Nominal Cooling Capacity
For outdoor units Single Split
Application Split(Simultaneous operation)
45/42/39
Thermistor
0.275(7)
21
2R12C
3.3
29.3*11.5*29.3(744*292*744)
33.5*1.2*33.5(850*30*850)
24(52.9)
3(6.6)
1/4 (6.35)
5/8 (15.88)
1.26(32)
32.6*14.4*32.6(828*365*828)
36.8*3.5*36.8(935*90*935)
84/168
See chapter MPS Variable SINGLE-A(AUUH-B)
See chapter MPS Variable SINGLE-A(AUUH-B)
Notes:
1. Capacities are based on the following conditions:
Cooling: - Indoor Temperature 27°C(80.6°F) DB /19°C(66.2°F) WB
- Outdoor Temperature 35°C(95°F) DB /24°C(75.2°F) WB
- Interconnecting Piping Length 7.5m
- Level Difference of Zero.
Heating: - Indoor Temperature 20°C(68°F) DB / 15°C(59°F) WB
- Outdoor Temperature 7°C(44.6°F) DB / 6°C(42.8°F) WB
- Interconnecting Piping Length 7.5 m
- Level Difference of Zero.
2. Capacities are Net Capacities.
3. Due to our policy of innovation some specifications may be changed without notification.
16 Universal System Air Conditioner
ATNH306FLFC
PT-HFC(F)
7560(8793)
30000
8316(9672)
33000
19/17/15(671/600/530)
18~30 / 16~30
48.6
OBM-4015P2
6
146
0.67
4/440
Turbo Fan
1/15.0(382)
Ceiling Cassette 4-way
Indoor Unit Type
Model
Indoor Unit
Decoration Panel
Nominal Cooling Capacity
Nominal Heating Capacity
kcal/h(W)
Btu/h
kcal/h(W)
Btu/h
CMM(CFM)
°C
W
ATNH366DLFC
PT-HDC(F)
9072(10549)
36000
9979(11607)
39600
25/23/21(883/812/742)
18~30 / 16~30
52.5
IC-1630LGPJ
6
175
0.76
4/440
Turbo Fan
1/18.1(460)
Ceiling Cassette 4-way
ATNH486DLFC
ATNH606DLFC
PT-HDC(F)
PT-HDC(F)
12095(14067)
14112(16412)
48000
56000
13305(15474)
15523(18053)
52800
61600
30/28/26(1059/988/918) 34/32/30(1200/1130/1059)
18~30/16~30
18~30/16~30
58.5
107
IC-1640LGPH
IC-14640LGPM
6
6
195
237
1.5
1.8
6/400
6/400
Turbo Fan
Turbo Fan
1/18.1(460)
1/18.1(460)
Air Circulation
H/M/L
Setting temperature range(cool/heat)
Fan motor
Output
Model
No. of Poles
Input
W
Running Current
A
Capacitor
µF/Vac
Fan
Type
No. Used / Diameter EA/inch(mm)
Noise Level
40/38/36
43/41/39
50/47/43
H/M/L
dB(A)
(Sound Press,1.5m)
Thermistor
Thermistor
Thermistor
Temperature controller
0.275(7)
0.275(7)
0.275(7)
Coil
Tube Size (OD)
inch(mm)
21
21
21
Fins per inch
2R12C
2R12C
2R12C
No. of Rows & Column
4.0
5.5
6.5
Dehumidification Rate
l/h
Dimensions
Indoor Unit
inch(mm)
33.1*11.3*33.1(840*288*840) 33.1*11.3*33.1(840*288*840) 33.1*11.3*33.1(840*288*840)
37.4*1.2*37.4(950*30*950) 37.4*1.2*37.4(950*30*950)
37.4*1.2*37.4(950*30*950)
(W*H*D)
Decoration Panel
inch(mm)
Net Weight
Indoor Unit
kg(lbs)
32(70.4)
32(70.4)
32(70.4)
5(11)
5(11)
5(11)
Decoration Panel
kg(lbs)
1/4 (6.35)
3/8(9.52)
3/8(9.52)
Piping Connection Liquid
inch(mm)
5/8 (15.88)
3/4(19.05)
3/4(19.05)
Gas
inch(mm)
1.26(32)
1.26(32)
1.26(32)
Drain hose (ID Ø)
inch(mm)
Packing Dimension Indoor Unit
inch(mm)
36.4*13.8*36.4(925*350*925) 36.4*13.8*36.4(925*350*925) 36.4*13.8*36.4(925*350*925)
(W*H*D)
Decoration Panel
inch(mm) 40.6*3.5*40.6(1,030*90*1,030) 40.6*3.5*40.6(1,030*90*1,030) 40.6*3.5*40.6(1,030*90*1,030)
Stuffing Quantity
Without S/Parts
20/40ft
72/144
72/144
72/144
For outdoor units Single Split
Application Split(Simultaneous operation)
See chapter MPS Variable SINGLE-A(AUUH-B)
See chapter MPS Variable SINGLE-A(AUUH-B)
Notes:
1. Capacities are based on the following conditions:
Cooling: - Indoor Temperature 27°C(80.6°F) DB /19°C(66.2°F) WB
- Outdoor Temperature 35°C(95°F) DB /24°C(75.2°F) WB
- Interconnecting Piping Length 7.5m
- Level Difference of Zero.
Heating: - Indoor Temperature 20°C(68°F) DB / 15°C(59°F) WB
- Outdoor Temperature 7°C(44.6°F) DB / 6°C(42.8°F) WB
- Interconnecting Piping Length 7.5 m
- Level Difference of Zero.
2. Capacities are Net Capacities.
3. Due to our policy of innovation some specifications may be changed without notification.
Service Manual 17
Ceiling Cassette 4-way
4. Dimensional Drawings
ATNH-EL
600 (Ceiling opening)
521(Hanging bolt)
269
570 Unit size
570 Unit size
670
75
670
600 (Ceiling opening)
39.5
450 (Hanging bolt) 75
39.5
Unit:mm
670
570
450
521
40
6
4
30
1
52
3
(unit : mm)
Number
1
2
3
4
5
6
Name
Liquid pipe connection
Gas pipe connection
Drain pipe connection
Power supply connection
Air discharge grille
Air suction grille
18 Universal System Air Conditioner
Descripition
ø6.35 flare
12k: ø9.52, 18k: ø12.7 flare
190.5
110
90
90
120.4
30
269
110
2
160
670
570
5
Ceiling Cassette 4-way
ATNH-FL
790 (Ceiling opening)
572(Hanging bolt)
109
744 Unit size
744 Unit size
292
850
66
850
790 (Ceiling opening)
658 (Hanging bolt)
66
109
Unit:mm
850
658
850
744
5
6
572
744
70
4
2
212
150
90
110
54
192
30
110
90
292
117
1
3
(unit : mm)
Number
1
2
3
4
5
6
Name
Liquid pipe connection
Gas pipe connection
Drain pipe connection
Power supply connection
Air discharge grille
Air suction grille
Descripition
ø6.35 flare
24K: ø12.7, 30K: ø15.88 flare
Service Manual 19
Ceiling Cassette 4-way
ATNH-DL
875 (Ceiling opening)
785(Hanging bolt)
288
950
950
840 Unit size
840 Unit size
875 (Ceiling opening)
45
101.5 672 (Hanging bolt) 101.5
45
Unit:mm
950
840
5
785
840
950
678
4
40
6
1
210.5
52 180
110
90
110
90
140
30
290
30
2
3
(unit : mm)
Number
1
2
3
4
5
6
Name
Liquid pipe connection
Gas pipe connection
Drain pipe connection
Power supply connection
Air discharge grille
Air suction grille
20 Universal System Air Conditioner
Descripition
36k:ø6.35, 48/60k: ø9.52 flare
36k:ø15.88, 48/60k: ø19.05flare
Ceiling Cassette 4-way
PT-HEF/HFF/HDF
H
D
W
(unit : mm)
Model
DIM
PT-HEF
PT-HFF
PT-HDF
Unit
W
mm
670
850
950
H
mm
90
90
90
D
mm
670
850
950
Service Manual 21
Ceiling Cassette 4-way
5. Wiring Diagrams
5.1 Wiring Diagrams(Product)
CONNECTOR NUMBER
LOCATION
CN-POWER
AC POWER SUPPLY
CN-MOTOR
BLDC FAN MOTOR OUTPUT
CN-D/PUMP
DRAIN PUMP OUTPUT
CN-DISP
DISPLAY
CN-FLOAT
FLOAT SWITCH INPUT
CN-PTC
PTC HEATER INUT
CN-REMO
REMOTE CONTROL
CN-GRILL
GRILL CONTROL
CN-CC
CENTRAL CONTROL
CN-PIPE2
DISCHARGE PIPE SENSOR
CN-ROOM
ROOM SENSOR
CN-PIPE1
PIPE SENSOR
CN-HVB
AIR CLEANER
CN-UD1
STEP MOTOR
CN-UD2
STEP MOTOR
CN-LR1
STEP MOTOR
CN-LR2
STEP MOTOR
22 Universal System Air Conditioner
Ceiling Cassette 4-way
5.2 Wiring Diagrams(Elevation Grill)
PT-HEF
PT-HFF/HDF
Service Manual 23
Ceiling Cassette 4-way
6. Piping Diagrams
:Cooling
:Heating
Heat Exchanger
Turbo Fan
lndoor unit
: Thermistor
Refrigerant pipe connection port diameter
[unit: mm(inch)]
Model
Gas
ATNH126ELFC
9.52(3/8)
ATNH186ELFC
12.7(1/2)
6.35(1/4)
ATNH246FLFC
ATNH306FLFC
Liquid
15.88(5/8)
ATNH366DLFC
ATNH486DLFC
ATNH606DLFC
24 Universal System Air Conditioner
19.05(3/4)
9.52(3/8)
Ceiling Cassette 4-way
7. Operating Instructions
■ Name and Function of Remote Controller
AUTO SWING
OPERATION
SET TEMP
Room Temp
Operation unit
03
SUB FUNCTION
HI
MED
LO
AUTO Heater Preheat
JET Defrost Humidify
Filter Out door
ZONE
1 2 3 4
Time
Timer
On Off
Set no. Time 01
FAN SPEED
Program set
05
07
09
11
13
15
17
19
21
23
6
3
17
10
11
12
13
14
15
Heat Pump Model
1
2
Timer
Cancel
Program
Week
5
Holiday
Plasma
Set/Clr
Hour
Min
RESET
16
18
Cooling Model
4
7
8
9
1. Operation display
Displays the operation conditions.
9. Plasma Air Clean Button (optional)
2. On/Off Button
Operation starts when this button is pressed, and
stops when the button is pressed again.
10. Timer Cancel Button
Used to cancel the timer.
3. Set Temperature Button
Used to set the temperature when the desired temperature is obtained.
4. FAN Operation Button
Used to circulate room air without cooling or heating.
5. Fan Speed (Jet Cool Button: 4 way)
Used to set the desired fan speed or select Jet cool
mode.
6. Operation Mode Selection Button
Used to select the operation mode.
• Auto Operation Mode
• Cooling Operation Mode
• Soft Dry Operation Mode
• Heating Operation Mode(except cooling model)
7. Auto Swing Button
Used to swing up and down.
8. Room Temperature Checking Button
Used to check the room temperature.
11. Timer Set Button
Used to set the timer when the desired time is
obtained.
12. Week Button
Used to set a day of the week.
13. Program Button
Used to set the weekly timer.
14. Holiday Button
Used to set a holiday of the week.
15. Time Set Button
Used to set the time of the day and change the time
in the weekly timer Function.
16. Set and Clear Button
Used to set and clear the weekly timer.
17. Swirl Button (4 way)
Used to select swirl mode.
Jet Cool Button (1 way)
18. Reset Button
Used to set the current time and clear the setting
time.
❈ Display temperature can be different from actual room temperature if the remote controller is installed
at the place where sun-rays are falling directly or the place nearby heat source.
Service Manual 25
Ceiling Cassette 4-way
■ Wireless Remote Controller (optional)
This air-conditioner is equipped with wired remote controller basically. But if you want to be available with wireless remote
controller, you pay for it.
1. START/STOP BUTTON
Operation starts when this button is pressed and
stops when the button is pressed again.
Signal transmitter
2. OPERATION MODE SELECTION BUTTON
Used to select the operation mode.
3. ROOM TEMPERATURE
SETTING BUTTONS
Used to select the room temperature.
4. INDOOR FAN SPEED SELECTOR
Used to select fan speed in four steps
low, medium, high and CHAOS.
5.
JET COOL
5
1
Used to start or stop the speed cooling/heating.
6
(Speed cooling/heating operates super high fan
3
speed.)
6. CHAOS SWING BUTTON
4
Used to stop or start louver movement and set the
10
2
desired up/down airflow direction.
CANCEL
9
7
7. ON/OFF TIMER BUTTONS
SET
ON
OFF
AUTO CLEAN
11
Used to set the time of starting and stopping opera12
tion.
8
8. TIME SETTING BUTTONS
13
Used to adjust the time.
15
9. TIMER SET/CANCEL BUTTON
14
Used to set the timer when the desired time is
obtained and to cancel the Timer operation.
10. SLEEP MODE AUTO BUTTON
Flip-up door
Used to set Sleep Mode Auto operation.
(opened)
11. AIR CIRCULATION BUTTON
Used to circulate the room air without cooling or
heating.
12. ROOM TEMPERATURE CHECKING BUTTON
Used to check the room temperature.
13. PLASMA(OPTIONAL)
Used to start or stop the plasma-purification function.
❈ The wireless remote controller do not operate the swirl mode.
14. RESET BUTTON
Initialize remote controller.
15. 2nd F Button
Used prior to using modes printed in blue at the
bottom of buttons.
CAUTION:of handling the Remote Controller
• Aim at the signal receiver on the wired remote controller so as to operate.
• The remote control signal can be received at a distance of up to about 7m.
• Be sure that there are no obstructions between the remote controller and the signal receptor.
• Do not drop or throw the remote controller.
• Do not place the remote controller in a location exposed to direct sunlight, or near the heating unit, or any other
heat source.
• Block a strong light over the signal receptor with a curtain or etc. so as to prevent the abnormal operation. (ex:electronic quick start, ELBA, inverter type fluorescent lamp)
26 Universal System Air Conditioner
Ceiling Cassette 4-way
■ ELEVATION GRILL (REMOTE CONTROLLER_Accessory)
Signal transmitter
• Main Components of Lift Grill
➀ Lift grill front panel assembly
➁ Bolts for installation (4 EA, P/No. 3A00255K)
Ascend
Descend
Stop
➂ Instruction manual
➃ Remote Controller for lift grill
• How to Use Remote Controller
As for operation of Remote Controller, use it by directing the transmitter part of Remote Controller to the receiver part of front panel
directly under front panel.
• Do not drop it down or into water. Or else there is worry about
trouble failure.
• Do not press hard the Remote Controller button with nail (ballpoint pen or other sharp substance). Or else there is worry
about trouble failure.
• In case when obstacle such as curtain hides the signal reception
part of receiver in between the space interval, Remote Controller
operation is infeasible.
Service Manual 27
Ceiling Concealed Duct
• How to Operate the Lift Grill
• Always stop the air conditioner operation for safety before operating lift grill.
• Take heed _ there is worry about dust fall etc. when suction grill descends.
• In case when the set automatic stop distance goes wrong, check the set value of operation panel and confirm if there is neither obstacle nor mankind.
• When you are not to remove obstacle, stop the operation before touching the obstacle.
1. Stop the Air Conditioner Operation
Automatic Stop Distance of Grill
- Depress the down button( ).
Then suction grill descends and stops automatically at a certain
distance.
- You may stop it at wanted distance point by depressing the stop button ( ) when descending.
3. Raise the Suction Grill
- Depress the up button( ).
Then suction grill goes up and enters into the front panel.
4. Stop the Suction Grill during Rising
- Depress the stop button( ).
Make use of this when you want to stop it at your wished position.
Automatic stop distance
2. Descend the Suction Grill
Medium
High
(Height: 3~4 m)
Automatic stop distance 1.5±0.5m 2.5±0.5 m 3.5±0.5m
Ceiling height
Low
✳ If you want to change automatic distance setting,
consult with your sale agency.
28 Universal System Air Conditioner
Ceiling Cassette 4-way
8. Installation
• Please read this instruction sheet completely before installing the product.
• When the power cord is damaged, replacement work shall be performed by authorized personnel only.
• Installation work must be performed in accordance with the national wiring standards by authorized personnel only.
Anti-bacteria filter
Air
Intake
Air Outlet
Required Parts
Required Tools
• Connecting cable
• Pipes: Gas side
Liquid side
• Hanging Bolt
(W 3/8 or M10 length 650mm)
• Insulated drain hose
• Level
• Screw driver
• Electric drill
• Hole core drill (ø70mm)
• Flaring Tools set
• Torque Wrenches
• Hexagonal Wrench (4mm, 5mm)
• Gas-leak detector
• Owner’s Manual
• Additional Drain hose
(Inner Diameter ...........................32mm)
• Thermometer
Ceiling Board
50 or
more
30 or less
50 or
more
Above 250
400 or less
Ceiling
Ceiling Board
100
or more
• There should not be any heat source or steam near the
unit.
• There should not be any obstacles to the air circulation.
• There should be provision of easy condensate drain.
• Taking into accounting the noise prevention criteria,
spot the installation location.
• Do not install the unit near the door way.
• Keep proper distances, of the unit, from ceiling, fence,
floor, walls and other obstacles as shown in figure.
• The indoor unit must have the maintenance space.
30 or more
8.1 Selection of the best location
Unit:cm
Floor
Service Manual 29
Ceiling Cassette 4-way
8.2 Ceiling opening dimensions and hanging bolt location
• The dimensions of the paper pattern for installation are the same as those of the ceiling opening dimensions.
Ceiling
Ceiling board
Level gauge
TF Model
790 (Ceiling opening)
39.5
109
572(Hanging bolt)
875 (Ceiling opening)
109
45
785(Hanging bolt)
840 Unit size
658 (Hanging bolt)
840 Unit size
66
744 Unit size
790 (Ceiling opening)
600 (Ceiling opening)
672 (Hanging bolt) 75
744 Unit size
75
570 Unit size
570 Unit size
45
875 (Ceiling opening)
521(Hanging bolt)
66
39.5
TD Model
101.5 672 (Hanging bolt) 101.5
TE Model
600 (Ceiling opening)
Unit:mm
Unit:mm
Unit:mm
CAUTION
• This air-conditioner uses a drain pump.
• Install the unit horizontally using a level gauge.
• During the installation, care should be taken not to
damage electric wires.
• Select and mark the position for fixing bolts and
piping hole.
• Decide the position for fixing bolts slightly tilted to
the drain direction after considering the direction
of drain hose.
• Drill the hole for anchor bolt on the wall.
NOTE:
• Avoid the following installation location.
1. Such places as restaurants and kitchen where considerable amount of oil steam and flour is generated.
These may cause heat exchange efficiency reduction, or water drops, drain pump mal-function.
In these cases, take the following actions;
• Make sure that ventilation fan is enough to cover all noxious gases from this place.
• Ensure enough distance from the cooking room to install the air conditioner in such a place where it may not suck oily steam.
Air conditioner
Take enough
distance
Use the ventilation fan
for smoke-collecting
hood with sufficient
capacity.
Cooking table
2. Avoid installng air conditioner in such places where cooking oil or iron powder is generated.
3. Avoid places where inflammable gas is generated.
4. Avoid place where noxious gas is generated.
5. Avoid places near high frequency generators.
30 Universal System Air Conditioner
Ceiling Cassette 4-way
Ceiling
Nut
(W3/8 or M10)
Flat washer for M10
(accessory)
Ceiling board
Spring washer
(M10)
Flat washer for M10
(accessory)
Nut
(W3/8 or M10)
Air Conditioner body
Ceiling board
Paper pattern
for installation
Adjust the same height
• The following parts are local purchasing.
Hanging Bolt - W 3/8 or M10
Nut
- W 3/8 or M10
Spring Washer - M10
Plate Washer - M10
150mm
Keep the length of the bolt
from the bracket to 40mm
Hanging bolt
(W3/8 or M10)
Set screw of
paper pattern (4 pieces)
Open the ceiling board
along the outer edge of the
paper pattern.
CAUTION
• Tighten the nut and bolt to prevent unit from
falling off.
8.3 Wiring Connection
• Open the control box cover and connect the remote control cord and Indoor power wires.
Indoor
power cord
Remote
controller
cord
Control box cover
[Air inlet side view]
Control box cover
fitting screw(2 units)
Terminal Block in Indoor
1(L)
2(N)
3
4
Connected to outdoor unit
WARNING
Make sure that the screws of the terminal are free from looseness.
Service Manual 31
Ceiling Cassette 4-way
8.4 Installation of Decoration Panel
Before installing the decoration panel,
always remove the paper template.
The decoration panel has its installation
direction.
1. Temporarily fix two decoration panel fixing screws (hexagon M5 screw) on the unit body. (Tighten by
amount 10mm in length.)
The fixing screws (hexagon M5 screw) are included the indoor unit box.
2. Remove the air inlet grille from the decoration panel. (Remove the hook for the air inlet grille cord.)
3. Hook the decoration panel key hole (
) on the screws fixed in step above, and slide the panel so
that the screws reach the key hole edge.
4. Retighten completely two temporarily fixed screws and other two screws. (Total 4 screws)
5. Connect the louver motor connector and display connector.
6. After tightening these screws, install the air inlet grille (including the air filter).
Piping side
Air conditioner unit
Decoration panel fixing screws
(hexagon M5 screws)
Temporally fitting at 2 places
(Tightening about 10mm)
Control box cover
Louver
motor
Inlet Grille
Decoration panel
Display
Key holes
Lead wire for
louver motor and
display
Decoration panel fixing screws
(Hexagon M5 screw)
Inlet Grille
CAUTION
Install certainly the decoration
panel.
Cool air leakage causes sweating.
Water drops fall.
Good example
Bad example
Air conditioner
unit
Ceiling
board
Decoration panel
Fit the insulator (this part) and
be careful for cool air leakage
32 Universal System Air Conditioner
Air conditioner unit
Air
Cool air leakage
(no good)
Ceiling
board
Decoration
panel
Ceiling Cassette 4-way
8.5 Installation of Decoration Panel(Elevation Grille)
Before installing the decoration panel,
always remove the paper template.
The decoration panel has its installation
direction.
1. Temporarily fix two decoration panel fixing screws (hexagon M5 screw) on the unit body. (Tighten by
amount 10mm in length.)
The fixing screws (hexagon M5 screw) are included unit box.
2. Remove the air inlet grille from the decoration panel. (Remove the hook for the air inlet grille cord.)
3. Hook the decoration panel key hole (
) on the screws fixed in step above, and slide the panel so
that the screws reach the key hole edge.
4. Retighten completely two temporarily fixed screws and other two screws. (Total 4 screws)
5. Connect the louver motor connector display connector, elevation grille connector and power supply connector
6. After tightening these screws, install the air inlet grille (including the air filter).
Piping side
Air conditioner unit
Decoration panel fixing screws
(hexagon M5 screws)
Temporally fitting at 2 places
(Tightening about 10mm)
Control box cover
Louver
motor
Inlet Grille
Decoration panel
Key holes
Display
Decoration panel fixing screws
(Hexagon M5 screw)
Inlet grille
Service Manual 33
Ceiling Concealed Duct
• Don't lay any material upon suction grill.
• Suction grill comprises 2 strands of wire. If any substance is placed on it then balance may be destroyed so that
the substance would drop down and cause a breakage or damage. Also the matter may cause trouble owing to
which the grill would not be correctly inserted at front panel.
• Don't shake suction grill. Or else there is worry that it may collide with adjacent material and the suction grill fall
down.
• Don't pull suction grill. Don't draw out suction grill irrationally. Or else there is worry that lift grill drive part is
damaged and suction grill might drop down.
• Don't place obstacle in lift passage of lift grill.
When suction grill descends, it automatically stops at a certain distance.
If there is any obstacle in lift passage, suction grill might drop down and there may be caused trouble failure of lift grill drive part.
• Turn off the air conditioner operation button before operating the lift grill.
Always stop the air conditioner operation for safety when suction grill descends.
• Don't damage lift rope by a sharp material. Or else there is worry about suction grill dropping because of rope
cutoff.
34 Universal System Air Conditioner
Ceiling Cassette 4-way
8.5 Indoor Unit Drain Piping
• Drain piping must have down-slope (1/50 to 1/100): be sure
not to provide up-and-down slope to prevent reversal flow.
• During drain piping connection, be careful not to exert extra
force on the drain port on the indoor unit.
• The outside diameter of the drain connection on the indoor
unit is 32mm.
Piping material: Polyvinyl chloride pipe VP-25
and pipe fittings
Upward
routing
not allowed
Pipe clamp
Indoor unit
Maintenance
drain port
• Be sure to install heat insulation on the drain piping.
1/50~1/100
Heat insulation material: Polyethylene foam with
thickness more than 8 mm.
MAX 700mm
Drain test
The air conditioner uses a drain pump to drain water.
Use the following procedure to test the drain pump operation:
Feed water
Flexible drain hose
(accessory)
Main
drain pipe
Drain Pump
Drain
port
Glue the joint
Drain hose connection
Use the clip (accessory)
Drain pan
CAUTION
• Connect the main drain pipe to the exterior
and leave it provisionally until the test
comes to an end.
• Feed water to the flexible drain hose and
check the piping for leakage.
• Be sure to check the drain pump for normal
operating and noise when electrical wiring
is complete.
• When the test is complete, connect the
flexible drain hose to the drain port on the
indoor unit.
Flexible drain hose
1/50~1/100
The supplied flexible drain hose should not be curved,
neither screwed. The curved or screwed hose may
cause a leakage of water.
CAUTION
MAX 700mm
Flexible drain hose
Flexible drain hose
After the confirmation of the above conditions, prepare the wiring as follows:
1) Never fail to have an individual power specialized for the air conditioner. As for the method of wiring, be guided by the
circuit diagram pasted on the inside of control box cover.
2) Provide a circuit breaker switch between power source and the unit.
3) The screw which fasten the wiring in the casing of electrical fittings are liable to come loose from vibrations to which the
unit is subjected during the course of transportation. Check them and make sure that they are all tightly fastened. (If they
are loose, it could give rise to burn-out of the wires.)
4) Specification of power source
5) Confirm that electrical capacity is sufficient.
6) Be sure that the starting voltage is maintained at more than 90 percent of the rated voltage marked on the name plate.
7) Confirm that the cable thickness is as specified in the power sources specification.
(Particularly note the relation between cable length and thickness.)
8) Never fail to equip a leakage breaker where it is wet or moist.
9) The following troubles would be caused by voltage drop-down.
• Vibration of a magnetic switch, damage on the contact point there of, fuse breaking, disturbance to the normal function of a
overload protection device.
• Proper starting power is not given to the compressor.
Service Manual 35
Ceiling Cassette 4-way
9. Accessories
Standard Accessories
Name
Drain hose
Clamp metal
Quantity
1 EA
1 EA
Washer for
hanging backet
8 EA
Clamp
Insulation for
fitting
8 EA
1 SET
Shape
for gas pipe
(Other)
• Paper pattern for
installation
• Owner's manual
• Installation manual
for liquid pipe
Optional Accessories(For Unit)
No.
Item
Type
Model No.
1
Wireless remote
control
With air purifying
function
AHWRHD
2
Central control
Simple
PQCSA101S0
Component Parts
• Wireless remote control : 1EA
• Holder : 1EA
• Battery : 2EA
• Screw : 2EA
• Central control
• Installation manual
• PCB: 1EA
3
PI485 Gateway
For central control
PHNFP14A0
• Installation manual
• Wire assembly
36 Universal System Air Conditioner
Ceiling & Floor
Ceiling & Floor
Ceiling & Floor
(R410A·Indoor Units)
AVNH-EL/BL/KL/LL
Contents
1. Features & Benefits ..............................................................................38
2. List of Functions....................................................................................39
3. Specifications........................................................................................40
4. Dimensional Drawings ..........................................................................42
5. Wiring Diagrams ...................................................................................45
6. Piping Diagrams....................................................................................47
7. Operating Instructions...........................................................................48
8. Installation.............................................................................................49
9. Accessories ..........................................................................................53
Service Manual 37
Ceiling & Floor
1. Features & Benefits
■ Flexible Installation
■ Low noise
■ 4-Way Airflow Direction Control
(Automatic Vertical airflow & Manual Horizontal airflow)
■ LCD Wireless Remote Control
Flexible Installation
It can be installed on the floor or ceiling according to your need.
<Ceiling Installation>
<Floor Installation>
Low Noise
Advanced airflow system and cross flow fan give quiet and
more comfortable environment.
Noise Distribution(dBA)
Vertical Airflow & Balanced Temperature
Distribution
Upward
The heat distribution graph shows an example of even temperature distribution achieved by the auto-swing airflow.
Downward
38 Universal System Air Conditioner
Ceiling & Floor
2. List of Functions
Function
Air Discharge Outlet
Airflow Direction control (left & right)
Airflow Direction control (up & down)
Airflow Steps(Fan / Cool /Heat)
Auto Changeover
Auto Operation
Auto Restart Operation
Auto Swing
Central Control
CHAOS Wind (Auto wind)
Child Lock Function
Cooling & Fan Operation(Cooling Only)
Cooling, heating & Fan Operation(Heat Pump)
Defrost / Deicing
Deodorizing Filter
Drain Pump
E.S.P. Control
Electric Heater
Environment Friendly Refrigerant
Fire Alarm Function
Forced Operation
Group Control
High Ceiling Operation
Hot Start
Jet Cool
Plasma Air Purifier
Prefilter(Washable / Anti-fungus)
Self Diagnosis
Sleep Mode
Soft Dry Operation
Swirl Swing
Space Control
Tele Control
Temperature Control
Test Function
Time Delay Safety function
Timer (weekly)
Two Thermistor Control
Wired LCD Remote Control
Wireless Remote Control
Zero Standby Power
Zone Control
AVNH-EL
1
Manual
Auto
3/3/3
O
O
O
Accessory
O
O
O
O
O
O
Optional
O
O
O
O
O
O
O
O (LCD)
-
Ceiling & Floor (Convertible)
AVNH-BL
AVNH-KL
1
1
Manual
Manual
Auto
Auto
3/3/3
3/3/3
O
O
O
O
O
O
O
O
Accessory
Accessory
O
O
O
O
O
O
O
O
O
O
O
O
O
O
O
O
O
O
O
O
O
O
O
O
O
O
O (LCD)
O (LCD)
-
AVNH-LL
1
Manual
Auto
3/3/3
O
O
O
O
Accessory
O
O
O
O
O
O
O
O
O
O
O
O
O
O (LCD)
-
Notes :
O : Basic
Optional : Factory-Installed
Accessory : Field-Installed
- : Not available on this system
Service Manual 39
Ceiling & Floor
3. Specifications
Indoor Unit Type
Model
Nominal Cooling Capacity
Nominal Heating Capacity
kcal/h(W)
Btu/h
kcal/h(W)
Btu/h
CMM(CFM)
°C
W
Air Circulation
H/M/L
Setting temperature range(cool/heat)
Fan motor
Output
Model
No. of Poles
Input
W
Running Current
A
Capacitor
µF/Vac
Fan
Type
No. Used / Diameter EA/inch(mm)
Noise Level
H/M/L
dB(A)
(Sound Press, 1m)
Temperature controller
Coil
Tube Size (OD)
inch(mm)
Fins per inch
No. of Rows & Column
Dehumidification Rate
l/h
Dimensions (W*H*D)
inch(mm)
Net Weight
kg(lbs)
Piping Connection Liquid
inch(mm)
Gas
inch(mm)
Drain hose (OD Ø)
inch(mm)
Packing Dimension (W*H*D)
inch(mm)
Stuffing Quantity
Without S/Parts
20/40ft
For outdoor units Single Split
Application Split(Simultaneous operation)
Ceiling & Floor (Convertible)
AVNH126ELAC
AVNH186BLAC
AVNH246BLAC
AVNH306BLAC
3024(3517)
4536(5274)
6048(7032)
7056(8207)
12000
18000
24000
28000
3327(3869)
4991(5803)
6654(7737)
7762(9027)
13200
19800
26400
30800
10.0/8.3/6.5(353/293/230)13.5/12/11(477/424/388) 15/13.5/12(530/477/424) 18/16/14(636/564/494)
18-30/16-30
18-30/16-30
18-30/16-30
18~30/16~30
17.5
30
35
42.5
IC-18422LG31A
IC-9430LGCG
IC-9430LGCE
OBM-3019P2
4
4
4
4
43
53
63
81
0.23
0.23
0.27
0.38
1.5/370
1.5/370
1.5/370
1.5/ 370
Cross Flow Fan
Cross Flow Fan
Cross Flow Fan
Cross Flow Fan
1/3.7(95)
1/3.1(80)
1/3.1(80)
1/3.1(80)
40/36/31
43/40/37
45/42/39
Thermistor
Thermistor
Thermistor
Thermistor
0.197(5)
0.275(7)
0.275(7)
0.275(7)
20
18
20
20
2R,12C
2R 12C
2R 14C
2R 14C
1.2
2.3
3.2
3.5
35.4*7.9*19.3(900*200*490) 47.2*8.1*24.2(1200*205*615) 47.2*8.1*24.2(1200*205*615) 47.2*8.1*24.2(1200*205*615)
12(26.5)
30(66.1)
30(66.1)
30(66.1)
1/4 (6.35)
1/4 (6.35)
1/4 (6.35)
1/4 (6.35)
3/8 (9.52)
1/2 (12.7)
1/2 (12.7)
5/8 (15.88)
20
20
20
20
38.2*11.2*22.2(970*285*565) 50.8*11.4*27.4(1290*290*696) 50.8*11.4*27.4(1290*290*696) 50.8*11.4*27.4(1290*290*696)
189/383
102/219
102/219
102/219
See chapter MPS Variable SINGLE-A(AUUH-C)
See chapter MPS Variable SINGLE-A(AUUH-C)
Notes:
1. Capacities are based on the following conditions:
Cooling: - Indoor Temperature 27°C(80.6°F) DB /19°C(66.2°F) WB
- Outdoor Temperature 35°C(95°F) DB /24°C(75.2°F) WB
- Interconnecting Piping Length 7.5m
- Level Difference of Zero.
Heating: - Indoor Temperature 20°C(68°F) DB / 15°C(59°F) WB
- Outdoor Temperature 7°C(44.6°F) DB / 6°C(42.8°F) WB
- Interconnecting Piping Length 7.5 m
- Level Difference of Zero.
2. Capacities are Net Capacities.
3. Due to our policy of innovation some specifications may be changed without notification.
40 Universal System Air Conditioner
45/42/39
Ceiling & Floor
Indoor Unit Type
Model
Nominal Cooling Capacity
Nominal Heating Capacity
kcal/h(W)
Btu/h
kcal/h(W)
Btu/h
CMM(CFM)
°C
W
Air Circulation
H/M/L
Setting temperature range(cool/heat)
Fan motor1
Output
Model
No. of Poles
Input
W
Running Current
A
Capacitor
µF/Vac
Fan motor2
Output
W
Model
No. of Poles
Input
W
Running Current
A
Capacitor
µF/Vac
Fan
Type
No. Used / Diameter EA/inch(mm)
Noise Level
H/M/L
dB(A)
(Sound Press, 1m)
Temperature controller
Coil
Tube Size (OD)
inch(mm)
Fins per inch
No. of Rows & Column
Dehumidification Rate
l/h
Dimensions (W*H*D)
inch(mm)
Net Weight
kg(lbs)
Piping Connection Liquid
inch(mm)
Gas
inch(mm)
Drain hose (OD Ø)
inch(mm)
Packing Dimension (W*H*D)
inch(mm)
Stuffing Quantity
Without S/Parts
20/40ft
For outdoor units Single Split
Application Split(Simultaneous operation)
AVNH366KLAC
8568(9965)
34000
9072(10552)
36000
29/27/24(1023/953/847)
18-30/16-30
63
IC-9430LG58C
4
152
0.67
4.0/440
45
IC-9430LG58E
4
80
0.4
4.0/440
Cross Flow Fan
3/5.7(145)
Ceiling & Floor (Convertible)
AVNH486LLAC
AVNH606LLAC
11718(13629)
13608(15827)
46500
54000
13306(15476)
14969(17410)
52800
59400
36/34/32(1271/1207/1136) 40/38/36(1412/1341/1270)
18-30/16-30
18-30/16-30
63
63
IC-9430LG58C
IC-9430LG58C
4
4
152
152
0.67
0.67
4.0/440
4.0/440
63
63
IC-9430LG58C
IC-9430LG58C
4
4
152
152
0.6
0.6
4.0/440
4.0/440
Cross Flow Fan
Cross Flow Fan
3/5.7(145)
3/5.7(145)
44/42/40
54/52/50
56/54/52
Thermistor
0.275(7)
19
3R,14C
3.3
53.2*8.66*24.8(1350*220*630)
35(77.2)
1/4 (6.35)
5/8 (15.88)
20
57.2*12.4*29.5(1452*315*750)
84/168
Thermistor
0.275(7)
19
3R,14C
5
68.9*8.66*24.8(1750*220*630)
45(99.2)
3/8 (9.52)
3/4 (19.05)
20
72.8*12.4*29.5(1850*315*750)
63/133
Thermistor
0.275(7)
19
3R,14C
6.1
68.9*8.66*24.8(1750*220*630)
45(99.2)
3/8 (9.52)
3/4 (19.05)
20
72.8*12.4*29.5(1850*315*750)
63/133
See chapter MPS Variable SINGLE-A(AUUH-C)
See chapter MPS Variable SINGLE-A(AUUH-C)
Notes:
1. Capacities are based on the following conditions:
Cooling: - Indoor Temperature 27°C(80.6°F) DB /19°C(66.2°F) WB
- Outdoor Temperature 35°C(95°F) DB /24°C(75.2°F) WB
- Interconnecting Piping Length 7.5m
- Level Difference of Zero.
Heating: - Indoor Temperature 20°C(68°F) DB / 15°C(59°F) WB
- Outdoor Temperature 7°C(44.6°F) DB / 6°C(42.8°F) WB
- Interconnecting Piping Length 7.5 m
- Level Difference of Zero.
2. Capacities are Net Capacities.
3. Due to our policy of innovation some specifications may be changed without notification.
Service Manual 41
Ceiling & Floor
4. Dimensional Drawings
AVNH-EL
24
879
Signal receiver & Operation indicator
900
200
490
Air discharge grille
(Unit: mm)
Note:
1. Pipe Specification(mm)
Model
Liquid
Gas
12k
Ø 6.35
Ø 9.52
Air suction grille
<Ceiling Installation>
<Floor Installation>
More than 20Cm
More than 20Cm
More than 20Cm
More than 5Cm
More than 5Cm
More than 20Cm
Anchor nut
Ceiling
Nut
Washer
Suspension
bolts
40
235
820
Suspension bolt
50
70
70
Installation plate
100
120
Drain piping
hole (Ø25)
piping hole
(Ø45)
Ø70mm
Ø70mm
Left rear piping
more than 200
Floor
Suspension
bolts
Spring
washer
Hangen
Max.
12mm
Nut
Washer
42 Universal System Air Conditioner
Right rear piping
Ceiling & Floor
AVNH-BL
1200
61
5
R
205
63
38
Ø10 Stud Bolt hole
26
5
250
39
2
128
36
46
8
175
76
10
(Rear Side)
(Installation Plate)
(Unit: mm)
36
More than
20cm
Note:
1. Pipe Specification(mm)
More than
20cm
Model
Liquid
Gas
18k, 24k
Ø 6.35
Ø 12.7
30k
Ø 6.35
Ø 15.88
R
More than
20cm
R
More than
20cm
More than eye-level
(Ceiling installation)
(Floor/Wall installation)
1076
265
1076
mor
e th
260 an
Suspension bolt
(W3/8 or M10)
1236
265
Center-line for the
piping hole
265
123
6
Service Manual 43
Ceiling & Floor
AVNH-KL/LL
160
320
320
160
B
50
50
C
650
A
(unit: mm)
Dimension
A
B
C
VL Chassis
1750
1655
220
VK Chassis
1350
1255
220
Chassis
More than
70cm
Anchor nut
Ceiling
Nut
Suspension
bolts
Washer
B
A
Suspension bolt
More than
30cm
More than
70cm
Note
1. Pipe Specification(mm)
Model
Liquid
Gas
36k
Ø6.35
Ø15.88
48k, 60k
Ø9.52
Ø19.05
44 Universal System Air Conditioner
Suspension
bolts
Spring
washer
Hangen
Max.
12mm
Nut
Washer
Ceiling & Floor
5. Wiring Diagrams
AVNH-EL
WIRING DIAGRAM
4
3
GN/YL
CN-TH1
CN-TH2
CN-FLOAT
IN-PIPE
THERMISTOR
OUT-PIPE
ROOM
THERMISTOR THERMISTOR FLOAT S/W
CN-DISP
FUSE
DISPLAY
PCB ASSY
GN/YL
BL
BR
CNDPUMP
CNMOTOR
CAPACITOR
CN-HVB
HVB
CN-ACDC
CN-ACDC
DC PCB ASSY
RD
TO OUTDOOR UNIT
A/CL UNIT
AC PCB ASSY
1(L) 2(N)
S/W1
CN-UD1
CN-CC
S/W2
CENTRAL
CONTROL
CN-DOOR
STEP
MOTOR
INDOOR
MOTOR
OPTION
DRAIN
PUMP
3854A20419D
AVNH-BL
CONNECTOR NUMBER
LOCATION
CONNECTOR NUMBER LOCATION
CN-POWER
AC POWER SUPPLY
CN-TH2
CN-MOTOR
BLDC FAN MOTOR OUTPUT CN-TH1
PIPE AND ROOM SENSOR
CN-D/PUMP
DRAIN PUMP OUTPUT
CN-HVB
AIR CLEANER
CN-AC/DC
AC/DC CONNECTION
CN-DOOR
STEP MOTOR
CN-DISPLAY
DISPLAY
CN-U/D1
STEP MOTOR
CN-FLOAT
FLOAT SWITCH INUT
CN-CC
CENTRAL CONTROL
DISCHARGE PIPE SENSOR
Service Manual 45
Ceiling & Floor
AVNH-KL
AVNH-LL
CONNECTOR NUMBER
LOCATION
CONNECTOR NUMBER LOCATION
CN-POWER
AC POWER SUPPLY
CN-TH2
CN-MOTOR
BLDC FAN MOTOR OUTPUT CN-TH1
PIPE AND ROOM SENSOR
CN-D/PUMP
DRAIN PUMP OUTPUT
CN-HVB
AIR CLEANER
CN-AC/DC
AC/DC CONNECTION
CN-DOOR
STEP MOTOR
CN-DISPLAY
DISPLAY
CN-U/D1
STEP MOTOR
CN-FLOAT
FLOAT SWITCH INUT
CN-CC
CENTRAL CONTROL
46 Universal System Air Conditioner
DISCHARGE PIPE SENSOR
Ceiling & Floor
6. Piping Diagrams
:Cooling
Heat Exchanger
:Heating
C.F.F.
lndoor unit
: Thermistor
Refrigerant pipe connection port diameter
[unit: mm(inch)]
Model
Gas
AVNH126ELAC
9.52(3/8)
AVNH186BLAC
AVNH246BLAC
AVNH306BLAC
AVNH366KLAC
AVNH486LLAC
AVNH606LLAC
12.7(1/2)
Liquid
6.35(1/4)
15.88(5/8)
19.05(3/4)
9.52(3/8)
Service Manual 47
Ceiling & Floor
7. Operating Instructions
■ Remote Control Operation
The Remote Controller transmits the signals to the system.
Signal transmitter
1. START/STOP BUTTON
Operation starts when this button is pressed and stops when
the button is pressed again.
2. OPERATION MODE SELECTION BUTTON
Used to select the operation mode.
(Heat Pump)
(Cooling Only)
3. ROOM TEMPERATURE
SETTING BUTTONS
Used to select the room temperature.
5
6
4. INDOOR FAN SPEED SELECTOR
Used to select fan speed in four steps
low, medium, high and CHAOS.
1
5. JET COOL
Used to start or stop the speed cooling/heating.
(Speed cooling/heating operates super high fan speed.)
3
9
6. CHAOS SWING BUTTON
Used to stop or start louver movement and
set the desired up/down airflow direction.
12
7. ON/OFF TIMER BUTTONS
Used to set the time of starting and stopping operation.
4
2
7
11
8
13
10
CANCEL
ON
OFF
SET
AUTO CLEAN
8. TIME SETTING BUTTONS
Used to adjust the time.
15
14
9. TIMER SET/CANCEL BUTTON
Used to set the timer when the desired time is obtained and to
cancel the Timer operation.
Flip-up door
(opened)
11. AIR CIRCULATION BUTTON
Used to circulate the room air without cooling or heating.
Operation Mode
12. ROOM TEMPERATURE CHECKING BUTTON
Used to check the room temperature.
Cooling Operation
13. PLASMA(OPTIONAL)
Used to start or stop the plasma-purification function.
Auto Operation
14. RESET BUTTON
Initialize remote controller.
Healthy Dehumidification Operation
Heating Operation
• Cooling Model(
), Heat Pump Model(
10. SLEEP MODE AUTO BUTTON
Used to set Sleep Mode Auto operation.
)
15. 2nd F Button
Used prior to using modes printed in blue at the bottom of buttons.
❈ For the convertible type of air conditional, jet cool mode does not operate.
48 Universal System Air Conditioner
Ceiling & Floor
8. Installation
• Please read this instruction sheet completely before installing the product.
• When the power cord is damaged, replacement work shall be performed by authorized personnel only.
• Installation work must be performed in accordance with the national wiring standards by authorized personnel only.
Installation Parts Provided
Installation Plate (VB, 2pcs)
-1 Installation Plate (VE, 1pc)
Washer Bolt (M8
1 -1
1
6
L25, 4pcs, type "A")
Floor Mount Bracket (1pcs)
Drain Hose, Insulated
2
Drain Hose Hanger and screw
(Ceiling/Wall Mounting)
5
The other Installation Parts Needed
3
Suspension Bolt
Bolts for Mount Bracket
Connecting Tube(mm)
• Gas side : Ø12.7, Ø15.88
• Liquid side : Ø6.35
Connecting Cable
7
(Floor Mounting)
4
Drain Hose Extended
Required Parts
Required Tools
• Installation Plate
• Four Type “A” screws
• Connecting cable
• Level
• Screw driver
• Electric drill
• Hole core drill (ø70mm)
• Pipes: Gas side ..........Ø9.52, Ø12.7, Ø15.88mm
Liquid side.............................................Ø6.35mm
• Insulated drain hose
• Insulation materials
• Flaring Tools set
• Specified Torque Wrenches
1.8kg·m...........................Liquid side piping
5.5kg·m .............................Gas side piping
Spanner .....................................Half union
• Specified Torque Wrenches
1.8kg·m...........................Liquid side piping
5.5kg·m..............................Gas side piping
• Hexagonal Wrench (4mm)
• Gas-leak Detector
• Two type “B” screws
• Owner’s Manual
• Thermometer
Service Manual 49
Ceiling & Floor
8.1 Selection of the best location
• There should not be any heat source or steam near the
unit.
• There should not be any obstacles to the air circulation.
• There should be provision of easy condensate drain.
• Taking into accounting the noise prevention criteria, spot
the installation location.
• Do not install the unit near the door way.
• Keep proper distances, of the unit, from ceiling, fence,
floor, walls and other obstacles as shown in figure.
• The indoor unit must have the maintenance space.
More than
20cm
More than
20cm
R
More than eye-level
(Ceiling installation)
More than
20cm
More than
20cm
R
(Floor/Wall installation)
8.2 Wiring connection
R
1) Connecting cables to the Indoor Unit
1. Remove the Air guide - L by loosening 2 screws after
removing the Inlet grille from the Indoor unit.
2. Connect the wires to the terminals on the control board
individually according to the outdoor unit connection.
• Ensure that the color of the wires of outdoor unit and
the terminal No. are the same as those of indoor unit
respectively
AIR GUIDE-L
INDOOR UNIT
Terminal Block in Indoor
1(L)
2(N)
3
4
Clamp
1
2
Connected to outdoor unit
Control
Panel
2) Clamping of cables
1) Arrange 2 power cables on the control panel.
2) First, fasten the steel clamp with a screw to the inner boss of control panel.
3) For the cooling model, fix the other side of the clamp with a screw strongly.
For the heat pump model, put the 0.75mm2 cable(thinner cable) on the clamp and tighten it with a plastic clamp to the
other boss of the control panel.
4) In Australia, the length of power supply cord measured from the entry of the power supply cord to the middle of live pin
on the power plug should be over 1.8m.
50 Universal System Air Conditioner
Ceiling & Floor
CAUTION
1. Install declination of the indoor unit is very important for the drain of the convertible type air
conditioner.
2. Minimum thickness of the insulation for the connecting pipe shall be 7mm.
3. If the Installation Plates are fixed to horizontal line, the indoor unit after installing will be declined
to the bottomside.
Front of view
• The unit must be horizontal or declined to the drain hose connected when finished installation.
Ceiling
Drain hose
Ceiling
Side of view
• The unit must be declined to the bottomside of the unit when finished installation.
Ceiling
Service Manual 51
Ceiling & Floor
CAUTION
After the confirmation of the above conditions, prepare the wiring as follows:
1) Never fail to have an individual power specially for the air conditioner. As for the method of
wiring, be guided by the circuit diagram pasted on the inside of control box cover.
2) Provide a circuit breaker switch between power source and the unit.
3) The screw which fasten the wiring in the casing of electrical fittings are liable to loose due to
vibrations to which the unit is subjected during the course of transportation. Check them and
make sure that they are all tightly fastened. (If they are loose, it could give rise to burn-out of the
wires.)
4) Specification of power source
5) Confirm that electrical capacity is sufficient.
6) Be sure that the starting voltage is maintained at more than 90 percent of the rated voltage
marked on the name plate.
7) Confirm that the cable thickness is as specified in the power sources specification.
(Particularly note the relation between cable length and thickness.)
8) Never fail to equip a leakage breaker where it is wet or moist.
9) The following troubles would be caused by voltage drop-down.
• Vibration of a magnetic switch, damage on the contact point there of, fuse breaking, disturbance to
the normal function of a overload protection device.
• Proper starting power is not given to the compressor.
10) The means for disconnection from a power supply shall be incorporated in the fixed wiring and
have an air gap contact separation of at least 3mm in each active(phase) conductors.
52 Universal System Air Conditioner
Ceiling & Floor
9. Accessories
Standard Accessories
Name
Drain hose
Clamp metal
Washer for
hanging backet
Clamp
Insulation for
fitting
Quantity
1 EA
1 EA
8 EA
6 EA
1 set
(Other)
• Owner's manual
• Installation manual
Shape
for gas pipe
for liquid pipe
Optional Accessories(For Unit)
No.
Item
Type
Model No.
1
Central control
Simple
PQCSA101S0
Component Parts
• Central control
• Installation manual
• PCB: 1EA
2
PI485 Gateway
For central control
PHNFP14A0
• Installation manual
• Wire assembly
Service Manual 53
Ceiling Concealed Duct
Ceiling Concealed Duct
Ceiling Concealed Duct
(R410A·Indoor Units)
ABNH-HL/GL/RL
Contents
1. Features & Benefits ..............................................................................55
2. List of Functions....................................................................................57
3. Specifications........................................................................................58
4. Dimensional Drawings ..........................................................................60
5. Wiring Diagrams ...................................................................................61
6. Piping Diagrams....................................................................................62
7. E.S.P. Setting for
...............................................................63
8. Operating Instructions ..........................................................................67
9. Installation.............................................................................................69
10. Accessories ..........................................................................................74
54 Universal System Air Conditioner
Ceiling Concealed Duct
1. Features & Benefits
■ Easy Installation
• Compact & light design
•
(Linear E.S.P Control)
• High head drain pump(700mm, Accessory)
■ Comfort & Reliability
• Low noise design
• 2-Thermistor control(Main body & Remote control)
• Zero stanby power consumption
■ Convenience
• Tele control(Accessory)
• LCD wired remote control
• Group control
• Zone control(Accessory)
• Central control(Accessory)
• Weekly progam
■ Cleanness
• Plasma air purifying system(Accessory)
• Hygienic and easy to clean filter
Easy Installation
Flexible Duct is easy to install, regardless of room
size or heater position.
It can be installed even in a limited space and saves
construction cost with slim thickness
Indoor Unit
Canvas
Duct
Discharge
Flexible Duct
Intake
Duct
Air Intake
Port
Ceiling
Air Discharge
Port
Ceiling
Board
Ceiling Board
Inspection
Port
Innovative Design of Fan and Housing System
Low Noise ! Easy Serviceability!
Plastic Fan and Housing Assembly
- Designed for low noise
- Designed to reduce weight
- Designed for easy service
This product guarantees lower sound level and gives
lesser service expenses.
Service Manual 55
Ceiling Concealed Duct
LG’s High Technology provide Easy and Low cost Design
of Duct work
Generally, when External Static Pressure increases
air volume decreases. But by controlling the phase of
motor while installing the product E.S.P. is controlled
from 8~10 mmAq linearly. E.S.P. control provides
required constant air volume irrespective of ESP
change. Desired ESP can also be set through LCD
wired remote control. Setting of the desired ESP
gives required combination of ESP and airflow.
Plasma Air Purifying Kit (Accessory)
The PLASMA Air Purifying Function not only removes
microscopic contaminants and dust, but also removes
house mites, pollen, and pet fur helps to prevent
allergic diseases like asthma.
Dust electrode discharge
Dust particles
Ionizer
Photo-Catalyst Coated Mesh
+4.8KV discharge
Polluted Air
+
+
+
Purified fresh Air
+
Generating plasma
Odour
Odour molecule
High Head Drain Pump(Accessory:700mm)
In some of the places natural drainage is not possible. For such places drain pump is very useful. It
removes condensed water from the unit.
Zone Control(Accessory)
It controls the temperature of each zone. Opening or
closing of the damper is controlled by sensing the
temperature of each zone. In the cooling mode, if the
temperature of a particular zone is lower than set
temperature then the damper is closed. On the other
hand if the temperature of a particular zone is higher
than the set temperature, damper is opened to provide cooling to the zone and vice versa in the heating
mode.
56 Universal System Air Conditioner
Ceiling Concealed Duct
2. List of Functions
Function
Air Discharge Outlet
Airflow Direction control (left & right)
Airflow Direction control (up & down)
Airflow Steps(Fan / Cool /Heat)
Auto Changeover
Auto Operation
Auto Restart Operation
Auto Swing
Central Control
CHAOS Wind (Auto wind)
Child Lock Function
Cooling & Fan Operation(Cooling Only)
Cooling, heating & Fan Operation(Heat Pump)
Defrost / Deicing
Deodorizing Filter
Drain Pump
E.S.P. Control
Electric Heater
Environment Friendly Refrigerant
Fire Alarm Function
Forced Operation
Group Control
High Ceiling Operation
Hot Start
Jet Cool
Plasma Air Purifier
Prefilter(Washable / Anti-fungus)
Self Diagnosis
Sleep Mode
Soft Dry Operation
Swirl Swing
Space Control
Tele Control
Temperature Control
Test Function
Time Delay Safety function
Timer (weekly)
Two Thermistor Control
Wired LCD Remote Control
Wireless Remote Control
Zero Standby Power
Zone Control
ABNH-HL
3/3/3
O
O
O
Accessory
O
O
O
Accessory
O
Accessory
O
O
O
O
Accessory
O
O
O
O
Accessory
O
O
O
O
O
O
Accessory
O
Accessory
Ceiling Concealed Duct
ABNH-GL
3/3/3
O
O
O
Accessory
O
O
O
Accessory
O
Accessory
O
O
O
O
Accessory
O
O
O
O
Accessory
O
O
O
O
O
O
Accessory
O
Accessory
ABNH-RL
3/3/3
O
O
O
Accessory
O
O
O
Accessory
O
Accessory
O
O
O
O
Accessory
O
O
O
O
Accessory
O
O
O
O
O
O
Accessory
O
Accessory
Notes :
O : Basic
Optional : Factory-Installed
Accessory : Field-Installed
- : Not available on this system
Service Manual 57
Ceiling Concealed Duct
3. Specifications
Indoor Unit Type
Model
Nominal Cooling Capacity
Ceiling Concealed Duct
ABNH186HLAC
ABNH246HLAC
ABNH306GLAC
kcal/h(W)
4536(5276)
6048(7034)
8064(9379)
18000
24000
32000
Btu/h
4990(5803)
6653(7738)
8870(10317)
Nominal Heating Capacity
kcal/h(W)
19800
26400
35200
Btu/h
Air Circulation
H/M/L
CMM(CFM) 16.5/14.5/13(583/512/459) 18/16.5/14(636/583/494) 26.5/23/20(936/812/706)
External Static Pressure
mmAq
8
8
10
18~30 / 16~30
18~30 / 16~30
18~30 / 16~30
Setting temperature range(cool/heat)
°C
118
118
211
Fan motor
Output
W
IC-13450LG13C
IC-13450LG13C
IC-13450LG13J
Model
4
4
4
No. of Poles
180
180
300
Input
W
0.92
0.92
1.34
Running Current
A
6/370
6/370
6/370
Capacitor
µF/Vac
Sirocco Fan
Sirocco Fan
Sirocco Fan
Fan
Type
1/6.97(177)
1/6.97(177)
1/6.97(177)
No. Used / Diameter EA/inch(mm)
Noise Level
36/34/32
38/36/34
40/38/35
H/M/L
dB(A)
(Sound Press,1.5m)
Thermistor
Thermistor
Thermistor
Temperature controller
0.275(7)
0.275(7)
0.275(7)
Coil
Tube Size (OD)
inch(mm)
21
21
21
Fins per inch
3R10C
3R10C
3R,12C
No. of Rows & Column
2.0
2.5
3.3
Dehumidification Rate
l/h
Dimensions (W*H*D)
inch(mm)
34.6*10.2*17.7(880*260*450) 34.6*10.2*17.7 (880*260*450) 46.5*11.7*17.7(1180*298*450)
Net Weight
kg(lbs)
35(77.2)
35(77.2)
38(84)
1/4 (6.35)
1/4 (6.35)
1/4 (6.35)
Piping Connection Liquid
inch(mm)
1/2 (12.7)
1/2 (12.7)
5/8 (15.88)
Gas
inch(mm)
25.4
25.4
25.4
Drain hose (OD Ø)
inch(mm)
Packing Dimension (W*H*D)
inch(mm)
44.7*13.4*22.0(1135*340*565) 44.7*13.4*22.0 (1135*340*565) 56.5*14.8*22.9(1,435*375*582)
Stuffing Quantity
Without S/Parts
20/40ft
120/252
120/252
95/191
For outdoor units Single Split
Application Split(Simultaneous operation)
See chapter MPS Variable SINGLE-A(AUUH-C)
See chapter MPS Variable SINGLE-A(AUUH-C)
Notes:
1. Capacities are based on the following conditions:
Cooling: - Indoor Temperature 27°C(80.6°F) DB /19°C(66.2°F) WB
- Outdoor Temperature 35°C(95°F) DB /24°C(75.2°F) WB
- Interconnecting Piping Length 7.5m
- Level Difference of Zero.
Heating: - Indoor Temperature 20°C(68°F) DB / 15°C(59°F) WB
- Outdoor Temperature 7°C(44.6°F) DB / 6°C(42.8°F) WB
- Interconnecting Piping Length 7.5 m
- Level Difference of Zero.
2. Capacities are Net Capacities.
3. Due to our policy of innovation some specifications may be changed without notification.
58 Universal System Air Conditioner
Ceiling Concealed Duct
Indoor Unit Type
Model
Nominal Cooling Capacity
Nominal Heating Capacity
kcal/h(W)
Btu/h
kcal/h(W)
Btu/h
CMM(CFM)
mmAq
°C
W
ABNH366GLAC
9072(10552)
36000
9979(11607)
39600
32/29/26(1130/1024/918)
10
18~30 / 16~30
272
IC-13450LG13A
4
323
1.42
6/370
Sirocco Fan
1/6.97(177)
Ceiling Concealed Duct
ABNH486RLAC
12096(14069)
48000
13306(15476)
52800
40/35/30(1413/1236/1059)
15
18~30/16~30
431
Y002276-1
4
818
3.65
15/450
Sirocco Fan
2/9.1(230)
ABNH606RLAC
14112(16414)
56000
15523(18055)
61600
50/45/40(1766/1413/1236)
15
18~30/16~30
431
Y002276-1
4
818
3.65
15/450
Sirocco Fan
2/9.1(230)
Air Circulation
H/M/L
External Static Pressure
Setting temperature range(cool/heat)
Fan motor
Output
Model
No. of Poles
Input
W
Running Current
A
Capacitor
µF/Vac
Fan
Type
No. Used / Diameter EA/inch(mm)
Noise Level
42/39/36
44/42/40
46/44/42
H/M/L
dB(A)
(Sound Press,1.5m)
Thermistor
Thermistor
Thermistor
Temperature controller
0.275(7)
0.375(9.52)
0.375(9.52)
Coil
Tube Size (OD)
inch(mm)
21
19
19
Fins per inch
3R,10C
3R13C
4R13C
No. of Rows & Column
4.0
6
6.5
Dehumidification Rate
l/h
Dimensions (W*H*D)
inch(mm) 46.5*11.7*17.7(1180*298*450) 48.4*15.0*23.2(1230*380*590) 48.4*15.0*23.2(1230*380*590)
Net Weight
kg(lbs)
38(84)
60(132)
60(132)
1/4 (6.35)
3/8(9.52)
3/8(9.52)
Piping Connection Liquid
inch(mm)
5/8 (15.88)
3/4(19.05)
3/4(19.05)
Gas
inch(mm)
25.4
25.4
25.4
Drain hose (OD Ø)
inch(mm)
Packing Dimension (W*H*D)
inch(mm) 56.5*14.8*22.9(1,435*375*582) 56.9*17.9*27.6(1445*455*700) 56.9*17.9*27.6(1445*455*700)
Stuffing Quantity
Without S/Parts
20/40ft
95/191
57/120
57/120
For outdoor units Single Split
Application Split(Simultaneous operation)
See chapter MPS Variable SINGLE-A(AUUH-C)
See chapter MPS Variable SINGLE-A(AUUH-C)
Notes:
1. Capacities are based on the following conditions:
Cooling: - Indoor Temperature 27°C(80.6°F) DB /19°C(66.2°F) WB
- Outdoor Temperature 35°C(95°F) DB /24°C(75.2°F) WB
- Interconnecting Piping Length 7.5m
- Level Difference of Zero.
Heating: - Indoor Temperature 20°C(68°F) DB / 15°C(59°F) WB
- Outdoor Temperature 7°C(44.6°F) DB / 6°C(42.8°F) WB
- Interconnecting Piping Length 7.5 m
- Level Difference of Zero.
2. Capacities are Net Capacities.
3. Due to our policy of innovation some specifications may be changed without notification.
Service Manual 59
Ceiling Concealed Duct
4. Dimensional Drawings
ABNH-HL, GL, RL
k
A
B
h
i l
f
e
K
J
C
E
j
a
D
F
(G)
H
b
c
d
Note:
1. Pipe Specification(mm)
Model
Liquid
18, 24k
Ø 6.35
Gas
Ø 12.7
Ø 15.88
30, 36 k
Ø 9.52
48, 60k
Ø 19.05
(Unit: mm)
Capacity
A
B
C
D
E
ABNH186HLAC
ABNH246HLAC 932 882 355 45.5 450
ABNH306GLAC
1232 1182 355 45.5 450
ABNH366GLAC
ABNH486RLAC
1282 1230 477 56 590
ABNH606RLAC
Top view
(unit: mm)
F
(G)
H
30
87
750
30
87
830
30
J
K
a
b
c
d
e
f
h
i
j
163 260 61.5 243 212.3 243
110
130
52
66
81
30 158.5
186 298 229.5 243
116
160
53
59
81
19 158.5
120 1006 294 380 215 279 241 279 185 168
51
98
83
17
232 243
k
Front view
Inspection hole
(600X600)
Control box
600
1000
H
600
Front
60 Universal System Air Conditioner
※Suitable dimension "H" is necessary
to get a slope to drain as figure.
l
172
Ceiling Concealed Duct
5. Wiring Diagrams
ROOM.
IN-PIPE.
OUT-PIPE.
CENTRAL CONTROL
REMOTE
TELE CONTROL THERMISTOR CONTROL THERMISTOR THERMISTOR
DRY CONTACT
CN-PIPE1
CN-REMO CN-PIPE2
CN-ROOM
PTC
HEATER
CN-AIRC
CN-PTC
VENTILATION
E/HEATER
FUSE
CN-POWER
TO OUTDOOR UNIT
BL
BR
1(L) 2(N)
GN/YL
CN-FLOAT
FLOAT S/W
RD
3
4
5
CN-ZONE
ZONE CONTROL
CN-CC
A/CL
UNIT
CN-OUT
ABNH-HL, ABNH-GL
CN-DISP
CN-MOTOR
CN-DPUMP
OPTION
RF-REMOTE
CONTROL
ABNH-RL
CONNECTOR NUMBER
CN-POWER
CN-MOTOR
CN-D/PUMP
CN-DISP
CN-FLOAT
CN-ZONE
CN-CC
LOCATION
AC POWER SUPPLY
BLDC FAN MOTOR OUTPUT
DRAIN PUMP OUTPUT
RF-REMOTE CONTROL
FLOAT SWITCH INUT
ZONE CONTROL OUTPUT
CENTRAL CONTROL OUTPUT
CONNECTOR NUMBER
CN-PIPE1
CN-PIPE2
CN-REMO
CN-ROOM
CN-AIRC
CN-PTC
CN-OUT
LOCATION
PIPE SENSOR
DISCHAGE PIPE SENSOR
REMOTE CONTROL
ROOM SENSOR
AIR CLEAN
PTC HEATER
VENTILATION /ELECTRIC HEATER
Service Manual 61
Ceiling Concealed Duct
6. Piping Diagrams
:Cooling
:Heating
Heat Exchanger
Sirocco Fan
lndoor unit
: Thermistor
Refrigerant pipe connection port diameter
[unit: mm(inch)]
Model
ABNH186HLAC
Gas
Liquid
12.7 (1/2)
ABNH246HLAC
6.35 (1/4)
ABNH306GLAC
15.88(5/8)
ABNH366GLAC
ABNH486RLAC
ABNH606RLAC
62 Universal System Air Conditioner
19.05(3/4)
9.52(3/8)
Ceiling Concealed Duct
7. E.S.P. Setting for
(E.S.P. Control) provide required constant air volume irrespective of E.S.P.
charge.
(1) Open the rear cover of the wired remote-controller to set the mode.
(2) Select one of three selectable modes as follows.
■ Without Zone System
1. Position V-H, F-H:
• This position sets the maximum E.S.P as a default set.
2. Position V-L:
• This position sets the minimum E.S.P as a default set.
■ With Zone System
1. Position V-H:
• Maximum E.S.P setting & Fan speed is varied according to the state of dampers by micom.
2. Position F-H:
• Maximum E.S.P setting & Fan speed doesn't vary according to the opening & Closing of dampers.
3. Position V-L:
• Minimum E.S.P setting & Fan speed is varied according to the state of dampers by micom.
*Maximum: 18/24k - 8mmAq
30/36k - 10mmAq
48/60k - 15mmAq
Minimum: All-0mmAq
(3) Move the slide switch to set position.
TH
R14H OP3
SW TH
V-H
R13H
OP2
REMO
MAIN
2TH
CO1H
OP1
R19H
R11H
OP5R16H
OP4
R15H
OP7
R18H
R17H
F-H
OP6
LO
STAND
C070
V-L
R12H
R03S
HI
R04S
HIGH
R01S
R02S
SW
Slide switch for ceiling height
(4) Close the rear cover and check if it works normally.
CAUTION
• Select the position after checking duct work and E.S.P of the unit.
• Maunfactured in the position F-H.
Service Manual 63
Ceiling Concealed Duct
How to Set E.S.P?
Procedure of RPM change:
Ex) External Static pressure is 4mmAq for Model Name "ABNH246HLAB".
• To protect the unit, compressor is designed to be off during E.S.P. setting.
1
Push the "On/Off" button.
The unit will start.
AUTO SWING
OPERATION
SET TEMP
FAN SPEED
Room Temp
AUTO Heater Preheat
JET Defrost Humidify
Filter Out door
ZONE
1 2 3 4
Time
Timer
Operation unit
On Off
Set no. Time 01
2
Push the "Timer" and "Wind" button simultaneously for more then 3 seconds.
AUTO SWING
03
Program set
05
07
OPERATION
09
11
13
SET TEMP
Room Temp
15
3
Push the "Up" of "Down" button for E.S.P adjustment.
And, adjust the number which you want.(In this example, the number is "190".
Refer to the table 7-1 on the next page.)
03
AUTO SWING
OPERATION
05
07
09
11
13
SET TEMP
15
SUB FUNCTION
17
19
FAN SPEED
21
23
SUB FUNCTION
HI
MED
LO
AUTO Heater Preheat
JET Defrost Humidify
Filter Out door
ZONE
1 2 3 4
Time
Operation unit
03
23
AUTO Heater Preheat
JET Defrost Humidify
Filter Out door
ZONE
1 2 3 4
Room Temp
Timer
21
Program set
On Off
Set no. Time 01
On Off
Set no. Time 01
19
FAN SPEED
Time
Operation unit
17
HI
MED
LO
Timer
Timer
SUB FUNCTION
HI
MED
LO
Program set
05
07
09
11
13
15
17
19
21
23
Note: The range of selection is from 1~254. Since, the display is two Digit only.
If the range selection is above 100 then the third digit will appear in the screen as shown.
4
Shift the fan speed mode by pressing the fan speed button.
And then, Adjust numbers of next steps by repeating the stage 3.
(In this example, the numbers are "220" and "235" respectively.
5
Push the "Timer" and "Wind" button simultaneously for more than 3 seconds.
Then, Wind Data is memorized by the EEPROM of the main PCB.
AUTO SWING
OPERATION
Room Temp
Timer
Operation unit
03
FAN SPEED
SUB FUNCTION
HI
MED
LO
AUTO Heater Preheat
JET Defrost Humidify
Filter Out door
ZONE
1 2 3 4
Time
Timer
On Off
Set no. Time 01
64 Universal System Air Conditioner
SET TEMP
Program set
05
07
09
11
13
15
17
19
21
23
Ceiling Concealed Duct
Table 7-1
Static Pressure(mmAq)
Model Name
ABNH186HLAC
ABNH246HLAC
ABNH306GLAC
ABNH366GLAC
ABNH486RLAC
ABNH606RLAC
0
2
4
6
8
10
12
14
15
Step
CMM(CFM)
High
16.5(583)
235
230
225
215
180
Med
14.5(512)
245
238
235
230
215
Low
13(459)
254
252
248
245
240
High
18(636)
220
205
190
50
1
Med
16.5(583)
235
230
220
200
100
Low
14(494)
250
240
235
230
210
High
26.5(936)
153
150
150
148
130
1
Med
23(812)
173
173
175
175
170
155
Low
20(706)
190
190
190
190
190
190
High
32(1130)
230
230
225
220
150
1
Med
29(1024)
240
238
237
235
230
220
Low
26.5(936)
245
245
243
243
240
240
High
40(1412)
230
225
220
215
205
200
190
180
160
Med
35(1235)
250
245
240
235
230
220
215
210
200
Low
30(1059)
255
255
255
250
245
240
235
230
225
High
50(1766)
185
180
174
162
154
140
90
5
1
Med
45(1589)
210
205
199
191
189
180
155
138
110
Low
40(1423)
230
225
219
215
210
205
193
180
171
Setting Value
Note: 1. To get the desired Airflow & E.S.P combination from the table set the matching value from
the table. Value other than that in table will not give the combinations of airflow & ESP
which are mentioned in the table.
2. Table 7-1 is based at 230V. According to the fluctuation of voltage, air flow rate varies.
Service Manual 65
Ceiling Concealed Duct
Table 7-2
Model Name
ABNH186HLAC
ABNH246HLAC
ABNH306GLAC
ABNH366GLAC
ABNH486RLAC
ABNH606RLAC
Static Pressure(mmAq)
6
8
10
Setting
Value
0
High
180
22(777)
21(742)
19.8(669)
18.3(646)
16.5(583)
Med
215
18.5(653)
17.8(629)
17.1(604)
16.2(572)
14.5(512)
Low
240
16.1(569)
15.6(551)
15.1(533)
14.2(501)
13(459)
High
1
24(848)
22.5(795)
20.8(735)
19(671)
18(636)
Med
100
21.3(752)
19.9(703)
18.7(660)
17.2(607)
16.5(583)
Low
210
17(600)
16.1(569)
15.4(551)
14.7(519)
14(494)
High
1
Med
155
27(954)
26.3(929)
26.1(922)
25.8(911)
24.8(876)
23(812)
Low
190
21(742)
20.8(735)
20.6(727)
20.4(720)
20.4(720)
20(706)
High
1
42(1483)
40(1413)
38(1342)
35.5(1254) 33.5(1183) 32(1130)
Med
220
39(1377)
37(1307)
35(1236)
33(1165)
31(1095)
29(1024)
Low
240
34(1201)
32.5(1148)
31(1095)
29.5(1042)
27(954)
26.5(936)
High
200
49(1730)
Med
220
Low
14
15
47.4(1675) 44.9(1584) 43.3(1529) 41.7(1472) 40(1412) 38.6(1361)
37(1305)
35.4(1249)
44(1554)
42.4(1498) 40.2(1420) 39.2(1384) 36.7(1296) 35(1236) 34.6(1220)
33(1164)
32.2(1137)
240
38(1342)
37.2(1314)
27(953)
26.2(925)
High
140
59(2083)
57.4(2028) 55.8(1969) 53.4(1886) 51.7(1826) 50(1766) 46.6(1644) 42.9(1516) 40.6(1432)
Med
180
53(1871)
51.4(1816) 49.8(1758) 47.4(1674) 45.9(1621) 45(1589) 42.6(1502) 39.6(1397) 38.3(1352)
Low
205
47(1660)
45.8(1618) 43.8(1547) 42.1(1488) 40.7(1435) 40(1412) 37.8(1335)
Step
2
4
12
CMM(CFM)
34.2(1208) 33.1(1169) 31.7(1119) 29.9(1056) 27.7(978)
35(1234)
26.5(936)
32.4(1145) 31.6(1114) 30(1059) 28.6(1008)
35(1234)
Notes:
1) The above table shows the correlation of External Static Pressure & Air Flow.
2) When installing, the value of motor step needs to be set according to E.S.P. of the table 7-2.
66 Universal System Air Conditioner
33.4(1179)
Ceiling Concealed Duct
8. Operating Instructions
■ Name and Function of Remote Controller
AUTO SWING
OPERATION
SET TEMP
Room Temp
Timer
Operation unit
3
Signal Receiver
5
8
9
10
11
12
13
03
SUB FUNCTION
AUTO Heater Preheat
JET Defrost Humidify
Filter Out door
ZONE
1 2 3 4
HI
MED
LO
Time
On Off
Set no. Time 01
FAN SPEED
1
Program set
05
07
09
11
13
15
17
19
21
23
2
Timer
Cancel
Program
Week
6
7
4
Holiday
Plasma
SET/CLR
Hour
Min
RESET
14
15
16
17
1. Operation display
Displays the operation conditions.
9. Timer Set Button
Used to set the timer when the desired time is obtained.
2. On/Off Button
Operation starts when this button is pressed, and stops
when the button is pressed again.
10. Week Button
Used to set a day of the week.
3. Set Temperature Button
Used to set the temperature when the desired temperature
is obtained.
4. FAN Operation Button
Used to circulate room air without cooling or heating.
5. Electric Heater Button(optional)
Used to set the Electric Heater.
6. Fan Speed Button
Used to set desired fan speed.
7. Operation Mode Selection Button
Used to select the operation mode.
• Auto Operation Mode.
• Cooling Operation Mode.
• Soft Dry Operation Mode.
• Heating Operation Mode.(except cooling model)
11. Program Button
Used to set the weekly timer.
12. Holiday Button
Used to set a holiday of the week.
13. Time Set Button
Used to set the time of the day and change the time in the
weekly timer Function.
14. Set and Clear Button
Used to set and clear the weekly timer.
15. Room Temperature Checking Button
Used to check the room temperature.
16. Plasma Air Clean Button(optional)
17. Reset Button
Used to set the current time and clear the setting time.
8. Timer Cancel Button
Used to cancel the timer.
❈ Display temperature can be different from actual room temperature if the remote controller is installed at the
place where sun-rays are falling directly or the place nearby heat source.
Service Manual 67
Ceiling Concealed Duct
■ Optional Function
• Wireless Remote Controller
This air-conditioner is equipped with wired remote controller basically. But if you want to have the wireless remote controller,
you pay for it.
1. FAN Operation Button
Used to circulate room air without cooling or heating.
Signal transmitter
Transmits the signals to the signal receptor.
2. Cooling Operation Button
3. Soft Dry Operation Button
Used to dehumidify without overcooling.
1
11
A/CL
4
10
3
9
5
2
6
7
8
4. Heating Operation Button
(Heat pump model only)
5. Timer Set Button
Used to set the timer when the desired time is
obtained.
Then the wired remote controller is set up to 24
hours by an hour but the wireless remote controller
is set up to 7 hours by an hour. Therefore, if you
want to set over 7 hours, use the wired remote
controller.
6. Fan Speed Button
Used to set the desired fan speed.
7. On/Off Button
Operation starts when this button is pressed, and
stops when the button is pressed again.
8. Set Temperature Button
Used to set the temperature when the desired temperature is obtained
9. Auto Operation Button
10. Plasma Air Clean Button(Optional)
11. Electric Heater Button(Optional) Used to set the
Electric Heater.
CAUTION : for handling the Remote Controller
• Aim at the signal receptor on the wired remote controller so as to operate.
• The remote control signal can be received at a distance of up to about 7m.
• Be sure that there are no obstructions between the remote controller and the signal receptor.
• Do not drop or throw the remote controller.
• Do not place the remote controller in a location exposed to direct sunlight, or near the heating unit, or any other heat
source.
• Block a strong light over the signal receptor with a curtain or etc. so as to prevent the abnormal operation. (ex:electronic quick start, ELBA, inverter type fluorescent lamp)
68 Universal System Air Conditioner
Ceiling Concealed Duct
9. Installation
• Please read this instruction sheet completely before installing the product.
• When the power cord is damaged, replacement work shall be performed by authorized personnel only.
• Installation work must be performed in accordance with the national wiring standards by authorized personnel only.
Air outlet vents
Air filters
Air intake vents
Wired LCD Remote Control
Required Parts
Required Tools
• Connecting cable
• Pipes: Gas side
Liquid side
• Hanging Bolt
(W 3/8 or M10 length 650mm)
• Insulated drain hose
• Level
• Screw driver
• Electric drill
• Hole core drill (ø70mm)
• Flaring Tools set
• Torque Wrenches
• Hexagonal Wrench (4mm, 5mm)
• Gas-leak detector
• Owner’s Manual
• Additional Drain hose
(Outer Dia ................................25.4mm)
• Thermometer
9.1 Selection of the best location
Top view
(unit: mm)
Inspection hole
(600X600)
Control box
600
1000
Install the air conditioner in the location that satisfies the following conditions.
• The place shall easily bear a load exceeding four times the
indoor unit’s weight.
• The place should have enough area for inspection as shown
in figure.
• The place where the unit shall be leveled.
• The place shall allow easy water drainage.(Suitable dimension “H” is necessary to get a slope to drain as figure.)
• The place shall easily connect with the outdoor unit.
• The place where the unit is not affected by an electrical
noise.
• The place where air circulation in the room will be good .
• There should not be any heat source or steam near the unit.
600
Front
Front view
H
Service Manual 69
Ceiling Concealed Duct
9.2 Ceiling dimension and hanging bolt
location
A
■ Installation of Unit
Install the unit above the ceiling correctly.
B
C
E
CASE 1
D
POSITION OF SUSPENSION BOLT
• Apply a joint-canvas between the unit and duct to absorb
unnecessary vibration.
• Apply a filter Accessory at air return hole.
• Refer toDimensinal Drawings.
I
1-3 mm
F
(G)
H
Drainage hole
• Install the unit leaning to a drainage hole side as a figure
for easy water drainage.
M10 Nut
X4
(Local
M10 SP. washer X 4 supply)
M10 washer
X4
M10 washer
CASE 2
X4
(Local
M10 SP. washer X 4 supply)
M10 Nut
X4
POSITION OF CONSOLE BOLT
• A place where the unit will be leveled and that can support the weight of the unit.
• A place where the unit can withstand its vibration.
• A place where service can be easily performed.
NOTE:
• Throughly study the following installation locations:
1. In such places as restaurants and kitchens, considerable amount of oil steam and flour adhere to the fan, the fin of the heat
exchanger, resulting in heat exchange reduction, spraying, dispersing of water drops, etc.
In these cases, take the following actions:
• Make sure that the ventilation fan for smoke-collecting hood on a cooking table has sufficient capacity so that it draws oily
steam which should not flow into the suction of the air conditioner.
• Make enough distance from a cooking room to install the air conditioner in such a place where it may not suck in oil steam.
2. Avoid installing air conditioner in such circumstances where cutting oil mist or iron powder is in suspension in factories, etc.
3. Avoid places where inflammable gas is generated, flows in, is stored or vented.
4. Avoid places where sulfurous acid gas or corrosive gas is generated.
5. Avoid places near high frequency generators.
70 Universal System Air Conditioner
Ceiling Concealed Duct
• Select and mark the position for fixing bolts.
• Drill the hole for set anchor on the face of ceiling.
• Insert the set anchor and washer onto the suspension bolts for locking the suspension bolts on the
ceiling.
• Mount the suspension bolts to the set anchor firmly.
• Secure the installation plates onto the suspension
bolts (adjust level roughly) using nuts, washers and
spring washers.
Old building
New building
1 Set anchor
2 Plate washer
3 Spring washer
4 Nut
CAUTION
Tighten the nut and bolt to prevent unit falling.
5 Suspension
bolts
9.3 Connecting Cables
Connect the wires to the terminals on the control board individually according to the outdoor unit connection.
• Ensure that the color of the wires of outdoor unit and the terminal No. are the same as those of indoor unit respectively
Terminal Block in Indoor
1(L)
2(N)
3
4
Connected to outdoor unit
WARNING
Make sure that the screws of the terminal are free from looseness.
Clamping of cables
1) Arrange 2 power cables on the control panel.
2) First, fasten the steel clamp with a screw to the inner boss of control panel.
3) For the cooling model, fix the other side of the clamp with a screw strongly. For the heat pump model, put the
0.75mm2 cable(thinner cable) on the clamp and tighten it with a plastic clamp to the other boss of the control
panel.
4) In Australia, the length of power supply cord measured from the entry of the power supply cord to the middle of
live pin on the power plug should be over 1.8m.
Service Manual 71
Ceiling Concealed Duct
9.4 Insulation
THERMAL INSULATION
All thermal insulation must comply with local requirement.
INDOOR UNIT
Union for liquid pipe
Refrigerant pipe and thermal
insulator(Local supply)
Hose crip for thermal insulator
(Local supply)
Thermal insulator for refrigerant pipe
(Local supply)
Union for gas pipe
9.5 Checking the Drainage
1. Remove the Air Filter.
2. Check the drainage.
• Spray one or two glasses of water on the evaporator.
• Ensure that water flows to drain hose from indoor
unit without any leakage.
72 Universal System Air Conditioner
Thermal insulator for refrigerant pipe
(Local supply) Thermal insulator for
piping(Local supply)
Overlap with thermal
insulator for piping.
Hose crip for thermal insulator(Local supply)
Make sure that there is no clearance here.
Ceiling Concealed Duct
CAUTION
1. Decline Installation of indoor unit is very important for the drain of the duct type air conditioner.
2. Minimum thickness of the insulation for the connecting pipe should be 5mm.
Front of view
• The unit must be or declined to wards drain hose while installation.
1~3mm
Ceiling
Drainage hole
CORRECT
Drainage hole
INCORRECT
CAUTION FOR GRADIENT OF
UNIT AND DRAIN PIPING
• Alway lay the drain with downward inclination
(1/50 to 1/100).
Prevent any upward flow or reverse flow in any
part.
• 5mm or thicker formed thermal insulator shall
always be provided for the drain pipe.
Lay the drain hose with a downware
inclination so water will drain out.
Thermal insulator
(Local supply)
Drainage pipe
(Local supply)
Unit
Make sure to be closed.
CORRECT
Drainage hole
INCORRECT
• Install the P-Trap (or U-Trap) to prevent
a water leakage caused by the blocking
of intake air filter.
1/50~1/100
Drain Pipe
MAX 700mm
Applied U-Trap Dimension
A ≥ 70mm
B ≥ 2C
C ≥ 2 x SP
SP = External Pressure
(mmAq)
Ex) External Pressure
= 10mmAq
A ≥ 70mm
B ≥ 40mm
C ≥ 20mm
B
C
U-Trap
A
Drain Pump
Service Manual 73
Ceiling Concealed Duct
10. Accessories
Standard Accessories
Name
Clamp metal
Drain hose
Insulation for
fitting
Clamp
Screws for
duct flanges
Quantity
1 EA
1 EA
1 set
6 EA
1 set
(Other)
• Owner's manual
• Installation manual
• Washers(8 pcs.)
Shape
for gas pipe
for liquid pipe
Optional Accessories(For Unit)
No.
Item
1
Wireless remote
control
2
Type
Model No.
Component Parts
• Wireless remote control : 1EA
• Holder : 1EA
• Battery : 2EA
• Screw : 2EA
With air purifying
function
AHWRHS
AHWRHD(LCD)
Plasma air puirifying
filter
-
ABPAHH
3
Zone Control
-
ABZCA
• Factory sypplied-Zone control PCB
• Durchased Locally-Damper,
Damper Moter, thermostat
4
Drain Pump
-
ABDPG
• Drain Pump Assembly: 1EA
5
Central control
Simple
PQCSA101S0
• Central control
• Installation manual
6
PI485 Gateway
For central control
PHNFP14A0
• PCB: 1EA
• Installation manual
• Wire assembly
74 Universal System Air Conditioner
• Plasm Air Purifier Kit: 1EA
• Wired Remote Control: 1EA
MPS Variable SINGLE A
II. Outdoor Units
Introduction ....................................................................................................76
MPS Variable SINGLE A ...........................................................................78
Service Manual 75
MPS Variable SINGLE A
Introduction
Introduction
Outdoor Units - R410A
(AUUH-C)
• Models List
Series
Model name
Power supply
AUUH126C
1 Compressor
AUUH186C
1Ø, 220-240V, 50Hz
AUUH246C
Single A
Heat Pump
AUUH306C
MPS Variable
AUUH368C
AUUH488C
1 Compressor
3Ø, 380-415V, 50Hz
AUUH608C
• Indoor Unit Matching
LG’s
ual system.
system consist of one outdoor unit which can match with three different indoor units as individ-
The indoor units are ceiling cassette, ceiling concealed duct and ceiling & floor types.
Outdoor unit
AUUH126C
AUUH186C
AUUH246C
AUUH306C
AUUH368C
AUUH488C
AUUH608C
Indoor unit
Type
Model name
Ceiling Cassette
ATNH126ELFC
Ceiling & Floor
AVNH126ELAC
Ceiling Cassette
ATNH186ELFC
Ceiling & Floor
AVNH186BLAC
Ceiling Concealed Duct
ABNH186HLAC
Ceiling Cassette
ATNH246FLFC
Ceiling & Floor
AVNH246BLAC
Ceiling Concealed Duct
ABNH246HLAC
Ceiling Cassette
ATNH306FLFC
Ceiling & Floor
AVNH306BLAC
Ceiling Concealed Duct
ABNH306GLAC
Ceiling Cassette
ATNH366DLFC
Ceiling & Floor
AVNH366KLAC
Ceiling Concealed Duct
ABNH366GLAC
Ceiling Cassette
ATNH486DLFC
Ceiling & Floor
AVNH486LLAC
Ceiling Concealed Duct
ABNH486RLAC
Ceiling Cassette
ATNH606DLFC
Ceiling & Floor
AVNH606LLAC
Ceiling Concealed Duct
ABNH606RLAC
76 Universal System Air Conditioner
Introduction
MPS Variable SINGLE A
• Model Number Nomenclature
A U U H 1 8 6 C
Serial Number
Electric Standard (Phase, Volts, Freq)
6:1Ø,220V~240V,50Hz
8:3Ø,380V~415V,50Hz
Nominal Cooling Capacity in Btu/h
60 : 60,000 Btu/h
12 : 12,000 Btu/h
18 : 18,000 Btu/h
24 : 24,000 Btu/h
30 : 30,000 Btu/h
36 : 36,000 Btu/h
48 : 48,000 Btu/h
Model Type
H: MPS Variable Single A
W: MPS inverter Single A
Indicates that this is a
R410A
outdoor unit
Service Manual 77
MPS Variable SINGLE A
MPS Variable SINGLE A
(R410A·Outdoor Units)
AUUH-C
Contents
1. Features & Benefits ..............................................................................79
2. Specifications........................................................................................81
3. Dimensional Drawings ..........................................................................85
4. Wiring Diagrams ...................................................................................89
5. Piping Diagrams....................................................................................93
6. Electric Characteristics .........................................................................96
7. Operation Range...................................................................................97
8. Installation.............................................................................................98
78 Universal System Air Conditioner
MPS Variable SINGLE A
1. Features & Benefits
MPS(Multi Power System) Variable Control : (Except: AUUH126B/186B/246B/608B)
Big Energy Saving with MPS Variable Control
• Basic Principle of MPS Variable Control
MPS control provides comfortable and convenient environment as there are two compressors with 60&40%
load sharing with on compressor of small capacity always working to maintain the set temperature conditions &
meanwhile other compressor is at rest if the load is low whereas in conventional system the only compressor is
working with ON/OFF cycles.
Conventional (On/Off Operation)
MPS Control
40%
100%
60%
• Comfort Control
- Conventional Operation : The compressor must turn on and off to reach desired temperature setting. A large
portion of power is used during restarting. This causes unnecessary power consumption.
- MPS(Multi Power System) Control : This is a power saving system with two rotary compressors of different
capacity (60% & 40%) operating an A/C at high power until it reaches desired temperature. And when it
reaches the temperature, only the 40% capacity rotary compressor operates.
On
Off
On
Off
(°C)
Conventional on/off operation (Single Stage)
27
25
23
21
MPS Control (Multi Stage)
19
100% operation
5'
40% operation
10'
15'
20'
(min)
Service Manual 79
MPS Variable SINGLE A
Low Ambient Control
If the outdoor temperature drops below certain temperature,
liquid back to the compressor is prevented by reducing outdoor fan speed. It can prevent frosting of evaporator and
keep cooling operation on.
138%~133%
Heating Capacity Improved
• Using MPS technology, LG's air conditioning system achieved world's best wide range of operation which is from 12%~120% in cooling mode
and from 12%~138% in heating mode to give
quicker cooling and heating.
• Compared cooling capacity
120%~115%
124%
112%
120%
Heating
100%
110%
100%
100%
Cooling
- Standard heating capacity 120%
- Max heating capacity 138%
Before Now
STD
Energy Saving Gold Fin
Uncoated Aluminum
Befor Now
Max
Gold fin
- Outdoor Heat Exchanger fins are coated with anticorrosive & hydrophilic layers. It prevents the corrosion of heat exchanger. Fins remain as new even
after long time of operation and maintain efficiency
Pitting Corrosion
of heat exchanger constant. It also saves power &
10mm
maintenance Cost
80 Universal System Air Conditioner
10mm
Salt Spray Test Result : After 360 hours
[ Test Standard: ASTM B-117, KS D 9502 ]
MPS Variable SINGLE A
2. Specifications
Nominal Capacity and Nominal Input
For combination indoor units + outdoor units :
Indoor Units
ATNH126ELFC
Outdoor Units
AUUH126C
Nominal Capacity Cooling
Btu/h
12,000
W
3,517
Heating
Btu/h
13,200
W
3,869
Nominal Input
Cooling
W
1,350
Heating
W
1,370
EER
8.89(2.61)
Btu/h.W(W/W)
COP
9.64(2.82)
Btu/h.W(W/W)
ATNH186ELFC
AUUH186C
18,000
5,275
19,800
5,803
1,880
2,060
9.57(2.81)
9.61(2.82)
ATNH246FLFC
AUUH246C
24,000
7,033
26,400
7,738
2,500
2,750
9.60(2.81)
9.60(2.81)
ATNH306FLFC
AUUH306C
30,000
8,793
33,000
9,672
3,970
4,020
7.56(2.21)
8.20(2.41)
Nominal Capacity and Nominal Input
For combination indoor units + outdoor units :
Indoor Units
Outdoor Units
Nominal Capacity Cooling
Btu/h
W
Heating
Btu/h
W
Nominal Input
Cooling
W
Heating
W
EER
Btu/h.W(W/W)
COP
Btu/h.W(W/W)
ABNH186HLAC
AUUH186C
18,000
5,275
19,800
5,803
1,880
2,060
9.57(2.81)
9.61(2.82)
ABNH246HLAC
AUUH246C
24,000
7,033
26,400
7,738
2,500
2,750
9.60(2.81)
9.60(2.81)
ABNH306GLAC
AUUH306C
32,000
9,379
35,200
10,317
4,250
3,670
7.53(2.21)
9.59(2.81)
AVNH186BLAC
AUUH186C
18,000
5,275
19,800
5,803
1,880
2,060
9.57(2.81)
9.61(2.82)
AVNH246BLAC
AUUH246C
24,000
7,033
26,400
7,738
2,500
2,750
9.60(2.81)
9.60(2.81)
-
Nominal Capacity and Nominal Input
For combination indoor units + outdoor units :
Indoor Units
AVNH126ELAC
Outdoor Units
AUUH126C
Nominal Capacity Cooling
Btu/h
12,000
W
3,517
Heating
Btu/h
13,200
3,869
W
Nominal Input
Cooling
W
1,350
Heating
W
1,370
8.89(2.61)
EER
Btu/h.W(W/W)
COP
Btu/h.W(W/W)
9.64(2.82)
AVNH306BLAC
AUUH306C
28,000
8,207
30,800
9,027
3,720
4,020
7.53(2.21)
7.66(2.25)
Service Manual 81
MPS Variable SINGLE A
Nominal Capacity and Nominal Input
For combination indoor units + outdoor units :
Indoor Units
ATNH366DLFC
Outdoor Units
AUUH368C
Nominal Capacity Cooling
Btu/h
36,000
W
10,552
Heating
Btu/h
39,600
W
11,607
Nominal Input
Cooling
W
4,050
Heating
W
3,620
EER
8.89(2.61)
Btu/h.W(W/W)
COP
10.94(3.21)
Btu/h.W(W/W)
ATNH486DLFC
AUUH488C
48,000
14,069
52,800
15,476
5,840
5,630
8.22(2.41)
9.38(2.75)
ATNH606DLFC
AUUH608C
56,000
16,414
61,600
18,055
6,820
6,910
8.21(2.41)
8.91(2.61)
For combination indoor units + outdoor units :
Indoor Units
ABNH366GLAC
Outdoor Units
AUUH368C
Nominal Capacity Cooling
Btu/h
36,000
W
10,552
Heating
Btu/h
39,600
W
11,607
Nominal Input
Cooling
W
4,050
Heating
W
4,130
EER
8.89(2.61)
Btu/h.W(W/W)
COP
9.59(2.81)
Btu/h.W(W/W)
ABNH486RLAC
AUUH488C
48,000
14,069
52,800
15,476
5,840
5,630
8.22(2.41)
9.38(2.75)
ABNH606RLAC
AUUH608C
56,000
16,414
61,600
18,055
6,800
6,440
8.23(2.41)
9.57(2.80)
For combination indoor units + outdoor units :
Indoor Units
AVNH366KLAC
Outdoor Units
AUUH368C
Nominal Capacity Cooling
Btu/h
34,000
W
9,965
Heating
Btu/h
36,000
W
10,552
Nominal Input
Cooling
W
4,130
Heating
W
4,050
EER
Btu/h.W(W/W)
8.23(2.41)
8.89(2.61)
COP
Btu/h.W(W/W)
AVNH486LLAC
AUUH488C
46,500
13,629
52,800
15,476
5,650
5,630
8.23(2.41)
9.38(2.75)
AVNH606LLAC
AUUH608C
54,000
15,827
59,400
17,410
6,580
6,200
8.21(2.41)
9.58(2.81)
82 Universal System Air Conditioner
MPS Variable SINGLE A
Technical Specification
Outdoor Units
Running Current
Starting Current
Power Supply
Power Factor
Compressor
(Constant)
Refrigerant charge
Coil
Fan motor
Fan
Air Circulation
Noise Level(H/L)
Defrosting
SVC Valve
Cooling/Heating
Cooling/Heating
A
A
Ø,V,Hz
%
Type
Model
Quantity
Motor Input
W
Oil Charge
cc
Oil Type
Charge*
g(oz)
Type
Control
Tube Size (OD)
inch(mm)
Fins per inch
No. of Rows & Column/No.
Model
Output
W
Capacitor
µF/Vac
Type
No. Used / Diameter EA/inch(mm)
Discharge
Side / Top
CMM(CFM)
Sound Press,1m
dB(A)±1
Liquid
Gas
Dimensions
W*H*D
Net Weight
Outdoor
Power Supply Cable(Includes earth)
Interunit Cable(Includes earth)
Max. Piping Length/Elevation
Additional Refrigerant Charge (Over 7.5m)
Packing Dimension W*H*D
Stuffing Quantity
Without S/Parts
inch(mm)
inch(mm)
inch(mm)
kg(lbs)
No.* mm2
No.* mm2
m
g/m
inch(mm)
20/40ft
AUUH126C
7.5/7.0
AUUH186C
8.4/9.2
AUUH246C
11.0/12.0
AUUH306C
20.0/20.0
1,220~240,50
1,220~240,50
1,220~240,50
1,220~240,50
Rotary
Rotary
Rotary
Rotary
GK151PAC
5KS225DAF21
GP290PAC
5KS225DKSM
1
1
1
2
1,245
1,980
2,505
2,175
350
600
1,130
1,340
FVC68D
FV50S
FVC68D
FV50S
1200(42.4)
1300(45.90)
1950(68.9)
2300(81.37)
R410A
R410A
R410A
R410A
capillary
L.E.V
L.E.V
L.E.V
0.276(7.0)
0.276(7.0)
0.276(7.0)
0.276(7.0)
18
18
18
18
2R,24C
2R,28C
2R,36C
2R,36C
OBM-2012P2
IC28640LG28P
IC28640LG28P
IC28640LG28J
25.5
67.2
67.2
67.2
1.5/370
6/370
6/370
6/370
Propeller
Propeller
Propeller
Propeller
1/15.7(400)
1/18.1(460)
1/18.1(460)
1/18.1(460)
Side Discharge
Side Discharge
Side Discharge
Side Discharge
26(918)
58(2048)
58(2048)
53(1872)
47
52
52
53
Inversion cycle
Inversion cycle
Inversion cycle
Inversion cycle
1/4 (6.35)
1/4 (6.35)
1/4 (6.35)
1/4 (6.35)
3/8 (9.52)
1/2 (12.7)
1/2 (12.7)
5/8 (15.88)
30.3*21.3*9.6 (770*540*245) 34.3*25.8*12.6 (870*655*320) 34.3*31.5*12.6 (870*800*320) 34.3*31.5*12.6 (870*800*320)
31(68.3)
52(114.6)
60(132.2)
64(141)
3*2.5
3*2.5
3*2.5
3*2.5
4*0.75
4*0.75
4*0.75
4*0.75
15/10
50/30
50/30
50/30
20
35
35
35
36.2*20.8*14.2(920*580*360) 40.2*28.1*17.3(1020*715*440) 40.2*34.3*17.3(1020*870*440) 40.2*34.3*17.3(1020*870*440)
144/312
81/171
54/114
54/114
Notes:
1. Capacities are based on the following conditions:
Cooling:
- Indoor Temperature 27°C(80.6°F) DB /19°C(66.2°F) WB
- Outdoor Temperature 35°C(95°F) DB /24°C(75.2°F) WB
Heating:
- Indoor Temperature 20°C(68°F) DB / 15°C(59°F) WB
- Outdoor Temperature 7°C(44.6°F) DB / 6°C(42.8°F) WB
Piping Length - Interconnecting Piping Length 7.5m(25ft)
- Level Difference of Zero.
2. * : Full factory charge is shipped in the outdoor unit. The charge is determined based on 7.5m(25ft) of line.
3. Due to our policy of innovation some specifications may be changed without notification.
Service Manual 83
MPS Variable SINGLE A
Technical Specification
Outdoor Units
Running Current
Starting Current
Power Supply
Power Factor
Compressor
(Constant)
Refrigerant charge
Coil
Fan motor
Fan
Air Circulation
Noise Level(H/L)
Defrosting
SVC Valve
Cooling/Heating
Cooling/Heating
A
A
Ø,V,Hz
%
Type
Model
Quantity
Motor Input
W
Oil Charge
cc
Oil Type
Charge*
g(oz)
Type
Control
Tube Size (OD)
inch(mm)
Fins per inch
No. of Rows & Column/No.
Model
Output
W
Capacitor
µF/Vac
Type
No. Used / Diameter EA/inch(mm)
Discharge
Side / Top
CMM(CFM)
Sound Press,1m
dB(A)±1
Liquid
Gas
Dimensions
W*H*D
Net Weight
Outdoor
Power Supply Cable(Includes earth)
Interunit Cable(Includes earth)
Max. Piping Length/Elevation
Additional Refrigerant Charge (Over 7.5m)
Packing Dimension W*H*D
Stuffing Quantity
Without S/Parts
inch(mm)
inch(mm)
inch(mm)
kg(lbs)
No.* mm2
No.* mm2
m
g/m
inch(mm)
20/40ft
AUUH368C
7.8/6.6
AUUH488C
11.5/11.0
AUUH608C
32.5/31.5
3,380~415,50
3,380~415,50
3,380~415,50
Rotary
Rotary
SCROLL
5KS225PAA21
GPT330Y
AR073YA
2
2
1
2,065
2,550
6,473
1,340
1,200
2,325
FV50S
FVC68D(PVE)
FVC68ST
2600(92.1)
4200(148.1) for 30m
4700(197) for 30m
R410A
R410A
R410A
L.E.V
L.E.V
L.E.V
0.276(7.0)
0.276(7.0)
0.276(7.0)
18
17
17
2R,36C
2R 52C
2R 52C
5BM-3018P2*2
AMR071B9*2
AMR071B9*2
47.2*2
70*2
70*2
2.0/400
6/370
6/370
Propeller
Propeller
Propeller
2 /15.7(400)
2/18.1(460)
2/18.1(460)
Side Discharge
Side Discharge
Side Discharge
32(1130)*2
53(1872) *2
53(1872) *2
52
57
57
Invertion cycle
Invertion cycle
Invertion cycle
1/4 (6.35)
3/8 (9.52)
3/8 (9.52)
5/8 (15.88)
3/4 (19.05)
3/4 (19.05)
35.3*41.7*12.6(870*1060*320) 35.4*45.8*14.5(900*1165*370) 35.4*45.8*14.5(900*1165*370)
80(176)
105(231)
93(205)
3*2.5
3*2.5
3*2.5
4*0.75
4*0.75
4*0.75
50/30
50/30
50/30
40
75(30m chargeless)
75(30m chargeless)
41.1*44.9*17.3(1045*1140*440) 41.7*48.0*18.3(1060*1220*465) 41.7*48.0*18.3(1060*1220*465)
51/111
27/55
27/55
Notes:
1. Capacities are based on the following conditions:
Cooling:
- Indoor Temperature 27°C(80.6°F) DB /19°C(66.2°F) WB
- Outdoor Temperature 35°C(95°F) DB /24°C(75.2°F) WB
Heating:
- Indoor Temperature 20°C(68°F) DB / 15°C(59°F) WB
- Outdoor Temperature 7°C(44.6°F) DB / 6°C(42.8°F) WB
Piping Length - Interconnecting Piping Length 7.5m(25ft)
- Level Difference of Zero.
2. ★ : Full factory charge is shipped in the outdoor unit.
The charge of 36k model is determined based on 7.5m(25ft) of line.
48/60k models : Chargeless for 30m of piping length.
3. Due to our policy of innovation some specifications may be changed without notification.
84 Universal System Air Conditioner
MPS Variable SINGLE A
3. Dimensional Drawings
AUUH126C
L2
D
L1
W
H
L3
L5
Gas side
(3-way valve)
L4
Liquid side
(2-way valve)
DIM
MODEL
unit
AUUH126C
W
mm
770
H
mm
540
D
mm
245
L1
mm
287
L2
mm
64
L3
mm
518
L4
mm
10
L5
mm
100
Service Manual 85
MPS Variable SINGLE A
AUUH186C/AUUH246C/AUUH306C
W
Air discharge grille
Model
Dimensions
W
mm
H
mm
D
mm
L1
mm
L2
mm
L3
mm
L4
mm
L5
mm
L6
mm
L7
mm
L8
mm
L9
mm
L10
mm
L11
mm
mm
mm
86 Universal System Air Conditioner
AUUH186C
AUUH246C/306C
870
655
320
370
25
340
775
25
546
162
162
54
74.5
79
Ø6.35
Ø12.7
870
800
320
370
25
340
775
25
546
162
162
54
74.5
79
Ø6.35
24k : Ø12.7, 30k : Ø15.88
MPS Variable SINGLE A
AUUH368C
320
340
1030
4
1060
3
2
76.5
360
4-holes for anchor bolts
160
550
870
1
160
64
320
(Unit: mm)
Number
Name
Descripition
1
Liquid side service valve(mm)
Ø6.35
2
Gas side service valve(mm)
Ø15.88
3
Air discharge grill
4
Control Cover
Service Manual 87
MPS Variable SINGLE A
AUUH488C/AUUH608C
4-hole for anchor bolts
L1
L2
D
L3
W
L4
H
Control cover
Liquid side
3-way valve
L5
L10 L11
Gas side
3-way valve
L7
L6
L8
L9
Model
Dimensions
W
mm
H
mm
D
mm
L1
mm
L2
mm
L3
mm
L4
mm
L5
mm
L6
mm
L7
mm
L8
mm
L9
mm
L10
mm
L11
mm
mm
mm
88 Universal System Air Conditioner
AUUH488C/AUUF608C
900
1,165
370
460
45
410
1,135
30
550
175
175
112
120
83
Ø9.52
Ø19.05
MPS Variable SINGLE A
4. Wiring Diagrams
AUUH126C
AUUH186C
Service Manual 89
Electronic Control Device
AUUH246C
AUUH306C
90 Universal System Air Conditioner
MPS Inverter SINGLE A
MPS Inverter SINGLE A
Electronic Control Device
AUUH368C
AUUH488C
Service Manual 91
MPS Variable SINGLE A
AUUH608C
92 Universal System Air Conditioner
MPS Variable SINGLE A
5. Piping Diagram
AUUH126C
OUTDOOR UNIT
Refrigerant Flow
Reversing
Valve
Cooling
Heating
Thermistor
Accumulator
Heat
Exchanger
Constant
Compressor
Gas
(Ø 9.52mm)
Field Piping
Capillary
Thermistor
Liquid
(Ø 6.35mm)
AUUH186C/246C
OUTDOOR UNIT
Refrigerant Flow
Reversing
Valve
Cooling
Heating
Thermistor
High Pressure
S/W
Thermistor
Heat
Exchanger
Accumulator
Thermistor
Constant
Compressor
Thermistor
Gas
(Ø 12.7mm)
Field Piping
L.E.V.
Thermistor(LAK)
Liquid
(Ø 6.35mm)
Service Manual 93
MPS Variable SINGLE A
AUUH306C
OUTDOOR UNIT
Reversing
Valve
Refrigerant Flow
Cooling
Heating
Thermistor
Thermistor
High Pressure
S/W
Check
Valve
Check
Valve
Accumulator
Heat
Exchanger
Thermistor
Field Piping
Constant
Compressor*2
Thermistor
Gas
(Ø15.88mm)
Liquid
(Ø6.35mm)
Thermistor(LAK)
L.E.V.
AUUH368C
OUTDOOR UNIT
Reversing
Valve
Refrigerant Flow
Cooling
Heating
Thermistor
Thermistor
Check
Valve
Thermistor
High Pressure
S/W
Check
Valve
Heat
Exchanger
Accumulator
Constant
Compressor*2
Thermistor
Field Piping
Gas
(Ø15.88mm)
Liquid
(Ø6.35mm)
L.E.V.
94 Universal System Air Conditioner
Thermistor(LAK)
MPS Variable SINGLE A
OUTDOOR UNIT
AUUH488C
Refrigerant Flow
Reversing
Valve
Cooling
Heating
Thermistor
Thermistor
High Pressure
S/W
Thermistor
Check
Valve
Check
Valve
Heat
Exchanger
Accumulator
Constant
Compressor*2
Field Piping
Gas
(Ø19.05mm)
L.E.V.
Thermistor
Thermistor(LAK)
Liquid
(Ø9.52mm)
Receiver
OUTDOOR UNIT
AUUH608C
Refrigerant Flow
Reversing
Valve
Cooling
Heating
Thermistor
Thermistor
High Pressure
S/W
Thermistor
Accumulator
Heat
Exchanger
Constant
Compressor
Field Piping
Gas
(Ø19.05mm)
L.E.V.
Thermistor
Thermistor(LAK)
Liquid
(Ø9.52mm)
Receiver
Service Manual 95
MPS Variable SINGLE A
6. Electric Characteristics
Models
Power Supply
Indoor Unit Outdoor Unit Hz, Volts
ATNH126ELFC
AUUH126C
Compressor
Voltage MCA MFA
range
8.0
15
LRA
24
OFM
RLA
kW
5.7
0.026
IFM
FLA
kW
FLA
0.51
0.018
0.35
AVNH126ELAC
7.9
15
5.7
0.51
0.018
0.23
ATNH186ELFC
12.3
15
8.9
0.7
0.022
0.43
12.8
15
0.7
0.118
0.92
AVNH186BLAC
12.1
15
8.9
0.7
0.030
0.23
ATNH246FLFC
15.4
20
11.3
0.7
0.040
0.53
15.7
20
0.7
0.118
0.92
15.1
20
11.3
0.7
0.035
0.27
14.4
30
9.9+9.9
1.4
0.049
0.67
15.1
30
1.4
0.211
1.34
14.2
30
1.4
0.043
0.38
11.6
20
0.48x2
0.053
0.76
12.3
20
0.48x2
0.272
1.42
17.1
20
0.73x2
0.059
1.50
19.2
20
0.73x2
0.431
3.65
17.3
25
0.73x2
0.107
1.80
19.1
25
0.73x2
0.431
3.65
ABNH186HLAC
ABNH246HLAC
AUUH186C
AUUH246C
AVNH246BLAC
50,
220~240
ATNH306FLFC
ABNH306GLAC
AUUH306C
Min.
198V
Max.
246V
AVNH306BLAC
ATNH366DLFC
AUUH368C
ABNH366GLAC
ATNH486DLFC
AUUH488C
ABNH486RLAC
ATNH606DLFC
AUUH608C
ABNH606RLAC
33.8
62
36+36
8.9
0.067
11.3
0.067
9.9+9.9
0.067
9.9+9.9
18+18
3.95+3.95
0.047x2
3.95+3.95
42+42
5.65+5.65
0.070x2
5.65+5.65
75
11.2
0.070x2
11.2
Symbols:
MCA: Minimum Circuit Amperes (A)
MFA : Maximum Fuse Amperes(A)
The relationship between the starting time
and starting current
MSC : Maximum Starting Current Amperes(A)
OFM : Outdoor Fan Motor
kW : Fan Motor Rated Output(kW)
FLA : Full Load Amperes(A)
Starting current
RLA : Rated Load Amperes(A)
MSC
RLA
Starting time
Note :
1. Voltage Range
Units are suitable for use on electrical system where voltage supplied to unit terminals is not below
or above listed range limits.
2. Maximum allowable voltage unbalance between phase is 2%.
3. Select wire size based on the MCA
4. MFA is used to select the circuit breaker and ground fault circuit interrupter(each leakage circuit breaker).
5. RLA is based on the following conditions.
Indoor temperature : 27 DB / 19.0 WB
Outdoor temperature : 35 DB
96 Universal System Air Conditioner
MPS Variable SINGLE A
7. Operation Range
Inlet air temperature
(Cooling)
Range
Outdoor air temperature °C D.B.(°F)
Item
46(114.8)
Standard operation
-10(14)
14(57.2)
24(75.2)
Inlet air temperature
(Heating)
Outdoor air temperature °C W.B.(°F)
Indoor air temperature °C W.B.(°F)
15.5(59.9)
Standard operation
-10(14)
14(57.2)
28(82.4)
Indoor air temperature °C D.B.(°F)
Power source voltage
Rating ±10%
Voltage at starting
Min. 85% of rating
Service Manual 97
MPS Variable SINGLE A
8. Installation
8.1 Selection of the best location
• If a roof is built over the unit to prevent direct sunlight or rain exposure, make sure that heat radiation from the
condenser is not restricted.
• Do not place animals and plants in the path of the warm air.
• Take the air conditioner weight into account and select a place where noise and vibration are minimum.
• Select a place so that the warm air and noise from the air conditioner do not disturb neighbors.
• Rooftop Installations : If the outdoor unit is installed on a roof structure, be sure to level the unit. Ensure the
roof structure and anchoring method are adequate for the unit location. Consult local codes regarding rooftop
mounting.
Model : AUUH12-306B, AUUH36-608B
• Ensure that the space around the back is more than 30cm and sides is more than 30cm. The front of the unit
should have more than 70cm of space.
More than
30cm
Fe
ob nce
sta or
cle
s
Su
nro
More than
30cm
of
More than
30cm
More than 50cm
Su
nro
More than 50cm
(Service space)
of
More than
30cm
Fe
ob nce
sta or
cle
s
More than 70cm
More than 50cm
More than 70cm
8.2 Settlement of outdoor unit
• Anchor the outdoor unit with a bolt and nut(ø10mm)
tightly and horizontally on a concrete or rigid mount.
• When installing on the wall, roof or rooftop, anchor the
mounting base securely with a nail or wire assuming the
influence of wind and earthquake.
• In the case when the vibration of the unit is conveyed to
the hose, secure the unit with an anti-vibration rubber.
98 Universal System Air Conditioner
Bolt
Tubing connection
MPS Variable SINGLE A
8.3 Piping length and the elevation
Pipe Size
(Diameter:Ø)
Capacity
Gas
Liquid
Length
(m)
Elevation
(m)
Standard
Max.
Standard
Max.
*Additional
refrigerant(g/m)
12k Btu/h
3/8"
1/4"
(9.52mm) (6.35mm)
7.5
15
5
5
20
18k Btu/h
1/2"
1/4"
(12.7mm) (6.35mm)
7.5
50
5
30
35
24k Btu/h
1/2"
1/4"
(12.7mm) (6.35mm)
7.5
50
5
30
35
30k Btu/h
5/8"
1/4"
(15.88mm) (6.35mm)
7.5
50
5
30
35
36k Btu/h
5/8"
1/4"
(15.88mm) (6.35mm)
7.5
50
5
30
40
48k Btu/h
3/4"
3/8"
(19.05mm) (9.52mm)
7.5
50
5
30
75
(Chargeless 30m)
60k Btu/h
3/4"
3/8"
(19.05mm) (9.52mm)
7.5
50
5
30
80
(Chargeless 30m)
❈ Extra refrigerant = (Extended length - Rated length) x Additional refrigerant.
Outdoor unit
Indoor unit
A
B
A
Outdoor unit
Outdoor unit
Oil trap
A
B
Indoor unit
B
Indoor unit
CAUTION
• Capacity is based on standard length and maximum allowance length is on the basis of reliability.
• Improper refrigerant charge may result in abnormal cycle.
• Oil trap should be installed every 10 meters.
8.4 Refrigerant Additional Charging Method
(Except: AUUH126C / 186C / 246C / 306C / 368C)
There is not additional charging of refrigerant by main pipe of 30m below.
For additional charging method, see below table.
* Example(AUUH608C)
Single
Refrigerant=(L1-30)*0.08
*(L1=Main Pipe)
Service Manual 99
MPS Variable SINGLE A
8.5 Wiring Connection
1. All wiring must comply with LOCAL REGULATIONS.
2. Select a power source that is capable of supplying the current as required by the air conditioner.
3. Feed the power source to the unit via a distribution switch board designed for this purpose.
4. The terminal screws inside the control box may be loose due to vibration during transport.
Check the screws for loose connection.
(Running the air conditioner with loose connection can overload and damage electrical components.)
5. Always ground the air conditioner with a grounding wire and connector to meet the LOCAL REGULATION.
1Phase
Heat Pump Model.
Terminals on the indoor unit
Terminals on the outdoor unit
1(L) 2(N)
1(L) 2(N)
3
4
5
1(L) 2(N)
3
4
5
POWER
INPUT
3Phase
Heat Pump Model.
R
S
T
N
Power
Input
1(L) 2(N)
3
1(L) 2(N)
3
Terminal Block
(Outdoor Unit)
4
5
Terminal Block
(Indoor Unit)
CAUTION
The power cord connected to the outdoor unit should be
complied with the following specifications (Rubber
insulation, type H05RN-F approved by HAR or SAA).
The connecting cable connected to the indoor and outdoor
unit should be complied with the following specifications
(Rubber insulation, type H05RN-F approved by HAR or SAA).
NORMAL CROSS-SECTIONAL AREA
GN
/YL
20
mm
Capacity
12k BTU/h
18k BTU/h
24k BTU/h
30k BTU/h
36k BTU/h
48k BTU/h
60k BTU/h
1 Phase
1.0mm
2.5mm
2.5mm
2.5mm
-
3 Phase
2.5mm2
3.0mm2
3.0mm2
NORMAL
CROSS-SECTIONAL
AREA 0.75mm2 (12k/18k/24k/30k)
AREA 1.25mm2 (36k/48k60k)
GN
/YL
20
mm
If the supply cord is damaged, it must be replaced by a special cord or assembly available from the manufacturer of its service agent.
WARNING:
Make sure that the screws of the terminal are free from looseness.
100 Universal System Air Conditioner
Troubleshooting Guide
III. Troubleshooting Guide
Self-diagnosis Function ...............................................................................102
Electronic Parts Troubleshooting Guide ....................................................103
Service Manual 101
Troubleshooting Guide
Self-diagnosis Function
■ Error Indicator
The function is to self-diagnoisis airconditioner and express the troubles identifically if there is any trouble.
If more than two troubles occur simultaneously, primarily the highest trouble fo error code is expressed.
After error occurrence, if error is released, error LED is also released simultaneously.
Having or not of error code is different from Model.
■ ERROR display
• Error display method is classified depending on method and frequencies of flickering as example:
ex) ERROR CODE = 45
Number of "10" cipher "4"= Flickers lengthily 4 times.
Number of "1" cipher "5"= Flickers shortly 5 times.
■ Type and code of indoor unit error
[ERROR CODE]
No Error .......................................................................................................................................................01
Indoor Room themistor error .......................................................................................................................01
Indoor in-piping sensor error .......................................................................................................................02
Remote controller error................................................................................................................................03
Drain Pump error .........................................................................................................................................04
Communcation error between in and out ....................................................................................................05
Indoor Out-Piping sensor error ....................................................................................................................06
Differnt mode operation ...............................................................................................................................07
■ Type and code of outdoor unit error
[ERROR CODE]
Outdoor unit, outdoor temperature Thermister open/short .........................................................................44
Outdoor unit pipe temperature Thermister open/short ...............................................................................45
Excess of capacity (inconsistency with option capacity setup in outdoor unit)............................................51
Communication between indoor unit and outdoor unit in-available ..............................................................5
D-Pipe Temperature High
...............................................................................................33
D-Pipe thermister open/short ......................................................................................................................47
Outdoor unit suction temperature Thermister open/short ...........................................................................48
■ Countermeasure of error occurred
1) For error as described in above item
~
Transmits error code to the indoor unit.
,
): Stops operation of the outdoor unit
2) For error as described in above item 4): Transmits error code to the indoor unit
• For thermister error, error terminates after powering off.
• Excess of capacity (Where capacity of the outdoor unit differs from capacity of the indoor unit Error display)
3) Error of the discharge temperature sensor is processed in following method:
For sensor open process, check 4 minutes after COMP operation and 10 minutes after power application.
For short process, check and process from the time when power is applied.
102 Universal System Air Conditioner
Electronic Parts Troubleshooting Guide
Troubleshooting Guide
Electronic Parts Troubleshooting Guide
1. The Outdoor Unit does not operate at all
NO
Does the Operating LED of indoor unit blink
when Operation’s ON?
Refer to the self-diagnosis function.
NO
NO
Is the Connection between CN-Power of indoor
unit and terminal block?
Check the connecting state of connector
YES
NO
Is the connection of cable between indoor and
outdoor unit ringht?
Indoor
1(L)
2(N)
Outdoor
1(L)
2(N)
3
3
YES
NO
00
Is the voltage of CN-POWER
in outdoor
PCB Ass’y about AC220V / 240V?
No Error
Check the main power
ON
01
YES error
Indoor Room themistor
1time
OFF
02
Indoor in-piping sensor error
2times
OFF
03
Remote controller error
3times
OFF
04
4times
OFF
05
Drain Pump
errorof outdoor PCB Ass’y.
Check
the Fuse
Chek
the
connecting
state ofinwires
Communcation error between
and out
5times
OFF
06
Indoor Out-Piping sensor
error
NO
6times
OFF
07
Differnt mode operation
7times
OFF
Replace the PCB Ass’y.
* MPS units start at three minutes after main power turning on.
Service Manual 103
Electronic Control Device
Electronic Parts Troubleshooting Guide
2. The product is not operate with the remote controller.
Turn on Main Power
While the compressor has been stopped, the compressor does not
operate owing to the delaying function for 3 minutes after stopped.
When the compressor stopped Indoor Fan is driven by a low speed.
At this point the wind speed is not controlled by the remote controller.
(When operated in the Sleeping Mode, the wind speed is set to the
low speed by force.)
Caused by the remote controller
When the mark(
battery.
) is displayed in LCD screen, replace
Caused by other parts except the remote controller
Check the contact of CN-DISP1 connector.
When the detect switch(double key) inside the remote
controller door is fault, it is impossible to operate
temperature regulating( / ) and wind speed selecting.
Check DISP PWB Ass'y
- Voltage between CN DISP1
Replace remote controller
Check point
-
: DC +5V
• Check the connecting circuit between PIN
R01L(1K) - C01L(680PF) - MICOM PIN
• Check Receiver Ass'y
104 Universal System Air Conditioner
-
Electronic Parts Troubleshooting Guide
Electronic Control Device
3. When cooling does not operate
Turn on Main Power
Operate "Cooling Mode( )" by setting the desired temperature of the
remote controller is less than one of the indoor temperature by 1°C at least.
When in Air Circulation Mode, Compressor/Outdoor Fan is stopped.
Check the sensor for indoor temperature is attached as close as to be
effected by the temperature of Heat Exchanger(EVA).
When the sensor circuit for indoor temperature and connector are in bad
connection or are not engaged, Compressor/Outdoor Fan is stopped.
• Check the indoor temperature sensor is disconnected or not(About 10kΩ / at 25°C).
Check Relay(RY - COMP) for driving compressor.
• When the power(About AC220V/240V) is applied to the connecting wire
terminal support transferred to compressor, PWB Ass'y is normal.
• Check the circuit related to the relay.
Check point
Between two pin of DC
part in relay for COMP
COMP ON
COMP OFF
Below DC 1V
(app)
About DC12V
Service Manual 105
Electronic Control Device
Electronic Parts Troubleshooting Guide
4. When Heating does not operate
Turn ON Main Power
Operate “Heating Mode( )” by setting the desired temperature of the
remote control is higher than one of the indoor temperature by 2°C at
least.
In heating Mode, the indoor fan operates in case the pipe temperature
is higher than 28°C.
Check the connector of intake and pipe sensor(thermistors)
• Check the indoor room temperature is disconnected or not (about
10KΩ/at 25°C).
• Check the indoor pipe temperature is disconnected or not (about
5KΩ/at 25°C).
Check the DC voltage on the PWB ASS’Y
• The details of check are as followings
• Comp Relay.
Check point
• 4-Way Relay
Comp ON
Between two pin
of DC part in relay Below DC 1V
for COMP.
Comp OFF
About DC
12V
Check point
4-Way OFF
Between two pin
of DC part in relay Below DC 1V About DC 12V
for 4-way.
Check Outdoor Unit
106 Universal System Air Conditioner
4-Way ON
Electronic Parts Troubleshooting Guide
Electronic Control Device
5. When indoor Fan does not operate
Turn off Main power
Check the connection of CN-FAN or CN-MOTOR
Check the Fan Motor
Check the Fuse(AC250V/T2A)
Check the related circuit of indoor Fan Motor.
• The pin of Micom, and the part for driving SSR
• Check the pattern
• Check the SSR
- SSR Open: Indoor Fan Motor never operate
- SSR short: Indoor Fan Motor always operates in case of ON or OFF.
Turn ON Main Power
Check the SSR high speed operation by remote control.
(The Indoor Fan Motor is connected)
The voltage of PIN NO 1(blue) and 3(yellow) of CN-FAN or CN-MOTOR.
About AC 160V over
About AC 50V over
SSR is not damaged
SSR Check
Service Manual 107
Electronic Control Device
Electronic Parts Troubleshooting Guide
6. When Vertical Louver does not operate
• Confirm that the Vertical Louver is normally geared with the shaft of
Stepping Motor.
• If the regular torque is detected when rotating the Vertical Louver with
hands
Normal
• Check the connecting condition of CN-U/D Connector
• Check the soldering condition(on PWB) of CN-U/D Connector
Check the operating circuit of the Vertical Louver
• Confirm that there is DC +12V between pin
GND.
(RED) of CN-U/D and
If there are no problems after above checks
• Confirm the assembly conditions that are catching and interfering parts
in the rotation radial of the Vertical Louver
108 Universal System Air Conditioner
Electronic Control Device
IV. Electronic Control Device
Ceiling Cacsette Type...................................................................................110
Ceiling Duct Type..........................................................................................111
Celing & Floor ...............................................................................................113
Service Manual 109
Electronic Control Device
Ceiling Cassette Type
Main P.C.B ASM
110 Universal System Air Conditioner
Electronic Control Device
Ceiling Duct Type
(BH Series)
Service Manual 111
Electronic Control Device
(BG/BR Series)
112 Universal System Air Conditioner
Electronic Control Device
Ceiling & Floor
(VE Series)
AC
C
DC
Service Manual 113
Electronic Control Device
(VB/VK/VL Series)
114 Universal System Air Conditioner
Electronic Control Device
V. Schematic Diagram
Ceiling Cacsette Type...................................................................................116
Ceiling Duct Type..........................................................................................117
Celing & Floor ...............................................................................................118
Service Manual 115
Electronic Control Device
Ceiling Cassette Type
116 Universal System Air Conditioner
Schematic Diagram
Schematic Diagram
Electronic Control Device
Ceiling Duct Type
Service Manual 117
Electronic Control Device
Ceiling & Floor
118 Universal System Air Conditioner
Schematic Diagram
VI. Exploded View &
Replacement Parts List
Indoor Unit ..................................................................................................120
Outdoor Unit .................................................................................................139
Panel Assembly, Front .................................................................................153
Service Manual 119
Exploded View & Replacement Parts List
Indoor Unit
Ceiling Cassette Type
ATNH-EL
266090
249951
268714
263230-1
159830
354211
352118
35211A
263230-2
263230-3
330870
158591
266012
120 Universal System Air Conditioner
Exploded View & Replacement Parts List
130411
W0CZZ
346811
359011
130911-2
130911-1
267110-1
267110-2
Service Manual 121
Exploded View & Replacement Parts List
ATNH-FL
349490
266090
249951
268714
354211-2
354211-1
263230-1
159830
263230-2
263230-3
158591
330870
122 Universal System Air Conditioner
352118-2
552111
352118-1
266012
Exploded View & Replacement Parts List
130411
W0CZZ
346810
359012
130911-2
130911-1
267110-1
267110-2
Service Manual 123
Exploded View & Replacement Parts List
ATNH-DL
349490
249951
266090
268714
159830
263230-1
354211-2
130411
354211-1
263230-2
263230-3
552111
352118-1
330870
158591
124 Universal System Air Conditioner
266012
Exploded View & Replacement Parts List
130411
W0CZZ
346810
359012
130911-2
130911-1
267110-1
267110-2
352150-2
Service Manual 125
Exploded View & Replacement Parts List
Parts List
Part No.
LOCATION
No.
SVC CODE
DESCRIPTION
ATNH126ELFC
ATNH186ELFC
3041A10013A
3041A10013A
R
130911-1 CABINET ASSEMBLY, INDOOR
3091A10023C
3091A10023C
R
130911-2 CABINET ASSEMBLY, INDOOR
3091A10023D
3091A10023D
R
130411
BASE ASSEMBLY, WELD(INDOOR)
158591
PUMP ASSEMBLY, WATER
5859A20001R
5859A20001R
R
159830
FILTER ASSEMBLY, AIR
5983A10002A
5983A10002A
R
249951
CASE ASSEMBLY, CONTROL
4995A14001P
4995A14001Z
R
266012
SWITCH ASSEMBLY, FLOAT
6601A20001M
6601A20001M
R
266090
H.V ASSEMBLY
6609A20005C
6609A20005C
R
267110-1 REMOTE CONTROLLER ASSEMBLY
6711A20096H
6711A20096H
R
267110-2 REMOTE CONTROLLER ASSEMBLY
6711A90076J
6711A90076J
R
330870
PAN ASSEMBLY, DRAIN
3087A10002A
3087A10002A
R
346811
MOTOR ASSEMBLY, AC
4681AC2026E
4681AC2026C
R
35211A
TUBE ASSEMBLY, SUCTION INDOOR
5211A20243M
5211A20243N
R
354211
EVAPORATOR ASSEMBLY, BENDING
5421A10006A
5421A10006A
R
359011
FAN, TURBO
5900A10004A
5900A10004A
R
352118
TUBE ASSEMBLY, MENIFOLD(INDOOR)
5211A20241S
5211A20241R
R
W0CZZ
CAPACITOR, FILM, BOX
3H00660N
3H00660N
R
268714
PWB(PCB) ASSEMBLY, MAIN
6871A10370C
6871A10370D
R
263230-1 THERMISTOR ASSEMBLY
6323A10002A
6323A10002A
R
263230-2 THERMISTOR ASSEMBLY
6323AQ3226F
6323AQ3226F
R
263230-3 THERMISTOR ASSEMBLY
6323AQ3226T
6323AQ3226T
R
126 Universal System Air Conditioner
Exploded View & Replacement Parts List
Part No.
LOCATION
No.
SVC CODE
DESCRIPTION
ATNH246FLFC
ATNH306FLFC
3041A10030B
3041A10030B
R
130911-1 CABINET ASSEMBLY, INDOOR
3091A10051C
3091A10051C
R
130911-2 CABINET ASSEMBLY, INDOOR
3091A10051D
3091A10051D
R
130411
BASE ASSEMBLY, WELD(INDOOR)
158591
PUMP ASSEMBLY, WATER
5859A20001S
5859A20001S
R
159830
FILTER ASSEMBLY, AIR
5983A10002A
5983A10002A
R
249951
CASE ASSEMBLY, CONTROL
4995A10131K
4995A10131J
R
266012
SWITCH ASSEMBLY, FLOAT
6601A20001N
6601A20001N
R
266090
H.V ASSEMBLY
6609A20005E
6609A20005E
R
267110-1 REMOTE CONTROLLER ASSEMBLY
6711A20096H
6711A20096H
R
267110-2 REMOTE CONTROLLER ASSEMBLY
6711A90076J
6711A90076J
R
268714
PWB(PCB) ASSEMBLY, MAIN
6871A10370E
6871A10370F
R
330870
PAN ASSEMBLY, DRAIN
3087A10010B
3087A10010B
R
346810
MOTOR AC
4681A20051Z
4681A20051W
R
349490
ORIFICE ASSEMBLY
4949A10007B
4949A10007B
R
352118-1 TUBE ASSEMBLY, MENIFOLD(INDOOR)
5211A20251Q
5211A20251U
R
352118-2 TUBE ASSEMBLY, MENIFOLD(INDOOR)
5211A20251K
5211A20251K
R
354211-1 EVAPORATOR ASSEMBLY, BENDING
5421A10016G
5421A10016G
R
354211-2 EVAPORATOR ASSEMBLY, BENDING
5421A10016H
5421A10016H
R
359012
FAN, TURBO
5901A10036A
5901A10036A
R
552111
TUBE ASSEMBLY, CAPILLARY
5211A21137C
5211A21137C
R
W0CZZ
CAPACITOR, FILM, BOX
3H00660M
3H00660M
R
263230-1 THERMISTOR ASSEMBLY
6323A10002A
6323A10002A
R
263230-2 THERMISTOR ASSEMBLY
6323AQ3226Y
6323AQ3226Y
R
263230-3 THERMISTOR ASSEMBLY
6323AQ3226E
6323AQ3226E
R
Service Manual 127
Exploded View & Replacement Parts List
Parts List
Part No.
LOCA
TION No.
SVC CODE
DESCRIPTION
ATNH366DLFC
ATNH486DLFC
ATNH606DLFC
3041A10016A
3041A10016A
3041A10016A
R
130911-1 CABINET ASSEMBLY, INDOOR
3091A20035A
3091A20035A
3091A20035A
R
130911-2 CABINET ASSEMBLY, INDOOR
3091A20035B
3091A20035B
3091A20035B
R
130411
BASE ASSEMBLY, WELD(INDOOR)
158591
PUMP ASSEMBLY, WATER
5859A20001T
5859A20001T
5859A20001T
R
266012
SWITCH ASSEMBLY, FLOAT
6601A20001P
6601A20001P
6601A20001P
R
159830
FILTER ASSEMBLY, AIR
5983A10003D
5983A10003D
5983A10003D
R
249951
CASE ASSEMBLY, CONTROL
4995A22010L
ABQ30092301
ABQ30092302
R
266090
H.V ASSEMBLY
6609A20005H
6609A20005H
6609A20005H
R
267110-1 REMOTE CONTROLLER ASSEMBLY
6711A20096H
6711A20096H
6711A20096H
R
267110-2 REMOTE CONTROLLER ASSEMBLY
6711A90076J
6711A90076J
6711A90076J
R
330870
PAN ASSEMBLY, DRAIN
3087A10006A
3087A10006A
3087A10006A
R
346810
MOTOR AC
4681A20006Z
4681A20006H
4681A20006M
R
354211-1 EVAPORATOR ASSEMBLY, BENDING
5421A10016A
5421A10016A
5421A10016A
R
354211-2 EVAPORATOR ASSEMBLY, BENDING
5421A10016B
5421A10016B
5421A10016B
R
5211A20316S
5211A20316R
5211A20316R
R
352118-1 TUBE ASSEMBLY, MENIFOLD(INDOOR)
5211A20251R
5211A20251A
5211A20251A
R
352118-2 TUBE ASSEMBLY, MENIFOLD(INDOOR)
5211A20251B
5211A20251B
5211A20251B
R
5900A10003B
5900A10003B
5900A10003B
R
3H00660N
2A00986D
2A00986D
R
6871A10370G
6871A10370H
6871A10370J
R
352150-2 ELBOW
5212A20004A
5212A20004A
5212A20004A
R
263230-1 THERMISTOR ASSEMBLY
6323A10002B
6323A10002B
6323A10002B
R
263230-2 THERMISTOR ASSEMBLY
6323A30002A
6323A30002A
6323A30002A
R
263230-3 THERMISTOR ASSEMBLY
6323AQ3226T
6323AQ3226T
6323AQ3226T
R
552111
TUBE ASSEMBLY, CAPILLARY
359012
FAN, TURBO
W0CZZ
CAPACITOR, FILM, BOX
268714
PWB(PCB) ASSEMBLY, MAIN
128 Universal System Air Conditioner
Exploded View & Replacement Parts List
Ceiling Concealed Duct Type
ABNH-HL, ABNH-GL
336610-1
359012-1
346810
359012-2
336610-1
336610-2
W0CZZ
263230-3
267110-1
263230-2
354210
263230-1
249951
268714
267110-1
152302
552111
352118
330870
Service Manual 129
330870
354210
336610-1
359012-1
130 Universal System Air Conditioner
268714
263230-1
W0CZZ
346810
336610-2
249951
263230-3
263230-2
359012-2
152302
267110-1
Exploded View & Replacement Parts List
ABNH-RL
Exploded View & Replacement Parts List
Parts List
Part No.
LOCATION
No.
SVC CODE
DESCRIPTION
ABNH186HLAC
ABNH246HLAC
336610-1 HOUSING(MECH),WRAPPER
3660A20017A
3660A20017A
R
336610-2 HOUSING(MECH),WRAPPER
3660A20018A
3660A20018A
R
4681A10013C
4681A10013C
R
359012-1 FAN ASSEMBLY,BLOWER
5901A10026A
5901A10026A
R
359012-2 FAN ASSEMBLY,BLOWER
5901A10028B
5901A10028B
R
2A00986D
2A00986D
R
346810
MOTOR ASSEMBLY, AC
W0CZZ
CAPACITOR, FILM, BOX
354210
EVAPORATOR ASSEMBLY, FIRST
5421A20100A
5421A20100B
R
352118
TUBE ASSEMBLY, MENIFOLD(INDOOR)
5211A20465G
5211A20465G
R
552111
TUBE ASSEMBLY, CAPILLARY
5211A20466M
5211A20466N
R
330870
DRAIN PAN ASSEMBLY
3087A10008B
3087A10008B
R
249951
CASE ASSEMBLY, CONTROL
4995A14002S
4995A14002V
R
268714
PWB(PCB) ASSEMBLY, MAIN
6871A00089C
6871A00089D
R
6711A10008D
6711A10008D
R
5230A30001M
5230A30001M
R
263230-1 THERMISTOR ASSEMBLY
6323AQ3226G
6323AQ3226G
R
263230-2 THERMISTOR ASSEMBLY
6323AQ3226V
6323AQ3226V
R
263230-3 THERMISTOR ASSEMBLY
6323A30004D
6323A30004D
R
267110-1 REMOTE CONTROLLER ASSEMBLY
152302
FILTER(MECH),A/C
Service Manual 131
Exploded View & Replacement Parts List
Part No.
LOCATION
No.
SVC CODE
DESCRIPTION
ABNH306GLAC
ABNH366GLAC
336610-1 HOUSING(MECH),WRAPPER
3660A20019A
3660A20019A
R
336610-2 HOUSING(MECH),WRAPPER
3660A20020A
3660A20020A
R
4681A10013J
4681A10013A
R
359012-1 FAN ASSEMBLY,BLOWER
5901A10026A
5901A10026A
R
359012-2 FAN ASSEMBLY,BLOWER
5901A10026A
5901A10026A
R
2A00986D
2A00986D
R
346810
MOTOR ASSEMBLY, AC
W0CZZ
CAPACITOR, FILM, BOX
354210
EVAPORATOR ASSEMBLY, FIRST
5421A10027A
5421A10027A
R
552111
TUBE ASSEMBLY, DISTRIBUTOR
5211A20693E
5211A20693E
R
352118
TUBE ASSEMBLY, MENIFOLD(INDOOR)
5211A20416J
5211A20416J
R
330870
DRAIN PAN ASSEMBLY
3087A10008A
3087A10008A
R
249951
CASE ASSEMBLY, CONTROL
4995A14002T
4995A14002U
R
268714
PWB(PCB) ASSEMBLY, MAIN
6871A00090B
6871A00090C
R
6711A10008D
6711A10008D
R
5230A30001L
5230A30001L
R
263230-1 THERMISTOR ASSEMBLY
6323AQ3226G
6323AQ3226G
R
263230-2 THERMISTOR ASSEMBLY
6323AQ3226V
6323AQ3226V
R
263230-3 THERMISTOR ASSEMBLY
6323A30004D
6323A30004D
R
267110-1 REMOTE CONTROLLER ASSEMBLY
152302
FILTER(MECH),A/C
132 Universal System Air Conditioner
Exploded View & Replacement Parts List
Part No.
LOCATION
No.
SVC CODE
DESCRIPTION
ABNH486RLAC
ABNH606RLAC
336610-1 HOUSING(MECH),WRAPPER
3660A20044A
3660A20044A
R
336610-2 HOUSING(MECH),WRAPPER
3660A20045A
3660A20045A
R
4681A10032A
4681A10032A
R
359012-1 FAN ASSEMBLY,BLOWER
5901A10051A
5901A10051A
R
359012-2 FAN ASSEMBLY,BLOWER
5901A10051A
5901A10051A
R
346810
MOTOR ASSEMBLY, AC
W0CZZ
CAPACITOR, FILM, BOX
0CZZA20001B
0CZZA20001B
R
354210
EVAPORATOR ASSEMBLY, FIRST
5421A20212B
5421A20210B
R
552111
TUBE ASSEMBLY, DISTRIBUTOR
5211A21416A
5211A21417A
R
352118
TUBE ASSEMBLY, MENIFOLD(INDOOR)
5211A21333B
5211A21334B
R
330870
DRAIN PAN ASSEMBLY
3087A20025A
3087A20025A
R
249951
CASE ASSEMBLY, CONTROL
4995A14002W
4995A14002X
R
268714
PWB(PCB) ASSEMBLY, MAIN
6871A00090D
6871A00090E
R
6711A10008D
6711A10008D
R
5230A30017A
5230A30017A
R
263230-1 THERMISTOR ASSEMBLY
6323AQ3226G
6323AQ3226G
R
263230-2 THERMISTOR ASSEMBLY
6323AQ3226V
6323AQ3226V
R
263230-3 THERMISTOR ASSEMBLY
6323A30004D
6323A30004D
R
267110-1 REMOTE CONTROLLER ASSEMBLY
152302
FILTER(MECH),A/C
Service Manual 133
Exploded View & Replacement Parts List
Ceiling & Floor Type
AVNH-EL
137211
135310
268712
147581
152302
135313
146811
733010
131410
267110
W0CZZ
330870
266000
135500
346810
131410
354212
35211B
263230-1
268715
352150
268716
263230-2
W4810
359011
342800
330780
134 Universal System Air Conditioner
266000
249951
267110
135314
137213
352150
146811
235450
237900
268712
152302
330870
354210
346810
359011
W0CZZ
268714
266000-1
249951
352115
342800
35211A
263230-1
266000-2
263230-2
263230-3
130911
Exploded View & Replacement Parts List
AVNH-BL
Service Manual 135
Exploded View & Replacement Parts List
Parts List
Part No.
LOCATION
No.
SVC CODE
DESCRIPTION
AVNH126ELAC
137211
PANEL ASSEMBLY,FRONT(INDOOR)
3721A10092A
R
146811
MOTOR ASSEMBLY, STEP
4681A20055A
R
147581
LOUVER,HORIZONTAL
4758A10006A
R
152302
FILTER ASSEMBLY, AIR CLEANER
5230A10009A
R
249951
CASE ASSEMBLY, CONTROL
4995A20356H
R
266000
SWITCH,PUSH BUTTON
6600AP2059B
R
267110
REMOTE CONTROLLER ASSEMBLY
6711A20096K
R
268712
PWB(PCB) ASSEMBLY, DISPLAY
6871A20390D
R
268715
PWB(PCB) ASSEMBLY, MAIN(AC)
6871A20359B
R
268716
PWB(PCB) ASSEMBLY, MAIN(DC)
6871A20358H
R
330780
HOUSING
3078A20001A
R
330870
DRAIN PAN ASSEMBLY
3087A10018A
R
342800
BEARING
4280A20004A
R
346810
MOTOR ASSEMBLY, AC
4681A20131A
R
35211B
TUBE ASSEMBLY, TUBING
5211A21217B
R
352115
TUBE ASSEMBLY, EVAPORATOR IN
5211A25012B
R
352116
TUBE ASSEMBLY, EVAPORATOR OUT
5211A22007B
R
352150
HOSE ASSEMBLY,DRAIN
5251AR2575Q
R
354212
EVAPORATOR ASSEMBLY,FINAL
5421A10044B
R
359011
FAN ASSEMBLY,CROSS FLOW
5901A20008E
R
733010
PLATE ASSEMBLY,INSTALL
3301A10002A
R
W0CZZ
CAPACITOR, FILM, BOX
3H00671A
R
W4810
BRACKET
4810A21019A
R
131410
CHASSIS ASSEMBLY
3141A10009A
R
135500
COVER
3550A30201A
R
135310
GRILLE ASSEMBLY,DIFFUSER(INDOOR)
3531A10248A
R
135313
GRILLE ASSEMBLY,INLET
3531A10247A
R
263230-1 THERMISTOR ASSEMBLY
6323A20004T
R
263230-2 THERMISTOR ASSEMBLY
6323AQ3226V
R
136 Universal System Air Conditioner
Exploded View & Replacement Parts List
Part No.
LOCATION
No.
SVC CODE
DESCRIPTION
AVNH186BLAC
AVNH246BLAC
AVNH306BLAC
135314
GRILLE ASSEMBLY,INLET SUB
5237AP2817B
5237AP2817B
5237AP2817B
R
137211
PANEL ASSEMBLY,FRONT(INDOOR)
3720AP2767P
3720AP2767P
3720AP2767P
R
146811
MOTOR ASSEMBLY, STEP
4681A20055A
4681A20055A
4681A20055A
R
152302
FILTER ASSEMBLY, AIR CLEANER
5230AP7093A
5230AP7093A
5230AP7093A
R
266000-1 SWITCH,PUSH BUTTON
6600AP2059A
6600AP2059A
6600AP2059A
R
266000-2 SWITCH,PUSH BUTTON
6600AP2059A
6600AP2059A
6600AP2059A
R
235450
DISPLAY ASSEMBLY
3545AP7224E
3545AP7224E
3545AP7224E
R
237900
WINDOW, DISPLAY
3790AP7080A
3790AP7080A
3790AP7080A
R
267110
REMOTE CONTROLLER ASSEMBLY
6711A20096K
6711A20096K
6711A20096K
R
268712
PWB(PCB) ASSEMBLY, DISPLAY
6871AQ3263B
6871AQ3263B
6871AQ3263B
R
268714
PWB(PCB) ASSEMBLY, MAIN
6871A10186B
6871A10186C
6871A10186D
R
330870
DRAIN PAN ASSEMBLY
3087AP7233A
3087AP7233A
3087AP7233A
R
342800
BEARING
3H02821B
3H02821B
3H02821B
R
346810
MOTOR ASSEMBLY, AC
4681AP2306M
4681AP2306N
4681AP2306P
R
352115
TUBE ASSEMBLY, EVAPORATOR IN
5211AP2810Q
5211AP2810R
5211AP2810R
R
35211A
TUBE ASSEMBLY, SUCTION INDOOR
5211AP2813G
5211AP2813H
5211AP2813J
R
354210
EVAPORATOR ASSEMBLY,FIRST
5421AP2812B
5421AP2812A
5421AP2812A
R
359011
FAN ASSEMBLY,CROSS FLOW
5901AR2351E
5901AR2351E
5901AR2351E
R
352150
HOSE ASSEMBLY,DRAIN
5251AP2460B
5251AP2460B
5251AP2460B
R
W0CZZ
CAPACITOR, FILM, BOX
3H00671A
3H00671A
3H00671A
R
130911
CABINET ASSEMBLY,INDOOR
3091AP2533A
3091AP2533A
3091AP2533A
R
249951
CASE ASSEMBLY, CONTROL
4995A10172D
4995A10172E
4995A10172F
R
263230-1 THERMISTOR ASSEMBLY
6323A30002C
6323A30002C
6323A30002C
R
263230-2 THERMISTOR ASSEMBLY
6323AQ3226V
6323AQ3226V
6323AQ3226V
R
263230-3 THERMISTOR ASSEMBLY
6323A30004D
6323A30004D
6323A30004D
R
Service Manual 137
Exploded View & Replacement Parts List
Part No.
LOCATION
No.
SVC CODE
DESCRIPTION
AVNH366KLAC
AVNH486LLAC
AVNH606LLAC
135303
GRILLE, INLET
3530A10256A
3530A10256A
3530A10256A
R
135312
GRILLE ASSEMBLY. DIFFUSER
3531A10306B
3531A10306D
3531A10306A
R
135515-1 COVER ASSEMBLY, TOP(INDOOR)
3551A20179A
3551A20179A
3551A20179A
R
135515-2 COVER ASSEMBLY, TOP(INDOOR)
3551A20179B
3551A20179C
3551A20179C
R
137211
PANEL ASSEMBLY,FRONT(INDOOR)
3721A10143B
3721A10143A
3721A10143A
R
146811
MOTOR ASSEMBLY, STEP
4681AP2968L
4681AP2968L
4681AP2968L
R
152312
FILTER ASSEMBLY, AIR CLEANER
5231A10016A
5231A10016A
5231A10016A
R
159901-1 LOUVER, HORIZONTAL
5990A10023A
5990A10026A
5990A10026A
R
159901-2 LOUVER, HORIZONTAL
-
5990A10026B
5990A10026B
R
237202
PANEL FRONT
3720A11009D
3720A11009B
3720A11009B
R
249310
HOLDER ASSEMBLY
4931A20022A
4931A20022A
4931A20022A
R
249951
CASE ASSEMBLY, CONTROL
4995A10159U
4995A10159S
4995A10159T
R
263230-1 THERMISTOR ASSEMBLY
6323A30004A
6323A30004A
6323A30004A
R
263230-2 THERMISTOR ASSEMBLY
6323AQ3226G
6323AQ3226G
6323AQ3226G
R
263230-3 THERMISTOR ASSEMBLY
6323AQ3226W
6323AQ3226W
6323AQ3226W
R
267110
REMOTE CONTROLLER ASSEMBLY
6711A20096K
6711A20096K
6711A20096K
R
268712
PWB(PCB) ASSEMBLY, DISPLAY
6871A20096B
6871A20096B
6871A20096B
R
268714
PWB(PCB) ASSEMBLY, MAIN
6871A10186E
6871A10186F
6871A10186G
R
330860
PAN ASSEMBLY, DRAIN
3087A10025B
3087A10025A
3087A10025A
R
336610-1 HOUSING(MECH),WRAPPER
3660A20047A
3660A20047A
3660A20047A
R
336610-2 HOUSING(MECH),WRAPPER
3660A20048A
3660A20048A
3660A20048A
R
346810
MOTOR ASSEMBLY, AC
4681A20158D
4681A20158E
4681A20158C
4681A20158C
R
354212
EVAPORATOR ASSEMBLY,FINAL
5421A20226B
5421A20226E
5421A20226E
R
359012
FAN, BLOWER
5900A20052A
5900A20052A
5900A20052A
R
W0CZZ
CAPACITOR, FILM, BOX
3H00671A
3H00660M
3H00660M
R
W3110
CASE
3110A20118A
3110A20118A
3110A20118A
R
138 Universal System Air Conditioner
435301
349480
437211
559010
546810
649950
W0CZZ
648600
554031
552117
268713
552112
552203-1
552203-2
554160
263230
552113
435511
437212
Exploded View & Replacement Parts List
Outdoor Unit
Model No.: AUUH126C
Service Manual 139
Exploded View & Replacement Parts List
Parts List
Part No.
LOCATION
No.
SVC CODE
DESCRIPTION
AUUH126C
237200
CASE, CONTROL(OUTDOOR)
4994A20008A
R
263230
THERMISTOR ASSEMBLY
6323A20023R
R
349480
ORIFICE
4948A20001A
R
435301
GRILLE, DISCHARGE
3530A20006G
R
435511
COVER ASSEMBLY, CONTROL(OUTDOOR)
3551A30023W
R
437211
PANEL ASSEMBLT, FRONT
3721A20027P
R
437212
PANEL ASSEMBLT, REAR
3721A20026J
R
552112
TUBE ASSEMBLY, CONDENSER IN
5211A10134Z
R
552113
TUBE ASSEMBLY, CONDENSER OUT
5211A10558B
R
552116
TUBE ASSEMBLY, REVERSING
5211A21234B
R
552202
VALVE, REVERSE
5220AR3228D
R
552203-1 VALVE, SERVICE
2H02479H
R
552203-2 VALVE, SERVICE
5220A20001B
R
554031
CONDENSER ASSEMBLY, BENT
5403A20019V
R
554160
COMPRESSOR
2520UGEP2AA
R
559010
FAN ASSEMBLY, PROPELLER
5901A10004A
R
561410
COIL ASSEMBLY, REVERSING VALVE
6141AR3733R
R
668711
PWB(PCB) ASSEMBLY, MAIN(OUTDOOR)
6871A20917A
R
W0CZZ
CAPACITOR, FILM, BOX
2H01451T
R
140 Universal System Air Conditioner
435301
349480
435512
437211
559010
546810
554160
552114
W0CZZ
554031
552116
268713
548490
561410
648600
552112
552113
552204
263230
263230
552200
435511
552203-2
552203-1
649950
437212
Exploded View & Replacement Parts List
Model No.: AUUH186C
Service Manual 141
Exploded View & Replacement Parts List
Parts List
Part No.
LOCATION
No.
237200
SVC CODE
DESCRIPTION
AUUH186C
CASE, CONTROL(OUTDOOR)
2A00928A
R
263230-1 THERMISTOR ASSEMBLY
6323A20019C
R
263230-2 THERMISTOR ASSEMBLY
6323A20023E
R
349480
ORIFICE
4948A20005A
R
435301
GRILLE, DISCHARGE
3530A20007B
R
435511
COVER ASSEMBLY, CONTROL(OUTDOOR)
3551A30061G
R
435512
COVER ASSEMBLY, TOP(OUTDOOR)
3H03266K
R
437211
PANEL ASSEMBLT, FRONT
3721A20005Q
R
437212
PANEL ASSEMBLT, REAR
3720AP0003L
R
552112
TUBE ASSEMBLY, CONDENSER IN
5211A30298V
R
552113
TUBE ASSEMBLY, CONDENSER OUT
5211A24003F
R
552116
TUBE ASSEMBLY, REVERSING
5211A24005C
R
552200
VALVE EXPANSION BODY
6140A90001K
R
552202
VALVE, REVERSE
5220AR3228E
R
552203-1 VALVE, SERVICE
5220A20006A
R
552203-2 VALVE, SERVICE
5220A20007A
R
554031
CONDENSER ASSEMBLY, BENT
5403A20022R
R
554160
COMPRESSOR
5416A90023A
R
559010
FAN ASSEMBLY, PROPELLER
5901A10032A
R
561410
COIL ASSEMBLY, REVERSING VALVE
6141AR3733R
R
561411
COIL ASSEMBLY, EXPANSION
6877A20050L
R
668711
PWB(PCB) ASSEMBLY, MAIN(OUTDOOR)
6871A21318B
R
W0CZZ
CAPACITOR, FILM, BOX
2A00986Y
R
142 Universal System Air Conditioner
435301
349480
435512
437211
559010
546810
263230-2
263230-1
552112
554160
552116
W0CZZ
268713
137213-1
552113
554031
137213-2
552203-2
552203-1
552200
551410
552116
649950
43511
435300
Exploded View & Replacement Parts List
Model No.: AUUH246C
Service Manual 143
Exploded View & Replacement Parts List
Parts List
Part No.
LOCATION
No.
SVC CODE
DESCRIPTION
AUUH246C
137213
PANEL ASSEMBLY, SIDE
1A00202F
R
137213
PANEL ASSEMBLY, SIDE
3A02284N
R
263230-1 THERMISTOR ASSEMBLY
6323A20019C
R
263230-2 THERMISTOR ASSEMBLY
6323A20023E
R
4948AP2527A
R
1A00206B
R
349480
ORIFICE
349600
BRACKET, MOTOR
435301
GRILLE, DISCHARGE
3530A20007J
R
548490
ACCUMULATOR ASSEMBLY(MECH)
4848A20011A
R
552112
TUBE ASSEMBLY, CONDENSER IN
5211A12318A
R
552113
TUBE ASSEMBLY, CONDENSER OUT
5211A21133D
R
552202
VALVE, REVERSE
5220AR3228E
R
552203-1 VALVE, SERVICE
5220A20006A
R
552203-2 VALVE, SERVICE
5220A20007A
R
554031
CONDENSER ASSEMBLY, BENT
5403A10030A
R
554160
COMPRESSOR
5417A10006C
R
559010
FAN ASSEMBLY, PROPELLER
5901A10032A
R
561410
COIL ASSEMBLY, REVERSING VALVE
6141AR3733R
R
561411
COIL ASSEMBLY, EXPANSION
6877A20050L
R
649950
CASE ASSEMBLY, CONTROL
4995A10225B
R
668711
PWB(PCB) ASSEMBLY, MAIN(OUTDOOR)
6871A21318C
R
W0CZZ
CAPACITOR, FILM, BOX
2A00986Y
R
552200
VALVE EXPANSION BODY
5220A90003B
R
144 Universal System Air Conditioner
435301
349480
435512
437211
559010
554160
546810
430410
263230
263230
W0CZZ
552204
554161
137213-2
552203-2
552203-1
552200
552116
649950
43511
435300
561410
268713
552112
552202
137213-1
552113
554031
Exploded View & Replacement Parts List
Model No.: AUUH306C
Service Manual 145
Exploded View & Replacement Parts List
Parts List
Part No.
LOCATION
No.
SVC CODE
DESCRIPTION
AUUH306C
137213-1 PANEL ASSEMBLY, SIDE
1A00202F
R
137213-2 PANEL ASSEMBLY, SIDE
3721A10150A
R
263230-1 THERMISTOR ASSEMBLY
6323A20019C
R
263230-2 THERMISTOR ASSEMBLY
6323A20023E
R
349480
ORIFICE
4948A20005A
R
435301
GRILLE, DISCHARGE
3530A20007J
R
435511
COVER ASSEMBLY, CONTROL(OUTDOOR)
3551A30061G
R
437210
PANEL ASSEMBLY, FRONT SUB
1A00197C
R
552111
TUBE ASSEMBLY, CAPILLARY
5211A23322D
R
552114
TUBE ASSEMBLY, DISCHARGE(OUTDOOR)
5211A21488D
R
552115
TUBE ASSEMBLY, MENIFOLD(OUTDOOR)
5211A21440A
R
552116
TUBE ASSEMBLY, REVERSING
5211A22111B
R
552200
VALVE EXPANSION BODY
6140A90001H
R
552203-1 VALVE, SERVICE
5220A20013A
R
552203-2 VALVE, SERVICE
5220A20007A
R
554031
CONDENSER ASSEMBLY, BENT
5403A20070B
R
554160
COMPRESSOR
5416A90022E
R
554161
COMPRESSOR
5416A90022E
R
559010
FAN ASSEMBLY, PROPELLER
5901A10032A
R
561411
COIL ASSEMBLY, EXPANSION
6877A20050L
R
649950
CASE ASSEMBLY, CONTROL
4995A10178L
R
W0CZZ
CAPACITOR, FILM, BOX
6120AR2194F
R
W0CZZ
CAPACITOR, FILM, BOX
2A00986W
R
146 Universal System Air Conditioner
135301
349480
435512
437211
559010
552112
552113
546810
430410
554160
W0CZZ-1
W0CZZ-2
56601
554031
137213-1
554161
551410
268713
135314
552200
263230
263230
435511
552203-2
552203-1
649950
137213-2
Exploded View & Replacement Parts List
Model No.: AUUH368C
Service Manual 147
Exploded View & Replacement Parts List
Parts List
Part No.
LOCATION
No.
SVC CODE
DESCRIPTION
AUUH368C
135301
GRILLE, DISCHARGE
3530A20006G
R
135314
GRILLE, REAR
3530A10176B
R
137213-1 PANEL ASSEMBLY, SIDE
3721A10110A
R
137213-2 PANEL ASSEMBLY, SIDE
3721A10111B
R
263230-1 THERMISTOR ASSEMBLY
6323A20020X
R
263230-2 THERMISTOR ASSEMBLY
6323A20020Z
R
349480
ORIFICE
4948A20001A
R
430410
BASE ASSEMBLY, WELD(OUTDOOR)
3041AP7177B
R
435511
COVER ASSEMBLY, CONTROL(OUTDOOR)
3551A30061G
R
435512
COVER ASSEMBLY, TOP(OUTDOOR)
3H03266H
R
437211
PANEL ASSEMBLY, FRONT(OUTDOOR)
3721A10109A
R
546810
MOTOR ASSEMBLY, OUTODDR
4681A20170A
R
552114
TUBE ASSEMBLY, DISCHARGE(OUTDOOR)
5211A11076A
R
552116
TUBE ASSEMBLY, REVERSING
5211A11079C
R
552117
TUBE ASSEMBLY, SUCTION(OUTDOOR)
5211A11077A
R
552200
VALVE EXPANSION BODY
5220A90003B
R
552203-1 VALVE, SERVICE
5220A20013A
R
552203-2 VALVE, SERVICE
5220A20007A
R
554031
CONDENSER ASSEMBLY, BENT
5403A20168B
R
554160
COMPRESSOR
5416A90043A
R
554161
COMPRESSOR
5416A90043A
R
559010
FAN ASSEMBLY, PROPELLER
5901A10033A
R
561410
COIL ASSEMBLY, REVERSING VALVE
6141AR3733R
R
649950
CASE ASSEMBLY, CONTROL
4995A10178M
R
W0CZZ
CAPACITOR, FILM, BOX
3A02157A
R
561411
COIL ASSEMBLY, EXPANSION
6141A20032A
R
56601
SWITCH, MAGNET
6600B000039
R
148 Universal System Air Conditioner
263230-2
263230-1
437210
435301
435512
559010
435511
137212
546810
430411
554031
554031
554160
668711
W0CZZ-1
W0CZZ-2
566001
649950
552203-1
437212
552200
561411
561410
552203-2
Exploded View & Replacement Parts List
Model No.: AUUH488C
Service Manual 149
Exploded View & Replacement Parts List
Parts List
Part No.
LOCATION
No.
SVC CODE
DESCRIPTION
AUUH488C
135301
GRILLE, DISCHARGE
3530AP1225D
R
137213
PANEL ASSEMBLY, SIDE
3721A20229A
R
263230-1
THERMISTOR ASSEMBLY
6323A20020X
R
263230-2
THERMISTOR ASSEMBLY
6323A20020Z
R
430410
BASE ASSEMBLY, WELD(OUTDOOR)
3041A20047F
R
435511
COVER ASSEMBLY, CONTROL(OUTDOOR)
3A01293X
R
435512
COVER ASSEMBLY, TOP(OUTDOOR)
3530AP1213B
R
437211
PANEL ASSEMBLY, FRONT(OUTDOOR)
3530AP1212B
R
437212
PANEL ASSEMBLY, REAR
3720AP1202C
R
546810
MOTOR ASSEMBLY, OUTODDR
4681A20028J
R
552200
VALVE EXPANSION BODY
5220A90013A
R
552203-1
VALVE, SERVICE
2A00499L
R
552203-2
VALVE, SERVICE
5220A20001E
R
554031-1
CONDENSER ASSEMBLY, BENT
5403A20215A
R
554031-2
CONDENSER ASSEMBLY, BENT
5403A20215A
R
554160
COMPRESSOR
2520UXGY2BA
R
559010
FAN ASSEMBLY, PROPELLER
5901A10032A
R
561410
COIL ASSEMBLY, REVERSING
6141AR3733R
R
561411
COIL ASSEMBLY, EXPANSION
6141A20011W
R
566001
SWITCH, MAGNET
6600B000039
R
649950
CASE ASSEMBLY, CONTROL
4995A10228A
R
668711
PWB(PCB) ASSEMBLY, MAIN(OUTDOOR)
6871A21317E
R
W0CZZ-1
CAPACITOR, FILM, BOX
2A00986D
R
W0CZZ-2
CAPACITOR, FILM, BOX
2A00986D
R
150 Universal System Air Conditioner
437910
559010
435512
435511
546810
137212
263230
554031-2
554031-1
554160
561410
W6640
268713
566001
649950
W0CZZ-1
552201
352115
352111
552116
548490
669200
648600
W0CZZ-2
552203-1
437212
552203-2
551410
552200
263230-2
263230-1
Exploded View & Replacement Parts List
Model No.: AUUH608C
Service Manual 151
Exploded View & Replacement Parts List
Parts List
Part No.
LOCATION
No.
SVC CODE
DESCRIPTION
AUUH608C
137213
PANEL ASSEMBLY, SIDE
3721A20229A
R
263230-1
THERMISTOR ASSEMBLY
6323A20020X
R
263230-2
THERMISTOR ASSEMBLY
6323A20020Z
R
430410
BASE ASSEMBLY, WELD(OUTDOOR)
3041A20047B
R
435511
COVER ASSEMBLY, CONTROL(OUTDOOR)
3A01293X
R
435512
COVER ASSEMBLY, TOP(OUTDOOR)
3530AP1213B
R
437211
PANEL ASSEMBLY, FRONT(OUTDOOR)
3720AP1212B
R
437212
PANEL ASSEMBLY, REAR
3720AP1202C
R
546810
MOTOR ASSEMBLY, OUTODDR
4681A20028J
R
552200
VALVE EXPANSION BODY
5220A90013A
R
552203-1
VALVE, SERVICE
2A00499L
R
552203-2
VALVE, SERVICE
5220A20001E
R
554031-1
CONDENSER ASSEMBLY, BENT
5403A20215A
R
554031-2
CONDENSER ASSEMBLY, BENT
5403A20215A
R
554160
COMPRESSOR
2520UBDY2AA
R
559010
FAN ASSEMBLY, PROPELLER
5901A10032A
R
561410
COIL ASSEMBLY, REVERSING
6141AR3733R
R
561411
COIL ASSEMBLY, EXPANSION
6141A20011V
R
566001
SWITCH, MAGNET
6600B000039
R
649950
CASE ASSEMBLY, CONTROL
4995A10228B
R
668711
PWB(PCB) ASSEMBLY, MAIN(OUTDOOR)
6871A21317G
R
W0CZZ-1
CAPACITOR, FILM, BOX
2A00986D
R
W0CZZ-2
CAPACITOR, FILM, BOX
2A00986D
R
152 Universal System Air Conditioner
Exploded View & Replacement Parts List
Panel Assembly, Front
PT-HEA/C
268712
146811
146811
152312
435310
137211
135802
Service Manual 153
Exploded View & Replacement Parts List
PT-HFA/C
268712
146811
146811
152312
435310
154 Universal System Air Conditioner
137211
Exploded View & Replacement Parts List
PT-HDA/C
146811
268712
152312
435310
135802
137211
Service Manual 155
Exploded View & Replacement Parts List
PT-HEF/HFF/FDF (Elevation Grille_Accessory)
137211
W4811-1
W4811-2
146812-1
146812-2
249951
668713
750830
268712
146811
266011-2
266011-2
146811
152312
267110
435310
156 Universal System Air Conditioner
Exploded View & Replacement Parts List
Parts List
Part No.
LOCATION
No.
SVC
DESCRIPTION
PT-HEA
PT-HEC
CODE
137211
PANEL ASSEMBLY, FRONT(INDOOR)
3721A10105A
3721A10105B
R
435310
GRILLE ASSEMBLY, FRONT(INDOOR)
3531A10059A
3531A10059A
R
152312
FILTER ASSY, AIR CLEANER
5231A10005A
5231A10005A
R
146811
MOTOR ASSEMBLY, STEP
4681A20055A
4681A20055A
R
268712
PWB(PCB) ASSEMBLY, DISPLAY
6871A20096J
6871A20096J
R
135802
DOOR
3580A20005A
3580A20005A
R
Part No.
LOCATION
No.
SVC
DESCRIPTION
PT-HFA
PT-HFC
CODE
137211
PANEL ASSEMBLY, FRONT(INDOOR)
3721A10072A
3721A10072E
R
435310
GRILLE ASSEMBLY, INLET
3531A10211A
3531A10211C
R
152312
FILTER ASSY, AIR CLEANER
5231A10012A
5231A10012A
R
146811
MOTOR ASSEMBLY, STEP
4681A20055A
4681A20055A
R
268712
PWB(PCB) ASSEMBLY, DISPLAY
6871A20096J
6871A20096J
R
Part No.
LOCATION
No.
SVC
DESCRIPTION
PT-HDA
PT-HDC
CODE
137211
PANEL ASSEMBLY, FRONT(INDOOR)
3721A10106A
3721A10106B
R
435310
GRILLE ASSEMBLY, INLET
3531A10066A
3531A10066A
R
152312
FILTER ASSY, AIR CLEANER
5231A10004A
5231A10004A
R
146811
MOTOR ASSEMBLY, STEP
4681A20055A
4681A20055A
R
268712
PWB(PCB) ASSEMBLY, DISPLAY
6871A20096J
6871A20096J
R
135802
DOOR
3580A20005A
3580A20005A
R
Service Manual 157
Exploded View & Replacement Parts List
Part No.
LOCATION
No.
SVC
DESCRIPTION
PT-HEF
PT-HFF
PT-HDF
146811
MOTOR ASSEMBLY, STEP
4681A20055A
4681A20055A
4681A20055A
435310
GRILLE ASSEMBLY, INLET
3531A10350A
3531A10211A
3531A10066M
152312
FILTER ASSY, AIR CLEANER
5231A10005A
5231A10012A
5231A10004A
W4811-1 BRACKET ASSEMBLY
4811A20073A
4811A20072A
4811A20068A
W4811-2 BRACKET ASSEMBLY
4811A20073B
4811A20072B
-
266011-2 SWITCH ASSEMBLY, MICRO
6601A20002D
6601A20002D
6601A20002C
266011-2 SWITCH ASSEMBLY, MICRO
6601A20002E
6601A20002E
-
146812-1 MOTOR ASSEMBLY, SYNC
4681AP2596J
4681AP2596J
4681AP2596H
146812-2 MOTOR ASSEMBLY, SYNC
4681AP2596M
4681AP2596M
-
750830
ROPE ASSEMBLY
5083A20002A
5083A20002A
5083A20002A
249951
CASE ASSEMBLY, CONTROL
4995A20450B
4995A20450A
4995A20450A
668713
PWB(PCB) ASSEMBLY, SUB
6871A20362A
6871A20362A
6871A20362A
268712
PWB(PCB) ASSEMBLY, DISPLAY
6871A20096K
6871A20096K
6871A20096K
267110
REMOTE CONTROLLER ASSEMBLY
6711A90094A
6711A90094A
6711A90094A
158 Universal System Air Conditioner
CODE
P/No.: 3828A22009P
Printed in Korea