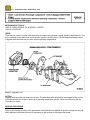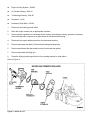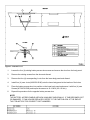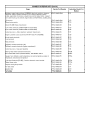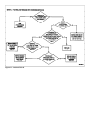
1
97-1, Publication Date: JANUARY 2, 1997
LIGHT TRUCK:
1997 WINDSTAR
MEDIUM/HEAVY TRUCK:
1997 CARGO SERIES, F & B SERIES, L SERIES
This TSB article is being republished in its entirety to include reference to FD1060 and FD1460 engines.
ISSUE:
The 1996 Powertrain Control/Emissions Diagnosis (PC/ED) On-Board Diagnostics II (OBD II) Service Manual
is required to service driveability concerns for the 1997 Windstar. The 1996 PC/ED OBD I Service Manual is
required to service 1997 vehicles with an FD1060 or FD1460 diesel engine.
ACTION:
Refer to the 1996 PC/ED OBD II Service Manual for servicing driveability concerns on the 1997 Windstar, and
refer to the 1996 PC/ED OBD I Service Manual for servicing driveability concerns on the 1997 FD1060 and
FD1460 diesel F & B/Cargo/L-Series vehicles. Replace the existing 1997 PC/ED OBD II Service Manual cover
page with the new cover page that includes a reference note to the 1997 Windstar and FD1060 and FD1460
diesel engines.
OTHER APPLICABLE ARTICLES: NONE
SUPERSEDES: 96-22-14
WARRANTY STATUS: INFORMATION ONLY
OASIS CODES: 190000, 290000, 390000, 490000, 590000, 690000, 790000
97-1, Publication Date: JANUARY 2, 1997
MEDIUM/HEAVY TRUCK:
1992-97 CARGO SERIES, F & B SERIES, L SERIES
1996-97 LOUISVILLE
ISSUE:
There may be a lack of interior cab heat and/or the engine may not reach normal operating temperatures. This
may be caused by the thermostat and deaeration system currently used in FD1060 engines allowing coolant
to bypass the thermostat and not reach normal operating temperatures.
Figure 1 - Article 97-1-17
ACTION:
Replace the thermostat and deaeration system. The new thermostat will allow for zero bypass of the coolant
which should allow the engine to warm up to operating temperature quicker. Refer to the following Service
Procedure for details.
SERVICE PROCEDURE
Refer to the following sections of the appropriate model/year Service Manual for specific component removal
and installation procedures that may be necessary to gain access to the engine thermostat.
Engine Cooling System - 03A-03
Air Cleaner Ducting - 03A-12
Turbocharge Ducting - 03A-48
Generator - 14-02
Accessory Drive Belts - 03A-05
1.
Disconnect the battery ground cable.
2.
Drain the engine coolant into an appropriate container.
3.
Remove and/or reposition as necessary the air cleaner, turbocharger ducting, generator, accessory
drive belts and other components to gain access to the thermostat housing.
4.
Disconnect the upper radiator hose from the thermostat housing.
5.
Remove and retain the three (3) thermostat housing attaching bolts.
6.
Remove and discard the thermostat housing, thermostat and gasket.
7.
Remove and retain the lifting eye.
8.
Clean the lifting eye and engine block of any sealing material or other debris.
Refer to Figure 2.
Figure 2 - Article 97-1-17
NOTE:
FOR THE NEW ZERO LEAK THERMOSTAT TO BE INSTALLED INTO THE ENGINE A NEW
THERMOSTAT HOUSING AND TWO (2) NEW RING SEALS WILL ALSO BE NEEDED.
NOTE:
INSTEAD OF THE SINGLE THERMOSTAT GASKET, THE ZERO LEAK THERMOSTAT USES TWO
(2) SEALS TO PROVIDE A SEAL FOR THE COOLING SYSTEM. A THERMOSTAT GASKET IS
THEREFORE NOT NEEDED. ALSO IT IS NOT NECESSARY TO USE AN RTV OR OTHER SEALER
ON THE NEW SEAL RINGS.
9.
Install the existing engine lifting eye, the new thick Seal Ring (F7HZ-8255-BA), Zero Leak Thermostat
(F7HZ-8575-AA), thin Seal Ring (F7HZ-8255-AA) and Thermostat Housing (F7HZ-8592-AA) onto the
engine as shown in Figure 2 using the three (3) existing attaching bolts. Torque the bolts to 42-57
N-m (31-42 lb-ft).
Refer to Figure 3.
Figure 3 - Article 97-1-17
NOTE:
FIGURE 3 PROVIDES A VIEW OF THE DEAERATION SYSTEM AND THE ENGINE COOLANT
TEMPERATURE SENDER AS IT APPEARS ON 1996-97 VEHICLES AFTER THE INSTALLATION OF
THE NEW DEAERATION CHECK VALVE/JIGGLE PIN. ON 1992-95 VEHICLES, THE INSTALLATION
OF THE ENGINE COOLANT TEMPERATURE SENDER VARIED. THE CHANGE WAS OUTLINED IN
TSB «95-20-12». FOR THESE VEHICLES, THE COOLANT TEMPERATURE SENDER
INSTALLATION SHOULD BE MODIFIED AS STATED IN TSB 95-20-12. THIS WILL PROVIDE A
MORE ACCURATE COOLANT TEMPERATURE GAUGE READING.
10.
Remove the existing deaeration hose from the hose fitting.
11.
Remove the existing deaeration hose barb fitting and bushing from the coolant stand pipe assembly
and discard. The new deaeration check valve/jiggle pin will replace both of these components.
12.
Install the new deaeration Check Valve/Jiggle Pin (3926761-CF) into the coolant stand pipe. Be sure
the threaded portion of the new check valve/jiggle pin is first coated with a sealer or wrapped in a
teflon tape prior to installation to reduce the possibility of coolant leaks.
13.
Install the deaeration hose onto the new check valve/jiggle pin and tighten the hose clamp to 1-1.5
N-m (9-13 lb-in).
14.
Reinstall and/or reposition any components removed to gain access to the thermostat housing.
15.
Reinstall the negative battery cable.
16.
Refill the cooling system following the procedure provided in the appropriate model/year Service
Manual.
OTHER APPLICABLE ARTICLES:
95-20-12
WARRANTY STATUS: Eligible Under Basic Warranty Coverage
LABOR ALLOWANCE
DEALER CODING
OASIS CODES: 208100, 208999, 402000, 499000
97-1, Publication Date: JANUARY 2, 1997
MEDIUM/HEAVY TRUCK:
1992-97 CARGO SERIES, F & B SERIES, L SERIES
ISSUE:
High engine noise/vibration/harshness (NVH) at low engine rpm may occur on some vehicles. This may be
caused by a reduction in cushioning of the rear engine mounts.
ACTION:
Replace the rear engine mount with a revised rear engine mount. Refer to the following Service Procedure for
details.
SERVICE PROCEDURE
NOTE:
1992-93 VEHICLES WITH AN FD ENGINE WERE ORIGINALLY EQUIPPED WITH SOLID FRONT AND
REAR ENGINE MOUNTS/ISOLATORS. TO RESOLVE NOISE/VIBRATION/HARSHNESS (NVH)
CONCERNS, TSB ARTICLE «95-23-15» SHOULD BE USED TO UPDATE THESE VEHICLES TO THE
VOIDED STYLE MOUNTS/ISOLATORS. THE REAR ENGINE MOUNTS/ISOLATORS PROVIDED IN
THIS TSB ARTICLE SHOULD ONLY BE USED ON 1992-93 VEHICLES IF TSB ARTICLE 95-23-15 HAS
ALREADY BEEN PERFORMED AND THE VOIDED REAR MOUNTS/ISOLATORS HAVE SINCE
COLLAPSED OR HAVE OTHERWISE FAILED. 1994-97 VEHICLES WERE ORIGINALLY EQUIPPED
WITH THE VOIDED MOUNTS AND THIS TSB ARTICLE SHOULD BE FOLLOWED WHEN REPLACING
THE REAR MOUNTS/ISOLATORS.
NOTE:
NVH CONCERNS MAY BE CAUSED AND/OR AMPLIFIED IF THE ENGINE IDLE SPEED IS SET BELOW
SPECIFICATIONS. THE ENGINE IDLE SPEED SHOULD BE CHECKED AND IF NECESSARY
ADJUSTED TO THE SPECIFICATION PROVIDED ON THE ENGINE DATA PLATE. THE POWERTRAIN
CONTROL/EMISSIONS DIAGNOSIS (PC/ED) MANUAL, SECTION 19A, PROVIDES THE IDLE SETTING
PROCEDURE.
Refer to Figures 1, 2 and 3 for the following procedure.
Figure 1 - Article 97-1-18
Figure 2 - Article 97-1-18
Figure 3 - Article 97-1-18
1.
Remove the bolts, nuts and washers that retain both the right and left side rear engine mount/isolator
caps.
2.
Carefully raise the rear of the engine using suitable service jack and a wood block placed under the
transmission. The engine should only be raised enough to unload the rear engine mounts/isolators
and to allow their removal.
3.
Remove and discard the existing rear mounts/isolators.
NOTE:
THE REVISED ISOLATORS HAVE A SELF ALIGNING FEATURE BUILT INTO THEM. IT IS A
RUBBER WEDGE THAT FITS ONTO THE CORRESPONDING FLAT OF THE NEW SUPPORT PIN.
THIS FEATURE AIDS THE ASSEMBLY PROCESS AND IT IS UTILIZED ON VEHICLES BUILT
AFTER 10/15/96. ON VEHICLES ALREADY IN SERVICE EQUIPPED WITH THE ORIGINAL FULLY
ROUND PIN, THE ALIGNING FEATURE OF THE NEW ISOLATOR MUST BE REMOVED. THIS CAN
BE DONE BY CUTTING THE RUBBER WEDGE OUT USING A KNIFE. NEW SUPPORT PINS ARE
NOT NEEDED.
NOTE:
PROPER POSITIONING OF THE NEW REAR MOUNTS/ISOLATORS IS VERY IMPORTANT. ON
FD1060 ENGINES, THE NEW ISOLATORS MUST BE INSTALLED WITH THE LARGE VOID ON
TOP. ON FD1460 ENGINES, THE ISOLATORS MUST BE INSTALLED WITH THE LARGE VOID ON
THE BOTTOM.
4.
Be sure the new isolators are oriented correctly, then install the new isolators onto the pins.
NOTE:
TO PREVENT THE POSSIBLE ROTATION OF THE NEW ISOLATOR, NEW CAPS ARE NEEDED.
THE NEW CAP HAS A SETSCREW BUILT IN THAT LOCKS THE ISOLATOR IN PLACE.
5.
Slowly lower the engine onto the revised isolators and remove the service jack and wood block.
6.
Install a new cap onto each revised isolators.
7.
Install the existing isolator/cap retaining bolts, washers and new Nuts (34989-S2). Torque the bolts to
102-142 N-m (75-105 lb-ft).
OTHER APPLICABLE ARTICLES:
95-23-15
WARRANTY STATUS: Eligible Under Basic Warranty Coverage
LABOR ALLOWANCE
DEALER CODING
OASIS CODES: 497000, 499000, 703000
97-1, Publication Date: JANUARY 2, 1997
MEDIUM/HEAVY TRUCK:
1996-97 AEROMAX, LOUISVILLE
ISSUE:
An air leak may be heard from one or more of the following accessory air valve assemblies:
Differential Axle Lock
Fifth Wheel
Engine Air
Air Suspension Dump
Wheel Lock
These air valves are located on the right side of the instrument panel.
ACTION:
Replace the leaking valve with a new valve. The new valve has been revised to reduce the possibility of an air
leak. Refer to the following Service Procedure for replacement details.
SERVICE PROCEDURE
There are five (5) types of air valves currently available that operate various accessories. The number of
valves in a vehicle will depend on the options in the vehicle.
If an air leak is noted that is originating from behind the instrument panel, locate the source of the leak. If one
of the air valve assemblies is leaking, replace the valve using the following procedure.
1.
Disconnect the negative battery cable.
2.
Remove the eight (8) Torx head screws that retain the RH instrument panel to the dash.
3.
Carefully pull the instrument panel away from the dash.
4.
Locate/identify the leaking air valve.
5.
Release any air pressure left in the system.
6.
Remove the two (2) air lines from the valve by pushing in on the tube, depressing the collet and then
pulling the tube out of the fitting. If a fitting has been exposed to particulary harsh conditions or has
been in service for a long period of time, it may be necessary to grip the collet with a pair of pliers and
rotate the collet slightly to help free the components. Additional information regarding
Push-To-Connect fittings can be found on Page 06-08-3 of the appropriate year Louisville/Aeromax
Service Manual.
7.
Squeeze the valve tangs that retain the valve to the instrument panel and remove the valve from the
panel.
8.
Install a new valve into the instrument panel in place of the original.
NOTE:
BEFORE CONNECTING THE TUBES INTO THE NEW VALVE, CHECK THE END OF THE TUBE
AND BE SURE IT IS CUT SQUARE AND THAT THE TUBE END IS NOT DISTORTED OR
DAMAGED. THE MAXIMUM ALLOWABLE ANGLE IS 15 DEGREES. IF THE ANGLE OF THE CUT
EXCEEDS THIS SPECIFICATION, RE-CUT THE TUBE. USE A SHARP BLADED CUTTING TOOL
THAT WILL NOT COLLAPSE THE TUBE OR LEAVE BURRS ON THE TUBE END THAT COULD
DAMAGE THE O-RING.
9.
Make sure the air tubes are installed in the same position on the new valve as they were on the
original. Insert each tube into the fitting until it is fully seated. A small resistance will be felt as the
tube passes the collet teeth and the O-ring. Pull back on the tube to be sure the collet is properly
retained on the tube.
10.
Reposition the instrument panel into the dash.
11.
Reinstall the eight (8) Torx head screws and torque to 2.5-3.5 N-m (22-30 lb-in).
12.
Reconnect the negative battery cable.
OTHER APPLICABLE ARTICLES: NONE
WARRANTY STATUS: Eligible Under Basic Warranty Coverage
LABOR ALLOWANCE
DEALER CODING
OASIS CODES: 205000, 301000, 304000, 702000
97-2, Publication Date: JANUARY 20, 1997
MEDIUM/HEAVY TRUCK:
1996-97 AEROMAX, LOUISVILLE
ISSUE:
The fasteners for the battery access doors on vehicles equipped with lower body side panels may become
loose. This may be caused by the current fasteners not retaining torque. Also, the battery access doors were
not serviced/available individually and parts are now available.
ACTION:
Replace the existing door fasteners with new fasteners. The new fasteners should retain their torque and
reduce the possibility of the door coming loose. Refer to the following Service Procedure for details.
SERVICE PROCEDURE
Refer to Figure 1.
Figure 1 - Article 97-2-17
1.
Loosen the four (4) existing battery access door screws and remove the door from the body panel.
2.
Remove the existing screws from the door and discard.
3.
Remove the four (4) corresponding J-nuts from the lower body panel and discard.
4.
Install four (4) new J-nuts (N623332-S100) onto the lower body panel at the location of the holes.
5.
Place the battery access door into position on the lower body panel and secure it with four (4) new
Screws (W701810-S300) and torque the screws to 10-13 N-m (85-115 lb-in).
6.
Repeat this procedure for the opposite battery access door.
NOTE:
THE BATTERY ACCESS PANELS ARE NOW AVAILABLE INDIVIDUALLY. IF ONE BECOMES LOST
OR DAMAGED, IT CAN NOW BE REPLACED. REFER TO THE PARTS BLOCK AT THE END OF
THIS TSB ARTICLE FOR CORRECT PART NUMBERS.
OTHER APPLICABLE ARTICLES: NONE
WARRANTY STATUS: Eligible Under Basic Warranty Coverage
LABOR ALLOWANCE
DEALER CODING
OASIS CODES: 108000, 111000
97-3, Publication Date: FEBRUARY 3, 1997
MEDIUM/HEAVY TRUCK:
1992-97 CARGO SERIES, F & B SERIES, L SERIES
ISSUE:
The engine may not crank on some vehicles. This may be due to the starter motor not being robust enough
for certain applications that are subject to frequent and/or repeated starts and/or vehicles which are operated
in extremely cold weather.
ACTION:
If the starter motor requires service, replace the motor with a revised, more robust starter motor. The new
motor has been developed to have improved life in these severe operating conditions. Refer to the following
text for details.
NOTE:
FOR 1992-95 VEHICLES BUILT BEFORE 8/22/94, THE STARTER MOTOR WIRING MODIFICATION
PROCEDURE OUTLINED IN TSB 94-26-13 MUST BE COMPLETED BEFORE THE REVISED MOTOR IS
INSTALLED.
NOTE:
COMPLETE DIAGNOSING AND TESTING PROCEDURES FOR THE STARTING SYSTEM AND ITS
COMPONENTS AND WIRING CAN BE FOUND IN SECTION 03-06 OF THE APPROPRIATE
MODEL/YEAR SERVICE MANUAL.
Starter motor removal and installation procedures can be found in Section 03-06 of the appropriate
model/year Service Manual.
NOTE:
TO EASE THE INSTALLATION OF THE NEW STARTER MOTOR, ON VEHICLES EQUIPPED WITH A
MANUAL TRANSMISSION, INSERT THE UPPER STARTER MOTOR ATTACHING BOLT THROUGH
THE STARTER FLANGE BEFORE INSTALLING THE STARTER ONTO THE ENGINE. THEN DURING
INSTALLATION THE UPPER BOLT WILL HAVE TO BE THREADED INTO PLACE BEFORE THE
STARTER MOTOR CAN BE FULLY SEATED ONTO THE BELLHOUSING.
NOTE:
WHEN INSTALLED ON THE ENGINE, THE SOLENOID OF THE NEW STARTER MOTOR IS
POSITIONED BELOW THE NEW STARTER. ON SOME VEHICLES IT MAY BE NECESSARY TO
ADJUST THE ROUTING AND/OR CLIPPING OF THE STARTER MOTOR WIRING HARNESS TO
PROVIDE SUFFICIENT LENGTH FOR INSTALLATION AND ENSURE THE WIRING IS NOT STRESSED
DURING ENGINE OPERATION.
OTHER APPLICABLE ARTICLES:
94-26-13
WARRANTY STATUS: Eligible Under Basic Warranty Coverage
LABOR ALLOWANCE
DEALER CODING
OASIS CODES: 499000, 601300, 603300
97-4, Publication Date: FEBRUARY 17, 1997
MEDIUM/HEAVY TRUCK:
1992-97 CARGO SERIES, F & B SERIES, L SERIES
This TSB article is being republished in its entirety to revise the part number of the Idler Pulley Support Plate.
ISSUE:
The Front End Accessory Drive (FEAD) belt may have high wear and/or may come off of the drive pulleys on
some vehicles. This may be caused by the belt tensioner support plate and/or the idler pulley support plate not
being flat. This can cause the tensioner and idler pulleys to be out of alignment which results in accelerated
FEAD belt wear and/or belt roll off.
ACTION:
Replace the belt tensioner support plate and if equipped, the idler pulley support plate. The revised plate(s)
should allow both pulleys to be in proper alignment which should reduce the possibility of belt wear and/or belt
roll off. Refer to the following Service Procedure for details.
SERVICE PROCEDURE
1.
Rotate the automatic belt tensioner using a 3/8" breaker bar or ratchet in the square of the belt
tensioner arm to release drive belt tension.
2.
With the tension released, remove the drive belt from the tensioner.
3.
Inspect the original drive belt for wear. If it is still serviceable, it may be reused. If wear is noted,
replace the belt with a new Belt (F3HZ-8620-F, F/B/L-Series and F3HZ-8620-K, Cargo Series).
NOTE:
THE PARTS CATALOGUE INCORRECTLY CALLS OUT AN F3HZ-8620-M FOR SOME
APPLICATIONS. USE ONLY THE BELT LISTED IN THIS TSB ARTICLE.
NOTE:
IF THE DRIVE BELT NEEDS TO BE REPLACED AND THE VEHICLE IS EQUIPPED WITH
HYDRAULIC BRAKES, THEN THE HYDRAULIC BRAKE PUMP DRIVE BELT WILL HAVE TO BE
REMOVED BEFORE THE SERPENTINE DRIVE BELT CAN BE REMOVED FROM THE ENGINE.
FOR REMOVAL PROCEDURE, REFER TO THE APPROPRIATE MODEL/YEAR SERVICE MANUAL,
SECTION 03A-05.
NOTE:
ON EARLY BUILT FD1060 ENGINES, THE TENSIONER AND IDLER SUPPORT PLATES WERE
ATTACHED TO THE ENGINE WITH COUNTERSUNK BOLTS (REFER TO FIGURE 2). THE NEW
IDLER AND SUPPORT PLATE ASSEMBLY NOW USES HEX HEAD FLANGE BOLTS. THEREFORE,
IF AN ENGINE IS EQUIPPED WITH THE COUNTERSUNK BOLTS, THEN THOSE BOLTS MUST BE
REPLACED WITH NEW HEX HEAD FLANGE BOLTS (3900631-CF).
Figure 2 - Article 97-4-11
4.
Remove the automatic belt tensioner from the support plate and then remove the support plate from
the engine. Discard the support plate. Refer to Figure 1.
Figure 1 - Article 97-4-11
NOTE:
IF THE AUTOMATIC BELT TENSIONER IS EQUIPPED WITH A PLASTIC PULLEY, THEN REFER TO
«TSB 96-8-23» FOR INFORMATION REGARDING AN IMPROVED AUTOMATIC TENSIONER.
5.
Install the new automatic Belt Tensioner Support Plate (F3HZ-6B209-AAA) onto the engine with the
two (2) attaching bolts. Torque the bolts to 20-32 N-m (15-24 lb-ft).
6.
Install the automatic belt tensioner onto the support plate with one (1) bolt and torque to 41-52 N-m
(30-38 lb-ft).
7.
If the vehicle is equipped with air conditioning, proceed to Step 9. If the vehicle is not equipped with
air conditioning, proceed to Step 8.
8.
Remove the idler pulley and support plate assembly from the engine and discard. Install the new Idler
Pulley Support Plate (F3HZ-8678-AAA) onto the engine with two (2) bolts and torque to 24 N-m (18
lb-ft). Refer to Figure 2.
NOTE:
AN IDLER PULLEY IS USED IN PLACE OF THE AIR CONDITIONING COMPRESSOR ON VEHICLES
NOT EQUIPPED WITH AIR CONDITIONING. THE IDLER PULLEY AND SUPPORT PLATE ARE
ONLY AVAILABLE TOGETHER AS AN ASSEMBLY.
9.
Install the new belt or verify the original belt is wrapped properly around the crankshaft, fan,
generator and A/C compressor or idler pulley (Figure 3). The belt must be completely seated in the
groove of each pulley.
Figure 3 - Article 97-4-11
10.
Position the drive belt on the inside of the automatic belt tensioner.
11.
With one hand, rotate the tensioner to release the tension. With the other hand, guide the drive belt
onto the water pump pulley. Carefully release the tensioner to tighten the drive belt.
12.
Check again to verify the drive belt is properly positioned in all the drive pulley's grooves.
NOTE:
IF SO EQUIPPED, REINSTALL THE HYDRAULIC PUMP DRIVE BELT BY REFERRING TO THE
APPROPRIATE MODEL/YEAR SERVICE MANUAL, SECTION 03A-03.
13.
Start the engine and check the belt and belt tensioner for proper operation.
OTHER APPLICABLE ARTICLES:
96-8-23
SUPERSEDES: 96-25-29
WARRANTY STATUS: Eligible Under Basic Warranty Coverage
LABOR ALLOWANCE
DEALER CODING
OASIS CODES: 497000, 499000
97-4, Publication Date: FEBRUARY 17, 1997
MEDIUM/HEAVY TRUCK:
1991-97 L SERIES
1996-97 AEROMAX, LOUISVILLE
ISSUE:
The center hub of the 28.5" fan may crack around the mounting bolts due to the use of thin material at the
center hub point.
ACTION:
Replace the fan with a revised fan. The revised fan has a thicker steel mounting disc than the previous design.
Refer to the following Service Procedure for details.
SERVICE PROCEDURE
1.
Remove the old fan.
2.
Refer to the following Application Chart and procure the correct revised fan and install.
3.
Torque the retaining bolts to 42-57 N-m (31-42 lb-ft).
NOTE:
IF USING A RUBBER-MOUNTED FAN ON DETROIT DIESEL CORPORATION (DDC) ENGINES, THE
SPECIAL BOLTS NEED TO BE FIRST TORQUED TO 20 N-m (15 LB-FT) FOLLOWING A STAR
PATTERN. THEN REPEAT THE STAR PATTERN AND TORQUE TO 34 N-m (25 LB-FT).
OTHER APPLICABLE ARTICLES: NONE
WARRANTY STATUS: Eligible Under Basic Warranty Coverage
LABOR ALLOWANCE
DEALER CODING
OASIS CODES: 402000, 499000
97-5, Publication Date: MARCH 3, 1997
MEDIUM/HEAVY TRUCK:
1992-97 CARGO SERIES, F & B SERIES, L SERIES
1997 AEROMAX, LOUISVILLE
ISSUE:
White smoke from the exhaust system of a diesel engine during initial warm-up in cold ambient temperatures
is normal, in most cases. It is caused by the incomplete combustion of the air/fuel mixture resulting from low
engine operating temperatures and cold ambients. However, once the engine temperature warms, the amount
of white smoke present in the exhaust should diminish.
ACTION:
To help identify whether the white smoke is a normal condition caused by a cold engine and cold ambients,
refer to the following Diagnostic Procedure for details.
DIAGNOSTIC PROCEDURE
1.
When the engine is cold, start the engine, allow it to run at its normal idle speed and monitor the
temperature of the engine oil pan. A hand held infrared temperature meter or a Digital Volt-Ohm
Meter (DVOM) with a temperature probe may be used. The engine oil/oil pan provides an accessible
reading point for engine temperature and also correlates to the engine coolant temperature.
NOTE:
ON CERTAIN VEHICLES, A NOISE SHIELD HAS BEEN MOUNTED ONTO THE EXTERIOR OF THE
OIL PAN. IT IS IMPORTANT, THEREFORE, TO BE SURE THE TEMPERATURE READINGS ARE
TAKEN DIRECTLY FROM THE OIL PAN, OTHERWISE THE TEMPERATURE READINGS WILL NOT
BE ACCURATE.
NOTE:
IN EXTREME COLD AMBIENTS, IT MAY BE NECESSARY TO OPERATE THE ENGINE AT SPEEDS
HIGHER THAN IDLE OR WITH THE ENGINE UNDER LOAD SO THAT IT IS ABLE TO OBTAIN THE
TEMPERATURES LISTED IN STEP 2.
2.
Once the engine oil/oil pan reaches approximately 57-66°C (135-150°F), white smoke should no
longer be emitted from the exhaust. The 57-66°C (135-150°F) engine oil/oil pan temperature
correlates to the engine coolant temperature gauge reading at about the beginning of the normal
range.
3.
If the engine exhaust system emits white smoke during the initial warm-up of the engine, but the
white smoke is gone by the time the engine oil/oil pan temperature reaches 57-66°C (135-150°F) and
no other engine driveability concerns exist, the engine is operating properly and no further action
should be taken. If the engine exhaust system emits white smoke during the initial warm-up of the
engine and/or:
a.
The white smoke continues even after the engine oil/oil pan temperature reaches 57-66°C
(135-150°F),
b.
The engine oil/oil pan temperature does not reach the 57-66°C (135-150°F),
c.
Other driveability concerns exist, then further diagnosis should be performed on the engine, fuel
and/or cooling systems to determine the root cause of the concern.
Factors that can affect engine operation and white smoke are in the list that follows this paragraph.
Complete operation and diagnosis information on each system can be found in the appropriate model/year
Powertrain/Drivetrain Service Manual and the Powertrain Control/Emissions Diagnosis (PC/ED) Service
Manual.
Cooling system size/volume - auxiliary heaters/cooling system hose routing/use of shutoff
valves, etc.
Ambient temperature
Fuel quality
Engine starting aids - what type/how used
Time allowed for engine warm-up at idle before beginning normal operation
Engine base idle speed
Cooling system specification - fan clutch type, viscous or on-off/winter fronts
Cooling system operation - thermostats, fan clutch
Engine operation - base timing, fuel injection pump, injectors, base engine, etc.
NOTE:
TWO (2) TSB ARTICLES HAVE BEEN ISSUED THAT SPECIFICALLY RELATE TO THE ENGINE
COOLING SYSTEM AND THE ENGINE'S ABILITY TO ACHIEVE NORMAL OPERATING
TEMPERATURES. THESE TSB ARTICLES SHOULD BE REVIEWED AND, IF APPLICABLE,
PERFORMED ON VEHICLES THAT HAVE CONCERNS WITH WHITE SMOKE AND/OR
ENGINE/CAB HEATING CONCERNS. THE TWO (2) TSB ARTICLES ARE: 1) FD1460 ENGINE «96-19-11», ENGINE THERMOSTAT SHIM KIT, AND 2) FD1060 ENGINE - «97-1-17», ZERO
LEAK THERMOSTAT AND DEAERATION CHECK VALVE.
OTHER APPLICABLE ARTICLES:
96-19-11
97-1-17
WARRANTY STATUS: INFORMATION ONLY
OASIS CODES: 403000, 499000
97-5, Publication Date: MARCH 3, 1997
MEDIUM/HEAVY TRUCK:
1997 AEROMAX, LOUISVILLE
ISSUE:
The Front End Accessory Drive (FEAD) belt may wear and/or come off on some vehicles equipped with an
FD1460 engine, Delco generator, and air conditioning. This may be caused by the generator and air
conditioning support bracket allowing the generator drive pulley to be misaligned with the other pulleys in the
FEAD system.
ACTION:
Replace the generator and air conditioning bracket with a revised bracket. The revised bracket should keep
the pulleys in alignment to reduce the possibility of FEAD belt wear and/or roll off. Refer to the following
Service Procedure for details.
SERVICE PROCEDURE
Refer to Page 12-03A-54 of the 1997 Louisville/AeroMax Service Manual for a sketch of the bracket. The
bracket is Item #10.
1.
Disconnect the negative battery cable.
2.
Remove or reposition any components as necessary to gain access to the bracket.
NOTE:
REMOVAL AND INSTALLATION PROCEDURES FOR THE AIR CONDITIONING COMPRESSOR
CAN BE FOUND IN SECTION 12-03A, AND FOR THE GENERATOR, SECTION 14-02B, OF THE
1997 LOUISVILLE/AEROMAX SERVICE MANUAL.
3.
Remove the bracket from the engine. Discard the bracket, but retain the four (4) attaching bolts.
4.
Position the revised Bracket (F7HZ-19D626-AA) onto the engine and torque the attaching bolts to
22-33 N-m (16-24 lb-ft).
5.
Reinstall all components that were previously removed.
6.
Reconnect the negative battery cable.
OTHER APPLICABLE ARTICLES: NONE
WARRANTY STATUS: Eligible Under Basic Warranty Coverage
LABOR ALLOWANCE
DEALER CODING
OASIS CODES: 203100, 208200, 499000
97-6, Publication Date: MARCH 17, 1997
MEDIUM/HEAVY TRUCK:
1994-97 CARGO SERIES, F & B SERIES, L SERIES
1996-97 AEROMAX, LOUISVILLE
This TSB article is being republished in its entirety to include the latest level parts and to include vehicles built
through the 1997 model year.
ISSUE:
To comply with 1994 Federal Emission requirements for Diesel Engines, a Catalytic Converter/Muffler (CCM)
has been released for FD1060 and FD1460 midrange diesel engines.
ACTION:
This TSB article provides information on the CCM application, design, serviceability and testing procedures.
NOTE:
PERFORM TSB'S «96-19-11» AND «97-1-17» WHEN PROCEEDING WITH THIS TSB ARTICLE.
CCM APPLICATION
Only 1994 emission level engines are equipped with a CCM. The word "catalyst" followed by a five
(5) digit number will appear on the engine data plate if the engine is required to be equipped with a
CCM. (The engine data plate is attached to the side of the front gear housing in front of the fuel
injection pump. Refer to Figure 1.) Certain 1994 engines/vehicles built for export may not be
equipped with a CCM. A vehicle's model year and/or build date are not absolute indicators of CCM
usage. To verify usage, consult the engine data plate.
Figure 1 - Article 97-6-30
CCM COMPONENT DESIGN AND SERVICEABILITY
The CCM looks very similar to a conventional muffler, however the CCM contains an oxidation
catalyst. Refer to Figure 2.
Figure 2 - Article 97-6-30
The CCM is not repairable. It must be replaced with the correct CCM.
Low sulfur diesel fuel must be used. High sulfur diesel fuel can reduce the efficiency of the CCM.
WARNING:
EXPOSURE TO SULFATES HAS BEEN SHOWN TO RESULT IN RESPIRATORY DISCOMFORT.
THE USE OF HIGH SULFUR DIESEL FUEL (ABOVE 0.5% SULFUR BY WEIGHT MAXIMUM) WILL
RESULT IN SULFATE FORMATION IN THE EXHAUST GAS, UNDER HIGH LOAD CONTINUOUS
USE.
Blending waste lubricating oil in the fuel is not permitted. The blended oil will accumulate on the
catalyst and plug the CCM.
Internal engine, turbocharger and fuel injector failures may allow debris, excessive engine oil and/or
fuel to accumulate on the catalyst and plug the CCM.
The original equipment (OE) horizontal mounting straps are not reusable. The production straps can
be removed and new service straps installed. Depending on the part number, a service CCM may
come with mounting straps. Refer to Figure 3 for applications. Mounting straps will have to be
ordered separately for those CCM's that do not already come equipped with mounting straps.
Figure 3 - Article 97-6-30
If the catalyst inlet pipe is modified (e.g., for installation of an exhaust brake), any new inlet pipes
must be made of stainless steel, grade 409 or higher, to prevent interior pipe rust from plugging the
catalyst.
Vertical CCM's have a water drain system to prevent water from contacting the catalyst. The water
drain system, consisting of an internal water trap, a drain port, a 90 degree elbow and a water drain
tube, drains water away from the catalyst and directs it to the ground. The drain tube should be
checked periodically to make sure it is not restricted.
Horizontal CCM's with vertical outlet pipes have two (2) 1/4" diameter water drain holes on the bottom
of the CCM body. The drain holes should be checked periodically to make sure they are not
restricted.
A special "Torca" clamp is used to seal and connect the inlet exhaust pipe to the CCM. This special
clamp is required to properly close the "Torca" slots on the CCM inlet. When installed on the CCM,
inlet the clamp bolt should not be positioned over one (1) of the four (4) "Torca" slots. Instead, the
clamp bolt needs to be positioned between the slots in order to seal the connection properly. Refer to
Figure 4. Each new service CCM will come equipped with a new "Torca" clamp. These clamps are
also available individually.
Figure 4 - Article 97-6-30
CCM DIAGNOSTIC PROCEDURES
A CCM back pressure test should be performed when symptoms indicate excessive exhaust system
back pressure may be causing engine driveability concerns, such as low power, hard starting, black
smoke or low turbocharger boost pressure.
A CCM back pressure test should also be performed following an internal engine, turbocharger, or
fuel injector failure and repair. These types of failures may allow engine debris and/or excessive
amounts of engine oil or fuel to accumulate on the catalyst and plug the CCM. The results of this will
be excessive exhaust system back pressure and engine driveability concerns.
Other components in the exhaust system may affect the back pressure test. The integrity of the entire
system should be checked before the test is performed.
The engine data plate should be checked to determine the engine's rated rpm and make sure the
vehicle is equipped with a CCM before the test procedure is performed. Refer to Figure 1.
DIAGNOSTIC PROCEDURE - CCM BACK PRESSURE TEST PROCEDURE
CAUTION:
MAKE SURE VEHICLE PARKING BRAKE IS SET, WHEELS BLOCKED, TRANSMISSION IN NEUTRAL
AND THE AREA AROUND THE VEHICLE AND THE ENGINE IS CLEAR BEFORE PERFORMING THIS
TEST.
1.
Locate the back pressure test port (1/8" NPT fitting).
a.
The test port for the single horizontal CCM and the single vertical CCM is located in the inlet end
cap of the CCM.
b.
The test port for the single horizontal CCM with vertical outlet pipe is located in the exhaust pipe
just downstream of the engine turbocharger.
2.
Install a pressure gauge (Manometer) with a range of 0-60 In. H2O or 0-10 In. Hg. or 0-20 kPa onto
the test port. The Rotunda Diesel Engine Pressure Test Kit (Gauge Bar) 014-00761 has an
appropriate gauge.
3.
Determine the engine's rated rpm. This rated rpm specification is located on the engine data plate.
4.
Install a tachometer if vehicle is not so equipped.
5.
Operate the engine until it reaches normal operating temperature.
6.
Accelerate the engine to its high idle/no load wide open throttle (WOT) limit (maximum engine
speed). The FD engines under these conditions will reach speeds from 10 to 17 percent above their
rated rpm.
a.
If the engine is unable to reach its high idle/no load WOT limit (maximum speed) (rated rpm plus
10%) it will be necessary to first diagnose and repair this concern before the back pressure test
can be performed. Failure to reach rated rpm plus 10% could be caused by a misadjusted throttle
linkage, incorrect engine timing, fuel system restrictions or base engine concerns.
b.
A CCM that is severely plugged could also prevent the engine from reaching its high idle/no load
WOT limit (maximum speed) (rated rpm plus 10%). In this case record the engine rpm and the
CCM back pressure at the maximum obtainable engine speed in the comment section of the
Repair Order and then replace the CCM.
7.
With the engine operating 10 percent above its rated rpm (e.g., rated rpm 2500, engine must operate
at 2750 rpm or above), record the engine rpm and exhaust system back pressure. These results
must be entered into the comments section of the Warranty Repair Order.
8.
The MAXIMUM back pressure limit for both the FD1060 and FD1460 engines is 41 In. H2O or 3 In.
Hg. or 10.2 kPa. If this is exceeded, replace the CCM. Refer to Figure 3 for applications. If the back
pressure is below this specification, then the CCM is not plugged.
DEALER WARRANTY CLAIM PROCEDURE
In the comment section of the Warranty Repair Order, record the engine rpm and exhaust system back
pressure results that were obtained during the test (e.g., Engine Maximum rpm: ______, "CCM Back
Pressure: ____ inches of Hg/H2O or kPa"). A copy of the Warranty Repair Order with this information MUST
be returned with the CCM. The repair order should be placed into an envelope and attached directly to the
CCM.
All CCM assemblies are mandatory return parts. An FCS-700 tag will be issued for each warranty
replacement. The failed CCM must be returned to the Warranty Parts Return Center (WPRC), 7655 Haggerty
Road, Canton, Michigan 48187. Return the CCM, freight prepaid. Claims for freight reimbursement can be
submitted by following the warranty freight reimbursement procedures outlined in the Warranty and Policy
Manual, Section 6.3. The failed CCM should be returned in the service CCM packaging. Remove the CCM
mounting straps, if necessary to package.
NOTE:
IF MOUNTING STRAPS WERE THE CAUSE OF THE CCM FAILURE, THE STRAPS MUST NOT BE
REMOVED; BOTH THE CCM AND STRAPS MUST BE RETURNED AS AN ASSEMBLY.
NOTE:
WARRANTY PAYMENT MAY BE DENIED IF THE CCM IS REPLACED FOR EXCESSIVE BACK
PRESSURE AND THE ENGINE MAXIMUM RPM AND EXHAUST SYSTEM BACK PRESSURE TEST
RESULTS ARE NOT WRITTEN ON THE WARRANTY REPAIR ORDER. A COPY OF THE WARRANTY
REPAIR ORDER WITH THIS INFORMATION MUST BE RETURNED WITH THE CCM. THE REPAIR
ORDER SHOULD BE PLACED INTO AN ENVELOPE AND ATTACHED DIRECTLY TO THE CCM.
OTHER APPLICABLE ARTICLES:
96-19-11
97-1-17
SUPERSEDES: 95-5-28
WARRANTY STATUS: Eligible Under Basic Warranty Coverage And Emissions Warranty Coverage (For
Return Details, Refer To Warranty Claim Procedure In This TSB Article)
LABOR ALLOWANCE
DEALER CODING
OASIS CODES: 403000, 602300, 614000, 614500, 614600
97-7, Publication Date: MARCH 31, 1997
MEDIUM/HEAVY TRUCK:
1996-97 AEROMAX, LOUISVILLE
ISSUE:
The optional roof-mounted sun visor may vibrate excessively at highway speeds. This may be caused by the
attaching bolts not properly securing the sun visor to the roof.
ACTION:
Replace the current fasteners and add two (2) additional fasteners. The new fasteners and the additional two
(2) fasteners should improve the mounting of the sun visor and reduce the possibility of vibration. Refer to the
following Service Procedure for details.
SERVICE PROCEDURE
1.
Remove the six (6) existing sun visor-to-roof attaching screws and discard.
2.
Remove the sun visor and place it on a workbench.
3.
To determine the location of the two (2) new sun visor attaching bolts, first measure the length of the
sun visor to determine its centerpoint and mark. Refer to Figure 1.
Figure 1 - Article 97-7-15
4.
Outboard from the centerpoint, measure 63.5mm (2.5") to each side and mark. Refer to Figure 1.
5.
Measure from the rear edge of the visor forward 38mm (1.5") and mark. Refer to Figure 1.
6.
Then mark the intersection of the two (2) measurements and drill an 8mm hole through the sun visor.
Refer to Figure 1.
7.
Place the sun visor in position on the roof, making sure that all six (6) attaching bolt holes are
aligned. Using the sun visor as a template, mark the location in the roof that corresponds to the two
(2) new holes in the sun visor.
8.
Remove the sun visor and drill a 13mm hole at each of the two (2) marks on the roof.
Refer to Figure 2 for the following Steps.
Figure 2 - Article 97-7-15
9.
Install a new Rivet Nut (N808712-S309) in the two (2) new holes and apply a small amount of Clear
Silicone Rubber Sealer (D6AZ-19562-AA or equivalent meeting Ford specification ESB-M4G92-A)
onto the roof around the new rivet nut.
10.
Remove the protective paper from the new self-adhesive Isolator Pad (E5HZ-9042598-A) and attach
the pad to the new Spacer (obtain locally).
11.
Check the condition of the original sun visor-to-roof isolator pads. If the new pads are needed,
replace them with new Isolator Pads (F6HZ-9053740-AA).
12.
Carefully position the sun visor onto the roof and align the attaching bolt holes.
13.
Flatwashers will be needed as spacers between the sun visor and the roof at the two (2) new
attaching screw locations. Obtain locally, six (6) stainless steel 5/16" or 3/8"x1/8" washers and place
three (3) washers between the roof/isolator pad and new sun visor at each of the two (2) new
attaching locations.
14.
Install six (6) new Screw and Washer Assemblies (N606689-S55) through the original six (6) hole
positions.
15.
Install the two (2) new Screw and Washer Assemblies (N606691-S101) through the two (2) new sun
visor holes with the new spacer/pad assemblies into the new rivet nuts.
16.
Make sure the sun visor is properly aligned and torque all the fasteners to 22-32 N-m (16-24 lb-ft).
OTHER APPLICABLE ARTICLES: NONE
WARRANTY STATUS: Eligible Under Basic Warranty Coverage
LABOR ALLOWANCE
DEALER CODING
OASIS CODES: 108000, 111000, 701000, 703000
97-7, Publication Date: MARCH 31, 1997
MEDIUM/HEAVY TRUCK:
1992-97 C SERIES, F & B SERIES, L SERIES
1996-97 AEROMAX, LOUISVILLE
ISSUE:
There have been several requests from the field to clarify the Bosch warranty policy and procedures for
components used on FD1060 and FD1460 engines.
ACTION:
Refer to the following text for service information regarding Bosch policies and procedure on warrantable
repairs.
The Bosch warranty coverage on fuel injection components used on FD1060 and FD1460 engines is 2 years
from a vehicle's warranty start date or 160,900 km (100,000 miles), whichever comes first.
For vehicles that have exceeded the time and mileage limits of the Bosch warranty, certain components may
still be covered under the Ford warranty. Specific information regarding the Ford warranty can be found in the
Ford Warranty and Policy Manual.
If a Bosch component is suspect of failure it should be removed from the engine and brought to a Bosch
Diesel Service Dealer (DSD) for diagnosis, repair and or replacement. It is very important that the DSD be
advised if the failed component is still covered within the Bosch warranty program. The DSD will then
be able to submit for payment the necessary repairs through the Bosch warranty system. In order for the DSD
to file a warranty claim, certain information regarding the vehicle and the failed Bosch component is required.
This information should be provided to the DSD when the component is brought in for service. The required
information is:
Customer complaint/engine driveability concern
Engine make and model
Engine serial number
Vehicle make and model
Vehicle delivery date or warranty start date
Failed component part number
Failed component/vehicle miles or hours of operation
Failure date/vehicle repair date
Bosch provides a form entitled "Request for Warranty Repair" that highlights the required information. It is
available from the local DSD and is a useful tool to ensure all the required information is provided.
In some cases, the Bosch warranty may have expired, however, a vehicle may still be covered under the Ford
warranty. In these cases, the failed component should still be repaired at a Bosch DSD and a claim for the
cost submitted to Ford Motor Company following the procedure listed in the Ford Warranty and Policy Manual.
Additional questions regarding Bosch warranty policies and procedure should be directed to your local Bosch
DSD.
NOTE:
IF THE FUEL INJECTION PUMP IS RETURNED TO A DSD FOR DIAGNOSIS AND/OR REPAIR, IT IS
VERY IMPORTANT THAT THE OVERFLOW CHECK VALVE/FUEL PRESSURE VALVE BE RETURNED
WITH THE PUMP. THIS WILL ENSURE THAT THE DSD WILL BE ABLE TO MAKE THE PROPER
DIAGNOSIS.
OTHER APPLICABLE ARTICLES: NONE
WARRANTY STATUS: INFORMATION ONLY
OASIS CODES: 404000
97-7, Publication Date: MARCH 31, 1997
MEDIUM/HEAVY TRUCK:
1996-97 AEROMAX, LOUISVILLE
ISSUE:
Intermittent or complete loss of the electrical system may be experienced on some vehicles. This may be due
to the improper seating of the single terminal ground system connectors which are used to connect the
-14290- wire harness to the -14289- or -14305- wire assemblies.
ACTION:
Gain access to the ground system connectors and fully seat the connections. Refer to the following Service
Procedure for details.
SERVICE PROCEDURE
1.
Raise the hood to gain access to the left inner fender splash panel.
2.
Loosen the fender splash panel forward retaining nut. DO NOT REMOVE THE NUT.
3.
While supporting the fender splash panel, remove the remaining five (5) nuts and then carefully
remove the fender splash panel.
4.
Locate the ground system single terminal connectors (Figure 1) that connect the -14290- wire
assembly to the -14289- or -14305- wire assemblies.
Figure 1 - Article 97-7-17
5.
The two (2) ground circuits are tagged green and blue for identification. In addition, if the vehicle is
equipped with a sleeper, there will be a third ground system connector in this location that will need to
be checked.
6.
With channel lock pliers, carefully seat each connector completely. Seating the connectors by hand
will not supply sufficient force to completely seat the connectors.
7.
Reinstall the inner fender splash panel and the retaining screws.
OTHER APPLICABLE ARTICLES: NONE
WARRANTY STATUS: Eligible Under Basic Warranty Coverage
LABOR ALLOWANCE
DEALER CODING
OASIS CODES: 203000, 203200
TSB Article 97-8-3 has been superseded by Article 98-2-1.
97-9, Publication Date: APRIL 28, 1997
MEDIUM/HEAVY TRUCK:
1996-98 AEROMAX, LOUISVILLE
ISSUE:
The generator drive belts may wear excessively and/or roll off the Front End Accessory Drive (FEAD) pulleys
on some vehicles. This may be caused by the belts oscillating excessively at certain engine rpms.
ACTION:
Replace the current belts with revised belts. The revised belts are banded and are less susceptible to
oscillations. This should reduce the belt wear and roll-off concern. Refer to the following Service Procedure for
details.
SERVICE PROCEDURE
1.
Remove the two (2) single V-belts from the generator and engine pulleys. Refer to the appropriate
year Louisville/AeroMax Service Manual, Page 03C-05-1 for removal procedures.
2.
Check the conditions of the drive pulleys. Make sure they are free of nicks, debris, etc.
3.
Install the new banded belt over the generator pulleys and engine pulleys. Be sure the belts are
properly seated in the pulleys.
4.
Tighten the generator adjusting bolt so that the belt tension on the new banded belt is within 183-203
N-m (135-150 lb-ft).
OTHER APPLICABLE ARTICLES: NONE
WARRANTY STATUS: Eligible Under Basic Warranty Coverage
LABOR ALLOWANCE
DEALER CODING
OASIS CODES: 203000, 203100, 205000, 499000
97-10, Publication Date: MAY 12, 1997
MEDIUM/HEAVY TRUCK:
1993-97 CARGO SERIES, F SERIES, L SERIES
ISSUE:
The engine may leak oil at the air brake compressor on some vehicles. This may be caused by insufficient
rear support of the air brake compressor.
ACTION:
Replace the rear air brake compressor support bracket with a new bracket. The new bracket will provide
additional support to reduce the possibility of oil leakage. Refer to the following Service Procedure for details.
SERVICE PROCEDURE
NOTE:
THIS PROCEDURE DETAILS THE REMOVAL AND INSTALLATION OF THE AIR BRAKE REAR
SUPPORT BRACKET ONLY. IF ENGINE OIL IS LEAKING FROM THE AIR BRAKE COMPRESSOR TO
FRONT COVER ATTACHMENT POINT, IT MAY BE NECESSARY TO RESOLVE THE ENGINE OIL
LEAK BEFORE REPLACING THE BRACKET AS OUTLINED IN THIS TSB ARTICLE. REFER TO THE
APPROPRIATE MODEL/YEAR SERVICE MANUAL FOR COMPLETE AIR COMPRESSOR AND GASKET
REMOVAL AND INSTALLATION PROCEDURES.
Refer to Figure 1.
Figure 1 - Article 97-10-11
1.
Remove and discard the existing air compressor support bracket and the four (4) bracket retaining
bolts.
Refer to Figure 2.
Figure 2 - Article 97-10-11
2.
Coat the four (4) new Bolts (N807470-S36) with Loctite 242 or equivalent.
3.
Position the new Support Bracket (F7HZ-2902-BA) onto the air compressor and engine bracket.
4.
Install the four (4) new bolts, torquing the bolts to 41-62 N-m (30-46 lb-ft).
OTHER APPLICABLE ARTICLES: NONE
WARRANTY STATUS: Eligible Under Basic Warranty Coverage
LABOR ALLOWANCE
DEALER CODING
OASIS CODES: 301000, 302000, 401000, 497000, 499000
97-10, Publication Date: MAY 12, 1997
MEDIUM/HEAVY TRUCK:
1997 AEROMAX, LOUISVILLE
ISSUE:
A loss of power, and inoperative or erratic speedometer and cruise control may occur on some vehicles. The
Malfunction Indicator Lamp (MIL) may illuminate with Electronic Control Module (ECM) fault codes:
31 and 36 for CAT engines
241 and 242 for Cummins engines
54 and 58 for DDC engines
This may be caused by a complete or intermittent loss of the Vehicle Speed Sensor (VSS) signal to the ECM.
ACTION:
Verify wire harness and connector integrity by referring to the following Service Procedure, Steps 1-3. Refer to
Step 4 if engine loss of power occurs after the instrument cluster has been heat-soaked through normal
operation. In addition, refer to the 1997 Louisville/AeroMax Service Manual, Sections 03C and 13 for normal
diagnostic and repair of the VSS, cruise control and instrumentation/warning systems.
SERVICE PROCEDURE
1.
VSS Connector Terminal Crimp
a.
Unplug the VSS connector at the transmission.
NOTE:
THE WIRE ASSEMBLY CONNECTOR USED AT THE VSS IS A PULL-TO-SEAT TYPE
CONNECTOR. TO INSPECT THE WIRE TERMINAL CRIMPS, CAREFULLY PUSH THE
TERMINALS AND WIRES TOWARD THE FRONT OF THE CONNECTOR HARD SHELL.
b.
Each terminal will have separate insulation and conductor crimps. If both insulation and conductor
have been crimped at the conductor crimp location, this will result in a loss of conductor integrity
at the crimp and an intermittent or continuous loss of the vehicle speed input signal to the
speedometer. If loss of conductor integrity is found, go to the following Step 1c.
c.
2.
Replace the connector assembly with Connector Kit F6HZ-14A464-DEA. Refer to TSB
«97-10-13» for additional kit information.
Electronic Control Module (ECM) Connector Terminal Crimp - -12A581- Wire Assembly (DDC Series
60 Engines)
a.
Unplug the -12A581- wire assembly to the ECM connector.
NOTE:
THE WIRE ASSEMBLY CONNECTOR USED AT THE ECM IS A PULL-TO-SEAT CONNECTOR.
TO INSPECT THE VEHICLE SPEED INPUT CIRCUIT (CK-614 GREEN) LOCATED AT PIN E2,
CAREFULLY PUSH THE TERMINAL AND WIRE TOWARD THE FRONT OF THE CONNECTOR
HARD SHELL.
b.
The terminal will have separate insulation and conductor crimps. If both insulation and conductor
have been crimped at the conductor crimp, this will result in a loss of conductor integrity at the
crimp and an intermittent or continuous loss of the vehicle speed input signal to the ECM. If loss
of conductor integrity is found, go to Step 2c.
c.
Replace the damaged terminal with a terminal and wire pigtail assembly from the VSS Connector
Kit (F6HZ-14A464-DEA). Refer to TSB «97-10-13» for additional kit information.
3.
Speedometer Head - 16-Way Connector Terminals - -14401- Wire Assembly
a.
If Steps 1a-2c indicate no problem and an intermittent or no signal condition is present, carefully
inspect the speedometer head to -14401- wire assembly connector.
CAUTION:
DO NOT ATTEMPT TO PROBE THE SPEEDOMETER HEAD-TO-WIRE ASSEMBLY
CONNECTOR FROM THE FRONT.
b.
Inspect the connector for deformed terminals by looking into the front of the connector.
c.
If the connector hard shell or any terminals show signs of damage, replace the connector with the
connector assembly found in Connector Kit (F7HZ-14A464-AB).
4.
Speedometer Head - Loss Of Digital Output Signal To ECM - Erratic Or Inoperative Speedometer
a.
Check the vehicle production date. If the production date is earlier than 1/14/97, remove the
speedometer assembly.
b.
Check the speedometer head for a tag showing alert number 10695533. Electronic cluster gauges
will have the alert sticker placed on the metal housing of the tachometer. Individual case gauges
will have the alert sticker on the plastic housing of the gauge.
If no alert sticker is found, and the engineering number is one of the following:
F7HT-17255-AB
F7HT-17255-BB
F7HT-17C290-AB
F7HT-17C290-BB
F7HT-17C290-CB
F7HT-17C290-DB
replace the speedometer assembly.
Refer to the following Speedometer Assembly Description Chart for part number.
c.
Set the speedometer and, if applicable, tachometer calibration as per the procedure outline in the
1997 Louisville/AeroMax Service Manual, Section 13.
d.
If needed, the speedometer repair can be verified by performing the following Speedometer Heat
Test.
SPEEDOMETER ASSEMBLY HEAT SENSITIVITY/HEAT SOAK TEST
NOTE:
TESTS MUST BE PERFORMED WITH THE SPEEDOMETER ASSEMBLY COMPLETELY INSTALLED.
PERFORMING THE HEAT SOAK/BREAKDOWN TEST WITH THE ASSEMBLY REMOVED WILL BE
INEFFECTIVE.
1.
Clear any active/inactive codes from the ECM. Start the engine, turn on instrument panel lights, set
fan to high speed, heat to full "hot" position and vent ducts to floor position.
2.
With windows closed, bring the engine and cab to full operating temperature.
3.
After allowing the speedometer head and instrument panel assembly to fully heat soak, speedometer
operation and vehicle speed signal output to the ECM can be verified by road testing or dynamometer
testing. The test may also be performed by operating the transmission in high gear at engine idle with
the transmission coupling shaft removed.
4.
With instrument panel lights on and the heater on high as per Step 1 of this test, the engine should
not derate, speedometer become inoperative/erratic, or the check engine light come on during the
test.
5.
Verify that the ECM has not logged a loss of vehicle speed signal fault code to complete the test.
OTHER APPLICABLE ARTICLES:
97-10-13
WARRANTY STATUS: Eligible Under Basic Warranty Coverage
LABOR ALLOWANCE
DEALER CODING
OASIS CODES: 204000, 204200, 205000, 609000, 610000, 612000, 614000, 698298
97-10, Publication Date: MAY 12, 1997
MEDIUM/HEAVY TRUCK:
1996-97 AEROMAX, LOUISVILLE
This TSB article is being republished in its entirety to include the latest level parts for repairing the
Speedometer and Tachometer.
ISSUE:
Kits for repairing wire harness connectors are now available for service. These kits will save the cost of
replacing an entire wiring harness when only the connector needs replacing.
ACTION:
If connector repairs are required and you desire to purchase a kit(s), refer to the Connector Repair Kits Chart
in this TSB article to order the proper repair kit.
The connector repair kits provide service to in-line and component connectors, fuse panel and power
distribution box terminals, and bulkhead connectors.
IN-LINE AND COMPONENT CONNECTORS
Each kit contains a connector, pigtail assemblies (terminals and butt splice crimped to a 203mm (8") wire) and
applicable spacer and grommet. The kit contains material to completely replace an entire connector,
independent of usage.
FUSE PANEL, POWER DISTRIBUTION BOX AND BULKHEAD TERMINALS
Each kit contains pigtail assemblies in various wire gauges to provide terminal replacement for one of the
following components:
Fuses
Relays
Circuit Breakers
Customer Access Studs
Bulkhead Connectors (cab and engine compartment)
BULKHEAD CONNECTOR
Each cab and engine compartment bulkhead connector is offered individually.
OTHER APPLICABLE ARTICLES: NONE
SUPERSEDES: 96-23-23
WARRANTY STATUS: INFORMATION ONLY
OASIS CODES: 203000, 203200
97-11, Publication Date: MAY 27, 1997
MEDIUM/HEAVY TRUCK:
1996-97 AEROMAX, LOUISVILLE
ISSUE:
An additional module is needed to allow the 4-way flashers to function with the service brakes applied,
depending on the vocation of the truck. The standard Signal-Stat multi-function switch does not allow the
4-way flashers to function with the service brakes applied.
ACTION:
Install a new Brake Override Module. The new module in series with the Signal-Stat multi-function switch will
allow the 4-way flashers to function with the service brake applied. Refer to the following Service Procedure
for details.
NOTE:
THIS INFORMATION IS ONLY APPLICABLE TO THE SIGNAL-STAT (TRACTOR PACKAGE) TURN
SIGNAL SYSTEM.
SERVICE PROCEDURE
This is an information only TSB article. This is a Domestic Special Order (DSO) option that the customer may
now need, due to a change in the vocation of the truck. Start with Step 1 for electronic engines. For
mechanical engines, start with Step 2.
1.
If equipped with an electronic engine, remove the Deutsch engine diagnostic plug bracket mounted
below the instrument panel on the left side of the steering column. Install a new Module Mounting
Bracket (F7HZ-14A206-BB) and relocate the Deutsch engine diagnsotic plug to the new mounting
bracket.
2.
On mechanical engines, install a Module Mounting Bracket (F7HZ-14A206-BB) below the instrument
panel on the left side of the steering column.
3.
Disconnect Connector C254 from the Signal-Stat multi-function switch and install a Brake Override
Module (F7HZ-13A318-BA) in series. Mount the Brake Override Module to the new mounting bracket.
Refer to the Louisville/AeroMax Electrical and Vacuum Troubleshooting Manual (EVTM), Page 90-2.
4.
Plug the Ground Wire (F7HZ-14N000-AA) into the module ground terminal and the eyelet into a
suitable ground location. A ground possibility would be the fuse panel terminal post "C".
OTHER APPLICABLE ARTICLES: NONE
WARRANTY STATUS: INFORMATION ONLY
OASIS CODES: 201000, 201200, 301000
97-11, Publication Date: MAY 27, 1997
MEDIUM/HEAVY TRUCK:
1993-97 CARGO SERIES, F SERIES, L SERIES
ISSUE:
The engine may leak oil between the air brake compressor and engine gear housing mating point on some
vehicles. This may be caused by the gasket not sealing properly between these two points.
ACTION:
Replace the original gasket with a revised Gasket. The revised gasket has been redesigned to provide an
improved sealing surface to reduce the possibility of oil leakage. Refer to the following text for details.
The removal and installation procedures for the air brake compressor and the revised gasket can be found in
the appropriate model/year Service Manual, Section 06-08A.
NOTE:
FOR THE REVISED GASKET TO PERFORM PROPERLY, IT IS VERY IMPORTANT THAT THE AIR
BRAKE COMPRESSOR BE MOUNTED SECURELY TO THE FRONT GEAR HOUSING. MAKE SURE
THE TWO (2) STUDS AND NUTS THAT SECURE THE AIR BRAKE COMPRESSOR TO THE FRONT
GEAR HOUSING ARE SOUND, COATED WITH LOCTITE AND TORQUED TO THE FOLLOWING
SPECIFICATIONS: AIR COMPRESSOR MOUNTING STUDS 60-95 N-m (44-70 LB-FT) AND AIR
COMPRESSOR ATTACHING NUTS 60-95 N-m (44-70 LB-FT). THE AIR BRAKE COMPRESSOR REAR
SUPPORT BRACKET MUST ALSO BE MOUNTED PROPERLY AND ITS FASTENERS COATED WITH
LOCTITE AND TORQUED PROPERLY. ADDITIONAL INFORMATION REGARDING THE AIR BRAKE
COMPRESSOR CAN BE FOUND IN THE FOLLOWING TSBs, «94-9-18», «95-15-17», AND TSB
«97-10-11».
OTHER APPLICABLE ARTICLES:
94-9-18
95-15-17
97-10-11
WARRANTY STATUS: Eligible Under Basic Warranty Coverage
LABOR ALLOWANCE
DEALER CODING
OASIS CODES: 301000, 302000, 401000, 497000, 499000
97-12, Publication Date: JUNE 9, 1997
MEDIUM/HEAVY TRUCK:
1996-97 AEROMAX, LOUISVILLE
ISSUE:
The turn signal switch may self-cancel when the steering column and/or vehicle is jarred. This may be caused
by insufficient detent within the switch for the turn signal switch lever.
ACTION:
Replace the turn signal switch with a revised Turn Signal Switch (F7HZ-13B302-DA) which has an improved
detent. Refer to Section 17-01 of the appropriate year Louisville/AeroMax Service Manual for removal and
installation procedures.
NOTE:
THE NEW TURN SIGNAL SWITCH HAS A LONGER WIRING HARNESS WHICH NOW CONNECTS
DIRECTLY TO THE WIPER MOTOR (REFER TO FIGURE 1). WITH THE NEW SWITCH, THE JUMPER
HARNESS THAT WAS USED TO CONNECT THE PREVIOUS SWITCH TO THE WIPER MOTOR IS NO
LONGER NEEDED AND SHOULD BE REMOVED AND DISCARDED.
Figure 1 - Article 97-12-14
OTHER APPLICABLE ARTICLES: NONE
WARRANTY STATUS: Eligible Under Basic Warranty Coverage
LABOR ALLOWANCE
DEALER CODING
OASIS CODES: 201000, 201200, 203000
97-12, Publication Date: JUNE 9, 1997
MEDIUM/HEAVY TRUCK:
1997-98 AEROMAX, LOUISVILLE
ISSUE:
A "rattling" noise may be heard coming from the clutch linkage on some vehicles. This noise is most prevalent
when the vehicle is being driven under load at highway speeds. This may be caused by vibrations generated
by the engine, transmission, and driveline that are transmitted through the hard mechanical clutch linkage into
the cab.
ACTION:
Replace the original clutch rod end with the new elastomeric rod end. The new rod end has an internal rubber
isolator which may reduce the amount of vibrations that can be transmitted through the clutch rod. Refer to the
following Service Procedure for details.
SERVICE PROCEDURE
Refer to Figures 1 and 2 for Step 1 of the Service Procedure.
Figure 1 - Article 97-12-15
Figure 2 - Article 97-12-15
NOTE:
TO ENSURE PROPER OPERATION, IT IS VERY IMPORTANT THAT THE STANDARD PARTS
PROVIDED IN THIS TSB BE USED TO INSTALL THE NEW ELASTOMERIC ROD.
1.
Remove the clutch rod assembly from the vehicle.
a.
Remove the nut (at the top of the rod) retaining the clutch rod to the clutch pedal shaft and lever.
Discard the nut.
NOTE:
BEFORE REMOVING THE CLUTCH ROD ASSEMBLY FROM THE CLUTCH ROD LEVER AT THE
TRANSMISSION, BE SURE TO NOTICE ITS ORIENTATION. THE CLUTCH ROD WILL EITHER
BE INBOARD (BETWEEN THE CLUTCH LEVER AND THE TRANSMISSION) OR OUTBOARD OF
THE CLUTCH LEVER (OPPOSITE THE TRANSMISSION, BETWEEN THE CLUTCH LEVER AND
THE FRAME).
2.
b.
Remove the nut (at the bottom of the rod) retaining the clutch rod to the clutch release lever.
Discard the nut.
c.
Remove the clutch rod assembly from the vehicle.
Secure the clutch rod in a vise so that the lower ball stud (the ball stud that attaches to the clutch
release lever) is accessible.
Refer to Figure 3 for Steps 3 and 4 of the Service Procedure.
Figure 3 - Article 97-12-15
3.
Measure the distance from the center of the ball stud to the collar of the clutch rod as shown in
Figure 3. Note this measurement.
4.
In addition, mark the clutch rod to note the orientation of the ball stud in relation to the clutch rod.
NOTE:
THE ORIGINAL BALL STUD WAS CRIMPED ONTO THE CLUTCH ROD. IN ORDER TO INSTALL
THE NEW ELASTOMERIC ROD END, THE ORIGINAL BALL STUD MUST BE REMOVED. THIS
MUST BE DONE CAREFULLY TO PREVENT DAMAGE TO THE CLUTCH ROD THREADS.
5.
Using a die grinder with a metal cutting bit, carefully cut the original ball stud shank lengthwise
making sure not to cut the threads of the clutch rod. Several cuts can be made to ease removal.
6.
With the cuts made, the ball stud can now be rotated off the clutch rod threads.
7.
Inspect the threads on the rod for damage. If necessary, a die, 3/8-24 UNF, may be used to clean up
the threads.
Refer to Figure 3 for Step 8 of the Service Procedure.
8.
Assemble the new Elastomeric Rod End (F7HZ-7B537-CC) onto the clutch rod.
a.
Thread the new Stop Nut (355571-S8) onto the clutch rod.
NOTE:
IT IS VERY IMPORTANT THAT THE NEW ELASTOMERIC ROD END BE INSTALLED IN THE
SAME POSITION AND ORIENTATION AS THE ORIGINAL BALL STUD.
b.
Thread the new rod end onto the clutch rod until the same dimension is obtained as was
measured in Step 3.
c.
Make sure the orientation of the rod is the same as the original.
d.
Tighten the stop nut against the new rod end.
9.
10.
Install the clutch rod onto the vehicle.
a.
Place the clutch rod either inboard or outboard of the clutch release lever, as was noted in Step 1.
b.
Install the new Bolt (58638-S100) through the new Washer (391817-S421M), the new rod end,
and then through the clutch release lever. Install the new Nut (382802-S36) onto the bolt. Torque
the nut to 42-57 N-m (31-42 lb-ft). Do not exceed this torque value.
c.
Attach the upper end of the clutch rod onto the clutch pedal shaft and lever. Install a new Nut
(391494-S2) and torque the nut to 42-57 N-m (31-42 lb-ft).
Cycle the clutch pedal several times to be sure the linkage operates correctly.
NOTE:
THIS PROCEDURE SHOULD NOT AFFECT THE CLUTCH PEDAL ADJUSTMENT. HOWEVER, IF
CLUTCH PEDAL ADJUSTMENT IS NEEDED, REFER TO SECTION 08-02 OF THE APPROPRIATE
YEAR LOUISVILLE/AEROMAX SERVICE MANUAL FOR THE ADJUSTMENT PROCEDURE.
OTHER APPLICABLE ARTICLES: NONE
WARRANTY STATUS: Eligible Under Basic Warranty Coverage
LABOR ALLOWANCE
DEALER CODING
OASIS CODES: 497000, 506000, 597997, 702000
97-13, Publication Date: JUNE 23, 1997
MEDIUM/HEAVY TRUCK:
1997 LOUISVILLE
ISSUE:
There may be insufficient cab heat on some vehicles. This may be caused by the hot water supply being
incorrectly routed from the radiator.
ACTION:
Relocate the hot water supply to the engine block to provide sufficient cab heat. Refer to the following Service
Procedure for details.
SERVICE PROCEDURE
NOTE:
COMPONENTS WHICH ARE THREADED WITH AN NPT SHOULD NOT BE REUSED. ONLY
COMPONENTS WITH NEW PIPE THREADS AND SEALANT SHOULD BE USED IN THE
MODIFICATION DESCRIBED IN THIS TSB ARTICLE.
1.
Drain engine coolant to a level just below the top of the water jacket.
2.
Remove the heater core supply hose (lower hose) from the heater core and current valve location on
the upper radiator pipe.
3.
Remove heater control valve and all attached elbows and fittings from the upper radiator pipe and
install a new Plug (obtain locally) into the boss where the valve was located.
4.
Remove all components and plugs from the two (2) water jacket penetrations near the top, forward
portion of the engine immediately before the thermostat housing.
5.
Assemble the Heater Water Inlet Tube Assembly (F2HZ-18696-C), T-fitting (obtain locally), Pipe
Connector 5/8x1/2" (obtain locally), Heater Water Control Valve Assembly (FOHZ-18495-A), Elbow 45 Degree (obtain locally), and Pipe Connector 3/4x1/2" (obtain locally) into the water jacket
penetration nearest engine centerline. Refer to Figure 1.
Figure 1 - Article 97-13-24
6.
Connect upper hose connector coming out of the shutoff valve and Heater Core Inlet (standard bulk
hose or silicone hose) with existing sleeve protector cut to 584mm (23"), and secure hose at both
ends with Hose Clamps (E9HS-8287-CA). Secure air compressor coolant hose to the other hose
connector hose clamp in the T-fitting with an existing hose clamp (Figure 1).
7.
Into the other open water jacket penetration, nearest lift hook, install a 1/4x1/2" Bushing (obtain
locally), then the Water Outlet Adapter (F6HZ-8K554-A) and the quiescent vent line.
8.
All fitting orientations shall be such that no hoses contact any other engine component.
9.
Refill engine coolant to correct level and check for leaks.
OTHER APPLICABLE ARTICLES: NONE
WARRANTY STATUS: Eligible Under Basic Warranty Coverage
LABOR ALLOWANCE
DEALER CODING
OASIS CODES: 208000, 208100, 208999
97-14, Publication Date: JULY 7, 1997
MEDIUM/HEAVY TRUCK:
1996-98 AEROMAX, LOUISVILLE
ISSUE:
The air horn lanyard may become loose and/or unattached from the air horn valve. This may be due to the air
horn valve fastener not being able to properly fasten the lanyard to the valve.
ACTION:
Replace the air horn and lanyard assembly. The new valve and lanyard have been revised to reduce the
possibility of the lanyard pulling away from the valve. Refer to Section 13-01 of the appropriate
Louisville/AeroMax Service Manual for removal and installation procedures.
OTHER APPLICABLE ARTICLES: NONE
WARRANTY STATUS: Eligible Under Basic Warranty Coverage
LABOR ALLOWANCE
DEALER CODING
OASIS CODES: 203000, 205000
97-15, Publication Date: JULY 21, 1997
MEDIUM/HEAVY TRUCK:
1975-96 L SERIES
ISSUE:
The windows may be hard to roll up and/or down. This may be caused by corrosion buildup within the window
regulator mechanism.
ACTION:
Replace the window regulator with a revised regulator which has added a corrosion coating on the regulator to
reduce the possibility of corrosion. Refer to the appropriate L-Series Service Manual, Section 01-11, for
removal and installation procedures.
OTHER APPLICABLE ARTICLES: NONE
WARRANTY STATUS: Eligible Under Basic Warranty Coverage
LABOR ALLOWANCE
DEALER CODING
OASIS CODES: 102000, 110000
97-15, Publication Date: JULY 21, 1997
Not enough memory.
MEDIUM/HEAVY TRUCK:
1996-97 AEROMAX, LOUISVILLE
1996-98 CARGO SERIES, F & B SERIES, L SERIES
ISSUE:
A brake "squealing" noise and/or vibration may be heard or felt on some vehicles traveling at low speeds with
a light load. This may be caused by the brake lining material.
ACTION:
Replace the brake linings. The new linings have been revised with a different material to reduce the possibility
of noise and/or vibration at low speeds with a light load. Refer to the appropriate model/year Service Manual
for removal and installation procedures.
NOTE:
THE BRAKE LININGS LISTED IN THIS ARTICLE ONLY APPLY TO VEHICLES EQUIPPED WITH
Q-PLUS BRAKES.
OTHER APPLICABLE ARTICLES: NONE
WARRANTY STATUS: Eligible Under Basic Warranty Coverage
LABOR ALLOWANCE
DEALER CODING
OASIS CODES: 301000, 702000, 702100, 702200, 703000
97-16, Publication Date: AUGUST 4, 1997
MEDIUM/HEAVY TRUCK:
1996-98 AEROMAX, LOUISVILLE
ISSUE:
The exhaust pipe may crack on some vehicles at the muffler inlet. The original exhaust pipe is not robust
enough and results in cracking around the pipe flange where it mates with the turbocharger outlet.
ACTION:
Replace the muffler inlet pipe with a revised pipe to reduce the potential for cracking. Refer to Section 09-00
of the appropriate Louisville/AeroMax Service Manual for removal and installation procedures.
OTHER APPLICABLE ARTICLES: NONE
WARRANTY STATUS: Eligible Under Basic Warranty Coverage
LABOR ALLOWANCE
DEALER CODING
OASIS CODES: 403000
97-18, Publication Date: SEPTEMBER 2, 1997
MEDIUM/HEAVY TRUCK:
1998 AEROMAX, F & B SERIES, LOUISVILLE
ISSUE:
The specification for the air brake governor cut-in and cut-out on vehicles equipped with air brakes has been
changed starting with vehicles built after 3/1/97. This is due to a change in Federal Regulations concerning air
brake systems.
ACTION:
Refer to the following text for the new specifications.
Additional information regarding air brake supply systems and the air brake governor can be found in Section
06 of the appropriate Service Manual.
For vehicles built after 3/1/97, the air brake governor specifications are:
Cut-in pressure - 765 ±76 kPa (111 ±11 PSI)
Cut-out pressure - 896 ±34 kPa (130 ±5 PSI)
For vehicles built before 3/1/97, the air brake governor specifications are:
Cut-in pressure - When pressure drops below cut-out pressure by 83-179 kPa (12-26 PSI)
Cut-out pressure - 827 ±34 kPa (120 ±5 PSI)
OTHER APPLICABLE ARTICLES: NONE
WARRANTY STATUS: INFORMATION ONLY
OASIS CODES: 301000, 302000, 390000
TSB Article 97-18-15 has been superseded by Article 97-19-23.
TSB Article 97-18-16 has been superseded by Article 97-19-24.
97-18, Publication Date: SEPTEMBER 2, 1997
MEDIUM/HEAVY TRUCK:
1995-98 AEROMAX, L SERIES, LOUISVILLE
ISSUE:
A service caution is necessary when reprogramming electronic diesel engine management systems
(Powertrain Control Module/Electronic Control Unit).
ACTION:
Some electronically controlled diesel engines can be modified to increase engine output by altering the
original engine management system. Such modification may result in damage to the drivetrain and chassis
components designed to accommodate original engine output levels. These modifications may void the
vehicle warranty for affected components as stated in the vehicle's warranty guide.
OTHER APPLICABLE ARTICLES: NONE
WARRANTY STATUS: INFORMATION ONLY
OASIS CODES: 614000, 614500, 614600
TSB Article 97-19-10 has been superseded by Article 98-10-4.
97-19, Publication Date: SEPTEMBER 15, 1997
MEDIUM/HEAVY TRUCK:
1996-98 LOUISVILLE
ISSUE:
The vehicle may wander or dart after contacting uneven pavement. This may be caused by the addition of
aftermarket pusher axles or tag rear axles and their affect on the front end geometry.
ACTION:
Install new steering and suspension components. Refer to the following Service Procedure for details.
SERVICE PROCEDURE
NOTE:
THE SERVICE PROCEDURE IN THIS TSB ARTICLE PROVIDES ONLY A GENERAL GUIDELINE FOR
DIAGNOSING AND REPAIRING A POTENTIAL STEERING WANDER OR DARTING CONCERN ON
CERTAIN LOUISVILLE VEHICLES. COMPLETE DIAGNOSTIC AND SERVICE (INCLUDING PART
REMOVAL AND INSTALLATION PROCEDURES AND FASTENER TORQUE SPECIFICATIONS)
INFORMATION FOR THE PARTS PROVIDED IN THE ARTICLE CAN BE FOUND IN THE
APPROPRIATE YEAR LOUISVILLE/AEROMAX SERVICE MANUAL, SECTIONS 04 AND 11.
CAUTION:
ON SOME VEHICLES IT WILL BE NECESSARY TO DRILL NEW MOUNTING HOLES FOR THE UPPER
SHOCK BRACKET INTO EACH FRAME RAIL. CARE SHOULD BE TAKEN WHEN PERFORMING THE
DRILLING OPERATION TO PREVENT DAMAGE TO THE FRAME AND SURROUNDING
COMPONENTS. REFER TO THE FORD BODY BUILDERS LAYOUT BOOK FOR ADDITIONAL
INFORMATION REGARDING FRAME RAIL MODIFICATIONS.
1.
Verify the concern.
NOTE:
INSPECT THE VEHICLE TO DETERMINE IF A MODIFICATION HAS BEEN MADE TO THE FRONT
SUSPENSION OF THE VEHICLE. SOME VEHICLES COMPLETED AS DUMP TRUCKS HAVE
ADDITIONAL PUSHER OR TAG REAR AXLES, AND TO LEVEL OUT THE FRAME, SPACERS OR
ADDITIONAL SPRING LEAVES MAY HAVE BEEN ADDED TO THE FRONT SPRINGS. THE
MAXIMUM ALLOWABLE SPRING PACK THICKNESS IS 134.1mm (5.28") WITH THE CASTER
WEDGE INCLUDED (NEW SPRINGS HAVE A CASTER WEDGE INCLUDED IN THE SPRING
PACK). IF THE SPRING PACK IS THICKER, THE EXTRA LEAVES MUST BE REMOVED.
2.
Balance the front tires.
3.
Check and correct, if necessary, front wheel runout if it exceeds 2.28mm (0.090").
4.
Refer to the following chart:
Figure 1 - Article 97-19-21
Figure 2 - Article 97-19-21
Figure 3 - Article 97-19-21
Figure 4 - Article 97-19-21
5.
Replace the two (2) existing pitman arms with revised Pitman Arms (F8HZ-3590-CA - Right Side, and
F8HZ-3590-DA - Left Side) (Figure 3).
6.
Check the front end caster and toe-in, and if necessary adjust to specifications listed in the
appropriate Louisville/AeroMax Service Manual, Section 04-00.
OTHER APPLICABLE ARTICLES: NONE
WARRANTY STATUS: Eligible Under Basic Warranty Coverage
LABOR ALLOWANCE
DEALER CODING
OASIS CODES: 303000, 304000
97-19, Publication Date: SEPTEMBER 15, 1997
MEDIUM/HEAVY TRUCK:
1996-98 AEROMAX, LOUISVILLE
ISSUE:
The tachometer may become inoperative and/or erratic on some vehicles equipped with a mechanical engine.
This may be due to a defective and/or improperly adjusted tachometer sensor.
ACTION:
Install a new tachometer sensor that has a plastic spacer used to set initial gap. The correct gap should
reduce the possibility of an inoperative and/or erratic tachometer. Refer to the following Service Procedure for
details.
SERVICE PROCEDURE
1.
2.
Check the tachometer sensor output voltage signal at the wire harness connector on the tachometer
gauge. Output voltage must be measured with the connector attached to the gauge and the engine at
an idle.
a.
For individual case gauges, measure voltage between Pins 4 and 7.
b.
For electronic cluster gauges, measure voltage between Pins 1 and 10.
If the voltage is less than 1.5 volts, replace the tachometer sensor.
NOTE:
THE ELECTRICAL CONNECTOR ON THE NEW TACHOMETER SENSOR WILL NOT CONNECT TO
THE EXISTING TACHOMETER SENSOR CONNECTOR OF THE 14289 WIRE HARNESS. IN
ORDER TO CONNECT THE NEW SENSOR TO THE WIRE HARNESS, IT WILL BE NECESSARY TO
REMOVE BOTH THE SENSOR AND WIRE HARNESS CONNECTORS AND SPLICE THE SENSORS
DIRECTLY TO THE HARNESS WIRES, OR USE A QUALITY WATERPROOF TWO PIN
AFTERMARKET CONNECTOR TO CONNECT THE SENSOR TO THE HARNESS. REFER TO THE
SPLICING PROCEDURES FOUND IN «TSB 96-16-3» TO ENSURE A QUALITY ELECTRICAL
CONNECTION. DUE TO THE TYPE OF SIGNAL GENERATED BY THE TACHOMETER SENSOR,
EITHER ONE OF THE SENSOR WIRES MAY BE CONNECTED TO EITHER ONE OF THE HARNESS
WIRES FOR THE SENSOR AND GAUGE TO FUNCTION PROPERLY.
3.
Adjust the new sensor by rotating the sensor clockwise until it contacts the flywheel. Tighten the jam
nut to 27-34 N-m (20-25 lb-ft). Operating the engine will remove the plastic spacer.
4.
If the sensor is removed and reinstalled after the initial adjustment procedure, it can be adjusted by
rotating the sensor clockwise until it contacts the flywheel and then backing off 1/4 to 1/2 turn. The
correct sensor gap should be 1.25mm (0.050").
OTHER APPLICABLE ARTICLES: NONE
WARRANTY STATUS: Eligible Under Basic Warranty Coverage
LABOR ALLOWANCE
DEALER CODING
OASIS CODES: 204000, 204100, 204200
97-19, Publication Date: SEPTEMBER 15, 1997
MEDIUM/HEAVY TRUCK:
1996-98 AEROMAX, LOUISVILLE
This TSB article is being republished in its entirety to revise the Operation Time.
ISSUE:
The fan clutch may cycle on when electrical accessories, such as turn signals, headlamps, etc. are activated
on some vehicles. This may be due to the engine cooling fan control module ground circuit picking up
interference from other electrical accessories and causing the module to falsely cycle the fan clutch.
ACTION:
Add a dedicated electrical ground wire for the fan control module. Refer to the following Service Procedure for
details.
SERVICE PROCEDURE
NOTE:
THE INFORMATION IN THIS TSB ARTICLE APPLIES TO VEHICLES EQUIPPED WITH ELECTRIC
STARTERS THAT HAVE A GROUND STUD. VEHICLES EQUIPPED WITH AIR STARTERS WILL
REQUIRE THAT THE NEW JUMPER GROUND WIRE BE ATTACHED DIRECTLY TO THE BATTERY
NEGATIVE TERMINAL SINCE THE AIR STARTER DOES NOT CONTAIN A STUD.Fabricate a new fan
control ground circuit jumper wire using the following locally obtained components:
Approximately 1905mm (75") of 14 gauge wire
Butt connector, 14 gauge, with heat shrink insulation
Eye connector, 14 gauge, with heat shrink insulation (determine eye terminal size by measuring the
starter motor ground stud diameter and then selecting the appropriate size terminal)
1.
Disconnect the negative battery cable.
For Steps 2 and 3, refer to Figure 1.
Figure 1 - Article 97-19-23
2.
Locate the engine fan control module on the cowl panel just above the steering column outlet. It may
be necessary to temporarily remove the air cleaner housing to gain access to the module.
3.
Disconnect the -14290- harness from the module.
4.
Open the -14290- harness and locate the module ground wire #57 BK. The #57 BK wire connects to
Pin B of the fan control module.
For Steps 5-7, refer to Figure 2.
Figure 2 - Article 97-19-23
5.
About 127mm (5") from the module connector, cut the #57 wire.
6.
Strip the module end of the #57 wire and install and crimp the new butt connector onto the wire. Heat
to seal the insulation.
7.
On the harness side of the #57 wire, use heat shrink tubing to seal off the end.
8.
Reconnect the -14290- connector onto the fan control module.
9.
Route the new jumper wire along the cowl, across to the engine and down to the starter. Use plastic
wire ties to secure the wire in position. The new jumper wire must be routed and secured to prevent it
from interfering or chafing on other components.
For Step 10-12, refer to Figure 3.
Figure 3 - Article 97-19-23
10.
Remove the starter motor ground stud nut.
11.
Install the new jumper harness eyelet onto the starter motor ground stud.
12.
Install the ground stud nut. Torque specifications for the ground stud nut based on the stud can be
found in the Louisville/AeroMax Service Manual Index.
13.
If removed, install the air cleaner housing assembly or any other components that may have been
removed to gain access to perform this repair.
14.
Reconnect the battery ground cable.
OTHER APPLICABLE ARTICLES: NONE
SUPERSEDES: 97-18-15
WARRANTY STATUS: Eligible Under Basic Warranty Coverage
LABOR ALLOWANCE
DEALER CODING
OASIS CODES: 402000, 499000
TSB Article 97-19-24 has been superseded by Article 98-25-7.
TSB Article 97-20-1 has been superseded by Article 97-21-4.
97-20, Publication Date: SEPTEMBER 29, 1997
MEDIUM/HEAVY TRUCK:
1996-97 AEROMAX, LOUISVILLE
ISSUE:
The hood tilt cylinder may become inoperative. This may be caused by motion between the hood and radiator
support causing the seals and attaching components to fail.
ACTION:
Replace the hood tilt cylinder with a cable system. The cable system is not sensitive to motion between the
hood and radiator support. Refer to the following Service Procedure for details.
SERVICE PROCEDURE
1.
Tilt hood and support the hood from the ground.
2.
Remove the tilt cylinder and the two (2) mounting brackets and discard. Also discard the clevis pin.
Refer to Figure 1.
Figure 1 - Article 97-20-20
3.
Install revised hood bracket onto the hood using the fasteners removed in Step 2. Torque the bolts to
9-13 N-m (80-115 lb-in).
4.
Install revised radiator support bracket onto the radiator support using the fasteners removed in Step
2. Torque the bolts to 42-57 N-m (31-42 lb-ft).
5.
Using a 5/16" Clevis Pin (76007-S8, or equivalent), install the cable yoke onto the hood bracket and
secure with the retaining clip removed in Step 2. Install the cable spring onto the radiator support
bracket as shown in Figure 2.
Figure 2 - Article 97-20-20
OTHER APPLICABLE ARTICLES: NONE
WARRANTY STATUS: Eligible Under Basic Warranty Coverage
LABOR ALLOWANCE
DEALER CODING
OASIS CODES: 112000
97-20, Publication Date: SEPTEMBER 29, 1997
MEDIUM/HEAVY TRUCK:
1997 AEROMAX, F & B SERIES, LOUISVILLE
ISSUE:
Some vehicles may have been built with a 45 degree elbow that is missing some threads. The elbow is
located within the heater plumbing and may result in a coolant leak and/or poor/slow heat.
ACTION:
Replace the 45 degree elbow in the heater plumbing. Refer to the following Service Procedure for details.
SERVICE PROCEDURE
1.
Verify the concern.
2.
Drain coolant following the procedure outlined in the appropriate Service Manual.
3.
Remove the 45 degree elbow fitting from location shown in Figures 1 through 4 and inspect for thread
shortage.
Figure 1 - Article 97-20-21
Figure 2 - Article 97-20-21
Figure 3 - Article 97-20-21
Figure 4 - Article 97-20-21
4.
Replace the 45 Degree Elbow (F7HZ-18599-SA) fitting.
5.
Refill cooling system. Verify the repair.
OTHER APPLICABLE ARTICLES: NONE
WARRANTY STATUS: Eligible Under Basic Warranty Coverage
LABOR ALLOWANCE
DEALER CODING
OASIS CODES: 208000, 208100, 208999, 402000
TSB Article 97-20-22 has been superseded by Article 99-14-13.
TSB Article 97-21-3 has been superseded by Article 99-12-10.
TSB Article 97-21-4 has been superseded by Article 98-9-3.
97-21, Publication Date: OCTOBER 13, 1997
MEDIUM/HEAVY TRUCK:
1997-98 AEROMAX, LOUISVILLE
ISSUE:
The fan clutch attaching bolts may become loose on some vehicles equipped with the Kysor on/off fan clutch.
This may be due to the original fan mounting hub not being robust enough.
ACTION:
Modify the existing mounting of the fan clutch hub and add two (2) additional attaching bolts. The additional
bolts should help prohibit the possibility of the fan hub from becoming loose. Refer to the following Service
Procedure for details.
SERVICE PROCEDURE
Refer to Figure 1.
Figure 1 - Article 97-21-17
1.
Remove the RH side charge air cooler pipe to gain access to the fan and fan clutch.
2.
Remove the cooling fan.
3.
Remove the serpentine belt.
4.
Disconnect the air line from the fan hub/clutch assembly.
5.
Remove the four (4) bolts that attach the fan hub/clutch assembly to the engine and discard.
6.
Remove the fan hub/clutch assembly from the engine and place it on a work bench so that the
mounting flange is accessible.
Refer to Figure 2.
Figure 2 - Article 97-21-17
7.
Carefully mark the new attaching bolt locations on the mounting flange using the information provided
in Figure 2.
8.
Drill two (2) 9.7mm (0.38") holes at the locations marked.
9.
Reinstall the fan hub/clutch assembly onto the engine using six (6) new Bolts (N601212-S2) and six
(6) new Washers (N630068-S2). Be sure to coat the bolts with Ford Threadlock 262 (E2FZ-19554-B)
prior to installation.
10.
Torque the six (6) bolts to 22-33 N-m (16-24 lb-ft).
11.
Install the fan hub/clutch air line.
12.
Install the serpentine drive belt.
13.
Install the fan assembly and torque the bolts to 42-57 N-m (31-42 lb-ft).
14.
Install the air charge cooler tube and torque the clamps to 2-3 N-m (18-27 lb-in).
OTHER APPLICABLE ARTICLES: NONE
WARRANTY STATUS: Eligible Under Basic Warranty Coverage
LABOR ALLOWANCE
DEALER CODING
OASIS CODES: 402000, 497000
97-22, Publication Date: OCTOBER 27, 1997
MEDIUM/HEAVY TRUCK:
1997-98 AEROMAX, LOUISVILLE
ISSUE:
This TSB article will provide diagnostic information and wiring schematics for both the Horton and Kysor
engine cooling fan clutches.
ACTION:
If the engine cooling fan is not functioning properly, refer to the following text and illustrations to aid in
identifing the root cause of the concern.
DIAGNOSTIC INFORMATION
NOTE:
THIS TSB PROVIDES SPECIFIC ENGINE COOLING FAN SERVICE INFORMATION FOR VEHICLES
EQUIPPED WITH A PREMIUM ELECTRONIC DIESEL ENGINE BUILT AFTER 10/7/96 ONLY.
ADDITIONAL SERVICE INFORMATION ON FAN CLUTCH OPERATION CAN BE FOUND IN OTHER
TECHNICAL SERVICE BULLETINS, IN SERVICE MANUALS, AND THE ELECTRICAL AND VACUUM
TROUBLESHOOTING MANUAL (EVTM).
ON/OFF FAN CLUTCH TERMINOLOGY
Electronic Control Unit (ECU) - an electronic module used to control the operation of the engine
Fan Override Switch - a toggle switch mounted on the instrument panel which activates the fan if the
parking brakes are set
F/P - fuse panel
A/C - air conditioning
Jumper - using a separate wire to link two (2) electrical connectors
KOER - key on engine running
Powered Circuit - circuit on which more than 6 volts are present
R-21 - the fan control relay located on the instrument panel fuse panel
R-15 - the air conditioning high pressure relay located on the instrument panel fuse panel
Voltage Drop Test - using a voltmeter to measure voltage differential by connecting the negative
voltmeter probe on the negative battery post and the positive probe on the tested components ground
pin. A measurement of more than 0.2 volts on the tested components indicates a poor ground circuit
ON/OFF FAN CLUTCH OPERATIONAL THEORY
These vehicles use the electronic engine ECU to control the engine cooling fan operation. This TSB
does not apply to CAT 3126 electronic engines
On CAT and Cummins engines, the ECU will turn the engine cooling fan off by applying 12 volts to
Circuit 721 which is wired to either Pin 1 or 2 of the fan control relay (R-21). The opposite pin in the
relay, either 1 or 2 will contain a ground on Circuit 57
On Detroit Diesel engines, the ECU will turn the engine cooling fan off by applying a ground to Circuit
721 which is wired to either Pin 1 or 2 of the fan control relay (R-21). The opposite pin in the relay,
either Pin 1 or 2 will contain a 12 volt power source from Fuse 12 on Circuit 517
On all engines, with no signal from the ECU, the fan control relay (R-21) should default to the fan on
position (i.e., the engine cooling fan should run all the time)
Circuit 721 can be found on the ECU connectors at the following locations:
CAT engines - Pin 28 of Connector C110
Cummins engines - Pin C of Connector C171
Detroit Diesel engines - Pin Y3 of Connector C135
NOTE:
ON DDC ENGINES, THE C135 CONNECTOR IS IN THE ENGINE HARNESS ABOUT 61cm (24")
FORWARD OF THE ENGINE ECU.
Before the ECU will turn the engine cooling fan off, it is programmed to check for a signal loop on the
A/C high pressure switch input to the ECU. This signal is a loop between two (2) pins at the ECU that,
if broken or open, will cause the engine cooling fan to run continuously. This signal loop runs from:
CAT engines - Pin 29 of Connector C110 to Pin 38 of Connector C110
Cummins engines - Pin 10 of Connector C170 to Pin T of Connector C171
Detroit Diesel engines - ground of Pin H1 of Connector C135
Relay R-15 is wired into this signal loop. R-15 will be normally closed allowing the signal loop to
return to the ECU. The ECU will then control the engine cooling fan based on engine requirements
If the A/C high pressure relay (R-15) is opened or removed from the panel, the ECU will assume high
pressure and will turn the engine cooling fan on
The A/C high pressure relay (R-15) is controlled by two systems:
The A/C high pressure switch (if equipped)
The fan clutch override switch (if equipped)
The coil in the A/C high pressure relay (R-15) is powered by Circuit 517 at Relay Pin 1 or 2. The
opposite pin contains ground Circuit 90 which splits and runs to both the A/C high pressure switch
and fan clutch override switch. Each of these switches supply ground necessary to power the A/C
high pressure relay (R-15) causing the relay to open and the engine fan to come on
If the A/C high pressure switch senses excessive pressure in the A/C system, the following will occur:
The A/C high pressure switch closes grounding Circuit 90
Relay R-15 will open causing an open in the signal loop to the ECU
The ECU will turn the engine cooling fan on until relay R-15 closes and the signal loop is restored
or 3 minutes have elasped whichever occurs last
If the driver switches the fan override switch to the on position the following will occur:
The fan override switch grounds Circuit 90. The parking brake must be applied for the override
switch to function
Relay R-15 will open causing a loss of the signal loop to the ECU
The ECU turns the engine cooling fan on
During the vehicle build process, the engine ECU is programmed to accept/identify the options of the
vehicle such as A/C or the fan override switch. If the ECU programming has been changed or is
incorrect, the operation of these systems and/or the engine cooling fan clutch can be affected
DIAGNOSIS
All diagnosis begins with Figure 1 and ends with Figure 12. Start with Figure 1 and follow the diagnostic path
for the specific fan clutch concern. It is very important that each Step or Test in the diagnostics be followed
and/or performed in order to be sure that the root cause of the concern is identified.
Figure 1 - Article 97-22-18
Figure 2 - Article 97-22-18
Figure 3 - Article 97-22-18
Figure 4 - Article 97-22-18
Figure 5 - Article 97-22-18
Figure 6 - Article 97-22-18
Figure 7 - Article 97-22-18
Figure 8 - Article 97-22-18
Figure 9 - Article 97-22-18
Figure 10 - Article 97-22-18
Figure 11 - Article 97-22-18
Figure 12 - Article 97-22-18
WIRING SCHEMATICS
CAT and Cummins electronic engines with Kysor fan clutch - Figure 13
Figure 13 - Article 97-22-18
CAT and Cummins electronic engines with Horton fan clutch - Figure 14
Figure 14 - Article 97-22-18
Detroit Diesel electronic engines with Kysor fan clutch - Figure 15
Figure 15 - Article 97-22-18
Detroit Diesel electronic engines with Horton fan clutch - Figure 16
Figure 16 - Article 97-22-18
OTHER APPLICABLE ARTICLES: NONE
WARRANTY STATUS: INFORMATION ONLY
OASIS CODES: 208000, 402000, 499000
97-23, Publication Date: NOVEMBER 10, 1997
MEDIUM/HEAVY TRUCK:
1997 AEROMAX, LOUISVILLE
ISSUE:
The hood may separate at the inner hood reinforcement bond on some vehicles. This may be caused by the
bonding design between the hood center rear reinforcement and the hood side reinforcement.
ACTION:
Repair the hood by securing the hood center rear reinforcement to the hood side reinforcements. Refer to the
following Service Procedure for details.
SERVICE PROCEDURE
1.
Open and inspect the inside of the hood at the hood center rear reinforcement to the hood side
reinforcement bond locations (Figures 2 and 3 for 113" and 122" Bumper-to-Back-of-Cab (BBC)
vehicles, and Figures 4 and 5 for 101" BBC vehicles). Inspect both right and left side bonds.
Figure 2 - Article 97-23-16
Figure 3 - Article 97-23-16
Figure 4 - Article 97-23-16
Figure 5 - Article 97-23-16
If evidence of a separation concern between the hood center rear reinforcement and the hood
side reinforcements is present, proceed to Step 2. If no evidence is present, the following repair is
not needed.
NOTE:
SIX (6) NEW RIVETS WILL BE USED TO SECURE THE HOOD CENTER REAR REINFORCEMENT
TO THE HOOD SIDE REINFORCEMENTS. THE INSTALLATION OF THE NEW RIVETS CAN BE
DONE WITHOUT REMOVING THE HOOD FROM THE VEHICLE.
2.
Using the information provided in Figures 1-5, determine and mark the location for all six (6) new rivet
holes on the hood center rear reinforcement. Six (6) rivets will be used, three (3) on the left and three
(3) on the right side.
Figure 1 - Article 97-23-16
CAUTION:
ONLY DRILL THROUGH THE HOOD CENTER REAR AND HOOD SIDE REINFORCEMENTS. BE
CAREFUL NOT TO DRILL INTO OR THROUGH THE OUTER SHELL OF THE HOOD.
3.
Make sure the hood center rear reinforcement is fully seated against the hood side reinforcements
and drill six (6) new 6.75mm (17/64") holes through the reinforcements at the locations marked
(Figures 2 through 5).
4.
Make sure the hood center rear reinforcement is still fully seated against the hood side
reinforcements, then using a suitable rivet tool, install one (1) W525174-S rivet into each side hole.
Complete this procedure for all six (6) new rivet holes.
OTHER APPLICABLE ARTICLES: NONE
WARRANTY STATUS: Eligible Under The Provisions Of Bumper To Bumper Warranty Coverage
LABOR ALLOWANCE
DEALER CODING
OASIS CODES: 108000, 111000
97-24, Publication Date: NOVEMBER 24, 1997
MEDIUM/HEAVY TRUCK:
1996-98 AEROMAX, LOUISVILLE
ISSUE:
This TSB article will provide diagnostic information and wiring schematics for the Horton, Kysor, and Bendix
engine cooling fan clutches.
ACTION:
If the engine cooling fan is not functioning properly, refer to the following text and illustrations (Figures 1-4) to
aid in identifying the root cause of the concern.
Figure 1 - Article 97-24-30
Figure 2 - Article 97-24-30
Figure 3 - Article 97-24-30
Figure 4 - Article 97-24-30
DIAGNOSTIC INFORMATION
NOTE:
THIS TSB PROVIDES SPECIFIC ENGINE COOLING FAN SERVICE INFORMATION FOR VEHICLES
EQUIPPED A WITH PREMIUM DIESEL ENGINE BUILT BEFORE 10/7/96. THIS TSB DOES NOT APPLY
TO CAT 3126 ELECTRONIC ENGINES. ADDITIONAL SERVICE INFORMATION ON FAN CLUTCH
OPERATION CAN BE FOUND IN OTHER TECHNICAL SERVICE BULLETINS, IN SERVICE MANUALS,
AND THE ELECTRICAL AND VACUUM TROUBLESHOOTING MANUAL (EVTM).
OTHER APPLICABLE ARTICLES: NONE
WARRANTY STATUS: INFORMATION ONLY
OASIS CODES: 208000, 402000, 499000
97-24, Publication Date: NOVEMBER 24, 1997
MEDIUM/HEAVY TRUCK:
1996-98 AEROMAX, LOUISVILLE
ISSUE:
The exhaust flex pipe that comes from the turbocharger outlet may crack on some vehicles equipped with a
Detroit Diesel engine. This may be caused by the existing pipe being too rigid to compensate for normal
vibrations and movements of the exhaust system.
ACTION:
Modify the exhaust system and install a longer flex pipe. The longer flex pipe should reduce the possibility of
cracking. Refer to the following Service Procedure for details.
SERVICE PROCEDURE
1.
Remove and discard the existing exhaust system flex pipe and clamps.
2.
Cut a total of 76mm (3") from the existing turbocharger outlet pipe and/or muffler inlet pipe extension
at the flex pipe connection. Refer to Figure 1.
Figure 1 - Article 97-24-31
NOTE:
THE MOUNTING AND ALIGNMENT OF THE EXHAUST SYSTEM IS CRITICAL TO THE DURABILITY
OF THE FLEX PIPE. THE ENTIRE EXHAUST SYSTEM SHOULD BE CHECKED AND REPAIRED IF
NECESSARY PRIOR TO INSTALLING THE NEW FLEX PIPE.
3.
Install the new Flex Pipe (DOHZ-5B286-B) and new wide band Clamps (F2HZ-5A231-C).
4.
Torque the clamps to 61-81 N-m (45-60 lb-ft).
OTHER APPLICABLE ARTICLES: NONE
WARRANTY STATUS: Eligible Under Basic Warranty Coverage
LABOR ALLOWANCE
DEALER CODING
OASIS CODES: 403000, 497000