1
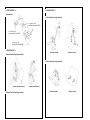
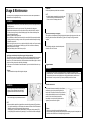
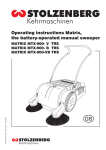
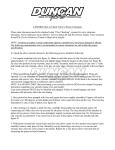
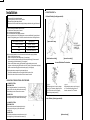
r work.
Installation
<< FRONT SEAT BELT >>
- Outboard Position (3-point type seat belt) -
Pre-removal and Post-installation Operation
● Turn the ignition key to the LOCK (OFF) position.
● Disconnect the negative battery terminal.
● Wait at least 60 seconds after disconnecting the battery cable before doing any further work.
● Observe existing belt installation before removal.
● To install, reverse the sequence of removal.
● Do not damage belts while installing.
● Do not install the belts while webbing are twisted.
● Use only new bolts and nuts. The tightening bolts or nuts are classified into 3 types by thread
diameter. Each tightening torque is as follows, unless otherwise shown in following sketches.
Nominal diameter of the thread
Tightening torque
10 mm or 7/16 inches
43 ±8 Nm / 32 ±6 ft-lb
8 mm
19 ±3 Nm / 14 ±2 ft-lb
6 mm
5.0 ±1.0 Nm / 44 ±9 in-lb
● After completing installation, re-check to ensure each belt has been properly installed.
- Make sure seat belts latch securely.
- Make sure rotary anchor parts rotate properly. (if so equipped)
- Make sure retractor operates smoothly and locks when pulled sharply (if it has a sensor of
the acceleration of seat belt extraction). (if so equipped)
- Make sure SRS indicator warning light illuminates for approximately seven seconds,
and goes out after turning the ignition switch to the “ON” position. (if pre-tensioner is equipped)
- Make sure seat belt warning light/reminder works properly. (if so equipped)
● Following sketches are examples of typical seat belt layout.
The shape & installation position may be slightly different for each vehicle.
Please refer to the vehicle service manual & owner’s manual for detail.
1
[lap anchor on seat]
1: SEAT BELT
PRE-TENSIONER
CONNECTOR
(if so equipped)
[buckle anchor on body]
[lap anchor on body]
In case of Mechanical Pre-tensioner
2
4
3
1
FOR SEAT BELT WITH ELECTRICAL PRE-TENTIONER
<CONNECTOR TYPE 1>
DISCONNECTION
Use a flat-tipped screwdriver (1) to unlock the locking
button (2) of the floor wiring harness side connector (3).
After releasing the lock, disconnect the connector.
CONNECTION
Connect the pre-tensioner connector then securely lock
the locking button (2) of the harness-side connector (3).
<CONNECTOR TYPE 2>
DISCONNECTION
Disconnect the connector after releasing the lock by
pulling up the locking lever (1) of the harness-side
connector (2).
CONNECTION
Connect the pre-tensioner connector then securely lock
the locking lever (1) of the harness-side connector (2).
1
2
3
<Type 1>
After fastening lower bolt, push up stopper
lever (3) to “A” direction, rotating lock plate
(2) to “B” direction, and fix it by tapping
screw with upper stay bracket (1).
<Type 2>
After installing the retractor, pull the lever (4)
to “Y” direction with pushing down to “X”
direction, and rotate it to “Z” direction.
- Center Position (2-point type seat belt) -
1
2
[anchor on body]
<< FRONT SEAT BELT >>
<< REAR SEAT BELT >>
- Automatic Belt - Center Position (3-point type seat belt) 11 ± 2 Nm / 8 ± 1 ft-lb
(only these Ф8 bolts for ECLIPSE)
11 ± 2 Nm / 8 ±1 ft-lb
(only these Ф8 bolts for ECLIPSE)
11 ± 2 Nm / 8 ±1 ft-lb
(only these Ф8 bolts for MIRAGE)
<< REAR SEAT BELT >>
[retractor on body]
[retractor on seat]
- Outboard Position (3-point type seat belt)-
- Center Position (2-point type seat belt) -
[retractor on side structure]
- Outboard Position (2-point type seat belt)-
[retractor on shelf panel]
[ anchor on body]
[ anchor on seat]
Usage & Maintenance
To protect you and your passengers in the event of an accident, it is the most important that the
seat belts be worn correctly while driving.
WARNING
● Always place the shoulder belt over your shoulder and across your chest. Never put it behind you
or under your arm.
● One seat belt should be used by only one person. Doing otherwise can be dangerous.
● Seat belts should always be worn by every adult who drives or rides in this vehicle, and by all
children who are large enough to wear seat belts properly. Other children should always use
proper child restraint systems.
● Remove any twists when using the belt.
● No modifications or additions should be made by the user which will either prevent the seat belt
adjusting devices from operating to remove slack, or prevent the seat belt assembly from being
adjusted to remove slack.
● Never hold a child in your arms or on your lap when riding in this vehicle, even if you are wearing
your seat belt. To do so risks severe or fatal injury to your child in a collision or sudden stop.
● Always adjust the belt to a snug fit.
● Always wear the lap portion of the belt over your hips.
3-point type seat belt and lap belt (with emergency locking mechanism)
This type of belt requires no length adjustment. Once worn, the belt adjusts itself to the movement
of wearer, but in the event of a sudden or strong shock, the belt automatically locks to hold the
wearer’s body. The belt also locks when the vehicle accelerates or decelerates quickly or when the
vehicle is on a steep slope or when the belt is pulled sharply.
If it has a sensor of the acceleration of seat belt extraction, you can check the belt locks when you
pull it sharply.
To fasten
1. Pull the seat belt out slowly while holding the latch plate.
WARNING
● Never wear the lap portion of the belt across your
abdomen. During accidents it can press sharply
against abdomen and increase the risk of injury.
3. Pull the belt slightly to adjust slackness as desired.
NOTE
● In the case that the seat belt is equipped with an automatic locking retractor (ALR) mechanism.
If you pull the seat belt fully out of the retractor, the retractor will switch to its ALR child restraint
installation mode and lock, thus preventing further movement.
If this happens, you should switch the retractor back to its emergency locking retractor (ELR)
mode by taking off the seat belt and fully rewinding it. You should then wear the seat belt again.
To unfasten
Hold the latch plate and push the button on the buckle.
NOTE
● As the belt retracts automatically, keep the latch plate
held while retracting so that the belt stows slowly.
Failure to do this could damage the vehicle.
Lap belts (manual belt) (if so equipped)
The lap belts should be adjusted by holding the belt and latch plate at right angles to each other, and
then pulling the belt as shown in the illustration (1 Tighten or 2 Loosen) to a snug fit around the
occupant.
While holding the latch plate, insert the latch plate into
the buckle until a “click” is heard.
Pregnant women
WARNING
● Seat belts work for everyone, including pregnant women. Pregnant women should use the
available seat belts. This will reduce the likelihood of injury to both the woman and the unborn child.
The lap belt should be worn across the thighs and as snug against the hips as possible, but not
across the waist. Consult your doctor if you have any additional questions or concerns.
Automatic shoulder belt
The shoulder belt moves automatically to the set (fasten)
position when a door is closed and the ignition key is
turned to the “ON” position. When the door is opened, the
shoulder belt automatically moves to the off (unfastened)
position. For the driver’s seat the shoulder belt
automatically moves to the set-off position when the
ignition key is removed from the ignition.
To fasten
1. Get in the car, close the door and adjust the seat position.
2. Grasp the seat belt (lap portion belt) latch plate and pull the webbing, then push the latch plate into
the buckle until a click is heard. of an abrupt change in car motion.
3. Turn the ignition key to the “ON” position; the shoulder belt will move automatically to the set
(fasten) position.
4. Pull up the shoulder belt and seat belt slightly to be sure that there is no excess slack or tightness
in the belts. The belts will retain a small amount of looseness necessary for comfort during driving.
If a belt is too tight, pull it up slightly and let it return. The belts will not tighten during normal use;
therefore you can set them once for safe, comfortable snugness.
5. The belts will allow unrestricted movement under normal conditions. The belts will lock in the event
of an abrupt change in car motion.
Inspection &
● Check the belts for cuts, worn or frayed webbing and for cracked or deformed metallic parts.
Replace the belt assembly if defective.
● A dirty belt should be cleaned with neutral detergent in warm water. After rinsing in water, let it dry in the
shade.
Do not attempt to bleach or re-dye the belts because this affects their characteristics.
WARNING
WARNING
● Do not use the shoulder belt without a lap belt.
Emergency release button (if so equipped)
If the shoulder belt sliding anchor is locked in an
emergency, push the emergency release button (1) to
release the shoulder belt. Use this button only when
the shoulder belt prevents you from leaving the car in
an accident.
1
● All seat belt assemblies including retractors and attaching hardware should be inspected by
an authorized Mitsubishi Motors dealer after any collision. We recommend that seat belt
assemblies in use during a collision be replaced unless the collision was minor and the belts
show no damage and continue to operate properly.
● Do not attempt to repair or replace any part of the seat belt assemblies; this work should be
done by an authorized Mitsubishi Motors dealer. Failure to have an authorized Mitsubishi Motors
dealer perform the work could reduce the effectiveness of the belts and could result in serious
injury in the event of a collision.
● Once the pre-tensioner has activated, it cannot be re-used.
It must be replaced together with the retractor.
NOTE
● For further information, please refer to vehicle owner’s manual.
WARNING
● To maintain the normal shoulder belt restraint, do not press the emergency release button except
in an emergency.
Seat belt extender (if so equipped)
When your seat belt, even fully extended, is not long
enough, a seat belt extender must be obtained.
WARNING
● The extender should only be used if the existing belt is not long enough. Anyone who can use the
standard seat belt should not use an extender. Unnecessary use of an extender can adversely
affect seat belt performance in an accident.
● When not required, the extender must be removed and stowed.