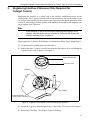
1
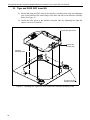
Delta Edge Configurable Handler Interface Installation Manual for DUT Up Docking Kit No. 814-309-XX Revision 0343 Documentation Part No. 573-088-00 LIMITED REPRODUCTION RIGHTS This document may be reproduced by a Teradyne Customer solely for internal use with authorized systems by operators who have agreed to observe this restriction. Any copy of this document, or portions thereof, must contain the copyright and proprietary rights notice as stated on the original. Copyright 2003 Teradyne, Inc. Printed in the U.S.A. The material in this document is subject to change without notice. Teradyne, Inc. assumes no responsibility for any errors which may appear in this document. RESTRICTED RIGHTS LEGEND Use, duplication, or disclosure by the Government is subject to restrictions as set forth in subdivision (b) (3) (ii) of the Rights in Technical Data and Computer Software clause of DFARS 52.227-7013. Teradyne, Inc. 321 Harrison Avenue Boston, MA 02118 About this Manual Configurable Handler Interface - Installation Manual for DUT Up Docking Kit This manual provides installation instructions for the configurable material handler interface and is used when docking to a Catalyst, Tiger, or FLEX tester. The material in this manual is being provided for informational purposes and is subject to change without notice. Additional Information Further information about the Catalyst Test System can be found in the following Teradyne service manuals: • Catalyst Signals CD pn 553-700-90 • Catalyst Test Head Service Manual pn 553-700-58 • Catalyst Site Preparation Guide pn 553-700-60 • Catalyst Service Manual pn 553-700-63 • Catalyst KCS and Manipulator Manual pn 553-700-78 Further information about the Tiger Test System can be found in the following Teradyne service manuals: • Tiger Signal Solutions CD pn 553-702-70 • Tiger Site Prep Guide pn 553-702-00 • Tiger Installation and Checkout Guide pn 553-702-01 Further information about the FLEX Test System can be found in the following Teradyne service manuals: • FLEX Signal Solutions CD pn 553-703-00 • FLEX Site Preparation Guide pn 553-703-01 • FLEX Installation and Checkout Guide pn 553-703-02 Revision History Manual Name: Delta Edge Configurable Handler Interface Installation Manual for DUT Up Docking Kit No. 814-309-XX Part Number: 573-088-00 ___________________________________________________________________________ Revision Date: Reason for Change 0343 Initial Release Manual Comment Form We appreciate your feedback. Your comments are a valuable source of information for continuous improvement in our documentation effort. Please return this form together with a copy of any pages of the manual marked with your comments to the address at the end of this form. Manual Name Document Number Revision number and date Tester (s) Sender Name Company Job Title Address 1. How do you use this manual? (select all that apply) __I read it from the beginning to the end. __I read the sections that pertain to my immediate needs. __I read sections that pertain to my job. __I use this manual for training purposes. __I use this manual for reference purposes. 2. When you need to find information in this manual, where is the first place you look: __Table of Contents __Thumb through the manual until I find what I am looking for 3. How easily can you find information in this manual? 1 Not Easily 2 3 4 5 Very Easy 4 5 Very Clear 4 5 Very Easy 4. How clear is the information in this manual? 1 Not Clear 2 3 5. How easy is it to follow instructions in this manual? 1 Not Easily 2 3 6. How well did you understand the product before reading this manual? 1 Not at All 2 3 4 5 Very Well 7. How well did you understand the product after reading this manual? 1 Not at All 2 3 4 5 Very Well 8. Was all the information you needed to install the interface included in this manual? __Yes __No If you answered No, what was missing? ______________________________________________________________________________ ______________________________________________________________________________ ____________________________________________________________ 9. What did you like best about the manual? ______________________________________________________________________________ ______________________________________________________________________________ ____________________________________________________________ 10. If you could change one thing about this manual, what would it be: ______________________________________________________________________________ ______________________________________________________________________________ ____________________________________________________________ Comments: ______________________________________________________________________________ ______________________________________________________________________________ ____________________________________________________________ Return Address: Teradyne, Inc. Production Integration Department 179 Lincoln Street Boston, MA 02111 USA FAX Number: 617-368-7062 Configurable Handler Interface Installation Manual for Catalyst, Tiger, and FLEX Test Systems Table of Contents 1 2 3 4 5 6 7 Overview ......................................................................................................................... 3 Configurable Interface Bills of Material (BOM) ................................................................ 5 Registering Interface V-Grooves (Only Required for Catalyst Testers) .......................... 11 Mounting and Aligning the Interface Assembly Plate ...................................................... 15 Mounting the Insert Plate on the Interface Assembly Plate ............................................ 21 Installing Guide Pins on the Interface Assembly Plate .................................................... 25 Mounting and Aligning the Handler Interface Board (HIB) .............................................. 27 Appendix A: Changing Catalyst V-Groove Spacers Based on HIB Board Thickness ............. 37 Appendix B: Changing the Z-Height or Mounting Block Orientation of a Tiger, FLEX, or Catalyst Handler Interface .............................................................................. 39 Delta Edge Configurable Handler Interface (DUT Up Docking) Configurable Handler Interface Installation Manual for Catalyst, Tiger, and FLEX Test Systems 1 Overview The Configurable Handler Interface provides a docking solution for the Catalyst, Tiger, and FLEX testers to a material handler. The interface allows quick and easy re-configuration (if necessary) of the interface when swapping between different tester platforms. The interface plate is used with each tester platform and remains fixed to the handler, with only a few subcomponents that -may change- when configuring between tester platforms. This interface is for use with the following tester HIB thicknesses: • Catalyst - 0.187" thick handler interface board (HIB) (board manufacturing • Tiger and FLEX - 0.200" thick handler interface board (HIB) (board manufacturing thickness tolerances can range between 0.182 and 0.210 inches). thickness tolerances can range between 0.175 and 0.200 inches). A. Unpack the Interface Assembly Kit Unpack and inspect the installation kit thoroughly for shipping damage. Verify the material against the packing list to make sure that all necessary components are in the kit. If there is damage or if there are discrepancies, report it immediately to your local Teradyne field service office before proceeding with the installation. B. Preparing the Tester Site Refer to the appropriate tester Site Preparation Guide for information on planning and preparing a tester site for the installation of the interface assembly. Because system layout is critical, Teradyne provides a recommended floor plan. Proper layout allows unhindered docking and ensures minimal strain on the manipulator cable bundle while providing service to the mainframe. If your test head/manipulator configuration and floor plans do not conform to those described in the guides below, and/or you require additional floor plans, contact the Teradyne Product Support Group (PSG). For information on floor strength requirements/floor plans, refer to • • • Catalyst Site Preparation Guide (pn 553-700-60) Tiger Site Preparation Guide (pn 553-702-00) FLEX Site Preparation Guide (pn 553-703-01) 3 Configurable Handler Interface Installation Manual for Catalyst, Tiger, and FLEX Test Systems 2 Configurable Interface Bills of Material (BOM) To install the configurable handler interface you need the base configurable interface kit and one or more of the insert kits to complete the interface setup. • Delta Edge 0.625 Z Kit Table 1 • Delta Edge Base Configuration Kit Table 2 • Insert Kits, Application Specific Table 3 through Table 7 • Fixture Kit Table 8 (one per customer site) • Registration Tool Kit Table 9 (purchased separately for Catalyst testers Only) • Customer Supplied Tools Table 10 Teradyne supplies the parts listed in Table 1 through Table 9. However, you will also need additional tools. See Table 10. 5 Configurable Handler Interface Installation Manual for Catalyst, Tiger, and FLEX Test Systems Interface Assembly and Associated Equipment An exploded view of the interface assembly and associated equipment is shown in Figure 1. Spacer (X3) Handler Manufacturer Supplied Mounting Plate Interface Assembly Plate V-Groove Assemblies (X3) Guide Pin (X3) Alignment Tool* Registration Tool* (pn 480-226-00) (only required for Catalyst Testers) HIB (Varies, depending on tester-Catalyst Shown) Interface Plate Insert (Varies, depending on tester-Catalyst shown) *For registration and alignment only, not used during docking. Figure 1 Interface Assembly (Catalyst Shown) 6 Configurable Handler Interface Installation Manual for Catalyst, Tiger, and FLEX Test Systems Table 1 Delta Edge 0.625 Kit (pn 814-309-00) Quantity Part No. Description 1 811-738-00 Kit, Delta Edge 0.625 Z (See Table 2) 1 573-088-00 Delta Edge Configurable Handler Interface Installation Manual for DUT Up Docking Kit No. 814-309-XX Table 2 Delta Edge Base Configurable Kit (pn 811-738-00) (part of 814-309-00) Quantity Part No. Description 6 470-046-16 Screw, Cap, Skt Hd, 1/4-20X5/8 4 470-046-21 Screw, Cap, Skt Hd, 1/4-20X3/4 16 470-075-08 Screw, Mach, 8-32 X 3/8 Flat Hd 12 470-080-26 Washer, Flat #1/4 SS PASS 3 480-018-17 Guide Pins, Handler-Cat. 6 480-094-00 Bushing, Docking Groove 1 480-227-06 Spacer, Groove A 0.324 T, Cat 1 480-227-07 Spacer, Groove B 0.324 T, Cat 1 480-227-08 Spacer, Groove C 0.324 T, Cat 4 480-577-01 Z-Block, Mtg 0.625 Z, Delta Edge 6 480-213-00 Washer 0.28IDX0.590.DX.0.02T BZ 3 804-887-00 Assembly Groove 1 406-403-00 Interface Plate Cat. Config Handler 1 422-436-00 LBL, Installation Manual, Ref. Table 3 Catalyst Insert Kit (pn 814-397-10) Quantity Part No. 1 480-417-02 Description Catalyst, HIB Insert 7 Configurable Handler Interface Installation Manual for Catalyst, Tiger, and FLEX Test Systems Table 4 Tiger and FLEX Quick DIB Clamp (QDC) Insert Kit (pn 814-397-40) Quantity Part No. 1 866-745-00 Description QDC Insert, (same for Tiger and FLEX testers Table 5 Basic Insert Plate, Handler Interface, Flex and Tiger Test Systems (pn 814-397-50) Quantity Part No. 1 480-376-03 Description Basic Insert, (Same for Tiger and FLEX Test Systems Table 6 Tiger/FLEX HIB Changer Kit (pn 814-397-60) Quantity Part No. Description 1 811-688-00 Semiautomatic HIB Changer Insert Assembly and Pneumatic Control Box for DUT-Up Handler Applications 1 573-075-00 Delta Edge Configurable Handler Interface Installation Manual for DUT Up Docking Kit No 814-309-XX Note For Tiger/FLEX HIB Changer information, refer to: Tiger/FLEX Semiautomatic HIB Changer Insert Assembly for DUT-Up Handler Applications Installation Manual for Insert Assembly No. 814-397-60 (Document Number 573-075-00). Table 7 Catalyst QDC Insert Kit (pn 814-397-70) Quantity Part No. 1 866-751-00 Description Catalyst QDC Insert Table 8 Fixture Kit, Bill of Materials (pn 814-309-20) (One per customer site) Quantity Part No. Description 1 480-381-15 Alignment Tool, Config Delta Edge Handler 1 480-386-00 Ring Alignment Groove, Tiger Note The Fixture Kit provides tools required to align and register the interface. If you are docking to a Catalyst tester you also require the use of the Registration Tool Kit (See Table 9). 8 Configurable Handler Interface Installation Manual for Catalyst, Tiger, and FLEX Test Systems Table 9 Registration Tool Kit (pn 806-303-00) (purchased separately for Catalyst only - one per site) Quantity Part No. Description 1 480-059-00 Torque Wrench 1 480-226-00 Registration Tool 3 480-379-00 Peripheral Planarization Tool 1 480-060-00 Catalyst Interface Tool Kit 1 * T-Handle Hex Key- 3/16” Hex, 6” Long (T-wrench) 1 * 0.120" Thick Rectangular Gauge Block 1 * 1/2” Square Drive, 11/16” 6 Point Deep Socket 1 * 1/2” x 9/16” Open End Wrench 1 * 9 Piece Folding Hex Key set 1 * 5” x 7” Zippered Utility Bag *Indicates parts of the Catalyst Interface Tool Kit (pn 480-060-00). Note Use proper equipment and do not exceed the indicated torque values in the Installation section. Table 10 Customer Supplied Tools Quantity Description 1 3/8-inch chuck electric drill (if adding mounting holes to the handler) 1 T-handle tap wrench, 1/4-1/2-inch capacity (if adding mounting holes to the handler) 1 Twelve piece L-wrench set (.050-inch to 3/16-inch) 1 Nine piece L-wrench set (1.5mm-10mm) 1 Torque wrench (torque range: 2-1/4 to 70-inch lbs.) 1 Philips head screw driver 9 Configurable Handler Interface Installation Manual for Catalyst, Tiger, and FLEX Test Systems Torque Specifications Torque values in Table 11 are used for steel (CRS/SS) screws in standard nuts, elastic stop nuts, cage nuts, rivnuts, and tapped holes in steel, and SEMS screws. These specifications can also be used for PEM nuts, PEM studs, and PEM standoffs in steel or aluminum stock. Table 11 Torque Specifications 10 STANDARD SCREW SIZE TORQUE (IN.-LB) 2-56 2-1/4 4-40 4-1/2 6-32 METRIC SCREW SIZE TORQUE Newton-meter(N-m) TORQUE (IN.-LB) M2 x 0.4 0.19 1.7 M2.5 x 0.45 0.39 3.5 9 M3 x 0.5 0.7 6.2 8-32 18 M3.5 x 0.6 1.1 10 10-32 30 M4 x 0.7 1.6 14 1/4-20 70 M5 x 0.8 3.3 29 5/16-18 140 M6 x 1.0 5.6 49 3/8-16 240 M8 x 1.25 13.5 119 1/2-13 500 M10 x 1.5 27 238 M12 x 1.75 47 415 M14 x 2.0 75 662 Configurable Handler Interface Installation Manual for Catalyst, Tiger, and FLEX Test Systems 3. Registering Interface V-Grooves (Only Required for Catalyst Testers) Registering the interface is a critical step in the interface installation process for the Catalyst tester. The V-grooves should come to you assembled to the interface plate. If you are using a Catlayst tester you must register your V-grooves following the procedure in this section. If, after testing, you have an issue with continuity and/or pin-to-pad alignment you can re-register your V-grooves. Note If you are using a Tiger or a FLEX tester, registering the V-grooves is not required. Skip this section and go to Section 4. "Mounting and Aligning the Interface Assembly Plate" on page 15. When registering V-grooves for docking to a Catalyst tester follow Step 1 though Step 11. 1) Lay the interface assembly plate on a flat surface. 2) Remove the three V-groove covers by loosening the four captive #8 screws holding the V-groove cover to the V-groove. See Figure 2. Captive Screws (X4) V-Groove Cover V-Groove Spacer V-Groove Screws (1/4-20) (2 per V-Groove) Figure 2 V-groove Cover Removal and Loosening the Spacers 3) Loosen the V-grooves from the spacers by 1/4 turn of the 1/4-20 screws. See Figure 2. 4) Repeat Step 2 and Step 3 for all three V-groove locations. 11 Configurable Handler Interface Installation Manual for Catalyst, Tiger, and FLEX Test Systems 5) Position the alignment tool on the interface assembly plate so the two pins in the alignment tool mate with the hole and slot in the interface assembly plate. See Figure 3. If necessary, raise the interface assembly plate off the surface to allow the alignment tool locating features (that is, pins or bushings) to be above the surface. This allows the alignment tool to seat flush to the interface assembly plate . 6) Secure the alignment tool to the interface assembly plate by using the 1/4-20 captive screws (tighten to 70 inch-lbs.) (see Figure 3). Captive Screws (1/4-20) Interface Assembly Plate Alignment Tool Figure 3 Mounting the Alignment Tool to the Interface Assembly Plate and Removing V-Groove Covers 7) Position the registration tool (pn 480-226-00) on the interface assembly plate so that its pins engage the bushings in the alignment tool and the alignment blocks at the corners engage the flats of the V-grooves. See Figure 4. The side of the registration tool with the raised inner ring must face the installer and the side with the flats on the corner bushings must face the interface assembly plate. The long, narrow cut-out window can be used as a reference when positioning the registration tool in the proper orientation-(the long, narrow cut out runs between V-groove location A and V-groove location C). For V-groove locations A and C, See Figure 4. 12 Configurable Handler Interface Installation Manual for Catalyst, Tiger, and FLEX Test Systems Raised Inner Ring V-Groove Cover (Assembled after the Registration Tool is Removed) V-groove Location C Registration Tool V-groove Location A Spacers (X3) Alignment Fixture Interface Assembly Plate An exploded view of the registration tool, alignment fixture, interface assembly plate, guide pin(s), and V-groove assembly is shown above, and the fully assembled piece is shown below. V-groove Location C V-groove Location A Registration Tool Interface Plate Assembly Alignment Fixture Figure 4 Registration Tool in Place on the Interface Assembly Plate Note Do not apply force to the periphery of the registration tool during Step 8. 13 Configurable Handler Interface Installation Manual for Catalyst, Tiger, and FLEX Test Systems 8) Tighten each 1/4-20 V-groove screw to 70 inch-lbs (see Figure 5). Captive Screws (X4) V-Groove Cover V-Groove &$7$/<67 7,*(5 )/(; V-Groove Screws (1/4-20 ) (2 per Groove) Spacer Figure 5 Location of V-Groove Screws (1/4-20) 9) Remove and store the registration tool. 10) Remove the alignment tool-this will be used later in Section 4. "Mounting and Aligning the Interface Assembly Plate" on page 15. 11) Reattach the V-groove covers to the V-groove assemblies by fastening (torque 2 inch lbs.) the four captive screws using the 5/64” hex wrench (see Figure 5). Note Be careful not to over tighten these four V-groove cover captive screws. Using excessive force strips the screw heads, preventing their future removal. 14 Configurable Handler Interface Installation Manual for Catalyst, Tiger, and FLEX Test Systems 4. Mounting and Aligning the Interface Assembly Plate Use the following procedure to mount and align the interface assembly plate. 1) Prior to mounting the interface assembly plate to the handler, verify that the interface’s “key hole” mounting blocks provide the required Z-stack dimensions. The standard Delta Edge interface positions the handler side of the interface board 0.625 inches (15.875mm) away from the handler mounting plate. If your docking requirements are different from this, contact your Teradyne sales person to obtain the proper mounting blocks (See Figure 6). Refer to Appendix B: Changing the Z-Height or Mounting Block Orientation of a Tiger, FLEX, or Catalyst Handler Interface for more information. Key hole Mounting Block 0.535” (13.589mm) Mounting Block Key Holes USE WITH 0.523” DOCK PLATE Figure 6 Verify Proper Mounting Block Z Stack Height 15 Configurable Handler Interface Installation Manual for Catalyst, Tiger, and FLEX Test Systems 2) Place a mounting plate screw (1/4-20 X 3/4” socket head cap)(pn 470-046-21) in each of the four mounting plane holes indicated by a triangle (for side docking) or by a rectangle (for rear docking) as show in Figure 7. Leave about 1/2” (13mm) of the screw head exposed to allow the interface assembly plate to be loosely fastened at the four mounting block “key holes.” See Figure 6. = Side Docking Mounting Hole Locations = Rear Docking Mounting Hole Locations Place a Mounting Plate Screw (pn 470-046-21) in the Areas Marked by Triangles (X4) for Side Docking Place a Mounting Plate Screw (pn 470-046-21) in the Areas Marked by Rectangles (X4) for Rear Docking Figure 7 View of the Handler Mounting Plane as Seen if You Could Look Down Through the Top of the Handler 16 Configurable Handler Interface Installation Manual for Catalyst, Tiger, and FLEX Test Systems 3) Position the interface assembly plate under the handler mounting plate. The side of the interface assembly plate with tester names and lettered markings (A, B and C) for the groove spacers must face away from the handler. The Delta Edge handler chuck is configurable to allow site layouts to remain centered about the center of test. Therefore, the Teradyne, Inc. interface plate has only one key hole per mounting block. Mounting Block (X4) Figure 8 Mounting Block Site Setup Selection Note Step 4 through Step 7 requires two people to perform. Note Step 4 through Step 11 are executed each time the interface assembly plate is reattached to the handler. 4) Position the interface assembly plate under the handler, placing the screw heads through the mounting block keyholes (see Figure 8). 17 Configurable Handler Interface Installation Manual for Catalyst, Tiger, and FLEX Test Systems ! Caution Make sure the screw head is completely in the small part of the mounting block keyhole! 5) Secure the four mounting screws and then loosen each screw by approximately 1.5 revolution of the screw so that the interface assembly plate can be accurately positioned using the alignment tool. 6) To properly locate the interface assembly plate relative to the center of test, use the alignment tool (see Figure 9). These pins mate with two bushings in the handler base dock plate (see Figure 10). Figure 9 Alignment Tool Pin Configuration 18 Configurable Handler Interface Installation Manual for Catalyst, Tiger, and FLEX Test Systems 7) Position the alignment tool under the handler so that it captures a hole and slot in the interface assembly plate and the two bushings in the handler dock plate. See Figure 10. Hole Interface Plate Bushing Slot Alignment Tool Figure 10 Interface Assembly Plate Position (Rear Docking Shown) 8) Move the loosely mounted interface assembly plate until all of the pins are engaged and the alignment tool rests flush against the interface assembly plate. 9) Attach the alignment tool to the interface assembly plate using the two captive 1/4"-20 screws on the alignment tool. 10) Tighten the four 1/4-20 mounting screws to 70 in-lbs. 11) Remove and store the alignment tool. 19 Configurable Handler Interface Installation Manual for Catalyst, Tiger, and FLEX Test Systems 5. Mounting the Insert Plate on the Interface Assembly Plate Instructions for mounting and attaching the insert plate to the interface assembly plate of the following testers or kits are given in this section (see Figure 11 through Figure 13): • Catalyst Insert Kit and Catalyst QDC Insert Kit • Tiger and FLEX QDC Insert Kit • Basic Insert Plate (for FLEX and Tiger Test Systems) • For information on the HIB Changer Insert Kit (Tiger/FLEX) refer to: Semiautomatic HIB Changer Insert Assembly for DUT UP Handler Applications (Doc no. 573-075-00)(part of HIB Changer Assembly Kit (pn 814-357-60) A. Catalyst Insert Kit and Catalyst QDC Insert Kit 1) Mount and align the insert plate to the interface assembly plate using the two alignment pins on the bottom of the insert plate flange to the hole and slot on the interface assembly plate. See Figure 11. 2) Secure the insert plate to the interface plate assembly by tightening the eight M5 captive screws to 29 inch-lbs. Interface Assembly Plate Catalyst Insert Plate Captive M5 Screws (X8) QDC Latching Pins (part of Catalyst QDC Insert Kit only) V-grooves on the Interface Plate (X3) Figure 11 Attaching the Catalyst Insert Plate to the Interface Assembly Plate 21 Configurable Handler Interface Installation Manual for Catalyst, Tiger, and FLEX Test Systems B. Tiger and FLEX QDC Insert Kit 1) Mount and align the QDC insert to the interface assembly plate using two alignment pins on the bottom of the insert flange to the hole and slot on the interface assembly plate. See Figure 12. 2) Attach the QDC insert to the interface assembly plate by tightening the eight M5 captive screws to 29 inch lbs. Tiger/FLEX QDC Insert Captive M5 Screws (X8) Interface Assembly Plate V-groove on the Interface Plate (X3) Figure 12 Attaching the Tiger/FLEX QDC Insert to the Interface Assembly Plate 22 Configurable Handler Interface Installation Manual for Catalyst, Tiger, and FLEX Test Systems C. Basic Insert Plate (for FLEX and Tiger Test Systems) 1) Mount and align the basic insert plate to the interface assembly plate using two alignment pins on the bottom of the basic insert plate flange to the hole and slot on the interface assembly plate. See Figure 13. 2) Secure the basic insert plate to the interface assembly plate by tightening the eight M5 captive screws to 29 inch lbs. M5 Screws (X8) Basic Insert Plate Interface Assembly Plate Figure 13 Basic Tiger/FLEX Insert Kit 23 Configurable Handler Interface Installation Manual for Catalyst, Tiger, and FLEX Test Systems 6. Installing Guide Pins on the Interface Assembly Plate When docking to a Catalyst, Tiger, or FLEX tester, fasten the guide pins (pn 480-018-17) to the interface assembly plate (torque: 24 inch-lbs.). See Figure 14 for pin placement. Note Catalyst interface requires two guide pins, the Tiger and FLEX interface requires three guide pins. These Guide Pins are used on both Catalyst and Tiger/FLEX Test Systems This Guide Pin is not required for Catalyst docking but is used for Tiger/FLEX docking Figure 14 Mounting Rough Alignment Guide Pins 25 Configurable Handler Interface Installation Manual for Catalyst, Tiger, and FLEX Test Systems 7. Mounting and Aligning the Handler Interface Board (HIB) Instructions for mounting and aligning the handler interface board (HIB) to the following testers or kits are given in this section (see Figure 15 through Figure 22): • Catalyst HIB Installation • Catalyst HIB Installation Using the Catalyst QDC • Tiger and FLEX HIB Installation Using the Quick DIB Clamp Assembly • Basic Insert Plate Installation (FLEX and Tiger Test Systems Only) • For information on the HIB Changer Insert Kit (Tiger/FLEX) refer to: Semiautomatic HIB Changer Insert Assembly for DUT UP Handler Applications (Doc no. 573-075-00) A. Catalyst HIB Installation 1) If necessary, attach the Catalyst interface insert plate to the handler. 2) Before attaching a Catalyst HIB, orient it with the flush circular edge positioned towards the A and C V-groove positions (see Figure 15). V-Groove Position C Interface Plate V-Groove Position A Catalyst Insert Plate Flush Circular Edge QDC Handles (X2) Catalyst HIB Stiffener Figure 15 Catalyst HIB Attachment 27 Configurable Handler Interface Installation Manual for Catalyst, Tiger, and FLEX Test Systems 3) Align the Catalyst HIB using the three standoffs in the interface plate insert. Secure the HIB to the insert plate by tightening the three #10-32 captive screws located in the stiffener. Refer to Table 11 on page 10 for torque specifications. The handler is now ready for docking with a Catalyst test head. The KCS couplers on the test head must be registered prior to docking. Refer to section, 3.6 Kinematic Coupler Alignment and section, 4.4 Docking the Test Head in the KCS and Manipulator Manual. Detaching the Catalyst HIB from the Interface Insert Plate Use the instructions in this section to detach the Catalyst HIB from the interface insert plate. 1) Loosen the three #10-32 captive screws located in the HIB stiffener. 2) Remove the HIB stiffener from the interface insert plate and store in a safe place. B. Catalyst HIB Installation Using the Catalyst QDC Use the instructions in this section to attach and detach the HIB stiffener to the interface plate. Attaching the HIB Stiffener to the Insert Assembly Plate This section provides instructions for attaching the HIB stiffener to the insert assembly plate using QDC handles. 1) If necessary, reattach the Delta seal adapter and Catalyst insert plate to the handler. 2) To attach a Catalyst HIB stiffener, orient it with the flush circular edge positioned towards the A and C V-groove positions (see Figure 16). V-Groove Position C Interface Plate V-Groove Position A QDC Pins (X2) Catalyst Insert Plate Flush Circular Edge QDC Handles (X2) Catalyst HIB Stiffener Figure 16 Attaching the HIB Stiffener to the Insert Assembly Plate 28 Configurable Handler Interface Installation Manual for Catalyst, Tiger, and FLEX Test Systems 3) Depress the QDC handles and lift the HIB stiffener onto the QDC pins until the HIB board makes full contact with the handler seal block/dock plate (see Figure 17 for the fully attached HIB stiffener/interface plate). HIB Stiffener Captive Screws (X3) Latch (X2) Insert Plate Interface Plate Figure 17 Fully Attached HIB Stiffener, Insert Plate, and Interface Plate Note The Quick HIB Connector (QDC) does not control the location of the HIB in the X, Y, Z positions. Socket to contactor alignment is achieved through other means (such as pins in the seal adapter mating with holes in the DIB). 4) Secure the HIB stiffener by fastening the three HIB stiffener captive screws to the insert assembly plate (see Figure 17). Refer to Table 11 for torque specifications. The handler is now ready for docking with a Catalyst test head. The KCS couplers on the test head must be registered prior to docking. Refer to Section 3.6 Kinematic Coupler Alignment and Section 4.4, Docking the Test Head in the KCS and Manipulator Manual (pn 553-700-78). 29 Configurable Handler Interface Installation Manual for Catalyst, Tiger, and FLEX Test Systems Detaching the HIB Stiffener from the Interface Assembly Plate This section provides instructions for removing the HIB stiffener from the handler interface assembly plate. 1) Unscrew the three captive HIB stiffener screws (see Figure 17). 2) Grasp the latch on the QDC handle and pull the latch toward you (see Figure 18). 3) Pull the HIB stiffener toward you until it is free of the QDC pins. 4) Place the HIB stiffener in a safe place for future use. HIB Stiffener QDC Handle Handle Bushing QDC Handle Latch Figure 18 Location of the QDC Handle Latches (only one shown) 30 Configurable Handler Interface Installation Manual for Catalyst, Tiger, and FLEX Test Systems C. Tiger and FLEX HIB Installation Using the Quick DIB Clamp Assembly Use the following procedure to mount the handler interface board (HIB) to the handler. Note Any handler interface board that is used with this interface requires a handle upgrade kit (pn 866-741-00) attached to the interface board stiffener (see Figure 19). 1) Move the Quick DIB Clamp locking handle to the unlocked position (see Figure 19). Locking Handle in the Unlocked Position Interface Board with Stiffener Slotted Hole Spring Loaded Handle (X2) Figure 19 Quick DIB Clamp Kit Locking Handle in the Open (Unlocked) Position 31 Configurable Handler Interface Installation Manual for Catalyst, Tiger, and FLEX Test Systems 2) Orient the interface board (with stiffener and handles) so that it is properly aligned to the quick DIB clamp’s corresponding pins. The stiffener has two bushings that engage these pins; one bushing is round the other is slotted. Hold the stiffener (and interface board) by its spring loaded handles. See Figure 19. 3) Move the stiffener (and interface board) toward the Quick DIB Clamp Kit and actuate/retract the spring loaded handles until they contact the clamp latches (see Figure 19 and Figure 20). Release the handles so that they engage the clamp latches. The board is now prelatched and holding itself in place (see Figure 20). Clamp Latch (X2) The Stiffener Handles will Engage the Clamp Latches Figure 20 Prelatched Interface Board 32 Configurable Handler Interface Installation Manual for Catalyst, Tiger, and FLEX Test Systems 4) Bring the Quick DIB Clamp Handle from the open position to the closed position. This moves the DIB down and compresses the signal pins. See Figure 21. This should be a smooth operation with some noise coming from the compressing signal pins. Note If it becomes difficult to bring the handle all the way down (to the closed position), stop, and return the handle to the open position. Check and reseat the DIB stiffener. Bring the handle over to the closed position again. If you still have a problem seek technical assistance. With the HIB in place, the installation is complete and testhead docking can proceed. . Stiffener Handles Engage Clamp Latches Quick DIB clamp locking handle shown in locked position. Use this closed position prior to docking the test head to the interface. Figure 21 Stiffener Handles Engaging the Clamp Latches Removing the Interface Board 1) To remove the interface board (with stiffener) from the interface, move the locking handle to the unlocked position. See Figure 19. 2) While holding the interface board in place, actuate the stiffener handles to release the stiffener from the Quick DIB Clamp Kit and remove the interface board from the assembly. 33 Configurable Handler Interface Installation Manual for Catalyst, Tiger, and FLEX Test Systems D. Basic Insert Plate Assembly (FLEX and Tiger Systems Only) Use the following procedures to attach or detach the handler interface board (HIB) to/from the basic insert assembly. Attaching the HIB to the Basic Insert Plate Assembly Use the following procedure to attach the HIB to the basic insert plate assembly . 1) Unscrew all four thumb nuts on the basic insert plate and put them in the open position. 2) Orient the HIB stiffener so that the round and slotted bushing are properly aligned to the corresponding pins on the basic insert plate. 3) Position the DIB on the basic insert plate and place the thumb nuts in the grooves on the DIB stiffener mounting brackets (see Figure 22). 4) Tighten (finger tight) the four thumb nuts by rotating them clockwise. This secures the stiffener to the basic insert plate (see Figure 22). Thumb nut (x4) Basic Insert Plate Stiffener Mounting Bracket (X4) Thumb nut (x4) HIB and HIB Stiffener Figure 22 Attaching the HIB to the Insert Plate (Manual Mount) 34 Configurable Handler Interface Installation Manual for Catalyst, Tiger, and FLEX Test Systems Detaching the HIB from the Basic Insert Assembly Plate Use the following procedure to detach the HIB from the basic insert assembly plate (see Figure 22). 1) Loosen the four thumb nuts by rotating them counterclockwise. 2) Hold the HIB stiffener securely while sliding the thumb nuts out of the stiffener mounting bracket grooves. 3) Lift the HIB and HIB stiffener off the basic insert plate and store in a safe place. 35 Configurable Handler Interface Installation Manual for Catalyst, Tiger, and FLEX Test Systems Appendix A: Changing Catalyst V-Groove Spacers Based on HIB Board Thickness Standard Teradyne Catalyst handler interfaces work with 0.187-inch thick interface boards (board manufacturing thickness may range between 0.175 and 0.200 inches). The interface assemblies are configured with v-groove spacers that accommodate this thickness. If a board thickness other than the standard 0.187-inch thick is used with the Catalyst version of the interface, the v-groove spacers must be replaced. Note If the interface board thickness is different from the standard 0.187-inch thickness, contact Teradyne, Inc. Production Integration Marketing for more information. 37 Configurable Handler Interface Installation Manual for Catalyst, Tiger, and FLEX Test Systems Appendix B: Changing the Z-Height or Mounting Block Orientation of a Tiger, FLEX, or Catalyst Handler Interface The distance between the handler interface board (HIB) and the handler is governed by four mounting blocks, which are part of the interface assembly plate. These mounting blocks are fabricated so that the HIB is positioned at a standard height as defined by the handler manufacturer. At times it may be necessary to alter this height based on customer requirements (that is, use of non-standard dock plate or contactor block by installing new mounting blocks. The Z-height of the handler interface must be changed depending on variations in the Z-stack. To change mounting blocks 1) Determine the new Z-height. See Figure 23. HIB DOCK PLATE OR SEAL BLOCK Handler Manufacture’s Mounting Plane Z is determined by Dock Plate thickness or height of the Seal Block relative to the mounting plane. Use a vernier caliper to make this measurement. Figure 23 Mounting Block Z-Height 2) See your sales engineer for assistance with selecting the proper Teradyne mounting block kit part number. 3) If the interface assembly plate is fastened to the handler, remove it. 39 Configurable Handler Interface Installation Manual for Catalyst, Tiger, and FLEX Test Systems 4) Position the interface assembly plate on a supporting structure so that the V-grooves are facing the floor (V-grooves face down). See Figure 24 for mounting block locations. Interface Assembly Plate Mounting Blocks (facing up when the plate is on the flat surface) Figure 24 Positioning the Interface Assembly Plate 5) Change the mounting blocks one at a time, being careful to note the orientation of notches and positions on the main plate of the mounting blocks prior to removing them from the plate. 40 Configurable Handler Interface Installation Manual for Catalyst, Tiger, and FLEX Test Systems 6) Each block is secured with 8-32 flat head screws. Remove the screws and remove the mounting block. See Figure 25. Interface Assembly Plate Mounting Block 8-32 Flat Head Screw Figure 25 Upgrade Assembly Sequence 7) Place the new mounting block in the interface assembly plate cutout with the same orientation that the removed mounting block had. Fasten the mounting block to the interface assembly plate using the previously removed screws (8-32 flat head). 8) Repeat the removal and replace procedure for each of the remaining mounting blocks. 9) Reattach the interface assembly plate to the handler. Be sure to use the proper alignment tool. Refer to Section 4. "Mounting and Aligning the Interface Assembly Plate". 41