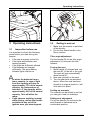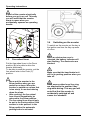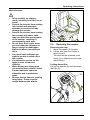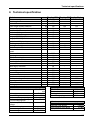
1
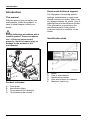
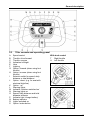
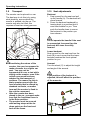
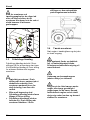
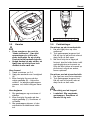
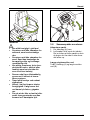
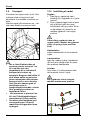
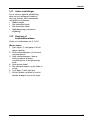
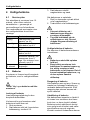
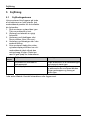
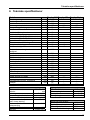
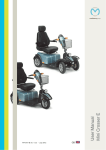
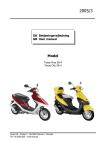
USER MANUAL
BRUGERMANUAL
TROPHY
9002432B
2
English ........................................................................................ 4
Dansk ........................................................................................ 26
3
English
© 2008 Handicare
All rights reserved.
The information provided herein may not be reproduced and/or published in any form, by print,
photoprint, microfilm or any other means whatsoever (electronically or mechanically) without the
prior written authorization of Handicare.
The information provided is based on general data concerning the constructions known at the time
of the publication of this manual. Handicare executes a policy of continuous improvement and
reserves the right to changes and modifications.
The information provided is valid for the product in its standard version. Handicare cannot be held
liable for possible damage resulting from specifications of the product deviating from the standard
configuration.
The available information has been prepared with all possible diligence, but Handicare
cannot be held liable for possible errors in the information or the consequences thereof.
Handicare accepts no liability for loss resulting from work executed by third parties.
Names, trade names, etc. used by Handicare may not, as per the legislation concerning the
protection of trade names, be considered as being available.
2008-01
4
Table of contents
Introduction...................................................................................................................6
This manual ............................................................................................................6
Product reference ...................................................................................................6
Service and technical support .................................................................................6
Identification plate ...................................................................................................6
Approval ................................................................................................................7
CE declaration ........................................................................................................7
Warranty ................................................................................................................7
Liability ................................................................................................................9
Used scooters and the environment .......................................................................9
1
Safety ...................................................................................................................10
1.1 General safety instructions............................................................................10
1.2 Decals and instructions on the scooter .........................................................10
1.3 Electronic safety............................................................................................10
2
General description ............................................................................................11
2.1 Product description .......................................................................................11
2.2 Main components..........................................................................................12
2.3 Tiller console and operating panel ................................................................13
2.4 Battery indicator ............................................................................................14
2.5 Speed............................................................................................................14
2.6 Indicators ......................................................................................................14
2.7 Warning lights ...............................................................................................14
2.8 Speed, daily distance and total distance .......................................................14
2.9 Brake button (option).....................................................................................14
3
Operating instructions .......................................................................................15
3.1 Inspection before use....................................................................................15
3.2 Getting in and out..........................................................................................15
3.3 Free wheel lever ...........................................................................................16
3.4 Switching on the scooter ...............................................................................16
3.5 Driving...........................................................................................................17
3.6 Obstacles ......................................................................................................17
3.7 Operation ......................................................................................................18
3.8 Reducing the scooter ....................................................................................19
3.9 Transport.......................................................................................................20
3.10 Seat adjustments ..........................................................................................20
3.11 Adjustment options .......................................................................................21
3.12 Coding the combination lock .........................................................................21
4
Maintenance ........................................................................................................22
4.1 Maintenance table.........................................................................................22
4.2 Batteries........................................................................................................22
4.3 Checking and inflating the tyres ....................................................................23
4.4 Cleaning the scooter .....................................................................................23
5
Troubleshooting..................................................................................................24
5.1 Troubleshooting table....................................................................................24
6
Technical specification ......................................................................................25
5
Introduction
Service and technical support
Introduction
For information concerning specific
settings, maintenance or repair work,
please contact your dealer. Make sure
you always mention the model, year of
manufacture and identification number.
This information is provided on the
identification plate of the product.
A service manual is available for the
dealer.
This manual
With this manual you can safely use
and maintain (clean) the product. In
case of doubt always contact your
dealer.
Strictly follow the procedures with a
caution symbol! These procedures
can - if they are not executed
properly - result in human injury or
damage to the product or the
environment.
Identification plate
C
B
MAX. 2,4 BAR
D
A
MAX. 2,2 BAR
Product reference
A
B
C
D
6
Free wheel
Identification plate
Tyre pressure front wheel(s)
Tyre pressure rear wheels
A
B
C
D
E
Model
Year of manufacture
Identification number
User area indoors or outdoors
Maximum load in kg
Introduction
Approval
The product meets the following
standards:
1. EN12184 (1999) Electrically driven
wheelchairs and scooters, class C.
2. ISO7176-8 Requirements for
impact, static and fatigue strength.
3. ISO7176-9 Climate tests for electric
wheelchairs and scooters.
4. ISO7176-14 Standards and test
methods for controller systems of
electrically driven wheelchairs.
5. ISO7176-16 Requirements of
resistance to fire.
The product is EMC (Electro Magnetic
Compatibility) approved in accordance
with EN12184 (1999).
CE declaration
The product is in conformity with the
provisions of the Medical Devices
Directive and thus has CE marking.
Warranty
In the following warranty and liability
stipulations the terms and definitions
as summed up hereafter must be
explained as follows:
Product: The hand-operated or
electric wheelchair or scooter
manufactured and delivered by
Handicare.
Customer: The person who directly
obtains a Product from Handicare.
Dealer: The person who delivers a
Product obtained from Handicare to
customers or third parties.
User: The person who uses a Product
manufactured by Handicare.
Irrespective of what is determined
concerning warranty conditions
applicable to the Product, in any case
the following applies with regard to the
warranty:
1. Except insofar as described
otherwise Handicare guarantees
the Product for its suitability for the
purpose for which the Product is
intended - all of these points as
described in this manual - and for
the quality of the material of which
the Product is made and the
manner in which the Product is
manufactured.
2. Repairs or replacement of parts of
the Product that may be necessary
as a result of faults that are based
on qualitatively faulty material or
manufacturing errors will be
executed free of charge, as long as
such faults occurred within one (1)
year after the date of delivery of the
Product to the Customer. The parts
to be replaced must be shipped
post-paid to Handicare.
Disassembly or assembly of these
parts is for the expense of the
Customer. Therefore the following
cases are not eligible for free repair
or replacement as meant above:
• The repair or replacement that
is necessary in connection with
faults that arise after one (1)
year after the date of delivery of
the Product to the Customer;
• The repair or replacement that
is required in connection with
faults due to improper or
careless use of the Product or
that are based on the Product
being used for another purpose
than the one for which it is
intended, in which regard it
applies that if the Customer is a
Dealer, this Dealer will
indemnify Handicare against
possible claims from Users or
other third parties for faults
based on an incorrect or
careless use of the Product;
7
Introduction
•
Parts that are subject to wear,
and the need for repair or
replacement of the parts are the
actual consequence of normal
wear.
3. Irrespective of that stipulated under
2, it applies as far as an electric
Product is concerned that with
regard to the battery that forms part
of the Product warranty is only
given in case of faults or nonfunctioning of the battery that are
demonstrably the direct
consequence of material or
manufacturing errors. A fault or
non-functioning of the battery as a
result of normal wear is not
covered by the warranty as meant
in these warranty stipulations.
Similarly not covered by the
warranty are faults or nonfunctioning that are the
consequence of improper or
unprofessional use of the Product
or the battery that is part of the
Product, including the incorrect
charging of the battery and the
failure to carry out timely and good
maintenance, in which context it
also applies that if the Customer is
a Dealer, this Dealer will indemnify
Handicare against possible claims
from Users or other third parties
that are based on the above
mentioned improper or
unprofessional use of the Product
or the battery that is part of the
Product.
4. The warranty conditions as
mentioned in above stipulations in
any case become null and void if:
•
The guidelines of Handicare
for the maintenance of the
Product are not, or
insufficiently, followed;
•
A necessary repair or
replacement of parts is based
on neglect, damage or abuse
of the Product or a use of the
8
5.
6.
7.
8.
Product for another purpose
than the one for which it was
intended;
•
Parts of the Product are
replaced by parts of another
origin than those which
Handicare uses and/or parts of
the Product are replaced
without the permission of
Handicare.
The warranties as mentioned in
stipulations 1 through 3 also
become null and void if what is
involved is re-used by a new user
within the warranty period and that
such re-use necessitates
adaptations to the product and
those adaptations are carried out
without the instructions and/or at
the order of Handicare.
To retain rights under the above
delineated warranties the Customer
must, in case of damage or other
calamities, as rapidly as possible
contact Handicare and inform them
as fully as possible. The possibility
of taking recourse to the abovementioned warranty conditions
becomes null and void for the
Customer in any case after 20
workdays after the claim situation
or the calamity arises that was the
reason for the recourse to the
guarantee.
The replacement of a part or the
repair or the reconditioning of the
Product within a current warranty
period does not extend the
warranty period.
Handicare gives no warranty on
repair to or reconditioning of the
Product carried out other than
under order of and/or at the
instructions of Handicare. If repairs
and/or reconditioning are executed
by or on behalf of a Customer, the
Customer indemnifies Handicare
with respect to the claims of third
parties who result, in the broadest
Introduction
sense of the word, from such
repairs or reconditioning.
electronic waste. Used batteries
belong to chemical waste.
Liability
Irrespective of what is determined
regarding liability in the general
conditions applicable to the Product,
with regard to liability in any case the
following applies:
1. Taking into consideration the
following stipulations, Handicare
only accepts liability for loss due to
death or physical injury that is the
result of a defect in the Product for
which Handicare is responsible and
for damage to another object that is
the private property of the user of
the Product, as long as said loss is
the direct result of a fault in the
Product. At all times, the liability of
Handicare is limited to the amount
which is being covered by the thirdparty insurer of Handicare.
2. Handicare accepts no other or
further liability than delineated
under 1. In particular Handicare
accepts no liability for
consequential damage, in any form
whatsoever.
Used scooters and the
environment
If your scooter has become
superfluous or needs to be replaced, it
can usually be taken back by your
dealer. If this is not possible, please
contact your local authorities for the
possibilities of recycling or an
environmentally friendly way of
disposing of the used materials.
For the production of the scooter
several plastics and metals have been
used. The scooter also contains
electronic components that must go to
9
Safety
1 Safety
Handicare accepts no liability
whatsoever for damage or injury
caused by the failure to (strictly)
adhere to the safety guidelines and
instructions or else due to
carelessness during the use and
cleaning of the scooter and possible
accessories. Depending on the specific
work circumstances or the accessories
used, additional safety instructions
may be required. Please contact your
dealer immediately if you observe a
potential danger during the use of the
product.
1.1
General safety
instructions
•
1.3
•
•
•
•
•
•
1.2
•
10
The user of the scooter is at all
times fully responsible for the
fulfilment of the locally
applicable safety regulations and
guidelines.
The technical specifications
must not be altered.
Modifications to (parts of) the
scooter are not permitted.
Decals and instructions on
the scooter
Signs, symbols and instructions
placed on this scooter comprise
part of its safety facilities. They
must never be covered or
removed and must remain
present and clearly legible
throughout the entire lifespan of
the scooter.
Immediately replace or repair
illegible or damaged signs,
symbols and instructions.
Contact your dealer with regard
to this.
Electronic safety
The standard version of your
scooter has been tested according
to the strictest EMC requirements.
Mobile telephones have no
influence on the driving behaviour of
the scooter.
When using a mobile telephone in
the vicinity of a scooter with special
adaptations, you are advised to first
switch off the scooter.
Your scooter may influence
electromagnetic fields such as alarm
systems.
If the electronics of the scooter is
not properly screened off, this may
affect sensitive electrical appliances,
such as shop alarms and garage
openers. The scooter has been
tested for this. Should any problems
of this nature occur, please report
these to your dealer immediately.
General description
2 General description
2.1
Product description
The Trophy is an electrically driven
scooter for longer distance outdoor
use. The unique suspension system,
stability and manoeuvrability offer
excellent driving characteristics and
maximum comfort. Fully adjustable, the
Trophy scooter can be tailored to
optimally meet your specific
requirements, ensuring a relaxing
position of the hands and shoulders.
With controls on the right- or left-hand
side the clear control panel can be
easily operated with very little
operating force. The Trophy scooter
provides maximum independence!
If you use the scooter for other
purposes than those for which it is
intended, Handicare accepts no liability
whatsoever for damage or injury
resulting from such use other than for
which the scooter was developed and
designed.
Please study this manual carefully
before you use the scooter.
The Trophy has been designed for:
• Transport of persons to a maximum
weight of 160 kg.
• Use on paved roads, sidewalks,
foot- and bicycle paths.
• Use in and around the house.
Your dealer must give you good
driver’s instructions before you can
independently operate the product and
participate in traffic.
You must be able to correct the
consequences of actions while driving
the scooter.
Consider operating the scooter under
the supervion of an experienced dealer
during first operations.
The scooter is not a motorised vehicle
in the sense of traffic regulations.
The Trophy has a maximum speed of
15 kph.
11
General description
E
D
C
F
K
G
L
B
H
I
A
B
J
M
2.2
A
B
C
D
E
F
G
H
12
Main components
Rear wheels
Lighting
Seat
Backrest
Armrest
Tiller console
Ignition lock
Mirror
I
J
K
L
M
Basket
Front wheel(s)
Tiller angle adjustment
Charge connection for the
batteries
Lap belt, to be provided by the
dealer (option)
General description
2.3
A
B
C
D
E
F
G
H
I
J
K
L
M
N
O
P
Q
R
S
Tiller console and operating panel
Speed control
Throttle: drive forward
Throttle: reverse
Indicators left/right
Horn
Lighting
Option: forward (when using foot
throttle)
Option: reverse (when using foot
throttle)
Selector switch for speed, daily
distance or total distance
Option: ‘down’ (e.g. for seat with
electrical high/low)
Option: ‘up’
Warning lights
Indicator ‘indictors switched on’
Warning lights on
Speed, daily distance and total
distance indicator
Indicator light ‘charge battery’
Battery indicator
Lights switched on
Option: brake button
With dual control
T Right throttle
U Left throttle
13
General description
2.4
Battery indicator
The battery indicator shows the
condition of the batteries.
When all the lights are on, the
batteries are fully charged. As the
batteries are depleted, lights from right
to left will go out.
• One or more lights are on: OK.
• Lights are flashing: the batteries
must be charged as soon as
possible.
• Lights are flashing quickly:
malfunction, see 5.
The indicator will automatically switch
off after taking a curve.
The indicator can be switched off
manually by pushing it once again.
2.7
Switch on the alarm lights if you fear
you will not be seen by other traffic, of
if you have stopped because of a
malfunction. The alarm lights can also
be switched on if the key is not in the
ignition.
2.8
•
•
2.5
If only the red lights are on, the
batteries must be charged
immediately.
If the indicator light ‘charge
battery’ is on: charge batteries.
Speed
The speed can be set as follows:
1. Set the desired maximum speed
with the speed control (D).
2. Dose with the throttle.
2.6
Indicators
The left and right turn indicator can be
operated on both sides.
14
Warning lights
Speed, daily distance and
total distance
The display shows the speed (kph),
daily distance (km) or total distance
(km). Press the selector switch to
switch between speed, daily distance
and total distance.
Select daily distance and keep the key
pressed in for 2 seconds to reset the
daily distance.
2.9
Brake button (option)
1. Push the brake button.
2. After having used the brake button,
switch off contact and reboot to
drive again
Operating instructions
C
1
2
B
A
D
3 Operating instructions
3.2
3.1
1. Make sure the scooter is switched
off electrically.
2. Put the free wheel handle in the
DRIVE position.
Inspection before use
It is important to check the following
points before you start driving the
scooter:
• If the seat is properly locked (A).
• If the lights and indicators are
working properly.
• If the tyres are sufficiently inflated.
• If the batteries are charged
sufficiently. The green battery
indicator lights must be on.
•
•
In winter the batteries have a
lower capacity. In case of light
frost the capacity will drop to
approximately 75% of the normal
capacity. At a temperature of
less than -5° the capacity will be
approximately 50% of the normal
capacity. This will affect the
range.
If you observe anything unusual
while driving, release the throttle
and take the key out of the
ignition once you have stopped.
Getting in and out
Tiller angle adjustment
Pull the handle (B) for the tiller angle
adjustment (C) and push the tiller
forward.
Turning the seat
1. Move handle (A) forward and turn
the seat 90° to the left or the right.
The seat will lock automatically
when turned 90°.
2. Now seat yourself on the seat.
3. Turn the seat back as described
above. When the seat has been
turned to its original position, it will
click back into place.
Folding up armrests
The armrest can be folded up so that
you can get in and out sideways.
Sliding seat adjustment
Pull up the handle (D) and move the
seat forward or backward into a
comfortable position.
15
Operating instructions
Switch of the scooter electrically
before you get in or out! This way
you will avoid that the scooter
starts to move when you
accidentally squeeze an operating
handle.
B
A
3.4
C
3.3
Free wheel lever
Put the free wheel lever in the DRIVE
position (B) to be able to drive the
scooter electrically.
To be able to push the scooter, put the
free wheel lever in the Push (C)
position.
•
•
•
16
Never put the scooter in the
Drive position when you are
parked on a slope. When the
scooter is parked on a slope that
is too steep, it can start moving
down the slope.
After pushing, the free wheel
lever should immediately be
returned to the Drive position.
The free wheel lever should only
be put in the Push position if the
scooter is to be pushed. In the
Drive position the automatic
parking brake is activated.
Switching on the scooter
To switch on the scooter put the key in
the ignition and turn the key a quarter
of a turn.
When an electronics error is
detected, the battery indicator will
start flashing. The electronics are
blocked.
Make sure that the hand brake isn’t
still in its parking position when you
take off.
Make sure no other keys / key ring
are attached to the scooter’s key
ring while driving. This way you will
avoid that that the scooter is
accidentally switched off and
comes to a standstill.
Operating instructions
A
C
3.5
•
•
•
Select speed position 2 using the
speed control (A). In the lowest
speed position, the scooter will not
drive.
B
Driving
As a scooter driver you are
vulnerable in traffic. Other traffic
participants may not always
notice you.
Keep to the applicable traffic
regulations.
Avoid out-of-the way routes, so
that help can be on its way
quickly when needed.
Driving forward
1. Switch on the scooter, see 3.4.
2. Use the speed control (A) to select
the desired speed.
3. Squeeze the bottom part (B) of one
of the operating handles. The
further you squeeze the handle, the
faster you will drive.
Reversing
1. Release the operating handle. The
scooter will come to a standstill.
2. Slowly squeeze the top part (C) of
one of the operating handles. The
scooter will drive in reverse.
3. When you release the operating
handle, you will brake
automatically.
3.6
Obstacles
Driving up obstacles
1. Drive straight up to the kerb.
2. Slowly squeeze the operating
handle. Drive up the sidewalk
without changing direction.
3. As soon as the front wheel is on
the sidewalk, you must keep your
speed for the rear wheels to be
able to move up the sidewalk as
well. If you cannot drive up onto
the sidewalk, find a lower place
where you can.
Driving down obstacles
1. Drive straight up to the edge of the
sidewalk.
2. Slowly squeeze one of the
operating handles. Drive carefully
down the kerb without changing
direction.
•
Do not drive down stairs!
17
Operating instructions
•
3.7
•
•
In panic, release immediately the
throttle. The scooter will stop
automatically.
Operation
Switch of the scooter electrically
before you get in or out! This
way you will avoid that the
scooter starts to move when you
accidentally squeeze an
operating handle.
Maximum slope witch can safely
be driven with maximum weight
according to ISO 7176-2 is 10° at
160 kg.
Driving up a slope
•
•
•
•
•
•
Slopes with an angle of more
than 10° must not be taken.
Always drive slowly and with
awareness on slopes.
Do not drive down slopes with
loose gravel or a sandy surface,
as one of the rear wheels might
slip.
Avoid sudden and jerky
movements.
Avoid directional changes and
turns on slopeIf you notice a
strong decrease in speed when
driving up a slope, take a less
steep route.
Driving on a slope too long can
cause overheating.
Driving down a slope
•
•
•
Curves
•
•
•
18
If you need to drive down a
slope, make sure the speed
control is in the lowest position
and drive as slowly as possible
and with the utmost control.
It can be very dangerous to
reverse down a slope.
Move the upper part of your
body slightly backward and
always brake slowly. If you brake
fast, you may cause the scooter
to tip over forward.
Never take curves at full speed.
Decrease speed before taking a
curve.
Use the indicators when
changing direction.
When making difficult
movements, turn the speed
controller in a low position.
Operating instructions
Miscellaneous
•
•
•
•
•
•
•
•
Drive carefully on slippery
roads, resulting from rain, ice or
snow!
Prevent the scooter from coming
into contact with seawater:
seawater is caustic and may
damage the scooter.
Prevent the scooter from coming
into contact with sand: sand
may can affect the moving parts
of the scooter, resulting in
unnecessarily rapid wear.
Do not drive the scooter when
you are under the influence of
drugs, alcohol or medication
that could affect your ability to
drive.
You must have sufficient eye
sight to be able to safely drive
the scooter.
It is imperative to turn on the
lights in case of reduced
visibility.
When driving at a high speed
you must be extra careful. Select
a lower maximum speed on
sidewalks and in pedestrian
areas.
Be sure that no items of clothing
hang loose. These could be
caught between the wheels.
A
3.8
Reducing the scooter
Removing the seat
1. Move the handle (A) forward.
2. Lift the seat from the socket in
which it turns.
The seat can be removed more
easily if you slightly turn the seat
while lifting it.
Folding down tiller
Pull up the handle (A) and fold down
the tiller (B).
B
1
2
A
19
Operating instructions
3.9
3.10 Seat adjustments
Transport
The scooter can be placed in a car.
The best way to do this is by using
steel planking, across which the
scooter is pushed into the car. The
scooter may also be lifted; this
requires at least two strong persons.
B
Backrest
1. Seat yourself on the seat and pull
up the handle (A). The backrest will
move forward.
2. Press the backrest backward by
leaning back to a position that is
most comfortable for you. Then
push the handle down to secure
the backrest in the position you
have chosen.
C
Do not operate the handle if the seat
is unoccupied, because then the
backrest will come forcefully
forward.
A
Lower-backrest
Seat yourself on the seat and turn the
knob (B) in such a way that the lowerbackrest reaches the most optimal
position for you.
•
•
•
20
Considering the nature of the
scooter, the user is supposed to
make a transfer to a regular car
seat. You may not be
transported in a car or taxi while
sitting on the scooter, even if the
vehicle concerned has been
adapted for the transport of
scooters. The reason for this is
that a scooter cannot offer the
level of safety that is offered by
standard car seats, no matter
how well the scooter is fixed to
the vehicle concerned.
After the scooter has been
placed in the car, you must make
sure that the free wheel lever is
in the Drive position.
The scooter must be secured
with lashing straps at the tiedown points on the front and
back of the frame.
Armrest
Turn the wheel (C) to adjust the height
and angle of the armrest.
If the position of the backrest is
adjusted, this will affect the position
of the armrests.
2
1
Operating instructions
Headrest height
Choose a comfortable height for the
headrest.
3.11 Adjustment options
To ensure optimal posture and
positioning as well as a relaxing
position of the arms and shoulders,
your dealer can adjust the:
• Seat height
• Tiller console height
• Tiller console angle
• Spring tension (suspension of the
scooter)
3.12
Coding the
combination lock
The code is set to 0-0-0 ex-works.
Adjusting the code
1. Remove the button (1) using a
small, sharp object.
2. Move the released button (2) in the
direction of the wheels.
3. Keep the button in this position and
set your personal code by turning
the wheels.
4. Remember this code.
5. Release the button: your code has
been set.
6. Firmly push the button (1) back in
its position.
7. To unlock and release the basket,
move the button to ‘open’.
21
Maintenance
4 Maintenance
4.1
Maintenance table
It is recommended to have your
scooter serviced by your dealer once a
year or, in case of intensive use, every
six months. The table below shows the
maintenance activities you can
perform yourself.
Frequency
Daily
Weekly
Monthly
Every three
months
4.2
Description
Charge the batteries
after each use, see
4.2.
Check tyre pressure
and inflate the tyres if
necessary, see 4.3
Clean the scooter, see
4.4.
Clean the upholstery, if
necessary, see 4.4.
Check the batteries (in
summer: once every
fortnight; in winter:
once a month), see 4.2
Lubricate the turning
system of the seat.
2. Put the plug of the charge cord in
the charge connection, see chapter
2.2.
3. Put the plug of the battery charger
in the wall outlet of the electricity
mains.
When the batteries have been
charged:
1. Remove the plug from the charge
connection.
2. Remove the plug of the battery
charger from the wall outlet of the
electricity mains.
•
•
Maintenance of the batteries
Refer to the battery instructions.
Batteries
The scooter has ‘dry’ gel batteries.
These dry batteries are entirely closed
and maintenance free.
•
•
The use of ‘wet’ batteries is not
permitted.
Charging the batteries
Consult the owner’s manual of the
battery charger.
In case of normal use the batteries
should be charged every night.
1. Switch off the scooter.
22
As soon as the plug of the
charge cord is connected to the
charge connection, the
operation of the scooter is
switched off.
Always remove the charge cord
when the batteries have been
charged. This way, you will
prevent slow depletion of the
batteries.
Make sure that the batteries are
always well charged.
Do not use the scooter if the
batteries are almost depleted
and never completely deplete
the batteries. This can seriously
damage the batteries and you
run the risk to come to an
unintended standstill.
Cleaning the batteries
Keep the batteries clean and dry. Dirt
and water can cause a leak, reducing
the capacity of the batteries. After
cleaning grease the poles with acidfree vaseline.
Maintenance
Replacing the batteries
If the capacity of the batteries is
reduced to the extent that the scooter
can only make very short trips, the
batteries are at the end of their
lifespan. The batteries must be
replaced as soon as possible. Contact
your dealer for this.
4.3
•
•
Checking and inflating the
tyres
•
•
•
•
Never use abrasive or
aggressive cleansers. They can
scratch the scooter.
Do not use organic solvents
such a thinner, benzene or white
spirit.
Be careful with water in view of
the electronic system.
Do not dry clean, iron or spindry the upholstery.
Make sure the tyres are kept at
the correct pressure.
The tyre pressure may never
exceed the maximum value
indicated on the tyre.
Inflate the tyres with a foot pump or a
bicycle pump, in combination with the
reducing nipple included in the
delivery. You can also have your tyres
inflated at your local petrol station.
• Tyre pressure front wheel: 2.4 bar
• Tyre pressure rear wheel: 2.2 bar
4.4
Cleaning the scooter
Removing dry dirt
Upholstery, metal parts and frame
parts can usually easily be cleaned
with a dry soft cloth.
Removing mud and other wet dirt
The dirty parts can best be cleaned by
first wiping them with a wet sponge
and then wiping them dry with a dry
soft cloth.
Cleaning the upholstery
Clean the upholstery with a damp cloth
and household soap. Then wipe the
upholstery dry with a soft dry cloth.
23
Troubleshooting
5 Troubleshooting
5.1
Troubleshooting table
If the scooter will not function, while
the batteries are fully charged, check
the following points before contacting
your dealer.
1. Switch off the scooter and then
switch it on again. Check if the
problem has been solved.
2. Check if all charge plugs are
properly connected and secured.
3. Check if the scooter is in the DRIVE
position (not in NEUTRAL).
4. Check if the position of the speed
control has not changed.
5. In case of a malfunction the battery
indicator lights will be flashing. Use
the table below to find out the
cause and report this information to
your dealer.
Number
of lights
6
7
Fault description
Action
Scooter is connected to the battery
charger.
Throttle error.
Disconnect the scooter from the
battery charger.
Make sure the throttles are not
activated when the scooter is
switched on.
In all other cases contact your dealer.
24
Technical specifications
6 Technical specification
Model
Trophy 3W
Max. user weight
Total length
Total width
Total weight without batteries
Transport weight of heaviest part
Static stability downward
Static stability upward
Static stability sideways
Range (ISO 7176) 85 Ah batteries
Range (ISO 7176) 56 Ah batteries
Dynamic stability on slopes
Climbing capacity for obstacles
Starting on a slope
Maximum speed forward
Minimum brake distance at maximum
speed
Idem, maximum
Seat angle
Effective seat depth
Effective seat width
Seat height front, minimum
Idem, maximum
Back angle, minimum
Idem, maximum
Back height
Armrest height, minimum
Idem, maximum
Front armrest to backrest
Minimum turning radius
Capacity to drive over obstacles
Ground clearance
Turning space
Batteries
Maximum dimensions batteries
Battery type
Scooter weight incl batteries
Maximum battery capacity
Maximum battery capacity with
5 hours charging time
Maximum permissible charging
voltage
Maximum charging current
Connector type
Connector type
Trophy 4W Trophy Alpine
kg
mm
mm
kg
kg
°
°
°
km
km
160
1400
660
155
90
15
15
15
60
40
166
101
-
155
90
-
°
mm
°
km/u
14
100
10
15
10
15
14
11
mm
2100
-
-
mm
°
mm
mm
mm
mm
°
°
mm
mm
mm
mm
mm
mm
mm
mm
2200
2
440
460
420
550
90
180
550
180
220
260
1250
100
70
1650
1480
1940
1250
1650
334x178x253
mm
Gel/AGM
170 kg
110 Ah
27.5 Ah
13.6 V
10 A
A DIN 72311
A DIN 72311
Operating force
Throttle
Electronic switches
Parking brake
Insert charge plug
Wheels
Diameter front wheel
Diameter rear wheels
Tyre pressure front wheel
Tyre pressure rear wheels
< 60 N
< 13.5 N
< 60 N
< 60 N
12.5" x 2.25"
3.00x10
2.4 Bar
2.2 Bar
25
Dansk
© 2008 Handicare
All rights reserved.
The information provided herein may not be reproduced and/or published in any form, by print,
photoprint, microfilm or any other means whatsoever (electronically or mechanically) without the
prior written authorization of Handicare.
The information provided is based on general data concerning the constructions known at the time
of the publication of this manual. Handicare executes a policy of continuous improvement and
reserves the right to changes and modifications.
The information provided is valid for the product in its standard version. Handicare cannot be held
liable for possible damage resulting from specifications of the product deviating from the standard
configuration.
The available information has been prepared with all possible diligence, but Handicare
cannot be held liable for possible errors in the information or the consequences thereof.
Handicare accepts no liability for loss resulting from work executed by third parties.
Names, trade names, etc. used by Handicare may not, as per the legislation concerning the
protection of trade names, be considered as being available.
2008-01
26
Håndbogen
Håndbogen ..................................................................................................................28
Brugermanual .......................................................................................................28
Produkt oversigt ....................................................................................................28
Service og teknisk service ....................................................................................28
Typeskilt ..............................................................................................................28
Godkendelser........................................................................................................29
CE overensstemmelse..........................................................................................29
Garanti ..............................................................................................................29
Ansvar ..............................................................................................................31
Udtjente scootere og miljøet .................................................................................31
1
Sikkerhed.............................................................................................................32
1.1 Generelle sikkerheds instruktioner ................................................................32
1.2 Mærkning og instruktioner på scooteren .......................................................32
1.3 Elektronisk sikkerhed ....................................................................................32
2
Generel beskrivelse ............................................................................................33
2.1 Produktbeskrivelse........................................................................................33
2.2 Bestanddele ..................................................................................................34
2.3 Styrkonsol og instrumentbord .......................................................................35
2.4 Batteri indikator .............................................................................................36
2.5 Hastighed......................................................................................................36
2.6 Blinklys..........................................................................................................36
2.7 Advarselsblink...............................................................................................36
2.8 Speedometer, dagens km og total km...........................................................36
2.9 Bremseknap (ekstra udstyr) ..........................................................................36
3
Kørsel...................................................................................................................37
3.1 Før kørsel......................................................................................................37
3.2 Ind- og udstigning .........................................................................................37
3.3 Frikoblings håndtag.......................................................................................38
3.4 Tænde scooteren ..........................................................................................38
3.5 Kørslen..........................................................................................................39
3.6 Forhindringer.................................................................................................39
3.7 Kørsel i ujævnt terræn...................................................................................40
3.8 Sammenpakke scooteren .............................................................................41
3.9 Transport.......................................................................................................42
3.10 Indstilling af sædet ........................................................................................42
3.11 Andre indstillinger .........................................................................................43
3.12 Kodning af kombinationslåsen ......................................................................43
4
Vedligeholdelse...................................................................................................44
4.1 Service plan ..................................................................................................44
4.2 Batterier ........................................................................................................44
4.3 Kontrol og pumpning af dæk .........................................................................45
4.4 Rengøring af scooteren.................................................................................45
5
Fejlfining ..............................................................................................................46
5.1 Fejlfindingsskema .........................................................................................46
6
Tekniske specifikationer ....................................................................................47
27
Håndbogen
Service og teknisk service
Håndbogen
Brugermanual
Denne håndbog forbereder dig på
risikofri benyttelse og vedligeholdelse
(rengøring) af køretøjet. I tvivlstilfælde
henvises til at kontakte din forhandler
eller relevant fagpersonale.
Der henvises til forhandleren for
oplysninger om den konkrete
opsætning, vedligeholdelse og
eventuelle reparationer. Du bedes
oplyse model navn, produktions år og
stelnummer. Disse oplysninger kan
aflæses af køretøjets typeskilt.
Servicehåndbog kan rekvireres fra
forhandleren.
Advarsler vises ved dette symbol.
Respekter altid advarslerne nøje.
Manglende overholdelse af en
advarsel givet i denne håndbog kan
betyde fare for mennesker eller
medføre skader på køretøjet eller
dets omgivelser.
C
B
MAX. 2,4 BAR
D
A
MAX. 2,2 BAR
Produkt oversigt
A
B
C
D
28
Fri kobling
Typeskilt
Dæk tryk forhjul
Dæk tryk baghjul
Typeskilt
A
B
C
D
E
Model
Produktionsår
Stel nummer
Indendørs / udendørs brug
Maksimum kg. last
Håndbogen
Godkendelser
Produktet opfylder krav og
specifikationer i følgende standarder:
1. EN12184 (1999) Elektrisk drevne
køre-stole, scootere og deres
ladere - Klasse C.
2. ISO7176-8 Krav og prøvningsmetoder til statisk, slag- og
udmattelsesstyrke.
3. ISO7176-9 Klimaprøvninger til
elektriske kørestole.
4. ISO7176-14 Kraftoverførsels- og
kontrolsystemer til elektriske
kørestole. Krav og prøvningsmetoder.
5. ISO7176-16 Modstandsevne over
for antændelse af polstrede dele Krav og prøvningsmetoder.
Produktet er EMC (Electro Magnetic
Compatibility) godkendt i henhold til
EN12184 (1999).
CE overensstemmelse
Dette produkt er i overensstemmelse
med bestemmelserne i EU Direktiv om
Medicinsk Udstyr og er således CE
mærket.
Garanti
I den følgende gengivelse af garantiog ansvarsbestemmelser benyttes
begreberne:
Produktet: Den håndstyrede elscooter produceret af Handicare.
Kunden: Den person som overtager
produktet direkte fra Handicare.
Forhandleren: Den person som
leverer produktet fra Handicare til
kunden eller til 3. person.
Brugeren: Den person som benyt-ter
produktet fra Handicare.
Nedenstående garantibestemmelser
gælder i alle tilfælde uanset øvrige
bestemmelser om garanti vedrørende
produktet:
1. Medmindre andet er beskrevet
garanterer Handicare for
produktets egnethed til enhver
tilsigtet anvendelse – således som
det er beskrevet i denne håndbog –
og for produktets med hensyn til
materialer og tilvirkning.
2. Reparationer og udskiftning af
komponenter som måtte
nødvendiggøres af mangler ved
kvalitet eller materialer eller af
produktionsfejl, vil blive udført uden
omkostning for kunden eller
brugeren, forudsat at en sådan
mangel eller fejl indtræder inden et
år efter produktets levering til
kunden. Den fejlbehæftede del må
sendes franko til forhandleren.
Afmontering og genmontering af
sådanne dele skal varetages for
kundens regning. Følgelig er
nedenstående tilfælde ikke omfattet
af Handicare garanti:
•
Reparationer og udskiftning af
komponenter som måtte
nødvendiggøres af fejl som
indtræder 1 år eller senre efter
at produktet er leveret til
kunden.
•
Reparationer og udskiftning af
komponenter som måtte nødvendiggøres af fejl opstået på
grund af forkert eller skødesløs
benyttelse af produktet, eller
opstået ved brug af produktet
på en måde hvortil det ikke er
beregnet; i hvilke situationer
en eventuel forhandler bør
holde Handicare skadesløs for
eventuelle krav fra brugere
eller anden 3. part hidrørende
fra forkert eller skødesløs brug
af produktet.
•
Sliddele hvis reparation eller
udskiftning er resultat af
normal slidtage.
29
Håndbogen
3. Uanset det ovenfor under pkt. 2
bestemte, gælder det for elektriske
produkter, at med hensyn til batterier som udgør en del af produktet
er disse kun er omfattet af garantien i tilfælde af fejl eller funktionsmangler på batteriet, hvis sådanne
mangler beviseligt er en direkte
følge af materiale- eller
produktionsfejl. En fejl eller
funktionsmangel ved et batteri der
er en følge af normalt slidtage er
ikke dækket af denne garanti.
Tilsvarende er fejl eller
funktionsmangel der er en følge af
forkert eller ukorrekt brug af
produktet eller batteriet som er en
del af produktet, herunder forkert
opladning af batteriet eller mangel
på rettidig og god vedligeholdelse,
ikke dækket af denne garanti; i
hvilke situationer en eventuel
forhandler bør holde Handicare
skadesløs for eventuelle krav fra
brugere eller anden 3. part
hidrørende fra forkert eller ukorrekt
brug af produktet eller af batteriet
som er en del af produktet.
4. Garantierstatning som fastlagt
ovenfor bortfalder i alle tilfælde
hvis:
•
Den af Handicare beskrevne
vedligeholdelse af produktet
udeladt eller er udført
utilstrækkeligt.
•
En nødvendig reparation eller
udskiftning forårsaget af
misligholdelse, skade eller
misbrug af produktet eller af
brug af produktet til et andet
formål end det, hvortil det er
beregnet.
•
Dele af produktet er udskiftet
med uoriginale komponenter
eller dele af produktet er
udskiftet uden tilladelse givet
af Handicare.
5. Garantierstatning som stipuleret
ovenfor pkt. 1 til 3 bortfalder, hvis
30
der som led i produktets genbrug
hos en ny burger indenfor garantiperioden er foretaget tilpasninger af
produktet og sådanne tilpasninger
er udført uden instruktion af eller
uden foranledning af Handicare.
6. For at oppebære de ovenfor
beskrevne garantikrav, skal kunden
i tilfælde af skader eller anden
funktionssvigt, så hurtigt som
muligt kontakte Handicare og
informere så fyldestgørende som
muligt. Adgang til at gøre regres
fortabes 20 arbejdsdage efter at
garantiskaden er opstået eller
funktionssvigt er indtrådt som er
årsag til garantikrav.
7. Erstatning af en del eller reparation
eller opgradering af produktet i
garantiperioden medfører ikke
forlængelse af grantien.
8. Handicare yder ikke garanti på
reparationer eller opgraderinger af
produktet udført af andre eller uden
instruktion eller ordre af Handicare.
Hvis reparation eller opgradering er
udført af eller på kundens ordre,
skal kunden holde Handicare
skadesløs for eventuelle krav fra
brugere eller anden 3. part
hidrørende fra reparation eller
opgradering af produktet.
Håndbogen
Ansvar
Uanset hvad der matte være bestemt
af generelle betingelser omfattende
dette produkt, gælder følgende:
1. I henhold til de følgende
betingelser accepterer Handicare
kun ansvar for tab ved dødsfald
eller ved person skade som er
forårsaget af en defekt ved
produktet for hvilken Handicare er
ansvarlig og for skader på ting som
tilhører brugeren af produktet, og
kun i det omfang at et sådant tab er
den direkte følge af en defekt ved
produktet. Handicare’s ansvar er til
enhver tid begrænset til
forsikringssummen dækket af
Handicare’s forsikringsselskab.
2. Handicare er ikke ansvarspligtig ud
over det under pkt. 1 fastlagte.
Handicare fraskriver sig ethvert
ansvar for følgeskader, i enhver
form og udstrækning.
Udtjente scootere og miljøet
Når din scooter er udtjent eller står
foran udskiftning, vil den ofte kunne
leveres tilbage til forhandleren. Kontakt
din kommunale genbrugsordning for at
få vejledning til en miljørigtig
bortskaffelse af køretøjet.
31
Sikkerhed
1 Sikkerhed
Handicare er ikke i nogen udstrækning
ansvarlig for skader eller kvæstelser
forårsaget af manglende (nøje)
overholdelse af sikkerheds -forskrifter
og instruktioner eller forårsaget af
skødesløshed under brug eller
rengøring af scooteren ellers dens
tilbehør. Alt efter den konkrete
funktionssituation eller af det konkrete
tilbehør kan yderligere
sikkerhedsinstruktioner være
påkrævet. Kontakt omgående
forhandleren hvis du observerer en
potentiel farlig situation under brug af
produktet.
1.1
•
•
•
1.2
•
32
Generelle sikkerheds
instruktioner
Føreren af scooteren er til
enhver tid ansvarlig for
overholdelse af færdselsloven
og andre gældende regler og
vejledninger.
Køretøjets tekniske
specifikationer må ikke ændres.
Det er ikke tilladt at foretage
konstruktive ændringer af
scooteren (og dens dele).
Mærkning og instruktioner
på scooteren
Skilte, symboler og instruktioner
placeret på denne scooter udgør
en del af dens sikkerhedsudstyr.
De må ikke tildækkes eller
fjernes og skal forblive til stede
og synlige i hele scooterens
levetid.
•
1.3
•
•
•
Udskift eller reparer omgående
ulæselige eller beskadigede
skilte, symboler eller instruktioner. Kontakt forhandleren
herom.
Elektronisk sikkerhed
Denne typegodkendte version af din
scooter er afprøvet under de højeste
EMC krav. Mobiltelefoner har ingen
indvirkning på scooterens
køreegenskaber. Benyttes en
mobiltelefon i nærheden af en
scooter med specielle tilpasninger,
tilrådes det at slukke for scooteren
først.
Scooteren kan påvirke
elektromagnetiske felter som f.eks.
alarmsystemer.
Såfremt scooterens elektronik ikke
er korrekt skærmet, kan den påvirke
visse følsomme elektriske
installationer så som butiksalarmer
og garageåbnere. Scooteren er
testet herfor. Hvis der skulle opstå
sådanne problemer bedes du
kontakte din forhandler omgående
Generel beskrivelse
2 Generel beskrivelse
2.1
Produktbeskrivelse
Trophy er en elektrisk drevet scooter til
brug over større afstande udendørs.
Det unikke fjedrende ophæng, dens
stabilitet og dens manøvredygtighed
sikrer enestående køreegenskaber og
maksimal komfort. Den er fuldt
indstillelig og vil passe til præcis dine
behov samtidigt med at du sidder
afslappet med hænder og skuldre.
Med gasknapper i både højre og
venstre side af det ergonomiske styr
kan den betjenes med et minimum af
kræfter. Trophy’en giver frihed og
uafhængighed!
Hvis du benytter scooteren til andre
formål end den er beregnet til,
bortfalder Handicare’s ansvar for
enhver skade eller ulykke som den
utilsigtede benyttelse måtte medføre.
Læs denne håndbog grundigt før du
benytter scooteren.
Trophy er designet til:
• Transport af personer op til 160 kg.
• Kørsel på asfalt veje, fortove,
cykelstier og gangstier.
• Brug inde og ude.
Forhandleren eller en anden fagperson
vil tilbyde dig en grundig introduktion
og træning så du hurtigt føler dig tryg
ved din Trophy, især i trafikken:
Du skal være i stand til at kontrollere
scooteren og foretage korrigerende
handlinger medens du kører.
Foretag de første køreture under
vejledning af forhandleren eller anden
fagperson.
Scooteren er ikke et motorkøretøj i
færdselslovens betydning.
Trophy når en max. hastighed på 15
km/t.
33
Generel beskrivelse
E
D
C
F
K
G
L
B
H
I
A
B
J
M
2.2
A
B
C
D
E
F
G
34
Bestanddele
Baghjul
Lygter
Sæde
Ryglæn
Armlæn
Styrkonsol
Tændingslås
H
I
J
K
L
M
Spejl
Kurv
Forhjul
Styrkonsol justering
Ladebøsning til batterierne
Hoftesele (ekstra udstyr)
Generel beskrivelse
2.3
A
B
C
D
E
F
G
H
I
J
K
L
M
N
O
P
Q
R
S
Styrkonsol og instrumentbord
Hastighedsvælger
Gasknap: Frem
Gasknap: Bak
Blinklys højre /venstre
Horn
Lygter
Ekstra udstyr: Frem (hvis
monteret med fod gas)
Ekstra udstyr: Bak (hvis monteret
med fod gas)
Vælger-knap: Dagens km / Total
km
Ekstra udstyr: Ned (hvis monteret
med sæde-lift)
Ekstra udstyr: Op (hvis monteret
med sæde-lift)
Advarselsblink
Blinklys tændt
Advarselsblink tændt
Display
Lampe: Batterier skal oplades
Batteri-indikator
Lys tændt
Ekstra udstyr: Bremseknap
Med dual control
T Gasknap: Højre
U Gasknap: Venstre
35
Generel beskrivelse
2.4
Batteri indikator
Batteri-indikatoren viser batteriernes
ladestand.
Når alle lamper lyser, er batterierne
fuldt opladte. Efterhånden som
batterierne aflades vil lamperne gå ud
fra højre mod venstre.
• En eller flere lamper lyser: OK.
• Lamperne blinker: Batterierne skal
oplades så snart som muligt.
• Lamperne blinker hurtigt: Fejl! (se
afs. 5)
•
•
2.5
Hvis de røde lamper lyser, skal
batterierne oplades omgående.
Hvis indikatorlampen P lyser,
skal batterierne oplades.
Hastighed
Således vælges kørehastighed:
1. Vælg den ønskede max. hastighed
med hastighedsvælger (D).
2. Farten doseres med Gasknappen.
2.6
Blinklys
Højre og venstre blinklys kan betjenes
fra begge sider.
Blinklys vil automatisk slå fra efter et
sving.
Blinklys slås fra manuelt ved at trykke
på vælgeren igen.
2.7
Advarselsblink
Tænd advarselsblink hvis du frygter
ikke at blive set af de øvrige
trafikanter, eller i tilfælde af at du er
stoppet på grund af en defekt i
køretøjet. Advarselsblink fungerer
også med slukket tændingsnøgle.
36
2.8
Speedometer, dagens km
og total km
Displayet viser hastighed (km/t,)
dagens distance (km) eller total
distance (km). Tryk på vælgerknappen for at skifte mellem
hastighed, dagens km og total km.
Vælg dagens km og hold knappen
nede i 2 sekunder for at nulstille.
2.9
Bremseknap (ekstra
udstyr)
1. Tryk på bremseknappen.
2. Efter at have aktiveret
bremseknappen skal scooteren
slukkes og genstartes for at kunne
køre
Kørsel
C
1
2
B
A
D
3 Kørsel
3.2
3.1
1. Sørg for at scooteren er slukket
ved tændingsnøglen.
2. Sæt Frikoblings-håndtaget i DRIVE
position.
Før kørsel
Det er vigtigt at kontrollere de følgende
punkter før du starter scooteren:
• At sædet er korrekt låst (A).
• At lygter og blinklys fungerer
korrekt.
• At dæktryk er korrekt.
• At batterier er tilstrækeligt opladet.
Batteriindikator lyser grønt.
•
•
Batteriernes kapacitet er nedsat
om vinteren. I let frostvejr vil
deres kapacitet være reduceret
til 75% af den normale. Ved
temperaturer under -5° vil
batteriernes kapacitet være ca.
50%. Dette vil påvirke
kørestolens rækkevidde.
Hvis du oplever en usædvanlig
situation ved scooteren mens du
kører, slip gasknappen og sluk
ved tændingsnøglen straks når
den holder stille.
Ind- og udstigning
Justering af Styr-konsol
Træk i håndtag (B) for at justere styrkonsollen (C) og skub styret fremad.
Dreje Sædet
1. Skub håndtag (A) fremad og drej
sædet 90° mod venstre eller højre.
Sædet vil låses automatisk når det
står i 90°.
2. Du kan nu sætte dig i sædet.
3. Drej sædet tilbage som beskrevet
ovenfor. Sædet låses automatisk,
når det står i kørestilling.
Opklappelige armlæn
Armlæn kan klappes op så du kan
komme ind og ud af sædet fra siden.
Sædets frem og tilbage justering
Løft i håndtag (D) og skub sædet
fremad eller tilbage til den ønskede
position.
37
Kørsel
stillingen er den automatiske
parkeringsbremse indkoblet.
Sluk for scooteren ved
tændingsnøglen før du stiger ind
eller ud! Herved sikrer du at
scooteren ikke kører hvis du ved et
uheld kommer til at berøre
gasknappen.
B
A
C
3.4
Tænde scooteren
Sæt nøglen i tændinglåsen og drej den
en kvart omgang.
3.3
Frikoblings håndtag
Frikoblings håndtag skal stå i DRIVE
stillingen (B) for at scooteren kan køre.
Vrid frikoblings håndtag til PUSH stilling
for at kunne skubbe eller bugsere
scooteren.
•
•
•
38
Sæt aldrig scooteren i Push
stilling når den er parkeret på et
skrånende underlag. Hvis
scooteren parkeres på en for
stejl skråning, kan den rulle
nedad.
Efter endt bugsering skal
Frikoblings håndtag straks føres
tilbage til Drive stilling.
Frikoblings håndtaget må kun
befinde sig i Push stilling når
scooteren skubbes. I Drive
Hvis systemet finder en elektrisk
fejl, vil batteridispalyet blinke.
Scooterens elektroniske styring vil
være blokeret.
Undersøg om bremseknappen
(ekstra udstyr) er aktiveret.
Sørg for at der ikke hænger andre
nøgler eller tunge genstande i
nøgleringen før du kører. Derved
forhindres at nøglen ved et uheld
drejer sig under kørslen og dermed
slukker for scooteren.
Kørsel
A
C
3.5
•
•
B
Kørslen
På en scooter er du en af de
“bløde trafikanter”. Vær altid
opmærksom på, at ikke alle
andre trafikanter får øje på dig.
Overhold altid færdselsreglerne.
Undgå færdsel på øde steder, så
hjælp kan nå hurtigt frem hvis
uheldet skulle være ude.
Køre fremad
1. Tænd scooteren, se 3.4.
2. Vælg den ønskede max. hastighed
(A).
3. Klem forsigtigt foroven på den
valgte gasknap (B) – højre eller
venstre. Jo længere gasknappen
presses ind, desto hurtigere kører
du.
Køre baglæns
1. Slip gasknappen og scooteren vil
standse.
2. Klem forsigtigt forneden på den
valgte gasknap (C). Scooteren vil
nu bakke.
3. Når gasknappen slippes, vil den
automatiske holdebremse koble
ind.
3.6
Forhindringer
Om at køre op på niveauforskelle
1. Kør altid lige på en op- eller
nedkørsel.
2. Tryk gasknappen langsomt ind.
Kør nu lige op på fortovet uden at
dreje før du er helt oppe.
3. Når først forhjulet er oppe på
fortovet, skal du holde farten indtil
også baghjulene er kommet op.
Hvis det ikke lykkes at komme op
på fortovet, søg da en anden,
lavere opkørsel.
Om at køre ned ad niveauforskelle
1. Kør lige frem mod fortorvskanten.
2. Tryk gasknappen langsomt ind.
Kør nu ned fra fortovet uden at
dreje før du er helt nede.
•
•
Kør aldrig ned ad trapper!
I nødsfald: Slip omgående
gasknappen. Scooteren vil
standse af sig selv.
39
Kørsel
3.7
•
•
Kørsel i ujævnt terræn
•
Sluk for scooteren ved
tændingsnøglen før du stiger ind
eller ud! Herved sikrer du at
scooteren ikke kører hvis du ved
et uheld kommer til at berøre
gasknappen.
Den stejleste skråning som kan
forceres med fuld last 160 kg er
10° ISO 7176-2.
Læn dig bagover mod ryglænet
og brems altid forsigtigt. Hvis
der bremses brat ned ad en
bakke, kan det få scooteren til at
tippe forover.
Om at køre op ad bakke
•
•
•
•
•
•
Prøv aldrig at køre på steder
som skråner mere end 10°.
Kør altid i roligt tempo og vær
opmærksom på om terrænet
skråner.
Kør aldrig op ad en skråning
med grus eller anden løs
overflade, da der her vil være
risiko for at et hjul mister
vejgrebet, og scooteren kommer
ud af kontrol.
Undgå pludselige bevægelser i
ryk.
Undgå at svinge eller skifte
retning mens du kører op ad en
skråning. Hvis du oplever at
køretøjet mister kraft på vej op,
vælg en mere flad rute.
Der er risiko for overbelastning
hvis du forsøger at køre op ad
en for lang bakke.
Om at køre ned ad bakke
•
•
40
Drej altid hastighedsvælgeren til
laveste fart når du skal køre ned
af en bakke og kør så roligt som
muligt med stor forsigtighed.
Det kan være farligt at skifte
kørselsretning på en bakke.
Om at køre i sving
•
•
Kør aldrig i et sving med fuld
fart. Sæt farten ned inden du
drejer!
Benyt blinklys når du drejer.
Sæt hastighedsvælger til langsom
inden der foretages en vanskelig
drejning.
Kørsel
B
1
2
A
A
Advarsler
•
•
•
•
•
•
•
•
Kør altid forsigtigt i glat føre!
Scooteren må ikke udsættes for
saltvand, som kan beskadige
den.
Scooteren må ikke udsættes for
sand. Sand kan beskadige de
bevægelige dele og forårsage
unødvendig slid.
Kør aldrig scooteren, hvis du er
påvirket af narko, alkohol eller
medicin som kan påvirke din
evne til at føre køretøj.
Føreren skal have tilstrækkelig
synsevne til sikkert at kunne
føre scooteren.
Tænd altid kørelys ved nedsat
sigtbarhed.
Kørsel i høj fart kræver ekstra
forsigtighed. Vælg lavere fart
ved kørsel på fortov, gågader
mv.
Pas på at der ikke er løst tøj eller
andre løse genstande som kan
komme ind i køretøjets hjul.
3.8
Sammenpakke scooteren
Afmontere sædet
1. Før håndtag (A) frem.
2. Løft sædet ud af røret det sidder i.
Det er lettere at løfte sædet op hvis
du drejer det fra side til side mens
det løftes op.
Lægge styrkonsollen ned
Træk i håndtag (A) og læg konsollen
ned (B).
41
Kørsel
3.9
3.10 Indstilling af sædet
Transport
Scooteren kan tages med i en bil. Den
enkleste måde er benytte et sæt
køreslisker til at skubbe scooteren op i
bilen.
Man kan også løfte scooteren op – der
skal være mindst to personer hertil.
B
Ryglæn
1. Sæt dig op i sædet og træk i
håndtag (A). Ryglænet vil nu glide
fremad.
2. Pres ryglænet bagud ved at læne
dig op ad det indtil den mest
komfortable stilling er nået. Skub
nu håndtaget (A) nedad for at
fastlåse ryglænet I den valgte
position.
C
Udløs aldrig ryglænet uden at
nogen sidder i sædet, da ryglænet
ellers vil springe frem med stor
kraft.
A
Nakkestøtten
Indstil nakkestøtten til den ønskede
højde.
•
•
•
42
Det er ikke tilladt at sidde på
scooteren under transport i en
bil; end ikke hvis den
pågældende bil er indrettet til
transport af scootere og
kørestole. Brugeren skal skifte til
et af bilens sæder og anvende
bilens monterede selesystemer.
Årsagen hertil er at en scooter
ikke yder den samme grad af
beskyttelse som et
typegodkendt autosæde, uanset
hvor grundigt scooteren er
fastspændt i bilen.
Når scooteren er placeret i en
bil, skal Frikoblingshåndtaget
være placeret i Drive position.
Scooteren skal fastgøres med
surringsstropper i de dertil
mærkede surringpunkter foran
og bagpå.
Lændestøtten
Sæt dig i sædet og drej i håndhjulet
(B) frem eller tilbage indtil du opnår
den ønskede lændestøtte.
Armlæn
Drej rullen (C) indtil armlænet står i
den ønskede vinkel / højde.
Når ryglænets vinkel justeres,
ændres armlænenes position.
2
1
Kørsel
3.11 Andre indstillinger
For at sikre en optimal siddestilling
såvel som en afslappet holdning i
arme og skuldre, har forhandleren
mulighed for at tilpasse:
• Sædets højde
• Styr-konsolets højde
• Styr-konsolets vinkel
• Støddæmpning (scooterens
affjedring)
3.12 Kodning af
kombinationslåsen
Koden er fra fabrikken sat til: 0-0-0
Ændre koden
1. Fjern låget (1) ved hjælp af et lille
skarpt værktøj.
2. Skub udøserknappen (2) ind mod
nummerhjulene.
3. Hold udløserknappen i denne
stilling medens du drejer
nummerhjulene til din personlige
kode.
4. Husk denne kode!
5. Slip udløserknappen og din kode er
nu sat.
6. Tryk låget (1) helt fast igen.
7. Kurven åbnes og løftes op ved at
skubbe knappen over mod ‘open’.
43
Vedligeholdelse
4 Vedligeholdelse
3. Sæt laderens netstik i
vægkontakten og tænd.
4.1
Når batterierne er opladede:
1. Sluk for strømmen og træk stikket
ud af vægkontakten.
2. Træk stikket ud af ladebøsningen.
Service plan
Det anbefales at scooteren hver 12.
måned – eller oftere ved stort
kørselsbehov – gennemgår et
serviceeftersyn hos forhandleren.
Den nedenstående serviceplan viser
den vedligeholdelse du selv kan
varetage:
Frekvens
Daglig
Ugentlig
Månedlig
Hver
3. måned
4.2
Beskrivelse
Ladning efter hver
køretur, se 4.2.
Tjek dæktryk. Pump
hvis behov, se 4.3
Rengør scooteren, se
4.4.
Rens polster, hvis
behov, se 4.4.
Kontroller batterier (om
sommeren: hver 2.
uge. Om vinteren: hver
måned), see 4.2
Smør sædets
drejesøjle.
Batterier
Scooteren er forsynet med forseglede
gel batterier, som er vedligeholdelsesfri.
“Våde” bly / syre batterier må ikke
monteres.
Ladning af batterier
Læs betjeningsvejledning for den
benyttede batterilader.
Ved normal brug af scooteren skal
batterierne lades hver nat.
1. Sluk scooteren.
2. Sæt laderens stik ind i kørestolens
ladebøsning, se afsnit 2.2.
44
•
•
Så snart stikket er sat i
ladebøsningen afbrydes
scooteren automatisk.
Tag altid ladekabelt ud når
opladningen er slut. Derved
undgås langsom afladning af
batterierne.
Vedligeholdelse af batterier
Der henvises til batterileverandørens
instruktioner.
•
•
Batterierne skal altid oplades
fuldt ud.
Benyt aldrig scooteren hvis
batterierne er næsten tomme og
kør aldrig scooteren indtil
batterierne er helt tomme. Det vil
kunne beskadige batterierne, og
du kan opleve uønsket
driftsstop.
Rengøring af batterier
Hold batterier rene og tørre. Snavs og
væske kan forårsage utætheder og
nedsætte batteriets kapacitet. Efter
rengøring kan polerne smøres ind i
syrefri vaseline.
Udskiftning af batterier
Når batteriernes kapacitet er faldet til
et niveau hvor scooteren kun klarer
korte ture, er deres levetid udløbet.
Batterierne skal udskiftes så hurtigt
som muligt med et batteri med same
specifikationer som de originale.
Kontakt eventuelt forhandleren herom.
Vedligeholdelse
4.3
•
•
Kontrol og pumpning af
dæk
Sørg for dæk altid er pumpet
med det korrekte tryk.
Dæktryk må aldrig overstige det
angivne dæktryk.
Pump dæk med en fodpumpe eller
med en cykelpumpe ved hjælp af den
sammen med scooteren leverede
ventilnippel. Man kan også pumpe
dækkende på den nærmeste benzin
station.
• Dæk tryk forhjul: 2.4 bar
• Dæk tryk baghjul: 2.2 bar
4.4
Rengøring af scooteren
Rense tør snavs
Polster, metal dele og ramme lader sig
normalt let aftørre med en tør, blød
klud.
Rense mudder og andet vådt snavs
Beskidte områder kan afvaskes med
en våd svamp og derefter aftørres med
en tør, blød klud.
Rense poster
Rens sædebetræk med en fugtig klud
og sædvanlig mild sæbe. Aftørres med
en tør, blød klud.
•
•
•
•
Brug aldrig slibende eller
aggressive rengøringsmidler.
Det vil kunne ridse scooterens
overflader.
Brug aldrig organiske
opløsningsmidler så som
fortynder, benzin, eller sprit.
Vær forsigtig med at bruge vand
ved scooterens elektriske dele.
Polster må ikke kemisk renses,
stryges eller udsættes for tørre
tumbler.
45
Fejlfining
5 Fejlfining
5.1
Fejlfindingsskema
Hvis scooteren ikke fungerer på trods
af at batterierne er fuldt opladte, tjek
nedenstående punkter før du kontakter
din forhandler:
1. Sluk scooteren og tænd den igen.
Tjek om problemet er løst.
2. Underøg om laderstik er rigtigt
forbundet.
3. Undersøg om frikoblingen står i
DRIVE position (ikke i NEUTRAL).
4. Undersøg om fartvælger står i den
ønskede stilling.
5. Hvis scooteren stadig ikke virker,
og batteridisplayet blinker kan du i
nedenstående tabel afkode den
mulige årsag til fejlen. Dette kan
være til god hjælp for forhandleren.
Antal
lamper
6
7
Fejlbeskrivelse
Løsning
Scooteren er forbundet til
ladeapparatet.
Gasknap fejl.
Træk ladestikket ud af ladebøsningen
og forsøg at starte igen.
Kontroller at ingen af gasknapperne
er aktiverede når scooteren tændes.
Frigør gasknappen og forsøg at
starte igen.
I alle andre tilfælde: Kontakt forhandleren eller fagpersonel.
46
Tekniske specifikationer
6 Tekniske specifikationer
Model
Trophy 3W Trophy 4W
Max. burger vægt
Total længde
Total brede
Total vægt uden batterier
Transport vægt for tungeste dele, adskilt
Statisk stabilitet nedkørsel
Statisk stabilitet opkørsel
Statisk stabilitet sideværts
Rækkevidde (ISO 7176) 85 Ah batterier
Rækkevidde (ISO 7176) 56 Ah batterier
Trophy Alpine
kg
mm
mm
kg
kg
°
°
°
km
km
160
1400
660
155
90
15
15
15
60
40
166
101
-
155
90
-
Dynamisk stabilitet på hældninger
Klatreevne max. forhindring
Start på en skråning
Maximum hastighed frem
°
mm
°
km/u
14
100
10
15
10
15
14
11
Minimum bremselængde v/ max.
hastighed
Idem, maximum
Sæde vinkel
Effektiv sædedybde
Effektiv sædebredde
Sædehøjde foran, minimum
Idem, maximum
Rygvinkel, minimum
Idem, maximum
Ryg højde
Armlæn højde, minimum
Idem, maximum
Fokant armlæn til ryglæn
Minimum venderadius
Forhindringsevne max. forhindring
Frihøjde
Krævet vendeplads
mm
2100
-
-
mm
°
mm
mm
mm
mm
°
°
mm
mm
mm
mm
mm
mm
mm
mm
2200
2
440
460
420
550
90
180
550
180
220
260
1250
100
70
1650
1480
1940
1250
1650
Batterier
Maximum dimensioner
batterier
Batteri type
Scooter vægt incl batterier
Maximum batteri capacitet
Maximum batteri capacittet
ved 5 timers ladning
Maximum tilladte
ladespænding
Maximum tilladte ladestrøm
Stik type
334x178x253
mm
Gel/AGM
170 kg
110 Ah
27.5 Ah
13.6 V
10 A
A DIN 72311
Hjul og dæk
Diameter fordæk
Diameter bagdæk
Dæktryk for
Dæktryk bag
Betjenings kraft krævet
Gasknapper
Trykknapper, på styrkonsol
Parkerings bremse
Sætte ladestik i bøsning
12.5" x 2.25"
3.00x10
2.4 Bar
2.2 Bar
< 60 N
< 13.5 N
< 60 N
< 60 N
47
Dealer: