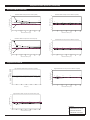
1
Alaris® SE Pump (Models 7130/7131 and 7230/7231) Supports Guardrails® Suite MX s Directions For Use en Contents • • • • • • • • • • • • • • • • • • • • • • • Introduction ................................................................................................................................................................... 2 About this Manual ......................................................................................................................................................... 2 Features ......................................................................................................................................................................... 3 Controls and Indicators ................................................................................................................................................ 4 Symbol Definitions ........................................................................................................................................................ 5 Display Features ............................................................................................................................................................ 6 Operating Precautions .................................................................................................................................................. 7 Getting Started .............................................................................................................................................................. 10 • Initial Set Up............................................................................................................................................................ 10 • Pole Clamp Installation.......................................................................................................................................... 10 • Priming an Infusion Set.......................................................................................................................................... 11 • Loading an Infusion Set......................................................................................................................................... 12 • Starting the Infusion.............................................................................................................................................. 13 Bolus ............................................................................................................................................................................... 15 Intermittent Infusion .................................................................................................................................................... 16 Secondary Infusion ....................................................................................................................................................... 17 Options ........................................................................................................................................................................... 18 • Promoting Basic Infusion....................................................................................................................................... 18 • Dose Rate Calculator.............................................................................................................................................. 18 • Loading Dose.......................................................................................................................................................... 19 • Multi-Dose............................................................................................................................................................... 20 • Multi-Step................................................................................................................................................................ 21 • Monitoring Options................................................................................................................................................ 22 SmartSite® Needle-Free System Instructions ............................................................................................................. 26 Alarms, Alerts and Prompts .......................................................................................................................................... 27 • Alarms...................................................................................................................................................................... 27 • Alerts....................................................................................................................................................................... 28 • Prompts................................................................................................................................................................... 29 • Alerts Counter......................................................................................................................................................... 31 Flow Sensor Operation (optional) ................................................................................................................................ 32 Configurable Settings ................................................................................................................................................... 33 Configured Options Record .......................................................................................................................................... 35 Specifications ................................................................................................................................................................ 36 Maintenance .................................................................................................................................................................. 38 • Routine Maintenance Procedures......................................................................................................................... 38 • Battery Operation................................................................................................................................................... 38 • Test Routines........................................................................................................................................................... 38 • Cleaning and Storage ............................................................................................................................................ 39 • Disposal................................................................................................................................................................... 39 RS232 Computer Link ................................................................................................................................................... 40 Trumpet and Start-Up Curves ...................................................................................................................................... 41 • Pressure Mode........................................................................................................................................................ 42 • Resistance Mode..................................................................................................................................................... 44 • High Resistance Mode............................................................................................................................................ 45 Service Contacts ............................................................................................................................................................ 46 Compliance .................................................................................................................................................................... 47 1000DF00479 Issue 2 1/50 Introduction This document provides directions for use for the Alaris® SE pump, Models 7131 and 7231. The pump is intended for use in professional healthcare environments, including healthcare facilities, home care, and medical transport, that utilize infusion pumps for the delivery of fluids, medications, blood, and blood products. It is indicated for continuous or intermittent delivery through clinically acceptable routes of administration; such as, intravenous (IV), intra-arterial (IA), subcutaneous, epidural, enteral, and irrigation of fluid spaces. The Pump is available as either a single or a dual channel pump that supports the Guardrails® Suite MX. The Alaris® SE Dual Channel Pump is a two-channel pump intended to deliver multiple infusions to a single patient. Guardrails® Suite MX for the Pump brings a new level of medication error prevention to the point of patient care. Guardrails® Suite MX features programming guidelines for medication dosing, delivery rate, duration, bolus dose and bolus dose administration rate, concentration and optional initial programming values in up to 15 patient-specific care areas referred to as profiles. Each profile contains a specific Drug Library and an IV Fluid library as well as pump configurations appropriate for the care area. Optional drug-specific or fluid-specific clinical advisories provide visual messages. Limits for each Guardrails® drug or fluid entry may include Hard Limits that cannot be overridden during infusion programming and/or Soft Limits that can be overridden, based on clinical requirements. A data set is developed and approved by the facility’s own multi-disciplinary team using the Editor Software, the PC-based authoring tool. A data set is then transferred to the Pump by qualified personnel. Approved data sets are maintained by the Editor Software for future updates and reference. Information about a Guardrails® alert that occurs during use is stored within the Pump, and can be accessed using the CQI Reporter. The Pump may be operated with or without the Guardrails® Suite MX protection. When an approved data set is transferred to the Pump by qualified personnel and the Profiles feature is enabled (ON) in pump configuration, then Guardrails® Suite MX protection is available. When the Profiles feature is not enabled (Off), or when no data set has been transferred to the Pump, Guardrails® Suite MX protection is not available (see "Primary Infusion – NO Guardrails® Suite MX Protection", and "Secondary Infusion - NO Guardrails® Suite MX Protection"). Programming and navigation may differ when Guardrails® Suite MX software is not in use. About this Manual The user must be thoroughly familiar with the pump described in this manual prior to use. All illustrations used in this manual show typical settings and values which may be used in setting up the functions of the pump. These settings and values are for illustrative use only. The complete range of settings and values are detailed in the specifications section. Conventions used in this manual: A Important Information: Wherever this symbol is shown an Important note is found. These notes highlight an aspect of use that is important to know about. Defined terms: The following table identifies the defined terms used throughout this document for certain products and product features. Product Name Defined Term AccuSlide® flow regulator Flow Regulator Alaris® SE pump Pump Guardrails® clinical advisory Clinical Advisory Guardrails® CQI Reporter CQI Reporter Guardrails® data set data set Guardrails® drug library Drug Library Guardrails® Editor Editor Software Guardrails® hard limit Hard Limit Guardrails® IV fluid IV Fluid Guardrails® soft limit Soft Limit SmartSite® needle-free valve Needle-Free Valve SmartSite® positive bolus needle-free valve Needle-Free Valve 1000DF00479 Issue 2 2/50 Features AC power indicator Rate Display(s) A RUN HOLD ml/hr KVO OPT HLD PRI Latch ml/hr SEC PRI PRI A B B RUN HOLD POWER POWER SEC HLD SEC OPT KVO OPTIONS Pumping Mechanism 1 2 3 4 5 6 7 8 9 • 0 Clear Enter Pressure Transducer Main Display Air-in-line Detector Lower Display Air-in-line Arm Panel Lock Keypad Flow Sensor Receptacle(s) BB AA RS232 Connector Pole Clamp AC Power Connector 1000DF00479 Issue 2 3/50 Controls and Indicators Controls: Symbol I ..... Description Numeric Keypad keys - Enters/changes values. Channel Select keys and indicators - Select channel A or B. Lights to indicate which channel is selected. A B Split Screen key - Displays information for both channels when both channels are infusing. Audio Volume key - Sets audio volume for alarms, alerts and KVO tone. Press key to adjust volume. Audio volume level displays in the lower LCD display. • Pump can be configured to enable only Medium and High, or only High audio volume levels. Clear Clear key - Clears selected numeric value. Enter Enter key - Accepts value or selection entered. POWER Power key - Turn channel(s) on and off. OPTIONS Options key - Accesses additional features. Silence key - Silences audible alarm or alert for 2 minutes; message remains on screen. New alarm or alert reinstates the audible tone. PRI Primary key - Selects Primary mode. Channel must be selected, if applicable. SEC Secondary key - Selects Secondary mode. Channel must be selected, if applicable. RUN HOLD Run/Hold key - Start and stop infusion on selected channel. Channel must be selected to restart, if applicable. Panel Lock key - Located behind the handle this key helps prevent unauthorised changes to the pump settings. Softkeys - Access main display menu options. A soft key is active if there is a tick mark (y) next to the key. Indicators: Symbol Description Infusing indicator(s) - Indicates a channel is infusing. Power indicator - When illuminated Green the pump is connected to an AC power supply and the battery is being charged. When flashing Amber the pump is running on the internal battery. Alarm indicator(s) - Indicates a channel is in alarm and has stopped infusing. 1000DF00479 Issue 2 4/50 Symbol Definitions Labelling Symbols: Symbol Description w Y x k l IPX1 s T t Attention (Consult accompanying document) Consult accompanying document Potential Equalisation (PE) Connector Type CF applied part. (Degree of protection against electrical shock) Defibrillation-proof Type CF applied part. (Degree of protection against electrical shock) Protected against vertically falling drops of water Device complies with the requirements of Council Directive 93/42/EEC as amended by 2007/47/EC. Date of Manufacture Manufacturer B Not for Municipal Waste e Functional Earth RS 232 RS232 / Nurse Call Connector Canadian and U.S. Certification Mark: Products bearing this mark have been tested and certified in accordance with applicable U.S. and Canadian electrical safety and performance standards. X U.S. Certification Mark: Products bearing this mark have been tested and certified in accordance with applicable Federal Communications Comission Guidelines. A Flow Sensor receptacle, Channel A B Flow Sensor receptacle, Channel B EC REP Authorised representative in the European Community 1000DF00479 Issue 2 5/50 Display Features Main Display The Main Display is backlit for easy viewing. The backlight dims when operating on battery power as an energy-saving feature. Pressing any key automatically turns the backlight up again. A Appearance of lines and/or dots that remain on constantly when the pump is powered on may indicate improper functioning of the Main Display. Although the pump is functioning properly, return it to qualified service personnel. A OPTIONS B Rate = 56.0 mL/h A Dose= 0.8 mg/kg/h Conc= 100 mg/ 100 mL Wt= 70 kg menu ok Rate Display Indicates current infusion rate(s) in ml/h. Flashes to indicate hold or alarm condition, and when in KVO mode. Indicates which mode pump is in: OPT Optional Modes PRIPrimary HLDHold SECSecondary KVO Keep Vein Open LED rate display is easily viewed from a distance. Lower Display The lower LCD display is backlit for easy viewing. The display dims when operating on battery power, as an energy-saving feature. GOLD MNTR Screen Icons: Symbol GOLD Description BATTERY POWER GAUGE icon - Indicates approximate battery time remaining under current infusing conditions. To ensure a more accurate gauge reading, review the remaining battery run time 5 minutes after starting an infusion. The battery gauge does not represent the battery time remaining when the pump is turned off Panel lock icon - Indicates that panel lock is on Audio Volume Indicator - Indicates audio volume for alarms and alerts. Low Medium High MNTR GOLD Computer Mode Indicator - Displayed if pump is in computer monitor mode. Pump ID Label - Characters are entered to identify selected Profile or configuration, ownership, location, etc. Hourglass icon - Flashes to indicate timer is counting down to start of dose in Multi-dose mode. Soft LIMIT icon - Indicates the pump is running at a rate above (pointing up) or below (pointing down) the rate limit for that profile. 1000DF00479 Issue 2 6/50 Operating Precautions Infusion Sets • Use only sets dedicated for use with the pump. The use of any other set may cause improper operation, resulting in an inaccurate fluid delivery or other potential hazard. • It is recommended that infusion sets are changed according to the instructions in the 'Changing the Infusion Set' section. Carefully read the Directions For Use supplied with the infusion set prior to use. • When combining several apparatus and/or instruments with infusion sets and other tubing, for example via a 3-way tap or multiple infusion, the performance of the pump may be affected and should be monitored closely. • Uncontrolled flow may result if the infusion set is not properly isolated from the patient i.e. closing a tap in the set or activating an in-line clamp / roller clamp. • The infusion set may be fitted with an in-line clamp, which can be used to occlude tubing in case it is required to stop fluid flow. • The pump is a positive pressure pump, which should use infusion sets fitted with Luer lock fittings or equivalent locking connectors. • To infuse from a burette, close the roller clamp above the burette and open the clamp on the vent on top of the burette. • Before operating the pump, verify the infusion set is free from kinks and installed correctly in the pump. • Discard infusion set if the packaging is not intact or the protector cap is detached. Ensure sets are not kinked as this may occlude the tubing. Using Collapsible bags, Glass Bottles and Semi Rigid containers • It is recommended that the air vent be opened on the infusion set if using glass bottles or semirigid containers, to reduce the partial vacuum formed as the fluid is infused from the container. This action will ensure the pump can maintain volumetric accuracy whilst the container empties. The action of opening the air vent for semi-rigid containers should take place after the spiking of the container and priming of the drip chamber. Steps for Glass Bottles and Semi-rigid containers 2. Spike the container Steps for the Collapsible bags 3. 4. Fill drip chamber to fill line Open the air vent to allow pressure equalisation - ready for infusion Follow steps 1 to 3 as shown for the semi-rigid containers, however do not open vent as in step 4, but prime the set as per step 5. Ensure the bag outlet is fully pierced before filling the drip chamber. 5. 1. Close the roller clamp Prime the set by opening / closing the roller clamp Operating Environment • When using any infusion pump in conjunction with other pumps or devices requiring vascular access, extra care is advised. Adverse delivery of medication or fluids can be caused by the substantial variation in pressures created within the fluid channels of such pumps. Typical examples of those pumps are used during dialysis, bypass or cardiac assist applications. • The pump is suitable for use in all establishments, including domestic establishments and those directly connected to the public low voltage power supply network that supplies buildings used for domestic purposes. • This pump is not intended to be used in the presence of a flammable anaesthetic mixture with air or oxygen or nitrous oxide. • Do not use the pump in a hyperbaric chamber. • Do not use the pump near Magnetic Resonance Imaging (MRI) including Stereotaxis technology. 1000DF00479 Issue 2 7/50 Operating Precautions (continued) Operating Pressure • The pumping pressure alarm system is not designed to provide protection against, or detection of, extravasation or tissuing complications which can occur. • The pump is designed to stop fluid flow under alarm conditions. Periodic patient monitoring must be performed to ensure the infusion is proceeding as expected. It is a positive displacement delivery system, capable of developing positive fluid pressures to overcome widely varying resistances to flow encountered in practice, including resistances to flow imposed by small gauge catheters, filters and intra-arterial infusion. It is neither designed nor intended to detect infiltrations and will not alarm under infiltration conditions. • M d • Alarm Conditions Several alarm conditions detected by this pump will stop the infusion and generate visual and audible alarms. Users must perform regular checks to ensure that the infusion is progressing correctly and no alarms are operating. Electromagnetic Compatibility and Interference This pump is protected against the effects of external interference, including high energy radio frequency emissions, magnetic fields and electrostatic discharge (for example, as generated by electrosurgical and cauterising equipment, large motors, portable radios, cellular telephones etc.) and is designed to remain safe when unreasonable levels of interference are encountered. • In some circumstances the pump may be affected by an electrostatic discharge through air at levels close to or above 15kv; or by radio frequency radiation close to or above 10v/m. If the pump is affected by this external interference the pump will remain in a safe mode; the pump will duly stop the infusion and alert the user by generating a combination of visual and audible alarms. Should any encountered alarm condition persist even after user intervention, it is recommended to replace that particular pump and quarantine the pump for the attention of appropriately trained technical personnel. • This pump is a CISPR 11 Group 1 Class A device when the model 180 (Flow Sensor) is used and a CISPR 11 Group 1 Class B device without the use of the model 180 (Flow Sensor). The pump uses RF energy only for its internal function in the normal product offering. In a domestic environment, this system may cause radio interference. Reorienting, relocating or shielding the system, or filtering the connection to the public mains network, are examples of steps that can be taken to reduce or eliminate interference. However, this pump emits a certain level of electromagnetic radiation which is within the levels specified by IEC/EN60601-2-24 and IEC/EN60601-1-2. If the pump interacts with other equipment, measures should be taken to minimise the effects, for instance by repositioning or relocation. • Therapeutic Radiation Equipment: Do not use the pump in the vicinity of any Therapeutic Radiation Equipment. Levels of radiation generated by the radiation therapy equipment such as Linear Accelerator, may severely affect functioning of the pump. Please consult manufacturer’s recommendations for safe distance and other precautionary requirements. For further information, please contact your local CareFusion representative. • Magnetic Resonance Imaging (MRI): The pump contains ferromagnetic materials which are susceptible to interference with magnetic field generated by the MRI devices. Therefore, the pump is not considered an MRI compatible pump as such. If use of the pump within an MRI environment is unavoidable, then CareFusion highly recommends securing the pump at a safe distance from the magnetic field outside the identified ‘Controlled Access Area’ in order to evade any magnetic interference to the pump; or MRI image distortion. This safe distance should be established in accordance with the manufacturers’ recommendations regarding electromagnetic interference (EMI). For further information, please refer to the product technical service manual (TSM). Alternatively, contact your local CareFusion representative for further guidance. • Accessories: Do not use any non-recommended accessory with the pump. The pump is tested and compliant with the relevant EMC claims only with the recommended accessories. Use of any accessory, transducer or cable other than those specified by CareFusion may result in increased emissions or decreased pump immunity. • Earth Conductor The pump is a Class I device, therefore must be earthed when connected to an AC power supply. • This pump also has an internal power source. • When connected to an external power source, a three-wire (Live, Neutral, Earth) supply must be used. If the integrity of the external protective conductor on the AC power cable has been compromised, the pump should be disconnected from the AC power source and operated utilising the internal battery. 1000DF00479 Issue 2 8/50 Operating Precautions (continued) Hazards B m • An explosion hazard exists if the pump is used in the presence of flammable anaesthetics. Exercise care to locate the pump away from any such hazardous sources. • Dangerous Voltage: An electrical shock hazard exists if the pump’s casing is opened or removed. Refer all servicing to qualified service personnel. • If this pump is dropped, subjected to excessive moisture, fluid spillage, humidity or high temperature, or otherwise suspected to have been damaged, remove it from service for inspection by a qualified service engineer. When transporting or storing the pump, use original packaging where possible, and adhere to temperature, humidity and pressure ranges stated in the Specifications section and on the outer packaging. • If this pump behaves abnormally, remove from service and contact a qualified service engineer. Guardrails® Suite MX • The Guardrails® Suite MX incorporates dosing limits and pump configuration parameters based on hospital/facility protocol. The software adds a test of reasonableness to drug programming based on the limits defined by the hospital/facility. Qualified personnel must ensure the appropriateness of drug dosing limits, drug compatibility, and pump performance, as part of the overall infusion. Potential hazards include drug interactions, inaccurate delivery rates and pressure alarms, and nuisance alarms. • When delivering an infusion with the Guardrails® Suite MX protection, ensure the correct profile (for patient care area) is selected prior to starting an infusion. Failure to select the appropriate profile could cause serious consequences. Epidural Administration • Epidural administration of drugs other than those indicated for epidural use could result in serious injury to the patient. • It is strongly recommended that the source container, infusion set, and Pump used for epidural drug delivery be clearly differentiated from those used for other types of administration. • The Pump can be used for epidural administration of anaesthetic and analgesic drugs. This application is only appropriate when using anaesthetics and analgesics labeled for continuous epidural administration and catheters intended specifically for epidural use. Use only sets dedicated for use with the Pump, without a ‘Y’ connector or injection port, for epidural infusions • Epidural administration of anaesthetic drugs: Use indwelling catheters specifically indicated for short-term (96 hours or less) anaesthetic epidural drug delivery. • Epidural administration of analgesic drugs: Use indwelling catheters specifically indicated for either short-term or long-term analgesic epidural drug delivery. 1000DF00479 Issue 2 9/50 Getting Started A Before operating the pump read this Directions For Use (DFU) manual carefully. Initial Set Up 1. 2. 3. Check that the pump is complete, undamaged and that the voltage rating specified on the label is compatible with your AC power supply. Items supplied are : • Alaris® SE Pump • Directions For Use (CD) • AC Power Cable (as requested) • Protective Packaging Connect the pump to the AC power supply for at least 24 hours to ensure that the internal battery is charged (verify that the AC Mains indicator is lit). A Maximum battery capacity, as well as gauge accuracy, is reached after several charge/discharge/ recharge cycles, in the refresh process. CareFusion recommends that the battery be fully charged/ discharged/recharged, using the refresh cycle, before placing the pump in use. The pump will automatically operate from its internal battery if the pump is switched on without being connected to the power supply. Should the pump fail to perform correctly, replace in its original protective packaging, where possible and contact a qualified service engineer for investigation. Pole Clamp Installation The uniquely designed pole clamp adapts to a wide variety of surfaces (such as, poles, bed rails) to provide greater versatility and to simplify transports. It features: • 360º rotation in 90º increments • ergonomically designed knob • accommodates diameters from 15 to 35 millimetres BB AA BB AA Changing Pole Clamp Orientation 1. 2. 3. Press and hold rotation lever. Reposition clamp. Release lever at desired position. BB BB AA AA Lever A • The illustrated pole clamp knob may not reflect the knob in use on the pump. • When using multiple pumps, care should be taken to evenly distribute the pumps to ensure stability. • To ensure proper occlusion detection, do not operate the pump tilted back more than 45º from the upright position. 1000DF00479 Issue 2 10/50 Getting Started (continued) Priming an Infusion Set A When priming: • Ensure patient is not connected. • Ensure air is expelled from line prior to beginning infusion (unexpelled air in line could have serious consequences). • Failure to prime correctly can delay infusion delivery and cause the total volume to be infused to read higher than the actual total delivered to the patient. Prepare the primary solution container in accordance with the manufacturer’s directions for use. Use only sets dedicated for use with the Alaris® SE Pump. 1. Slide Flow Regulator thumb clamp down until an audible click verifies it is in fully closed position. 2. Spike solution container. 3. Fill drip chamber to 2/3 full. A • Open the vent cap on the spike if the container requires venting. 4. Invert Flow Regulator. 5. Slide Flow Regulator thumb clamp to open position to slowly prime set. Slide up to open for priming 6. Close Flow Regulator clamp when priming is complete, as in Step 1. Verify no fluid is flowing. 7. A gravity flow rate may be adjusted with Flow Regulator thumb clamp, if desired. Slide down to close for loading 1000DF00479 Issue 2 11/50 Getting Started (continued) Loading an Infusion Set A 1. 2. 3. 4. 5. 6. 7. • After set installation, verify no fluid is flowing through the infusion set’s drip chamber, to avoid freeflow. • Before operating pump, verify that infusion set is free from kinks and installed correctly in pump. • Ensure the appropriate infusion set for the fluid/drug to be infused has been selected. • Follow the instructions supplied with the individual infusion set. • Use only sets dedicated for use with the pump. The use of any other set may cause improper operation, resulting in an inaccurate fluid delivery or other potential hazard. • Position the fluid container to avoid spillage onto the pump. Slide Flow Regulator thumb clamp down until an audible click verifies it is in fully closed position. Using both hands, press top and bottom of Flow Regulator into pump until it snaps into place. Verify 3 gray fingers (clamp arms) on each side of pumping mechanism have engaged Flow Regulator. Let go of set. A properly loaded set should stay in pump. Press firmly just below blue thumb clamp on Flow Regulator with one hand while using other hand to close latch fully to left. • If resistance is met while closing latch, remove set, verify Flow Regulator is fully closed and then reinstall set. • Verify thumb clamp has moved to open (up) position prior to starting infusion. Attach set to patient’s vascular access device. Verify flow from IV container after starting infusion. Thumb Clamp Click Flow Regulator Removing the Infusion Set 1. 2. 3. 4. Place channel on hold. Open latch. Flow Regulator automatically closes to prevent accidental unintended flow. Press latch fully to right. Set is ejected from pump. A • Verify the Flow Regulator is closed when the infusion set is removed from the pump to prevent unintended flow. • Do not attempt to force the infusion set from the pump. Contact a qualified service engineer for investigation. 1000DF00479 Issue 2 12/50 IV Getting Started (continued) Starting the Infusion 1. 2. 3. To turn channel on, press channel’s POWER key. • The pump will run a short self-test. • Check the display test pattern and ensure that no rows or pixels are missing. Confirm Profile? - Press change to change Profile, Profile selection menu displays, select profile and ok. Go to step 3. Accept will retain profile and display NEW PATIENT? screen. New Patient? - Answering Yes will clear all previous patient data. No will retain previous patient data. MENU Screen displays. A 4. MENU screen will show either Resume Previous Drug, Resume Previous Fluid or Return to ....? if New Patient is not selected. Option shown will be dependent on previous infusion. MENU screen - Select one of the following: • New Guardrails Drug - allows a drug to be selected from the Drug Library in the data set. • New Guardrails Fluid - allows a fluid to be selected from the Fluid Library in the data set. • Basic Infusion - allows infusions to be given when a drug is not listed or when a data set is not loaded. • Previous infusion resume option, if available. A Before each use, verify all infusion settings are appropriate for the patient. New Guardrails Drug 1. 2. 3. 4. 5. 6. Select a drug name by pressing the adjacent soft key. Select therapy or clinical indication, if applicable. Select Dose units and Concentration, if applicable. To confirm selection and continue programming, press ok soft key. To confirm clinical advisory, if applicable, press ok soft key. An optional hospital-defined and editable starting value for continuous infusion dose may already be entered. To enter or adjust a value, use numeric keypad then press ENTER key. Press ok soft key to confirm. 7. To enter desired VTBI, use numeric keypad then press ENTER key. 8. If there is a VI value that needs to be cleared, press CLEAR key or press 0 (zero) key then press ENTER key. 9. To continue programming, press ok soft key. 10. Verify that all parameters are correct, then press run soft key or RUN/HOLD key to start infusion. 11. To briefly view setup parameters (therapy, concentration, patient weight, current profile) from RUN/HOLD page or during a running infusion, press 4 soft key. New Guardrails Fluid 1. Select a fluid name by pressing the adjacent soft key. 2. To confirm selection and continue programming, press ok soft key. 3. To confirm clinical advisory, if applicable, press ok soft key. 4. Enter rate value, use numeric keypad then press ENTER key. 5. To enter desired VTBI, use numeric keypad then press ENTER key. 6. If there is a VI value that needs to be cleared, press CLEAR key or press 0 (zero) key then press ENTER key. 7. Verify that all parameters are correct, then press run soft key or RUN/HOLD key to start infusion. 8. To briefly view current profile from RUN/HOLD page or during a running infusion, press 4 soft key. Basic Infusion 1. 2. 3. 4. 5. Enter rate value, use numeric keypad then press ENTER key. To enter desired VTBI, use numeric keypad then press ENTER key. If there is a VI value that needs to be cleared, press CLEAR key or press 0 (zero) key then press ENTER key. Verify that all parameters are correct, then press run soft key or RUN/HOLD key to start infusion. To briefly view current profile from RUN/HOLD page or during a running infusion, press 4 soft key. 1000DF00479 Issue 2 13/50 Getting Started (continued) Resuming Previous Infusion If a channel has been powered off during an infusion, previous programming may be resumed if: • One channel of a dual channel pump remained on. • Current profile is accepted and New Patient? – no is selected during start up 1. Select desired channel as necessary. 2. Press soft key next to the resume option required. Previous set-up screen displays. 3. Verify that all parameters are correct or change as required, then press run soft key or RUN/HOLD key to start infusion. Pausing and Restarting Infusion 1. 2. An infusion may be paused temporarily by pressing channel RUN/HOLD key. To restart infusion while on hold, press channel RUN/HOLD key. A • Rate LED flashes while infusion is on hold. • After 2 minutes, “Hold Time Exceeded” visual and audio prompts begin. An additional 2 minute period may be initiated by pressing either hold soft key or channel RUN/HOLD key. Making Changes to Rate, Dose or VTBI Continuous infusion parameters (Rate, Dose or VTBI) may be changed without pausing the infusion and VI may be cleared. 1. Select desired channel, as necessary. 2. Press soft key next to parameter to be edited. Current value is highlighted. 3. Make changes: To enter a new value, use numeric keypad or to reset Volume Infused to 0.0 ml, press CLEAR or 0 (zero) key. 4. To accept new value, press ENTER key. Making Changes to Concentration or Patient Weight Infusion must be paused before making changes. If a drug with a defined standard concentration was selected, Conc (concentration) values are not editable. 1. To pause infusion, press channel’s RUN/HOLD key. 2. Press set up soft key. 3. Press soft key next to parameter to be edited. Current value is highlighted. 4. To enter a new value, use numeric keypad then press ENTER key. Changing the Infusion Set To pause infusion, press channel’s RUN/HOLD key. Close in-line clamp and ensure the access to the patient is isolated. Disconnect the infusion set from the patient. Remove infusion set from the pump and discard the set and fluid container according to hospital protocol. Prepare the new infusion set, load infusion set into pump and close the door, see ‘Priming the Infusion Set’ and ‘Loading the Infusion Set’. 6. Restart infusion, see ‘Getting Started’. 1. 2. 3. 4. 5. A When changing the infusion set or the fluid container use aseptic technique according to hospital protocol. It is recommended that infusion sets are changed in accordance with the Directions For Use. Carefully read the Directions For Use supplied with the infusion set prior to use. Keep Vein Open (KVO) Mode When the primary VTBI reaches 0.0ml, the pump automatically switches to the configured KVO rate, or remains at the current infusion rate, whichever is less. • KVO rate flashes in rate LED display. • Programmed infusion rate continues to display in Main Display. • KVO flashes in infusion status bar. • KVO alert tone sounds (may be silenced for 2 minutes using Silence key). • VTBI = 0 (infusion in kvo) message flashes in Main Display. 1. To exit KVO mode, press RUN/HOLD key to place channel on hold. 2. Press VTBI soft key. VTBI is highlighted. 3. To enter desired VTBI, use numeric keypad then press ENTER key. 4. To resume infusion, press run soft key or RUN/HOLD key. Clearing Volume Infused The volume infused counter increments as fluids are infused through a given channel. All fluids infused in primary mode, including boluses, all fluids infused in secondary mode and all fluids infused in KVO mode are counted. 1. To reset volume infused counter to 0.0ml, press VI soft key. VI field is highlighted. 2. Press CLEAR key or press 0 (zero) key then press ENTER key. 1000DF00479 Issue 2 14/50 Bolus A Bolus can be programmed at the beginning of, or during a continuous infusion. The drug being programmed must be a drug selected from the Drug Library that has bolus enabled. Bolus volume must be at least 1 ml and not more than 999.9 ml. Bolus parameters may not be edited during bolus infusion. If new parameters are desired, select New Bolus from the Bolus menu. Delivering a Bolus Prior to Beginning an Infusion 1. 2. 3. 4. 5. 6. On VTBI and VI setup page, press Bolus soft key. An optional hospital-defined and editable starting value for bolus dose may already be entered or to enter a value, use numeric keypad then press ENTER key. An optional hospital-defined bolus dose administration rate may have been used to calculate an editable Time in minutes (1-99) to deliver programmed bolus dose or to enter a Time value, use numeric keypad then press ENTER key. Verify parameters are correct and press ok soft key. Verify that all parameters are correct, then press run soft key or RUN/HOLD key to start infusion. When bolus dose completes, an audio tone sounds and Bolus Dose Complete briefly displays, and infusion automatically transitions to continuous rate. Delivering a Bolus During an Infusion 1. 2. 3. 4. 5. 6. 7. Press OPTIONS key. Press Bolus soft key. Press New Bolus soft key or, to repeat a previous bolus, press Repeat Last Bolus soft key. An optional hospital-defined and editable starting value for bolus dose may already be entered or to enter a value, use numeric keypad then press ENTER key. An optional hospital-defined bolus dose administration rate may have been used to calculate an editable Time in minutes to deliver programmed bolus dose or to enter a value, use numeric keypad then press ENTER key. Verify parameters are correct and press ok soft key to transition from continuous to bolus infusion. When bolus dose completes, an audio tone sounds and Bolus Dose Complete briefly displays, and infusion automatically transitions back to continuous rate. Bolus Only The Bolus Only feature is used to deliver single boluses from a fluid container without delivering a continuous infusion. The feature is not available once a continuous dose or rate has been entered, or if an initial value for continuous infusion dose has been entered in the data set. 1. 2. 3. 4. 5. 6. 7. 8. Prior to entering a dose or rate press BolusOnly soft key. An optional hospital-defined and editable starting value for bolus dose may already be entered or to enter a value, use numeric keypad then press ENTER key. An optional hospital-defined bolus dose administration rate may have been used to calculate an editable Time in minutes (1-99) to deliver programmed bolus dose or to enter a time value, use numeric keypad then press ENTER key. Verify parameters are correct and press ok soft key. Verify that bag contains an adequate volume to deliver programmed dose as specified and press ok soft key. Verify that all parameters are correct and press run soft key or RUN/HOLD key to start infusion. When bolus dose completes, an audio tone sounds and Bolus Dose Complete displays until user takes action. Press menu key to return to Bolus Menu. Stopping a Bolus 1. 2. 3. 4. Press RUN/HOLD key for desired channel. Press menu soft key. Press Quit Bolus soft key. To start continuous infusion, if one was programmed, verify parameters are correct and then press run soft key or channel RUN/HOLD key. 1000DF00479 Issue 2 15/50 Intermittent Infusion When using a drug listed in the Drug Library, the drug parameters are automatically calculated based on: • drug amount • weight entry or BSA entry (if required) • VTBI entry • time or rate entry Press New Guardrails Drug soft key. To use pre-selection menu press soft key corresponding to first letter of desired drug. Press soft key next to desired drug name to select it. If applicable, an optional hospital-defined therapy or clinical indication for delivery of this infusion may appear. 4. If applicable, multiple concentration listings for delivery of this infusion may appear, press soft key next to desired selection. 5. To confirm selection and continue programming, press ok soft key. 6. If facility has defined a Clinical Advisory for selected drug, a message appears. To indicate that information has been noted and continue programming, press ok soft key. 7. Enter parameters as needed. 8. Verify that all parameters are correct and press ok soft key to confirm. 9. To accept VTBI value, press ENTER key or to enter another value, use numeric keypad then press ENTER key. 10. If there is a VI value that needs to be cleared, press CLEAR key or press 0 (zero) key then press ENTER key. 11. An optional hospital-defined and editable starting value for time may already be entered or to enter a value, use numeric keypad to enter hours (0-99), then minutes (0-59). Press ENTER key to accept each entry. 1. 2. 3. A Time can be entered to calculate rate or if rate entry is desired, press rate - time softkey. It changes to rate - time, indicating that rate may be entered. 12. Verify that all parameters are correct and press ok soft key. 13. Verify that all parameters are correct and press run soft key or RUN/HOLD key to start infusion. 14. To briefly view setup parameters (therapy, total dose, concentration, patient weight or BSA, current profile) from RUN/HOLD page or during a running infusion, press 4 soft key. Making Changes During Intermittent Infusion Intermittent infusions must be paused to change parameters (Rate, VTBI or Time) or to clear VI. 1. Press RUN/HOLD key for desired channel. 2. Press soft key next to parameter to be edited. 3. To enter a new value, use numeric keypad. 4. To reset volume infused to 0.0 ml, press CLEAR or 0 (zero) key. 5. To accept new value, press ENTER key. A Rate can be entered to calculate time or if time entry is desired, press rate - time softkey. It changes to rate - time , indicating that time may be entered. 1000DF00479 Issue 2 16/50 Secondary Infusion This mode is designed to support automatic secondary infusions (“piggybacking”) in the same channel. A secondary infusion can be programmed as a Basic SEC or Guardrails SEC drug. When the secondary VTBI reaches zero, an audio tone sounds (if enabled), Secondary Complete message displays briefly, and the primary infusion rate automatically resumes. When the pump is programmed and delivering in the secondary mode, the primary infusion is temporarily stopped and fluid is drawn from the secondary container. Delivery from the primary container resumes when the fluid level in the secondary infusion set is level with the fluid in the primary container. Primary infusion must be on hold to program secondary infusion. A secondary infusion may be programmed only after a primary IV Fluid (that supports secondary mode) or a primary Basic Infusion has been programmed. The secondary key is unavailable for selections that have been designated as inappropriate for secondary delivery. Pressing the SEC key after programming a fluid that does not support secondary infusions results in a message, “Secondary not allowed with this fluid”. Load the primed set. See 'Loading the Infusion Set' for instructions. Prepare the secondary infusion using a secondary solution container and the check valve primary set; lower the primary container. See illustration right. 3. Prime the secondary infusion set in accordance with the set Directions for Use 4. Attach secondary infusion set to the upper Y-site of the primary infusion set 5. Fully open the regulating clamp on the secondary infusion set. 6. Press the SEC key. Secondary Menu displays. 7. Choose Guardrails SEC Drug or Basic SEC. 8. Enter parameters as required following on screen prompts. (See primary infusion set-ups for more detail) 9. Verify all parameters are correct and press ok soft key. 10. Press yes soft key to confirm Secondary Clamp is open. 11. Verify that all parameters are correct and press run soft key or RUN/HOLD key to start infusion. 12. To briefly view setup parameters (therapy, total dose, concentration, patient weight or BSA, current profile) from RUN/HOLD page or during a running infusion, press 4 soft key. Secondary container 1. 2. Hanger at least 24cm Primary container Back Check valve Y-Site Secondary Infusion Preparation A WARNING: • Secondary applications require the use of a check valve set on the primary infusion set. • Secondary infusion applications using a check valve set must have a VTBI setting equal to the volume in the secondary container; this will require consideration of such variables as factory overfill, medication additions, etc. • Underestimating the volume will cause remaining secondary solution to be infused at the primary rate; overestimating will result in primary solution being infused at the secondary rate. A When using a flow sensor it must be on the primary infusion set. Correct placement of a flow sensor is essential for proper operation. 1000DF00479 Issue 2 17/50 Options Promoting Basic Infusion When the Profiles feature is set to OFF or when no data set has been transferred to the Pump, Guardrails® Suite MX protection is not available and this section does not apply. A basic infusion may be promoted to a continuous drug infusion or a fluid infusion with Guardrails® Suite MX protection while infusing. A basic infusion may not be promoted to an intermittent drug. If an intermittent drug is selected a Pri Running message is displayed. Infusion must be running in the Basic Primary Mode. 1. Select desired channel as necessary. 2. Press Options key. 3. Press Guardrails Menu soft key. 4. Press New Guardrails Drug or New Guardrails Fluid soft key, as required. 5. Set-up New Guardrails Drug or New Guardrails Fluid as per previous instructions. 6. Verify that all parameters are correct and press ok soft key or ENTER key as appropriate. Dose Rate Calculator When the Profiles feature is set to OFF, this feature allows the clinician to select a drug name from a pre-set list or to select a generic calculation feature by selecting “Drug?” to calculate drug parameters for drugs not on the list. If the preset list is disabled in the pump configuration settings, then only generic calculation is available. Parameters are calculated automatically based on: • concentration • weight entry (if required) • rate or dose entry 1. 2. 3. 4. 5. 6. 7. 8. 9. 10. 11. 12. 13. 14. 15. Press OPTIONS soft key. Press Dose Rate Calculator soft key. Press Enter New Program soft key. To use pre-selection menu press soft key corresponding to first letter of desired drug. Press soft key next to desired drug name to select it. To approve all displayed information and advance to setup page press ok soft key or to change concentration or weight units press soft key next to parameter to be changed. To scroll through available selections, press soft key. When desired unit displays, press ENTER key, then press ok soft key to continue programming. Press ok soft key to confirm selection and dosing units. To enter desired values, use numeric keypad then press ENTER key. When all fields have been completed, verify that all parameters are correct and press ok soft key to confirm To enter a VTBI value, use numeric keypad then press ENTER key. If there is a VI value that needs to be cleared, press CLEAR key or press 0 (zero) key then press ENTER key. To continue programming, press ok soft key. Verify that all parameters are correct and press run soft key or RUN/HOLD key to start infusion. To briefly view current dose rate setup parameters (concentration, patient weight) from RUN/HOLD page or during a running infusion, press 4 soft key. A If desired drug name is not listed, use “Drug? NO DOSE LIMIT”. • Profile features must be enabled • Press New Guardrails Drug soft key. • Go to end of drug list and select Drug? NO DOSE LIMIT. • Enter parameters as needed. • Verify that all parameters are correct and press run soft key or RUN/HOLD key to start infusion. 1000DF00479 Issue 2 18/50 Options (continued) Loading Dose This feature allows an initial infusion rate to be set up for a specific volume, automatically followed by a maintenance rate (primary settings) from the same container. If delivering a bolus dose of medication to load prior to the start of a continuous infusion, see "Primary Infusion - With Guardrails® Suite MX Protection", "Bolus Dose". The primary VTBI and VI include the loading dose volumes. When the loading dose VTBI reaches zero, a transition tone sounds (if transition tone feature is enabled), Load Dose Complete message displays briefly, and the primary settings automatically take effect. Verify the primary mode parameters prior to accessing the Loading Dose option. 1. Select desired channel, as necessary. Channel must be on hold in primary mode. 2. Press options key. 3. Press Loading Dose soft key. Loading Dose infusion rate is highlighted. 4. If current value is appropriate press ENTER key or to enter a new infusion rate, use numeric keypad and press ENTER key. 5. Loading Dose VTBI is highlighted. If current value is appropriate press ENTER key or to enter a new vtbi, use numeric keypad and press ENTER key. 6. To start loading dose infusion, press RUN/HOLD key. 7. To briefly view current profile press 4 soft key. 8. To briefly view primary settings (Pri Rate, Pri VTBI, Total VI) during loading dose infusion, press Primary Settings soft key. 9. To change Primary Settings during a loading dose infusion, press Primary Settings soft key. 10. Press soft key next to parameter to be edited. 11. To enter a new value, use numeric keypad or to reset volume infused to 0.0 ml, press CLEAR or 0 (zero) key. 12. To accept new value, press ENTER key. A This mode is useful for delivering fluid challenges. This feature is for delivery from primary containers only. Using this feature with 2 separate containers may result in unintended flow rates. 1000DF00479 Issue 2 19/50 Options (continued) Multi-Dose This feature allows 1 to 24 infusions to be preprogrammed with the same rate and volume, to be delivered at equally spaced intervals, over a period of up to 24 hours. It also offers a delayed start option up to 8 hours and a Dose Complete Alert Option. These features can be turned on or off. This program requires another infusing line to keep the vein open between programmed doses since there is no KVO infusion between doses or following program completion. 1. Select desired channel, as necessary. Channel must be on hold in primary mode. 2. Press options key. 3. Press Multi-Dose soft key. 4. Press Enter New Program soft key. 5. To enter infusion rate, use numeric keypad. Press ENTER key. 6. To enter VTBI/Dose, use numeric keypad. Press ENTER key. 7. To enter number of doses, use numeric keypad. Press ENTER key. 8. To enter dose frequency (time interval from start of one dose until start of next), use numeric keypad. Press ENTER key. 9. Verify that all parameters are correct then press ok soft key. 10. If Dose Complete Alert Option is enabled, DOSE COMPLETE ALERT OPTION page appears. To select On or Off, use soft keys. 11. To continue programming, press ok soft key. 12. To start first dose immediately, press ok soft key. Then press run soft key or RUN/HOLD key to start infusion. 13. To delay start of first dose, enter time (hours and minutes) using numeric keypad and ENTER key. Then to advance to timer hold page, press start timer soft key. Changing Time Interval Until Next Dose 1. Press stop timer soft key. 2. To select a value for editing, press relevant soft key. 3. To enter new value, use numeric keypad. Press ENTER key. 4. When editing is complete, press start timer soft key. Resuming an Interrupted Multi-Dose 1. 2. 3. 4. Press yes soft key on the Return To Multi-Dose? page. To accept set-up parameters, press Review/Resume soft key. To continue, press ok soft key. If infusion was in progress when interrupted press run soft key or RUN/HOLD key to resume infusion. If infusion was NOT in progress when interrupted, edit time to delivery of next dose, as necessary, then press start timer soft key. Quitting Multi-Dose The channel must be on hold or the last dose complete. 1. Press menu soft key. 2. To return to primary set-up page, press Quit Program soft key. 1000DF00479 Issue 2 20/50 Options (continued) Multi-Step The Multi-Step feature allows a sequential drug delivery program (up to 9 steps) to be set, delivering volumes of fluid at different rates during each step. This allows the pump parameters to be set up once and to deliver a sequence eliminating the need to change the rate and VTBI after each infusion step. The infusion may be programmed in either rate and volume or volume and time. At completion of the last programmed step, the channel switches to the preset KVO rate or remains at the current rate, whichever is less. 1. Select desired channel, as necessary. Channel must be on hold in primary mode. 2. Press options key. 3. Press Multi-Step soft key. 4. Press Enter New Program soft key. 5. Select either Rate and Volume (pump calculates step infusion time) or Volume and Time (pump calculates rate). 6. To enter values for rate, volume or time as applicable, use numeric keypad. Press ENTER key. 7. To approve all displayed parameters and advance to next step press ok soft key. 8. Repeat steps 6 & 7 for each additional step required. 9. When all steps have been entered and accepted, press done soft key. 10. To approve and advance through review page(s), press ok soft key. 11. To clear VI, if required, press CLEAR or 0 (zero) key. Press ENTER key. 12. To approve STEP TOTALS page, press ok soft key. 13. To start Multi-Step infusion program, press run soft key or RUN/HOLD key. Making Changes During Multi-Step The channel must be on hold to view or edit the steps in the program. 1. To place channel on hold, press RUN/HOLD key. 2. To return to review page(s), press setup soft key. • A tick mark (y) next to a step on review page(s) indicates it has not started. • Only steps having a (y) can be edited. • A step number in progress is highlighted. 3. To advance through review page(s) of program, press ok soft key. 4. To select a step for editing, press a soft key. 5. To select value for editing, press a soft key. 6. To enter new value, use numeric keypad. Press ENTER key. 7. To return to review page(s) when programming is complete, press ok soft key. 8. To approve review page(s) and STEP TOTALS page, press ok soft key. 9. To resume infusion, press RUN/HOLD key or run soft key. Viewing Totals Remaining Press 4 soft key. Time and VTBI remaining in Multi-Step program display for a short interval. Resuming an Interrupted Multi-Step The channel retains its place in the program if the pump is turned off. The program can be restarted from step 1 or resume where it left off. 1. Select desired channel, as necessary. 2. Select New Patient and Profile Options, as necessary. Return To Multi-Step? page appears. 3. Press yes soft key. 4. Press Review/Resume soft key. 5. To resume program from point of interruption, press Continue Program soft key or to restart program at beginning of step 1, press Restart Program soft key. 6. Verify all settings are correct. If a change is required, see “Making Changes During Multi-Step”. 7. To approve review page(s) and STEP TOTALS page, press ok soft key. 8. To continue or restart program, press RUN/HOLD key or run soft key. Quitting Multi-Step The channel must be on hold or the last dose complete. 1. Press menu soft key. 2. To return to primary set-up page, press Quit Program soft key. 1000DF00479 Issue 2 21/50 Options (continued) Monitoring Options All features and options in this section are shown enabled. Options are enabled through the hospital data set profile configuration settings, or through the pump configuration settings if the Profiles feature is not enabled (OFF). The Dynamic Monitoring System provides the ability to monitor downstream pressure or resistance, allowing rapid detection of full and partial occlusions. Resistance monitoring eliminates the impact of patient elevation and flow rate to provide the most direct assessment of patency. Components of this system are: • Monitoring Options: to select IV infusion set/site monitoring modes of resistance, high resistance, and adjustable or fixed pressure. • Auto Restart Plus Feature: allows pump to automatically resume operation when specific pump operating conditions are met. • Adjustable Resistance Alert: to provide an early warning of increases in downstream flow resistance. • Adjustable Pressure Alarm: to provide an early warning of increases in downstream pressure. • Trend Graph: to display downstream pressure or flow resistance over time. • Pressure Baseline: to provide a starting point from which to measure changes in system pressure. Infusion sets, catheters, and applications create various levels of resistance to flow. Monitoring mode options are available to meet each clinical need. • Resistance: designed to monitor IV infusion set/site resistance providing optimum sensitivity for most IV applications. • High Resistance: designed to monitor IV infusion set/site resistance with optimum sensitivity where higher resistance catheters are used. • Adjustable Pressure: designed to monitor IV infusion set/site pressure and provide user-adjustable pressure alarm limits. Used for Precision Flow mode or for high resistance systems; such as, infusion through transducers, into dialysis systems and through highest resistance catheters. • Pressure: designed to monitor IV infusion set/site pressure and alarm based on a fixed pressure limit. A Precision Flow: in fixed and adjustable pressure modes, the Pump provides enhanced flow continuity at rates below 50 ml/h. Selecting Monitoring Option For dual channel pumps, select the desired channel as necessary. The bar graph and numeric displays are not available when the split screen is displayed. 1. Press options key. 2. Press Monitoring Options soft key. 3. Press soft key for Resistance, High Resistance or Adjustable Pressure. 4. Press ok soft key. Display automatically returns to normal operating screen. •If Resistance option is selected, % Resistance displays below bar graph while infusing. •If High Resistance option is selected, % Hi Resist. displays below bar graph while infusing. •If Adjustable Pressure option is selected, pressure system accuracy can be enhanced by ensuring no occlusion or other pressure source exists in infusion set when activating RUN/HOLD. A • Each time the pump is turned on, verify and/or set the monitoring mode. If the monitoring mode, resistance alert and/or pressure alarm limit are not verified, the pump may not be operating with the desired occlusion detection parameter(s). • High Resistance and Resistance alert limit may be adjusted using the soft keys located below the arrow symbols. • Pressure alarm limits may be adjusted when operating in Adjustable Pressure mode using the soft keys located below the arrow symbols. • Maximum pressure limit settings may be configured by qualified service personnel. 1000DF00479 Issue 2 22/50 Options (continued) Monitoring Options (continued) Auto Restart Plus Feature The Auto Restart Plus feature provides the ability to automatically continue an infusion if downstream resistance or pressure measurements indicate that an occlusion condition has cleared within a 40-second Checking Line period (excluding High Resistance Monitoring mode). The Checking Line message and tone are presented when a resistance measurement exceeds the alarm threshold of 100%. If resistance measurements initiate the Checking Line condition, the channel continues infusing in order to determine if the measured flow resistance has changed. If the measured flow resistance falls to any value below 100% within 40 seconds, the channel automatically resumes normal operating conditions (excluding High Resistance Monitoring mode). Pressure measurements initiate the Checking Line period when the pressure exceeds the configured limit. If the pressure falls to less than one-third of the configured limit within 40 seconds, normal flow resumes. If the condition is not cleared, the OCCLUSION DOWNSTREAM alarm occurs and infusion stops until manually restarted. This feature can be configured through the hospital data set to allow from 1 to 9 Checking Line restarts. After the programmed number of restarts has occurred or the 40-second Checking Line period has been exceeded, the channel immediately alarms OCCLUSION DOWNSTREAM when resistance or pressure conditions indicate an occlusion. A • An OCCLUSION DOWNSTREAM condition is detected when the measured resistance reaches 100% of scale. For the Resistance mode, 100% results from a resistance producing 2 mmHg per ml/h of flow. For the High Resistance mode, 100% results from a resistance producing 6 mmHg per ml/h flow. • An OCCLUSION DOWNSTREAM condition is also detected when the configured pressure limit is exceeded. This limit may be set, by qualified service personnel, from 1 mmHg to 600 mmHg (Pressure Limit, Maximum). Resistance Alert The Resistance Alert provides an early warning of increasing flow resistance. The Resistance Alert marker can be set from 0% to 100% of scale in 5% increments. This feature can be enabled or disabled and a power-on default alert level is set through the hospital data set. To optimize the alert feature, it is advisable to set the alert level 20-30% higher than the initial displayed resistance. Read the resistance approximately 2 minutes after starting an infusion. Setting Alert Marker •To numerically display present alert level marker, press either or soft key. Vertical line on resistance bar graph visually indicates alert level. •Each additional press of either arrow soft key increases or decreases alert level marker and numeric value by 5%. Resistance Trend Graphs In Resistance and High Resistance monitoring modes, a trend graph displays flow resistance over time. Trend graphs of 15 minutes, 1 hour, 4 hours and 12 hours are available during normal operation when enabled through the hospital data set. Downstream Occlusions are indicated by a tick mark (y) at the top of the trend screen. For dual channel pumps, select the desired channel, as necessary. The trend graph is not available while the split screen is displayed. 1. Press options key. 2. Press Resistance Trend soft key. 3. To change graph time frame, press time soft key. •A dashed horizontal line represents current resistance alert level. •Gaps in graph may indicate non-infusing conditions; such as, turned off, on hold, in alarm. •If channel has been placed in Pressure Monitoring mode for some portion of a trend graph window, resistance data is not available and zero values are plotted. •A tick mark (y) at top of graph indicates an occlusion. •When viewing Resistance Trend Graphs in High Resistance mode, HI RESIST displays under graph. A • To clear graphed data, press clear soft key and then ok to confirm. • Press return soft key to return to normal operating screen. 1000DF00479 Issue 2 23/50 Options (continued) Monitoring Options (continued) Adjustable Pressure Alarm In the Adjustable Pressure monitoring mode, the pressure alarm limit may be varied from 25 mmHg to the maximum configured pressure limit, in 25 mmHg increments. A default alarm level and a maximum pressure limit are set through the hospital data set profile configuration settings or through the pump confirmation settings if the Profiles feature is not enabled (OFF). Pressing either arrow ( or ) soft key changes alarm limit by 25 mmHg in corresponding direction. It is advisable to select an alarm limit appropriate for flow rate. At lower flow rates, alarm limit should be set lower, to shorten time to alarm. Pressure Monitoring Using Automatic Baseline Calibration The auto pressure baseline calibration remains in effect until the pump is turned off, the latch is opened, the set is reloaded, or the Set Pressure Baseline function is performed. A • First activation of RUN/HOLD for a new infusion automatically establishes a pressure baseline based on current system pressure. An optimal baseline is maintained upon subsequent activations of RUN/HOLD, as follows: • If current system pressure is same or higher than original baseline, pressure baseline does not change. • If current system pressure is less than original baseline, system automatically resets to new system pressure value. • Pressure measurement can be optimised, particularly at low flow rates (less than 3 ml/h), by pausing and restarting at least once every 2 hours. This allows pressure baseline to calibrate based on current system pressure. • Prior to activation, ensure that pressure has not built up in infusion set due to either occlusion or flow from other pumps through a common catheter. This will result in a more accurate pressure measurement. • When loading a set connected to a small diameter catheter, wait at least 5 seconds after loading set before activating RUN/HOLD. This allows pressure generated by loading process to dissipate and sensor to stabilise. (Very small PICC catheters; such as, 28 gauge/1.2 French, may require 60 seconds or more for stabilisation.) • When multiple pumps are infusing through a common small diameter catheter, pressure measurement accuracy can be optimised by temporarily stopping all infusions, then restarting all pumps beginning with pump delivering at lowest rate. 1000DF00479 Issue 2 24/50 Options (continued) Monitoring Options (continued) Pressure Baseline The Pressure Baseline feature, when enabled through the hospital data set profile configuration settings, provides a real-time bar graph and numeric display of line pressure. The pressure limit may be reduced if the pressure in the set is high or changing. This results in the pressure limit being lowered from the selected setting. If this occurs, first try to remove or reduce the downstream pressure. Following that, try to reload the set, wait 15 to 30 seconds and then perform a Set Pressure Baseline operation. The pressure baseline may need to be set a second time, after the pressure readings have stabilized. For dual channel pumps, select the desired channel as necessary. The pressure bar graph is not shown when the split screen display is active. For optimal results, set the baseline 15 minutes after starting an infusion. The pressure baseline can be optimised, particularly at low flow rates (less than 3 ml/h), by resetting the pressure baseline when the readings are negative. Check periodically for negative readings; for example, when programming vtbi. This allows the pressure baseline to calibrate based on current system pressure. 1. To place channel on hold, press channel’s RUN/HOLD key. (All infusions connected to channel being baselined must be on hold.) 2. Press options key. 3. Press Set Pressure Baseline soft key. 4. Verify no pressure, due to occlusion or other infusions through a common set, is present in infusion set at this time. 5. For best results, verify set outlet (for example, stopcock) is located at patient’s heart level before continuing with next step. 6. Press ok soft key. 7. Verify pressure readout is 0 (zero) mmHg. 8. To start infusion, press RUN/HOLD key. A • To return to the normal screen without setting the baseline, press return soft key. • True baseline pressure will be zero or within a few mmHg of zero. If not, and the pressure is unstable, allow the pressure to drop to the lowest level and then repeat the Set Pressure Baseline process. • The pressure baseline calibration remains in effect until the pump is turned off, the latch is opened, the set is reloaded, or the set Pressure Baseline function is performed again. • Setting the manual baseline overrides the auto baseline until the pump is turned off, the latch is opened, set is loaded, or another manual baseline is set. • Setting a manual Pressure Baseline displays a horizontal real-time bar graph and numeric pressure readings. The vertical line on the pressure bar graph visually indicates the pressure alarm limit. 1000DF00479 Issue 2 25/50 Options (continued) Monitoring Options (continued) Pressure Trend Graphs In Pressure Monitoring mode, a trend graph displays monitored pressure over time. Trend graphs of 15 minutes, 1 hour, 4 hours and 12 hours are available during normal operation when enabled through the hospital data set. Downstream Occlusions, which occur in Pressure or Resistance modes, are indicated by a tick mark (y) at the top of the trend screen. To view graph: 1. Dual channel pumps: Select desired channel, as necessary. Trend graph is not available while split screen is displayed. 2. Press options key. 3. Press Pressure Trend soft key. 4. To change graph time frame, press time soft key. A • A solid horizontal line represents current pressure alarm limit level. • Gaps in graph may indicate non-infusing conditions; such as, turned off, on hold, in alarm. • If channel has been placed in Resistance Monitoring mode for some portion of a trend graph window, pressure data is not available and zero values are plotted. • A tick mark (y) at top of graph indicates an occlusion. To clear graph: 1. To clear graphed data, press clear soft key. 2. Press ok soft key. To return to normal operation: 1. Press return soft key. SmartSite® Needle-Free System Instructions SmartSite® Needle-Free Valve is designed to permit safe gravity flow and automated flow, injection and aspiration of fluids without the use of needles by utilising Luer lock and luer slip connectors. Precautions: Discard if packaging is not intact or protector caps are unattached. Needle-Free Valve contraindicated for blunt cannula system. A DIRECTIONS - Use Aseptic Technique 1. Prior to every access, swab top of Needle-Free Valve port with 70% Isopropyl alcohol (1-2 seconds) and allow to dry (approximately 30 seconds). NOTE: Dry time is dependent on temperature, humidity, ventilation of the area. 2. Prime valve port. If applicable, attach syringe to Needle-Free Valve port and aspirate minuscule air bubbles. 3. Replace every 72 hours for stand alone valves. However, if the valve is part of the set, then the set change interval is as per the complete set or 100 activations which ever occurs first. For infusions of blood, blood products or lipid emulsions replace infusion set every 24 hours. NOTE: During use of Needle-Free Valve port, fluid may be observed between the housing and blue piston. This fluid does not enter the fluid path and requires no action. For product questions or needle-free valve educational materials contact your Cardinal Health, Alaris® Products representative. The Center for Disease Control, Intravenous Nurses Society (USA) and other organizations publish guidelines useful in developing facility guidelines. Consult facility protocols. 1000DF00479 Issue 2 26/50 Alarms, Alerts and Prompts There are 3 types of displayed messages listed on the following pages with a probable cause and suggested remedy next to each one. Use this section in conjunction with the appropriate clinical practice of hospital procedure. ALARM: pump or channel problem. • infusion stops • alarm bell icon illuminates • alarm tone sounds • rate LED display flashes • message appears in Main Display when channel is selected ALERT: may indicate a change in infusion status. • channel continues to operate • alert tone sounds • message appears in Main Display PROMPT: infusion status not changed. Startup procedures were not completed or an invalid key was pressed. A When using the dual channel pump, some messages also display Channel A or Channel B, to indicate which channel is affected. Always verify the channel is selected before making any changes. Alarms Alarm Meaning Response accumulated air in line Air detector has detected multiple small bubbles. Air detector has detected multiple small bubbles. Press hold soft key. Open latch to remove set. Clear air per hospital protocol. Reinstall set. Press Run/Hold to resume infusion. If reset key is active and air bubbles are clinically insignificant, press reset soft key and then press run soft key to resume infusion. Ensure air-in-line sensors are thoroughly cleaned. air in line Air detector has detected an air bubble larger than configured threshold tolerance. Air detector has detected an air bubble larger than configured threshold tolerance. Press hold soft key. Open latch to remove set. Clear air per hospital protocol. Reinstall set. Press RUN/HOLD to resume infusion. If reset key is active and air bubbles are clinically insignificant, press reset soft key and then press run soft key to resume infusion. At flow rates of 1.0 ml/h and below, verify upstream fluid path is unobstructed. Ensure air-in-line sensors are thoroughly cleaned. battery depleted (Plug In) Battery is too low to operate pump. Plug power cord into an AC outlet immediately. Press run soft key or RUN/HOLD to resume infusion. channel malfunction Dual channel pump only. Channel malfunction. Turn channel off and then on. If problem persists, do not use channel. Contact qualified service personnel computer link failure RS-232 connection to computer was disrupted. Computer Link feature is in monitor mode. Check RS-232 connections. Clearing this alarm automatically puts pump in monitor mode. Reestablish infusion. flow sensor unplugged Flow sensor is unplugged from back of pump. Plug flow sensor into flow sensor receptacle. hold time exceeded Channel has been on hold for 2 minutes and no keys have been pressed (on either channel if dual channel). Press hold soft key to return to hold mode. 1000DF00479 Issue 2 27/50 Alarms, Alerts and Prompts (continued) Alarms (continued) Alarm Meaning Response instrument malfunction Pump malfunction. For a dual channel pump, neither channel is functional. Turn pump off and then on. If problem persists, do not use pump. Contact qualified service personnel. key stuck A key is stuck or was held down too long. Release key. Turn pump off (both channels if dual channel pump) and then on. If problem persists, do not use pump. Contact qualified service personnel. latch open Latch was opened during an infusion. Check for proper set installation. Close latch fully to the left. Press run soft key. no upstream flow detected Flow has been obstructed between container and pump when using a flow sensor. Check to see if container is empty, flow sensor is mispositioned or clouded, tubing is kinked or air vent is closed. Verify correct set connections and open fluid path. Press run soft key to restart infusion. Note: Infusing fluids which form smaller drops through a 60 drops/ml set at high rates may result in a No Upstream Flow Detected alarm. (This is because the small, rapidly falling drops form a continuous stream which does not trigger the flow sensor). In this event, unplug the flow sensor from the pump. occlusion downstream Pressure in infusion set has exceeded a pressure alarm threshold or Resistance has reached 100%. Check infusion set for probable cause (such as kinked tubing, closed stopcock, high resistance catheter). Press run soft key to restart infusion. occlusion upstream Flow has been obstructed between fluid container and pump's pressure sensor. Check infusion set for probable cause (such as kinked tubing, closed clamp). Verify that blue thumb clamp on Flow Regulator has moved to open (up) position. If not, reload set. Press run soft key to restart infusion. primary flow detected during secondary Pump detected flow from primary container during secondary infusion. NOTE: Alarm can only occur when using optional flow sensor. Verify that flow sensor is on Primary infusion set and that set up is correct. set out Set has been removed during an infusion. Reinstall set. Press run soft key to restart infusion setup time exceeded Pump has been turned on but no keys have been pressed for 10 minutes. Press hold soft key to return to hold mode. Pump turns off if left in alarm more than 5 minutes. If an audio alarm remains on, turn pump on and then off. Alerts Alert Meaning Response Battery Low Battery has 30 minutes or less of charge remaining. Plug power cord into an AC outlet as soon as possible. Check Entry Key press unclear. Press Clear key to continue. Checking Line Flow has been obstructed. Auto Restart Plus feature is on. Auto Restart Plus feature must be on for downstream occlusion alerts (not required for upstream occlusion alerts). Check infusion set for probable cause (such as kinked tubing, clogged filter, etc.). Complete Entry ENTER was not pressed to accept a new value. Press ENTER to confirm entry or press CLEAR twice to return to previous settings. NOTE: Channel operates as previously programmed until ENTER is pressed. Resistance Alert Infusion set resistance has reached preset alert level. Resistance Alert feature is on. Check downstream line and site. Raise resistance alert level, if appropriate. Additional Alerts: Additional alerts provide notification of program completion and/or transition to another mode: Bolus Dose Complete, Dose Complete (Multi-Dose Mode), Loading Dose Complete, Multi-Step Complete, Secondary Complete, Infusion in KVO or VTBI = 0.) 1000DF00479 Issue 2 28/50 Alarms, Alerts and Prompts (continued) Prompts Prompt Meaning Response Air In Line Air detector has detected air prior to starting infusion or is in poor contact with set. Press continue soft key to allow infusion to continue. An alarm occurs if air detector detects an air bubble larger than configured threshold. Verify set is loaded correctly. Prime and reload set or remove air. Reshape tubing to ensure optimum contact with sensor. Ensure air-in-line sensors are thoroughly cleaned. Dose Out of Range Calculated dose is outside allowable range. Verify and re-enter settings. Entry Invalid An invalid value was entered during programming. Press CLEAR or 0 key to clear entry. Enter appropriate value. Instrument Self-Check Is Due Please Eject the Set Pump/channel has not performed self-check within programmed interval. If set is loaded: Eject set, wait 5 seconds and then reload set. If no set is loaded: Load set, wait 1 minute and then eject set. Wait 5 seconds and then reload set. Invalid Entry Rate Out of Range Pump has calculated a rate less than 0.1ml/h. Verify and re-enter settings. Latch Open Latch is open (prior to starting an infusion). Close latch fully to left. Maintenance Reminder Periodic maintenance interval has elapsed. Maintenance Reminder feature is on. Notify Biomedical Engineering department. If desired, press continue soft key to temporarily bypass reminder. Max Rate = XXX.X ml/h An attempt was made to enter a rate greater than maximum configured rate or pump has calculated a rate greater than maximum configured rate. Default maximum rate is 999.9 ml/h in primary mode, 600 ml/h in secondary mode. Verify and re-enter settings. New Baseline Set A new Manual Pressure Baseline was successfully set. Manual Pressure Baseline feature is on. Baseline remains set until a new manual baseline is set, pump is turned off or latch is opened. Occlusion Downstream A very high pressure exists in infusion set while baseline is being set. Pressure Baseline feature is on. Remove source of high pressure and repeat setting of pressure baseline. Ok Entry Attempt was made to go to another page before pressing ok soft key. Verify all parameters are correct and press ok soft key. Panel Locked A key was pressed. Panel lock feature is on. Turn panel lock off to access panel controls. Panel lock key is located behind handle. Place on Hold to Change A key was pressed during KVO. Channel must be on hold to make changes. Place on Hold to Set Pressure Baseline SET PRESSURE BASELINE function was selected while running. Pressure Baseline feature is on. Place pump on hold before performing manual SET PRESSURE BASELINE operation. Press and Hold Key to Turn Off POWER was pressed. Press and hold POWER until display turns off. Pressure Limit XXX mmHg (XXX represents configured maximum pressure) An elevated pressure was present in fluid path when pressure baseline was established. This may reduce maximum available pressure range. Reload infusion set and verify no obstruction exists which could cause excess pressure. • If Pressure Baseline feature is on, repeat manual setting of pressure baseline. otherwise • Restarting infusion automatically sets pressure baseline. Pressure Limit Must Be Less Than or Equal to XXX mmHg (XXX represents configured maximum pressure) Attempt was made to increase pressure alarm limit to a level higher than configured maximum pressure. Choose a pressure alarm limit that is less than, or equal to, configured maximum pressure. (XXX.X represents maximum flow rate configured for pump or profile.) 1000DF00479 Issue 2 29/50 Alarms, Alerts and Prompts (continued) Prompts (continued) Prompt Meaning Response Pressure Unstable Cannot Set Baseline Excessive variation in pressure due to motion, flow from other pumps or blood pressure prevents accurate setting of pressure baseline. Pressure Baseline feature is on. Reduce or temporarily remove sources of variation while performing manual baseline setting operation. Program Lost Re-Enter Settings Pump detected a memory or power failure. Existing operating parameters were erased. Press continue soft key and re-enter all infusion settings. Configurable options are not affected. Rate Out of Range Pump has calculated a rate less than 0.1 ml/h. Verify and re-enter settings. Set Must Be Loaded Flow Regulator segment is not loaded in selected channel during a manual pressure baseline setting operation. Pressure Baseline feature is on. Load Flow Regulator segment in selected channel. Repeat manual pressure baseline setting. Set Out Flow Regulator segment is not installed correctly. Reinstall Flow Regulator segment. Set Pressure Baseline Set Pressure Baseline was selected in options mode. Press ok soft key to set Pressure Baseline or press return soft key to go to exit. Set Pri VTBI A primary VTBI was not programmed. Enter a primary VTBI. Set Pri VTBI > Loading Dose VTBI Loading Dose VTBI entered is greater than primary VTBI. Raise primary VTBI or lower Loading Dose VTBI, as appropriate. Stop Secondary and Infuse Primary? Run soft key was pressed in Primary Mode when a secondary infusion was on hold. If return to primary parameters is appropriate press yes soft key. If continued secondary infusion is appropriate, press no soft key. Stop Timer to Change An invalid key was pressed while timer was running in Multi-Dose program. Wait several seconds for popup to finish. Press stop timer soft key to make changes. The Specified VTBI Will Only Deliver a Partial Dose Secondary VTBI value is significantly less than bag volume programmed on set up page. Verify parameters are correct. Press yes soft key to proceed or no soft key to return to programming. Time Out of Range Programmed step time exceeds 24 hours and 59 minutes, or is less than 1 minute. Verify and re-enter settings. Verify Time Internal clock needs to be reset following depleted battery. Press change soft key. Re-enter settings and press ok soft key to confirm. Soft Limit Programmed parameter is outside Soft Limit for that care area. If it is clinically appropriate and necessary to override Soft Limit, press yes soft key. Otherwise press no soft key and enter new value within limit. Important: Prior to overriding a Soft Limit prompt, confirm the infusion parameters are correct. Hard Limit Programmed parameter is outside Hard Limit for that care area. Use numeric keys to enter a new value, then press ENTER key. Invalid Keypress During Programming: The following Prompts may be seen if an invalid key is pressed during programming: Both A and B not Running, Channel Not On, Complete or OK Setup, No Numeric Entries, Select Channel. Invalid Keypress During Infusion: During an infusion, if an invalid key is pressed, the following prompts may be seen: Dose Rate Running, Loading Dose Running, Multi-Dose Running, Multi-Step Running, Pri Running, Sec Running, or Timer Running (Multi-Dose program). Resuming Previous Programming: When a pump has been powered off then on again previous parameters may be preserved if Current Profile is accepted and New Patient? – No is selected. The following prompts may be seen: Return to Dose Rate?, Return to Loading Dose?, Return to Multi-Dose?, Return to Multi-Step?, or Return to Secondary?. 1000DF00479 Issue 2 30/50 Alarms, Alerts and Prompts (continued) Alerts Counter The pump keeps a running count of Guardrails® Alerts that occur that can be viewed with the Alerts Counter feature. 1. Press options key. 2. Press Alerts Counters soft key. 3. To return to main display, press return soft key. To clear counter (reset all values to zero), press clear soft key. To view second event counter page, press page soft key. Definitions: GR Alerts Total number of Hard Limit and Soft Limit Guardrails® alerts that occur. GR Starts Total starts when a Guardrails® drug or Guardrails® IV fluid is selected. GR Start counter also increments if a rate or dose rate change occurs during a running infusion. A transition to KVO rate is not counted as a start. Log % Full CQI log retained by pump can hold up to 300 Guardrails® alerts and resolutions snapshots. The % full indication represents percentage of 300 available logged snapshots used. Log always retains most recent 300 snapshots, therefore, even if this indication is 100% full, subsequent Guardrails® alerts and resolution snapshots are stored and oldest ones are deleted to make space for newer ones. New Patients Total number of new patients or profiles selected. Counter increments when yes to New Patient? screen prompt or a different profile at pump power up is selected. Overrides Total number of Soft Limit Guardrails® alerts that are overridden. Counter increments when yes is selected in response to soft override alert prompt. Soft Alerts Total number of Soft Limit Guardrails® alerts that occur. Counter increments when either yes or no is selected in response to soft override alert prompt. Total Starts Total number of infusion starts. A start occurs when run key is selected from an inactive or paused condition. A • For dual channel pumps, the counters represent the total counts for both channels. • These are the counter labels as they appear on the Main Display. 1000DF00479 Issue 2 31/50 Flow Sensor Operation (optional) The optional flow sensor notifies users of empty containers and/or upstream occlusions. A handle cap accessory is available for storing the flow sensor when not in use. The flow sensor is not used for the first 25 ml delivered when changing from secondary to primary. This is to account for overfill of secondary containers. If a flow sensor is not connected to the pump, ensure protective plugs are installed at the connector site to prevent entry of foreign material. 1. Plug a Model 180 Flow Sensor into applicable channel connector on back of pump. 2. Attach flow sensor to upper portion of drip chamber. 3. Attach flow sensor to pump handle when not in use. 4. Routinely clean flow sensor with warm water while actuating slider, then dry thoroughly. A Flow Sensor Connectors BB AA • Infusing fluids which form smaller drops, through a 60 drops/ml set, at high rates may result in a No Upstream Flow Detected alarm. This is because the small, rapidly falling drops form a continuous stream which does not trigger the flow sensor. In this event, unplug the flow sensor from the pump. • Do not use solvents or cleaning agents. Damage to plastic parts of the flow sensor could occur. • When using flow sensor, correct placement is essential for proper operation. Some infusion set drip chambers have a flange at top to which flow sensor can be attached. Attachment on flange ensures proper placement. • Upper surface of flow sensor should be slightly below drop-forming orifice but above level of fluid in drip chamber. • Ensure drip chamber is at least 2/3 full and sensor optics are clean. Fluid level in drip chamber must be checked/re–established after each empty container condition • When using flow sensor option while ambulating or transporting a patient from one area to another, use care to avoid excessive swinging of solution container(s). • If the flow sensor option is in use, VTBI can be turned off by selecting VTBI, pressing CLEAR and then ENTER keys or Primary VTBI can be deleted from the primary mode setup page. 1000DF00479 Issue 2 32/50 Configurable Settings With the Profiles feature enabled, the settings are configured independently for each profile. A hospital-defined, best-practice data set must be uploaded to enable the Profiles feature. If the Profiles feature is not enabled (off ) or if no data set is loaded, the configurations options are set in the configuration mode by qualified service personnel. If the configuration settings need to be changed from the factory default settings, reference the Technical Service Manual or contact CareFusion Technical Support for technical, troubleshooting, and preventive maintenance information. Feature Description Air in Line Threshold (microliters) Sets upper limit for a single bolus of air to pass without alarm. In other words, it is amount of air allowed to pass through air-in-line detector before an air-in-line alarm sounds. One of 4 different air-in-line detection settings can be selected: 50, 100, 200, 500 µl. AIL Accumulator Detects presence of multiple air bubbles that are too small to be detected by single bolus AIL detection limit. Accumulator feature, when enabled, looks for 10-15% of downstream fluid path to be air before giving an ACCUMULATED AIR IN LINE alarm. Volume of air that trips accumulated air detection alarm varies based on current setting for single air bolus. AIL Reset Allows clinician to respond to an air-in-line alarm, assess its clinical significance, and choose whether or not to continue infusion without removing air. Reset feature allows only current bubble to proceed without tripping alarm. Transition Tone (Secondary to Primary) Provides an audible tone when secondary VTBI reaches zero, to indicate infusion has transitioned to primary rate. Audio Volume Provides clinician with ability to adjust audio volume for alarms, alerts and KVO tone to either High, Medium, or Low if all audio volume levels are enabled. Audio volume indicator in lower LCD display indicates audio volume selected. Pump can be configured to enable only Medium and High, or only High audio volume levels if desired. Configuration Name Allows a 4-digit pump ID label to appear in lower LCD display, identifying patient care profile. Auto Restart Plus Part of the Dynamic Monitoring system and designed to help minimize nuisance “occlusion downstream” alarms. It allows pump to automatically continue an infusion following detection of a downstream occlusion if downstream pressure falls to an acceptable level within a 40-second Checking Line period. May be set to off (0 restarts) or to allow from 1 – 9 Checking Line restarts. If allowable number of restarts is exceeded, or when resistance or pressure conditions indicate an occlusion, an occlusion downstream alarm occurs. Monitoring Options Dynamic monitoring provides clinician ability to select one of following monitoring modes: Resistance mode, High Resistance mode or Pressure mode. All of these modes offer an optional Auto-Restart Plus feature and optional trend graph display. Trends Provides ability to display downstream pressure or flow resistance over time. Trend graphs of 15 minutes, 1 hour, 4 hours and 12 hours are available during normal operation. When Trends is enabled, if pump is operating in pressure mode, a pressure trend graph is available, and when it is operating in resistance mode, a resistance trend graph is available. Manual Pressure Baseline Provides a real-time bar graph and numeric display of line pressure. Pressure Alarm When Pressure Display is enabled, Pressure Alarm may be set to Adjustable Pressure mode or Fixed Pressure mode. Pressure Display In Adjustable Pressure monitoring mode, pressure alarm limit may be varied by from 25 mmHg to maximum configured pressure limit in 25 mmHg increments. Pressure Display indicates current pressure limit and provides ability to adjust limit by pressing “increase” or “decrease” arrows. In Fixed Pressure mode, pressure limit of 600 mmHg displays, with no means of adjusting it. When Pressure Display is disabled, pump automatically defaults to Fixed Pressure mode. Pressure Limit, Initial This is default pressure alarm limit that is automatically set when pump is powered on and a new profile is selected or New Patient? - Yes is selected. Alarm level must be less than or equal to maximum pressure limit. Pressure Limit, Maximum In Adjustable Pressure monitoring mode, pressure alarm limit may be varied by from 25 mmHg to this maximum configured pressure limit in 25 mmHg increments. A value that exceeds this pressure limit cannot be selected. Default Resistance Alert Default resistance alert level that is automatically set when pump is powered on and a new profile is selected or New Patient? - Yes is selected. Resistance Alert Marker can be adjusted up or down from this default setting, as needed. Resistance Alert Provides an early warning of increasing flow resistance. When enabled, Resistance Alert marker can be set by from 0% to 100% of scale in 5% increments (Resistance Display must also be enabled). To optimise alert feature, it is advisable to set alert level 20-30% higher than initial displayed resistance, which should be read approximately 2 minutes after starting an infusion. Resistance Display When enabled provides a bar graph on Main Display to indicate current % resistance on a scale of 0 – 100%. When disabled, resistance alert feature is unavailable. 1000DF00479 Issue 2 33/50 Configurable Settings (continued) Feature Description Resistance Pressure Setting Provides an “Occlusion Downstream” alarm when measured pressure reaches Resistance Pressure limit while operating in Resistance Mode. This threshold may be set from 1 to 600 mmHg in 1 mmHg increments. In other words, while operating in Resistance mode or High Resistance mode, an “Occlusion Downstream” condition can be detected in 2 ways; measured resistance reaches 100% of scale or configured Resistance Pressure Setting is exceeded. KVO Rate KVO (keep vein open) mode automatically occurs when primary VTBI has counted down to 0.0 ml. Channel switches to preset KVO rate or remains at current rate, whichever is less. KVO rate may be set to a value between 0.1 and 20 ml/h in 0.1 ml/h increments. KVO rate is not adjustable by the clinician. Bolus Allows clinician to deliver a bolus when enabled. Dose Rate Calculator Allows clinician to enter either flow rate or drug dose rate for a continuous infusion. System then calculates alternate parameter based on drug concentration and weight if used. For an intermittent infusion, system calculates total dose based on drug amount and patient weight (kg) or BSA (m2) if used. Next, clinician enters either volume and time to calculate rate, or rate and volume to calculate time. Dose rate calculator must be enabled in order to access Bolus Dose feature and Drug Library. Loading Dose Allows clinician to set up an initial infusion rate for a specific volume, to be followed automatically by a maintenance rate (primary settings) from same container. This is useful for delivering fluid challenges. Limits do not apply when using Loading Dose feature. To deliver a loading dose of a medication selected from Drug Library, Bolus Dose feature may be used. Multi-Dose Allows 1 - 24 doses to be programmed at equally spaced intervals on same pump over a 24-hour period. This mode allows delivery of multiple, equal doses from same IV container at regularly scheduled intervals. Limits do not apply when using Multi-Dose feature. Within this mode, a delayed start option allows pump to be programmed to delay infusion start for up to 8 hours. Multi-Dose Alert When enabled, this feature alerts clinician of completion of each dose delivered during a Multi-Dose program. Multi-Step Allows a sequential drug delivery program (up to 9 steps) to be set delivering volumes of fluid at different rates at each step. This allows pump parameters to be set up once and deliver a step profile, eliminating need to change rate and VTBI after each step of infusion. Infusion may be programmed in rate/volume or volume/time. Limits do not apply when using Multi-Step feature. Panel Lock When enabled, this feature allows the Panel Lock keypad to be used to lock the main keypad. Rate Maximum Maximum infusion rate may be set to a value from 0.1 to 999.9 ml/h in 0.1 ml/h increments. BSA, Maximum* Sets maximum patient body surface area for each profile. May be set to a value from 0.05 to 3 m2 (meters squared) in 0.01 ml increments. Dose Checking Mode* Dose Checking (limit checking) has 2 selectable options: Always checking option causes a Guardrails® alert to occur each time a dose limit is exceeded. If limit is overridden, drug label displays an indicator (↑↑↑ or ↓↓↓ arrows) that infusion is beyond current Soft Limit. Smart option causes an initial Guardrails® alert to occur when a dose limit is exceeded. Subsequent programming beyond dose limit does not cause an alert to display. If limit is overridden, drug label displays an indicator (↑↑↑ or ↓↓↓ arrows) that infusion is beyond current Soft Limit Weight, Maximum* Sets maximum patient weight (kg) for each profile. May be set to a value from 0 to 4534 kg in 1 kg increments. *These features are configured only within a hospital-defined data set. 1000DF00479 Issue 2 34/50 Configured Options Record Configurable Options Enter the pump-specific information for your records on a copy of this page. Option Default Range Setting Air-in-Line Accumulator On On/Off Air-in-Line threshold 100 µl 50, 100, 200 or 500 µl Air-in-Line Reset Off On/Off Transition Tone On On/Off Audio Volume Low/Med/Hi Low/Med/Hi, Med/Hi, Hi Configuration Name GOLD 4 alphanumeric characters Auto Restart Plus Off On/Off Monitoring Options Pressure Resistance / High Resistance / Pressure Trends On On/Off Manual Pressure Baseline On On/Off Pressure Alarm Adjustable Adjustable/Fixed Pressure Display On On/Off Pressure Limit, Initial 600 mmHg 25 - 600 mmHg Pressure Limit, Maximum 600 mmHg 25 - 600 mmHg / 600 mmHg Default Resistance Alert 100% 0 - 100% Resistance Alert On On/Off Resistance Display On On/Off Resistance Pressure Setting 600 mmHg 1 - 600 mmHg KVO Rate 5 ml/h 0.1 - 20 ml/h Bolus Off On/Off Dose Rate Calculator Off On/Off Loading Dose On On/Off Multi-Dose Off On/Off Multi-Dose Alert Off On/Off Multi-Step Off On/Off Panel Lock On On/Off Rate Maximum 999.9 ml/h 0.1 - 999.9 ml/h System Configurable Options These features can be customised by qualified service personnel in Configuration or Diagnostic Modes. Option Default Range Computer Link Baud Rate Setting 9600 300/600/1200/1800/2400/4800/9600 Computer Link Mode Off Monitor/Off, Off Computer Link Parity None Even/Odd/None Pump ID 000000000 9 digits Maintenance Interval 52 weeks 1 - 52 weeks Maintenance Reminder On On/Off Self Check Interval 12 weeks 1 - 52 weeks Profiles Off On/Off Regional Settings** European English North America English/European English VTBI On On/Off ** If a new logic pcb is installed or the pump is set to factory defaults, the pump defaults to North America English. Hospital Name Serial No. Software Version Approved by Configured by Date Date 1000DF00479 Issue 2 35/50 Specifications Infusion sets: Use only infusion sets for Alaris® SE Pump. Alarms: Accumulated Air In Line Key Stuck Set Out Air In Line Latch Open Set Up Time Exceeded Battery Depleted No Upstream Flow Detected Pump Malfunction Channel Malfunction Occlusion Downstream Hold Time Exceeded Occlusion Upstream Computer Link Failure Flow Sensor Unplugged Primary Flow Detected During Secondary Battery: Rechargeable nickel-cadmium. A single channel pump operates for 4 hours nominal and a dual channel pump operates for 3 hours nominal, under following conditions: • new, fully charged battery • ambient room temperature, 23±4°C (73±7°F) • resistance monitoring modes • rate: 100 ml/h on a single channel pump and 50 ml/h on each channel of a dual channel pump Battery run time is affected by operating mode, rate, monitoring options and back pressure. Critical Volume: Maximum incremental volume in case of single point failure does not exceed 1.0 ml at 999.9 ml/h. Dimensions: (Nominal) Downstream Occlusion: 7131 7231 Depth* 127mm 127mm Height 218mm 218mm Width 193mm 267mm Weight** 3.0 kg 3.8 kg * Without pole clamp ** Without power cord Time to Alarm Monitoring Options Time to Detect Downstream Occlusion (minutes) Threshold Settings 1 ml/h 25 ml/h Maximum Typical Maximum Typical Pressure Resistance and High Resistance 25 mmHg 600 mmHg 100% 25 mmHg 100% 600 mmHg 2 75 2 7 0.6 30 0.6 4 1 25 1 3 0.1 1 0.1 1 When occlusion alarm pressure limit is set to maximum threshold setting, maximum infusion pressure generated into a hard occlusion at 25 ml/h is 11.6±3.9 psi. Bolus Volume Monitoring Options Bolus Volume released upon correcting Downstream Occlusion (ml) 25 ml/h Resistance and High Resistance 25 mmHg 600 mmHg 100% 25 mmHg 100% 600 mmHg Maximum 0.5 0.5 0.5 0.5 Typical <0.1 0.3 <0.1 <0.1 Maximum 0.5 0.5 0.5 0.5 Typical <0.1 0.3 <0.1 0.3 Threshold Settings 1 ml/h Pressure Testing performed using Model 72003 infusion set, at 20±4°C (68±8°F). Time to Occlusion and Bolus Volume data tested to standards defined in AAMI ID26:1998, Section 51.101 b. 1000DF00479 Issue 2 36/50 Specifications (continued) Environmental Conditions: Operating Storage Atmospheric Pressure 700 to 1060 hPa 500 to 1060 hPa Relative Humidity 20 to 90% (Non condensing) 5 to 95% (Non condensing) Temperature Range 5 to 40°C (41 to 104°F) -40 to 60°C (-40 to 140°F) Flow Rate Range: 0.1 to 600.0 ml/h in 0.1 ml/h increments (secondary mode) 0.1 to 999.9 ml/h in 0.1 ml/h increments (all other modes) Ground Current Leakage: Electrical leakage current, enclosure: <100 microamperes Electrical leakage current, patient: <10 microamperes KVO Flow Range: 0.1 to 20.0 ml/h in 0.1 ml/h increments Mode of Operation: Continuous Power Requirements: 100-240 V~, 50/60 Hz (72 VA MAX), 3-wire grounded system Class 1 with Internal Power Source Rate Accuracy: For rates greater than 1 ml/h, up to 999.9 ml/h: ±5%, 95% of time with 95% confidence, under conditions listed below. For rates equal to or less than 1 ml/h: ±6.5%, 95% of time with 95% confidence, under conditions listed below. Rate Accuracy Test Conditions: Infusion rate range: 0.1 to 999.9 ml/h Head height: 24 ±1 in. (61±2.5 cm) Test solution: distilled water Environment temperature: 68±8°F (20±4°C) Back pressure: 0 psi Needle: 18 gauge Set Model: 72003 Minimum collection volume: 6 ml A Variations of head height, back pressure, time, monitoring mode option, pump tilt or any combination of these may affect rate accuracy. Factors that can influence head height and back pressure are: Infusion set configuration, IV solution viscosity, and IV solution temperature. Back pressure may also be affected by catheter type. See "Trumpet and Start-up Curves" for data on how certain factors influence rate accuracy. Volume Infused Range: 0.0 to 9999.9 ml in 0.1 ml increments VTBI Range: 0.1 to 9999.9 ml in 0.1 ml increments (Basic Infusion, Drug Library Primary Infusion, IV Fluid Infusion and Multi-Step mode); 0.1 to 999.9 ml in 0.1 ml increments (all other modes) Standards: IEC/EN 60601–1 / bs 5724, including amendments A1 and A2; IEC/EN 60601–2–24; cispr 11, Group 1, Class A/B Emissions; IEC/EN 60601–1–2, UL 60601-1, CAN/CSA No. 601.1-M90 1000DF00479 Issue 2 37/50 Maintenance Routine Maintenance Procedures To ensure that this pump remains in good operating condition, it is important to keep it clean and carry out the routine maintenance procedures described below. All servicing should only be performed by a qualified service engineer with reference to the Technical Service Manual (TSM). Circuit diagrams and components parts lists and all other servicing information which will assist the qualified service engineer in performing repair of the parts designated as repairable are available upon request from CareFusion. A If the pump is dropped, damaged, subjected to excessive moisture or high temperature, immediately take it out of service for examination by a qualified service engineer. All preventative and corrective maintenance and all such activities shall be performed at a compliant work place in accordance with the information supplied. CareFusion, Alaris® Products will not be responsible should any of these actions be performed outside the instructions or information supplied by CareFusion. Refer to the Technical Service Manual for access to diagnostic and configuration modes for technical service. The Technical Service Manual is available in electronic format on the World Wide Web at :www.carefusion.com/alaris-intl/ A username and password are required to access our manuals. Please contact a local customer services representative to obtain login details. INTERVAL ROUTINE MAINTENANCE PROCEDURE As per Hospital policy. Thoroughly clean external surfaces of the pump before and after prolonged period of storage. At least once per year 1. (Refer to TSM for identification 2. 3. of parts) Inspect AC power supply plug and cable for damage. Perform functional tests as outlined in the Technical Service Manual. Operate the pump on battery power until the battery low alarm then charge the battery to confirm battery operation and charging. Please refer to Technical Service Manual for calibration procedures. The units of measurement used in the A calibration procedure are standard SI (The International System of Units) units. Battery Operation The Battery Management System incorporates features which enhance battery maintenance in order to maximize the life of the battery, reduce associated costs and increase pump availability. The system provides: • • • • Green : lights when pump is plugged in. Amber : flashes when pump is operating on battery power. Automatic battery power: if pump is unplugged or in the event of a power failure. Low battery alert: indicates battery depletion is imminent, beginning at least 30 minutes prior to a Battery Depleted alarm. Maximum battery capacity, as well as optimal gauge accuracy, is reached after several complete charge/discharge/recharge cycles in the refresh process. It is recommended that the battery be fully charged/discharged/recharged, using the refresh cycle, before placing the pump in use. Reference the Technical Service Manual for detailed information on the refresh cycle. The battery recharges whenever the pump is plugged into an AC outlet. The battery can be replaced when charging capacity gets too low. All batteries gradually lose their capacity to hold a charge over time and use. To maintain optimal battery performance, ensure the pump is connected to AC power whenever possible, including when it is powered off or stored. Following certain battery depleted conditions it is necessary to reset the internal clock so the CQI Reporter data integrity is maintained. Test Routines The test routines are designed to allow confirmation of many of the pump functions, defaults and calibrations without requiring internal inspection. They do not represent a full calibration check. A See the Technical Service Manual for a complete list of the test procedures and calibration procedures. 1000DF00479 Issue 2 38/50 Maintenance (continued) Cleaning and Storage Cleaning the pump: Before the transfer of the pump to a new patient and periodically during the use, clean the pump by wiping over with a lint-free cloth lightly dampened with warm water and a standard disinfectant / detergent solution. A soft bristled brush may be used to clean narrow areas. A Before cleaning always switch off and disconnect from the AC power supply. Do not allow liquid to enter the casing and avoid excess fluid build up on the pump. Do not spray fluid directly into any connector and before cleaning verify that the RS232 connector is covered. Use light pressure when cleaning pressure transducer and air-in-line detector areas of the pump. Do not use aggressive cleaning agents as these may damage the exterior surface of the pump. Do not steam autoclave, ethylene oxide sterilise or immerse this pump in any fluid. Recommended cleaners are: • Bleach solution 10% (v/v) • Vesphene • Manu-Klenz • Warm Water Do not use the following disinfectant types: • phosphoric acid (Foamy Q&A) • aromatic solvents (naphtha, paint thinner, etc.) • chlorinated solvents (Trichloroethane, MEK, Toluene, etc.) • ammonia, acetone, benzene, xylene or alcohol, other than as specified above. Storing the pump: If the pump is to be stored for an extended period it should be first cleaned and the internal battery fully charged. Store in a clean, dry atmosphere at room temperature and, if available, employ the original packaging for protection. Once every 3 months during storage, carry out functional tests as described in the technical service manual and ensure that the internal battery is fully charged. Cleaning and storing the infusion set: The infusion set is a disposable single use item and should be discarded after use according to hospital protocol. Cleaning the Flow Sensor: Before the transfer of the flow sensor to a new infusion set and periodically during use, clean the flow sensor by wiping over with a lint-free cloth lightly dampened with warm water and a standard disinfectant / detergent solution. Ensure the connector does not get wet. Dry flow sensor before use. Flow sensor should be routinely cleaned by running warm water over it while actuating slider, and then thoroughly dried. After cleaning, the sensor should be allowed to dry fully prior to use. A The plug of the flow sensor must not be immersed in water as damage will occur. Disposal Information on Disposal for Users of Waste Electrical & Electronic Equipment A This symbol on the product and/or accompanying documents means that used electrical and electronic products should not be mixed with household waste. If you wish to discard electrical and electronic equipment, please contact your CareFusion affiliate office or distributor for further information. Disposing of this product correctly will help to save valuable resources and prevent any potential negative effects on human health and the environment which could otherwise arise from inappropriate waste handling. Information on Disposal in Countries outside the European Union This symbol is only valid in the European Union. The product should be disposed of taking environmental factors into consideration. To ensure no risk or hazard, remove the internal rechargeable battery and the Nickel Metal Hydride battery from the control board and dispose of as outlined by the local country regulations. All other components can be safely disposed of as per local regulations. 1000DF00479 Issue 2 39/50 RS232 Computer Link The optional Computer Link feature allows a hospital/facility computer to interact with the pump. The computer cannot start or stop the pump, set the rate, or make any change in status. The feature may be enabled or disabled by qualified personnel in the pump configuration settings. If the feature is enabled (On) the user may select Monitor, to allow the computer to receive information from the pump, or Off. When Off is selected, the computer cannot communicate with the pump. To assure continued electromagnetic compatibility performance, the communications cable attached to the pump should be no longer than 1 meter, have fully shielded connector housings, and have a 100% coverage braid/foil shield attached to the connector housings around the signal conductors with the cable jacket. Connecting to a Computer 1. 2. 3. 4. 5. 6. Press options key. To advance to next page, press page soft key. Press Computer Link soft key. Press Monitor soft key. Press ok soft key. Connect an RS232 cable from hospital computer to RS232 port on pump back panel. • During communication between host computer and pump, MNTR (Monitor Mode) appears in lower LCD. • If communication is interrupted, MNTR flashes for 60 seconds. Disconnecting from a Computer 1. 2. 3. 4. 5. 6. Press options key. To advance to next page, press page soft key. Press Computer Link soft key. Press Off soft key. Press ok soft key. Disconnect RS232 cable from RS232 port on pump back panel. A • Use of any accessory or cable other than those specified may result in increased emissions or decreased Pump immunity. • The protective cover over the RS232 connector must remain in place when not in use. • Only equipment that complies with IEC/EN 60601-1 or UL 1069 (approved medical or hospital signaling equipment) should be connected to the RS232 connector. 1000DF00479 Issue 2 40/50 Trumpet and Start-Up Curves DESCRIPTION AND EXPLANATION OF TRUMPET AND START-UP CURVES In this pump, as with all infusion systems, the action of the pumping mechanism and variations in individual administration sets cause short-term fluctuations in rate accuracy. The following graphs show typical performance of the system for both Pressure and Resistance modes in two ways: • Accuracy during various time periods over which fluid delivery is measured (trumpet curves). • Delay in onset of fluid flow when infusion commences (start-up curves). Product operation is not affected by the selection of Resistance or High Resistance at 0.1, 1.0, and 25 ml/h; therefore, High Resistance graphs are not included. Trumpet curves are named for their characteristic shape. They display discrete accuracy data averaged over particular time periods or “observation windows”, not continuous data versus operating time. Over long observation windows, short-term fluctuations have little effect on accuracy, as represented by the flat part of the curve. As the observation window is reduced, short-term fluctuations have greater effect, as represented by the “mouth” of the trumpet. Knowledge of system accuracy over various observation windows may be of interest when certain drugs are being administered. Because the clinical impact of short-term fluctuations on rate accuracy depends on the half-life of the drug being infused and on the degree of intravascular integration, the clinical effect cannot be determined from the trumpet curves alone. Knowledge of the start-up characteristics should also be considered. The start-up curves represent continuous flow rate versus operating time for two hours from the start of the infusion. They exhibit the delay in onset of delivery due to mechanical compliance and provide a visual representation of uniformity. Trumpet curves are derived from the second hour of this data. FLOW CHARACTERISTICS UNDER VARYING DELIVERY CONDITIONS Effects of Pressure Variations Under conditions of +100 mmHg pressure, the Pump typically exhibits a long-term accuracy offset of approximately -1.4% from mean values. Under conditions of +300 mmHg pressure, the Pump typically exhibits a long-term accuracy offset of approximately -1.5% from mean values. Under conditions of -100 mmHg pressure, the Pump typically exhibits a long-term accuracy offset of approximately -0.8% from mean values. Resulting trumpet observation points typically track those of accuracy; therefore, no significant change in short–term variations result under these pressure conditions. Effects of Negative Solution Container Heights With a negative head height of -0.5 meters, the Pump typically exhibits a long–term accuracy offset of approximately -5.8% from mean values. Resulting trumpet observation points typically track those of accuracy; therefore, no significant change in short–term variations result under negative head height conditions. Effects of Rate For applications where flow uniformity is a concern, use of the Pressure Mode at rates of 1.0 ml/h or above is recommended. A Tests conducted in accordance with IEC/EN 60601–2–24, “Particular requirements for safety of infusion pumps and controllers” and AAMI ID26–1998 “Medical electrical equipment - Part 2: Particular requirements for the safety of infusion pumps and controllers”, using a Model 72003 Administration Set (includes Flow Regulator). 1000DF00479 Issue 2 41/50 Trumpet and Start-Up Curves (continued) Pressure Mode Pressure Mode Start-up at 1 mL/h (initial) 2.0 1.8 1.6 1.4 1.2 (mL/h) 1.0 0.8 0.6 0.4 0.2 0.0 -0.2 0 20 40 60 80 100 120 Time (min) Pressure Mode Trumpet Curve at 1 mL/h (initial) 15 21.2 12.2 Flow Rate Error (%) 10 5 4.9 4.9 3.9 0.8 1.1 2.0 3.2 0 -5 -10 -6.2 -12.1 -15 0 5 10 15 20 Observation Interval (min) Pressure Mode Trumpet Curve at 0.1 mL/h (48 hr) 100 Flow Rate Error (%) 80 98.0 51.0 60 40 23.8 20 12.3 6.0 -11.9 -7.5 0.0 0 -20 -21.8 -40 -60 -42.9 -80 -124.5 -100 0 5 10 15 20 25 30 Observation Interval (min) Legend: Maximum rate error Overall rate error u Minimum rate error 1000DF00479 Issue 2 42/50 25 30 Trumpet and Start-Up Curves (continued) Pressure Mode (continued) Pressure Mode Start-up at 999.9 mL/h (initial) 2000 45 1800 40 1600 35 1400 30 1200 25 1000 (mL/h) (mL/h) Pressure Mode Start-up at 25 mL/h (initial) 50 20 800 15 600 10 400 5 200 0 0 -5 -200 0 20 40 60 80 100 120 0 20 40 10 10 2.9 2.5 2.3 2.2 2.0 2.1 2.2 2.2 1.8 0 2.1 1.3 -5 120 5 -0.9 0 -1.0 -1.2 -1.8 -5 -1.5 -1.1 -1.1 -1.4 -1.3 -1.2 -1.3 -15 -15 0 5 10 15 20 25 0 30 5 Observation Interval (min) 10 10 5 -0.2 -0.7 0.0 -0.1 -0.5 -0.3 -0.1 -0.3 -1.1 -5 -10 Flow Rate Error (%) 15 0.1 15 20 25 30 Pressure Mode Trumpet Curve at 999.9 mL/h (24 hr) 15 0.5 10 Observation Interval (min) Pressure Mode Trumpet Curve at 25 mL/h (48 hr) Flow Rate Error (%) 100 -10 -10 0 80 Pressure Mode Trumpet Curve at 999.9 mL/h (initial) 15 Flow Rate Error (%) Flow Rate Error (%) Pressure Mode Trumpet Curve at 25 mL/h (initial) 15 5 60 Time (min) Time (min) 5 0 -5 -3.3 -3.4 -3.7 -4.0 -3.8 -3.5 -3.5 -3.6 -3.7 -3.6 -3.6 -10 -15 -15 0 5 10 15 20 25 30 0 Observation Interval (min) 5 10 15 20 Observation Interval (min) Legend: Maximum rate error Overall rate error u Minimum rate error 1000DF00479 Issue 2 43/50 25 30 Trumpet and Start-Up Curves (continued) Resistance Mode Resistance Mode Start-up at 1 mL/h (initial) 2.0 0.18 1.8 0.16 1.6 0.14 1.4 0.12 1.2 0.10 1.0 (mL/h) (mL/h) Resistance Mode Start-up at 0.1 mL/h (initial) 0.20 0.08 0.8 0.06 0.6 0.04 0.4 0.02 0.2 0.00 0.0 -0.02 -0.2 0 20 40 60 80 100 120 0 20 40 Time (min) Resistance Mode Trumpet Curve at 0.1 mL/h (initial) 100 153.4 120 10 60 43.0 40 14.6 18.8 20 1.8 0 -20 -6.3 -19.0 -22.7 -40 4.8 5 3.7 2.6 -1.6 -0.6 1.2 0 -1.4 -5 -10 -49.2 -80 -104.7 -23.4 -11.5 -15 -100 0 5 10 15 20 25 0 30 5 10 80 15 60 46.4 13.3 17.2 -1.5 0 -20 -6.7 -22.0 -22.9 -40 -60 14.2 5.9 5 4.2 3.2 -1.0 0.1 1.7 0 -0.6 -5 -23.5 -109.5 -100 30 -10 -48.9 -80 25 10 40 20 33.1 74.6 Flow Rate Error (%) 173.6 20 Resistance Mode Trumpet Curve at 1 mL/h (48 hr) Resistance Mode Trumpet Curve at 0.1 mL/h (48 hr) 100 15 Observation Interval (min) Observation Interval (min) Flow Rate Error (%) 100 13.3 32.6 -60 -11.7 -15 0 5 10 15 20 25 30 0 5 Observation Interval (min) 45 1800 40 1600 35 1400 30 1200 (mL/h) 2000 25 20 600 400 5 200 0 0 -5 -200 80 100 120 0 20 40 60 Time (min) Time (min) Legend: Maximum rate error Overall rate error u Minimum rate error 60 25 30 800 10 40 20 1000 15 20 15 Resistance Mode Start-up at 999.9 mL/h (initial) 50 0 10 Observation Interval (min) Resistance Mode Start-up at 25 mL/h (initial) (mL/h) 80 Resistance Mode Trumpet Curve at 1 mL/h (initial) 15 73.0 Flow Rate Error (%) Flow Rate Error (%) 80 60 Time (min) 1000DF00479 Issue 2 44/50 80 100 120 Trumpet and Start-Up Curves (continued) Resistance Mode (continued) Resistance Mode Trumpet Curve at 999.9 mL/h (initial) Resistance Mode Trumpet Curve at 25 mL/h (initial) 15 15 15.6 10 Flow Rate Error (%) 6.1 5.0 5 Flow Rate Error (%) 10 3.0 3.2 2.3 1.5 1.3 0 -0.2 -2.0 -5 -10 5 0.1 0 -0.3 -0.6 -0.7 -1.2 -1.1 -0.7 -0.9 -1.5 -1.9 -5 -1.0 -10 -8.4 -15 -15 0 5 10 15 20 25 0 30 5 10 15 20 25 30 Observation Interval (min) Observation Interval (min) Resistance Mode Trumpet Curve at 25 mL/h (48 hr) Resistance Mode Trumpet Curve at 999.9 mL/h (24 hr) 15 15 13.4 10 4.1 5 3.1 1.2 1.4 0.5 0 -0.2 -0.5 -2.0 -3.6 -5 Flow Rate Error (%) Flow Rate Error (%) 10 5 0 -5 -2.7 -2.9 -3.3 -3.9 -3.7 -3.1 -3.1 -3.2 -3.5 -3.4 -3.3 -9.9 -10 -10 -15 -15 0 5 10 15 20 25 30 0 5 10 15 20 25 30 Observation Interval (min) Observation Interval (min) High Resistance Mode High Resistance Mode Start-up at 999.9 mL/h (initial) High Resistance Mode Trumpet Curve at 999.9 mL/h (initial) 2000 15 1800 1600 Flow Rate Error (%) 10 1400 (mL/h) 1200 1000 800 600 400 200 5 -0.1 0 0.8 0.0 -0.3 -0.5 -1.4 -1.1 -0.9 -0.7 -1.3 -5 -2.3 -10 0 -200 -15 0 20 40 60 80 100 120 0 Time (min) 5 10 15 20 25 30 Observation Interval (min) High Resistance Mode Trumpet Curve at 999.9 mL/h (24 hr) 15 Flow Rate Error (%) 10 5 -1.7 0 -5 -2.7 -2.5 -2.8 -3.0 -3.9 -3.5 -3.3 -3.1 -3.7 -4.7 -10 Legend: Maximum rate error Overall rate error u Minimum rate error -15 0 5 10 15 20 25 30 Observation Interval (min) 1000DF00479 Issue 2 45/50 Service Contacts For service contact your local Affiliate Office or Distributor: AE CN GB NZ CareFusion, PO Box 5527, Dubai, United Arab Emirates. CareFusion, 上海代表机构,中国上海市张杨路 500 号, 上海时代广场办事处大楼, A 座,24 层, 邮编:200122。 CareFusion, The Crescent, Jays Close, Basingstoke, Hampshire, RG22 4BS, United Kingdom. CareFusion, 14B George Bourke Drive, Mt Wellington 1060, PO Box 14-518, Panmure 1741, Auckland, New Zealand Tel: (971) 4 28 22 842 电话:(86) 21 58368018 Tel: (44) 0800 917 8776 Tel: 09 270 2420 Freephone: 0508 422734 Fax: (971) 4 28 22 914 传真:(86) 21 58368017 Fax: (44) 1256 330860 Fax: 09 270 6285 AU DE HU PL CareFusion, 3/167 Prospect Highway, PO Box 355 Seven Hills, NSW 2147, Australia. CareFusion, Pascalstr. 2, 52499 Baesweiler, Deutschland. CareFusion, Döbrentei tér 1, H-1013 Budapest, Magyarország. CareFusion, ul. Rzymowskiego 53, 02-697 Warszawa, Polska. Tel: (61) 2 9838 0255 Tel: (49) 2401 604 0 Tel: (36) 1 488 0232 Tel: (36) 1 488 0233 Tel: (48) 225480069 Fax: (61) 2 9674 4444 Fax: (49) 2401 604 121 Fax: (36) 1 201 5987 Fax: (48) 225480001 BE DK IT SE CareFusion, Leuvensesteenweg 248 D, 1800 Vilvoorde, Belgium. CareFusion, Firskovvej 25 B, 2800 Lyngby, Danmark. CareFusion, Via Ticino 4, 50019 Sesto Fiorentino, Firenze, Italia. CareFusion, Hammarbacken 4B, 191 46 Sollentuna, Sverige. Tel: (32) 2 267 38 99 Tlf. (45)70 20 30 74 Tél: (39) 055 30 33 93 00 Tel: (46) 8 544 43 200 Fax: (32) 2 267 99 21 Fax. (45)70 20 30 98 Fax: (39) 055 34 00 24 Fax: (46) 8 544 43 225 CA ES NL US CareFusion, 235 Shields Court, Markham, Ontario L3R 8V2, Canada. CareFusion, Edificio Veganova, Avenida de La Vega, nº1, Bloque 1 - Planta 1, 28108 Alcobendas, Madrid, España. CareFusion, De Molen 8-10, 3994 DB Houten, Nederland. CareFusion, 10020 Pacific Mesa Blvd., San Diego, CA 92121, USA. Tel: (1) 905-752-3333 Tel: (34) 902 555 660 Tel: +31 (0)30 2289 711 Tel: (1) 800 854 7128 Fax: (1) 905-752-3343 Fax: (34) 902 555 661 Fax: +31 (0)30 2289 713 Fax: (1) 858 458 6179 CH FR NO ZA CareFusion Switzerland 221 Sàrl Critical Care A-One Business Centre Zone d’activitiés Vers-la-Pièce n° 10 1180 Rolle / Switzerland CareFusion, Parc d’affaire le Val Saint Quentin 2, rue René Caudron 78960 Voisins le Bretonneux France CareFusion, Solbråveien 10 A, 1383 ASKER, Norge. CareFusion, Unit 2 Oude Molen Business Park, Oude Molen Road, Ndabeni, Cape Town 7405, South Africa. Ph.: 0848 244 433 Tél: (33) 1 30 05 34 00 Tel: (47) 66 98 76 00 Tel: (27) (0) 860 597 572 Tel: (27) 21 510 7562 Fax: 0848 244 100 Fax: (33) 1 30 05 34 43 Fax: (47) 66 98 76 01 Fax: (27) 21 5107567 1000DF00479 Issue 2 46/50 Compliance This system complies with part 18 of the fcc Rules. Operation is subject to the following 2 conditions: • This system may not cause harmful interference. • This system must accept any interference received, including interference that may cause undesired operation. The digital apparatus does not exceed the Class b limits for radio noise emissions from digital apparatus set out in the radio interference regulations of the Canadian Department of Communications (doc). This system has been tested and found to comply with either the limits for a Class b digital pump (without Model 180 Flow Sensor), or as a Class A digital pump (with Model 180 Flow Sensor), pursuant to Part 18 of the fcc Rules. These limits are designed to provide reasonable protection against harmful interference when the system is operated in a commercial environment. This system generates, uses, and can radiate radio frequency energy. If it is not installed and used in accordance with the applicable directions for use, it may cause harmful interference to radio communications. Operation of this system in a residential area is likely to cause harmful interference, in which case the user will be required to correct the interference at their own expense. The authority to operate this system is conditioned by the requirement that no modifications will be made to the system unless the changes or modifications are expressly approved by CareFusion. This Class A/b digital apparatus meets all requirements of the Canadian Interference-Causing Equipment Regulation. Tables: The Pump is intended for use in the electromagnetic environments specified in the following tables. Guidance and Manufacturer’s Declaration – Electromagnetic Emissions The pump is intended for use in the electromagnetic environment specified below. The customer or the user of the pump should assure that it is used in such an environment. Emissions Test Compliance Electromagnetic Environment – Guidance The pump is suitable for use in all establishments, including domestic establishments and those directly connected to a public low-voltage power supply network that supplies buildings used for domestic purposes, provided the following Caution is heeded:. CISPR 11 RF Emissions Group 1 Class A CISPR 11 RF Emissions Group 1 Class B IEC/EN 61000-3-2 Harmonic Emissions Class A IEC/EN 61000-3-3 Voltage Fluctuations, Flicker Emissions Complies Caution: The pump is intended for use under the supervision of healthcare professionals only. This is a CISPR 11 Class A when the Model 180 (Flow Sensor) accessory is used and a CISPR 11 Class B when the Model 180 is not used. In a domestic environment, this system may cause radio interference. Reorienting, relocating or shielding the system, or filtering the connection to the public mains network, are examples of steps that can be taken to reduce or eliminate interference. The pump is suitable for use in all establishments, including domestic establishments and those directly connected to a public low-voltage power supply network that supplies buildings used for domestic purposes. 1000DF00479 Issue 2 47/50 Compliance (continued) Guidance and Manufacturer’s Declaration - Electromagnetic Immunity The pump is intended for use in the electromagnetic environment specified below. The customer or the user of the pump should assure that it is used in such an environment. IEC/EN 60601-1-2 Immunity Test Compliance Level Electromagnetic Environment – Guidance Test Level IEC/EN 61000-4-2 Electro-Static Discharge (ESD) ±6 kV contact ±8 kV air ±8 kV contact (Note 2) ±15 kV air (Note 2) Floors should be wood, concrete, or ceramic tile. If floors are covered with synthetic material, the relative humidity should be at least 30 %. If connector testing exemption is used, the following symbol for ESD sensitivity appears adjacent to each connector. “Caution – Do Not Touch”. IEC/EN 61000-4-4 Electrical Fast Transient, Burst (EFT) (Note 3) ±2 kV for power supply lines ±1 kV for input/ output lines ±2 kV for power supply lines N/A (Note 4) Mains power quality should be that of a typical commercial or hospital environment. IEC/EN 61000-4-5 Power Line Surge (Note 3) ±1 kV Line(s) to Line(s) ±2 kV Line(s) to Earth IEC/EN 61000-4-8 Power Frequency Magnetic Field (50/60 Hz) 3 A/m 400 A/m 50 Hz (Note 2) Power frequency magnetic fields should be at levels characteristic of a typical location in a typical commercial or hospital environment. IEC/EN 61000-4-11 Voltage Dips, Short Interruptions, and Voltage Variations (Note 3) <5 % UT (Note 1) (>95 % dip in UT) for 0.5 cycle <5 % UT (>95 % dip in UT) for 0.5 cycle 40 % UT (60 % dip in UT) for 5 cycles 40 % UT (60 % dip in UT) for 5 cycles Mains power quality should be that of a typical commercial or hospital environment. If the user of the pump requires continued operation during power mains interruptions, it is recommended that the pump be powered from an uninterruptible power supply or a battery. 70 % UT (30 % dip in UT) for 25 cycles 70 % UT (30 % dip in UT) for 25 cycles <5 % UT (>95 % dip in UT) for 5 sec <5 % UT (>95 % dip in UT) for 5 sec ±1 kV Line(s) to Line(s) ±2 kV Line(s) to Earth Mains power quality should be that of a typical commercial or hospital environment. The pump does employ an internal short duration battery. Note 1—UT is the AC mains voltage prior to application of the test level. Note 2—Compliance levels raised by IEC/EN 60601-2-24. Note 3—Performed at the Minimum and Maximum Rated Input Voltage. Note 4—CareFusion recommends using signal cables of less than 3 meters in length and this requirement is applicable only if signal cables are 3 meters or more in length. (IEC/EN 60601-1-2:2002, Clause 36.202.4) 1000DF00479 Issue 2 48/50 Compliance (continued) Guidance and Manufacturer’s Declaration—Electromagnetic Immunity LIFE SUPPORT Equipment The pump is intended for use in the electromagnetic environment specified below. The customer or the user of the pump should ensure that it is used in such an environment. Immunity Test IEC/EN 60601-1-2 Test Level Compliance Level Electromagnetic Environment – Guidance Portable and mobile RF communications equipment should be used no closer to any part of the pump, including cables, than the recommended separation distance calculated from the equation applicable to the frequency of the transmitter. IEC/EN 61000-4-6 Conducted RF IEC/EN 61000-4-3 Radiated RF 3 V rms 150 kHz to 80 MHz 3 V/m 80 MHz to 2.5 GHz 10 V rms (Note 3) 10 V/m (Note 3) Recommended Separation Distance 12 d = [-----] √P 80 MHz to 800 MHz V2 12 d = [-----] √P 80 MHz to 800 MHz E1 12 d = [-----] √P 800 MHz to 2.5 GHz E1 where P is the maximum output power rating of the transmitter in watts (W) according to the transmitter manufacturer and d is the recommended separation distance in meters (m).a Field strengths from fixed RF transmitters, as determined by an electromagnetic site survey, b should be less than the compliance level in each frequency range. c Interference may occur in the vicinity of equipment marked with the following symbol: Note 1—At 80 MHz and 800 MHz, the higher frequency range applies. Note 2—These guidelines may not apply in all situations. Electromagnetic propagation is affected by absorption and reflection from structures, objects, and people. Note 3—Compliance levels raised by IEC/EN 60601-2-24. a The compliance levels in the ISM frequency bands between 150 kHz and 80 MHz and in the frequency range 80 MHz to 2.5 GHz are intended to decrease the likelihood that mobile/portable communications equipment could cause interference if it is inadvertently brought into patient areas. For this reason, an additional factor of 10/3 is used in calculating the recommended separation distance for transmitters in these frequency ranges. b Field strengths from fixed transmitters, such as base stations for radio (cellular/cordless) telephones and land mobile radios, amateur radio, AM and FM radio broadcast, and TV broadcast cannot be predicted theoretically with accuracy. To assess the electromagnetic environment due to fixed RF transmitters, an electromagnetic site survey should be considered. If the measured field strength in the location in which the pump is used exceeds the applicable RF compliance level above, the pump should be observed to verify normal operation. If abnormal performance is observed, additional measures may be necessary, such as re-orienting or relocating the pump. c Over the frequency range 150 kHz to 80 MHz, field strengths should be less than 10 V/m. 1000DF00479 Issue 2 49/50 Compliance (continued) Recommended Separation Distances for LIFE SUPPORT Equipment between portable and mobile RF communications equipment and the Pump The pump is intended for use in an electromagnetic environment in which radiated RF disturbances are controlled. The user of the pump can help prevent electromagnetic interference by maintaining a minimum distance between portable and mobile RF communications equipment (transmitters) and the pump as recommended below, according to the maximum output power of the communications equipment. Rated Maximum Output Power of Transmitter Separation Distance According to Frequency of Transmitter m 150 kHz to 80 MHz In ISM bands 12 d = [------] √P V2 80 MHz to 800 MHz 800 MHz to 2.5 GHz W 150 kHz to 80 MHz Outside ISM bands 3.5 d = [------] √P V1 12 d = [ ------] √P E1 23 d = [------] √P E1 0.01 0.04 0.12 0.12 0.23 0.1 0.11 0.38 0.38 0.73 1 0.35 1.20 1.20 2.30 10 1.11 3.80 3.80 7.3 100 3.50 12.00 12.00 23.00 For transmitters rated at a maximum output power not listed above, the recommended separation distance d in meters (m) can be determined using the equation applicable to the frequency of the transmitter, where P is the maximum output power rating of the transmitter in watts (W) according to the transmitter manufacturer. Note 1—At 80 MHz and 800 MHz, the separation distance for the higher frequency range apply. Note 2—The ISM (Industrial, Scientific, and Medical) bands between 150 kHz and 80 MHz are 6.765 MHz to 6.795 MHz; 13.553 MHz to 13.567 MHz; 26.957 MHz to 27.283 MHz; and 40.66 MHz to 40.70 MHz. Note 3—An additional factor of 10/3 is used in calculating the recommended separation distance for transmitters in the ISM frequency bands between 150 kHz and 80 MHz and in the frequency range 80 MHz to 2.5 GHz to decrease the likelihood that mobile/portable communications equipment could cause interference if it is inadvertently brought into patient areas. Note 4—These guidelines may not apply in all situations. Electromagnetic propagation is affected by absorption and reflection from structures, objects, and people. 1000DF00479 Issue 2 50/50 Alaris, Guardrails, AccuSlide and SmartSite are trademarks or registered trademarks of CareFusion Corporation or one of its subsidiaries. All rights reserved. All other trademarks are property of their respective owners. ©2011 CareFusion Corporation or one of its subsidiaries. All rights reserved. This document contains proprietary information of CareFusion Corporation or one of its subsidiaries, and its receipt or possession does not convey any rights to reproduce its contents, or to manufacture or sell any product described. Reproduction, disclosure, or use other than for the intended purpose without specific written authorization of CareFusion Corporation or one of its subsidiaries is strictly forbidden. t CareFusion Switzerland 317 Sàrl, CH-1180, Rolle EC REP CareFusion U.K. 305 Ltd., RG22 4BS, UK 1000DF00479 Issue 2 carefusion.com