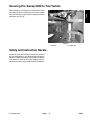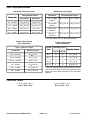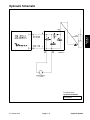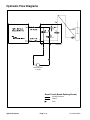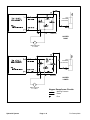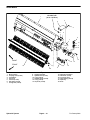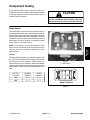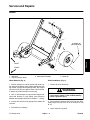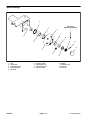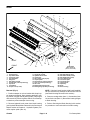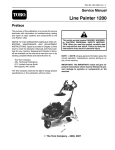
1
Part No. 05137SL (Rev. A)
Service Manual
Pro Sweep 5200
Preface
The purpose of this publication is to provide the service
technician with information for troubleshooting, testing
and repair of major systems and components on the Pro
Sweep 5200.
REFER TO THE OPERATOR’S MANUAL FOR OPERATING, MAINTENANCE
AND ADJUSTMENT
INSTRUCTIONS. Space is provided in Chapter 2 of this
book to insert the Operator’s Manual and Parts Catalog
for your machine. Additional copies of the Operator’s
Manual and Parts Catalog are available on the internet
at www.Toro.com.
The Toro Company reserves the right to change product
specifications or this publication without notice.
This safety symbol means DANGER, WARNING,
or CAUTION, PERSONAL SAFETY INSTRUCTION. When you see this symbol, carefully read
the instructions that follow. Failure to obey the
instructions may result in personal injury.
NOTE: A NOTE will give general information about the
correct operation, maintenance, service, testing or repair of the machine.
IMPORTANT: The IMPORTANT notice will give important instructions which must be followed to prevent damage to systems or components on the
machine.
E The Toro Company - 2005, 2009
This page is intentionally blank.
Pro Sweep 5200
Chapter 2 – Product Records and Maintenance
Product Records . . . . . . . . . . . . . . . . . . . . . . . . . . .
Maintenance . . . . . . . . . . . . . . . . . . . . . . . . . . . . . . .
Equivalents and Conversions . . . . . . . . . . . . . . . .
Torque Specifications . . . . . . . . . . . . . . . . . . . . . . .
2–1
2–1
2–2
2–3
Chapter 3 – Hydraulic System
Chapter 5 – Chassis
Specifications . . . . . . . . . . . . . . . . . . . . . . . . . . . . . . 6 – 2
General Information . . . . . . . . . . . . . . . . . . . . . . . . 6 – 2
Service and Repairs . . . . . . . . . . . . . . . . . . . . . . . . 6 – 3
Chapter 6 – Electrical Diagrams
Electrical Schematic . . . . . . . . . . . . . . . . . . . . . . . . 6 – 3
Circuit Drawings . . . . . . . . . . . . . . . . . . . . . . . . . . . . 6 – 4
Wire Harness Drawings . . . . . . . . . . . . . . . . . . . . . 6 – 7
Electrical
Diagrams
Chassis
General Information . . . . . . . . . . . . . . . . . . . . . . . . 4 – 2
Hydraulic Schematic . . . . . . . . . . . . . . . . . . . . . . . . 4 – 5
Hydraulic Flow Diagrams . . . . . . . . . . . . . . . . . . . . 4 – 6
Troubleshooting . . . . . . . . . . . . . . . . . . . . . . . . . . . 4 – 10
Service and Repairs . . . . . . . . . . . . . . . . . . . . . . . 4 – 13
PARKER TORQLINK TM SERVICE PROCEDURE
Electrical Diagrams . . . . . . . . . . . . . . . . . . . . . . . . . 5 – 1
Special Tools . . . . . . . . . . . . . . . . . . . . . . . . . . . . . . 5 – 1
Troubleshooting . . . . . . . . . . . . . . . . . . . . . . . . . . . . 5 – 2
Safety Interlock System . . . . . . . . . . . . . . . . . . . . . 5 – 4
Component Testing . . . . . . . . . . . . . . . . . . . . . . . . . 5 – 5
Service and Repairs . . . . . . . . . . . . . . . . . . . . . . . 5 – 11
Product Records
and Maintenance
1–2
1–4
1 – 5
1 – 5
Hydraulic
System
Safety Instructions . . . . . . . . . . . . . . . . . . . . . . . . . .
Jacking Instructions . . . . . . . . . . . . . . . . . . . . . . . . .
Securing Pro Sweep 5200 to Tow Vehicle . . . . . .
Safety and Instruction Decals . . . . . . . . . . . . . . . .
Electrical
System
Chapter 4 – Electrical System
Chapter 1 – Safety
Safety
Table Of Contents
Pro Sweep 5200
This page is intentionally blank.
Pro Sweep 5200
Safety
Table of Contents
SAFETY INSTRUCTIONS . . . . . . . . . . . . . . . . . . . . . .
Before Operating . . . . . . . . . . . . . . . . . . . . . . . . . . . .
While Operating . . . . . . . . . . . . . . . . . . . . . . . . . . . . .
Maintenance and Service . . . . . . . . . . . . . . . . . . . .
JACKING INSTRUCTIONS . . . . . . . . . . . . . . . . . . . . .
SECURING PRO SWEEP 5200 TO TOW VEHICLE
SAFETY AND INSTRUCTION DECALS . . . . . . . . . .
Pro Sweep 5200
2
2
2
3
4
5
5
Page 1 – 1
Safety
Safety
Chapter 1
Safety Instructions
The Pro Sweep 5200 is designed and tested to offer
safe service when operated and maintained properly.
Although hazard control and accident prevention partially are dependent upon the design and configuration
of the machine, these factors are also dependent upon
the awareness, concern and proper training of the personnel involved in the operation, transport, maintenance and storage of the machine. Improper use or
maintenance of the machine can result in injury or
death. To reduce the potential for injury or death, comply
with the following safety instructions.
WARNING
To reduce the potential for injury or death,
comply with the following safety instructions.
Before Operating
1. Read and understand the contents of the Operator’s
Manual before starting and operating the machine. Become familiar with the controls and know how to stop the
sweeper quickly. Additional copies of the Operator’s
Manual are available on the internet at www.Toro.com.
2. Keep all shields, safety devices and decals in place.
If a shield, safety device or decal is defective, illegible
or damaged, repair or replace it before operating the
machine. Also tighten any loose nuts, bolts or screws to
ensure machine is in safe operating condition.
3. Make sure that the tow vehicle is carefully selected
to assure the best performance and safe operation of
the Pro Sweep 5200.
4. Assure sweeper interlock system functions correctly
so sweeper brush does not rotate unless dump hopper
is lowered.
5. Make sure that operator is familiar with tow vehicle
operation.
While Operating
1. Operator should be in the operators position when
operating the tow vehicle and sweeper. Stay away from
the sweeper when the brush is engaged.
2. Make sure that hitch pin is properly positioned in tow
vehicle and sweeper. Hitch pin should be secured with
hairpin clip.
6. While operating, the Pro Sweep 5200 may exceed
noise levels of 85dB(A) at the operator position. Hearing
protection is recommended for prolonged exposure to
reduce the potential of permanent hearing damage.
7. Before leaving the operator’s position of the tow vehicle:
3. Do not run tow vehicle engine in a confined area without adequate ventilation. Exhaust fumes are hazardous
and could possibly be deadly.
A. Stop sweeper brush.
B. Ensure that vehicle traction lever is in neutral, set
parking brake, stop engine and remove key from
ignition switch.
4. Do not touch tow vehicle engine, muffler or exhaust
pipe while engine is running or soon after it is stopped.
These areas could be hot enough to cause burns.
5. If abnormal vibration is detected, stop tow vehicle
and sweeper immediately and determine source of
vibration. Correct problems before resuming the use of
sweeper.
Safety
C. Make sure that dump hopper is lowered.
8. Park on level surface, empty hopper and chock
sweeper wheels before disconnecting Pro Sweep 5200
from tow vehicle.
Page 1 -- 2
Rev. A
Pro Sweep 5200
1. Before servicing or making adjustments, empty
sweeper hopper and position sweeper on a level surface. Chock sweeper wheels to prevent it from moving.
If sweeper is attached to tow vehicle, engage tow vehicle parking brake, stop engine and remove key from
the ignition switch.
7. If hopper is raised, install lift cylinder stop to ensure
that unexpected shifting of sweeper frame does not occur.
2. Make sure machine is in safe operating condition by
keeping all nuts, bolts and screws tight.
9. If major repairs are ever needed or assistance is desired, contact an Authorized Toro Distributor.
3. Make sure all hydraulic line connectors are tight and
all hydraulic hoses and lines are in good condition before applying pressure to the hydraulic system.
10.At the time of manufacture, the machine conformed
to all applicable safety standards. To assure optimum
performance and continued safety certification of the
machine, use genuine Toro replacement parts and accessories. Replacement parts and accessories made
by other manufacturers may result in non-conformance
with the safety standards, and the warranty may be
voided.
4. Keep body and hands away from pin hole leaks in hydraulic lines that eject high pressure hydraulic fluid. Use
cardboard or paper to find hydraulic leaks. Hydraulic
fluid escaping under pressure can penetrate skin and
cause injury. Hydraulic fluid accidentally injected into
the skin must be surgically removed within a few hours
by a doctor familiar with this form of injury or gangrene
may result.
5. Before disconnecting any hydraulic component or
performing any work on the hydraulic system, all pressure in system must be relieved. See Relieving Hydraulic System Pressure in the General Information section
of Chapter 3 – Hydraulic System.
6. If hopper is to be raised, make sure that sweeper is
not placed in the offset position.
Pro Sweep 5200
8. Disconnect electrical power harness from tow vehicle before servicing the sweeper.
11. When changing tires or performing other service,
use correct blocks, hoists and jacks. Make sure machine is parked on a solid level floor such as a concrete
floor with the hopper empty and lowered. Have sweeper
attached to towing vehicle, engage vehicle parking
brake, stop engine and remove key from the ignition
switch. Always chock or block wheels. Use jack stands
or solid wood blocks to support the raised machine. If
the machine is not properly supported by blocks or jack
stands, the machine may move or fall, which may result
in personal injury (see Jacking Instructions).
Page 1 – 3
Safety
Safety
Maintenance and Service
Jacking Instructions
CAUTION
1
When changing tires or performing other service, use correct blocks, hoists and jacks to
support sweeper. Make sure machine is parked
on a solid level surface such as a concrete floor.
Always chock or block wheels. Use jack stands
or solid wood blocks to support the raised machine. If the machine is not properly supported
by blocks or jack stands, the machine may
move or fall, which may result in personal injury.
1. Position sweeper on a level surface with dump hopper empty and lowered. Have sweeper attached to towing vehicle, engage vehicle parking brake, stop engine
and remove key from the ignition switch. Chock sweeper wheels to prevent it from moving.
2
Figure 1
1. Wheel
2. Frame jacking point
2. Position jack securely under the main sweeper
frame (Fig. 1). Do not use the axle as a jacking point.
3. Carefully jack machine off the ground.
4. Position jack stands or hardwood blocks under the
main frame to support the sweeper.
Safety
Page 1 – 4
Pro Sweep 5200
While operating or servicing the Pro Sweep 5200, make
sure that hitch pin is properly positioned in tow vehicle
hitch and sweeper tongue. Hitch pin should be secured
with hairpin clip (Fig. 2).
Safety
Securing Pro Sweep 5200 to Tow Vehicle
1
2
Figure 2
1. Hitch pin
2. Hairpin clip
Safety and Instruction Decals
Numerous safety and instruction decals are affixed to
the Pro Sweep 5200. If any decal becomes illegible or
damaged, install a new decal. Part numbers for replacement decals are listed in your Parts Catalog. Order replacement decals from your Authorized Toro Distributor.
Pro Sweep 5200
Page 1 – 5
Safety
This page is intentionally blank.
Safety
Page 1 – 6
Pro Sweep 5200
Chapter 2
Product Records and Maintenance
PRODUCT RECORDS . . . . . . . . . . . . . . . . . . . . . . . . .
MAINTENANCE . . . . . . . . . . . . . . . . . . . . . . . . . . . . . .
EQUIVALENTS AND CONVERSIONS . . . . . . . . . . .
Decimal and Millimeter Equivalents . . . . . . . . . . . .
U.S. to Metric Conversions . . . . . . . . . . . . . . . . . . .
TORQUE SPECIFICATIONS . . . . . . . . . . . . . . . . . . .
Fastener Identification . . . . . . . . . . . . . . . . . . . . . . .
1
1
2
2
2
3
3
Standard Torque for Dry, Zinc Plated and
Steel Fasteners (Inch Series) . . . . . . . . . . . . . . .
Standard Torque for Dry, Zinc Plated and
Steel Fasteners (Metric Fasteners) . . . . . . . . . .
Other Torque Specifications . . . . . . . . . . . . . . . . . .
Conversion Factors . . . . . . . . . . . . . . . . . . . . . . . . .
4
5
6
6
Product Records
Insert Operator’s Manual and Parts Catalog for your Pro
Sweep 5200 at the end of this chapter. Additionally, if
any optional equipment or accessories have been
installed to your machine, insert the Installation Instructions, Operator’s Manuals and Parts Catalogs for those
options at the end of this chapter.
Maintenance
Maintenance procedures and recommended service intervals for the Pro Sweep 5200 are covered in the Operator’s Manual. Refer to that publication when performing
regular equipment maintenance.
Pro Sweep 5200
Page 2 – 1
Product Records and Maintenance
Product Records
and Maintenance
Table of Contents
Equivalents and Conversions
0.09375
Product Records and Maintenance
Page 2 -- 2
Rev. A
Pro Sweep 5200
Recommended fastener torque values are listed in the
following tables. For critical applications, as determined
by Toro, either the recommended torque or a torque that
is unique to the application is clearly identified and specified in this Service Manual.
These Torque Specifications for the installation and
tightening of fasteners shall apply to all fasteners which
do not have a specific requirement identified in this Service Manual. The following factors shall be considered
when applying torque: cleanliness of the fastener, use
of a thread sealant (e.g. Loctite), degree of lubrication
on the fastener, presence of a prevailing torque feature,
hardness of the surface underneath the fastener’s head
or similar condition which affects the installation.
As noted in the following tables, torque values should be
reduced by 25% for lubricated fasteners to achieve
the similar stress as a dry fastener. Torque values may
also have to be reduced when the fastener is threaded
into aluminum or brass. The specific torque value
should be determined based on the aluminum or brass
material strength, fastener size, length of thread engagement, etc.
The standard method of verifying torque shall be performed by marking a line on the fastener (head or nut)
and mating part, then back off fastener 1/4 of a turn.
Measure the torque required to tighten the fastener until
the lines match up.
Fastener Identification
Grade 1
Grade 5
Grade 8
Class 8.8
Class 10.9
Inch Series Bolts and Screws
Metric Bolts and Screws
Figure 1
Figure 2
Pro Sweep 5200
Page 2 – 3
Product Records and Maintenance
Product Records
and Maintenance
Torque Specifications
Standard Torque for Dry, Zinc Plated and Steel Fasteners (Inch Series)
Thread Size
# 6 -- 32 UNC
Grade 1, 5 &
8 with Thin
Height Nuts
SAE Grade 1 Bolts, Screws, Studs &
Sems with Regular Height Nuts
(SAE J995 Grade 2 or Stronger Nuts)
in--lb
in--lb
N--cm
10 + 2
13 + 2
147 + 23
# 6 -- 40 UNF
# 8 -- 32 UNC
13 + 2
25 + 5
282 + 30
# 8 -- 36 UNF
# 10 -- 24 UNC
18 + 2
30 + 5
339 + 56
# 10 -- 32 UNF
SAE Grade 5 Bolts, Screws, Studs &
Sems with Regular Height Nuts
(SAE J995 Grade 2 or Stronger Nuts)
SAE Grade 8 Bolts, Screws, Studs &
Sems with Regular Height Nuts
(SAE J995 Grade 5 or Stronger Nuts)
in--lb
N--cm
in--lb
N--cm
15 + 2
169 + 23
23 + 3
262 + 34
17 + 2
192 + 23
25 + 3
282 + 34
29 + 3
328 + 34
41 + 5
463 + 56
31 + 4
350 + 45
43 + 5
486 + 56
42 + 5
475 + 56
60 + 6
678 + 68
48 + 5
542 + 56
68 + 7
768 + 79
1/4 -- 20 UNC
48 + 7
53 + 7
599 + 79
100 + 10
1130 + 113
140 + 15
1582 + 169
1/4 -- 28 UNF
53 + 7
65 + 10
734 + 113
115 + 12
1299 + 136
160 + 17
1808 + 192
5/16 -- 18 UNC
115 + 15
105 + 15
1186 + 169
200 + 25
2260 + 282
300 + 30
3390 + 339
5/16 -- 24 UNF
138 + 17
128 + 17
1446 + 192
225 + 25
2542 + 282
325 + 33
3672 + 373
ft--lb
ft--lb
N--m
ft--lb
N--m
ft--lb
N--m
3/8 -- 16 UNC
16 + 2
16 + 2
22 + 3
30 + 3
41 + 4
43 + 5
58 + 7
3/8 -- 24 UNF
17 + 2
18 + 2
24 + 3
35 + 4
47 + 5
50 + 6
68 + 8
7/16 -- 14 UNC
27 + 3
27 + 3
37 + 4
50 + 5
68 + 7
70 + 7
95 + 9
7/16 -- 20 UNF
29 + 3
29 + 3
39 + 4
55 + 6
75 + 8
77 + 8
104 + 11
1/2 -- 13 UNC
30 + 3
48 + 7
65 + 9
75 + 8
102 + 11
105 + 11
142 + 15
1/2 -- 20 UNF
32 + 4
53 + 7
72 + 9
85 + 9
115 + 12
120 + 12
163 + 16
5/8 -- 11 UNC
65 + 10
88 + 12
119 + 16
150 + 15
203 + 20
210 + 21
285 + 28
5/8 -- 18 UNF
75 + 10
95 + 15
129 + 20
170 + 18
230 + 24
240 + 24
325 + 33
3/4 -- 10 UNC
93 + 12
140 + 20
190 + 27
265 + 27
359 + 37
375 + 38
508 + 52
3/4 -- 16 UNF
115 + 15
165 + 25
224 + 34
300 + 30
407 + 41
420 + 43
569 + 58
7/8 -- 9 UNC
140 + 20
225 + 25
305 + 34
430 + 45
583 + 61
600 + 60
813 + 81
7/8 -- 14 UNF
155 + 25
260 + 30
353 + 41
475 + 48
644 + 65
667 + 66
904 + 89
NOTE: Reduce torque values listed in the table above
by 25% for lubricated fasteners. Lubricated fasteners
are defined as threads coated with a lubricant such as
engine oil or thread sealant such as Loctite.
NOTE: Torque values may have to be reduced when
installing fasteners into threaded aluminum or brass.
The specific torque value should be determined based
on the fastener size, the aluminum or base material
strength, length of thread engagement, etc.
Product Records and Maintenance
NOTE: The nominal torque values listed above for
Grade 5 and 8 fasteners are based on 75% of the minimum proof load specified in SAE J429. The tolerance is
approximately + 10% of the nominal torque value. Thin
height nuts include jam nuts.
Page 2 -- 4
Rev. A
Pro Sweep 5200
Standard Torque for Dry, Zinc Plated and Steel Fasteners (Metric Fasteners)
Class 8.8 Bolts, Screws and Studs with
Regular Height Nuts
(Class 8 or Stronger Nuts)
Class 10.9 Bolts, Screws and Studs with
Regular Height Nuts
(Class 10 or Stronger Nuts)
M5 X 0.8
57 + 6 in–lb
644 + 68 N–cm
78 + 8 in–lb
881 + 90 N–cm
M6 X 1.0
96 + 10 in–lb
1085 + 113 N–cm
133 + 14 in–lb
1503 + 158 N–cm
M8 X 1.25
19 + 2 ft–lb
26 + 3 N–m
28 + 3 ft–lb
38 + 4 N–m
M10 X 1.5
38 + 4 ft–lb
52 + 5 N–m
54 + 6 ft–lb
73 + 8 N–m
M12 X 1.75
66 + 7 ft–lb
90 + 10 N–m
93 + 10 ft–lb
126 + 14 N–m
M16 X 2.0
166 + 17 ft–lb
225 + 23 N–m
229 + 23 ft–lb
310 + 31 N–m
M20 X 2.5
325 + 33 ft–lb
440 + 45 N–m
450 + 46 ft–lb
610 + 62 N–m
NOTE: Reduce torque values listed in the table above
by 25% for lubricated fasteners. Lubricated fasteners
are defined as threads coated with a lubricant such as
engine oil or thread sealant such as Loctite.
NOTE: The nominal torque values listed above are
based on 75% of the minimum proof load specified in
SAE J1199. The tolerance is approximately + 10% of the
nominal torque value.
NOTE: Torque values may have to be reduced when
installing fasteners into threaded aluminum or brass.
The specific torque value should be determined based
on the fastener size, the aluminum or base material
strength, length of thread engagement, etc.
Pro Sweep 5200
Page 2 – 5
Product Records and Maintenance
Product Records
and Maintenance
Thread Size
Other Torque Specifications
SAE Grade 8 Steel Set Screws
Wheel Bolts and Lug Nuts
Recommended Torque
Thread Size
Thread Size
Square Head
Hex Socket
1/4 – 20 UNC
140 + 20 in–lb
73 + 12 in–lb
5/16 – 18 UNC
215 + 35 in–lb
145 + 20 in–lb
3/8 – 16 UNC
35 + 10 ft–lb
18 + 3 ft–lb
1/2 – 13 UNC
75 + 15 ft–lb
50 + 10 ft–lb
Recommended Torque**
7/16 – 20 UNF
Grade 5
65 + 10 ft–lb
88 + 14 N–m
1/2 – 20 UNF
Grade 5
80 + 10 ft–lb
108 + 14 N–m
M12 X 1.25
Class 8.8
80 + 10 ft–lb
108 + 14 N–m
M12 X 1.5
Class 8.8
80 + 10 ft–lb
108 + 14 N–m
** For steel wheels and non–lubricated fasteners.
Thread Cutting Screws
(Zinc Plated Steel)
Type 1, Type 23 or Type F
Thread Size
Baseline Torque*
No. 6 – 32 UNC
20 + 5 in–lb
No. 8 – 32 UNC
Thread Cutting Screws
(Zinc Plated Steel)
Thread
Size
Threads per Inch
Baseline Torque*
Type A
Type B
No. 6
18
20
20 + 5 in–lb
30 + 5 in–lb
No. 8
15
18
30 + 5 in–lb
No. 10 – 24 UNC
38 + 7 in–lb
No. 10
12
16
38 + 7 in–lb
1/4 – 20 UNC
85 + 15 in–lb
No. 12
11
14
85 + 15 in–lb
5/16 – 18 UNC
110 + 20 in–lb
3/8 – 16 UNC
200 + 100 in–lb
* Hole size, material strength, material thickness & finish
must be considered when determining specific torque
values. All torque values are based on non–lubricated
fasteners.
Conversion Factors
in–lb X 11.2985 = N–cm
ft–lb X 1.3558 = N–m
Product Records and Maintenance
N–cm X 0.08851 = in–lb
N–m X 0.7376 = ft–lb
Page 2 – 6
Pro Sweep 5200
Chapter 3
Hydraulic System
Table of Contents
Pro Sweep 5200
Page 3 – 1
Hydraulic
System
GENERAL INFORMATION . . . . . . . . . . . . . . . . . . . . . 2
Hydraulic Hoses . . . . . . . . . . . . . . . . . . . . . . . . . . . . 2
Hydraulic Fitting Installation . . . . . . . . . . . . . . . . . . 2
Relieving Hydraulic System Pressure . . . . . . . . . . 4
Securing Sweeper to Tow Vehicle . . . . . . . . . . . . . 4
HYDRAULIC SCHEMATIC . . . . . . . . . . . . . . . . . . . . . 5
HYDRAULIC FLOW DIAGRAMS . . . . . . . . . . . . . . . . 6
Brush Circuit . . . . . . . . . . . . . . . . . . . . . . . . . . . . . . . 6
Hopper Dump/Lower Circuits . . . . . . . . . . . . . . . . . 8
TROUBLESHOOTING . . . . . . . . . . . . . . . . . . . . . . . . 10
SERVICE AND REPAIRS . . . . . . . . . . . . . . . . . . . . . 13
General Precautions for Removing and Installing
Hydraulic System Components . . . . . . . . . . . . . 13
Check Hydraulic Lines and Hoses . . . . . . . . . . . . 13
Brush Motor . . . . . . . . . . . . . . . . . . . . . . . . . . . . . . . 14
Brush Motor Service . . . . . . . . . . . . . . . . . . . . . . . . 16
Hydraulic Control Manifold . . . . . . . . . . . . . . . . . . 18
Hydraulic Control Manifold Service . . . . . . . . . . . 20
Lift Cylinder . . . . . . . . . . . . . . . . . . . . . . . . . . . . . . . 22
Lift Cylinder Service . . . . . . . . . . . . . . . . . . . . . . . . 24
PARKER TORQLINKTM SERVICE PROCEDURE
Hydraulic System
General Information
Hydraulic Hoses
Hydraulic hoses are subject to extreme conditions such
as pressure differentials during operation and exposure
to weather, sun, chemicals, very warm storage conditions or mishandling during operation and maintenance.
These conditions can cause damage or premature deterioration. Some hoses are more susceptible to these
conditions than others. Inspect the hoses frequently for
signs of deterioration or damage.
When replacing a hydraulic hose, be sure that the hose
is straight (not twisted) before tightening the fittings.
This can be done by observing the imprint on the hose.
Use two wrenches; hold the hose straight with one
wrench and tighten the hose swivel nut onto the fitting
with the other wrench.
WARNING
Before disconnecting or performing any work
on hydraulic system, relieve all pressure in
system. See Relieving Hydraulic System Pressure in this section.
Keep body and hands away from pin hole leaks
or nozzles that eject hydraulic fluid under high
pressure. Use paper or cardboard, not hands,
to search for leaks. Hydraulic fluid escaping
under pressure can have sufficient force to
penetrate the skin and cause serious injury. If
fluid is injected into the skin, it must be surgically removed within a few hours by a doctor
familiar with this type of injury. Gangrene may
result from such an injury.
Hydraulic Fitting Installation
O–Ring Face Seal
Nut
1. Make sure both threads and sealing surfaces are
free of burrs, nicks, scratches or any foreign material.
Body
Sleeve
2. Make sure the o–ring is installed and properly seated
in the groove. It is recommended that the o–ring be replaced any time the connection is opened.
Seal
3. Lubricate the o–ring with a light coating of oil.
4. Put the tube and nut squarely into position on the
face seal end of the fitting and tighten the nut until finger
tight.
Figure 1
5. Mark the nut and fitting body. Hold the body with a
wrench. Use another wrench to tighten the nut to the correct Flats From Finger Tight (F.F.F.T.). The markings on
the nut and fitting body will verify that the connection has
been tightened.
Size
4 (1/4 in. nominal hose or tubing)
6 (3/8 in.)
8 (1/2 in.)
10 (5/8 in.)
12 (3/4 in.)
16 (1 in.)
Hydraulic System
Final
Position
Mark Nut
and Body
Extend Line
F.F.F.T.
0.75 + 0.25
0.75 + 0.25
0.75 + 0.25
1.00 + 0.25
0.75 + 0.25
0.75 + 0.25
Finger Tight
Initial
Position
After Proper Tightening
Figure 2
Page 3 – 2
Pro Sweep 5200
SAE Straight Thread O–Ring Port – Non–adjustable
1. Make sure both threads and sealing surfaces are
free of burrs, nicks, scratches or any foreign material.
2. Always replace the o–ring seal when this type of fitting shows signs of leakage.
O–Ring
3. Lubricate the o–ring with a light coating of oil.
4. Install the fitting into the port and tighten it down full
length until finger tight.
Size
4 (1/4 in. nominal hose or tubing)
6 (3/8 in.)
8 (1/2 in.)
10 (5/8 in.)
12 (3/4 in.)
16 (1 in.)
F.F.F.T.
1.00 + 0.25
1.50 + 0.25
1.50 + 0.25
1.50 + 0.25
1.50 + 0.25
1.50 + 0.25
Fitting Size
Installation Torque
4
9–10 ft–lb (12–13 N–m)
6
20–21 ft–lb (27–28 N–m)
8
35–37 ft–lb (47–50 N–m)
10
60–66 ft–lb (81–89 N–m)
12
81–87 ft–lb (110–117 N–m)
16
121–131 ft–lb (164–177 N–m)
NOTE: Installation torque values for non–adjustable fittings are listed in Figure 4. These torque values should
only be used when a fitting can be accessed with a
socket. Use of an offset wrench (e.g. crowfoot wrench)
will affect torque wrench accuracy and should not be
used.
Figure 4
SAE Straight Thread O–Ring Port – Adjustable
1. Make sure both threads and sealing surfaces are
free of burrs, nicks, scratches or any foreign material.
2. Always replace the o–ring seal when this type of fitting shows signs of leakage.
Lock Nut
3. Lubricate the o–ring with a light coating of oil.
4. Turn back the jam nut as far as possible. Make sure
the back up washer is not loose and is pushed up as far
as possible (Step 1).
Back–up Washer
O–Ring
5. Install the fitting into the port and tighten finger tight
until the washer contacts the face of the port (Step 2).
6. To put the fitting in the desired position, unscrew it by
the required amount, but no more than one full turn
(Step 3).
Figure 5
Step 1
Step 3
Step 2
Step 4
7. Hold the fitting in the desired position with a wrench
and turn the jam nut with another wrench to the correct
Flats From Finger Tight (F.F.F.T.) (Step 4).
Size
4 (1/4 in. nominal hose or tubing)
6 (3/8 in.)
8 (1/2 in.)
10 (5/8 in.)
12 (3/4 in.)
16 (1 in.)
Pro Sweep 5200
F.F.F.T.
1.00 + 0.25
1.50 + 0.25
1.50 + 0.25
1.50 + 0.25
1.50 + 0.25
1.50 + 0.25
Page 3 – 3
Figure 6
Hydraulic System
Hydraulic
System
5. Tighten the fitting to the correct Flats From Finger
Tight (F.F.F.T.).
Figure 3
Relieving Hydraulic System Pressure
CAUTION
Operate all sweeper hydraulic controls to relieve
system pressure and to avoid injury from pressurized hydraulic oil. See Relieving Hydraulic
System Pressure in the General Information section of this chapter.
Before disconnecting or performing any work on the
sweeper hydraulic system, all pressure in the hydraulic
system must be relieved. With the hopper fully lowered,
turn tow vehicle key switch to OFF and allow engine to
stop.
To relieve sweeper hydraulic system pressure, turn tow
vehicle key switch to ON (engine not running). Press
brush switch on and off. Press hopper switch to both
raise and lower. After cycling the switches, return tow
vehicle key switch to OFF and remove key from the ignition switch.
Securing Sweeper to Tow Vehicle (Fig. 7)
While servicing the Pro Sweep 5200, make sure that the
hitch pin is properly positioned in tow vehicle hitch and
sweeper tongue. Hitch pin should be secured with hairpin clip.
1
2
Figure 7
1. Hitch pin
Hydraulic System
Page 3 – 4
2. Hairpin clip
Pro Sweep 5200
LIFT
CYLINDER
CONTROL
MANIFOLD
BRUSH MOTOR
2.7 CI/REV
Pro Sweep 5200
Hydraulic Schematic
All solenoids are shown as
de–energized
Pro Sweep 5200
Page 3 – 5
Hydraulic System
Hydraulic
System
Hydraulic Schematic
Hydraulic Flow Diagrams
LIFT
CYLINDER
(ENERGIZED)
(ENERGIZED)
CONTROL
MANIFOLD
BRUSH MOTOR
2.7 CI/REV
Brush Circuit (Brush Rotating Shown)
Working Pressure
Return
Flow
Hydraulic System
Page 3 – 6
Pro Sweep 5200
Brush Circuit
NOTE: Hydraulic flow and relief pressure for the Pro
Sweep 5200 are determined by the tow vehicle.
Hydraulic flow from the tow vehicle goes to the control
manifold (port P) through the hydraulic input hose.
When the sweeper brush motor is not engaged and the
lift cylinder is stationary, hydraulic flow from the vehicle
is directed by the un–energized demand solenoid valve
(S2) to return to the tow vehicle through control manifold
port T and the return to tank hose.
When the brush switch is pressed to engage, both the
demand (S2) and brush (S3) solenoid valves in the hydraulic control manifold are energized. The valve shift of
S2 prevents hydraulic flow return to the tow vehicle. The
valve shift of S3 allows oil flow out of control manifold
port MP and to the brush motor causing rotation of the
sweeper brush. Oil return from the brush motor is routed
to control manifold port MR, out control manifold port T
and returns to the tow vehicle.
Hydraulic
System
NOTE: The hopper must be lowered for the Pro Sweep
5200 brush to operate.
Pro Sweep 5200
Page 3 – 7
Hydraulic System
LIFT
CYLINDER
(ENERGIZED)
(EXTENDING)
(ENERGIZED)
CONTROL
MANIFOLD
HOPPER
DUMP
BRUSH MOTOR
2.7 CI/REV
LIFT
CYLINDER
(RETRACTING)
(ENERGIZED)
CONTROL
MANIFOLD
HOPPER
LOWER
BRUSH MOTOR
2.7 CI/REV
Hopper Dump/Lower Circuits
Working Pressure
Return
Flow
Hydraulic System
Page 3 – 8
Pro Sweep 5200
Hopper Dump/Lower Circuits
Hydraulic flow from the tow vehicle goes to the control
manifold (port P) through the hydraulic input hose.
When the sweeper brush motor is not engaged and the
lift cylinder is stationary, hydraulic flow from the vehicle
is directed by the un–energized demand solenoid valve
(S2) to return to the tow vehicle through control manifold
port T and the return to tank hose.
Hopper Dump
When the hopper switch is pressed to dump, both the
hopper up (S1) and demand (S2) solenoid valves in the
hydraulic control manifold are energized. The valve shift
of S2 prevents hydraulic flow return to the tow vehicle.
The valve shift of S1 allows oil flow past the check valve
in the control manifold, out of control manifold port CYL
and to the lift cylinder. Hydraulic pressure against the lift
cylinder rod extends the cylinder and dumps the hopper.
The check valve fitting attached to the lift cylinder allows
oil flow to bypass the orifice in the fitting for proper lift cylinder extension.
Pro Sweep 5200
When the hopper switch is released, solenoid valves S1
and S2 in the hydraulic manifold are de–energized. The
load holding check valve in the control manifold and the
de–energized solenoid valve S4 prevent oil flow from
the lift cylinder so the hopper remains in the raised
(dump) position.
Hopper Lower
When the hopper switch is pressed to lower, the hopper
down (S4) solenoid valve in the hydraulic control manifold is energized. The valve shift of S4 allows a path for
oil flow from the lift cylinder. The weight of the dump hopper and frame cause the lift cylinder to retract and the
dump hopper to lower. Oil flow from the retracting lift cylinder returns to the control manifold port CYL, past S4,
out manifold port T and returns to the tow vehicle. The
orifice in the lift cylinder check valve fitting restricts oil
flow from the cylinder to provide for proper lift cylinder
retraction speed.
While lowering, if the hopper switch is released, solenoid valve S4 will de–energize and oil flow from the lift
cylinder will cease. The hopper will remain in the partially lowered position.
Page 3 – 9
Hydraulic System
Hydraulic
System
NOTE: Hydraulic flow and relief pressure to the Pro
Sweep 5200 are determined by the tow vehicle.
Troubleshooting
The cause of an improperly functioning hydraulic system is best diagnosed with the use of proper testing
equipment and a thorough understanding of the complete hydraulic system.
A hydraulic system with an excessive increase in heat
or noise has a potential for failure. Should either of these
conditions be noticed, immediately stop the machine,
turn off the engine, locate the cause of the trouble and
correct it before allowing the machine to be used again.
Continued use of an improperly functioning hydraulic
system could lead to extensive hydraulic component
damage.
The charts that follow contain information to assist in
troubleshooting. There may possibly be more than one
cause for a machine malfunction.
The successful operation of the Pro Sweep 5200 depends on the hydraulic system of the tow vehicle. When
troubleshooting a sweeper hydraulic problem, make
sure that the tow vehicle hydraulic system is evaluated
as well.
NOTE: When troubleshooting a hydraulic problem on
the Pro Sweep 5200, inspect tow vehicle hydraulic system if both sweeper brush motor and lift cylinder are malfunctioning. If one sweeper hydraulic component
appears to be malfunctioning, check that component.
ÁÁÁÁÁÁÁÁÁÁÁÁÁÁÁÁÁÁÁÁÁÁÁÁÁÁÁÁÁÁÁÁÁÁÁ
ÁÁÁÁÁÁÁÁÁÁÁÁÁ
ÁÁÁÁÁÁÁÁÁÁÁÁÁ
ÁÁÁÁÁÁÁÁÁÁÁÁÁÁÁÁÁÁÁÁÁÁÁ
ÁÁÁÁÁÁÁÁÁÁÁÁÁÁÁÁÁÁÁÁÁ
ÁÁÁÁÁÁÁÁÁÁÁÁÁÁÁÁÁÁÁÁÁÁ
ÁÁÁÁÁÁÁÁÁÁÁÁÁ
ÁÁÁÁÁÁÁÁÁÁÁÁÁÁÁÁÁÁÁÁÁÁ
ÁÁÁÁÁÁÁÁÁÁÁÁÁ
ÁÁÁÁÁÁÁÁÁÁÁÁÁÁÁÁÁÁÁÁÁÁÁ
ÁÁÁÁÁÁÁÁÁÁÁÁÁÁÁÁÁÁÁÁÁ
ÁÁÁÁÁÁÁÁÁÁÁÁÁ
ÁÁÁÁÁÁÁÁÁÁÁÁÁÁÁÁÁÁÁÁÁÁ
ÁÁÁÁÁÁÁÁÁÁÁÁÁ
ÁÁÁÁÁÁÁÁÁÁÁÁÁÁÁÁÁÁÁÁÁÁ
ÁÁÁÁÁÁÁÁÁÁÁÁÁ
ÁÁÁÁÁÁÁÁÁÁÁÁÁÁÁÁÁÁÁÁÁÁ
ÁÁÁÁÁÁÁÁÁÁÁÁÁ
ÁÁÁÁÁÁÁÁÁÁÁÁÁÁÁÁÁÁÁÁÁÁÁ
ÁÁÁÁÁÁÁÁÁÁÁÁÁÁÁÁÁÁÁÁÁ
ÁÁÁÁÁÁÁÁÁÁÁÁÁ
ÁÁÁÁÁÁÁÁÁÁÁÁÁÁÁÁÁÁÁÁÁÁ
ÁÁÁÁÁÁÁÁÁÁÁÁÁ
ÁÁÁÁÁÁÁÁÁÁÁÁÁÁÁÁÁÁÁÁÁÁ
ÁÁÁÁÁÁÁÁÁÁÁÁÁ
ÁÁÁÁÁÁÁÁÁÁÁÁÁÁÁÁÁÁÁÁÁÁ
ÁÁÁÁÁÁÁÁÁÁÁÁÁ
ÁÁÁÁÁÁÁÁÁÁÁÁÁÁÁÁÁÁÁÁÁÁ
ÁÁÁÁÁÁÁÁÁÁÁÁÁ
ÁÁÁÁÁÁÁÁÁÁÁÁÁÁÁÁÁÁÁÁÁÁ
ÁÁÁÁÁÁÁÁÁÁÁÁÁ
ÁÁÁÁÁÁÁÁÁÁÁÁÁ
ÁÁÁÁÁÁÁÁÁÁÁÁÁÁÁÁÁÁÁÁÁÁÁ
ÁÁÁÁÁÁÁÁÁÁÁÁÁÁÁÁÁÁÁÁÁ
ÁÁÁÁÁÁÁÁÁÁÁÁÁÁÁÁÁÁÁÁÁÁ
ÁÁÁÁÁÁÁÁÁÁÁÁÁ
ÁÁÁÁÁÁÁÁÁÁÁÁÁÁÁÁÁÁÁÁÁÁ
ÁÁÁÁÁÁÁÁÁÁÁÁÁ
ÁÁÁÁÁÁÁÁÁÁÁÁÁÁÁÁÁÁÁÁÁÁ
ÁÁÁÁÁÁÁÁÁÁÁÁÁ
ÁÁÁÁÁÁÁÁÁÁÁÁÁÁÁÁÁÁÁÁÁÁ
ÁÁÁÁÁÁÁÁÁÁÁÁÁ
ÁÁÁÁÁÁÁÁÁÁÁÁÁÁÁÁÁÁÁÁÁÁ
ÁÁÁÁÁÁÁÁÁÁÁÁÁ
ÁÁÁÁÁÁÁÁÁÁÁÁÁÁÁÁÁÁÁÁÁÁ
ÁÁÁÁÁÁÁÁÁÁÁÁÁ
ÁÁÁÁÁÁÁÁÁÁÁÁÁÁÁÁÁÁÁÁÁÁ
ÁÁÁÁÁÁÁÁÁÁÁÁÁ
ÁÁÁÁÁÁÁÁÁÁÁÁÁÁÁÁÁÁÁÁÁÁ
ÁÁÁÁÁÁÁÁÁÁÁÁÁ
ÁÁÁÁÁÁÁÁÁÁÁÁÁÁÁÁÁÁÁÁÁÁ
ÁÁÁÁÁÁÁÁÁÁÁÁÁ
ÁÁÁÁÁÁÁÁÁÁÁÁÁÁÁÁÁÁÁÁÁÁ
Problem
Possible Cause
Hydraulic oil leaks.
Hydraulic fitting(s) or hose(s) are loose or damaged.
O–ring(s) or seal(s) are missing or damaged.
Foaming hydraulic fluid.
Hydraulic oil level in tow vehicle reservoir is low.
Hydraulic system has wrong kind of oil.
Hydraulic system on tow vehicle is malfunctioning.
Hydraulic system operates hot.
Hydraulic oil level in tow vehicle reservoir is low.
Excessive dirt and debris on hydraulic components.
Oil is contaminated or too light.
Brush motor is worn or damaged.
Hydraulic system on tow vehicle is malfunctioning.
Brush motor will not turn.
Hydraulic hose(s) to tow vehicle are not connected.
Control manifold brush solenoid (S2) is not being energized or cartridge is faulty.
Control manifold demand solenoid (S3) is not being energized or
cartridge is faulty.
Internal brush motor components are damaged.
Electrical problem exists (see Chapter 4 – Electrical System).
Hydraulic System
Page 3 – 10
Pro Sweep 5200
ÁÁÁÁÁÁÁÁÁÁÁÁÁÁÁÁÁÁÁÁÁÁÁÁÁÁÁÁÁÁÁÁÁÁÁ
ÁÁÁÁÁÁÁÁÁÁÁÁÁÁÁÁÁÁÁÁÁ
ÁÁÁÁÁÁÁÁÁÁÁÁÁÁÁÁÁÁÁÁÁÁÁÁÁÁÁÁÁÁÁÁÁÁÁÁ
ÁÁÁÁÁÁÁÁÁÁÁÁÁ
ÁÁÁÁÁÁÁÁÁÁÁÁÁÁÁÁÁÁÁÁÁÁ
ÁÁÁÁÁÁÁÁÁÁÁÁÁ
ÁÁÁÁÁÁÁÁÁÁÁÁÁÁÁÁÁÁÁÁÁÁ
ÁÁÁÁÁÁÁÁÁÁÁÁÁ
ÁÁÁÁÁÁÁÁÁÁÁÁÁÁÁÁÁÁÁÁÁÁ
ÁÁÁÁÁÁÁÁÁÁÁÁÁ
ÁÁÁÁÁÁÁÁÁÁÁÁÁÁÁÁÁÁÁÁÁÁ
ÁÁÁÁÁÁÁÁÁÁÁÁÁ
ÁÁÁÁÁÁÁÁÁÁÁÁÁÁÁÁÁÁÁÁÁÁ
ÁÁÁÁÁÁÁÁÁÁÁÁÁ
ÁÁÁÁÁÁÁÁÁÁÁÁÁÁÁÁÁÁÁÁÁÁ
ÁÁÁÁÁÁÁÁÁÁÁÁÁ
ÁÁÁÁÁÁÁÁÁÁÁÁÁÁÁÁÁÁÁÁÁÁ
ÁÁÁÁÁÁÁÁÁÁÁÁÁ
ÁÁÁÁÁÁÁÁÁÁÁÁÁÁÁÁÁÁÁÁÁÁ
ÁÁÁÁÁÁÁÁÁÁÁÁÁ
ÁÁÁÁÁÁÁÁÁÁÁÁÁÁÁÁÁÁÁÁÁÁ
ÁÁÁÁÁÁÁÁÁÁÁÁÁ
ÁÁÁÁÁÁÁÁÁÁÁÁÁÁÁÁÁÁÁÁÁÁ
ÁÁÁÁÁÁÁÁÁÁÁÁÁ
ÁÁÁÁÁÁÁÁÁÁÁÁÁÁÁÁÁÁÁÁÁÁ
ÁÁÁÁÁÁÁÁÁÁÁÁÁ
ÁÁÁÁÁÁÁÁÁÁÁÁÁÁÁÁÁÁÁÁÁÁ
ÁÁÁÁÁÁÁÁÁÁÁÁÁ
ÁÁÁÁÁÁÁÁÁÁÁÁÁÁÁÁÁÁÁÁÁÁ
ÁÁÁÁÁÁÁÁÁÁÁÁÁ
ÁÁÁÁÁÁÁÁÁÁÁÁÁÁÁÁÁÁÁÁÁÁÁ
ÁÁÁÁÁÁÁÁÁÁÁÁÁÁÁÁÁÁÁÁÁ
ÁÁÁÁÁÁÁÁÁÁÁÁÁ
ÁÁÁÁÁÁÁÁÁÁÁÁÁÁÁÁÁÁÁÁÁÁ
ÁÁÁÁÁÁÁÁÁÁÁÁÁ
ÁÁÁÁÁÁÁÁÁÁÁÁÁÁÁÁÁÁÁÁÁÁ
ÁÁÁÁÁÁÁÁÁÁÁÁÁ
ÁÁÁÁÁÁÁÁÁÁÁÁÁÁÁÁÁÁÁÁÁÁ
Problem
Possible Cause
Dump hopper will not lift or lifts
slowly.
Hydraulic hose(s) to tow vehicle are not connected.
Hydraulic oil level in tow vehicle reservoir is low.
Lift cylinder is binding.
Sweeper frame components are binding.
Check valve fitting on lift cylinder is faulty.
Control manifold demand solenoid (S3) is not being energized or
cartridge is faulty.
Hydraulic system on tow vehicle is malfunctioning.
Electrical problem exists (see Chapter 4 – Electrical System).
Dump hopper raises, but will not
stay up.
Pro Sweep 5200
Control manifold hopper down cartridge (S4) is faulty.
Control manifold check valve leaks.
Page 3 – 11
Hydraulic System
Hydraulic
System
Control manifold hopper up solenoid (S1) is not being energized or
cartridge is faulty.
This page is intentionally blank.
Hydraulic System
Page 3 – 12
Pro Sweep 5200
Service and Repairs
General Precautions for Removing and Installing Hydraulic System Components
Before Repair or Replacement of Components
After Repair or Replacement of Components
1. Before removing any parts from the hydraulic system, empty sweeper hopper and position sweeper on a
level surface. Chock sweeper wheels to prevent sweeper from moving. If sweeper is attached to tow vehicle,
engage tow vehicle parking brake, stop engine and remove key from the ignition switch.
1. If component failure was severe or if hydraulic system is contaminated, drain entire hydraulic system.
Drain and flush all hoses and components. Also, drain
and refill tow vehicle hydraulic system reservoir and
change oil filter.
2. Lubricate o–rings and seals with clean hydraulic oil
before installing hydraulic components.
3. Make sure caps or plugs are removed from the hydraulic tubes, hydraulic fittings and components before
reconnecting.
4. Use proper tightening methods when installing hydraulic hoses and fittings (see Hydraulic Fitting Installation in the General Information section of this chapter).
CAUTION
Operate all sweeper hydraulic controls to relieve
system pressure and to avoid injury from pressurized hydraulic oil. See Relieving Hydraulic
System Pressure in the General Information section of this chapter.
3. Put caps or plugs on any hydraulic lines, hydraulic fittings or hydraulic components left open or exposed to
prevent hydraulic system contamination.
4. Put labels on disconnected hydraulic lines and
hoses for proper installation after repairs are completed.
5. After repairs are completed but before operating the
sweeper, check oil level in the hydraulic reservoir of the
tow vehicle and add correct oil if necessary.
6. After disconnecting or replacing any hydraulic components, operate machine functions slowly until air is
out of system.
7. Check for hydraulic oil leaks. Shut off tow vehicle engine and correct leaks if necessary. Check oil level in hydraulic reservoir and add correct oil if necessary.
5. Note the position of hydraulic fittings (especially elbow fittings) on hydraulic components before removal.
Mark parts if necessary to make sure they will be aligned
properly when reinstalling hydraulic hoses and tubes.
Check Hydraulic Lines and Hoses
WARNING
Keep body and hands away from pin hole leaks
or nozzles that eject hydraulic fluid under high
pressure. Use paper or cardboard, not hands, to
search for leaks. Hydraulic fluid escaping under
pressure can have sufficient force to penetrate
the skin and cause serious injury. If fluid is injected into the skin, it must be surgically removed within a few hours by a doctor familiar
with this type of injury. Gangrene may result from
such an injury.
Pro Sweep 5200
Check hydraulic lines and hoses daily for leaks, kinked
lines, loose mounting supports, wear, loose fittings,
weather deterioration and/or chemical deterioration.
Make all necessary repairs before operating sweeper.
Page 3 – 13
Hydraulic System
Hydraulic
System
2. Clean machine before disconnecting, removing or
disassembling any hydraulic components. Make sure
hydraulic components, hoses, connections and fittings
are cleaned thoroughly. Always keep in mind the need
for cleanliness when working on hydraulic equipment.
Brush Motor
1
67 to 83 ft–lb
(91 to 112 N–m)
3
2
4
5
6
9
7
10
11
8
12
13
RIGHT
FRONT
15
19
17
14
16
18
Figure 8
1.
2.
3.
4.
5.
6.
7.
Brush housing
Coupling cover (2 used)
Lock washer
Cap screw
Lock nut (2 used)
Flat washer (2 used)
Carriage bolt (6 used)
Hydraulic System
8.
9.
10.
11.
12.
13.
Coupling assembly
Hydraulic hose (2 used)
O–ring (2 used)
Hydraulic fitting (2 used)
O–ring (2 used)
Cap screw (2 used)
Page 3 – 14
14.
15.
16.
17.
18.
19.
Hydraulic brush motor
Flat washer (6 used)
Lock nut (6 used)
Flange bearing (2 used)
Square key
Brush
Pro Sweep 5200
Removal (Fig. 8)
1. Empty sweeper hopper and position sweeper on a
level surface. Chock sweeper wheels to prevent sweeper from moving. If sweeper is attached to tow vehicle,
engage tow vehicle parking brake, stop engine and remove key from the ignition switch.
CAUTION
Operate all sweeper hydraulic controls to relieve
system pressure and to avoid injury from pressurized hydraulic oil. See Relieving Hydraulic
System Pressure in the General Information section of this chapter.
4. Align motor shaft with brush shaft. Secure brush motor to frame with two (2) cap screws (item 14), flat washers (item 7) and lock nuts (item 6). Torque lock nuts from
67 to 83 ft–lb (91 to 112 N–m).
5. Position coupling jaw on motor shaft to allow a gap
between coupler jaw valleys from .830” to .930” (21.1 to
23.6 mm) (Fig. 10). Apply Loctite #242 (or equivalent) to
threads of coupling set screw. Secure coupling jaw to
motor shaft by torquing set screw from 125 to 155 in–lb
(14.1 to 17.5 N–m).
6. Remove caps or plugs that were put on any hydraulic
lines or fittings during disassembly.
7. Install hydraulic hoses to hydraulic fittings on brush
motor. Tighten connections.
3. Clean brush motor and hydraulic connections. Label
hydraulic lines for assembly purposes.
Hydraulic
System
8. Install upper coupling cover to brush housing.
2. Relieve sweeper hydraulic system pressure.
5
3
4. Disconnect hydraulic lines from hydraulic fittings on
brush motor. Allow hydraulic oil to drain from lines into
a suitable container. Put caps or plugs on open hydraulic
lines and fittings to prevent contamination.
4
3
2
1
5. Remove upper coupling cover from brush housing.
6. Support brush motor. Remove two (2) cap screws
(item 14), flat washers (item 7) and lock nuts (item 6) that
secure motor to frame. Pull brush motor (with coupling
jaw attached) from the machine.
IMPORTANT: To prevent damage to hydraulic motor,
DO NOT hit coupling jaw or motor with a hammer
during coupling jaw removal or installation.
7. Loosen set screw that secures coupling jaw to brush
motor shaft. Use puller to remove coupler from motor
shaft. Locate and retrieve key from motor shaft.
6
7
125 to 155 in–lb
(14.1 to 17.5 N–m)
Loctite #242
Figure 9
1.
2.
3.
4.
Hydraulic brush motor
Key
Coupling jaw
Coupling spider
2
8. If required, remove hydraulic fittings and o–rings
from the wheel motor. Discard o–rings.
5. Brush
6. Square key
7. Set screw
4
3
Installation (Fig. 8)
1. If removed, install hydraulic fittings with new o–rings
into the brush motor ports (see Hydraulic Fitting Installation in the General Information section of this chapter).
2. If coupling jaw was removed from motor, position key
into shaft keyway and slide coupling jaw onto shaft.
Make sure that coupling spider is positioned into coupling jaw on brush shaft.
3. Position and support brush motor to the frame. Make
sure to align coupling jaw on motor shaft with coupling
spider.
Pro Sweep 5200
1
5
.830” to .930”
(21.1 to 23.6 mm)
Figure 10
1. Brush shaft
2. Brush coupling jaw
3. Coupling spider
Page 3 – 15
4. Motor coupling jaw
5. Motor shaft
Hydraulic System
Brush Motor Service
11
13
12
10
9
3
14
15
16
18
17
19
20
1
2
3
4
22 to 26 ft–lb
(30 to 35 N–m)
5
3
6
3
7
3
8
Figure 11
1.
2.
3.
4.
5.
6.
7.
Cap screw (5 used)
End cover
Ring seal
Commutator seal
Commutator and ring assembly
Manifold
Stator
8.
9.
10.
11.
12.
13.
14.
Wear plate
Drive link
Coupling shaft
Woodruff key
Bushing
Thrust bearing
Thrust washer
15.
16.
17.
18.
19.
20.
Inner seal
Backup washer
O–ring
Housing
Bearing
Seal
NOTE: For service of the hydraulic brush motor, see
the Parker TorqlinkTM Service Procedure at the end of
this chapter.
Hydraulic System
Page 3 – 16
Pro Sweep 5200
Hydraulic
System
This page is intentionally blank.
Pro Sweep 5200
Page 3 – 17
Hydraulic System
Hydraulic Control Manifold
5
1
3
RIGHT
4
FRONT
3
2
Figure 12
1. Main frame
2. Cap screw (2 used)
3. Flat washer (4 used)
4. Hydraulic control manifold
5. Lock nut (2 used)
Removal (Fig. 12)
2. Relieve sweeper hydraulic system pressure.
1. Empty sweeper hopper and position sweeper on a
level surface. Chock sweeper wheels to prevent sweeper from moving. If sweeper is attached to tow vehicle,
engage tow vehicle parking brake, stop engine and remove key from the ignition switch.
NOTE: The ports on the control manifold are marked to
identify hydraulic hose connections. Example: P is the
pump connection port (See Hydraulic Schematic to
identify the function of the hydraulic lines and cartridge
valves at each manifold port location).
3. Label all control manifold electrical and hydraulic
connections for assembly purposes.
CAUTION
Operate all sweeper hydraulic controls to relieve
system pressure and to avoid injury from pressurized hydraulic oil. See Relieving Hydraulic
System Pressure in the General Information section of this chapter.
Hydraulic System
4. Disconnect wire harness electrical connectors from
solenoid valves on control manifold.
5. Clean control manifold and manifold hydraulic connections. Disconnect hydraulic hoses from manifold fittings.
Page 3 – 18
Pro Sweep 5200
6. Allow disconnected hydraulic lines to drain into a
suitable container. Put caps or plugs on disconnected
hoses and fittings to prevent contamination. Discard any
removed o–rings.
2
7
3
3
2
6
1
8. Remove hydraulic manifold from the machine.
4
9. Remove hydraulic fittings from manifold as needed
(Fig. 13). Discard any removed o–rings.
1
2. Position hydraulic manifold to the frame mounting
bracket. Install cap screws, washers and lock nuts but
do not fully tighten.
1
2
3
Installation (Fig. 12)
1. Lightly oil new o–rings for all removed hydraulic fittings. Install hydraulic fittings to control manifold (see
Hydraulic Fitting Installation in the General Information
section of this chapter).
5
2
3
Figure 13
1.
2.
3.
4.
O–ring
Hydraulic fitting
O–ring
O–ring
5. Hydraulic fitting
6. O–ring
7. Hydraulic manifold
3. Make sure all hydraulic connections, ports and fittings are clean.
4. Remove caps or plugs that were put on hydraulic
lines or fittings during disassembly.
5. Lightly oil new o–rings for hydraulic fitting and hose
locations.
6. Correctly connect hydraulic lines to the manifold.
Properly tighten all hydraulic connections (see Hydraulic Fitting Installation in the General Information section
of this chapter).
7. Secure hydraulic manifold to machine by tightening
cap screws and lock nuts.
8. Reconnect solenoid valve electrical connectors.
Pro Sweep 5200
Page 3 – 19
Hydraulic System
Hydraulic
System
7. Support control manifold to prevent it from falling.
Remove two (2) cap screws, flat washers and lock nuts
that secure hydraulic manifold to the frame mounting
bracket.
1
Hydraulic Control Manifold Service
36 in–lb
(4.1 N–m)
36 in–lb
(4.1 N–m)
22 ft–lb
(30 N–m)
4
3
4
36 in–lb
(4.1 N–m)
3
22 ft–lb
(30 N–m)
4
5
22 ft–lb
(30 N–m)
20 to 25 ft–lb
(27 to 34 N–m)
3
2
5
1
5
22 ft–lb
(30 N–m)
6
Figure 14
1. Check valve
2. Demand solenoid (S2 port)
3. Solenoid coil
4. Nut
5. Solenoid valve (S1, S3 and S4 ports)
6. Hydraulic lift control manifold
NOTE: The ports on the manifold are marked for easy
identification of components. Example: P is the pump
connection port (See Hydraulic Schematics to identify
the function of the hydraulic lines and cartridge valves
at each port).
Hydraulic System
Page 3 – 20
Pro Sweep 5200
Hydraulic Manifold Service
CAUTION
1. Make sure the control manifold is clean before removing any cartridge valve.
CAUTION
Operate all sweeper hydraulic controls to relieve
system pressure and to avoid injury from pressurized hydraulic oil. See Relieving Hydraulic
System Pressure in the General Information section of this chapter.
Abrupt movement of internal spools can cause
stored fluid to be released suddenly.
6. Clean cartridge valve by submerging valve in clean
mineral spirits to flush out contamination. Particles as
fine as talcum powder can affect the operation of high
pressure hydraulic valves. If cartridge design allows,
use a wood or plastic probe to push the internal spool in
and out 20 to 30 times to flush out contamination. Be extremely careful not to damage cartridge. Use compressed air for cleaning.
7. Reinstall the cartridge valve into control manifold:
IMPORTANT: Use care when handling the cartridge
valve. Slight bending or distortion of the stem tube
can cause binding and malfunction.
A. Lubricate new seal kit components with clean hydraulic oil and install on valve. The o–rings, sealing
rings and backup rings must be arranged properly on
the cartridge valve for proper operation and sealing.
3. Remove cartridge valve with a deep socket wrench.
Note correct location for o–rings, sealing rings and
backup rings. Remove and discard seal kit from valve.
IMPORTANT: Use care when handling the valve
cartridge. Slight bending or distortion of the
stem tube can cause binding and malfunction.
4. Visually inspect the manifold port for damage to the
sealing surfaces, damaged threads and contamination.
B. Thread cartridge valve carefully into correct manifold port. The valve should go in easily without binding.
5. Visually inspect cartridge valve for damaged sealing
surfaces and contamination.
A. Contamination may cause valves to stick or hang
up. Contamination can become lodged in small valve
orifices or seal areas causing malfunction.
B. If valve sealing surfaces appear pitted or damaged, the hydraulic system may be overheating or
there may be water in the system.
C. Torque cartridge valve using a deep socket to values identified in Figure 14.
8. If solenoid cartridge was removed, carefully install
solenoid coil onto the cartridge valve. Install nut and
torque nut to 36 in–lb (4.1 N–m).
9. After assembly, if problems still exist, remove valve
and clean again or replace valve.
CAUTION
Use eye protection such as goggles when using
compressed air for cartridge valve cleaning.
Pro Sweep 5200
Page 3 – 21
Hydraulic System
Hydraulic
System
2. If solenoid cartridge is being serviced, remove nut
securing solenoid to the cartridge valve. Carefully slide
solenoid off the valve.
Lift Cylinder
2
RIGHT
FRONT
6
9 10
3
4
4
5
7 8
3
1
5
Figure 15
1.
2.
3.
4.
Main sweeper frame
Lift cylinder
Cap screw
Pivot pin
Hydraulic System
5. Lock nut
6. Pitch frame
7. Hydraulic hose
Page 3 – 22
8. O–ring
9. Check valve fitting
10. O–ring
Pro Sweep 5200
Removal (Fig. 15)
Installation (Fig. 15)
1. Empty sweeper hopper and position sweeper on a
level surface. Chock sweeper wheels to prevent sweeper from moving. If sweeper is attached to tow vehicle,
engage tow vehicle parking brake, stop engine and remove key from the ignition switch.
1. If removed, install hydraulic check valve fitting and
new o–ring into lift cylinder.
2. Position lift cylinder to the machine mounting points.
Make sure the port of the lift cylinder faces the front of
the machine.
3. Align lift cylinder mounting holes with frame mounts.
Install pivot pins. Secure pivot pins to frame with cap
screws and lock nuts.
CAUTION
Operate all sweeper hydraulic controls to relieve
system pressure and to avoid injury from pressurized hydraulic oil. See Relieving Hydraulic
System Pressure in the General Information section of this chapter.
4. Remove plugs from disconnected hose and fitting.
5. Connect hydraulic hose with new o–ring to hydraulic
fitting on lift cylinder. Tighten hose connection.
Hydraulic
System
2. Relieve sweeper hydraulic system pressure.
3. Disconnect hydraulic hose from hydraulic fitting on
lift cylinder. Locate and discard o–ring from between
hose and fitting. Allow hose to drain into a suitable container.
4. Plug disconnected hose and fitting to prevent contamination.
5. Remove lock nuts (item 5) and cap screws (item 3)
that are used to retain lift cylinder pivot pins (item 4) to
sweeper frame.
CAUTION
To prevent personal injury, make sure that lift
cylinder is supported as it is removed from the
machine. Lift cylinder weighs approximately
43 pounds (19.5 kg).
6. Support lift cylinder and slide pivot pins from the lift
cylinder and machine frame.
7. Remove lift cylinder from the machine.
8. If needed, remove hydraulic check valve fitting and
o–ring from the lift cylinder. Discard o–ring.
Pro Sweep 5200
Page 3 – 23
Hydraulic System
Lift Cylinder Service
11
1
2
7
3
4
8
10
13
5
12
9
250 to 300 ft--lb
(339 to 407 N--m)
6
Figure 16
1.
2.
3.
4.
5.
Wear ring
Seal
O--ring
Tube
Rod
6.
7.
8.
9.
O--ring
Backup ring
Retaining ring
Head
10.
11.
12.
13.
Wiper
Breather plug
Piston
Lock nut
Disassembly (Fig. 16)
1. Remove oil from the lift cylinder into a drain pan by
slowly pumping the cylinder rod. Plug ports and clean
the outside of the lift cylinder.
IMPORTANT: Prevent damage when clamping the
lift cylinder into a vise; clamp on the pivot only.
2. Mount lift cylinder in a vise so that the shaft end tilts
up slightly.
3. Using a spanner wrench, rotate head (item 9) clockwise until the edge of the retaining ring appears in the
tube opening. Insert a screwdriver under the beveled
edge of the retaining ring to start the retaining ring
through the tube opening. Rotate the head counter-clockwise to remove retaining ring (item 8) as shown in
Figure 17.
4. Grasp end of rod; extract rod assembly and head by
carefully twisting and pulling on the rod.
Hydraulic System
Spanner
wrench
Retaining
ring
Figure 17
IMPORTANT: Do not clamp vise jaws against rod
surface. Protect rod surface before mounting in
vise.
5. Mount rod securely in a vise by clamping vise on the
flats of the pivot. Remove lock nut (item 13) and carefully
slide piston and head from the rod.
Page 3 -- 24 Rev. A
Pro Sweep 5200
IMPORTANT: When removing seal components, be
careful not to scratch or damage piston or head.
6. Remove and discard seal kit components from the
head and piston.
Inspection
IMPORTANT: Do not clamp vise jaws against rod
surface. Protect rod surface before mounting in
vise.
3. Mount rod securely in a vise by clamping vise on the
pivot end of the shaft. Carefully slide head assembly and
piston assembly onto the rod.
4. Thread lock nut (item 13) onto rod. Torque lock nut
from 250 to 300 ft--lb (339 to 407 N--m).
Use eye protection such as goggles when using
compressed air
5. Remove rod assembly from vise.
IMPORTANT: Prevent damage when clamping the
tube into a vise; clamp on the pivot end only.
1. Wash all parts in solvent. Dry parts with compressed
air.
6. Mount tube in a vise so that the rod end tilts up slightly.
2. Inspect internal surface of tube for deep scratches,
out--of--roundness and bending. Replace if worn or
damaged.
IMPORTANT: When installing the head into the
tube, pay careful attention to the retaining ring slot
in the tube to insure that the backup ring does not
lodge in the slot.
3. Inspect rod, piston and head for excessive pitting,
scoring or wear. Replace any worn or damaged parts.
Assembly (Fig. 16)
1. Coat new seal kit components with clean hydraulic
oil.
IMPORTANT: When installing seal components, be
careful not to scratch or damage piston or head.
2. Install new seals to the head and piston.
Pro Sweep 5200
7. Coat all internal lift cylinder parts with a light coating
of clean hydraulic oil. Slide rod assembly into tube being
careful not to damage the seals.
8. Secure head in tube by installing retaining ring (item
8). Align retaining ring hole in the head with the access
slot in the tube. Insert the retaining ring hook into the
hole and rotate head clockwise until the retaining ring is
completely pulled into the tube and the ends are covered. Apply silicone sealer to barrel access slot.
Page 3 -- 25 Rev. A
Hydraulic System
Hydraulic
System
CAUTION
This page is intentionally blank.
Hydraulic System
Page 3 – 26
Pro Sweep 5200
Chapter 4
Electrical System
Table of Contents
Electrical
System
ELECTRICAL DIAGRAMS . . . . . . . . . . . . . . . . . . . . . 1
SPECIAL TOOLS . . . . . . . . . . . . . . . . . . . . . . . . . . . . . 1
TROUBLESHOOTING . . . . . . . . . . . . . . . . . . . . . . . . . 2
SAFETY INTERLOCK SYSTEM . . . . . . . . . . . . . . . . 4
COMPONENT TESTING . . . . . . . . . . . . . . . . . . . . . . . 5
Brush Switch . . . . . . . . . . . . . . . . . . . . . . . . . . . . . . . 5
Hopper Switch . . . . . . . . . . . . . . . . . . . . . . . . . . . . . . 6
Brush and Hopper Down Relays . . . . . . . . . . . . . . 7
Fuse . . . . . . . . . . . . . . . . . . . . . . . . . . . . . . . . . . . . . . 8
Diode Assembly . . . . . . . . . . . . . . . . . . . . . . . . . . . . 8
Solenoid Valve Coil . . . . . . . . . . . . . . . . . . . . . . . . . . 9
Hopper Down Proximity Switch . . . . . . . . . . . . . . 10
SERVICE AND REPAIRS . . . . . . . . . . . . . . . . . . . . . . 11
Solenoid Valve Coil . . . . . . . . . . . . . . . . . . . . . . . . . . 11
Electrical Diagrams
The electrical schematic and wire harness drawings for
the Pro Sweep 5200 are located in Chapter 6 – Electrical
Diagrams.
Special Tools
Multimeter
The multimeter can test electrical components and circuits for current (amps), resistance (ohms) or voltage.
NOTE: Toro recommends the use of a DIGITAL Volt–
Ohm–Amp multimeter when testing electrical circuits.
The high impedance (internal resistance) of a digital meter in the voltage mode will make sure that excess current is not allowed through the meter. This excess
current can cause damage to circuits not designed to
carry it.
Figure 1
Pro Sweep 5200
Page 4 – 1
Electrical System
Troubleshooting
CAUTION
Remove all jewelry, especially rings and
watches, before doing any electrical troubleshooting or testing. Disconnect the power harness from the vehicle unless the test requires
battery voltage.
For effective troubleshooting and repairs, you must
have a good understanding of the electrical circuits (see
Chapter 6 – Electrical Diagrams) and components used
on this machine.
If the machine has the interlock switch by–passed, it
must be reconnected for proper troubleshooting and
safety.
Problem
Possible Causes
Brush rotates (but should not) when dump hopper is
raised.
Hopper down proximity switch is malfunctioning or
faulty.
Brush relay is faulty.
Hopper switch or circuit wiring is faulty.
Logic diode is faulty.
Brush does not rotate.
Hopper is raised (brush should only rotate when
hopper is fully lowered).
Hopper down proximity switch is malfunctioning or
faulty.
Problem with power or ground from vehicle (other
sweeper functions affected as well).
Fuse (20 Amp) is faulty (other sweeper functions
affected as well).
Brush switch or circuit wiring is faulty.
Brush relay or circuit wiring is faulty.
Hopper down relay or circuit wiring is faulty.
Logic diode is faulty.
Demand solenoid valve coil (S2) or circuit wiring is
faulty.
Brush solenoid valve coil (S3) or circuit wiring is faulty.
Hydraulic problem exists (see Chapter 3 – Hydraulic
System).
Electrical System
Page 4 – 2
Pro Sweep 5200
Problem
Possible Causes
Dump hopper does not raise.
Fuse (20 Amp) is faulty (other sweeper functions
affected as well).
Problem with power or ground from vehicle (other
sweeper functions affected as well).
Hopper switch or circuit wiring is faulty.
Demand solenoid valve coil (S2) or circuit wiring is
faulty.
Hopper up solenoid valve coil (S1) or circuit wiring is
faulty.
Hydraulic problem exists (see Chapter 3 – Hydraulic
System).
Dump hopper does not lower.
Fuse (20 Amp) is faulty (other sweeper functions
affected as well).
Problem with power or ground from vehicle (other
sweeper functions affected as well).
Hopper down solenoid valve coil (S4) or circuit wiring
is faulty.
Hydraulic problem exists (see Chapter 3 – Hydraulic
System).
Pro Sweep 5200
Page 4 – 3
Electrical System
Electrical
System
Hopper switch or circuit wiring is faulty.
Safety Interlock System
The safety interlock system of the Pro Sweep 5200 ensures that the brush will not rotate when the dump hopper is in the raised position.
CAUTION
Do not disconnect the Pro Sweep 5200 hopper
down proximity switch. It is for the operator’s
protection. Check operation of the switch daily
to make sure the interlock system is operating
correctly. If the switch is not operating properly,
adjust or replace it before operating the sweeper.
Electrical System
Interlock system operation is described in the Pro
Sweep 5200 Operator’s Manual. Testing procedures for
the interlock system hopper down proximity switch and
brush relay are included in the Component Testing section of this Chapter.
Page 4 – 4
Pro Sweep 5200
Component Testing
For accurate resistance and/or continuity checks, electrically disconnect the component being tested from the
circuit (e.g. unplug the switch connector before doing a
continuity check on switch).
CAUTION
When testing electrical components for continuity with a multimeter (ohms setting), make sure
that power to the circuit has been disconnected.
Brush Switch
The brush switch is used to turn the sweeper brush on
by energizing the brush motor solenoid (S3) and the demand solenoid (S2). When the brush switch is in the off
position, the brush solenoid is not energized. The switch
includes an indicator light that will illuminate when the
brush switch is in the on position. This switch is located
in the control box enclosure (Fig. 2).
NOTE: If the hopper is in the raised position or if the
hopper switch is pushed to raise, the brush motor solenoid (S3) will be de–energized regardless of brush
switch position.
Electrical
System
1
Testing
The brush switch terminals are marked as shown in Figure 3. The circuitry of this switch is shown in the chart below. With the use of a multimeter (ohms setting), the
switch functions may be tested to determine whether
continuity exists between the various terminals for each
switch position. Verify continuity between switch terminals.
SWITCH
POSITION
NORMAL
CIRCUITS
OTHER
CIRCUITS
ON
2+3
5+6
OFF
2+1
5+4
Figure 2
1. Brush switch
BACK OF SWITCH
Figure 3
Pro Sweep 5200
Page 4 – 5
Electrical System
Hopper Switch
The hopper switch is used to raise or lower the hopper
by energizing solenoids S1 (hopper up) or S4 (hopper
down). This switch is located in the control box enclosure (Fig. 4).
When the hopper switch is pushed to raise the hopper,
the demand solenoid (S2) and the hopper up solenoid
(S1) are energized. These energized solenoids allow
hydraulic flow to extend the lift cylinder and raise the
hopper. Additionally, the brush relay is energized which
ensures that the sweeper brush will not be rotating.
When the hopper switch is pushed to lower, the hopper
down solenoid (S4) is energized allowing the raised
hopper to contract the lift cylinder. The hopper down
proximity switch prevents the sweeper brush from rotating until the hopper is fully lowered.
Testing
1
Figure 4
1. Hopper switch
The hopper switch terminals are marked as shown in
Figure 5. The circuitry of this switch is shown in the chart
below. With the use of a multimeter (ohms setting), the
switch functions may be tested to determine whether
continuity exists between the various terminals for each
switch position. Verify continuity between switch terminals.
SWITCH
POSITION
NORMAL
CIRCUITS
OTHER
CIRCUITS
RAISE
2+1
5+4
MIDDLE
NONE
NONE
LOWER
2+3
5+6
Electrical System
BACK OF SWITCH
Figure 5
Page 4 – 6
Pro Sweep 5200
Brush and Hopper Down Relays
The electrical system of the Pro Sweep 5200 includes
two relays: the brush relay and the hopper down relay.
These relays are identical and are located in the control
box enclosure.
The brush relay is used to de–energize the brush motor
solenoid (S3) when the hopper up/down switch is
pushed to raise. When the brush relay is not energized,
brush motor operation is possible.
Testing
86
85
NOTE: Prior to taking small resistance readings with a
digital multimeter, short the meter test leads together.
The meter will display a small resistance value (usually
0.5 ohms or less). This resistance is due to the internal
resistance of the meter and test leads. Subtract this value from from the measured value of the component you
are testing.
87A
87
30
Figure 6
Electrical
System
The energized hopper down relay allows current to the
brush switch when the hopper down switch is closed
(hopper lowered). If the hopper is raised, the hopper
down relay will not be energized to prevent brush operation.
1. Verify coil resistance between terminals 85 and 86
with a multimeter (ohms setting). Resistance should be
from 70 to 90 ohms.
2. Connect multimeter (ohms setting) leads to relay terminals 30 and 87. Ground terminal 86 and apply +12
VDC to terminal 85. The relay should make and break
continuity between terminals 30 and 87 as +12 VDC is
applied and removed from terminal 85.
3. Disconnect voltage from terminal 85 and multimeter
lead from terminal 87.
4. Connect multimeter (ohms setting) leads to relay terminals 30 and 87A. Apply +12 VDC to terminal 85. The
relay should break and make continuity between terminals 30 and 87A as +12 VDC is applied and removed
from terminal 85.
5. Disconnect voltage and multimeter leads from the
relay terminals.
Pro Sweep 5200
Page 4 – 7
Electrical System
Fuse
The Pro Sweep 5200 uses a single 20 amp fuse for circuit protection. The fuse holder is located in the wiring
harness (Fig. 7).
1
Testing
Remove fuse from the fuse holder for testing. Fuse
should have continuity between fuse terminals.
Figure 7
1. Fuse holder
Diode Assembly
The diode assembly used in the Pro Sweep 5200 allows
current flow to the demand solenoid (S2) when the
brush switch is turned on. Additionally, the diode prevents current flow to the brush motor solenoid (S3) when
the hopper switch is moved to the raise position. The
diode plugs into the wire harness in the control box enclosure.
2
3
Diode Test
1
The diode (Fig. 8) can be tested using a digital multimeter (diode test or ohms setting) and the table to the right.
Figure 8
1. Diode
2. Male terminal
Electrical System
3. Female terminal
Multimeter
Red Lead (+)
on Terminal
Multimeter
Black Lead (–)
on Terminal
Continuity
Female
Male
YES
Male
Female
NO
Page 4 – 8
Pro Sweep 5200
Solenoid Valve Coil
The hydraulic system on the Pro Sweep 5200 uses four
(4) solenoid valve coils on the hydraulic control manifold
(Fig. 9).
2
4
Testing
NOTE: The solenoid does not have to be removed from
the cartridge valve for testing.
1. Make sure tow vehicle ignition switch is in the OFF
position or that Pro Sweep power harness is unplugged
from tow vehicle. Unplug solenoid valve coil electrical
connector.
3
1
2. Apply 12VDC source directly to the solenoid coil. Listen for solenoid to switch on.
3. Remove 12VDC source from the solenoid coil. Listen for solenoid to switch off.
Figure 9
1. Hopper up solenoid (S1)
2. Demand solenoid (S2)
3. Brush solenoid (S3)
4. Down solenoid (S4)
Electrical
System
NOTE: Prior to taking small resistance readings with a
digital multimeter, short the test leads together. The meter will display a small resistance value (usually 0.5
ohms or less). This resistance is due to the internal resistance of the meter and test leads. Subtract this value
from from the measured value of the component you are
testing.
4. Measure resistance between the two coil connector
terminals. Resistance of the solenoid coil should be
approximately 7.6 ohms.
5. If solenoid coil needs replacement, see Solenoid
Valve Coil in the Service and Repairs section of this
chapter.
6. Reconnect electrical connector to the solenoid valve
coil.
Pro Sweep 5200
Page 4 – 9
Electrical System
Hopper Down Proximity Switch
The Pro Sweep 5200 uses a proximity switch as an interlock device to prevent brush operation (rotation) when
the dump hopper is raised. This switch is normally open
and closes when the pitch frame moves the switch cam
near the target end of the switch (dump hopper lowered). The switch is mounted on the main sweeper
frame (Fig. 10).
7
3. Check the continuity of the switch by connecting a
multimeter (ohms setting) across the switch connector
terminals.
NOTE: Before checking switch continuity, clean target
end of switch to make sure that there is no metallic debris on the switch that could prevent correct switch operation.
4
2
8
9
2. Locate hopper down switch. Disconnect switch from
machine wiring harness.
5
3
Testing
1. Position sweeper on a level surface with dump hopper lowered. If sweeper is attached to towing vehicle,
engage vehicle parking brake, stop engine and remove
key from the ignition switch.
6
10
Switch
Target
End
1
11
12
RIGHT
FRONT
13
14
15
Figure 10
1.
2.
3.
4.
5.
6.
7.
8.
4. With the switch cam positioned near the target end
of the switch (dump hopper lowered) (Fig. 11), there
should be continuity across the switch terminals.
9.
10.
11.
12.
13.
14.
15.
Mounting spacer
Spacer
Cap screw
Switch cam
Cam spacer
Flat washer
Cap screw
Flange nut (3 used)
2
1
Switch cam weight
Carriage screw (3 used)
Lock nut (2 used)
Flat washer (2 used)
Hopper down switch
Switch spacer
Cap screw (2 used)
3
1
5. When the switch cam is positioned away from the target end of the switch (dump hopper raised) (Fig. 11),
there should be no continuity across the switch terminals.
IMPORTANT: Proper proximity switch operation requires aluminum switch spacer that positions the
switch away from the sweeper frame. If switch is removed from machine, make sure that switch spacer
is installed between switch and frame.
6. Replace proximity switch as needed. Reconnect
switch to machine wiring harness.
Electrical System
Page 4 – 10
Figure 11
1. Hopper down switch
2. Switch cam: dump hopper lowered
3. Switch cam: dump hopper raised
Pro Sweep 5200
Service and Repairs
Solenoid Valve Coil
A solenoid valve coil on the hydraulic control manifold
(Fig. 12) can be replaced without opening the hydraulic
system.
2
5
Removal
36 in–lb
(4.1 N–m)
1. Position sweeper on a level surface with dump hopper lowered. If sweeper is attached to towing vehicle,
engage vehicle parking brake, stop engine and remove
key from the ignition switch.
2. Disconnect the machine wiring harness electrical
connector from the solenoid coil to be replaced.
36 in–lb
(4.1 N–m)
5
3
5
1
4
3. Remove the nut from the spool assembly.
4. Slide the coil assembly from the spool assembly. Discard the coil assembly.
Electrical
System
5. Clean all corrosion or dirt from the spool assembly.
Installation
1. Slide new coil assembly onto the spool assembly.
2. Install the nut onto the spool assembly and torque
nut 36 in–lb (4.1 N–m) (do not over tighten).
3. Connect the machine wiring harness electrical connector to the solenoid coil.
Pro Sweep 5200
Figure 12
1. Solenoid valve coil (S2)
2. Solenoid valve coil (S3)
3. Solenoid valve coil (S4)
Page 4 – 11
4. Solenoid valve coil (S1)
5. Nut
Electrical System
This page is intentionally blank.
Electrical System
Page 4 – 12
Pro Sweep 5200
Chapter 5
Chassis
Table of Contents
Chassis
SPECIFICATIONS . . . . . . . . . . . . . . . . . . . . . . . . . . . . 2
GENERAL INFORMATION . . . . . . . . . . . . . . . . . . . . . 2
Securing Pro Sweep 5200 to Tow Vehicle . . . . . . 2
SERVICE AND REPAIRS . . . . . . . . . . . . . . . . . . . . . . 3
Wheels . . . . . . . . . . . . . . . . . . . . . . . . . . . . . . . . . . . . 3
Wheel Bearings . . . . . . . . . . . . . . . . . . . . . . . . . . . . . 4
Servicing the Brush Housing . . . . . . . . . . . . . . . . . . 6
Brush . . . . . . . . . . . . . . . . . . . . . . . . . . . . . . . . . . . . . . 8
Brush Housing . . . . . . . . . . . . . . . . . . . . . . . . . . . . . 10
Roller . . . . . . . . . . . . . . . . . . . . . . . . . . . . . . . . . . . . . 12
Frame Assembly . . . . . . . . . . . . . . . . . . . . . . . . . . . 14
Pro Sweep 5200
Page 5 – 1
Chassis
Specifications
Item
Description
Tires
Size
Pressure
26.5 x 14 – 12, 4 Ply, Tubeless
12.5 PSI (.862 Bar)
Wheel Lug Nut Torque
70 to 90 ft–lb (95 to 122 N–m)
General Information
Securing Pro Sweep 5200 to Tow Vehicle
While operating or servicing the Pro Sweep 5200, make
sure that hitch pin is properly positioned in tow vehicle
hitch and sweeper tongue. Hitch pin should be secured
with hairpin clip (Fig. 1).
1
2
Figure 1
1. Hitch pin
Chassis
Page 5 – 2
2. Hairpin clip
Pro Sweep 5200
Service and Repairs
Wheels
1
70 to 90 ft–lb
(95 to 122 N–m)
Chassis
2
RIGHT
FRONT
3
4
Figure 2
1. Main frame
2. Lug nut (5 used per wheel)
3. Wheel and tire assembly
4. Wheel hub
Wheel Removal (Fig. 2)
Wheel Installation (Fig. 2)
1. Position sweeper on a level surface with dump hopper empty and lowered. Have sweeper attached to towing vehicle, engage vehicle parking brake, stop engine
and remove key from the ignition switch. Chock sweeper wheels to prevent sweeper from moving.
1. Position wheel to wheel hub.
WARNING
Failure to maintain proper lug nut torque
could result in failure or loss of wheel and may
result in personal injury.
2. Jack or hoist sweeper from ground and support machine with blocking or jack stands (see Operator’s
Manual and Jacking Instructions in Chapter 1 – Safety).
3. Loosen and remove five (5) lug nuts from wheel to be
removed.
4. Pull wheel from sweeper.
Pro Sweep 5200
2. Secure wheel to sweeper with five (5) lug nuts. Alternately torque lug nuts from 70 to 90 ft–lb (95 to 122
N–m).
3. Lower machine to ground.
Page 5 – 3
Chassis
Wheel Bearings
2
4
See text for
tightening procedure
6
7
1
8
11
3
12
13
5
9
10
Figure 3
1.
2.
3.
4.
5.
Axle
Grease seal
Inner bearing cone
Inner bearing cup
Wheel hub
Chassis
6.
7.
8.
9.
Lug bolt (5 used)
Outer bearing cup
Outer bearing cone
Lug nut (5 used)
Page 5 – 4
10.
11.
12.
13.
Washer
Slotted hex nut
Cotter pin
Dust cup
Pro Sweep 5200
Removal (Fig. 3)
Installation (Fig. 3)
1. Position sweeper on a level surface with dump hopper empty and lowered. Have sweeper attached to towing vehicle, engage vehicle parking brake, stop engine
and remove key from the ignition switch. Chock sweeper wheels to prevent sweeper from moving.
1. Clean all parts thoroughly before reassembly.
2. Assemble wheel hub:
A. If bearing cups were removed from the wheel
hub, press inner and outer cups into the hub until
they seat against the hub shoulder.
2. Jack or hoist sweeper from ground and support machine with blocking or jack stands (see Operator’s
Manual and Jacking Instructions in Chapter 1 – Safety).
B. Pack both bearing cones with grease. Install
greased inner bearing into the cup on inboard side of
the wheel hub.
3. Remove wheel assembly (see Wheel Removal in
this section).
C. Fill hub approximately 50% full of grease.
4. Carefully pry dust cap from wheel hub.
IMPORTANT: The grease seal must be pressed
in so it is flush with the end of the hub. The lip of
the seal must face the bearing.
5. Remove cotter pin from axle spindle.
6. Remove slotted hex nut and washer that secures
wheel hub to spindle. Slide wheel hub with bearings
from spindle.
A. Pull grease seal out of the wheel hub. Discard
seal.
B. Remove bearing cones from both sides of wheel
hub. Clean bearings in solvent. Clean inside of hub.
C. If necessary, remove bearing cups from hub using a hammer and punch.
D. Inspect wheel bearings. Check the bearing cones
and bearing cups for wear, pitting or other damage.
Replace worn or damaged parts.
3. Install the wheel hub onto the axle spindle taking
care to not damage grease seal in wheel hub.
4. Install greased outer bearing cone, washer and
slotted hex nut onto spindle shaft.
5. While rotating the wheel hub by hand, torque the
slotted hex nut from 75 to 180 in-lb (8.5 to 20.3 N–m) to
seat bearings. Loosen nut until it is away from washer
and hub has end play. Finally, while rotating hub, tighten
slotted hex nut from 15 to 20 in–lbs (1.7 to 2.3 N–m).
6. Install cotter pin through axle spindle hole. Install
dust cap to hub.
WARNING
Failure to maintain proper lug nut torque
could result in failure or loss of wheel and may
result in personal injury.
7. Install wheel assembly (see Wheel Installation in this
section).
8. Carefully lower machine to ground.
Pro Sweep 5200
Page 5 – 5
Chassis
Chassis
7. Disassemble wheel hub:
D. Lubricate the inside of a new grease seal and
press it into the wheel hub.
Servicing the Brush Housing
1
4
5
2
RIGHT
3
FRONT
Figure 4
1. Saddle frame
2. Roller
Chassis
3. Hydraulic brush motor
4. Brush
Page 5 – 6
5. Brush housing
Pro Sweep 5200
To perform service on the brush housing, brush assembly or roller, the following procedure can be used. These
steps will reduce the chance that brush housing components will fall or shift during the service process.
1. Position sweeper on a level surface with dump hopper empty and lowered. Have sweeper attached to towing vehicle, engage vehicle parking brake, stop engine
and remove key from the ignition switch. Chock sweeper wheels to prevent sweeper from moving.
2. With brush housing resting on the ground, remove
fasteners that secure component(s) that are to be removed (see Brush, Brush Housing and/or Roller in this
section).
5. Raise hopper and place cylinder stop on lift cylinder
to secure sweeper frame.
6. Perform necessary service on removed component(s).
7. Once necessary service has been completed, position serviced component(s) under raised hopper.
8. Remove cylinder stop from lift cylinder. Slowly lower
hopper to correctly position component(s) to be
installed.
9. Install component(s) to machine (see Brush, Brush
Housing and/or Roller in this section).
Chassis
3. Support component(s) to prevent it (them) from shifting position.
4. Start tow vehicle. Slowly raise sweeper hopper while
allowing brush housing component(s) to remain on the
ground.
Pro Sweep 5200
Page 5 – 7
Chassis
Brush
5
2
3
30
29
4
1
6
7
Antisieze
Lubricant
8
13
9
1
10
11
14
26
15
28
FRONT
19
27
25
5
24
5
23
22
16
17
20
RIGHT
12
14
18
21
5
Loctite #242
125 to 155 in–lb
(14.1 to 17.5 N–m)
Figure 5
1.
2.
3.
4.
5.
6.
7.
8.
9.
10.
Carriage screw
Top rubber shield
Lock nut (2 used)
Top shield plate
Flange nut
Flat washer (2 used)
Carriage bolt (3 used per bearing)
Cap screw
Lock washer
Coupler cover (2 used)
11.
12.
13.
14.
15.
16.
17.
18.
19.
20.
Cap screw (2 used)
Hydraulic brush motor
Coupler jaw
Set screw (2 used per jaw)
Coupler spider
Flat washer (3 used per bearing)
Lock nut (3 used per bearing)
Set screw
Bearing with locking collar
Bearing flange (2 used per bearing)
Removal (Fig. 5)
1. Position sweeper on a level surface with dump hopper empty and lowered. Have sweeper attached to towing vehicle, engage vehicle parking brake, stop engine
and remove key from the ignition switch. Chock sweeper wheels to prevent sweeper from moving.
2. Remove hydraulic brush motor from brush housing
(see Hydraulic Brush Motor Removal in the Service and
Repairs section of Chapter 3 – Hydraulic System). Remove coupler spider (item 15).
Chassis
21.
22.
23.
24.
25.
26.
27.
28.
29.
30.
Side angle plate (2 used)
Side rubber shield (2 used)
Side shield plate (2 used)
Front rubber shield
Front shield plate
Front angle plate
Carriage screw
Square key
Brush
Brush housing
NOTE: If desired, brush housing (with brush installed)
can be removed from sweeper to allow brush removal
(see Brush Housing Removal in this section).
3. Remove carriage bolts (item 7), flat washers (item
16) and lock nuts (item 17) that secure bearing flanges
to brush housing.
4. Refer to Servicing the Brush Housing in this section
for procedure to remove brush from brush housing.
Page 5 – 8
Pro Sweep 5200
5. After raising hopper and placing lift cylinder stop, retrieve brush assembly.
8. Place coupler spider into coupling jaw on brush
shaft.
6. Loosen set screws (item 14) that secure coupling jaw
to brush shaft. Slide coupling jaw from brush. Locate
and retrieve square key from brush shaft.
9. Install hydraulic brush motor to brush housing (see
Hydraulic Brush Motor Installation in the Service and
Repairs section of Chapter 3 – Hydraulic System). Make
sure that coupling jaws have a gap between coupler jaw
valleys from .830” to .930” (21.1 to 23.6 mm). Apply Loctite #242 (or equivalent) to threads of coupling set
screws. Secure coupling jaws to motor shaft and brush
shaft by torquing set screws from 125 to 155 in–lb (14.1
to 17.5 N–m) (Fig. 7).
7. To remove bearing from brush shaft:
A. Loosen set screw that secures locking collar to
shaft.
NOTE: Normal brush rotation is clockwise as
viewed from left side of sweeper.
1
B. Using a punch and hammer, rotate locking collar
in the opposite direction of normal brush rotation to
loosen collar.
C. Slide bearing flanges, locking collar and bearing
from brush shaft.
8. Disassemble brush using Figure 6 as a guide.
6
Installation (Fig. 5)
1. Assemble brush using Figure 6 as a guide.
5
3
4
2
Figure 6
1. Brush
2. Flange nut (4 used)
3. Brush drive (2 used)
4. Retaining ring (4 used)
5. Carriage screw (4 used)
6. Brush axle
3. Position square key in brush shaft. Slide coupling jaw
onto drive end of brush shaft.
5
4. Position brush assembly under raised hopper.
5. Slowly lower hopper to position brush assembly to
brush housing (see Servicing the Brush Housing in this
section).
4
1
Antisieze
Lubricant
NOTE: Normal brush rotation is clockwise as viewed
from left side of sweeper.
Pro Sweep 5200
3
2
6. Secure bearing flanges to brush housing with carriage bolts (item 7), flat washers (item 16) and lock nuts
(item 17). Center brush in brush housing.
7. Using a punch and hammer, rotate locking collar in
the direction of normal brush rotation to tighten collar.
Apply Loctite #242 (or equivalent) to set screw and
torque set screw from 125 to 155 in–lb (14.1 to 17.5
N–m) to secure locking collar to brush shaft.
Antisieze
Lubricant
3
6
7
125 to 155 in–lb
(14.1 to 17.5 N–m)
Loctite #242
Figure 7
1.
2.
3.
4.
Page 5 – 9
Hydraulic brush motor
Key
Coupling jaw
Coupling spider
5. Brush
6. Square key
7. Set screw (2 per jaw)
Chassis
Chassis
2. Clean brush shaft and apply antisieze lubricant to
shaft. Slide bearing flanges, bearing and locking collar
to each end of brush shaft. Do not tighten set screw in
locking collar.
Brush Housing
1
2
3
45 to 55 ft–lb
(61 to 75 N–m)
2
5
4
3
4
7
7
4
4
6
5
RIGHT
8
FRONT
Figure 8
1. Saddle frame
2. Cap screw
3. Lock nut
Chassis
4. Flange bushing
5. Pivot mount
6. Grease fitting (2 used)
Page 5 – 10
7. Thrust washer
8. Brush housing
Pro Sweep 5200
Removal (Fig. 8)
1. Position sweeper on a level surface with dump hopper empty and lowered. Have sweeper attached to towing vehicle, engage vehicle parking brake, stop engine
and remove key from the ignition switch. Chock sweeper wheels to prevent sweeper from moving.
5. Secure pivot mounts to frame with cap screws (item
2) and lock nuts (item 3). Torque lock nuts from 45 to 55
ft–lb (61 to 75 N–m).
3. Support brush housing to prevent it from shifting.
6. Install hydraulic brush motor to brush housing (see
Hydraulic Brush Motor Installation in the Service and
Repairs section of Chapter 3 – Hydraulic System). Make
sure that coupling jaws have a gap between coupler jaw
valleys from .830” to .930” (21.1 to 23.6 mm). Apply Loctite #242 (or equivalent) to threads of coupling set
screws. Secure coupling jaws to motor shaft and brush
shaft by torquing set screws from 125 to 155 in–lb (14.1
to 17.5 N–m) (Fig. 9).
4. Remove cap screws (item 2) and lock nuts (item 3)
that secure pivot mounts to frame.
7. Lubricate grease fittings on pivot mounts (see Operator’s Manual).
2. Remove hydraulic brush motor from brush housing
(see Hydraulic Brush Motor Removal in the Service and
Repairs section of Chapter 3 – Hydraulic System).
5. Refer to Brush Housing Service in this section for
procedure to remove brush housing from saddle frame.
5
6. After raising hopper and placing lift cylinder stop, retrieve brush housing.
Antisieze
Lubricant
3
4
7. Remove pivot mounts from brush housing. Locate
and retrieve thrust washers (item 7) from between pivot
mount and brush housing.
3
2
1
8. If necessary, remove flange bushings from pivot
mounts. Discard bushings if removed.
Antisieze
Lubricant
6
Installation (Fig. 8)
7
2. Place thrust washer and then pivot mount on both
brush housing pins.
3. Position brush housing under raised hopper.
125 to 155 in–lb
(14.1 to 17.5 N–m)
Loctite #242
Figure 9
1.
2.
3.
4.
Hydraulic brush motor
Key
Coupling jaw
Coupling spider
5. Brush
6. Square key
7. Set screw (2 per jaw)
4. Slowly lower hopper to position brush housing to
saddle frame (see Servicing the Brush Housing in this
section).
Pro Sweep 5200
Page 5 – 11
Chassis
Chassis
1. If flange bushings were removed from pivot mounts,
press new bushings fully into mounts.
Roller
ANTISIEZE
LUBRICANT
ANTISIEZE
LUBRICANT
1
2
15
3
2
14
5
5
6
RIGHT
4
5
7
13
8
12
11
FRONT
LOCTITE #242
9
10
125 to 155 in–lb
(14.1 to 17.5 N–m)
Figure 10
1.
2.
3.
4.
5.
Roller scraper
Carriage screw (8 used)
Roller
Brush housing
Flange nut (10 used)
Chassis
6.
7.
8.
9.
10.
Bearing flange (2 used per bearing)
Locking collar (2 used)
Set screw (2 used)
Bearing (2 used)
Lock nut (4 used)
Page 5 – 12
11.
12.
13.
14.
15.
Flat washer (4 used)
Roller adjustment plate (2 used)
Carriage screw (4 used)
Adjuster key (2 used)
Carriage screw (2 used)
Pro Sweep 5200
Removal (Fig. 10)
Installation (Fig. 10)
1. Position sweeper on a level surface with dump hopper empty and lowered. Have sweeper attached to towing vehicle, engage vehicle parking brake, stop engine
and remove key from the ignition switch. Chock sweeper wheels to prevent sweeper from moving.
1. Clean roller shaft ends and apply antisieze lubricant
to shaft ends. Place adjustment plate, bearing flanges,
bearing and locking collar onto each end of roller shaft.
Do not tighten set screws in locking collars.
2. Remove flange nuts and carriage screws that secure
roller scraper to roller adjustment plates. Remove roller
scraper from machine.
IMPORTANT: When fully lowered, the sweeper is
supported by the roller. To service the roller, raise
the sweeper slightly before carefully loosening fasteners that secure roller assembly.
2. Secure bearing flanges to roller adjustment plate
with carriage screws (item 13), flat washers (item 11)
and lock nuts (item 10).
3. Position roller assembly under raised hopper.
4. Slowly lower hopper to position roller assembly to
housing (see Servicing the Brush Housing in this section).
5. Secure adjustment plates and adjuster keys to brush
housing with carriage screws and flange nuts using
location noted during removal.
CAUTION
To prevent personal injury, make sure that roller is supported as it is removed from the machine. Roller weighs approximately 80 pounds
(36.3 kg).
6. Center roller between bearings.
NOTE: Normal roller rotation is counter–clockwise as
viewed from left side of sweeper.
7. Using a punch and hammer, rotate locking collars in
the direction of normal roller rotation to tighten collars.
4. Note location of roller adjustment plates and adjuster
keys for reassembly purposes.
5. Remove flange nuts that secure roller adjustment
plates and adjuster keys to brush housing.
6. Refer to Brush Housing Service in this section for
procedure to remove roller assembly from brush housing.
7. After raising hopper and placing lift cylinder stop, retrieve roller assembly.
8. Apply Loctite #242 (or equivalent) to threads of set
screws (item 8). Install set screws into collars and torque
from 125 to 155 in–lb (14.1 to 17.5 N–m) to secure locking collars to roller shaft.
9. Check that roller is free to rotate and no binding exists.
10.Position roller scraper to machine. Install carriage
screws and flange nuts that secure roller scraper to roller adjustment plates.
11. Check roller height and roller scraper clearance and
adjust if necessary (see Operator’s Manual).
8. To remove bearings from roller:
A. Remove set screw (item 8) that secures locking
collar to roller shaft.
NOTE: Normal roller rotation is counter–clockwise
as viewed from left side of sweeper.
B. Using a punch and hammer, rotate locking collar
(item 7) in the opposite direction of normal roller rotation to loosen collar.
C. Remove carriage screws (item 13), flat washers
(item 11) and lock nuts (item 10) that secure bearing
flanges to roller adjustment plate.
D. Slide bearing flanges, locking collar and bearing
from roller.
Pro Sweep 5200
Page 5 – 13
Chassis
Chassis
3. Support roller to prevent it from shifting.
Frame Assembly
4
18
RIGHT
12
19
17
2
6
4
16
FRONT
4
14
17
12
15
15
6
2
3
3
2
2
1
4
13
4
4
5
11
8
10
9
6
7
7
Figure 11
1.
2.
3.
4.
5.
6.
7.
Main frame
Cap screw
Pivot pin
Lock nut
Pitch frame
Grease fitting
Cap screw
8.
9.
10.
11.
12.
13.
14.
15.
16.
17.
18.
19.
Pivot pin
Tow hook plate
Pivot saddle
Carriage bolt
Pivot pin
Lock nut
Saddle frame
Cap screw
Lift cylinder
Lock nut
Link
Hardened spacer (2 used)
Disassembly (Fig. 11)
Assembly (Fig. 11)
1. Position sweeper on a level surface with dump hopper empty and lowered. Have sweeper attached to towing vehicle, engage vehicle parking brake, stop engine
and remove key from the ignition switch. Chock sweeper wheels to prevent sweeper from moving.
1. Assemble frame using Figure 11 as a guide.
2. Lubricate pivot point grease fittings (see Operator’s
Manual).
2. Disassemble frame as needed using Figure 11 as a
guide.
Chassis
Page 5 – 14
Pro Sweep 5200
Chapter 6
Electrical Diagrams
Table of Contents
3
4
5
6
7
8
9
Electrical
Diagrams
ELECTRICAL SCHEMATIC
Electrical Schematic . . . . . . . . . . . . . . . . . . . . . . . . .
CIRCUIT DRAWINGS
Brush Circuit . . . . . . . . . . . . . . . . . . . . . . . . . . . . . . .
Hopper Dump Circuit . . . . . . . . . . . . . . . . . . . . . . . .
Hopper Lower Circuit . . . . . . . . . . . . . . . . . . . . . . . .
WIRE HARNESS DRAWINGS
Main Wire Harness . . . . . . . . . . . . . . . . . . . . . . . . . .
Control Box Wire Harness . . . . . . . . . . . . . . . . . . . .
Power Wire Harness . . . . . . . . . . . . . . . . . . . . . . . .
Pro Sweep 5200
Page 6 – 1
Electrical Diagrams
This page is intentionally blank.
Electrical Diagrams
Page 6 – 2
Pro Sweep 5200
Pro Sweep 5200
Electrical Schematic
Relays are shown as de–energized
All ground wires are black.
Page 6 – 3
(HOPPER DOWN)
(ENERGIZED)
(ENERGIZED)
(NOT ENERGIZED)
(ENERGIZED)
Pro Sweep 5200
Brush Circuit
Power Current
Control Current
Indicator Current
Page 6 – 4
(HOPPER RAISING)
(NOT ENERGIZED)
(ENERGIZED)
(ENERGIZED)
(ENERGIZED)
Pro Sweep 5200
Hopper Dump Circuit
Power Current
Control Current
Indicator Current
Page 6 – 5
(HOPPER LOWERING)
(NOT ENERGIZED)
(NOT ENERGIZED)
(ENERGIZED)
Pro Sweep 5200
Hopper Lower Circuit
Power Current
Control Current
Indicator Current
Page 6 – 6
GREEN
ORANGE
BROWN
VIOLET
WHITE
BLACK
RED
PINK
YELLOW
GRAY
BLACK
BLACK
BLACK
BLACK
BLACK
BLACK
BLUE
BLACK
Pro Sweep 5200
Main Wire Harness
Page 6 – 7
GRAY
YELLOW
VIOLET
PINK
PINK
VIOLET
PINK
YELLOW
ORANGE
BLACK
PINK
YELLOW
WHITE
BLACK
PINK
PINK
BLACK
BLUE
PINK
BROWN
GRAY
YELLOW
BLACK
GREEN
VIOLET
ORANGE
VIOLET
Pro Sweep 5200
Control Box
Wire Harness
Page 6 – 8
VEHICLE
GROUND
MAIN
HARNESS
VEHICLE
POWER
MAIN HARNESS
BLUE
BRAKE CONTROL HARNESS
BLACK
VEHICLE GROUND
RED
FUSIBLE LINK
VEHICLE POWER
Pro Sweep 5200
Power Wire Harness
Page 6 – 9