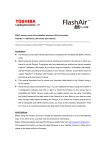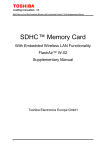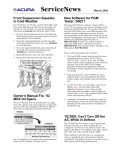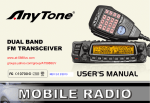
1
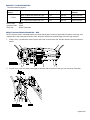
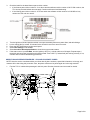
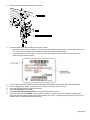
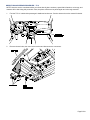
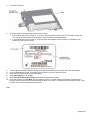
Service Bulletin
May 13, 2015
15-017
01621 Version 1
AcuraLink® System Status Indicator Is Red and DTC B1403 Will Not
Clear
AFFECTED VEHICLES
Year
Model
Trim Level
VIN Range
2014
MDX
ALL with navigation
ALL
2015
MDX
2WD with navigation
5FRYD3…FB000001 thru 5FRYD3…FB007880
SH-AWD with navigation
5FRYD4…FB000001 thru 5FRYD4…FB018838
2014–15
RLX
ALL with navigation
ALL
2014
RLX Sport Hybrid
ALL with navigation
ALL
2WD L4 with navigation
19UUB1…FA000001 thru 19UUB1…FA007105
2WD V6 with navigation
19UUB2…FA000001 thru 19UUB2…FA009308
SH-AWD V6 with navigation
19UUB3…FA000001 thru 19UUB3…FA001517
2015
TLX
SYMPTOM
The AcuraLink system status indicator changes from green to red and DTC B1403 (telematics GPS receiver error) will
not clear.
POSSIBLE CAUSES
The TCU (telematics control unit) has an intermittent failure that causes a loss of GPS location.
CORRECTIVE ACTION
Inspect the TCU and, if necessary, replace it.
PARTS INFORMATION
Model
Part Name
Part Number
Quantity
MDX
Telematics Control Unit
39770-TZ5-A52
1
RLX
Telematics Control Unit
39770-TY2-A01
1
TLX
Telematics Control Unit
39770-TZ3-A51
1
CLIENT INFORMATION: The information in this bulletin is intended for use only by skilled technicians who have the proper tools, equipment, and
training to correctly and safely maintain your vehicle. These procedures should not be attempted by “do-it-yourselfers,” and you should not assume
this bulletin applies to your vehicle, or that your vehicle has the condition described. To determine whether this information applies, contact an
authorized Acura automobile dealer.
© 2015 American Honda Motor Co., Inc. – All Rights Reserved
Page 1 of 6
WARRANTY CLAIM INFORMATION
The normal warranty applies.
Operation
Number
1215A6
Description
Flat Rate Time
Template ID
Failed Part
Number
MDX – Inspect and replace the TCU
0.3 hr
15-017N
39770-TZ5-A52
RLX – Inspect and replace the TCU
0.3 hr
15-017P
39770-TY2-A01
TLX – Inspect and replace the TCU
0.4 hr
15-017Q
39770-TZ3-A51
Defect Code:
03217
Symptom Code:
03214
Skill Level:
Repair Technician
INSPECTION AND REPAIR PROCEDURE – MDX
NOTE: Have the service consultant advise your client that all phone numbers, speed dial information, voice tags, and
contacts will be lost during this procedure. Also, the phone will have to be paired again and voice tags restored.
1. Find the TCU. It is behind the center console side cover on the driver’s side. See the electronic service manual for
details.
2. Pull the cover to the side without damaging the harness and connectors so that you can access the TCU label.
Page 2 of 6
3.
Check the label for the latest Visteon part revision number.
• If the Visteon part revision number is 13 or above and the software revision number is 02.07.000 or above, the
TCU is okay and this bulletin does not apply. Continue with normal troubleshooting.
• If the Visteon part revision number is 12 or less and/or the software revision number is 02.06.000 or less,
replace the TCU and go to step 4.
4.
5.
6.
7.
8.
9.
Turn the ignition to ON and park the vehicle in an open area away from trees, power lines, and tall buildings.
Let the vehicle idle for at least 15 minutes for the AcuraLink service to return to normal.
Press the SETTINGS button on the control panel.
Select Info Settings on the ODMD.
Select AcuraLink Subscription Status to show the current contract status.
If the status comes up as No Data, turn the ignition to OFF for 1 minute and then to ON again. Repeat steps 4
through 8 and check that AcuraLink and AcuraLink Real-Time Traffic™ (if subscribed) are working correctly. If not,
continue with normal troubleshooting procedures.
INSPECTION AND REPAIR PROCEDURE – RLX AND RLX SPORT HYBRID
NOTE: Have the service consultant advise your client that all phone numbers, speed dial information, voice tags, and
contacts will be lost during this procedure. Also, the phone will have to be paired again and voice tags restored.
1.
Find the TCU. It is behind the passenger’s side kick panel. See the electronic service manual for details.
Page 3 of 6
2.
Remove the screws and disconnect the connectors.
3.
Check the label for the latest Visteon part revision number.
• If the Visteon part revision number is 13 or above and the software revision number is 02.07.000 or above, the
TCU is okay and this bulletin does not apply. Continue with normal troubleshooting.
• If the Visteon part revision number is 12 or less and/or the software revision number is 02.06.000 or less,
replace the TCU and go to step 4.
4.
5.
6.
7.
8.
9.
Turn the ignition to ON and park the vehicle in an open area away from trees, power lines, and tall buildings.
Let the vehicle idle for at least 15 minutes for the AcuraLink service to return to normal.
Press the SETTINGS button on the control panel.
Select Info Settings on the ODMD.
Select AcuraLink Subscription Status to show the current contract status.
If the status comes up as No Data, turn the ignition to OFF for 1 minute and then to ON again. Repeat steps 4
through 8 and check that AcuraLink and AcuraLink Real-Time Traffic™ (if subscribed) are working correctly. If not,
continue with normal troubleshooting procedures.
Page 4 of 6
INSPECTION AND REPAIR PROCEDURE – TLX
NOTE: Have the service consultant advise your client that all phone numbers, speed dial information, voice tags, and
contacts will be lost during this procedure. Also, the phone will have to be paired again and voice tags restored.
1.
Find the TCU. It is behind the passenger’s dashboard undercover. See the electronic service manual for details.
2.
Remove the two bolts, then remove the bracket and disconnect the connectors.
Page 5 of 6
3.
Locate the TCU label.
4.
Check the label for the latest Visteon part revision number.
• If the Visteon part revision number is 11 or above and the software revision level is 01.05.000 or above, the
TCU is okay and this bulletin does not apply. Continue with normal troubleshooting.
• If the Visteon part revision number is 10 or less and/or the software revision number is 01.04.000 or less,
replace the TCU and go to step 5.
5.
6.
7.
8.
9.
10.
Turn the ignition to ON and park the vehicle in an open area away from trees, power lines, and tall buildings.
Let the vehicle idle for at least 15 minutes for the AcuraLink service to return to normal.
Press the SETTINGS button on the control panel.
Select Info Settings on the ODMD.
Select AcuraLink Subscription Status to show the current contract status.
If the status comes up as No Data, turn the ignition to OFF for 1 minute and then to ON again. Repeat steps 6
through 10 and check that AcuraLink and AcuraLink Real-Time Traffic™ (if subscribed) are working correctly. If not,
continue with normal troubleshooting procedures.
END.
Page 6 of 6