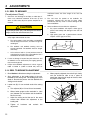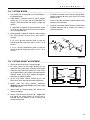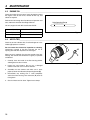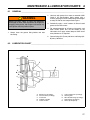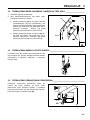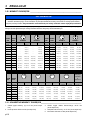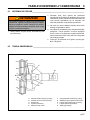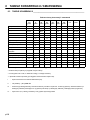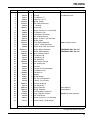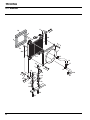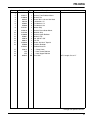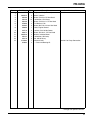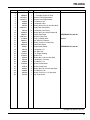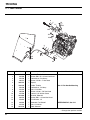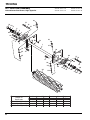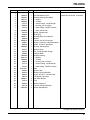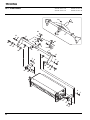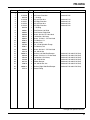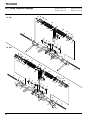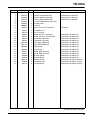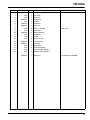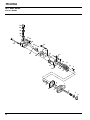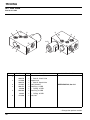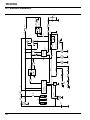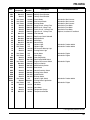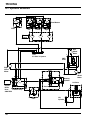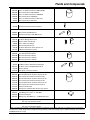
1
4189623-Rev.A-PL
6
5
9
11
16
15
13
7
8
18
1 - INCLUDES ITEMS 3 - 16
17
19
3
10
4
Parts & Maintenance Manual
Instrukcja części zamiennych i konserwacji
Tri King® Triplex Mower with ROPS
Kosiarka Tri King® z trzema bębnami i pałąkiem ROPS
67069 – Kubota D722-E3B Engine
67069 – Silnik Kubota D722-E3B
WARNING
WARNING: If incorrectly used this machine can cause severe
injury. Those who use and maintain this machine should be
trained in its proper use, warned of its dangers and should
read the entire manual before attempting to set up, operate,
adjust or service the machine.
OSTRZEŻENIE
OSTRZEŻENIE: Przy niewłaściwym użytkowaniu opisywana
maszyna może być przyczyną wielu poważnych zagrożeń.
Osoby korzystające z maszyny i przeprowadzające prace
konserwacyjne powinny być przeszkolone pod względem jej
prawidłowego użycia, zapoznać się z możliwymi zagrożeniami
oraz przeczytać całą instrukcję przed jej rozruchem,
uruchomieniem, regulacją lub konserwacją.
When Performance Matters.™
GB
PL
United
Kingdom
Poland
FOREWORD
This manual contains adjustment, maintenance,
troubleshooting instructions and parts list for your new
Jacobsen machine. This manual should be stored with
the equipment for reference during operation.
The serial plate is located on the left rear frame rail.
Jacobsen recommends you record these numbers below
for easy reference.
Before you operate your machine, you and each operator
you employ should read the manual carefully in its
entirety. By following the safety, operating and
maintenance instructions, you will prolong the life of your
equipment and maintain its maximum efficiency.
If additional information is
Jacobsen Dealer.
® P.O. BOX 7708,
A Textron Company
CHARLOTTE,
NC 28241, USA
Jacobsen.com
1-800-848-1636 (US)
kg
kg
kg
kW
needed, contact your
Suggested Stocking Guide
To Keep your Equipment fully operational and productive, Jacobsen suggests you maintain a stock of the more
commonly used maintenance items. We have included part numbers for additional support materials and training aids.
To order any of the following material:
1. Write your full name and complete address on your
order form.
2. Explain where and how to make shipment:
❑ UPS
❑ Regular Mail
❑ Overnight
❑ 2nd Day
3. Order by the quantity desired, the part number, and
the description of the part.
4. Send or bring the order to your authorized Jacobsen
Dealer.
Service Parts
Qty. Part No.
Description
Qty. Part No.
550489 Fuel Filter, Diesel Engine
5000913 Air Filter, Diesel Engine
502644 Oil Filter, Diesel Engine
Description
549579 Hydraulic Oil Filter (2 Req’d)
3001950 Pump Drive Belt
1001958 Ignition Key Switch
Service Support Material
Qty. Part No.
4189624
4189623
4189622
4191622
Qty. Part No.
Description
Description
4171674 Service Manual
Safety & Operation Manual
Parts & Maintenance
Engine Parts Catalog
DVD, Operator Training
Proposition 65 Warning
© Copyright 2009, Jacobsen A Textron Company. “All rights
reserved, including the right to reproduce this material or portions
thereof in any form.”
2
LITHO IN U.S.A. 9-2009
This product contains or emits
chemicals known to the State of
California to cause cancer and birth
defects or other reproductive harm.
Table of Contents
1 Safety
1.1
Operating Safety ........................................... 4
1.2
Important Safety Notes ................................. 5
2 Specifications
2.1
Product Identification .................................... 6
2.2
Engine ........................................................... 6
2.3
Cutting Units: ................................................ 6
2.4
Mower ........................................................... 6
2.5
Weights and Dimensions .............................. 7
2.6
Accessories & Support Literature ................. 7
3 Adjustments
3.1
General ......................................................... 8
3.2
Fan Belt ......................................................... 8
3.3
Pump Drive Belt ............................................ 8
3.4
Neutral and 3WD Switches ........................... 9
3.5
Parking Brake Switches ................................ 9
3.6
Lift Limit Switch ............................................. 9
3.7
Traction Pedal Neutral ................................ 10
3.8
Traction Pedal Forward Stop ...................... 10
3.9
Lift / Lower Pedal Stop ................................ 10
3.10 Parking Brake ............................................. 11
3.11 Rear Lift Arm ............................................... 11
3.12 Down Pressure ........................................... 11
3.13 Reel To Bedknife ........................................ 12
3.14 Reel to Bedknife Adjustment ....................... 12
3.15 Cutting Modes ............................................. 13
3.16 Cutting Height Adjustment .......................... 13
3.17 Removing the Cutting Unit .......................... 14
3.18 Cutting Height - Fixed Mode ....................... 14
3.19 Cutting Height - Floating Mode ................... 15
3.20 Torque Specification ................................... 16
3.21 Specific Torque ............................................16
4 Maintenance
4.1
General ........................................................ 17
4.2
Engine ..........................................................17
4.3
Engine Oil ....................................................18
4.4
Air Filter .......................................................18
4.5
Fuel ..............................................................19
4.6
Fuel System .................................................19
4.7
Battery .........................................................19
4.8
Jump Starting ...............................................20
4.9
Charging Battery ..........................................20
4.10 Hydraulic Hoses ...........................................20
4.11 Hydraulic Oil ................................................21
4.12 Hydraulic Oil Filters ......................................21
4.13 Electrical System .........................................21
4.14 Muffler and Exhaust .....................................22
4.15 Tires .............................................................22
4.16 Wheel Mounting Procedure .........................22
4.17 Care and Cleaning .......................................23
4.18 Radiator .......................................................23
4.19 Backlapping .................................................24
4.20 Storage ........................................................25
5 Troubleshooting
5.1
General ........................................................ 26
6 Maintenance & Lubrication Charts
6.1
General ........................................................ 27
6.2
Lubrication Chart .........................................27
6.3
Maintenance Charts .....................................28
7 Parts Catalog
7.1
Table Of Contents........................................ 29
3
1
1
1.1
SAFETY
SAFETY
OPERATING SAFETY ______________________________________________________
! WARNING
EQUIPMENT OPERATED IMPROPERLY OR BY UNTRAINED PERSONNEL CAN BE DANGEROUS.
Familiarize yourself with the location and proper use of all controls. Inexperienced operators should receive
instruction from someone familiar with the equipment before being allowed to operate the machine.
1. Safety is dependent upon the awareness, concern,
and prudence of those who operate or service the
equipment. Never allow minors to operate any
equipment.
11. Never operate equipment that is not in perfect working
order or is without decals, guards, shields, discharge
deflectors, or other protective devices securely fastened
in place.
2. It is your responsibility to read this manual and all
publications associated with this equipment (Safety
and Operation Manual, Engine Manual, and
attachments/accessories instruction sheets). If the
operator cannot read English it is the owner’s
responsibility to explain the material contained in this
manual to them.
12. Never disconnect or bypass any switch.
3.
Learn the proper use of the machine, the location and
purpose of all the controls and gauges before you
operate the equipment. Working with unfamiliar
equipment can lead to accidents.
4.
Never allow anyone to operate or service the machine
or its attachments without proper training and
instructions; or while under the influence of alcohol or
drugs.
5.
Wear all the necessary protective clothing and personal
safety devices to protect your head, eyes, ears, hands,
and feet. Operate the machine only in daylight or in
good artificial light.
6.
Evaluate the terrain to determine what accessories and
attachments are needed to properly and safely perform
the job. Only use accessories and attachments
approved by Jacobsen.
7.
Stay alert for holes in the terrain and other hidden
hazards.
8.
Inspect the area where the equipment will be used.
Pick up all the debris you can find before operating.
Beware of overhead obstructions (low tree limbs,
electrical wires, etc.) and also underground obstacles
(sprinklers, pipes, tree roots, etc.). Enter a new area
cautiously. Stay alert for hidden hazards.
9.
Never direct discharge of material toward bystanders,
nor allow anyone near the machine while in operation.
The owner/operator can prevent and is responsible for
injuries inflicted to themselves, to bystanders, and
damage to property.
10. Do not carry passengers. Keep bystanders and pets a
safe distance away.
13. Do not change the engine governor setting or
overspeed the engine.
14. Carbon monoxide in the exhaust fumes can be fatal
when inhaled. Never operate the engine without proper
ventilation or in an enclosed area.
15. Fuel is highly flammable; handle with care.
16. Keep the engine clean. Allow the engine to cool before
storing and always remove the ignition key.
17. Disengage all drives and engage parking brake before
starting the engine (motor). Start the engine only when
sitting in operator’s seat, never while standing beside
the unit.
18. Equipment must comply with the latest federal, state,
and local requirements when driven or transported on
public roads. Watch out for traffic when crossing or
operating on or near roads.
19. Local regulations may restrict the age of the operator.
20. Operate the machine up and down the face of slopes
(vertically), not across the face (horizontally).
21. To prevent tipping or loss of control, do not start or stop
suddenly on slopes. Reduce speed when making sharp
turns. Use caution when changing directions.
22. Always use the seat belt when operating mowers
equipped with a Roll Over Protective Structure (ROPS).
Never use a seat belt when operating mowers
without a ROPS.
Accessory operator protective structures will
continue to be offered for all equipment currently
covered. This allows for the outfitting of any
machines without previous ROPS installations or
replacement of damaged structures.
23. Keep legs, arms, and body inside the
compartment while the vehicle is in motion.
seating
24. Disconnect battery and controller electrical connectors
before performing any welding on this mower.
This machine is to be operated and maintained as specified in this manual and is intended for the professional
maintenance of specialized turf grasses. It is not intended for use on rough terrain or long grasses.
4
SAFETY
1.2
1
IMPORTANT SAFETY NOTES ________________________________________________
This safety alert symbol is used to alert you to potential hazards.
DANGER - Indicates an imminently hazardous situation which, if not avoided, WILL result in death or serious injury.
WARNING - Indicates a potentially hazardous situation which, if not avoided, COULD result in death or serious
injury.
CAUTION - Indicates a potentially hazardous situation which, if not avoided, MAY result in minor or moderate injury
and property damage. It may also be used to alert against unsafe practices.
NOTICE - Indicates a potentially hazardous situation which, if not avoided, MAY result in property damage. It may
also be used to alert against unsafe practices.
For pictorial clarity, some illustrations in this manual may show shields, guards or plates open or removed. Under no
circumstances should this equipment be operated without these devices securely fastened in place.
! WARNING
The Interlock System on this mower prevents the mower from starting unless
the brake lever is engaged, reel switch is off, and traction pedal is in Neutral.
The system will stop the engine if the operator leaves the seat without
engaging the parking brake or setting the reel switch off.
NEVER operate mower unless the Interlock System is working.
! WARNING
1. Before leaving the operator’s position for any reason:
a.
b.
c.
d.
e.
Return traction pedal to Neutral.
Disengage all drives.
Lower all implements to the ground.
Engage parking brake.
Stop engine and remove the ignition key.
2. Keep hands, feet, and clothing away from moving parts. Wait for all
movement to stop before you clean, adjust, or service the machine.
3. Keep the area of operation clear of all bystanders and pets.
4. Never carry passengers, unless a seat is provided for them.
5. Never operate mowing equipment without the discharge deflector
securely fastened in place.
By following all instructions in this manual, you will prolong the life of your machine and maintain its maximum
efficiency. Adjustments and maintenance should always be performed by a qualified technician.
If additional information or service is needed, contact your Authorized Jacobsen Dealer who is kept informed of the
latest methods to service this equipment and can provide prompt and efficient service.
5
2
2
2.1
SPECIFICATIONS
SPECIFICATIONS
PRODUCT IDENTIFICATION _________________________________________________
67069 .............................. Tri-King Mower, 3-WD, 17.7 hp
diesel engine with ROPS. Without
front lift arms or mowers.
® P.O. BOX 7708,
A Textron Company
CHARLOTTE,
NC 28241, USA
Jacobsen.com
1-800-848-1636 (US)
Serial Number ................ An identification plate, like the one
shown, listing the serial number, is
attached to the frame of the
mower and is located to the
operator’s left just behind the front
wheel motor. Always provide the
serial number of the unit when
ordering replacement parts or
requesting service information.
619
kg
Note: Actual sustained horsepower will likely be lower
than listed in specifications due to operating limitations
and environmental factors
Displacement .................. 43.88 cu. in. (719 cc)
Torque ............................. 26 ft. lbs. (35 Nm) @ 2600 rpm
Fuel:
Type .......................... No. 2 Low or Ultra-Low Sulfur
Diesel
Rating ....................... Min. Cetane rating 45
TRI-KING
Product
EEC Sound
Power
Sound Pressure
Level
Operator Ear
Arms
Body
99 dba
86.4 dba
7.72
0.016
Vibration M/S2
Capacity.................... 6.5 U.S. Gal. (24.6 liters)
Governor......................... Ball Type Governor
Low Idle ................... 1450 RPM
High Idle ................... 3400 RPM
Lubrication:
Capacity.................... 3.4 quarts (3.2 liter) with filter
Type .......................... SAE 20W, SAE 30W
API Classification ..... CD, CE
Air Filter .......................... Dry type with evacuator valve and
service indicator
Alternator........................ 40 amp
26 in. Reels............... 72 in. (1828 mm)
30 in. Reels............... 84 in. (2134 mm)
Overall Width:
26 in. Reels............... 78.5 in. (1994 mm)
30 in. Reels............... 90.5 in. (2298 mm)
Cutting Frequency:
7 Blade ..................... 0.151 in./mph (3.8 mm/kph)
MOWER _________________________________________________________________
Tires:
Front ......................... 20 x 10 - 10 tubeless
Rear ......................... 20 x 10 - 8 tubeless
Pressure:
Front.......................... 10-12 psi (0.69-0.82 BAR)
Rear .......................... 8-10 psi (0.55-0.69 BAR)
Battery:
Type .......................... 12 Volt Lead/Acid
Group ........................ 22 NF
Parking Brake ................. Mechanical front wheel disk
Hand lever actuated
6
67069
1651
CUTTING UNITS: __________________________________________________________
Reel ................................ 3 Reels, 26 in. (660 mm) wide or,
3 Reels, 30 in. (762 mm) wide.
Reel Diameter................. 7 in. (178 mm)
Bearings.......................... Self adjusting tapered roller
bearings
Blade Options ................. 7 blades
Cutting Width:
2.4
XXXX
kW
ENGINE__________________________________________________________________
Make ............................... Kubota
Model .............................. D722-E3B
Horsepower..................... 17.7 hp (13.2 kW) @ 3200 rpm
2.3
kg
RIDING GREENS MOWERS
67069
2.2
13.2
kg
Speed:
Mow ......................... 0 - 5 mph (8 kph)
Transport ................. 0 - 8.5 mph (13.7 kph)
Reverse .................... 0 - 2.3 mph (3.7 kph)
Hydraulic System:
Capacity.......................... 5.5 U.S. gal. (20.8 liters) System
Fluid Type ....................... GreensCare 68 Biodegradable
Charge Filter................... 10 micron
Return Line Filter............ 10 micron
Steering ......................... Hydrostatic power steering
SPECIFICATIONS
2.5
WEIGHTS AND DIMENSIONS ________________________________________________
Dimensions:
Inches
(mm)
Length ............................................................. 99 (2519)
Height........................................................... 51.5 (1308)
Width - Wheel .............................................. 64.5 (1638)
2.6
2
Weights:...................................................... Lbs.
67069 (Base Mower, No Reels) .................. 1445
(kg)
(655)
ACCESSORIES & SUPPORT LITERATURE _____________________________________
Contact your area Jacobsen Dealer for a complete listing of accessories and attachments.
! CAUTION
Use of other than Jacobsen authorized parts and accessories may cause personal injury or damage to the
equipment.
Accesories
Air Blow Gun ........................................................... JAC5098
Orange Touch-up Paint (12 oz. spray) ...................... 554598
2-Post ROPS with Seat Belt........................................ 69157
Light Kit ....................................................................... 69149
Arm Rest ................................................................. 4139431
Grass Catchers for 26 in. Reel.................................... 69151
Grass Catchers for 30 in. Reel.................................... 69150
600 RPM Reel Kit (Diesel Units)............................. 5003062
Down Pressure Kit .................................................. 1002588
Reels
7 Blade, 26 in. Left Hand Reel .................................... 67114
7 Blade, 26 in. Right Hand Reel.................................. 67115
7 Blade, 26 in. Center Reel ......................................... 67116
7 Blade, 30 in. Left Hand Reel .................................... 67123
7 Blade, 30 in. Right Hand Reel.................................. 67124
7 Blade, 30 in. Center Reel ......................................... 67125
Vertical Mower, 26 in. Left Hand ................................. 67139
Vertical Mower, 26 in. Right Hand ............................... 67140
Vertical Mower, 26 in. Center ...................................... 67141
Rollers
Grooved Front Roller (Steel) for 26 in. Reel.................67731
Grooved Front Roller (Steel) for 30 in. Reel.................67729
Solid Roller for 26 in. Reel .........................................132639
Solid Roller for 30 in. Reel .........................................132640
Grooved Front Roller Scraper for 26 in. Reel...............69147
Grooved Front Roller Scraper for 30 in. Reel...............69148
Rear Roller Scraper for 26 in. Reel..............................67909
Rear Roller Scraper for 30 in. Reel..............................67910
Support Literature
Safety & Operation Manual......................................4189624
Parts & Maintenance Manual...................................4189623
Diesel Engine Parts Catalog....................................4189622
Operator Training DVD.............................................4191622
Service & Repair Manual.........................................4171674
7
3
3
ADJUSTMENTS
ADJUSTMENTS
3.1
GENERAL________________________________________________________________
! WARNING
To prevent injury, lower implements to the ground,
disengage all drives, engage parking brake, stop engine,
and remove key from ignition switch before making any
adjustments or performing maintenance.
adjustment cannot be made, contact an authorized
Jacobsen Dealer.
2.
Replace, do not adjust, worn or damaged components.
3.
Do not wear jewelry or loose fitting clothing when
making adjustments or repairs.
! CAUTION
Make sure the mower is parked on a solid and level
surface. Never work on a mower that is supported only
by the jack. Always use jack stands.
If only the front or rear of the mower is raised, place
chocks in front of and behind the wheels that are not
raised.
1.
3.2
Adjustments and maintenance should always be
performed by a qualified technician. If proper
Be careful to prevent entrapment of the hands and
fingers between moving and fixed components of the
machine.
4.
Do not change governor settings or overspeed the
engine.
FAN BELT________________________________________________________________
Inspect and adjust new belt after first ten hours of
operation. Adjust every 100 hours thereafter.
1. Adjust alternator pulley so belt (B) deflects 9/32 to
11/32 in. (7 to 9 mm) with a 22 lb. (10 kg) push at
midspan between pulleys.
A
2. If tension is incorrect, loosen alternator mounting
bolts (A), and adjust alternator until proper belt
tension is achieved. Tighten hardware (A).
B
Figure 3A
3.3
PUMP DRIVE BELT ________________________________________________________
Adjust reel pump belt (C) to deflect 1/4 in. (6 mm) with a
force of 5-7 lb. (2-3 kg) applied at midspan.
1. Loosen hardware (D and E).
E
2. Move pump/clutch assembly down to increase
tension on belt (C) then tighten hardware (D and E).
3. Torque hardware (D and E) to 27 - 33 ft. lb. (37-45
Nm).
D
C
D
Diesel Engine
Gasoline En
Figure 3B
8
ADJUSTMENTS
3.4
3
NEUTRAL AND 3WD SWITCHES _____________________________________________
1. Check traction pedal adjustment.
2. Use a volt/ohm meter to determine when switch
opens or closes.
G
a. Adjust switch (G) so “finger” of actuating arm (F)
is centered over sensing portion of switch.
Switch contacts should be closed with traction
pedal in neutral and open with minimal pedal
travel in forward or reverse direction.
b.
Adjust 3WD switch (H) so contacts are open with
traction pedal in neutral, and contacts close with
minimal pedal travel in forward direction.
F
H
Figure 3C
3.5
PARKING BRAKE SWITCHES________________________________________________
Loosen screws (K) and adjust both switches so contacts
just close as the brake lever is moved to the engaged
position then tighten screws.
K
Figure 3D
3.6
LIFT LIMIT SWITCH ________________________________________________________
The lift limit switch must be adjusted so the reels stop
turning before the cutting plane between the reel and
ground reach 15-3/4 in. (400 mm). To adjust, loosen
screw (L), and adjust arm (M).
L
M
Figure 3E
9
3
ADJUSTMENTS
3.7
TRACTION PEDAL NEUTRAL________________________________________________
1. If the mower “creeps” in either direction when the
engine is running, but the traction pedal is not
depressed, adjust spring tension so that the pedal
always returns to neutral when released.
a. Lock rear nuts and adjust front nuts (N) to
maintain 3/8 in. (9 mm) of extension in spring
(O).
b.
Note: The mower may “creep” when the hydraulic oil
is cold. Operate the mower for 15 minutes before
determining if adjustment is required.
Start the engine and check for “creep” then
repeat the process if necessary.
Front
2. Use extreme caution when making this adjustment
as the wheels will be off the ground and the engine
will be running.
O
3. Engage parking brake, stop the engine, open hoods,
then lubricate all linkage pivot points.
4. Chock the rear wheel, and place the front of the
mower on jackstands.
N
N
5. Loosen all nuts (N) and adjust rear spring to
position traction arm in neutral.
3.8
Figure 3F
TRACTION PEDAL FORWARD STOP__________________________________________
Loosen nuts (P) move the traction pedal to its maximum
forward position. Adjust screw (Q) until the head just
touches the traction pedal arm. Return traction pedal to
neutral and turn screw (Q) out one full turn. Tighten nuts
(P).
Important: Screw (Q) must stop traction pedal before the
internal stops in the hydrostatic transmission are
contacted.
P
Q
P
Figure 3G
3.9
LIFT / LOWER PEDAL STOP_________________________________________________
Adjust bolts (R and S) to stop spool valve from hitting the
internal stops, while maintaining the full stroke of the
spool.
S
R
Figure 3H
10
ADJUSTMENTS
3
3.10 PARKING BRAKE__________________________________________________________
1. Check linkage cables and pivots to ensure they are
operating smoothly.
2. Park the mower on a 30% slope (16.7°) near the
bottom of the hill, with the front of the mower facing
downhill. Engage the parking brake and stop the
engine.
! CAUTION
DO NOT disengage the brakes with the engine off.
a. The mower should stay on the hill without
creeping.
3. With parking brake disengaged, turn adjusting knob
in a clockwise direction, applying and releasing
brake every quarter turn, until a definite “snap over
center” action is achieved.
b.
4. Repeat the test on the hill if required.
If the brakes do not hold, start the engine,
disengage the brake, and drive to the bottom of
the hill.
Note: Over adjustment causes hard lever action, but
does not increase brake efficiency.
3.11 REAR LIFT ARM ___________________________________________________________
1. Rear lift arm position is properly adjusted when the
rear mower bumpers are putting slight pressure
against the underside of the foot rests.
2. Disconnect lift chain (T) from crank and adjust ball
joint (U) as required.
T
U
Figure 3I
3.12 DOWN PRESSURE _________________________________________________________
1. Place mowers in the Fixed Mode (Section 3.18) and
lower the mowers onto a scale, capable of weighing
250 lb. (113 kg). The rear roller of the mower must
rest on the scale.
V
2. To adjust pressure on rear mower loosen nuts (V)
and adjust to obtain the desired pressure.
3. To adjust pressure on front mowers, loosen nut (W)
and adjust bolt (X). Minimum thread engagement
should be 1/2 in. (13 mm).
4. To maintain a consistent height of cut, the down
pressure should be adjusted evenly on all three
mowers.
5. Jacobsen, recommends the mower weight for
Floating Mode at 60 lb. (27 kg), and for Fixed Mode
at 90 lb. (41 kg).
Figure 3J
X
W
Figure 3K
11
3
ADJUSTMENTS
3.13 REEL TO BEDKNIFE _______________________________________________________
(Pre-adjustment Check)
1.
Check the reel bearings for end play or radial play. If
there is any abnormal movement of the reel, up and
down or side to side, adjust or replace components as
needed.
! CAUTION
maintained across the entire length of the reel and
bedknife.
5.
The reel must be parallel to the bedknife. An
improperly adjusted reel will lose its sharp edges
prematurely and may result in serious damage to the
reel and bedknife.
6.
Grass conditions will also affect the adjustment.
a.
Dry, sparse conditions will require a wider gap to
prevent heat buildup and damage to the reel and
bedknife.
b.
High quality grass with a good moisture content
requires a closer gap (near zero).
To prevent personal injury and damage to the cutting
edges, handle the reel with extreme care.
2.
Inspect the reel blades and bedknife to insure good
sharp edges without bends or nicks.
a.
The cutting edges of the reel blades and bedknife
must be sharp, free of burrs, and show no signs of
rounding off.
b.
The bedknife and bedknife backing must be
securely tightened. The bedknife must be straight
and sharp.
c.
93°
5 -6 °
5/32 in.
A flat surface of 5/32 in. (4 mm) minimum must be
maintained on the front face of the bedknife. Use a
standard flat file to dress the bedknife.
3.
If wear or damage is beyond the point where the reel
or bedknife can be corrected by the lapping process,
they must be reground.
4.
Proper reel-to-bedknife adjustment is critical. A gap of
0.001 to 0.003 in. (0.025 to 0.076 mm) must be
Figure 3L
Leading
Edge of Reel
Normal
Rotation
3.14 REEL TO BEDKNIFE ADJUSTMENT __________________________________________
1. Read Section 3.13 before making the adjustment.
2. Start adjustment at the leading edge of the reel,
followed by the trailing end. The leading end of the
blade is the end that passes over the bedknife first
during normal rotation.
e.
When properly adjusted, the reel will spin freely,
and you should be able to cut a piece of
newspaper along the full length of the reel, when
the paper is held at 90°.
3. Loosen nut (C) 1/4 turn on both ends of the cutting
unit.
A
a. Turn adjuster (A) in 1/16 to 1/8 turn increments.
b.
Slide a feeler gauge or shim stock.001 in. (.025
mm) between the reel blade and the bedknife.
Do not turn reel.
c.
Adjust the trailing end of the reel in the same
manner then recheck the adjustment at the
leading end.
d. Tighten all
adjustment.
12
hardware
and
recheck
the
G
F
E
B
C
D
Figure 3N
A D J U S T M E N T S
3
3.15 CUTTING MODES__________________________________________________________
1. The mower may be operated in the Fixed Mode or
the Floating Mode.
2. Fixed Mode is generally used for cutting heights
greater than 1 in. (25 mm) and the mower does not
require a front roller unless the terrain is rough and
uneven.
If a front roller is required, the roller should be raised
1/4 in. (6 mm) higher than the rear roller and used for
anti-scalp purposes only.
4. To convert the mower from Fixed to Floating Mode,
remove hardware (H) from each side of the three
mower frames.
Install a front roller and store hardware (H) for future
conversion to fixed mode.
5. To convert the mower from Floating to Fixed Mode,
assemble hardware (H) as shown and remove or
raise the front roller.
3. Floating Mode is generally used for cutting heights
less than one inch (25 mm) and a front roller is
required.
If a 2-1/2 in. (63 mm) solid front roller is used, the
cutting height will range from 3/8 to 2-1/8 in. (9 to
54 mm).
If a 3 in. (76 mm) grooved front roller is used, the
cutting height will range from 3/8 to 2-1/4 in. (9 to
57 mm).
H
H
H
Figure 3O
3.16 CUTTING HEIGHT ADJUSTMENT_____________________________________________
1. Raise and lock the lift arms in transport mode.
2. For easier access to the height adjusters on the
motor end of the front reels, Jacobsen recommends
raising the front end of the mower just a few inches
off the ground then, being careful not to damage the
hydraulic hoses, tilt the front mowers 90 degrees,
and tether the mowers together.
Tether
3. On the rear mower (center) remove the pin and
collar on the shaft and slide the mower backwards.
4. Always make the reel-to bedknife adjustment
(Sections 3.13 and 3.14) before making the cutting
height adjustment.
Figure 3P
5. Select Fixed or Floating Mode and convert the
mower accordingly.
6. Loosen skid mounting hardware (D - Figure 3N)
then adjust the cutting height. (A special tool is
provided with the mowers. A 5/8 in. socket and
ratchet are required).
13
3
ADJUSTMENTS
3.17 REMOVING THE CUTTING UNIT _____________________________________________
1. To prevent contamination of the hydraulic system, as
well as loss of oil, do not disconnect the hoses from
the motor.
! CAUTION
Disconnect lift springs before removing mowers.
2. Raise and lock the lift arms in transport mode
(Section 3.4) and disconnect the down pressure
springs.
4. Remove hardware securing motor to drive housing
and carefully pull the motor away.
5. Place motor in a clean plastic bag and cover the
opening in the gear box.
6. Remove pin and collar from center (rear) lift arm
and pull the center cutting unit away from the
mower.
7. Remove the hardware securing the front lift arms to
the cutting units, and slide the mowers out of the
way.
3. Remove transport pin then lower the lift arms to the
ground.
3.18 CUTTING HEIGHT - FIXED MODE ____________________________________________
Follow the procedures outlined in Section 3.16.
1. Reposition the rear roller adjuster.
a. For cutting heights from 3/8 to 1-3/4 in. (9 to
44 mm), use holes (M) on the mower frame, and
two holes (shown in black) of the height adjuster
(F) as shown.
b.
For cutting heights greater than 1-3/4 inches
(44 mm), disassemble adjuster (F) and turn the
mounting bracket upside down; then use holes
(N) of the frame, and the two holes (shown in
black) of the adjuster (F).
G
F
E
B
N
M
N
M
5
6
7
8
1
2
3
4
Figure 3Q
2. Remove the tether, and lower the cutting units to
the ground.
3. Place spacers of the desired height (J) under each
end of the reel, adjacent to the front edge of the
bedknife.
4. Loosen nut (G) and lower rear roller to the ground.
Tighten nut (E) against the adjuster then recheck
the setting on both side of the reel. Readjust if
necessary.
5. Assemble the front roller adjuster (B) (If a roller is
required) to holes number 2 and 4 only of the
mower frame. Do not use holes number 1 and 3.
Set roller to 1/4 in. (6 mm) above rear roller.
U
T
S
R
A
G
B
F
E
J
Figure 3R
14
ADJUSTMENTS
3
3.19 CUTTING HEIGHT - FLOATING MODE _________________________________________
Follow the procedures outlined in Section 3.16.
1. Assemble the front roller adjuster (B) to holes number 2 and 4 only of the mower frame. Do not use hole
numbers 1 and 3. Refer to the chart below for correct
hole of front roller adjuster to use.
2. Reposition the rear roller adjusters (F).
a. For cutting heights from 3/8 to 1-3/4 in. (9 to
44 mm), use holes (M) on the mower frame, and
two holes (shown in black) of adjuster (F) as
shown.
b.
B
G
F
N
M
N
M
E
5
6
1
2
3
4
7
8
For cutting heights greater than 1-3/4 in.
(44 mm), disassemble adjuster (F) and turn the
mounting bracket upside down; then use holes
(N) of the frame, and the two holes (shown in
black) of adjuster (F).
3. Loosen nut (L) and adjust screw (K) to obtain
desired cutting height (X) then lock nut (L) against
gauge (P).
4. Place one end of the gauge under the front roller at
either end of the reel, and slide the head of screw
(K) over the bedknife.
U
T
S
R
Figure 3S
X-Cutting Height
Front Roller
P
Rear Roller
K
L
a. Adjust nut (G) to lower the rear roller to the
gauge, then tighten nut (E) against the adjuster.
b.
Move the gauge to the other end of the reel and
repeat Steps 4a and 4b.
Figure 3T
Range of Cut
Inches
Millimeters
Rear
Solid Roller
Millimeters
Front
Grooved Roller
Inches
3/8 - 3/4
3/4 - 1-1/4
1-1/4 - 1-3/4
1-3/4 - 2-1/4
10 - 19
19 - 32
32 - 44
44 - 57
3/8 - 5/8
5/8 - 1-1/8
1-1/8 - 1-5/8
1-5/8 - 2-1/8
10 - 16
16 - 29
29 - 41
41 - 54
R
S
T
U
M
M
M
N
15
3
ADJUSTMENTS
3.20 TORQUE SPECIFICATION___________________________________________________
NOTICE
All torque values included in these charts are approximate and are for reference only. Use of these torque values is
at your sole risk. Jacobsen is not responsible for any loss, claim, or damage arising from the use of these charts.
Extreme caution should always be used when using any torque value.
Jacobsen uses Grade 5 Plated bolts as standard, unless otherwise noted. For tightening plated bolts, use the value
given for lubricated.
AMERICAN NATIONAL STANDARD FASTENERS
SIZE
UNITS
GRADE 5
Lubricated
GRADE 8
Dry
Lubricated
SIZE
UNITS
GRADE 5
Dry
Lubri-
GRADE 8
Dry
Lubri-
cated
Dry
cated
#6-32
in-lb (Nm)
–
20 (2.3)
–
–
7/16-14
ft-lb (Nm)
37 (50.1)
50 (67.8)
53 (71.8)
70 (94.9)
#8-32
in-lb (Nm)
–
24 (2.7)
–
30 (3.4)
7/16-20
ft-lb (Nm)
42 (56.9)
55 (74.6)
59 (80.0)
78 (105)
#10-24
in-lb (Nm)
–
35 (4.0)
–
45 (5.1)
1/2-13
ft-lb (Nm)
57 (77.2)
75 (101)
80 (108)
107 (145)
#10-32
in-lb (Nm)
–
40 (4.5)
–
50 (5.7)
1/2-20
ft-lb (Nm)
64 (86.7)
85 (115)
90 (122)
120 (162)
#12-24
in-lb (Nm)
–
50 (5.7)
–
65 (7.3)
9/16-12
ft-lb (Nm)
82 (111)
109 (148)
115 (156)
154 (209)
1/4-20
in-lb (Nm)
75 (8.4)
100 (11.3)
107 (12.1)
143 (16.1)
9/16-18
ft-lb (Nm)
92 (124)
122 (165)
129 (174)
172 (233)
1/4-28
in-lb (Nm)
85 (9.6)
115 (13.0)
120 (13.5)
163 (18.4)
5/8-11
ft-lb (Nm)
113 (153)
151 (204)
159 (215)
211 (286)
5/16-18
in-lb (Nm)
157 (17.7)
210 (23.7)
220 (24.8)
305 (34.4)
5/8-18
ft-lb (Nm)
128 (173)
170 (230)
180 (244)
240 (325)
5/16-24
in-lb (Nm)
173 (19.5)
230 (26.0)
245 (27.6)
325 (36.7)
3/4-10
ft-lb (Nm)
200 (271)
266 (360)
282 (382)
376 (509)
3/8-16
ft-lb (Nm)
23 (31.1)
31 (42.0)
32 (43.3)
44 (59.6)
3/4-16
ft-lb (Nm)
223 (302)
298 404
315 (427)
420 (569)
3/8-24
ft-lb (Nm)
26 (35.2)
35 (47.4)
37 (50.1)
50 (67.8)
7/8-14
ft-lb (Nm)
355 (481)
473 (641)
500 (678)
668 (905)
METRIC FASTENERS
4.6
SIZE
8.8
10.9
Non Critical
Fasteners
into
Aluminum
12.9
UNITS
Lubricated
Dry
Lubricated
Dry
Lubricated
Dry
Lubricated
Dry
–
–
3.83 (34)
5.11 (45)
M4
Nm (in-lb)
–
–
–
–
2.0 (18)
M5
Nm (in-lb)
1.80 (16)
2.40 (21)
4.63 (41)
6.18 (54)
6.63 (59)
8.84 (78)
7.75 (68)
10.3 (910
4.0 (35)
M6
Nm (in-lb)
3.05 (27)
4.07 (36)
7.87 (69)
10.5 (93)
11.3 (102)
15.0 (133)
13.2 (117)
17.6 (156)
6.8 (60)
M8
Nm (in-lb)
7.41 (65)
9.98 (88)
19.1 (69)
25.5 (226)
27.3 (241)
36.5 (323)
32.0 (283)
42.6 (377)
17.0 (150)
M10
Nm (ft-lb)
14.7 (11)
19.6 (14)
37.8 (29)
50.5 (37)
54.1 (40)
72.2 (53)
63.3 (46)
84.4 (62)
33.9 (25)
M12
Nm (ft-lb)
25.6 (19)
34.1 (25)
66.0 (48)
88.0 (65)
94.5 (70)
125 (92)
110 (81)
147 (108)
61.0 (45)
M14
Nm (ft-lb)
40.8 (30)
54.3 (40)
105 (77)
140 (103)
150 (110)
200 (147)
175 (129)
234 (172)
94.9 (70)
3.21 SPECIFIC TORQUE ________________________________________________________
1. Tie rod ball joints: (2) 30 - 35 ft. lb. (41 - 47 Nm)
4. Steering wheel nut: 30-40 ft. lb (41 - 51 Nm)
2. Engine drain plugs: 22 ft. lb. (30 Nm)
5. Wheel hardware:65 - 85 ft. lb. (88 - 116 Nm)
3. Steering ball joints: 50 - 55 ft. lb. (68 - 75 Nm)
16
MAINTENANCE
4
4
MAINTENANCE
4.1
GENERAL ________________________________________________________________
! WARNING
Before you clean, adjust, or repair this equipment,
disengage all drives, lower implements to the ground,
engage parking brake, stop engine, and remove key from
ignition switch to prevent injuries
Make sure the mower is parked on a solid and level
surface. Never work on a mower that is supported only
by the jack. Always use jack stands.
1.
Adjustment and maintenance should always be
performed by a qualified technician. If proper
adjustments cannot be made, contact an Authorized
Jacobsen Dealer.
2.
4.2
Keep all moving parts properly adjusted and lubricated.
c.
Replace worn or damaged parts before operating
the machine.
d.
Keep all fluids at their proper levels.
e.
Keep shields in place and all hardware securely fastened.
f.
Keep tires properly inflated.
3.
Do not wear jewelry or loose fitting clothing when
making adjustments or repairs.
4.
Use the illustrations in the Parts Catalog as reference
for the disassembly and reassembly of components.
5.
Recycle or dispose of all hazardous materials
(batteries, fuel, lubricants, anti-freeze, etc.) according
to local, state, or federal regulations.
Inspect the equipment on a regular basis, establish a
maintenance schedule, and keep detailed records.
a.
b.
Keep the equipment clean.
ENGINE _________________________________________________________________
IMPORTANT: A separate Engine Manual, prepared by
the engine manufacturer, is supplied with this mower.
Read the Engine Manual carefully until you are familiar
with the operation and maintenance of the engine.
Proper attention to the engine manufacturer’s
directions will assure maximum service life of the
engine. To order replacement engine manuals contact
the engine manufacturer.
5.
Refer to Section 6.3 and Engine Manual for specific
maintenance intervals.
If the injection pump, injectors, or the fuel system require
service, contact an authorized Jacobsen Dealer.
The proper break-in of a new engine can make a
considerable difference to the performance and life of the
engine.
NOTICE
The mower is designed to operate and cut most
efficiently at the preset governor setting. Do not change
the engine governor settings or overspeed the engine.
During the break-in period, Jacobsen recommends the
following:
1.
During the first 50 hours of operation, a new engine
should be allowed to reach an operating temperature of
at least 140°F (60°C) prior to operation at full load.
2.
Check the engine oil level twice daily during the first 50
hours of operation. Higher than normal oil consumption
is not uncommon during the initial break-in period.
3.
Change engine oil and oil filter element after first 50
hours of operation.
4.
Check and adjust fan and alternator belts.
17
4
MAINTENANCE
4.3
ENGINE OIL ______________________________________________________________
Check the engine oil at the start of each day, before starting
the engine. If the oil level is low, remove oil filler cap, and
add oil as required.
Safe Operating Range
⎧
⎪
⎪
⎨
⎪
⎪
⎩
Perform initial oil change after first 50 hours of operation and
every 100 hours thereafter. See Engine Manual.
Use only engine oils with API classification CD/CE.
Above 77°F (25°C)
SAE 30W or SAE10W30/10W40
32 to 77°F (0 to 25°C)
SAE 20W or SAE 10W30/10W40
Below 32° (0°C)
SAE10W or SAE 10W30/10W40
4.4
Figure 4A
AIR FILTER_______________________________________________________________
Check the service indicator daily. If red band appears in the
window (C) replace the element.
Do not remove the element for inspection or cleaning.
Unnecessary removal of the filter increases the risk of
injecting dust and other impurities into the engine.
D
When service is required, first clean the outside of the filter
housing; then remove the old element as gently as possible
and discard.
1.
Carefully clean the inside of the filter housing without
allowing dust into the air intake.
2.
Inspect the new element. Do not use a damaged
element and never use an incorrect element.
3.
Assemble the new element and make sure it seats
properly. Reset the indicator by depressing button (D).
4.
Reassemble cap making sure it seals completely
around the filter housing. Dust evacuator (E) must be
facing down.
5.
Check all hoses and air ducts. Tighten hose clamps.
18
C
E
Figure 4B
MAINTENANCE
4.5
4
FUEL ____________________________________________________________________
Handle fuel with care - it is highly flammable. Use an
approved container, the spout must fit inside the fuel filler
neck. Avoid using cans and funnels to transfer fuel.
! WARNING
Never remove the fuel cap from the fuel tank, or add fuel,
when the engine is running or while the engine is hot.
Do not smoke when handling fuel. Never fill or drain the
fuel tank indoors.
Do not spill fuel and clean spilled fuel immediately.
• Fill the fuel tank to within 1 in. (25 mm) of the bottom of
the filler neck.
• Store fuel according to local, state, or federal ordinances
and recommendations from your fuel supplier.
• Never overfill or allow the tank to become empty.
• Check fuel lines and clamps every 50 hours. Replace fuel
lines and clamps at the first sign of damage.
• Use clean, fresh, #2 Diesel fuel. Minimum Cetane rating
45. Refer to Engine Manual for additional information.
Never handle or store fuel containers near an open flame
or any device that may create sparks and ignite the fuel
or fuel vapors.
Be sure to reinstall and tighten fuel cap securely.
4.6
FUEL SYSTEM ____________________________________________________________
Refer to Section 6.3 for specific maintenance intervals.
Before replacing any filter, thoroughly clean the filter housing
and the area around the filter. Dirt must not be allowed to
enter into fuel system.
4.7
For diesel engines, bleed the fuel system after the fuel filter
and lines have been removed, or the fuel tank has become
empty. See Engine Manual.
BATTERY ________________________________________________________________
Make absolutely certain the ignition switch is OFF and the
key has been removed before servicing the battery.
! CAUTION
Always use insulated tools, wear protective glasses or
goggles and protective clothing when working with
batteries. You must read and obey all battery
manufaturer’s instructions.
Tighten cables securely to battery terminals and apply a
light coat of silicone dielectric grease to terminals and cable
ends to prevent corrosion. Keep vent caps and terminal
covers in place.
2.
When removing the battery, always remove the ground,
BLACK, negative (-) cable first, and the RED, positive
(+) cable last.
3.
Make sure battery is properly installed and secured to
the battery tray.
! WARNING
Battery posts, terminals, and related accessories
contain lead and lead compounds, chemicals known
to the State of California to cause cancer and
reproductive harm. Wash your hands after
handling.
Check the electrolyte level every 100 hours. Keep the cable
ends, battery, and battery posts clean.
Verify battery polarity before connecting or disconnecting
the battery cables.
1.
When installing the battery, always assemble the RED,
positive (+) battery cable first, and the ground, BLACK,
negative (-) battery cable last.
19
4
MAINTENANCE
4.8
JUMP STARTING __________________________________________________________
Before attempting to “jump start” the mower, check the
condition of the discharged battery. Section 4.7
! WARNING
Batteries generate explosive hydrogen gas. To reduce
the chance of an explosion, avoid creating sparks near
battery. Always connect the negative jumper cable to the
frame of the mower with the discharged battery, away
from the battery.
4.9
When connecting jumper cables:
1.
Stop the engine on the vehicle with a good battery.
2.
Connect RED jumper cable to the positive (+) terminal
on the good battery and to the positive (+) terminal on
the “discharged” battery.
3.
Connect the BLACK jumper cable from the negative
(-) terminal on the good battery to the frame of the
mower with the discharged battery.
After cables have been connected, start the engine on the
vehicle with the good battery then start the mower.
CHARGING BATTERY _____________________________________________________
! WARNING
Charge battery in a well ventilated area. Batteries
generate explosive gases. To prevent an explosion, keep
any device that may create sparks or flames away from
the battery.
To prevent injury, stand away from battery when the
charger is turned on. A damaged battery could explode.
1.
Refer to Section 4.7. Read the Battery and Charger’s
manual for specific instructions.
2.
Whenever possible, remove the battery from the
mower before charging. If battery is not sealed, check
that the electrolyte covers the plates in all the cells.
3.
Make sure the charger is Off Then connect the charger
to the battery terminals as specified in the charger’s
manual.
4.
Always turn the charger Off before disconnecting
charger from the battery terminals.
4.10 HYDRAULIC HOSES _______________________________________________________
! WARNING
To prevent serious injury from hot, high pressure oil,
never use your hands to check for oil leaks, use paper or
cardboard.
Hydraulic fluid escaping under pressure can have
sufficient force to penetrate skin. If fluid is injected into
the skin it must be surgically removed within a few hours
by a doctor familiar with this form of injury or gangrene
may result.
1.
2.
Always lower implements to ground, disengage all
drives, engage parking brake, stop engine, and remove
key before inspecting or disconnecting hydraulic lines or
hoses.
Check visible hoses and tubes daily. Look for wet
hoses or oil spots. Replace worn or damaged hoses
and tubes before operating the machine.
3.
The replacement tube or hoses must be routed in the
same path as the existing hose, do not move clamps,
brackets, and ties to a new location.
4.
Thoroughly inspect all tubes, hoses, and connections
every 250 hours.
20
IMPORTANT: The hydraulic system
permanently damaged if the oil
contaminated. Before disconnecting any
component, clean the area around fittings
ends to keep impurities out of the system.
can be
becomes
hydraulic
and hose
a.
Before disconnecting any hydraulic component, tag
or mark the location of each hose then clean the
area around the fittings.
b.
As you disconnect the component, be prepared to
assemble plugs or caps to the hose ends and open
ports. This will keep impurities out of the hydraulic
system and also prevent oil spills.
c.
Make sure “O” rings are clean and hose fittings are
properly seated before tightening.
d.
Keep the hose from twisting. Twisted hoses can
cause couplers to loosen as the hose flexes during
operation resulting in oil leaks.
e.
Kinked or twisted hoses can restrict the oil flow
causing the system to malfunction and the oil to
overheat and also lead to hose failure.
MAINTENANCE
4
4.11 HYDRAULIC OIL___________________________________________________________
b.
Refer to Section 6.3 for specific maintenance intervals.
The hydraulic reservoir on this machine is filled with
Jacobsen Greens Care 68 Biodegradable fluid.
Drain and replace the hydraulic oil after a major component
failure, or if you notice the presence of water or foam in the
oil, or a rancid odor (indicating excessive heat).
2.
Remove drain plug from bottom of tank and loosen or
remove breather cap on top of tank. Check and clean
the breather cap, replace as necessary.
3.
After oil has drained install drain plug and fill with
Jacobsen GreensCare 68 Biodegradable Fluid.
4.
Purge air from system.
Always replace the hydraulic filter when changing oil.
To change hydraulic oil:
1.
a.
Operate all mower functions for about 5 minutes to
purge air out of the system and stabilize the oil
level.
b.
Once the level has stabilized and the air is purged,
fill the tank to the full mark on dipstick.
Clean the area around the oil cap to prevent impurities
from entering and contaminating the system.
a.
The hydraulic oil level should never fall below the
lower line on the dipstick or be above the top line on
dipstick.
Oil temperature should be at 60° to 90°F (16° 32°C). Do not check oil level when oil is hot.
4.12 HYDRAULIC OIL FILTERS ___________________________________________________
The hydraulic system is protected by two 10 micron filters.
To replace hydraulic oil filter:
1.
Remove the old filters.
2.
Fill new filter with oil then install new filter. Hand tighten
only.
3.
Operate engine at idle speed with hydraulic system in
neutral for five minutes.
4.
Check hydraulic oil level in reservoir and fill to full mark
on dipstick.
4.13 ELECTRICAL SYSTEM _____________________________________________________
6.
Do not wash or pressure spray around electrical
connections and components.
! CAUTION
Always turn the ignition switch off and remove the
negative battery cable (BLACK) before inspecting or
working on the electrical system.
General precautions that can be taken to reduce electrical
problems are listed below.
1.
Make certain all terminals and connections are clean
and properly secured.
2.
Check the operator backup system, fuses, and circuit
breakers regularly.
If the operator backup does not function properly and
the problem cannot be corrected, contact an authorized
Jacobsen Dealer.
3.
Keep the wire harness and all individual wires away
from moving parts to prevent damage.
4.
Make sure the seat switch harness is connected to the
main wire harness.
5.
Check the battery and battery charging circuit.
21
4
MAINTENANCE
4.14 MUFFLER AND EXHAUST __________________________________________________
! WARNING
Exhaust fumes contain carbon monoxide that is toxic and
can be fatal when inhaled.
NEVER operate an engine without proper ventilation.
To protect from carbon monoxide poisoning, inspect the
complete exhaust system regularly and always replace a
defective muffler.
If you notice a change in the color or sound of the exhaust,
stop the engine immediately. Identify the problem and have
the system repaired.
Torque all exhaust manifold hardware evenly. Tighten or
replace exhaust clamps.
4.15 TIRES ___________________________________________________________________
1.
Keep tires properly inflated to prolong tire life. Check
inflation pressure while the tires are cool. Inspect tread
wear.
2. Check the pressure with an accurate, low pressure
tire gauge.
3. Keep tires inflated to:
Front: - 10-12 psi (0.69-0.83 BAR).
Rear: - 8-10 psi (0.55-0.69 BAR).
! CAUTION
Unless you have the proper training, tools, and
experience, DO NOT attempt to mount a tire on a rim.
Improper mounting can produce an explosion which
may result in serious injury.
4.16 WHEEL MOUNTING PROCEDURE ____________________________________________
! WARNING
Make sure the mower is parked on a solid and level
surface. Never work on a mower that is supported only
by the jack. Always use jack stands.
If only the front or rear of the mower is raised, place
chocks in front of and behind the wheels that are not
raised.
1.
Remove dirt, grease, and oil from stud thread. Do not
lubricate threads.
2.
Position wheel on hub and inspect to insure full contact
between mounting surface of wheel and hub or brake
drum.
3.
Finger tighten all hardware then torque hardware in
criss-cross order; always tighten nuts in the top
position.
4.
Check and retorque daily until torque is maintained,
85-95 ft.lbs. (115-128 Nm).
22
MAINTENANCE
4
4.17 CARE AND CLEANING _____________________________________________________
Wash the mower and implements after each use. Keep the
equipment clean.
4.
Clean all plastic or rubber trim with a mild soap
solution or use commercially available vinyl/rubber
cleaners.
NOTICE
5.
To maintain the original high luster of the fiberglass,
periodically wax with a good grade of One-Step
cleaner wax.
Do not wash any portion of the equipment while it is hot.
Do not use high pressure spray or steam. Use cold water
and automotive cleaners.
1.
Use compressed air to clean engine and radiator fins. A
special blow gun is available through Jacobsen Dealer.
2. Use only fresh water for cleaning your equipment.
NOTICE
Use of salt water or affluent water has been known to
encourage rust and corrosion of metal parts resulting
in premature deterioration or failure. Damage of this
nature is not covered by the factory warranty.
3.
Do not spray water directly at the instrument panel,
ignition switch, controller, any other electrical
components, bearing housings, or seals.
Repair damaged metal surfaces and use Jacobsen touch-up
paint. Wax the equipment for maximum paint protection.
! CAUTION
Clean grass and debris from cutting units, drives,
muffler, and engine to prevent fires.
! WARNING
NEVER use your hands to clean cutting units. Use a
brush to remove grass clippings from blades. Blades are
extremely sharp and can cause serious injuries.
4.18 RADIATOR _______________________________________________________________
! WARNING
To prevent serious bodily injury from hot coolant or
steam blow-out, never attempt to remove the radiator
cap while the engine is running. Stop the engine and wait
until it is cool. Even then, use extreme care when
removing the cap.
Check and tighten the fan belt. Replace clamps and hoses
every two years.
If you have to add coolant more than once a month, or add
more than one quart at a time, have a authorized Jacobsen
Dealer check the cooling system.
! CAUTION
Do not pour cold water into a hot radiator. Do not
operate engine without a proper coolant mixture.
Install cap and tighten securely.
Check coolant level daily. Radiator should be full and
recovery bottle should be up to the cold mark.
Drain and refill annually. Remove the radiator cap, open the
engine block drain and the radiator drain. Empty and clean
the recovery bottle.
Mix clean water with ethylene glycol based anti-freeze for
the coldest ambient temperature. Read and follow the
instructions on the anti-freeze container and engine manual.
Keep radiator air passages clean. Use compressed air (30
psi maximum) to clean the fins.
23
4
MAINTENANCE
4.19 BACKLAPPING ___________________________________________________________
3.
! WARNING
Turn nut (A) on the reel to be backlapped so the reel
turns in reverse. Adjust the reel speed to 100-150
RPM.
To prevent injury, keep hands, feet, and clothing away
from rotating reels.
a.
When the backlap switch is in the BACKLAP position, the
reels will turn without the operator in the seat.
Apply lapping compound with a long handle brush
to high spots first then along entire length of the
reel.
b.
Carbon Monoxide in exhaust fumes can be fatal when
inhaled, never operate an engine without proper
ventilation.
Continue lapping and at the same time make a
slight adjustment on the reel until there is a uniform
clearance along the full length of the cutting edges.
c.
When the blades have been evenly honed, turn
adjusting nut (A) to neutral. Carefully and
thoroughly remove all lapping compound from reels
and bedknife before running the reel in forward
direction.
d.
Disengage reel switch and turn backlap switch to
Off.
Check the reel and bedknife to determine if backlapping or
grinding will restore the cutting edge.
If wear or damage is beyond the point where the cutting
edges can be corrected by the lapping process, they must
be reground.
To Backlap:
1.
Adjust reel to bedknife as described in Sections 3.13
and 3.14.
2.
Obtain and engage the mechanics (backlap) key.
a.
Make absolutely certain your feet and clothing are
far away from the reel.
b.
Make sure the parking brake is Engaged, reel
switch is Off, backlap switch is Off, and the traction
pedal is in Neutral.
c.
24
Start the engine, turn the mechanics key to Backlap
then engage the reel switch. If any of the reels turn,
adjust nut (A) to stop the reel.
4.
Reset reel motors to forward rotation. If reel speeds
vary, check nut (A) to insure it is turned completely to
full forward rotation.
5.
Remove and store the backlap key.
A
Figure 4C
MAINTENANCE
4
4.20 STORAGE ________________________________________________________________
General
Cutting Units
1.
Wash the mower thoroughly and lubricate. Repair and
paint damaged or exposed metal.
1.
Wash the cutting units thoroughly, then repair and paint
any damaged or exposed metal.
2.
Inspect the mower, tighten all hardware, replace worn
or damaged components.
2.
Lubricate all fittings and friction points.
3.
3.
Drain and refill radiator.
4.
Clean the tires thoroughly and store the mower so the
load is off the tires. If mower is not on jack stands,
check tires at regular intervals and reinflate as
necessary.
Backlap the reels then back the reel away from the
bedknife. Apply a light coat of rust preventative oil to
the sharpened edges of the reel and bedknife.
5.
! CAUTION
To prevent personal injury and damage to the cutting
edges, handle the reel with extreme care
Keep the machine and all its accessories clean, dry,
and protected from the elements during storage. Never
store equipment near an open flame or spark which
could ignite fuel or fuel vapors.
Battery
After Storage
1.
Remove, clean, and store battery in upright position in a
cool, dry place.
1.
Check and reinstall battery.
2.
Check or service fuel filter and air cleaner.
2.
Check and recharge battery every 60 to 90 days while
in storage.
3.
Check the radiator coolant level.
3.
Store batteries in a cool, dry place. To reduce the self
discharge rate, room temperature should not be above
80°F (27°C) or fall below 20°F (-7°C) to prevent
electrolyte from freezing.
4.
Check oil level in the engine crankcase and hydraulic
system.
5.
Fill the fuel tank with fresh fuel. Bleed the fuel system.
6.
Make certain that the tires are properly inflated.
7.
Remove all oil from the reels and bedknife. Adjust
bedknife and cutting height.
8.
Start and operate the engine at 1/2 throttle. Allow
enough time for the engine to become properly
warmed and lubricated.
Engine (General)
1.
2.
While the engine is warm, remove the drain plug, drain
the oil from the crankcase, and change oil filter. Install
drain plug and refill with fresh oil. Let engine cool before
starting.
Clean exterior of engine. Paint exposed metal, or apply
a light coat of rust preventative oil.
3. Add a fuel conditioner or biocide to prevent gelling
or bacterial growth in fuel. See your local fuel
supplier.
! WARNING
Never operate the engine without proper ventilation;
exhaust fumes can be fatal when inhaled.
25
5
5
TROUBLESHOOTING
TROUBLESHOOTING
5.1
GENERAL________________________________________________________________
The troubleshooting chart below lists basic problems that may occur during start-up and operation. For more detailed
information regarding the hydraulic and electrical systems contact your area Jacobsen Dealer.
Symptoms
Possible Causes
Action
1.
Parking brake disengaged, traction pedal not in Neutral or reel/
3WD switch on.
1.
Check operator back-up system and start-up procedure.
2.
Battery low on charge or
defective.
2.
Inspect condition of battery and battery connections.
3.
Fuel tank empty or dirty.
3.
Fill with fresh fuel. Change fuel filter. Bleed fuel lines.
4.
Fuse blown.
4.
Replace fuse.
1.
Fuel level low, fuel or fuel filter
dirty.
1.
Fill with fresh fuel. Change fuel filter. Bleed fuel lines.
2.
Air cleaner dirty.
2.
Inspect and replace air filter.
3.
Injectors, fuel pump.
3.
Consult engine manual.
4.
Engine problem.
4.
Consult engine manual.
1.
Fuel tank empty.
1.
Fill with fresh fuel and bleed fuel lines.
2.
Interlocks not set before leaving
operator’s seat.
2.
Engage parking brake, move traction lever to “N” and
set reel control to OFF.
1.
Coolant level low.
1.
Inspect and add coolant.
2.
Air intake restricted.
2.
Clean cooling air intake.
3.
Water pump belt broken or loose.
3.
Tighten or replace belt.
4.
Engine overload.
4.
Reduce forward speed.
1.
Loose or corroded battery terminals.
1.
Inspect and clean terminals.
2.
Low electrolyte.
2.
Refill to correct level.
3.
Alternator belt loose or broken.
3.
Tighten or replace belt.
4.
Charging system defective.
4.
See engine manual.
1.
Bedknife-to-reel not adjusted correctly.
Inspect bedknife-to-reel adjustment.
2.
Engine speed too low.
Check engine speed. Run engine at full throttle.
3.
Low hydraulic oil.
Check reservoir level and fill if needed.
1.
Parking brake engaged.
Disengage parking brake.
2.
Tow Valve Open.
Close Tow Valve.
3.
Low hydraulic oil.
Check reservoir level and fill if needed.
Implement does not
raise or lower.
1.
Low hydraulic oil.
Check reservoir level and fill as needed.
Gauges/Indicator
operating.
1.
Circuit Breaker.
Reset circuit breaker, check bulb.
2.
Loose wiring.
Check electrical connections.
Engine will not start.
Engine hard to start or
runs poorly.
Engine stops.
Engine overheating.
Battery not holding
charge.
Reels cut unevenly.
Mower does not react
to traction pedal.
26
not
MAINTENANCE & LUBRICATION CHARTS
6
6
MAINTENANCE & LUBRICATION CHARTS
6.1
GENERAL ________________________________________________________________
! WARNING
Before you clean, adjust, or repair this equipment,
disengage all drives, lower implements to the ground,
engage parking brake, stop engine and remove key
from ignition switch to prevent injuries
1. Always clean the grease fitting before and after
lubricating.
2. Lubricate with grease that meets or exceeds NLGI
Grade 2 LB specifications. Apply grease with a
manual grease gun and fill slowly until grease begins
to seep out. Do not use compressed air guns.
3. Periodically apply a small amount of lithium based
grease to the seat runners.
4. For smooth operation of all levers, pivot points, and
other friction points that are not shown on the
lubrication chart apply several drops of SAE 30 oil
every 40 hours or as required.
5. Grease fittings (A - F) every 50 hours and fittings (G K) every 100 hours.
6.2
LUBRICATION CHART______________________________________________________
H
J
F
A
G
J
B
D
B
C
J
E
F
A
J
A.
B.
C.
D.
E.
Mower Pivot (3 Fittings)
Front Lift Arms (2 Fittings)
Crank Hub
Hydraulic Cylinder
Center Lift Arm
F.
G.
H.
J.
K.
Control Pedal Pivot (2 Fittings)
Steering Yoke
Drive Shaft Bearings (2 Fittings)
Reel Bearings (6 Fittings)
Rollers (As Required)
27
6
MAINTENANCE & LUBRICATION CHARTS
6.3
MAINTENANCE CHARTS ___________________________________________________
Recommended Service and Lubrication Intervals
Every
8-10
Hours
Air Filter
Every
50
Hours
I
Every
250
Hours
Brake
I-A
See
Section
R
4.4
I
3.10
R
Fuel System
I
R*
R
R*
R
4.3
L
Hydraulic Hoses and Tubes
I***
I
Hydraulic Oil
I-A
R**
Hydraulic Oil Filter
I
Muffler and Exhaust
I
R*
R
4.6
L
6.2
R**
4.11
R
4.12
I
4.14
I
III
4.18
I-A
A - Add or Adjust
II
4.10
I-C/AR
Tires
IV
4.6
Fuel Filter
L
4.18
4.13
I
L
Lubricant
Type
3.2,
3.3
A
I*
Engine Oil Filter
Radiator Screens
Yearly
R
I-C-A
Electrical System
Grease Fittings - All
Every
1000
Hours
4.7
I-A*
Engine Oil
Every
500
Hours
I
I-A*
Cooling System
Every
400
Hours
AR
Battery Charge
Belts
Every
100
Hours
C - Clean
4.15
I - Inspect
L- Lubricate
R - Replace
AR - As Required
* Indicates initial service for new machines.
** Every 250 hours, or yearly whichever comes first.
*** Inspect visible hoses and tubes for leaks or oil marks.
I
- Manual grease gun with NLGI Grade 2 (Service Class LB).
II
- Engine Oil - See Section 4.3.
III
- Use Jacobsen GreensCare 68 Biodegradable fluid: Capacity: 5 gallons (19 Liters). Order Part No. 5003103 containing 5 gal.
(19 l), pail or Part No. 5003102, 55 gal. (208 l) Drum.
IV - Capacity: 3qt. (2.8 l) 50/50 water ethylene glycol mix.
28
WSTĘP
Niniejsza instrukcja zawiera informacje dotyczące
regulacji, konserwacji i usuwania usterek oraz listę części
Państwa nowej maszyny firmy Jacobsen. Niniejszą
instrukcję należy przechowywać wraz z maszyną, aby
można się było z nią konsultować podczas eksploatacji.
Tabliczka znamionowa znajduje się na ramie za lewym
przednim kołem. Zalecamy, aby zapisać podane numery
poniżej, aby były łatwo dostępne.
® P.O. BOX 7708,
Przed uruchomieniem maszyny właściciel i każdy
operator powinni przeczytać uważnie całą instrukcję.
Przestrzeganie
wszystkich
zaleceń
dotyczących
bezpieczeństwa, eksploatacji i konserwacji zawartych w
niniejszej instrukcji wydłuża żywotność maszyny i
utrzymuje jej maksymalną wydajność.
CHARLOTTE,
NC 28241, USA
Jacobsen.com
1-800-848-1636 (US)
kg
kg
kg
kW
Jeśli potrzebne są dodatkowe informacje, należy
skontaktować się z autoryzowanym sprzedawcą firmy
Jacobsen.
Wskazówki dotyczące zapasów
Aby utrzymać dobry stan techniczny i wydajność maszyny, firma Jacobsen zaleca, aby utrzymywać zapasy najczęściej
wykorzystywanych materiałów eksploatacyjnych. Dołączyliśmy również numery katalogowe dodatkowych materiałów
pomocy technicznej i materiałów szkoleniowych.
Aby zamówić dowolny produkt:
1. Na zamówieniu należy napisać pełne imię i nazwisko
oraz dokładny adres.
3. W zamówieniu należy podać wymaganą ilość, numer
katalogowy oraz opis części.
2. Określić, gdzie i jak ma zostać przekazana przesyłka:
4. Zamówienie należy przesłać lub przekazać do autoryzowanego sprzedawcy firmy Jacobsen.
q UPS
q zwykła poczta
qW ciągu nocy
q drugi dzień
Elementy eksploatacyjne
Ilość
Nr
katalogowy
550489
5000913
502644
Nr
Ilość katalog
owy
Opis
Filtr paliwa, silnik wysokoprężny
Filtr paliwa, silnik wysokoprężny
Filtr oleju, silnik wysokoprężny
Opis
549579 Filtr oleju hydraulicznego (wymagane 2 szt.)
3001950 Pas napędowy pompy
1001958 Przełącznik zapłonu
Materiały pomocnicze
Ilość
Nr
katalogowy
4189624
4189623
4189622
Ilość
Opis
Bezpieczeństwo i obsługa
Części zamienne i konserwacja
Katalog części silnika
2006/42/EC: Są to tłumaczenia oryginalnych instrukcji
sprawdzone przez ACMTRAD SL.
Opis
Płyta DVD ze szkoleniem dla
operatorów
Instrukcja konserwacji
4191622
4171674
Ostrzeżenie dotyczące Ustawy 65
Copyright 2009, Jacobsen, A Textron Company. „Wszelkie
prawa zastrzeżone, włącznie z prawem powielania treści lub ich
części w dowolnej formie.”
pl-2
Nr
katalogowy
Produkt ten zawiera lub emituje
substancje, które według wiedzy Stanu
Kalifornia mogą powodować nowotwory
i problemy z płodnością.
DRUK W U.S.A. 9.2009 R.
Spis treści
1
1.1
1.2
BEZPIECZEŃSTWO
Bezpieczeństwo podczas eksploatacji . . . . . 4
Ważne informacje dotyczące
bezpieczeństwa . . . . . . . . . . . . . . . . . . . . . . 5
2
2.1
2.2
2.3
2.4
2.5
2.6
SPECYFIKACJE
Identyfikacja produktu . . . . . . . . . . . . . . . . . .
Silnik . . . . . . . . . . . . . . . . . . . . . . . . . . . . . . .
Zespoły tnące: . . . . . . . . . . . . . . . . . . . . . . .
Kosiarka . . . . . . . . . . . . . . . . . . . . . . . . . . . .
Masa i wymiary . . . . . . . . . . . . . . . . . . . . . . .
Akcesoria i dokumenty uzupełniające . . . . .
3
3.1
3.2
3.3
3.4
REGULACJE
Informacje ogólne . . . . . . . . . . . . . . . . . . . . . 8
Pas wentylatora . . . . . . . . . . . . . . . . . . . . . . 8
Pas napędowy pompy . . . . . . . . . . . . . . . . . 8
Przełączniki biegu jałowego i napędu
na trzy koła . . . . . . . . . . . . . . . . . . . . . . . . . . 9
Przełączniki hamulca postojowego . . . . . . . 9
Przełącznik ogranicznika podnoszenia . . . . 9
Położenie neutralne pedału jazdy . . . . . . . 10
Zatrzymanie pedału jazdy przy jeździe
w przód. . . . . . . . . . . . . . . . . . . . . . . . . . . . 10
Zatrzymanie pedału podnoszenia /
opuszczania . . . . . . . . . . . . . . . . . . . . . . . . 10
Hamulec postojowy . . . . . . . . . . . . . . . . . . 11
Tylne ramię nośne . . . . . . . . . . . . . . . . . . . 11
Docisk . . . . . . . . . . . . . . . . . . . . . . . . . . . . . 11
Ustawienie prześwitu bębna i noża
dolnego . . . . . . . . . . . . . . . . . . . . . . . . . . . . 12
Ustawienie prześwitu bębna i noża
dolnego . . . . . . . . . . . . . . . . . . . . . . . . . . . . 12
Tryby cięcia . . . . . . . . . . . . . . . . . . . . . . . . 13
Regulacja wysokości cięcia . . . . . . . . . . . . 13
Demontaż zespołu tnącego . . . . . . . . . . . . 14
Wysokość cięcia – tryb stały . . . . . . . . . . . 14
Wysokość cięcia – tryb swobodny . . . . . . . 15
Momenty dokręceń . . . . . . . . . . . . . . . . . . . 16
Konkretne momenty dokręceń . . . . . . . . . . 16
3.5
3.6
3.7
3.8
3.9
3.10
3.11
3.12
3.13
3.14
3.15
3.16
3.17
3.18
3.19
3.20
3.21
6
6
6
6
7
7
4
4.1
4.2
4.3
4.4
4.5
4.6
4.7
4.8
4.9
4.10
4.11
4.12
4.13
4.14
4.15
4.16
4.17
4.18
4.19
4.20
KONSERWACJA
Informacje ogólne . . . . . . . . . . . . . . . . . . . . 17
Silnik . . . . . . . . . . . . . . . . . . . . . . . . . . . . . . 17
Olej silnikowy . . . . . . . . . . . . . . . . . . . . . . . 18
Filtr powietrza . . . . . . . . . . . . . . . . . . . . . . . 18
Paliwo . . . . . . . . . . . . . . . . . . . . . . . . . . . . . 19
Układ paliwowy . . . . . . . . . . . . . . . . . . . . . . 19
Akumulator . . . . . . . . . . . . . . . . . . . . . . . . . 19
Rozruch z innego akumulatora . . . . . . . . . . 20
Ładowanie akumulatora . . . . . . . . . . . . . . . 20
Przewody hydrauliczne . . . . . . . . . . . . . . . . 20
Olej hydrauliczny . . . . . . . . . . . . . . . . . . . . . 21
Filtry oleju hydraulicznego . . . . . . . . . . . . . 21
Układ elektryczny . . . . . . . . . . . . . . . . . . . . 21
Tłumik i układ wydechowy . . . . . . . . . . . . . 22
Ogumienie . . . . . . . . . . . . . . . . . . . . . . . . . . 22
Procedura zakładania koła . . . . . . . . . . . . . 22
Czyszczenie i pielęgnacja . . . . . . . . . . . . . . 23
Chłodnica . . . . . . . . . . . . . . . . . . . . . . . . . . 23
Docieranie przez cofanie bębna . . . . . . . . . 24
Przechowywanie . . . . . . . . . . . . . . . . . . . . . 25
5
5.1
USUWANIE PROBLEMÓW
Informacje ogólne . . . . . . . . . . . . . . . . . . . . 26
6
6.1
6.2
6.3
TABELE KONSERWACJI I SMAROWANIA
Informacje ogólne . . . . . . . . . . . . . . . . . . . . 27
Tabela smarowania . . . . . . . . . . . . . . . . . . . 27
Tabele konserwacji . . . . . . . . . . . . . . . . . . . 28
pl-3
1
BEZPIECZEŃSTWO
1
BEZPIECZEŃSTWO
1.1
BEZPIECZEŃSTWO PODCZAS EKSPLOATACJI ________________________________
! OSTRZEŻENIE
SPRZĘT OBSŁUGIWANY NIEPRAWIDŁOWO LUB PRZEZ NIEPRZESZKOLONY PERSONEL MOŻE BYĆ NIEBEZPIECZNY.
Należy się zaznajomić z położeniem i prawidłową obsługą wszystkich elementów sterujących. Niedoświadczeni operatorzy
powinni zostać przeszkoleni przez osobę zaznajomioną z maszyną, zanim będą mogli sami go obsługiwać.
1.
Bezpieczeństwo zależy od koncentracji, uwagi i
ostrożności osób obsługujących lub konserwujących
sprzęt. Maszyna nie może być obsługiwana przez osoby
niepełnoletnie.
11. Nie wolno uruchamiać maszyny, która nie jest w idealnym
stanie technicznym lub której naklejki, osłony, pokrywy,
wyrzutniki lub inne zabezpieczenia nie są pewnie
zamocowane na swoich miejscach.
2.
Obowiązkiem użytkownika jest przeczytanie niniejszej
instrukcji i wszelkich dokumentów związanych z
opisywanym sprzętem („Instrukcja części i konserwacji”,
„Instrukcja dotycząca silnika” oraz arkusze instrukcji
osprzętu/akcesoriów). Jeśli operator nie potrafi czytać
dokumentów w danym języku, obowiązkiem właściciela
jest wyjaśnienie mu treści niniejszej instrukcji.
12. Nie wolno odłączać żadnych przełączników
wykonywać obwodów obejściowych.
3.
Przed rozpoczęciem eksploatacji sprzętu należy poznać
zasady prawidłowej obsługi maszyny oraz położenie i
przeznaczenie wszystkich elementów sterujących i
wskaźników. Praca z nieznanym sprzętem może być
przyczyną wypadków.
4.
Nie wolno pozwolić, aby ktoś obsługiwał lub konserwował
maszynę lub jej osprzęt bez odpowiedniego przeszkolenia
i instruktażu lub też pod wpływem alkoholu lub środków
psychotropowych.
5.
Należy nosić niezbędne ubranie ochronne oraz środki
ochrony osobistej chroniące głowę, oczy, uszy, dłonie i
stopy. Maszynę należy użytkować tylko przy świetle
dziennym lub przy dobrym świetle sztucznym.
6.
Należy ocenić teren, aby określić, jakie akcesoria i
osprzęt są niezbędne, aby prawidłowo i bezpiecznie
wykonać wyznaczone zadanie. Należy stosować tylko
akcesoria i osprzęt zatwierdzone przez firmę Jacobsen.
7.
Należy uważać na dziury w podłożu i inne niewidoczne
zagrożenia.
8.
Należy zbadać obszar, na którym będzie wykorzystywany
opisywany sprzęt. Przed rozpoczęciem użytkowania
usunąć wszelkie odpadki znajdujące się na danym
obszarze. Należy uważać na przeszkody nad głową
(nisko wiszące gałęzie drzew, przewody elektryczne, itp.)
oraz na przeszkody podziemne (zraszacze, rury, korzenie
drzew, itp.). Należy zachować ostrożność przy
wchodzeniu na nowy teren. Należy uważać na
niewidoczne zagrożenia.
9.
Nie wolno kierować wyrzucanego materiału w kierunku
osób postronnych ani zezwalać na przebywanie osób
postronnych w pobliżu działającej maszyny. Właściciel/
operator są odpowiedzialni za urazy odnoszone przez
nich samych, osoby postronne oraz za szkody materialne
oraz mogą im zapobiec.
10. Nie wolno przewozić pasażerów. Osoby postronne i
zwierzęta należy utrzymywać w bezpiecznej odległości.
ani
13. Nie wolno zmieniać ustawienia regulatora prędkości
silnika ani przekraczać jego maksymalnych obrotów.
14. Wdychanie tlenku węgla z gazów wylotowych może być
przyczyną śmierci. Nie wolno uruchamiać silnika w
miejscu bez odpowiedniej wentylacji lub w zamkniętym
pomieszczeniu.
15. Paliwo jest wysoce łatwopalne; należy postępować z nim
bardzo ostrożnie.
16. Silnik
należy
utrzymywać
w
czystości.
Przed
odstawieniem maszyny należy odczekać, aż silnik
ostygnie i zawsze wyjmować kluczyk z przełącznika
zapłonu.
17. Przed uruchomieniem silnika należy odłączyć napęd (bieg
neutralny) i załączyć hamulec postojowy. Silnik
uruchamiać tylko siedząc w fotelu operatora, nigdy stojąc
obok maszyny.
18. Podczas jazdy lub transportu po drogach publicznych
sprzęt musi spełniać wszystkie aktualne przepisy lokalne,
regionalne i krajowe. Należy uważać na ruch podczas
przejazdu przez drogi, pracy na nich lub w ich pobliżu.
19. Lokalne przepisy mogą ograniczać wiek operatora.
20. Podczas pracy na zboczach należy maszynę prowadzić z
góry na dół i na odwrót (pionowo), a nie w poprzek
zbocza (poziomo).
21. Nie należy gwałtownie ruszać lub hamować podczas
jazdy po zboczu, aby nie doprowadzić przewrócenia
maszyny lub utraty kontroli nad nią. Przy wykonywaniu
ostrych zakrętów należy zmniejszyć prędkość. Przy
zmianie kierunku jazdy należy zachować ostrożność.
22. Podczas obsługi kosiarek wyposażonych w pałąk ROPS
należy zawsze zapinać pas bezpieczeństwa.
Podczas obsługi kosiarek pozbawionych pałąka ROPS nie
wolno używać pasów bezpieczeństwa.
Dodatkowe konstrukcje zabezpieczające będą dalej
oferowane dla wszystkich maszyn, na których można je
zamontować. Dzięki temu pałąk ROPS będzie można
zamontować na maszynach, które go nie posiadają lub na
których uległ on uszkodzeniu.
23. Gdy pojazd porusza się, nogi, ramiona i ciało operatora
muszą znajdować się w we wnętrzu przedziału operatora.
Obsługa i konserwacja opisywanej maszyny musi przebiegać zgodnie z niniejszą instrukcją. Maszyna jest przeznaczona
do pielęgnacji specjalistycznej trawy darniowej. Nie jest przeznaczona do stosowania na nierównym terenie lub do
koszenia długich traw.
pl-4
BEZPIECZEŃSTWO
1.2
1
WAŻNE INFORMACJE DOTYCZĄCE BEZPIECZEŃSTWA _________________________
Pokazany symbol ostrzegawczy informuje o potencjalnym zagrożeniu.
BACZNOŚĆ – wskazuje sytuację stanowiącą bezpośrednie zagrożenie; jeśli się jej nie zapobiegnie, BĘDZIE ona
skutkować śmiercią lub poważnymi obrażeniami.
OSTRZEŻENIE – wskazuje sytuację stanowiącą potencjalne zagrożenie; jeśli się jej nie zapobiegnie, MOŻE ona
skutkować śmiercią lub poważnymi obrażeniami.
UWAGA – wskazuje sytuację stanowiącą potencjalne zagrożenie; jeśli się jej nie zapobiegnie, MOŻE ona skutkować
średnimi lub lekkimi obrażeniami i szkodami materialnymi. Informuje również o niebezpiecznych zachowaniach.
INFORMACJA – wskazuje sytuację stanowiącą potencjalne zagrożenie; jeśli się jej nie zapobiegnie, MOŻE ona
skutkować szkodami materialnymi. Informuje również o niebezpiecznych zachowaniach.
Dla przejrzystości niektóre rysunki w niniejszej instrukcji mogą pokazywać zdjęte osłony, zabezpieczenia lub pokrywy.
Pod żadnym pozorem nie można użytkować maszyny, jeśli któryś z tych elementów nie jest prawidłowo zamocowany
na swoim miejscu.
! OSTRZEŻENIE
Blokada kosiarki umożliwia uruchomienie kosiarki tylko, gdy jest załączona dźwignia
hamulca, przełącznik koszenia jest wyłączony, a pedał jazdy jest w położeniu
neutralnym. System zatrzyma silnik, jeśli operator opuści fotel bez załączenia
hamulca postojowego lub odłączenia przełącznika koszenia.
NIE WOLNO uruchamiać kosiarki, jeśli nie działa system blokady.
! OSTRZEŻENIE
1.
Przed opuszczeniem fotela operatora z dowolnego powodu, należy:
a.
b.
c.
d.
e.
Ustawić pedał jazdy w położenie neutralne.
Odłączyć wszystkie elementy napędowe.
Opuścić wszystkie narzędzia na podłoże.
Załączyć hamulec postojowy.
Zatrzymać silnik i wyjąć kluczyk z przełącznika zapłonu.
2.
Nie zbliżać dłoni, stóp i ubrania do ruchomych części. Przed rozpoczęciem
czyszczenia, regulacji lub konserwacji maszyny należy poczekać, aż wszystkie
części ruchome zatrzymają się.
3.
Nie dopuszczać osób postronnych lub zwierząt do obszaru roboczego.
4.
Nie wolno przewozić pasażerów, chyba, że jest dostępny dla nich oddzielny
fotel.
5.
Nie wolno użytkować kosiarki bez prawidłowo zamontowanego wyrzutnika.
Przestrzeganie wszystkich zaleceń zawartych w niniejszej instrukcji wydłuża żywotność maszyny i utrzymuje jej
maksymalną wydajność. Regulacje i prace konserwacyjne powinien przeprowadzać zawsze wykwalifikowany technik.
Jeśli potrzebne są dodatkowe informacje lub usługi, należy skontaktować się z autoryzowanym sprzedawcą firmy
Jacobsen, który jest zaznajomiony z najnowszymi metodami serwisowania tego typu sprzętu i może zapewnić szybką i
sprawną obsługę.
pl-5
2
2
2.1
SPECYFIKACJE
SPECYFIKACJE
IDENTYFIKACJA PRODUKTU _______________________________________________
67069.............................. Kosiarka Tri-King, napęd na trzy
koła, silnik wysokoprężny
17,7 KM, pałąk ROPS. Bez
przednich ramion nośnych i
zespołów tnących.
Numer seryjny ................ Tabliczka znamionowa
zawierająca numer seryjny,
podobna do pokazanej na
ilustracji, jest przymocowana do
ramy kosiarki po lewej stronie
operatora tuż za napędem
przedniego koła. Przy zamawianiu
części zamiennych lub
uzyskiwaniu informacji na temat
konserwacji należy zawsze podać
numer seryjny urządzenia.
2.2
Pojemność skokowa ....... 719 cm3 (43,88 cal3)
Moment obrotowy ........... 35 Nm (26 stopa-funt) przy
2600 obr/min
Paliwo:
Rodzaj....................... Olej napędowy klasy 2 z niską lub
bardzo niską zawartością siarki
Liczba cetanowa ....... Min. liczba cetanowa 45
13.2
kg
kg
RIDING GREENS MOWERS
TRI-KING
Produkt
67069
XXXX
kW
Moc
akustyczna
wg EEC
Poziom ciśnienia
akustycznego
Ucho operatora
99 dBA
86,4 dBA
67069
1651
Drgania m/s2
Ramiona Korpus
3,78
0,016
Pojemność
zbiornika ................... 24,6 l (6,5 galonów US)
Regulator prędkości silnikakulowy
Niskie obroty
jałowe ...................... 1450 obr/min
Wysokie
obroty jałowe ........... 3400 obr/min
Smarowanie:
Pojemność................ 3,2 l (3,4 kwarty) z filtrem
Typ............................ SAE 20W, SAE 30W
Klasyfikacja API........ CD, CE
Filtr powietrza ................. Suchy z zaworem próżniowym i
wskaźnikiem pracy
Alternator ........................ 40 A
Szerokość cięcia:
Bębny 660 mm ......... 1828 mm (72 cale)
Bębny 762 mm ......... 2134 mm (84 cale)
Szerokość całkowita:
Bębny 660 mm ......... 1994 mm (78,5 cala)
Bębny 762 mm ......... 2298 mm (90,5 cala)
Częstotliwość cięcia:
7 ostrzy ..................... 3,8 mm/km/h (0,151 cal/mil/h)
KOSIARKA _______________________________________________________________
Ogumienie:
Przednie ................... 20x10-10 bezdętkowe
Tylne ........................ 20x10-8 bezdętkowe
Ciśnienie:
Przednie.................... 10-12 psi (0,69-0,82 bar)
Tylne ......................... 8-10 psi (0,55-0,69 bar)
Akumulator:
Typ ............................ 12 V, kwasowo-ołowiowy
Grupa ........................ 22 NF
Hamulec postojowy......... Mechaniczny przedni tarczowy
Uruchamiany dźwignią
pl-6
619
kg
ZESPOŁY TNĄCE: _________________________________________________________
Bęben ............................. Trzy bębny, szerokość 660 mm
(26 cali) lub trzy bębny, szerokość
762 mm (30 cali).
Średnica bębna............... 178 mm (7 cali)
Łożyska........................... Samonastawne łożyska z wałkami
stożkowymi
Warianty ostrzy ............... 7 ostrzy
2.4
CHARLOTTE,
NC 28241, USA
Jacobsen.com
1-800-848-1636 (US)
SILNIK___________________________________________________________________
Producent ....................... Kubota
Model .............................. D722-E3B
Moc ................................. 17,7 KM (13,2 kW) przy
3200 obr/min
Uwaga:
Faktyczna
moc
wyjściowa
będzie
najprawdopodobniej niższa niż podana w specyfikacjach ze
względu na ograniczenia eksploatacyjne i czynniki
środowiskowe
2.3
® P.O. BOX 7708,
Prędkość:
Koszenie .................. 0-8 km/h (0-5 mil/h)
Jazda ....................... 0-13,7 km/h (0-8,5 mil/h)
Wsteczny ................. 0-3,7 km/h (0-2,3 mil/h)
Układ hydrauliczny:
Pojemność...................... 20,8 l (5,5 galonów US)
Rodzaj płynu................... Biodegradowalny płyn
GreensCare 68
Filtr wlotowy.................... 10 mikronów
Filtr powrotny .................. 10 mikronów
Układ kierowniczy ...........Hydrostatyczny ze wspomaganiem
SPECYFIKACJE
2.5
MASA I WYMIARY _________________________________________________________
Wymiary:
mm
Długość ........................................................... 2519
Wysokość........................................................ 1308
Szerokość – koła............................................. 1638
2.6
2
(cale)
(99)
(51,5)
(64,5)
Masa:...................................................................kg (funty)
670069 (kosiarka zasadnicza, bez bębnów)......655 (1445)
AKCESORIA I DOKUMENTY UZUPEŁNIAJĄCE _________________________________
Pełny wykaz akcesoriów i osprzętu można uzyskać od sprzedawcy firmy Jacobsen.
! UWAGA
Stosowanie części i akcesoriów niezatwierdzonych przez firmę Jacobsen może być przyczyną wypadków prowadzących
do obrażeń lub szkód materialnych.
Akcesoria
Pistolet pneumatyczny ............................................JAC5098
Pomarańczowy lakier uzupełniający
(puszka 12 uncji z rozpylaczem)............................... 554598
Pałąk ROPS z dwoma słupkami i pasem
bezpieczeństwa .......................................................... 69157
Zestaw świateł ............................................................ 69149
Podłokietnik............................................................. 4139431
Kosz na trawę do bębnów 660 mm............................. 69151
Kosz na trawę do bębnów 762 mm............................. 69150
Zestaw bębna 600 obr/min (kosiarki z silnikiem
wysokoprężnym) ..................................................... 5003062
Zespół dociskowy.................................................... 1002588
Bębny
Lewy bęben 660 mm, 7 ostrzy .....................................67114
Prawy bęben 660 mm, 7 ostrzy ...................................67115
Środkowy bęben 660 mm, 7 ostrzy..............................67116
Lewy bęben 762 mm, 7 ostrzy .................................... 67123
Prawy bęben 762 mm, 7 ostrzy .................................. 67124
Środkowy bęben 762 mm, 7 ostrzy............................. 67125
Pionowy zespół tnący 660 mm, lewy .......................... 67139
Pionowy zespół tnący 660 mm, prawy ........................ 67140
Pionowy zespół tnący 660 mm, środkowy .................. 67141
Wałki
Rowkowany wałek przedni (stalowy) do bębna
660 mm........................................................................67731
Rowkowany wałek przedni (stalowy) do bębna
762 mm........................................................................67729
Wałek gładki do bębna 660 mm ................................132639
Wałek gładki do bębna 762 mm ................................132640
Zgarniacz do rowkowanego wałka przedniego
do bębna 660 mm........................................................69147
Zgarniacz do rowkowanego wałka przedniego
do bębna 762 mm........................................................69148
Zgarniacz do wałka tylnego do bębna 660 mm ...........67909
Zgarniacz do wałka tylnego do bębna 762 mm ...........67910
Dokumenty uzupełniające
Instrukcja bezpieczeństwa i obsługi.........................4189624
Instrukcja części zamiennych i konserwacji.............4189623
Katalog części silnika wysokoprężnego...................4189622
Płyta DVD ze szkoleniem dla operatorów................4191622
Instrukcja konserwacji i napraw ...............................4171674
pl-7
3
3
3.1
REGULACJE
REGULACJE
INFORMACJE OGÓLNE ____________________________________________________
! WARNING
Aby zapobiec wypadkom, należy przed rozpoczęciem
regulacji lub prac konserwacyjnych opuścić narzędzia
na podłoże, odłączyć wszystkie elementy napędowe,
załączyć hamulec postojowy, zatrzymać silnik i wyjąć
kluczyk z przełącznika zapłonu.
Należy sprawdzić, czy kosiarka jest ustawiona na
pewnym i płaskim podłożu. Nie wolno wykonywać
prac na kosiarce, która jest podparta tylko przez
podnośnik. Należy zawsze stosować podpory.
Jeśli uniesiony jest tylko przód lub tył kosiarki, należy
umieścić klocki przed i za kołami, które nie są
uniesione.
1. Regulacje i prace konserwacyjne powinien
przeprowadzać zawsze wykwalifikowany technik.
3.2
Jeśli nie można dokonać odpowiedniej regulacji,
należy skontaktować się z autoryzowanym
sprzedawcą firmy Jacobsen.
2. Części zużyte lub uszkodzone należy wymienić, a
nie regulować.
3. Podczas regulacji lub napraw nie wolno nosić
biżuterii lub luźnej odzieży.
! UWAGA
Należy uważać, aby nie dopuścić do pochwycenia
dłoni i palców pomiędzy ruchomymi i nieruchomymi
częściami maszyny.
4. Nie wolno zmieniać ustawienia regulatora prędkości
silnika ani przekraczać jego maksymalnych obrotów.
PAS WENTYLATORA ______________________________________________________
Należy sprawdzić i wyregulować nowy pas po
pierwszych dziesięciu godzinach działania. Potem należy
go regulować co 100 godzin.
A
1. Należy ustawić koło pasowe alternatora tak, aby pas
(B) odchylał się o 7 do 9 mm (9/32 do 11/32 cala)
przy nacisku 10 kg (22 funty) na środku pomiędzy
kołami pasowymi.
B
2. Jeśli naprężenie jest nieprawidłowe, należy
poluzować śruby mocujące alternatora (A) i ustawić
alternator tak, aby uzyskać prawidłowe naprężenie
pasa. Dokręcić mocowanie (A).
Rysunek 3A
3.3
PAS NAPĘDOWY POMPY___________________________________________________
Ustawić pas pompy bębna (C), aby odchylał się o 6 mm
(1/4 cala) przy nacisku 2-3 kg (5-7 lb.) na środku między
kołami pasowymi.
E
1. Poluzować mocowanie (D oraz E).
2. Przesunąć zespół pompy/sprzęgła w dół, aby
zwiększyć naprężenie pasa (C), a następnie
dokręcić mocowanie (D oraz E).
3. Dokręcić mocowanie (D oraz E z momentem 37-45
Nm (27-33 st/funt).
D
C
D
Diesel Engine
Gasoline E
Rysunek 3B
pl-8
REGULACJE
3.4
3
PRZEŁĄCZNIKI BIEGU JAŁOWEGO I NAPĘDU NA TRZY KOŁA ___________________
1. Sprawdzić regulację pedału jazdy.
2. Użyć woltomierza/omomierza, aby ustalić, kiedy
przełącznik otwiera się i zamyka.
G
a. Ustawić przełącznik (G) tak, aby palec ramienia
uruchamiającego (F) był wyśrodkowany nad
aktywną częścią przełącznika. Styki przełącznika
powinny być zamknięte, gdy pedał jazdy jest w
położeniu neutralnym i otwarte, gdy pedał
przesunięty jest minimalnie w przód lub w tył.
b. Ustawić przełącznik napędu na trzy koła (H) tak,
aby styki były otwarte, gdy pedał jazdy jest w
położeniu neutralnym i zamknięte, gdy pedał
przesunięty jest minimalnie w przód lub w tył.
F
H
Rysunek 3C
3.5
PRZEŁĄCZNIKI HAMULCA POSTOJOWEGO ___________________________________
Poluzować śruby (K) i ustawić oba przełączniki tak, aby
styki zamykały się, jak tylko dźwignia hamulca zostanie
przestawiona w położenie załączenia, a następnie
dokręcić śruby.
K
Rysunek 3D
3.6
PRZEŁĄCZNIK OGRANICZNIKA PODNOSZENIA ________________________________
Przełącznik ogranicznika podnoszenia należy tak
ustawić, aby bębny przestały się kręcić, zanim
płaszczyzna cięcia pomiędzy bębnem a podłożem
przekroczy 400 mm (15-3/4 cala). Aby dokonać regulacji,
poluzować śrubę (L) i ustawić ramię (M).
L
M
Rysunek 3E
pl-9
3
REGULACJE
3.7
POŁOŻENIE NEUTRALNE PEDAŁU JAZDY ____________________________________
1. Jeśli kosiarka wykonuje minimalny ruch (pełzanie)
przy włączonym silniku, a pedał jazdy jest zwolniony,
należy wyregulować naprężenie sprężyny, aby
zwolniony pedał zawsze wracał w położenie
neutralne.
a. Zablokować tylne nakrętki i ustawić przednie
nakrętki (N) tak, aby utrzymać wysunięcie
sprężyny równe 9 mm (3/8 cala) (O).
b. Uruchomić silnik i sprawdzić pełzanie; w razie
potrzeby powtórzyć procedurę.
Note: Kosiarka może wykonywać ruch pełzający,
gdy olej hydrauliczny jest zimny. Przed podjęciem
decyzji o tym, czy regulacja jest konieczna, należy
pozostawić kosiarkę włączoną przez 15 minut.
Przód
O
2. Należy zachować najwyższą ostrożność przy
dokonywaniu tej regulacji, gdyż koła będą
uniesione, a silnik będzie pracował.
3. Załączyć hamulec postojowy, zatrzymać silnik,
otworzyć
pokrywy
silnika,
a
następnie
przesmarować wszystkie czopy układu zawieszenia.
N
N
4. Zablokować klockiem tylne koło i umieścić przód
kosiarki na podporach.
Rysunek 3F
5. Poluzować wszystkie nakrętki (N) i wyregulować
tylną sprężynę tak, aby ramię pedału jazdy było w
położeniu neutralnym.
3.8
ZATRZYMANIE PEDAŁU JAZDY PRZY JEŹDZIE W PRZÓD._______________________
Poluzować nakrętki (P) i przesunąć pedał jazdy w
maksymalnie przednie położenie. Wyregulować śrubę
(Q), aż jej łeb ledwie dotknie ramienia pedału jazdy.
Ustawić pedał jazdy w położenie neutralne i odkręcić
śrubę (Q) o jeden pełny obrót. Dokręcić nakrętki (P).
Important: Śruba (Q) musi zatrzymać pedał jazdy, zanim
zetkną się wewnętrzne ograniczniki hydrostatycznego
układu jezdnego.
P
Q
P
Rysunek 3G
3.9
ZATRZYMANIE PEDAŁU PODNOSZENIA / OPUSZCZANIA _______________________
Ustawić śruby (R oraz S) tak, aby zawór suwakowy nie
uderzał w ograniczniki wewnętrzne, przy zachowaniu
pełnego skoku suwaka.
S
R
Rysunek 3H
pl-10
REGULACJE
3
3.10 HAMULEC POSTOJOWY____________________________________________________
1. Należy sprawdzić linki i przeguby, aby mieć
pewność, że działają bez problemów.
! UWAGA
2. Ustawić kosiarkę na zboczu o nachyleniu 30%
(16,7°) w pobliżu jego podnóża tak, aby przód
kosiarki był skierowany w dół. Załączyć hamulec
postojowy i zatrzymać silnik.
a. Kosiarka powinna pozostać na zboczu, nie
zsuwając się.
b. Jeśli siła hamowania jest niewystarczająca,
należy uruchomić silnik, zwolnić hamulec i
zjechać na dół zbocza.
NIE WOLNO zwalniać hamulca, gdy silnik jest
wyłączony.
3. Jeśli hamulec postojowy jest zwolniony, należy
przekręcić pokrętło regulacji w prawo, co ćwierć
obrotu załączając i zwalniając hamulec, aż wystąpi
wyraźne zatrzaśnięcie na środku.
4. Powtórzyć próbę na zboczu, jeśli to konieczne.
Uwaga:
Nadmierna regulacja powoduje ciężką
pracę dźwigni, ale nie zwiększa skuteczności
hamowania.
3.11 TYLNE RAMIĘ NOŚNE ______________________________________________________
1. Położenie tylnego ramienia nośnego jest prawidłowe,
gdy tylne zderzaki kosiarki wywierają lekki nacisk na
spód podnóżków.
2. Odłączyć łańcuch nośny (T) od wahacza i ustawić
prawidłowo przegub kulowy (U).
T
U
Rysunek 3I
3.12 DOCISK __________________________________________________________________
1. Przestawić zespoły tnące w tryb stały (punkt 3.18) i
opuścić je na wagę o udźwigu 113 kg (250 lb.). Tylny
wałek kosiarki musi spoczywać na wadze.
V
2. Aby wyregulować docisk tylnego zespołu tnącego
należy poluzować nakrętki (V) i dokonać regulacji,
uzyskując właściwy docisk.
3. Aby wyregulować docisk przednich zespołów
tnących, należy poluzować nakrętkę (W) i ustawić
śrubę (X). Minimalne zazębienie gwintu powinno
wynosić 13 mm (1/2 cala).
Rysunek 3J
4. Aby zapewnić jednakową wysokość cięcia, docisk
powinien być równy we wszystkich zespołach
tnących.
5. Firma Jacobsen zaleca ustawienie masy zespołu
tnącego w trybie swobodnym na 27 kg (60 lb.) oraz
w trybie stałym na 41 kg (90 lb.).
X
W
Rysunek 3K
pl-11
3
REGULACJE
3.13 USTAWIENIE PRZEŚWITU BĘBNA I NOŻA DOLNEGO ___________________________
(kontrola przed regulacją)
1. Sprawdzić lub osiowy oraz luz promieniowy łożysk
bębna. Jeśli występują nietypowe ruchy bębna, na
przykład w górę lub w dół czy też na boki, należy
przeprowadzić regulację lub wymienić odpowiednie
elementy.
! UWAGA
5. Bęben musi być równoległy do noża dolnego.
Nieprawidłowe
ustawienie
bębna
może
spowodować nadmierne tępienie jego noży oraz
poważne uszkodzenia bębna i noża dolnego.
6. Stan trawy również wpływa na to ustawienie.
a. Trawa sucha i rzadka wymaga większego
prześwitu, co zapobiega gromadzeniu się ciepła i
uszkodzeniu bębna i noża dolnego.
b. Trawa wysokiej jakości o dobrej zawartości
wilgoci wymaga mniejszego prześwitu (niemal
zerowego).
Aby nie dopuścić do zranienia konserwatora i
uszkodzenia krawędzi tnących, należy zachować
najwyższą ostrożność przy pracy z bębnem.
2. Sprawdzić, czy noże bębnowe i nóż dolny mają
odpowiednio ostre krawędzie, bez wygięć lub
szczerb.
93°
5 -6 °
a. Krawędzie tnące noży bębnowych i noża
dolnego muszą być ostre, bez zadziorów i nie
mogą wykazywać oznak zaokrąglenia.
5/32 in.
Rysunek 3L
b. Nóż dolny oraz wspornik noża dolnego muszą
być dobrze umocowane. Nóż dolny musi być
prosty i ostry.
c.
Na przedniej powierzchni noża dolnego musi być
zachowana płaska powierzchnia co najmniej 4
mm (32 cala). Do korekty profilu noża dolnego
należy użyć zwykłego płaskiego pilnika.
3. Jeśli zużycie lub uszkodzenia są tak duże, że noży
bębna i noża dolnego nie da się dotrzeć, należy je
zeszlifować na nowo.
Krawędź
Leadingnatarcia
bębna
Edge of Reel
Normalny
Normal
obrót
Rotation
Rysunek 3M
4. Prawidłowe ustawienie bębna względem noża
dolnego jest niezwykle ważne. Należy utrzymywać
prześwit równy 0,025-0,076 mm (0,001 do 0,003
cala) na całej długości bębna i nożna dolnego.
3.14 USTAWIENIE PRZEŚWITU BĘBNA I NOŻA DOLNEGO ___________________________
1. Przed ustawieniem należy przeczytać punkt 3.13.
2. Rozpocząć ustawienie od krawędzi natarcia bębna
aż do drugiego końca. Krawędź natarcia noża to ten
koniec, który pierwszy mija nóż dolny podczas
normalnego obrotu.
e. Gdy bęben jest prawidłowo ustawiony, będzie się
swobodnie obracał i będzie można przeciąć
arkusz gazety na całej długości bębna, gdy
papier jest ustawiony pod kątem 90°.
3. Poluzować nakrętkę (C) o 1/4 obrotu na obu
końcach zespołu tnącego.
A
a. Przekręcić śrubę regulującą (A) o 1/16 do 1/8
obrotu.
b. Wsunąć szczelinomierz lub podkładkę o
grubości 0,025 mm (0,001 cala) pomiędzy nóż
bębna i nóż dolny. Nie przekręcać bębna.
c.
Ustawić tylny koniec bębna w ten sam sposób, a
następnie ponownie sprawdzić ustawienie na
krawędzi natarcia.
d. Dokręcić wszystkie elementy
ponownie sprawdzić ustawienie.
pl-12
mocujące
i
G
F
E
B
C
D
Rysunek 3N
REGULACJE
3
3.15 TRYBY CIĘCIA ____________________________________________________________
1. Kosiarkę można użytkować w trybie stałym lub w
trybie swobodnym.
2. Tryb stały wykorzystywany jest przy wysokości
cięcia większej niż 25 mm (1 cal), a kosiarka nie
wymaga przedniego wałka, chyba, że teren jest
nierówny i wyboisty.
Jeśli wymagany jest przedni wałek, należy go unieść
o 6 mm (1/4 cala) wyżej niż wałek tylny i stosować
tylko po to, aby zapobiec zrywaniu darni.
3. Tryb swobodny wykorzystywany jest przeważnie
przy wysokości cięcia mniejszej niż 25 mm (1 cal) i
wymaga przedniego wałka.
Jeśli stosowany jest gładki wałek przedni 63 mm (21/2 cala), wysokość cięcia będzie zmieniać się w
zakresie 9-54 mm (3/8 do 2-1/8 cala).
Jeśli stosowany jest rowkowany wałek przedni 76
mm (3 cale), wysokość cięcia będzie zmieniać się w
zakresie 9-57 mm (3/8 do 2-1/4 cala).
4. Aby przestawić kosiarkę z trybu stałego na
swobodny, należy zdjąć element (H) z każdej strony
trzech ram zespołów tnących.
Zamontować przedni wałek i umieścić elementy (H)
w bezpiecznym miejscu, na wypadek, gdy kosiarkę
znowu trzeba będzie przestawić w tryb stały.
5. Aby przestawić kosiarkę z trybu swobodnego na
tryb swobodny, należy złożyć element (H) jak to
pokazano na rysunku i zdjąć lub unieść przedni
wałek.
H
H
H
Rysunek 3O
3.16 REGULACJA WYSOKOŚCI CIĘCIA ___________________________________________
1. Unieść i zablokować ramiona nośnego w położeniu
transportowym.
2. Aby można było uzyskać łatwiejszy dostęp do
elementów regulujących po stronie napędu na
przednich bębnach, firma Jacobsen zaleca
uniesienie przedniego końca kosiarki na kilka
milimetrów nad podłożem, a następnie, uważając,
aby nie uszkodzić przewodów hydraulicznych,
przechylić przednie zespoły tnące o 90 stopni i
sprząc zespoły tnące.
3. Na
tylnym
zespole
tnącym
(środkowym)
zdemontować trzpień i kryzę z wałka, a potem
przesunąć zespół tnący do tyłu.
Sprzężenie
Tether
Rysunek 3P
4. Należy zawsze uregulować ustawienie bębna
względem noża dolnego (punkty 3.13 oraz 3.14)
przed ustawieniem wysokości cięcia.
5. Wybrać tryb stały lub swobodny i odpowiednio
ustawić zespół tnący.
6. Poluzować element mocujący ślizgacza (D Rysunek 3N), a następnie ustawić wysokość cięcia.
(Do kosiarek dołączane jest specjalne narzędzie.
Potrzebny jest klucz nasadowy grzechotkowy
5/8 cala).
pl-13
3
REGULACJE
3.17 DEMONTAŻ ZESPOŁU TNĄCEGO ____________________________________________
1. Nie należy odłączać przewodów od silnika, aby nie
dopuścić
do
zanieczyszczenia
układu
hydraulicznego oraz utraty oleju.
! UWAGA
Przed demontażem zespołów
odłączyć sprężyny nośne.
tnących
należy
2. Unieść i zablokować ramiona nośne w położeniu
transportowym (punkt 3.4) oraz odłączyć sprężyny
dociskowe.
3. Wyjąć zawleczkę, a następnie opuścić ramiona
nośne na podłoże.
4. Zdjąć element mocujący silnik do obudowy napędu i
ostrożnie wyjąć silnik.
5. Umieścić silnik w czystym plastykowym worku i
zakryć otwór w skrzyni przekładniowej.
6. Zdemontować trzpień i kryzę ze środkowego
(tylnego) ramienia nośnego i odciągnąć środkowy
zespół tnący od kosiarki.
7. Zdjąć elementy mocujące przednie ramiona nośne
do zespołów tnących i odsunąć je.
3.18 WYSOKOŚĆ CIĘCIA – TRYB STAŁY __________________________________________
Postępować zgodnie z procedurami opisanymi w
punkcie 3.16.
1. Ustawić element regulujący tylnego wałka.
a. W przypadku wysokości cięcia 9-44 mm (3/8 do
1-3/4 cala), należy wykorzystać otwory (M) na
ramie kosiarki oraz dwa otwory (pokazane na
czarno) na elemencie regulującym wysokość (F),
jak to pokazano na rysunku.
G
F
E
b. W przypadku wysokości większych niż 44 mm
(1-3/4 cala), zdemontować element regulujący
(F) i przekręcić wspornik mocujący do góry
nogami; następnie wykorzystać otwory (N) na
ramie i dwa otwory (pokazane na czarno)
elementu regulującego (F).
B
N
M
N
M
5
6
7
8
U
T
S
R
1
2
3
4
Rysunek 3Q
A
2. Rozprząc zespoły tnące i obniżyć je na podłoże.
3. Umieścić przekładki odpowiedniej wysokości (J) pod
każdym końcem bębna tak, aby przylegały do
przedniej krawędzi noża dolnego.
4. Poluzować nakrętkę (G) i obniżyć tylny wałek na
podłoże. Dokręcić nakrętkę (E) do elementu
regulującego, a następnie sprawdzić ustawienie po
obu stronach bębna. W razie potrzeby dokonać
ponownej regulacji.
5. Zamontować element regulujący przedniego wałka
(B) (jeśli wałek jest wymagany) w otworach 2 i 4
tylko na ramie kosiarki. Nie wykorzystywać otworów
1 i 3. Ustawić wałek na wysokość 6 mm (1/4 cala)
nad tylnym wałkiem.
pl-14
G
B
F
E
J
Rysunek 3R
REGULACJE
3
3.19 WYSOKOŚĆ CIĘCIA – TRYB SWOBODNY _____________________________________
Postępować zgodnie z procedurami opisanymi w
punkcie 3.16.
1. Zamontować element regulujący przedniego wałka
(B) w otworach 2 i 4 tylko na ramie kosiarki. Nie
wykorzystywać otworów 1 i 3. Należy zapoznać się
ze schematem poniżej, aby ustalić, które otwory
elementu regulującego przedniego wałka należy
wykorzystać.
B
G
F
N
M
N
M
E
2. Ustawić elementy regulujące tylnego wałka (F).
a. W przypadku wysokości cięcia 9-44 mm (3/8
1-3/4 cala), należy wykorzystać otwory (M)
ramie kosiarki oraz dwa otwory (pokazane
czarno) na elemencie regulującym (F), jak
pokazano na rysunku.
5
6
1
2
3
4
7
8
do
na
na
to
b. W przypadku wysokości większych niż 44 mm
(1-3/4 cala), zdemontować element regulujący
(F) i przekręcić wspornik mocujący do góry
nogami; następnie wykorzystać otwory (N) na
ramie i dwa otwory (pokazane na czarno)
elementu regulującego (F).
3. Poluzować nakrętkę (L) i wyregulować wkręt (K),
aby uzyskać właściwą wysokość cięcia (X), a
następnie dokręcić nakrętkę (L) do płytki
pomiarowej (P).
4. Umieścić jeden koniec płytki pomiarowej pod
przednim wałkiem na dowolnym końcu bębna i
przesunąć łeb śruby (K) nad nożem dolnym.
U
T
S
R
Rysunek 3S
X-Cutting Height
X-Wysokość
cięcia
Front
Roller
Przedni
wałek
P
Tylny Roller
wałek
Rear
K
L
Rysunek 3T
a. Ustawić nakrętkę (G), aby opuścić tylny wałek do
płytki pomiarowej, a następnie dokręcić nakrętkę
(E) do elementu regulującego.
b. Przesunąć płytkę pomiarową do drugiego końca
bębna i powtórzyć krok 4a oraz 4b.
Zakres cięcia
Milimetry
3/8 - 3/4
3/4 - 1-1/4
1-1/4 - 1-3/4
1-3/4 - 2-1/4
10 - 19
19 - 32
32 - 44
44 - 57
Wałek gładki
Cale
3/8 - 5/8
5/8 - 1-1/8
1-1/8 - 1-5/8
1-5/8 - 2-1/8
Milimetry
Tył
Cale
Przód
Wałek rowkowany
10 - 16
16 - 29
29 - 41
41 - 54
R
S
T
U
M
M
M
N
pl-15
3
REGULACJE
3.20 MOMENTY DOKRĘCEŃ ____________________________________________________
INFORMACJA
Wszystkie wartości momentów dokręceń są przybliżone i mają charakter informacyjny. Operator wykorzystuje te
wartości na własne ryzyko. Firma Jacobsen nie jest odpowiedzialna za straty, roszczenia lub szkody spowodowane
użyciem poniższych tabel. Przy stosowaniu momentów dokręceń należy zachować zawsze najwyższą ostrożność.
Firma Jacobsen standardowo wykorzystuje śruby platerowane klasy 5, o ile nie podano inaczej. W przypadku
dokręcenia śrub platerowanych należy stosować wartości dotyczące śrub smarowanych.
ŁĄCZNIKI WG NORMY AMERYKAŃSKIEJ ANS
ROZM
IAR
JEDNO
STKI
KLASA 5
ROZM
IAR
KLASA 8
Smarowane
Suche
Smarowane
Suche
JEDNO
STKI
KLASA 5
KLASA 8
Smarowane
Suche
Smarowane
Suche
#6-32
in-lb (Nm)
–
20 (2,3)
–
–
7/16-14
ft-lb (Nm)
37 (50,1)
50 (67,8)
53 (71,8)
70 (94,9)
#8-32
in-lb (Nm)
–
24 (2,7)
–
30 (3,4)
7/16-20
ft-lb (Nm)
42 (56,9)
55 (74,6)
59 (80,0)
78 (105)
#10-24
in-lb (Nm)
–
35 (4,0)
–
45 (5,1)
1/2-13
ft-lb (Nm)
57 (77,2)
75 (101)
80 (108)
107 (145)
#10-32
in-lb (Nm)
–
40 (4,5)
–
50 (5,7)
1/2-20
ft-lb (Nm)
64 (86,7)
85 (115)
90 (122)
120 (162)
#12-24
in-lb (Nm)
–
50 (5,7)
–
65 (7,3)
9/16-12
ft-lb (Nm)
82 (111)
109 (148)
115 (156)
154 (209)
1/4-20
in-lb (Nm)
75 (8,4)
100 (11,3)
107 (12,1)
143 (16,1)
9/16-18
ft-lb (Nm)
92 (124)
122 (165)
129 (174)
172 (233)
1/4-28
in-lb (Nm)
85 (9,6)
115 (13,0)
120 (13,5)
163 (18,4)
5/8-11
ft-lb (Nm)
113 (153)
151 (204)
159 (215)
211 (286)
5/16-18
in-lb (Nm)
157 (17,7)
210 (23,7)
220 (24,8)
305 (34,4)
5/8-18
ft-lb (Nm)
128 (173)
170 (230)
180 (244)
240 (325)
5/16-24
in-lb (Nm)
173 (19,5)
230 (26,0)
245 (27,6)
325 (36,7)
3/4-10
ft-lb (Nm)
200 (271)
266 (360)
282 (382)
376 (509)
3/8-16
ft-lb (Nm)
23 (31,1)
31 (42,0)
32 (43,3)
44 (59,6)
3/4-16
ft-lb (Nm)
223 (302)
298 404
315 (427)
420 (569)
3/8-24
ft-lb (Nm)
26 (35,2)
35 (47,4)
37 (50,1)
50 (67,8)
7/8-14
ft-lb (Nm)
355 (481)
473 (641)
500 (678)
668 (905)
ŁĄCZNIKI METRYCZNE
4.6
ROZM
IAR
8.8
10.9
Łączniki o
mniejszym
znaczeniu
w
aluminium
12.9
JEDNO
STKI
Smarowane
Suche
Smarowane
Suche
Smarowane
Suche
Smarowane
Suche
M4
Nm (in-lb)
–
–
–
–
–
–
3,83 (34)
5,11 (45)
2,0 (18)
M5
Nm (in-lb)
1,80 (16)
2,40 (21)
4,63 (41)
6,18 (54)
6,63 (59)
8,84 (78)
7,75 (68)
10,3 (910
4,0 (35)
M6
Nm (in-lb)
3,05 (27)
4,07 (36)
7,87 (69)
10,5 (93)
11,3 (102)
15,0 (133)
13,2 (117)
17,6 (156)
6,8 (60)
M8
Nm (in-lb)
7,41 (65)
9,98 (88)
19,1 (69)
25,5 (226)
27,3 (241)
36,5 (323)
32,0 (283)
42,6 (377)
17,0 (150)
M10
Nm (ft-lb)
14,7 (11)
19,6 (14)
37,8 (29)
50,5 (37)
54,1 (40)
72,2 (53)
63,3 (46)
84,4 (62)
33,9 (25)
M12
Nm (ft-lb)
25,6 (19)
34,1 (25)
66,0 (48)
88,0 (65)
94,5 (70)
125 (92)
110 (81)
147 (108)
61,0 (45)
M14
Nm (ft-lb)
40,8 (30)
54,3 (40)
105 (77)
140 (103)
150 (110)
200 (147)
175 (129)
234 (172)
94,9 (70)
3.21 KONKRETNE MOMENTY DOKRĘCEŃ_________________________________________
1.
2.
Główki cięgieł wahaczy: (2) 41-47 Nm (30-35 stopafunt)
Korki spustowe silnika: 30 Nm (22 stopa-funt)
pl-16
3.
4.
5.
Główki cięgieł układu kierowniczego: 68-75 Nm
(50-55 stopa-funt)
Nakrętka koła kierownicy: 41-51 Nm (30-40 stopa-funt)
Mocowanie koła: 88-116 Nm (65-85 stopa-funt)
KONSERWACJA
4
4.1
KONSERWACJA
INFORMACJE OGÓLNE_____________________________________________________
! OSTRZEŻENIE
Aby zapobiec wypadkom, należy przed rozpoczęciem
czyszczenia, regulacji lub naprawy maszyny odłączyć
elementy napędowe, opuścić narzędzia na podłoże,
załączyć hamulec postojowy, zatrzymać silnik i wyjąć
kluczyk z przełącznika zapłonu
Należy sprawdzić, czy kosiarka jest ustawiona na
pewnym i płaskim podłożu. Nie wolno wykonywać prac
na kosiarce, która jest podparta tylko przez podnośnik.
Należy zawsze stosować podpory.
1.
2.
4.2
4
Regulacje
i
prace
konserwacyjne
powinien
przeprowadzać zawsze wykwalifikowany technik. Jeśli
nie można dokonać odpowiedniej regulacji, należy
skontaktować się z autoryzowanym sprzedawcą firmy
Jacobsen.
Należy regularnie przeprowadzać przeglądy maszyny,
ustalić harmonogram prac konserwacyjnych i
prowadzić ich szczegółowy rejestr.
a.
Utrzymywać maszynę w czystości.
b.
Wszystkie ruchome części muszą być prawidłowo
ustawione i smarowane.
c.
Przed uruchomieniem maszyny należy wymienić
zużyte lub uszkodzone części.
d.
Wszystkie płyny eksploatacyjne
odpowiedni poziom.
e.
Wszystkie osłony muszą być na swoim miejscu, a
elementy mocujące muszą być prawidłowo
przytwierdzone.
f.
Ciśnienie w ogumieniu musi być prawidłowe.
muszą
mieć
3.
Podczas regulacji lub napraw nie wolno nosić biżuterii
lub luźnej odzieży.
4.
Podczas demontażu i montażu elementów należy
korzystać z ilustracji w katalogu części jako materiałów
poglądowych.
5.
Należy utylizować lub odpowiednio neutralizować
wszystkie materiały niebezpieczne (akumulatory,
paliwo, smary, płyny przeciw zamarzaniu, itp.), zgodnie
z przepisami lokalnymi lub krajowymi.
SILNIK __________________________________________________________________
WAŻNE: Do opisywanej kosiarki dodawana jest
oddzielna „Instrukcja dotycząca silnika”, przygotowana
przez producenta silnika. Należy uważnie przeczytać
„Instrukcję dotyczącą silnika”, aby zaznajomić się z
jego eksploatacją i konserwacją. Przestrzeganie
wskazówek
producenta
silnika
zagwarantuje
maksymalną
żywotność
silnika.
Aby
zamówić
dodatkowe egzemplarze „Instrukcji dotyczącej silnika”,
należy skontaktować się z producentem silnika.
Prawidłowe dotarcie silnika może znacząco wpłynąć na
wydajność i żywotność silnika.
INFORMACJA
2.
Podczas pierwszych 50 godzin eksploatacji należy
sprawdzać poziom oleju dwa razy dziennie. Wyższe
niż normalne zużycie oleju nie jest nieprawidłowe
podczas docierania silnika.
3.
Należy wymienić olej i wkład filtra oleju po pierwszych
50 godzinach eksploatacji.
4.
Należy sprawdzić i wyregulować pasy wentylatora i
alternatora.
5.
Szczegółowe okresy konserwacji podane są w punkcie
punkt 6.3 i „Instrukcji dotyczącej silnika”.
Jeśli pompa wtryskowa, wtryskiwacze lub układ paliwowy
wymagają serwisowania, należy skontaktować się z
autoryzowanym sprzedawcą firmy Jacobsen.
Kosiarkę zaprojektowano tak, aby działała i cięła trawę
najbardziej wydajnie przy fabrycznym ustawieniu
regulatora prędkości silnika. Nie wolno zmieniać
ustawienia regulatora silnika ani przekraczać jego
maksymalnych obrotów.
W czasie docierania firma Jacobsen zaleca następujące
czynności:
1.
Podczas pierwszych 50 godzin eksploatacji nowy silnik
powinien osiągnąć temperaturę co najmniej 60°C
(140°F), zanim zacznie pracować pod pełnym
obciążeniem.
pl-17
4
KONSERWACJA
4.3
OLEJ SILNIKOWY _________________________________________________________
Sprawdzać poziom oleju silnikowego na początek każdego
dnia, przed uruchomieniem silnika. Jeśli poziom oleju jest
niski, należy zdjąć korek wlewu oleju i dodać odpowiednią
ilość oleju.
Bezpieczny
zakres działania
Safe Operating
Range
⎧
⎪
⎪
⎨
⎪
⎪
⎩
Pierwszą wymianę oleju należy wykonać po pierwszych 50
godzinach eksploatacji, a potem co 100 godzin. Należy
zapoznać się z „Instrukcją dotyczącą silnika”.
Należy stosować tylko oleje silnikowe CD/CE według
klasyfikacji API.
Powyżej 25°C
SAE 30W lub SAE10W30/10W40
0 do 25°C
SAE 20W lub SAE 10W30/10W40
Poniżej 0°C
SAE10W lub SAE 10W30/10W40
4.4
Rysunek 4A
FILTR POWIETRZA ________________________________________________________
Należy codziennie sprawdzać wskaźnik kontrolny. Jeśli w
okienku (C) pojawi się czerwona obwódka, należy wymienić
wkład.
D
Nie wyjmować wkładu do oględzin lub czyszczenia.
Niepotrzebne wyjmowanie wkładu filtra zwiększa ryzyko
dostania się kurzu i innych zanieczyszczeń do silnika.
Gdy wymagane są prace serwisowe, należy najpierw
oczyścić część zewnętrzną obudowy filtra; następnie jak
najostrożniej wyjąć stary wkład i go zutylizować.
1.
Ostrożnie oczyścić wnętrze obudowy filtra, nie
pozwalając, aby kurz dostał się do wlotu powietrza.
2.
Sprawdzić nowy wkład. Nie używać uszkodzonego
wkładu i nigdy nie używać nieodpowiedniego wkładu.
3.
Założyć nowy element i upewnić się, że jest
prawidłowo osadzony. Ustawić wskaźnik, naciskając
przycisk (D).
4.
Założyć pokrywę, sprawdzając, czy szczelnie zamyka
obudowę filtra. Odpylacz (E) musi być skierowany w
dół.
5.
Sprawdzić wszystkie przewody powietrza. Dokręcić
zaciski na przewodach.
pl-18
C
E
Rysunek 4B
KONSERWACJA
4.5
4
PALIWO__________________________________________________________________
Z paliwem należy postępować bardzo ostrożnie – jest
wysoce łatwopalne. Należy stosować odpowiedni
pojemnik, dziobek musi mieścić się wewnątrz szyjki wlewu
paliwa. Należy unikać wlewania paliwa przy pomocy puszek
i lejków.
! OSTRZEŻENIE
Nie wolno zdejmować korka wlewu paliwa ze zbiornika
paliwa ani dodawać paliwa, gdy silnik pracuje lub jest
gorący.
Nie wolno palić w pobliżu paliwa. Nie wolno napełniać ani
opróżniać
zbiornika
paliwa
w
zamkniętym
pomieszczeniu.
• Zbiornik paliwa należy napełnić do 25 mm (1 cala) od
dolnej krawędzi szyjki wlewu paliwa.
• Paliwo należy przechowywać zgodnie z przepisami
lokalnymi lub krajowymi oraz zaleceniami producenta
paliwa.
• Nie wolno przekraczać maksymalnego poziomu paliwa
ani pozwalać, aby zbiornik był pusty.
• Należy sprawdzać co 50 godzin przewody paliwowe i
zaciski. W przypadku pierwszych oznak uszkodzenia
należy wymienić przewody paliwowe i zaciski.
• Należy stosować czysty, świeży olej napędowy klasy 2.
Minimalna liczba cetanowa to 45. Więcej informacji można
znaleźć w „Instrukcji dotyczącej silnika”.
Nie wolno rozlewać paliwa, rozlane paliwo należy
natychmiast wytrzeć.
Nie wolno używać ani przechowywać zbiorników paliwa
w pobliżu otwartego płomienia lub urządzeń, które
mogłyby wytworzyć iskrę i spowodować zapłon paliwa
lub jego oparów.
Należy pamiętać, aby prawidłowo założyć i dokręcić
korek wlewu paliwa.
4.6
UKŁAD PALIWOWY ________________________________________________________
Szczegółowe okresy konserwacji podane są w punkcie
punkt 6.3.
Przed wymianą filtra należy dokładnie oczyścić obudowę
filtra i obszar wokół filtra. Nie można dopuścić, aby do
układu paliwowego dostały się zanieczyszczenia.
4.7
W przypadku silników wysokoprężnych należy opróżnić
układ paliwowy, gdy zostały zdemontowane filtr paliwa lub
przewody paliwowe albo gdy zbiornik paliwa zostanie
opróżniony. Należy zapoznać się z „Instrukcją dotyczącą
silnika”.
AKUMULATOR ____________________________________________________________
Przed rozpoczęciem konserwacji akumulatora należy
dokładnie się upewnić, że przełącznik zapłonu jest w
położeniu WYŁ oraz że kluczyk przełącznika zapłonu został
wyjęty.
! UWAGA
Podczas wykonywania prac związanych z akumulatorem
należy zawsze stosować narzędzia z odpowiednią
izolacją, nosić okulary ochronne oraz odzież ochronną.
Należy przeczytać i przestrzegać wszystkich instrukcji
producenta akumulatora.
Dokręcić mocno przewody do zacisków akumulatora i
nałożyć
cienką
warstwę
silikonowego
smaru
dielektrycznego na zaciski i końcówki przewodów, aby
zapobiec korozji. Należy umieścić korki komór i pokrywy
zacisków na swoich miejscach.
Poziom elektrolitu należy sprawdzać co 100 godzin. Końce
przewodów, akumulator i styki należy utrzymywać w
czystości.
Przed przyłączaniem i odłączaniem przewodów należy
sprawdzać bieguny akumulatora.
1.
Montując akumulator należy zawsze podłączać
CZERWONY, dodatni (+) przewód akumulatora jako
pierwszy, a CZARNY, ujemny (–) przewód uziemienia
jako ostatni.
2.
Demontując akumulator należy zawsze odłączać
CZARNY, ujemny (–) przewód uziemienia jako
pierwszy, a CZERWONY, dodatni (+) przewód jako
ostatni.
3.
Należy sprawdzić, czy akumulator jest prawidłowo
zamontowany i przymocowany do podstawy.
! OSTRZEŻENIE
Styki i zaciski akumulatora i związane z nimi akcesoria
zawierają ołów i związki ołowiu – substancje, które mogą
powodować nowotwory i problemy z płodnością. Po
pracy z nimi należy umyć ręce.
pl-19
4
KONSERWACJA
4.8
ROZRUCH Z INNEGO AKUMULATORA________________________________________
Przed próbą uruchomienia kosiarki z akumulatora innego
pojazdu,
należy
sprawdzić
stan
wyładowanego
akumulatora. Ppunkt 4.7.
! OSTRZEŻENIE
Akumulatory wydzielają wybuchowy gaz – wodór. Aby
zmniejszyć zagrożenie wybuchem, należy uważać na
iskry w pobliżu akumulatora. Ujemny przewód
rozruchowy należy zawsze podłączać do ramy kosiarki z
wyczerpanym akumulatorem, z dala od akumulatora.
4.9
Podczas podłączania przewodów rozruchowych:
1.
Zatrzymać silnik pojazdu ze sprawnym akumulatorem.
2.
Podłączyć CZERWONY przewód rozruchowy do
dodatniego (+) zacisku działającego akumulatora i do
dodatniego (+) styku wyładowanego akumulatora.
3.
Podłączyć CZARNY przewód rozruchowy od ujemnego
(–) zacisku na działającym akumulatorze do ramy
kosiarki z wyładowanym akumulatorem.
Po podłączeniu przewodów należy uruchomić silnik pojazdu
ze sprawnym akumulatorem, a następnie uruchomić
kosiarkę.
ŁADOWANIE AKUMULATORA ______________________________________________
1.
Patrz punkt punkt 4.7. Należy przeczytać instrukcje
akumulatora i ładowarki, aby uzyskać szczegółowe
informacje.
Akumulator podłączać w pomieszczeniu z dobrą
wentylacją. Akumulatory wydzielają wybuchowe gazy.
Należy trzymać z dala od akumulatora urządzenia
wytwarzające iskry lub otwarty płomień, aby nie dopuścić
do wybuchu.
2.
Jeśli tylko jest to możliwe, należy wymontować
akumulator z kosiarki przed jego ładowaniem. Jeśli
akumulator nie jest typu zamkniętego, należy
sprawdzić, czy elektrolit pokrywa płytki we wszystkich
komorach.
Należy stać z dala od akumulatora, gdy włączona jest
ładowarka, aby nie dopuścić do wypadków. Uszkodzony
akumulator może wybuchnąć.
3.
Należy sprawdzić, czy ładowarka jest wyłączona, a
następnie
podłączyć
ładowarkę
do
zacisków
akumulatora, jak to opisano w instrukcji ładowarki.
4.
Należy zawsze wyłączać ładowarkę przed odłączeniem
jej od zacisków akumulatora.
! OSTRZEŻENIE
4.10 PRZEWODY HYDRAULICZNE _______________________________________________
4.
! OSTRZEŻENIE
Nie wolno sprawdzać przecieków oleju ręką, gdyż grozi
to poważnymi uszkodzeniami ciała spowodowanymi
przez gorący olej pod ciśnieniem; należy użyć papieru
lub tektury.
Płyn hydrauliczny wydostaje się pod ciśnieniem z siłą
wystarczającą do naruszenia skóry. Jeśli płyn zostanie
wstrzyknięty w skórę, musi zostać chirurgicznie usunięty
w ciągu kilku godzin przez lekarza zaznajomionego z
tego typu obrażeniami, w przeciwnym wypadku może
wystąpić gangrena.
1.
Przed oględzinami lub odłączeniem przewodów
hydraulicznych należy opuścić narzędzia na podłoże,
odłączyć elementy napędowe, załączyć hamulec
postojowy, zatrzymać silnik i wyjąć kluczyk z
przełącznika zapłonu.
2.
Należy codziennie dokonywać przeglądu widocznych
przewodów. Należy sprawdzać, czy przewody nie są
wilgotne oraz czy nie widać plam oleju. Przed
uruchomieniem maszyny należy wymienić zużyte lub
uszkodzone przewody.
3.
Zamienne przewody muszą być prowadzone tą samą
drogą, co istniejące, nie należy przenosić zacisków,
wsporników i wiązań do nowego położenia.
pl-20
Wszystkie przewody i przyłącza należy dokładnie
sprawdzać co 250 godzin.
WAŻNE: Jeśli olej ulegnie zanieczyszczeniu, to
układ
hydrauliczny
może
ulec
trwałemu
uszkodzeniu.Przed odłączeniem elementu układu
hydraulicznego należy oczyścić obszar wokół przyłączy
i końcówek przewodów, aby zapobiec dostawaniu się
zanieczyszczeń do układu.
a.
Przed odłączeniem jakiegokolwiek elementu układu
hydraulicznego
należy
oznaczyć
położenie
każdego przewodu, a następnie oczyścić obszar
wokół przyłączy.
b.
Po odłączeniu elementu należy być gotowym na
założenie korków lub zatyczek na końce
przewodów i na otwory przyłączy. Pozwoli to
zapobiec dostawaniu się zanieczyszczeń do układu
hydraulicznego oraz zapobiec rozlaniu oleju.
c.
Należy sprawdzić, czy pierścienie uszczelniające
są czyste, a przyłącza są prawidłowo osadzone
przed przykręceniem.
d.
Nie dopuszczać do skręcenia przewodu. Skręcone
przewody mogą spowodować poluzowanie złączek,
gdy przewód zgina się podczas pracy, co może
prowadzić do przecieku oleju.
e.
Zagięte lub skręcone przewody mogą utrudniać
przepływ oleju, co może spowodować awarię
układu albo przegrzanie oleju, skutkujące dalszymi
usterkami przewodów.
KONSERWACJA
4
4.11 OLEJ HYDRAULICZNY _____________________________________________________
Szczegółowe okresy konserwacji podane są w punkcie
punkt 6.3.
b.
Poziom oleju hydraulicznego nie powinien nigdy
spaść poniżej dolnej linii na bagnecie pomiarowym
ani być powyżej górnej linii na bagnecie.
Zbiornik układu hydraulicznego w tej kosiarce napełniony
jest biodegradowalnym płynem Jacobsen Greens Care 68.
2.
Olej hydrauliczny należy usuwać i wymieniać po każdej
większej awarii, a także gdy pojawi się woda lub piana w
oleju lub też ostry zapach (co oznacza przegrzewanie).
Wyjąć korek spustowy z dna zbiornika i poluzować lub
odkręcić odpowietrznik na wierzchu zbiornika.
Sprawdzić i oczyścić odpowietrznik, w razie potrzeby
wymienić.
3.
Po usunięciu oleju założyć korek spustowy i napełnić
zbiornik
biodegradowalnym
płynem
Jacobsen
Greenscare 68.
4.
Usunąć powietrze z układu.
Przy wymianie
hydrauliczny.
oleju
należy
zawsze
wymienić
filtr
Aby wymienić olej hydrauliczny:
1.
a.
Uruchomić wszystkie funkcje koszenia na około 5
minut, aby usunąć powietrze z układu i
ustabilizować poziom oleju.
b.
Gdy poziom oleju wyrówna się, a powietrze
zostanie usunięte, napełnić zbiornik do górnego
poziomu na bagnecie pomiarowym.
Oczyścić obszar wokół korka wlewu oleju, aby zapobiec
dostawaniu się zanieczyszczeń do układu.
a.
Temperatura oleju powinna wynosić 16°-32°C (60°90°F). Nie należy sprawdzać poziomu oleju, gdy
jest on rozgrzany.
4.12 FILTRY OLEJU HYDRAULICZNEGO __________________________________________
Układ hydrauliczny chronią dwa filtry 10 mikronów.
Aby wymienić filtr oleju hydraulicznego:
1.
Wymontować stare filtry.
2.
Napełnić nowy filtr olejem, po czym go założyć.
Dokręcać tylko ręką.
3.
Uruchomić na pięć minut silnik na jałowych obrotach, z
układem hydraulicznym w położeniu neutralnym.
4.
Sprawdzić poziom oleju hydraulicznego w zbiorniku i
napełnić do górnego poziomu na bagnecie.
4.13 UKŁAD ELEKTRYCZNY_____________________________________________________
! UWAGA
Przed
oględzinami
lub
konserwacją
układu
elektrycznego należy zawsze przekręcić przełącznik
zapłonu w położenie WYŁ i odłączyć przewód ujemny
akumulatora (CZARNY).
3.
Wiązki przewodów i poszczególne przewody muszą
znajdować się z dala od ruchomych części, aby nie
uległy uszkodzeniu.
4.
Sprawdzić, czy wiązka przełączników w fotelu jest
podłączona do wiązki głównej.
5.
Sprawdzić akumulator i układ ładujący akumulatora.
6.
Nie należy myć i czyścić pod ciśnieniem obszarów w
pobliżu połączeń i elementów elektrycznych.
Poniżej podano ogólne zalecenia pozwalające ograniczyć
możliwość usterki układu elektrycznego.
1.
Sprawdzić, czy wszystkie zaciski i przyłącza są czyste
oraz prawidłowo umocowane.
2.
Regularnie sprawdzać układ blokady, bezpieczniki i
automatyczne wyłączniki.
Jeśli układ blokady nie działa prawidłowo i nie można
usunąć jego usterki, należy skontaktować się z
autoryzowanym sprzedawcą firmy Jacobsen.
pl-21
4
KONSERWACJA
4.14 TŁUMIK I UKŁAD WYDECHOWY _____________________________________________
! OSTRZEŻENIE
Gazy wylotowe zawierają tlenek węgla, który jest trujący
i wdychany może być przyczyną śmierci.
NIE WOLNO uruchamiać silnika w miejscu bez
odpowiedniej wentylacji.
Aby chronić się przed zatruciem tlenkiem węgla, należy
regularnie sprawdzać cały układ wydechowy i zawsze
wymieniać tłumik, jeśli jest wadliwy.
W przypadku zauważenia zmiany w kolorze gazów
wydechowych lub ich dźwięku, należy natychmiast
zatrzymać silnik. Ustalić przyczynę problemu i usunąć
usterkę.
Wszystkie elementy kolektora wylotowego muszą być
dokręcane z takim samym momentem. Dociągnąć lub
wymienić zaciski przewodów wydechowych.
4.15 OGUMIENIE ______________________________________________________________
1.
Właściwe ciśnienie w ogumieniu wydłuża jego
żywotność. Ciśnienie w ogumieniu należy sprawdzać,
gdy nie jest ono rozgrzane. Sprawdzić zużycie bieżnika.
2. Należy
stosować
niskociśnieniowy.
dokładny
ciśnieniomierz
3. Ciśnienie w ogumieniu powinno być następujące:
Przód: - 10-12 psi (0,69-0,83 bar).
Tył: - 8-10 psi (0,55-0,69 bar).
! UWAGA
NIE WOLNO próbować zakładać opony na obręcz
bez odpowiedniego przeszkolenia, narzędzi i
doświadczenia. Nieprawidłowe założenie opony może
być przyczyną jej wybuchu, co grozi poważnym
wypadkiem.
4.16 PROCEDURA ZAKŁADANIA KOŁA ___________________________________________
! OSTRZEŻENIE
Należy sprawdzić, czy kosiarka jest ustawiona na
pewnym i płaskim podłożu. Nie wolno wykonywać prac
na kosiarce, która jest podparta tylko przez podnośnik.
Należy zawsze stosować podpory.
Jeśli uniesiony jest tylko przód lub tył kosiarki, należy
umieścić klocki przed i za kołami, które nie są uniesione.
1.
Usunąć zabrudzenia, smar i olej z kołka gwintowanego.
Nie smarować gwintów.
2.
Umieścić koło na piaście koła i sprawdzić, czy
powierzchnia mocowania koła cała styka się z piastą
lub bębnem hamulca.
3.
Dokręcić ręką wszystkie nakrętki, a następnie
dokręcać na krzyż z odpowiednim momentem; nakrętki
dokręcać zawsze w górnym położeniu.
4.
Sprawdzać i dokręcać codziennie z odpowiednim
momentem, aż przestanie się on zmieniać i będzie
utrzymywać wartość 115-128 Nm (85-95 stopa-funt).
pl-22
KONSERWACJA
4
4.17 CZYSZCZENIE I PIELĘGNACJA ______________________________________________
Po każdym użyciu kosiarkę i jej narzędzia należy umyć.
Utrzymywać maszynę w czystości.
INFORMACJA
Nie myć żadnej części, która jest gorąca. Nie stosować
strumienia wody lub pary pod ciśnieniem. Stosować
zimną wodę i środki do czyszczenia samochodów.
1.
Do czyszczenia silnika i żeberek chłodnicy należy
stosować sprężone powietrze. U sprzedawcy firmy
Jacobsen
można
kupić
specjalny
pistolet
pneumatyczny.
2. Do czyszczenia kosiarki należy stosować tylko
czystą, słodką wodę.
INFORMACJA
Użycie wody słonej lub odpływowej może zwiększać
korozję części metalowych, co będzie prowadzić do
ich przedwczesnego zużycia i usterek. Uszkodzenia
tego typu nie są objęte gwarancją fabryczną.
3.
Nie należy bezpośrednio spryskiwać wodą tablicy
rozdzielczej,
przełącznika
zapłonu,
elementów
sterowania, innych elementów elektrycznych, obudów
łożysk ani uszczelek.
4.
Plastykowe lub gumowe wykończenia należy czyścić
łagodnym roztworem mydła lub stosować dostępne w
handlu środki do czyszczenia winylu/gumy.
5.
Aby powierzchnie z włókna szklanego pozostały
błyszczące, należy je okresowo woskować przy
pomocy wysokiej klasy wosku czyszczącego OneStep.
Należy naprawiać uszkodzone powierzchnie metalowe i
stosować lakier uzupełniający Jacobsen. Aby jak najlepiej
chronić lakier, należy stosować woskowanie.
! UWAGA
Należy usunąć trawę i zabrudzenia z zespołów
tnących, elementów napędowych, tłumika i silnika,
aby wyeliminować możliwość pożaru.
! OSTRZEŻENIE
NIE WOLNO zespołów tnących czyścić rękami. Należy
użyć szczotki, aby usunąć kawałki trawy z noży. Noże są
bardzo ostre i mogą spowodować poważne obrażenia.
4.18 CHŁODNICA ______________________________________________________________
! OSTRZEŻENIE
Nie wolno zdejmować korka chłodnicy, gdy silnik pracuje,
gdyż grozi to poważnymi obrażeniami spowodowanymi
przez gorące chłodziwo lub wytrysk pary. Należy
zatrzymać silnik i poczekać, aż ostygnie. Nawet wtedy
zachować najwyższą ostrożność przy zdejmowaniu
korka.
! UWAGA
Nie wlewać zimnej wody do gorącej chłodnicy. Nie
uruchamiać silnika bez zastosowania odpowiedniej
mieszanki chłodziwa. Zamontować korek i mocno
dokręcić.
Codziennie sprawdzać poziom chłodziwa. Chłodnica
powinna być pełna, a zbiornik zwrotny powinien być
napełniony do znaku zimne.
Co roku opróżniać i ponownie napełnić układ chłodnicy.
Zdjąć korek chłodnicy, otworzyć korek spustowy bloku
silnika oraz korek spustowy chłodnicy. Opróżnić i wyczyścić
zbiornik zwrotny.
W przypadku bardzo niskich temperatur otoczenia
wymieszać czystą wodę z środkiem przeciw zamarzaniu z
glikolem etylenowym. Przeczytać i postępować zgodnie z
instrukcjami zamieszczonymi na opakowaniu środka
przeciw zamarzaniu oraz w instrukcji dotyczącej silnika.
Przewody powietrzne chłodnicy należy utrzymywać w
czystości. Do czyszczenia żeberek chłodnicy zastosować
sprężone powietrze (maks. 30 psi).
Sprawdzić i dokręcić pas wentylatora. Zaciski i przewody
wymieniać co dwa lata.
Jeśli trzeba uzupełniać chłodziwo częściej niż raz w
miesiącu lub jednorazowo trzeba dodawać więcej niż 0,95 l
(1 kwartę) płynu, autoryzowany przedstawiciel firmy
Jacobsen powinien sprawdzić układ chłodzenia.
pl-23
4
KONSERWACJA
4.19 DOCIERANIE PRZEZ COFANIE BĘBNA _______________________________________
3.
! OSTRZEŻENIE
Przekręcić nakrętkę (A) na bębnie, który ma być
cofany, tak aby bęben obracał się w drugą stronę niż
normalnie (cofanie). Ustawić prędkość bębna na 100150 obr/min.
Nie zbliżać dłoni, stóp i ubrania do obracających się
bębnów.
a.
Gdy przełącznik cofania bębna jest ustawiony w
położeniu COFANIE, bębny będą kręcić się nawet wtedy,
gdy operatora nie będzie w fotelu.
Nałożyć środek ścierny przy pomocy szczotki o
długim trzonku najpierw na najwyższe punkty, a
potem wzdłuż całej długości bębna.
b.
Kontynuować
cofanie
bębna,
jednocześnie
nieznacznie regulując położenie bębna tak długo,
aż prześwit na całej długości krawędzi tnącej jest
jednakowy.
c.
Gdy ostrza zostały równo naostrzone, przekręcić
nakrętkę (A) w położenie neutralne. Ostrożnie i
dokładnie usunąć środek ścierny z bębnów i noża
dolnego przed uruchomieniem bębna w normalnym
kierunku.
d.
Odłączyć przełącznik bębnów i przekręcić kluczyk
cofania w położenie WYŁ.
Wdychanie tlenku węgla z gazów wylotowych może być
przyczyną śmierci, nie wolno uruchamiać silnika w
miejscu bez odpowiedniej wentylacji.
Sprawdzić bęben i nóż dolny, aby stwierdzić, czy docieranie
lub szlifowanie przywróci ostrość noża.
Jeśli zużycie lub uszkodzenia są tak duże, że noży bębna i
noża dolnego nie da się naostrzyć poprzez cofanie bębna,
należy je zeszlifować na nowo.
Aby wykonać docieranie przez cofanie bębna:
1.
Wyregulować położenie bębna względem noża
dolnego, jak to opisano w punktach 3.13 oraz 3.14.
2.
Umieścić w przełączniku kluczyk serwisowy (cofania).
a.
Należy się dokładnie upewnić, że stopy i ubranie
znajdują się z dala od bębna.
b.
Upewnić się, że hamulec postojowy jest załączony,
przełącznik bębnów jest wyłączony, a pedał jazdy
jest w położeniu neutralnym.
c.
Uruchomić silnik, przekręcić kluczyk serwisowy w
położenie cofania bębna, a następnie załączyć
przełącznik bębnów. Jeśli któryś z bębnów porusza
się, ustawić nakrętkę (A) tak, aby zatrzymać bęben.
4.
Przestawić silnik bębnów na ruch do przodu. Jeśli
prędkość bębnów jest różna, sprawdzić, czy nakrętka
(A) jest całkowicie dokręcona, co powoduje obroty do
przodu.
5.
Wyjąć i schować kluczyk cofania.
A
Rysunek 4C
pl-24
KONSERWACJA
4
4.20 PRZECHOWYWANIE _______________________________________________________
Informacje ogólne
Zespoły tnące
1.
Dokładnie umyć i przesmarować kosiarkę. Naprawić i
pomalować uszkodzone lub odsłonięte elementy
metalowe.
1.
Dokładnie umyć zespoły tnące, a potem naprawić i
pomalować uszkodzone lub odsłonięte elementy
metalowe.
2.
Dokonać przeglądu kosiarki, dokręcić wszystkie
elementy mocujące, wymienić elementy zużyte lub
uszkodzone.
2.
Przesmarować wszystkie punkty smarowania i punkty,
w których występuje tarcie.
3.
3.
Opróżnić i ponownie napełnić chłodnicę.
4.
Dokładnie oczyścić opony i przechowywać kosiarkę
tak, aby jej ciężar nie spoczywał na oponach. Jeśli
kosiarka nie jest oparta na podporach, należy
regularnie sprawdzać ogumienie i w razie potrzeby
dopompować je.
Po dotarciu bębnów odsunąć bęben od noża dolnego.
Nałożyć cienką warstwę oleju przeciwkorozyjnego na
naostrzone noże bębnów oraz na nóż dolny.
5.
Podczas przechowywania maszyna i wszystkie jej
akcesoria muszą być czyste, suche i zabezpieczone
przed czynnikami atmosferycznymi. Nie wolno
przechowywać maszyny w pobliżu otwartego płomienia
lub iskier, gdyż mogłyby one spowodować zapłon
paliwa lub jego oparów.
Akumulator
1.
Zdemontować i oczyścić akumulator oraz postawić go w
chłodnym, suchym miejscu.
2.
Podczas przechowywania akumulatora sprawdzać go i
ładować co 60-90 dni.
3.
Akumulatory przechowywać w chłodnym, suchym
miejscu. Aby zmniejszyć tempo samorozładowania
akumulatora, temperatura pomieszczenia nie powinna
przekraczać 27°C (80°F) ani spaść poniżej -7°C
(20°F).
Silnik – informacje ogólne
1.
2.
Gdy silnik jest ciepły, odkręcić korek spustowy, usunąć
olej ze skrzyni korbowej i wymienić filtr oleju. Założyć
korek spustowy i napełnić skrzynię nowym olejem.
Pozwolić, aby silnik ostygł przed uruchomieniem.
Oczyścić zewnętrzną powierzchnię silnika. Pomalować
odkryte elementy metalowe lub nałożyć cienką
warstwę oleju przeciwkorozyjnego.
! UWAGA
Aby nie dopuścić do zranienia konserwatora i
uszkodzenia krawędzi tnących, należy zachować
najwyższą ostrożność przy pracy z bębnem
Po przechowywaniu
1.
Sprawdzić i zamontować akumulator.
2.
Sprawdzić filtr paliwowy i filtr powietrza i usunąć
ewentualne usterki.
3.
Sprawdzić poziom chłodziwa w chłodnicy.
4.
Sprawdzić poziom oleju w skrzyni korbowej silnika oraz
w układzie hydraulicznym.
5.
Napełnić
zbiornik
paliwa
Odpowietrzyć układ paliwowy.
6.
Sprawdzić, czy ogumienie ma odpowiednie ciśnienie.
7.
Usunąć całkowicie olej z bębnów i noża dolnego.
Ustawić nóż dolny oraz wysokość cięcia.
8.
Uruchomić i utrzymywać silnik w ruchu z przepustnicą
otwartą do 1/2. Poczekać, aż silnik odpowiednio się
nagrzeje i przesmaruje.
świeżym
paliwem.
! OSTRZEŻENIE
Wdychanie gazów wylotowych może być przyczyną
śmierci, nie wolno uruchamiać silnika w miejscu bez
odpowiedniej wentylacji.
3. Należy dodać środek uszlachetniający lub
bakteriobójczy, aby zapobiec żelowaniu i rozwojowi
bakterii w paliwie. W tym celu należy się
skontaktować z lokalnym dostawcą paliwa.
pl-25
5
5
5.1
USUWANIE PROBLEMÓW
USUWANIE PROBLEMÓW
INFORMACJE OGÓLNE ____________________________________________________
Tabela usuwania problemów opisuje podstawowe problemy, które mogą wystąpić podczas rozruchu i eksploatacji. Więcej
informacji na temat układu hydraulicznego i układu elektrycznego można uzyskać u lokalnego sprzedawcy firmy Jacobsen.
Objawy
Silnik nie daje się
uruchomić.
Trudno uruchomić silnik
lub pracuje
nieprawidłowo.
Silnik zatrzymuje się.
Silnik przegrzewa się.
Akumulator nie trzyma
ładunku.
Możliwe przyczyny
Postępowanie
1.
Odłączony hamulec postojowy,
pedał jazdy nie jest w położeniu
neutralnym lub przełącznik
bębnów/napędu na trzy koła w
położeniu WŁ.
1.
Sprawdzić układ blokady i procedurę rozruchu.
2.
Akumulator wyczerpany lub
wadliwy.
2.
Sprawdzić stan akumulatora i warunki jego pracy.
3.
Zbiornik paliwa pusty lub
zanieczyszczony.
3.
Napełnić świeżym paliwem. Wymienić filtr paliwa.
Odpowietrzyć przewody paliwowe.
4.
Przepalony bezpiecznik.
4.
Wymienić bezpiecznik.
1.
Niski poziom paliwa,
zanieczyszczone paliwo lub filtr
paliwa.
1.
Napełnić świeżym paliwem. Wymienić filtr paliwa.
Odpowietrzyć przewody paliwowe.
2.
Zanieczyszczony filtr powietrza.
2.
Sprawdzić i wymienić filtr powietrza.
3.
Wtryskiwacze, pompa paliwowa.
3.
Zapoznać się z instrukcją silnika.
4.
Usterka silnika.
4.
Zapoznać się z instrukcją silnika.
1.
Zbiornik paliwa pusty.
1.
Napełnić świeżym paliwem i odpowietrzyć przewody
paliwowe.
2.
Blokada niezałączona przed
opuszczeniem fotela operatora.
2.
Załączyć hamulec postojowy, przesunąć dźwignię
jazdy na „N” i ustawić przełącznik bębnów na WYŁ.
1.
Niski poziom chłodziwa.
1.
Sprawdzić i uzupełnić chłodziwo.
2.
Zablokowany wlot powietrza.
2.
Oczyścić wlot powietrza układu chłodzenia.
3.
Pas pompy wodnej zerwany lub
luźny.
3.
Naciągnąć lub wymienić pasek.
4.
Silnik przeciążony.
4.
Zmniejszyć prędkość jazdy w przód.
1.
Poluzowane lub skorodowane
zaciski akumulatora.
1.
Sprawdzić i oczyścić zaciski.
2.
Niski poziom elektrolitu.
2.
Uzupełnić do właściwego poziomu.
3.
Pas alternatora luźny lub
przerwany.
3.
Naciągnąć lub wymienić pasek.
4.
Usterka układu ładowania.
4.
Zapoznać się z instrukcją silnika.
1.
Nieprawidłowo ustawiony prześwit
między nożem dolnym i bębnem.
1.
Sprawdzić ustawienie prześwitu.
2.
Zbyt niska prędkość silnika.
2.
Sprawdzić prędkość silnika. Uruchomić
całkowicie otwartą przepustnicą.
3.
Niski poziom oleju
hydraulicznego.
3.
Sprawdzić poziom w zbiorniku i uzupełnić w razie
potrzeby.
1.
Załączony hamulec postojowy.
1.
Zwolnić hamulec postojowy.
2.
Otwarty zawór holowania.
2.
Zamknąć zawór holowania.
3.
Niski poziom oleju
hydraulicznego.
3.
Sprawdzić poziom w zbiorniku i uzupełnić w razie
potrzeby.
Narzędzia nie podnoszą
się i nie opuszczają.
1.
Niski poziom oleju hydraulicznego. 1.
Sprawdzić poziom w zbiorniku i uzupełnić w razie
potrzeby.
Zegary/wskaźniki nie
działają.
1.
Wyłącznik automatyczny.
2.
Przestawić
żarówkę.
2.
Poluzowane przewody.
3.
Sprawdzić połączenia elektryczne.
Bębny tną nierówno.
Kosiarka nie reaguje na
ruch pedału jazdy.
pl-26
wyłącznik
automatyczny,
silnik
z
sprawdzić
TABELE KONSERWACJI I SMAROWANIA
6
6.1
6
TABELE KONSERWACJI I SMAROWANIA
INFORMACJE OGÓLNE_____________________________________________________
! OSTRZEŻENIE
Aby zapobiec wypadkom, należy przed rozpoczęciem
czyszczenia, regulacji lub naprawy maszyny odłączyć
elementy napędowe, opuścić narzędzia na podłoże,
załączyć hamulec postojowy, zatrzymać silnik i wyjąć
kluczyk z przełącznika zapłonu
1. Należy zawsze oczyścić punkty smarowania przed i
po smarowaniu.
2. Stosować smar, który spełnia lub przekracza
specyfikacje NLGI klasa 2 LB. Nakładać smar ręczną
smarownicą i powoli napełniać punkt smarowania, aż
smar zacznie wydostawać się na zewnątrz. Nie
stosować pistoletów ze sprężonym powietrzem.
3. Od czasu do czasu nakładać niewielką ilość smaru
litowego na prowadnice fotela.
4. Aby zapewnić prawidłową pracę wszystkich dźwigni,
przegubów i innych punktów, w których występuje
tarcie, a które nie są pokazane w tabeli smarowania,
należy dodać kilka kropel oleju SAE 30 co 40 godzin
lub według wymagań.
5. Punkty (A - F) smarować co 50 godzin, a punkty (G K) co 100 godzin.
6.2
TABELA SMAROWANIA ____________________________________________________
H
J
F
A
G
B
J
D
J
B
C
E
F
A
J
A.
B.
C.
D.
E.
Przegub zespołu tnącego (3 punkty)
Przednie ramiona nośne (2 punkty)
Oś wahacza
Cylinder hydrauliczny
Środkowe ramię nośne
F.
G.
H.
J.
K.
Przegub pedału sterowania (2 punkty)
Widełki przegubu układu kierowniczego
Łożyska wału napędowego (2 punkty)
Łożyska bębnów (6 punktów)
Wałki (wg potrzeby)
pl-27
6
TABELE KONSERWACJI I SMAROWANIA
6.3
TABELE KONSERWACJI ____________________________________________________
Zalecane okresy konserwacji i smarowania
Co
50
godzin
Co
8-10
godzin
Filtr powietrza
O
O-U*
O-U*
Co
1000
godzin
Co
rok
R
O
W*
R
W*
R
Układ paliwowy
O
O***
O
Olej hydrauliczny
O-U
W**
Filtr oleju hydraulicznego
O
Tłumik i układ wydechowy
O
S
W*
U - uzupełnienie lub ustawienie
4.13
R
4.6
S
6.2
II
O
4.10
W**
4.11
R
4.12
O
4.14
O-C/WG
Ogumienie
IV
4.6
Punkty smarowania –
wszystkie
Przewody hydrauliczne
S
4.18
4.3
Filtr paliwa
S
4.4
3.2, 3.3
R
O
Rodzaj
3.10
O-C-U
O*
Patrz
punkt
4.7
U
Filtr oleju silnikowego
Kratki chłodnicy
Co
500
godzin
R
O-U
Układ elektryczny
Olej silnikowy
Co
400
godzin
O
Hamulec
Układ chłodzenia
Co
250
godzin
WP
Naładowanie akumulatora
Pasy
Co
100
godzin
III
4.18
O-U
4.15
C - czyszczenie O - oględziny S - smarowanie W - wymiana WP - według potrzeby
* Oznacza okres początkowy w przypadku nowych maszyn.
** Co 250 godzin lub co roku, w zależności od tego, co nastąpi wcześniej.
*** Sprawdzić widoczne przewody pod względem nieszczelności lub plam oleju.
I
- Ręczna smarownica ze smarem NLGI klasa 2 (LB).
II
- Olej silnikowy - patrz punkt 4.3.
III
- Stosować płyn biodegradowalny GreensCare 68 firmy Jacobsen: Pojemność: 19 litrów (5 galonów). Zamówić wiaderko (nr
katalogowy 5003103) zawierające 19 l (5 galonów) lub beczkę (nr katalogowy 5003102), zawierającą 208 l (55 galonów).
IV
- Pojemność: 2,8 l (3 kwarty) mieszaniny wody i glikolu etylenowego 50/50.
pl-28
PARTS CATALOG
7
7.1
7
PARTS CATALOG
TABLE OF CONTENTS______________________________________________________
1.1 .................................................................................Decals..................................................................................................... 32
2.1 .................................................................................Hood ....................................................................................................... 34
3.1 .................................................................................Seat Pan and Foot Rest ........................................................................ 36
4.1 .................................................................................Panel Mounting...................................................................................... 38
5.1 .................................................................................Instrument Panel ................................................................................... 40
6.1 .................................................................................Traction Pedal Linkage ......................................................................... 42
7.1 .................................................................................Lift Pedal and Spring Bracket .............................................................. 44
8.1 .................................................................................Parking Brake ........................................................................................ 46
9.1 .................................................................................Frame and Steering Column ................................................................ 48
10.1 ...............................................................................ROPS and 3WD Valve ........................................................................... 50
11.1 ...............................................................................Rear Steering ......................................................................................... 52
12.1 ...............................................................................Air Filter.................................................................................................. 54
13.1 ...............................................................................Radiator.................................................................................................. 56
14.1 ...............................................................................Engine Mount......................................................................................... 58
15.1 ...............................................................................Engine and Pump .................................................................................. 60
16.1 ...............................................................................Engine Exhaust ..................................................................................... 62
17.1 ...............................................................................Fuel Control ........................................................................................... 64
18.1 ...............................................................................Fuel Hose Routing................................................................................. 65
19.1 ...............................................................................Fuel and Hydraulic Tanks ..................................................................... 66
20.1 ...............................................................................Traction Pump and Charge Filter......................................................... 68
21.1 ...............................................................................Traction Pump Hydraulics.................................................................... 70
22.1 ...............................................................................Traction Hydraulics............................................................................... 72
23.1 ...............................................................................Steering and Lift Hydraulics................................................................. 74
24.1 ...............................................................................Gear Pump Hydraulics.......................................................................... 76
25.1 ...............................................................................Reel Hydraulics ..................................................................................... 78
26.1 ...............................................................................Hydraulic Tube Clamps ........................................................................ 80
27.1 ...............................................................................Electrical Routing.................................................................................. 81
28.1 ...............................................................................Lift Cylinder Linkage............................................................................. 82
29.1 ...............................................................................Reel Assembly....................................................................................... 84
30.1 ...............................................................................Inner Reel Assembly ............................................................................. 86
31.1 ...............................................................................Outer Reel .............................................................................................. 88
32.1 ...............................................................................Pivot Arms ............................................................................................. 90
33.1 ...............................................................................Roller Brackets and Skids .................................................................... 92
34.1 ...............................................................................Down Pressure Springs........................................................................ 94
35.1 ...............................................................................Reel Pump.............................................................................................. 96
36.1 ...............................................................................Reel Motor.............................................................................................. 98
37.1 ...............................................................................Traction Pump ..................................................................................... 100
38.1 ...............................................................................3WD Valve ............................................................................................ 102
39.1 ...............................................................................Brake Calipers ..................................................................................... 103
40.1 ...............................................................................Wheel Motor......................................................................................... 104
41.1 ...............................................................................Wheel Motor......................................................................................... 105
42.1 ...............................................................................Electrical Schematics ......................................................................... 106
43.1 ...............................................................................Hydraulic Schematic ........................................................................... 108
31
TRI-KING
Serial No. All
1.1 Decals
13
IMPORTANT
This machine uses GreensCare 68,
a biodegradable hydraulic fluid.
(Order 5003103 for 5 gal. pail).
2811597
2812032
3
4181863
15
4181862
19
4
4141266
2
®
®
BIOD
EG
UI
D
20
RA
DABLE FL
21
4181864
1
4199140
18
4181865
9
FUSE PANEL
GAGES
3
SPARE
3WD
VALVE
REEL
CLUTCH
LIGHTS
3
SPARE
7.5
SPARE
7.5
SPARE
(OPTIONAL)
3003606
16
7/8
10
11
Tri-King
22
with GreensCare
5/6
Manufactured under one or more
of the following U.S. patents:
x, xxx, xxx; x, xxx, xxx
and others pending.
25
L WA
1-800-848-1636 (US)
CHARLOTTE, NC 28273
26
kW
A Textron Company
PRODUCT OF U.S.A.
kg
® 11524 WILMAR BLVD,
105 dB
24
T H I S R A D I ATO R C O N TA I NS
A N TI - F R E E Z E
PROTECTED TO -26°F (- 3 2°C)
Mix e qual par t s o f c l ean wat e r an d a p r e miu m q u al i t y
e t hyl e n e g l y c o l b a se d a n t i - f r e e ze t o mai n t ai n t h e bo i l
ove r, r ust an d c o r r osi o n p r o t e c t i o n .
Drai n an d d i scar d c o o la nt ye ar l y. Re ad m a nua l for
ad d i t i o na l inst r uc t i o n s.
363995
12
1
17
3
4
2
3004207
23
14
32
TRI-KING
Item
1
2
3
4
5
6
7
8
9
10
11
12
13
14
15
16
17
18
19
20
21
22
23
24
25
26
Part No.
Qty.
Description
4181864
1
Decal, Battery Warning
4141266
2812032
4181863
4124357
4124358
4124790
4124789
4181865
3002053
4124721
3003349
2811597
3003348
3003350
3003606
363995
4199140
4181862
4182386
4111408
4189581
3004207
REF
4194328
4117468
1
1
1
1
1
1
1
1
1
1
1
1
1
1
1
1
1
1
1
1
2
1
1
1
1
Decal, Oil
Decal, Hydraulic Fluids
Decal, See Manual for Service
Decal, Left Side Stripe
Decal, Right Side Stripe
Decal, Jacobsen 12”
Decal, Jacobsen 10”
Decal, Warning
Decal, Backlap Switch
Decal, GreensCare
Decal, Lift/Lower Pedal
Decal, Parking Brake Light
Decal, Forward/Reverse Pedal
Decal, Dash Overlay
Decal, Fuse Panel
Decal, Antifreeze
Decal, Heat Warning
Decal, Radiator Warning
Decal, Jacobsen Emblem
Decal, Biodegradable Fluid
Decal, Tri-King
Decal, Opening Hood
Serial Plate
Decal, Patent
Decal, 105 dB Noise
Serial Numbers/Notes
On right side steering column
On Hood Pivot
On Radiator Shroud
On left front wheel motor mount
On left front wheel motor mount
On left front wheel motor mount
> Change from previous revision
33
TRI-KING
Serial No. All
2.1 Hood
22
23
22
25
23 24
12
11
11
9
15
9
16
10
8
21
17
19
5
5
17
16
15
9
14
18
10 7
13
3
9
8
1
2
14
20
6
20
19
18
20
20
4
5
6
34
TRI-KING
Item
1
2
3
4
5
6
7
8
9
10
11
12
13
14
15
16
17
18
19
20
21
22
23
24
25
Part No.
Qty.
2810064
1
2811139
441676
453011
446142
443110
2811495
400408
452012
3000576
443818
4201302
400188
3004410
446136
443106
3002673
400260
354989
443812
2810029
1001758
403912
4199660
2810413
AR
2
2
6
6
2
4
8
4
8
1
3
3
3
3
2
4
2
4
1
1
3
1
1
Description
Serial Numbers/Notes
Pivot Bracket
Shim, Hood
Carriage Bolt, 3/8-16 x 1-1/4”
Flat Washer, 3/8
Lockwasher, 3/8 Heavy
Nut, 3/8-16 Hex
Pivot Link
Screw, 1/2-13 x 1-1/2” Hex Head
Flat Washer, 1/2
Washer, Nylon
Nut, 1/2-13 Hex Jam
Hood, Left Side
Screw, 5/16-18 x 1” Hex Head
Spacer
Lockwasher, 5/16 Heavy
Nut, 5/16-18 Hex
Bracket, Hood Stop
Screw, 3/8-16 x 7/8” Hex Head
Stop, 3/8-24 Rubber
Nut, 3/8-24 Hex Jam
Hood, RIght Side
Rubber Latch and Keeper
Screw, #10-24 x 5/8” Truss Head
Bracket, Upper Radiator
Right Foot Rest
See 13.1
See 3.1
> Change from previous revision
35
TRI-KING
Serial No. All
3.1 Seat Pan and Foot Rest
21
20
7
24
22 23
40
30
21
20
25
19
21
17
18
37
7
3
2
3
26
20
27
28
19
31
26
18
33
1
6
34
7
32
35
29
22
25
20
21
7
20
21
13
9
8
8
11
39
37
9
9
8
10
16
8
4
4
15
14
5
5
12
8
14
15
36
16
36
TRI-KING
Item
1
2
3
4
5
6
7
8
9
10
11
12
13
14
15
16
17
18
19
20
21
22
23
24
25
26
27
28
29
30
31
32
33
34
35
36
37
38
39
40
Part No.
Qty.
5001665
1
3003301
440134
446142
443110
400188
452006
445795
403770
3002803
3002804
2810411
2810413
400260
452008
445796
3003299
440078
551651
446136
443106
3004410
3003402
443806
3003368
558012
303567
440088
3003968
4139430
523356
523357
4139450
3001328
5003769
2810062
2810061
3003928
844945
3001328
1
2
2
2
4
12
18
14
1
1
1
1
12
12
12
1
5
1
10
10
3
1
2
1
2
1
1
1
1
1
1
1
6
1
1
1
1
AR
2
Description
Seat Pan
Seat Base
Carriage Bolt, 3/8-16 x 3”
Lockwasher, 3/8 Heavy
Nut, 3/8-16 Hex
Screw, 5/16-18 x 1” Hex Head
Flat Washer, 5/16
Nut, 5/16-18 Spiralock Flange
Screw, 5/16-18 x 3/4” Hex Flange
Left Side Transition
Right Side Transition
Left Foot Rest
Right Foot Rest
Screw, 3/8-16 x 7/8” Hex Head
Flat Washer, 3/8
Nut, 3/8-16 Spiralock Flange
Hinge, Seat Plate
Carriage Bolt, 5/16-18 x 3/4”
Moulding
Lockwasher, 5/16 Heavy
Nut, 5/16-18 Hex
Spacer
Seat Latch
Nut, 5/16-18 Hex Jam
Plate, Seat
Pad, Cork
Grommet
Carriage Bolt, 5/16-18 x 1-3/4”
Cover, Filter
Seat
• Seat, Adjuster with Handle
• Seat Adjuster
• Seat Switch
• Screw, 5/16-18 x 5/8” Washer Head
Harness, Seat Switch
Pad, Left Foot Rest
Pad, Right Foot Rest
Literature Pouch
Trim, Seal
Screw, 5/16-18 x 5/8” Washer Head
Serial Numbers/Notes
Includes Decals
10 Foot Length, Cut to 7 in.
10 Foot Length, Cut to 8 in.
REFERENCE SW6, See 42.1
30 Ft. Length, Cut to 11”
> Change from previous revision
37
TRI-KING
Serial No. All
4.1 Panel Mounting
22
14
22
16
5
4
19
15 17
18
19
19 18
17
8
18
17
1
6
16
15
20
7
21 4
2
9
17
11
23
20
25
24
13
3
38
18 19
10
12
13
TRI-KING
Item
1
2
3
4
5
6
7
8
9
10
11
12
13
14
15
16
17
18
19
20
21
22
23
24
25
Part No.
Qty.
Description
REF
1
Instrument Panel Assembly
3003540.7
441602
444718
403770
1002264.7
362469
403912
3008433
1004340
452002
446118
444310
2810209
3003468
404016
452004
446130
443102
3003541
441664
3002098
403914
446116
REF
5003276
5003279
1
2
4
2
1
1
2
1
1
2
2
4
1
2
4
8
8
8
2
4
2
4
4
2
4
4
Mounting Bracket
Carriage Bolt, 5/16-18 x 3/4”
Locknut, 5/16-18 Hex Center
Screw, 5/16-18 x 3/4” Hex Flange
Angle Bracket
U-Bolt, 5/16-18
Screw, #10-24 x 5/8” Truss Head
Plate, Stop
Cable, Throttle
Flat Washer, #10
Lockwasher, #10 Heavy
Nut, #10-24 Hex
Console Cover
Plate, Plastic
Screw, 1/4-20 x 5/8” Truss Head
Flat Washer, 1/4
Lockwasher, 1/4 Heavy
Nut, 1/4-20 Hex
Latch Bracket
Carriage Bolt, 1/4-20 x 5/8”
Latch, Swell
Screw, #10-24 x 3/4” Truss Head
Lockwasher, #10
Fuse Block
Fuse, 3 Amp
Fuse, 7.5 Amp
Serial Numbers/Notes
See 5.1
See 17.1 For Engine Connection
Part of Wire Harness
REFERENCE F1 and F2, See 42.1
REFERENCE F3 and F4, See 42.1
> Change from previous revision
39
TRI-KING
Serial No. All
5.1 Instrument Panel
16
31
32
26
28
27
30
29
20
39
26
24
25
1
19
21
38
23
8
3
22
6
34
7
38
33
37
36 14
15
2
5
4
36
10
11
35
14
12
13
9
40
17
18
TRI-KING
Item
1
2
3
4
5
6
7
8
9
10
11
12
13
14
15
16
17
18
19
20
21
22
23
24
25
26
27
28
29
30
31
32
33
34
35
36
37
38
39
Part No.
Qty.
Description
2811437
1
Instrument Panel
3003350
2811597
3002053
1001958
5002101
5002102
5000039
1001010
558036
N/S
5001428
3001780
N/S
447220
162723
N/S
447006
444310
162721
N/S
444306
447206
447002
444304
444306
162720
N/S
444306
447206
447002
444304
338601
364774
363961
N/S
363962
366751
164194
1
1
1
1
1
1
2
1
2
1
1
1
1
2
1
1
1
1
1
1
2
2
2
2
4
1
1
2
2
3
3
1
1
1
2
1
1
1
• Decal, Panel Overlay
• Decal, Parking Brake
• Decal, Backlap Switch
Ignition Switch
• Bezel, Slotted Rubber
• Nut, 5/8-32 Black Nylon
• Key, Ignition Switch
Switch, Backlap Lockout
• Nut, 13/16-20 Hex Panel
• Lockwasher, 13/16 Internal Tooth
• Key, Backlap Lockout Switch
Switch, Reel / 3WD
• Nut, 15/32-32 Hex Panel
• Lockwasher, 1/2 Internal Tooth
Gauge Hour Meter
• Bracket, Gauge
• Lockwasher, #10 External Tooth
• Nut, #10-24 Hex Nut
Gauge, Volt Meter
• Bracket, Gauge
• Nut, #8-32 Hex
• Lockwasher, #8 External Tooth
• Lockwasher, #6 Internal Tooth
• Nut, #6-32
Nut, #8-32 Hex
Gauge, Water Temperature
• Bracket, Gauge
• Nut, #8-32 Hex
• Lockwasher, #8 External Tooth
• Lockwasher, #6 Internal Tooth
• Nut, #6-32
Circuit Breaker, 10 Amp
Boot, 15/32-32 Circuit Breaker
Switch, Glow Plug Toggle
• Nut, 15/32-32 Hex Panel
Boot, 15/32-32 Toggle Switch
Light, Parking Brake
Light, Oil Pressure
Serial Numbers/Notes
REFERENCE SW9, See 42.1
REFERENCE SW10, See 42.1
REFERENCE SW2, See 42.1
REFERENCE U3, See 42.1
REFERENCE U2, See 42.1
REFERENCE U4, See 42.1
REFERENCE CB2, See 42.1
REFERENCE SW1, See 42.1
REFERENCE L4, See 42.1
REFERENCE L3, See 42.1
> Change from previous revision
41
TRI-KING
Serial No. All
6.1 Traction Pedal Linkage
8
42
4
3
40
2
12
●
39
40
26
28
35
34
27
37
35
42
●
35
34
36
28
16
23
21
22
23
14
10
●
35
14 16
9
3
6
7
3
3
33
26
5
25
38
29
15
21
22
13
24
32
20
10
27
25
31
11
2
41
30
18
19
17
1
4
TRI-KING
Item
1
2
3
4
5
6
7
8
9
10
11
12
13
14
15
16
17
18
19
20
21
22
23
24
25
26
27
28
29
30
31
32
33
34
35
36
37
38
39
40
41
42
●
Part No.
Qty.
2811387
1
328133
453017
460028
2811390
2811654
352936
3003475
400190
453009
446136
443806
400118
2811659
2812215
444708
403860
3007392-1
4140149
3009193
453004
446110
444306
3002399
443108
343398
444754
452006
1004900
307374
454001
463005
444758
3002372
443110
3006746
3006745
441606
4129590
443106
400192
471214
2
6
1
1
1
1
1
1
2
1
1
1
2
1
2
4
1
1
AR
4
4
4
1
2
2
2
4
1
1
2
1
1
2
4
1
1
1
1
2
1
1
Description
Serial Numbers/Notes
Traction Pedal
Bushing
Flat Washer, 1/2
Cotter Pin, 1/8 x 1”
Spring, Torsion
Arm, Switch Actuating
• Bushing
Pedal, Grip
Screw, 5/16-18 x 1-1/4” Hex Head
Flat Washer, 5/16
Lockwasher, 5/16 Heavy
Nut, 5/16-18 Hex Jam
Screw, 1/4-20 x 1-3/4” Hex Head
Spacer, Nylon
Plate, Switch Mounting
Locknut, 1/4-20 Hex Center
Screw, #8-32 x 5/8” Truss Head
Switch, Neutral Proximity
Switch, 3WD Proximity
Shim, Proximity Switch
Flat Washer, #8
Lockwasher, #8
Nut, #8-32 Hex
Rod, Traction Linkage
Nut, 5/16-24 Hex
Ball Joint
Locknut, 5/16-24 Hex Center
Flat Washer, 5/16
Traction Arm
Washer
Spring Washer
Key, 1/8 x 5/8” Woodruff
Locknut, 1/2-13 Center
Bolt, 3/8-16 Spring
Nut, 3/8-16 Hex
Sping, Extension
Spring, Extension
Carriage BOlt, 1/4-20 x 3/4”
Pump, Hydraulic Traction
Nut, 5/16-18 Hex
Screw, 5/16-18 x 1-1/2” Hex Head
Grease Fitting, 1/4-28 Straight
Included with frame
See 8.1 for plate mount.
REFERENCE SW7, See 42.1
REFERENCE SW5, See 42.1
Reverse Return
Forward Return
See 20.1 for pump mounting.
Frame Components
> Change from previous revision
43
TRI-KING
Serial No. All
7.1 Lift Pedal and Spring Bracket
20
21
22
23
24
22
14
16
18
15
19
12 13
11 13
7
4 3
2
25
13
16
17
5
1
17
10
9
2
6 8
44
TRI-KING
Item
Part No.
1
2
3
4
5
6
7
8
9
10
11
12
13
14
15
16
17
18
19
20
21
22
23
24
25
Qty.
Description
1002606.7
1
Lift Pedal
328133
453017
460028
3003474
4240904
4240905
400118
444708
461379
3002234.7
400190
400192
443106
1001176.7
400262
446142
443110
400264
3002630.7
3004679
400112
452004
446130
443102
471214
2
1
1
1
1
1
2
2
1
1
1
1
4
1
2
4
4
2
1
1
2
4
2
2
1
Bushing, Pedal
Flat Washer, 1/2
Cotter Pin, 1/8 x 1”
Grip, Pedal
Lift Valve
• Seal Kit
Screw, 1/4-20 x 1-3/4” Hex Head
Locknut, 1/4-20 Hex Center
Roll Pin, 3/16 x 1/2”
Plate, Link
Screw, 5/16-18 x 1-1/4” Hex Head
Screw, 5/16-18 x 1-1/2” Hex Head
Nut, 5/16-18 Hex
Bracket, Spring Tab
Screw, 3/8-16 x 1” Hex Head
Lockwasher, 3/8 Heavy
Nut, 3/8-16 Hex
Screw, 3/8-16 x 1-1/4” Hex Head
Bracket, Hose Support
Bracket, Hood Centering
Screw, 1/4-20 x 1” Hex Head
Flat Washer, 1/4
Lockwasher, 1/4 Heavy
Nut, 1/4-20 Hex
Grease Fitting, 1/4-28 Straight
Serial Numbers/Notes
Included with frame
Lower Stop
Lift Stop
> Change from previous revision
45
TRI-KING
Serial No. All
8.1 Parking Brake
1
6
12
13
14
7
4
2
2
3
18
25
20
20
15
16
17
11
5
19
10
8
21
10
9
22
21
22
22
27
23
21
20
24
20
21
22
25
10
26
24
23
46
TRI-KING
Item
1
2
3
4
5
6
7
8
9
10
11
12
13
14
15
16
17
18
19
20
21
22
23
24
25
26
27
Part No.
Qty.
Description
2500127
1
Parking Brake Lever
N/S
545237
545234
460002
400216
2812215
3004410
3002788
453009
444718
402022
3002056
3002056
453005
447204
444304
3002627
3002628
338383
453020
460028
346771
352204
460008
1001634
1001635
2
2
2
2
2
1
2
1
4
2
2
1
1
2
2
2
1
1
4
4
4
2
2
2
1
1
• Stabilizer Plate
• Spacer
• Clevis Pin
• Cotter Pin, 1/16 x 1/2”
Screw, 5/16-18 x 2-3/4” Hex Head
Plate, Switch Mounting
Spacer
Bracket, Parking Brake Switch
Flat Washer, 5/16
Locknut, 5/16-18 Hex Center
Screw, #6-32 x 2” Slotted Round
Switch, Parking Brake Light
Switch, Parking Brake
Flat Washer, #6
Lockwasher, #6 Internal Tooth
Nut, #6-32 Hex
Brake Cable, Left Side
Brake Cable, Right Side
Pulley, Brake Cable
Flat Washer, 5/8
Cotter Pin, 1/8 x 1”
Clevis Pin, 5/16 x 3/4”
Spring, Brake Return
Cotter Pin, 5/64 x 3/4”
Caliper, Left Side
Caliper, Right Side
Serial Numbers/Notes
REFERENCE SW12, See 42.1
REFERENCE SW8, See 42.1
See 9.1
See 8.1
> Change from previous revision
47
TRI-KING
Serial No. All
9.1 Frame and Steering Column
36
32
38
35
37
28
31
30
33
34
29
26
27
42
13
15
25
16
23
24
1
2
9
18
2
17 8
10
2 24
39
40
2
4
7
25
23
41
22
11
12
4
16
3
14
5
12
13
11
6
19
10
18
8
17
20
20
19
48
21
22
9
TRI-KING
Item
Part No.
Qty.
Description
Serial Numbers/Notes
1
2
3
4
5
N/S
1
Frame Assembly
328133
3002170
365106
471216
4
4
2
1
•
•
•
•
6
4182425
1
Wheel Motor, 11.9 in3 Front Left
See 40.1
7
4189920
1
See 41.1
8
9
10
11
12
13
14
15
16
17
18
19
20
21
22
23
24
25
26
27
554780
554779
400410
446154
443118
400414
1001634
1001635
3008482
395388
447030
4242563
4242564
360111
353914
400188
452006
445781
4197061
4196485
4197940
64205-054
4211400
4210420
4201840
443828
450168
450410
2811364
2811365
2811547
447224
354080
446136
443106
3003748
1
1
4
8
8
4
1
1
2
2
2
2
2
1
8
2
2
2
1
1
1
4
4
1
1
1
4
4
1
1
5
1
2
1
1
2
Wheel Motor, 9.6 in3 Front Right
• Key
• Nut, 1-20 Slotted Hex
Screw, 1/2-13 x 1-3/4” Hex Head
Lockwasher, 1/2 Heavy
Nut, 1/2-13 Hex
Screw, 1/2-13 x 2-1/4” Hex Head
Caliper, Left Side
Caliper, Right Side
Spacer
Hub, Wheel
Lockwasher, 1” External Tooth
Tire, 20 x 10 - 10 Grassmaster
Rim, 10 x 7
Valve, Inflation
Wheel Bolt, 1/2-20 x 3/4”
Screw, 5/16-18 x 1” Hex Head
Flat Washer, 5/16
Nut, 5/16-18 Whizlock Flange
Frame, Steering Column
Valve, Steering
• Seal Kit
Screw, M8-1.25 x 130 mm Hex Head
Spacer
Shaft, Steering
• Seal, Steering Shaft
• Nut, 5/8-18 Hex Jam
Screw, M6-1 x 12 mm Hex Head
Lockwasher, M6
Steering Wheel
• Cap, Steering Wheel
Washer
Lockwasher, 5/8 Internal Tooth
Clamp, Hose
Lockwasher, 5/16 Heavy
Nut, 5/16-18 Hex
Edging
28
29
30
31
32
33
34
35
36
37
38
39
40
41
42
Bushing, Pedal Pivot
Bushing, Lift Arm Pivot
Bushing, Lift Crank
Grease Fitting, 1/4-28
See 39.1
See 39.1
> Change from previous revision
49
TRI-KING
Serial No. All
10.1 ROPS and 3WD Valve
WARNING
!
This structure's
proctective capability
may be impaired by
structural damage,
overturn, or alteration.
If any of these
conditions occur, this
structure must be
replaced.
5003597
14
WARNING
!
Use seat belt
5003598
14
13
13
5
7
6
7
5
11
19
17
20
11
10
3
1
10
9
16
4
8
15
21
22
17
17
18
11
10
2
12
50
TRI-KING
Item
1
2
3
4
5
6
7
8
9
10
11
12
13
14
15
16
17
18
19
20
21
22
Part No.
Qty.
69157
1
N/S
5003595
5003596
5000629
400370
452010
444730
400408
446154
443118
400420
5003598
5003597
4111942
400124
452004
444708
400126
360343
354080
345671
1
1
1
1
2
2
2
8
12
12
4
1
1
1
1
3
2
1
1
1
1
Description
Serial Numbers/Notes
ROPS Assembly
• Base, ROPS
• Plate, Rear Backing
• Bracket, Seat Belt
• Seat Belt, 60”
• Screw, 7/16-20 x 1” Hex Head
• Flat Washer, 7/16
• Locknut, 7/16-20 Hex Center
• Screw, 1/2-13 x 1-1/2” Hex Head
• Lockwasher, 1/2 Heavy
• Nut, 1/2-13 Hex
• Screw, 1/2-13 x 3-1/2” Hex Head
• Decal, Seat Belt Warning
• Decal, Structure Warning
3WD Valve
Screw, 1/4-20 x 2-1/2” Hex Head
Flat Washer, 1/4
Locknut, 1/4-20 Hex Center
Screw, 1/4-20 x 3” Hex Head
Clamp, Harness
Clamp, Hose
Clamp, Hose
See 39.1
Seat Switch Harness
Return Hose
Reel Return Tube
> Change from previous revision
51
TRI-KING
Serial No. All
11.1 Rear Steering
8
2
3
1
8
2
3
9
20 21
13
7
6
5
9
10
18
11
23
12
22
20 21
14
18
4
16 17
19
15
24
52
7
7
TRI-KING
Item
Part No.
Qty.
Description
1
4138501
1
Steering Cylinder
2
3
4
5
6
7
8
9
10
11
12
13
4137139
443820
3010485
353914
1001129.7
471231
400414
444758
5002916
452018
445676
460054
400408
1
2
2
4
1
1
5
2
2
1
1
1
1
• Seal Kit
Nut, 1/2-20 Hex
Ball Joint
Wheel Bolt, 1/2-20 x 3/4”
Steering Fork
Grease Fitting, 1/8 NPTF
Screw, 1/2-13 x 2-1/4” Hex Head
Locknut, 1/2-13 Hex Center
Bearing, Cup and Cone with Seal
Flat Washer, 3/4”
Nut, 3/4-16 Slotted Hex
Cotter Pin, 3/16 x 1-3/4”
Screw, 1/2-13 x 1-1/2” Hex Head
14
4182425
1
15
16
17
18
19
20
21
22
23
24
554780
554779
447030
3008482
220290.7
443118
446154
360111
4236061
4236021
1
1
1
2
1
4
4
1
1
1
Wheel Motor, 11.9 in3
• Key
• Nut, 1-20 Slotted Hex
Lockwasher, 1” External Tooth
Spacer
Hub, Wheel
Nut, 1/2-13 Hex
Lockwasher, 1/2 Heavy
Valve, Inflation
Tire, 20 x 10 - 8 Grass Master
Rim, 8 x 7”
Serial Numbers/Notes
Includes cup portion of Item 9
See 40.1
> Change from previous revision
53
TRI-KING
Serial No. All
12.1 Air Filter
5
6
7
24
1
2
14
15
22
4
18
3
4
17
16
9
8
23
10
13
12
8
9
11
19
21
54
20
TRI-KING
Item
Part No.
Qty.
Description
1
1001354
1
Air Cleaner
2
3
4
5
6
7
8
9
10
11
12
13
14
15
16
17
18
19
20
21
22
23
24
5000913
5000912
5000914
3002862
3002863
326112
361005
446136
452006
446142
443110
3004256
364703
1001752
N/S
3004253
5002126
3004333
473142
400260
557580
553926
4189580
REF
2810411
4197061
1
1
1
1
1
2
2
2
2
2
2
1
1
1
1
1
1
1
1
2
1
1
1
1
1
1
• Element, Air Cleaner
• Cover
• Valve, Vactuator
Foam Ring
Hose, Engine Air Intake
Clamp, Hose
Screw, M8-1.25 x 25 mm Hex Head
Lockwasher, 5/16 Heavy
Flat Washer, 5/16
Lockwasher, 3/8 Heavy
Nut, 3/8-16 Hex
Bracket, Air Cleaner Indicator
Overflow Hose, 30” Long
Air Cleaner Indicator
• Adapter, 1/8 NPT
Elbow, 1/8 NPT
Tube
Fitting, 1/8 NPT Bulkhead
Cable Tie
Screw, 3/8-16 x 7/8” Hex Head
Support, Tank
Tank, Reserve
Engine, Kubota D722-E3B
Radiator Assembly
Left Foot Rest
Frame, Steering Column
Serial Numbers/Notes
See 15.1
See 13.1
See 3.1
See 9.1
> Change from previous revision
55
TRI-KING
Serial No. All
13.1 Radiator
11
10
6
8
5
4
20
8
6
5
4
10
3
20
17
1
19
14
7
17
13
6
14
4
12
12
6
2
4
5
16
7
12
7
12
15
15
56
17
18
9
13
7
5
5 4
17
TRI-KING
Item
1
2
3
4
5
6
7
8
9
10
11
12
13
14
15
16
17
18
19
20
Part No.
Qty.
4141036
1
4150717
4140846
362535
446128
452004
452008
4197181
4150418
4197180
4199660
553887
443810
460312
4150598
553886
4141392
319914
N/S
N/S
844945
1
1
9
9
9
6
2
1
2
1
4
2
2
2
2
1
4
1
1
AR
Description
Serial Numbers/Notes
Radiator
Bracket, Front Radiator Mount
Shroud, Fan
Screw, M6-1 x 16 mm Hex Head
Lockwasher, 1/4
Flat Washer, 1/4
Flat Washer, 3/8
Weater Strip
Bracket, Rear adiator Mount
Weather Strip
Bracket, Upper Radiator
Washer, Cup
Nut, 3/8-16 x 3/8”
Hair Pin
Screw, 3/8-16 x 2” Special
Cushion, Radaitor
Radiator Hose Kit
• Clamp, Hose
• Hose, Lower Radiator
• Hose, Upper Radiator
Trim, Seal
30 Ft. Length, Cut to 11”
> Change from previous revision
57
TRI-KING
Serial No. All
14.1 Engine Mount
1
14
9
4
7
10
4
10
10
3
4
3
4
5
3
2
4
4
2
2
2
8
6
3
11
12
13
11
12
13
6
4
9
11
58
12
13
12
13
11
TRI-KING
Item
1
2
3
4
5
6
7
8
9
10
11
12
13
14
Part No.
Qty.
REF
1
3004523
400186
446136
400190
452006
361005
346006
444718
400272
3004526
446142
443110
4129589
554663
4
8
12
1
2
3
1
2
4
4
4
4
1
2
Description
Engine and Pump Assembly
Mount, Isolation
Screw, 5/16-18 x 7/8” Hex Head
Lockwasher, 5/16 Heavy
Screw, 5/16-18 x 1-1/4” Hex Head
Flat Washer, 5/16
Screw, M8-1.25 x 25 mm Hex Head
Cable, Engine Ground
Locknut, 5/16-18 Hex Center
Screw, 3/8-16 x 2-1/4” Hex Head
Washer, Isolation Mount
Lockwasher, 3/8 Heavy
Nut, 3/8-16 Heavy
Universal Joint
• Cross and Bearing Kit
Serial Numbers/Notes
See 15.1
See 20.1 for Pump Connection
> Change from previous revision
59
TRI-KING
Serial No. All
15.1 Engine and Pump
22
20
23 24
15
21
9
1
12
13
4
17
5
18
6
11
14
25
6
7
19 2
26
5
28
9
27
7
3
30
8
28
29
9 26
16
28
60
9
27
9
10
TRI-KING
Item
1
2
3
4
5
6
7
8
9
10
11
12
13
14
15
16
17
18
19
20
21
22
23
24
25
26
27
28
29
30
Part No.
Qty.
4189580
1
5002644
4127309.7
2811637.7
452008
363485
362263
2810499.7
446136
2810545
2809727
4130754.7
4174020
5001437
400226
3001950
364501
446128
361001
4141024
4125492
363448
446130
452004
4210160
457016
361005
452006
400190
443106
1
1
1
8
8
8
1
12
5
1
1
1
1
4
1
1
1
1
1
1
4
4
4
1
6
2
3
1
1
Description
Serial Numbers/Notes
Engine, Kubota D722-E3B
• Cartridge, Engine Oil Filter
Bracket, Front Engine Mount
Bracket, Rear Engine Mount
Flat Washer, 3/8
Lockwasher, M10
Screw, M10-1.25 x 25 mm Hex Head
Pulley, Reel Pump Drive
Lockwasher, 5/16 Heavy
Screw, M8-1.25 x 30 mm Button Hd
Clutch, Reel Pump
Bracket, Pump Pivot
Pump, 3 Section Gear
Key, 5/32 x 3/4” Square
Screw, 5/16-24 x 1” Hex Head
V-Belt, Reel Pump
Temperature Sender
Lockwasher, 1/4
Nut, M6-1 Hex
Fan, Engine Cooling
Spacer, Fan
Screw, M6-1 x 35 mm Hex Head
Lockwasher, 1/4 Heavy
Flat Washer, 1/4
Spacer, Pump Mount
Spacer, Pump Pivot
Screw, M8-1.25 x 25 mm Hex Head
Flat Washer, 5/16
Screw, 5/16-18 x 1-1/4” Hex Head
Nut, 5/16-18 Hex
REFERENCE K2, See 42.1
See 35.1
REFERENCE U5, See 42.1
> Change from previous revision
61
TRI-KING
Serial No. All
16.1 Engine Exhaust
3
4
6
5
2
1
12
11
10
9
15
7
25
37
26
20
28
34
28
34
35
36
21
22
36
35
13
27
16
17
11
36 8 6
14
19
21
22
32
34
18
27 26
29
27
31
39
30
33
19
38
23
19
4
11
24
62
19
TRI-KING
Item
●
●
●
●
●
●
●
●
1
2
3
4
5
6
7
8
9
10
11
12
13
14
15
16
17
18
19
20
21
22
23
24
25
26
27
28
29
30
31
32
33
34
35
36
37
38
39
Part No.
Qty.
4121920
1
553020
594331
452006
400264
452008
4121007.7
446142
550376
363586
446136
553934
4130755
361005
550383
550409
550398
4123003
1002033
4130753
441602
445795
4130757
400186
4208820
400106
446130
452004
4121872.7
400108
443102
4130756
441630
4124806
319755
444762
400270
3000359
364774
1
4
6
1
2
1
1
1
1
10
1
1
1
2
2
2
1
2
1
2
2
1
2
1
4
6
4
1
2
2
1
1
2
2
3
1
1
1
Description
Serial Numbers/Notes
Muffler
Gasket, Muffler
Bolt, Muffler
Flat Washer, 5/16
Screw, 3/8-16 x 1-1/4” Hex Head
Flat Washer, 3/8
Bracket, Muffler
Lockwasher, 3/8 Heavy
Bolt
Screw, M8-1.25 x 20 mm Hex Head
Lockwasher, 5/16 Heavy
Hook, Engine
Bracket, Muffler
Screw, M8-1.25 x 25 mm Hex Head
Bolt, Starter
Washer, Spring
Nut
Pipe, Exhaust
Clamp, Exhaust
Bracket, Lower Exhaust
Carriage Bolt, 5/16-18 x 3/4”
Nut, 5/16-18 Spiralock Flange
Bracket, Tailpipe
Screw, 5/16-18 x 7/8” Hex Head
Shield, Muffler
Screw, 1/4-20 x 5/8” Hex Head
Lockwasher, 1/4 Heavy
Flat Washer, 1/4
Bracket, Heat Shield
Screw, 1/4-20 x 3/4” Hex Head
Nut, 1/4-20 Hex
Bar, Engine Stay
Carriage Bolt, 3/8-16 x 2”
Mount, Bonded Tube Isolator
Washer
Locknut, 3/8-16 Hex Center
Screw, 3/8-16 x 2” Hex Head
Circuit Breaker, 50 Amp
Boot, Circuit Breaker
REFERENCE CB1, See 42.1
Included with Engine
> Change from previous revision
63
TRI-KING
Serial No. All
17.1 Fuel Control
8
12
7
13
7
11
14
4
15
16
2
9
3
1
6
7
87
5
4
7
8
8
10
Item
1
2
3
4
5
6
7
8
9
10
11
12
13
14
15
16
Part No.
Qty.
Description
2810134
1
Bracket, Throttle Cable
361898
446136
400112
3004410
1004340
446130
443102
400108
444708
2810088
362535
453023
338289
443104
2810546
1
1
4
1
1
7
5
1
1
1
2
2
1
1
1
Screw, M8-1.25 x 16 mm Hex Head
Lockwasher, 5/16 Heavy
Screw, 1/4-20 x 1” Hex Head
Spacer
Cable, Throttle
Lockwasher, 1/4 Heavy
Nut, 1/4-20 Hex
Screw, 1/4-20 x 7/8” Hex Head
Locknut, 1/4-20 Hex Center
Bracket, Solenoid
Screw, M6-1 x 16 mm Hex Head
Flat Washer, 1/4
Solenoid, Fuel Shutoff
Nut, 1/4-28 Hex
Rod, Solenoid
Serial Numbers/Notes
See 4.1 For Handle Mounting
REFERENCE K1, See 42.1
> Change from previous revision
64
TRI-KING
Serial No. All
18.1 Fuel Hose Routing
7
9
1
4
6
1
2 10 10
1
1
3
A
8
5
B
7
B
A
View Rotated 180°
For Clarity
Item
Part No.
1
2
3
4
5
6
7
8
9
10
Qty.
366526
4
554748
550553
550489
400200
444718
554748
366526
554752
3003764
473142
AR
1
1
1
1
AR
2
AR
1
4
Description
Serial Numbers/Notes
Clamp, Hose
Hose, 5/16 I.D. Tank to Fuel Filter
Filter, Fuel
Element, Fuel Filter
Screw, 5/16-18 x 2-1/2” Hex Head
Locknut, 5/16-18 Hex Center
Hose, 5/16 I.D. Fuel Filter To Engine
Clamp, Hose
Hose, 3/16 I.D. Fuel Return
Convoluted Conduit, 1/2” I.D.
Cable Tie
10 Foot Length, Cut to 37”
10 Foot Length, Cut to 13”
10 Fot Length, Cut to 88”
22”
> Change from previous revision
65
TRI-KING
Serial No. All
19.1 Fuel and Hydraulic Tanks
21
18
20
2
16
19
3
18
17
10
6
15
14
13
7
12
5
4
3
11
8
23
24
1
9
4
2
66
5
22
TRI-KING
Item
Part No.
1
2
3
4
5
6
7
8
9
10
11
12
13
14
15
16
17
18
19
20
21
22
23
24
Qty.
Description
1002019.6
1
Tank, Hydraulic Oil
400424
344132
446154
443118
1000973
2809688
5003624
1001148
549597
N/S
346361
3003444
452004
446130
445612
1001134
1001311
361117
325822
361748
4179802
3002397
339899
339900
4
4
4
4
1
1
1
1
1
1
2
1
2
2
2
1
1
2
1
1
1
1
1
1
Screw, 1/2-13 x 4-1/2” Hex Head
Washer
Lockwasher, 1/2 Heavy
Nut, 1/2-13 Hex
Bracket, Battery
Cap, Tank Breather
• Gasket
Filter Assembly
• Cartridge, Filter
Battery, 12V Group 22NF
Hook, 1/4-20 J
Retainer, Battery
Flat Washer, 1/4
Lockwasher, 1/4 Heavy
Nut, 1/4-20 Wing
Fuel Tank
Fuel Shut Off Valve
Bushing, Fuel Tank
Hose, 1/4 x 14” Fuel
Valve, Overflow
Cap, Fuel Tank
Plug, -10 ORB Magnetic Drain
• O-Ring, -10 ORB
O-Ring, -12 ORB
Serial Numbers/Notes
Approximately 4.5 Gallons
REFERENCE B1, See 42.1
Approximately 6.5 Gallons
> Change from previous revision
67
TRI-KING
Serial No. All
20.1 Traction Pump and Charge Filter
1
5
4
21
9
20
16
7
6
8
7
22
3
13 12 11
16
6
3
10
22
16
14
15
68
17
16
3
18
19
2
20
TRI-KING
Item
1
2
3
4
5
6
7
8
9
10
11
12
13
14
15
16
17
18
19
20
21
22
Part No.
Qty.
Description
4129590
1
Pump, Hydraulic Traction
400272
446142
400276
400274
443110
452008
3003223
444762
2810439
400108
446130
452004
1001148
549597
400264
443810
463113
4129588
4129589
554663
412020
361723
453011
2
4
1
1
2
2
1
1
1
2
2
2
1
1
1
4
1
1
1
2
2
1
2
Screw, 3/8-16 x 2-1/4” Hex Head
Lockwasher, 3/8 Heavy
Screw, 3/8-16 x 3” Hex Head
Screw, 3/8-16 x 2-1/2” Hex Head
Nut, 3/8-16 Hex
Flat Washer, 3/8
Shield, Filter Drain
Locknut, 3/8-16 Hex Center
Bracket, Charge Filter
Screw, 1/4-20 x 3/4” Hex Head
Lockwasher, 1/4 Heavy
Flat Washer, 1/4
Charge Filter Assembly
• Cartridge, Charge Filter
Screw, 3/8-16 x 1-1/4” Hex Head
Nut, 3/8-16 Hex Jam
Key, 3/16 x 3/4” Morton
Fan, Pump Cooling
Universal Joint
• Cross and Bearing Kit
Screw, 5/16-18 x 1” Square Head Set
Stop, Rubber
Flat Washer, 3/8
Serial Numbers/Notes
See 37.1
See 14.1 For Engine Connection
> Change from previous revision
69
TRI-KING
Serial No. All
21.1 Traction Pump Hydraulics
17
2
17
17
13
1
7
14
8
4
6
15
3
2
16
17
5
11
9
12
12
10
9
70
TRI-KING
Item
Part No.
Qty.
Description
Serial Numbers/Notes
3003219
1
Hose, Charge Pump Suction
108094-02
4129590
340070
339911
339899
2809725
339911
339908
1001503
339989
339911
339899
354080
340055
339908
339896
2
1
1
1
1
1
1
2
1
1
1
1
1
2
1
1
Clamp, Hose
Pump, Hydraulic Traction
Fitting, -10 ORFS x -10 ORB 90°
• O-Ring, -10 ORFS
• O-Ring, -10 ORB
Tube, Traction Pump Return
• O-Ring, -10 ORFS
• O-Ring, -4 ORFS
Hose, Traction Pump Return
Fitting, -10 ORFS x -10 ORB Straight
• O-Ring, -10 ORFS
• O-Ring, -10 ORB
Clamp, Hose
Fitting, -4 ORFS x -4 ORB 90°
• O-Ring, -4 ORFS
• O-Ring, -4 ORB
10
4182425
1
Wheel Motor, 11.9 in3 Front Left
See 9.1 for Motor Mounting
11
4189920
1
See 9.1 for Motor Mounting
12
13
1001488
1001148
549597
340068
339910
339900
1001372
339983
339910
339897
473142
2
1
1
1
1
1
1
1
2
1
4
Wheel Motor, 9.6 in3 Front Right
Hose, Wheel Motor Case Drain
Charge Filter Assembly
• Cartridge, Charge Filter
Fitting, -8 ORFS x -12 ORB 90°
• O-Ring, -8 ORFS
• O-Ring, -12 ORB
Tube, Charge Filter to Pump
Fitting, -8 ORFS x -6 ORB Straight
• O-Ring, -8 ORFS
• O-Ring, -6 ORB
Cable Tie
1
2
3
4
5
6
7
8
9
14
15
16
17
See 20.1 for Pump Mounting
See 22.1 for Mounting
See 20.1 for Filter Mounting
> Change from previous revision
71
TRI-KING
Serial No. All
22.1 Traction Hydraulics
11
16
2
8
9
2
3
2
2
1
2
17
2
(Port B)
2
(Port A)
17
10
5
2
(Port B)
17
17
Port A
14
4
(Port A)
Port B
Motor (10) Viewed from Rear
15
Port A
12
2
(Port A)
Port B
13
7
2
(Port B)
Port B
Motor (15) Viewed from Rear
6
Port A
Motor (6) Viewed from Rear
72
TRI-KING
Item
Part No.
Qty.
4129590
1
5
339989
339911
339899
2810603
340265
339911
339899
2810602
11
1
1
1
1
2
1
1
6
4182425
1
7
8
9
1001495
4111942
1001496
1
1
1
10
4182425
1
11
12
13
14
1001496
1001495
2810601
340121
339911
1
1
1
1
2
15
4189920
1
16
17
2810604
473142
1
3
1
2
3
4
Description
Pump, Hydraulic Traction
Serial Numbers/Notes
See 20.1 For Pump Mounting
Fitting, -10 ORFS x -10 ORB Straight
• O-Ring, -10 ORFS
• O-Ring, -10 ORB
Tube, Pump to Upper Motor Port
Tee, -10 ORFS x -10 ORB Run
• O-Ring, -10 ORFS
• O-Ring, -10 ORB
Tube, Upper Motor Ports
Wheel Motor, 11.9 in3 Front Left
Hose, Upper Tube to 3WD Valve
3WD Valve
Hose, 3WD Valve to Motor
See 9.1 For Motor Mounting
Wheel Motor, 11.9 in3 Rear
Hose, Motor to 3WD Valve
Hose, 3WD Valve to Lower Tube
Tube, Lower Motor Ports
Tee, -10 ORFS Swivel Run
• O-Ring, -10 ORFS
See 11.1 For Motor Mounting
Wheel Motor, 9.6 in3 Front Right
Tube, Lower Motor Port to Pump
Cable Tie
See 9.1 For Motor Mounting
See 10.1 For Valve Mounting
Wheel Motor Port (A)
Wheel Motor Port (B)
> Change from previous revision
73
TRI-KING
Serial No. All
23.1 Steering and Lift Hydraulics
Item 6
Item 3
13
12
T
P
12
Item 5
L
E
R
Item 11
22
4
Item 14
15
11
3
9
14
6
8
2
5
22
1
22
22
7
16
17
20
10
23
24
2
2
18
25
19
26
Part of
Frame
74
27
2
21
TRI-KING
Item
Part No.
1
2
3
4
5
6
7
8
9
10
11
12
13
14
15
16
17
18
19
20
21
22
23
24
25
26
27
Qty.
Description
4129590
1
Pump, Hydraulic Traction
340061
339909
339897
4223520
4196485
4197940
4218141
4203100
340120
339910
340068
339910
339900
1001148
549597
1001500
1002942
340057
339908
339897
4138501
4137139
1002941
354080
4240904
4240905
340088
339908
339897
1001501
122759
554331
1001502
339974
339908
339897
473142
400188
452006
361064
446136
443106
5
1
1
1
1
1
1
1
1
2
1
1
1
1
1
1
1
2
1
1
1
1
1
1
1
1
1
1
1
1
1
1
1
1
1
1
4
1
1
1
1
1
Fitting, -6 ORFS x -6 ORB 90°
• O-Ring, -6 ORFS
• O-Ring, -6 ORB
Tube, Pump to Steering Valve
Valve, Steering
• Seal Kit
Hose, Steering Valve to Lift Valve
Tube, Steering Valve to Charge Filter
Tee, -8 ORFS Swivel Run
• O-Ring, -8 ORFS
Fitting, -8 ORFS x -12 ORB 90°
• O-Ring, -8 ORFS
• O-Ring, -12 ORB
Charge Filter Assembly
• Cartridge, Charge Filter
Hose, Lift Valve to Charge Filter
Hose, Steering Valve to Cylinder
Fitting, -4 ORFS x -6 ORB 90°
• O-Ring, -4 ORFS
• O-Ring, -6 ORB
Steering Cylinder
• Seal Kit
Hose, Steering Valve to Cylinder
Clamp, Hose
Lift Valve
• Seal Kit
Fitting, -4 ORFS x -6 ORB 90° Orifice
• O-Ring, -4 ORFS
• O-Ring, -6 ORB
Hose, Lift Valve to Cylinder
Cylinder, Hydraulic Lift
• Seal Kit
Hose, Cylinder to Lift Valve
Fitting, -4 ORFS x -6 ORB Orifice
• O-Ring, -4 ORFS
• O-Ring, -6 ORB
Cable Tie
Screw, 5/16-18 x 1” Hex Head
Flat Washer, 5/16
Clamp, Hose
Lockwasher, 5/16 Heavy
Nut, 5/16-18 Hex
Serial Numbers/Notes
See 20.1 for Pump Mounting
Steering Valve Port P
See 20.1 for Valve Mounting
Steering Port Port E
Steering Valve Port T
See 20.1 for Filter Mounting
Steering Valve Port L
See 11.1 for Cylinder Mounting
Steering Valve Port R
See 9.1 for clamp mounting
0.0595 Orifice
See 28.1 for Cylinder Mounting
> Change from previous revision
75
TRI-KING
Serial No. All
24.1 Gear Pump Hydraulics
1
1
2
3
11
9
10
9
8
4
7
14
15
12
13
1
5
16
17
6
Part of
Frame
76
1
TRI-KING
Item
1
2
3
4
5
6
7
8
9
10
11
12
13
14
15
16
17
Part No.
Qty.
Description
367458
4
Clamp, Hose
3003113
3003115
354080
3003114
4174020
1001147
345671
108094-02
3003218
3003256
339900
3004182
339963
400188
452006
446136
443106
1
1
1
1
1
1
1
2
1
1
1
1
1
1
1
1
1
Hose, Suction
Tube, Gear Pump Suction
Clamp, Hose
Hose, Formed Suction
Pump, 3 Section Gear
Tube, Reel Motor Return
Clamp, Hose
Clamp, Hose
Hose
Fitting, -12 ORB Beaded Tube
• O-Ring, -12 ORB
Angle, Bulkhead
Nut, -10 ORFS Bulkhead
Screw, 5/16-18 x 1” Hex Head
Flat Washer, 5/16
Lockwasher, 5/16 Heavy
Nut, 5/16-18 Hex
Serial Numbers/Notes
See 9.1
See 15.1
See 10.1
> Change from previous revision
77
TRI-KING
Serial No. All
25.1 Reel Hydraulics
14
10
7
8
4
6
15
6
13
4
1
5
6
12
6 5
9
8
2
11
6
3
13
10
8
7
6
3
12
6
6
78
TRI-KING
Item
Part No.
1
2
3
4
5
6
7
8
9
10
11
12
13
14
15
Qty.
Description
4174020
1
Pump, 3 Section Gear
339979
339909
339897
1001492
1001493
1001494
473142
339980
339909
339898
1002603
340062
339909
339898
340070
339911
339899
339989
339911
339899
1001489
1001490
1001491
1001147
3
1
1
1
1
1
8
2
1
1
3
1
1
1
2
1
1
1
1
1
1
1
1
1
Fitting, -6 ORFS x -6 ORB Straight
• O-Ring, -6 ORFS
• O-Ring, -6 ORB
Hose, Pump to Left Motor
Hose, Pump to Center Motor
Hose, Pump to RIght Motor
Cable Tie
Fitting, -6 ORFS x -8 ORB
• O-Ring, -6 ORFS
• O-Ring, -6 ORB
Motor, Reel
Fitting, -6 ORFS x -8 ORB 90°
• O-Ring, -6 ORFS
• O-Ring, -6 ORB
Fitting, -10 ORFS x -10 ORB 90°
• O-Ring, -10 ORFS
• O-Ring, -10 ORB
Fitting, -10 ORFS x -10 ORB Straight
• O-Ring, -10 ORFS
• O-Ring, -10 ORB
Hose, Left Motor to Return Tube
Hose, Right Motor to Return Tube
Hose, Center Motor to Return Tube
Tube, Reel Return
Serial Numbers/Notes
See 15.1
Pump Section 1
Pump Section 2
Pump Section 3
See 24.1
> Change from previous revision
79
TRI-KING
Serial No. All
26.1 Hydraulic Tube Clamps
Center Reel
16
14
5
5
13
9
4
4
8
10
11
12
13
4
12
7
4
6
4
5
7
2
3
13
14
5
4
4
1
6
4
15
Item
1
2
3
4
5
6
7
8
9
10
11
12
13
14
15
16
Part No.
Qty.
3003242
1
441668
3004410
452004
444708
3003110
400116
364221
400114
3003665
446130
443102
3003473
400120
400108
3003323
2
2
8
10
2
2
1
1
1
1
3
4
3
2
1
Description
5
5
Serial Numbers/Notes
Bracket, Tube Clamp
Carriage Bolt, 1/4-20 x 1-1/4”
Spacer
Flat Washer, 1/4
Locknut, 1/4-20 Hex Center
Clamp, Double Tube
Screw, 1/4-20 x 1-1/2” Hex Head
Clamp, Double Tube
Screw, 1/4-20 x 1-1/4” Hex Head
Stud, 1/4-20 x 2-3/4”
Lockwasher, 1/4 Heavy
Nut, 1/4-20 Hex
Clamp, Double Hose
Screw, 1/4-20 x 2” Hex Head
Screw, 1/4-20 x 3/4” Hex Head
Bracket, Center Reel Hose Clamp
> Change from previous revision
80
TRI-KING
Serial No. All
27.1 Electrical Routing
6
1
5
7
4
3
17
2
7
16
15
12
14
13
10
6
Item
1
2
3
4
5
6
7
8
9
10
11
12
13
14
15
16
17
Part No.
Qty.
Description
2810264
1
3003523
3004539
400112
447010
443102
1004795
400108
452004
345671
446128
403912
447006
446118
444310
3001307
2811632
1 Cable, Negative Battery
1 Convoluted Conduit
1 Screw, 1/4-20 x 1” Hex Head
1 Lockwasher, 1/4 External Tooth
3 Nut, 1/4-20 Hex
1 Wire Harness, Main
2 Screw, 1/4-20 x 3/4” Hex Head
2 Flat Washer, 1/4
2 Clamp, Harness
2 Lockwasher, 1/4
1 Screw, #10-24 x 5/8” Truss Head
1 Lockwasher, #10 External Tooth
1 Lockwasher, #10 Heavy
1 Nut, #10-24 Hex
2 Relay, SPDT with Resistor
1 Harness, Brake Light
11
9
8
Serial Numbers/Notes
Cable, Positive Battery
REFERENCE K4 and K5, See 42.1
> Change from previous revision
81
TRI-KING
Serial No. All
28.1 Lift Cylinder Linkage
38
21
22
11
23
12
10
24
20
9
19
13
37
15
14
33
9
34
35
3
6
36
4
4
16
2
1
17
5
30
7
8
18
29
31
29
28
27
25
26
82
31
32
17
TRI-KING
Item
Part No.
Qty.
Description
1
122759
1
Cylinder, Hydraulic Lift
2
3
4
5
6
7
8
9
10
11
12
13
14
15
16
17
18
19
20
21
22
23
24
25
26
27
28
29
30
31
32
33
34
35
36
37
38
554331
554330
364238
345700
460052
1001258.7
307374
458038
365106
463040
1001259.7
415519
3003035
461418
460335
1001271.7
3007694
471216
2809741
460096
400188
446136
452006
443106
364234
444780
443820
1000956.7
3001905.7
3006409
452006
445799
364149.7
400262
446142
452008
3003754
443110
1
1
1
6
1
1
1
1
2
1
1
1
1
1
1
1
2
1
1
1
1
1
1
1
1
1
1
1
2
2
2
2
1
1
1
1
1
2
• Seal Kit
• Bushing, Bronze
Pin, Cylinder
Washer, Shim
Cotter Pin, 3/16 x 1-1/2
Crank Bottom
Washer
Retaining Ring
Bushing, Lift Crank
Key, 1/4 x 1-1/4” Woodruff
Crank Top
Set Screw, 5/16-18 x 3/8”
Pin, Transport Lock
Roll Pin, 1/4 x 3-1/2”
Pin, 1/8 Spring Clip
Rear Lift Arm
• Bushing
Grease Fitting, Straight
Pin, Pivot
Cotter Pin, 5/16 x 1-3/4”
Screw, 5/16-18 x 1” Hex Head
Lockwasher, 5/16 Heavy
Flat Washer, 5/16
Nut, 5/16-18 Hex
Ball Joint, Rod End
Locknut, 1/2-20 Hex Center
Nut, 1/2-20 Hex Jam
Chain, Lift
Plate
Screw, 3/8-16 x 1-1/2” Gr 8 Hex Head
Flat Washer
Locknut, 3/8-16 Hex Center
Spring, Extension
Screw, 3/8-16 x 1” Hex Head
Lockwasher, 3/8 Heavy
Flat Washer, 3/8
Bolt, 3/8-16 Spring
Nut, 3/8-16 Hex
Serial Numbers/Notes
Included with Frame
For Grade 8 Bolt
> Change from previous revision
83
TRI-KING
Serial No. All
29.1 Reel Assembly
2
30” Reel
Lift Arms
17
3
4
40
5
32
31 30
2
29
7
40
3
17
19
18
18
16
3
2
1
20
21
22
2
3
1
35
5
36
39
38
33 / 34
37
4
23
24
21 25
9
8
7
4
5
15
6
11 14
13
12
84
10
11
8
27
28
26
TRI-KING
Item
1
2
3
4
5
6
6
7
7
8
9
10
11
12
13
14
15
16
16
17
17
18
19
20
21
22
23
24
25
26
26
27
28
29
30
31
32
33
34
35
36
37
38
39
40
Part No.
Qty.
3002430
2
400272
444762
1002603
2810171
67114
67123
2811281
2811279
3007694
471214
364781
446142
400260
364777
453011
443110
67115
67124
2811280
2811278
3007694
471214
364781
446142
400260
364777
453011
443110
67116
67125
3002718
3005435
364777
453011
446142
443110
5000183
5000184
3001078
364694
402132
446118
444310
3003041
AR
AR
3
3
1
1
1
1
2
1
1
3
1
1
2
2
1
1
1
1
2
1
1
3
1
1
2
2
1
1
1
1
1
2
2
2
1
1
1
1
2
2
2
2
Description
Serial Numbers/Notes
Pin, Lift Arm
Screw, 3/8-16 x 2-1/4” Hex Head
Locknut, 3/8-16 Hex Center
Motor, Reel
Snap Ring
26” 7 Blade Left Reel Assembly
30” 7 Blade Left Reel Assembly
• Lift Arm, Left Side 26” Reel
• Lift Arm, Left Side 30” Reel
• • Bushing
• Grease FItting, 1/4-28 Straight
• Washer, Retaining
• Lockwasher, 3/8 Heavy
• Screw, 3/8-16 x 7/8” Hex Head
• Gasket, Motor
• Flat Washer, 3/8
• Nut, 3/8-16 Hex
26” 7 Blade Right Reel Assembly
30” 7 Blade Right Reel Assembly
• Lift Arm, Right Side 26” Reel
• Lift Arm, Right Side 30” Reel
• • Bushing
• Grease FItting, 1/4-28 Straight
• Washer, Retaining
• Lockwasher, 3/8 Heavy
• Screw, 3/8-16 x 7/8” Hex Head
• Gasket, Motor
• Flat Washer, 3/8
• Nut, 3/8-16 Hex
26” 7 Blade Center Reel Assembly
30” 7 Blade Center Reel Assembly
• Collar
• Pin, Spring Lock
• Gasket, Motor
• Flat Washer, 3/8
• Lockwasher, 3/8 Heavy
• Nut, 3/8-16 Hex
Limit Switch
Operator Head
Actuator Head
Cable Connector
Screw, #10-24 x 1-3/4” Slotted Round
Lockwasher, #10
Nut, #10-24 Hex
Shaft, Lift Arm
See 36.1
Includes Items 2, 3, and 40
Used with 67114, Includes Decal
Used with 67123, Includes 2, 3, 40
Includes Items 2, 3, and 40
Used with 67115, Includes Decal
Used with 67124, Includes 2, 3, 40
REFERENCE SW4, See 42.1
Used with 67123 and 67124
> Change from previous revision
85
TRI-KING
Serial No. 67123 - All
Serial No. 67124 - All
Serial No. 67125 - All
Serial No. 67114 - All
Serial No. 67115 - All
Serial No. 67116 - All
30.1 Inner Reel Assembly
Left and Center Reel Shown, Right Opposite.
32
15
19
10
16
9
17
31
6
4
3
8
14
13
2
12
32
18
7
5
1
31
33
34
18
11
35
20
17
16
11
21
33
25
15
34
26
24
12
13
14
22
35
Number of
Reel Blades
5 Blade Reel (Optional)
7 Blade Reel (Standard)
10 Blade Reel (Optional)
86
26 in. (660 mm) Reels
30 in. (762 mm) Reels
Left
Center
Right
Left
Center
Right
67114
67116
67115
67123
67126
67125
2500712 2500712 2500713 503359 503359 503360
5002087 5002087 5002088 5002089 5002089 5002090
2500714 2500714 2500715 503361 503361 503362
30
23
27
28
29
TRI-KING
Item
1
1
2
3
4
5
6
7
8
9
10
11
12
13
14
15
16
17
18
19
20
21
22
23
24
25
26
27
28
29
30
31
32
33
34
35
Part No.
Qty.
Description
Serial Numbers/Notes
1001643
1
26” Reel Mower Frame
Used on 67114, 67115, and 67116
1001642
5001607
3001152
3000983
471214
500596
471242
3003086
364148
458039
3003517
306828
3004370
434031
400446
3003389
364151
445789
503684
5001606
3001152
3000983
500596
471214
471242
See Chart
364283
364259
400264
446142
3003611
472519
365995
445718
3004189
1
1
1
1
1
1
1
2
1
1
2
2
2
2
2
2
2
2
1
1
1
1
1
1
1
1
1
1
1
1
2
2
2
2
2
30” Reel Mower Frame
Bearing Housing, Reel Motor
• Washer
• Oil Seal
• Grease Fitting, 1/4-28 Straight
• Bearing, Cup and Cone
• Relief Fitting, 1/8 NPTF Grease
• Stud, 3/8-16 x 5/8”
Spring, Compression
Snap Ring
Shoulder Bolt, 3/4-16 Special
Washer
Locknut, 3/4-16 Thin Security
Screw, 1/4-20 x 3/4” Hex Socket Head
Screw, 1/2-20 x 2” Hex Head
Bushing, Housing Pivot
Washer, Wave
Nut, 1/2-20 Spiralock Flange
Coupler, Motor
Bearing Housing
• Washer
• Oil Seal
• Bearing, Cup and Cone
• Grease Fitting, 1/4-28 Straight
• Relief Fitting, 1/8 NPTF Grease
Reel
Spacer, Tube
Washer, Bearing Retainer
Screw, 3/8-16 x 1-1/4” Hex Head
Lockwasher, 3/8 Heavy
Nut, Reel Adjuster
Plug
Washer, Spherical
Locknut, 5/8-18 Hex Stover
Screw, Reel Adjuster
Used on 67123, 67124, and 67125
2500712
2500713
2500714
2500715
5002087
5002088
5002089
5002090
503359
503360
503361
503362
> Change from previous revision
87
TRI-KING
19
Serial No. 67123 - All
Serial No. 67124 - All
Serial No. 67125 - All
Serial No. 67114 - All
Serial No. 67115 - All
Serial No. 67116 - All
31.1 Outer Reel
22
3
67114
67115
21
23
22
25
20
4182520
22
22
67116
23
24
22
23
67123
67124
14
18
67125
17
3
1
2
16
9
6
15
4
13 12
5
7
3
2
8
88
11
10
TRI-KING
Item
1
2
3
4
5
6
6
7
7
8
8
9
9
10
11
12
13
14
14
14
14
15
16
17
18
19
20
21
21
22
23
24
25
Part No.
Qty.
REF
1
400258
446142
364282
3005890
5000616
5000617
554284
503550
3007308
3007308
4184653
4184653
338585
364147
434038
446116
122875.6
1003056.6
122769.6
1003057.6
400186
446136
3000718
364281
443110
364150
5003650
5003648
4182520
3002379
400260
453011
6
8
1
4
1
1
1
1
11
13
11
13
1
1
4
4
1
1
1
1
4
4
AR
2
2
1
1
1
4
2
2
2
Description
Inner Reel
Screw, 3/8-16 x 3/4” Hex Head
Lockwasher, 3/8 Heavy
Plate, Support
Wheel Bolt, 3/8-16
Bedkinfe Backing, 26”
Bedknife Backing, 30”
Bedknife, 26”
Bedknife, 30”
Screw, 3/8-24 x 3/4” Flat Head
Screw, 3/8-24 x 3/4” Flat Head
Locknut, 3/8-24 Expanding
Locknut, 3/8-24 Expanding
Cover, Bearing Housing
Gasket, Cover
Screw, #10-24 x 1/2” Truss Head
Lockwasher, #10
Rear Shield
Rear Shield
Rear Shield
Rear Shield
Screw, 5/16-18 x 7/8” Hex Head
Lockwasher, 5/16 Heavy
Shim, Shield
Backup Nut, 5/16-18
Nut, 3/8-16 Hex
Clamp, Tube
Shield, 26” Reel
Shield, 30” Reel
• Decal, Shield
• Decal, Tight
Screw, 3/8-16 x 7/8” Hex Head
Flat Washer, 3/8
Serial Numbers/Notes
See 30.1
Used on 67114, 67115, 67116
Used on 67123, 67124, 67125
Used on 67114, 67115, 67116
Used on 67123, 67124, 67125
Used on 67114, 67115, 67116
Used on 67123, 67124, 67125
Used on 67114, 67115, 67116
Used on 67123, 67124, 67125
Used on 67114 and 67115
Used on 67116
Used on 67123 and 67124
Used on 67125
Used on 67114, 67115, 67116
Used on 67123, 67124, 67125
> Change from previous revision
89
TRI-KING
Serial No. 67123 - All
Serial No. 67124 - All
Serial No. 67125 - All
Serial No. 67114 - All
Serial No. 67115 - All
Serial No. 67116 - All
32.1 Pivot Arms
23
4
20
14
13
18
19
22
23 21
9
10
19
2
11
13
2
10
3
4
21
17
18
20
21
16
21
1
17
7
13
8
13
14
10
11
10
6
12
8
9
15
8
7
12
5
15 8
90
TRI-KING
Item
1
1
2
3
3
3
3
4
5
6
7
8
9
10
11
12
13
14
15
16
17
18
19
20
21
22
23
Part No.
Qty.
Description
Serial Numbers/Notes
4113759
1
26” Center Pivot Arm
Used on 67116
4113756
364140
4113758
4113757
4113755
4113754
364156
338561
338562
400260
446142
400442
452012
366827
445789
453011
400264
443110
3002813
400190
446136
443106
361723
443810
3002814
471214
1
2
1
1
1
1
2
1
1
4
4
2
4
2
2
6
2
2
1
4
4
4
2
4
1
1
30” Center Pivot Arm
• Bushing
26” Left Pivot Arm
26” Right Pivot Arm
30” Left Pivot Arm
30” Right Pivot Arm
• Bushing
Pivot Bracket, Left Side
Pivot Bracket, RIght Side
Screw, 3/8-16 x 7/8” Hex Head
Lockwasher, 3/8 Heavy
Screw, 1/2-20 x 1-1/2” Hex Head
Flat Washer, 1/2
Spacer, Pivot
Nut, 1/2-20 Spiralock Flange
Flat Washer, 3/8
Screw, 3/8-16 x 1-1/4” Hex Head
Nut, 3/8-16 Hex
Bracket, Left Side Reel Bumper
Screw, 5/16-18 x 1-1/4” Hex Head
Lockwasher, 5/16 Heavy
Nut, 5/16-18 Hex
Rubber Bumper
Nut, 3/8-16 Hex Jam
Bracket, Right Side Reel Bumper
Grease FItting
Used on 67125
Used on 67114
Used on 67115
Used on 67123
Used on 67124
Used on 67116 and 67125 Only
Used on 67116 and 67125 Only
Used on 67116 and 67125 Only
Used on 67116 and 67125 Only
Used on 67116 and 67125 Only
Used on 67116 and 67125 Only
Used on 67116 and 67125 Only
> Change from previous revision
91
TRI-KING
Serial No. 67123 - All
Serial No. 67124 - All
Serial No. 67125 - All
Serial No. 67114 - All
Serial No. 67115 - All
Serial No. 67116 - All
33.1 Roller Brackets and Skids
11
10
7
6
5
4
8
3
9
1/2
13
12
16
9
24
15
4
5
6
13
14
10
21
21
7
22
22
16
16
15
8
13
19
18
11
14
15
25
10
12
24
14
15
14
13
15
16
17
10
19 15
22
23
20
22
92
21
21
16
TRI-KING
Item
1
1
2
2
3
3
4
5
6
7
8
9
10
11
12
13
14
15
16
17
18
19
20
21
22
23
24
25
Part No.
Qty.
Description
Serial Numbers/Notes
132639
1
Roller, 26” Reel Rear
Used on 67114, 67115, and 67116
132640
5002831
5002832
3003415
3003414
338647
500534
3005156
3004882
367029
471214
132680
412015
3007673
3000313
400264
446142
443110
3008359
3008360
366653
207474
434002
446174
554723
471214
207473
1
1
1
1
1
2
2
2
2
2
2
2
2
2
4
8
8
8
1
1
2
1
4
4
1
2
1
Roller, 30” Reel Rear
• Tube, 26” Reel Roller
• Tube, 30” Reel Roller
• Shaft, 26” Reel Roller
• Shaft, 30” Reel Roller
• Seal, Inner Oil
• Bearing, Cup and Cone
• Wear Sleeve
• Seal, Outer Oil
• Locknut, 3/4-16 Hex Jam
• Grease Fitting, 1/4-28 Straight
Rear Roller Adjuster
Set Screw, 5/16-18 x 5/8” Square Hd
Housing, Roller Adjuster
Nut, 3/4-16 Hex Adjuster
Screw, 3/8-16 x 1-1/4” Hex Head
Lockwasher, 3/8 Heavy
Nut, 3/8-16 Hex
Bracket, Left Side Front Roller
Bracket, Right Side Front Roller
Washer
Shoe, Left Side Reel Skid
Screw, 3/4-16 x 1-1/2” Hex Socket
Lockwasher, 3/4 Light
Wrench, 5/8” Hex Skid Shoe
Grease Fitting, 1/4-28 Straight
Shoe, Right Side Reel Skid
Used on 67123, 67124, and 67125
Used on 67114, 67115, and 67116
Used on 67123, 67124, and 67125
Used on 67114, 67115, and 67116
Used on 67123, 67124, and 67125
> Change from previous revision
93
TRI-KING
Serial No. 67123 - All
Serial No. 67124 - All
Serial No. 67125 - All
Serial No. 67114 - All
Serial No. 67115 - All
Serial No. 67116 - All
34.1 Down Pressure Springs
8
26” Reel
9
9
10
11 12
10
13
12
14
13
13
14
12
6
11
13
7
4
10 9
4
3
4
5
30” Reel
8
4
2
9
10
16
17
9
10
16
11
3
12
13
1
17
12
14
7
15
13
14
6
14
13
14
6
7
2
12
13
4
8
5
16
4
12
17
11 16
10
17
4
9
5
16 10
4
9
3
8
7
6
3
1
94
9
12
16
5
10
TRI-KING
Item
1
1
2
2
3
4
5
6
7
8
9
9
10
10
11
11
12
12
13
13
14
14
15
16
17
Part No.
Qty.
Description
Serial Numbers/Notes
2811281
1
Lift Arm, Left Side 26” Reel
Used with 67114, See 29.1
2811279
2811280
2811278
4181863
1001854
3004065
441904
452012
443118
400262
401213
446142
446142
2811128
2811127
3007908
3007908
364157
364157
364160
364160
3005219
452008
443110
1
1
1
1
4
2
2
2
2
4
6
4
6
2
2
4
6
4
6
4
6
2
6
6
Lift Arm, Left Side 30” Reel
Lift Arm, Right Side 26” Reel
Lift Arm, Right Side 30” Reel
• Decal, Read Manual for Service
Shackle, Chain
Lift Chain
Screw, 1/2-13 x 10” Hex Head
Flat Washer, 1/2
Nut, 1/2-13 Hex
Screw, 3/8-16 x 1” Hex Head
Screw, 3/8-16 x 4-1/2” Hex Head
Lockwasher, 3/8 Heavy
Lockwasher, 3/8 Heavy
Plate, Spring Mounting
Plate, Spring Mounting
Plug, Spring
Plug, Spring
Spring, Down Pressure
Spring, Down Pressure
Shackle, Spring
Shackle, Spring
Bracket, Spring
Flat Washer, 3/8
Nut, 3/8-16 Hex
Used with 67123, See 29.1
Used with 67115, See 29.1
Used with 67124, See 29.1
Full Thread
Used with 67114 and 67115
Used with 67123 and 67124
Used with 67114 and 67115
Used with 67123 and 67124
Used with 67114 and 67115
Used with 67123 and 67124
Used with 67114 and 67115
Used with 67123 and 67124
Used with 67114 and 67115
Used with 67123 and 67124
Used with 67114 and 67115
Used with 67123 and 67124
Used with 67123 and 67124 Only
Used with 67123 and 67124 Only
Used with 67123 and 67124 Only
> Change from previous revision
95
TRI-KING
Serial No. All
35.1 Reel Pump
Part No. 4174020
14
13
10 8
16
17
1
9
10
7
8
10
14
10 8
10
16
17
19
9
10
8
10
14
10
10
4 8
4
18
10
4
8
4
3
16
17
3
9
6
11
3
2
10
12
15
10
5
96
TRI-KING
Item
●
●
●
●
●
●
Part No.
Qty.
Description
1
2
3
4
5
6
7
N/S
1
Gear Housing, Section 3
N/S
N/S
5001442
N/S
5001435
5001444
1
3
4
1
1
1
Ball, Steel
Shear Pin
Snap Ring
Oil Seal
Driveshaft
Plug, Lee
8
N/S
6
Gear, 7/16” Wide
9
10
11
12
13
14
15
16
17
18
19
N/S
5001446
N/S
N/S
N/S
5001449
5001437
N/S
N/S
N/S
N/S
3
12
1
1
8
6
1
3
3
1
1
5001436
1
Serial Numbers/Notes
0.226 in3/rev
Seal Plate
Sleeve, Bearing
Idler Shaft
Stator
Screw, 1/4-20
Pin, Alignment
Drive Key
Wear Plate
O-Ring, Diamond
Gear Housing, Section 1
Gear Housing, Section 2
Repair Kit
Includes Items marked O
> Change from previous revision
97
TRI-KING
Serial No. All
36.1 Reel Motor
Part No. 1002603
27
28
29
30
31
17
25
32
26
24
21 22
16
19
18
15
23
14
20
5
10
11
10
12
5
13
9
10
11
8
5
7
6
5
10
1
2
3
4
98
TRI-KING
Item
●
●
●
●
●
●
●
●
●
●
1
2
3
4
5
6
6
6
7
8
9
10
11
12
13
14
15
16
17
18
19
20
21
22
23
24
25
26
27
28
29
30
31
32
Part No.
Qty.
Description
5001448
1
Stator
5001443
N/S
N/S
5001446
N/S
N/S
N/S
5001447
N/S
5001441
5001442
5001445
N/S
5001444
5001449
N/S
555828
N/S
N/S
2501165
N/S
503504
N/S
N/S
N/S
N/S
N/S
N/S
503503
503502
N/S
N/S
N/S
N/S
N/S
N/S
1
1
1
4
1
1
1
1
1
1
4
2
1
1
2
1
1
1
1
1
1
1
1
1
1
1
1
7
1
1
1
1
1
1
1
1
Drive Shaft
Oil Seal
Retaining Ring
Sleeve, Bearing
Gasket, 0.00050 (Silver)
Gasket, 0.00100 (Amber)
Gasket, 0.00075 (Gold)
Idler Shaft
Steel Ball
Shear Pin
Snap Ring
Gear, 1-3/8” Wide
Housing, Gear
Lee Plug
Alignment Pin
Dowel Bushing
Screw, 1/4-20
Housing, Valve
O-Ring
Valve Plate
O-Ring
Valve Stem Kit
• Valve Stem
• Shear Pin
• O-Ring
Roll Pin
Plug, 1/16 NPTF
Screw, 1/4-20
Relief Valve Kit
• Relief Valve Cap
• • Cap
• • Copper Gasket
• Adjustment Screw
• Spring
• Poppet
O-Ring
5002657
1
Seal Kit
Serial Numbers/Notes
Use gasket same color as original
gasket.
Includes Items marked ●
> Change from previous revision
99
TRI-KING
Serial No. All
37.1 Traction Pump
Part No. 4129590
5
1
11
12
10
13
3
2
6
4
10
3
37
43
8
9
42
41
45
7
15
14
13
16
38
39 40
36
44
18
16
31
20
28 30
21
17
19
28
23
24
25
26
29
27
32
33
22
35
34
100
TRI-KING
Item
●
●
●
●
●
●
1
2
3
4
5
6
7
8
9
10
11
12
13
14
15
16
17
18
19
20
21
22
23
24
25
26
27
28
29
30
31
32
33
34
35
36
37
38
39
40
41
42
43
44
45
Part No.
Qty.
Description
4132078
1
Charge Pump Kit
4120216
N/S
N/S
N/S
4120217
549354
549380
549609
546437
N/S
4195121
546415
N/S
4195120
502459
N/S
N/S
N/S
N/S
N/S
N/S
N/S
N/S
N/S
N/S
N/S
N/S
N/S
549365
N/S
549376
554377
N/S
N/S
N/S
361631
339899
549379
N/S
N/S
N/S
N/S
N/S
N/S
N/S
2500620
1
6
4
1
1
1
1
1
2
1
1
2
1
1
1
1
1
1
1
1
1
2
2
2
1
1
2
1
2
1
1
1
4
2
1
1
1
2
1
1
1
1
1
1
1
1
• Carrier
• Roller
• Screw, 5/16-18 x 1-1/4” Hex Socket
• Screw, 5/16-18 x 1-3/4” Hex Socket
• Pin, Drive
• Seal, Square Cut Ring
• Seal, Square Cut Ring
• Plate, Pump
• Snap Ring
Retaining Ring
Bearing, Ball
Oil Seal
Cover, Pump
Input Shaft
Pump, Ball Rotor
Pump Race
Cam Ring
Insert, Cam Ring
Pintle Assembly
• Coil Pin
• Dowel
• Piston, Dampening
• Backup Ring
• O-Ring
• Upper Acceleration Valve
• Lower Acceleration Valve
• Check Valve
• Charge Pressure Relief Valve
Spring, Tow Valve
Bracket, Pins
Seal, Square Cut Ring
Cover, Pintle
Screw, 5/16-18 x 1” Hex Socket
Screw, 5/16-18 x 1” Torx Socket
Control Shaft
Fitting, -10 ORB Barbed
• O-Ring, -10 ORB
Button
Washer, Control Shaft
Pin, Dowel
Shaft, Tow Valve
Nut, Gasket
O-Ring
Fitting, O-Ring Guide
Pin, Dowel
Seal Kit
Serial Numbers/Notes
Includes Items marked ●
101
TRI-KING
Serial No. All
38.1 3WD Valve
Part No. 4111942
4
5
5
5
4
5
2/3
1
4
Item
6
Part No.
1
2
3
4
5
6
Qty.
Description
4113025
2
Check Valve
5003578
4113026
5003579
4113027
5002157
339896
5001065
339897
4113028
1
1
1
1
3
1
1
1
1
• Seal Kit, Check Valve
Spool Valve
• Seal Kit, Spool Valve
Coil, Solenoid
Port Plug, -4 ORB
• O-Ring, -4 ORB
Port Plug, -6 ORB
• O-Ring, -6 ORB
Nut, Coil
1
4
Serial Numbers/Notes
REFERENCE K3, See 42.1
> Change from previous revision
102
TRI-KING
Serial No. All
39.1 Brake Calipers
Part No. 1001634 (Left Side) and 1001635 (Right Side)
7
6
5
1
4
2
3
Item
Part No.
1
1
2
3
4
5
6
7
Qty.
Description
Serial Numbers/Notes
N/S
1
Cam
Left Side
N/S
557823
503660
557824
557825
557826
503660
1
1
1
1
1
1
1
Cam
Pivot Pin
Carrier, Side Pad
Pad, Support
Lever Retainer Spring
Pad, Support
Cam Side Pad
Right Side
> Change from previous revision
103
TRI-KING
Serial No. All
40.1 Wheel Motor, 11.9 in3
Part No. 4182425
2
5
6
3
8
1
4
11
2
2
2
9
7
Item
◆
●
●
●
◆
●
●
1
2
3
4
5
6
7
8
9
10
11
Part No.
Qty.
Description
N/S
1
Seal Guard
N/S
N/S
N/S
5003384
554780
554779
N/S
N/S
N/S
556450
4
1
1
1
1
1
1
1
1
4
Seal, 3” I.D.
Back Up Ring
Shaft Seal
Shaft and Bearing Kit
Key
Hex Nut
Shaft Face Seal
Inner Face Seal
Outer Face Seal
Bolt
4178561
4178562
1
1
Rear Seal Kit
Front Seal Kit
10
Serial Numbers/Notes
Includes Items marked ●
Includes Items marked ◆
> Change from previous revision
104
TRI-KING
Serial No. All
41.1 Wheel Motor, 9.6 in3
Part No. 4189920
2
5
6
3
8
1
4
11
2
2
2
9
7
Item
◆
●
●
●
◆
●
●
1
2
3
4
5
6
7
8
9
10
11
Part No.
Qty.
Description
N/S
1
Seal Guard
N/S
N/S
N/S
5003384
554780
554779
N/S
N/S
N/S
554782
4
1
1
1
1
1
1
1
1
4
Seal, 3” I.D.
Back Up Ring
Shaft Seal
Shaft and Bearing Kit
Key
Hex Nut
Shaft Face Seal
Inner Face Seal
Outer Face Seal
Bolt
4178561
4178562
1
1
Rear Seal Kit
Front Seal Kit
10
Serial Numbers/Notes
Includes Items marked ●
Includes Items marked ◆
> Change from previous revision
105
-
+
RD
BK
B1
G
U1 Ig
RD
R1
G
M1
B S P
OR/GY
RD
OR/RD
OR/BN
P
BK
BK/WH
OR/BN
BK
SW3
G
K1
H
L4
BN/BK
OR
L3
RD
OR/YE
F1
OR/YE
OR/YE
OR/GN
86 BN/YE
85
K5
30 RD/WH
87
87A
SW12
OR/WH
SW8
SW9
B
BN
A
Y
RD
X
BN
OFF-NONE
RUN - B+I+A; X+Y
START - B+I+S S I
OR/GY
SW1
RD
OR/GN
RD/OR
2
RD/OR
CB1
OR/YE
RD RD
2
1
SW7
RD/OR
G
M
U4 S
I
YE/GY
4
1
OR/BU
5
U5
Optional Light Kit
SW11
RD
L2
L1
6
3
2
RD
SW2
RD/OR
RD/WH
SW10
RD/YE
L
G
U3
I
F4
B
OFF-G+M
RUN - B+L
SW6
G
D2
D3
G
U2
B+
OR/YE
CB1
RD/YE
B
1
OR/YE
BK/WH
RD/GN
RD/OR
BK/WH
OR/GN
RD/OR
OR/GN
RD/WH
GY/BK
RD/GN
RD/BU
RD/YE
GY/RD
OR/YE
BK/WH
30
RD/YE
F2
BK
F3
BK 85
RD/BU
RD/OR
87
SW4
D1
GY
K3
BN/GY
86 BN/RD
87A
RD/BK
K4
SW5
BN/RD
GY
BK
106
BK
GY
BK
RD
K2
TRI-KING
42.1 Electrical Schematics
Serial No. All
TRI-KING
Item
B1
CB1
CB2
D1
D2
D3
F1
F2
F3
F4
K1
K2
K3
K4
K5
L1
L2
L3
L4
M1
R1
SW1
SW2
SW3
SW4
SW5
SW6
SW7
SW8
SW9
SW10
SW11
SW12
U1
U2
U3
U4
U5
Reference
Illustration
See 19.1
See 16.1
See 5.1
Not Shown
Not Shown
Not Shown
See 4.1
See 4.1
See 4.1
See 4.1
See 17.1
See 15.1
See 38.1
See 27.1
See 27.1
Not Shown
Not Shown
See 5.1
See 5.1
Not Shown
Not Shown
See 5.1
See 5.1
Not Shown
See 29.1
See 6.1
See 3.1
See 6.1
See 8.1
See 5.1
See 5.1
Not Shown
See 8.1
Not Shown
See 5.1
See 5.1
See 5.1
See 15.1
Part
Number
NS
3000359
338601
555846
555846
555846
5003276
5003276
5003279
5003279
338289
2809727
5001354
3001307
3001307
NS
NS
164194
366751
NS
NS
363961
3001780
554018
5000183
3007392
4139450
3007392
3002056
1001958
1001010
NS
3002056
NS
162721
162723
162720
364901
Description
Battery
50 Amp Circuit Breaker
10 Amp Circuit Breaker
Clutch Diode
Seat Switch Diode
Backlap Diode
Gauge Circuit, 3 Amp Fuse
3WD Circuit, 3 Amp Fuse
Clutch Circuit, 7.5 Amp Fuse
Light Circuit, 7.5 Amp Fuse
Fuel Solenoid
Reel Pump Clutch Solenoid
3WD Solenoid
3WD Relay
Neutral Relay
Optional Light
Optional Light
Oil Pressure Warning Light
Parking Brake Light
Starter Motor
Glow Plugs
Glow Plug Switch
Reel Control/3WD Switch
Engine Oil Pressure Switch
Reel Limit Switch
3WD Proximity Switch
Seat Switch
Neutral Proximity Switch
Parking Brake Switch
Ignition Switch
Backlap Switch
Optional Light Switch
Parking Brake Light Switch
Alternator
Volt Meter
Hour Meter
Temperature Gauge
Termperature Sender
Serial Numbers/Notes
Included in Wire Harness
Included in Wire Harness
Included in Wire Harness
Installed in Fuse Block
Installed in Fuse Block
Installed in Fuse Block
Optional, Installed in Fuse Block
Included in Product 69149
Included in Product 69149
Included in Engine
Included in Engine
Included in Engine
Included in Product 69149
Included in Enigne
> Change from previous revision
107
TRI-KING
Serial No. All
43.1 Hydraulic Schematic
Reel Motors
Filter
Center
Left
Right
Electric
Clutch
Rear
Wheel
Motor
Tank
5.5 Gals. in System
1
2
3WD
Valve
A
Left
Wheel
Motor
L
B
T
PB
Steering
Cylinder
P
Lift Valve
R
Engine
Direct
Traction Pump
Drive
3400 RPM
Steering Valve
A
T
Filter
108
A A1
B B1
Right
Wheel
Motor
Lift
Cylinder
B
P
Fluids and Compounds
Hydraulic Fluid*
5001405
5001404
2500548
2500546
503409
503407
Two 2-1/2 Gallon Container of ISO VG68 Oil
One 5 Gallon Pail of ISO VG68 Oil
Two 2-1/2 Gallon Container of 10W30 Oil
One 5 Gallon Pail of 10W30 Oil
Two 2-1/2 Gallon Container of ATF Fluid
One 5 Gallon Pail of ATF Fluid
2-Cycle Oil
554599
Twenty Four 8 Ounce Plastic Container
Grease
5000067
One 5 Gallon Pail OO-Grease
5000068
Twenty Four 8 Ounce Tube OO-Grease
Paint
4184140
2500789
546409
5002631
838140
4112764
12 Ounce Orange Aerosol Can
Twelve 1 Quart Can Orange
Two 1 Gallon Can Orange
Hunter Green Aerolol Can
16 Ounce Ransomes Green Aerosol Can
1 Quart Can Ransomes Green
Lapping Compound
5002488
5002490
5002489
5002491
One 10 Pound Pail of 80 Grit
One 25 Pound Pail of 80 Grit
One 10 Pound Pail of 120 Grit
One 25 Pound Pail of 120 Grit
Specialty Compound
365422
5001581
523248
4136736
5.3 Ounce Tube of Electrical Insulating Gel
14 Ounce Can of Lubriplate Multi Lube A
Chain Lubricant
Zinc Spray Corrosion Protection
5003102
5003103
5003105
5003104
4115976
4115977
4114701
5003106
One 55 Gallon Drum Jacobsen GreensCare 68
One 5 Gallon Pail Jacobsen GreensCare 68
One 55 Gallon Drum Jacobsen GreensCare 46
One 5 Gallon Pail Jacobsen GreensCare 46
One 55 Gallon Drum Jacobsen GreensCare 32
One 5 Gallon Pail Jacobsen Greens Care 32
GreensCare Bio-Flush
Twenty Four 14 Ounce Tube Greens Care Grease
Biodegradable Hydraulic Fluid*
O-Ring Kit
5002452
5002453
5002454
SAE O-Ring Boss (3/32 ~ 2” Tube O.D.)
Common O-Ring Kit
O-Ring Face Seal ORFS (-4 ~ -24 ORS Tube Size)
Right Start Kit for New Machines
See your local Jacobsen Dealer
On-Time Maintenance Kit
See your local Jacobsen Dealer
* Refer to the Operator’s manual or the Parts & Maintenance Manual for the correct hydraulic oil requirements for your machine.
Jacobsen offers a High Usage Parts Catalog illustrating commonly used Parts through easy to read line Drawings. See your local
Jacobsen Dealer for a copy.
INDEX
1000956.7....................83
1000973.......................67
1001010.......................41
1001129.7....................53
1001134.......................67
1001147.................77, 79
1001148.... 67, 69, 71, 75
1001176.7....................45
1001258.7....................83
1001259.7....................83
1001271.7....................83
1001311.......................67
1001354.......................55
1001372.......................71
1001488.......................71
1001489.......................79
1001490.......................79
1001491.......................79
1001492.......................79
1001493.......................79
1001494.......................79
1001495.......................73
1001496.......................73
1001500.......................75
1001501.......................75
1001502.......................75
1001503.......................71
1001634.................47, 49
1001635.................47, 49
1001642.......................87
1001643.......................87
1001752.......................55
1001854.......................95
1001958.......................41
1002019.6....................67
1002033.......................63
1002264.7....................39
1002603.................79, 85
1002606.7....................45
1002941.......................75
1002942.......................75
1003056.6....................89
1003057.6....................89
1004340.................39, 64
1004795.......................81
1004900.......................43
108094-02 .............71, 77
122759...................75, 83
122769.6......................89
122875.6......................89
132639.........................93
132640.........................93
132680.........................93
162720.........................41
162721.........................41
162723.........................41
110
164194.........................41
207473.........................93
207474.........................93
220290.7......................53
2500127.......................47
2500620.....................101
2500712.......................87
2500713.......................87
2500714.......................87
2500715.......................87
2501165.......................99
2809688.......................67
2809725.......................71
2809727.......................61
2809741.......................83
2810029.......................35
2810061.......................37
2810062.......................37
2810064.......................35
2810088.......................64
2810134.......................64
2810171.......................85
2810209.......................39
2810264.......................81
2810411................ 37, 55
2810413.......................37
2810439.......................69
2810499.7....................61
2810545.......................61
2810546.......................64
2810601.......................73
2810602.......................73
2810603.......................73
2810604.......................73
2811127.......................95
2811128.......................95
2811139.......................35
2811278................ 85, 95
2811279................ 85, 95
2811280................ 85, 95
2811281................ 85, 95
2811364.......................49
2811365.......................49
2811387.......................43
2811390.......................43
2811437.......................41
2811495.......................35
2811547.......................49
2811597................ 33, 41
2811632.......................81
2811637.7....................61
2811654.......................43
2811659.......................43
2812032.......................33
2812215................ 43, 47
3000313.......................93
3000359 ...................... 63
3000576 ...................... 35
3000718 ...................... 89
3000983 ...................... 87
3001078 ...................... 85
3001152 ...................... 87
3001307 ...................... 81
3001328 ...................... 37
3001780 ...................... 41
3001905.7 ................... 83
3001950 ...................... 61
3002053 ................ 33, 41
3002056 ...................... 47
3002098 ...................... 39
3002170 ...................... 49
3002234.7 ................... 45
3002372 ...................... 43
3002379 ...................... 89
3002397 ...................... 67
3002399 ...................... 43
3002430 ...................... 85
3002627 ...................... 47
3002628 ...................... 47
3002630.7 ................... 45
3002673 ...................... 35
3002718 ...................... 85
3002788 ...................... 47
3002803 ...................... 37
3002804 ...................... 37
3002813 ...................... 91
3002814 ...................... 91
3002862 ...................... 55
3002863 ...................... 55
3003035 ...................... 83
3003041 ...................... 85
3003086 ...................... 87
3003110 ...................... 80
3003113 ...................... 77
3003114 ...................... 77
3003115 ...................... 77
3003218 ...................... 77
3003219 ...................... 71
3003223 ...................... 69
3003242 ...................... 80
3003256 ...................... 77
3003299 ...................... 37
3003301 ...................... 37
3003323 ...................... 80
3003348 ...................... 33
3003349 ...................... 33
3003350 ................ 33, 41
3003368 ...................... 37
3003389 ...................... 87
3003402 ...................... 37
3003414 ...................... 93
3003415 ...................... 93
3003444 ...................... 67
3003468 ...................... 39
3003473 ...................... 80
3003474 ...................... 45
3003475 ...................... 43
3003517 ...................... 87
3003523 ...................... 81
3003540.7 ................... 39
3003541 ...................... 39
3003606 ...................... 33
3003611 ...................... 87
3003665 ...................... 80
3003748 ...................... 49
3003754 ...................... 83
3003764 ...................... 65
3003928 ...................... 37
3003968 ...................... 37
3004065 ...................... 95
3004182 ...................... 77
3004189 ...................... 87
3004207 ...................... 33
3004253 ...................... 55
3004256 ...................... 55
3004333 ...................... 55
3004370 ...................... 87
3004410 ...35, 37, 47, 64,
80
3004523 ...................... 59
3004526 ...................... 59
3004539 ...................... 81
3004679 ...................... 45
3004882 ...................... 93
3005156 ...................... 93
3005219 ...................... 95
3005435 ...................... 85
3005890 ...................... 89
3006409 ...................... 83
3006745 ...................... 43
3006746 ...................... 43
3007308 ...................... 89
3007392-1 ................... 43
3007673 ...................... 93
3007694 ................ 83, 85
3007908 ...................... 95
3008359 ...................... 93
3008360 ...................... 93
3008433 ...................... 39
3008482 ................ 49, 53
3009193 ...................... 43
3010485 ...................... 53
303567 ........................ 37
306828 ........................ 87
307374 .................. 43, 83
319755 ........................ 63
319914 ........................ 57
325822 ........................ 67
INDEX
326112........................ 55
328133............ 43, 45, 49
338289........................ 64
338383........................ 47
338561........................ 91
338562........................ 91
338585........................ 89
338601........................ 41
338647........................ 93
339896................ 71, 102
339897.... 71, 75, 79, 102
339898........................ 79
339899..... 67, 71, 73, 79,
101
339900...... 67, 71, 75, 77
339908.................. 71, 75
339909.................. 75, 79
339910.................. 71, 75
339911............ 71, 73, 79
339963........................ 77
339974........................ 75
339979........................ 79
339980........................ 79
339983........................ 71
339989............ 71, 73, 79
340055........................ 71
340057........................ 75
340061........................ 75
340062........................ 79
340068.................. 71, 75
340070.................. 71, 79
340088........................ 75
340120........................ 75
340121........................ 73
340265........................ 73
343398........................ 43
344132........................ 67
345671............ 51, 77, 81
345700........................ 83
346006........................ 59
346361........................ 67
346771........................ 47
352204........................ 47
352936........................ 43
353914.................. 49, 53
354080 49, 51, 71, 75, 77
354989........................ 35
360111.................. 49, 53
360343........................ 51
361001........................ 61
361005............ 55, 59, 63
361064........................ 75
361117........................ 67
361631...................... 101
361723.................. 69, 91
361748........................ 67
361898 ........................ 64
362263 ........................ 61
362535 .................. 57, 64
362649 ........................ 39
363448 ........................ 61
363485 ........................ 61
363586 ........................ 63
363961 ........................ 41
363962 ........................ 41
363995 ........................ 33
364140 ........................ 91
364147 ........................ 89
364148 ........................ 87
364149.7 ..................... 83
364150 ........................ 89
364151 ........................ 87
364156 ........................ 91
364157 ........................ 95
364160 ........................ 95
364221 ........................ 80
364234 ........................ 83
364238 ........................ 83
364259 ........................ 87
364281 ........................ 89
364282 ........................ 89
364283 ........................ 87
364501 ........................ 61
364694 ........................ 85
364703 ........................ 55
364774 .................. 41, 63
364777 ........................ 85
364781 ........................ 85
365106 .................. 49, 83
365995 ........................ 87
366526 ........................ 65
366653 ........................ 93
366751 ........................ 41
366827 ........................ 91
367029 ........................ 93
367458 ........................ 77
395388 ........................ 49
400106 ........................ 63
400108 63, 64, 69, 80, 81
400112 ............ 45, 64, 81
400114 ........................ 80
400116 ........................ 80
400118 .................. 43, 45
400120 ........................ 80
400124 ........................ 51
400126 ........................ 51
400186 ............ 59, 63, 89
40018835, 37, 49, 75, 77,
....................... 83
400190 43, 45, 59, 61, 91
400192 .................. 43, 45
400200 ........................ 65
400216 ........................ 47
400226 ........................ 61
400258 ........................ 89
40026035, 37, 55, 85, 89,
....................... 91
400262 ............45, 83, 95
40026445, 63, 69, 87, 91,
....................... 93
400270 ........................ 63
400272 ............59, 69, 85
400274 ........................ 69
400276 ........................ 69
400370 ........................ 51
400408 ............35, 51, 53
400410 ........................ 49
400414 .................. 49, 53
400420 ........................ 51
400424 ........................ 67
400442 ........................ 91
400446 ........................ 87
401213 ........................ 95
402022 ........................ 47
402132 ........................ 85
403770 .................. 37, 39
403860 ........................ 43
403912 .................. 39, 81
403914 ........................ 39
404016 ........................ 39
4111408 ...................... 33
4111942 ................ 51, 73
4113025 .................... 102
4113026 .................... 102
4113027 .................... 102
4113028 .................... 102
4113754 ...................... 91
4113755 ...................... 91
4113756 ...................... 91
4113757 ...................... 91
4113758 ...................... 91
4113759 ...................... 91
4117468 ...................... 33
412015 ........................ 93
412020 ........................ 69
4120216 .................... 101
4120217 .................... 101
4121007.7 ................... 63
4121872.7 ................... 63
4121920 ...................... 63
4123003 ...................... 63
4124357 ...................... 33
4124358 ...................... 33
4124721 ...................... 33
4124789 ...................... 33
4124790 ...................... 33
4124806 ...................... 63
4125492 ...................... 61
4127309.7 ...................61
4129588 ......................69
4129589 ................59, 69
4129590 .. 43, 69, 71, 73,
75
4130753 ......................63
4130754.7 ...................61
4130755 ......................63
4130756 ......................63
4130757 ......................63
4132078 ....................101
4137139 ................53, 75
4138501 ................53, 75
4139430 ......................37
4139450 ......................37
4140149 ......................43
4140846 ......................57
4141024 ......................61
4141036 ......................57
4141266 ......................33
4141392 ......................57
4150418 ......................57
4150598 ......................57
4150717 ......................57
415519 ........................83
4174020 ......... 61, 77, 79
4178561 ............104, 105
4178562 ............104, 105
4179802 ......................67
4181862 ......................33
4181863 ................33, 95
4181864 ......................33
4181865 ......................33
4182386 ......................33
4182425 ... 49, 53, 71, 73
4182520 ......................89
4184653 ......................89
4189580 ................55, 61
4189581 ......................33
4189920 ......... 49, 71, 73
4194328 ......................33
4195120 ....................101
4195121 ....................101
4196485 ................49, 75
4197061 ................49, 55
4197180 ......................57
4197181 ......................57
4197940 ................49, 75
4199140 ......................33
4199660 ......................57
4201302 ......................35
4201840 ......................49
4203100 ......................75
4208820 ......................63
4210160 ......................61
4210420 ......................49
111
INDEX
4211400.......................49
4218141.......................75
4223520.......................75
4236021.......................53
4236061.......................53
4240904.................45, 75
4240905.................45, 75
4242563.......................49
4242564.......................49
434002.........................93
434031.........................87
434038.........................89
440078.........................37
440088.........................37
440134.........................37
441602...................39, 63
441606.........................43
441630.........................63
441664.........................39
441668.........................80
441676.........................35
441904.........................95
44310239, 45, 63, 64, 80,
........................81
443104.........................64
44310635, 37, 43, 45, 49,
61, 75, 77, 83, 91
443108.........................43
44311035, 37, 43, 45, 55,
.... 59, 69, 83, 85,
89, .... 91, 93, 95
443118 49, 51, 53, 67, 95
443806...................37, 43
443810............ 57, 69, 91
443812.........................35
443818.........................35
443820...................53, 83
443828.........................49
444304...................41, 47
444306...................41, 43
444310...... 39, 41, 81, 85
444708 43, 45, 51, 64, 80
444718...... 39, 47, 59, 65
444730.........................51
444754.........................43
444758...................43, 53
444762............ 63, 69, 85
444780.........................83
445612.........................67
445676.........................53
445718.........................87
445781.........................49
445789...................87, 91
445795...................37, 63
445796.........................37
445799.........................83
112
446110.........................43
446116.................. 39, 89
446118............ 39, 81, 85
446128............ 57, 61, 81
44613039, 45, 61, 63, 64,
........... 67, 69, 80
44613635, 37, 43, 49, 55,
.... 59, 61, 63, 64,
75, 77, 83, 89, 91
44614235, 37, 45, 55, 59,
.... 63, 69, 83, 85,
87, 89, 91, 93, 95
446154...... 49, 51, 53, 67
446174.........................93
447002.........................41
447006.................. 41, 81
447010.........................81
447030.................. 49, 53
447204.........................47
447206.........................41
447220.........................41
447224.........................49
450171.........................49
450410.........................49
452002.........................39
45200439, 45, 51, 57, 61,
63, 67, 69, 80, 81
45200637, 43, 49, 55, 59,
61, 63, 75, 77, 83
45200837, 57, 61, 63, 69,
................. 83, 95
452010.........................51
452012............ 35, 91, 95
452018.........................53
453004.........................43
453005.........................47
453009.................. 43, 47
453011 35, 69, 85, 89, 91
453017.................. 43, 45
453020.........................47
453023.........................64
454001.........................43
457016.........................61
458038.........................83
458039.........................87
460002.........................47
460008.........................47
460028............ 43, 45, 47
460052.........................83
460054.........................53
460096.........................83
460312.........................57
460335.........................83
461379.........................45
461418.........................83
463005.........................43
463040 ........................ 83
463113 ........................ 69
47121443, 45, 85, 87, 91,
....................... 93
471216 .................. 49, 83
471231 ........................ 53
471242 ........................ 87
472519 ........................ 87
473142 55, 65, 71, 75, 79
5000039 ...................... 41
5000183 ...................... 85
5000184 ...................... 85
5000616 ...................... 89
5000617 ...................... 89
5000629 ...................... 51
5000912 ...................... 55
5000913 ...................... 55
5000914 ...................... 55
5001065 .................... 102
5001428 ...................... 41
5001435 ...................... 97
5001436 ...................... 97
5001437 ................ 61, 97
5001441 ...................... 99
5001442 ...................... 99
5001443 ...................... 99
5001444 ...................... 99
5001445 ...................... 99
5001446 ...................... 99
5001447 ...................... 99
5001448 ...................... 99
5001449 ...................... 99
5001606 ...................... 87
5001607 ...................... 87
5001665 ...................... 37
5002087 ...................... 87
5002088 ...................... 87
5002089 ...................... 87
5002090 ...................... 87
5002101 ...................... 41
5002102 ...................... 41
5002126 ...................... 55
5002157 .................... 102
5002644 ...................... 61
5002657 ...................... 99
5002831 ...................... 93
5002832 ...................... 93
5002916 ...................... 53
5003276 ...................... 39
5003279 ...................... 39
5003384 ............ 104, 105
5003578 .................... 102
5003579 .................... 102
5003595 ...................... 51
5003596 ...................... 51
5003597 ...................... 51
5003598 ...................... 51
5003624 ...................... 67
5003648 ...................... 89
5003650 ...................... 89
5003769 ...................... 37
500534 ........................ 93
500596 ........................ 87
502459 ...................... 101
503359 ........................ 87
503360 ........................ 87
503361 ........................ 87
503362 ........................ 87
503502 ........................ 99
503503 ........................ 99
503504 ........................ 99
503550 ........................ 89
503660 ...................... 103
503684 ........................ 87
523356 ........................ 37
523357 ........................ 37
545234 ........................ 47
545237 ........................ 47
546415 ...................... 101
546437 ...................... 101
549354 ...................... 101
549365 ...................... 101
549376 ...................... 101
549379 ...................... 101
549380 ...................... 101
549597 ......67, 69, 71, 75
549609 ...................... 101
550376 ........................ 63
550383 ........................ 63
550398 ........................ 63
550409 ........................ 63
550489 ........................ 65
550553 ........................ 65
551651 ........................ 37
553020 ........................ 63
553886 ........................ 57
553887 ........................ 57
553926 ........................ 55
553934 ........................ 63
554284 ........................ 89
554330 ........................ 83
554331 .................. 75, 83
554377 ...................... 101
554663 .................. 59, 69
554723 ........................ 93
554748 ........................ 65
554752 ........................ 65
554779 ..49, 53, 104, 105
554780 ..49, 53, 104, 105
554782 ...................... 105
555828 ........................ 99
556450 ...................... 104
INDEX
557580........................ 55
557823...................... 103
557824...................... 103
557825...................... 103
557826...................... 103
558012........................ 37
558036........................ 41
594331........................ 63
64205-054................... 49
67114.......................... 85
67115.......................... 85
67116.......................... 85
67123.......................... 85
67124.......................... 85
67125.......................... 85
69157.......................... 51
844945.................. 37, 57
113
World Class Quality, Performance and Support
Equipment from Jacobsen is built to exacting
standards ensured by ISO 9001 and ISO 14001
registration at all our manufacturing locations.
A worldwide dealer network and factory trained
technicians backed by Genuine Parts
provide reliable, high-quality product support.
Światowej klasy jakość, wydajność i pomoc techniczna
Urządzenia firmy Jacobsen są konstruowane zgodnie ze ścisłymi
normami określonymi przez ISO 9001 oraz ISO 14001
wdrożonymi we wszystkich naszych zakładach produkcyjnych.
Światowa sieć przedstawicieli handlowych i serwisantów szkolonych w
naszych zakładach, korzystających z oryginalnych części Jacobsen,
zapewniają niezawodną pomoc techniczną na najwyższym poziomie.
When Performance Matters.™
Jacobsen, A Textron Company
11108 Quality Drive, Charlotte, NC 28273
www.Jacobsen.com
800-848-1636