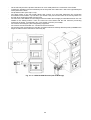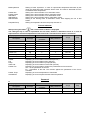
1
HERCULES
HerculesDUO
U26
MANUAL FOR BOILER Návod
OPERATION
k obsluze
AND INSTALLATION
Table of contents:
page.
1.
Use of boiler and its advantages .................................................................................................................3
2.
Boiler technical data ....................................................................................................................................3
3.
Description ...................................................................................................................................................7
3.1
Boiler construction ...............................................................................................................................7
4.
Positioning and installation ........................................................................................................................10
4.1
Regulations and directives ................................................................................................................10
4.2
Positioning options ............................................................................................................................11
4.3
Hydraulic connection diagram ...........................................................................................................13
5.
Boiler installation........................................................................................................................................14
5.1
Delivery and accessories...................................................................................................................14
5.2
Installation procedure ........................................................................................................................15
5.2.1
Installation of boiler drum with the basement ..............................................................................15
5.2.2
Shells assembly ..........................................................................................................................17
5.2.3
Fuel reservoir assembly ..............................................................................................................19
5.2.4
Mounting of the service board to the fuel reservoir .....................................................................20
5.2.5
Mounting of cleaning tools ..........................................................................................................20
5.2.6
Mounting of emergency fire extinguishing equipment .................................................................21
5.2.7
Boiler conversion from right-hand design to the left-hand design ...............................................21
5.2.8
Wiring diagram ............................................................................................................................26
6.
Boiler operation by user .............................................................................................................................28
6.1
Control, regulation and security elements .........................................................................................28
6.1.1
Saphir regulator...........................................................................................................................28
6.1.2
Safety thermostat ........................................................................................................................28
6.1.3
Temperature sensor on the fuel feeder ......................................................................................29
6.1.4
Emergency fire-extinguishing system .........................................................................................29
6.1.5
Forced withdrawal of superfluous heat .......................................................................................29
6.1.5.1
Forced withdrawal of superfluous boiler heat ......................................................................29
6.1.5.2
Forced withdrawal of superfluous water heater heat ...........................................................29
6.2
HMI (ACX84.910/ALG) service unit for Saphir regulator operation ...................................................29
6.2.1
Positioning and connection to Saphir regulator...........................................................................30
6.2.2
Service elements.........................................................................................................................30
6.2.3
Configuration ...............................................................................................................................31
6.2.4
Structure......................................................................................................................................31
6.2.5
Changing parameters .................................................................................................................36
6.2.6
Failures .......................................................................................................................................36
6.4
Service board ....................................................................................................................................38
6.5
Control activity before start ................................................................................................................38
6.5
Setting of parameters before the equipment start-up........................................................................39
6.6
Boiler putting into operation ...............................................................................................................40
6.7
Superior control .................................................................................................................................41
7.
Important warnings ....................................................................................................................................42
8.
Maintenance ..............................................................................................................................................43
9.
Instructions for product disposal after expiration of its lifetime ..................................................................43
10.
Guarantee and liability for defects .........................................................................................................44
Dear customer,
Thank you for the purchase of automatic solid fuel boiler HERCULES DUO whereby you expressed your
trust to VIADRUS a.s.
Please read this manual (particularly chapter no. 6 – Boiler operation by user, chapter no. 7 – Important
warnings and chapter no. 8 – Maintenance) that provides you with instructions for the proper use of your new
product that you have to get familiarized with at the very beginning. Please follow the current information and
take notice of instructions issued by the manufacturer or installation company that installed your boiler so that
the long-life trouble-free operation of your boiler can be guaranteed both to your and our satisfaction.
1.
Use of boiler and its advantages
Hot-water automatic solid fuel boiler HERCULES DUO is destined particularly for heating the family houses,
cottages, office buildings, small premises etc.
Boiler advantages
• automatic boiler operation, equithermal control
• possibility of HW heating
• possibility of biomass – wood pellets combustion
• mechanical fuel fedd from inbuilt reservoir
• simple, time non-consuming boiler attendance and maintenance
• low operating costs
2.
Boiler technical data
Tab. no. 1 Boiler dimensions, technical parameters
Size
Boiler weight
- small reservoir
kg
- large reservoir
kg
3
Water space volume
dm
Diameter of smoke socket
mm
3
Fuel reservoir capacity – small
dm
3
Fuel reservoir capacity – large
dm
Boiler dimensions
(including small fuel reservoir):
mm
width x depth x height
Boiler dimensions
(including large fuel reservoir):
mm
width x depth x height
Filling hole dimensions – small reservoir
mm
Filling hole dimensions – large reservoir
mm
Boiler degree acc. to EN 303 - 5
Working water overpressure
bar (kPa)
Testing water overpressure
bar (kPa)
Recommended operating temperature of
°C
heating water
Minimum return water temperature
°C
mbar
Boiler hydraulic loss
Noise level
dB
mbar
Chimney draught
Boiler connections – heating water
Js
– return water
Js
Connecting voltage
Electric input
W
Electric coverage
3
4 sect.
5 sect.
6 sect.
7 sect.
465
496
60
517
547
71,9
569
598
83,8
621
649
95,8
156
269
528
See fig. no. 1
See fig. no. 1
422 x 545
422 x 1210
3
2,5 (250)
5 (500)
50 – 85
65 – 85
45
0,72
50
0,96
1,32
1,59
Doesn´t exceed level 65 dB (A)
0,15 – 0,20
0,20 – 0,25
G 2”
G 2”
1/N/PE 230 V AC 50 Hz TN - S
100
IP 44
Tab. no. 2a) Thermal technical parameters of the boiler during combustion of brown coal
Size
Nominal output
Regulated output
Fuel consumption at nominal output
Fuel consumption at minimum output
Fuel consumption in upkeep regime
Fuel value
Burning time at nominal output – small
reservoir
Burning time at nominal output – large reservoir
Efficiency
Flue gas temperature
Flue gas mass flow at outlet
kW
kW
-1
kg.h
-1
kg.h
-1
kg.h
-1
MJ.kg
4 sect.
20
6 - 20
4,5
1,4
0,1
19,17
5 sect.
25
7,5 - 25
5,6
1,7
0,1
19,17
6 sect.
30
9 - 30
6,65
2,02
0,1
19,17
7 sect.
35
10,5 - 35
7,65
2,32
0,1
19,17
h
36 h 15 min
29 h 10 min
24 h 30 min
21 h 15 min
h
%
°C
-1
kg.s
71 h 30 min
57 h 20 min
48 h 15 min
42 h
up to 83,1
up to 85
up to 87
up to 89
115 – 195
100 – 180
95 – 170
90 – 160
0,007 – 0,015 0,009 – 0,019 0,011 – 0,022 0,013 – 0,025
Tab. no. 2b) Thermal technical parameters of the boiler during combustion of black coal
Size
Nominal output
Regulated output
Fuel consumption at nominal output
Fuel consumption at minimum output
Fuel consumption in upkeep regime
Fuel value
Burning time at nominal output – small
reservoir
Burning time at nominal output – large reservoir
Efficiency
Flue gas temperature
Flue gas mass flow at outlet
kW
kW
-1
kg.h
-1
kg.h
-1
kg.h
-1
MJ.kg
4 sect.
20
6 - 20
3,4
1,03
0,13
25,1
5 sect.
25
7,5 - 25
4,21
1,28
0,13
25,1
6 sect.
30
9 - 30
5
1,52
0,13
25,1
7 sect.
35
10,5 - 35
5,8
1,76
0,13
25,1
h
45 h 10 min
36 h 30 min
30 h 35 min
26 h 25 min
h
%
°C
-1
kg.s
88 h 40 min
71 h 35 min
60 h 15 min
52 h
up to 84,2
up to 85
up to 86
up to 87
110 – 195
90 – 170
85 – 165
80 – 150
0,007 – 0,014 0,010 – 0,017 0,012 – 0,021 0,014 – 0,024
Tab. no. 2c) Thermal technical parameters of the boiler during combustion of wood pellets
Size
Nominal output
Regulated output
Fuel consumption at nominal output
Fuel consumption at minimum output
Fuel consumption in upkeep regime
Fuel value
Burning time at nominal output – small
reservoir
Burning time at nominal output – large reservoir
Efficiency
Flue gas temperature
Flue gas mass flow at outlet
kW
kW
-1
kg.h
-1
kg.h
-1
kg.h
-1
MJ.kg
4 sect.
20
6 - 20
4,85
1,5
0,35
17
5 sect.
25
7,5 - 25
6,06
1,84
0,35
17
6 sect.
30
9 - 30
7,26
2,21
0,35
17
7 sect.
35
10,5 - 35
8,47
2,57
0,35
17
h
27 h 10 min
21 h 45 min
18 h 10 min
15 h 30 min
h
%
°C
-1
kg.s
53 h 20 min
42 h 40 min
35 h 35 min
30 h 30 min
up to 87,3
up to 87,4
up to 87,5
up to 87,5
95 – 175
90 – 165
90 – 160
85 – 145
0,007 – 0,015 0,009 – 0,018 0,010 – 0,022 0,012 – 0,025
! Important warning:
The stated thermal technical parameters vary in dependance on the sort, quality and moisture of
used fuel. Therefore some corrections might be necessary when setting the stoking cycle (time for
fuel feed versus time for fuel afterburning). For example if unburned fuel slivers appear on the grate
and in the ash-pan it stands to reason that stoking is faster than burning and the stoking cycle must
be reduced – see parameters description
Parameters of prescribed fuel – fuel used for tests in SZÚ:
• water content
max. 12 % (hard coal, wood pellets),
max. 20 % (lignite)
12 – 20 % (wood)
• volatile combustible content
28 – 40 %
• ash deformation by melting temperature > 1150 °C
• low sintering capacity
• small moisture expansion
4
Tab. no. 3
Specified fuel
Fuel
Sort of fuel
Hard coal
Peas
Nub 2
Nub 3
Wood pellets
Lignite
Biomass
Tab. no. 4
Granularity
[mm]
10 – 25
10 – 25
10 – 16
Ø6-8
Fuel value
-1
[MJ.kg ]
21 – 28,5
16,5 – 19,5
16,5 – 19,5
15 – 19
Specified fuel – lignite
Fuel
Screened lignite –
nub 2
Granulari
ty
[mm]
Fuel
value
[MJ.kg-1]
Ash content
[%]
water
content
[%]
sulphur
content
[%]
Specific
sulphur
content
[g/MJ]
Tar
content in
dry matter
[%]
Tar content
in
combustibl
e matter [%]
10 - 25
17,6
9,8
(in
anhydrous
condition)
max. 20
0,77
0,44
15,1
15,71
Pellets must conform at least to one of following directives or standards:
Directive no. 14-2000 MŽP ČR
DIN 517 31
ÖNORM M 7135
Specified granularity of pellets
6 to 8 mm
Water content in fuel
max. 12 %
Ash content
max. 1,5 %
ATTENTION!
A low fuel quality can distinctly negatively influence the boiler output and emission
parameters.
5
Length
L [mm]
L1 [mm]
4
754
498
5
865
609
6
976
720
7
1087
831
Fig. no. 1 Main dimensions of HERCULES DUO boiler (right-hand version)
(dimensions after the slash apply to the variant with a large reservoir)
6
3.
Description
3.1
Boiler construction
1.
2.
3.
4.
5.
6.
7.
8.
9.
10.
11.
12.
13.
14.
15.
16.
Basement
Burner
Boiler drum
Smoke adapter
Cleaning door
Cleaning door
Ash-pan door
Smoke control draw rod
Basement shell
Boiler drum shell incl. ash-pan
Safety thermostat
Turbulators
Partition of the combustion chamber front
Partition of the combustion chamber
Deflector
Ash-pan
17.
18.
19.
20.
21.
22.
23.
24.
25.
26.
27.
28.
29.
30.
31.
32.
Fuel feeder
Geared engine
Fan
Fuel reservoir
Service board
Filling and drain taps G ½“
Heating a return water flanges
Safety valve
Stopper with male thread Js 1 / 2 "
Stopper of boiler Js 1 / 2 "
Stopper of keg Ø 52.5 mm
Hook
Ceramics front
Ceramics lower
Fireclay top plate
Insulation back
Fig. no. 2a) Main components of boiler
7
Fig. no. 2b) Main components of boiler
The pressure components of boiler correspond to strength requirements according to:
EN 303-5
Boilers for central heating– Part 5: Solid fuel boilers for central heating with manual or
automatic feed and nominal heat output maximum 300 kW – Terminology, requirements,
testing and marking.
The cast iron body positioned on the basement welded of steel sheets is the core part of the boiler. The boiler
drum consists of sections connected by means of pressed-on boiler inserts of 56 mm diameter and secured
by anchor bolts. The sections form the combustion space, water space and convective part. Heating water
inlet and outlet are situated at the rear of the boiler by means of two flanges 2” for connection to the heating
system. The temafast Ø 60 x 48 x 2 mm sealing is between the boiler and flange.
The rear boiler section has the smoke adapter and heating water flange in the upper part and the return water
flange is in the lower part of the basement. The cleaning door and ash-pan door are fastened to the front
section. The folding grate is positioned behind the cleaning door (6).
Under the cast iron body there is positioned the burner with mixer (see. Fig. no. 3) that consists of cast iron
grate and retort. We use 4 types of cast-iron grates with regard to the size of the boiler and fuel used. The
various types of grates are marked with an identification symbol, see Figure 3 - a detail In table No. 5 there is
shown the assignment of individual types of grates to a given boiler and fuel type. The fuel is fed from the
reservoir through the feed screw emptying into retort on the cast iron grate.
The ash-pan drawer is under the combustion chamber. Next to the boiler there is positioned the fuel reservoir
that empties into fuel feed screw.
Fan for combustion air is positioned behind the fuel reservoir and is connected to the burner. Fan has control
by SAPHIR regulator.
All components (boiler drum, basement) are insulated by means of health non-detrimental mineral insulation
that reduces the heat transmission losses.
The high-quality komaxit spray is used for boiler shell colour treatment.
8
The boiler is made in left & right design.
1.
2.
3.
4.
5.
6.
7.
8.
Mixer
Retort
Countersunk screw with internal hexagon M8 x 20
Cast iron grate
Sealing
Cap
Washer 8,4
Screw M8 x 20
Detail A – Identification symbol
Fig. no. 3
Burner with mixer
Tab. No. 5 Assignment of the type of grate according to size of boiler and type of fuel
Number of boiler sections and type of fuel
6a7
4 sections
4 sections
5 sections
Marking of the grate
sections
(identification symbol)
black coal
black coal
pellets
brown coal
pellets
brown coal
pellets
no identification symbol
x
1 identification symbol
2 identification symbols
x
3 identification symbols
x
x
9
6a7
sections
black coal
brown coal
x
4.
Positioning and installation
4.1
Regulations and directives
The solid fuel boiler can only be installed by a company holding a valid license for boiler installation
and maintenance.
The project according to valid regulations must be elaborated for installation.
The heating system must be filled with water that meets the requirements of ČSN 07 7401 and
especially its hardness must not exceed the desired parameters.
Hardness
2+
Ca
Total Fe + Mn concentration
*) recommended value
Recommended values
mmol/l
mmol/l
mg/l
1
0,3
(0,3)*
WARNING!!! The use of anti-freeze mixture is not recommended by the manufacturer.
In case of two-way safety device response regarding the water refill permit in case the water does not
conform to ČSN 07 7401 it is necessary to treat water in system so that it again conforms to this
standard.
a) regarding the heating system
ČSN 06 0310
Thermal systems in buildings – Design and installation
ČSN 06 0830
Thermal systems in buildings – Protecting devices
ČSN 07 7401
Water and steam for thermal energetic devices with steam working pressure up
to 8 MPa.
EN 303-5
Boilers for central heating – Part 5: Solid fuel boilers for central heating with
manual or automatic feed and max. 300 kW nominal thermal output:
terminology, requirements, testing and marking.
b) regarding the chimney
ČSN 73 4201
Designing the chimneys and smoke flues
c) regarding the fire regulations
ČSN 06 1008
Fire safety of thermal equipments
EN 13501-1 + A1
Fire classification of construction products and building elements – Part 1:
Classification using test data from reaction to fire tests.
d) regarding the electric network
ČSN 33 0165
Electrical regulations; marking the leading wires by colours or digits;
implementing regulations
ČSN 33 1500
Electrical regulations; revision of electrical equipments
ČSN 33 2000-1 ed. 2
Low-voltage electrical installations – Part 1: Fundamental principles,
assessment of general characteristics, definitions.
ČSN 33 2000-4-41 ed. 2 Low voltage electrical installations - Part 4- 41: Protection for safety - Protection
against electric shock
ČSN 33 2000-5-51 ed. 3 Electrical installations of buildings – Part 5-51: Selection and erection of
electrical equipment – Common rules
ČSN 33 2130 ed. 2
Low-voltage electrical installations – Internal electric distribution lines
ČSN 33 2180
Electrical regulations: Connection of electric instruments and appliances
ČSN 34 0350 ed. 2
Safety requirements for flexibile cords and cables
EN 60 079-10
Electrical regulations: Regulations for electrical equipments at the places with
explosion hazard with flammable gases and vapours.
EN 60 252-1
Capacitors for AC motors – Part 1: In general – Design, testing, dimensioning –
Safety requirements – Instructions for installation and operation.
EN 60 335-1 ed.2
Electric appliances for household and similar purposes – Safety – Part 1:
General requirements
EN 60 335-2-102
Electric appliances for household and similar purposes – Safety – Part 2-102:
Special demands on appliances containing the electric connections and burning
the gas, oil and solid fuels
EN 60445 ed. 4
Basic and safety principles for man-machine interface, marking and
identification – Identification of equipment terminals, conductor terminations and
conductors
EN 61000 – 6 – 3
EMC – Part 6 – 3: Basic standards – Emissions – residaytial, commercial and
light industry environment.
10
EN 61000 -3 – 2
EN 61000 – 3 –3
EMC - Part 3 – 2: Limits – Limits for harmonic currents emissions (device with
input phase current up to 16 A inclusive).
EMC – Part 3 - Limits - section 3: Specifies the limitation of voltage fluctuation
and flicker in low-voltage supply systems for equipment with a rated input
current greater than 16 A.
e) regarding the system for HW heating
ČSN 06 0320
Thermal systems in buildings– Hot water preparation– Design and project
engineering
ČSN 06 0830
Thermal systems in buildings – Protecting devices
ČSN 75 5409
Water installations inside buildings
4.2
Positioning options
The boiler is equipped with the movable mains supply and plug. Boiler according to EN 60 335–1 ed.
2 Art. 7.12.4 must be positioned in such a way that the plug is accessible.
Boiler positioning in the living space (including corridors) is prohibited!
The installation of the boiler must comply with all requirements of ČSN 06 1008
Boiler positioning with regard to fire regulations:
1. Positioning on the floor made of incombustible material
− put the boiler on a fireproof and heat-insulating pad exceeding the boiler plan by 20 mm on the sides;
− In case the boiler is installed in a cellar it should be put on a minimum 50 mm high substructure. The
boiler must be installed straight, any possible inequalities of retaining wall are eliminated by means of
adjustable foot (see Figure No. 11)
2. A safe distance from the combustible materials:
− when installing and operating the boiler it is necessary to keep a safety distance of 200 mm from the
materials of combustibility grade A1, A2, B and C (D);
− for easily combustible materials of combustibility grade E (F), which quickly burn and burn themselves
even after removal of ignition source (such as paper, cardboard, asphalt and tar paper, wood and
wood-fiber boards, plastics, floor coverings) the safe distance has to be doubled, i.e. to 400 mm;
− safe distance should be doubled as bulb where the grade of reaction to fire has not been proved.
Tab. no. 6
Grade of reaction to fire
Examples of building materials and products included in the reaction to fire
(Extract from EN 13 501-1 + A1)
Granite, sandstone, concrete, bricks, ceramic tiles, mortars, fireproof plasters, …
A1 – incombustible
A2 – combustible with difficulty acumin, izumin, heraklit, lignos, boards and basalt felt, fibreglass boards,...
Beech and oak wood, hobrex boards, plywood, werzalit, umakart, sirkolit,...
B – hardly combustible
Pinewood, larch, whitewood, chipboard and cork boards, rubber flooring,...
C (D) – medium combustible
Asphaltboard, fibreboards, cellulose materials, polyurethane, polystyrene,
E (F) – easily combustible
polyethylene, PVC,…
Grade of reaction to fire
Boiler positioning with regard to the necessary handling space:
•
•
•
•
•
•
basic environment AA5/AB5 according to ČSN 33 2000-1 ed. 2;
min. 1000 mm handling space must be left in front of the boiler;
minimum distance between the boiler rear side and wall is 400 mm;
a gap min. 1000 mm is left on the side of fuel reservoir in case of feed screwremoval;
minimum distance from the side wall is 100 mm;
at least 450 mm are left above the boiler.
Boiler positioning with regard to electrical network(mains):
•
The boiler must be placed in such a way that the plug in socket (230V/50Hz) is always accessible.
Placing of fuel:
•
•
•
Dry fuel has to be used in order to ensure its proper burning in the boiler. Fuel stored in cellar or at
least sheltered is recommended by the manufacturer;
It is out of the question to store fuel behind the boiler or next to the boiler in the distance shorter than
400 mm;
Min. 1 000 mm distance kept between the boiler and fuel is recommended by the manufacturer or the
fuel has to be stored in a room separated from the boiler-room.
11
It must be ensured the continuous air supply into the room, where the boiler is installed for burning and
eventual ventilation
Air consumption of HERCULES DUO boiler:
Number of section
air consumption
WARNING:
-1
4
60
5
75
6
90
7
110
When connecting the boiler to the heating system the drain tap must be installed at
the lowest point and closest possible to the boiler.
Fig. no. 4
Fig. no. 5
3
[m .h ]
HERCULES DUO boiler positioning in the boiler-room
Boiler HERCULES DUO (right-hand design with small reservoir) with open fuel reservoir
12
4.3
Hydraulic connection diagram
Fig. no. 6
Fig. no. 7
Hydraulic diagram with HW preparation
Hydraulic diagram without HW preparation
Legend to Fig. no. 6 and 7:
BT1
Safety thermostat
B2
Boiler outlet temperature sensor
B3
HW temperature sensor
B5
Fuel feeder temperature sensor
EX
Expansion vessel
M1
Fuel feeder motor
M2
PV
Q1
Y3
V1
ZK
Air fanmotor
Safety valve
Boiler primary circuit pump
HW heating three-way valve
Thermostatic valve
Clack valve
Sensor cables can anyhow be shortened or prolonged provided following principles are observed:
- do not cut the sensor cable in the distance shorter than 0,5 m from the jacket;
- cable sensor prolongation by more than 10 m is not recommended;
- CMSM – H 2 x 0,5 mm cable is recommended for cable prolongation;
- Cable connection in case of prolongation is to be done very carefully. Ensure the conductive joint
when you shorten or prolong the cable.
Note to the three-way valve V4044C (V4044F) made by Honeywell:
Connection AB –heating water outlet from boiler
Connection A – outlet to the water heater
Connection B – outlet to the heating circuit
13
Fig. no. 8
5.
Boiler installation
5.1
Delivery and accessories
Connecting dimensions of boiler
HERCULES DUO boiler based on the order is delivered in such a way that the complete boiler drum
including the basement is put on the pallet and packed boiler shell is gripped at the side of it. The
accessories are put inside the boiler drum and are accessible after opening the stoking door. The fuel
3
3
reservoir (depending on the requirement small – 269 dm or large – 528 dm ) including the fuel feeder
set is put on another pallet. The boiler is packed in transport package and must not be tipped over
during the transport.
Standard boiler delivery:
•
•
•
•
•
•
•
•
•
•
•
•
•
•
•
•
•
•
•
boiler drum with basement
fuel feeder set
fuel reservoir
service board SIMBOX WP 8GB1 373-3 – set incl. electric pack
HMI (ACX84.910/ALG) service unit for Saphir regulator operation – Siemens
fan
intermediate flange
round head screw and cross-recessed screw M6 x 16 (4 pc) for fan gripping to the intermediate flange
countersunk screw M6 x 20 (4 pcs), M6 nuts (4 pcs) and washer 6.4 (4 pcs) for attaching of the
intermediate flange to the assembly of fuel feeder
safety thermostat
round head screw and cross-recessed screw M4 x 6 (2 pc) for safety thermostat gripping
boiler drum shell incl. ash-pan
connection accessories for boiler drum shell
(4 pcs spring clip, 4 pcs junction stud 10 pcs screw ST4,8 x 13)
basement shell
connection accessories for basement shell (16 pcs screw ST 4,8 x 13)
connection accessories for basement shell gripping to the basement (4 pcs washer 8,4; 4 pcs nut M8)
ash-pan
boiler mastic – tube 310 ml
bushings PG 13,5 (2 pcs)
14
•
•
•
•
•
•
•
•
•
•
•
•
•
•
•
•
•
•
•
•
•
•
•
•
•
•
•
bushings PG 11 (2 pcs)
stud bolt M10 x 30 (4 pc) and washers 10,5 (4 pcs) for gripping the fuel feeder set to the basement
hexagon head screws M8 x 20 (4 pc) and washers 8 (4 pcs) for gripping the fuel reservoir to the fuel
feeder
filling and drain tap Js 1/2“ (1 pc)
plug Js 6/4“ blind (1 pc)
sealing φ 60 x 48 x 2 (1 pc)
hook (1 pc)
deflector (1 pc)
ceramics into the boiler drum (5 pcs)
partitions of the combustion chamber (4 sections - 2 pcs, 5 sections - 3 pcs, 6 sections - 4 pcs, 7
sections - 5 pcs)
turbulators (8 pcs)
draw rod with hanaccording to for smoke flap control (1 pc)
grommet HEYCO (2 pc)
label for smoke flap control (1 pc)
flange of heating and return water 2“ (2 pcs)
sealing φ 90 x 60 x 3 (2 pcs)
handling key (1 pc)
cleaning tools (hook, brush with hanaccording to, tang, dowel 8 mm – 2 pc, straight threaded rivet 5x60 –
2 pcs)
siseal 10 g
thermostatic valve BVTS (Danfoss) or TS 130 (Honeywell) or STS 20 (Watts)
cast iron grate (for boiler size 6 a 7 sect.)
boiler sensor QAZ 36.526/109
sensor against fuel fire penetration QAZ 36.526/109
thermostatic valve (filling valve) - series VTC312 (external thread) made by ESBE (minimum temperature
o
of return water is 45 C) (ord. code: 5100 15 00) - for HERCULES DUO 4 sect.
thermostatic valve (filling valve) - series VTC512 (external thread) made by ESBE (minimum temperature
o
of return water is 45 C) (ord. code: 5100 15 00) - for HERCULES DUO 5 - 7 sect.
sticker - LED for the safety thermostat signalization
boiler service and installation manual incl. the certificate of warranty
Obligatory accessories (not included in the delivery):
•
•
•
Hot water sensor QAZ36.526/109 (in case boiler will be used for HW heating) (Siemens)
Three-way valve V4044F (in case boiler will be used for HW heating) (Honeywell). – in this case only the
phase, working and protective conductors will be connected. Note: also V4044C valve can be used.
Safety valve (1 pc) according to the maximum boiler operating overpressure (see tab. no. 1)
By request:
•
•
Circulating pump Grundfos UPS 25-40
Water heater (according to VIADRUS a.s. offer)
The boiler equipment ordered as „obligatory accessories“ and „by request“ is not included in the
basic price of boiler.
5.2
Installation procedure
5.2.1 Installation of boiler drum with the basement
1.
2.
3.
4.
5.
6.
Position the boiler drum with basement on the substructure (pad) into the horizontal position.
Insert the sealing between the heating water flange and boiler, then mount by means of four screws to
the boiler (follow the boiler-room dispositions). By welding connect the heating water outlet with the
heating system.
Insert the sealing between the return water flange and boiler, then mount by means of four screws to the
boiler. By welding connect the lower return water outlet with the heating system.
Mount the drain valve into the hole at the rear of the basement.
Put the stove-pipe on the smoke adapter and insert into chimney hole. The stove-pipe diameter is
160 mm.
Blind the threaded hole JS 6/4“ in the front section with plug JS 6/4“. Put the sealing under the plug.
15
7.
It is recommended to install shut-off valves before and after the pump with a filter, for reason of
cleansing the strainer of filter or replacement of pump.
8.
Open the cleaning door (see Figure No. 2 - Item 6) and hang hook with deflector so that the center of the
deflector is above the center of the burner grate (see Figure No. 9).
9.
Open the cleaning door (see Figure No. 2a - Item 5) and insert 8 turbulators (see Figure No. 2a - Item
12), 5 pieces of ceramics (see Figure No. 9) and partitions of the combustion space (see Figure No. 9).
1.
2.
3.
4.
5.
6.
7.
8.
Fig.No. 9
Grate
Deflector
Hook
Bottom ceramics
Top ceramic plate
Partition of the
combustion space
Partition of the
combustion spacefront
Front ceramics
Location of components and ceramics inside the boiler
16
5.2.2 Shells assembly
Fig. no. 10 Boiler shell
17
Legend to Fig.No. 10:
1.
2.
3.
4.
5.
6.
7.
8.
9.
10.
11.
12.
13.
14.
15.
16.
17.
18.
19.
20.
21.
22.
23.
24.
25.
1.
2.
3.
4.
5.
6.
7.
8.
9.
10.
11.
12.
13.
Boiler drum with basement
Left side part of basement shell
Safety thermostat holder
Safety thermostat
Screw M4 x 6 (2 pcs)
Screw ST 4,8 x 13 (2 pcs)
Insulation of left side part of basement shell
Insulation into cut-out
Right side part of basement shell
Bushing PG 13,5 (2 pcs)
Insulation of left side part of basement shell
Washer 8,4 (4 pcs)
Nut M8 (4 pcs)
Screw ST 4,8 x 13 (4 pcs)
Front lower part of shell
Front lower part of the shell insulation
Front upper part of shell
Front upper part of the shell insulation (sibral)
Front upper part of the shell insulation
(rotaflex)
Rear part of shell
Screw ST 4,2 x 9,5 (4 pc)
Left side part of the shell
Side part of the shell insulation
Grommet Heyco
Junction stud (2 pc)
26.
27.
28.
29.
30.
31.
32.
33.
34.
35.
36.
37.
38.
39.
40.
41.
42.
43.
44.
45.
46.
47.
48.
49.
50.
51.
52.
Washer 10,5 (1 pc)
Draw rod of smoke control
Control mechanism lever
Washer 10,5 (1 pc)
Plug ∅3 x 25 (1 pc)
Lock 2,5 x 32 (1 pc)
Bakelite ball
Right side part of the shell
Side part of the shell insulation
Junction stud (2 pcs)
Screw ST 4,8 x 13 (6 pcs)
Face
Face insulation (rotaflex)
Face insulation (sibral)
Upper part of the shell
Spring clip (4 pcs)
Upper part of the shell insulation
Front part of the shell
Front part of the shell insulation (rotaflex)
Front part of the shell insulation (sibral)
Rear part of the shell upper insulation
Rear part of the shell
Screw ST 4,8 x 13 (4 pcs)
Rear part of the shell insulation
Stopper of keg Ø 52.5 mm
Cover
Screw ST 4,8 x 13 (4 pcs)
Remove the shell from the cardboard package.
Mount the relevant connection accessories on the steel sheet components according to Fig. no. 10.
Jacket the boiler according to Fig. no. 10.
Screw the safety thermostat (2 pc screw M4 x 6) to the safety thermostat holder. Screw the holder with
the safety thermostat to the left shell of basement (2 pc screw ST 4,8 x 13) – see detail A. (Note: lead
the safety thermostat capillary between the shell and insulation). The electric connection of safety
thermostat is done before jacketing the boiler. The cable goes in the bushing through the side part of the
basement shell depending on the design either in the left or right part of basement shell. The boiler
output temperature sensor must be positioned in the boiler basin across the bushing in the side part of
the basement shell (depending on the right or left design) also before the boiler jacketing.
Mount the left and right side part of basement shell incl. insulation. Depending on the left or right design
selection break out the steel sheet for feeder connection. Screw the cover by means of 4 screws ST 4.8
x 13 to a part of the cut out hole. Grip the side parts to the basement by means of M8 nuts and 8,4
washers (only to the front part of the basement).
Mount the front parts of basement shell incl. insulation (upper and lower) and screw the rear part of
basement shell to the side parts of basement shell.
Mount the left and right side part of shell incl. insulation to the anchor screws (screw the junction studs
into both side parts of shells and mount the HEYCO bushings in the left shell).
Pull the smoke control draw rod through the left side part of the shell and secure by a plug. Mount the
smoke control lever on the draw rod and secure by means of 2 pc washers and plugs. Connect the
smoke control lever with smoke adapter flap and secure with a lock; the screw the bakelite ball
Stick the label for signalling the smoke flap on the left-hand side part of the shell at the point of smoke
control draw rod.
Mount the front part of the shell incl. insulation.
Screw the rear part of the shell to the side parts.
Seat the face with insulation on the side parts.
Insert the spring clips into the upper part of shell with insulation and mount on junction studs of shell side
parts.
18
5.2.3 Fuel reservoir assembly
1.
2.
3.
4.
5.
6.
7.
8.
Fuel feeder
Screw M10 x 30 (4 pc)
Washer 10,5 (4 pc)
Nut M10 (4 pc)
Fan
Screw M6 x 16 (4 pc)
Washer 6,4 (4 pc)
Nut M6 (4 pc)
9.
10.
11.
12.
13.
14.
15.
Fuel reservoir
Screw M8 x 20 (4 pc)
Nut M8 (4 pc)
Washer 8,4 (8 pc)
Adjustable foot
Intermediate flange
Screw M6 x 20 (4 pcs)
Fig. no. 11 Mounting of fuel feeder and reservoir to the boiler
19
Screw on the adjustable legs of the the fuel feeder assembly, see Fig.No. 11 - Detail D.
Apply sealant onto the base of boiler , then mount the fuel feeder assembly to the base of the boiler and
tighten. Thus we have ensured a precise position of the fuel feeder assembly perpendicularly to the boiler
base. Loose the adjustable legs so that they sit on the floor. Apply sealant to the flange for the fan on the the
fuel feeder assembly. Then mount the fan.
Apply sealant to the fuel feeder assembly at the point of sitting surface of the fuel tank. Settle the fuel tank
and tighten the screws.
ATTENTION!!!
Before the fuel reservoir is loaded with fuel it is necessary to check the free
rotation of fuel feed screw.
5.2.4 Mounting of the service board to the fuel reservoir
1.
2.
3.
4.
5.
Service board
Screw M6 x 16 (4 pcs)
Washer 6,4 (4 pcs)
Nut M6 (4 pcs)
Sticker - LED for the safety
thermostat signalization
Fig. no. 12 Mounting of the service board to the fuel reservoir
1.
2.
3.
Screw the service board to the side of fuel reservoir.
Carry out the wiring system according to diagram in chap. 5.2.8.
To stick the sticker – LED of the safety thermostat signalization (5) on the switchboard (1).
5.2.5 Mounting of cleaning tools
The ordinary assembly tools and leather gloves are to be used for mounting and demounting of the brush and
spike on tang (if it is included in the delivery).
20
5.2.6 Mounting of emergency fire extinguishing equipment
In the cleaning hole cover there is a pipe for water inlet with 1/2“ connection that serves for BVTS valve or
TS 130 or STS 20 interconnection. The interconnection can be carried out by means of flexible(stainless)
hose. On the ground of possible disassembly it must regard the demountable connection of valve with the
pipe in the cleaning hole cover. The valve sensor is to be positioned in the sensor holder that is on the fuel
feeder.
Note: The valve sensor is to be positioned in the sensor holder without the valve basin that is included in the
delivery.
1 – Cleaning hole cover
2 – Sensor holder
Fig. no. 13 Mounting of emergency fire-extinguishing equipment
Emergency fire-extinguishing equipment function:
o
In case of fuel fire penetration into feeder (temperature in feeder has reached 95 C), BVTS or TS 130 or
STS 20 valve opens the cold water inlet into hopper and the burning fuel is extinguished. After the
o
temperature on the sensor has dropped by 6 C the water supply is stopped. Then it is necessary to dismount
the motor with worm shaft and stainless insert and do cleaning. This is followed by the re-assembly and
check whether the valve does not let flowing the cold water into the reservoir; if yes exchange the valve.
5.2.7 Boiler conversion from right-hand design to the left-hand design
Boiler conversion after delivery before installation:
−
−
−
We remove the grate and pull out the burner with mixer from the basement (the connection accessories
are as follows: 6 pc screw M10 x 30, 12 pc washer a 10,5, 6 pc nut M10).
From the left side of the base unscrew the blind flange, insulation, bracket of insulation (see Figure 15 Detail B) and install them on the right side (connecting material is as follows: 4 pc screw M10 x 30, 8 pc
washer 10,5 , 4 pcs nuts M10). We will remove the old sealant. The metal plates must be sealed with a
sealant between the base and bracket of insulation and between the bracket of insulation and blind
flange..
We apply mastic to the burner with mixer flange and we put the burner into the basement from the lefthand side and screw it (the connection accessories are as follows: 6 pc screw M10 x 30, 12 pc washer
10,5, 6 pc nut M10).
21
−
We remove the old mastic from the grate. We apply a reasonable quantity of new mastic to the bearing
surfaces and we mount the grate in the burner. Note: Turning of the cutting off of the grate according to
the Figure No. 3
!
Apply boiler mastic
marked and put the
retort with mixer. It is
ensure the tightness
burner and grate.
−
to the point
grate on the
necessary to
between the
Then we proceed according to chap. 5.2 Installation procedure.
Conversion of already installed boiler:
−
−
−
−
−
−
−
−
−
−
−
−
We let the boiler burn out.
We disconnect the boiler from mains
We disconnect the geared motor, fan (we disconnect the connector), boiler primary pump, safety
thermostat from regulator and we will pull out the sensor against fire penetration from the sump and the
output sensor from the sump of boiler. Unplug the HW sensor with three-way valve HW
We remove the service board including the consoles for service board gripping.
We disconnect the emergency fire extinguishing equipment.
First of all we empty the reservoir. We dismantle the fuel reservoir from the fuel feeder (the connection
accessories are as follows: 4 pc screw M8 x 20, 8 pc washer 8,4 a 4 pc nut M8).
We disconnect the fuel feeder from the boiler basement (the connection accessories are as
follows: 4 pc washer 10,5 and 4 pc nut M10).
We remove the boiler shell.
We remove the grate and pull out the burner with mixer from the basement (the connection accessories
are as follows: 6 pc screw M10 x 30, 12 pc washer 10,5, 6 pc nut M10).
From the left side of the base we unscrew the blind flange, insulation, insulation bracket (see Figure 15
- Detail B) and install them on the right side (connecting material is as follows: 4 pc screw M10 x 30, 8 pc
washer 10,5 , 4 pcs nuts M10). We remove the old sealant. The metal plates must be sealed with a
sealant between the base and bracket of insulation and between the bracket of insulation and blind
flange.
We apply mastic to the burner with mixer flange and we put the burner into the basement from the lefthand side and screw it (the connection accessories are as follows: 6 pc screw M10 x 30, 12 pc washer
10,5, 6 pc nut M10).
We remove the old mastic from the grate. We apply a reasonable quantity of new mastic to the bearing
surfaces and we mount the grate in the burner. Note:. Turning of cutting off of the grate according to the
Figure No. 3
!
Apply boiler mastic
marked and put the
retort with mixer. It is
ensure the tightness
burner and grate.
22
to the point
grate on the
necessary to
between the
1.
2.
3.
4.
5.
6.
7.
8.
9.
10.
11.
12.
Service board
Nut M6 (4 pc)
Washer 6,4 (4 pc)
Screw M6 x 16 (4 pc)
Fuel reservoir
Nut M8 (4 pc)
Washer 8,4 (8 pc)
Screw M8 x 20 (4 pc)
Fuel feeder
Screw M10 x 20 (4 pc)
Washer 10,5 (4 pc)
Nut M10 (4 pc)
Fig. no. 14 Boiler conversion from the right-hand to left-hand design- fuel reservoir and feeder
disconnection
23
1.
2.
3.
4.
5.
6.
7.
8.
9.
10.
Basement
Burner
Grate
Screw M10 x 30 (6 pc)
Washer 10,5 (16 pc)
Nut M10 (10 pc)
Blind flange
Insulation (sibral board)
Insulation of the opening otvoru (sibral mat)
Holder (bracket) of insulation
Fig. no. 15 Boiler conversion from the right-hand to left-hand design – dismantling of burner and
blind flange
24
-
-
-
On the left side part of the jacket of the base cut out a metal plate for the connection of the feeder.
Transfer the insulation from the left lateral part of the jacket of the base into a slot in the right lateral part
of the jacket of the base.
We jacket the boiler (see chap. 5.2.2).
We apply mastic to the fuel feeder flange and connect it to the boiler basement (the connection
accessories are as follows: 4 pc nut M10, 4 pc washer 10,5). We turn the motor in such a way that it is in
the rear when viewing the boiler from the front.
We remove the old sealant from the flange of the fuel feeder and we apply a reasonable amount of a new
sealant to the seating surface. Then we connect the fuel feeder with the fuel reservoir (connecting
material is as follows: 4 screws M8 x 20, 4 pcs washer 8.4 and 4 pcs nut M8).
We connect the emergency fire-extinguishing equipment.
We connect the service board incl. consoles to the fuel reservoir.
We reconnect the components (in case the conversion was done already after the primary installation the
length of cables must be trimmed as need may be).
Fig. no. 16 HERCULES DUO boiler (left-hand design)
25
A1
S1
B2
B5
B3
BT1
H1
TB
Regulator Siemens ACX 38.030
Regulator system reverser
Boiler output temperature sensor QAZ 36.526/109
Fuel feeder temperature sensor QAZ 36.526/109
Temperature sensor HW QAZ 36.526/109
Safety thermostat
Safety thermostat signalling
Motor thermal protection
M1
M2
Q1
Y3
K1
S
K3, K4
Fuel feeder motor
Air fan motor
Boiler primary circuit pump
HW three-way valve
Fuel feeder relay
Contact of external control
Relay of security circuit
ACX84.910/ALG
SERVICE UNIT FOR
SAPHIR
REGULATOR
5.2.8 Wiring diagram
Fig. no. 17 Elementary wiring diagram
26
Fig. no. 18 Connection diagram
27
BT1
M2
M1
Q1
Y3
B3
B2
B5
TB
S
SAFETY THERMOSTAT
VENTILATOR SUPPLY
FUEL FEEDER
BOILER PUMP
HW THREE-WAY VALVE
HW TEMPERATURE
BOILER OUTLET TEMPERATURE
FUEL FEEDER TEMPERATURE
MOTOR THERMAL PROTECTION
CONTACT OF EXTERNAL CONTROL
SERVICE BOX
SERVICE
BOX
Color of conduit:
BK
Black
BN
Brown
BU
Blue
GNYE Green-yellow
GREY Grey
WHITE White
YELOW Yellow
RED
Red
SERVICE
BOX
SERVICE
BOX
6.
Boiler operation by user
6.1
Control, regulation and security elements
6.1.1 Saphir regulator
Heating - automatic mode
The boiler must be in the ON state (boiler display HMI).
The requirement for heating will be generated by switching of contact D2 (room unit or the superior system of
regulation). The boiler starts to heat to the set desired temperature. The fan starts to run (constant speed)
and also the fuel feeder according to parameters set for the operation and delay of feeder.
The pump switches on reaching a defined temperature of boiler. If during heating the outlet temperature has
decreased by 5 °C below the set temperature of switching on the pump, the pump will be turned off. When
demand for heating has ceased , the pump will stop. When the set temperature of boiler has been exceeded,
the boiler goes to attenuation mode. If there is still the requirement for heating, the pump continues to run. In
case of a decrease in outlet temperature of boiler (set temperature minus hysteresis) the will be again the
automatic mode
Hot water
Request for hot water is generated from the sensor B3. The requirement occurs when the temperature in the
water heater has decreased by the set hysteresis. This state is indicated by the green LED that is illuminated
on the display of boiler. The three-way valve is turned into the hot water circuit. The pump switches on when
reaching a defined temperature of boiler with the condition that the temperature of the boiler is by 7 °C higher
than the current temperature of the hot water in the heater. Otherwise, the pump is suspended to prevent
cooling in the water heater. When demand for heating has ceased, there will occur the defined deceleration
of three-way valve to the water heater. If the requirement for heating will be active, then deceleration of the
three-way valve will not occur.
Attenuation mode
If there is no requirement for heating and hot water, the boiler goes into attenuation mode. This mode is
signalled by a flashing green LED of display of boiler. In this mode, the minimum boiler temperature is
maintained. If has been reached the minimum temperature of boiler, then the fan and the feeder are switched
on only in a defined time delay for a certain period of time to avoid fire blow out in the boiler. The fan is
running longer compared to the feeder, so the fuel can sufficiently begin to burn.
In the attenuation mode the pump switches when the temperature of boiler reaches 70 °C. The pump turns
off during in case of decrease by 5 °C below this temperature.
It is not recommended disconnect the boiler from the mains.In case of boiler disconnection from
mains time in regulator might stop and consequently the time regimes will switch incorrectly (applies
to the time mode of hot water, if activated).
In an extreme case also the fuel fire penetration into reservoir (pellets used the fuel) can occur. At the
switched off boiler (but not disconnected from mains) the protection against fuel fire penetration into
reservoir is active. In case of a long-term electricity outage pellets should be removed from the
burner in order to prevent their fire penetration to the reservoir. In this way we prevent the burning
fuel from being poured with water (which is the function of emergency fire extinguishing system –
see chap. 5.2.6) and we are spared of complicated removal of soaked pellets from the fuel feeder
Boiler (cursor is above symbol
), heating circuit (parameter P 40) or HW preparation (parameter
P 42) can be switched of by means of QAA 88 device
6.1.2 Safety thermostat
The safety thermostat is mounted on the left-hand side part of basement shell and it serves for boiler
shutdown in case the safety temperature has been exceeded. The safety thermostat must be set to 100 °C
o
temperature i.e. to the temperature higher than the set maximum boiler temperature (90 C). After the safety
thermostat switch-off the safety thermostat signal lamp will light up. The fuel feeder and fan will stop. The
safety thermostat de-blocking must be done manually – after the cover dismantling and then pressing the
trap.
In case of safety thermostat repeated switch-offs it is necessary to put the boiler out of service and find the
reason of boiler repeated overheating. After the safety thermostat switch-off the primary pump is still working.
28
6.1.3 Temperature sensor on the fuel feeder
If the temperature set in P26 parameter appears on the temperature sensor the fuel feed will be accelerated
in order to move the burning fuel to the burner. Once the temperature has dropped below the set value the
boiler will come back into the original regime. This security only functions in case the boiler is supplied with
electricity. If the feeder temperature hasn’t dropped within 7 minutes (preset value) the feeder will be shut
down.
6.1.4 Emergency fire-extinguishing system
o
In case of fuel fire penetration into the feeder (95 C temperature reached on the feeder) the BVTS
(TS 130, STS 20) valve opens the water inlet into the hopper in order to extinguish the burning fuel;
once the temperature on sensor has dropped by 6°C the water inlet will be closed.
6.1.5 Forced withdrawal of superfluous heat
6.1.5.1 Forced withdrawal of superfluous boiler heat
In case the boiler temperature has exceeded 90°C so called forced withdrawal of the superfluous heat into
the heating circuit will start. The fan and feeder are not active. In case the temperature is lower than the
current desired boiler temperature the boiler comes back into actual automatic regime (in case the boiler
temperature has reached 100°C and the safety thermostat has been blocked the thermostat must be
manually de-blocked).
6.1.5.2 Forced withdrawal of superfluous water heater heat
o
If the temperature in water heater has exceeded 80 C the forced withdrawal of the superfluous heat into the
heating circuit will start.
6.2
HMI (ACX84.910/ALG) service unit for Saphir regulator operation
As display of boiler is used the control unit (HMI ACX84.910/ALG) to control the controller Saphir.
The connection of the control unit HMI is conditioned by preservation of the left segment of the switch S1 in
position off. blbec
HMI service unit cannot be used as the space device.
Technical data
Supply
Connection
Interface
Protection
Ambient conditions
Industrial
standards
Dimensions
General data
Operating voltage
Rated current
Connecting cable
Cable length
Serial interface
Protection class according to
EN 60529
Temperature range:
- Operation
- Storage
DC 12 V (supply from Saphir regulator)
Max. 50 mA
JST 4-four-wire
3 m (max. 15 m without reinforcement)
8-eight-wire, socket RJ45
IP 50 as unit for manual operation
Resistance
EN 61000-4-2
Casing
LCD display:
- Visible surface
- Active surface
Casing:
- Weight
- Colour
LCD – display:
- Image - Latin characters
- Resolution
99,3 x 153,5 x 23 mm
o
-10 … 50 C
o
-30 … 70 C
70 x 45 mm
61 x 39 mm
0,124 pc
Anthracite, RAL 7016
8 lines, 20 characters in line
128 x 80 points
29
6.2.1 Positioning and connection to Saphir regulator
Position
A suitable position of HMI service unit is on the front side of HERCULES DUO boiler fuel reservoir. Magnet
installed at the unit backside belongs to HMI service unit.
ATTENTION!
With regard to device operating temperatures do not position HMI service unit on the front parts of the boiler
shell.
Connection to Saphir regulator
The connecting cable with the mains connector belongs to the service unit. Ii is FORBIDDEN to prolong or
shorten the cable.
HMI service unit connection to Saphir regulator:
-
Disconnect the boiler from the electricity supply.
Demount the cover of service board that is fixed with four screws.
Cut through reasonably the cable padding ABB for mains connector of HMI device.
Pull the cable with mains connector through the cable padding ABB and connect to the input for
mains connector on Saphir regulator
Mount the cover of service board.
Connect the boiler to the electricity supply.
6.2.2 Service elements
1 – LCD display
2 – Home key
3 – Backspace key
4 – Key of time programs
5 – Key of faults display with LED-diode
6 – Line selection keys (▲/▼)
7 – Setting key
8 – Enter key
Fig.no.19
Service elements of HMI unit for Saphir regulator control
30
Image
Service element (key)
name
Function description
Home key
Return to original page
Backspace key
Cursor moved back by one menu
Schedule key
The schedules selection is displayed
Key of faults display with LEDdiode
Image and alarm acknowledgement
Line selection keys (▲/▼)
Selection of menu/parameters/lines
Set key
Setpoint values (+/-)
Cursor horizontal control (◄/►)
Enter key
Confirmation of the set value
6.2.3 Configuration
Boiler equipment
• HMI service unit for (ACX84.910/ALG) Saphir
regulator control
• Thermostatic valve (Filling valve ) - series
VTC312 or VTC512 (external thread)
Necessary boiler accessories
• Three-way valve V4044C (only in case the boiler
is used for HW heating)
• QAZ36 Hot water sensor(only in case the boiler
is used for HW heating)
Type of control
The control to the set temperature of the boiler
or the control by using a room device, or a
higher-level regulation (contact D2).
6.2.4 Structure
Through menu (original page) and other submenus you will get to the names of parameters or directly to the
setting lines.
All lines on the HMI service unit display are not always displayed at once (depending on the display
possibilities). You will get to other lines by means of the key for lines selection (▲/▼).
The cursor is displayed on the first line that can be changed (e.g. on Boiler Menu line in case of the original
page) and then always on each of next lines enabling the change.
31
The initial side of HMI control unit for controlling of the controller Saphir.
Explanation:
z=
the imaging parameter (specified value can not be changed)
+=
parameter value can be changed
HW = hot water
►
the step to the second level (by pressing Enter)
Note: The text descriptions of the parameters correspond to the display of the HMI unit.
Displaying on the display of HMI unit
Description
5.1.2012
Boiler Status
Boiler Temp.
HW Temp.
Feeder Man.
Fan Man.
/Param. Setting
Password
Select language
Example
12:37
On
o
68 C
o
56 C
Off
Off
English
Parameter
Without
password
+
+
z
z
+
+
►
Range
Step
With password
►
+
+
z
z
+
+
►
Off / On
5 … 100
5 … 100
Off / On
Off / On
►
Polish/
French/
Czech/
English/
German
1
1
DUO model 2013
Boiler Status
Boiler Temp.
HW Temp.
Feeder Man.
Fan Man.
Param. Setting
Password
Select language
Boiler switched on/ off
Display of current boiler temperature .
Display of current hot water temperature (if the status of HW preparation is active).
Switch on/ switch off of the feeder for a defined time (use when making fire)
Switch on/ switch off of the fan for a defined time (use when making fire)
Input into menu of setting parameters
Input into menu of boiler, HW and time plans of HW.
Setting language possibility.
/ Parameters Setting
►
Displaying on the display of HMI unit
Description
/ Parameters
Parameter
Example
Without
password
With password
70°C
55°C
60°C
3°C
5s
19s
10s
40min
90s
48°C
+
+
+
+
+
+
+
+
+
+
+
+
+
+
+
+
+
+
+
+
Range
Step
50 – 85 °C
10 – 65 °C
20 – 70 °C
1 – 10 °C
3 – 20 s
5 – 120 s
3 – 20 s
5 – 120 min
3 – 240 s
20 – 70 °C
1
1
1
1
0,1
1
0,1
1
1
1
Setting
Boiler Temp.
HW Temp. On
MinBoilerTemp
BoilerHysterese
Feeder Run
Feeder Pause
StbFdrRun
StbFdrPause
StbFanOvRun
PumpMinTemp
Boiler Temp.
HW Temp. On
MinBoilerTemp
Setting of desired boiler temperature.
Setting of desired HW temperature and switch off/ on of HW preparation .
Setting of boiler temperature which will be maintained in the attenuation mode.
32
BoilerHysterese
Feeder Run
Feeder Pause
StbFdrRun
StbFdrPause
StbFanOvRun
PumpMinTemp
Setting of boiler hysteresis - in case of output boiler temperature decrease by this
value the automatic boiler operation will be reset. The value is deducted from the
set desired boiler temperature.
Setting of the time of feeder run in automatic mode
Setting of the time of feeder delay in automatic mode.
Setting of the time of feeder run in attenuation mode
Setting of the time of feeder delay in attenuation mode
Setting of fan slowing down in attenuation mode, after stopping the run of fuel
feeder.
Setting of temperature at which the pump switches on
Current statuses
After pressing the button
the current status of boiler is displayed
The LED lights up in case of requirement for hot water, flashes in attenuation mode or in case of
requirement for minimum temperature of the boiler and is turned off when boiler is turned off.
Displaying on the display of HMI unit
Description
Current statuses
Feeder
Fan
Pump
Valve HW
Feeder Fire
Feeder Temp.
ActualDmnd
Feeder
Fan
Pump
Valve HW
Feeder Fire
Feeder Temp.
ActualDmnd
Parameter
Example
Without
password
With password
Off
On
On
Off
OK
o
24 C
70°C
z
z
z
z
z
z
z
z
z
z
z
z
z
z
Range
Step
Off/On
Off/On
Off/On
Off/On
OK / Err
5 … 100
0…85
1
1
Displaying of current status of fuel feeder(Off./On.)
Displaying of current status of fan (Off./On.)
Displaying of current status of pump(Off./On.)
Displaying of current status of valve HW (Off./On.)
Displaying of current status, whether fire penetrates into fuel reservoir:
OK – no fire penetration of the fuel
Err - penetration of the fuel. The function against fire penetration of the fuel is
activated.
Displaying of current temperature of fuel feeder
Displaying of current requirement dor boiler temperature
Password
►
Displaying on the display of HMI unit
Description
Example
Parameter
Without
With password
password
- Enter the password ****
33
Range
Step
After entering the correct password (9000), the following menu appears below the line
"Password"
/Menu Boiler
Displaying on the display of HMI unit
Description
Example
Parameter
Without
With password
password
/Menu Boiler
Set.Low.Temp
Low.T.Delay
InFireFdrRun
InFireFdrStop
FeederMaxTemp
Max.Fdr.Man
Max.Fan Man
Pump Mode
Pump Man
PumpOverRun
40 C
30 min
20s
10s
o
90 C
6min
15min
Auto
Off
3min
+
+
+
+
+
+
+
+
+
+
PumpKickDay
Friday
+
Set.Low.Temp
Low.T.Delay
InFireFdrRun
InFireFdrStop
FeederMaxTemp
Max.Fdr.Man
Max.Fan Man
Pump Mode
Pump Man
PumpOverRun
PumpKickDay
o
Range
Step
10 … 60
10 … 60
10 … 30
5 … 15
85 … 95
1 … 10
1 … 30
Man/Auto
Off/On
0 … 30
Mo … Sun/
AlwaysOff
1
1
1
1
1
1
1
1
Setting of desired minimum temperature of boiler, thatbhas to be achieved up to the
set value in the parameter Low.T.Delay.
Failing to achieve the value set in parameter Set.Low.T. during the time set in this
parameter, occurs the fault message "LowBoilerTemp" - extinction of the boiler and
the consequent shut down of the boiler.
Setting of running time of feeder if the current temperature of feeder is above the
set maximum temperature of feeder (Factory Setting of 90 °C).
Setting of delay of feeder if the current temperature of feeder is above the set
maximum temperature of feeder (Factory Setting of 90 °C)
When this temperature is reached at the sensor of fuel feeder, then the feeder
starts to move fuel at an accelerated pace until such time as there is a drop in
temperature below the set value. If there is no temperature drop of feeder for
7 minutes (firmly set software value) the feeder will be shut down. The
manufacturer recommends leaving the factory preset value.
Setting of running time of feeder when firing up. Fuel feeder feeds continuously for
the time set in this parameter. Interrupting or re-commissioning of the feeder into
operation can be done using the display of boiler when firing up in boiler.
Setting of fan run time when firing up. The fan is running continuously for the time
set in this parameter. Interruption or reactivation fan operation when firing up can
be done using the display of the boiler..
Setting of the mode of pump. With this parameter it is possible to verify its
functionality. By default, the Auto mode is selected.
Manual Switch on / switch off the pump when the pump mode Man is selected.
Note: After verifying the functionality of the pump is required again to select Auto
mode.
Setting of pump slowing-down time
At the appointed day will pump kick at 12:00 for 30 sec.
Value 1-7 - corresponds to days Monday to Sunday.
Value 0 - pump kick of primary pump is not active.
Value 8 - pump kick of primary pump is active every day.
Note: If at this time the pump is running, the function is not active.
34
/Menu HW
Displaying on the display of HMI unit
Description
Example
/Menu HW
Preparation
Increas. HW
Hysteresis HW
Valve mode HW
Valve HW Man
ForcedExh.ToHW
Preparation
Increas. HW
Hysteresis HW
Valve mode HW
Valve HW Man
ForcedExh.ToHW
Parameter
Without
password
Range
With password
On
o
15 C
o
4 C
Auto
Off
No
+
+
+
+
+
+
Off/On
5 … 20
1 … 10
Man/Auto
Off/On
Yes/No
Step
1
1
Preparation of HW On/Off.
Setting of the boiler temperature increase from the currently desired hot water
temperature.
This value refers to the desired temperature HW. When the HW temperature drops
by this value from the setpoint of hot water (HW) then HW will be heated again.
Setting of mode of the three-way valve. With this parameter it is possible to verify
its functionality. By default, the Auto mode is selected.
Manual Switch on / switch off of three-way valve in case the selected mode valve
Man. Note: After verifying the functionality of the valve is necessary again to select
Auto mode.
Setting of exhaust of the excess heat (factory setting of 90 °C) from the boiler to the
hot water tank.
ATTENTION! Setting the value of YES is only possible if the construction of HW
reservoir and material of the connecting pipe is sized up to a minimum temperature
of 90 °C.
/ Time plan of HW
Displaying on the display of HMI unit
Description
Example
/Time plan of HW
Select a day
Period 1
00:00 23:59
Period 2
23:59 23:59
Period 3
23:59 23:59
Reset plan
Select a day
Period 1
Reset plan
Parameer
Without
password
all
Passive
Range
With password
Step
+
Mon … No/ all
+
00:00 …23:59
1 min
+
00:00 …23:59
1 min
+
+
00:00 …23:59
Active/Passive
1 min
Setting of the desired day of the week for setting of individual periods of heating of
HW. The value Mon to Sun- corresponds to days Monday to Sunday; each day is to
be set separately
The value All - Setting of all days at once.
Setting of time on and off of the first period of heating of HW. Note: It is not
necessary to use the second and third periods.
By activating this parameter will return time mode to the factory settings
Note: Functionality of time plan is conditioned by switching on the preparation of HW
35
6.2.5 Changing parameters
The values that are displayed in black backlighting can be changed. Flashing black backlighting indicates the
position where we are and the parameter can be changed as follows:
- Press the Enter key to change the parameter (Fig. 20);
- The given field stops flashing (Fig. 21);
- By means of setting button we change the value;
- Confirm by pressing the key Enter (Figure 22).
In case you do not want to change a given parameter, continue to the next line by using the button to select
rows.
Fig. no. 20
Fig. no. 21
Fig. no. 22
6.2.6 Failures
The failure, either existing or already resolved, is signalled by a flashing LED-diode on the button of
displaying failures
. After pressing the button
is displayed list of failures and also are confirmed
(deblocked) the failures that already have passed away or have been removed. In the list of failures is
necessary by pressing the key
display also the history of failures and then re-press the button
to stop the signalling of the failure (i.e. flashing of LED- diodes).
From the list or history of faults will return to the starting page by pressing the Home button.
36
Image
Sensor
BoilerOverTemp
B2
Excess of security
(max. boiler value)
FeederFire
B5
Excess of fuel feeder temperature
ThermoContact
LowBoilerTemp
Fault description
Boiler response
temperature Boiler operation shutdown. Pump/s
are still running.
Fuel feeding according to the set
algorithm so that the burning fuel is
transferred again to the burner.
Boiler operation shutdown. The
primary pump keeps running. After
Engine
Excess of fuel feeder motor winding the winding has cooled down and
thermal
temperature
the boiler thermal protection
protection
switched again put again into
operation.
B2
Boiler extinction. The outlet
temperature in a given time interval
does not increase.The absence of
fuel, feeder blockage etc. might be
the reasons.
Boiler operation shutdown. The
protection against fuel fire
penetration is active.
It is necessary confirm (unblock)
the fault
TimeFault
-
Time validity.
If there is absence of voltage on the
regulator longer than approx. 3 days Signalling of failures on the display
then the time (date, time) counting
of boiler
is stopped. It is necessary to set the
actual time and date.
HWOvrhtMsg
B3
Exceeding of the safety temperature HW heating termination. Three-way
in the reservoir of HW (80 °C)
valve turns to central heating.
FAULT REPORTS IN CASE OF SHORT CIRCUIT OR SENSORS DISCONNECTION
Boiler operation shutdown. The
protection against fuel fire
Boiler outlet temperature
BoilerTemp
B2
penetration is active Primary pump
is active.
HW reservoir temperature
HW heating shutdown
HW Temp
B3
Temperature of feeder to the fuel
Shut down of the boiler.
Feeder Temp.
B5
reservoir
37
6.4
Service board
1.
2.
3.
4.
Cable gland ABB (thermoplastic)
Safety thermostat signal lamp (orange)
Dummy plug 28,0 (colour: white)
Dummy plug 14,3 (colour: white)
Fig. no. 23 Service board
6.5
Control activity before start
Only the contractual service organization qualified for such type of activity is allowed to put boiler
into operation.
Following checks must be carried out before putting the boiler into operation:
a)
Filling the heating system with water
Water for filling the boiler and heating system must be clear and colourless, with no suspended matters,
oil and chemically aggressive substances. Its hardness must correspond to ČSN 07 7401 and it is
necessary to treat water in case its hardness is unsatisfactory. Even the multiple heating of water with a
higher hardness does not prevent the salts from precipitation on the walls of the boiler drum. The
precipitation of 1 mm of calcite in a given place reduces the heat transfer from metal to water by 10 %.
Heating systems with an open expansion tank allow the direct contact between the heating water and
atmosphere. During the heating season the water expanding in the tank absorbs oxygen which
increases its corrosive effects and at the same time a considerable volume of water evaporates. Only
water treated according to ČSN 07 7401 can be used for refilling.
The heating system must be thoroughly flushed in order to wash out all impurities. During the heating
season it is necessary to keep a constant volume of water in the heating system. Refilling the heating
system with water must be done carefully in order to prevent air sucking into the system. Water in boiler
and heating system must never be discharged or taken for use with the exception of exigencies such as
the repairs etc. By water discharging and new water filling the risk of corrosion and scale formation is
increased.
If it is necessary to refill water in heating system we only refill the cooled down boiler in order to
prevent the steel basement and cast iron heat exchanger from damage.
b) heating system tightness
c) connection to the chimney - it must be approved by a chimney-sweepers’ company
d) burner tightness
Connect the equipment to the mains (insert the plug into socket). By starting the fan via a display is
carried out the check of burner sealing. All air must flow into the combustion space of retort and cast iron
grate. The check must be focused on bearing surfaces:
of Fan to the flange
round the burner cleaning hole
- of the cast iron grate with burner. In case a leakage appears the grate must be removed, the old boiler
mastic must be removed from bearing surfaces and an adequate quantity of new mastic must be applied
38
to them; then the grate is remounted into burner. Note : Turning of the cutting off of grate according to
Figure No. 3
Repeat the check.
!
Apply boiler mastic to the point marked and
put the grate on the retort with mixer. It is
necessary to ensure the tightness between
the burner and grate.
e)
f)
g)
connection to the mains
The boiler is connected through a movable lead by means of a plug into the standardized socket
230 V/50 Hz/10 A. Protection against electric shock must be ensured according to ČSN 33 2000-4-41
ed. 2.
open the water inlet into valve BVTS or TS 130 or STS 20
check the opening of chimney flap
The installation and heating test completion must be recorded in the „Guarantee certificate“.
6.5
Setting of parameters before the equipment start-up
Parameters necessary for equipment start-up
Before the first firing upt is necessary to set the year, date, time for proper preparation of the time plan for
preparation of HW, if the HW and time plan are active.
If the heating of water is not used (no sensor connected HW) turn off the preparation of HW to prevent
signaling failures.
Set the following parameters according to the type of fuel used. Regarding the production the parameters are
set for 4 sectional boiler size - brown coal as the fuel.
The parameters in Tables 7 - 9 only serve as informative and they can be modified depending on the fuel
used.
Tab. No. 7 Setting parameters before start-up of equipment – brown coal
Parameters
4 sect.
5 sect.
6 sect.
7 sect.
Feeder Run (s)
Feeder Pause (s)
StbFdrRun (s)
StbFdrPause (min)
StbFanOvRun (s)
Fan throttle (%)
MinBoilerTemp (°C)
5
5
5
5
19
15
12
10
10
10
10
10
40
90
25
50
40
90
40
60
40
90
60
60
40
90
80
60
Tab. No. 8 Setting parameters before start-up of equipment – hard coal
Parameters
4 sect.
5 sect.
6 sect.
7 sect.
Feeder Run (s)
Feeder Pause (s)
StbFdrRun (s)
StbFdrPause (min)
StbFanOvRun (s)
Fan throttle (%)
MinBoilerTemp (°C)
5
31
10
40
90
30
50
5
26
10
40
90
50
60
5
20
10
40
90
70
60
39
5
14
10
40
90
90
60
Tab. No. 9 Setting parameters before start-up of equipment – pellets
Parameters
4 sect.
5 sect.
6 sect.
7 sect.
Feeder Run (s)
Feeder Pause (s)
StbFdrRun (s)
StbFdrPause (min)
StbFanOvRun (s)
Fan throttle (%)
MinBoilerTemp (°C)
6.6
5
14
15
10
3
0 - 10
50
5
12
15
10
3
30
60
5
10
15
10
3
50
60
5
8
15
10
3
70
60
Boiler putting into operation
1. Making fire in the boiler.
− Connect the equipment to the mains (insert plug into the socket).
− Check switching off the unit HMI.
− Check setting of parameters see chap. 6.5.
− On the pressure gauge check volume of water in heating system.
− Open the stop valves between boiler and heating system.
− Check the pump.
− Clean the burner and ash-pan drawer (in case fire isn’t made for the first time). Ash-pan door during
fire making and boiler operation must be permanently closed.
− Fill the fuel reservoir with specified fuel and then close the reservoir carefully in order to prevent
possible air intake into the burner through the feeder.
−
Feeder of fuel for transport the fuel to the burner is switched on by means of HMI on the row(line)
FeederMan. (On.) Fuel must supplied about 2 cm below the edge of the cast iron grate. If the fuel
feeder is empty the fuel supply to the burner takes 6 - 6.5 min. After 6 minutes, the screw feeder
automatically is switched off and by using the HMI unit you can put it into operation, if needed.
Switching off of feeder is performed by switching into the status Off .
− Put the kindling e.g. paper, wood chips, PEPO, solid alcohol etc. on the fuel.
− Ignite and let flare up.
− Shovel a small volume of specified fuel to the burning kindling.
− Close the door and turn on the fan by means of HMI unit(run of fan is signalled in the current statuses
on the HMI). The fan can be turned off as needed on the HMI unit, otherwise the fan will turn off
automatically after 15 minutes. Fan for making a fire can be regulated by a throttle.
− During making a fire please maintain sufficient height of fuel..
− If the fuel sufficiently burns , turn off the fan in manual mode or wait until it is automatically switched
off. Turn the boiler on the HMI unit into status ON..
− If the fuel after 5 minutes does not sufficiently flare up, turn the fan on the time required. Then switch
on the boiler by using the display..
− Set the throttle of fan, see tab. No. 7 - 9.
− Now the boiler is in the automatic regime.
2. Check the boiler tightness again.
3. Carry out the heat test according to relevant standards (see the Guarantee certificate).
4. Make the user acquainted with boiler attendance.
5. Make a record in the Guarantee certificate.
The boiler only can be put into operation by a professional installation company qualified for
conducting this activity.
Operation
Check of shape of flame (fuel: brown coal)
The shape of flame gives us information about the correct setting of boiler to the rated output. You are
advised to check it with each purchase of a new coal:
By means of the throttle of fan (Fig. 26) adjust the quantity of required air so the shape of flame
corresponds the picture No. 24 This amount is dependent on the performance and quality of fuel.
Generally, in case of the reduction of the boiler output (i.e. increase of the delay time of feeder or
decrease of run time of feeder), we must reduce the amount of combustion air. When increasing the
boiler output (i.e. decrease of delay time of feeder or increase of run time of feeder ) we must increase
the amount of combustion air. ATTENTION! - Too much combustion air will result in very intense
40
-
short burning on a small area. After a short time there occurs a reduction of the boiler output due
to the small area of the flame and unburnt fuel at the edge of the burner. The unburnt fuel will fall
into the ash pan. Too little combustion air will result in incomplete combustion, which results in
visible smoke from the chimney
After setting of combustion air tighten the screw of the throttle to avoid coming loose.
Air control is effective only if the grid is properly centred and sealed.
Fig.No. 24 Optimal shape of the flame
Fig. No. 26
6.7
Fig.No. 25 Awkward shape of the flame
Throttle of fan
Superior control
The manufacturer recommends the superior control of Siemens series RVS (RVS 43,345 + additional
modules), because for its use has been already processed the design documentation of VIADRUS.
In the case of using the superior control is necessary to do the following:
•
For electrical connection of the superior control is used the input D2 on the controller Saphir
•
•
The right segment of the switch S1 must be in position off
.
Due to the forced exhaust of excess heat must be connected the sensor from the superior control at the
output from the boiler (see Design documents VIADRUS).
41
7.
•
•
•
•
•
•
•
•
•
•
•
•
•
•
•
•
•
Important warnings
The boiler must not be used for other purposes than those it is designed for.
The boiler only can be operated by adults who are acquainted with this service manual. It is
forbidden to leave unattended children in the vicinity of operating boilers.
The boiler is not destined for use by persons (including children) whose physical, sensory or
mental disability or lack of experience and knowledge prevent them from a safe use of the
appliance if they are not supervised or were not instructed regarding the use of the appliance by
a person responsible for their safety.
Children should be watched to make sure that they do not play with the appliance.
If there occurs the danger of flammable vapours or gases development and their penetration into
boiler room or during the works that are accompanied by temporary danger of fire or explosion
(gluing the flooring materials, painting with combustible paints etc.) the boiler must be put out of
service prior to the start of such works
When transporting fuel into combustion chamber before firing up the volume of fuel in retort
must be checked visually and not by putting hands into fireplace. There is a danger of injury
caused by rotating worm shaft.
It is forbidden to use flammable liquids in making fire in boiler.
During the boiler operation it is forbidden to overheat it in any way.
It is forbidden to put any things made of flammable materials on the boiler or within the distance
less than the safe distance.
When removing the ash from boiler there must not be found any flammable substances within
1500 mm from the boiler. The ash must be collected in a non-flammable ashbin with a cover. Use
the protection aids.
After the end of heating season the boiler including the smoke flue must be properly cleaned.
The boiler room must be kept clean and dry.
It is forbidden to interfere with construction and electric installation of boiler.
In case the two-way safety device has responded to refill with water not conforming to
ČSN 07 7401 it is necessary to treat the water in the system so that it again conforms to this
standard.
The safety valve of max. 250 kPa (2,5 bar) overpressure must be installed in the system and its
dimensions must correspond to boiler nominal output. In case of further questions please
contact our contractual installation firms and service organizations.
In case of malfunction, turning off the boiler or in the absence of fuel there is not ensured the
protection against freezing. The regulation of boiler does not solve the protection of heating
circuit of boiler against freezing. If the heating system is not in the winter daily used, it is
necessary to drain the water of it.
A poor fuel quality can markedly negatively affect the boiler output and emission parameters.
During assembly, installation and operation of the appliance it is necessary to comply with
standards that apply in the relevant country of destination.
If you fail to meet these conditions you cannot requisite the guarantee repairs.
42
8.
1)
2)
3)
4)
5)
6)
7)
8)
9.
Maintenance
It is necessary to be mindful of timely fuel refilling. If only a small volume of fuel is left in the reservoir it
must be immediately refilled. Mind the proper closing of the fuel reservoir cover!
If the boiler is correctly adjusted the fuel is burnt out in case it has reached the edges of the combustion
grate. The ash and slag fall into do ash-pan drawer. At an average boiler output the ash-pan drawer
must be emptied every other day (protective gloves must be used). Sometimes a piece of slag can get
stuck between the edge of the combustion grate and boiler wall. Then it must be removed by means of a
poker.
In case of non-stop boiler operation the boiler drum convective surface should be cleaned once a month
(the heat exchange surfaces are covered with deposits thus both the heat transfer and boiler efficiency
can be adversely affected). When combusting the pellets the fuel is agglomerated in the retort
therefore this agglomerate must be mechanically removed once a month otherwise the feed
screw stops moving. It is necessary to clean the mixer as needed , because when covered with
deposits the combustion air flow to the burner gets worse. At least one hour before cleaning the boiler
must be put out of service.
Then the geared motor and fan have to be externally cleaned from time to time. (The operator must
not remove the cover from the fan or interfere with these units. Only the qualified service worker
can perform these operations.) A dry brush must be used for cleaning. At this time boiler must be
disconnected from the electricity supply.
If pieces of stone, metal or wood appear in the fuel the feed screw might get blocked In this situation
accompanied by engine overheating followed by its stopping the boiler must be switched off and the
obstacle removed.
WARNING: before performing this operation you must make certain that the boiler is
disconnected from the electricity supply (the plug pulled out of the socket).
Because a slight overpressure is developed in the burner during the fan operation it is necessary to mind
the perfect boiler tightness (door of the fireplace, door of the ash-pan, burner cleaning hole, fuel
reservoir cover etc.). The fuel reservoir tightness is given by the proper closing of its cover by means of
rotary closure and undamaged rubber sealing of the bearing surfaces.
In case of emergency (electricity outage lasting longer etc.) and fuel fire penetration to the fuel reservoir
the valve BVTS (TS 130, STS20) responds due to the increased temperature and fuel is extinguished.
Regularly once a month clean the boiler walls inside the fireplace, boiler smoke draughts and smoke
o
adapter (by means of a brush at cooled down boiler the temperature of which does not exceed 40 C).
The cleaning cover in the lower part of the smoke adapter serves for ash removal. When dismantling the
cleaning cover the screw of securing swivel must be loosened to avoid its damage. After the smoke
adapter has been cleaned we mount back the cleaning cover whereas we are particular about the
tightness between the cleaning cover and smoke adapter.
Instructions for product disposal after expiration of its lifetime
VIADRUS a.s. a contract partner of EKO–KOM a. s. with client number F00120649.
The packages conform to EN 13427
The packages are recommended to be disposed of in following way:
plastic foil, cardboard package, use the salvage service
metal strapping band, use the salvage service
wood base, is destined for a single use and no longer can be used as the product. Its disposal is subject
to law 477/ 2001 Coll. and 185/2001 Coll. as amended.
Because the product is constructed of common metal materials the individual components are recommended
to be disposed of in following way:
heat exchanger (grey cast iron), use the salvage service
tube distribution, shell, use the salvage service
other metal components, use the salvage service
insulation material ROTAFLEX, through the company engaged in waste collection and disposal
In case the product has lost its manufacture qualities then so called reverse product withdrawal (if it
is introduced) can be used; if the originator declares that it regards the waste it will be handled
according to the legislation valid in relevant country.
43
10.
Guarantee and liability for defects
VIADRUS a.s. provides the guarantee:
– for boilers for 24 months after the product has been put into service, but maximum 30 months after the
date of dispatch from the production plant;
– for cast iron boiler drum for 5 years after the date of dispatch from the production plant.
In case of a complaint regarding the shell the customer is obliged to submit the packaging label of the boiler
shell. It is put on cardboard in which the shell is dispatched.
The user is obliged to entrust a professional installation company with putting the boiler into service and a
professional contractual service accredited by VIADRUS a.s. with and faults removal, otherwise the guarantee
does not apply to the proper function of boiler. „The HERCULES DUO boiler quality and completeness
certificate “ serves for infilling as the „Guarantee certificate“.
The user is obliged to carry out a regular maintenance on the boiler.
Every fault must be announced in writing or by telephone immediately after it has been detected.
In case the above instructions are not observed the guarantees provided by the manufacturer are not
admitted.
The manufacturer reserves the right to make changes within the product innovation that needn’t be
contained in this manual.
The guarantee does not apply to:
- faults caused by wrong mounting and improper product attendance and faults caused by
improper maintenance see chap. 8
- product damage caused by transport or other mechanical damage
- faults caused by improper storage
- faults and damage caused by failure to observe water quality in heating system see chap. no. 4.1
and 6.5 or by using the anti-freeze mixture
- faults caused by instructions specified in this manual non-observance
- faults caused by boiler operation with non-specified fuel (see tab. no. 3 and 4)
44
Information for customer
Packaging identification
Assessment reference
PE Plastic sacks, folie, corrugated board, iron and plastic fix
line
Identification of principal materials used. Paper, Polyethylene, iron, wood
Part 1: Summary of assessment
Standard/Report
Assessment requirement
1.1 Prevention by source
reduction
1.2 Heavy metals and
ensure below maximum permitted levels
for components
(CR 13695-1)
1.3 Other
ensure in compliance with
noxious/hazardous
(ČSN 77 0150-2, EN 13428)
substances
2 Reuse
ensure reusability in all terms of the
standard for the functional packaging unit
(EN 13429)
3.1 Recovery by material ensure recyclability in all terms of the
recycling
standard for the functional packaging unit
(EN 13430)
3.2 Recovery in the form
ensure that calorific gain is achievable for
of energy
the functional packaging unit
(EN 13431)
3.3 Recovery by
ensure compost ability in all terms of the
composting
standard for the functional packaging unit
(EN 13432)
Claim
Note
YES
YES
YES
NO
YES
YES
Iron - NO
NO
NOTE Conformity with EN 13427 requires affirmative responses to sections 1.1; 1.2; 1.3 and to at
least one of 3.1; 3.2; 3.3. In addition, where a claim of reuse is made section 2 should also
record affirmative responses.
Part 2: Statement of conformity
In the light of the assessment results recorded in part I above, this packaging is claimed to comply
with the requirements of EN 13427.
45
46
Adressed to the user
VIADRUS a.s.
Bezručova 300
735 81 Bohumin
Certificate of warranty and Quality and completeness certificate for
HERCULES DUO boiler
Boiler serial number
..............................……….
Boiler Output
..........................................
User(surname,name)
……………………………………………………………………………………..
Address(Street,city,zipcode)
……………………………………………………………………………………..
Phone/Fax
……………………………………………………………………………………..
The boiler corresponds to requirements:
EN 303-5 Boiler for central heating– Part 5: Solid fuel boiler for central heating with manual or automatic
feed and nominal heat output maximum 300 kW – Terminology, requirements, testing and
marking.
VIADRUS a.s. provides the guarantee:
– for boilers for 24 months after the product has been put into service, but maximum 30 months after the
date of dispatch from the production plant
– for cast iron boiler drum for 5 years after the date of dispatch from the production plant
Validity conditions of the guarantee:
• The boiler must be installed according to „Boiler service and installation manual“ by a
professional installation company
• The boiler must be put into service according to „Boiler service and installation manual“ by a
contractual service organization accredited by the manufacturer
• The faults must be removed by a contractual service organization accredited by the manufacturer
The delivery completeness is guaranteed by the seller.
The unfilled guarantee certificate is not valid.
The guarantee conditions and liability for defects follow chap. no. 10 this manual.
Measured values
Chimney draught (mbar)
Flue gas temperature (°C)
Numeric value
The user confirms that:
•
the boiler adjusted by the contractual service organization did not prove any fault during the heat test
•
he obtained the „Boiler service and installation manual “with properly filled-out Guarantee certificate and
Quality certificate
•
he was made acquainted with boiler attendance and maintenance
……………………………………..
Manufacture date
……………………………………..
Manufacturer ’s stamp
……………………………………..
Checked by (signature)
……………………………………..
Date of installation
……………………………………...
Installation company
(stamp, signature)
……………………………………..
User ’s signature
…………………………………….
Date of putting into service
……………………………………..
Contractual service organization
(stamp, signature)
……………………………………..
User ’s signature
47
Appendix to the guarantee certificate for customer - user
Record of carried out guarantee and after-guarantee repairs and product controls
Date of
record
Contractual service
Customer’s
organization(signature,
signature
stamp)
Carried out activity
48
Adressed to the service organization
VIADRUS a.s.
Bezručova 300
735 81 Bohumin
Certificate of warranty and Quality and completeness certificate for
HERCULES DUO boiler
Boiler serial number
..............................……….
Boiler Output
..........................................
User(surname,name)
……………………………………………………………………………………..
Address(Street,city,zipcode)
……………………………………………………………………………………..
Phone/Fax
……………………………………………………………………………………..
The boiler corresponds to requirements:
EN 303-5 Boiler for central heating– Part 5: Solid fuel boiler for central heating with manual or automatic
feed and nominal heat output maximum 300 kW – Terminology, requirements, testing and
marking.
VIADRUS a.s. provides the guarantee:
– for boilers for 24 months after the product has been put into service, but maximum 30 months after the
date of dispatch from the production plant
– for cast iron boiler drum for 5 years after the date of dispatch from the production plant
Validity conditions of the guarantee:
• The boiler must be installed according to „Boiler service and installation manual“ by a
professional installation company
• The boiler must be put into service according to „Boiler service and installation manual“ by a
contractual service organization accredited by the manufacturer
• The faults must be removed by a contractual service organization accredited by the manufacturer
The delivery completeness is guaranteed by the seller.
The unfilled guarantee certificate is not valid.
The guarantee conditions and liability for defects follow chap. no. 10 this manual.
Measured values
Chimney draught (mbar)
Flue gas temperature (°C)
Numeric value
The user confirms that:
•
the boiler adjusted by the contractual service organization did not prove any fault during the heat test
•
he obtained the „Boiler service and installation manual “with properly filled-out Guarantee certificate and
Quality certificate
•
he was made acquainted with boiler attendance and maintenance
……………………………………..
Manufacture date
……………………………………..
Manufacturer ’s stamp
……………………………………..
Checked by (signature)
……………………………………..
Date of installation
……………………………………...
Installation company
(stamp, signature)
……………………………………..
User ’s signature
…………………………………….
Date of putting into service
……………………………………..
Contractual service organization
(stamp, signature)
……………………………………..
User ’s signature
49
50
Adressed to the manufacturer
VIADRUS a.s.
Bezručova 300
735 81 Bohumin
Certificate of warranty and Quality and completeness certificate for
HERCULES DUO boiler
Boiler serial number
..............................……….
Boiler Output
..........................................
User(surname,name)
……………………………………………………………………………………..
Address(Street,city,zipcode)
……………………………………………………………………………………..
Phone/Fax
……………………………………………………………………………………..
The boiler corresponds to requirements:
EN 303-5 Boiler for central heating– Part 5: Solid fuel boiler for central heating with manual or automatic
feed and nominal heat output maximum 300 kW – Terminology, requirements, testing and
marking.
VIADRUS a.s. provides the guarantee:
– for boilers for 24 months after the product has been put into service, but maximum 30 months after the
date of dispatch from the production plant
– for cast iron boiler drum for 5 years after the date of dispatch from the production plant
Validity conditions of the guarantee:
• The boiler must be installed according to „Boiler service and installation manual“ by a
professional installation company
• The boiler must be put into service according to „Boiler service and installation manual“ by a
contractual service organization accredited by the manufacturer
• The faults must be removed by a contractual service organization accredited by the manufacturer
The delivery completeness is guaranteed by the seller.
The unfilled guarantee certificate is not valid.
The guarantee conditions and liability for defects follow chap. no. 10 this manual.
Measured values
Chimney draught (mbar)
Flue gas temperature (°C)
Numeric value
The user confirms that:
•
the boiler adjusted by the contractual service organization did not prove any fault during the heat test
•
he obtained the „Boiler service and installation manual “with properly filled-out Guarantee certificate and
Quality certificate
•
he was made acquainted with boiler attendance and maintenance
……………………………………..
Manufacture date
……………………………………..
Manufacturer ’s stamp
……………………………………..
Checked by (signature)
……………………………………..
Date of installation
……………………………………...
Installation company
(stamp, signature)
……………………………………..
User ’s signature
…………………………………….
Date of putting into service
……………………………………..
Contractual service organization
(stamp, signature)
……………………………………..
User ’s signature
51
52
Update: 16/2013 – GB – model 2013