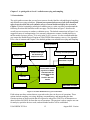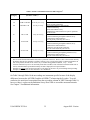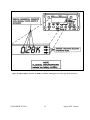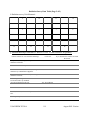
1
Contents Chapter 1. Introduction ....................................................................................................5 1.1. Roadmap............................................................................................................................... 5 1.2. Overview .............................................................................................................................. 7 1.3. TG-236A, the Level 1 assessment........................................................................................ 7 1.4. Disclaimers........................................................................................................................... 9 Chapter 2. Health and safety issues ...............................................................................11 Chapter 3. A quick guide to Level 1 radiation surveying and sampling ....................15 3.1. Introduction ........................................................................................................................ 15 3.2. Checklist for a Level 1 Assessment (Page 1 of 3).............................................................. 17 Chapter 4. Radiation surveying and sampling guidance .............................................25 4.1. Minimum supply requirements .......................................................................................... 25 4.2. Selecting a radiation survey unit ........................................................................................ 25 4.3. Setting up the radiation survey unit.................................................................................... 26 4.4. Background measurements ................................................................................................ 26 4.4.1. Methods....................................................................................................................... 26 4.4.2. When is a measurement “above background?”........................................................... 27 4.5. Instrumentation use for a radiation survey......................................................................... 27 4.6. External radiation survey ................................................................................................... 28 4.7. Collecting soil samples....................................................................................................... 28 4.8. Quality assurance and quality control (QA/QC) ................................................................ 29 Chapter 5. Data interpretation and archiving ..............................................................31 5.1. RES categories ................................................................................................................... 31 5.2. Estimating the maximum duration of a mission before exceeding the OEG ..................... 31 5.3. Estimating the RES at the end of a mission ....................................................................... 35 5.4. Estimating numerical values for a mission duration .......................................................... 36 Example calculations............................................................................................................. 36 5.5. Archiving............................................................................................................................ 37 Chapter 6. Contamination control procedures .............................................................39 6.1. Setting up a personnel monitoring and decontamination station ....................................... 39 6.1.1. Setting up a step-off pad.............................................................................................. 39 6.1.2. Personnel contamination monitoring (frisking) ............................................................ 40 6.2. Radiation surveys of items or commodities ....................................................................... 41 6.3. Personnel decontamination ................................................................................................ 41 6.4. Item and commodity decontamination............................................................................... 42 6.5. Care of RADIAC equipment during monitoring and decontamination ............................. 43 Chapter 7. AN/PDR-77 and AN/VDR-2 ........................................................................45 Chapter 8. Sampling and sample management ............................................................55 8.1. Common sample collection practices................................................................................. 55 8.2. General site selection considerations ................................................................................. 55 8.3. Proper selection of sample containers ................................................................................ 56 8.4. Avoiding cross-contamination ........................................................................................... 57 USACHPPM TG236A 1 August 2001 Version 8.5. Sample ID, sample labels, and field sampling forms......................................................... 57 8.5.1. Sample ID and labeling ............................................................................................... 57 8.5.2. Sample collection forms.............................................................................................. 59 8.6. Chain-of-custody................................................................................................................ 61 8.6.1. Field custody considerations ....................................................................................... 61 8.6.2. Transfer of custody...................................................................................................... 61 8.6.3. Instructions for fulfilling chain-of-custody requirements ........................................... 61 8.6.3.1. Chain-of-custody for samples requiring strict custody ........................................ 62 8.6.3.2. Field chain-of-custody guidance .......................................................................... 63 8.6.3.3. Sample security when strict custody is necessary................................................ 63 8.7. Field processing, preservation, and transport of samples from the survey unit ................. 67 8.7.1. General ........................................................................................................................ 67 8.7.2. Sample transport.......................................................................................................... 67 8.8. Liaison between sampling team and sample control.......................................................... 67 Chapter 9. Sample receipt, inspection, tracking, and shipment..................................69 9.1. Overview ............................................................................................................................ 69 9.2. Shipment of samples to analytical laboratories.................................................................. 70 9.2.1. Sample packing ........................................................................................................... 70 9.2.2. Sample inspection, administration, ID confirmation .................................................. 70 9.2.3. Sample shipping .......................................................................................................... 71 9.2.3.1. OCONUS shipping............................................................................................... 71 9.2.3.2. CONUS shipping ................................................................................................. 72 9.3. Communication between sample control and laboratory................................................... 72 9.4. Short-term sample storage.................................................................................................. 72 9.5. Final sample disposition..................................................................................................... 72 Chapter 10. Surface soil sampling..................................................................................75 10.1. Prior to being dispatched.................................................................................................. 75 10.2. At the site (survey unit).................................................................................................... 76 10.3. Sampling guidance for specific soil types........................................................................ 77 10.3.1. Sampling in dry, loose, and sandy soils .................................................................... 77 10.3.1.1. Stamp method..................................................................................................... 77 10.3.1.2. Template method................................................................................................ 77 10.3.2. Sampling in moist or loamy soil ............................................................................... 78 10.3.3. Other types of soil conditions.................................................................................... 78 Chapter 11. USACHPPM, Directorate of Laboratory Sciences, Radiologic, Classic, and Clinical Chemistry Division concerns ....................................................................79 Appendix A. Glossary......................................................................................................91 Appendix B. List of Abbreviations.................................................................................97 Appendix C. Equipment common to sampling and radiation surveying ...................99 C.1. C.2. C.3. C.4. C.5. Supplies ................................................................................................................. 99 Radiation protection equipment ............................................................................ 99 Instrumentation.................................................................................................... 100 Communication/Location equipment.................................................................. 100 Supporting documentation .................................................................................. 100 USACHPPM TG236A 2 August 2001 Version C.6. Sample transport.................................................................................................. 100 Appendix D. A removable packet for Level 1 radiation surveying and sampling...101 Appendix E. Field Results Summary Checklist ..........................................................115 Appendix F. Preventive medicine officer’s information for dose tracking ..............116 Appendix G. CONUS transportation regulations and procedures ...........................119 Appendix H. Points of contact ......................................................................................131 Appendix I. References..................................................................................................133 USACHPPM TG236A 3 August 2001 Version This page is intentionally blank USACHPPM TG236A 4 August 2001 Version Chapter 1. Introduction 1.1. Roadmap This roadmap is intended to present brief summaries of the chapters of this technical guide so that a user will be able to find information more quickly within the document. The roadmap is not a survey checklist or a shortcut to perform an assessment. Each chapter will be summarized with the important concepts emphasized. Purpose, scope, and audience Chapter 1 presents a basic overview of the reasons for creating this technical guide, the intended audience, the scope of the guide, the expected results of an assessment, personnel requirements, and disclaimers or limitations of the entire assessment process. Chapter 1 is not necessary to perform an assessment. Health and safety Health and safety in relation to performing a Level 1 assessment are discussed in Chapter 2. The chapter is intended to remind the user to be aware of all potential hazards in the field not just radiological hazards. In this chapter there are reminders to alert the user to specific threats that may be found in the field. Quick Start for a Level 1 assessment Guidance for the user experienced in general surveying and sampling is given in Chapter 3. Checklists and datasheets are included for fast review so that the experienced user can start on an assessment. Planning for radiation surveying and sampling Chapter 4 provides general guidance on radiation surveying and sampling for a Level 1 assessment. The chapter offers information on the basic supplies for sampling and surveying, selecting and setting up the survey unit, background measurements, instrumentation, and quality assurance. How to interpret the data Tables, equations (if needed), and guidance are found in Chapter 5. With the information in Chapter 5, the user should be able to evaluate the field data in a timely manner and communicate the results to the Command staff. How to handle radioactive contamination Contamination control procedures are covered in Chapter 6including instructions on setting up a monitoring station, frisking and decontaminating people and equipment. The AN/PDR-77 and the AN/VDR-2 Chapter 7 is devoted to the care and use of these RADIAC meters. USACHPPM TG236A 5 August 2001 Version Sampling and sample management during collection While doing the surveying and sampling of the survey unit, the user needs to be aware of the precautions needed to ensure proper sample quality and integrity. The guidance in Chapter 8 provides the user with enough information to collect soil samples, avoid cross-contamination, pack and label samples, establish and maintain chain-of-custody, and prepare the samples to be taken from the survey unit for further handling. Getting the samples ready to be shipped to a laboratory Once the samples have been collected, labeled, and had all the proper papers filled out, they need to be shipped to a laboratory for analysis. Most of the information required for preparing samples for shipping to a CONUS or OCONUS laboratory can be found in Chapter 9. The user must be aware of the current national, international, Army, DOD, transportation regulations as this document cannot be updated every time a regulation changes. Actually digging dirt or sampling soil Chapter 10 summarizes NATO guidance on collecting soil samples. It is not a substitute for onsite expertise, but the guidance is useful for the less experienced user or the user who has not been in the field for some time. Using the laboratory at USACHPPM-Main Both as an example and a practical guide, the requirements for shipping samples to the Directorate of Laboratory Services, Radiologic, Classical, and Clinical Chemistry Division (DLS, RCCCD) are presented in Chapter 11. Although written specifically for the laboratory at CHPPM-Main, many of the requirements are general enough to be used at other laboratories. However, the user must arrange for the sample analyses and shipping with the laboratory before the assessment begins. Other good stuff The appendices contain additional information that will be useful to people who use this document. In particular, the removable survey packet in Appendix D can be removed and copied as many times as the user needs. The rest of the appendices contain definitions, points-ofcontact, summaries of regulations and other procedures. Appendix A. Glossary Appendix B. List of Abbreviations Appendix C. Equipment common to sampling and radiation surveying Appendix D. A removable packet for Level 1 radiation surveying and sampling Appendix E. Field Results Summary Checklist Appendix F. Preventive medicine officer’s information for dose tracking Appendix G. CONUS transportation regulations and procedures Appendix H. Points of contact Appendix I. References USACHPPM TG236A 6 August 2001 Version 1.2. Overview Traditional nuclear, biological, and chemical (NBC) doctrine was developed to address radiological conditions, such as the use of nuclear weapons, on the battlefield that might lead to degradation of mission performance of soldiers or units. Recently, as the United States has become more involved in support and stability operations (SASO), concern regarding the potential long-term health hazards of deployment has risen among the troops and the leadership. In response to this concern, the medical community has developed ways to detect, assess, and record potential health risks. This guide focuses on estimating the exposure to external ionizing radiation. External ionizing radiation may be used as a rough guide to address potential health risk from ionizing radiation exposure. Current doctrine presents a methodology to document, track, and manage radiological exposure. Concepts critical to understanding this methodology are radiation exposure status (RES) and operational exposure guidance (OEG). The RES is defined as the average exposure of a platoon or larger unit, categorized by levels of performance decrement, or decreasing level of unit mission effectiveness. The OEG is the commander’s tool for expressing his willingness to accept risk expressed as a radiation dose equivalent or absorbed dose. The commander has the responsibility of defining the level of exposure that will not be exceeded in performing a given mission. The NATO Standardization Agreement (STANAG) No. 2473, Commanders Guide On Low Level Radiation (LLR) Exposure In Military Operations1, created additional RES categories for use during SASO or operations other than war. RES category 1 was broken down into five subcategories that parallel regulatory and federal guidance, which is founded on minimizing long-term health consequences of exposure to radiation. RES category 1 was broadly defined in doctrine as a level of exposure that would lead to little, if any, loss of combat effectiveness, or immediate short-term effects. The extended RES categories as defined in STANAG 2473 are intended to bridge the gap between peacetime operations and operations conducted during war. Technical Guide 236A, Basic Radiological Dose Estimation – A Field Guide, is the first in a series of documents designed to work together to give the preventive medicine (PM) community increasingly sophisticated, and therefore complex, methods to evaluate radiological dose. The methods presented in TG236A require minimal resources and gives a quick estimate of the dose or maximum duration of a mission. Reference Document (RD) 236A, the accompanying reference document, contains the logic and underlying scientific principles from which this technical guide was developed. 1.3. TG-236A, the Level 1 assessment The intended audience for this document is primarily preventive medicine personnel. Without assigning tasks, which is beyond the scope of this technical guide, the expected operational roles are that of the PM Specialist (91S10) who will actually perform the radiation survey, and that of the junior PM NCO who will conduct direct supervision, check the calculations, and make conclusions based on the data. The senior PM NCO and/or officer will track, document, and communicate the developed information to the command staff as appropriate. This procedure has been designed so that two trained personnel equipped with the AN/VDR-2 or AN/PDR-77 will have gross screening capability for acute radiation threats as provided by the USACHPPM TG236A 7 August 2001 Version NBC doctrine and the capability for collection of samples that will be sent back to higher echelon assets for further, more refined analyses. With proper training, Level 1 personnel will be able to answer the following questions in a timely manner: • Is there an immediate threat to life and health? • What are the ambient external gamma radiation levels in the area? • Is there an indication that radioactive contamination is present? • What is the estimated personnel radiation dose from external radiation exposure? • Can the mission be accomplished within the specified OEG, and what is the maximum mission duration given the OEG? The answers to these questions indicate that a commander might need to consider: changing the OEG, canceling the mission, adjusting the mission duration, finding alternate routes or bivouac areas, minimizing exposures if exposures are necessary, and calling for a higher level radiation survey and assessment to refine the dose estimate and subsequently the estimate of potential health risks. Minimum personnel requirements to conduct a Level 1 assessment are a trained PM NCO/officer and an assistant. A Level 1 radiation survey is designed for the AN/VDR-2 or the AN/PDR-77 (βγ−probe and x ray probe). The Level 1 radiation survey team is expected to execute the following tasks: • Using and maintaining the equipment in accordance with the manual. • Following quality assurance and quality control (QA/QC) procedures appropriate for equipment and procedures. • Designing and performing radiation surveys as described in this document. • Planning, coordinating, and executing environmental sampling (soil and water) for shipment to and analysis by higher echelon assets. Prior coordination with the element that will analyze samples will avoid misunderstandings and enhance data quality. • Comparing results of radiation survey and analyses to pre-set action levels. • Communicating results of the radiation survey and analyses as ordered by command staff. The personnel involved in a Level 1 radiation survey may include radiation surveyors (PM personnel 72E&D and 91S), nuclear medical science officers (72A), commanders (commanders need timely guidance on radiation exposure potentials and their risks to personnel), and USACHPPM (USACHPPM health physics personnel might be able to use the data to offer assistance for a more detailed radiation survey or analysis). Normally, theater level commanders (or higher) make the decision concerning the OEG for a mission and its duration. The Level 1 radiation survey and assessment should result in data that will estimate either the maximum potential radiation exposure or the mission duration for a specified OEG. USACHPPM TG236A 8 August 2001 Version 1.4. Disclaimers 1. Because the AN/PDR-77 displays exposure rate in multiples of milliroentgen per hour and the AN/VDR-2 displays absorbed dose rates in multiples of gray per hour, the use of NATO preferred units is impractical. An attempt was made to eliminate all references to units where possible. For simplicity and because only whole body gamma irradiation is considered, the roentgen, rad, rem, and centisievert are considered to be equivalent units of radiation exposure. Thus, 1 R ≈ 1 rad ≈ 1 rem ≈ 0.01 Gy = 1 cGy = 10 mGy ≈ 0.01 Sv = 1 cSv= 10 mSv for the purposes of TG/RD-236A. 2. Further complicating the issue is the fact that the AN/PDR-77 is calibrated to absorbed dose rates in rads/h, despite the units of mR/h on the faceplate. 3. This technical guide was designed to be consistent with existing doctrine including NATO STANAG 2473; however, TG236A and RD236A are not implementation documents. They present a preferred and consistent set of procedures for collecting and performing basic analysis of data. 4. Established doctrine prevails over anything in TG/RD236A. 5. It is the user’s responsibility to understand the contents of this technical guide or get help if needed. 6. Any mention of a trademarked product name, tradename, commercially available product or service is not an official endorsement. USACHPPM TG236A 9 August 2001 Version This page is intentionally blank USACHPPM TG236A 10 August 2001 Version Chapter 2. Health and safety issues The battlefield is an inherently hazardous place. Be aware of battlefield hazards such as unexploded ordnance (UXO), confined spaces, environmental hazards, poisonous plants, venomous insects and snakes, toxic chemicals, gunfire, and unsanitary conditions before undertaking Level 1 radiation surveys. The procedures in this document should not be undertaken if they endanger the health and safety of personnel unless so ordered by the commander. Several precautions can help minimize the radiological risk to the radiation surveyors during a Level 1 radiation survey. Surveyors must be aware of potential radiological hazards that might not be detected by their instrumentation; TG238 is a useful reference to aid in identifying potential hazards.2 For example, if elevated alpha activity is present or is suspected to be present, higher echelon assets shall be notified as soon as possible. All radiation surveyors should have an operating βγ-probe and should be watching the dose rate while approaching any potentially contaminated area. The list below outlines health and safety precautions from NATO Handbook for Sampling and Identification of Radiological Agents (SIRA).3 § ALWAYS be aware of the hazards that you may encounter in the field and take the necessary precautions. § NEVER attempt any field activities without the appropriate safety equipment. Always know how to use it. § Use the buddy system; do not become separated from the radiation survey team. § All activities SHALL BE conducted so that exposures are maintained as low as reasonably achievable (ALARA). § BE AWARE of turn back dose-rates and radiation exposure status. § BE CAUTIOUS proceeding to areas where the dose-rate is greater than 10% of the OEG/mission duration. § You SHALL NOT proceed to areas in which the dose-rates exceed OEG divided by mission duration unless commanded otherwise. § You SHALL EXIT the contaminated area when your dose exceeds 90% of the OEG, unless commanded otherwise. § USE distance, time and shielding to protect personnel. § DO NOT eat, drink, or smoke in any contaminated areas. § DO NOT take unnecessary risks; no sample is worth dying for. [sic] § Follow additional command guidance. USACHPPM TG236A 11 August 2001 Version The following list is a reminder of things to keep in mind when performing radiological radiation surveys.4 n Immediate or serious radiological threats to health and safety • Exposure to high radiation fields from high-level radiation sources, for example, from energized radiation-generating devices, such as an accelerator, an industrial radiography machine, or from nuclear fallout. • “Beta burns” from nuclear fallout particles. • Ongoing exposure to smoke plume from fire/explosion involving plutonium or spent fuel from a nuclear reactor. • Ongoing exposure to a potentially high-concentration fission product release from a nuclear reactor accident. • Local intense radiation fields from physically small radiation sources (e.g., industrial radiography and medical cancer therapy sources). n Potential threats or near-term concerns • Possibility of nuclear weapon detonation (nuclear yield). • Possibility of a nuclear criticality accident (addition of water, change in geometry). • Threat of fire or explosion from explosives, fuel sources, or chemical reactions. • Resuspended airborne contamination from ground, foliage, clothing, or surfaces. Mechanisms for resuspension include changes in wind direction or speed, human activity such as plowing, excavation, vehicle traffic, or propwash, and forest fire or wildfire. • Change in shielding configuration leading to a loss of shield integrity and potentially high radiation fields. • Release of volatile radionuclides (for example, iodine and cesium) or gaseous radionuclides (e.g., tritium and krypton). • Spread of surface contamination (personnel, vehicles, clothing, objects). • Contamination of hospitals or emergency vehicles (ambulance, fire, etc.) during the transfer of contaminated patients to nearby medical facilities. n Interim or long-term concerns • Contaminated run-off from fire fighting. • Contaminated crops. • Contaminated livestock feed. • Contaminated drinking water supply. • Contaminated irrigation water. USACHPPM TG236A 12 August 2001 Version • Contaminated fish/shellfish. n Miscellaneous concerns • Contaminated wounds (including imbedded fragments of radioactive materials) or breaks in the skin. • Contact with contaminated solvents. • Increased hazard due to change in chemical state (e.g., oxidation of elemental tritium in a fire). USACHPPM TG236A 13 August 2001 Version This page is intentionally blank USACHPPM TG236A 14 August 2001 Version Chapter 3. A quick guide to Level 1 radiation surveying and sampling 3.1. Introduction The quick guide assumes that you and your team are already familiar with radiological sampling and radiation surveying techniques. You and your team must be aware of all of the health and safety issues involved with your radiation survey. General health and safety are covered in Chapter 2. Before beginning a radiological radiation survey, make sure that you understand the following flowchart and checklist on the next page. The flowchart in Figure 1 describes the overall process necessary to conduct a radiation survey. The dashed connections in Figure 1 are suggested routes of communication. It is extremely important to contact a health physicist or nuclear medical science officer (72A) early in the Level 1 process. It is also recommended that you contact the Health Physics Program at USACHPPM when starting a survey. See Appendix H for a list of contacts and Chapter 4 for detailed guidance on radiation surveying and sampling. Field Actions Sample soil. Level I process Communicate with the laboratory if samples are taken. Survey and interpret data. Commander’s report Lab analyses. Results Consult with a health physicist or NMSO. Communicate lab results back to the field. Archive data and results. Archive samples. Garrison Actions Figure 1. TG-236A Radiation survey process flowchart. Field actions are those actions that are expected to take place in the area of operations. These actions include sampling, surveying, shipping, communicating, and interpreting the data. Garrison actions are those actions that are expected to take place CONUS or at laboratories or other facilities OCONUS far from the area of operations. The garrison is where samples are sent for analysis, specialist advisors work, and an intended archive will be established. USACHPPM TG236A 15 August 2001 Version In general the process should proceed as follows. There would a be a call for a Level 1 assessment at which point the assessment team would prepare for the assessment and alert a nuclear medical science officer or health physicist. If samples were going to be collected, the laboratory would be notified. The laboratory personnel can advise the team on what sample requirements are needed for proper analysis. The team could then start to gather preliminary information about the survey unit and start the survey. The team would then do the survey and evaluate the data IAW this technical guide and report the results to the commander or command staff. The NMSO or health physicist who has been alerted would be able to aid in interpreting the data for the command staff. Meanwhile, once the soil sample analyses are done, the results would be communicated through the advisor to the command staff. Finally, the assessment results, data, and perhaps samples should be archived for future reference, if needed. USACHPPM TG236A 16 August 2001 Version 3.2. Checklist for a Level 1 Assessment (Page 1 of 3) The checklists, instructions, and data sheets in this section are for review only. For an actual assessment make copies of and use the removable survey packet in Appendix D. q Review USACHPPM TG236A (sections cited in this checklist refer to TG236A). q Inform CHPPM or a nuclear medical science officer that you are starting a Level 1 radiation survey. If samples are to be collected inform the laboratory. USACHPPM points of contact are shown in Appendix H, and USACHPPM Directorate of Laboratory Sciences points of contact are shown in Chapter 11. CAUTION: If elevated alpha activity is present or is suspected to be present, higher echelon assets must be notified as soon as possible. q Gather supplies (See Chapter 4, section 4.1.) q Review the instructions for using the Radiation Survey Data Table on page 21. q Record the check source measurements in section b of the Radiation Survey Data Table. If this reading is within 30% of the value on the calibration sheet, proceed with the radiation survey. If not, see Chapter 4 section 4.8. q Gather and document any information you can about the area to be radiation surveyed. q Answer the site assessment questions on the Site Assessment and Cover Sheet on page 20. q Record the meteorological data on the day of the radiation survey. CAUTION: If anything in this plan endangers the life or health of personnel, the plan should not be undertaken unless so ordered by the commander. See Chapter 2. q Go to a staging area near the area to be radiation surveyed. CAUTION: Be aware of non-radiological battlefield hazards before undertaking this radiation survey. Examples of these hazards are unexploded ordnance (UXO), confined spaces, tripping hazards, poisonous plants, venomous insects and animals, toxic chemicals, gunfire, and unsanitary conditions. See Chapter 2. q Decide where the specific radiation survey units are (See Chapter 4, section 4.2.). q Identify the appropriate background measurement locations (See Chapter 4, section 4.4.). q Ensure that the RADIAC instrument is in the proper configuration for static measurements. (See Chapter 4, section 4.6) q Take and record the appropriate background measurements (See Chapter 4, section 4.4.). q Set up the radiation survey unit (See Chapter 4, section 4.3.). USACHPPM TG236A 17 August 2001 Version Checklist for a Level 1 Assessment (Page 2 of 3) ¡ 1. Define the area to be radiation surveyed with a rectangle. ¡ 2. If GPS/grid coordinates are available, record the points indicated on the datasheet. ¡ 3. Record the length and width of the radiation survey unit on the datasheet. ¡ 4. Divide the width into 6 equal blocks. ¡ 5. Divide the length into 8 equal blocks. ¡ 6. If possible, mark the boundaries of and restrict access to the radiation survey unit. Divide the unit into 48 blocks as shown on the datasheet. ¡ 7. Sketch the radiation survey unit, landmarks, structures, and other information on the radiation survey unit schematic. q Perform the radiation survey. The preferred order of steps is below. CAUTION: The radiation surveyor should have the β γ -probe operational (window closed) and should be observing the dose rate while approaching any potentially contaminated area. (See Chapter 2.) ¡ 1. Record the external gamma exposure measurements next to the letter G in blocks 1-12 on the Radiation Survey Data Table. Take a two kilogram soil sample in block 1, split this sample, and label one as a QC sample. ¡ 2. Sample the soil from the center of blocks 1-12 as laid out on the Radiation Survey Unit. See Chapter 4 section 4.7. ¡ 3. If the x ray probe is available, record the x ray probe measurements next to the letter X in blocks 1 – 12 on the Radiation Survey Data Table. ¡ 4. Record the external gamma exposure measurements next to the letter G in blocks 13-24 on the Radiation Survey Data Table. ¡ 5. Take the QC external gamma exposure rate in block 1 on the Radiation Survey Data Table and record the result next to GQC in block 1. ¡ 6. If the x ray probe is available , the QC x ray probe measurement in block 2 on the Radiation Survey Data Table and record the result next to XQC in block 2. ¡ 7. Record the post-operational check source measurements. USACHPPM TG236A 18 August 2001 Version Checklist for a Level 1 Assessment (Page 3 of 3) q Record any topographical information on the radiation survey unit schematic. q Interpret the data using the tables in Chapter 5 and fill out the Field Results Summary checklist. q Report the results of the assessment to the commander. q Send the samples and a copy of the paperwork to the appropriate laboratory for gross αβ measurement and 10-minute qualitative gamma spectroscopy. q Send a copy of the paperwork to CHPPM-Main HPP or other appropriate nuclear medical science officer. q Decide on the final disposition of the samples with the advice of the command staff, CHPPM Main HPP, and the laboratory. USACHPPM TG236A 19 August 2001 Version Table 1. Site Assessment and Cover Sheet Site Assessment and Cover Sheet Location: Project #: Radiation survey Unit ID: Personnel Information Length of stay: Site Use: Circle one: Hours Days Weeks Months Years Unit’s Existing RES: Personnel occupation time: h/day Circle the appropriate information below describing expected use Water source: ROWPU Bottled Other (specify): Food source: Pre-packaged Site use: Housing Types of activity in area: Laundry facilities: Storage Sleep Military Decon facilities available? Local No CONUS Other (specify): Other (specify ): Rest Minimal Labor Local Other (Specify): Yes Moderate Labor Heavy Labor Type: Geographical and Meteorological Information (Circle all that apply.) Prevailing wind speed (units): Terrain: ( ) Prevailing wind direction: deg/mil Open Brush Wooded Ground Condition: Dry Normal Flat Hilly Mountainous Dusty Compact Moist Sandy Wet Gravel Known industrial activity in the area: Direction and distance: Radiation surveyors: (Signatures) POC: CHPPM EUR: Reviewer: DSN: 486-8551 COM: 49-6371-86-8551 PAC: DSN: 263-8502 COM: 81-3117-63-8502 Date: MAIN: DSN: 584-4375 COM: 410-436-4375 TG-236A Level 1 Assessment Radiological Health Risk Planning and Projection U.S. Army Center for Health Promotion and Preventive Medicine United States Army Medical Department USACHPPM TG236A 20 August 2001 Version Table 2. Instructions for using the Radiation Survey Data Table on the following pages. Instruction ID a. Circle the type of instrument used (AN/PDR-77 or VDR-2). Record the calibration date (Cal. Due Date) and the serial number (SN) of the instrument. b. Record the check source measurement results (refer to Chapter 4 section 4.8 for the requirements for operational checks). c. Record the radiological background data and take soil samples at the 3 background locations. Record the average background readings. d. Evaluate and record the GPS/grid-A and -B locations. e. Perform the radiation survey and record the results. • Record the appropriate instrument reading in the center of each numbered box. • Collect soil samples. Collect two kilograms of soil in block 1-Soil/QC and split the sample. • Return to block 1 (1-Soil/QC) and repeat the appropriate measurements (βγ-probe and x ray probe). • Exclude the GQC measurement in block 1 and take the average of all the βγ-probe measurements. Record the results. f. Record the personnel information. g. Record the length and width of the radiation survey unit. h. Indicate the measurement units used for all of the measurements. You must be aware of any scale changes and use the same units for all measurements. i. Indicate north in the Indicate North box. j. Record topographical information on Radiation Survey Unit Schematic. k. Answer the Potential Radiological Hazard ID questions to the best of your ability. Use TG238 and other references, if available.2 USACHPPM TG236A 21 August 2001 Version Table 3. Radiation Survey Data Table (Page 1 of 2) a. b. c. Radiation survey Data Table Circle the instrument used. d. GPS/Grid Coordinates (GPS/Grid below.) AN/PDR-77 Or VDR-2 A: B: Cal. Due Date: SN: Radiation survey Results e. Gamma X-ray Check Source Measurements Gamma X-ray Average Reading: Pre-radiation survey: Average Background Reading: Post-radiation survey: Net Reading: Radiological Background Information Personnel Information f. Radiation surveyors: Location Gamma X-ray 1. 2. 3. Reviewers: Average: Radiation Survey Unit Boxes 9-Soil X: G: 21 G: 10-Soil X: G: 11-Soil X: G: 22 G: 23 G: 5-Soil X: G: 17 G: 6-Soil X: G: 19 G: 2-Soil X1: XQC: G: X: G1: GQC: 13 G: 8-Soil X: G: 15 G: i. North 20 G: 3-Soil X: G: 14 G: GPS/Grid-B 24 G: 7-Soil X: G: 18 G: 1-Soil/QC 12-Soil X: G: 4-Soil X: G: 16 G: g. Width GPS/Grid-A g. Length h. Soil: X: G: Soil Sampling Location X ray Probe Reading βγ-probe or VDR-2 Reading Unit of Measurement TG-236A Level 1 Assessment Radiological Health Risk Planning and Projection U.S. Army Center for Health Promotion and Preventive Medicine United States Army Medical Department USACHPPM TG236A 22 August 2001 Version Table 3. Radiation Survey Data Table (Page 2 of 2) j.. Radiation Survey Unit Schematic 9 21 10 22 5 17 23 6 18 1 13 11 24 7 19 2 14 12 8 20 3 15 4 16 k. Potential Radiological Hazard ID- Refer to TG-2382or other references for guidance. Is there evidence or a record of the following? Circle one The presence, use, storage, or disposal of radioactive materials. Yes / No/Unknown The use of DU or military commodities. Yes / No/Unknown The decontamination, maintenance, or storage of radioactively contaminated equipment. Yes / No/Unknown The presence of enhanced naturally occurring radioactive material. Yes / No/Unknown Radiation generating machines such as accelerators and x ray machines. Yes / No/Unknown Any aircraft accident in the area. Yes / No/Unknown Medical or research facilities in the area. Yes / No/Unknown Coal ash, fertilizer, other mineral processes in the area. Yes / No/Unknown Nuclear power plants in the area. Yes / No/Unknown USACHPPM TG236A 23 If yes, describe the evidence or attach the record. August 2001 Version Field Results Summary Checklist (Page 1 of 1) Net Reading: Instrument Used: Radiation survey Unit ID: Existing RES: ¨ PDR-77 or VDR-2 The net gamma reading is less than 0.010 mR/h (0.10 µGy/h on the VDR-2). There is no need to proceed with the data interpretation, the radiation survey unit can be considered equivalent to background at this time. Document these results and send them on to the Health Physics Program at CHPPM-Main. Existing RES = 0 ¨ The RES at the end of the mission lasting ¨ For an assigned OEG of days will be: the maximum mission duration is about days. Existing RES > 0 ¨ The RES at the end of the mission lasting ¨ For an assigned OEG of days will be: the maximum mission duration is about days. This checklist summarizes the results of a particular radiation survey and is intended to ease the communication of the results. USACHPPM TG236A 24 August 2001 Version Chapter 4. Radiation surveying and sampling guidance 4.1. Minimum supply requirements The following is a list of supplies required for a Level 1 radiation survey. Reasonable substitutions can be made for the items on this list. A list of additional equipment is in 0. • AN/PDR-77 or AN/VDR-2 RADIAC and the corresponding user’s manuals • Copy of TG236A and datasheets • Extra batteries for the RADIAC meters and other instruments. • Copies of the removable survey packet from TG236A • GPS receiver (optional) and tape measure (optional) • Disposable dust masks • Pens • Indelible marker • Soil sampling tool, e.g., trowel or entrenching tool • Sample labels • Sealing or other strong tape • Flags or other land-marking items • Rubber gloves • Distilled water (at least 4 liters) • Calculator • Leather or gardener’s gloves • Fifty (50) 1-gallon Ziploc†â or similar plastic bags. Other sample containers may be used in coordination with the laboratory. 4.2. Selecting a radiation survey unit The choice of the radiation survey unit depends on the overall military operation. In general, a single radiation survey unit should be limited to an area with uniform environmental characteristics. For example, if the commander wants a radiation survey of an area that includes both farmland and industrial plants, this area should be divided into two radiation survey units. A single room or a group of similar rooms can constitute a single radiation survey unit. However, if you are radiation surveying a warehouse, its parking lot, and an adjacent vacant lot, then consider each area as a single radiation survey unit. † Ziploc is a registered trademark of S.C. Johnson and Son, Inc., Racine, WI, USA 53403-2236. USACHPPM TG236A 25 August 2001 Version 4.3. Setting up the radiation survey unit The recommended maximum area for each outdoor radiation survey unit is 10,000 m2. For each indoor radiation survey unit, the recommended maximum area is 100 m2 of floor space. The minimum unit area for an outdoor radiation survey is a rectangle 16 meters long and 12 meters wide (192 m2). If the radiation survey unit is less than 192 m2 for an outdoor unit or less than 10 m2 for an indoor unit, then you should alert a nuclear medical science officer (72A) or a health physicist and initiate an external gamma scan of the area and an x ray scan, if the x ray probe is available. The radiation survey unit should encompass an area that is suspected to have elevated levels of radiation. If you are radiation surveying near a potentially contaminated item (for example, a tank damaged by a depleted uranium penetrator), the radiation survey unit should be centered on that potentially contaminated item. If you suspect that radioactive materials were released in the air, you may want to conduct additional radiation surveys downwind to determine the spread of the contamination. The radiation survey unit is a rectangle that delineates the actual area to be surveyed. The width of the rectangle is marked off into six units, and the length is marked off into eight units. Entry to the radiation survey unit may be controlled if desired. After the radiation survey is completed, a decision can be made as to who can enter the area. Site assessment information can be recorded on the Site Assessment and Cover Sheet. The site assessment sheet contains information about the site conditions, personnel involved, occupation times, site location, and geographical and meteorological information. A recommended radiation survey unit ID is the GPS/Grid coordinates of point GPS/Grid-A from the Radiation Survey Data Table. However, any unique identifier can be used. The radiation survey unit schematic is included for recording the pertinent geographical features of the site. Following this schematic is a list of questions about the radiological features of the site, such as the presence of depleted uranium, nearby power plants (nuclear, coal, oil, gas, or other fuel), any type of mineral extraction industry, or radioactive material storage locations. 4.4. Background measurements 4.4.1. Methods Before any radiation survey is begun, the naturally occurring “background” radiation data should be gathered at specified locations. The Level 1 assessment recommends three background measurement locations. Measurements at the three locations (at the 0 , 120 , and 240 compass directions) should be in an “background-only” area thought to be uncontaminated and at least 10 meters from the central point of the area. USACHPPM TG236A 26 August 2001 Version Radiation Uncontaminated Area 0o ~10 m 240o 120o Figure 2. Background area radiation surveying and sampling locations The outdoor background measurements should be made in an area well outside the radiation survey unit. The background location must have no or, at most, a very small chance of being contaminated, but in all other ways it should be similar to the radiation survey unit. All background sampling locations must be noted on a field map. A soil sample, a gamma exposure rate measurement taken at about 1 meter (40 inches or waist height) above the ground and an x ray probe (if the probe is available) measurement at about 10 centimeters (about 4 inches or palm height) above the ground will be taken at each outdoor background location. Ideally, an indoor background location should be a room of similar design and construction as the radiation survey unit, but well away from it. If possible, avoid choosing an indoor background location that shares ventilation ductwork with the radiation survey unit. A pattern similar to the outdoor pattern used to identify locations may be used to take indoor background measurements. Indoor locations require gamma exposure dose rate measurements and x ray probe measurements, if the probe is available. 4.4.2. When is a measurement “above background?” As a rule-of-thumb, any gross measurement that exceeds about 3 times the appropriate background measurement (roughly a range of 2 –5 times background) should be considered as a potential elevated radiation measurement or an action level for further investigation. This rule-of-thumb applies to contamination radiation surveys as well as external radiation surveys. However, the decision whether or not to declare an elevated radiation level or the existence of contamination is best left to those qualified personnel most familiar with the situation. 4.5. Instrumentation use for a radiation survey Field radiation survey meters should be calibrated every 12 months, and no uncalibrated instrument should be used, unless no other option exists. You should use standard procedures to calibrate and maintain equipment and keep the instruments and accessories within their manufacturer specified humidity and temperature requirements. Fill out the Arrival Checklist and Preoperational Test (Table 15 on page 54) before starting the operational checks. All radiation survey meters should undergo operational checks before and after the radiation survey using an appropriate radioactive check source. The results of these checks must be recorded on the USACHPPM TG236A 27 August 2001 Version radiation survey datasheets. All instruments should be operated in ratemeter mode with the filter on (See Chapter 7.) and should be held in place for 60 seconds before recording any stationary (static) measurement value on the radiation survey forms. This procedure has been designed so that two trained personnel equipped with the AN/VDR-2 or AN/PDR-77 will have gross screening capability for acute radiation threats as provided by the NBC doctrine. Additional information about the AN/VDR-2 and AN/PDR-77 is in Chapter 7. 4.6. External radiation survey A 2-second update time and the filtered mode for a 1-minute data collection interval is recommended for the stationary measurements. The window on the βγ-probe is to be closed for all measurements. For scanning measurements, an update time of 1 second and the unfiltered mode are recommended because this combination allows a quicker response, which is desirable when scanning for elevated radiation levels. For stationary measurements, the radiation surveyor will record the external exposure (βγ-probe) rate at about 1 m (about 3 ft) above the ground. If an x ray probe is available, x ray probe measurements will be taken about 10 cm (~4 in.) above the ground. You need to take only βγ-probe measurements in grid blocks 13-24. Refer to the Radiation Survey Data Sheet on page 22. For all scanning measurements the radiation surveyor will walk slowly, at a rate of about 0.5 m/s (roughly one-half step per second). For an external gamma exposure rate scan, the βγ-probe will be held about 1 meter above the ground (or floor) and the x ray probe should be held about 10 cm (~4 in.) above the ground. 4.7. Collecting soil samples Soil samples (outdoors only), x-ray, and βγ-probe measurements will be taken in the center of grid blocks 1-12. The list below is a brief set of reminders intended for a radiation surveyor. For more detailed guidance on sampling and sample management, see Chapter 10 starting on page 75. • Avoid taking soil samples that contain large pieces of organic material (sticks, roots, or plant materials) or pebbles and stones larger than 2.5 cm (1 inch). • Collect soil samples at the locations laid out on the datasheet. • Surface soil samples should be collected from the first 15 cm (6 inches) of soil. If other depths are used, they must be noted on the radiation survey sheet. • Ensure that each soil sample weighs about 1 kg (about 2 lbs). Because of the great variation in soil composition, moisture content, and bulk density, it is impossible to specify a particular volume of soil to collect. You must use some judgment. • Double bag, seal with tape, and properly label all soil samples. • If additional soil samples are taken (at the discretion of the radiation surveyor), ensure that they are marked as additional samples and that the location and why they were collected are recorded. USACHPPM TG236A 28 August 2001 Version 4.8. Quality assurance and quality control (QA/QC) The intent of QA/QC is to ensure that the proper data are properly collected with respect to the objectives of the radiation survey. The datasheets included in the plan ensure that the data are collected uniformly no matter who the radiation surveyors are or where the radiation survey takes place. Operational checks of the field instrumentation ensure that the instruments are operating acceptably during the radiation survey. One field split soil sample and one additional external exposure rate measurement are required to ensure consistency in the overall measurement process. More extensive QA/QC procedures are not necessary at Level 1 because the data collected and the interpretation of the data are not intended to be used for a rigorous dose assessment. Follow these guidelines for quality assurance and quality control. • Data collection forms and worksheets are provided in the protocols for the radiation surveys. • Contact a nuclear medical science officer (72A) or health physicist early in the radiation survey process. • Before deployment to the radiation survey site: o Prepare all RADIAC meters for use in accordance with (IAW) the appropriate technical/user manual. o Use the flowchart in Figure 3 on the next page to perform check source measurements on the RADIAC meter with the appropriate radioactive check source. Record the results of these operational checks on the datasheets. • Ensure that the soil sample from block 1 is about 2 kg, homogenize the sample in the field and split it into two 1 kg samples. Label one of these soil samples as a QC sample. o Satisfactory substitutions for a kilogram of soil are a filled coffee can, a half-filled gallon Ziploc bag, 2 quart Ziploc bags, and anything that is about half a gallon in volume (e.g., a half-gallon ice cream container). • Repeat an external exposure rate measurement at the end of the radiation survey in block 1 of the radiation survey unit. Record the meter reading as GQC in block 1 of the radiation survey unit. • If the x ray probe is available, record a second reading as XQC in block 2 of the radiation survey unit. • The OIC or the NCOIC will review the radiation survey data for anomalies and completeness at the end of each radiation survey. • Follow the procedures in Chapter 8 for sample management after collection. USACHPPM TG236A 29 August 2001 Version Is the check source measurement within 30% of the value on the calibration sheet? Yes Record the result and continue the radiation survey. No Take two additional measurements. Is the check source measurement within 30% of the value on the calibration sheet? Yes No Yes Are additional RADIAC meters available? Get another instrument and restart the procedure. No Record results. Alert the OIC or NCOIC; continue radiation surveying with the consent of the OIC or NCOIC. Figure 3. Operational check source flowchart USACHPPM TG236A 30 August 2001 Version Chapter 5. Data interpretation and archiving If the net gamma reading is less than 0.010 mR/h (0.10 µGy/h), staying in this area will not affect your RES category. The area radiation surveyed can be considered equivalent to background at this time. 5.1. RES categories The field results should be discussed with personnel knowledgeable in radiation protection. CHPPM-Main HPP can also provide assistance in the final data interpretation and recommendations. The discussions should be made with the primary purpose of relaying the results and recommendations to the commander in a useful manner. Table 4 is a listing of recommended actions for radiation exposures that result in different RES categories. Your commander is responsible for deciding the OEG for the unit. Appendix F contains useful charts for the preventive medicine or chemical officer to track the RES of the various units. 5.2. Estimating the maximum duration of a mission before exceeding the OEG The first step in determining the maximum duration of a mission before exceeding the OEG is to determine the maximum total dose for that mission. The maximum total dose for the mission is the OEG minus the unit’s current accumulated dose. For example, if the OEG guidance is not to exceed 10 R (equivalent to RES category 1C) and the unit’s current accumulated dose is 1 R, then the maximum total dose allowed for the mission is 10 R -1 R = 9 R. To determine the maximum duration of the mission, simply divide the maximum dose allowed by the average radiation level (the Net Reading from your Data Radiation survey Sheet). Be sure to put the numbers in the proper units. To continue with the above example, if the average radiation level is 50 mR/hr, then the maximum duration is: 9R 50 mR = hr 9R 50 mR hr = 7.5 days. ∗ 1000mR days ∗ R 24hr If you know the unit’s current RES category but do not know the unit’s accumulated dose, then use Table 5 through Table 9 (pages 33 through 34). These tables assume the RES category average value as the unit’s accumulated dose.5 To use the tables, first find the table of your present RES. If your unit has not been exposed to radiation above background, then use Table 5 (RES of 0). Then find the average radiation level (the Net Reading from your Data Radiation survey Sheet) in the left column. Then find your assigned OEG in the top row. The maximum number of days that can be spent in that area without exceeding the OEG is the intersection of that row and column. USACHPPM TG236A 31 August 2001 Version Table 4. NATO recommended actions for RES categories1. RES Category Total Cumulative Dose (See notes 1 and 2.) Actions 0 < 50 mR < 0.05 cGy None 1A 50 mR to 500 mR 0.05 cGy to 0.5 cGy 1B 500 mR to 5 R 0.5 cGy to 5 cGy 1C 5 R to 10 R 5 cGy to 100 cGy 1D 10 R to 25 R 10 cGy to 25 cGy 1E 25 R to 75 R 25 cGy to 75 cGy Record individual dose measurements Initiate periodic monitoring Record individual dose measurements Continue monitoring Initiate rad radiation survey Establish dose control measures as part of operations Prioritize tasks Record individual dose measurements Continue monitoring and update radiation survey Continue dose control measures Execute priority tasks only (See note 3.) Record individual dose measurements Continue monitoring and update radiation survey Continue dose control measures Continue to execute priority tasks only Execute critical tasks only (See note 4.) Record individual dose measurements Continue monitoring and updating radiation survey Continue dose control measures Execute critical tasks only (See note 4.) NOTES: 1. The use of the measurement millisieverts (mSv) is preferred in all cases. However, due to the fact that normally the military has only the capability to measure centigray (cGy), as long as the ability to obtain measurements in mSv is not possible, NATO forces will use cGy. For whole body gamma irradiation, 1 cGy = 10 mSv 2. All doses should be kept as low as reasonably achievable (ALARA). This will reduce individual soldier risk as well as retain maximum operational flexibility for future employment of exposed soldiers. 3. Examples of priority tasks are those missions to avert danger to persons or to prevent damage from spreading. 4. Examples of critical tasks are those missions to save human life. On Table 5 through Table 10 the net readings are instrument specific because of the display differences between the AN/VDR-2 and the AN/PDR-77 when using the βγ-probe. To avoid confusion, the units have been omitted from the net reading column in Table 5 through Table 10; however, there is a place on the Radiation Survey Data Table to record the measurement units. See Chapter 7 for additional information. USACHPPM TG236A 32 August 2001 Version Table 5. Estimating the maximum duration of a mission in days for units with no previous radiation exposure (RES of 0). Net Reading PDR-77 VDR-2 0.01 0.1 0.02 0.2 0.03 0.3 0.04 0.4 0.05 0.5 0.06 0.6 0.07 0.7 0.08 0.8 0.09 0.9 0.10 1.0 0.15 1.5 0.20 2.0 0.30 3.0 0.40 4.0 0.50 5.0 1.00 10.0 1.50 15.0 2.00 20.0 3.00 30.0 4.00 40.0 5.00 50.0 10.00 100.0 15.00 150.0 20.00 200.0 0 > 180 100 69 52 41 34 29 26 23 20 13 10 6 5 4 2 1 1 0 0 0 0 0 0 1A > 180 > 180 > 180 > 180 > 180 > 180 > 180 > 180 > 180 > 180 130 98 65 49 39 19 13 9 6 4 3 1 1 0 Assigned OEG 1B 1C > 180 > 180 > 180 > 180 > 180 > 180 > 180 > 180 > 180 > 180 > 180 > 180 > 180 > 180 > 180 > 180 > 180 > 180 > 180 > 180 > 180 > 180 > 180 > 180 > 180 > 180 > 180 > 180 > 180 > 180 > 180 > 180 140 > 180 100 > 180 69 140 51 100 41 83 20 41 13 27 10 20 1D > 180 > 180 > 180 > 180 > 180 > 180 > 180 > 180 > 180 > 180 > 180 > 180 > 180 > 180 > 180 > 180 > 180 > 180 > 180 > 180 > 180 100 69 52 1E > 180 > 180 > 180 > 180 > 180 > 180 > 180 > 180 > 180 > 180 > 180 > 180 > 180 > 180 > 180 > 180 > 180 > 180 > 180 > 180 > 180 > 180 > 180 160 Table 6. Estimating the maximum duration of a mission in days for units with existing RES of 1A. Net Reading PDR-77 VDR-2 1.00 10.0 1.50 15.0 2.00 20.0 3.00 30.0 4.00 40.0 5.00 50.0 10.00 100.0 15.00 150.0 20.00 200.0 USACHPPM TG236A Assigned OEG 1B > 180 130 98 65 49 39 19 13 9 1C > 180 > 180 > 180 140 100 81 40 27 20 33 1D > 180 > 180 > 180 > 180 > 180 > 180 100 68 51 1E > 180 > 180 > 180 > 180 > 180 > 180 > 180 > 180 160 August 2001 Version Table 7. Estimating the maximum duration of a mission in days for units with existing RES of 1B. Net Reading PDR-77 VDR-2 1.50 15.0 2.00 20.0 3.00 30.0 4.00 40.0 5.00 50.0 10.00 100.0 15.00 150.0 20.00 200.0 Assigned OEG 1D > 180 > 180 > 180 > 180 > 180 92 61 46 1C > 180 151 100 75 60 30 20 15 1E > 180 > 180 > 180 > 180 > 180 > 180 > 180 150 Table 8. Estimating the maximum duration of a mission in days for units with existing RES of 1C. Net Reading Assigned OEG PDR-77 VDR-2 1D 1E 4.00 40.0 > 180 > 180 5.00 50.0 140 > 180 10.00 100.0 72 > 180 15.00 150.0 48 190 20.00 200.0 36 140 Table 9. Estimating the maximum duration of a mission in days for units with existing RES of 1D. Net Reading PDR-77 VDR-2 10.00 100.0 Assigned OEG 1E > 180 15.00 150.0 160 20.00 200.0 120 USACHPPM TG236A 34 August 2001 Version 5.3. Estimating the RES at the end of a mission The RES of a unit at the end of a mission depends on the RES of the unit at the beginning of the mission, the mission duration, and the net exposure rate. The next exposure rate is reflected as the net reading on the tables and data sheets. If your unit had not previously received radiation (RES of 0), then Table 7 should be used to determine the new RES for the unit. To use this table, first find the average radiation level (the Net Reading from your Data Radiation survey Sheet) in the left column. Then find the duration of the mission (the time spent in the area with net radiation levels greater than 0.010 mR/h (0.10 µGy/h on the VDR-2)) in the top row. The new RES of the unit is the intersection of that row and column. Net Reading PDR-77 VDR-2 0.01 0.10 0.02 0.20 0.03 0.30 0.04 0.40 0.05 0.50 0.10 1.00 0.15 1.50 0.20 2.00 0.30 3.00 0.40 4.00 0.50 5.00 0.60 6.00 0.70 7.00 0.80 8.00 0.90 9.00 1.00 10.00 1.50 15.00 2.00 20.00 3.00 30.00 4.00 40.00 5.00 50.00 10.00 100.00 15.00 150.00 20.00 200.00 1 0 0 0 0 0 0 0 0 0 0 0 0 0 0 0 0 0 0 1A 1A 1A 1A 1A 1A 7 0 0 0 0 0 0 0 0 1A 1A 1A 1A 1A 1A 1A 1A 1A 1A 1B 1B 1B 1B 1B 1B Table 10. Estimating the net RES for a mission. Duration (days) 14 21 30 35 40 45 50 0 0 0 0 0 0 0 0 0 0 0 0 0 0 0 0 0 0 0 0 0 0 0 0 0 0 0 0 0 0 0 0 0 1A 1A 0 1A 1A 1A 1A 1A 1A 1A 1A 1A 1A 1A 1A 1A 1A 1A 1A 1A 1A 1A 1A 1A 1A 1A 1A 1A 1A 1A 1A 1A 1A 1A 1A 1A 1A 1A 1A 1A 1A 1A 1B 1B 1A 1A 1A 1B 1B 1B 1B 1A 1A 1B 1B 1B 1B 1B 1A 1A 1B 1B 1B 1B 1B 1A 1A 1B 1B 1B 1B 1B 1A 1B 1B 1B 1B 1B 1B 1B 1B 1B 1B 1B 1B 1B 1B 1B 1B 1B 1B 1B 1B 1B 1B 1B 1B 1B 1B 1B 1B 1B 1B 1B 1B 1B 1B 1B 1B 1B 1B 1B 1C 1C 1B 1C 1C 1C 1C 1D 1D 1C 1C 1D 1D 1D 1D 1D 1C 1D 1D 1D 1D 1D 1D 60 0 0 0 1A 1A 1A 1A 1A 1A 1B 1B 1B 1B 1B 1B 1B 1B 1B 1B 1C 1C 1D 1D 1E 90 0 0 1A 1A 1A 1A 1A 1A 1B 1B 1B 1B 1B 1B 1B 1B 1B 1B 1C 1C 1D 1D 1E 1E 120 0 1A 1A 1A 1A 1A 1A 1B 1B 1B 1B 1B 1B 1B 1B 1B 1B 1C 1C 1D 1D 1E 1E 1E 180 0 1A 1A 1A 1A 1A 1B 1B 1B 1B 1B 1B 1B 1B 1B 1B 1C 1C 1D 1D 1D 1E 1E >1E If your unit had a RES greater than zero at the beginning of the mission and you know the accumulated dose for the unit, then add the total dose for the mission to the unit’s accumulated dose. To determine the total dose for the mission, multiply the average radiation level (the Net Reading from your Data Radiation survey Sheet) by the duration of the mission. Then add this number to the unit’s accumulated dose of the unit to find the new accumulated dose. Be sure to put the numbers in the proper units. Once you find your new accumulated dose, refer to Table 1 to determine the RES category. For example, at the beginning of a 10-day mission, your unit was in RES category 1B with an accumulated dose of 600 mR. The average radiation level (the USACHPPM TG236A 35 August 2001 Version Net Reading from your Data Radiation survey Sheet) is 10 mR/hr. The total dose for the mission is: 10 mR hr 24hr ∗ ∗ 10days hr days = 2400 mR or 2.4 R. ∗ 10days = 10 mR Adding the total dose for the mission to the previously accumulated dose, you get 3.0 R for the current accumulated dose. Referring to Table 4, you see that your unit is still RES category 1B with an accumulated dose of 3 R. If your unit had a RES greater than zero at the beginning of the mission and you do not know the accumulated dose for the unit, then you use the RES category average value as the unit’s accumulated dose.5 The average value for RES 1A is 275 mR, for 1B it is 2.75 R, for 1C it is 7.5 R, for 1D it is 17.5 R, and for 1E it is 50 R. Add this average value to the total dose for the mission to determine the new accumulated dose for the unit. The total dose for the mission is the average radiation level (the Net Reading from your Data Radiation survey Sheet) times the duration of the mission. Be sure to put the numbers in the proper units. Once you find your new accumulated dose, refer to Table 4 to determine the RES category. 5.4. Estimating numerical values for a mission duration Equation 1 below can be used to estimate a mission duration. The parameter RN is the net reading from block e on the Radiation Survey Data Table of the datasheet. Equation 1. Estimating the duration of a mission. æ OEG - (Existing Exposure) ö ÷÷ Mission Duration = çç RN è ø If the existing exposure is not known but the unit’s RES is known, then use midpoint of the RES category as the value for “Existing Exposure” in Equation 1. The units of the numerator in Equation 1 are radiological dose units (e.g., mR or cGy), and the units of the denominator are radiological dose rate units (e.g., mR h-1 or cGy h-1). Example calculations Example 1 A unit with no previous radiation exposure is directed to occupy an area where the net reading on the AN/PDR-77 is 0.23 mR/h. How long can the unit remain in the area and not exceed an OEG of 1A? Answer 1 USACHPPM TG236A 36 August 2001 Version The upper limit of RES category 1A is 500 mR and RN = 0.23 mR/h. These numbers are entered into the Equation 1 above to get: æ 500 mR ö ÷ = 2174 hours = 90.6 days. Mission Duration = çç -1 ÷ 0.23 , R h ø è This value is rounded down to 90 days. Example 2 Another unit is going to occupy the same area as above. The new unit has a RES of 1A before beginning this mission. How long can they stay there and not exceed an OEG of 1B? Answer 2 Note that the existing exposure is unknown but the RES category is known. Therefore, the existing exposure value is 275 mR, which is the midpoint of RES category 1A. The OEG if 1B corresponds to an exposure of 5000 mR. æ 5000 - 275 ö æ 4725 mR ö ÷ = 20543 hours = 856 days Mission Duration = ç ÷ = çç -1 ÷ è 0.23 ø è 0.23 mR h ø Example 3 You’ve been tasked to determine how long a unit can operate in an area where you’ve recently performed a Level 1 radiation survey with an AN/VDR-2. The commander’s OEG is given as 4.5 cGy, and the unit has had no previous radiation exposure. The results of the radiation survey yielded a net dose rate of 95 µGy/h. Answer 3 æ 4.5 cGy ö æ 45000 µGy ö ÷ =ç ÷ = 474 hours = 19.7 days Mission Duration = çç -1 ÷ ç -1 ÷ è 95 µGy h ø è 95 µGy h ø This would be rounded down to 19 days. Because the AN/VDR-2 automatically changes units on its display, you must be very careful to record and use the proper units in any calculation. 5.5. Archiving When the data interpretation and communication is completed, all the associated paperwork should be preserved and archived. To archive the data, fill out Field Results Summary Checklist and attach copies of all paperwork with the samples. The documentation should be kept by the command. Send an additional copy of all documentation to Health Physics Program (HPP) at CHPPM-Main. USACHPPM TG236A 37 August 2001 Version This page is intentionally blank USACHPPM TG236A 38 August 2001 Version Chapter 6. Contamination control procedures Except for nuclear war, radiological contamination is a minor concern in most instances. On page 67 of Medical Management of Radiological Casualties, First Edition it states, “It is impossible for a living patient [a radiation surveyor in our case] to be so contaminated as to pose a threat to medical providers.”6 Do not panic if you discover that you might be contaminated; take the appropriate steps for decontamination. Remember that despite your best efforts, some degree of contamination may remain. This chapter includes procedures for setting up decontamination and monitoring station, personnel and equipment monitoring procedures, and decontamination procedures to be followed in the event of radiological contamination. Table 12 at the end of this chapter is a comprehensive list of Army documents that contain decontamination and other related procedures. Although the documents listed are concerned with operations in war with nuclear weapons, they contain a much greater level of detail than in this chapter. 6.1. Setting up a personnel monitoring and decontamination station In this technical guide, the phrase decontamination station includes the personnel monitoring station. A decontamination station can vary greatly in complexity, from a complete CCS (detailed in the Nuclear Weapon Accident Response Procedures7 (NARP) manual) for a weapons accident, to a simple step-off pad and monitoring (frisker) station. 6.1.1. Setting up a step-off pad This section describes the basic principles used to set up a simple step-off pad. Figure 4 below shows the basic components of a simple step-off pad. A decontamination station should be placed in a low background area free of contamination, upwind of the radiation survey area or far enough away from areas of elevated contamination to minimize chance of airborne material reaching the location, and in an area that is flat and easy to work in. If necessary, a preliminary decontamination station can be set up near or in the radiation survey area. This preliminary station can be used as a transfer point for items that may be contaminated or for the removal of the outermost layer of protective clothing. The purpose of a decontamination station is to remove and contain contamination. Contaminated items may be brought into the clean area if they are bagged and sealed or radiation surveyed and found to be clean. USACHPPM TG236A 39 August 2001 Version Figure 4. Decontamination step-off pad schematic. 6.1.2. Personnel contamination monitoring (frisking) Personnel monitoring (frisking) is often required for people who have been in an area with elevated radiation measurements. RADIAC radiation surveys are used to determine with reasonable certainty whether that person is contaminated. In the event that a person is contaminated, the level of contamination should be estimated so that a decision whether or not to decontaminate can be made. The following guidelines for personnel monitoring are adapted from Preparedness and Response in Radiation Accidents.8 • Try to find an area with low background radiation (roughly ≤0.02 mR/hr or ≤0.2 µGy/hr) and little to no radiological contamination. • The pancake probe or the βγ−probe with the end window open is the best choice for personnel monitoring. • Use the headphones or other audio capabilities of the radiation survey meter. It is easier to detect audible than visual changes in counting rate, and audio monitoring will allow you to concentrate on the radiation survey, not just the meter. • Note the background on the meter. • The person being monitored should stand straight, with feet spread apart, arms extended with the palms flat, and the fingers straight out (see Figure 5). • Keep the probe window within 2.5 cm (1 in.) from the surface of the body. To avoid contaminating the probe, do not to touch the person with the probe. • Move the probe over the person at a rate of about 2.5 cm/s (1 in/s). Start at the head and radiation survey the front of the person, including the inseam, crotch, and armpits. USACHPPM TG236A 40 August 2001 Version Radiation survey the outline of the body with special attention to the fingertips. Repeat with the arms and hands turned over, and repeat the radiation survey on the back of the person. Figure 5. Individual personnel monitoring with a portable radiation survey meter.8 Take another background measurement after the personnel radiation survey is completed. If the second background reading is significantly different from the first: check to see if the probe is contaminated, if it’s not, then resurvey the person. 6.2. Radiation surveys of items or commodities An equipment radiation survey is required for an item that may have been in an area with elevated radiation measurements, may have been damaged by a depleted uranium penetrator, or may contain a broken radioactive commodity. Because of the complexity and range of sizes of equipment that might be encountered in the field, a single generic approach to an equipment radiation survey would be ineffective and incomplete. Techniques similar to those described in the Personnel contamination monitoring section (Section 6.2)can be used for an equipment radiation survey. • For relatively small pieces of equipment, a surface scan can cover the entire surface of the equipment. • Measure the ambient background reading about 1 m from the equipment to be radiation surveyed. • Bag (for example, Ziplocâ bags) and label small, contaminated items, if possible. 6.3. Personnel decontamination Personnel suspected of being contaminated should be monitored with a radiation survey meter to identify contaminated areas. Special emphasis should be placed on the location of any contaminated areas on the individual. USACHPPM TG236A 41 August 2001 Version If you suspect contamination, resurvey the person carefully, noting areas that are contaminated. First, you should remove clothing that is contaminated. Clothing that is significantly contaminated should be removed and stored in plastic bags until the activity has decayed to an acceptable level. If the radionuclide can be identified, then it may be possible to calculate the time until the radioactivity has reached a level acceptable for reuse or disposal. If skin contamination occurs, start with the mildest decontamination measures and move to stronger measures if the contamination is difficult to remove. Washing with soap (detergent) and water is the best initial decontamination approach for unbroken skin. If simple washing fails, then you can try harsher methods such as abrasive soap or a complexing agent. Take care not to break the person's skin or cause abrasion, which could introduce contamination into the bloodstream. Clipping the fingernails may remove a significant amount of contamination that remains on the hands after washing. Wounds suspected of being contaminated should be irrigated profusely with tepid water and cleaned with a swab. Skin cleansing methods, in order of harshness, are listed in Table 11. Table 11. List of cleansing methods in order of harshness to the skin. Order Method 1. 2. Lifting off dry contamination with sticky tape. (CAUTION: Some individuals are allergic to certain adhesives. Strong adhesives can also disturb the skin barrier, enabling internal uptake of the contamination.) Flushing with water. 3. Cleansing with soap and warm water, commercial skin cleaner. 4. Cleansing with mild abrasive soap, soft brush, and water. 5. Cleansing with skin cleaner with a mild abrasive. 6. Cleansing with a complexing solution. (CAUTION: Any agents not designed and approved for use on the human skin should have medical approval before use.) 7. Cleansing with a mild organic acid (e.g., citric acid). (CAUTION: Any agents not designed and approved for use on the human skin should have medical approval before use.) After each decontamination attempt, radiation survey the surrounding area to ensure that contamination is not being spread. Wear gloves and coveralls, if they are needed, and work from the edges of the contaminated area of the person's body toward the center. 6.4. Item and commodity decontamination Equipment decontamination proceeds in essentially the same way as personnel decontamination, except that there are a few more options with equipment decontamination. Rougher mechanical means such as vacuuming with a filtered vacuum system and using abrasives are available. There is no concern about breaking the skin. USACHPPM TG236A 42 August 2001 Version Five general methods to reduce surface contamination from equipment are: 1. Brushing or vacuum cleaning. 2. Washing, soaking, or scrubbing with hot or cold water. Soaps, detergents, or chelating agents may be used. 3. Steam cleaning. 4. Cleaning with solvents, such as bleach or gasoline. 5. Removing the contaminated surface by using chemicals, abrasives, or by sandblasting or electrolysis. As with personnel decontamination, the milder methods to reduce contamination should be tried first, and equipment should be monitored after each decontamination attempt. If additional decontamination is needed, a milder method can be repeated or a more aggressive method can be tried until acceptable levels are reached. Showering, washing, or hosing them prior to their removal can generally decontaminate moisture-proof protective clothing, rubber boots, and similar items. Personnel may decontaminate canvas, rope, and similar coarse materials by dry brushing or shaking them. When items are soaked, washed, or scrubbed with liquids other than water, soap, or solvents, clear water should be used as a final rinse. Regardless of the decontamination method used, an adequate drainage system must be provided to ensure control of contaminated wastewater. If an item or commodity cannot be decontaminated, then request advice from the command staff regarding the disposition of the materiel. 6.5. Care of RADIAC equipment during monitoring and decontamination Care should be taken to avoid contaminating the RADIAC meter or its probes while monitoring. If an instrument is contaminated, it can be decontaminated just like any other piece of equipment. It is important not to damage the meter or probes while cleaning them. Gently pouring water over the contaminated surface may be sufficient to decontaminate the surface. If the instrument cannot be cleaned, then you may still use it providing that you collect a new background reading and subtract it from all subsequent readings. USACHPPM TG236A 43 August 2001 Version Table 12. Army publications containing decontamination protocols. Publication type Field Manuals (FMs) Document FM 3-3 FM 3-3-1 FM 3-4 FM 3-4-1 FM 3-5 FM 3-7 FM 3-100 FM 3-101 FM 3-100 FM 8-9 Title NBC Contamination Avoidance Nuclear Contamination Avoidance NBC Protection Fixed Site Protection NBC Decontamination NBC Field Handbook NBC Operations Chemical Staffs and Units Chemical Operations Principles and Fundamentals NATO Handbook on the Medical Aspects of NBC Defensive Operations (AmedP-6(C)) Explosive Ordnance Disposal Service and Unit Operations Operations for Nuclear Capable Units Nuclear Weapon Accident Investigation Board (CONUS) Medical Support Nuclear/Chemical Accidents Nuclear and Chemical Weapons Materiel-Nuclear Surety Nuclear, Biological, and Chemical Defense and Chemical Warfare Nuclear Weapons and Nuclear Weapons Materiel Disposal of Unwanted Radioactive Materiel FM 9-15 Department of the Army Regulations (ARs) FM 100-50 AR 15-22 AR 40-13 AR 50-5 AR 350-42 AR 700-65 AR 755-15 Soldier Training Publications (STPs) Technical Bulletins (TBs) Training Circulars (TCs) STP 21-24-SMCT Technical Manuals (TMs) TM 5-225 Soldier’s Manual of Common Tasks (SMCT) Skill Level 2-4 Nuclear Weapons Fire Fighting Procedures Nuclear Accident and Incident Response and Assistance (NAIRA) (Superceded by DA PAM 50-5.) Radiological and Disaster Recovery at Fixed Installations Nuclear Handbook for Medical Service Personnel Emergency Destruction of Nuclear Weapons (WC/2) Nuclear Weapons Expendable EOD Procedures for Nuclear Weapons EOD Procedures: Incident and Accident Hazards Associated with Nuclear Ordnance and for Individual Nuclear Components Nuclear Safety Criteria Army Information Officer's Guide Effects of Nuclear Weapons Radiological Response Procedures Handling Procedures for Equipment Contaminated with Depleted Uranium or Radioactive Commodities TB 385-2 TC 3-15 TM 8-215 TM 9-1100-816-14 TM 9-1100-814-40 TM 9-1185-217 TM 9-1185-219 Department of the Army Pamphlets USACHPPM TG236A TM 39-20-7 DA PAM 360-5 DA PAM 50-3 DA PAM 50-5 DA PAM 700-48 44 August 2001 Version Chapter 7. AN/PDR-77 and AN/VDR-2 The AN/PDR-77 RADIAC Set is a set of portable radiation detection equipment for detecting alpha, beta, x-ray, and gamma radiation. The set includes a scaler/ratemeter, an alpha scintillator (ZnS), an energy-compensated pair of Geiger-Mueller (GM) tubes, and an x ray detector (thin NaI detector). The accessory kit (Radiation Protection Officer kit) contains a pancake GM tube and a R meter (1” x 1.5” NaI) detector. The AN/PDR-77 faceplate displays units of mR/h, but the instrument is calibrated in units of absorbed dose rate, rads/h. The AN/VDR-2 is the standard Army RADIAC instrument, issued to every deployable unit. The AN/VDR-2 includes a pair of energy-compensated (GM) tubes identical to that found with the AN/VDR-77. The AN/VDR-2 is normally used to measure dose rates and accumulated doses. The scaler/ratemeter can detect the type of probe attached and automatically set the correct operating characteristics. Because each probe is calibrated with a particular unit, only under extreme circumstances may a probe be used with a unit other than the one with which it was calibrated. If circumstances require using a mismatched probe and scaler, the results must be considered suspect until they are confirmed with a calibrated system. Both the AN/PDR-77 and the AN/VDR-2 use three 9V batteries as a power source. The minimum lifetime of the batteries in the AN/PDR-77 is about 50 hours, and in the AN/VDR-2 the minimum lifetime is about 100 hours of constant use. After the low-battery warning is triggered, there are about 10 operational hours left on the AN/VDR-2 and about 5 operational hours left on the AN/PDR-77. Figure 6 is a picture of the digital readout meter resting on the β/γ-probe. Table 13 and Table 14 list the front panel components of the AN/VDR-2 and AN/PDR-77 and their respective functions. Figure 7 through Figure 12 show the major components, controls, and indicators of the AN/VDR-2 and the AN/PDR-77 including switches, buttons, and display lights .9 Routine external radiation surveys can be taken with the β/γ probe (Model DT-616), which is to be used for external dose rate measurements and for locating sources of radiation. According to the draft User’s Guide10 for β/γ probe Model DT-616, “for routine radiation surveying, the best accuracy in the ratemeter mode is obtained in the filtered mode with a 2 second update time.”11 Filtered and unfiltered modes refer to smoothed or raw data, respectively. The filter takes the count rate from the current update time and averages it over the previous 32 update periods. In the unfiltered mode, the counting rate determined over the current update period is displayed, with no averaging over previous update periods. In effect, filtered data displays a running average of the past 32 measurements (64 seconds). This averaging smoothes out the statistical fluctuations in the dose rate data, but it also smoothes out real fluctuations. The effect of filtered data is similar to that of choosing a longer time constant on an analog meter. For routine gamma ray radiation surveys, it is recommended that the filter is turned on, but it is more likely to miss a small hot spot of radioactive material when operating in the filtered mode when moving the meter too quickly. With proper training, either mode can be used well. The β/γ-probe has an end shield that can be lifted for beta dose measurements, but this capability is not always accurate12. If needed, however, the end shield can be lifted for beta surface contamination radiation surveys to detect beta radiation but not measure it. If more sensitivity is USACHPPM TG236A 45 August 2001 Version required, the thick end-window (under the moveable shield) can be removed for contamination radiation surveys. If the thick end-window is removed, the user must be extremely careful not to break the very thin window of the GM tube. The β/γ probe and its components are shown in Figure 11 and Figure 12. The AN/VDR-2 displays units of the Gy h-1 and automatically changes ranges when necessary. There are three ranges for the autoscaling function of the AN/VDR-2, µGy h-1, cGy h-1, and Gy h-1. At environmental radiation levels and the levels expected to be encountered for this technical guide to be most useful, the AN/VDR-2 will most likely display µGy h-1. The AN/PDR-77 displays units mR h-1 (with the mR h-1 symbol engraved on the faceplate) but does not change ranges. What the AN/PDR-77 does is append a k to the displayed value to give “kilo-milliroentgen per h” when the dose rate exceeds 1 R h-1. For example, 1.33 R h-1 is displayed as 1.33 k. As a further complication, the AN/PDR-77 is calibrated to display absorbed dose, mrad h-1. Figure 6: Picture of the AN/PDR-77 with the beta/gamma probe, Model DT 616. USACHPPM TG236A 46 August 2001 Version Table 13: Front panel controls of the AN/VDR-2. Panel controls from left to right PWR (switch) CLR/TEST (push button) DOSE PER HR ACCUM DOSE ATTEN LIGHT (switch) ALARM (3-position switch) DOSE and RATE lights USACHPPM TG236A Function Toggle switch turns power on (up) and off (down). If depressed and held, CLR/TEST activates the preoperational self-test. It changes settings when used with other buttons. Used with other buttons to set the dose rate alarm, display the dose rate alarm set point, and clear the accumulated dose. When pressed, the accumulated dose is displayed. This button is used with other buttons to perform various other functions. When the VDR-2 is mounted in a vehicle, pressing this button displays the dose external to a vehicle. Used with the CLR/TEST button to display the attenuation factor. On/off toggle switch that turns display light on or off. The light intensity is not very bright, and in daylight conditions the light may not be visible. The light should only be left on when needed as it drastically increases the battery use. Used to change audible settings for the instrument. In the AUD position (up/top), an alarm will sound when either alarm set point is exceeded. In the OFF position (center), no alarm will sound. In the VIS position (bottom), the RATE or DOSE light illuminates when either set point is exceeded. Illuminate when the dose rate or accumulated dose alarm set points are exceeded and the alarm is set to VIS. 47 August 2001 Version Table 14: Front panel controls of the AN/PDR-77. Panel controls from left to right PWR (switch) CLR/TEST (push button) SCALER FILTER (push button) SET or AGE LIGHT (switch) CHIRP/ALARM (switch) TREND (lights) USACHPPM TG236A Function Toggle switch turns power on (up) and off (down). If depressed and held, it activates the operating self-test. It changes settings when used with other buttons. Accumulates the total counts for a predetermined time. To access the scaler mode, press this button while turning the instrument on. This mode allows for count time from 0.1 to 20.9 minutes or will allow for a continuous count until it is manually terminated. To clear the previous reading and begin a new count sequence, press and hold the CLR/TEST button. To view the preset count time, press and hold the ALARM button. To change the preset count time (minute value), press and release the CLR/TEST button while depressing the SCALER button. To adjust the tenths of a minute value, press and release the UPDATE TIME button while depressing the SCALER button. By setting the time to 0.0, the instrument will set a continuous count time that must be stopped manually. To display the preset count time, press the SCALER button during a scaler count. To display the elapsed count time, press the SCALER button while depressing the UPDATE TIME button. Converts indicated readings to average readings. To display the filter status, press this button while the instrument is on. A display of 1 indicates that the filter is active, and a display of 2 indicates the filter is off. To display average readings, set the filter in the active position. To display raw readings, set the filter in the off position. For all probes except the alpha probe, a filter in the active position is recommended. To change the filter status, depress and release the CLR/TEST button while holding down the FILTER button. Only used with the x ray probe in the Ci/m2 mode. To view and change the weapon age data, press this button and hold it while turning the instrument on. After the instrument is turned on, 01 is displayed, followed by a flashing digit (tens place of the weapons age). Successively pressing the AGE button will change the digit from 0 to 6. Pressing the CLR/TEST button will display a 02, and a flashing digit represents the ones place of the weapons age. Pressing the CLR/TEST button again will display a 03 and a flashing digit that represents the tenths place of the weapons age. The only acceptable choices here are a 0 or a 5. All ages should be rounded to the nearest half of a year. To place the instrument back into the ratemeter mode once age is set, press the CLR/TEST button. On/off toggle switch that turns display light on or off. The light intensity is not very bright, and in daylight conditions the light may not be visible. The light should only be left on when needed as it drastically increases the battery use. Used to change audible settings for the instrument. In the CHIRP (up/top) position, the instrument will make a "chirping" sound indicative of the count rate. In the VIS (center) position, all meter functions must be visualized on the front panel. Both CHIRP and Audible alarm are disabled. In the AUD/VIS (down/bottom) position, the trend lights are illuminated and the audible and visual indicator alarms operate when alarm set point is exceeded. This signal will automatically shut off when the reading drops below the alarm value. Dual-purpose trend lights located on each side of the word TREND. They illuminate when a statistically significant change in the count rate has occurred. The light on the left will illuminate if the trend is downward, and the light on the right will illuminate if the trend is upward. Both trend lights are illuminated when alarm set point is exceeded. 48 August 2001 Version AN/VDR-2 Radiacmeter converts signals from the probe into dose rate and accumulated dose; alarms when preset alarm values are exceeded. AN/VDR-2 Same as AN/PDR-77. AN/VDR-2 Same as AN/PDR-77. Figure 7: Major components of the AN/PDR-77 ratemeter with annotations for the AN/VDR-2. USACHPPM TG236A 49 August 2001 Version Figure 8: Toggle switches and alarm settings in the AN/PDR-77 ratemeter. USACHPPM TG236A 50 August 2001 Version Figure 9: Pushbuttons on the AN/PDR-77 ratemeter. USACHPPM TG236A 51 August 2001 Version Figure 10: Digital display from the AN/PDR-77 ratemeter. This figure is an exact copy from reference 9. USACHPPM TG236A 52 August 2001 Version Figure 11: Picture of the beta/gamma probe (DT-616). Figure 12: The beta/gamma probe and its components. USACHPPM TG236A 53 August 2001 Version Table 15. RADIAC checklist and preoperational test Instrument Type (Circle one.): Beta/ Gamma Probe SN: X ray Probe SN (PDR-77 only): Alpha Probe SN (PDR-77 only): PDR-77 or VDR-2 Date: Time: Radiation survey Unit ID AN/PDR Radiac SN: Checkout performed by: PDR-77 Yes No VDR-2 Yes No Carrying Case Inspection: Is the case free of obvious damage and is the case in proper working order? All probes present? RADIAC Meter Inspection: Is the meter free of obvious damage? Beta/Gamma Probe Inspection: Is the probe free of obvious damage? Alpha Probe Inspection: Is the probe free of obvious damage, especially the Mylar§ window? X ray Probe Inspection: Is the probe free of obvious damage? RPO Kit Pancake Probe SN: “micro R” Probe SN: Yes No Are the pancake probe and “micro R” probe present? Pancake Probe Inspection: Is the probe free of obvious damage? “micro R” Probe Inspection: Is the probe free of obvious damage? Preoperational Test If the unit passes the preoperational test in the Technical Manual, the unit is ready for the operational check source test. See the flowchart page 30. If the instrument fails the test twice, then notify your supervisor. § Mylar is a registered trademark of E.I. du Pont de Nemours and Company, Inc. , 1007 Market Street, Wilmington, Delaware, USA, 19899. USACHPPM TG236A 54 August 2001 Version Chapter 8. Sampling and sample management The majority of this chapter was adapted from the NATO Handbook for Sampling and Identification of Radiological Agents.3 The principal objective of sampling is to provide reliable estimates of radionuclide concentrations in environmental media, food, and bioassay media. The level of accuracy of such measurements is not only dependent on the analytical method used by a laboratory, but also by protocols employed in collecting, handling, storing and transporting of the samples by field personnel. This section provides guidance on the collection, preparation and preservation of samples subject to radioanalysis. 8.1. Common sample collection practices The following sample collection practices are common to all sampling procedures to assure sample quality: § Use properly sized and prepared containers with an airtight seal § Keep empty containers in a clean bag or box § Only open the sample container to add the sample § Use proper tools to collect samples § Ideally, sampling equipment should be either disposable or enough spares should be available to allow single-use during a sampling mission § Properly decontaminate sampling equipment between sample locations (See Section 6.4 for guidance.) § Collect sufficient amount and number of samples for accurate lab analysis; generally collect as much of a sample as the container will safely allow § Mark and record sample locations for quality control and if additional samples must be taken § Number and label sample containers and sample collection forms sequentially § Complete the sampling form during the sample collection § Tape the container cap or seal after closing § Double-bag samples 8.2. General site selection considerations When selecting a sampling site, the following general considerations should be included: § As a rule, [sampling sites] are open undisturbed areas that are unaffected by water runoff, or unusual local wind patterns (e.g., away from buildings, trees, etc.). USACHPPM TG236A 55 August 2001 Version § Sampling and measurements in support of military operations will be at the direction of the Commander, and potentially include field hospitals, staging areas, and logistical support areas. Local officials will likely have a list of high-priority sampling locations that, under the Commander’s discretion, may be sampled. § It is quite possible that a pattern of 'hot particles' could be superimposed on a contamination gradient. These might be particles of fuel from a power reactor damaged by a conventional weapon, spread over a wide area and generating pockets of high doserates. These particles would be easily detected with even simple GM detectors and could be sampled into shielded containers for further measurement, subject to handling doserate considerations. 8.3. Proper selection of sample containers There are several physical and chemical characteristics that must be considered when selecting a suitable container for shipping and sampling. Important characteristics include the container material and its size, shape, and method of sealing. Generally, containers should be made of a material that is chemically non-reactive with the sample. Similarly, it should maintain physical integrity during normal handling and shipment. The container must have a volume sufficient to contain enough samples for all analyses required of the sample, as well for several repeat analyses. It should have an opening that allows for easy filling and emptying of the container with the media of interest, and minimizes external contamination of the container. Finally, all containers should be new and unused. Table 16 recommends sample containers based on accepted analytical practices and typical media sampled. Table 16. Characteristics of typical soil sample containers Container High density polyethylene, Wide mouth containers Sealable plastic bags Advantages Economical Disposable Resistant to chemicals Break resistant Leak proof Transparent Disposable Inexpensive It is important to ensure that sufficient quantities of the correct type of sample containers will be available. Sample kits should be pre-assembled to have sufficient containers to collect all required media, as well as sufficient quality control samples for each media. USACHPPM TG236A 56 August 2001 Version 8.4. Avoiding cross-contamination Critical to accurate analysis is that a sample does not become contaminated during the process of collection and transport. To avoid cross-contamination, it is necessary to take the following precautions: § When sampling, work from the site you expect to be least contaminated towards the site you expect to be most contaminated (without exceeding specified radiation exposure guidance). § Wear disposable gloves when collecting samples and change gloves after taking each group of samples at one site (e.g., discard your gloves after collecting all soil samples). § Keep equipment out of dirt, dust, soil and surfaces that are likely to be contaminated. Use a clean plastic sheet to put your equipment on. § Double-bag samples immediately after they are collected. § Clean sampling equipment after taking each group of samples and check for residual contamination, or use only disposable sampling equipment. Sampling tools must be adequately cleaned or decontaminated in between the collection of the replicate samples to minimize cross-contamination. Loose soil or vegetation should be scraped off and then suitable agents used (e.g., alcohol followed by wiping with paper tissues). A contamination meter should be used to determine if the tool is sufficiently clean to take the next sample. If the tool is not clean, (i.e., it is either physically dirty or contaminated above background) then it should not be used for sampling. Using disposable tools (e.g., plastic scoops for soil, funnels for liquids, brushes for dust sampling, and scalpels to cut vegetation) is the easiest way to eliminate cross-contamination of samples. 8.5. Sample ID, sample labels, and field sampling forms 8.5.1. Sample ID and labeling Each sample can only be identified over the life of the incident response if permanent identification is written-on or affixed-to the sample container. Generally, writing directly on the sample container with permanent marker is the simplest and safest way to label a sample. If tags or adhesive labels (bar codes for example) are used, they should be affixed to each sample container immediately after a sample is collected. Labeling should not contaminate the sample and should be sufficiently resistant to degradation, fading, or tampering (i.e., difficult to remove once affixed to the container). The sample number or ID should be clearly printed on the label, and also clearly recorded on the accompanying sample data sheet or film or video that documents the nature and circumstances of collection. A unique identifier can combine a sample descriptor, the 6-digit sampling site location, and the NATO Date-Time Group for collection. The following method is recommended: USACHPPM TG236A 57 August 2001 Version ALATLOGDDTTTTZMMMYYYYXX, where: A is the media descriptor: A - Air S - Soil H - Hydrological samples (Water) V - Vegetation D - Dairy (Milk) G - Grain M - Meat O - Other Foodstuffs B - Breathing Zone Air U - Urine F - Feces W - Wipes (Smears and Swipes) LATLOG is the six digit latitude-longitude GPS or grid coordinate DDTTTTZMMMYYYY is the NATO Date-Time Group, where DD – day of the month (e.g., 09 = 9th day of month) TTTT – time of day (e.g., 1600 hours) Z – time zone (e.g., A for alpha and Z for zulu time) MMM – month, alphabetically abbreviated (e.g., April is APR) YYYY – year (e.g., 2001) XX - A sequential number used to identify field replicate or split samples, or for sampling methods that generate more than one sample (e.g., simultaneous particulate and iodine sampling). Note The actual sampler identifier format must be compatible with record keeping systems used to track samples. For example, the laboratory at CHPPM-Main requires that the field identifier of the samples be 15 characters or fewer. The example above is 23 characters long. A suggested format consisting of 15 characters is shown in Chapter 11. Warning If the sample is sufficiently radioactive to trigger a response from hand-held instruments, the sample containers shall be labeled by means of a yellow and/or magenta colored radiation symbol. USACHPPM TG236A 58 August 2001 Version 8.5.2. Sample collection forms A sample data sheet must accompany each sample when forwarded for analysis. All information relevant to field sampling may be subject to audit, and therefore should be well documented on the appropriate sampling forms. Critical information that is recorded regardless of sample type includes: § Identification of operation or incident, and its date and time § Date and time of sampling § Grid and GPS location of the sampling point § Sampled medium § Sample specific identification number § Sampling method and equipment used § Sample preparation and preservation § Name of persons collecting the sample, or identification of sampling team § Physical and meteorological conditions at time of sampling § Special handling or safety precautions § Results of field expedient assays using hand-held instruments § Signatures Additional information may be required, depending on the media sampled and the intent of sampling. Figure 13 is an example of a soil sample collection form. USACHPPM TG236A 59 August 2001 Version Soil Sample Collection USACHPPM – Health Physics Program – TG-236A Sampling Location: Radiation survey Unit ID: Sample Types: Grab and Soil Analyses Desired: Gross αβ and 10-minute γ-spectroscopy (CHPPM-Main DLS #s 765,814) Team Leader: Samples packed by: POC: USACHPPM Project number if applicable: List the Field ID and NATO Date-Time Group. Field ID NATO Date-Time Group (DDTTTTZMMMYYYY) Tamper Resistant Seals Used? ¨ Yes Chain of Custody Information Sign and Print Name Released By Received By Date ¨ No Purpose of Transfer Notes and Comments Figure 13. An example of a soil collection form USACHPPM TG236A 60 August 2001 Version 8.6. Chain-of-custody Documentation of changes in the custody of a sample(s) is very important. In such cases, there should be sufficient evidence to demonstrate that the integrity of the sample was not compromised from the time it is collected to the time the sample is analyzed. During this time, the sample should either be under the positive control of a responsible individual or secured and protected from any activity that could change the true value of the results. Samples of particular concern should be closed with tamper indicating seals after field processing and preservation steps have been completed. The seals will show if a sample has been disturbed. 8.6.1. Field custody considerations The sample collection technician [This is anyone collecting samples.] is responsible for the care and custody of the samples until they are properly transferred or dispatched. This means that samples in their possession are under constant observation, or secured. Samples may be secured in a sealed container, locked vehicle, locked room, etc. 8.6.2. Transfer of custody A chain-of-custody record should accompany all samples with medical or legal significance. This record documents sample custody transfer from the sampler, often through several persons, to the analyst in the laboratory. The individuals relinquishing and the individual receiving the samples should sign, date, and note the time on the record. Upon receipt of the sample, the new custodian should inspect the condition of the sample container and tamper seals, if used, and record observations on the record. Any problems with the individual samples, such as a broken container, should also be noted. The method of shipment, and courier name can also be listed in the chain-of-custody record. For samples shipped from the field to a fixed laboratory, the original chain-of-custody record should accompany the samples. The individual relinquishing the samples should retain a copy of the record. The custody objectives should be discussed with the shipper to ensure that the required shipping conditions are met. For example, if the samples are sent by mail and the originator of the sample requires a record that the shipment was delivered, the package should be registered with return receipt requested. If, on the other hand, the objective is to simply provide a written record of the shipment, a certificate of mailing may be a less expensive appropriate alternative. 8.6.3. Instructions for fulfilling chain-of-custody requirements Decisions on what level of security needs to be applied should be made in consultation with command staff, the analytical laboratory, and the Health Physics Program at USACHPPM. An adequate chain-of-custody record allows tracing of custody and handling of individual samples from the time of field collection through laboratory analysis. The chain-of-custody record should be included in the shipment of each sample and should, at a minimum, contain the following information: • Sample number • Signature of collector • Date and time of collection USACHPPM TG236A 61 August 2001 Version • Sample station location • Number of containers • Signatures of people involved in the chain of possession • Inclusive dates of possession. When transferring samples, the individuals releasing and receiving them should sign, date, and note the time on the form. The original chain-of-custody form accompanies the sample shipment, while the sampling team retains the copies. When samples are split, the event should be noted in the “Notes and Comments” section of the chain-of-custody record. The team should complete a separate chain-of-custody record for custody and shipment of the split samples. A sample chain-of-custody form is shown in Figure 14 on page 66. 8.6.3.1. Chain-of-custody for samples requiring strict custody Most of section 8.6.3.1 through section 8.6.3.3 was adapted from Groundwater Field Sampling Manual. 13 To be admissible as evidence, sample results must be traceable back through their collection, storage, handling, shipment and analysis so that the court is satisfied how the sample results submitted as evidence were collected, transferred and claimed. This is accomplished by following chain-of-custody procedures from sample collection to introduction as evidence. Field records identifying sampling personnel, equipment, collection, storage and transfer techniques, and field conditions are required. The sample collector is responsible for maintaining sample custody and integrity until the samples are transferred via a dated and signed chain-of-custody form to a carrier or are personally delivered and transferred directly to the laboratory. A sample is in custody if it is Ø In physical possession, or Ø In view, after being in physical possession, or Ø Secured so that no one can tamper with it. The courts have accepted two degrees of chain-of-custody. The first involves physical possession of the sample from collection to laboratory possession. With this chain-of-custody method, the sample collector or other person to whom sample possession was transferred delivers the samples to the laboratory. The second chain-of-custody method is by shipping the samples through a mail carrier. Mail carriers may not assume any liability or responsibility for compromised sample integrity during shipping (e.g., broken samples and/or containers, ice melting in cooler, etc.). In both cases, a written record must be transferred with the samples. However, when using the second method described above, the sample collector fills out a chain of custody record, seals it in a shipping container, and uses a carrier to deliver the samples to the laboratory. Upon arrival, a pre-determined laboratory custodian receives the samples, notes the [shipping container’s] condition (whether sealed or unsealed), each sample container's condition (broken samples, ice USACHPPM TG236A 62 August 2001 Version present in cooler, etc.), and assumes custody of the samples by signing and dating the chain-of-custody record. The laboratory maintains possession of the chain-of-custody record until the sample analysis is complete and then sends the analytical results, along with the chain-of-custody record, to the sample collector or other pre-designated receiver of the analytical results and chain-of-custody records. For [routine] surveillance samples, the second chain-of -custody method should suffice. If enforcement action may occur based on the type of samples and/or regulatory programs or agencies involved, the first chain-of-custody method involving the sample collector physically delivering and transferring possession of the samples to the laboratory is recommended. 8.6.3.2. Field chain-of-custody guidance 1. Limit sample collection and handling to as few people as possible. If sample transfers are necessary, use signed receipts of possession. The chain- of- custody record must accompany the samples. Keep a copy of the chain- of- custody record for your own records. 2. Check with the mail carrier for restrictions and procedures. 3. Record field measurements and other important data in a bound field notebook or on the data sheets provided in this technical guide. For legal purposes, indelible ink should be used for recording all data and errors in field records should be crossed out with one line and initialed. 4. When required or applicable, document with photographs the sample locations, pollution sources, violations, etc. If possible, use cameras that print the date the photos were taken. 5. Maintain physical possession and sample integrity of the collected samples until they are properly transferred to the laboratory custodian or the mail carrier. 6. Obtain a sample possession transfer receipt (a copy of the dated and signed chain- ofcustody record) after transferring possession of the samples to the laboratory custodian or the mail carrier. 8.6.3.3. Sample security when strict custody is necessary Use the following procedures when securing and transferring possession of strict custody samples: 1. Use sample seals. Tape the sample container so that the tape must be cut or ripped to open the container. Use nylon-reinforced tape or other tape that cannot be tampered with without being noticed upon receipt. Sign and date the tape across the top. 2. Using an indelible permanent marker or ink, write the following information on the security tape, writing across the overlapping ends: a. Name of the sample collector(s), date, time, well number, facility name, etc., where the samples were collected. b. Write the words "Strict Custody Requirements," or similar language indicating that sample security is critical. USACHPPM TG236A 63 August 2001 Version c. Write, "To be opened by _________." In the blank write the appropriate person or organizational representative. By overlapping and writing over the edges of the security tape, it will be possible to detect if someone has tampered with the sample container. If someone were to remove the tape and then reseal it, it would be difficult to seamlessly realign the writing. Do not use sealing wax to seal the tape. Sealing wax is brittle and will chip and break during normal use. This gives the appearance of tampering even when none has occurred. Sample containers labeled "Strict Custody Requirements," or with similar language, must be locked up by the laboratory upon receipt and not removed from the locked refrigerator until ready to be analyzed. The laboratory will hold all strict custody samples until notified otherwise. When the case is resolved, either by trial or stipulation, the enforcement specialist should notify the laboratory that the samples associated with the case may be discarded or destroyed. USACHPPM TG236A 64 August 2001 Version Field Chain-of-Custody Sheet USACHPPM – Health Physics Program – TG236A Date of Collection: Page 1of 2 Sampling Location: Radiation survey Unit ID: Sample Types: Grab and Soil Analyses Desired: Gross αβ and 10-minute γ-spectroscopy (CHPPM-Main DLS #s 765,814) Team Leader: Samples packed by: POC: USACHPPM Project number if applicable: List the Field ID and time of collection of each sample. Time Time 1. 11. 2. 12. 3. QC. 4. Sample Desired 5. Additional Samples Time Type Analyses 6. BKG 1. 7. BKG 2. 8. BKG 3. 9. 13. 10. 14. Method of Shipping and Carrier Used: Tamper Resistant Seals On the container? q Yes q No Shipping Date: On each sample? q Yes q No Chain- of- Custody Sample or Samples Sign and Print Name Transferred Released By Received By USACHPPM TG236A 65 Date Purpose of Transfer August 2001 Version Field Chain-of-Custody Sheet USACHPPM – Health Physics Program – TG236A Chain-of-Custody Sample or Samples Sign and Print Name Transferred Released By Received By Page 2 of 2 Date Purpose of Transfer Notes and Comments Figure 14. A sample chain-of-custody form. USACHPPM TG236A 66 August 2001 Version 8.7. Field processing, preservation, and transport of samples from the survey unit 8.7.1. General Initial steps, taken in the field, are frequently critical to the quality of the laboratory analysis performed hours or days after sample collection. Various steps of preparing raw sampling materials for field or fixed laboratory processing may be required depending on sample matrix, the nature of the contaminant, and the analytical method to be used. Field processing ensures the sample is (1) homogeneously distributed, (2) free from material that is not considered part of the sample matrix, and (3) chemically and physically preserved. In this case the field does not mean the sample collection location. The field essentially is any location that is not the CONUS or OCONUS destination for the samples. Examples of field processing include: § Separating and separately bagging biological matter removed from soil samples. § Excluding oversized material, including rocks and gravel, not representative of soil. 8.7.2. Sample transport The final responsibility of field sampling teams is to properly and as quickly as possible, transport samples from the collection site to a sample control site or field laboratory. For sampling performed in a known contaminated region, transport will include contamination control precautions (Chapter 6). Sample forms must be maintained with the samples through the contamination control area, and transfers of possession must be documented on the chain-ofcustody record. The following issues should be considered when moving samples: § Transfer to sample control should be expedited in order to minimize decay of short half-life radionuclides and surface plating before analysis. § Samples should be segregated from contaminated sampling equipment. § Low activity and background samples should be segregated from high activity samples. § Samples should be transported securely and safely. At this point in the process, the samples have been packed and transported out of the survey unit and must be made ready to be shipped to their CONUS or OCONUS destination. This aspect of shipping is discussed in Chapter 9. 8.8. Liaison between sampling team and sample control All laboratories will have unique requirements and procedures with respect to analyzing a given media for a given analyte. To assure sampling protocols are consistent with analytical protocols of the laboratory, field teams should communicate with either the field deployed laboratory or the field sample control station to determine any special requirements for sample collection or quality control. USACHPPM TG236A 67 August 2001 Version This page is intentionally blank USACHPPM TG236A 68 August 2001 Version Chapter 9. Sample receipt, inspection, tracking, and shipment The majority of this chapter was adapted from the NATO Handbook for Sampling and Identification of Radiological Agents.3 9.1. Overview After a sample is collected, it is passed to a sample control site or field laboratory. Successful acceptance of the sample by either entity terminates the sampling teams' role in sample handling. The following figure demonstrates the typical flow of activities for sample receipt and inspection at a sample control site which in turn will forward the sample, if necessary, to a field laboratory or rear echelon fixed radioanalytical laboratory. From field team to sample control or field laboratory Sample Receipt Sample Inspection Sample Accepted Login and Tracking -Sample received in receipt area -Check for evidence of leakage or breakage -External package gamma exposures rates -α/β surface contamination on package or containers -Check container ID with sample forms -Check sample content against forms -All forms completed correctly -Check forms for health and safety concerns -Check tamper seals (if present) -Check preservation (if added) -Sign transfer of custody on CoC form -Assign sample ID -Login sample, receipt information, field info. -Screen sample Short-term Storage, or Transfer to Field Laboratory, or Shipment to Fixed Laboratory Figure 15. Flow Chart for Sample Receipt USACHPPM TG236A 69 August 2001 Version 9.2. Shipment of samples to analytical laboratories 9.2.1. Sample packing All samples being sent off-site for analysis should be properly packaged before shipment. Some examples of sample packaging techniques include: § Visually inspecting each sample container for indications of leaks or defects in the sample container. § Wiping individual sample containers with a damp cloth or absorbent paper to remove any exterior contamination. § Placing sample containers inside individual plastic bags to reduce the chance of cross-contamination, and to contain the sample in case of leakage or breakage. § Grouping samples for shipment in terms of overall activity or surface contamination levels. § Including sufficient absorbent material to contain the samples in case of leakage or breakage if there are liquid samples in the package. § Packaging sample containers to prevent breakage by immobilizing and isolating each sample container using packing material—this is especially important in cold weather when plastic containers become brittle and water samples may freeze. A minimum 2.5-cm cushion between samples is recommended. § Including the original, signed chain-of-custody form that lists the samples that are included in each package (e.g., if possible avoid having multiple packages covered by a single chain-of-custody form). § Sealing the package to deter tampering with the samples—the seal should indicate if the sample has been opened or tampered with during shipment. § Enclosing the paperwork (the chain-of-custody and sample forms) in a plastic sealable bag. The sealable bag serves to protect the sampling forms from inadvertent sample leakage. The bag should be securely attached to the sample container. 9.2.2. Sample inspection, administration, ID confirmation Verifying the identity of a sample is a simple process where the appearance, sample container label, chain-of-custody form, and sample collection form are inspected. Nonconformance between labels, ID numbers, forms, and chain-of-custody forms must be resolved immediately before final packaging and shipping. Visual inspection allows one to: § Verify the identity of samples by matching container IDs and sample form IDs. § Verify that the samples are as described by matrix (and quantity). § Check the tamper seal. § Verify field preparation, if appropriate, including removal of extraneous materials. USACHPPM TG236A 70 August 2001 Version § Note any change in sample since collection (e.g., from chemical reactions). If these problems cannot be resolved upon receipt, or by coordination with the sampling team, the sample must be rejected for nonconformance. 9.2.3. Sample shipping Samples should be delivered to the analysts within a reasonable amount of time. For some contamination scenarios, short-lived radionuclides (fission or activation products) could be present and unnecessary delays in transport or analysis could result in the loss of this information. The time requirements for shipping should be made in consultation with the analytical lab, NBC personnel, command, national and international regulators, and other appropriate personnel. Packages and sample containers are screened for external exposure rates and surface contamination before shipping. Radiological screening of shipping and sample containers should be performed with a dose-rate meter and a beta/gamma and alpha contamination radiation survey meter. The Technical Escort Unit is a good resource for shipping and other transportation issues. 9.2.3.1. OCONUS shipping If OCONUS samples are sent off-site for analysis via commercial carrier, the consignor is responsible for complying with all applicable international regulations. Requirements will include use of a proper container or packaging dependent on the total activity of the shipment, and the dose-equivalent rates measured at the exterior of the package. Additional requirements include package marking and labeling, and completion of proper shipping papers. Specific guidance for the shipment of radioactive material is found in the International Atomic Energy Agencies (IAEA) Safety Series Number 6 report “Safe Transport of Radioactive Materials”.[sic, This is the document cited in the SIRA document. There is a newer IAEA document, Regulations for the Safe Transport of Radioactive Material, 199614.] It is not possible to specify what the requirements would be for military transport without a detailed knowledge of the exemptions that might apply, particularly following a conflict. However, IAEA regulations are generally conservative, and when complied with, there should be no possibility of exceeding either civil or military restrictions on the transport of radioactive materials. A generalization of the IAEA regulations follows: Where the activity of a sample is less than 70 kBq*kg-1, no specific packaging requirement is necessary. However, it is assumed that, in most cases, this specific activity cannot be determined or is estimated to exceed this limit. In these cases, specific packaging and transport requirements apply. For practical purposes, it is assumed that the international movement of radioactive samples, undertaken in the sampling program, will be conducted using a Type A container as defined by the International Atomic Energy Agency (IAEA) for the Safe Transport of Radioactive Materials. USACHPPM TG236A 71 August 2001 Version The regulations place limits on the contents of these containers and the general limits of activity, which must be applied, are as follows: • If only beta or gamma emitting nuclides are known to be present then the A2 limit for the package is 0.02 TBq (2*1010 Bq); • If alpha emitting nuclides are known to be present or if there is no relevant data available then the A2 limit is reduced to 20 MBq (2*107 Bq). In the absence of detailed radionuclide analysis, it will be difficult to determine if samples contain alpha emitting radionuclides. Therefore, the lower A2 limit of 20 MBq (2*107 Bq) should be applied to ensure that the radioactivity level inside the package is within the IAEA limits. The maximum radiation level at the surface of the container must not exceed 2 mSv h-1 (200 mrem h-1). In practice, providing the external dose-rate of a Type A container does not exceed the permitted value, it is unlikely that the overall activity contained exceeds the activity limit of 20 MBq. 9.2.3.2. CONUS shipping Shipping samples within the United States must conform with all federal and state regulations. Detailed information about CONUS shipping is in Appendix G. 9.3. Communication between sample control and laboratory Laboratory personnel conducting sample analysis are generally not involved with sample collection. This separation of tasks can potentially lead to problems based on the lack of communication between the two groups. Fixed and field laboratories may need to pass special requirements on to the sampling teams. For this reason, unhindered communications between command personnel, the sampling personnel, and the laboratory is vital. Any unique conditions of the sample and any special requirements for sample analysis should be communicated to the laboratory. Sampling teams generally make this communication by thorough documentation on the sample form. However, the laboratory can be prepared for receiving special samples. For example, a sample may contain combustible materials or high levels of chemically or biologically hazardous materials. This is particularly important for samples posing health and safety issues for laboratory personnel. 9.4. Short-term sample storage If necessary, samples should be stored with samples of comparable activities, in designated storage areas, to await forwarding to a fixed laboratory. Storage areas must meet chain-of-custody requirements, and be designated and posted as a radioactive material storage area. 9.5. Final sample disposition After the samples are analyzed, it is up to the requester of the analyses to decide on how to dispose of the samples and any residuals. Archiving the samples is strongly recommended. At the time of this technical guide's publication, an archive location has not been established; USACHPPM TG236A 72 August 2001 Version however, it is very important to communicate with the Health Physics Program at CHPPM-Main about the final disposition of samples. USACHPPM TG236A 73 August 2001 Version This page is intentionally blank USACHPPM TG236A 74 August 2001 Version Chapter 10. Surface soil sampling This chapter provides guidance on surface soil sampling IAW the NATO Handbook for Sampling and Identification of Radiological Agents from which most of this information was adapted.3 This chapter is intended to expand on the information in Chapter 4 and provide greater detail for specific soil sampling situations. Precautions/Limitations Ø Ground contamination may vary significantly from place to place (hot spots); local dose rate averages are helpful in choosing a representative sampling location. Ø Soil sampling is to be done after a release has ended and after plume passage; exposure to external radiation is possible but inhalation hazards may only be due to re-suspended materials. Ø Team members should be aware of commanders’ dose and turn back dose-rate guidance. Ø No sample is worth life or limb. Always be aware of the hazards that you may encounter in the field and take the necessary precautions. Never attempt any field activities without the appropriate safety equipment. Always know how to use it. Ø All monitoring activities shall be conducted so that exposures are maintained as low as reasonably achievable. Team members shall be aware of turn back levels. Ø Monitoring teams must refrain from eating, drinking, or smoking in any contaminated areas or where monitoring activities are being conducted. 10.1. Prior to being dispatched Step 1 a) Receive an initial briefing and initial assignments from Command. b) Obtain appropriate equipment. See Chapter 4. c) Check instrument performance. d) Conduct the radio check when leaving for the assignment. NOTE Command will decide on the implementation of the use of protective clothing, respirators, or other protective equipment. e) Conduct a GPS check when leaving for the assignment. Step 2 According to instructions from Command: a) Wrap the instruments in plastic to prevent contamination (except for the detector window if there is any). b) Ensure that sample collection equipment is pre-cleaned and bagged or wrapped. c) Set alarm levels of direct-reading dosimeters and dose rate meters. USACHPPM TG236A 75 August 2001 Version d) Wear appropriate radiation protection equipment. e) Wear disposable latex or vinyl gloves and change between sample locations. 10.2. At the site (survey unit) Step 3 a) Upon selecting the sampling site (survey unit), identify the position using GPS reading, local landmarks, stakes or other markers. Select the survey unit based on the Command requirements. The information is guidance on sampling after the survey unit has been defined. b) Select an area that is relatively unvegetated and undisturbed since the radioactive release and well away from structures (e.g., approximately twice the height of the nearby structure) to minimize the effects of wind currents on deposition. i) Populated Area: Select an open, level, grassy area that has been undisturbed, if possible. These areas should be away from normal walkways and roadways, and located in open, level, grassy areas that are mowed at reasonable intervals (e.g., lawns, parks, etc.). If possible, do not select areas that have been fertilized heavily since fertilizing adds naturally occurring radioactive materials to the soils. ii) Agricultural Area: Select an open, level, grassy area that has been undisturbed, if possible. Such an area should be free of excessive rocks and vegetation and there should be little or no run-off during heavy rains causing excessive erosion. Such sites are frequently found on smooth ridge crests and level virgin lands. NOTE Place tools, instruments and collected samples on a ground tarp to help prevent contamination of sampling equipment. Step 4 At each sampling location, record the environmental conditions at the time of sample collection. These include the weather conditions and ambient gamma dose rate. Step 5 Collect the soil samples based on the procedures IAW guidance in Chapter 4, Chapter 8, and this chapter. Step 6 Seal the bags with tape. With an indelible ink pen, write on the sampling container and the sample control form the sample ID, location (GPS), date, and time of sample collection, and the collector's initials. Begin a chain- of- custody form if necessary. Step 7 Clean the sampling tools in clean (distilled) water and dry before proceeding to the next sample collection point. Assess the tool for residual contamination using alpha/beta instruments. Step 8 USACHPPM TG236A 76 August 2001 Version Repeat the above steps for all necessary replicates, background samples, and other sampling locations. Step 9 Visually inspect the sampling equipment and replace or clean if necessary. Use alpha/beta instruments to determine if the sampler remains contaminated. Step 10 For each soil sample collected, complete a soil sampling form. Place the original forms in a sealed plastic bag to be shipped with the sample. Step 11 Periodically perform radiation surveys on vehicles and personnel used during sampling. Step 12 Throughout the mission perform personnel and equipment monitoring (contamination check) using the guidance in Chapter 6. 10.3. Sampling guidance for specific soil types This section provides guidance for sampling specific soil types. This guidance is very general and is not required for sampling. It is best to perform the sampling after consulting with specialist advisors in environmental or radiological sampling. Use the information in this section as a starting point if there is difficulty in collecting samples. 10.3.1. Sampling in dry, loose, and sandy soils After selecting the location of sampling and the sampling pattern to be used, don rubber gloves and remove all vegetation to a height of 1 - 2 cm above the soil and save for vegetation analysis if desired. 10.3.1.1. Stamp method Ø Press the 10x10x1 cm "stamp" into the desired location. (A rubber mallet may be used if necessary to assist.) Ø Use the matching scoop to slide beneath stamp, trapping the sample within the stamped area. Ø Carefully transfer the sample to a clean, unused sample container. 10.3.1.2. Template method Ø Measure a 30x30cm area for sampling. Ø Next to the desired area, dig away from the sampling area to create a sloping trench with a perpendicular wall along one side of and slightly larger than the sampling area. Ø Collect the top 5cm of soil from the desired area of the surface at the edge of the wall. If the sample location has a cover of vegetation, collect it as a separate sample. Place the sample into a new container. USACHPPM TG236A 77 August 2001 Version 10.3.2. Sampling in moist or loamy soil Ø After selecting the location of sampling and the sampling pattern to be used, don rubber gloves and remove all vegetation to a height of 1 - 2 cm above the soil and save for vegetation analysis if desired. Ø Using an indelible ink pen, measure and mark the outside of the sampling tool to the desired depth. Ø Press the sampling tool into the ground to the desired depth without twisting or disturbing the grass cover or surface soil. Force may be required to get the sampling tool into the ground. This may be accomplished by stepping on the top of the sampling tool or using a rubber mallet. Ø After the sampling tool is at the appropriate depth, gently twist it to cleanly remove the topsoil plug intact. If the plug cannot be removed intact another method of sampling must be used. Ø Place the plug in a new sample collection container. If the plug does not easily come out of the sampling tool, take a long, flat blade knife or picker to remove it from the tool. 10.3.3. Other types of soil conditions Ø Extremely Wet Areas If possible, avoid areas where soil is extremely wet. If this is impossible, it may be difficult to follow the above procedures. A modified area sample may be appropriate in this situation. Any changes in the location of the survey unit must be made with concurrence from Command and advice from specialist advisors. Use a shovel or trowel to remove the upper layer off the desired area. Put the sample in a container and label it as appropriate. Ø Frozen Soils Lightly frozen soil can be sampled by taking a square bladed spade and driving it into the ground to a known depth. The soil can be easily removed in one quick movement. Hard frozen soils must be sampled using a chisel to "chip" the soil. This process is extremely difficult to use to obtain a representative sample. Ø Clay Soils These should be avoided if possible. Because clays tend to be "sticky", there may be a handling to get a representative sample. Wearing double gloves may be warranted. The long flat blade knife or picker can be used to assist removal of a core from the sampler. USACHPPM TG236A 78 August 2001 Version Chapter 11. USACHPPM, Directorate of Laboratory Sciences, Radiologic, Classic, and Clinical Chemistry Division concerns If you choose to use the laboratory at CHPPM-Main, coordinate all laboratory analyses with USACHPPM, Directorate of Laboratory Services (DLS), Radiologic, Classic, and Clinical Chemistry Division (RCCCD). All samples submitted to the RCCCD must be submitted in accordance with a chain-of-custody protocol. The samples will be analyzed in accordance with USACHPPM, RCCCD protocols and procedures to meet the radiation survey plan data quality objectives (DQOs). Normally the initial analyses of the soil samples will be a gross αβ-activity measurement (DLS Test Code: 765) and a qualitative gamma spectroscopy measurement (10minute counting interval is recommended; DLS Test Code: 814). Details about interacting with DLS can be found in USACHPPM Technical Guide 214, Customer Service Manual.15 • Suggested format for a sample (field) identifier: LATXLOGXDDDYYBB where: Ø LATXLOGX is the 8-digit GPS coordinate of the point labeled “GPS/Grid-A” on the Radiation Survey Data Table. Ø DDD is the sequential day of the year; e.g., 100 for the 100th day of the year. Ø YY is the 2-digit year. Ø BB is the sample number; i.e., 01 – 12 plus QC for the quality control sample. USACHPPM TG236A 79 August 2001 Version USACHPPM TG236A 80 August 2001 Version USACHPPM TG236A 81 August 2001 Version USACHPPM TG236A 82 August 2001 Version USACHPPM TG236A 83 August 2001 Version • The following is a copy of CHPPM Form 330-R-E, Request For Laboratory Services. This is the preferred form to use when arranging to have samples analyzed at CHPPM-Main. The DLS codes and descriptions of the initial analyses of the soil samples have already been entered in Part II of this form. USACHPPM TG236A 84 August 2001 Version USACHPPM TG236A 85 August 2001 Version USACHPPM TG236A 86 August 2001 Version USACHPPM TG236A 87 August 2001 Version Directorate of Laboratory S ervices DLS CONTROL NUMBER: REQUEST FOR LABORATORY SERVICES S ee CHPPM TG 214 for instructions on completing this form. PART I: PROJECT INFORMATION PLEA S E PRIN T OR TYPE A LL REQ U ES TED IN FORM A TIO N 2.* PROGRAM NUMBER: ( * IN D IC A TES REQ U IRED FIELD S ) (dd mmm yyyy) 4.* SUBJ ONO: 3.* J ONO: 5.* PROJ ECT OFFICER (s): 6.* TELEPHONE: 7.* W as this project coordinated with DLS? 9.* FUND SOURCE: 1. DATE OF REQUEST: P8 4 YES C ONTINGENC Y 10.* DATE S AMPLE TO ARRIVE AT DLS: 8. DLS TECHNICAL CONSULTANT: NO OTHER REIM BURSA BLE (specify): Prior arrangements must be made with S M L for samples that will arrive outside of routine duty hours (M -F 0730-1600). This includes weekend and holiday deliveries. (dd mmm yyyy) 11. PROJ ECT INSTALLATION: 12. LOCATION (STATE/COUNTRY): 13. PROJ ECT NAME: PART II: ANALYSIS REQUESTED 1. PROJ ECT DES CRIPTION/OBJ ECTIVE: 2. S AMPLE OR SITE HIS TORY (High toxicity, etc.): 3. ANALYTICAL REQUES T TABLE Project officer is not required to use the following table; customized spreadsheet/table containing the specified information may be attached. ACODE/DLS TEST CODE ANALYTICAL METHOD DESCRIPTION 765 814 GROS S ALPHA/BETA 10-MINUTE QUAL. GAMMA S PEC. * LIS T ADDITIONAL ANALYSES ON PAGE 3. 4. METHOD NO. MATRIX SAMPLE COUNT ARE THERE ADDITIONAL ANALYSES ON PAGE 3? COMMENTS/SPECIAL REQUEST (e.g., B lanks , S pec ial M edia, Extra C ontainers , Forms , etc .) YES NO PART III: TURNAROUND REQUEST TIME 1.* INDICATE SAMPLE OR PROJ ECT TAT PRIORITY: S tandard (2 9 days) High-Priority (1 4 days) Top-Priority (7 days) 2.* DATE RESULTS NEEDED: (dd mmm yyyy) ****NOTE**** TAT is calculated using calendar days from the date of sample receipt. All samples are routinely processed as STANDARD analysis. High-priority and Top-priority requests should be coordinated with DLS and are subject to cost surcharges. CHPPM Form 330-R-E, Nov 2000 (MCHB-TS-LID) USACHPPM TG236A Page 1 of 3 88 August 2001 Version PART IV: PROJECT COORDINATION INFORMATION 1.* ARE SAMPLING KIT/SUPPLIES NEEDED? YES (C omplete Item 2) 2.* DATE KIT/SUPPLIES REQUESTED BY: 3.* EX PECTED # OF S HIPMENTS : (For preparation of blanks) (dd mmm yyyy) a. Kit Handling Preference: 4. S PECIAL HANDLING REQUIREMENTS: PICK-UP by project officer SHIP TO: CHAIN-OF-CUS TODY (COC) (Please provide address in box below ) S hipping Address: NO (S kip to Item 3 ) (C OC document should be initialed in the field and forw arded w ith samples.) (include Bldg# and Phone#) SAFETY CONSIDERATIONS /HAZARDOUS MATERIALS (Specify): ANALYSES W ITH SHORT-HOLDING TIMES (List Specific Analyses): OTHER (Specify): b. Number of coolers requested: PART V: ANALYTICAL REPORT OPTIONS 1.* DELIVER RES ULTS BY: (Indicate preference * * A hard copy report will be furnished in all cases* * ) 2. EDD DATA TYPE: ELECTRONIC DATA DELIVERABLE (EDD): Excel FAX TO: Access Other: MAIL TO: 3. ADDITIONAL DATA REQUEST (Thes e items are delivered by mail only): QC REPORT RAW DATA 4.* REQUEST SUBMITTED BY: 5. PRINT NAME: 6. SIGNATURE: (A utho rizer) (N ote: A u thorizer' s S igna ture Req uired if S ubmitted by H a rd C opy) FOR DLS USE ONLY Date Rec'd: Expiration: Profile #: Processor Initials & Date: Work Order #: DLS Laboratory Team Responses: RAD MET EXP ASB GCMS IH CLS PES CDT Date Sample Kit Completed: Date Sample Kit Shipped/Picked Up: Quote Completed: Sent: Quote Report #: Invoice Completed: Sent: Invoice Report #: Notes C HPPM Form3 3 0-R-E, Nov 2 00 0 (M C HB-TS -LID ) USACHPPM TG236A Page 2 of 3 89 August 2001 Version ANALYTICAL REQUEST TABLE (CONTINUED FROM PART II) ACODE/DLS TEST CODE ANALYTICAL METHOD DESCRIPTION METHOD NO. C HPPM Form3 3 0-R-E, Nov 2 00 0 (M C HB-TS -LID ) USACHPPM TG236A MATRIX SAMPLE COUNT COMMENTS/SPECIAL REQUEST (e.g., B lanks , S pec ial M edia, Extra C ontainers , Forms , etc .) Page 3 of 3 90 August 2001 Version Appendix A. Glossary Absorbed dose The energy imparted by ionizing radiation per unit mass of irradiated material. The units of absorbed dose are the rad and the gray (Gy). Appropriate personnel In this document, appropriate personnel will refer to the commander and specialist advisors as defined in STANAG 2473, “Other unit and formation NBC officers and cells, allied NBC Defence specialists (may include SIBCRA) [No definition of this abbreviation was found in the STANAG.] teams when concept endorsed by NATO, and national sources which will bring together all necessary experts and coordinate any help or advice to the area of operation.”1 Assessment In TG-236A an assessment is the entire process of evaluating the radiological characteristics of a given area, not just hazards. Contrast this with Risk assessment: The identification and assessment of hazards (first two steps of the risk management process).16 Background radiation Radiation from cosmic sources; naturally occurring radioactive material, including radon (except as a decay product of source or special nuclear material); and global fallout as it exists in the environment from the testing of nuclear explosive devices or from past nuclear accidents such as Chernobyl that contribute to background radiation. Background radiation does not include radiation from source, by-product, or special nuclear materials that the NRC regulates or from NARM that the Army regulates. Becquerel The International System (SI) unit of activity equal to one nuclear transformation (disintegration) per second. 1 Bq = 2.7x10⁻¹¹ Curies (Ci) = 27.03 picocuries (pCi) Bioassay The determination of kinds, quantities or concentrations, and, in some cases, the locations of radioactive material in the human body, whether by direct measurement (in vivo counting) or by analysis and evaluation of materials excreted or removed from the human body (in vitro counting). Breathing zone air sampler (BZA; lapel air sampler) An air sampler that is used to sample air in the breathing zone of the user. Buildup factor A multiplicative factor used in the exponential attenuation equation to account for scattered photons. USACHPPM TG236A 91 August 2001 Version Complexing agent A chemical that will bind with a metal atom to form a molecule that can be easily removed from a system. Chelating agents are a subset of complexing agents. Contamination Radioactive material where it is not wanted. Curie The traditional unit of radioactivity. One curie (Ci) is equal to 37 billion disintegrations per second (3.7 x 10¹⁰ dps = 3.7 x 10¹⁰ Bq). Data quality objectives (DQOs) Data quality objectives are those qualitative and quantitative statements that clarify a study’s technical and quality objectives, define the appropriate type of data, and specify the tolerable levels of potential decision errors that will be used as the basis for establishing the quality and quantity of data needed to support decisions. Dose equivalent The product of absorbed dose in tissue, quality factor and all other necessary modifying factors at the location of interest in tissue. The units of dose equivalent are the rem and sievert (Sv). Gray (Gy) The SI unit of absorbed dose. One gray is equal to an absorbed dose of 1 joule/kilogram (100 rad).16 Grid In this technical guide, grid refers exclusively to map reference points. Half-life The time required for one-half of the atoms present in a particular radionuclide to decay. Every radionuclide has a different half-life, ranging from fractions of seconds to billions of years. As an example, if we start with 100 atoms of a radionuclide with a 5-year half-life, in 5 years only 50 atoms will be left, and in another 5 years, only half of those atoms (25 atoms) will be left. Hazard Any real or potential condition that can cause injury, illness, death of personnel, damage to or loss of equipment or property, or mission degradation.16 Health risk assessment In TG-236A, a health risk assessment means the process that identifies and evaluates the risk to human health of exposures to radiation or radioactive materials. Intake The amount of a radionuclide taken into the body by inhalation, ingestion, or absorption through the skin. USACHPPM TG236A 92 August 2001 Version Ionizing radiation Charged subatomic particles and ionized atoms with kinetic energies greater than 12.4 eV, electromagnetic radiation with photon energies greater than 12.4 eV, and all free neutrons and other uncharged subatomic particles (except neutrinos and antineutrinos).16 Measurement The term measurement encompasses both sampling and radiation surveying. Operational checks Those procedures to verify that an instrument is acceptable for use. Operational exposure guidance (OEG) An operational exposure guidance is a maximum radiation exposure status (RES) for all individuals called upon to perform a mission. This decision is made in consultation with appropriate staff specialists as defined in STANAG 2473. Qualified expert A person who, by virtue of training and experience, can provide competent authoritative guidance about certain aspects of radiation safety. Being a qualified expert in one aspect of radiation safety does not necessarily mean that a person is a qualified expert in a different aspect. Forward requests for determination of whether a certain individual is a qualified expert through command channels to the MACOM RSSO as necessary. Forward these requests to HQDA (DACS-SF), WASH DC 20310-0200, for further evaluation as necessary.16 Quality factor The modifying factor [listed in 10 CFR 20.1004, tables 1004(b).1 and 1004(b).2] that is used to derive dose equivalent from absorbed dose.16 Rad A unit of absorbed dose. One rad is equal to an absorbed dose of 0.01 joule/kilogram (0.01 gray).16 Radiation In TG-236A, radiation refers to ionizing radiation only. Radioactive commodity An item of Government property made up in whole or in part of radioactive material. A national stock number (NSN) or part number is assigned to commodities containing radioactive material greater than 0.01 Ci.16 Radioactive decay The spontaneous transformation of an unstable atom into one or more different nuclides accompanied by either the emission of energy and/or particles from the nucleus, nuclear capture USACHPPM TG236A 93 August 2001 Version or ejection of orbital electrons, or fission. Unstable atoms decay into a more stable state, eventually reaching a form that does not decay further or has a very long half-life. Radiation exposure status (RES) The radiation exposure status is the current cumulative radiation dose for a given unit of soldiers or the cumulative radiation dose at the end of a given mission, including any radiation dose acquired before the mission. Radioactivity The mean number of nuclear transformations occurring in a given quantity of radioactive material per unit time. The International System (SI) unit of radioactivity is the becquerel (Bq). The traditional unit is the curie (Ci). Radionuclide An unstable nuclide that undergoes radioactive decay. Reference (standard) man A hypothetical aggregation of human physical and physiological characteristics arrived at by international consensus that is used by researchers to standardize results of experiments and relate them to human biology [5]. Rem A unit of any of the quantities expressed as dose equivalent. The dose equivalent in rems is equal to the absorbed dose in rads multiplied by the quality factor (1 rem = 0.01 sievert). Resuspension The process whereby materials deposited on surfaces can become airborne. Risk Chance of [encountering a] hazard or bad consequences; exposure or chance of injury or loss. Risk level is expressed in terms of hazard probability and severity.16 Roentgen A unit of exposure; a measure of the charge produced in air by photons. One roentgen equals 2.58 x 10⁻⁴ coulombs per kilogram of air. The symbol for roentgen is R. Sievert (Sv) The SI unit of any of the quantities expressed as dose equivalent. The dose equivalent in sieverts is equal to the absorbed dose in grays multiplied by the quality factor (1 Sv = 100 rem). Sampling Sampling is the act of collecting material in the field for additional analysis; for example, collecting soil samples. USACHPPM TG236A 94 August 2001 Version Scan or scanning Scans or scanning measurements are specific radiation surveying techniques where a RADIAC meter is operating constantly in ratemeter mode while the radiation surveyor moves about a given area or moves the probe over a surface. Sometimes the term scanning radiation survey is used as a synonym for scan or scanning. Radiation survey A radiation survey is the process of using an instrument to determine radiation or contamination levels in a given area, on a person (personnel radiation survey), or on equipment. Radiation survey unit A radiation survey unit is an area assumed to be homogeneous with respect to radiological parameters in which a radiation survey will be done. In this plan, a recommended radiation survey unit can be an outdoor area of less than 10,000 m2 or an indoor area with a floor space of less than 100 m2. There can be more than one radiation survey unit for each radiation survey site. Uptake The amount of a radionuclide that was taken into the body that makes it to the blood. Contrast this with an intake; for example, the amount of material inhaled would be an intake, but the amount of material that passes through the lung and enters the blood is an uptake. Technically, a contaminated wound would result in an uptake with no intake because the radioactive material enters the blood directly. It is possible to have an intake without having an uptake. Wipes Wipes are a subset of samples. They are used to estimate the removable amount of surface contamination on a given area, usually 100 cm2 (an area of about 4 inches by 4 inches or the size of the palm of your hand. USACHPPM TG236A 95 August 2001 Version This page is intentionally blank USACHPPM TG236A 96 August 2001 Version Appendix B. List of Abbreviations Allied Command Europe ACE Army Regulation AR Biological Effects of Ionizing Radiation (committee) BEIR Breathing zone air (sampler) (see Glossary) BZA Contamination control station CCS Center for Devices and Radiological Health CDRH Code of Federal Regulations CFR Center for Health Promotion and Preventive Medicine CHPPM Continental United States CONUS Directorate of Laboratory Services (CHPPM-Main) DLS Department of Defense DOD Data quality objectives (see Glossary) DQOs Food and Drug Administration FDA Field manual FM Geiger-Mueller (counter) GM Global positioning system GPS Health Physics Program at CHPPM-Main HPP Headquarters, Department of the Army HQDA International Atomic Energy Agency IAEA In accordance with IAW International Commission on Radiological Protection ICRP Low-level radiation LLR Major Commands (US Army) MACOM Multi-Agency Radiation survey and Site Investigation Manual MARSSIM Mission oriented protective posture MOPP Naturally occurring or accelerator-produced radioactive material NARM North Atlantic Treaty Organization NATO Nuclear, biological, and chemical NBC Noncommissioned officer in charge NCOIC Nuclear Emergency and Radiological Decision (handbook) NERD National Institute of Standards and Technology NIST Nuclear Medical Science Officer NMSO Naturally occurring radioactive material NORM Nuclear Regulatory Commission NRC National stock number NSN Outside the continental United States OCONUS Operational exposure guidance (see Glossary) OEG Officer in charge OIC Preventive medicine PM Quality control/quality assurance QA/QC Radiation detection, identification, and computation RADIAC Radiologic, Classic, and Clinical Chemistry Division RCCCD Research document RD Radiation exposure status (see Glossary) RES USACHPPM TG236A 97 August 2001 Version ROWPU RPO RSSO SASO SI SIRA SOP STANAG TAML TG USACHPPM US DHHS UXO Reverse osmosis water purification unit Radiation Protection Officer Radiation Safety Staff Officer Stability and support operations International System (Système International) Sampling and Identification of Radiological Agents Standard operating procedure Standardization Agreement (NATO) Theater Area Medical Laboratory Technical guide United States Army Center for Health Promotion and Preventive Medicine United States Department of Health and Human Services Unexploded ordnance USACHPPM TG236A 98 August 2001 Version Appendix C. Equipment common to sampling and radiation surveying This section was adapted from NATO Handbook for Sampling and Identification of Radiological Agents (SIRA)3 and lists additional equipment that could help in radiation surveying and sampling. C.1. Supplies ¨ Rucksack ¨ Binoculars (wide depth of field) ¨ Camera (with time and date display facility), films and spare batteries ¨ Video camera, video tapes and spare batteries, charger ¨ Sample position markers: flags, spray paint, etc. ¨ Flashlight (torch) and spare batteries, whistle ¨ Ladder (collapsible) ¨ Stop-watch ¨ Measuring tape (50 m) or laser range finder ¨ Indelible ink pens / writing pad ¨ Log book ¨ Small tool kit containing hammer, knife, screwdrivers, pliers ¨ Bar code labels ¨ Radioactive hazard labels ¨ Disposable plastic sheeting ¨ Tissues/paper roll (for cleaning purposes) ¨ Solvent, alcohol or de-ionized water (for cleaning/decontamination purposes) ¨ Groundsheet C.2. Radiation protection equipment ¨ Individual direct reading dosimeter ¨ Individual passive (permanent) dosimetry, this should be the national (for record) or best available dosimetry. ¨ First aid kit ¨ Vinyl and heavy duty gloves ¨ Protective clothing (anti-Cs, overshoes, gloves) ¨ Respiratory protection USACHPPM TG236A 99 August 2001 Version C.3. Instrumentation ¨ Alpha/beta contamination monitor, calibrated with spare batteries ¨ Dose-rate meter and spare batteries ¨ Portable balance/weighing machine (to gauge weight of collected sample) ¨ Check source for instruments C.4. Communication/Location equipment ¨ Mobile (cellular) phone ¨ 2-way Radio ¨ Global Positioning System ¨ Compass C.5. Supporting documentation ¨ Maps ¨ Sample forms ¨ Equipment operations manuals ¨ Sample collection procedures ¨ Field monitoring procedures ¨ Radiation protection instructions C.6. Sample transport ¨ Packing/Transport containers (e.g., 30 gallon drums) ¨ Absorbent packing material ¨ Seals for transport containers Boxes/crates (for temporary storage of samples prior to transportation) USACHPPM TG236A 100 August 2001 Version Appendix D. A removable packet for Level 1 radiation surveying and sampling This packet is intended for a knowledgeable radiation surveyor or radiation survey team and includes the following items. q RADIAC preoperational test and check source procedures. q Checklist for a Level 1 Assessment. q Site Assessment and Cover Sheet. q Instructions for using the Radiation Survey Data Table. q Radiation Survey Data Table. q Chain-of-custody form. q Field results summary checklist. This packet consolidates the necessary information to perform the radiation surveying and sampling parts of a Level 1 assessment. Make as many copies of this packet as you need or use it as a basis for recording data if you can’t make copies. USACHPPM TG236A 101 August 2001 Version This page is intentionally blank USACHPPM TG236A 102 August 2001 Version RADIAC checklist and preoperational test Instrument Type (Circle one.): PDR-77 or VDR-2 Date: Beta/ Gamma Probe SN: Time: X ray Probe SN (PDR-77 only): Alpha Probe SN (PDR-77 only): Radiation survey Unit ID AN/PDR Radiac SN: Checkout performed by: PDR-77 Yes No VDR-2 Yes No Carrying Case Inspection: Is the case free of obvious damage and is the case in proper working order? All probes present? RADIAC Meter Inspection: Is the meter free of obvious damage? Beta/Gamma Probe Inspection: Is the probe free of obvious damage? Alpha Probe Inspection: Is the probe free of obvious damage? X ray Probe Inspection: Is the probe free of obvious damage? RPO Kit Pancake Probe SN: “micro R” Probe SN: Yes No Are the pancake probe and “micro R” probe present? Pancake Probe Inspection: Is the probe free of obvious damage? “micro R” Probe Inspection: Is the probe free of obvious damage? Preoperational Test If the unit passes the preoperational test in the Technical Manual, the unit is ready for the operational check source test. See the flowchart on the following page. If the unit fails the test twice, then notify your supervisor. USACHPPM TG236A 103 August 2001 Version Operational check source flowchart Is the check source measurement within 30% of the value on the calibration sheet? Yes Record the result and continue the radiation survey. No Take two additional measurements. Is the check source measurement within 30% of the value on the calibration sheet? Yes No Yes Are additional RADIAC meters available? Get another instrument and restart the procedure. No Record results. Alert the OIC or NCOIC; continue radiation surveying with the consent of the OIC or NCOIC. USACHPPM TG236A 104 August 2001 Version Checklist for a Level 1 Assessment (Page 1 of 3) q Review USACHPPM TG236A (sections cited on this page refer to TG236A). q Inform CHPPM or a nuclear medical science officer that you are starting a Level 1 radiation survey. If samples are to be collected inform the laboratory. CHPPM points of contact are shown in Appendix F, and USACHPPM Directorate of Laboratory Sciences points of contact are shown in Chapter 11. CAUTION: If elevated alpha activity is present or is suspected to be present, higher echelon assets must be notified as soon as possible. q Gather supplies (See Chapter 4, section 4.1.). q Record the check source measurements. If this reading is within 30% of the value on the calibration sheet, proceed with the radiation survey. If not, see Chapter 4, section 4.8. q Gather any information you can about the area to be radiation surveyed. CAUTION: If anything in this plan endangers the immediate life and health of personnel, the plan should not be undertaken unless so ordered by the commander. See Chapter 2. q Go to a staging area near the area to be radiation surveyed. CAUTION: Be aware of non-radiological battlefield hazards before undertaking this radiation survey. Examples of these hazards are unexploded ordnance (UXO), confined spaces, tripping hazards, poisonous plants, venomous insects and animals, toxic chemicals, gunfire, and unsanitary conditions. See Chapter 2. q Decide where the specific radiation survey units are (See Chapter 4, section 4.2.). q Identify the appropriate background measurement locations (See Chapter 4, section 4.4.). q Ensure that the RADIAC instrument is in the proper configuration for static measurements. (See Chapter 4, section 4.6). q Take and record the appropriate background measurements (See Chapter 4, section 4.4.). q Set up the radiation survey unit (See Chapter 4, section 4.3.). USACHPPM TG236A 105 August 2001 Version Checklist for a Level 1 Assessment (Page 2 of 3) ¡ 1. Define the area to be radiation surveyed with a rectangle. ¡ 2. If GPS/grid coordinates are available, record the points indicated on the datasheet. ¡ 3. Record the length and width of the radiation survey unit on the datasheet. ¡ 4. Divide the width into 6 equal blocks. ¡ 5. Divide the length into 8 equal blocks. ¡ 6. Mark the boundaries of and restrict access to the radiation survey unit, if possible. Divide the unit into 48 blocks as shown on the datasheet. ¡ 7. Sketch the radiation survey unit, landmarks, structures, and other information on the radiation survey unit schematic. q Answer the site assessment questions on the Site Assessment and Cover Sheet. q Record the meteorological data on the day of the radiation survey. q Perform the radiation survey. The preferred order of steps is below. CAUTION: The radiation surveyor should have the βγ probe operational and should be observing the dose rate while approaching any potentially contaminated area. See Chapter 2. ¡ 1. Record the external gamma exposure measurements in blocks 1-12 on the Radiation Survey Data Table. Take a two kilogram soil sample in block 1, split this sample, and label one as a QC sample. ¡ 2. Sample the soil in blocks 1-12 on the Radiation Survey Data Table. ¡ 3. If the x ray probe is available, record the x ray probe measurements in blocks 1 – 12 on the Radiation Survey Data Table. ¡ 4. Record the external gamma exposure measurements in blocks 13-24 on the Radiation Survey Data Table. ¡ 5. Take the QC external gamma exposure rate in block 1 on the Radiation Survey Data Table. ¡ 6. Take the QC x ray probe measurement in block 2 on the Radiation Survey Data Table, if the probe is available. ¡ 7. Record the post-operational check source measurements. USACHPPM TG236A 106 August 2001 Version Checklist for a Level 1 Assessment (Page 3 of 3) q Record any topographical information on the radiation survey unit schematic. q Interpret the data using the tables in Chapter 5. q Report the results of the assessment to the commander. q Send the samples and a copy of the paperwork to the appropriate laboratory for a gross αβ measurement and 10-minute qualitative gamma spectroscopy. q Send a copy of the paperwork to CHPPM-Main HPP or other appropriate nuclear medical science officer. q Decide on the final disposition of the samples on the advice of the command staff, CHPPMMain HPP, and the laboratory. USACHPPM TG236A 107 August 2001 Version Site Assessment and Cover Sheet Location: Project #: Radiation survey Unit ID: Personnel Information Length of stay: Site Use: Circle one: Hours Days Weeks Months Years Unit’s Existing RES: Personnel occupation time: h/day Circle the appropriate information below describing expected use Water source: ROWPU Bottled Other (specify): Food source: Pre-packaged Site use: Housing Types of activity in area: Laundry facilities: Storage Sleep Military Decon facilities available? Local No CONUS Other (specify): Other (specify ): Rest Minimal Labor Local Other (Specify): Yes Moderate Labor Heavy Labor Type: Geographical and Meteorological Information (Circle all that apply.) Prevailing wind speed (units): Terrain: ( ) Prevailing wind direction: deg/mil Open Brush Wooded Ground Condition: Dry Normal Flat Hilly Mountainous Dusty Compact Moist Sandy Wet Gravel Known industrial activity in the area: Direction and distance: Radiation surveyor(s): (Signatures) Reviewer(s): Date: TG-236A Level 1 Assessment Radiological Health Risk Planning and Projection U.S. Army Center for Health Promotion and Preventive Medicine United States Army Medical Department USACHPPM TG236A 108 August 2001 Version Instructions for using the Radiation Survey Data Table on the following pages. Instruction ID a. Circle the type of instrument used (AN/PDR-77 or VDR-2). Record the calibration date (Cal. Due Date) and the serial number (SN) of the instrument. b. Record the check source measurement. c. Record the radiological background data and take soil samples at the 3 background locations. Record the average background readings. d. Evaluate and record the GPS/grid-A and -B locations. e. Perform the radiation survey and record the results. • Record the appropriate instrument reading in the center of each numbered box. • Collect soil samples. Collect two kilograms of soil in block 1-Soil/QC and split the sample. • Return to block 1 (1-Soil/QC) and repeat the appropriate measurements (βγ-probe and x ray). • Exclude the GQC measurement in block 1 and take the average of all the βγ-probe measurements. Record the results. f. g. h. i. j. k. Record the personnel information. Record the length and width of the radiation survey unit. Indicate the measurement units used for all of the measurements. You must be aware of any scale changes and use the same units for all measurements. Indicate north in the Indicate North box. Record topographical information on Radiation Survey Unit Schematic. Answer the Potential Radiological Hazard ID to the best of your ability. Use TG2382 and other references, if available. USACHPPM TG236A 109 August 2001 Version a. b. c. Radiation Survey Data Table (Page 1 of 2) Circle the instrument used. AN/PDR-77 Or VDR-2 Cal. Due Date: SN: Check Source Measurements G X Pre-radiation survey: Post-radiation survey: Radiological Background Information Location G Radiation survey Unit ID: d. GPS/Grid Coordinates (GPS/Grid below.) A: B: Radiation survey Results e. G X Average Reading: Average Background Reading: Net Reading: Personnel Information f. Radiation surveyors: X 1. 2. 3. Reviewers: Average: Radiation Survey Unit Boxes 9-Soil X: G: 21 G: 10-Soil X: G: 22 G: 17 G: 6-Soil X: G: 18 G: g. Width 14 G: h. North 7-Soil X: G: 2-Soil X1: XQC: G: X: G1: GQC: 12-Soil X: G: 24 G: 19 G: 1-Soil/QC 13 G: 11-Soil X: G: 23 G: 5-Soil X: G: GPS/Grid-B 8-Soil X: G: 20 G: 3-Soil X: G: 15 G: 4-Soil X: G: 16 G: GPS/Grid-A g. Length h. Soil: X: G: Soil Sampling Location X ray Probe Reading βγ-probe or VDR-2 Reading Unit of Measurement TG-236A Level 1 Assessment Radiological Health Risk Planning and Projection U.S. Army Center for Health Promotion and Preventive Medicine United States Army Medical Department USACHPPM TG236A 110 August 2001 Version Radiation Survey Data Table (Page 2 of 2) i. Radiation survey Unit Schematic 9 21 10 11 22 5 17 23 6 13 24 7 18 1 12 19 2 8 20 3 14 15 4 16 j. Potential Radiological Hazard ID - Refer to TG2382 or other references for guidance. Is there evidence or a record of the following? Circle one The presence, use, storage, or disposal of radioactive materials. Yes / No/Unknown The use of DU or military commodities. Yes / No/Unknown The decontamination, maintenance, or storage of radioactively contaminated equipment. Yes / No/Unknown The presence of enhanced naturally occurring radioactive material. Yes / No/Unknown Radiation generating machines such as accelerators and x ray machines. Yes / No/Unknown Any aircraft accident in the area. Yes / No/Unknown Medical or research facilities in the area. Yes / No/Unknown Coal ash, fertilizer, other mineral processes in the area. Yes / No/Unknown Nuclear power plants in the area. Yes / No/Unknown USACHPPM TG236A 111 If yes, describe the evidence or attach the record. August 2001 Version Soil Sample Collection USACHPPM – Health Physics Program – TG-236A Sampling Location: Radiation survey Unit ID: Sample Types: Grab and Soil Analyses Desired: Gross αβ and 10-minute γ-spectroscopy (CHPPM-Main DLS #s 765,814) Team Leader: Samples packed by: POC: USACHPPM Project number if applicable: List the Field ID and NATO Date-Time Group. Field ID NATO Date-Time Group (DDTTTTZMMMYYYY) Tamper Resistant Seals Used? ¨ Yes Chain-of-Custody Information Sign and Print Name Released By Received By Date ¨ No Purpose of Transfer Notes and Comments USACHPPM TG236A 112 August 2001 Version Field Chain- of- Custody Sheet USACHPPM – Health Physics Program – TG-236A Date of Collection: Page 1of 2 Sampling Location: Radiation survey Unit ID: Sample Types: Grab and Soil Analyses Desired: Gross αβ and 10-minute γ-spectroscopy (CHPPM-Main DLS #s 765,814) Team Leader: Samples packed by: POC: USACHPPM Project number if applicable: List the Field ID and time of collection of each sample. Time 13. 14. QC. 11. 12. 13. 14. 15. 16. 17. 18. 19. 20. Method of Shipping and Carrier Used: Additional Samples Time Sample Desired Type Analyses BKG 1. BKG 2. BKG 3. 15. 16. Tamper Resistant Seals On the container? q Yes q No On each sample? q Yes q No Shipping Date: Chain- of- Custody Sample or Samples Sign and Print Name Transferred Released By Received By USACHPPM TG236A Time 113 Date Purpose of Transfer August 2001 Version Field Chain- of- Custody Sheet USACHPPM – Health Physics Program – TG-236A Chain- of- Custody Sample or Samples Sign and Print Name Transferred Released By Received By Page 2 of 2 Date Purpose of Transfer Notes and Comments USACHPPM TG236A 114 August 2001 Version Appendix E. Field Results Summary Checklist Net Reading: Instrument Used: Radiation survey Unit ID: Existing RES: ¨ ¨ ¨ ¨ ¨ PDR-77 or VDR-2 The net gamma reading is less than 0.010 mR/h (0.10 µGy/h on the VDR-2). There is no need to proceed with the data interpretation, the radiation survey unit can be considered equivalent to background at this time. Document these results and send them on to the Health Physics Program at CHPPM-Main. Existing RES = 0 The RES at the end of the mission lasting days will be: For an assigned OEG of the maximum mission duration is about days. Existing RES > 0 The RES at the end of the mission lasting days will be: For an assigned OEG of the maximum mission duration is about days. USACHPPM TG236A 115 August 2001 Version Appendix F. Preventive medicine officer’s information for dose tracking (The following are based on radiation exposure charts found in Appendix A, page 7, of FM 3-3-117.) Date: Unit: Total Accumulated Dose <50 mR <500 µGy 50 mR to 500 mR 500 µGy to 5 mGy 500 mR to 5 R 5 mGy to 50 mGy 5 R to 10 R 50 mGy to 100 mGy 10 R to 25 R 100 mGy to 250 mGy 25 R to 75 R 250 mGy to 750 mGy RES of Company or Battalion 0 1A 1B 1C 1D 1E 2 RES Category 0 1A 1B 1C 1D 1E RES-Equivalent Value 0 1 2 3 4 5 Number of Platoons in Company or Companies in Battalion 3 4 5 6 7 Sum of all the RES-equivalent Values from the radiation exposure chart below. 0 0-1 0-1 0-2 0-2 0-3 1-2 2-4 2-5 3-7 3-8 4-10 3-4 5-7 6-9 8-12 9-14 11-17 5-6 8-10 10-13 13-17 15-20 18-24 7-8 11-13 14-17 18-22 21-26 25-31 9-10 14-15 18-20 23-25 27-30 32-35 USACHPPM TG236A 116 August 2001 Version Radiation Exposure Chart Element Previous Exposure New Exposure Total Exposure RES Category RES-equivalents RES-equivalent total (Equivalent to “Category Total” from FM 3-3-1.): Overall Status (Use the previous table): Definitions Site Location: Dates of Exposure: Duration: Dose Rate: Total Dose: Accumulated Dose: RES: RES-equivalent: Recorder: Where the exposure occurred. At a minimum, the Site ID from the Site Assessment Sheet must be included here. Time over which the exposure occurred. “Dates” can be a single day; for example, a unit is exposed for 10 hours on 5 JUN 01. The “Dates of Exposure” would be 5 JUN 01. Actual time interval during which the unit was exposed, in hours. Net dose rate if it is greater than 0.010 mR/h (0.1 µGy/h for the VDR-2). Total dose received by the unit from a single location. The product of the dose rate and duration. Running total of the doses received by the unit. Radiation exposure status of the unit, based on the accumulated dose. A conversion factor that allows the RES categories between 0 and 1E to be used in place of the standard categories 0 to 5. Preventive medicine person responsible for recording and maintaining this record. USACHPPM TG236A 117 August 2001 Version 5 JUN 01 1350 5 JUN 01 1850 Dates of Exposure From To 5 Duration (hours) 0.060 mR h-1 Dose Rate¶ 0.3 mR (Duration x Dose rate) Total Dose 0.3 mR Accumulated Dose EUR: USACHPPM TG236A CHPPM 118 DSN: 486-8551 PAC: DSN: 263-8502 MAIN: COM: 49-6371-86-8551 COM: 81-3117-63-8502 TG-236A - Unit Dose Tracking Sheet Radiological Health Risk Planning and Projection U.S. Army Center for Health Promotion and Preventive Medicine United States Army Medical Department 0 Page RES 1LT Someone of Recorder August 2001 Version DSN: 584-4375 COM: 410-436-4375 The units for dose rate are mR/h for the AN/PDR-77 and µGy/h (be aware of automatic scale changes) for the AN/VDR-2. POC: ¶ Example Site Unit ID: Location (Site ID) Unit Dose tracking sheet Appendix G. CONUS transportation regulations and procedures REFERENCES: Title 49 Code of Federal Regulations. Army Regulation 11-9, Ionization Radiation Protection Technical Bulletin 43-0116, Identification of Radioactive Items in the Army, 1 Aug 1993 A. Regulations Governing Radioactive Materials Use and Shipment 1. 2. 3. B. Title 10 Code of Federal Regulations a. Governs the use of byproduct material b. Nuclear Regulatory Commission (NRC) is proponent c. Part 71 “Packaging and Shipment of Radioactive Material” Title 49 Code of Federal Regulations a. Governs the transportation of all materials b. Department of Transportation is proponent c. Considers item radioactive if concentrations are greater that 0.002 (70 Bq/gm) d. Primary reference for the shipment of radioactive materials Ci/gm Technical Bulletin 43-0116, Identification of Radioactive Items in the Army a. Identifies, by part number and national stock number (NSN), items in the Department of the Army that contain radioactive materials b. U.S. Army Communications-Electronics Command (CECOM) is proponent c. Identifies radioactive material and activity in becquerels Terms and Definitions 1. Special Form Radioactive Material - materials which, by nature of their physical form or encapsulation, if released from a package, might present some direct USACHPPM TG236A 119 August 2001 Version radiation hazard but would present little hazard from the possibility of contamination. a. Single solid piece or contained in a sealed capsule b. At least one dimension not less than 5mm (0.2in) c. Meets requirements of test specified in 49CFR 173.469 2. Normal Form Radioactive Material - materials which if released from a package might present a contamination hazard. 3. Instrument and Articles - any manufactured instrument and article such as an instrument, clock, electronic tube or apparatus, or similar instrument and article having Class 7 (radioactive) material in gaseous or non-dispersible solid form as a component part. 4. Package - the packaging together with its radioactive contents as presented for shipment. 5. Transport Index (TI) - dimensionless number (rounded up to the next tenth) placed on a label of a package to designate the degree of control to be exercised by the carrier during transportation. For non-fissile materials, TI is the radiation level in mr/hr measured one meter from the external surface of the package. C. Preparing Proper Shipment - once an item containing radioactive material is identified for shipment, a shipping packet should be started in which all information pertaining to the shipment will be maintained. It is the responsibility of the shipper to ensure that all shipping requirements are met. 1. Identity and activity of radioactive material(s) NOTE: Just knowing that an item is radioactive or has radioactive material as a component part is not enough to satisfy shipping requirements. The exact isotope and activity are required to determine the proper shipping method. a. Look on item to be shipped. Many items will contain a label that identifies the isotope and activity. b. For military commodities, the radioactive items may be identified using either the end item or individual part NSN and the TB 43-0116. Items are listed giving the radioactive isotope and the activity in Bq. c. For other items in the military supply system, the Army Master Data File (AMDF) has a Special Control Item Code (SCIC). This code can be used to USACHPPM TG236A 120 August 2001 Version identify which items are radioactive or have radioactive materials. Unfortunately the AMDF may not give you the specific information needed for shipment. NOTE: Regardless of the method used to identify the radioactive material and activity, ensure that the information gathered is transferred accurately (i.e., units and isotope identifications). 2. Construction Form - maximum activity allowed in a shipping sub-type is determined by the radioactive materials construction form (Special or Normal) a. b. 3. Special form material is constructed such that the radioactive material will not be dispersed if the shipping package is destroyed. To be considered special form, the radioactive material must have been constructed and tested in accordance with Department of Transportation (DOT) specifications. (1) Special form requirement allow for more activity in the same shipping sub-type. (2) Without documentation specifying special form the source must be shipped as normal form. (3) Specified as A1 values. Normal form radioactive material is any form that is not certified to be special form. (1) May be in any physical form (gas, solid, liquid), in any type of container (glass, plastic, ceramic). (2) When in doubt or without a specific document certifying special form, ship radioactive material as normal form. (3) Specified as A2 values. Shipping Sub-type - there are 6 sub-types for the shipment of radioactive material (RAM); “Limited Quantity”, “Instrument and Article”, “Type A Quantities”, “Type B Quantities”, “Low Specific Activity (LSA)”, and “Surface Contaminated Object (SCO)”. The shipment of military items can usually be accomplished under the specifications for Limited Quantity, Instrument and Article, or Type A Quantity. a. Limited Quantities - a quantity of radioactive material not exceeding the limits specified in § 173.425. USACHPPM TG236A 121 August 2001 Version b. c. (1) Package requirements specified in § 173.410. Essentially a strong tight package that is easy to handle and will contain the material during incident normal to transportation. (2) Radiation levels at any point on the external surface of the package does not exceed 5 Sv/h (0.5 mrem/hr). (3) Removable contamination on the external surface does not exceed limits specified in Table 11 of § 173.443(a). (4) Outside of inner packaging, or outer packaging if no inner packaging, must bear the marking “Radioactive”. (5) Material prepared as specified in § 173.422. Instruments and Articles - may be excepted from the specification for packaging, shipping paper and certification, marking and labeling requirements provided: (1) Package requirements of § 173.410 are met. (2) The activity of the instrument or article or the entire package contents do not exceed the limits in Table 7 in § 173.425. (3) Radiation levels at any point external to the instrument or article when measured at 10 centimeters (4 in) does not exceed 5 Gy/hr (0.5mrem/hr). (4) Radiation levels at any point on the external surface of a package does not exceed 5 Sv/hr (0.5 mrem/hr). (5) Removable contamination on the external surface does not exceed limits specified in Table 11 of § 173.443(a). (6) The instrument or article is otherwise prepared as specified in § 173.422. Type A Quantity - when the requirements for limited quantity or instrument and articles can not be met and provided the activity of the radioactive material does not exceed the limits for A1 Special form or A2 Normal form as specified in § 173.435, you have a Type A quantity. NOTE: Due to the high cost of shipping materials and control measures the lowest subtype for which a radioactive material would qualify should be used for shipping. USACHPPM TG236A 122 August 2001 Version 4. Packaging Requirements - the cost of different shipping containers can be very drastic. The lowest package type that meets specifications should be used. a. If restrictions require the shipment to be sub-typed as Type A, the shipping container must be certified as meeting the specifications in § 173.410, 173.412, 173.415, such as the DOT specification 7A. b. No certification is required for the shipment of Limited Quantity or Instruments and Articles. 5. Special Restrictions - packages may include special instruction if the package weighs more than 110 pounds and/or contains materials being shipped as fissile or containing an additional hazard other than the radioactive hazard. 6. Package Assembly - Each package type must have the appropriate certification statement prepared to enclose in the package, included with the packing list, or otherwise forwarded with the package. 7. a. Limited Quantity - Inner package must be marked “Radioactive” along with statement; “This package conforms to the conditions and limitations specified in 49 CFR 173.421 for radioactive material, expected package-limited quantity of material, UN2910" b. Instruments or Articles - No requirement for the marking “Radioactive”. Certification statement must read; “This package conforms to the conditions and limitations specified in 49 CFR 173.424 for radioactive material, expected package-instruments or articles, UN2910". c. Type A - This package has DOT specification labels, or is identified by the DOT specification number. Must be shipped in the same configuration, as it was when the specification testing was performed. Radiation Surveys - must be performed to determine the radiation dose rates and removable contamination levels. a. Dose Rate Measurements - taken on all six sides and is the determining factor for the type of label used for a type A package. (1) LQ or IA dose rates must be less than 5 (2) Type A Packages label is dose rate specific (A) USACHPPM TG236A Sv/hr at the package surface White I - is used on packages with radiation levels measured at the surface of the package which do not exceed 5 Sv/hr (0.5 123 August 2001 Version mrem/hr); and do not exceed the background level when measured at a distance of 1 meter from the package. b. 8. (B) Yellow II - is used on all Type A packages with radiation levels measured at the surface of the package which exceed 5 Sv/hr (0.5 mrem/hr) but do not exceed 500 Sv/hr (50 mrem/hr); or with a radiation level measured at 1 meter which is greater than background but less than 10 Sv/hr (1 mrem/hr). (C) Yellow III - is used on all Type A packages with radiation levels measured at the surface of the package which exceed 500 Sv/hr (50 mrem/hr) but do not exceed 2000 Sv/hr (200 mrem/hr); or with a radiation level measured at 1 meter which is greater than 10 Sv/hr (1 mrem/hr) but less than 100 Sv/hr. (D) Yellow III whose surface radiation levels exceed 2000 Sv/hr (200 mrem/hr) but do not exceed 10,000 Sv/hr (1000 mrem/hr); or with a radiation level measured at 1 meter which exceeds 100 Sv/hr (10 mrem/hr) may be shipped only in a vehicle under exclusive use provisions. Removable (non-fixed) Radioactive Contamination - must be kept as low as practicable. (1) May be determined by wiping 300 cm2 of package surface with a smear or wipe using moderate pressure and measuring the activity on the wiping material. (2) Sufficient number of wipes will be taken to yield a representative assessment of the contamination present. (3) When performing the wipes records of the true area wiped must be recorded to calculate the activity per area. (4) Use the proper swipe medium for the isotope of concern (i.e., most beta/gamma emitter can be sampled using NUCON hard wipes; where isotopes like H-3 or Ni-63 need to be sampled using a medium which can be analyzed in a liquid scintillation counter). Communications - includes the written, verbal, and symbolic instructions that will ensure the package is transported IAW the specifications required by DOT. a. Basic Description - the Proper Shipping Name, Hazard Class, and ID Number as specified in 49CFR172.101. USACHPPM TG236A 124 August 2001 Version b. Additional Requirements for Radioactive Materials - (1) (2) (3) (4) (5) (6) (7) (8) (9) (10) (11) (12) (13) Name of Radionuclide Physical Form Quantity Total Weight Transport Index Activity per Package Highway Route Controlled Quantity (if appropriate) “Fissile Excepted” (if appropriate) “Warning - Fissile Material Controlled Shipment” (if appropriate) Package Identification Markings (if DOE/NRC approved) Shipper Certification found in 172.204(a)(1) “RQ” before basic description if Hazardous Substance 24 hour Emergency phone number for all labeled shipments 9. Special Communications - are usually for very hazardous shipments, not normally encountered. 10. US Postal Regulations - may be used when shipping small quantities of radioactive material (limited to 1/10 of Table 7 values). D. Summary - Organization and care are key to the shipping of radioactive material safely and in compliance with the federal regulations. To ensure that all packages are shipped in compliance with federal, army, and state regulations it is imperative that all items are completed to the fullest extent. 1. Identify: Isotope and activity to be shipped 2. Form: Normal - vs - Special as well as physical form 3. Activity Limit: Verify A1 Special form or A2 Normal Limits and Limited Quantities from Table 7. 4. Communicate: Applicable paperwork, labeling and marking, shipping papers, package and source certifications, etc. 5. Package: Proper package for class of shipment. 6. Surveys: Dose rate levels and removable contamination 7. Records: Maintain records for time specified by regulations. USACHPPM TG236A 125 August 2001 Version TABLE I GENERAL REQUIREMENTS FOR SHIPPING RADIOACTIVE MATERIALS Package Type Limited Quantity §173.421 Instruments/Articles §173.424 Type A §173.431 Activity Limit Table 7, §173.425 Table 7, §173.425 ≤ A1 or A2 Value Packaging Material General Design General Design Type A §173.465 Special Restrictions ≤ 15 grams U235 ≤ 15 grams U235 § 173.418, 173.419 Package Requirements §173.421 §173.421 DOT Type A ≤5 ≤ 5 Sv/hr ≤ 100 Sv/hr §173.441 Radiation Levels @ Surface @ 4" for I&A @ 1 meter Sv/hr Determines Label Contamination Level ≤ Table 11, §173.443 ≤ Table 11, §173.443 §173.443 Communications None None All of Part 172 Special Requirements “Radioactive” & Statement §173.422 Statement form §173,422 §173.448 and §173.451 Because of changes to the Code of Federal Regulations, values and requirements should be verified prior to each shipment. USACHPPM TG236A 126 August 2001 Version 2.0E08 SPECIAL FORM 4.0E07 SPECIAL FORM 2.0E08 SPECIAL FORM 2.0E08 SPECIAL FORM USACHPPM TG236A 2.0E04 NORMAL FORM Am-241 2.0E04 NORMAL FORM Pu-239 4.0E07 NORMAL FORM CO-60 5.0E07 US Postal Svc LQ PKG NORMAL FORM CS-137 NUCLIDE 2.0E09 2.0E05 2.0E09 2.0E05 4.0E08 4.0E08 2.0E09 5.0E08 US Postal Svc ea. I&A 2.0E11 2.0E07 2.0E11 2.0E07 4.0E10 4.0E10 2.0E11 5.0E10 127 2.0E10 2.0E06 2.0E10 2.0E06 4.0E09 4.0E09 2.0E10 5.0E09 Comm Carrier ea.I&A August 2001 Version 2.0E09 2.0E05 2.0E09 2.0E05 4.0E08 4.0E08 2.0E09 5.0E08 Comm US Postal Svc ea. I&A PKG Carrier LQ PKG 2.0E12 2.0E08 2.0E12 2.0E08 4.0E11 4.0E11 2.0E12 5.0E11 Comm Carrier ea. I&A PKG 2.0E12 2.0E08 2.0E12 2.0E08 4.0E11 4.0E11 2.0E12 5.0E11 Comm Carrier TYPE A Limited Quantities, Instruments & Articles and Type A package activity limits for common isotopes in military commodities in Bq TABLE II TABLE OF DOT ACTIVITY LIMITS COMMON TO MILITARY SHIPMENTS 4.0E09 SPECIAL FORM 4.0E09 SPECIAL FORM 3.0E07 SPECIAL FORM USACHPPM TG236A 2.0E06 NORMAL FORM Ra-226 9.0E07 NORMAL FORM Pm-147 3.0E09 US Postal Svc LQ PKG NORMAL FORM Ni-63 NUCLIDE 3.0E08 2.0E07 4.0E10 9.0E08 4.0E10 3.0E10 US Postal Svc ea. I&A 3.0E10 2.0E09 4.0E12 9.0E10 4.0E12 3.0E12 128 3.0E09 2.0E08 4.0E11 9.0E09 4.0E11 3.0E11 Comm Carrier ea.I&A August 2001 Version 3.0E08 2.0E07 4.0E10 9.0E08 4.0E10 3.0E10 Comm US Postal Svc ea. I&A PKG Carrier LQ PKG 3.0E11 2.0E10 4.0E13 9.0E11 4.0E13 3.0E13 Comm Carrier ea. I&A PKG 3.0E11 2.0E10 4.0E13 9.0E11 4.0E13 3.0E13 Comm Carrier TYPE A Limited Quantities, Instruments & Articles and Type A package activity limits for common isotopes in military commodities in Bq 2.0E07 SPECIAL FORM USACHPPM TG236A NORMAL FORM 8.0E10 2.0E09 SPECIAL FORM H-3 1.0E09 NORMAL FORM Kr-85 1.0E07 US Postal Svc LQ PKG NORMAL FORM Sr-90 NUCLIDE 8.0E10 2.0E09 1.0E09 2.0E08 1.0E08 US Postal Svc ea. I&A 8.0E11 2.0E10 1.0E10 2.0E10 1.0E10 129 8.0E11 2.0E10 1.0E10 2.0E09 1.0E09 Comm Carrier ea.I&A August 2001 Version 8.0E11 2.0E10 1.0E10 2.0E08 1.0E08 Comm US Postal Svc ea. I&A PKG Carrier LQ PKG 8.0E12 2.0E13 1.0E13 2.0E11 1.0E11 Comm Carrier ea. I&A PKG 4.0E13 2.0E13 1.0E13 2.0E11 1.0E11 Comm Carrier TYPE A Limited Quantities, Instruments & Articles and Type A package activity limits for common isotopes in military commodities in Bq NOTES: second; 1 Bq = 1 disintegration per second ; 3.7E10 Bq = 1 Ci 1 Ci = 3.7E10 disintegrations per To convert Curies to Bq: Multiply # of Curies by 3.7E10 To convert Bq to Curies: Divide # of Bq by 3.7E10 USACHPPM TG236A 130 August 2001 Version Appendix H. Points of contact USACHPPM – MAIN chppm-www.apgea.army.mil Commander's Office DSN 584-4311 584-2084 584-3305 584-4375 584-7301 584-8513 Commander Aide De Camp Sergeant Major Staff Duty Officer Secure FAX DSN FAX This line is staffed 24 hours per day. Health Physics Program DSN 584-3502 584-8261 Program Manager DSN FAX Commercial International calling 410-436-(the four digit extension) (Int'l access #)+1 +410 436-(the four digit extension) CHPPM – EUR Commander's Office & HQ Detachment Commander Scientific Advisor Sergeant Major Detachment Commander Detachment Sergeant FAX Access-Military DSN FAX Access-German Civilian FAX Access-International www.chppmeur.amedd.army.mil DSN 486-8084 486-8371 486-8962 486-8369 486-8803 486-7198 (Area Code) 06371+ 486-7198 (Int'l access)+49+ 6371+ 486-7198 Radiation Protection Personnel DSN Chief, Radiation Protection 486-8551 Chief, Radiation Protection Division 486-7415 NCOIC, Radiation Protection 486-8567 FAX Access-Military DSN 486-8954 FAX Access-German Civilian (Area Code) 06371+ 486-8954 FAX Access-International (Int'l access #) + 49+ 6371+ 486-8954 International calling (Int'l access #)+49+6371+ 86-(the four digit extension) USACHPPM TG236A 131 August 2001 Version CHPPM-PAC chppm-www.apgea.army.mil/pac Commander's Office Commander NCOIC Secretary DSN 263-8445 263-8456 263-8447 Health Physics and Nuclear, Biological, Chemical-Environmental (NBC-E) Readiness DSN Program Manager 263-8502 COM, Inside Japan 0462-51-1788 EXT 263-8502 DSN Fax 263-8597 International calling (Int'l access #) + 81 + 3117 63-(the four digit extension) Be aware of any time zone differences when you contact additional assets. USACHPPM TG236A 132 August 2001 Version Appendix I. References 1. Commanders Guide On Low Level Radiation (LLR) Exposure In Military Operations, NATO Standardization Agreement (STANAG) No. 2473, May 2000. 2. Radiological Sources of Potential Exposure and/or Contamination, USACHPPM Technical Guide 236, June 1999. 3. NATO Handbook for Sampling and Identification of Radiological Agents (SIRA), Volume 1, (AEP-49), August 2000. 4. Nuclear Emergency and Radiological Decision Handbook (NERD), U.S. Department of Energy, Lawrence Livermore National Laboratory, UCRL-MI-128496, 1998. 5. Nuclear, Biological, and Chemical General Reference for the Officer Basic Course, GR 76332-200, Army Medical Department Center and School, 1997. 6. Medical Management of Radiological Casualties Handbook, First edition, Military Medical Operations Office, Armed Forces Radiobiology Research Institute, www.afrri.usuhs.mil, 1999. 7. Nuclear Weapon Accident Response Procedures, DoD 3150.8-M, Defense Threat Reduction Agency, 1999. 8. Preparedness and Response in Radiation Accidents, Food and Drug Administration, 1983. Reprinted by Nucleon Lectern Associates, Inc. 9. The AN/PDR-77 Draft Technical Manual, TM 11-6665-365-12&P, Headquarters Department of the Army, 1994. 10. Grober, Edward, Draft AN/PDR-77 Users Guide, Project Manger, NBCDS, RADIAC Project Office, AMCPM-NNN-F, Fort Monmouth, NJ, 1997. 11. AN/PDR-77User’s Guide, AMCPM-NNN-F, Headquarters Department of the Army, 1997 12. The Production Qualification Test (PQT) of the Alpha RADIAC Set, AN/PDR-77, White Sands Missile Range, Nuclear Effects Directorate, 1993. 13. Groundwater Field Sampling Manual, PUBL-DG-038 96, Wisconsin Department of Natural Resources, Bureau of Drinking Water and Groundwater, 1996. 14. Regulations for the Safe Transport of Radioactive Materials, 1996 Edition, International Atomic Energy Agency, No. ST1, Vienna, 1996. USACHPPM TG236A 133 August 2001 Version 15. Directorate of Laboratory Sciences Customer Service Manual, USACHPPM Technical Guide 214,July 2001. 16. The Army Radiation Safety Program, Army Regulation 11-9, Headquarters Department of the Army, 1999. 17. Nuclear Contamination Avoidance, FM 3-3-1, Headquarters Department of the Army, 1994. USACHPPM TG236A 134 August 2001 Version