1
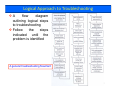
ﺑﺴﻢ اﷲ اﻟﺮﺣﻤﻦ اﻟﺮﺣﻴﻢ اﻟﻤﻤﻠﻜﺔ اﻟﻌﺮﺑﻴﺔ اﻟﺴﻌﻮدﻳﺔ ﻗﺴـﻢ اﻟﻌﻠﻮم اﻟﻄﺒﻴـﺔ اﻟﺘﻄﺒﻴﻘﻴـﺔ وزارة اﻟﺘﻌﻠﻴـــــﻢ اﻟﻌـــﺎﻟﻲ ﺗﺨﺼــﺺ أﺟــــﻬﺰة ﻃﺒﻴــــــــﺔ ﺟﺎﻣﻌــــﺔ اﻟﻤـــﻠﻚ ﺳﻌــﻮد إآﺘﺸﺎف اﻷﻋﻄﺎل ﻓﻰ اﻷﺟﻬﺰة اﻟﻄﺒﻴﺔ ٢٠٩أﺟﺰ آﻠﻴـﺔ اﻟﻤﺠﺘﻤـﻊ ﺑﺎﻟﺮﻳـﺎض اﻟﻔﺼﻞ اﻟﺪراﺳﻰ اﻟﺜﺎﻧﻲ ٣٣-٣٢ Medical Equipment Fault Detection MASH 209, A. Eshra, Spring 2011/12, 2nd Semester 1 Course Instructor Ayman Elsayed Eshra Assistant A i t t Prof. P f Dr. D Eng. E Tel. +9664735277 – 401 Room:24A 7-3 Office hours: see time table E-mail: [email protected] 2 Textbooks 1- Carr, 1 C J J. J J. & B Brown, J J. M M. “I “Introduction t d ti tto bi biomedical di l equipment technology” 4th ed., ch.16 pp.427. 2- Khandpur, p , R. S. “Handbook of Biomedical Instrumentation” 2nd ed. McGraw Hill, 2008 3- User and Service Manuals of Medical Devices. 4- www.ecri.org www ecri org 5- www.who.org 6-www.youtube.com 3 Grading & Assessment Assignments Reports R t Quizzes Midterm Experimental Test Final 10% 10% 10% 20% 10% 40% 4 Biomedical Equipment Biomedical Equipment Troubleshooting ٦ What should you have to be a Troubleshooter? Be able to read and understand the Service’s and User’ss Manuals User Be able to use biomedical hand tools. Be able to use multimeter (Voltmeter (Voltmeter, Ammeter Ammeter, Ohmmeter..) Be able to use Oscilloscope ٧ Preventive Maintenance To make sure that the medical equipment is safe in proper working order. Equipment should be inspected to ensure that it is calibrated accurately. PM can protect the patient by reducing the likelihood of mistakes when the equipment gives inaccurate data. data PM procedures are recommended by the manufacturers of equipment and are usually given in the equipment service manual. The frequency of PM depends on how vital the instrumentation is and on the observed failures (blood circulation, or breathing devices more than other). Wearing parts of equipment must be changed periodically: X-ray tubes, chemical electrodes, air filters. Inoperative equipment should be troubleshooted and repaired ٨ Principle of troubleshooting Systematic approach to locating the cause of a fault in an electronic circuit or system If your keyboard will not type, check to ensure that the cable is securely fastened to the keyboard port Determining which part of a system is responsible for a problem sensing electrode, reference electrode, instrument, solution, measuring technique ... and operator. Unexpected solution chemistry, incorrectly prepared standardizing solutions, improper plotting of data, unsuitable reference electrodes, operator error and poor choice of method account for many more problems than do instrument or electrode failure. A logical way of testing hardware or software in order to determine how to fix a problem ٩ Logical Approach to Troubleshooting Troubleshooting is done by one of the following methods: Case-study approach is used if a piece of equipment were known to have a chronic, or repetitive, problem. Check to see if it had reoccurred before looking for other problems. problems Logical analysis of given evidence. Data relating to the problem is gathered and used to isolate the case analytically. Because circuit theory is basic to design of medical equipment, equipment it could be used to deduce every problem with the hardware. Systematic approach to troubleshooting uses both methods. Repair procedure will involve systematic disassembling and reassembling of the equipment. To disassemble the equipment, number each part as you remove it. Then to reassemble, replace the parts in the reverse order, in order to be sure you are putting all the parts back together correctly. ١٠ Logical Approach to Troubleshooting A flow diagram outlining logical steps to troubleshooting Follow the steps indicated until the problem p ob e iss identified de t ed A general troubleshooting flowchart ١١ Logical Approach to Troubleshooting Step 1: all available resources should be used (emergency or hazard are involved) Step 2: interview the person who reported the problem. Step 3: system consists of units. Unit might b e different types of equipment (ECG, pressure, …). Unit consists of modules (particular functions). functions) Modules consist of transducer, transducer and another the signal processing section of the unit. The modules consists of circuit boards and discrete elements, and d circuit i it boards b d themselves th l consist i t off discrete di t elements. l t The troubleshooting process is the effort to find the discrete element or elements that have failed. The logical process is to start at the system level and work down to the discrete element. Step 4: interconnecting cable: corrosion. Early checking. breakage, loosening, and ١٢ Logical Approach to Troubleshooting Step p 9: manyy medical instruments display p y error messages g that aid in troubleshooting. Step 13: one good test of a cable is to invert it in its connector if its possible. connector, possible If the symptoms of the problem change, the cable is probably bad. Step p 14,, 15: troubleshooting g at the circuit-board level is facilitated if the equipment block diagram provided in the service manual is used as a guide. Data for problem analysis may be gathered from designated test points. Step 18: broad perspective on the kinds of problems that the equipment i may be b susceptible ibl to. Step 22: data can be used to isolate the problem either to a particular board or to an ancillary component that is often too large or that gets too hot to be attached to a board of heat ١٣ sink requirements Circuit‐Board Troubleshooting When a circuit board has been found to be faulty, y, component-level troubleshooting should be done. This involves: Detailed signal tracing Voltage and resistance measurements Use of the equipment schematic showing interconnection between th individual the i di id l components. t If a particular circuit board should be replaced by a another one,, the following g consideration should be taken: A visual inspection should be performed to look for any evidence of short circuits or overheating. Checking the power supply over over-voltage voltage, which could be damage the new board. Using of antistatic spray to prevent damage due to static charge buildup. Because the circuit boards are expensive, all precautions should be taken not to damage them during troubleshooting procedures. ١٤ Transducers troubleshooting Since theyy are the contact p point between the p patient and the instrument, transducers are often vulnerable to damage. Troubleshooting techniques apt to be effective with t transducers d are visual i l inspection, i ti i t i interview off the th operator, t and voltage or resistance measurement. Since transducers are often moved about and have delicate parts, they are subject to wear and abuse. Surface electrode: Check its attachment to the skin to make sure the electrode gel is adequate and has not dried out Be sure from the adhesive connection No excessive hair under the electrode, or a scarred or bony surface Visual inspection of cable connections for frays, breaks, or corrosion y reveal a p problem may ١٥ Transducers troubleshooting Thermistors: Poor thermal conductivity between the body tissue monitored and the thermistor Be sure that the mechanical connection free of air gaps In case that the thermistor is a branch of a Wheatstone bridge, a voltage check of the bridge output and resistance measurements on its components could reveal thermistor related faults Nonlinearity of the thermistor, for example, could be caused by a failure in a linearizing resistor attached across the thermistor The sensitivity of the thermistor can be effected by: Faults in the bridge branch components Drop in the excitation voltage of the bridge To isolate T i l t the th problem bl it can be b used d circuit i it analysis, l i voltage lt or resistance checks The final proof that a component is faulty is that changing the part either ith changes h th symptoms the t off the th problem bl or causes it t disappear di ١٦ Transducers troubleshooting Strain gauge: g g Troubles in this transducers are affected by mechanical contact with the patient Elimination of these problems is usually the responsibility of the equipment operator Problems with the balancing bridge and the excitation voltage are similar to those affecting the thermistor Because the operation of pressure transducer often depends on the measuring pressure transmitted through a fluid column (especial in INBP) any air bubbles in the line seriously degrade both the INBP), transducer sensitivity and its frequency response Bubbles often can be seen visually, and flushed and that must be done when the transducer is removed from the patient to remove any hazard of transferring bubbles into the bloodstream ١٧ ECG troubleshooting Calibration switch: It provides a handy troubleshooting aid. If it works properly, it is clear that the electronics beyond it to output is working and that a failure, working, failure if present, present has occurred before it in the signal path The following Box gives troubleshooting tips for an ECG: Possible Artifacts Base line with no Wave Form Check the following: •Trace switch ON and gain control set high enough? Readjust as required. Select appropriate lead. •Lead wires and patient cable fully inserted into proper receptacle? •Cable or lead wires damaged? (check with a lead continuityy tester.)) ١٨ Possible Artifacts Check the following: Base line Wander •Patient moving excessively? Secure lead wires and cable to patient •Caused by patient’s respiration? R Reposition iti electrodes. l t d •Electrodes dry? Re-prep skin and apply fresh moist electrodes. •Static buildup around patient? Check with Engineering a.c. Noise •Gain set too high? Readjust as required. •Unit in diagnostic mode? Select monitoring mode. •Electrodes dry? Re-prep skin and apply fresh moist electrodes. •Patient cable entwined with cables of other electrical devices? Separate patient cable from all other cables. ١٩ Possible Artifacts Check the following: Intermittent Signal •Connections not tight and properly secured (electrode to lead, lead to cable, cable to monitor)? Ensure proper connection •Electrodes dry? Re-prep skin and apply fresh moist electrodes. •Cable Cable or lead wires damaged? Check with continuity tester •Low battery in telemetry transmitter? Replace with fresh battery Low-Amplitude ECG Si Signal l •Gain set too low? Readjust as required. •Skin p properly p yp prepared? p Abrade skin. •Is the patient’s normal complex? Check with 12 lead electrocardiogram. ٢٠ EEG troubleshooting Troubleshooting g an EEG is similar in manyy ways y to troubleshooting of the ECG. They both have common-mode interference problems. They both use multiple surface electrodes and leads. As with ECG, also, an internal calibration control, can be used to check the instrument electronics and to distinguish problems with it from those related to the electrodes. Problems with the EEG are compounded by the fact that the signal levels are a thousand times smaller than the ECG potentials. Furthermore, there are multiple channels. A problem with one of the channels can be isolated to eliminate the possibility of problems with elements common to all channels, such as the power supply. Electrical or electronic and mechanical faults rarely occur in clinical EEG machines. ٢١ EEG troubleshooting To isolate a p problem in the diff amp p of p particular channel and its corresponding electrode, the calibration switch can be used. If the th channel h l under d test t t can be b calibrated lib t d with ith the th switch, it h this would indicate that the electronics beyond it is working and that the problem would probably be in a lead. The frequency response of filters can be checked by measuring the output of the filter due to a variable frequency input. input The most vulnerable element in active filters is the diff-amp chip. p Failure in the chip p would cause a radical change g in the frequency response. However, if the changes in frequency response are small, the problem may be a leaky capacitor, or aging or thermal damage in the components. aging, components ٢٢ EEG troubleshooting Typical yp faults fall into the following g categories: 1. Patient electrode connection problemshigh impedance connections to the scalp or broken electrode wires. 2. Cable connection problems- broken wires and bent connector pins. pins 3. Incorrect switch position- operator error or broken knob indicators. 4 Broken switches4. switches faulty switch contacts. contacts 5. Graphic recorder malfunctions- drive roller slipping or ink pens clogged or unseated. 6 Electronic 6. El t i malfunctionslf ti circuit i it faults f lt in i individual channels, system control, or power supply. ٢٣ EEG troubleshooting The EEG technician should perform a routine inspection procedure before daily use, as follows : 1. Machine turned on to warm up. 2 Calibration 2. C lib ti set, t usually ll att 100 µV, V and d rectangular t l pulse l observed b d on all channels (pen recorder). 3. Sensitivity set (system and individual channel) for proper deflection corresponding to 100 µV. V 4. Pressing and holding calibration switch set to observe time constant decay. 5. All inputs grounded to observe zero signal on all channels. ٢٤ Examples of typical EEG Faults Symptom: machine runs, but the tracing on one or more channels is missing. Possible causes: 1. Ink reservoirs for pens are dry [on missing channels] 2. Ink tubes are clogged. 3. Pen is not touching. Troubleshooting (machine off): 1. Check ink reservoirs. 2. Check ink tubes for clogging. 3. Check for upwardly bent pens-gently tl push h pen onto t paper with finger or pencil to observe any touching. Solutions: 1. For dry ink reservoirs, fill to level suggested by manufacturer (usually below top rim). rim) To overfill causes messy operation and can damage circuitry and mechanisms if allowed to drip into the machine. 2. For clogged ink tubes, remove the tube and pen and soak in warm water. water Use a fine wire to gently push the clog through. Be certain not to punch a hole in the tube. 3. For bent pens, remove the pen in question and gently bend the pen downward. Be careful not to bend at right angles, as these pens are delicate and will crack. ٢٥ Examples of typical EEG Faults Symptom: Spotty recordings (light or dark). Possible causes: 1. Worn pens or incorrectly loaded paper. Troubleshooting: 1. Check paper loading. 2. And if proper, then check pen for worn tip (ink not feeding properly). Solutions: 1. For paper loading, perform manufacturer’s procedure. 2 For 2. F worn pen tip, ti replace l with manufacturer’s part or equivalent. ٢٦ Examples of typical EEG Faults 1. 3. Symptom: Noisy or poor recording. Possible causes: Lead connection or electronic or mechanical problems. Troubleshooting: 1. 2. Place selector switches to standard calibration position and check for noise and improper operation. operation If calibration operation is normal, the problem is properly the patient connection. Grounded all EEG leads and check h k for f straight t i ht line li t i tracing (noiseless) and, if good, connect an EEG simulator, if available. Check for g good tracings. If noise appears on the trace, the problem is properly inside the machine. Refer to the service manual for troubleshooting. Solutions: 1 1. 2. For patient connection connection, physically inspect all electrodes and connectors to the machine. For machine p problem,, internal repair will be necessary. ٢٧ Defibrillators troubleshooting Problems show up p during g routine testing gp procedures. Procedures fro its use must be fail-safe. Safety of defibrillator is ensured by frequent testing and by training of the operator. Test procedures for the following defibrillator block diagram are done with defibrillator analyzer. analyzer ٢٨ Defibrillators troubleshooting Provides a 50 resistance discharge path for the defibrillator paddles that stimulate the torso resistance. The defibrillator electrodes are placed on the metal test pads. Energy gy levels of discharges g into the test p pads are measured up p to 1000 J. The discharge of this discharge may be displayed on an oscilloscope. The defibrillator analyzer generates an R R-wave wave of an ECG pattern at approximately 60 bpm, and it then displays the time between the leading edge of the R-wave and the cardioverter discharge. This measurement detects failures in the QRS detector and the 30 30ms delay circuit in the block diagram. In the defibrillator mode, the R-wave would be used along with the energize switch to ensure that the defibrillator properly inhibits unnecessary defibrillator pulses. ٢٩ Defibrillators troubleshooting The tester may also simulate a fibrillation waveform to ensure that a defibrillator discharge can be activated by the attendant switch as necessary. Any error in the waveform or energy level would indicate problems in the defibrillator itself. The wearing elements that would yield low-energy output is the battery pack. The battery voltage should be tested under loaded conditions. The battery should be periodically fully discharged. After recharging, g g, the battery y will be capable p of delivering g its rated energy. Otherwise, polarization on the battery terminals could limit its performance. ٣٠ Electrosurgical Unit (ESU) troubleshooting A logical first step to better define the symptom would be to interview the operator, if possible. An alternative to test the ESU with the electrosurgical analyzer. l This test equipment can be used to measure the output power in all modes of ESU operation. operation It can be used also to measure the RF leakage to ground, as well as low-frequency current. It is important for the troubleshooter to detect 60 Hz ac leakage currents, because they can cause microshock. Module-level Module level troubleshooting can be done by following block schematics, or diagrams, provided in the manual. g tip: p turn the p power off before removing g or Troubleshooting inserting any circuit board. Otherwise, transients induced may damage the board. ٣١ Electrosurgical Unit (ESU) troubleshooting There are two outputs to the ESU electrodes. The bipolar outputs are on the l lower right i h side id off the h schematic. The monopolar active output and the patient return are located just above the center. The keying switches on the electrodes feed into the upper right g corner of the schematic. Optical coupling isolates the electrodes, as do transformers on both b th the th monopolar l and d bipolar electrodes ٣٢ Electrosurgical Unit (ESU) troubleshooting The troubleshooting g g guide is g given in form of common symptoms, and suggested remedies, stated in terms of the block schematic modules. An A outline tli off some symptoms t and d possible ibl remedies di follows: f ll Symptom: there are no RF output from the monopolar ESU electrode. Possible causes: High-voltage power supply. Fuse blown. Surgical pencil open-circuit. Symptom: there are RF output in all modes except one. Possible causes: If the bipolar p is at fault,, the bipolar p control module should be checked. If a monopolar mode has failed, the clock/control module should be checked. Symptom: y p the p power output p in the monopolar p modes is more than 30 % below normal. Possible causes: Some components in the power amplifier stripline and output p modules may y have failed. Symptom: The display is dead. Possible causes: The low-voltage power supplies may be faulty. ٣٣