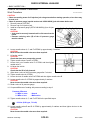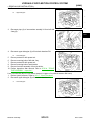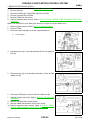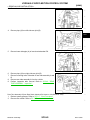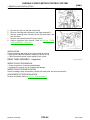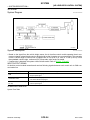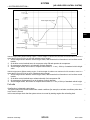
1
SUSPENSION SECTION SCS SUSPENSION CONTROL SYSTEM A B C D SCS CONTENTS HBMC CHECK SYSTEM PRESSURE ......................... 15 PRECAUTION ............................................... 4 PRECAUTIONS ................................................... 4 Precaution for Supplemental Restraint System (SRS) "AIR BAG" and "SEAT BELT PRE-TENSIONER" ................................................................... 4 Precaution Necessary for Steering Wheel Rotation after Battery Disconnect ..................................... 4 Precaution for Procedure without Cowl Top Cover...... 5 Precaution for Hydraulic Body-Motion Control System ...................................................................... 5 PREPARATION ............................................ 6 Work Procedure .......................................................15 PRESSURE REDUCING METHOD .................. 17 Work Procedure .......................................................17 Work Procedure .......................................................18 Work Procedure .......................................................20 Work Procedure .......................................................22 CHECK ORIFICE FOR CLOGGING ................. 27 Work Procedure .......................................................24 SYMPTOM DIAGNOSIS .............................. 29 DIFFERENCE IN APPEARANCE ..................... 29 COMPONENT PARTS ........................................ 8 Description ...............................................................29 Inspection Procedure ...............................................29 Hydraulic Body-Motion Control System .................... 9 Shock Absorber ......................................................... 9 PPMU ...................................................................... 10 Accumulator ............................................................ 11 PPMU Pipe .............................................................. 11 LARGE ROLL ANGLE ...................................... 30 Description ...............................................................30 Inspection Procedure ...............................................30 L M N O HYDRAULIC BODY-MOTION CONTROL SYSTEM ............................................................ 31 P Hydraulic Piping .......................................................31 System Diagram ...................................................... 12 System Description ................................................. 12 Component Description ........................................... 14 FRONT TUBE ASSEMBLY .......................................31 FRONT TUBE ASSEMBLY : Exploded View ..........32 FRONT TUBE ASSEMBLY : Removal and Installation ........................................................................32 FRONT TUBE ASSEMBLY : Inspection ..................34 Revision: 2010 May K REMOVAL AND INSTALLATION ............... 31 SYSTEM .............................................................12 BASIC INSPECTION ................................... 15 J Work Procedure .......................................................27 Description ................................................................ 7 STRUCTURE AND OPERATION ........................ 9 I CHECK FOR MALFUNCTION .......................... 22 Special Service Tools ................................................ 6 Commercial Service Tools ........................................ 6 Component Parts Location ........................................ 8 Component Description ............................................. 8 H CHECK INTERNAL LEAKAGE ........................ 20 PREPARATION ................................................... 6 DESCRIPTION .................................................... 7 G AIR BLEEDING METHOD ................................ 18 CHECK SHOCK ABSORBER FOR MALFUNCTION ........................................................ 24 SYSTEM DESCRIPTION .............................. 7 F SCS-1 2011 QX56 ACCUMULATOR ...................................................... 34 ACCUMULATOR : Exploded View ......................... 35 ACCUMULATOR : Removal and Installation .......... 35 ACCUMULATOR : Inspection ................................ 38 ACCUMULATOR : Disposal ................................... 38 PPMU, MIDDLE TUBE ASSEMBLY, PPMU PIPE ... 38 PPMU, MIDDLE TUBE ASSEMBLY, PPMU PIPE : Exploded View ...................................................... 39 PPMU, MIDDLE TUBE ASSEMBLY, PPMU PIPE : Removal and Installation ...................................... 39 PPMU, MIDDLE TUBE ASSEMBLY, PPMU PIPE : Inspection ............................................................. 43 PPMU, MIDDLE TUBE ASSEMBLY, PPMU PIPE : Disposal ................................................................ 43 REAR TUBE ASSEMBLY ......................................... 43 REAR TUBE ASSEMBLY : Exploded View ............ 44 REAR TUBE ASSEMBLY : Removal and Installation .......................................................................... 44 REAR TUBE ASSEMBLY : Inspection ................... 46 AIR LEVELIZER CONTROL SYSTEM PRECAUTION ............................................. 47 PRECAUTIONS ................................................. 47 Precaution for Supplemental Restraint System (SRS) "AIR BAG" and "SEAT BELT PRE-TENSIONER" ................................................................. 47 Precaution Necessary for Steering Wheel Rotation after Battery Disconnect .................................. 47 Precaution for Procedure without Cowl Top Cover... 48 Precaution for Air Levelizer Control System ........... 48 SYSTEM DESCRIPTION ............................ 49 DESCRIPTION ................................................... 49 Description .............................................................. 49 COMPONENT PARTS ....................................... 50 Component Parts Location ..................................... 50 Component Description .......................................... 50 Air Levelizer Control Module .................................. 51 Vehicle Height Sensor ............................................ 51 Air Compressor ....................................................... 51 Air Compressor Relay ............................................ 51 CK SUSP Indicator Lamp ....................................... 51 ECU DIAGNOSIS INFORMATION ............. 58 AIR LEVELIZER CONTROL MODULE ............. 58 Reference Value ..................................................... 58 Fail-safe .................................................................. 59 DTC Inspection Priority Chart ................................. 59 DTC Index ............................................................... 59 WIRING DIAGRAM .................................... 61 AIR LEVELIZER CONTROL SYSTEM .............. 61 Wiring Diagram ....................................................... 61 BASIC INSPECTION .................................. 65 DIAGNOSIS AND REPAIR WORKFLOW ......... 65 Work Flow ............................................................... 65 Diagnostic Work Sheet ........................................... 66 STANDARD VEHICLE HEIGHT SETTING ....... 67 Description .............................................................. 67 Work Procedure ...................................................... 67 DTC/CIRCUIT DIAGNOSIS ........................ 69 C1801 VHCL HEIGHT SENSOR ....................... 69 DTC Logic ............................................................... 69 Diagnosis Procedure .............................................. 69 Component Inspection ............................................ 70 C1802 AIR SUS COMPRS RELAY ................... 72 DTC Logic ............................................................... 72 Diagnosis Procedure .............................................. 72 C1803 AIR SUSPENSION EXH SOL ................ 74 DTC Logic ............................................................... 74 Diagnosis Procedure .............................................. 74 Component Inspection ............................................ 75 C1804 VHCL HEIGHT ADJ UP ......................... 77 DTC Logic ............................................................... 77 Diagnosis Procedure .............................................. 77 Component Inspection (Air Compressor Relay) ..... 79 Component Inspection (Air Compressor) ................ 79 C1805 VHCL HEIGHT ADJ DOWN ................... 80 DTC Logic ............................................................... 80 Diagnosis Procedure .............................................. 80 STRUCTURE AND OPERATION ...................... 52 C1806 VHCL HEIGHT SEN FIX ........................ 81 Rear Shock Absorber ............................................. 52 Vehicle Height Sensor ............................................ 53 DTC Logic ............................................................... 81 Diagnosis Procedure ............................................... 81 SYSTEM ............................................................. 54 C1807 VHCL HEIGHT SEN VOLT .................... 82 System Diagram ..................................................... 54 System Description ................................................. 54 Fail-safe .................................................................. 55 DTC Logic ............................................................... 82 Diagnosis Procedure .............................................. 82 DIAGNOSIS SYSTEM (AIR LEVELIZER CONTROL MODULE) ........................................ 56 CONSULT-III Function ........................................... 56 Revision: 2010 May C1808 AIR SUS COMPRS FNCTN ................... 84 DTC Logic ............................................................... 84 Diagnosis Procedure .............................................. 84 U1000 CAN COMM CIRCUIT ............................ 87 SCS-2 2011 QX56 Description .............................................................. 87 DTC Logic ............................................................... 87 Diagnosis Procedure ............................................... 87 U1010 CONTROL UNIT (CAN) ..........................88 Diagnosis Procedure ...............................................92 CK SUSP INDICATOR LAMP DOES NOT TURN OFF ......................................................... 93 Description ...............................................................93 Diagnosis Procedure ...............................................93 Description .............................................................. 88 DTC Logic ............................................................... 88 Diagnosis Procedure ............................................... 88 REMOVAL AND INSTALLATION ............... 94 POWER SUPPLY AND GROUND CIRCUIT ......89 AIR LEVELIZER CONTROL MODULE ............ 94 Diagnosis Procedure .............................................. 89 Exploded View .........................................................94 Removal and Installation .........................................94 Adjustment ...............................................................94 CK SUSP INDICATOR LAMP CIRCUIT ............90 Description .............................................................. 90 Component Function Check .................................... 90 Diagnosis Procedure ............................................... 90 A B C D AIR COMPRESSOR/AIR TUBE ........................ 95 SYMPTOM DIAGNOSIS .............................. 91 Exploded View .........................................................95 Removal and Installation .........................................95 Inspection ................................................................97 VEHICLE HEIGHT CANNOT BE RAISED .........91 VEHICLE HEIGHT SENSOR ............................ 98 F Description .............................................................. 91 Diagnosis Procedure ............................................... 91 Exploded View .........................................................98 Removal and Installation .........................................98 Adjustment ...............................................................99 G VEHICLE HEIGHT CANNOT BE LOWERED ....92 SCS Description .............................................................. 92 H I J K L M N O P Revision: 2010 May SCS-3 2011 QX56 PRECAUTIONS [HBMC] < PRECAUTION > PRECAUTION PRECAUTIONS Precaution for Supplemental Restraint System (SRS) "AIR BAG" and "SEAT BELT PRE-TENSIONER" INFOID:0000000006256134 The Supplemental Restraint System such as “AIR BAG” and “SEAT BELT PRE-TENSIONER”, used along with a front seat belt, helps to reduce the risk or severity of injury to the driver and front passenger for certain types of collision. This system includes seat belt switch inputs and dual stage front air bag modules. The SRS system uses the seat belt switches to determine the front air bag deployment, and may only deploy one front air bag, depending on the severity of a collision and whether the front occupants are belted or unbelted. Information necessary to service the system safely is included in the “SRS AIR BAG” and “SEAT BELT” of this Service Manual. WARNING: • To avoid rendering the SRS inoperative, which could increase the risk of personal injury or death in the event of a collision that would result in air bag inflation, all maintenance must be performed by an authorized NISSAN/INFINITI dealer. • Improper maintenance, including incorrect removal and installation of the SRS, can lead to personal injury caused by unintentional activation of the system. For removal of Spiral Cable and Air Bag Module, see the “SRS AIR BAG”. • Do not use electrical test equipment on any circuit related to the SRS unless instructed to in this Service Manual. SRS wiring harnesses can be identified by yellow and/or orange harnesses or harness connectors. PRECAUTIONS WHEN USING POWER TOOLS (AIR OR ELECTRIC) AND HAMMERS WARNING: • When working near the Air Bag Diagnosis Sensor Unit or other Air Bag System sensors with the ignition ON or engine running, DO NOT use air or electric power tools or strike near the sensor(s) with a hammer. Heavy vibration could activate the sensor(s) and deploy the air bag(s), possibly causing serious injury. • When using air or electric power tools or hammers, always switch the ignition OFF, disconnect the battery, and wait at least 3 minutes before performing any service. Precaution Necessary for Steering Wheel Rotation after Battery Disconnect INFOID:0000000006256136 NOTE: • Before removing and installing any control units, first turn the push-button ignition switch to the LOCK position, then disconnect both battery cables. • After finishing work, confirm that all control unit connectors are connected properly, then re-connect both battery cables. • Always use CONSULT-III to perform self-diagnosis as a part of each function inspection after finishing work. If a DTC is detected, perform trouble diagnosis according to self-diagnosis results. For vehicle with steering lock unit, if the battery is disconnected or discharged, the steering wheel will lock and cannot be turned. If turning the steering wheel is required with the battery disconnected or discharged, follow the operation procedure below before starting the repair operation. OPERATION PROCEDURE 1. 2. 3. 4. Connect both battery cables. NOTE: Supply power using jumper cables if battery is discharged. Turn the push-button ignition switch to ACC position. (At this time, the steering lock will be released.) Disconnect both battery cables. The steering lock will remain released with both battery cables disconnected and the steering wheel can be turned. Perform the necessary repair operation. Revision: 2010 May SCS-4 2011 QX56 PRECAUTIONS [HBMC] < PRECAUTION > 5. When the repair work is completed, re-connect both battery cables. With the brake pedal released, turn the push-button ignition switch from ACC position to ON position, then to LOCK position. (The steering wheel will lock when the push-button ignition switch is turned to LOCK position.) 6. Perform self-diagnosis check of all control units using CONSULT-III. A Precaution for Procedure without Cowl Top Cover B INFOID:0000000006256138 When performing the procedure after removing cowl top cover, cover the lower end of windshield with urethane, etc. C D SCS PIIB3706J Precaution for Hydraulic Body-Motion Control System F INFOID:0000000006255996 WARNING: • Always check the piping for loose connections, damage, or twists before starting operation, since pressure in hydraulic circuit becomes high during air bleeding operation. • When repairing or replacing a malfunctioning part, always release pressure from hydraulic circuit, since dangerous conditions may be created when oil leakage occurs during air bleeding operation. • Clean surrounding areas of oil inlet and air bleeder using steam before starting operation, since there may be mud on it. • Always decrease pressure when removing a system related part, since system pressure is high. • Seal the removed part using vinyl tape for preventing dirt from getting on or entering the removed part. • Check system pressure again 1 day or more after bleeding operation is complete, since system pressure may decrease when air bleeding is insufficient. • Use Genuine NISSAN Hydraulic Suspension Fluid for suspension fluid. • Never reuse drained suspension fluid. • Check for suspension fluid leakage after removing a system-related part. G H I J K L M N O P Revision: 2010 May SCS-5 2011 QX56 PREPARATION [HBMC] < PREPARATION > PREPARATION PREPARATION Special Service Tools INFOID:0000000006255997 The actual shapes of Kent-Moore tools may differ from those of special service tools illustrated here. Tool number (Kent-Moore No.) Tool name Description • Air bleeding • System diagnosis KV40107700 ( — ) Suspension oil pump JSEIA0183ZZ System pressure check KV40108000 ( — ) Oil pressure gauge JSEIA0184ZZ Shock absorber leakage check KV40108400 ( — ) Leak check plug JSEIA0185ZZ Commercial Service Tools INFOID:0000000006414888 Tool name Description Power tool Loosening bolts and nuts PBIC0190E Revision: 2010 May SCS-6 2011 QX56 DESCRIPTION [HBMC] < SYSTEM DESCRIPTION > SYSTEM DESCRIPTION A DESCRIPTION Description INFOID:0000000006255998 • Hydraulic body-motion control system is adopted, which makes shock absorber stroke appropriately by hydraulic pressure according to driving scenes. • The adoption of this system allows the reduction in a roll angle (i.e. vehicle body tilt angle at cornering) to improve steering stability and ride quality during travel on level roads. Furthermore, the use of this system improves the running performance on rough roads by shock absorption and quality tire adhesion through maximized stroke. B C D SCS F G H I J K L M N O P Revision: 2010 May SCS-7 2011 QX56 COMPONENT PARTS [HBMC] < SYSTEM DESCRIPTION > COMPONENT PARTS Component Parts Location INFOID:0000000006255999 JSEIA0228ZZ 1. Middle tube assembly RH 2. Accumulator assembly RH 3. Front tube assembly A 4. Front tube assembly B 5. Accumulator assembly LH 6. PPMU pipe A 7. PPMU assembly 8. Middle tube assembly LH 9. PPMU pipe B 10. Rear tube assembly A 11. Rear tube assembly B : Vehicle front Component Description INFOID:0000000006256000 Component parts Reference Shock absorber SCS-9, "Shock Absorber" Accumulator SCS-11, "Accumulator" PPMU SCS-10, "PPMU" PPMU pipe A PPMU pipe B Revision: 2010 May SCS-11, "PPMU Pipe" SCS-8 2011 QX56 STRUCTURE AND OPERATION [HBMC] < SYSTEM DESCRIPTION > STRUCTURE AND OPERATION A Hydraulic Body-Motion Control System INFOID:0000000006256001 B C D SCS F G H I JSEIA0228ZZ 1. Middle tube assembly RH 2. Accumulator assembly RH 3. Front tube assembly A 4. Front tube assembly B 5. Accumulator assembly LH 6. PPMU pipe A 7. PPMU assembly 8. Middle tube assembly LH 9. PPMU pipe B 10. Rear tube assembly A 11. Rear tube assembly B J K : Vehicle front Shock Absorber INFOID:0000000006256002 The use of accumulator-generated pressure responsive to driving conditions or pressure generated by oil flow to the upper/lower chamber improves the steering stability at curving, in addition to the running performance and a ride quality during off-road travel. L M FRONT SIDE Oil enters from oil inlet outlet hole (A) and flows into lower chamber (3) via outside oil path of cylinder inside. Oil enters from oil inlet outlet hole (B) and flows into upper chamber (1). With the pressure difference between oil flowed into the upper chamber and lower chamber, the piston (2) moves up and down and conveys a force generated through this motion to the tires. N O P Revision: 2010 May SCS-9 2011 QX56 STRUCTURE AND OPERATION [HBMC] < SYSTEM DESCRIPTION > JSEIA0173ZZ 1. Upper chamber 2. Piston 3. A. Oil inlet outlet hole B. Oil inlet outlet hole Lower chamber Vehicle upper : REAR SIDE Oil enters from oil inlet outlet hole (A) and flows into upper chamber (1). Oil enters from oil inlet outlet hole (B) and flows into lower chamber (3) via outside oil path of cylinder inside. With the pressure difference between oil flowed into the upper chamber and lower chamber, the piston (2) moves up and down and conveys a force generated through this motion to the tires. JSEIA0245ZZ 1. Upper chamber 2. Piston A. Oil inlet outlet hole B. Oil inlet outlet hole 3. Lower chamber : Vehicle upper PPMU INFOID:0000000006256003 • PPMU stands for Passive Pressure Maintenance Unit. • System pressure increases according to increase of oil volume due to oil temperature increase. Sudden rise in system pressure can be controlled by feeding the increased oil into the PPMU. • Oil flows into oil chamber via PPMU pipe A and PPMU pipe B by influence of pressure change, pushes gas spring of nitrogen gas, and pools. Revision: 2010 May SCS-10 2011 QX56 STRUCTURE AND OPERATION [HBMC] < SYSTEM DESCRIPTION > When system pressure decreases, influent oil is distributed to both pipes by gas spring reaction force of nitrogen gas via PPMU pipe A and PPMU pipe B to control sudden decrease in system pressure. A B C D SCS F JSEIA0175ZZ 1. Oil chamber 2. Bellows 3. G Gas chamber Accumulator INFOID:0000000006256004 H Influent oil from both front and rear shock absorbers on the outer ring flows simultaneously into the oil chamber during cornering, and gas spring reaction force of nitrogen gas increases pressure, according to the influent oil level. As for inner ring side, the gas spring conveys oil from the oil chamber to both front and rear shock absorbers and decreases pressure, according to the oil level. I J K L M N JSEIA0176ZZ O 1. Oil chamber 2. Gas chamber PPMU Pipe 3. Bellows INFOID:0000000006256005 PPMU and right and left tubes are connected. When oil increases according to increase of system pressure, increased amount of oil is sent to PPMU. When system pressure decreases, oil discharged from PPMU is sent to right and left tubes. Revision: 2010 May SCS-11 2011 QX56 P SYSTEM [HBMC] < SYSTEM DESCRIPTION > SYSTEM System Diagram INFOID:0000000006256006 JSEIA0179GB System Description INFOID:0000000006256007 • Drivability during cornering and driving on rough road is improved by mechanically generating oil pressure by connecting 4 units of shock absorbers to front, rear, right, and left by piping lines of 2 systems. • Oil filling and system diagnosis can be performed using PPMU. OPERATING PRINCIPLE During cornering (Front and rear wheels in the outer side of corner: compressing) When shock absorber in the outer side of corner is compressed during cornering, oil moves along piping path and overflowing oil from piping path flows in accumulator in the outer side of corner. Then, pressure increases by action of gas spring of nitrogen gas according to amount of oil that flows in. Pressure in the inner side of corner decreases, since oil is discharged from accumulator by stroke (extending direction) of shock absorber. The pressure difference generates stabilizer-like action to maintain balance in vehicle posture for a steady driving at cornering. Revision: 2010 May SCS-12 2011 QX56 SYSTEM [HBMC] < SYSTEM DESCRIPTION > A B C D SCS F G H I JSEIA0177GB During rough road driving (Front wheel LH: compressing, front wheel RH: extending, rear wheel LH: extending, rear wheel RH: compressing) Discharged oil from each shock absorber moves along piping path, but oil does not overflow from piping path, since oil moves in between each shock absorber. Oil does not flow in accumulator and system pressure does not increase. Since the oil from the contracted shock absorber flows into the shock absorber upper chamber, stabilizer-like action is not generated. This improves the adhesion level and the running performance on rough roads. J K L M N O P Revision: 2010 May SCS-13 2011 QX56 SYSTEM [HBMC] < SYSTEM DESCRIPTION > JSEIA0178GB Component Description INFOID:0000000006256008 Component parts Description Needle valve A Needle valve for oil filling or trouble diagnosis. It is usually closed. Needle valve B Needle valve for trouble diagnosis. It is usually open. Needle valve C Needle valve for oil filling or trouble diagnosis. It is usually closed. Needle valve D Needle valve for trouble diagnosis. It is usually open. Needle valve E Needle valve for oil filling or trouble diagnosis. It is usually closed. Relief valve If system pressure increases, then the orifice becomes clogged and oil flow into PPMU becomes disrupted, resulting in a large pressure difference between PPMU and both pipes. In this case, the relief valve opens to let the oil flow. Oil injection jack • Oil filling inlet • For basic inspection use. Air bleeder For air bleeding use. Revision: 2010 May SCS-14 2011 QX56 CHECK SYSTEM PRESSURE [HBMC] < BASIC INSPECTION > BASIC INSPECTION A CHECK SYSTEM PRESSURE Work Procedure INFOID:0000000006256009 B CAUTION: • Clean surrounding areas of oil injection jack using steam before starting operation, since there may C be mud on it. • Clean oil pressure gauge (special service tool: KV40108000) jack with steam before use. 1. Lift up the vehicle. D 2. Remove protector of PPMU. 3. Remove cap of oil injection jack. 4. Install an oil pressure gauge (SST: KV40108000) (A) to oil injecSCS tion jack. CAUTION: • Jack must be securely inserted until a click sound can be heard. F • Pressure reducing valve (B) of the oil pressure gauge must be closed. G JSEIA0186ZZ 5. Loosen needle valves A, C, and E of PPMU by approximately 2 rotations. CAUTION: Never loosen the needle valve more than required. H I J K JSEIA0187ZZ 6. 7. Refer to the figure and check the specified pressure. Tighten needle valves A, C, and E of PPMU to the specified torque. L M Tightening torque : 8.3 N·m (0.85 kg-m, 73 in-lb) N JSEIA0222GB O P Revision: 2010 May SCS-15 2011 QX56 CHECK SYSTEM PRESSURE < BASIC INSPECTION > 8. Loosen pressure reducing valve (A) of oil pressure gauge and then lower pressure. CAUTION: Be careful since oil drains swiftly from oil drain hole (B). 9. Check that reading of oil pressure gauge is 0 MPa. 10. Remove oil pressure gauge. 11. Install cap of oil injection jack. 12. Install protector of PPMU. Refer to SCS-39, "PPMU, MIDDLE TUBE ASSEMBLY, PPMU PIPE : Exploded View". [HBMC] JSEIA0188ZZ Revision: 2010 May SCS-16 2011 QX56 PRESSURE REDUCING METHOD [HBMC] < BASIC INSPECTION > PRESSURE REDUCING METHOD Work Procedure A INFOID:0000000006256010 CAUTION: B • Clean surrounding areas of oil injection jack using steam before starting operation, since there may be mud on it. • Clean oil pressure gauge (special service tool: KV40108000) jack with steam before use. C 1. Lift up the vehicle. 2. Remove protector of PPMU. 3. Remove cap of oil injection jack. D 4. Install an oil pressure gauge (SST: KV40108000) (A) to oil injection jack. CAUTION: SCS • Jack must be securely inserted until a click sound can be heard. • Pressure reducing valve (B) of the oil pressure gauge must be closed. F G JSEIA0186ZZ 5. Loosen needle valves A, C, and E of PPMU by approximately 2 rotations. CAUTION: Never loosen the needle valve more than required. H I J JSEIA0187ZZ 6. 7. 8. Loosen pressure reducing valve (A) of oil pressure gauge and then lower pressure. CAUTION: Be careful since oil drains swiftly from oil drain hole (B). Check that reading of oil pressure gauge is 0 MPa. Tighten needle valves A, C, and E of PPMU to the specified torque. Tightening torque K L M : 8.3 N·m (0.85 kg-m, 73 in-lb) N JSEIA0188ZZ O P Revision: 2010 May SCS-17 2011 QX56 AIR BLEEDING METHOD [HBMC] < BASIC INSPECTION > AIR BLEEDING METHOD Work Procedure INFOID:0000000006256011 WARNING: • Always check the piping for loose connections, damage, or twists before starting operation, since pressure in hydraulic circuit becomes high during operation. • When repairing or replacing a malfunctioning part, always release pressure from hydraulic circuit, since dangerous conditions may be created when oil leakage occurs during air bleeding operation. CAUTION: • Clean surrounding areas of oil injection jack and air bleeder using steam before starting operation, since there may be mud on it. • Clean suspension oil pump (special service tool: KV40107700) jack with steam before use. • Check system pressure again 1 day or more after bleeding operation is complete, since system pressure may decrease when air bleeding is insufficient. 1. Lift up the vehicle. 2. Remove protector of PPMU. 3. Remove cap of oil injection jack. 4. Install hose (A) of a suspension oil pump (SST: KV40107700) to oil injection jack. CAUTION: Jack must be securely inserted until a click sound can be heard. JSEIA0189ZZ 5. Loosen pressure reducing valve (A) of hose portion of suspension oil pump. JSEIA0190ZZ 6. 7. Set knob (A) of suspension oil pump to the direction as shown in the figure. Close pressure reducing valve of hose portion of suspension oil pump while sending oil by applying pressure using suspension oil pump. (Air bleeding in hose is complete.) JSEIA0191ZZ Revision: 2010 May SCS-18 2011 QX56 AIR BLEEDING METHOD [HBMC] < BASIC INSPECTION > 8. Loosen needle valves A, C, and E of PPMU by approximately 2 rotations. A CAUTION: Never loosen the needle valve more than required. 9. Install bleeder tube and drain tank to bleeder valve in upper side B of rear shock absorber RH. 10. Loosen bleeder valve and bleed air while sending oil by applying pressure using suspension oil pump, and then quickly tighten air C bleeder. CAUTION: JSEIA0187ZZ Be careful that oil in suspension oil pump is not at half or D less. 11. Repeat step 10 until no air appears in bleeder tube. 12. Tighten bleeder valve to the specified torque. Refer to SCS-32, "FRONT TUBE ASSEMBLY : Exploded View" (front shock absorber), SCS-39, "PPMU, MIDDLE TUBE ASSEMBLY, PPMU PIPE : Exploded SCS View" (upper side of rear shock absorber). F Lower side of rear shock absorber Tightening torque : 8.3 N·m (0.85 kg-m, 73 in-lb) 13. Perform operation according to steps 9 to 12 in the order of rear shock absorber RH (lower side) → front shock absorber RH (upper side and lower side) → rear shock absorber LH (upper side and lower side) → front shock absorber LH (upper side and lower side). 14. Repeat steps 9 to 13 (2nd turn). 15. Refer to the figure and send oil by applying pressure. G H I J K JSEIA0236GB 16. Tighten needle valves A, C, and E of PPMU to the specified torque. Tightening torque L : 8.3 N·m (0.85 kg-m, 73 in-lb) 17. Set knob (A) of suspension oil pump to the direction as shown in the figure and check that reading of pressure gauge is 0 MPa. 18. Remove hose of suspension oil pump. 19. Install cap of oil injection jack. 20. Install protector of PPMU. Refer to SCS-39, "PPMU, MIDDLE TUBE ASSEMBLY, PPMU PIPE : Exploded View". M N O JSEIA0193ZZ Revision: 2010 May SCS-19 2011 QX56 P CHECK INTERNAL LEAKAGE [HBMC] < BASIC INSPECTION > CHECK INTERNAL LEAKAGE Work Procedure INFOID:0000000006256012 CAUTION: • Clean surrounding areas of oil injection jack using steam before starting operation, since there may be mud on it. • Clean oil pressure gauge (special service tool: KV40108000) jack with steam before use. 1. Remove protector of PPMU. 2. Remove cap of oil injection jack. 3. Install an oil pressure gauge (SST: KV40108000) (A) to oil injection jack. CAUTION: • Jack must be securely inserted until a click sound can be heard. • Pressure reducing valve (B) of the oil pressure gauge must be closed. JSEIA0186ZZ 4. 5. 6. 7. 8. 9. 10. 11. 12. 13. 14. Loosen needle valves A, C, and E of PPMU by approximately 2 rotations. CAUTION: Never loosen the needle valve more than required. Lift up the vehicle. CAUTION: Check that tires never contact the ground. Tighten needle valves C and E of PPMU. Loosen lock nut of needle valve D of PPMU and then tighten needle valve D. Lift down the vehicle. CAUTION: Check that the lift is fully lowered. Write down a value of the oil pressure gauge after 5 minutes. Tighten needle valve A of PPMU. Loosen lock nut of needle valve B of PPMU and then tighten needle valve B. Loosen needle valve C of PPMU by approximately 2 rotations. CAUTION: Never loosen the needle valve more than required. Read a value of oil pressure gauge. Compare difference of reading with pressure reading in step 9. Pressure difference 0.1 MPa or more 0.1 MPa or less JSEIA0187ZZ : Normal : Malfunction 15. Tighten needle valves A, C, and E of PPMU to the specified torque. : 8.3 N·m (0.85 kg-m, 73 in-lb) 16. Loosen needle valves B and D of PPMU by approximately 2 rotations and then tighten lock nut to the specified torque. CAUTION: Never loosen the needle valve more than required. Revision: 2010 May SCS-20 2011 QX56 CHECK INTERNAL LEAKAGE [HBMC] < BASIC INSPECTION > A : 20 N·m (2.0 kg-m, 15 ft-lb) 17. Loosen pressure reducing valve (A) of oil pressure gauge and lower pressure. CAUTION: Be careful since oil drains swiftly from oil drain hole (B). 18. Check that reading of oil pressure gauge is 0 MPa. 19. Remove oil pressure gauge. B C D JSEIA0188ZZ SCS F G H I J K L M N O P Revision: 2010 May SCS-21 2011 QX56 CHECK FOR MALFUNCTION [HBMC] < BASIC INSPECTION > CHECK FOR MALFUNCTION Work Procedure INFOID:0000000006256013 CAUTION: • Clean surrounding areas of oil injection jack using steam before starting operation, since there may be mud on it. • Clean oil pressure gauge (special service tool: KV40108000) jack with steam before use. 1. Remove protector of PPMU. 2. Remove cap of oil injection jack. 3. Install an oil pressure gauge (SST: KV40108000) (A) to oil injection jack. CAUTION: • Jack must be securely inserted until a click sound can be heard. • Pressure reducing valve (B) of the oil pressure gauge must be closed. JSEIA0186ZZ 4. Loosen needle valves A, C, and E of PPMU by approximately 2 rotations. CAUTION: Never loosen the needle valve more than required. 5. Lift up the vehicle. CAUTION: Check that tires never contact the ground. 6. Tighten needle valves A and C of PPMU. 7. Loosen lock nuts of needle valves B and D of PPMU and then tighten needle valves B and D. 8. Write down a value of the oil pressure gauge. 9. Lift down the vehicle. CAUTION: Check that the lift is fully lowered. 10. Read a value of oil pressure gauge. 11. Compare difference of reading with pressure reading in step 8. Pressure change Pressure increases Pressure does not change JSEIA0187ZZ : PPMU malfunction : Shock absorber malfunction 12. Tighten needle valves A, C, and E of PPMU to the specified torque. Tightening torque : 8.3 N·m (0.85 kg-m, 73 in-lb) 13. Loosen needle valves B and D of PPMU by approximately 2 rotations and then tighten lock nut to the specified torque. CAUTION: Never loosen the needle valve more than required. Tightening torque Revision: 2010 May : 20 N·m (2.0 kg-m, 15 ft-lb) SCS-22 2011 QX56 CHECK FOR MALFUNCTION < BASIC INSPECTION > 14. Loosen pressure reducing valve (A) of oil pressure gauge and then lower pressure. CAUTION: Be careful since oil drains swiftly from oil drain hole (B). 15. Check that reading of oil pressure gauge is 0 MPa. 16. Remove oil pressure gauge. [HBMC] A B C JSEIA0188ZZ D SCS F G H I J K L M N O P Revision: 2010 May SCS-23 2011 QX56 CHECK SHOCK ABSORBER FOR MALFUNCTION [HBMC] < BASIC INSPECTION > CHECK SHOCK ABSORBER FOR MALFUNCTION Work Procedure INFOID:0000000006256014 CAUTION: • Clean surrounding areas of oil injection jack using steam before starting operation, since there may be mud on it. • Clean suspension oil pump (special service tool: KV40107700) jack with steam before use. • Clean leak check plug (special service tool: KV40108400) jack with steam before use. • Check each shock absorber, one by one, in accordance with the following procedures. 1. Lift up the vehicle. 2. Remove protector of PPMU. 3. Remove cap of oil injection jack. 4. Install hose (A) of a suspension oil pump (SST: KV40107700) to oil injection jack. CAUTION: • Jack must be securely inserted until a click sound can be heard. • Pressure reducing valve (B) of the suspension oil pump must be closed. JSEIA0244ZZ 5. Loosen needle valves A, C, and E of PPMU by approximately 2 rotations. CAUTION: Never loosen the needle valve more than required. JSEIA0187ZZ 6. 7. Set knob (A) of suspension oil pump to the direction as shown in the figure and check that reading of pressure gauge is 0 MPa. Tighten needle valves A, C, and E of PPMU. JSEIA0193ZZ 8. Disconnect upper side pipe or lower side pipe of each shock absorber. • For front shock absorber Revision: 2010 May SCS-24 2011 QX56 CHECK SHOCK ABSORBER FOR MALFUNCTION < BASIC INSPECTION > - Disconnect upper side pipe (B) of front shock absorber. [HBMC] A A : Lower side pipe B C JSEIA0233ZZ D • For rear shock absorber - Disconnect lower side pipe (B) of rear shock absorber. A SCS : Upper side pipe F G JSEIA0203ZZ 9. H Install a leak check plug (SST: KV40108400) (A) to the removed pipe and tighten the leak check plug to the specified torque. CAUTION: • O-ring must be free of scratches and damage. • Piping must be kept free of the intrusion of dust and dirt. Tightening torque : 5.0 N·m (0.51 kg-m, 44 in-lb) 10. Loosen lock nuts of needle valves B and D of PPMU and then tighten needle valves B and D. 11. Loosening position of needle valve of PPMU varies according to shock absorber that is checked. Loosen needle valve of PPMU by approximately 2 rotations, as per the following table. CAUTION: Never loosen the needle valve more than required. Shock absorber I J K JSEIA0210ZZ L Loosening position of needle valve Front LH C Rear LH C Front RH A Rear RH A M N O 12. Set knob (A) of suspension oil pump to the direction as shown in the figure. 13. Apply pressure of up to 2.4 MPa. 14. Go to step 15 when oil comes out from lower portion of shock absorber which pipe is removed from. Go to step 16 when oil does not come out. 15. Replace shock absorber, since shock absorber has internal leakage. Refer to FSU-10, "Removal and Installation" (front), RSU-8, "Removal and Installation" (rear). P JSEIA0191ZZ Revision: 2010 May SCS-25 2011 QX56 CHECK SHOCK ABSORBER FOR MALFUNCTION [HBMC] < BASIC INSPECTION > 16. Shock absorber that is checked is normal. Set knob (A) of suspension oil pump to the direction as shown in the figure and check that reading of pressure gauge is 0 MPa. 17. Tighten the loosened needle valve of PPMU. 18. Remove leak check plug from pipe. Install pipe to lower portion of shock absorber and tighten pipe to the specified torque. CAUTION: • O-ring must be free of scratches and damage. • Piping must be kept free of the intrusion of dust and dirt. Tightening torque : 5.0 N·m (0.51 kg-m, 44 in-lb) JSEIA0193ZZ 19. Check other shock absorbers in accordance with procedures of steps 8 to 18. 20. Tighten needle valves A, C, and E of PPMU to the specified torque, after completion of check. Tightening torque : 8.3 N·m (0.85 kg-m, 73 in-lb) 21. Loosen needle valves B and D of PPMU by approximately 2 rotations and then tighten lock nuts to the specified torque. CAUTION: Never loosen the needle valve more than required. Tightening torque Revision: 2010 May : 20 N·m (2.0 kg-m, 15 ft-lb) SCS-26 2011 QX56 CHECK ORIFICE FOR CLOGGING [HBMC] < BASIC INSPECTION > CHECK ORIFICE FOR CLOGGING Work Procedure A INFOID:0000000006256015 CAUTION: B • Clean surrounding areas of oil injection jack using steam before starting operation, since there may be mud on it. • Clean oil pressure gauge (special service tool: KV40108000) jack with steam before use. C 1. Remove protector of PPMU. 2. Remove cap of oil injection jack. 3. Install an oil pressure gauge (SST: KV40108000) (A) to oil injecD tion jack. CAUTION: • Jack must be securely inserted until a click sound can be SCS heard. • Pressure reducing valve (B) of the oil pressure gauge must be closed. F JSEIA0186ZZ 4. 5. 6. 7. 8. 9. 10. 11. 12. 13. 14. 15. 16. 17. Loosen needle valves A, C, and E of PPMU by approximately 2 rotations. CAUTION: Never loosen the needle valve more than required. Lift up the vehicle. CAUTION: Check that tires never contact the ground. Tighten needle valves A, C, and E of PPMU. Lift down the vehicle. CAUTION: Check that the lift is fully lowered. Loosen pressure reducing valve (A) of oil pressure gauge and then lower pressure. CAUTION: Be careful since oil drains swiftly from oil drain hole (B). Check that reading of oil pressure gauge is 0 MPa. Close pressure reducing valve. Loosen needle valve E of PPMU by approximately 2 rotations. CAUTION: Never loosen the needle valve more than required. Write down a value of the oil pressure gauge. Tighten needle valve E of PPMU. Loosen pressure reducing valve of oil pressure gauge and then lower pressure. CAUTION: Be careful since oil drains swiftly from oil drain hole. Check that reading of oil pressure gauge is 0 MPa. Close pressure reducing valve. Loosen needle valve A of PPMU by approximately 2 rotations. CAUTION: Never loosen the needle valve more than required. Read a value of the oil pressure gauge after 5 minutes. Compare difference of reading with pressure reading in step 11. Revision: 2010 May SCS-27 G H I J JSEIA0187ZZ K L M N JSEIA0188ZZ O P 2011 QX56 CHECK ORIFICE FOR CLOGGING [HBMC] < BASIC INSPECTION > Pressure difference 0.2 MPa or more 0.2 MPa or less : Replace the PPMU. Refer to SCS-39, "PPMU, MIDDLE TUBE ASSEMBLY, PPMU PIPE : Removal and Installation". : Normal 18. Tighten needle valve A of PPMU. 19. Loosen pressure reducing valve of oil pressure gauge and then lower pressure. CAUTION: Be careful since oil drains swiftly from oil drain hole. 20. Check that reading of oil pressure gauge is 0 MPa. Close pressure reducing valve. 21. Loosen needle valve C of PPMU by approximately 2 rotations. CAUTION: Never loosen the needle valve more than required. 22. Read a value of the oil pressure gauge after 5 minutes. 23. Compare difference of reading with pressure reading in step 11. Pressure difference 0.2 MPa or more 0.2 MPa or less : Replace the PPMU. Refer to SCS-39, "PPMU, MIDDLE TUBE ASSEMBLY, PPMU PIPE : Removal and Installation". : Normal 24. Tighten needle valve C of PPMU. 25. Loosen pressure reducing valve of oil pressure gauge and then lower pressure. CAUTION: Be careful since oil drains swiftly from oil drain hole. 26. Check that reading of oil pressure gauge is 0 MPa. 27. Remove oil pressure gauge. 28. Tighten needle valves A, C, and E of PPMU to the specified torque. : 8.3 N·m (0.85 kg-m, 73 in-lb) Revision: 2010 May SCS-28 2011 QX56 DIFFERENCE IN APPEARANCE [HBMC] < SYMPTOM DIAGNOSIS > SYMPTOM DIAGNOSIS A DIFFERENCE IN APPEARANCE Description INFOID:0000000006256016 While the vehicle is stopped, the difference of vehicle height of right side and left side (between wheel center and wheel arch) is 25 mm (0.98 in) or more. Inspection Procedure D 1. Visually check that the exterior parts (e.g. suspension spring) have no malfunctions. 2. Visually check tube and pipe for crush or oil leakage. Is the check result normal? YES >> GO TO 2. NO >> Repair or replace damaged parts. SCS 2.CHECK CLOGGING OF ORIFICE IN PPMU 2. 3. C INFOID:0000000006256017 1.CHECK APPEARANCE 1. B F Install an oil pressure gauge (SST: KV40108000) (A) to oil injection jack. CAUTION: • Clean surrounding areas of oil injection jack using steam before starting operation, since there may be mud on it. • Clean oil pressure gauge (special service tool: KV40108000) jack with steam before use. • Jack must be securely inserted until a click sound can be heard. • Pressure reducing valve (B) of the oil pressure gauge must be closed. G H I JSEIA0186ZZ J Loosen needle valves A and C of PPMU by approximately 2 rotations for check changes in vehicle height. CAUTION: Never loosen the needle valve more than required. Tighten needle valve A and C of PPMU to the specified torque after the inspection. K L Tightening torque : 8.3 N·m (0.85 kg-m, 73 in-lb) Does the vehicle height change 10 mm (0.39 in) or more? YES >> For detailed inspection of clogging of orifice in PPMU, refer to SCS-27, "Work Procedure". NO >> INSPECTION END M JSEIA0187ZZ N O P Revision: 2010 May SCS-29 2011 QX56 LARGE ROLL ANGLE [HBMC] < SYMPTOM DIAGNOSIS > LARGE ROLL ANGLE Description INFOID:0000000006256018 During cornering, inclination of the vehicle to outer side of corner is large. Inspection Procedure INFOID:0000000006256019 1.CHECK APPEARANCE 1. Visually check that the exterior parts (e.g. suspension spring) have no malfunctions. 2. Visually check tube and pipe for crush or oil leakage. Is the inspection result normal? YES >> GO TO 2. NO >> Repair or replace damaged parts. 2.CHECK NEEDLE VALVE OF PPMU Check that needle valves A and C are tightened to the specified torque. Tightening torque : 8.3 N·m (0.85 kg-m, 73 in-lb) Is the inspection result normal? YES >> GO TO 3. NO >> Tighten to the specified torque. JSEIA0187ZZ 3.SYSTEM PRESSURE CHECK Check system pressure. Refer to SCS-15, "Work Procedure". Is the inspection result normal? YES >> GO TO 4. NO >> Perform adjustment of system pressure. Refer to SCS-18, "Work Procedure". 4.CHECK INTERNAL LEAKAGE Check internal leakage. Refer to SCS-20, "Work Procedure". Is the inspection result normal? YES >> INSPECTION END NO >> GO TO 5. 5.CHECK MALFUNCTIONING PART Identify malfunctioning part. Refer to SCS-22, "Work Procedure". Does the pressure increase? YES >> Replace the PPMU. Refer to SCS-39, "PPMU, MIDDLE TUBE ASSEMBLY, PPMU PIPE : Removal and Installation". NO >> GO TO 6. 6.CHECK SHOCK ABSORBER Identify malfunctioning shock absorber. Refer to SCS-24, "Work Procedure". >> Replace identified shock absorber. Refer to FSU-10, "Removal and Installation" (front), RSU-8, "Removal and Installation" (rear). Revision: 2010 May SCS-30 2011 QX56 HYDRAULIC BODY-MOTION CONTROL SYSTEM [HBMC] < REMOVAL AND INSTALLATION > REMOVAL AND INSTALLATION A HYDRAULIC BODY-MOTION CONTROL SYSTEM Hydraulic Piping INFOID:0000000006256020 B C D SCS F G H I JSEIA0228ZZ 1. Middle tube assembly RH 2. Accumulator assembly RH 3. Front tube assembly A 4. Front tube assembly B 5. Accumulator assembly LH 6. PPMU pipe A 7. PPMU assembly 8. Middle tube assembly LH 9. PPMU pipe B 10. Rear tube assembly A 11. Rear tube assembly B J K : Vehicle front L FRONT TUBE ASSEMBLY M N O P Revision: 2010 May SCS-31 2011 QX56 HYDRAULIC BODY-MOTION CONTROL SYSTEM [HBMC] < REMOVAL AND INSTALLATION > FRONT TUBE ASSEMBLY : Exploded View INFOID:0000000006256021 JSEIA0229GB 1. Protector B 2. Bushing 3. Collar 4. Bleeder valve 5. Cap 6. O-ring 7. Front tube assembly A 8. Front tube assembly B 9. Protector A A. To front shock absorber LH B. To front shock absorber RH : Vehicle front : Apply genuine NISSAN hydraulic suspension fluid Refer to GI-4, "Components" for symbols not described on the above. FRONT TUBE ASSEMBLY : Removal and Installation INFOID:0000000006256022 REMOVAL Front Tube Assembly A (from Front Shock Absorber RH Upper to Front Shock Absorber LH Lower) 1. Reduce system pressure. Refer to SCS-17, "Work Procedure". Revision: 2010 May SCS-32 2011 QX56 HYDRAULIC BODY-MOTION CONTROL SYSTEM < REMOVAL AND INSTALLATION > 2. Disconnect lower side pipe (A) of front shock absorber LH. [HBMC] A B : Upper side pipe B C JSEIA0233ZZ 3. D Disconnect pipe (A) of accumulator assembly LH from left side 3-way (B). SCS F G JSEIA0195ZZ 4. Disconnect upper side pipe (A) of front shock absorber RH. B 5. 6. 7. 8. 9. 10. H : Lower side pipe Remove protector A with power tool. Remove mounting bolts of left side 3-way. Remove protector B with power tool. Remove mounting bolts of each bracket. Remove front tube assembly A from the vehicle. Perform inspection after removal. Refer to SCS-34, "FRONT TUBE ASSEMBLY : Inspection". I J JSEIA0234ZZ K Front Tube Assembly B (from Front Shock Absorber LH Upper to Front Shock Absorber RH Lower) 1. 2. Reduce system pressure. Refer to SCS-17, "Work Procedure". Disconnect upper side pipe (B) of front shock absorber LH. A L : Lower side pipe M N O JSEIA0233ZZ P Revision: 2010 May SCS-33 2011 QX56 HYDRAULIC BODY-MOTION CONTROL SYSTEM < REMOVAL AND INSTALLATION > 3. Disconnect pipe (A) of accumulator assembly RH from right side 3-way (B). [HBMC] JSEIA0197ZZ 4. Disconnect lower side pipe (B) of front shock absorber RH. A 5. 6. 7. 8. 9. 10. : Upper side pipe Remove protector A with power tool. Remove mounting bolts of right side 3-way. Remove protector B with power tool. Remove mounting bolts of each bracket. Remove front tube assembly B from the vehicle. Perform inspection after removal. Refer to SCS-34, "FRONT TUBE ASSEMBLY : Inspection". JSEIA0234ZZ INSTALLATION Note the following, and install in the reverse order of removal. • Apply genuine NISSAN hydraulic suspension fluid to O-ring. • Check connection portion of each piping for dirt or dust. • Completely insert guide (A) to guide hole on frame when installing left side 3-way. • For tightening torque for pipe of accumulator assembly LH, refer to SCS-35, "ACCUMULATOR : Exploded View". • For tightening torque for pipe of accumulator assembly RH, refer to SCS-35, "ACCUMULATOR : Exploded View". JSEIA0198ZZ FRONT TUBE ASSEMBLY : Inspection INFOID:0000000006256023 INSPECTION AFTER REMOVAL • O-ring must be free of scratches and damage. • Pipe and tube must be free of scratches and damage. INSPECTION AFTER INSTALLATION Check oil leakage, twists, deformation, contact with other parts, and loose connections. ADJUSTMENT AFTER INSTALLATION Perform air bleeding. Refer to SCS-18, "Work Procedure". ACCUMULATOR Revision: 2010 May SCS-34 2011 QX56 HYDRAULIC BODY-MOTION CONTROL SYSTEM [HBMC] < REMOVAL AND INSTALLATION > ACCUMULATOR : Exploded View INFOID:0000000006256024 A B C D SCS F G H I J K L JSEIA0230GB 1. O-ring : Vehicle front 2. Accumulator assembly RH 3. M Accumulator assembly LH N Apply genuine NISSAN hydraulic : suspension fluid Refer to GI-4, "Components" for symbols not described on the above. ACCUMULATOR : Removal and Installation O INFOID:0000000006256025 REMOVAL P Accumulator Assembly LH WARNING: Revision: 2010 May SCS-35 2011 QX56 HYDRAULIC BODY-MOTION CONTROL SYSTEM [HBMC] < REMOVAL AND INSTALLATION > Never remove mounting bolts of protector. JSEIA0200GB 1. 2. Reduce system pressure. Refer to SCS-17, "Work Procedure". Disconnect pipe (A) of accumulator assembly LH from left side 3-way (B). JSEIA0195ZZ 3. 4. 5. Disconnect pipe (A) of accumulator assembly LH from left side middle joint (B). Separate chassis and body. Refer to DLK-251, "Removal and Installation". Remove mounting bolts of each bracket. JSEIA0199ZZ 6. 7. 8. Remove mounting bolts of accumulator assembly LH. WARNING: Never remove mounting bolts of protector. Remove accumulator assembly LH from the vehicle. Perform inspection after removal. Refer to SCS-38, "ACCUMULATOR : Inspection". JSEIA0200GB Accumulator Assembly RH WARNING: Revision: 2010 May SCS-36 2011 QX56 HYDRAULIC BODY-MOTION CONTROL SYSTEM [HBMC] < REMOVAL AND INSTALLATION > Never remove mounting bolts of protector. A B C JSEIA0200GB D 1. 2. Reduce system pressure. Refer to SCS-17, "Work Procedure". Disconnect pipe (A) of accumulator assembly RH from right side 3-way (B). SCS F G JSEIA0197ZZ 3. 4. 5. Remove pipe (A) of accumulator assembly RH from right side middle joint (B). Separate chassis and body. Refer to DLK-251, "Removal and Installation". Remove mounting bolts of each bracket. H I J K JSEIA0201ZZ 6. 7. 8. Remove mounting bolts of accumulator assembly RH. WARNING: Never remove mounting bolts of protector. Remove accumulator assembly RH from the vehicle. Perform inspection after removal. Refer to SCS-38, "ACCUMULATOR : Inspection". L M N O JSEIA0200GB P INSTALLATION Note the following, and install in the reverse order of removal. • Apply genuine NISSAN hydraulic suspension fluid to O-ring. • Check connection portion of each piping for dirt or dust. Revision: 2010 May SCS-37 2011 QX56 HYDRAULIC BODY-MOTION CONTROL SYSTEM < REMOVAL AND INSTALLATION > • Completely engage hooks on frame when installing accumulator assembly. [HBMC] JSEIA0202ZZ ACCUMULATOR : Inspection INFOID:0000000006256026 INSPECTION AFTER REMOVAL • O-ring must be free of scratches and damage. • Pipe and tube must be free of scratches and damage. INSPECTION AFTER INSTALLATION Check oil leakage, twists, deformation, contact with other parts, and loose connections. ADJUSTMENT AFTER INSTALLATION Perform air bleeding. Refer to SCS-18, "Work Procedure". ACCUMULATOR : Disposal INFOID:0000000006256027 CAUTION: • Always wear safety goggles. • Always wear safety gloves. • Be careful since pressure is higher when temperature is high. • Be careful since metal shavings or oil may be blown away by compressed gas. • Discard drained oil in accordance with local laws and regulations. WORK PROCEDURE 1. 2. 3. Remove both tanks using an oil filter wrench. Secure tank using a vise. Drill a hole as shown in the figure (z) using an electric drill. Drain gas and oil. NOTE: • Gas is colorless, odorless, and harmless. • Use an electric drill with a drill bit of approximately 4 mm (0.16 in). • Drilling a hole is easier when electric drill speed is slow. JSEIA0182ZZ PPMU, MIDDLE TUBE ASSEMBLY, PPMU PIPE Revision: 2010 May SCS-38 2011 QX56 HYDRAULIC BODY-MOTION CONTROL SYSTEM [HBMC] < REMOVAL AND INSTALLATION > PPMU, MIDDLE TUBE ASSEMBLY, PPMU PIPE : Exploded View INFOID:0000000006256028 A B C D SCS F G H I J K L JSEIA0231GB 1. PPMU pipe B 2. Cap 3. Middle tube assembly RH 4. O-ring 5. Bleeder valve 6. Middle tube assembly LH 7. PPMU 8. Cap 9. Protector 10. PPMU pipe A A. To rear shock absorber RH : Vehicle front B. N O To rear shock absorber LH Apply genuine NISSAN hydraulic : suspension fluid Refer to GI-4, "Components" for symbols not described on the above. P PPMU, MIDDLE TUBE ASSEMBLY, PPMU PIPE : Removal and Installation INFOID:0000000006256029 REMOVAL PPMU Revision: 2010 May M SCS-39 2011 QX56 HYDRAULIC BODY-MOTION CONTROL SYSTEM [HBMC] < REMOVAL AND INSTALLATION > 1. Reduce system pressure. Refer to SCS-17, "Work Procedure". 2. Remove protector. 3. Disconnect PPMU pipe A and PPMU pipe B from PPMU. 4. Remove mounting bolts of PPMU. 5. Remove PPMU from the vehicle. 6. Perform inspection after removal. Refer to SCS-43, "PPMU, MIDDLE TUBE ASSEMBLY, PPMU PIPE : Inspection". Middle Tube Assembly LH (from Rear Shock Absorber LH Upper to Left Side Middle Joint) 1. 2. 3. Reduce system pressure. Refer to SCS-17, "Work Procedure". Remove PPMU. Disconnect upper side pipe (A) of rear shock absorber LH. B : Lower side pipe JSEIA0203ZZ 4. Disconnect pipe (A) of rear tube assembly B from left side rear joint (B). JSEIA0204ZZ 5. Disconnect pipe (A) of accumulator assembly LH from left side middle joint (B). JSEIA0199ZZ 6. 7. Disconnect PPMU pipe A (A) from left side middle joint (B). Separate chassis and body. Refer to DLK-251, "Removal and Installation". 8. Remove mounting bolts of each bracket. 9. Remove middle tube assembly LH from the vehicle. 10. Perform inspection after removal. Refer to SCS-43, "PPMU, MIDDLE TUBE ASSEMBLY, PPMU PIPE : Inspection". JSEIA0205ZZ Revision: 2010 May SCS-40 2011 QX56 HYDRAULIC BODY-MOTION CONTROL SYSTEM [HBMC] < REMOVAL AND INSTALLATION > Middle Tube Assembly RH (from Rear Shock Absorber RH Upper to Right Side Middle Joint) 1. 2. A Reduce system pressure. Refer to SCS-17, "Work Procedure". Disconnect upper side pipe (A) of rear shock absorber RH. B B : Lower side pipe C D JSEIA0206ZZ 3. Disconnect pipe (A) of rear tube assembly A from right side rear joint (B). SCS F G JSEIA0207ZZ 4. Remove pipe (A) of accumulator assembly RH from right side middle joint (B). H I J K JSEIA0201ZZ 5. 6. 7. 8. 9. L Disconnect PPMU pipe B (A) from right side middle joint (B). Separate chassis and body. Refer to DLK-251, "Removal and Installation". Remove mounting bolts of each bracket. Remove middle tube assembly RH from the vehicle. Perform inspection after removal. Refer to SCS-43, "PPMU, MIDDLE TUBE ASSEMBLY, PPMU PIPE : Inspection". M N O JSEIA0208ZZ PPMU pipe A and PPMU pipe B 1. 2. 3. 4. 5. 6. Reduce system pressure. Refer to SCS-17, "Work Procedure". Remove PPMU pipe A from left side middle joint. Remove PPMU pipe B from right side middle joint. Separate chassis and body. Refer to DLK-251, "Removal and Installation". Remove PPMU pipe B from the vehicle. Perform inspection after removal. Refer to SCS-43, "PPMU, MIDDLE TUBE ASSEMBLY, PPMU PIPE : Inspection". Revision: 2010 May SCS-41 2011 QX56 P HYDRAULIC BODY-MOTION CONTROL SYSTEM [HBMC] < REMOVAL AND INSTALLATION > INSTALLATION PPMU Note the following, and install in the reverse order of removal. • Check connection portion of each piping for dirt or dust. • Completely engage hooks of bracket on frame when installing PPMU. JSEIA0211ZZ Middle Tube Assembly LH (from Rear Shock Absorber LH Upper to Left Side Middle Joint) Note the following, and install in the reverse order of removal. • Apply genuine NISSAN hydraulic suspension fluid to O-ring. • Check connection portion of each piping for dirt or dust. • For tightening torque for pipe of rear tube assembly B, refer to SCS-44, "REAR TUBE ASSEMBLY : Exploded View". • For tightening torque for pipe of accumulator assembly LH, refer to SCS-35, "ACCUMULATOR : Exploded View". • Completely insert guide (A) to guide hole on frame when installing left side middle joint. JSEIA0215ZZ Middle Tube Assembly RH (from Rear Shock Absorber RH Upper to Right Side Middle Joint) • O-ring must be free of scratches and damage. • Apply genuine NISSAN hydraulic suspension fluid to O-ring. • Check connection portion of each piping for dirt or dust. • For tightening torque for pipe of rear tube assembly A refer to SCS-44, "REAR TUBE ASSEMBLY : Exploded View". • For tightening torque for pipe of accumulator assembly RH, refer to SCS-35, "ACCUMULATOR : Exploded View". • Completely insert guide (A) to guide hole on frame when installing right side middle joint. JSEIA0215ZZ PPMU pipe A and PPMU pipe B Install in the reverse order of removal. Revision: 2010 May SCS-42 2011 QX56 HYDRAULIC BODY-MOTION CONTROL SYSTEM [HBMC] < REMOVAL AND INSTALLATION > PPMU, MIDDLE TUBE ASSEMBLY, PPMU PIPE : Inspection INFOID:0000000006256030 A INSPECTION AFTER REMOVAL • O-ring must be free of scratches and damage. • Pipe and tube must be free of scratches and damage. B INSPECTION AFTER INSTALLATION Check oil leakage, twists, deformation, contact with other parts, and loose connections. C ADJUSTMENT AFTER INSTALLATION Perform air bleeding. Refer to SCS-18, "Work Procedure". PPMU, MIDDLE TUBE ASSEMBLY, PPMU PIPE : Disposal INFOID:0000000006256031 CAUTION: • Always wear safety goggles. • Always wear safety gloves. • Be careful since pressure is higher when temperature is high. • Be careful since metal shavings or oil may be blown away by compressed gas. • Discard drained oil in accordance with local laws and regulations. D SCS F WORK PROCEDURE 1. 2. 3. Remove both tanks using an oil filter wrench. Secure tank using a vise. Drill a hole as shown in the figure (z) using an electric drill. Drain gas and oil. NOTE: • Gas is colorless, odorless, and harmless. • Use an electric drill with a drill bit of approximately 4 mm (0.16 in). • Drilling a hole is easier when electric drill speed is slow. G H I J JSEIA0182ZZ K REAR TUBE ASSEMBLY L M N O P Revision: 2010 May SCS-43 2011 QX56 HYDRAULIC BODY-MOTION CONTROL SYSTEM [HBMC] < REMOVAL AND INSTALLATION > REAR TUBE ASSEMBLY : Exploded View INFOID:0000000006256032 JSEIA0247GB 1. Rear tube assembly A : Vehicle front 2. O-ring 3. Rear tube assembly B Apply genuine NISSAN hydraulic : suspension fluid Refer to GI-4, "Components" for symbols not described on the above. REAR TUBE ASSEMBLY : Removal and Installation INFOID:0000000006256033 REMOVAL Rear Tube Assembly A (from Rear Shock Absorber LH Lower to Right Side Rear Joint) 1. 2. Reduce system pressure. Refer to SCS-17, "Work Procedure". Remove rear muffler. Refer to EX-5, "Removal and Installation". Revision: 2010 May SCS-44 2011 QX56 HYDRAULIC BODY-MOTION CONTROL SYSTEM < REMOVAL AND INSTALLATION > 3. Remove lower side pipe (A) of rear shock absorber LH. [HBMC] A B C JSEIA0209ZZ D 4. Remove pipe (A) from left side rear joint (B). SCS F G JSEIA0204ZZ 5. Remove lower side pipe (A) of rear shock absorber RH. H I J JSEIA0212ZZ 6. 7. 8. 9. Remove pipe (A) from right side rear joint (B). Remove mounting bolts of bracket of rear tube assembly A and B. Remove rear tube assembly A from the vehicle. Perform inspection after removal. Refer to SCS-46, "REAR TUBE ASSEMBLY : Inspection". K L M N JSEIA0207ZZ Rear Tube Assembly B (from Rear Shock Absorber RH Lower to Left Side Rear Joint) 1. 2. O Reduce system pressure. Refer to SCS-17, "Work Procedure". Remove rear muffler. Refer to EX-5, "Removal and Installation". P Revision: 2010 May SCS-45 2011 QX56 HYDRAULIC BODY-MOTION CONTROL SYSTEM < REMOVAL AND INSTALLATION > 3. Remove lower side pipe (A) of rear shock absorber RH. [HBMC] JSEIA0212ZZ 4. 5. 6. 7. 8. Remove pipe (A) from left side rear joint (B). Remove mounting bolts of bracket of rear tube assembly B. Remove mounting bolts of bracket of rear left brake hose, and then free hose. Remove rear tube assembly B from the vehicle. Perform inspection after removal. Refer to SCS-46, "REAR TUBE ASSEMBLY : Inspection". JSEIA0204ZZ INSTALLATION Note the following, and install in the reverse order of removal. • Apply genuine NISSAN hydraulic suspension fluid to O-ring. • Check connection portion of each piping for dirt or dust. REAR TUBE ASSEMBLY : Inspection INFOID:0000000006256034 INSPECTION AFTER REMOVAL • O-ring must be free of scratches and damage. • Pipe and tube must be free of scratches and damage. INSPECTION AFTER INSTALLATION Check oil leakage, twists, deformation, contact with other parts, and loose connections. ADJUSTMENT AFTER INSTALLATION Perform air bleeding. Refer to SCS-18, "Work Procedure". Revision: 2010 May SCS-46 2011 QX56 PRECAUTIONS [AIR LEVELIZER CONTROL SYSTEM] < PRECAUTION > PRECAUTION A PRECAUTIONS Precaution for Supplemental Restraint System (SRS) "AIR BAG" and "SEAT BELT PRE-TENSIONER" B INFOID:0000000006256135 The Supplemental Restraint System such as “AIR BAG” and “SEAT BELT PRE-TENSIONER”, used along C with a front seat belt, helps to reduce the risk or severity of injury to the driver and front passenger for certain types of collision. This system includes seat belt switch inputs and dual stage front air bag modules. The SRS system uses the seat belt switches to determine the front air bag deployment, and may only deploy one front D air bag, depending on the severity of a collision and whether the front occupants are belted or unbelted. Information necessary to service the system safely is included in the “SRS AIR BAG” and “SEAT BELT” of this Service Manual. WARNING: SCS • To avoid rendering the SRS inoperative, which could increase the risk of personal injury or death in the event of a collision that would result in air bag inflation, all maintenance must be performed by an authorized NISSAN/INFINITI dealer. F • Improper maintenance, including incorrect removal and installation of the SRS, can lead to personal injury caused by unintentional activation of the system. For removal of Spiral Cable and Air Bag Module, see the “SRS AIR BAG”. • Do not use electrical test equipment on any circuit related to the SRS unless instructed to in this G Service Manual. SRS wiring harnesses can be identified by yellow and/or orange harnesses or harness connectors. H PRECAUTIONS WHEN USING POWER TOOLS (AIR OR ELECTRIC) AND HAMMERS WARNING: • When working near the Air Bag Diagnosis Sensor Unit or other Air Bag System sensors with the ignition ON or engine running, DO NOT use air or electric power tools or strike near the sensor(s) with a hammer. Heavy vibration could activate the sensor(s) and deploy the air bag(s), possibly causing serious injury. • When using air or electric power tools or hammers, always switch the ignition OFF, disconnect the battery, and wait at least 3 minutes before performing any service. I J Precaution Necessary for Steering Wheel Rotation after Battery Disconnect INFOID:0000000006256137 NOTE: • Before removing and installing any control units, first turn the push-button ignition switch to the LOCK position, then disconnect both battery cables. • After finishing work, confirm that all control unit connectors are connected properly, then re-connect both battery cables. • Always use CONSULT-III to perform self-diagnosis as a part of each function inspection after finishing work. If a DTC is detected, perform trouble diagnosis according to self-diagnosis results. For vehicle with steering lock unit, if the battery is disconnected or discharged, the steering wheel will lock and cannot be turned. If turning the steering wheel is required with the battery disconnected or discharged, follow the operation procedure below before starting the repair operation. OPERATION PROCEDURE 1. 2. 3. 4. Connect both battery cables. NOTE: Supply power using jumper cables if battery is discharged. Turn the push-button ignition switch to ACC position. (At this time, the steering lock will be released.) Disconnect both battery cables. The steering lock will remain released with both battery cables disconnected and the steering wheel can be turned. Perform the necessary repair operation. Revision: 2010 May SCS-47 2011 QX56 K L M N O P PRECAUTIONS [AIR LEVELIZER CONTROL SYSTEM] < PRECAUTION > 5. When the repair work is completed, re-connect both battery cables. With the brake pedal released, turn the push-button ignition switch from ACC position to ON position, then to LOCK position. (The steering wheel will lock when the push-button ignition switch is turned to LOCK position.) 6. Perform self-diagnosis check of all control units using CONSULT-III. Precaution for Procedure without Cowl Top Cover INFOID:0000000006256139 When performing the procedure after removing cowl top cover, cover the lower end of windshield with urethane, etc. PIIB3706J Precaution for Air Levelizer Control System INFOID:0000000006256038 • Never allow water and dust to enter the inside of air compressor. • Never disassemble the vehicle height sensor. Revision: 2010 May SCS-48 2011 QX56 DESCRIPTION [AIR LEVELIZER CONTROL SYSTEM] < SYSTEM DESCRIPTION > SYSTEM DESCRIPTION A DESCRIPTION Description INFOID:0000000006256039 • Corrects sinkage of vehicle rear that occurs in laden or towing conditions. • Maintains vehicle height at a constant level and improves riding comfort by charging or discharging air in air chamber of rear shock absorber, according to signal from vehicle height sensor installed to rear suspension. B C D SCS F G H I J K L M N O P Revision: 2010 May SCS-49 2011 QX56 COMPONENT PARTS [AIR LEVELIZER CONTROL SYSTEM] < SYSTEM DESCRIPTION > COMPONENT PARTS Component Parts Location INFOID:0000000006256040 JSEIA0223GB 1. 2. Combination meter Refer to MWI-6, "METER SYSTEM : Component Parts Location". CK SUSP indicator lamp 3. Air levelizer control module 4. Air compressor relay Air chamber 6. Air compressor 7. Vehicle height sensor A. Inside of luggage side finisher low- B. er (LH) Engine room (RH) C. Rear shock absorber D. Vehicle rear (LH) 5. Component Description INFOID:0000000006256041 Component parts Reference Air levelizer control module SCS-51, "Air Levelizer Control Module" Vehicle height sensor SCS-51, "Vehicle Height Sensor" Air compressor Exhaust solenoid Revision: 2010 May SCS-51, "Air Compressor" SCS-50 2011 QX56 COMPONENT PARTS [AIR LEVELIZER CONTROL SYSTEM] < SYSTEM DESCRIPTION > Component parts Reference Air compressor relay SCS-51, "Air Compressor Relay" CK SUSP indicator lamp SCS-51, "CK SUSP Indicator Lamp" Air Levelizer Control Module A INFOID:0000000006256042 B • Operates ON/OFF of air compressor (exhaust solenoid), according to signal from vehicle height sensor. • Transmits CK SUSP indicator lamp signal to the combination meter via CAN communication, when setting of standard vehicle height is incomplete. • If malfunction is detected, the system enters fail-safe mode. Refer to SCS-59, "Fail-safe". C Vehicle Height Sensor D INFOID:0000000006256043 Measures vehicle height of vehicle rear and transmits this information to air levelizer control module according to electric signal. Air Compressor SCS INFOID:0000000006256044 Operates according to signal from air levelizer control module via air compressor relay, and charges air in air chamber of rear shock absorber. F EXHAUST SOLENOID Operates according to signal from air levelizer control module, and discharges air in air chamber of rear shock absorber. Air Compressor Relay G INFOID:0000000006256045 H Turns ON according to signal from air levelizer control module, and operates air compressor. CK SUSP Indicator Lamp INFOID:0000000006256046 • Turns ON for 2 seconds when ignition switch is turned ON, for the purpose of bulb check. • Turns ON when setting of standard vehicle height is incomplete. NOTE: Does not turn ON when the system is malfunctioning. I J K L M N O P Revision: 2010 May SCS-51 2011 QX56 STRUCTURE AND OPERATION [AIR LEVELIZER CONTROL SYSTEM] < SYSTEM DESCRIPTION > STRUCTURE AND OPERATION Rear Shock Absorber INFOID:0000000006256047 • Discharges air in air chamber (2) from air valve (1) when vehicle height of vehicle rear is higher than standard vehicle height, has shock absorber stroke in compressed direction, lowers vehicle height, and returns it to standard vehicle height. • Also charges air in air chamber from air valve when height of vehicle rear is lower than standard vehicle height, has shock absorber stroke in extending direction, raises vehicle height, and returns it to standard vehicle height. • Charged air, because of rubber (3) that is hard and located on side surface, does not expand in lateral direction, but expands in vertical direction, and enables shock absorber to extend or retract. Without Hydraulic Body-Motion Control System JSEIA0217ZZ 1. Air valve A. Stroke : 2. Air chamber 3. Rubber Vehicle upper With Hydraulic Body-Motion Control System JSEIA0218ZZ 1. Air valve A. Stroke : 2. Air chamber 3. Rubber Vehicle upper Revision: 2010 May SCS-52 2011 QX56 STRUCTURE AND OPERATION [AIR LEVELIZER CONTROL SYSTEM] < SYSTEM DESCRIPTION > Vehicle Height Sensor INFOID:0000000006256048 A Vehicle height sensor is installed between rear suspension member (1) and rear lower link (2). Since arm (A) portion and rod (B) portion are ball joint type, distance between rear suspension member and rear lower link shortens when vehicle height of vehicle rear lowers because of laden or towing conditions, and arm portion changes to the status that is higher in its left side as shown in the figure. This angle change in arm portion is transmitted to the air levelizer control module according to electric signal. B C D SCS F G JSEIA0219ZZ H I J K L M N O P Revision: 2010 May SCS-53 2011 QX56 SYSTEM [AIR LEVELIZER CONTROL SYSTEM] < SYSTEM DESCRIPTION > SYSTEM System Diagram INFOID:0000000006256049 JSEIA0220GB System Description INFOID:0000000006256050 • Based on the signal from the vehicle height sensor, the air levelizer control module operates the air compressor (exhaust solenoid) and controls vehicle height so that it remains at a constant height. This operation occurs if vehicle height of vehicle rear is judged to be 15 mm (0.59 in) or more or 15 mm (0.59 in) or less than standard vehicle height, continuously for 30 seconds, when engine is started. • If malfunction is detected, the system enters fail-safe mode. Refer to SCS-59, "Fail-safe". INPUT/OUTPUT SIGNAL Air levelizer control module transmits and receives following signals between each control unit via CAN communication line. Component parts Control signal ECM Transmits the following signal via CAN communication line to air levelizer control module. • Engine speed signal Combination meter Receives the following signal via CAN communication line from air levelizer control module. • CK SUSP indicator lamp signal ABS actuator and electric unit (control unit) Transmits the following signal via CAN communication line to air levelizer control module. • Vehicle speed signal OPERATING PRINCIPLE System Time Table Revision: 2010 May SCS-54 2011 QX56 SYSTEM [AIR LEVELIZER CONTROL SYSTEM] < SYSTEM DESCRIPTION > A B C D SCS F G H JSEIA0221GB Vehicle height raises [When starting engine, if vehicle height of vehicle rear continues for 30 seconds or more in a status that is 15 mm (0.59 in) or less than standard vehicle height] 1. Vehicle height sensor detects vehicle height status, and transmits this information to air levelizer control module. 2. Air levelizer control module turns air compressor relay ON and operates air compressor. 3. Air compressor charges air in air chamber of shock absorber. 4. Vehicle height raises, and control is complete when status is −1 mm (−0.04 in) of standard vehicle height value. Vehicle height lowers [When starting engine, if vehicle height of vehicle rear continues for 30 seconds or more in a status that is 15 mm (0.59 in) or more of standard vehicle height] 1. Vehicle height sensor detects vehicle height status, and transmits this information to air levelizer control module. 2. Air levelizer control module turns exhaust solenoid of air compressor ON. 3. Air compressor discharges air from air chamber of shock absorber. 4. Vehicle height lowers, and control is complete when status is +1 mm (+0.04 in) of standard vehicle height. Fail-safe I J K L M INFOID:0000000006256051 If malfunction is detected, control stops. The system may enter fail-safe mode under certain conditions (for example, over-laden conditions) when electronic circuit is normal. In this case, always check that the system returns to normal by starting engine after unloading load. N O P Revision: 2010 May SCS-55 2011 QX56 DIAGNOSIS SYSTEM (AIR LEVELIZER CONTROL MODULE) [AIR LEVELIZER CONTROL SYSTEM] < SYSTEM DESCRIPTION > DIAGNOSIS SYSTEM (AIR LEVELIZER CONTROL MODULE) CONSULT-III Function INFOID:0000000006256052 CONSULT-III APPLICATION ITEMS Diagnostic test mode Function Work Support This mode enables a technician to adjust some devices faster and more accurately. Self Diagnostic Results Retrieve DTC from ECU and display diagnostic items. Data Monitor Monitor the input/output signal of the control unit in real time. CAN Diagnosis This mode displays a network diagnosis result about CAN by a diagram. CAN Diagnostic Support Monitor It monitors the status of CAN communication. ECU Identification Display the ECU identification number (part number etc.) of the selected system. Active Test Send the drive signal from CONSULT-III to the actuator. The operation check can be performed. WORK SUPPORT CAUTION: Perform the procedure when the vehicle is stopped. Item name Description STANDARD HEIGHT LEVEL Forcibly sets vehicle height to the set standard vehicle height. ADJUST HEIGHT INI Sets standard vehicle height. CLEAR HEIGHT INI Erases standard vehicle height. SELF DIAGNOSTIC RESULTS Refer to SCS-59, "DTC Index". When “CRNT” is displayed on self-diagnosis result, • The system is presently malfunctioning. When “PAST” is displayed on self-diagnosis result, • System malfunction in the past is detected, but the system is presently normal. Freeze frame data (FFD) Item name IGN COUNTER Description The number of times that ignition switch is turned ON after the DTC is detected is displayed. • When “0” is displayed: It indicates that the system is presently malfunctioning. • When except “0” is displayed: It indicates that system malfunction in the past is detected, but the system is presently normal. NOTE: Each time when ignition switch is turned OFF to ON, numerical number increases in 1 → 2 → 3...38 → 39. When the operation number of times exceeds 39, the number do not increase and “39” is displayed until self-diagnosis is erased. DATA MONITOR Monitored item (Unit) IGN VOLT Remarks (V) VHCL HT INTLZ STA Displays the power supply voltage of air levelizer control module. Displays setting status of standard vehicle height. VHCL HT INIT SLCT Displays setting status of standard vehicle height. VHCL HEIGHT SEN (V) Displays the signal voltage of vehicle height sensor. VHCL HT CNVSN VL (mm) Displays the vehicle height recognized by air levelizer control module. VHCL HGT FIX TIME (hour) Displays period of time that signal from vehicle height sensor does not change. Revision: 2010 May SCS-56 2011 QX56 DIAGNOSIS SYSTEM (AIR LEVELIZER CONTROL MODULE) [AIR LEVELIZER CONTROL SYSTEM] < SYSTEM DESCRIPTION > Monitored item (Unit) VHCL HGT INIT VAL Remarks (V) • Displays voltage when standard vehicle height is set. • Value does not change until setting of standard vehicle height is performed again. COMPRESSOR Displays operation status of air compressor. EXH SOLENOID Displays operation status of exhaust solenoid. ENG SPEED SIG Displays operation status of engine. WARNING LAMP Displays turning ON status of CK SUSP indicator lamp. A B C ACTIVE TEST CAUTION: • Perform the procedure when the vehicle is stopped. • Be careful that battery is not discharged when performing the procedure while engine is stopped. Item name SCS Description COMPRESSOR Air compressor can be operated. EXHAUST SOLENOID Ehaust solenoid of air compressore can be operated. WARNING LAMP CK SUSP indicator lamp can be turned ON or OFF. D F G H I J K L M N O P Revision: 2010 May SCS-57 2011 QX56 AIR LEVELIZER CONTROL MODULE [AIR LEVELIZER CONTROL SYSTEM] < ECU DIAGNOSIS INFORMATION > ECU DIAGNOSIS INFORMATION AIR LEVELIZER CONTROL MODULE Reference Value INFOID:0000000006256053 VALUES ON DIAGNOSIS TOOL Item name Condition IGN VOLT Value/Status (Approx.) Ignition switch ON VHCL HT INTLZ STA VHCL HT INIT SLCT 10 – 16 V Completion of the standard vehicle height setting CMPLT Other than the above INCMP Completion of the standard vehicle height setting 1 Other than the above 0 VHCL HEIGHT SEN Lift up the vehicle VHCL HT CNVSN VL Lift down the vehicle VHCL HGT FIX TIME Lift up the vehicle VHCL HGT INIT VAL COMPRESSOR EXH SOLENOID ENG SPEED SIG WARNING LAMP 2.8 – 3.8 V −15 – 15 mm 0h Completion of the standard vehicle height setting 2.800 – 3.800 V Other than the above 0V When the air compressor is operating On Other than the above Off When exhaust solenoid is operating On Other than the above Off Engine running RUN Other than the above STOP When CK SUSP indicator lamp is ON On Other than the above Off TERMINAL LAYOUT JSDIA0057ZZ PHYSICAL VALUES Terminal (Wire color) Description Input/ Output + − 2 (B) Ground GND 3 (V) Ground Air compressor relay Output 4 (L/W) Ground Vehicle height sensor (GND) — Signal name Revision: 2010 May — IGN ON Condition Reference value (Approx.) Always Less than 1 Ω Air compressor: ON 9 – 16 V Air compressor: OFF Less than 2 V Always SCS-58 Less than 1 Ω 2011 QX56 AIR LEVELIZER CONTROL MODULE [AIR LEVELIZER CONTROL SYSTEM] < ECU DIAGNOSIS INFORMATION > Terminal (Wire color) Description + − 5 (W) Ground 7 (P) 16 (L) 9 (P/L) Ground Signal name Input/ Output Vehicle height sensor (SIGNAL) Input Input/ Output CAN-L Air levelizer control module power supply Input 11 (V/W) Ground Exhaust solenoid Output 13 (R) Ground Vehicle height sensor (Power supply) Output 16 (L) 7 (P) CAN-H Input/ Output IGN ON Reference value (Approx.) A Condition IGN ON 0.2 – 4.6 V B IGN OFF 0V — 54 – 69 Ω IGN ON 10 – 16 V IGN OFF 0V D Exhaust solenoid: ON 9 – 16 V Exhaust solenoid: OFF Less than 2 V IGN ON 4.5 – 5.5 V IGN OFF 0V — 54 – 69 Ω Fail-safe SCS F INFOID:0000000006256054 If malfunction is detected, control stops. The system may enter fail-safe mode under certain conditions (for example, over-laden conditions) when electronic circuit is normal. In this case, always check that the system returns to normal by starting engine after unloading load. DTC Inspection Priority Chart Priority • U1000 CAN COMM CIRCUIT • U1010 CONTROL UNIT (CAN) 2 • • • • • H I J Detected items (DTC) 1 G INFOID:0000000006256055 If some DTCs are displayed at the same time, perform inspections one by one based on the following priority chart. 3 C K C1801 VHCL HEIGHT SENSOR C1802 AIR SUS COMPRS RELAY C1803 AIR SUS EXH SOL C1806 VHCL HEIGHT SEN FIX C1807 VHCL HEIGHT SEN VOLT L • C1804 VHCL HEIGHT ADJ UP • C1805 VHCL HEIGHT ADJ DOWN • C1808 AIR SUS COMPRS FNCTN M DTC Index INFOID:0000000006256056 N DTC CONSULT-III display Reference page C1801 VHCL HEIGHT SENSOR SCS-69 C1802 AIR SUS COMPRS RELAY SCS-72 C1803 AIR SUS EXH SOL SCS-74 C1804 VHCL HEIGHT ADJ UP SCS-77 C1805 VHCL HEIGHT ADJ DOWN SCS-80 C1806 VHCL HEIGHT SEN FIX SCS-81 C1807 VHCL HEIGHT SEN VOLT SCS-82 C1808 AIR SUS COMPRS FNCTN SCS-84 Revision: 2010 May SCS-59 2011 QX56 O P AIR LEVELIZER CONTROL MODULE [AIR LEVELIZER CONTROL SYSTEM] < ECU DIAGNOSIS INFORMATION > U1000 CAN COMM CIRCUIT SCS-87 U1010 CONTROL UNIT (CAN) SCS-88 Revision: 2010 May SCS-60 2011 QX56 AIR LEVELIZER CONTROL SYSTEM [AIR LEVELIZER CONTROL SYSTEM] < WIRING DIAGRAM > WIRING DIAGRAM A AIR LEVELIZER CONTROL SYSTEM Wiring Diagram INFOID:0000000006256057 B C D SCS F G H I J K L M N O P JCEWM0220GB Revision: 2010 May SCS-61 2011 QX56 AIR LEVELIZER CONTROL SYSTEM [AIR LEVELIZER CONTROL SYSTEM] < WIRING DIAGRAM > JCEWM0221GB Revision: 2010 May SCS-62 2011 QX56 AIR LEVELIZER CONTROL SYSTEM [AIR LEVELIZER CONTROL SYSTEM] < WIRING DIAGRAM > A B C D SCS F G H I J K L M N O JCEWM0222GB P Revision: 2010 May SCS-63 2011 QX56 AIR LEVELIZER CONTROL SYSTEM [AIR LEVELIZER CONTROL SYSTEM] < WIRING DIAGRAM > JCEWM0223GB Revision: 2010 May SCS-64 2011 QX56 DIAGNOSIS AND REPAIR WORKFLOW [AIR LEVELIZER CONTROL SYSTEM] < BASIC INSPECTION > BASIC INSPECTION A DIAGNOSIS AND REPAIR WORKFLOW Work Flow INFOID:0000000006256058 B DETAILED FLOW 1.INTERVIEW FROM THE CUSTOMER C Clarify customer complaints before inspection. First of all, perform an interview utilizing SCS-66, "Diagnostic Work Sheet" and reproduce the symptom as well as fully understand it. Ask customer about his/her complaints D carefully.Check symptoms by driving vehicle with customer, if necessary. CAUTION: Customers are not professional. Never guess easily like “maybe the customer means that...,” or “ maybe the customer mentions this symptom”. SCS >> GO TO 2. 2.CHECK SYMPTOM F Reproduce the symptom that is indicated by the customer, based on the information from the customer obtained by interview. Also check that the symptom is not caused by fail-safe mode. Refer to SCS-59, "Failsafe". CAUTION: When the symptom is caused by normal operation, fully inspect each portion and obtain the understanding of customer that the symptom is not caused by a malfunction. G H >> GO TO 3. 3.PERFORM THE SELF-DIAGNOSIS I With CONSULT-III Perform self-diagnosis for “E-SUS”. Is any DTC detected? YES >> Record or print self-diagnosis results. GO TO 4. NO >> GO TO 6. J K 4.RECHECK THE SYMPTOM With CONSULT-III Erase self-diagnostic results for “E-SUS”. Perform DTC confirmation procedures for the error-detected system. NOTE: If some DTCs are detected at the some time, determine the order for performing the diagnosis based on SCS-59, "DTC Inspection Priority Chart". Is any DTC detected? YES >> GO TO 5. NO >> Check harness and connectors based on the information obtained by interview. Refer to GI-40, "Intermittent Incident". 1. 2. L M N 5.REPAIR OR REPLACE ERROR-DETECTED PART O • Repair or replace error-detected parts. • Reconnect part or connector after repairing or replacing. • When DTC is detected, erase self-diagnostic result for “E-SUS”. P >> GO TO 7. 6.IDENTIFY ERROR-DETECTED SYSTEM BY SYMPTOM DIAGNOSIS Estimate error-detected system based on symptom diagnosis and perform inspection. Can the error-detected system be identified? Revision: 2010 May SCS-65 2011 QX56 DIAGNOSIS AND REPAIR WORKFLOW [AIR LEVELIZER CONTROL SYSTEM] < BASIC INSPECTION > YES >> GO TO 7. NO >> Check harness and connectors based on the information obtained by interview. Refer to GI-40, "Intermittent Incident". 7.FINAL CHECK With CONSULT-III 1. Check the reference value for “E-SUS”. 2. Recheck the symptom and check that the symptom is not reproduced on the same conditions. Is the symptom reproduced? YES >> GO TO 3. NO >> INSPECTION END Diagnostic Work Sheet INFOID:0000000006256059 Description • In general, customers have their own criteria for a problem. Therefore, it is important to understand the symptom and status well enough by asking the customer about his/her concerns carefully. To systemize all the information for the diagnosis, prepare the interview sheet referring to the interview points. • In some cases, multiple conditions that appear simultaneously may cause a DTC to be detected. INTERVIEW SHEET SAMPLE Interview sheet Custmer name MR/MS Registration number Initial year registration Vehicle type VIN Storage date Engine Mileage Symptom Does not operate ( ) function Warning lamp for ( ) turns ON Noise km/Mile Vibration Other ( ) First occurrence Recently Other ( Frequency of occurrence Always Under a certain conditions of Climate conditions Irrelevant Weather Fine Temperature Hot Relative humidity High Cloud Warm ) Rain Cool Sometimes ( Snow Others ( Cold Moderate time/day) Temp. [Approx. ) °C ( °F)] Low Road conditions Urban area Suburb area Mountainous road (uphill or downhill) Highway Rough road Operating condition, etc. Irrelevant When engine starts During idling During driving During acceleration At constant speed driving During deceleration During cornering (right curve or left curve) When steering wheel is steered (to right or to left) Memo Revision: 2010 May SCS-66 2011 QX56 STANDARD VEHICLE HEIGHT SETTING [AIR LEVELIZER CONTROL SYSTEM] < BASIC INSPECTION > STANDARD VEHICLE HEIGHT SETTING Description A INFOID:0000000006256060 Air levelizer control module enables precise control, by acquiring memorized standard vehicle height and signal (vehicle height) from vehicle height sensor. For this reason, always set standard vehicle height after performing the following operations. • Removal and installation or replacement of vehicle height sensor • Replacement of air levelizer control module Work Procedure B C INFOID:0000000006256061 D 1.CLEAR STANDARD VEHICLE HEIGHT With CONSULT-III Lift up the vehicle. SCS CAUTION: Check that tires never contact the ground. 2. Start the engine. F 3. Select “COMPRESSOR” in “Active Test” in “E-SUS”. 4. Touch “ON” and wait 60 seconds or more. 5. Touch “OFF”. 6. Select “CLEAR HEIGHT INI” in “Work Support” in “E-SUS”. G 7. Touch “Start”. 8. Touch “Clear”. NOTE: H CONSULT-III continues indicating "EXECUTING". The completion of the standard vehicle height erasing can be checked by the CK SUSP indicator lamp ON condition. Does CK SUSP indicator lamp turn ON? I YES >> GO TO 2. NO >> Perform step 1 again. 1. 2.ADJUST STANDARD VEHICLE HEIGHT J With CONSULT-III 1. Select “ADJUST HEIGHT INI” in “Work Support” in “E-SUS”. 2. Touch “Start”. 3. Touch “Initial 1”. NOTE: CONSULT-III continues indicating "EXECUTING". The completion of the standard vehicle height adjustment can be checked by the CK SUSP indicator lamp OFF condition. Does CK SUSP indicator lamp turn OFF? YES >> GO TO 3. NO >> Perform step 1 again. K L M 3. ADJUST VEHICLE HEIGHT With CONSULT-III Lift down the vehicle. CAUTION: Check that the lift is fully lowered. 2. Select “STANDARD HEIGHT LEVEL” in “Work Support” in “E-SUS”. 3. Touch “Start”. 4. Touch “Revert” and wait 120 seconds or more. 5. Although CONSULT-III continues indicating "EXECUTING", select “VHCL HGT CNVSN VL” in “Data Monitor” in “E-SUS”. Is value within −15 – 15 mm? YES >> GO TO 4. NO >> Perform step 1 again. N 1. 4.CHECK DTC With CONSULT-III Revision: 2010 May SCS-67 2011 QX56 O P STANDARD VEHICLE HEIGHT SETTING [AIR LEVELIZER CONTROL SYSTEM] < BASIC INSPECTION > Select “Self Diagnostic Results” in “E-SUS”. Is any DTC detected? YES >> Refer to SCS-59, "DTC Index". NO >> SETTING END Revision: 2010 May SCS-68 2011 QX56 C1801 VHCL HEIGHT SENSOR [AIR LEVELIZER CONTROL SYSTEM] < DTC/CIRCUIT DIAGNOSIS > DTC/CIRCUIT DIAGNOSIS A C1801 VHCL HEIGHT SENSOR DTC Logic INFOID:0000000006256062 B DTC DETECTION LOGIC C DTC C1801 Display itemI Malfunction detected condition Possible cause VHCL HEIGHT SENSOR Signal voltage of the vehicle height sensor remains 0.2 V or less or 4.6 V or more continuously for 60 seconds during sensor voltage (4.5 – 5.5 V) output by the air levelizer control module. • Harness or connectors (Sensor circuit is open.) • Vehicle height sensor • Air levelizer control module • Rear suspension component parts D SCS DTC CONFIRMATION PROCEDURE 1.PRECONDITIONING If “DTC CONFIRMATION PROCEDURE” has been previously conducted, always turn ignition switch OFF andwait at least 10 seconds before conducting the next test. F G >> GO TO 2. 2.CHECK DTC DETECTION H With CONSULT-III 1. Turn ignition switch ON and wait 60 seconds or more. 2. Perform “Self Diagnostic Results” in “E-SUS”. Is “C1801” detected ? YES >> Go to SCS-69, "Diagnosis Procedure". NO >> INSPECTION END I Diagnosis Procedure INFOID:0000000006256063 1.CHECK APPEARANCE Visually check for malfunction of suspension components, installing malfunction, or deformation of vehicle height sensor. Is the inspection result normal? YES >> GO TO 2. NO >> Repaire or replace damaged parts. 2.CHECK POWER SUPPLY CIRCUIT (PART 1) 1. 2. 3. J K L M Disconnect vehicle height sensor connector. Turn ignition switch ON. CAUTION: Never start the engine. Check voltage between vehicle height sensor harness connector and ground. N O Vehicle height sensor Connector Terminal C13 1 — Voltage Ground 4.5 – 5.5 V Is the inspection result normal? YES >> GO TO 4. NO >> GO TO 3. 3.CHECK POWER SUPPLY CIRCUIT (PART 2) 1. 2. Turn ignition switch OFF. Disconnect air levelizer control module connector. Revision: 2010 May SCS-69 2011 QX56 P C1801 VHCL HEIGHT SENSOR [AIR LEVELIZER CONTROL SYSTEM] < DTC/CIRCUIT DIAGNOSIS > 3. Check continuity between air levelizer control module harness connector and vehicle height sensor harness connector. Air levelizer control module 4. Vehicle height sensor Connector Terminal Connector Terminal B84 13 C13 1 Continuity Existed Check continuity between air levelizer control module harness connector and ground. Air levelizer control module Connector Terminal B84 13 — Continuity Ground Not existed Is the inspection result normal? YES >> 1. Check intermittent incident. Refer to GI-40, "Intermittent Incident". 2. If inspection result is OK, replace the air levelizer control module. Refer to SCS-94, "Removal and Installation". NO >> Repair or replace damaged parts. 4.CHECK HARNESS BETWEEN AIR LEVELIZER CONTROL MODULE AND VEHICLE HEIGHT SENSOR 1. 2. 3. Turn ignition switch OFF. Disconnect air levelizer control module connector. Check continuity between air levelizer control module harness connector and vehicle height sensor harness connector. Air levelizer control module Connector Terminal Connector 5 B84 4. Vehicle height sensor 2 C13 4 Continuity Terminal Existed 3 Check continuity between air levelizer control module harness connector and ground. Air levelizer control module Connector Terminal B84 5 4 — Continuity Ground Not existed Are the inspection results normal? YES >> GO TO 5. NO >> Repair or replace damaged parts. 5.CHECK VEHICLE HEIGHT SENSOR Check the vehicle height sensor. Refer to SCS-70, "Component Inspection". Is the inspection result normal? YES >> GO TO 6. NO >> Replace the vehicle height sensor. Refer to SCS-98, "Removal and Installation". 6.CHECK INTERMITTENT INCIDENT Refer to GI-40, "Intermittent Incident". Is the inspection result normal? YES >> Replace the air levelizer control module. Refer to SCS-94, "Removal and Installation". NO >> Repair or replace damaged parts. Component Inspection INFOID:0000000006256064 1.CHECK VEHICLE HEIGHT SENSOR Revision: 2010 May SCS-70 2011 QX56 C1801 VHCL HEIGHT SENSOR [AIR LEVELIZER CONTROL SYSTEM] < DTC/CIRCUIT DIAGNOSIS > 1. Remove the vehicle height sensor. Refer to SCS-98, "Removal and Installation". 2. Check resistance between vehicle height sensor connector terminals. Vehicle height sensor Condition Terminal 1 2 1 3 2 3 B Resistance (Approx.) A position 1.9 – 3.0 kΩ B position 320 – 680 Ω Always 1.6 – 2.4 kΩ A position 320 – 680 Ω B position 1.9 – 3.0 kΩ A C JSEIA0249ZZ Are the inspection results normal? YES >> 1. Install the vehicle height sensor. Refer to SCS-94, "Removal and Installation". 2. Perform “STANDARD VEHICLE HEIGHT SETTING”. Refer to SCS-67, "Work Procedure". NO >> Replace the vehicle height sensor. Refer to SCS-98, "Removal and Installation". D SCS F G H I J K L M N O P Revision: 2010 May SCS-71 2011 QX56 C1802 AIR SUS COMPRS RELAY [AIR LEVELIZER CONTROL SYSTEM] < DTC/CIRCUIT DIAGNOSIS > C1802 AIR SUS COMPRS RELAY DTC Logic INFOID:0000000006256065 DTC DETECTION LOGIC DTC C1802 Display item AIR SUS COMPRS RELAY Malfunction detected condition • Output voltage of the air compressor relay remains 9 V or less continuously for 5 seconds during air compressor ON signal output by the air levelizer control module. • Output voltage of the air compressor relay remains 2 V or more continuously for 10 seconds during air compressor OFF signal output by the air levelizer control module. Possible cause • Harness or connector • Air compressor relay • Air levelizer control module DTC CONFIRMATION PROCEDURE 1.PRECONDITIONING If “DTC CONFIRMATION PROCEDURE” has been previously conducted, always turn ignition switch OFF andwait at least 10 seconds before conducting the next test. >> GO TO 2. 2.CHECK DTC DETECTION With CONSULT-III 1. Turn ignition switch ON and wait 10 seconds or more. 2. Select “COMPRESSOR” in “Active Test” in “E-SUS”. 3. Touch “ON” and wait 5 seconds or more. 4. Select “Self Diagnostic Result” in “E-SUS”. Is “C1802” detected ? YES >> Go to SCS-72, "Diagnosis Procedure". NO >> INSPECTION END Diagnosis Procedure INFOID:0000000006256066 1.CHECK AIR COMPRESSOR ON SIGNAL FROM AIR LEVELIZER CONTROL MODULE CONSULT-III Disconnect air compressor relay connector. Turn ignition switch ON. CAUTION: Never start the engine. 3. Select “COMPRESSOR” in “Active Test” in “E-SUS”. 4. Touch “ON”. 5. While operating test item, check voltage between air compressor relay harness connector and ground. 1. 2. Air compressor relay Connector Terminal E116 2 — Voltage Ground 9 – 16 V Is the inspection result normal? YES >> GO TO 4. NO >> GO TO 2. 2.CHECK HARNESS BETWEEN AIR LEVELIZER CONTROL MODULE AND AIR COMPRESSOR RELAY 1. 2. Turn ignition switch OFF. Disconnect air levelizer control module connector. Revision: 2010 May SCS-72 2011 QX56 C1802 AIR SUS COMPRS RELAY [AIR LEVELIZER CONTROL SYSTEM] < DTC/CIRCUIT DIAGNOSIS > 3. Check continuity between air levelizer control module harness connector and air compressor relay harness connector. Air levelizer control module 4. Air compressor relay Connector Terminal Connector Terminal B84 3 E116 2 Connector Terminal B84 3 C — Continuity Ground Not existed Check voltage between air levelizer control module harness connector and ground. Air levelizer control module Connector Terminal B84 3 B Existed Check continuity between air levelizer control module harness connector and ground. Air levelizer control module 5. Continuity A D SCS — Voltage Ground 0V F Are the inspection results normal? YES >> GO TO 3. NO >> Repair or replace damaged part. G 3.CHECK INTERMITTENT INCIDENT H Refer to GI-40, "Intermittent Incident". Is the inspection result normal? YES >> Replace the air levelizer control module. Refer to SCS-94, "Removal and Installation". NO >> Repair or replace damaged parts. I 4.CHECK AIR COMPRESSOR RELAY GROUND 1. 2. J Turn ignition switch OFF. Check continuity between air compressor relay harness connector and ground. K Air compressor relay Connector Terminal E116 1 — Continuity Ground Existed Is the inspection result normal? YES >> GO TO 5. NO >> Repair or replace damaged part. L M 5.CHECK AIR COMPRESSOR RELAY 1. 2. Remove the air compressor relay. Refer to SCS-50, "Component Parts Location". Check continuity between air compressor relay harness connector terminals. Air compressor relay O Continuity Terminal 1 N 2 Existed P Is the inspection result normal? YES >> Check intermittent incident. Refer to GI-40, "Intermittent Incident". NO >> Replace the air compressor relay. Refer to SCS-50, "Component Parts Location". Revision: 2010 May SCS-73 2011 QX56 C1803 AIR SUSPENSION EXH SOL [AIR LEVELIZER CONTROL SYSTEM] < DTC/CIRCUIT DIAGNOSIS > C1803 AIR SUSPENSION EXH SOL DTC Logic INFOID:0000000006256067 DTC DETECTION LOGIC DTC C1803 Display item AIR SUS EXH SOL Malfunction detected condition • Output voltage of the exhaust solenoid remains 9 V or less continuously for 5 seconds during exhaust solenoid ON signal output by the air levelizer control module. • Output voltage of the exhaust solenoid remains 2 V or more continuously for 10 seconds during exhaust solenoid ON signal output by the air levelizer control module. Possible cause • Harness or connector • Exhaust solenoid • Air levelizer control module DTC CONFIRMATION PROCEDURE 1.PRECONDITIONING If “DTC CONFIRMATION PROCEDURE” has been previously conducted, always turn ignition switch OFF andwait at least 10 seconds before conducting the next test. >> GO TO 2. 2.CHECK DTC DETECTION With CONSULT-III 1. Turn ignition switch ON and wait 10 seconds or more. 2. Select “EXHAUST SOLENOID” in “Active Test” in “E-SUS”. 3. Touch “ON” and wait 5 seconds or more. 4. Select “Self Diagnostic Result” in “E-SUS”. Is “C1803” detected ? YES >> Go to SCS-74, "Diagnosis Procedure". NO >> INSPECTION END Diagnosis Procedure INFOID:0000000006256068 1.CHECK EXHAUST SOLENOID ON SIGNAL FROM AIR LEVELIZER CONTROL MODULE CONSULT-III Disconnect air compressor harness connector. Turn ignition switch ON. CAUTION: Never start the engine. 3. Select “EXHAUST SOLENOID” in “Active Test” in “E-SUS”. 4. Touch “ON”. 5. While operating test item, check voltage between air compressor harness connector and ground. 1. 2. Air compressor Connector Terminal C12 4 — Voltage Ground 9 – 16 V Is the inspection result normal? YES >> GO TO 4. NO >> GO TO 2. 2.CHECK HARNESS BETWEEN AIR LEVELIZER CONTROL MODULE AND AIR COMPRESSOR 1. 2. Turn ignition switch OFF. Disconnect air levelizer control module harness connector. Revision: 2010 May SCS-74 2011 QX56 C1803 AIR SUSPENSION EXH SOL [AIR LEVELIZER CONTROL SYSTEM] < DTC/CIRCUIT DIAGNOSIS > 3. Check continuity between air levelizer control module harness connector and air compressor harness connector. Air levelizer control module 4. Air compressor Connector Terminal Connector Terminal B84 11 C12 4 Continuity Connector Terminal B84 11 C — Continuity Ground Not existed Are the inspection results normal? YES >> GO TO 3. NO >> Repair or replace damaged part. D SCS 3.CHECK INTERMITTENT INCIDENT F Refer to GI-40, "Intermittent Incident". Is the inspection result normal? YES >> Replace the air levelizer control module. Refer to SCS-94, "Removal and Installation". NO >> Repair or replace damaged parts. G 4.CHECK AIR COMPRESSOR GROUND 1. 2. B Existed Check continuity between air levelizer control module harness connector and ground. Air levelizer control module A H Turn ignition switch OFF. Check continuity between air compressor harness connector and ground. I Air compressor Connector Terminal C12 3 — Continuity Ground Existed Are the inspection results normal? YES >> GO TO 5. NO >> Repair or replace damaged part. J K 5.CHECK AIR COMPRESSOR (EXHAUST SOLENOID) Check the air compressor (exhaust solenoid). Refer to SCS-75, "Component Inspection". Is the inspection result normal? YES >> Check intermittent incident. Refer to GI-40, "Intermittent Incident". NO >> Replace the air compressor. Refer to SCS-95, "Removal and Installation". Component Inspection L M INFOID:0000000006256069 CAUTION: • Keep the inside of air compressor free of dust. • Keep the resin stick and resin pipe free of scratches and burrs. N 1.CHECK AIR COMPRESSOR (EXHAUST SOLENOID) 1. O Remove the air compressor. Refer to SCS-95, "Removal and Installation". P Revision: 2010 May SCS-75 2011 QX56 C1803 AIR SUSPENSION EXH SOL [AIR LEVELIZER CONTROL SYSTEM] < DTC/CIRCUIT DIAGNOSIS > 2. Insert resin stick (A) 4.7 mm (0.185 in) in diameter into either one of the air compressor air tube holes to prevent leakage of air. 3. Insert resin pipe (B) 4.7 mm (0.185 in) in diameter into the other air tube hole and install air gauge (C) on the tip of the pipe. 4. Apply 12 V between air compressor connector terminal 1 and 2 until the air gauge reading reaches approximately 500 mm Hg (0.67 MPa). CAUTION: • Never make the terminals short. • Connect the fuse between the terminals when applying JSEIA0248ZZ the voltage. (+) (fuse) (−) Air compressor Condition Status Terminal 1 5. 2 Apply 12 V between air compressor connector terminal 1 and 2 until the air gauge reading reaches approximately 500 mm Hg (0.67 MPa). Air gauge needle remains at the pressurized position. Apply 12 V between air compressor connector terminal 3 and 4 for approximately 2 seconds. CAUTION: • Never make the terminals short. • Connect the fuse between the terminals when applying the voltage. (+) (fuse) (−) Air compressor Condition Status Terminal 4 3 Apply 12 V between air compressor connector terminal 3 and 4 for approximately 2 seconds. Air gauge reading lowers and the needle stops moving. *: It takes approximately 2 minutes for the air gauge needle to stop moving. Is the inspection result normal? YES >> INSPECTION END NO >> Replace the air compressor. Refer to SCS-95, "Removal and Installation". Revision: 2010 May SCS-76 2011 QX56 C1804 VHCL HEIGHT ADJ UP [AIR LEVELIZER CONTROL SYSTEM] < DTC/CIRCUIT DIAGNOSIS > C1804 VHCL HEIGHT ADJ UP A DTC Logic INFOID:0000000006256070 DTC DETECTION LOGIC DTC C1804 B Display item VHCL HEIGHT ADJ UP Malfunction detected condition The vehicle height is 15 mm (0.59 in) or more lower than the reference height despite the output of air compressor ON signal continuously for 120 seconds by the air levelizer control module. Possible cause • • • • • • • • • Harness or connector Air compressor Air compressor relay Air levelizer control module Rear shock absorber (air chamber) Vehicle height sensor Air tube Rear suspension component parts Overloaded C D SCS F DTC CONFIRMATION PROCEDURE 1.PRECONDITIONING If “DTC CONFIRMATION PROCEDURE” has been previously conducted, always turn ignition switch OFF andwait at least 10 seconds before conducting the next test. G H >> GO TO 2. 2.CHECK DTC DETECTION I With CONSULT-III 1. Set vehicle in the unloaded vehicle status. 2. Start the engine and wait 150 seconds or more. 3. Perform “Self Diagnostic Result” in “E-SUS”. Is “C1804” detected ? YES >> Go to SCS-77, "Diagnosis Procedure". NO >> INSPECTION END Diagnosis Procedure J K INFOID:0000000006256071 1.CHECK APPEARANCE L Visually check for malfunction of suspension components, damage of air chamber of rear shock absorber, installation malfunction, or deformation of vehicle height sensor. Is the inspection result normal? YES >> GO TO 2. NO >> Repaire or replace damaged parts. 2.CHECK AIR LEAK Apply soapy water to air tube, connecting portions between air tube and each component, and air chamber of rear shock absorber. Check for air leakage. Is the inspection result normal? YES >> GO TO 3. NO >> Repaire or replace damaged parts. 3.CHECK AIR COMPRESSOR RELAY POWER SUPPLY 1. 2. 3. 4. Turn ignition switch OFF. Check 30A fuse (#I). Disconnect air compressor relay connector. Check voltage between air compressor relay harness connector and ground. Revision: 2010 May SCS-77 2011 QX56 M N O P C1804 VHCL HEIGHT ADJ UP [AIR LEVELIZER CONTROL SYSTEM] < DTC/CIRCUIT DIAGNOSIS > Air compressor relay Connector Terminal E116 5 — Voltage Ground Battery voltage Is the inspection result normal? YES >> GO TO 4. NO >> Repair or replace damaged part. 4.CHECK AIR COMPRESSOR RELAY OUTPUT CIRCUIT 1. 2. 3. Turn ignition switch OFF. Disconnect air compressor connector. Check continuity between air compressor relay harness connector and air compressor harness connector. Air compressor relay 4. Air compressor Connector Terminal Connector Terminal E116 3 C12 1 Continuity Existed Check continuity between air compressor relay harness connector and ground. Air compressor relay Connector Terminal E116 3 — Continuity Ground Not existed Are the inspection results normal? YES >> GO TO 5. NO >> Repair or replace damaged part. 5.CHECK AIR COMPRESSOR GROUND Check continuity between air compressor harness connector and ground. Air compressor Connector Terminal C12 2 — Continuity Ground Existed Are the inspection results normal? YES >> GO TO 6. NO >> Repair or replace damaged part. 6.CHECK AIR COMPRESSOR RELAY Check the air compressor relay. Refer to SCS-79, "Component Inspection (Air Compressor Relay)". Is the inspection result normal? YES >> GO TO 7. NO >> Replace the air compressor relay. 7.CHECK AIR COMPRESSOR Check the air compressor. Refer to SCS-79, "Component Inspection (Air Compressor)". Is the inspection result normal? YES >> GO TO 8. NO >> Replace the air compressor. Refer to SCS-95, "Removal and Installation". 8.CHECK INTERMITTENT INCIDENT Refer to GI-40, "Intermittent Incident". Is the inspection result normal? YES >> 1. Perform “STANDARD VEHICLE HEIGHT SETTING”. Refer to SCS-67, "Work Procedure". 2. If DTC is detected, replace the air levelizer control module. Refer to SCS-94, "Removal and Installation". Revision: 2010 May SCS-78 2011 QX56 C1804 VHCL HEIGHT ADJ UP [AIR LEVELIZER CONTROL SYSTEM] < DTC/CIRCUIT DIAGNOSIS > NO >> Repair or replace damaged part. A Component Inspection (Air Compressor Relay) INFOID:0000000006256072 1.CHECK AIR COMPRESSOR RELAY 1. 2. 3. B Remove the air compressor relay. Refer to SCS-50, "Component Parts Location". Apply 12 V direct current between air compressor relay terminals 1 and 2. CAUTION: • Never make the terminals short. • Connect the fuse between the terminals when applying the voltage. Check continuity between air compressor relay terminals 3 and 5. C D (+) (fuse) (−) Air compressor relay Condition Continuity Terminal 2 1 Apply 12 V direct current between terminals 2 and 1. — — Does not apply 12 V direct current between terminals 2 and 1. Existed Not existed Is the inspection result normal? YES >> INSPECTION END NO >> Replace the air compressor relay. Refer to SCS-50, "Component Parts Location". Component Inspection (Air Compressor) INFOID:0000000006256073 H 1.CHECK AIR COMPRESSOR I Remove the air compressor. Refer to SCS-95, "Removal and Installation". Apply 12 V direct current between air compressor terminals 1 and 2. CAUTION: • Never make the terminals short. • Connect the fuse between the terminals when applying the voltage. (+) (fuse) J K (−) Air compressor Condition Status Terminal 1 F G CAUTION: Keep the inside of air compressor free of dust. 1. 2. SCS L 2 Apply 12 V direct current between terminals 1 and 2. Air flows from air exhaust holes. Is the inspection result normal? YES >> INSPECTION END NO >> Replace the air compressor. Refer to SCS-95, "Removal and Installation". M N O P Revision: 2010 May SCS-79 2011 QX56 C1805 VHCL HEIGHT ADJ DOWN [AIR LEVELIZER CONTROL SYSTEM] < DTC/CIRCUIT DIAGNOSIS > C1805 VHCL HEIGHT ADJ DOWN DTC Logic INFOID:0000000006256074 DTC DETECTION LOGIC DTC C1805 Display item VHCL HEIGHT ADJ DOWN Malfunction detected condition Possible cause The vehicle height is 15 mm (0.59 in) or more raise than the reference height despite the output of exhaust solenoid ON signal continuously for 120 seconds by the air levelizer control module. • Harness or connector • Vehicle height sensor • Air compressor (exhaust solenoid) • Air tube • Rear suspension component parts DTC CONFIRMATION PROCEDURE 1.PRECONDITIONING If “DTC CONFIRMATION PROCEDURE” has been previously conducted, always turn ignition switch OFF andwait at least 10 seconds before conducting the next test. >> GO TO 2. 2.CHECK DTC DETECTION With CONSULT-III 1. Start the engine and wait 150 seconds or more. 2. Perform “Self Diagnostic Result” in “E-SUS”. Is “C1805” detected ? YES >> Go to SCS-80, "Diagnosis Procedure". NO >> INSPECTION END Diagnosis Procedure INFOID:0000000006256075 1.CHECK APPEARANCE Visually check for malfunction of suspension components, crush of air tube, installation malfunction, or deformation of vehicle height sensor. Is the inspection result normal? YES >> GO TO 2. NO >> Repaire or replace damaged parts. 2.CHECK INTERMITTENT INCIDENT Refer to GI-40, "Intermittent Incident". Is the inspection result normal? YES >> Perform “STANDARD VEHICLE HEIGHT SETTING”. Refer to SCS-67, "Work Procedure". NO >> Repair or replace damaged part. Revision: 2010 May SCS-80 2011 QX56 C1806 VHCL HEIGHT SEN FIX [AIR LEVELIZER CONTROL SYSTEM] < DTC/CIRCUIT DIAGNOSIS > C1806 VHCL HEIGHT SEN FIX A DTC Logic INFOID:0000000006256076 DTC DETECTION LOGIC DTC C1806 B Display item VHCL HEIGHT SEN FIX Malfunction detected condition The signal voltage of the vehicle height sensor does not change for cumulated time of 100 hours under the condition that the air levelizer control module outputs sensor voltage (4.5 – 5.5 V) with vehicle speeds 2 km/h (2 MPH) or more. Possible cause C • Harness or connector • Vehicle height sensor D DTC CONFIRMATION PROCEDURE 1.PRECONDITIONING SCS If “DTC CONFIRMATION PROCEDURE” has been previously conducted, always turn ignition switch OFF andwait at least 10 seconds before conducting the next test. F >> GO TO 2. 2.CHECK VEHICLE HEIGHT SENSOR FIXATION 1. 2. 3. G With CONSULT-III Start the engine. Select “VHCL HEIGHT SEN” in “Data Monitor” in “E-SUS”. Drive vehicle and maintain the following conditions for 5 minutes or more. Vehicle speed H : 5 km/h (3 MPH) or more I Does the value of “VHCL HEIGHT SEN” change? YES >> INSPECTION END NO >> Go to SCS-81, "Diagnosis Procedure". Diagnosis Procedure J INFOID:0000000006256077 1.CHECK APPEARANCE K Visually check for installation malfunction, or deformation of vehicle height sensor. Is the inspection result normal? YES >> GO TO 2. NO >> Repaire or replace damaged parts. L 2.CHECK VEHICLE HEIGHT SENSOR M Check the vehicle height sensor. Refer to SCS-70, "Component Inspection". Is the inspection result normal? YES >> Check intermittent incident. Refer to GI-40, "Intermittent Incident". NO >> Replace the vehicle height sensor. Refer to SCS-98, "Removal and Installation". N O P Revision: 2010 May SCS-81 2011 QX56 C1807 VHCL HEIGHT SEN VOLT [AIR LEVELIZER CONTROL SYSTEM] < DTC/CIRCUIT DIAGNOSIS > C1807 VHCL HEIGHT SEN VOLT DTC Logic INFOID:0000000006256078 DTC DETECTION LOGIC DTC C1807 Display item Malfunction detected condition Possible cause The sensor power supply is more than 5.5 V or less than 4.5 V continuously for 20 seconds when the ignition switch is ON. VHCL HEIGHT SEN VOLT Sensor power supply is 0.5 V or more continuously for 1 second during 2 seconds after turning ON the ignition switch. • Harness or connector • Vehicle height sensor • Air levelizer control module DTC CONFIRMATION PROCEDURE 1.PRECONDITIONING If “DTC CONFIRMATION PROCEDURE” has been previously conducted, always turn ignition switch OFF andwait at least 10 seconds before conducting the next test. >> GO TO 2. 2.CHECK DTC DETECTION With CONSULT-III 1. Turn ignition switch ON and wait 20 seconds or more. 2. Perform “Self Diagnostic Results” in “E-SUS”. Is “C1807” detected ? YES >> Go to SCS-82, "Diagnosis Procedure". NO >> INSPECTION END Diagnosis Procedure INFOID:0000000006256079 1.CHECK POWER SUPPLY CIRCUIT (PART 1) 1. 2. 3. Disconnect vehicle height sensor connector. Turn ignition switch ON. CAUTION: Never start the engine. Check voltage between the vehicle height sensor harness connector and ground. Vehicle height sensor Connector Terminal C13 1 — Voltage Ground 4.5 – 5.5 V Is the inspection result normal? YES >> GO TO 3. NO >> GO TO 2. 2.CHECK POWER SUPPLY CIRCUIT (PART 2) 1. 2. 3. Turn ignition switch OFF. Disconnect air levelizer control module connector. Check continuity between air levelizer control module harness connector and vehicle height sensor harness connector. Air levelizer control module Vehicle height sensor Connector Terminal Connector Terminal B84 13 C13 1 Revision: 2010 May SCS-82 Continuity Existed 2011 QX56 C1807 VHCL HEIGHT SEN VOLT [AIR LEVELIZER CONTROL SYSTEM] < DTC/CIRCUIT DIAGNOSIS > 4. Check continuity between air levelizer control module harness connector and ground. A Air levelizer control module Connector Terminal B84 13 — Continuity Ground Not existed Is the inspection result normal? YES >> 1. Check intermittent incident. Refer to GI-40, "Intermittent Incident". 2. If inspection result is OK, replace the air levelizer control module. Refer to SCS-94, "Removal and Installation". NO >> Repair or replace damaged parts. 3.CHECK HARNESS BETWEEN AIR LEVELIZER CONTROL MODULE AND VEHICLE HEIGHT SENSOR 1. 2. 3. B C D Turn ignition switch OFF. Disconnect air levelizer control module connector. SCS Check continuity between air levelizer control module harness connector and vehicle height sensor harness connector. F Air levelizer control module Connector Terminal Connector 5 B84 4. Vehicle height sensor G 2 C13 4 Continuity Terminal Existed 3 Check continuity between air levelizer control module harness connector and ground. Air levelizer control module Connector — Terminal B84 H Continuity I 5 Ground 4 Not existed J Are the inspection results normal? YES >> GO TO 4. NO >> Repair or replace damaged parts. K 4.CHECK VEHICLE HEIGHT SENSOR Check the vehicle height sensor. Refer to SCS-70, "Component Inspection". Is the inspection result normal? YES >> Check intermittent incident. Refer to GI-40, "Intermittent Incident". NO >> Replace the vehicle height sensor. Refer to SCS-98, "Removal and Installation". L M N O P Revision: 2010 May SCS-83 2011 QX56 C1808 AIR SUS COMPRS FNCTN [AIR LEVELIZER CONTROL SYSTEM] < DTC/CIRCUIT DIAGNOSIS > C1808 AIR SUS COMPRS FNCTN DTC Logic INFOID:0000000006256080 DTC DETECTION LOGIC DTC C1808 Display item AIR SUS COMPRS FNCTN Malfunction detected condition Possible cause The cumulative operating time of the air compressor reaches 180 seconds or more. NOTE: Cumulative time is cleared under the following conditions: • Ignition switch: OFF • Exhaust conditions: satisfied [Vehicle height remains 15 mm (0.59 in) or more higher than the reference height for 30 seconds.] • Harness or connector • Vehicle height sensor • Air compressor (exhaust solenoid) • Air compressor relay • Overloaded • Rear shock absorber (air chamber) • Rear suspension component parts • Air tube DTC CONFIRMATION PROCEDURE 1.PRECONDITIONING If “DTC CONFIRMATION PROCEDURE” has been previously conducted, always turn ignition switch OFF andwait at least 10 seconds before conducting the next test. >> GO TO 2. 2.CHECK DTC DETECTION With CONSULT-III 1. Set vehicle in the unloaded vehicle status. 2. Start the engine and wait 5 minutes or more. 3. Perform “Self Diagnostic Result” in “E-SUS”. Is “C1808” detected ? YES >> Go to SCS-84, "Diagnosis Procedure". NO >> INSPECTION END Diagnosis Procedure INFOID:0000000006256081 1.CHECK APPEARANCE Visually check for malfunction of suspension components, damage of air chamber of rear shock absorber, installation malfunction, or deformation of vehicle height sensor. Is the inspection result normal? YES >> GO TO 2. NO >> Repaire or replace damaged parts. 2.CHECK AIR LEAK Apply soapy water to air tube, connecting portions between air tube and each component, and air chamber of rear shock absorber. Check for air leakage. Is the inspection result normal? YES >> GO TO 3. NO >> Repaire or replace damaged parts. 3.CHECK AIR COMPRESSOR RELAY POWER SUPPLY 1. 2. 3. 4. Turn ignition switch OFF. Check 30A fuse (#I). Disconnect air compressor relay connector. Check voltage between air compressor relay harness connector and ground. Revision: 2010 May SCS-84 2011 QX56 C1808 AIR SUS COMPRS FNCTN [AIR LEVELIZER CONTROL SYSTEM] < DTC/CIRCUIT DIAGNOSIS > A Air compressor relay Connector Terminal E116 5 — Voltage Ground Battery voltage Is the inspection result normal? YES >> GO TO 4. NO >> Repair or replace damaged part. C 4.CHECK AIR COMPRESSOR RELAY OUTPUT CIRCUIT 1. 2. 3. Turn ignition switch OFF. Disconnect air compressor connector. Check continuity between air compressor relay harness connector and air compressor harness connector. Air compressor relay 4. B D SCS Air compressor Connector Terminal Connector Terminal E116 3 C12 1 Continuity Existed F Check continuity between air compressor relay harness connector and ground. Air compressor relay Connector Terminal E116 3 — Continuity Ground Not existed G H Are the inspection results normal? YES >> GO TO 5. NO >> Repair or replace damaged part. I 5.CHECK AIR COMPRESSOR GROUND Check continuity between air compressor harness connector and ground. J Air compressor Connector Terminal C12 2 — Continuity Ground Existed Are the inspection results normal? YES >> GO TO 6. NO >> Repair or replace damaged part. K L 6.CHECK AIR COMPRESSOR RELAY Check the air compressor relay. Refer to SCS-79, "Component Inspection (Air Compressor Relay)". Is the inspection result normal? YES >> GO TO 7. NO >> Replace the air compressor relay. M N 7.CHECK AIR COMPRESSOR O Check the air compressor. Refer to SCS-79, "Component Inspection (Air Compressor)". Is the inspection result normal? YES >> GO TO 8. NO >> Replace the air compressor. Refer to SCS-95, "Removal and Installation". P 8.CHECK INTERMITTENT INCIDENT Refer to GI-40, "Intermittent Incident". Is the inspection result normal? YES >> 1. Perform “STANDARD VEHICLE HEIGHT SETTING”. Refer to SCS-67, "Work Procedure". 2. If DTC is detected, replace the air levelizer control module. Refer to SCS-94, "Removal and Installation". Revision: 2010 May SCS-85 2011 QX56 C1808 AIR SUS COMPRS FNCTN [AIR LEVELIZER CONTROL SYSTEM] < DTC/CIRCUIT DIAGNOSIS > NO >> Repair or replace damaged part. Revision: 2010 May SCS-86 2011 QX56 U1000 CAN COMM CIRCUIT [AIR LEVELIZER CONTROL SYSTEM] < DTC/CIRCUIT DIAGNOSIS > U1000 CAN COMM CIRCUIT A Description INFOID:0000000006256082 CAN (Controller Area Network) is a serial communication line for real-time application. It is an on-vehicle multiplex communication line with high data communication speed and excellent malfunction detection ability. Many electronic control units are equipped onto a vehicle, and each control unit shares information and links with other control units during operation (not independently). In CAN communication, control units are connected with 2 communication lines (CAN-H line, CAN-L line) allowing a high rate of information transmission with less wiring. Each control unit transmits/receives data but selectively reads required data only. DTC Logic INFOID:0000000006256083 B C D DTC DETECTION LOGIC DTC U1000 Display itemI Malfunction detected condition Possible cause CAN COMM CIRCUIT Air levelizer control module is not transmitting or receiving CAN communication signal for 2 seconds or more. • Harness or connectors (CAN communication line is open or shorted.) • Air levelizer control module DTC CONFIRMATION PROCEDURE SCS F G 1.PRECONDITIONING If “DTC CONFIRMATION PROCEDURE” is previously conducted, always turn ignition switch OFF and wait at least 10 seconds before performing the next test. >> GO TO 2. H I 2.CHECK DTC DETECTION With CONSULT-III 1. Start the engine. 2. Run engine for at least 2 consecutive seconds at idle speed. 3. Perform “Self Diagnostic Results” in “E-SUS”. Is “U1000” detected? YES >> Go to SCS-87, "Diagnosis Procedure". NO >> INSPECTION END Diagnosis Procedure J K INFOID:0000000006256084 L Go to LAN-18, "Trouble Diagnosis Flow Chart". M N O P Revision: 2010 May SCS-87 2011 QX56 U1010 CONTROL UNIT (CAN) [AIR LEVELIZER CONTROL SYSTEM] < DTC/CIRCUIT DIAGNOSIS > U1010 CONTROL UNIT (CAN) Description INFOID:0000000006256085 CAN (Controller Area Network) is a serial communication line for real-time application. It is an on-vehicle multiplex communication line with high data communication speed and excellent malfunction detection ability. Many electronic control units are equipped onto a vehicle, and each control unit shares information and links with other control units during operation (not independently). In CAN communication, control units are connected with 2 communication lines (CAN-H line, CAN-L line) allowing a high rate of information transmission with less wiring. Each control unit transmits/receives data but selectively reads required data only. DTC Logic INFOID:0000000006256086 DTC DETECTION LOGIC DTC Display itemI U1010 CONTROL UNIT (CAN) Malfunction detected condition Detecting error during the initial diagnosis of CAN controller of air levelizer control module. Possible cause Air levelizer control module DTC CONFIRMATION PROCEDURE 1.PRECONDITIONING If “DTC CONFIRMATION PROCEDURE” is previously conducted, always turn ignition switch OFF and wait at least 10 seconds before performing the next test. >> GO TO 2. 2.CHECK DTC DETECTION With CONSULT-III 1. Start the engine. 2. Run engine for at least 2 consecutive seconds at idle speed. 3. Perform “Self Diagnostic Results” in “E-SUS”. Is “U1010” detected? YES >> Go to SCS-88, "Diagnosis Procedure". NO >> INSPECTION END Diagnosis Procedure INFOID:0000000006256087 1.CHECK INTERMITTENT INCIDENT Refer to GI-40, "Intermittent Incident". Is the inspection result normal? YES >> Replace the air levelizer control module. Refer to SCS-94, "Removal and Installation". NO >> Repair or replace damaged parts. Revision: 2010 May SCS-88 2011 QX56 POWER SUPPLY AND GROUND CIRCUIT [AIR LEVELIZER CONTROL SYSTEM] < DTC/CIRCUIT DIAGNOSIS > POWER SUPPLY AND GROUND CIRCUIT A Diagnosis Procedure INFOID:0000000006256088 1.CHECK AIR LEVELIZER CONTROL MODULE IGNITION POWER SUPPLY CIRCUIT 1. 2. 3. B Disconnect air levelizer control module connector. Turn ignition switch ON. CAUTION: Never start the engine. Check voltage between the air levelizer control module harness connector and ground. C D Air levelizer control module Connector Terminal B84 9 — Voltage Ground 10 – 16 V Is the inspection result normal? YES >> INSPECTION END NO >> GO TO 2. SCS F 2.CHECK HARNESS BETWEEN AIR LEVELIZER CONTROL MODULE AND IPDM E/R 1. 2. 3. Turn ignition switch OFF. Disconnect IPDM E/R connector. Check continuity between air levelizer control module harness connector and IPDM E/R harness connector. Air levelizer control module 4. IPDM E/R Connector Terminal Connector Terminal B84 9 E10 5 Connector Terminal B84 9 H Continuity I Existed Check continuity between air levelizer control module harness connector ground. Air levelizer control module G J — Continuity Ground Not existed K Is the inspection result normal? YES >> GO TO 3. NO >> Repair or replace damaged parts. L 3.CHECK IPDM E/R M Check the IPDM E/R. Refer to PCS-10, "Diagnosis Description". Is the inspection result normal? YES >> Check intermittent incident. Refer to GI-40, "Intermittent Incident". NO >> Repair or replace damaged parts. N O P Revision: 2010 May SCS-89 2011 QX56 CK SUSP INDICATOR LAMP CIRCUIT [AIR LEVELIZER CONTROL SYSTEM] < DTC/CIRCUIT DIAGNOSIS > CK SUSP INDICATOR LAMP CIRCUIT Description INFOID:0000000006256089 Air levelizer control module transmits CK SUSP indicator lamp signal to combination meter via CAN communication, when setting of standard vehicle height is incomplete. Based on the signal, combination meter turns CK SUSP indicator lamp ON. Component Function Check INFOID:0000000006256090 1.CHECK CK SUSP INDICATOR LAMP OPERATION 1. 2. 3. CONSULT-III Turn ignition switch ON. Select “WARNING LAMP” in “Active Test” in “E-SUS”. While operating test item, check that the CK SUSP indicator lamp activates. ON OFF : CK SUSP indicator lamp turns ON : CK SUSP indicator lamp turns OFF Is the inspection result normal? YES >> INSPECTION END NO >> Refer to SCS-90, "Diagnosis Procedure". Diagnosis Procedure INFOID:0000000006256091 1.PERFORM SELF-DIAGNOSIS CONSULT-III 1. Turn ignition switch ON. 2. Select “Self Diagnostic Result” in “E-SUS”. Are any DTC detected? YES >> Refer to SCS-59, "DTC Index". NO >> GO TO 2. 2.CHECK COMBINATION METER Check combination meter. Refer to MWI-29, "On Board Diagnosis Function". Is the inspection result normal? YES >> Replace the air levelizer control module. Refer to SCS-94, "Removal and Installation". NO >> Repair or replace the combination meter. Refer to MWI-85, "Removal and Installation". Revision: 2010 May SCS-90 2011 QX56 VEHICLE HEIGHT CANNOT BE RAISED [AIR LEVELIZER CONTROL SYSTEM] < SYMPTOM DIAGNOSIS > SYMPTOM DIAGNOSIS A VEHICLE HEIGHT CANNOT BE RAISED Description INFOID:0000000006256092 B INFOID:0000000006256093 C Vehicle height remains in low status. Diagnosis Procedure 1.CHECK APPEARANCE Visually check for fuse, malfunction of suspension components, installation malfunction, or deformation of D vehicle height sensor. Is the inspection result normal? SCS YES >> GO TO 2. NO >> Repaire or replace damaged parts. 2.PERFORM SELF-DIAGNOSIS F 1. Turn ignition switch ON. 2. Select “Self Diagnostic Result” in “E-SUS”. Are any DTC detected? YES >> Refer to SCS-59, "DTC Index". NO >> GO TO 3. G 3.PERFORM STANDARD VEHICLE HEIGHT SETTING H Refer to SCS-67, "Work Procedure". Is the symptom improved? YES >> INSPECTION END NO >> Replace the air levelizer control module. Refer to SCS-94, "Removal and Installation". I J K L M N O P Revision: 2010 May SCS-91 2011 QX56 VEHICLE HEIGHT CANNOT BE LOWERED [AIR LEVELIZER CONTROL SYSTEM] < SYMPTOM DIAGNOSIS > VEHICLE HEIGHT CANNOT BE LOWERED Description INFOID:0000000006256094 Vehicle height remains in high status. Diagnosis Procedure INFOID:0000000006256095 1.CHECK APPEARANCE Visually check for fuse, malfunction of suspension components, installation malfunction, or deformation of vehicle height sensor. Is the inspection result normal? YES >> GO TO 2. NO >> Repaire or replace damaged parts. 2.PERFORM SELF-DIAGNOSIS 1. Turn ignition switch ON. 2. Select “Self Diagnostic Result” in “E-SUS”. Are any DTC detected? YES >> Refer to SCS-59, "DTC Index". NO >> GO TO 3. 3.PERFORM STANDARD VEHICLE HEIGHT SETTING Refer to SCS-67, "Work Procedure". Is the symptom improved? YES >> INSPECTION END NO >> Replace the air levelizer control module. Refer to SCS-94, "Removal and Installation". Revision: 2010 May SCS-92 2011 QX56 CK SUSP INDICATOR LAMP DOES NOT TURN OFF [AIR LEVELIZER CONTROL SYSTEM] < SYMPTOM DIAGNOSIS > CK SUSP INDICATOR LAMP DOES NOT TURN OFF Description A INFOID:0000000006256096 • CK SUSP indicator lamp turns ON while driving the vehicle. • CK SUSP indicator lamp does not turn ON after the completion of standard vehicle height setting. Diagnosis Procedure B INFOID:0000000006256097 C 1.STANDARD VEHICLE HEIGHT SETTING Perform “STANDARD VEHICLE HEIGHT SETTING”. Refer to SCS-67, "Work Procedure". Does CK SUSP indicator lamp turn OFF? YES >> INSPECTION END NO >> Replace the air levelizer control module. Refer to SCS-94, "Removal and Installation". D SCS F G H I J K L M N O P Revision: 2010 May SCS-93 2011 QX56 AIR LEVELIZER CONTROL MODULE [AIR LEVELIZER CONTROL SYSTEM] < REMOVAL AND INSTALLATION > REMOVAL AND INSTALLATION AIR LEVELIZER CONTROL MODULE Exploded View INFOID:0000000006256098 JSEIA0237GB 1. Air levelizer control module : Vehicle front Refer to GI-4, "Components" for symbols not described on the above. Removal and Installation INFOID:0000000006256099 REMOVAL CAUTION: Never impact on air levelizer control module when removing or installing air levelizer control module. 1. Disconnect battery cable from negative terminal. 2. Remove luggage side lower finisher (LH). Refer to INT-33, "Exploded View". 3. Disconnect air levelizer control module harness connector. 4. Remove the air levelizer control module. INSTALLATION Install in the reverse order of removal. Adjustment INFOID:0000000006256100 After air levelizer control module is replaced, perform “STANDARD VEHICLE HEIGHT SETTING”. Refer to SCS-67, "Work Procedure". Revision: 2010 May SCS-94 2011 QX56 AIR COMPRESSOR/AIR TUBE [AIR LEVELIZER CONTROL SYSTEM] < REMOVAL AND INSTALLATION > AIR COMPRESSOR/AIR TUBE A Exploded View INFOID:0000000006256101 B C D SCS F G H I J K L JSEIA0227GB 1. Air tube A 2. Air tube B 3. Bracket 4. Air compressor 5. Clip 6. Cover 7. Insulator 8. Washer 9. Exhaust tube 10. Exhaust tube connector A. To rear shock absorber (RH) B. To rear shock absorber (LH) C. To frame M N : Vehicle front O Refer to GI-4, "Components" for symbols not described on the above. Removal and Installation INFOID:0000000006256102 P REMOVAL CAUTION: Seal the removed part using vinyl tape for preventing dirt from getting on or entering the removed part. 1. Lift up the vehicle. 2. Remove the cover. 3. Disconnect the air compressor harness connector. Revision: 2010 May SCS-95 2011 QX56 AIR COMPRESSOR/AIR TUBE [AIR LEVELIZER CONTROL SYSTEM] < REMOVAL AND INSTALLATION > 4. Using a small spanner, remove the air tube A (1) and B (2) from air compressor. CAUTION: Be careful since air flows swiftly from air tube. JSEIA0238ZZ 5. 6. 7. 8. 9. 10. Remove the exhaust tube (1) from exhaust tube connector (2). Remove the exhaust tube connector only when it is damaged. Remove the exhaust tube from air compressor. Remove the air compressor from bracket. Rmove the bracket from vehicle. Remove the air tube A and B from rear shock absorbers RH and LH, according to the procedure in step 4. 11. Remove the air tube A and B from vehicle. 12. Perform inspection after removal. Rfer to SCS-97, "Inspection". JSEIA0239ZZ INSTALLATION Note the following, and install in the reverse order of the removal. • When installing air tube (1) to air compressor or shock absorber, insert as shown in the figure. • Dry each component thoroughly before installing, to prevent moisture from entering air compressor. JSEIA0240GB Revision: 2010 May SCS-96 2011 QX56 AIR COMPRESSOR/AIR TUBE < REMOVAL AND INSTALLATION > • Completely engage hooks on frame when installing bracket. [AIR LEVELIZER CONTROL SYSTEM] A B C JSEIA0241ZZ D • Install exhaust tube (1) according to the figure. • Perform inspection after installation. Rfer to SCS-97, "Inspection". SCS F G JSEIA0242ZZ Inspection INFOID:0000000006256103 H INSPECTION AFTER REMOVAL Check area 8 mm (0.31 in) from front end of air tubes for damage and burrs. I INSPECTION AFTER INSTALLATION • Lightly pull air tubes and check that it is locked. • Apply some soapy water to each joint. Check that there is no leakage of air after the activation of the air compressor during “Active Test” of CONSULT-III. CAUTION: Never allow soapy water to enter the inside of air compressor. J K L M N O P Revision: 2010 May SCS-97 2011 QX56 VEHICLE HEIGHT SENSOR [AIR LEVELIZER CONTROL SYSTEM] < REMOVAL AND INSTALLATION > VEHICLE HEIGHT SENSOR Exploded View INFOID:0000000006256104 JSEIA0226GB 1. Vehicle height sensor : Vehicle front Refer to GI-4, "Components" for symbols not described on the above. Removal and Installation INFOID:0000000006256105 REMOVAL CAUTION: Never disassemble the vehicle height sensor. 1. Lift up the vehicle. 2. Disconnect the vehicle height sensor harness connector. 3. Remove the vehicle height sensor. INSTALLATION Note the following, and install in the reverse order of the removal. Completely engage hooks on frame when installing vehicle height sensor. JSEIA0243ZZ Revision: 2010 May SCS-98 2011 QX56 VEHICLE HEIGHT SENSOR [AIR LEVELIZER CONTROL SYSTEM] < REMOVAL AND INSTALLATION > Adjustment INFOID:0000000006256106 A After vehicle height sensor is replaced, removal or installation, perform “STANDARD VEHICLE HEIGHT SETTING”. Refer to SCS-67, "Work Procedure". B C D SCS F G H I J K L M N O P Revision: 2010 May SCS-99 2011 QX56