1
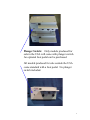
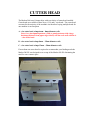
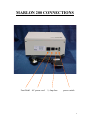
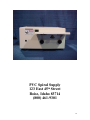
MARLON 200 AUTO CRIMPER
EL & ES MODELS
SERVICE MANUAL
INTRODUCTION
Your new Marlon 200 Auto Crimper is designed to
increase your plastic spiral binding production. The
Marlon 200 is an inexpensive yet extremely efficient
tabletop machine. The Marlon 200 is an operator friendly
machine that is easy to set up, allowing for quick
changeover from one coil diameter to another. We are
confident that your new Marlon 200 Auto Crimper will be a
valuable asset to your plastic coil binding operation.
The following pages of this service manual will cover
machine setup, operating procedures, maintenance and
trouble shooting your Marlon 200 Auto Crimper.
Warning:
Only trained service personnel should
perform machine service. Unplug unit
before servicing.
2
Plunger Switch: Only models produced for
sale in the USA will come with plunger switch.
An optional foot pedal can be purchased.
All models produced for sale outside the USA
come standard with a foot pedal. No plunger
switch included.
3
CUTTER HEAD
The Marlon 200 Auto Crimper ships with your choice of cutter head installed.
Cutter heads are available in three sizes, A, B, and C size heads. The cutter head
accounts for the majority of the machine cost therefore buying multiple heads for
one machine is not an option.
A – size cutter head crimps 6mm – 8mm diameter coils
Note: Over sized punch patterns (.248) or punch patterns with a large
backstop (distance from paper edge to hole) will not work well with the A
– size cutter head.
B – size cutter head crimps 8mm – 25mm diameter coils
C – size cutter head crimps 12mm – 50mm diameter coils
If more than one cutter head is required to accommodate your binding needs the
Marlon 200 ES was designed to set on top of the Marlon 200 EL eliminating the
need for extra counter space.
MARLON 200 CONNECTIONS
Foot Pedal
AC power cord
½ Amp fuse
power switch
5
TABLE ADJUSTMENTS
The worktable is fastened to the crimper using the ¼” stud knobs and two ¼” flat
washers included with your machine. The holes in the table are slotted allowing
side to side adjustments to be made. Mount the table in the top holes for small
and medium diameter coil and the bottom holes for medium and large diameter
coil.
Table height is adjusted up and down by turning the ¼” stud knob located in the
center of the table on the underneath side.
6
MACHINE SETUP
1.)
Place the bound document on the worktable with the left edge of the document
snug against the book guide.
2.)
Make a rough height adjustment by turning the table height adjustment knob in or
out until the center of the coil is close to the height of the crimper blades. A finer
adjustment is sometimes required after step three to achieve the optimum crimp.
3.)
Slightly loosen the two mounting knobs and adjust the table right or left until the
correct loop of the coil is centered and slides easily in and out of the crimper
blades. Tighten the two mounting knobs when the desired right and left
adjustment is achieved.
4.)
Make a finer height adjustment if needed. Test crimp the document by pressing
the plunger switch to activate the crimp cycle and make small adjustments until
the desired crimp is achieved.
5.)
Flip your document and crimp the other end.
NOTE:
Consistent document placing and holding by the operator will
speed setup and production rates and ensure consistent quality
crimps.
7
Machine Maintenance
Warning:
Only trained service personnel should
perform machine service. Unplug unit
before servicing. Service personnel shall
wear no jewelry or metal objects while
working inside machine.
Use only a damp cloth to clean exterior of
machine.
Periodically remove paper dust and plastic
clippings from machine using a dry cloth
and or compressed air.
Warning: Always wear safety glasses when
working with compressed air.
8
TROUBLE SHOOTING
PROBLEM:
Crimper does not cycle when plunger
switch or foot pedal is actuated.
SOLUTION:
1.) Check power cord and power switch
Make sure the power cords
connected to the crimper and
plugged into wall outlet. Verify that
the power switch is in the on
position.
2.) Check panel mounted fuse on back of
crimper. Reset fuse if tripped by
pushing it back into place.
3.) Check building power at breaker
panel or confirm power at wall outlet
with a different machine or
appliance.
Crimper cycles continuously or more
than once when plunger switch or foot
pedal is actuated.
1.) Internal micro-switch on cam is out
of adjustment. Call for technical
assistance or have a qualified service
person check the micro-switch.
WARNING:
The top cover of your Marlon 200 should only be removed by a qualified service
technician with the power off and the machine unplugged. This cover should never
be removed by a machine operator, and must be fastened in place at all times when
crimper is in use.
PVC Spiral Supply
123 East 45th Street
Boise, Idaho 83714
(800) 461-9301
10