1
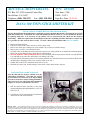
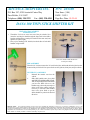
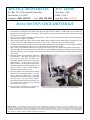
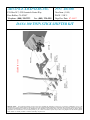
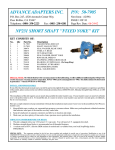
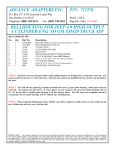
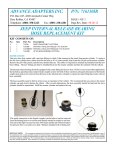
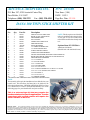
ADVANCE ADAPTERS INC.
P/N: 403300
P.O. Box 247, 4320 Aerotech Center Way
Paso Robles, CA 93447
Telephone: (800) 350-2223
Fax: (805) 238-4201
New Item: (1/04)
PAGE 1 OF 5
Page Rev. Date: 12-3-14
DANA 300 TWIN STICK SHIFTER KIT
KIT CONSITS OF:
No:
Qty
Part No.
Description
1.
1
403301
FRONT OUTPUT SHIFT RAIL
NOTE: This kit requires one of the shift
2.
1
403302
REAR OUTPUT SHIFT RAIL
rails to be modified when using it with a
3.
1
403303
SHIFTER BRACKET
4:1 low gear set. We do not offer a shift
rail with this modification already made
4.
2
403304
PIVOT SHAFT
to it.
5.
4
403305
HEIM JOINT LINK PLATE
6.
2
403307
SHIFTER HANDLE
7.
4
*403309
PIVOT BUSHINGS
Optional item: P/N 303150AA
8.
2
403310
3/8" FEMALE HEIM JOINT
Aluminum shift knobs
9.
2
403311
3/8" MALE HEIM JOINT
(Black Knobs with machined letters)
10.
2
300386
SHIFT FORK SET SCREW
11.
1
302060
TWIN STICK SHIFTER BOOT
12.
1
302061
FRONT SHIFT KNOB (SHIPPED IN SHIFTER BOOT)
13.
1
302062
REAR SHIFT KNOB (SHIPPED IN SHIFTER BOOT)
14.
1
302063
SHIFTER BOOT TRIM RING
15.
2
303121
1/2"-13 JAM NUT
16.
2
722523
1/4" FLAT WASHER
17.
6
723101
5/16"-18 JAM NUT
18.
2
723103
5/16" LOCK WASHER
19.
1
723110
5/16"-18 x 3/4" S.H.C.S.
20.
4
723151
5/16"-18 SHOULDER BOLT- 3/8" DIA. x 3/4" LONG
21.
1
723152
5/16"-18 x 1-1/4" SOCKET SET SCREW
22.
4
723719
3/8"-24 JAM NUT
23.
2
723755
3/8"-16 x 4" S.H.C.S.
24.
4
911341
3/8" SHIM WASHERS
* BUSHINGS ARE A PRESS FIT INTO THE SHIFT HANDLE BASE.
NOTE:
This assembly will require the installation of new shift rails into your
transfer case. This kit allows the Dana 300 to be shifted to the
following configurations: 2WD High, 4WD High, 4WD Low, Rear
Low, and Front Low. Refer to the exploded assembly view on the
following pages for part identification and part assembly.
This is a universal-type kit that may require the
handles to be bent for specific applications. Transfer
cases kept with a stock rotation will require the
shifter handles to be bent.
SPECIAL NOTE:
The components packaged in this kit have been assembled and machined for specific type of conversions. Modifications to any of the
components will void any possible warranty or return privileges. If you do not fully understand modifications or changes that will be required to complete your conversion,
we strongly recommend that you contact our sales department for more information. This instruction sheet is only to be used for the assembly of Advance Adapter
components. We recommend that a service manual pertaining to your vehicle be obtained for specific torque values, wiring diagrams and other related equipment.
These manuals are normally available at automotive dealerships and parts stores.
ADVANCE ADAPTERS INC.
P/N: 403300
P.O. Box 247, 4320 Aerotech Center Way
Paso Robles, CA 93447
Telephone: (800) 350-2223
Fax: (805) 238-4201
New Item: (1/04)
PAGE 2 OF 5
Page Rev. Date: 02-25-04
DANA 300 TWIN STICK SHIFTER KIT
INSTALLATION OF SHIFT RAILS (PARTS #403301 & 403302):
The new shift rails must be installed before continuing on to the remaining instructions. The following is a general
guide that outlines how to install the new shift rails included in this kit. Refer to a service manual for specifics
on replacing shift rails. It is necessary for the transfer case be removed from the vehicle for the required
disassembly. While not required for the installation of this kit, rebuilding the Dana 300 while it is apart may
be a good idea if it has not been done recently. We offer a Dana 300 rebuild kit under Part No. 400300.
1.
2.
3.
4.
5.
6.
7.
8.
9.
Remove the Dana 300 pan.
Unbolt the cluster shaft retainer and press out the cluster shaft.
Remove the cluster gear, making sure to not misplace any of the loose needle bearings.
Remove the set screws out of both shift forks.
Carefully remove both shift rails out the front of the transfer case, being careful not to misplace the balls and springs.
Before you set the shift rails down, mark them for identification.
DO NOT REMOVE THE INTERLOCK PILLS! If the interlock pills are removed, the transfer case will shift into
Low and High at the same time and transfer case damage will result!
Using the specific information in the service manual, install the new shift rails into the correct location. (Refer to the
old shift rails to determine which is the front and which is the rear.)
USING BLUE LOCTITE, reinstall the shift fork set screws.
Reinstall the cluster gear, needle bearings, cluster shaft, cluster shaft retainer, and pan.
INSTALLATION OF SHIFT LINKAGE:
Once the shift rails are in place, continue on to the
shift linkage installation. Note that the original
pivot location was cast into the front output casting
and can be cut off for a cleaner looking installation.
(This is necessary for some Dana 300 transmission
adapters to increase transmission clearance.)
1. Bolt the shifter bracket (#403303) to the front
output casting using the supplied fasteners, #723755,
and #723110.
2. Thread on the 3/8-24" jam nuts and 3/8" female heim
joints onto the end of the shift rails.
Cut off this portion (optional)
SPECIAL NOTE:
The components packaged in this kit have been assembled and machined for specific type of conversions. Modifications to any of the
components will void any possible warranty or return privileges. If you do not fully understand modifications or changes that will be required to complete your conversion,
we strongly recommend that you contact our sales department for more information. This instruction sheet is only to be used for the assembly of Advance Adapter
components. We recommend that a service manual pertaining to your vehicle be obtained for specific torque values, wiring diagrams and other related equipment.
These manuals are normally available at automotive dealerships and parts stores.
ADVANCE ADAPTERS INC.
P/N: 403300
P.O. Box 247, 4320 Aerotech Center Way
Paso Robles, CA 93447
Telephone: (800) 350-2223
Fax: (805) 238-4201
New Item: (1/04)
PAGE 3 OF 5
Page Rev. Date: 02-25-04
DANA 300 TWIN STICK SHIFTER KIT
INSTALLATION OF SHIFT
LINKAGE PIVOT
1. Thread the 5/16"-18 set screw into one of the pivot shafts. Now
insert the stud & pivot shaft through the large hole in the shifter
bracket and thread the second pivot shaft into the same stud, and
tighten (see photo right).
2. Press a pivot bushing (P/N 403309) into both sides of both shift
handles using a mallet.
Thread set screw into first pivot shaft,
insert into bracket and thread into
second pivot shaft.
PRE-ASSEMBLY
Thread a 3/8"-24 jam nut onto the 3/8" male heim joint, and thread the heim joint into the
bottom of the pivot block. Now repeat for the second, jam nut, heim joint, and pivot block.
IN VEHICLE - ASSEMBLY
1.
Reinstall the transfer case into the
vehicle.
2.
Slide shift handles onto pivot shaft
and CHECK FLOORBOARD CLEARANCE. Depending on the rotation that
you have the Dana 300 set to, the
handles may point to the passenger or
driver's side of the vehicle. It may be
necessary to bend the shift handles
close to the pivot block to get the
shifter handles to point in the desired
direction.
SPECIAL NOTE:
The components packaged in this kit have been assembled and machined for specific type of conversions. Modifications to any of the
components will void any possible warranty or return privileges. If you do not fully understand modifications or changes that will be required to complete your conversion,
we strongly recommend that you contact our sales department for more information. This instruction sheet is only to be used for the assembly of Advance Adapter
components. We recommend that a service manual pertaining to your vehicle be obtained for specific torque values, wiring diagrams and other related equipment.
These manuals are normally available at automotive dealerships and parts stores.
ADVANCE ADAPTERS INC.
P/N: 403300
P.O. Box 247, 4320 Aerotech Center Way
Paso Robles, CA 93447
Telephone: (800) 350-2223
Fax: (805) 238-4201
New Item: (1/04)
PAGE 4 OF 5
Page Rev. Date: 10-11-04
DANA 300 TWIN STICK SHIFTER KIT
3. Check that the existing hole in the floor will be large enough for the new shifters. If additional room is needed, cut/
grind the hole in the floor to the correct shape. Be careful not to cut the hole too large so that the shift boot ring will
no longer cover the hole.
4. Now you may paint the shift handles the desired color. Take care not to get paint onto the pivot bushings because
paint may cause a tight fit or binding.
5. Slide a shifter handle onto a pivot shaft with the handle offset pointing outward, followed by the included 1/4" flat
washer, 5/16" lock washer and then fasten with a 5/16"-18 nut. Repeat for the second shifter handle.
6. Fasten the female (shift rail) heim joint to the male (shifter handle) heim joint using the 3/8" shim washers, shoulder
bolts, heim joint, link plates, and 5/16"-18 nut. Repeat for the second shifter handle.
7. Now check to verify that the handles are vertical when the transfer case is in neutral and parallel to each other. If
the shift handles are not orientated properly, unbolt the heim joint link plates and adjust the position of the female heim
joint on the shift rail. Use the jam nut to secure it in the desired position. Reattach the heim joint link plates and check
your results.
8. Shift the transfer case through the following
configurations: 2wd High, 4wd High, 4wd
Low, 2wd Low, Rear Low, and Front Low.
The shifter handles should not be closer than
approximately 1" to the body in any of the
shifter positions. The frame and body will flex
while driving and can cause the transfer case to
pop out of gear or cause shifter binding if
sufficient clearance does not exist.
9. Once the transfer case shifts properly and has
sufficient body to handle clearance, it is now
time to fasten the shifter boot. Insert the
included boot ring into the shifter boot and slide
the boot down over both shifter handles.
Determine the proper location for the boot. Use
self taping screws to fasten the boot and ring
to the floor of the vehicle.
10. The last step is to thread the 1/2"-13 jam nuts
and shift knobs onto the shifter handles.
Notice parallel alignment of female heim joint and link plate.
SPECIAL NOTE:
The components packaged in this kit have been assembled and machined for specific type of conversions. Modifications to any of the
components will void any possible warranty or return privileges. If you do not fully understand modifications or changes that will be required to complete your conversion,
we strongly recommend that you contact our sales department for more information. This instruction sheet is only to be used for the assembly of Advance Adapter
components. We recommend that a service manual pertaining to your vehicle be obtained for specific torque values, wiring diagrams and other related equipment.
These manuals are normally available at automotive dealerships and parts stores.
ADVANCE ADAPTERS INC.
P/N: 403300
P.O. Box 247, 4320 Aerotech Center Way
Paso Robles, CA 93447
Telephone: (800) 350-2223
Fax: (805) 238-4201
New Item: (1/04)
PAGE 5 OF 5
Page Rev. Date: 07-16-07
403301
(Exploded view)
403302
DANA 300 TWIN STICK SHIFTER KIT
SPECIAL NOTE:
The components packaged in this kit have been assembled and machined for specific type of conversions. Modifications to any of the
components will void any possible warranty or return privileges. If you do not fully understand modifications or changes that will be required to complete your conversion,
we strongly recommend that you contact our sales department for more information. This instruction sheet is only to be used for the assembly of Advance Adapter
components. We recommend that a service manual pertaining to your vehicle be obtained for specific torque values, wiring diagrams and other related equipment.
These manuals are normally available at automotive dealerships and parts stores.