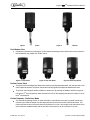
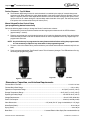
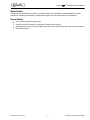
1
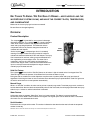
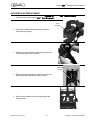
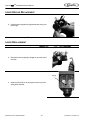
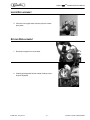
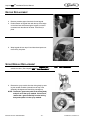
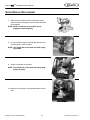
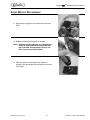
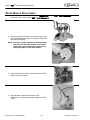
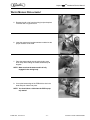
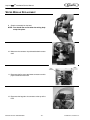
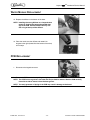
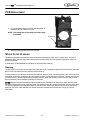
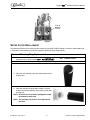
LEOPARD ERV™ Installation/Service Manual Release Date: November 30, 2004 Publication Number: 620919579SER Revision Date: April 02, 2014 Revision: H Visit the Cornelius web site at www.cornelius.com for all your Literature needs. The products, technical information, and instructions contained in this manual are subject to change without notice. These instructions are not intended to cover all details or variations of the equipment, nor to provide for every possible contingency in the installation, operation or maintenance of this equipment. This manual assumes that the person(s) working on the equipment have been trained and are skilled in working with electrical, plumbing, pneumatic, and mechanical equipment. It is assumed that appropriate safety precautions are taken and that all local safety and construction requirements are being met, in addition to the information contained in this manual. This Product is warranted only as provided in Cornelius’ Commercial Warrant applicable to this Product and is subject to all of the restrictions and limitations contained in the Commercial Warranty. Cornelius will not be responsible for any repair, replacement or other service required by or loss or damage resulting from any of the following occurrences, including but not limited to, (1) other than normal and proper use and normal service conditions with respect to the Product, (2) improper voltage, (3) inadequate wiring, (4) abuse, (5) accident, (6) alteration, (7) misuse, (8) neglect, (9) unauthorized repair or the failure to utilize suitably qualified and trained persons to perform service and/or repair of the Product, (10) improper cleaning, (11) failure to follow installation, operating, cleaning or maintenance instructions, (12) use of “non-authorized” parts (i.e., parts that are not 100% compatible with the Product) which use voids the entire warranty, (13) Product parts in contact with water or the product dispensed which are adversely impacted by changes in liquid scale or chemical composition. Contact Information: To inquire about current revisions of this and other documentation or for assistance with any Cornelius product contact: www.cornelius.com 800-238-3600 Trademarks and Copyrights: This document contains proprietary information and it may not be reproduced in any way without permission from Cornelius. This document contains the original instructions for the unit described. CORNELIUS INC 101 Regency Drive Glendale Heights, IL Tel: + 1 800-238-3600 Printed in U.S.A. TABLE OF CONTENTS Safety Instructions. . . . . . . . . . . . . . . . . . . . . . . . . . . . . . . . . . . . . . . . . . . . . . . . . . . . . . . . . . . . . . . . . 1 Read and Follow ALL Safety Instructions . . . . . . . . . . . . . . . . . . . . . . . . . . . . . . . . . . . . . . . . . . . . . 1 Safety Overview . . . . . . . . . . . . . . . . . . . . . . . . . . . . . . . . . . . . . . . . . . . . . . . . . . . . . . . . . . . . . . 1 Recognition . . . . . . . . . . . . . . . . . . . . . . . . . . . . . . . . . . . . . . . . . . . . . . . . . . . . . . . . . . . . . . . . . 1 Different Types of Alerts . . . . . . . . . . . . . . . . . . . . . . . . . . . . . . . . . . . . . . . . . . . . . . . . . . . . . . . . . . 1 Safety Tips . . . . . . . . . . . . . . . . . . . . . . . . . . . . . . . . . . . . . . . . . . . . . . . . . . . . . . . . . . . . . . . . . . . . . 1 Qualified Service Personnel. . . . . . . . . . . . . . . . . . . . . . . . . . . . . . . . . . . . . . . . . . . . . . . . . . . . . . . . 1 Safety Precautions. . . . . . . . . . . . . . . . . . . . . . . . . . . . . . . . . . . . . . . . . . . . . . . . . . . . . . . . . . . . . . . 2 Shipping And Storage . . . . . . . . . . . . . . . . . . . . . . . . . . . . . . . . . . . . . . . . . . . . . . . . . . . . . . . . . . . . 2 Introduction . . . . . . . . . . . . . . . . . . . . . . . . . . . . . . . . . . . . . . . . . . . . . . . . . . . . . . . . . . . . . . . . . . . . . . 3 Key Things To Know / Do For Quality Drinks – keep nozzles and the water/syrup system clean; and have the correct ratio, temperature, and carbonation! . . . . . . . . . . . . . . . . . . . . . 3 Overview . . . . . . . . . . . . . . . . . . . . . . . . . . . . . . . . . . . . . . . . . . . . . . . . . . . . . . . . . . . . . . . . . . . . . . 3 Product Description . . . . . . . . . . . . . . . . . . . . . . . . . . . . . . . . . . . . . . . . . . . . . . . . . . . . . . . . . . . 3 Sold Out Feature . . . . . . . . . . . . . . . . . . . . . . . . . . . . . . . . . . . . . . . . . . . . . . . . . . . . . . . . . . 3 Manual Purge. . . . . . . . . . . . . . . . . . . . . . . . . . . . . . . . . . . . . . . . . . . . . . . . . . . . . . . . . . . . . 3 Water Feature . . . . . . . . . . . . . . . . . . . . . . . . . . . . . . . . . . . . . . . . . . . . . . . . . . . . . . . . . . . . 3 Serial Numbers . . . . . . . . . . . . . . . . . . . . . . . . . . . . . . . . . . . . . . . . . . . . . . . . . . . . . . . . . . . 3 Recharge After Power Loss . . . . . . . . . . . . . . . . . . . . . . . . . . . . . . . . . . . . . . . . . . . . . . . . . . 4 4-Second Dispense:. . . . . . . . . . . . . . . . . . . . . . . . . . . . . . . . . . . . . . . . . . . . . . . . . . . . . . . . 4 Valve Type . . . . . . . . . . . . . . . . . . . . . . . . . . . . . . . . . . . . . . . . . . . . . . . . . . . . . . . . . . . . . . . 4 Push Button Valve . . . . . . . . . . . . . . . . . . . . . . . . . . . . . . . . . . . . . . . . . . . . . . . . . . . . . . . . . 5 Portion Control Valve . . . . . . . . . . . . . . . . . . . . . . . . . . . . . . . . . . . . . . . . . . . . . . . . . . . . . . . 5 Portion Dispense - Profile Pour Mode . . . . . . . . . . . . . . . . . . . . . . . . . . . . . . . . . . . . . . . . . . 5 Portion Dispense - Top-Off Mode . . . . . . . . . . . . . . . . . . . . . . . . . . . . . . . . . . . . . . . . . . . . . 6 Manual Keypad Portion Control Setup (per programming device instructions) . . . . . . . . . . . . . . . . . . . . . . . . . . . . . . . . . . . . . . . . . 6 Dimensions, Capacities, and Interface Requirements . . . . . . . . . . . . . . . . . . . . . . . . . . . . . . . . 6 Water Quality . . . . . . . . . . . . . . . . . . . . . . . . . . . . . . . . . . . . . . . . . . . . . . . . . . . . . . . . . . . . . . . . 7 Syrup Quality . . . . . . . . . . . . . . . . . . . . . . . . . . . . . . . . . . . . . . . . . . . . . . . . . . . . . . . . . . . . . . . . 7 Leopard ERV™ Valve Installation . . . . . . . . . . . . . . . . . . . . . . . . . . . . . . . . . . . . . . . . . . . . . . . . . . . . 8 Installation . . . . . . . . . . . . . . . . . . . . . . . . . . . . . . . . . . . . . . . . . . . . . . . . . . . . . . . . . . . . . . . . . . . . . 8 Mounting Block Retrofit (For Non Coca Cola LEV style mounting blocks). . . . . . . . . . . . . . . . . . 8 Leopard ERV™ Installation . . . . . . . . . . . . . . . . . . . . . . . . . . . . . . . . . . . . . . . . . . . . . . . . . . . . . 8 Pocket PC Installation (Note: This equipment is no longer available for purchase or upgrade.) . . . . 9 Installing the Pocket PC Software . . . . . . . . . . . . . . . . . . . . . . . . . . . . . . . . . . . . . . . . . . . . . . . . 9 Installing Active Sync: Required for Pocket PC to communicate with PC (go to next step if previously installed) . . . . . . . . . . . . . . . . . . . . . . . . . . . . . . . . . . . . . . . . . . 9 Installing Leopard ERV™ Pocket PC Software . . . . . . . . . . . . . . . . . . . . . . . . . . . . . . . . . . . . . . 9 Upgrade . . . . . . . . . . . . . . . . . . . . . . . . . . . . . . . . . . . . . . . . . . . . . . . . . . . . . . . . . . . . . . . . 10 Upgrading Leopard ERV™ software using Leopard Downloader . . . . . . . . . . . . . . . . . . . . . . . 10 Installing firmware into the Leopard ERV™ . . . . . . . . . . . . . . . . . . . . . . . . . . . . . . . . . . . . . 10 Valve Setup (IPAQ) . . . . . . . . . . . . . . . . . . . . . . . . . . . . . . . . . . . . . . . . . . . . . . . . . . . . . . . . . . . . . 11 Information can be retrieved such as: . . . . . . . . . . . . . . . . . . . . . . . . . . . . . . . . . . . . . . . . . 11 Portion control can be set up 3 different ways in the Pocket PC: . . . . . . . . . . . . . . . . . . . . 11 Diagnostics: . . . . . . . . . . . . . . . . . . . . . . . . . . . . . . . . . . . . . . . . . . . . . . . . . . . . . . . . . . . . . 11 Pocket PC Troubleshooting Guide . . . . . . . . . . . . . . . . . . . . . . . . . . . . . . . . . . . . . . . . . . . . . . . . . . 12 Pocket PC does not respond to input . . . . . . . . . . . . . . . . . . . . . . . . . . . . . . . . . . . . . . . . . . . . 12 Pocket PC Low Battery . . . . . . . . . . . . . . . . . . . . . . . . . . . . . . . . . . . . . . . . . . . . . . . . . . . . . . . 12 Leopard ERV™ and Pocket PC software . . . . . . . . . . . . . . . . . . . . . . . . . . . . . . . . . . . . . . . . . . . . 12 Software Revision Information . . . . . . . . . . . . . . . . . . . . . . . . . . . . . . . . . . . . . . . . . . . . . . . . . . 12 Pocket PC Version . . . . . . . . . . . . . . . . . . . . . . . . . . . . . . . . . . . . . . . . . . . . . . . . . . . . . . . . 12 Valve Software Version . . . . . . . . . . . . . . . . . . . . . . . . . . . . . . . . . . . . . . . . . . . . . . . . . . . . 12 Syrup File Version . . . . . . . . . . . . . . . . . . . . . . . . . . . . . . . . . . . . . . . . . . . . . . . . . . . . . . . . 12 Trouble Shooting and Repair . . . . . . . . . . . . . . . . . . . . . . . . . . . . . . . . . . . . . . . . . . . . . . . . . . . . . . . 13 Symptoms . . . . . . . . . . . . . . . . . . . . . . . . . . . . . . . . . . . . . . . . . . . . . . . . . . . . . . . . . . . . . . . . . . . . 13 No Syrup or Syrup Sold-Out Error . . . . . . . . . . . . . . . . . . . . . . . . . . . . . . . . . . . . . . . . . . . . . . . 13 Leopard ERV™ and Pocket PC Troubleshooting Guide . . . . . . . . . . . . . . . . . . . . . . . . . . . . . . 13 Repair Procedures. . . . . . . . . . . . . . . . . . . . . . . . . . . . . . . . . . . . . . . . . . . . . . . . . . . . . . . . . . . . . . . . 16 Mean Time to Repair . . . . . . . . . . . . . . . . . . . . . . . . . . . . . . . . . . . . . . . . . . . . . . . . . . . . . . . . . . . . 16 Removing the Leopard ERV™ from a Dispenser . . . . . . . . . . . . . . . . . . . . . . . . . . . . . . . . . . . . . . 16 Leopard ERV™ Disassembly . . . . . . . . . . . . . . . . . . . . . . . . . . . . . . . . . . . . . . . . . . . . . . . . . . . . . 18 Lever Keypad Replacement. . . . . . . . . . . . . . . . . . . . . . . . . . . . . . . . . . . . . . . . . . . . . . . . . . . . . . . 19 Lever Replacement . . . . . . . . . . . . . . . . . . . . . . . . . . . . . . . . . . . . . . . . . . . . . . . . . . . . . . . . . . . . . 20 Keypad Replacement. . . . . . . . . . . . . . . . . . . . . . . . . . . . . . . . . . . . . . . . . . . . . . . . . . . . . . . . . . . . 21 Syrup Module Replacement. . . . . . . . . . . . . . . . . . . . . . . . . . . . . . . . . . . . . . . . . . . . . . . . . . . . . . . 22 Water Module Replacement . . . . . . . . . . . . . . . . . . . . . . . . . . . . . . . . . . . . . . . . . . . . . . . . . . . . . . 26 PCB Replacement . . . . . . . . . . . . . . . . . . . . . . . . . . . . . . . . . . . . . . . . . . . . . . . . . . . . . . . . . . . . . . 29 Water Filter Cleaning . . . . . . . . . . . . . . . . . . . . . . . . . . . . . . . . . . . . . . . . . . . . . . . . . . . . . . . . . . . . 30 Cleaning. . . . . . . . . . . . . . . . . . . . . . . . . . . . . . . . . . . . . . . . . . . . . . . . . . . . . . . . . . . . . . . . . . . 30 Water Filter Replacement . . . . . . . . . . . . . . . . . . . . . . . . . . . . . . . . . . . . . . . . . . . . . . . . . . . . . . . . 31 Filter and Retaining Ring Replacement . . . . . . . . . . . . . . . . . . . . . . . . . . . . . . . . . . . . . . . . . . . 31 Leopard ERVTM Installation/Service Manual SAFETY INSTRUCTIONS READ AND FOLLOW ALL SAFETY INSTRUCTIONS Safety Overview • Read and follow ALL SAFETY INSTRUCTIONS in this manual and any warning/caution labels on the unit (decals, labels or laminated cards). • Read and understand ALL applicable OSHA (Occupational Safety and Health Administration) safety regulations before operating this unit. Recognition Recognize Safety Alerts ! This is the safety alert symbol. When you see it in this manual or on the unit, be alert to the potential of personal injury or damage to the unit. DIFFERENT TYPES OF ALERTS ! DANGER: Indicates an immediate hazardous situation which if not avoided WILL result in serious injury, death or equipment damage. ! WARNING: Indicates a potentially hazardous situation which, if not avoided, COULD result in serious injury, death, or equipment damage. ! CAUTION: Indicates a potentially hazardous situation which, if not avoided, MAY result in minor or moderate injury or equipment damage. SAFETY TIPS • Carefully read and follow all safety messages in this manual and safety signs on the unit. • Keep safety signs in good condition and replace missing or damaged items. • Learn how to operate the unit and how to use the controls properly. • Do not let anyone operate the unit without proper training. This appliance is not intended for use by very young children or infirm persons without supervision. Young children should be supervised to ensure that they do not play with the appliance. • Keep your unit in proper working condition and do not allow unauthorized modifications to the unit. QUALIFIED SERVICE PERSONNEL ! WARNING: Only trained and certified electrical, plumbing and refrigeration technicians should service this unit. ALL WIRING AND PLUMBING MUST CONFORM TO NATIONAL AND LOCAL CODES. FAILURE TO COMPLY COULD RESULT IN SERIOUS INJURY, DEATH OR EQUIPMENT DAMAGE. © 2002-2014, Cornelius Inc. -1- Publication Number: 620919579SER Leopard ERVTM Installation/Service Manual SAFETY PRECAUTIONS This unit has been specifically designed to provide protection against personal injury. To ensure continued protection observe the following: ! WARNING: Disconnect power to the unit before servicing following all lock out/tag out procedures established by the user. Verify all of the power is off to the unit before any work is performed. Failure to disconnect the power could result in serious injury, death or equipment damage. ! CAUTION: Always be sure to keep area around the unit clean and free of clutter. Failure to keep this area clean may result in injury or equipment damage. SHIPPING AND STORAGE ! CAUTION: Before shipping, storing, or relocating the unit, the unit must be sanitized and all sanitizing solution must be drained from the system. A freezing ambient environment will cause residual sanitizing solution or water remaining inside the unit to freeze resulting in damage to internal components. Publication Number: 620919579SER -2- © 2002-2014, Cornelius Inc. Leopard ERVTM Installation/Service Manual INTRODUCTION KEY THINGS TO KNOW / DO FOR QUALITY DRINKS – KEEP NOZZLES AND THE WATER/SYRUP SYSTEM CLEAN; AND HAVE THE CORRECT RATIO, TEMPERATURE, AND CARBONATION! Make sure the correct syrup type has been connected! Be sure filters are changed regularly! OVERVIEW Product Description The Leopard ERV™ is intended for use on post-mix beverage dispensing machines. The Leopard ERV™ is a purely volumetric valve, which means it monitors and regulates the volumes of water and syrup being dispensed. This allows the valve to compensate real time to pressure changes and maintain a constant ratio and flowrate. Water Module As the Leopard ERV™ is dispensing a drink, it’s constantly reacting to changes in water and syrup pressures in order to maintain the selected finished drink ratio and flowrate. The syrup flow is measured in real time, utilizing pressure differential and then regulated by a linear stepper motor. The water flow is measured in real time by a flow turbine and regulated by a second linear stepper motor. These two flow measurements are input to a microprocessor which adjusts the stepper motors to maintain proper flowrate and ratio. Syrup Module Figure 1. Sold Out Feature The Leopard ERV™ has a built in “Sold Out” feature on all valves. A light is located on the front keypad face. The “Sold Out” light informs the operator of insufficient flow from either the water or syrup. During the sold out condition, the valve dispenses a small amount of product (water and syrup) and shuts off regardless of how long the button or lever is activated. Once the water/syrup is replenished the “Sold Out” light turns off and the valve returns to normal operation automatically. Manual Purge While in a “Sold Out” condition, the valve can be put into a manual purge mode. To activate purge mode, continue to hold the button/lever after the valve has automatically shut off. After 5 seconds, the valve purges both water and syrup sides for up to 1 minute or until the button/lever is released. Water Feature Unlike other valves, a separate “Water Only” lever is no longer needed. This feature is now accomplished electronically with a “Water” button located on the keypad. The keypad option can be added to either a carbonated drink valve or a non-carbonated drink valve. Serial Numbers Each valve has a unique serial number. This number indicates the date that the valve was built and the sequential number for that day. 240506107 This is a valve that was built on 24th day of 5th month of 2006. Sequence number is 107. © 2002-2014, Cornelius Inc. -3- Publication Number: 620919579SER Leopard ERVTM Installation/Service Manual The Leopard ERV has the serial number recorded in three places. The permanent number is stored in the PCB memory. The number is also displayed on a bar-coded sticker on the side of the base and on a small sticker on the front of the PCB. When the valve is manufactured, the serial number on the sticker is the same as in the PCB memory. If the base is replaced, the number must then be determined from the PCB memory or the sticker on the PCB. Recharge After Power Loss The Leopard ERV™ requires the electronics board to charge the power backup system before operation. Drink operation is suspended until the valve is charged. When power is connected to the Leopard ERV™, the LED on the electronics board and keypad begins to flash rapidly (approximately 2 times a second). When the valve is fully charged and ready for use, the LED on the electronics board flashes slower (approximately 1 time a second). The LED on the keypad turns off. An uncharged valve takes approximately 3 minutes to fully charge. When connected to a Pocket PC or other programming device during this charge cycle, a status indicator is displayed on the bottom of the first Leopard ERV™ software screen and does not allow connection until fully charged. This charging only occurs when power is initially connected, when the machine is turned off then back on, or following machine turn on after power is lost to the valve. Once the valve has fully charged following a power loss, the first dispense is a setup dispense, beginning at a low flowrate and gradually increasing to the set flowrate. This dispense will be in ratio. Once the valve has reached it’s set flowrate it continues to dispense at that flowrate. On an Leopard ERV™ equipped with Portion Control, each of the sizes perform the same on the initial dispense. 4-Second Dispense: • Simultaneously press and hold the next to smallest and next to largest keypad buttons for 1 second. The valve dispenses at the current flow rate for 4 seconds. The keypad LED flashes during the four second flow rate test mode. Allow up to 0.1 second difference in switch actuation time. • Once the four second dispense has finished, the control returns to normal dispense mode. Valve Type There are three different activation methods for the Leopard ERV™. Cup Activated, Push Button, and Portion Control. Valve Activation Mode: • Any valve may be set up with a keypad or a lever. A keypad may be changed from one style to another by simply replacing the keypad and changing the setup as required with the Pocket PC/programming device interface. Cup Actuated Valve • Operate the cup actuated valve by pressing the cup against the lever until the cup is full; then release the lever. Publication Number: 620919579SER -4- © 2002-2014, Cornelius Inc. Leopard ERVTM Installation/Service Manual Figure 2. Lever with “Sold Out” Figure 3. Lever with Water Button Push Button Valve • Operate the push button by pressing the “PUSH” switch and holding until the desired amount of product has been dispensed, then release the “PUSH” switch. Figure 4. Push Button Figure 5. Push with Water Figure 6. Water Only Button Portion Control Valve • The portion control valve dispenses different size drinks by pressing the desired switch. The valve also has a Cancel/Pour dispense function. The portion control valve can be programmed to dispense different drink sizes. • The portion control keypad contains a hidden 5th button size. By pressing the Medium and Extra Large portion size the 5th size is dispensed. When activated, the LED on the keypad quickly blinks to notify the user of the 5th size dispense. Portion Dispense - Profile Pour Mode • The automatic dispensing function for each size switch is controlled by the replay of a stored volume measurement cycle. When activated, the valve dispenses the full stored volume at the defined flow rates. This function sets the first 20% of the total volume at a flowrate of 2 oz./sec., the next 60% of the total volume is set at the maximum available flowrate and the final 20% of the volume is set at a flowrate of 2 oz./sec. © 2002-2014, Cornelius Inc. -5- Publication Number: 620919579SER Leopard ERVTM Installation/Service Manual Portion Dispense - Top-Off Mode • The automatic dispensing function for each size switch is controlled by the replay of a stored volume measurement cycle. When activated, the valve dispenses 80% of the stored volume at the set flowrate. There is a delay of 3 seconds, then the valve dispenses the last 20% at the set flowrate. During the 80% portion of the cycle, the LED is off. It blinks during the 3 second delay and the last 20% of the cycle. The valve only tops off if the portion size is at least twice the top off volume (2 oz.). Manual Keypad Portion Control Setup (per programming device instructions) Perform the following steps to setup or change the Portion Control button volumes: 1. Simultaneously press and hold the smallest and the largest portion buttons until the LED illuminates (approximately 1 second). 2. Place the appropriate size cup (with desired amount of ice) under the dispensing nozzle. Press and hold the size button that you want to set until the desired volume of drink is dispensed into the cup. Repeat step 2 to program each drink size. NOTE: Any drink size may be programmed as many times as desired before exiting the program mode. It is not necessary to adjust all cup sizes while in the programming mode. 3. To return a size to the default value, press and hold the pour/cancel and that button simultaneously for 2 seconds. 4. To exit, press and release the “Pour/Cancel” button. This will save any changes. The LED switches off to signal leaving the programming mode. Figure 8. Portion Control with Water Figure 7. Portion Control Dimensions, Capacities, and Interface Requirements Finished Drink Flow Rate ...................................................................................................................... 1.5 to 4.5 oz./sec Finished Drink Ratio Range..........................................................................................................................3.5:1 to 8.5:1 Operational Temperature Range ........................................................................................... 0C (32F) to 60C (140F) Storage Temperature Range .............................................................................................-30C (-22F) to 70C (158F) Operating Humidity Range ...................................................................................................... <75%RH @ 40C (105F) Voltage Requirements ................................................................................................................22 to 27 VAC (50/60 Hz) Power Consumption................................................................................................................. <50mA (in standby mode) Valve Dimensions ......................................................................... 2.5” (wide) X 4.75” (long w/o backblock) X 5.5” (high) Water/Soda (Static)....................................................................................................................................... 30 to 120 psi Syrup (Static) .................................................................................................................................................. 30 to 90 psi Back Block ..................................................................................Licensed Electric Valve Style (Part number 60278110) Publication Number: 620919579SER -6- © 2002-2014, Cornelius Inc. Leopard ERVTM Installation/Service Manual Water Quality Chloramines are a combination of chlorine and ammonia which are responsible for some degradation of rubber components. Installing and maintaining a water filtration system can minimize the affects of Chloramines. Syrup Quality • Use only Coke approved quality syrups. • Syrups must be free from pulp or other types of solids to work correctly. • High sugar syrups are more viscous (thicker) than diet syrups. Consequently they may cause more pressure drop within a system. © 2002-2014, Cornelius Inc. -7- Publication Number: 620919579SER Leopard ERVTM Installation/Service Manual LEOPARD ERV™ VALVE INSTALLATION ! CAUTION: Only trained and certified technicians should service this unit. ALL WIRING AND PLUMBING MUST CONFORM TO NATIONAL AND LOCAL CODES. INSTALLATION The Leopard ERV™ can be installed on any dispenser with a Coca Cola LEV style mounting block, FFV mounting block or identical screw pattern. • Mounting Block Retrofit • Premium Leopard ERV™ Installation Mounting Block Retrofit (For Non Coca Cola LEV style mounting blocks) 1. Shut off syrup, unplug carbonator pump, shut off CO2 and water supply to the unit. 2. Release pressure in lines by activating valves and lifting relief valve on carbonator. 3. Turn power off to dispenser. 4. Detach current valves • Remove Cover. • Unplug wiring harness. • Lift retaining spring. • Remove Valve. 5. Remove 4 screws from mounting block and save. 6. Remove old mounting block. IMPORTANT: Before installing new mounting block, replace O-Rings on each fitting. Lubricate with Dow 111 or equivalent FDA approved lubricant. Do not use petroleum jelly. 7. Install new Coca Cola LEV style mounting block and secure with 4 screws. 8. Turn syrup, carbonator pump, CO2 and water supply back on. 9. Check for leaks. Leopard ERV™ Installation 1. Remove Existing Valve. • Remove Cover. • Unplug wiring harness. • Turn mounting block screws off. • Lift retaining spring. • Remove valve and set aside. IMPORTANT: Before installing new Leopard ERV™, lubricate both O-Rings with Dow 111 or equivalent FDA approved lubricant. Do not use petroleum jelly. 2. Remove Leopard ERV™ cover by spreading finger tabs on bottom of cover and lifting. Publication Number: 620919579SER -8- © 2002-2014, Cornelius Inc. Leopard ERVTM Installation/Service Manual 3. Lift retaining wire to the UP position. 4. Place Leopard ERV™ on mounting block and press retaining wire Down. 5. Connect wiring harness and turn dispenser power on. 6. Turn mounting block screws on. 7. Replace Cover. 8. Installation complete. POCKET PC INSTALLATION (NOTE: THIS EQUIPMENT IS NO LONGER AVAILABLE FOR PURCHASE OR UPGRADE .) Installing the Pocket PC Software Installing Active Sync: Required for Pocket PC to communicate with PC (go to next step if previously installed) 1. Do not connect Pocket PC cable or cradle until Active Sync is installed. 2. Insert Active Sync CD into PC. 3. The program automatically starts. 4. Follow directions to install Active Sync. 5. Connect Pocket PC to the PC using either the cradle or cable. 6. Establish a new partnership to fully synchronize or use Guest to only copy files. 7. The Pocket PC and PC will automatically synchronize. Installing Leopard ERV™ Pocket PC Software 1. Download three files from the Leopard ERV™ CD-ROM or the Cornelius web site (www.cornelius.com) to your PC: • Leopard ERV Pocket PC Compact Framework > netcf.core.ppc3.arm.cab • Leopard ERV Pocket PC Controller vx.xx.xx > Leopard_Controller_v#.##.##_PPC_setup.exe • Leopard ERV Pocket PC Downloader vx.xx.xx > Leopard_Downloader_v#.##.##_PPC_setup.exe 2. Synchronize your Pocket PC with your computer. 3. Double click the NETCCF.CORE.PPC3.exe icon. 4. The framework automatically installs. 5. Double click the Leopard_Controller_v#.##.##_PPC_setup.exe icon. 6. The controller automatically installs. 7. Double click the Leopard_Downloader_v#.##.##_PPC_setup.exe icon. 8. The downloader automatically installs. © 2002-2014, Cornelius Inc. -9- Publication Number: 620919579SER Leopard ERVTM Installation/Service Manual 9. The Leopard Controller and the Leopard Downloader icons are now displayed and active on the PROGRAMS screen on the Pocket PC. Upgrade 1. Download the file(s) from the Cornelius web site (www.cornelius.com) to your PC: • Leopard ERV Pocket PC Controller vx.xx.xx > Leopard_Controller_v#.##.##_PPC_setup.exe • Leopard ERV Pocket PC Downloader vx.xx.xx > Leopard_Downloader_v#.##.##_PPC_setup.exe 2. You may upgrade either of these programs separately or at the same time. It is presented here as updating both. 3. Synchronize your Pocket PC with your computer. 4. Double click the Leopard_Controller_v#.##.##_PPC_setup.exe icon. 5. The controller automatically installs. 6. Double click the Leopard_Downloader_v#.##.##_PPC_setup.exe icon. 7. The downloader automatically installs. 8. The Leopard Controller and the Leopard Downloader icons are now displayed and active on the PROGRAMS screen on the Pocket PC. Upgrading Leopard ERV™ software using Leopard Downloader 1. Download Leopard firmware file from the Cornelius web site (www.cornelius.com): Leopard ERV Firmware for pcb lpdxxxxx > lpdxxxxp.lpd (xxxx is the version number) 2. Open ActiveSync and connect the Pocket PC 3. Copy the new file to the Pocket PC folder My Documents. Installing firmware into the Leopard ERV™ 1. Connect the Pocket PC to the Leopard ERV™ via the Leopard ERV™ interface cable (part #620316409). 2. Start the program Leopard Downloader. 3. Tap the <LPD File> button. 4. Select the desired file in the menu. 5. Tap the <Continue> button and, when prompted, cycle power to the valve to start the downloading process. This may be done by disconnecting the power at the valve or by shutting off power to the machine. 6. The screen indicates the program is downloading. If not, cycle power again to start the download. 7. Once the software has completely downloaded, the program may be ended by pressing the <Exit> button. NOTE: Check the release notes to determine if there is additional setup required. If none noted, there is no need to re-set any of the valve settings following a software upgrade. NOTE: Pocket PC Communication Cable The cable contains a ground fault protection indicator, which detects when there is no communication between the Pocket PC and the valve. When communications is lost within the cable, a RED light will be illuminated. At this time, the cable should be removed from the valve. The indicator will remain on for approximately 3 seconds. Once the red light turns off, reconnect the cable to the valve, and restart the ERV interface software. For its protection, the Pocket PC should never be in contact with any other equipment. Publication Number: 620919579SER - 10 - © 2002-2014, Cornelius Inc. Leopard ERVTM Installation/Service Manual VALVE SETUP (IPAQ) Leopard ERV™ setup is done electronically using a Pocket PC equipped with the Leopard ERV™ software and communication cable. Once connected, the Leopard ERV™ software allows the installer to not only setup flavor, flowrate, and portion control, but also retrieve information such as diagnostics and valve history. Setup using Pocket PC handheld device equipped with Leopard ERV™ software. Setup requires the correct ratio cup, a splitter, the pocket PC and appropriate cable. Information can be retrieved such as: • Serial Number – Allows easy identification of valve. • Flavor Setup- Allows easy identification of flavor setup. • Finished Drink Ratio - Allows easy identification of ratio setup. • Flowrate - Allows easy identification of flowrate setup. • Portion Sizes - Volume of each button size. • Total Dispenses – Total number of valve actuations. • Water Volume Dispensed - Total volume of water valve has dispensed. • Syrup Volume Dispensed - Total volume of syrup valve has dispensed. Portion control can be set up 3 different ways in the Pocket PC: • Pour by Volume – A numeric volume is entered for the corresponding cup size. • Pour by Teach – The keypad button is pressed until the cup is full. The valve then saves that finished drink volume into memory. • Copy Settings - Portion control values can be copied from one to another using the pocket PC. • Default Portion Sizes - Country specific default sizes. Diagnostics: • Error Codes – Alerts service personnel that a fault has occurred and may require attention. Such as syrup sold-out, low water, and valve malfunction. • Purge Mode – Allows the system to be purged of water and syrup either simultaneously or separately. • System Flowrate Test - Check maximum system flowrate. • Syrup Pressure – Displays static or dynamic pressure (psi) on the Syrup Side Module. • Free Flow - Dispenses an in ratio drink at the current flow rate. • 4 Second Dispense © 2002-2014, Cornelius Inc. - 11 - Publication Number: 620919579SER Leopard ERVTM Installation/Service Manual POCKET PC TROUBLESHOOTING GUIDE When using the Pocket PC to install a Leopard valve, the following information may be helpful to troubleshoot Pocket PC problems. Pocket PC does not respond to input Perform a soft reset when: • You want to stop all running applications • After installing a new application • If your Pocket PC stops responding to input To perform a soft reset: • Locate the Reset button on the Pocket PC. • Use the stylus to lightly press the Reset button. The Pocket PC restarts and displays the Today screen. NOTE: A soft “normal” reset does not erase any programs or saved data. Save any unsaved data before performing a soft reset. Pocket PC Low Battery Recharge battery as soon as there is a low battery indication. NOTE: If the battery installed in your Pocket PC discharges completely you will lose all settings, programs, data, and information. LEOPARD ERV™ AND POCKET PC SOFTWARE Software Revision Information (How can I see if I am using the latest software revision?) All Leopard ERV™ and Pocket PC software revision information is obtained by connecting the Pocket PC to the Leopard ERV™ via the Leopard ERV™ interface cable. Software upgrades are done using the Pocket PC. To view: Pocket PC Version • Start Leopard ERV™ Controller. The current version is shown during this time. Valve Software Version • Start the Leopard ERV™ Controller and Connect. Press the Valve Info button. Current software version is displayed next to the Software Version text. Syrup File Version • Start the Leopard ERV™ Controller. Press Setup and Change buttons. The current Syrup File version is displayed directly above the pull-down menu. Publication Number: 620919579SER - 12 - © 2002-2014, Cornelius Inc. Leopard ERVTM Installation/Service Manual TROUBLE SHOOTING AND REPAIR Many operational problems are caused by problems with the system and/or incorrect valve set up. Many valve errors can be cleared by repeating set up with a TomcatTM unit. Before replacing components, attempt a new set up - the time it takes to perform the set up procedure could save unnecessary and costly repair time. If several valves or all valves on one unit are malfunctioning, the cause is most likely a problem with the system (recirc, back room, etc.) SYMPTOMS No Syrup or Syrup Sold-Out Error (i.e. valve does not dispense syrup or shuts down during dispense with lit LED) To troubleshoot this condition, perform the following procedure: Leopard ERV™ and Pocket PC Troubleshooting Guide Trouble No Power Fault/Cause A. B. C. No Product dispensed A. from one dispensing B. valve Solution Faulty electrical wiring. Unit unplugged Fuse or circuit breaker off. A. B. C. Other valves operating properly. A. Back room equipment operating prop- B. erly. Check back room supplies & equipment. Check syrup flow at backblock, if flow is present, replace syrup module. A. B. Wrong syrup running through valve. Valve not properly setup. A. B. C. Valve control system not working correctly. C. Replace with correct syrup. Setup valve using iPaq or TomCat with correct ratio and syrup - no mechanical adjustments need to be made to the valve itself. Replace PCB. A. B. C. Nozzle isn’t seated correctly in base. Damaged nozzle. Damaged valve. A. B. C. Remove and re-seat nozzle. Replace nozzle. Inspect valve assembly. Replace modules, as required. A. System contaminated. A. B. Valve is not performing correctly. B. Remove and check diffuser for contamination. If there is contamination in the diffuser, check system for contamination and clean system and valve, as required. Inspect valve assembly. Replace the appropriate module, as required. A. Insufficient pressure or flow to reach set flow rates. A. B. Incorrect setup. B. A. Initial dispense after applying power to A. the valve or changing a setting. Portion Control Valve -Profile Pour is B. enabled. Water to Syrup ratio too low or too high Liquid leaking from around nozzle Liquid leaking through the nozzle Flow rate lower than set value or fluctuates Valve starts off at a low flow and then increases B. © 2002-2014, Cornelius Inc. Check electrical wiring. Verify unit is getting power. Check circuit breaker or fuse. - 13 - Perform diagnostic flow rate test with handheld to determine system capabilities. Check system pressures, flow rates, cleanliness. Clean and/or repair as required. Note that still water systems and high viscosity syrups may not be able to develop adequate system pressure to maintain the set flow rate. The valve will compensate and automatically reduce flow rate while maintaining correct ratio. Check setup of valve with respect to system: correct syrup type? Correct ratio? Correct flow rate? Re-setup valve as required w/ TomCat. None – Valve will act normally after initial dispense. Disable if desired – “Profile Pour option minimizes foaming by flowing at low flow rates at the beginning and end of the drink.” Publication Number: 620919579SER Leopard ERVTM Installation/Service Manual Leopard ERV™ and Pocket PC Troubleshooting Guide Trouble Fault/Cause A. Solution Pocket PC cable fault indicated by an illuminated red light in the cable. No Communication B. “Comms Error” appears on Leopard ERV™ controller screen. between the valve and Pocket PC C. Multiple Controller programs open. D. A. B. C. Leopard ERV™ valve not able to com- D. municate with Pocket PC. Remove cable from valve and hold Pocket PC in hand. Upon red light going off, reconnect. Pocket PC should never be in contact with any other equipment or metal. Exit Leopard ERV™ Controller and reconnect. Close all controller programs, then re-start controller by pressing icon ONCE. Exit Leopard ERV™ Controller, disconnect Pocket PC, cycle valve power and retry communication. A. B. C. D. Product temperature. Dirty nozzle/diffuser. Flow rate too high. No small diffuser O-ring. A. B. C. D. Check cooling system. Clean nozzle/diffuser. Adjust flow to normal rate with Pocket PC or TomCat. Replace O-ring. A. Retaining clip not properly seated. A. B. O-rings worn or damaged. B. Turn back block shut-off to “off” and adjust or replace retaining clip. Replace O-rings. A. B. Off Taste – one brand C. Dirty nozzle/diffuser. Incorrect setup. Tubing and plastic components contaminated for that flavor. A. B. C. Clean. Connect handheld and correct setup. Replace all tubing and plastic components for that flavor. Portion controlled dis- A. pense stops and then dispenses a short amount again Top-off Feature is enabled. A. Disable if desired – Top-off option dispenses part of the total drink, waits several seconds and then completes the rest of the drink to minimize the effects of foaming. No product dispensed A. after a 60 second pour Leopard ERV™ has a time-out feature A. A. B. A. LED constant - Sold Out. B. LED blinking and will not dispense valve is in charge mode. LED blinking on portion control keypad C. - valve in keypad programming mode. Excess Foaming Liquid leaking between back block and valve Keypad LED is on or blinking C. Release actuator and repress. that shuts off flow after 60 seconds. Publication Number: 620919579SER - 14 - Replace syrup BIB. Wait until valve is in operating mode. Press Pour/Cancel button to exit keypad programming. © 2002-2014, Cornelius Inc. Leopard ERVTM Installation/Service Manual Leopard ERV™ and Pocket PC Troubleshooting Guide Trouble Fault/Cause Solution A. Verify that the valve is not spot-lighting an actual SOLD-OUT condition and syrup supply. 1. Check BIB and syrup pump - ensure good supply of syrup to valve 2. Ensure BIB change did not result in air in syrup line. Connect TomCat & perform PURGE operation on syrup & water (air in line may trigger a sold-out). 3. Try the valve on a different flavor. Does it operate normally? If YES - the problem is with the unit, not the valve. Troubleshoot unit If NO - go to Step 4. 4. Hold the push button or lever for 3+ sec. to override the sold-out. Do both syrup & water flow from the valve? Keypad LED is on and A. not blinking If YES - flow sensors are malfunctioning, go to Step 5. If NO - Motor may be stuck - replace the appropriate module (water or syrup). If still not working, replace the PCB. LED constant - Sold Out 5. Replace syrup module & quad ring (most flow sensor failures occur on syrup side of valve). Activate valve 5-10 times. Does sold-out clear? If YES - perform full setup with TomCat. If NO - go to Step 6. 6. Replace water module & quad ring. Activate valve 5-10 times. Does sold-out clear? If YES - perform a full setup with TomCat. If NO - go to Step 7. 7. Replace the PCB. Activate valve 5-10 times. Does sold-out clear? If YES - perform a full setup with TomCat. If NO - try a different valve in this position. If successful, replace valve. 8. If problem cannot be fixed, call Cornelius Technical Service. Portion size buttons do A. not dispense the correct amount. © 2002-2014, Cornelius Inc. Incorrect settings. A. - 15 - Connect pocket pc and reprogram the sizes. Keypad programming is available if enabled. Publication Number: 620919579SER Leopard ERVTM Installation/Service Manual REPAIR PROCEDURES MEAN TIME TO REPAIR Description Time (minutes) Install Valve (includes setup) 10 Replace Syrup Module 3 Replace Water Module 3 Replace PCB 3 Replace Keypad 2 Replace Lever 2 Replace Lever Keypad 3 Replace Base 3 Filter Cleaning & Replacement 4 REMOVING THE Leopard ERV™ FROM A DISPENSER 1. Remove valve cover by spreading finger tabs on bottom of cover and lifting it off. Lift and pull cover to remove. 2. Unplug the power wiring harness. Publication Number: 620919579SER - 16 - © 2002-2014, Cornelius Inc. Leopard ERVTM Installation/Service Manual REMOVING THE Leopard ERV™ FROM A DISPENSER 3. Turn off the backblock by turning the flow screws. 4. Remove the retaining spring by pulling it upward. 5. Pull the valve off the backblock. © 2002-2014, Cornelius Inc. - 17 - Publication Number: 620919579SER Leopard ERVTM Installation/Service Manual Leopard ERV™ DISASSEMBLY 1. Perform the steps in the “Removing the Leopard ERV™ from a Dispenser” procedure above. 2. When the valve has been removed, remove the nozzle by rotating left (1/4 turn) until it stops, then remove the nozzle and pull out the diffuser assembly. 3. Disconnect the keypad from the PCB. 4. Remove the PCB by pulling straight up and away from the base. 5. Remove the assembly from the base by disengaging the mixing body tabs and pushing upwards on the base. Syrup Side Tab Water Side Tab 6. Pull the mixing body out of the base. 7. If further disassembly is necessary, refer to the various module replacement procedures later in this manual. Publication Number: 620919579SER - 18 - © 2002-2014, Cornelius Inc. Leopard ERVTM Installation/Service Manual LEVER KEYPAD REPLACEMENT 1. Remove the valve from the dispenser. (See REMOVING THE Leopard ERV™ FROM A DISPENSER.) and disassemble the valve. (See Leopard ERV™ VALVE DISASSEMBLY) Lever Keypad 2. Perform the Leopard ERV Disassembly procedure to access the lever keypad. 3. Carefully remove the adhesive backed lever keypad from the base by pulling on the connector. Membrane Keypad 4. Remove the paper backing and install the new lever keypad by aligning the pad with the base, as shown. 5. Ensure that the keypad is properly seated against the alignment tabs. © 2002-2014, Cornelius Inc. - 19 - Publication Number: 620919579SER Leopard ERVTM Installation/Service Manual LEVER KEYPAD REPLACEMENT 6. Press the lever keypad firmly against the base using your index finger. 7. Reassemble the Leopard ERV valve and mount the valve back on the dispenser. LEVER REPLACEMENT 1. Remove the valve from the dispenser. (See REMOVING THE Leopard ERV™ FROM A DISPENSER.) 2. Remove the lever by pulling it straight out from the rear of the valve. Spring 3. Angle the new lever so the end goes over the top of the spring when inserted. Publication Number: 620919579SER - 20 - © 2002-2014, Cornelius Inc. Leopard ERVTM Installation/Service Manual LEVER REPLACEMENT 4. Push lever into support base until lever pins are in base pivot points. KEYPAD REPLACEMENT 1. Disconnect keypad from circuit board. 2. Carefully peel keypad off of face of base. Grab top corner and pull diagonally. © 2002-2014, Cornelius Inc. - 21 - Publication Number: 620919579SER Leopard ERVTM Installation/Service Manual KEYPAD REPLACEMENT 3. Remove protective paper from back of new keypad. 4. Position bottom of keypad flush with the top of the ledge on the front face while centering the keypad, so it does not extend over the sides of the base. Press firmly in place. 5. Wrap keypad tail over top of circuit board and press connector firmly into place. SYRUP MODULE REPLACEMENT 1. Remove the valve from the dispenser. (See REMOVING THE Leopard ERV™ FROM A DISPENSER.) and disassemble the valve. (See Leopard ERV™ VALVE DISASSEMBLY) 2. Remove the syrup module from the mixing body by rotating the module clockwise (viewed from the top of the assembly) 90 degrees and then lifting it straight up. NOTE: The black v-groove may stick to the mixing body and pull out of the syrup module. If this occurs, remove the v-groove carefully from the mixing body and replace it in the syrup module. V-Groove Publication Number: 620919579SER - 22 - © 2002-2014, Cornelius Inc. Leopard ERVTM Installation/Service Manual SYRUP MODULE REPLACEMENT 3. Remove the syrup module connectors from the PCB using a small screwdriver. Note their location on the board for replacement. Do Not remove the connectors by pulling on the wires. 4. Open the syrup module replacement kit (P/N 629097012). It contains a syrup module and a new oring. 5. Remove the old o-ring and replace it with the new o-ring from the kit. 6. Insert the connectors from the new syrup module into the proper locations on the PCB. © 2002-2014, Cornelius Inc. - 23 - Publication Number: 620919579SER Leopard ERVTM Installation/Service Manual SYRUP MODULE REPLACEMENT 7. Place the syrup module onto the mixing body, press down firmly while rotating the module counter-clockwise by 90 degrees. NOTE: Make sure that the syrup module is fully engaged in the mixing body. 8. Line up the bottom edge of the PCB with the slot in the base and push it down into place. NOTE: You should hear a click when the PCB is properly seated. 9. Snap the assembly into the base. NOTE: You should hear a click when the mixing body snaps into place. 10. Make sure the connector is positioned below the motor shell. Publication Number: 620919579SER - 24 - © 2002-2014, Cornelius Inc. Leopard ERVTM Installation/Service Manual SYRUP MODULE REPLACEMENT 11. Reconnect the keypad to its connector at the top of the PCB. 12. Replace the diffuser in the bottom of the base. NOTE: Installing the wrong diffuser on a Leopard valve results in flooding the base and possible damage to the PCB. Correct diffuser has only one red o-ring at the top of the diffuser. 13. Place the nozzle over the diffuser and rotate it 90 degrees to the right (viewed from the bottom of the valve) until it stops. © 2002-2014, Cornelius Inc. - 25 - Publication Number: 620919579SER Leopard ERVTM Installation/Service Manual WATER MODULE REPLACEMENT 1. Remove the valve from the dispenser. (See REMOVING THE Leopard ERV™ FROM A DISPENSER.) and disassemble the valve. (See Leopard ERV™ VALVE DISASSEMBLY) 2. Remove the water module from the mixing body by rotating it counterclockwise (away from the syrup module) and then lifting it straight up. NOTE: The white v-groove may stick to the mixing body and pull out of the water module. If this occurs, remove the v-groove carefully from the mixing body and replace it in the water module. V-Groove 3. Disconnect the water module connectors from the PCB. Make note of the locations. 4. Open the water module replacement kit (P/N 629097013). It contains a new water module and a new o-ring. Publication Number: 620919579SER - 26 - © 2002-2014, Cornelius Inc. Leopard ERVTM Installation/Service Manual WATER MODULE REPLACEMENT 5. Remove the old o-ring from the mixing body and replace it with the new o-ring from the kit. 6. Insert the connectors from the new water module into the proper locations on the PCB. 7. Place the water module onto the mixing body, press down firmly while rotating the module clockwise by 90 degrees. NOTE: Make sure that the water module is fully engaged in the mixing body. 8. Line up the bottom edge of the PCB with the slot in the base and push it down into place. NOTE: You should hear a click when the PCB is properly seated. © 2002-2014, Cornelius Inc. - 27 - Publication Number: 620919579SER Leopard ERVTM Installation/Service Manual WATER MODULE REPLACEMENT 9. Snap the assembly into the base. NOTE: You should hear a click when the mixing body snaps into place. 10. Make sure the connector is positioned below the motor shell. 11. Reconnect the five syrup and water connectors to their proper locations on the PCB. 12. Reconnect the keypad to its connector at the top of the PCB. Publication Number: 620919579SER - 28 - © 2002-2014, Cornelius Inc. Leopard ERVTM Installation/Service Manual WATER MODULE REPLACEMENT 13. Replace the diffuser in the bottom of the base. NOTE: Installing the wrong diffuser on a Leopard valve results in flooding the base and possible damage to the PCB. Correct diffuser has only one red o-ring at the top of the diffuser. 14. Place the nozzle over the diffuser and rotate it 90 degrees to the right (viewed from the bottom of the valve) until it stops. PCB REPLACEMENT 1. Disconnect the keypad connector. 2. Remove the PCB from the base by lifting it straight up. NOTE: The PCB fits into a groove in the base and may be hard to remove. Work the PCB carefully from side to side to loosen it from the base groove. NOTE: Too much pressure or flexing of the PCB may result in damage to the board. 3. Replace the PCB with a new PCB. © 2002-2014, Cornelius Inc. - 29 - Publication Number: 620919579SER Leopard ERVTM Installation/Service Manual PCB REPLACEMENT 4. Line up the bottom edge of the PCB with the guides in the base and push it down into place. NOTE: You should hear a click when the PCB is properly seated. PCB Guide PCB Guide 5. Reconnect the keypad connector to the PCB. WATER FILTER CLEANING The following procedure illustrates the proper methods for cleaning of the filter in the Leopard Valve. The filter is designed to block particles larger than 0.010 inches from entering the valve and possibly stopping the water flow sensor mechanism. A nozzle brush (P/N 325216000 or equivalent) is required for filter cleaning. Cleaning The filter/retainer set is place into the water side of the valve body. Looking at the back of the unit (inlet side), the water side is on the right side of the valve, with the motors facing up. To clean the filter, first remove the valve from the backblock. Hold the valve, back-side upward, under a faucet and run warm water on the filter, allowing any dry dirt particles to loosen up (see filter side in Figure 9). Use the nozzle brush (or similar brush) to remove the particles by brushing the filter gently and carefully. Continue to rinse and brush the filter as necessary until all visible dirt particles are removed. DO NOT attempt to remove/re-install the filter and retaining ring. Damage to the sides of the water inlet may result, and prevent sealing of the valve to the back block. The retaining ring acts to keep the mesh filter screen in place while the valve is prepared to be placed and locked into the back block. Locate and place the valve onto the back block assembly. The entire valve assembly can now be secured to the back block with the wire locking clip, Part No. 620716402. Publication Number: 620919579SER - 30 - © 2002-2014, Cornelius Inc. Leopard ERVTM Installation/Service Manual Filter & Retainer In Place Figure 9. WATER FILTER REPLACEMENT The following procedure is for replacing plastic retaining rings ONLY. DO NOT attempt to remove or install metal rings. If a filter with a metal retaining ring must be replaced, replace the entire water module. Filter and Retaining Ring Replacement 1. Remove the valve from the dispenser. (See REMOVING THE Leopard ERV™ FROM A DISPENSER.) and disassemble the valve. (See Leopard ERV™ VALVE DISASSEMBLY) 2. Carefully remove the plastic retaining ring and filter from the water module. 3. Place the new retaining ring on the machined end of the insertion tool. 4. Place the new filter inside the water module. Carefully slide the tool with the new filter ring in place into the water housing inlet. NOTE: Be careful not to scratch or damage the inside of the water module inlet. NOTE: The orientation of the tool is not important at this time. © 2002-2014, Cornelius Inc. - 31 - Publication Number: 620919579SER Leopard ERVTM Installation/Service Manual Filter and Retaining Ring Replacement 5. Once the ring is placed in the inlet, reverse the tool and use the flat end to carefully push the retaining ring into position parallel with the filter. 6. Make sure that the ring is pressed up against the filter and seated completely in the inlet. 7. Reassemble the valve and reinstall it in the dispenser. Publication Number: 620919579SER - 32 - © 2002-2014, Cornelius Inc. Cornelius Inc. www.cornelius.com


![Fountain Program [ 001930 ]](http://vs1.manualzilla.com/store/data/006022682_1-35065e157ee046f990de9548b34d6090-150x150.png)