1
Hoval DigiNet
Hoval DigiNet
Service manual
7010001.003 V2.4.1
7010001.003 V2.4.1
1
Hoval DigiNet
2
7010001.003 V2.4.1
Hoval DigiNet
Table of Contents
0
Overview of subjects
1 Introduction.............................................................................................................. 7
1.1
1.2
DigiNet DN5 system components ..................................................................... 7
Typical system topology.................................................................................... 9
2 DigiCom.................................................................................................................. 10
2.1 Installation ...................................................................................................... 10
2.1.1 PC configuration...................................................................................... 10
2.1.2 novaNet router EYZ 291.......................................................................... 10
2.1.3 Connection with novaNet......................................................................... 11
2.1.4 Software installation ................................................................................ 12
2.2 Starting and shutting down DigiCom ............................................................... 18
2.2.1 Start ........................................................................................................ 18
2.2.2 Close / shut down .................................................................................... 18
2.3 User login and logout...................................................................................... 19
2.3.1 Login ....................................................................................................... 19
2.3.2 Logout ..................................................................................................... 19
2.3.3 Change password ................................................................................... 19
2.4 Commissioning the DigiNet devices with DigiCom .......................................... 21
2.4.1 System overview ..................................................................................... 21
2.4.2 Downloading data from DigiZone / DigiUnit / DigiEco / DigiPlus control
devices .................................................................................................... 22
2.4.3 DigiZone control ...................................................................................... 25
2.4.4 DigiUnit control ........................................................................................ 26
2.4.5 DigiEco control ........................................................................................ 32
2.5 General operating functions............................................................................ 33
2.5.1 The screen .............................................................................................. 33
2.5.2 Time profile ............................................................................................. 37
2.5.3 Synchronise AS clocks ............................................................................ 46
2.5.4 Calendar.................................................................................................. 47
2.5.5 Alarms ..................................................................................................... 52
2.5.6 Trend / Historical database...................................................................... 57
2.5.7 Setting up users ...................................................................................... 63
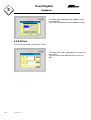
2.6 Options ........................................................................................................... 69
2.6.1 Access to the novaNet network via modem: ............................................ 69
2.6.2 Setting up an alarm (online messaging)................................................... 71
3 DigiMaster .............................................................................................................. 83
3.1 Configuration .................................................................................................. 83
3.1.1 Connecting EYT 250 to the PC................................................................ 83
3.1.2 Open a language-specific dataset ........................................................... 85
3.1.3 Write to EYT250 ...................................................................................... 85
3.2 Operation........................................................................................................ 87
7010001.003 V2.4.1
3
Hoval DigiNet
0
Table of Contents
3.2.1 Main menu ...............................................................................................87
3.2.2 Login, logout ............................................................................................88
3.2.3 Application list ..........................................................................................89
3.2.4 Calendar function .....................................................................................95
3.2.5 Historical data ..........................................................................................96
3.3 Settings ...........................................................................................................97
3.3.1 Calibration................................................................................................97
3.3.2 Display parameters ..................................................................................98
3.3.3 System info ..............................................................................................99
3.3.4 More settings ...........................................................................................99
3.3.5 Restart .....................................................................................................99
3.3.6 Time.......................................................................................................100
3.3.7 Profiles...................................................................................................100
3.3.8 Filters .....................................................................................................102
4 DigiEasy ................................................................................................................103
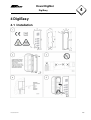
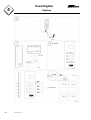
4.1
4.2
Installation .....................................................................................................103
Configuration.................................................................................................105
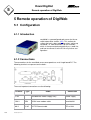
5 Remote operation of DigiWeb..............................................................................106
5.1 Configuration.................................................................................................106
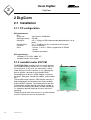
5.1.1 Introduction ............................................................................................106
5.1.2 Connections ...........................................................................................106
5.1.3 Power Supply.........................................................................................107
5.1.4 Connection to novaNet...........................................................................107
5.1.5 Ethernet .................................................................................................107
5.1.6 Proxy settings ........................................................................................110
5.2 Operation ......................................................................................................115
5.2.1 Introduction ............................................................................................115
5.2.2 Requirements.........................................................................................115
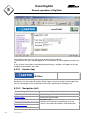
5.2.3 Layout and navigation ............................................................................115
5.2.4 Login/logout ...........................................................................................118
5.2.5 Control loops..........................................................................................119
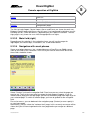
5.2.6 Installations ............................................................................................119
5.2.7 Installation view......................................................................................119
5.2.8 Progression............................................................................................122
5.2.9 User interactions ....................................................................................124
5.2.10 Additional links .......................................................................................126
5.2.11 Service view...........................................................................................127
5.2.12 System maintenance view......................................................................127
5.2.13 Alarms....................................................................................................128
5.2.14 Events....................................................................................................129
5.2.15 Service ...................................................................................................130
4
7010001.003 V2.4.1
Hoval DigiNet
Table of Contents
5.2.16
5.2.17
5.2.18
5.2.19
5.2.20
5.2.21
5.2.22
5.2.23
5.2.24
0
Settings ................................................................................................. 131
Data entry.............................................................................................. 131
E-mail messages................................................................................... 131
Hints...................................................................................................... 134
Tips and tricks ....................................................................................... 134
JavaScript ............................................................................................. 139
Language settings ................................................................................. 139
Connection ............................................................................................ 139
Appearance........................................................................................... 146
6 Service-Termial DigiService................................................................................ 149
6.1 Operation...................................................................................................... 149
6.2 Operating philosophy.................................................................................... 149
6.3 Illumination ................................................................................................... 149
6.4 Adjustement of the contrast .......................................................................... 150
6.5 List of functions............................................................................................. 150
6.6 The menu items explained............................................................................ 151
6.6.1 MENU 1................................................................................................. 151
6.6.2 MENU 2................................................................................................. 153
6.6.3 MENU 3................................................................................................. 158
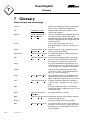
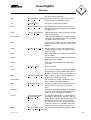
7 Glossary ............................................................................................................... 160
8 Further documentation........................................................................................ 165
9 Annexe.................................................................................................................. 166
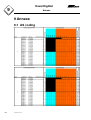
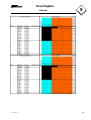
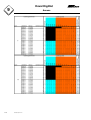
9.1
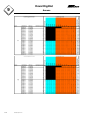
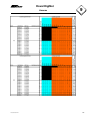
AS coding ..................................................................................................... 166
10 Document history ................................................................................................ 176
11 Detailed table of contents ................................................................................... 177
7010001.003 V2.4.1
5
Hoval DigiNet
0
Table of Contents
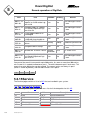
Key to symbols
Keyboard operation
Wait
Diskette
Mouse operation
Single mouse click with left button
Single mouse click with right button
Double mouse click with left button
Double mouse click with right button
Description
Application
Information
Attention
Note
6
7010001.003 V2.4.1
Hoval DigiNet
1
Introduction
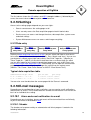
1 Introduction
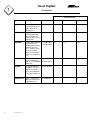
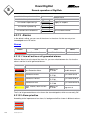
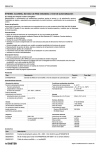
1.1 DigiNet DN5 system components
This manual describes the installation, commissioning and operation of the various
components of the DigiNet control system for the Hoval Indoor Air-Conditioning System.
Depending on the type of device and the desired operating interface, the following components may be used:Documentation
Type
Description
Product
Installation
Configuration
Operation
DigiUnit
DDC/PLC controller
(automation station),
built into the unit
switching box, for
fresh-air equipment(RoofVent, MH)
(cascade controller
and TempTronic)
- EYR209F921
-
2.4.4
-
DigiEco
DDC/PLC controller
(automation station),
built into the recirculated air device or
WelRad (TempTronic
only)
- EYE202F001
-
2.4.5
-
DigiZone
- EYE202F001
Control built into the
zone cabinet (automation station).
-
2.4.3
-
Interface for outdoor
and room temperature
sensors, control inputs, demand signals
and 'DigiEasy' easy
control device.
DigiPlus
7010001.003 V2.4.1
Additional DDC/PLC
controller (automation
station), built into the
zone cabinet, for options such as humidity
control, frequency
converter or other
special functions
- EYR203F001
-
-
7
Hoval DigiNet
1
Introduction
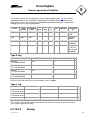
Documentation
8
Type
Description
Product
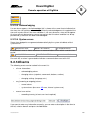
DigiMaster
Uniform user panel
(Touch Panel) for the
entire plant, for instructed users.
- EYT250F021
-
3.1
DigiEasy
Additional device for
restricted operation,
for untrained users.
Solely to operate one
control zone.
- EYB270F101
-
2.4.3
DigiCom
Visualisation software - YZP401F901
(novaPro32) for a
standardised network - EYZ291F001
environment; comprises software package and novaNet
router for connection
to a PC via COM interface.
2.1
2.5
2.4
DigiWeb
- EYW300F001
Connection to the
Internet comprising
web server (novaWeb) - EYZ291F001
and router.
-
5.1
5.2
DigiBac
Integration into management level with a
BACnet communication card via BACnet /
IP based on Ethernet.
- EYK230F040
-
DigiService
Service-Terminal to
display parameters of
a DigiUnit locally
- EYT240F001
6
7010001.003 V2.4.1
Installation
Configuration
Operation
3.2
Hoval DigiNet
Introduction
1
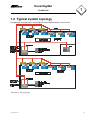
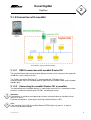
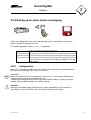
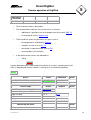
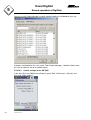
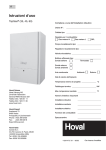
1.2 Typical system topology
Example with 2 control zones and 3 DigiUnit and 3 DigiEco devices in each case:
Illustration1-1: Typical topology
7010001.003 V2.4.1
9
Hoval DigiNet
2
DigiCom
2 DigiCom
2.1 Installation
2.1.1 PC configuration
HW requirements:
PC:
Processor:
Working memory:
Hard disk:
Diskette drive:
CD drive:
Ports:
Intel Pentium II 400 MHz
256 MB
min. 1.8 Gbyte (9 GB recommended depending on size of
plant)
3½ ' 1.44 MByte (for the installation of the licence)
for the installation
1 mouse, 1 serial, 1 ISA bus (optional for EYS290)
1 printer
1 network connection
SW requirements:
Windows NT 4 SP6a / 2000 / XP
Acrobat Reader 4.0 or higher
2.1.2 novaNet router EYZ 291
The EYZ 291 F001 novaNet router is used to connect
the EY3600 novaNet field bus to a PC via the RS-232
serial interface. In this case, the connection is either
made directly to the PC interface, or via a dialling modem or another switched or unswitched RS232compatible pair of devices (ISDN adapter, line driver,
converter, fibre optic, leased-line modem, radio modem
etc.).
The novaNet router contains 1MB of buffer memory in
order to decouple the time behaviour of the novaNet
and the RS232 interface. The functionality for the dialling operation includes dialling from above (remote access) and also dialling from below (remote monitoring,
i.e. automatic upward signalling of events that merit
reporting).
The baud rate for data transmission is set with the help
of 4 DIL switches on the rear of the device.
10
7010001.003 V2.4.1
Illustration2-1: novaNet router, EYZ
291
Hoval DigiNet
DigiCom
2
2.1.3 Connection with novaNet
Illustration2-2: Connection with novaNet
2.1.3.1 RS232 connection with novaNet Router 291
The novaNet Router 291 communication device must be set for a transmission speed of
38400 bits/s (only switch 3 to ON).
The COM 1 port of the DigiCom PC is connected to the COM port of the
novaNet Router 291via a standard cable of type DB9, zero modem cable (article number
386301 001).
2.1.3.2 Connecting the novaNet Router 291 to novaNet
The connection to the novaNet devices is made either from the RJ11 connection or from
terminals a and b of novaNet router EYZ291, according to choice.
Attention:
If connections a and b are transposed by mistake, communication on novaNet will collapse as a result.
A correct connection is shown by the flashing 'novaNet Receive' LED.
Note:
If the 'novaNet Fault' LED on novaNet Router EYZ291 lights up, there is a short to
earth in the novaNet network.
7010001.003 V2.4.1
11
Hoval DigiNet
2
DigiCom
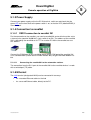
2.1.4 Software installation
2.1.4.1 The DigiCom CD-ROM
DigiCom YZP 401 F901 is the commissioning tool based on the EY3600 novaPro32
visualisation software, which allows simple parameterisation and commissioning of one
or more EY3600 automation stations in connection with the Hoval DigiNet DN5 system
technology.
In addition to the EY3600 novaPro32 standard visualisation, the following functionalities
are available:
- installation routine for FBD_nP32 and the DN5 universal project dataset with integrated licensing help
- integrated download tool, enabling automatic loading of data records into the
automation stations with no need for programming knowledge (CASE FBD)
- specific commissioning schematics allow simple adaptation of the configuration
parameters to device- and project-specific requirements.
DigiCom is supplied together with the DN5 universal project dataset in three languages
(d/f/e) on CD-ROM.
DigiCom is supplied on a CD-ROM without copy protection. You obtain the right to use
DigiCom in the form of a separate licence diskette.
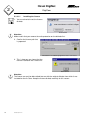
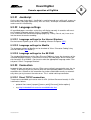
Place CD-ROM YZP 401 F901 in your drive. After a few seconds, the start menu of the
CD will open (see Illustration2-3). If the CD does not start automatically, start the SetupHoval.exe programme from Windows Explorer.
12
7010001.003 V2.4.1
Hoval DigiNet
DigiCom
2
Illustration2-3 Start menu of the EY3600 CD-ROM
Select the language you want
Information:
Your choice of language sets the language for these components:
• installation language
• language of the programmes to be installed
• language for the DigiCom commissioning schematics
If one of the listed components is already installed on the PC, it is flagged 'OK' and this
component is not selected for the installation. If you want to overwrite the component
that is already installed, you can set your choice manually.
Attention:
Please note these points before you start the installation on your PC:
• Close all Windows programmes on your PC.
• When installing in Microsoft Windows NT, 2000 and XP, you must be logged on as a
user in the Administrator group.
Select the language you want and follow the instructions in the installation programme.
7010001.003 V2.4.1
13
Hoval DigiNet
2
DigiCom
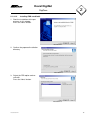
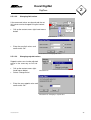
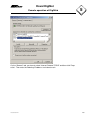
2.1.4.1.1
Installing the licence
1. You are asked to insert the licence
diskette.
Illustration2-4
Attention:
Make certain that you remove the write protection on the diskette first.
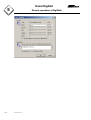
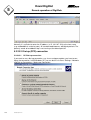
2. Confirm the licence path that
is proposed.
Illustration2-5: Installation programme for the user license
3. This is how you are shown that the
licence installation was successful:
Illustration2-6
Attention:
The licence can only be deinstalled later on with the original diskette from which it was
installed for the first time. Keep the licence diskette carefully for this reason.
14
7010001.003 V2.4.1
Hoval DigiNet
2
DigiCom
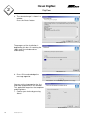
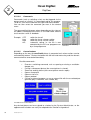
2.1.4.1.2
Installing FBD novaPro32
1. Start the installation of the programme in this window.
Press the 'Next>' button.
Illustration2-7
2. Confirm the proposed installation
directory.
Illustration2-8
3. Select the FBD option and novaPro32.
Press the 'Next>' button.
Illustration2-9
7010001.003 V2.4.1
15
Hoval DigiNet
2
DigiCom
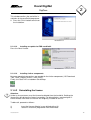
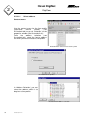
4. The selected range is shown in a
window.
Press the 'Next>' button.
Illustration2-10
The progress of the installation is
depicted by this bar. On reaching the
100% mark, the window closes
automatically.
Illustration2-11
6. Press OK to acknowledge the
message opposite.
Illustration2-12 Installation programme message
You can set the language for the ‘List
and Label’ programme in this window.
This application organises the templates
and the printers.
7. Confirm your choice by pressing
‘Next>'.
Illustration2-13
16
7010001.003 V2.4.1
Hoval DigiNet
2
DigiCom
This window confirms the end of the installation of the novaPro32 programme.
8. Press the 'Finish' button to exit from
the installation.
Illustration2-14
2.1.4.1.3
Installing an update for FBD novaPro32
Press the 'Next>' button
Illustration2-15
2.1.4.1.4
Installing further components
No more operating interventions are needed for the further components ('AS Download
Tool', 'Data', 'Registry Entries', 'HDB_Entry').
Finally, the 'Start' link is created on the desktop.
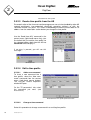
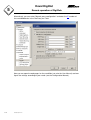
2.1.4.2 Deinstalling the licence
Attention:
Under no circumstances must the licence be deleted from the hard disk. Deleting the
licence files will destroy the licence irrevocably. For deinstallation, use the original licence diskette from which the licence was originally installed on the PC.
To deinstall, proceed as follows:1)
2)
7010001.003 V2.4.1
Insert the licence diskette in your diskette drive (A).
Start the ‘install.exe’ programme from the diskette.
17
Hoval DigiNet
2
DigiCom
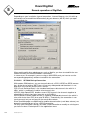
3)
4)
Under ‘Licence Path’, select the path for the installed licence (e.g.
C:\Programmes\Sauter\Ey3600\Licence\)
Select the 'Transfer licence to master disk' option.
Illustration2-16: Deinstallation of the user license
5) To start the deinstallation, click on the ‘Transfer-Licence’ command button.
6) You will be shown that the deinstallation was successful.
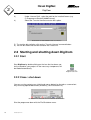
2.2 Starting and shutting down DigiCom
2.2.1 Start
Start DigiCom by double-clicking on the icon that has been specially created for your project. All the necessary components will
be loaded automatically.
Illustration2-17:
DigiCom start icon
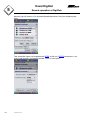
2.2.2 Close / shut down
You can use the context menu (right-hand mouse button) for the tab as a convenient
way of closing opened documents (windows) (see Illustration2-18).
Illustration2-18: context menu for novaPro32 document tabs
Shut the programme down with the File/Shut down menu.
18
7010001.003 V2.4.1
Hoval DigiNet
DigiCom
2
2.3 User login and logout
2.3.1 Login
•
To show the input mask for ‘user name’
and ‘password’, click on the key in the
icon bar or use the ‘File’ menu:
Illustration2-19: Login
•
In the next input box,
enter your user name
and your password, and
confirm your entries
with ‘OK’.
Illustration2-20: Entering your user name and password
2.3.2 Logout
Before leaving your workplace, you must log out
from your workstation. This bars all operating
functions, as an effective way of preventing incorrect manipulations by unauthorised people.
Click on the
icon in the icon bar, or use the
‘File’ menu to log out if you are already logged in.
All open windows (pictures, alarm lists, etc.) will
be closed and novaPro32 remains barred for
manipulations until a user logs in again.
Illustration2-21: Logout
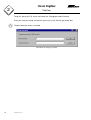
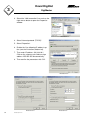
2.3.3 Change password
Users can independently change the password which the System Administrator assigns
them for a more familiar one.
7010001.003 V2.4.1
19
Hoval DigiNet
2
DigiCom
To do this, go to the ‘File’ menu and select the ‘Change password’ function:
Enter your new password, and confirm your entry in the ‘Confirm password’ box.
The password you enter is masked.
Illustration2-22: Change password
20
7010001.003 V2.4.1
Hoval DigiNet
DigiCom
2
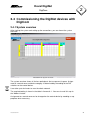
2.4 Commissioning the DigiNet devices with
DigiCom
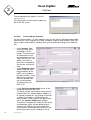
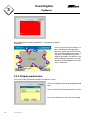
2.4.1 System overview
After starting the system and setting up the connections, you are shown the system
overview:
Illustration2-23: System overview
The system overview shows all the bus participants that are present in green. Assignment to a control zone and device category is determined by the coding of the DIP
switches on the control device.
It can take up to 6 minutes to scan the whole network.
The required coding is shown in the table in Annexe 9.1 . You can also call this up via
the 'Address' button.
Assignment to a control zone can be changed on the control device by recoding as appropriate when necessary.
7010001.003 V2.4.1
21
Hoval DigiNet
2
DigiCom
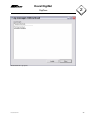
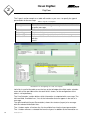
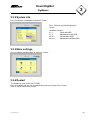
2.4.2 Downloading data from DigiZone / DigiUnit /
DigiEco / DigiPlus control devices
Press the 'Download' button to call up the Download window.
Illustration2-24: Download window
Enable the relevant checkboxes for the zones that are present. You can use the 'Check
all' or 'Uncheck all' buttons to select or deselect all the zones.
If at least one zone is selected, the Download buttons are enabled.
For first-time operation, select the 'Download with init' button.
Attention:
The 'Download with init' function initialises all the control devices and sets the default
parameters.
Information:
If the control devices have already been parameterised and you only want to adapt the
zone assignment, use the 'Download without init' function.
Illustration2-25: 'Stop download'
If the download is active, you can stop it with the 'Stop download' button if necessary.
If a download is stopped, the current zone is completed first.
The bar graphic shows the progress of the download.
After completion of the download, the result is shown in the 'Log reports' pop-up.
22
7010001.003 V2.4.1
Hoval DigiNet
DigiCom
2
Illustration2-26: Log reports
7010001.003 V2.4.1
23
Hoval DigiNet
DigiCom
2
2.4.3 DigiZone control
Press the 'Zone (1…n)' button in the System overview screen to call up the zone schematic:
Illustration2-27: Zone schematic
The zone overview shows those parameters and statuses that are valid throughout the
entire control zone.
The main devices that are present in this zone (DigiUnit) and the additional devices (DigiEco) are shown in green. Press the fast forward key to open the device in question:
Illustration2-28: Fast forward key
Information:
It is advisable to parameterise the main and additional devices first and then to set the
zone parameters.
7010001.003 V2.4.1
25
Hoval DigiNet
2
DigiCom
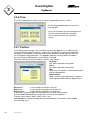
2.4.4 DigiUnit control
The device screen shows all the parameters and statuses for the selected device:
Illustration2-29: DigiUnit parameter list
2.4.4.1 Unit configuration
You specify the type of ventilation device in the 'Unit configuration' section. You can select the possible alternatives for each
parameter from the context menu. To do this, click with the
right-hand mouse button on the relevant input box and select
the alternative you want.
Illustration2-30: Unit configuration
To enter values for the 'Min. fresh
air quantity' parameter, select
'Change value' in the associated
context menu.
26
7010001.003 V2.4.1
Illustration2-31: Change value
Hoval DigiNet
2
DigiCom
Enter the new value in the input window and confirm with 'OK'.
After a processing cycle, the new value is fed back
from the controller and shown in the input box.
Illustration2-32: Enter value change
After a processing cycle, the new value is fed back from the controller and shown in the
input box.
Information:
If the input value is outside of the permitted input range, the highest or lowest possible
value is automatically effective (minimum 0 %, maximum 100 % here).
The configuration number resulting from the selected parameters is shown in the section header.
2.4.4.2 Variotronic
If the ventilation device is fitted with a servo motor to adjust the
swirl blades automatically, the associated default parameters
can be adapted to the particular conditions in the 'Variotronic'
section.
Click with the right-hand mouse button on the relevant input
box and the context menu to select the 'Change value' input
mask will open (see also the picture in Illustration2-31: and
Illustration2-32: Enter value ).
Illustration2-33: Variotronic
2.4.4.3 Configuration parameters
In the 'Configuration parameters' section, you can adjust the
default parameters for various functionalities of the ventilation
device if you need to.
The 'ERG', 'Backup mode', 'Icing protection', 'Defrost switching'
and 'Source ventilation' options can be switched on or off via
the respective 'Enable' parameters.
Illustration2-34: Configuration parameters
7010001.003 V2.4.1
27
Hoval DigiNet
2
DigiCom
2.4.4.4 Control parameters
In the 'Configure PIPI controller' section, you can specify the
control strategies and the associated control parameters.
Illustration2-35: Control
parameters
Information:
It is usually sufficient to set the starting points for the sequence in relation to the power
levels for the individual elements. The P-Band and Reset time parameters are preset for
'robust' control behaviour.
2.4.4.5 Alarms
If an alarm is active in the control zone of the selected DigiUnit,
this is signalled in red in the 'Collective alarm' field of the
'Alarms' section.
Illustration2-36: Collective
alarm
2.4.4.5.1
Alarm details in the alarm list
From the icon bar, select the
This opens the alarm list.
command button.
You will find details about the information in the
alarm list in 2.5.5.
Illustration2-37: Calling up the alarm list
2.4.4.5.2
Alarm reset
After the fault has been rectified, you must press the 'Reset Alarm' button. This resets
the stored alarms for the control zone.
28
7010001.003 V2.4.1
Hoval DigiNet
2
DigiCom
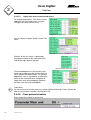
2.4.4.6 Plant mode
In the 'Plant mode' section, the DigiUnit can be put into an operating mode that diverges from the control zone.
Also, you can specify the Enable values for any additional DigiEco devices that might be assigned.
Illustration2-38: Plant
mode
2.4.4.7 Current values
The 'Current values' section shows the current operating values.
Illustration2-39: Current
values
2.4.4.7.1
Override equipment
The supply air fan, the exhaust air fan, the heating
pump and the cooling pump (if they are present for
this type of device) can be overridden with the help
of the context menu, for test purposes.
Select the 'Auto' command to return them to automatic mode.
2.4.4.7.2
Override control signals
The control signals for the ERG damper,
heating valve, cooling valve, FA/RCA damper
and swirl blades (if they are present for this
type of device) can be overridden with the
help of the 'Change value' command in the
context menu, for test purposes.
Select the 'Aut AO' command to return them
to automatic mode.
7010001.003 V2.4.1
Illustration2-40: Override equipment
Illustration2-41: Override control signals
29
Hoval DigiNet
2
DigiCom
2.4.4.7.3
Apply limit values to measured values
For monitoring purposes, limit values can be
applied to the measured values using the
'Change limit value' context menu .
Illustration2-42: Limit values
You can define an upper and/or a lower limit
value.
Illustration2-43: Change limit value
Violation of the limit value is signalled by
changing the colour of the measured value
(red for too high, blue for too low).
Illustration2-44: Limit value violation
The acknowledgement in the context menu
allows you to document the fact that the limit
value violation has been noted. The acknowledged limit value is signalled by changing the
colour of the measured value (magenta for
'upper limit value acknowledged', light blue
for 'lower limit value acknowledged').
.
Illustration2-45: Acknowledge limit value
Information:
For more extensive function analyses, the possibilities offered by Trend / Historic database are available if needed, see Section 2.5.6.
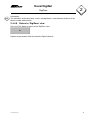
2.4.4.8 Close parameterisation
Enter the device number in the title line:
30
7010001.003 V2.4.1
Hoval DigiNet
DigiCom
2
Information:
The individual restart delay after a mains voltage break is calculated on the basis of the
device number entered here.
2.4.4.9 Return to 'DigiZone' view
Press the 'Exit' button to return to the 'DigiZone' view:
Repeat the parameterisation for the other DigiUnit devices.
7010001.003 V2.4.1
31
Hoval DigiNet
2
DigiCom
2.4.5 DigiEco control
Parameterisation of the DigiEco control is carried out in the same way as for the DigiUnit
control, as appropriate.
Use the 'Main device' parameter to specify the DigiUnit device to which the DigiEco device is assigned.
32
7010001.003 V2.4.1
Hoval DigiNet
DigiCom
2
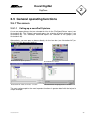
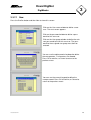
2.5 General operating functions
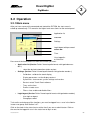
2.5.1 The screen
2.5.1.1 Calling up a novaPro32 picture
A user can open pictures that are selected for him via the 'File|Open|Picture' menu (see
Illustration2-46). The 'Picture' command opens the selection of plant schematics (see
Illustration2-48). The 'ASGroup' command opens the selection of AS groups (see
Illustration2-49).
Alternatively, you can open a picture directly via the icon bar (see Illustration2-47) or
directly from the document browser:
Illustration2-46: Open a picture
Illustration2-48: 'Plant schematics' selection
Illustration2-47: Icon bar
Illustration2-49: 'AS group pictures' selection
The next section explains the most important functions in greater detail with the help of a
simple example:
7010001.003 V2.4.1
33
Hoval DigiNet
2
DigiCom
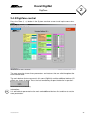
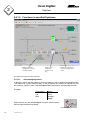
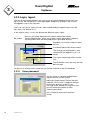
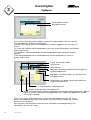
2.5.1.2 Functions in novaPro32 pictures
Display an alarm by
changing the color of a
schematic symbol
Display of an
actual temperature reading
Display of an alarm message by changing color of
a field
Illustration2-50: Typical novaPro32 picture
2.5.1.2.1
Acknowledging alarms
In pictures, alarms can be shown as text messages as well as fields that change colour.
The supervisor (system administrator) is free to choose the colours to indicate the various statuses (normal, alarm, acknowledged) when the pictures are being dynamised.
Example:
Field colour
white
red
blue
Status
normal
alarm
acknowledged
Active alarms can be acknowledged using the context menu,
with the right-hand mouse button.
Illustration2-51
34
7010001.003 V2.4.1
Hoval DigiNet
DigiCom
2.5.1.2.2
2
Changing limit values
If the measured values are dynamised, the set
limit values can be changed using the context
menu.
•
Call up the context menu: right-hand mouse
button
Illustration2-52
•
Enter the new limit values and
confirm with ‘OK’.
Illustration2-53: Changing limit values
2.5.1.2.3
Changing setpoint values
Setpoint values can also be adjusted
online in the same way as limit values.
•
•
•
Call up the context menu: righthand mouse button
Select ‘Change Value’
Illustration2-54
Enter the new setpoint value and
confirm with ‘OK’.
Illustration2-55: Changing a setpoint value
7010001.003 V2.4.1
35
Hoval DigiNet
2
DigiCom
2.5.1.2.4
Commands
Commands (such as switching a fan) can be triggered via the
context menu of a field, if it is parameterised for this purpose.
To do this, click on the field with the right-hand mouse button.
You can then select the command you want in the context
menu.
The command field changes colour depending on the status of
the address belonging to the field, i.e. the field colour and the
text it contains serve as feedback.
Example: OFF
Low
High
Aut
2.5.1.2.5
switch the fan off
switch the fan to a slower setting.
switch the fan to a faster setting.
‘automatic’ setting, i.e. the fan is now
controlled by the AS user programme or Illustration2-56: Switching
command
by a time programme.
Control buttons
Depending on the way the novaPro32 picture is parameterised, various actions can be
executed with buttons. Click on the button with the left-hand mouse key and the relevant
command will be executed without delay.
Possible commands:•
•
•
•
•
•
•
Execute a switching command, such as opening or closing a ventilation
damper, etc.
Call up a subsequent picture (the current picture is closed).
Zoom into another picture (the current picture remains open).
Open a time profile
Open an alarm list
Open a protocol
Call up an external program, or run an external file with the associated programme (play a sound file, start a video, etc.)
Illustration2-57: Control buttons
Any desired picture can be assigned to a button by the System Administrator, so the
appearance of a button can easily be adapted to the function assigned to it.
36
7010001.003 V2.4.1
Hoval DigiNet
DigiCom
2
Illustration2-58
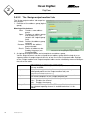
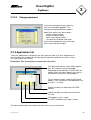
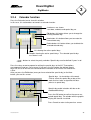
2.5.2 Time profile
The calendar and the time profiles based on it are used to specify the time behaviour of
automation station (AS) addresses. 320 time commands are possible per AS (or 64 for
ecos). Special days (public holidays, vacation, etc.) - i.e. variations from the annual calendar - can be parameterised in the calendar.
Both the calendar and the time profiles are saved in the automation stations. Configuration is menu-prompted from novaPro32, or from the nova240 / nova250 operating terminals.
2.5.2.1 Create a new time profile
Use the ‘File| New| Time profile’ menu command
to create a new time profile, or select the ‘New
AS Time profile’ command from the context
menu for folder ‘AS Time profiles’ in the novaPro32 document browser.
Then select a house address for which you want
to create a time profile.
7010001.003 V2.4.1
Illustration2-59: Create new time profile
37
Hoval DigiNet
2
DigiCom
2.5.2.1.1
Select address
Context menu:
Use the context menu for the time profile
(right-hand
mouse
button)
(see
Illustration2-60) to go via ‘Selection’ to the
properties window (see Illustration2-61):
From
the
address
selection
(see
Illustration2-62), select the house address
for which you want to create a time profile.
Illustration2-60: Context menu for time profile
Illustration2-61: Properties
In ‘Address Selection’, you can
select the address which is to
be given a time profile.
Illustration2-62: Address selection
38
7010001.003 V2.4.1
Hoval DigiNet
DigiCom
2
Address browser:
You can also insert the address you want directly from the address browser, using ‘drag
and drop’.
Illustration2-63
2.5.2.2 Opening an existing time profile template
Open a time profile that already exists
from the ‘File|Open|Time profile’ menu and
select a time profile that already exists
from the file selection box.
Alternatively, you can open a time profile
template with the ‘Open’ icon in the icon
bar, with a button configured for this purpose in a novaPro32 picture, or by double-clicking on the relevant time profile
icon in the novaPro32 document browser.
Illustration2-64: Opening a time profile
7010001.003 V2.4.1
39
Hoval DigiNet
2
DigiCom
Illustration2-65: Time profile
2.5.2.3 Read a time profile from the AS
Parameterisation of the time and vacation programmes can also be handled by other AS
network participants (non-networked novaPro32 operating stations) or with the
‘nova240’ manual user panel. This makes it necessary to read the current data for an
address from the automation station before you change the time profile.
Use the ‘Read (from AS)’ command in the
context menu (right-hand mouse key) (see
Illustration2-66) to read the time profile for
the selected address back from the AS into
novaPro32 and to display it.
If no entry is present, you will see this
message:
Illustration2-66: Context menu
Illustration2-67
2.5.2.4 Edit a time profile
2.5.2.4.1
Add a new command
To insert a new command into a
time profile, select the ‘New command’ command from the context
menu (right-hand mouse button).
The ‘Dyn_pas Control Properties’
window will open.
On the ‘TP parameters’ tab, select
the command you want (see
Illustration2-68).
Illustration2-68: Time profile parameterisation
2.5.2.4.2
Change a time command
Select this procedure to change a command in an existing time profile:
40
7010001.003 V2.4.1
Hoval DigiNet
DigiCom
•
•
•
2.5.2.4.3
2
select the command you want in the time profile.
select the ‘Change command’ command from the context menu (right-hand
mouse button).
The ‘Dyn_pas Control Properties’ window will open.
Make the changes you want.
Time command selection
Select the command you want in the ‘Dyn_pas Control Properties’ window on the TP
parameters tab:
Click on the programme type that
you want, and the next section of
the window will be adjusted.
Once:
7010001.003 V2.4.1
41
Hoval DigiNet
2
DigiCom
Time:
Hour:
Minute:
0-23
*
0 - 59
P4
P8
P15
P30
time: hour
every hour
time: minute
every four minutes (0, 4, 8, 12, 16, ...)
eight times per hour (3, 11, 19, 27, 33, 41, 49, 57)
every quarter of an hour (00, 15, 30, 45)
every half-hour (00, 30)
Command:
The possible commands depend on the address type and its parameterisation.
on:
Day:
Month:
Year:
1 - 31
1 - 12
1997 -2059
0
day of the month
month
calendar year
every year
Comment: maximum of 32 characters
Hourly:
Time:
Minute:
0 - 59
P4
P8
P15
P30
time: minute
every four minutes (0, 4, 8, 12, 16, ...)
eight times per hour (3, 11, 19, 27, 33, 41, 49, 57)
every quarter of an hour (00, 15, 30, 45)
every half-hour (00, 30)
Command:
The possible commands depend on the address type and its parameterisation.
Comment: maximum of 32 characters
Daily:
42
7010001.003 V2.4.1
Hoval DigiNet
DigiCom
Time:
Hour:
Minute:
0-23
0 - 59
P4
P8
P15
P30
2
Time: hour
time: minute
every four minutes (0, 4, 8, 12, 16, ...)
eight times per hour (3, 11, 19, 27, 33, 41, 49, 57)
every quarter of an hour (00, 15, 30, 45)
every half-hour (00, 30)
Command:
The possible commands depend on the address type and its
parameterisation (see the ‘Command codes’ table).
Comment: maximum of 32 characters
Weekly:
Time:
Hour:
Minute:
0-23
*
0 - 59
P4
P8
P15
P30
Time: hour
every hour
time: minute
every four minutes (0, 4, 8, 12, 16, ...)
eight times per hour (3, 11, 19, 27, 33, 41, 49, 57)
every quarter of an hour (00, 15, 30, 45)
every half-hour (00, 30)
Command:
The possible commands depend on the address type
and its parameterisation (see the ‘Command codes’ table).
Comment: maximum of 32 characters
Day selection:
Check the boxes
= active
Monthly:
7010001.003 V2.4.1
43
Hoval DigiNet
2
DigiCom
Time:
Hour:
Minute:
0-23
*
0 - 59
P4
P8
P15
P30
Time: hour
every hour
time: minute
every four minutes (0, 4, 8, 12, 16, ...)
eight times per hour (3, 11, 19, 27, 33, 41, 49, 57)
every quarter of an hour (00, 15, 30, 45)
every half-hour (00, 30)
Command:
The possible commands depend on the address type and its parameterisation (see the ‘Command codes’ table).
every:
day:
1 - 28 day of the month
Comment: maximum of 32 characters
2.5.2.4.4
Entry in the list
If all the parameters are correct, they must be transferred to the list line by line.
Press the ‘Apply’ button to transfer the data into the list. You can perform other parameterisations for this address directly.
Press the ‘OK’ button to transfer the data into the list, and the properties tabs will be
closed.
Press the ‘Cancel’ button if you do not want to transfer the last data that you parameterised, and the properties tabs will be closed.
2.5.2.4.5
Edit commands
You can edit the command lines of a time profile using the ‘Copy’, ‘Add’, ‘Delete’ and
‘Delete all’ commands.
To do this, select the command line(s) that you want, open the context menu and select
the command.
2.5.2.5 House addresses with several time profiles
Several time profiles can be assigned to one house address in novaPro32. However,
only one time profile is ever active in the automation station.
Use several time profiles per house address if you want to run a different time programme on the automation station in a particular season, for example. This enables you
to prepare the time programme in advance on your PC so that you can load it into the
automation station at the relevant time. The old settings will then stay saved on your PC
(in the old time profile). This means you can always refer back to the old settings.
44
7010001.003 V2.4.1
Hoval DigiNet
DigiCom
2
You can edit the time profiles with the commands from the ‘Edit time profile’ sub-menu
of the time profile context menu (see
Illustration2-69).
Illustration2-69: The ‘Edit time profile’ sub-menu
2.5.2.6 Send to AS
After you have finished
parameterising the address you want, the data
must be sent to the AS.
Press the right-hand
mouse button and click
on ‘Send’.
Illustration2-70
The warning
shown opposite appears
before the
download:
Illustration2-71
• Confirm entries with ‘OK’.
The data will be sent.
• Press ‘Cancel’ to exit without sending.
7010001.003 V2.4.1
45
Hoval DigiNet
2
DigiCom
2.5.3 Synchronise AS clocks
In every automation station of the EY3600 system, there is an independent time basis.
All time-based functions of the station access this time basis.
Examples:
•
•
•
Time profiles
HDB entries
Event Publisher
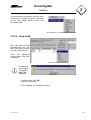
To call up the function to synchronise all the clocks in a network, go to the
'File | Configuration AS network synchronisation' menu.
In the 'AS network synchronisation' window (see Illustration2-72), press the 'All AS networks' button to set the times of all the automation stations in the project to the PC's
time.
Illustration2-72: AS network synchronisation
46
7010001.003 V2.4.1
Hoval DigiNet
DigiCom
2
2.5.4 Calendar
The calendars form the basis for the time programmes of the EY3600 system.
The AS calendar serves as the basis for the automation station time programmes; once
it has been configured successfully in novaPro32, it is loaded into the automation stations; this means that the calendar is stored in the automation stations. This guarantees
that the time programmes will run correctly, regardless of novaPro32's operating status.
The system calendar is assigned to all the automation stations by default.
With the novaPro32 calendar configuration, you can assign a substitute day to every
day within 2 years (even and uneven year numbers); this means that you can assign
‘Sunday’ as the substitute day of the week for the public holiday on 25 December. For all
time programmes based on the day of the week, 25 December will then behave like a
Sunday, regardless of the actual day of the week on which it falls.
As well as the normal days of the week (Monday to Sunday), eight special days are
available. The special days can be called up within the time programmes like days of the
week. They can be used to define exceptional days for time programmes based on days
of the week.
You can open or edit a calendar on the basis of your user rights.
In novaPro32, you can parameterise as many AS calendars as you want, and you can
load them into the automation stations as required.
7010001.003 V2.4.1
47
Hoval DigiNet
2
DigiCom
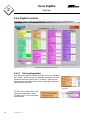
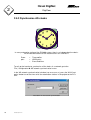
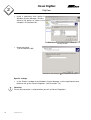
Illustration2-73: Calendar configuration, overview
2.5.4.1 Create a new calendar
Use the ‘File | Configuration Calendar’ menu to go to the calendar configuration. On
the ‘Calendar’ tab, select the calendar you want in the ‘Calendar name’ box.
In novaPro32, you can parameterise as many AS calendars as you want, and you can
load them into the automation stations as required, or you can define different calendars
for various automation stations.
•
•
Enter a new name in the ‘Calendar name’ box.
With the left-hand mouse button, click on the ‘New’ command button the new
calendar is created.
2.5.4.2 Delete a calendar
•
•
Select a calendar in the ‘Calendar name’ box.
With the left mouse button, click on the 'Delete' command button
2.5.4.3 Rename a calendar
•
•
•
•
Select a calendar in the ‘Calendar name’ box.
Enter a new name in the ‘Calendar name’ box.
With the left-hand mouse button, click on the ‘Rename’ command button.
The calendar will be saved under the new name.
Note:
The system calendar cannot be renamed!
48
7010001.003 V2.4.1
Hoval DigiNet
2
DigiCom
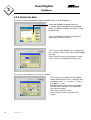
2.5.4.4 Assign a substitute day
You can assign a substitute day to any day
of the year. To do this, use the mouse to
select a date, and then assign a substitute
day to the date with the help of the ‘Select
Day’ window.
You can choose the substitute days from
the 7 days of the week (Monday to Sunday) plus 8 special days.
The ‘Substitute Day (SD)’ field lists all
dates which have substitute days assigned
to them.
Illustration2-74: Assigning a substitute day
2.5.4.5 Deleting a substitute day
•
•
With the mouse, select the date whose substitute day you want to delete.
With the help of the ‘Select Day’ window, assign the real day of the week. The date
will immediately be deleted from the ‘Substitute day (SD)’ field.
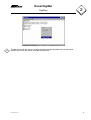
2.5.4.6 Assign an AS to a calendar
An automation station is always assigned to a calendar. Every automation station is assigned to the system calendar by default.
To assign a station to another calendar, it is advisable to proceed as follows:
•
•
•
Select the ‘AS Assignment’ tab
Select the system calendar in ‘Calendar name’.
From the list on the right, select an automation station and use the ‘<‘ command button to move it into the ‘AS not belonging to
any calendar’ field.
The automation station is temporarily not
assigned to any calendar.
Illustration2-75
When you exit from the calendar configuration, all automation stations in the field ‘AS
not belonging to any calendar’ are automatically assigned to the system calendar.
•
•
•
Select an AS calendar in ‘Calendar name’.
From the list on the left (‘AS not belonging to any calendar’), select an AS and use
the ‘>‘ command button to move it into the right-hand field.
Click on the ‘Send’ command button to load the new calendar into the automation
station.
7010001.003 V2.4.1
49
Hoval DigiNet
2
DigiCom
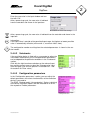
Illustration2-76: Assigning an automation station to a calendar
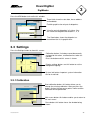
2.5.4.7 ‘Send after change’ parameter:
Use the ‘Send after change’
parameter to specify whether
the calendar should automatically be loaded into the asFig. 2-77: Parameters ‘Send after change’
signed automation station if
there is a change. This parameter is set to ‘No’ by default.
If the parameter is set to ‘No’, you must trigger the calendar download into the assigned
automation stations manually, by clicking on the ‘Send’ button.
Automation stations or AS groups which do not respond when the calendar is loaded are
marked in red. In this case, please check the data connection to the stations mentioned.
Example - Illustration2-76
In the example mentioned, the automation stations designated as AS2 and AS3
are assigned to the calendar designated as ‘Business’. If there is a change, the
calendar is immediately loaded into automation station AS2 (the ‘Send after
change’ parameter is set to ‘Yes’).
However, the calendar is not automatically loaded into automation station AS3
(the ‘Send after change’ parameter is set to ‘No’). With the left-hand mouse button, click on the ‘Send’ command button so that the calendar is loaded into
automation station AS3.
Automation stations AS4 and AS5 are not assigned to any calendar. You can
use the ‘>‘ command button to assign these stations to the ‘Business’ calendar.
If you do not assign the stations to a calendar and you exit from the ‘Calendar
Configuration’ dialogue, the system calendar is assigned to all the automation
stations in the ‘AS not belonging to any calendar’ field.
50
7010001.003 V2.4.1
Hoval DigiNet
DigiCom
2
Illustration2-78: Result of ‘Send’
7010001.003 V2.4.1
51
Hoval DigiNet
2
DigiCom
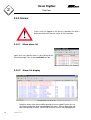
2.5.5 Alarms
!
Once a user has logged in, the alarm list provides him with a
quick overview of the current status of the installation.
2.5.5.1 Show alarm list
Open your user-specific alarm list by clicking on the
‘Warning triangle’ icon in the novaPro32 icon bar.
.
Illustration2-79: Calling up the alarm list
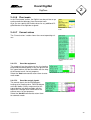
2.5.5.2 Alarm list display
Illustration2-80: The alarm list
Date/time when alarm occurred/Designation of alarm signal/Current limit values/Name of operator who acknowledged the alarm / Precise data-point address/Designation of alarm status/Date and time of alarm acknowledgement
52
7010001.003 V2.4.1
Hoval DigiNet
DigiCom
red:
active alarm, not acknowledged
blue:
active alarm, already acknowledged
The ‘Caused by’ column shows the user who acknowledged the alarm.
alarm which has already ceased without acknowledgement
Once a message shown in black has been acknowledged, the message is deleted from the alarm list.
black:
•
•
•
•
2
You can change the order within a column (ascending or descending) by clicking in
the header (as in Windows Explorer).
The order within the ‘Status/value’ column depends on these 3 statuses:
(1) alarm not acknowledged
(2) alarm acknowledged
(3) return to normal status, not acknowledged
and it can be specified as follows:
the first click selects order [1 - 2 - 3];
the second click selects order [3 - 2 - 1].
As in Windows Explorer, set the column width by dragging the column borders with
the mouse while keeping the left-hand button pressed down.
Use ‘drag and drop’ to position the columns
2.5.5.3 Call up alarm list automatically:
If an alarm occurs, the alarm list is automatically shown on top.
2.5.5.4 Call up alarm list manually:
Click on the 'Alarm list' icon (warning triangle).
2.5.5.5 Working with novaPro32 in the background
After the programme has been started and the alarm list has been displayed,
novaPro32 can be run as a background application in Windows. A warning
triangle in the Windows task bar will alert you if an alarm occurs while you are
working with another Windows application (such as Office software) in the
foreground.
Warning triangle
red triangle:
blue triangle:
black triangle:
green triangle:
there is at least one unacknowledged current
alarm.
there is at least one acknowledged current
alarm, but no unacknowledged current alarms.
there is at least one alarm which has not yet
been acknowledged, but is no longer current (but
there is no current alarm, either acknowledged
or unacknowledged).
the alarm list is empty.
Illustration2-81: What the warning triangle means
7010001.003 V2.4.1
53
Hoval DigiNet
2
DigiCom
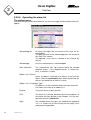
2.5.5.6 Operating the alarm list
The context menu
Click with the right-hand mouse button on an alarm message, and the context menu will
appear.
Illustration2-82: Alarm list context menu
Acknowledge All:
All alarm messages that are current at this time are acknowledged.
The date and time of the acknowledgement are entered in
the ‘Date/Time’ column.
The operator's user name is entered in the ‘Caused by’
column.
Acknowledge:
Only the selected alarm is acknowledged.
Plant schematic:
This automatically calls up a picture where the selected
datapoint occurs. If the datapoint occurs in several pictures, a selection is shown.
Address List: "Picture":
Opens an address list based on a picture. In the next dialogue, select the novaPro32 picture whose dynamised addresses you would like to show in list form.
Address List: "Installation Type":
All addresses in the installation where the alarm occurred
are shown in the form of an address list.
54
Preview:
Call up the alarm list print preview.
Print:
The alarm list is printed, based on the current template, on
the printer that was defined as per Chapter 12 in the configuration manual (7000904003).
Copy:
The selected alarm messages are copied to the clipboard.
This is a simple way of transferring the messages into a
word processing program.
7010001.003 V2.4.1
Hoval DigiNet
DigiCom
Mark all:
All the entries in the alarm list are selected and shown as
marked.
Properties:
Displays the alarm list properties.
2
2.5.5.7 Acoustic alarms
An acoustic signal can be used to denote the occurrence of an alarm in novaPro32. The
signal sound is reproduced by the PC sound card in this case.
Depending on the configuration, you must confirm the alarm sound by pressing any key,
by clicking on the alarm icon (see the arrow in Illustration 2-83) or by acknowledging the
alarm.
If an automatic alarm repeat is set, the signal sound will be repeated after an adjustable
time (such as 15 minutes) once it has been confirmed, until the alarm is acknowledged
or until it returns to the normal status.
Illustration2-83: Confirming an acoustic alarm
7010001.003 V2.4.1
55
Hoval DigiNet
DigiCom
2
2.5.6 Trend / Historical database
novaPro32 offers you a convenient tool to display measured values, status and alarm
messages in graphic form. This enables you to record current process values as well as
historical data in the form of charts or tables.
Charts show the progression of process values over time in graphic form. You can also
refer to the values stored in the historical databases, or you can show the current process progression online.
You can define, edit and view a chart. It is displayed in a window where up to 10 activities (addresses) can be shown at the same time, each with its own colour and form.
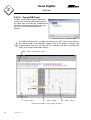
2.5.6.1 Show new HDB/Trend
Open a new HDB/Trend using the ‘File | New HDB/Trend’ menu, or the ‘New
HDB/Trend’ command in the context menu of the novaPro32 Document Browser, or
select the
icon in the icon bar.
The window that will now appear on the screen consists of 3 frames: Title Lines (at the
very top), Graphic (left) and Table (right) (see Illustration2-91).
Use the context menu (right-hand
mouse button) of the ‘Title’ frame to go
to the Properties window, where you
can specify all the settings such as the
address selection, type of presentation,
time slot, etc.
The ‘Address’ tab shows an overview of
all selected addresses (see Fehler!
Verweisquelle konnte nicht gefunden
werden.).
Mouse-click on the ‘Addresses’ command button to go to ‘Address SelecIllustration2-84: 'Address presentation' tab
tion’ (see Illustration2-85).
In the list of all addresses in the address selection, use the left-hand mouse button to
mark one address, and copy it into the list of selected addresses with the help of the
‘Main function’ or ‘Extra function’ command buttons.
7010001.003 V2.4.1
57
Hoval DigiNet
2
DigiCom
Main function
Additional function
Removes all
addresses
Removes a selected
address
Address tree view of
the project
Selected addresses
Illustration2-85: HDB/Trend-address selection
Use the ‘Address Presentation’ tab to specify the colour
and line type in the graphic
for each selected address.
The ‘Decimal Places’ box
defines the way numbers are
shown in the table.
At ‘Graphical Presentation’,
you can indicate a linear correction for analogue values,
so that several measured
values can be adjusted to
one common Y-axis.
The ‘Connection’ field enables you to portray a curve
with either a point-to-point or
a stepped connection.
58
7010001.003 V2.4.1
Illustration2-86: ‘Address Presentation’ tab
Hoval DigiNet
DigiCom
2
The ‘Time Slot’ tab defines the period of
time to be shown.
With Request Type ‘Historical Data
(HDB)’, you can set a start date and an
end date to define a period of time from
which historical data should be shown.
In this operating mode, you are only
shown data from the historical database
(HDB) of the controller if they are still
available in the ring memory (FIFO) of
the controller.
With Request Type ‘Trend’, you define
a period of time. This period determines
Illustration2-87: ‘Time slot’ tab
the time span of the display window.
The graphic will then show all spontaneous messages from the selected addresses from the current time onwards.
With Request Type ‘Trend + HDB’, data from the past are read from the historical database and displayed. The display is automatically continued for any desired period with
spontaneous messages from the selected addresses.
Use the ‘Title’ tab to define the header
for the HDB graphic. In the ‘Key’ area,
you can select attributes such as the
address, address text and units which
are to be used to identify the selected
addresses.
Illustration2-88: ‘Title’ tab
Finally, you can save the configuration
for HDB/Trend on the PC's hard disk.
To do this, select the ‘Save’ command
from the ‘File’ menu and enter a designation in the dialogue that appears now.
The HDB/Trend configuration is automatically stored in the ‘HDB/Trends’
folder of the novaPro32 Document
Browser (see Illustration2-89).
Illustration2-89: ‘Save’ dialogue box
Please note: No data (such as measured values, status, etc.) are saved. Only the
configuration (address selection, address presentation, time slot and title) is
saved.
7010001.003 V2.4.1
59
Hoval DigiNet
2
DigiCom
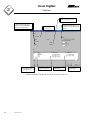
2.5.6.2 Open HDB/Trend
To open a saved HDB/Trend configuration,
use the ‘File | Open HDB/Trend’ menu or
the ‘Open’ icon in the icon bar, or double-click
with the left-hand mouse button on the relevant file in the novaPro32 Document
Browser.
Illustration2-90 List of configured HDBs
An HDB/Trend file of this sort does not contain any data. The file only contains
the settings made in the Properties window, such as the address selection, type
of presentation, time slot, etc. After the file is opened, the data are read by the
HDB server and the automation stations.
Frame: Titelzeile mit Legende
Frame: Grafik
Adress-Tooltip
Illustration2-91: HDB / Trend as graphic and table
60
7010001.003 V2.4.1
Frame: Tabelle
Hoval DigiNet
2
DigiCom
2.5.6.3 Working with HDB/Trend
Frame edges:
You can adapt the presentation of the HDB/Trend window to your individual requirements. To do this, keep the left-hand mouse button pressed down and drag the frame
edges to the positions you want. When you close the HDB/Trend window, you can save
the window configuration you set, so that the view you want is shown immediately when
you call the window up later on.
2.5.6.3.1
Edit graphic zone
Zoom:
You can enlarge a graphic shown in the left frame as you wish,
to view it in detail. To do this, keep the left-hand mouse button
pressed down and mark the section you want. The marked section will immediately be shown in enlarged view.
Illustration2-92
The ‘Zoom Out’ command in the context menu reverses the last zoom action – in other
words, you return to the previous view.
Tool tip: View the house address, the value and the time of origin of the chosen value
on the curve (break point of a curve or entry point of a stepped connection; see
Illustration2-86: ‘Address Presentation’ tab).
Copy:
The ‘Copy’ function in the chart and table context menu allows data exchange with other
programmes.
‘Copy’ in the chart context menu places a copy of the graphic on the Windows clipboard.
This enables you to paste and edit the graphic in another Windows program.
‘Copy’ in the table context menu copies the table cells you have just selected onto the
clipboard. This makes it easy to paste the data into Microsoft Excel where you can continue editing them.
2.5.6.3.2 Edit table sector
Copy: With the aid of this context menu, you can paste a selected number of lines into another document (e.g. in Word) via
the clipboard.
Illustration2-93
Context menu table sector
Export: This makes it possible to save a table of values (shown on the screen) as a .txt
file under a defined name.
Information:
To ensure that further processing of exported values tables is efficient, we advise you to use
a monitoring and optimisation tool such as EY3600 novaPro EBal.
7010001.003 V2.4.1
61
Hoval DigiNet
2
DigiCom
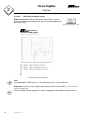
2.5.6.3.3
Edit title and legend sector
Export & print-out: With the aid of this context menu, you can
print out and export the graphic with the title and the legend (see
Illustration2-95 ).
Illustration2-94
Context menu - title sector
novaPro32
Header of HDB graphic
Mode BHD de 25.09.02 15:19:00 à 25.09.02 15:20:36
A : Splendid
B : Splendid
C : Splendid
D : Splendid
E : Splendid
F : Splendid
-3-TM-00 T° Extérieure °C Pas de valeur
-2-TM-00 T° Soufflage °C 12 Valeurs
-2-TM-03 T° amb. (Salle) °C Pas de valeur
-2-TM-04 T° amb. (Repr. Bas) °C Pas de valeur
-2-TM-01 T° amb. (Repr. Gén.) °C 7 Valeurs
-2-TM-02 T° Dép. Groupe Froid °C 3 Valeurs
Illustration2-95 Exported graphic
Note:
The exported file 'HDBview.rtf' is in the Sharable_Data / System directory.
Properties: can be used to adapt the parameters of the viewed HDB. (See also Section 57,
Show new HDB/Trend)
The manual print-out of a graphic is always outputted on the Windows default printer.
62
7010001.003 V2.4.1
Hoval DigiNet
DigiCom
2
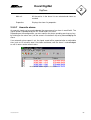
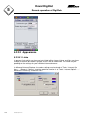
2.5.7 Setting up users
novaPro32's functions are only accessible to authorised staff. A user identifies himself
in the system with a user name and a password. The user name and password are used
as an individual 'electronic key'.
The code word / password can be used to assign rights to users on an individual basis.
Actions performed by the user are logged with his user name, making it possible to trace
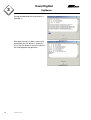
interventions in the system.
The 'File | Configuration | Generate password' menu takes you to the overview window. Global settings (i.e. ones that are valid for all users) are made in the 'novaPro32
Password Generation' overview window.
If the password function is switched off, all users will obtain unrestricted access to all the
functions in novaPro32.
7010001.003 V2.4.1
63
Hoval DigiNet
2
DigiCom
Switch Pre-login and Postlogin messages on or off.
Timeout: After the time
adjusted an automatic logout
appears and the novaPro32
workstation will be locked.
locked
User Status:
*: user logged in, now
X: suspended user
Illustration2-96:
If selected, access to
novaPro32 will be denied for 10
minutes after 3 invalid password
entries.
Switch the password on or off.
User List:
All users registered
Time and date of
the last login.
Time and date of
the last logout.
‘Password generation, novaPro32’
The overview window (Illustration 2-95: Overview window ‘Password generation novaPro32’), contains a list of all the users registered in the system. It also shows which
users are currently logged into the system (i.e. which ones are active), and when a user
last logged in or out.
Information:
Only users with the ‘Supervisor‘ or ‘Password generation‘ authorisation can assign
rights to other users, delete rights, set up or delete new users, or suspend/release users
who are already registered.
Use the right-hand mouse button to go to the context menu for the overview window (see
From here, you can set up new user profiles and you can also modify or delete user profiles that already exist.
Illustration 2-97: 'Password Generation' context menu).
64
7010001.003 V2.4.1
Hoval DigiNet
DigiCom
2
Open the user profile selected.
Create a new user profile.
Release a suspended user profile.
Suspend the selected user profile.
Delete the user profile selected.
Copy the user profile selected to the
clipboard.
Paste a profile from the clipboard.
Illustration2-97: )
7010001.003 V2.4.1
65
Hoval DigiNet
2
DigiCom
Switch Pre-login and Postlogin messages on or off.
Timeout: After the time
adjusted an automatic logout
appears and the novaPro32
workstation will be locked.
locked
User Status:
*: user logged in, now
X: suspended user
If selected, access to
novaPro32 will be denied for 10
minutes after 3 invalid password
entries.
Switch the password on or off.
User List:
All users registered
Time and date of
the last login.
Illustration2-96: Overview window: ‘Password generation, novaPro32’
66
7010001.003 V2.4.1
Time and date of
the last logout.
Hoval DigiNet
DigiCom
2
Open the user profile selected.
Create a new user profile.
Release a suspended user profile.
Suspend the selected user profile.
Delete the user profile selected.
Copy the user profile selected to the
clipboard.
Paste a profile from the clipboard.
Illustration2-97: Context menu: ‘Password generation’
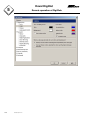
2.5.7.1 Create a new user
•
•
Use the right-hand mouse button to call up the context menu and select the ‘New’
command.
You will see the ‘Password properties’ tabs.
Specify the user profile with the help of the ‘Password properties’ tabs.
7010001.003 V2.4.1
67
Hoval DigiNet
2
DigiCom
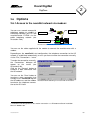
2.6
Options
2.6.1 Access to the novaNet network via modem:
You can use a normal commercial
telephone modem to establish a
connection between your PC and
novaNet-Router EYZ291 via the
public telephone network (see
Illustration 2-98).1
Modem Router /
Routel side
Modem P C side
ESC
novaNet Router EYZ291
Illustration 2-98: Connection via modem
You can use the cable supplied with the modem to connect the novaNet router with a
modem.
Depending on the novaPro32 start configuration, the telephone connection to the AS
network is established automatically, or else you have to make the connection manually
via the ‘File | Connections...’ menu.
To make the connection manually,
the ‘Connections’ dialogue will
appear on the screen (see
Illustration2-98).
Click on the ‘Connect’ button to
establish a data connection with
the AS network.
You can use the ‘Close’ button to
terminate a data connection that
already exists. novaPro32 logs off
the AS addresses and the modem Illustration2-98: Establishing a connection with an AS island
terminates the telephone connection to the AS island.
1
Installation and configuration of the modem connection: see EY3600 novaPro32 Installation
Manual. 7000915 001
7010001.003 V2.4.1
69
Hoval DigiNet
DigiCom
2
2.6.2 Setting up an alarm (online messaging)
Online messaging covers the alarm and reporting system. Configuration is based on
address groups and the type of event.
The reporting periphery shown in Table 1 is supported:
Table 1: Reporting periphery that is supported
Printer
Fax
E-mail
File
2.6.2.1
Line printers supported by Windows such as Epson FX, etc.
Faxes can be sent via the MAPI fax client (Windows)
E-mails can be sent via the MAPI e-mail client (Windows)
Messages are saved in a freely configurable text file. The file
can be used as an interface with third-party providers' messaging systems.
Configuration
Menu (File | Configuration Online Messaging) opens the tabs for the configuration of
the alarm and reporting system (see Illustration2-99).
Information:
When you configure online messaging for the first time, it is advisable to configure the
‘Output medium’ and ‘Output template' tabs first.
Complete the configuration on the 'Assign output medium' tab by assigning an output
medium and an output template to an address group.
Attention:
After the 'Online Messaging' configuration has been completed, you will need to restart. When you restart, the EP server is initialised with the new settings.
7010001.003 V2.4.1
71
Hoval DigiNet
2
DigiCom
2.6.2.2 The 'Assign output medium' tab
The 'Assign output medium' tab comprises
two sections:
1. Definition of the address group (logical
group)
Meaning of the buttons:
New
Creates a new address
group.
Open Changes an address group
that already exists (selected in the 'Logical group'
field)
Delete Deletes the address group
selected.
Rename Renames the address
group selected.
Result Shows all addresses defined by the group (see
Illustration2-99: Assigning the output medium
Illustration2-99)
2. Assigning the output medium and a template to an address group.
Various output channels can be assigned to one address group with the help of an assignment table. An output channel consists of one line in the assignment table. Settings
on the 'Output medium' and 'Output template' tables can be selected by mouse-clicking on
the cells of the table.
Table 2:Meanings of columns in the assignment table
Type
Output devices
Template
Disable
Time profile
72
7010001.003 V2.4.1
Defines the type of the output device (line printer, e-mail/fax or
file are available.
Specifies the output device. You can select one of the preconfigured profiles on the 'Output medium' tab (see
Illustration2-100 to Illustration2-111).
Defines the precise format of the output. You can choose from
the format templates on the 'Output template' tab.
An output channel may be disabled temporarily.
Yes: Disables the channel
No: Enables the channel.
Select an EP time profile. The EP time profile determines when
the selected reporting channel is enabled and when it is disabled.
Hoval DigiNet
DigiCom
2
2.6.2.3 The 'Output medium' tab
On the 'Output medium' tab, real
devices such as printers, fax
numbers, e-mail addresses, or
paths and file names on data
carriers can be assigned to all
the available types.
The lower 'Select output medium' field lists all the output
media assigned to the selected
'Output medium type'.
Depending on the preselected
output medium type, the 'Edit'
command button opens a configuration window.
Illustration2-100: Defining the output media
Various output media can be selected using the buttons:
Online printer:
see Illustration2-106 and Section 2.6.2.3.1 Online
see Fehler! Verweisquelle konnte nicht gefunden werden.
Mail/fax recipient:
and EY3600 novaPro32 Manual, Installation No. 7000 915 001
File
see Illustration2-115
If the' Disable data output' button was selected, no data are sent to the various output
media.
If the 'Disable data output at EP start' button was selected, only those alarms that have
reported since the system was started up are published. The messages that were edited
before the application was closed are no longer published.
2.6.2.3.1
Online printer
Up to 5 Windows printers can be used with 'continuous paper' to print out the online
messages.
Installing an alarm printer
Attention:
It is essential that you use a Microsoft driver (Win NT / 2000 or XP CD or Internet).
7010001.003 V2.4.1
73
Hoval DigiNet
2
DigiCom
•
Install a ‘continuous form’ printer in
Windows System Manager | Printers.
Select a line printer as shown in the
example in Illustration2-101:
Illustration2-101 Selecting a printer in Windows
NT/2000 and XP
•
Name the printer
(see Illustration2-102).
Illustration2-102: Naming a printer in Windows NT/2000 or
XP
Specific settings
•
In the ‘Printers’ window of the Windows System Manager, use the right-hand mouse
button to call up the ‘Server Properties’ (see Illustration 7.4).
Attention:
Ensure that no printer is selected when you call up 'Server Properties'!
74
7010001.003 V2.4.1
Hoval DigiNet
DigiCom
2
Illustration2-103: Calling up the ‘Properties’ of the Windows print server
The dimensions of the form must not exceed the margins/printable area of the printer,
otherwise the form will not be available to the printer.
7010001.003 V2.4.1
75
Hoval DigiNet
2
DigiCom
The paper source must be set as shown in Illustration 7.5:
Illustration2-104 : Setting up a new paper
format
•
Illustration2-105 : Paper source in Windows NT/2000
or XP
Configuration of the printer in novaPro32 online messaging:
See Section 2.6.2.3 'Output medium' tab.
Please check these points when carrying out the configuration:a) The printer adjustments for "Paper intake" and "Paper format"
From the printer settings, select the paper format which you set up above (such as
EY3600_1). At "Paper intake" select "Tractor intake".
b)
The "Paper intake" and "Paper format" in the Graphic Editor.
Defining an online printer
Depending on the output medium type you selected, all the assigned output media are
listed on the 'Select output medium' zone (see Illustration2-100).
The ‘Edit’ button, see Illustration2-106 opens
the configuration window.
The ‘New’ button is used to set the new
output printer.
A network printer can also be assigned.
The printer selected in the list can be removed using the ‘Delete’ button’ or
amended using the ‘Edit’ button’.
Name of physical printer
Name given by user
Illustration2-106 Online printers
76
7010001.003 V2.4.1
Hoval DigiNet
DigiCom
2
Creating a new printer, e.g. ‘Watchman’.
The ‘New’ button opens a window in which
you can enter a name for the printer (see
Illustration2-107).
Illustration2-107 : Dialogue
On confirming with ‘OK’, the dialogue box
for choosing the relevant Windows printer
opens.
If you press the ‘Select...’ button, all the
printers installed in Windows are listed
(Illustration2-109).
Illustration2-108 : Select printer
Attention:
For online messaging, it is essential that you choose the ‘Printer Page-Independent’
mode!
All the printers installed in Windows are listed
in the picture, including network printers.
Press ‘OK’ to confirm your choice.
Illustration2-109 : Printer set-up
A physical printer that has already been chosen as a protocol printer cannot be used a
second time, so it cannot be used as a line
printer at the same time.
A message appears in this case.
7010001.003 V2.4.1
Illustration2-110 Double definition of a printer
77
Hoval DigiNet
2
DigiCom
The configured printer appears in the list
(Illustration2-111).
All listed printers can be used as output media for the EP server.
Illustration2-111 : Online printer selection
2.6.2.3.2
E-mail and fax recipients
On the 'Output medium' / 'E-mail recipients' tab, you will find the 'Selected output media'
field where all e-mail recipients are listed. Configure recipients and senders in the 'Configure senders and recipients' window which you can open by clicking on the 'Edit' button:
•
•
•
78
In the 'Senders' field,
enter the name and email address of the
sender. These two items
of information are integral components of messages that are sent. The
address must be in a
form that is accepted by
the Internet service provider.
In the 'Outgoing e-mail
server' field, you enter
the parameters for the
SMTP server (address
and port number). These
data can be requested
from the relevant Internet service provider.
Illustration 2-112: Sender and receiver configuration
The default entry for
'Port' is 25.
In the 'Receiver configuration' frame, all the
configured recipients are listed.
The name may be freely chosen and may be allocated either to a single recipient's address or
to a group of addresses. By clicking on the blue
symbol in the 'Address' » field with the left
mouse button, a new recipient may be entered
with in the 'Contact address(es)' window.
The column 'Template title' allows the title of the
send template (which can be edited) to be inserted as the 'Subject' of the message. With
some Internet service providers the title as subject may be necessary for sending an e-mail
7010001.003 V2.4.1
Illustration 2-113: Contact addresses
Hoval DigiNet
DigiCom
2
message by SMS or fax.
•
Testing the recipients' addresses:
By clicking on the recipient's name with the right
mouse button, a test mail can be sent to the recipient via novaPro32 and the Internet service
provider.
2.6.2.3.3
Illustration 2-114: Receiver configuration
File
All path and files for online
messaging are listed in the
'File' configuration window.
Left mouse-click on the blue
icon in the 'Path' column to
indicate a new path file
name.
Illustration2-115: Set path and file name
The ‘Number of Messages’ column defines file size, i.e. the number of messages saved
in the file (values allowed: 100 – 1000).
The ‘Reorg.’ column defines how the file is reorganised if the file reaches the size defined in the ‘Number of Messages’ column (values allowed: 25% - 75%). A value such
as 25% means: if the file size reaches the number of messages defined, the oldest 25%
of the messages will be removed.
2.6.2.4 The 'Output template' tab
An output template specifies which
information is transmitted via the
relevant signalling channel, and
which form or presentation is used.
The 'output template' field lists all
templates available for the selected
template type.
The command buttons next to the list
allow you to create new templates,
and edit or delete existing templates.
Illustration2-116: Definition of output templates
The windows for the configuration of a template consist of the ‘Layout’ and 'Line selection' sections (see Illustration2-117).
7010001.003 V2.4.1
79
Hoval DigiNet
2
DigiCom
The' Layout' section comprises a table with entries as per Table 3 to specify the type of
presentation for the message.
Table 3: Layout of a template
Column
Message
Text
Font
Font settings
Additional Text
Additional File
Meaning
Selects the events that trigger an entry in the form and therefore
an online message.
Defines the text background colour
Defines font and size
Set font and size
Defines any additional text that is sent with the message.
Defines an additional file that is to be sent as an attachment
with the
e-mail.
Illustration2-117: Configuring an e-mail / fax template
Left-click in a cell of the table, or on the icon at the left edge of the field, and a selection
menu with all the possible entries for each field is shown, so the configuration of the
table is self-explanatory.
The 'Line Selection' section defines which information is outputted with a message. The
left-hand field, 'Available lines', lists all the information that can appear in the text of a
message.
The right-hand field (Layout Presentation) shows the structure (layout) of a message
with the selected information lines.
The ‘>’ button copies a line from the list of available lines into the layout presentation.
The ‘<’ button removes a selected line from the layout. In addition to the information se80
7010001.003 V2.4.1
Hoval DigiNet
DigiCom
2
lected in this way, any desired comment can be added to each line. To do so, left-click a
cell of the ‘Editable column’ and enter text of up to 40 characters.
Right-clicking the cells of the layout presentation will open a context menu to format the
text in the selected cell.
The
ments.
The
and
buttons change the line order of a message to suit your own requirecheckbox switches the yellow-backed title bar on or off.
The configuration of a file template is similar to the configuration for an e-mail/fax template, except that certain fields (such as Font, etc.) are not available.
2.6.2.5 The 'Output time profile' tab
The output time profiles allow timecontrolled release of the messaging
channels - so, for example, a message printer can be disabled while the
operator is absent or the messages
can be diverted to a private fax number at weekends.
Press the 'Edit' button to go to the
configuration dialogue Illustration2-119.
Illustration2-118: Output time profiles
2.6.2.5.1
Creating an EP time profile
In field you can choose all configured
time profiles.
Right-click in zone to show the context
menu.
Functions of the various buttons:
• 'Edit TPs' Lets you create a new time
profile.
• 'New entry' Lets you create a new
command line for the EP time profile.
Illustration2-119 The output time profile
7010001.003 V2.4.1
81
Hoval DigiNet
2
DigiCom
• 'Change entry' Lets you edit an existing command line.
• 'Copy: Lets you copy an existing profile and, using the ‘Insert’ button, copy it to a
time profile selected from the list.
• Delete: Lets you delete the selected command line.
• Suspend: Lets you disable one or more command lines manually. The disabled task
is marked with an ‘X’ in the ‘S’ column.
• Release: Revokes the suspension.
• Calendar: Lets you view and edit the assigned calendar.
82
7010001.003 V2.4.1
Hoval DigiNet
3
DigiMaster
3 DigiMaster
3.1 Configuration
The dataset for the DigiMaster Touch Panel is available in various alternative languages. To load the language-specific dataset, use the 'Touch Panel Configurator'
(TPC).
3.1.1 Connecting EYT 250 to the PC
To enable transfer of the data created
in the CASE TPC configuration tool into
the EYT 250, a connection is needed
between the PC and the control panel
via an Ethernet interface and a crossed
network cable.
Plug the cable into the RJ45 socket.
DB9 (RS232) is planned for the future.
For communication with the EYT 250 Ethernet interface, the PC network card that is
used must be set to a fixed IP address (see 3.1.1.1).
If you are also using the same network card within a LAN, note the current settings for
your network card so that you can reset to the original settings after the EYT250 configuration has been completed.
3.1.1.1 IP address of the PC
This address is used to create the connection between the PC and the EYT250 so that
the project created with the CASE TPC programme can be loaded into the control panel.
Procedure for adapting the PC's IP address:
1. Select the 'Network environment' icon on the desktop
and right-click on it to show this window.
2. Double-click on the properties; the 'Network and RDT
connections' window appears.
Illustration3-1:
7010001.003 V2.4.1
83
Hoval DigiNet
3
DigiMaster
3. Select the 'LAN connection' line and use the
right mouse button to open the Properties
window.
Illustration3-2:
4. Select 'Internet protocol (TCP/IP)'.
5. Select 'Properties'.
6. Enable the 'Use following IP address' option (see the illustration, bottom left).
7. Then enter IP address 192.168.10.1.
Click on the subnet mask field to assign
address 255.255.255.0 automatically.
8. Then confirm the parameters with 'OK'.
Illustration3-3:
Illustration3-4:
84
7010001.003 V2.4.1
Illustration3-5:
Hoval DigiNet
3
DigiMaster
There is no need to restart the PC in Windows 2000 and XP.
3.1.2 Open a language-specific dataset
Open the 'Project | Open' menu. An Explorer
window opens.
In directory
'C:\DigiNet\Sauter\EY3600\Hoval_DigiNet_DN5
_01\tpc' select project 'Hoval Diginet
DN5_xx.eyt' in the language you want:
_ge
German
_en
English
_fr
French
_..
…
Illustration3-6
3.1.3 Write to EYT250
Write the dataset with the help of the 'Project |
Write to EYT250' menu or function key F2.
Illustration3-7
When you start the 'Write to ETY250' function, the
'Download files' window will open (Illustration 3-8).
for the download the following files should be chosen:
• “Script files” (.xml) to write the project data
• “System files” to create the application and/or
plant filter, the AS filter, the definition of the
PC address on the novaNet and to enter the
calendar filter.
Illustration 3-8
Since the language data's are integrated in the project data's ("global.xml") the standard
language file "global.txt" should not be chosen for the download.
7010001.003 V2.4.1
85
Hoval DigiNet
3
DigiMaster
During the download the write process is
reported ().
Illustration3-9
After data transfer has been successfully
completed, the 'OK' button is enabled ().
Press the 'OK' button to close the connection and complete the operation.
Illustration3-10
86
7010001.003 V2.4.1
Hoval DigiNet
3
DigiMaster
3.2 Operation
3.2.1 Main menu
After you have successfully connected and started the EYT250, the start screen is
called up automatically. This contains the higher-level menu items for the control panel.
Application list
Title line
Settings
Login/logout with password
Status bar
Time
User logged in
or 'kNo user'
Press one of the three buttons to select the function you want:
•
Application list (Section Fehler! Verweisquelle konnte nicht gefunden werden.)
-
•
•
select the desired automation station or plant
Settings (Section Fehler! Verweisquelle konnte nicht gefunden werden.)
-
Calibration : calibrate the touch display
-
Display parameters: set the display contrast
-
Systeminfo : show current system settings and versions
-
Restart: restart Touch Panel software
-
Time: set the time
-
Profiles: create users
-
Filters: view, enable and disable filters
Login/logout (Section Fehler! Verweisquelle konnte nicht gefunden werden.)
-
User login or logout
-
Change password
To visualise and change all the functions, you must be logged in as a user in the Administrator user group. See Section 3.3.7.
Click on the clock in the status bar to set the time if you are an administrator. Click on
the area for the logged-in user in the status bar to log in or out.
7010001.003 V2.4.1
87
Hoval DigiNet
3
DigiMaster
3.2.2 Login, logout
Click on the login/logout button in the start screen to show a dialogue where users can
log in or out. You can go to the same login/logout dialogue by clicking on the name of
the logged-in user in the status bar.
The list of user names shows all users who are defined by the administrator in the Profiles menu. See Section 3.3.7.
In the original status, 2 users are defined with different access rights:
--------def_Admin
No user, only allows operation of the panel (without password).
'Default Administrator', allows you to enter system parameters, setpoints,
switching commands and time programmes (password: 654321).
Dropdown User name list box to select
the user
Password field to enter the password
The Change password button is only
shown when the logged-in user is selected.
The Logout button logs off the current
user.
The End button saves the entry and handles the login.
To log in, first select the user name from the list box and click on the Password box.
3.2.2.1 Enter password
You are shown a numerical keypad with a
request to enter your password.
Now enter the password. Confirm the password with OK; the user is logged in and you
return to the previous screen. A red
message shows whether the Login was successful (correct password) or failed
(incorrect password).
Press Cancel to return to the previous
screen.
88
7010001.003 V2.4.1
Hoval DigiNet
DigiMaster
3
3.2.2.2 Change password
If you want to change the password, the
user must already be logged in. The
Change password button then appears.
Make these entries one after another:
- enter the old password
- enter the new password
- confirm the new password
- save with the OK button and return
Use the Cancel button to return to the previous screen without changes.
3.2.3 Application list
Touch the 'Application list' button on the start screen to show a list of all automation stations or plants that respond via novaNet and that meet the conditions for a filter, if one is
set. (See Section 3.3.8 Filters).
Information: This list may have no more than 100 entries.
The Application column shows which applications or installations have responded.
Depending on the definition in CASE FBD, this
column shows the house address or, if there is
no definition, the device + group address.
The AS address column shows the AS group
address. If an installation is distributed over several AS, a * is shown.
Enable: the data are read into the EYT250
memory.
Update: the data are read into the AS of the
EYT250.
The logged-in user is shown.
If a filter is enabled, a message is shown.
The time and the back arrow to go to the main menu are also visualised.
7010001.003 V2.4.1
89
Hoval DigiNet
3
DigiMaster
3.2.3.1 Choosing an application or installation
You can select the application or installation that has to be shown from the list.
Press the 'Enable' button to trigger loading of all datapoints and pictures that are assigned to this application or installation. The 'Enable' button ensures that all datapoints
in the AS are read out. An application or installation that has already been read out once
can be reloaded from the EYT250 memory with 'Update'. In this case, the only new
items read are the values, status and alarms.
Two different types of visualisation are then possible.
If no project for this application or installation is stored in the EYT250, a datapoint list is
shown. The Load window tells you: 'File (scr_app_x_x.xml) is missing'.
If a project for this application or installation is stored in the EYT250, the assigned picture is shown.
3.2.3.2 Send a command or value
All datapoints that accept remote commands or change values can be set manually.
After the address is selected, these windows are shown for binary values:
Automatic mode
Manual mode
Press OK to close Automatic mode or Send command.
Use the Cancel key to return to the previous picture.
90
7010001.003 V2.4.1
Hoval DigiNet
3
DigiMaster
These windows are shown for analogue values.
Automatic mode
Manual mode
Press OK to close Automatic mode or Send value.
Use the Cancel key to return to the previous picture.
3.2.3.3 Visualise alarm list
Press the Alarm list button to open a window with a list of all active alarm datapoints in
the active application.
House address column
Description column
Value column
Physical variable column
The 'HA' and 'Desc' buttons allow visualisation of the house address and description
columns, house address only, description
only, or value and physical variable only.
Press on the names of the house address, description, value or physical variable columns to sort the lines alphabetically (forwards or backwards).
The time, the arrow to return to the application list and the logged-in user are also visualised.
3.2.3.4 Read or write time programmes
By pressing the time programme button, it is possible to visualise the existing time programme for specified datapoints, or to define a new time programme.
The first screen shows a list of datapoints that can be linked with a time programme.
7010001.003 V2.4.1
91
Hoval DigiNet
3
DigiMaster
house address column
description column
Press on the name of the house address column or the description column to sort the
lines alphabetically, forwards or backwards.
The time, the arrow to return to the application list and the logged-in user are also visualised.
To visualise or redefine the time programme, you must select the datapoint and enable it
by pressing 'Select'.
This window is shown provided that the selected datapoint does not have a time programme.
If the selected datapoint has a time programme, the time programme is shown in
graphic and list form.
'7 days of the week' column
Time column
Value column
Edit button: this button allows you to change existing time programmes.
New button: this button allows you to create new
time programmes.
Delete button: this button allows you to delete existing time programmes.
List showing weekly time programme
Graphic showing weekly time programme
Button to switch between weekly time programme and special day programme. Depending on its position, the weekly time programme or the special day programme can be
visualised or created.
Press on the return arrow to prepare for writing the time programme to the AS. Three
options are proposed: Send yes, no or cancel. If you press the Yes button, the time programme is sent to the AS.
After you press the Edit button (once you have selected the time programme) or the
New button, you see this screen.
92
7010001.003 V2.4.1
Hoval DigiNet
DigiMaster
3
Days of the week, Monday to Sunday.
Click to select the days you want.
Daily: all the days of the week are selected.
Up to 8 special day programmes can be
assigned to this time programme with the
help of the calendar function.
Set switching times with bar or forward/backward keys.
Press the OK button to confirm the new or
corrected time programme. The window with
the graphic display will then be visualised.
Press Cancel to return to the previous screen.
Value or status setting: click on the value, and the Value window or
Setting command is opened. Set the value or command and confirm
with OK. The new value is shown.
3.2.3.4.1
Read or write special day
When you switch over to the special day setting, this window will appear provided that
no special day is defined:
'8 special days' column
Time column
Value column
Edit button: this button allows you to change the
selected special day.
New button: this button allows you to create the
new special day. Important: only select the special
day that has to be defined.
Delete button: this button allows you to delete
the selected special day.
List showing all 8 special days
Graphic showing all 8 special days
Button to switch between weekly time programme and special day programme.
Depending on its position, the weekly time programme or the special day programme can be visualised or created.
7010001.003 V2.4.1
93
Hoval DigiNet
3
DigiMaster
Press on the return arrow to prepare for writing the special days to the AS. Three options are proposed: Send yes, no or cancel. If you press the Yes button, the special
days are sent to the AS.
After you press the Edit button (once you have selected the special days) or the New
button, you see this screen:
Special days 1 to 8. Click to select the special day you want.
Set switching times with bar or forward/backward keys.
Press the OK button to confirm the new or
corrected special day. The window with the
graphic display will then be visualised. Press
Cancel to return to the previous screen.
Value or status setting: click on the value, and the Value window or
Setting command is opened. Set the value or command and confirm with OK. The new value is shown.
The special days you select in this way can then be enabled for specified days with the
help of the calendar function.
94
7010001.003 V2.4.1
Hoval DigiNet
3
DigiMaster
3.2.4
Calendar function
Press the Calendar icon to show this window.
In this case, this station does not contain a calendar function
3 columnns are shown:
start date, end date and special day no.
Edit button: this button allows you to change the
existing calendar day.
New button: this button allows you to create the
new calendar day.
Delete button: this button allows you to delete the
selected calendar day.
List showing the active special days.
Graphic showing the active special days. The selected special days
are shown in red.
+ and – buttons to select the yearly calendar. Special days can be defined 2 years in advance.
Press the return arrow to prepare for writing the special days to the AS. Three options
are proposed: Send yes, no or cancel. If you press the Yes button, the defined special
days are sent to all AS that are connected on the novaNet or to AS that are selected via
a filter.
After you press the Edit button (once you have selected the special day) or the New
button, you see this screen:
Special days 1 to 8 and days of the week.
Click to select the special day or day of the
week that has to be assigned to the datapoint as a special day.
Special day period selection with bar or forward/backward keys.
Press the OK button to confirm the new or corrected special day. The window with the graphic
display will then be visualised.
Press Cancel to return to the previous screen.
7010001.003 V2.4.1
95
Hoval DigiNet
3
DigiMaster
3.2.5 Historical data
Press the historical data button to open a window with a list of all datapoints:
Select the datapoint and add it with the
'>' button. Up to 3 datapoints can be added.
When you add an analogue value, the Y-scale
window opens.
The Y-scale buttons allow you to adjust the
defined min. and max. values.
The Y-scale can be defined in this window with
min. and max. values. Press OK to acknowledge
the entry.
Press Cancel to return to the previous screen.
The Y-scale is not enabled for binary values.
Press the X-scale button to visualise this window:
The X-scale can be defined in this window.
Range: period of time that is visualised. You
can choose from: 1, 4, 12 hours; 1, 7 days, 1,
3, 8 months, 1 year.
End date: the last entry that is visualised in
the HDB (date and time). The Now button
sets the current date.
Press OK to save the entries.
Press Cancel to return to the previous
screen.
96
7010001.003 V2.4.1
Hoval DigiNet
DigiMaster
3
Press the HDB button to visualise this window:
Three fields show the start date, house address
and end date.
Field for graphic view of up to 3 datapoints.
Visualise up to 3 datapoints in list form. You
can select the datapoint with buttons 1, 2, 3.
The View button shows the datapoint selected from the list in graphic form.
3.3 Settings
Press the Settings button to show this screen:
Calibration button. If a button cannot be correctly
assigned to the action, a calibration has to be carried out.
Press the button and this screen is shown.
Display settings button: use this button to set the
background lighting.
System info button: important system information
can be visualised.
3.3.1 Calibration
Start calibration button: this button allows you to
change the existing calibration. After you press the
button, click on the two corner points shown and the
calibration will be performed.
Main menu button: this button enables you to return to
the main menu.
Close button: this button closes the window being
shown.
7010001.003 V2.4.1
97
Hoval DigiNet
3
DigiMaster
After calibration has been completed, it is important to check it.
Procedure:
Press the area with your finger or a
pen, and without interrupting the
pressure, check the active zone for
the start button (follow the arrow). If
the zone is enabled exactly at the
edge of the button, the device is correctly calibrated; otherwise, the calibration must be repeated until accuracy is achieved.
3.3.2 Display parameters
Press the Display parameters button to show this screen:
Contrast setting with bar or forward/backward
keys.
Press Cancel to return to the previous screen.
Press the OK button to save the new setting.
98
7010001.003 V2.4.1
Hoval DigiNet
3
DigiMaster
3.3.3 System info
Press the System info button to show this screen:
Press Close to return to the previous
screen:
Hardware versions:
3.1.1
Color with HBD
3.1.2
Monochrome with HDB
XX.X.1
Color without HDB
XX.X.2
Monochrome without HDB
3.3.4 More settings
Press the More settings button to show this screen:
3.3.5 Restart
This button lets you restart the EYT250.
Press this button and you see a window where you can select OK or Cancel.
Click on OK to initialise the restart.
7010001.003 V2.4.1
99
Hoval DigiNet
3
DigiMaster
3.3.6 Time
Press the Time button or click on the time that is displayed to see this screen:
Use the forward/backward keys to set the
time and date.
Press OK to transfer the time and date to all
AS that are connected to the novaNet.
Press Cancel to return to the previous
screen.
3.3.7 Profiles
To be able to make changes in this window, you must be logged in as an administrator.
Press the Profiles button to show this screen. A list of operators shows which operators
are defined. Three buttons allow you to define new operators, delete operators from the
list or change the login definitions. The logged-in operator can only define new operators; the Delete and Edit buttons are no longer visualised.
Touch the function you want to choose from four user groups:
No group
only allows operation of the panel.
Guest
only allows operation of the panel.
User
allows entry of setpoints, switching commands
and time programmes.
Administrator
allows entry of system parameters, setpoints,
switching commands and time programmes.
New button :
use this button to create a new user.
Edit button :
use this button to change an existing user.
Delete button :
use this button to delete an existing user.
In the lower Timeout window, you can define the reset for the password.
Use the forward/backward keys to give you a choice of these options:
Timeout: never, 60min, 30min, 10min, 5min, 1min.
Acknowledge the selected setting with the Accept button. The timeout is then enabled
for all defined users.
100
7010001.003 V2.4.1
Hoval DigiNet
DigiMaster
3
3.3.7.1 New
Press the Profiles button and then New to show this screen:
Click on the User name window to define a new
user. The next screen appears.
Click on the password window to define a password for this new user.
Click on the User group window to define the relevant password level for this new user. The password for the assigned user group must then be
entered.
You can use the alphanumeric keyboard to define
the new operator. 11 characters are allowed.
Press OK to confirm, or Cancel to return to the
previous menu.
You can use the numeric keypad to define the
new password. Press OK to confirm, or Cancel to
return to the previous menu.
7010001.003 V2.4.1
101
Hoval DigiNet
3
DigiMaster
The newly defined operator then appears in the
list of operators.
Press the Close button to acknowledge this entry.
3.3.8 Filters
Press the Filters button to show this screen:
The active filters (AS or application) are shown on
this screen.
You can enable or disable the filters in this window.
102
7010001.003 V2.4.1
Hoval DigiNet
DigiEasy
4
4 DigiEasy
4.1 Installation
7010001.003 V2.4.1
103
Hoval DigiNet
4
104
DigiEasy
7010001.003 V2.4.1
Hoval DigiNet
DigiEasy
4
4.2 Configuration
See 2.4.3
7010001.003 V2.4.1
105
Hoval DigiNet
5
Remote operation of DigiWeb
5 Remote operation of DigiWeb
5.1 Configuration
5.1.1 Introduction
novaWeb is a preconfigured web server for the novaNet automation stations (AS). This section describes the basic steps to be taken when setting up
novaWeb- i.e. how to connect it to the novaNet,
which is then presented automatically as a web site,
and how to connect it to the PC for any further configuration.
5.1.2 Connections
The connections for the novaWeb server correspond to a small single board PC. The
following terminals are present on the back:
The most important connections are the following:
Terminal
Type
DC-IN
106
Cable
Connection
(included with Power Supply Unit)
Power supply
COM 2
DB9
RS232 zero modem cable
novaNet291
LAN 2
RJ 45
CAT 5 Ethernet cable
PC or LAN
7010001.003 V2.4.1
Hoval DigiNet
Remote operation of DigiWeb
5
5.1.3 Power Supply
Connect your power supply unit to the DC-IN terminal, switch on and check that the
green LED on the front next to the power switch is on, or that the LED (labelled PWR) is
lit on the back.
5.1.4 Connection to novaNet
5.1.4.1 RS232 connection to novaNet 291
For the connection to the novaNet, you need a novaNet291 router which must be set to
a transmission speed of 38400 bits/s (only switch 3 to ON). The address of the novaNet
291 is defined by the novaWeb as 31777 so no other PC within the novaNet can use
this address.
Connect the COM2 port of your novaWeb device to the COM port of the novaNet 291
via a standard cable (Sauter article number 386301 001) of type DB9 Zero Modem Cable.
5.1.4.1.1
Connecting the novaNet291 to the automation stations
The connection from the RJ11 port of the novaNet 291 to the novaNet devices is made
with a twisted pair (TP) cable.
5.1.5 Ethernet
The LAN terminal (designated LAN2) can be connected in two ways:
•
via a standard Ethernet cable to the hub
•
via a crossed Ethernet cable, directly to the PC.
7010001.003 V2.4.1
107
Hoval DigiNet
5
Remote operation of DigiWeb
The status of the network connection can be checked via the LED on the LAN terminal:
if the right-hand LED (green) is lit, the connection is OK. A blinking left LED (yellow) indicates data traffic on your network.
5.1.5.1 PC and Ethernet settings
5.1.5.1.1
novaWeb settings
Ex factory (on delivery) the LAN connection (LAN2 terminal) of novaWeb is set to the
following values:
IP address: 10.10.10.11
Subnet mask: 255.255.255.0
5.1.5.1.2
Corresponding PC settings
To connect to novaWeb, you have to set the IP address of your PC to the same network. On the PC, this means you must set a different IP Address (e.g. 10.10.10.10) but
the same subnet mask (255.255.255.0).
You can specify your LAN connection either via "Desktop / My Network Places /Network
and Dial-up connections" or via "Start / Settings / Network and Dial-up connections".
108
7010001.003 V2.4.1
Hoval DigiNet
Remote operation of DigiWeb
5
On the "General" tab, you have to select 'Internet Protocol TCP/IP' and then click 'Properties'. Then enter the following IP address and subnet mask.
7010001.003 V2.4.1
109
Hoval DigiNet
5
Remote operation of DigiWeb
5.1.6 Proxy settings
Make sure that no proxy application is running, since there is no connection to the usual
proxy server in the local area network (LAN).
5.1.6.1 Internet Explorer
In the Internet Explorer, go to Tools / Internet Options / Connections / LAN Settings/…
and remove all proxy settings.
110
7010001.003 V2.4.1
Hoval DigiNet
Remote operation of DigiWeb
5
Alternatively, you can select "Bypass proxy server for local addresses" and enter the IP
address of your novaWeb device in the "Exceptions" field.
7010001.003 V2.4.1
111
Hoval DigiNet
5
112
Remote operation of DigiWeb
7010001.003 V2.4.1
Hoval DigiNet
Remote operation of DigiWeb
5
5.1.6.2 Mozilla
When working with Mozilla, go to "Edit / Preferences... / Advanced / Proxies" and then
select "Direct connection to the Internet".
7010001.003 V2.4.1
113
Hoval DigiNet
5
Remote operation of DigiWeb
Alternatively, you can select "Manual proxy configuration" and enter the IP number of
the novaWeb device in the "No Proxy for:" field.
Now you can open the web pages for the novaWeb (see also the User Manual) and configure the settings according to your needs (see the Configuration Manual).
114
7010001.003 V2.4.1
Hoval DigiNet
Remote operation of DigiWeb
5
5.2 Operation
5.2.1 Introduction
novaWeb is a small embedded Web Server that
allows you to visualize your installation via a standard Web Browser. Special attention has been paid
to the simplicity of the interface (pure HTML, no ActiveX, Java, etc.) to allow for fast access even with
very simple devices such as smart phones.
According to your login level, you can visualize any
statuses or measurements, modify setpoints and
commands or modify any settings.
Alarms and events (such as value changes) can be
sent to up to 4 e-mail recipients.
novaWeb can also send out an e-mail to transfer historic values for billing or long-term
backup.
This manual describes the user interactions via a standard PC Web browser (Microsoft
Internet Explorer or Mozilla) and via the standard Web browser of a Symbian smart
phone (SonyEricsson P900). Since the Web server is based on accepted Internet standards (HTML), any web browser complying to these standards should work identically.
However, tests were limited to these programmes.
5.2.2 Requirements
A standard HTML 4.01-compliant Web Browser which supports frame-based pages is
needed for optimal access to novaWeb pages.
For standard Windows PCs we recommend the current versions of MS Internet Explorer
(V6.0) or Mozilla (V1.7).
Access via a smart phone or a PDA is also possible. Due to the relatively small size of
the screens on these devices, we recommend you to use a special entry page without
frames or to bookmark the content page as one of your favourites.
5.2.3 Layout and navigation
All standard (HTML4.01-compliant) Internet browsers will show a novaWeb page subdivided into three frames:
Header
Navigation
7010001.003 V2.4.1
Main field (on right)
115
Hoval DigiNet
5
Remote operation of DigiWeb
The header shows the site's name and several pictures and links.
The content of the main window depends on the selection in the navigation frame on the
left.
If any of these three fields cannot be displayed entirely, scrollbars will appear to let you
navigate to the location you need.
5.2.3.1 Header (top)
VS Office
Beside the site name you will find the Sauter logo; it may also contain further logos and
links to home pages of the installation owner and a maintenance company, etc.
5.2.3.2 Navigation (left)
Navigation link
Login/Logout
Login and logout
Control Loops
Overview of control loops
Air Handling Unit 01
Installation view
- Number of installations according to your site
- Access to function descriptions and schematics
Air Handling Unit 02
Chiller Basement
Heating
116
Display in main field
7010001.003 V2.4.1
Hoval DigiNet
Remote operation of DigiWeb
Alarms
Alarm list
Events
Event logs
Service
Service list (AS-oriented)
Settings
Configuration pages
5
The links to Login/Logout, Control Loops, Alarms and Events are shown for each user.
Between Control Loops and Alarms you will see a list of configured installations (e.g. Air
Handling Unit 01, Chiller Basement,..) depending on your specific installation. The Settings page is only shown for users with the appropriate user rights.
5.2.3.3 Main field (right)
Depending on the selection in the navigation frame, you will see the pages for
login/logout, the control loops, installations, etc. as described above.
5.2.3.4 Navigation with smart phones
Some smart phone browsers (e.g. standard browser of SonyEricsson P900) cannot
show all the fields at the same time. In this case you have to select which one of the
three fields should be shown.
Select "Content" to show the navigation field. From here you can select the page you
want to see. The first time you select any page the login page will appear. If you selected another page than the login page, you have to reload the page after login to go to
your selected page. To switch to another page, you have to go back to the navigation
field.
For easier access, you can bookmark the navigation page (Content) or even specify it
as your home page.
Alternatively, you can select the "noframe.html" page. In this case only one menu will be
shown, but you still have to go back to the start page before you can go to a different
page.
7010001.003 V2.4.1
117
Hoval DigiNet
5
Remote operation of DigiWeb
5.2.4 Login/logout
To log in, go to the Login page:
•
enter your user name (typically your e-mail address),
•
select your user level,
•
enter your password,
and click on the Login button.
Your name
Your e-mail address
User level
Password
Login
Zurücksetzen
After login you will go directly to the Alarm page to give you initial information.
To log off, just go back to the login page once again (select Login/Logout in the navigator field on the left).
5.2.4.1.1 Version information
During login you always see information about the installed version of your novaWeb
station (e.g. novaWeb v2.0.1 means version 2.0.1).
5.2.4.2 Your name:
User name/e-mail address e.g.
5.2.4.3 User level:
Guest
As a Guest, no password is required. Guests are only allowed to view the main values
for control loops, installations, alarms and events without being able to modify anything.
User
A standard user has access to all Guest activities plus normal user operations such as
confirming alarms, changing setpoints, etc.
Service
As well as the standard user rights, a Service user has access to the service list, which
allows him to modify certain control loop parameters.
System maintenance
Only a System maintenance user has access to the system maintenance list in addition
to the other authorisations, and he can change the entire configuration (settings page).
118
7010001.003 V2.4.1
Hoval DigiNet
5
Remote operation of DigiWeb
5.2.4.4 Password
You have to enter the correct password for your user level. The password will be provided by your system engineer and cannot be changed by yourself.
5.2.5 Control loops
The Control loops section gives you an overview of the main information about your
possibilities for control. You are always shown the current (measured) value, the corresponding setpoint and the difference between them.
Control Loops
Actual
Setpoint
Diff
Supply Air Temp
32.6 °C
34 °C
-1,4 °C
Cooling Water Temp
16.1 °C
16 °C
0,1 °C
To facilitate the handling of your control loops, the deviation (or difference) is shown with
a green background for very small deviations, olive for small deviations and yellow for
large ones. This system allows a user to see very quickly whether he needs to take action.
The distinction between very small, small and large deviations is based on the type of
control loop (indicated by units):
Unit
Default °C Pa kPa ppm % bar m/s m3/h
(no
unit)
Very small
deviation
Borderline
between
very small
and small
1
1 30 0,3 100 5
3
5
10
2
2 60 0.6 200 10 6
10
20
Small deviation
Borderline
between
small and
large
Large deviation
5.2.6 Installations
If you select any installation in the navigation bar, the standard installation view will be
shown by default. This consists of the installation view itself plus some additional links
related to your site.
5.2.7 Installation view
The installation view gives you an overview of your installation, structured as follows:
7010001.003 V2.4.1
119
Hoval DigiNet
5
Remote operation of DigiWeb
Device
Control loops
Control loop 1
Control loop 2
Outputs
Monitoring and alarm
•
Device
o
•
Control loops
o
•
shows all datapoints belonging to a control loop grouped together as
such.
Outputs
o
•
displays the main devices, such as fans or pumps, together with feedback signals, commands and alarm statuses
any outputs which are controlled from more than one control loop
Monitoring and alarm
o
includes all other measurements, meters and alarms which are not directly linked to any of the above sections.
Each of these sections is displayed in up to 4 columns:
Header or de- Current value
scription
or status
Device
Control loops
Control loop 1
Control loop 2
Outputs
120
7010001.003 V2.4.1
User
interactions
Alarms
Hoval DigiNet
5
Remote operation of DigiWeb
Monitoring
and alarm
•
The first column shows a description
•
The second column indicates the current values or statuses.
•
•
o
additionally, it provides links to the progression of the value (50.5 °C)
o
or the group of values (Progression).
The third column shows any possible user inputs such as
o
time programmes (indicated by Change)
o
setpoints (a value such as 54 °C)
o
commands (a command state such as Off)
o
or push buttons (for example).
In the fourth column alarms are indicated as
OK or
o
o
Alarm
A green background for a control loop (first column) or a status (second column) indicates, if programmed, that this device is running (or is in functioning condition).
On
Device
Status
Command
Time Schedule AHU01
On
Change
Pump A3
Off
Off
Control loops
Temperature of supply air
Actual
50.5 °C
Supply air temp
42,4 °C
Limit
0%
Cooling valve
0%
Heating valve
0%
Fault, pump A
7010001.003 V2.4.1
OK
Setpoint
Alarm
Progression
Outside air divergence
Monitoring and alarm
Alarm
54 °C
Alarm
OK
121
Hoval DigiNet
5
Remote operation of DigiWeb
In a more general view you can see the following information:
Device
Status
Command
Alarm
Time schedule
time command status
time command
Digital Indication
digital input
digital output
button:
alarm
change setpoint
Control loops
Status
Control loop x
Progression
Setpoint
Compensation for control loop x
compensation
sensor
compensation
Control loop x
main sensor
calculated
setpoint
setpoint
Cascade controller for control loop x
limit sensor
Output for control loop x
output
Outputs
Individual output
(not specific to one control loop)
alarm
Current
Setpoint
Alarm
Current
Setpoint
Alarm
output
Monitoring and alarm
Common measurement
common sensor
Meter
meter
Runtime meter
runtime
Individual alarm
(not linked to any other value)
Alarm
alarm
button
alarm
alarm
5.2.8 Progression
The group progression link (Progression) will show you a diagram of the whole function
group (main sensor, setpoint or calculated setpoint and the positioning signal) whereas
a simple link for one address (such as 50.5 °C) will show only the progression of this
individual point.
122
7010001.003 V2.4.1
Hoval DigiNet
Remote operation of DigiWeb
5
Hours Days Weeks Years
If the whole group is shown, the left scale corresponds to the main sensor and the (calculated) setpoint, whereas the right scale is used for the positioning signal.
The period for the diagram can be selected via the upper table:
Hours Days Weeks Years
7010001.003 V2.4.1
123
Hoval DigiNet
5
Remote operation of DigiWeb
Depending on your selection, you receive the following predefined records:
Chart
Time
period
Mean Min. Max.
value value value
Recording
cycle
File
Saved in
e-mail sent
at
Hours
4 hours
30 sec
x
k1log
RAM
every hour
(x:00)
Days
4 days
5 min
x
k2log
RAM
every day
(00:00)
Weeks
4 weeks
1 hour
x
x
x
l1log
CF Card
every week
(Mo 00:00)
Years
1 year
1 day
x
x
x
l2log
CF Card
every quarter (01.xx.
00:00)
These records can be sent via e-mail to any e-mail recipient. For more details about this
transfer please refer to the section below.
5.2.9 User interactions
In general, two kinds of user interaction are possible.
•
Clicking on a button will always cause an immediate reaction (usually, a value is
sent to the AS).
•
A link will show a new page. On these pages, you can enter a new value (e.g. a
setpoint) or select a new position. In this case the action is only executed after
Change
Zurücksetzen
button. Pressing the
button will undo any
clicking on the
changes since the last confirmed change (this means any user modifications after the last time the Change button was clicked).
After the command is executed, you always receive information about the changes
made.
5.2.9.1 Button commands
Device
Start-up Chiller 1
Status
Off
Command
Start Up
Alarm
OK
A button can be given different button texts. However, it always functions identically by
setting a value to one and resetting it 60 seconds later. During these 60 seconds, the
background changes to green to indicate this change. After execution, feedback message will inform you of the change:
Change value
Changed command, switch for Pump A (as11chb.pump.pb) from 0 to 1
124
7010001.003 V2.4.1
Hoval DigiNet
5
Remote operation of DigiWeb
Button reset with 60 s delay.
5.2.9.2 Reset runtime
Monitoring and alarm
Alarm
Runtime, Pump A
Reset
23
OK
The runtime works in a similar way to the corresponding button, by resetting a counter
value (runtime meter) to 0 (as you can also see from the feedback).
Change value
Changed reset, pump runtime (as11chb.pump.rt.pb) from 0 to 1
Button reset with 60 s delay
(First line only when status actually changes).
5.2.9.3 Change time schedules
Time schedules are changed in a dedicated menu which looks like this:
Profile On
Off
1
0730
1700
2
0730
1400
3
0730
2100
Mo Tu We Th
Fr
Sa Su
E
4
It is possible to specify up to 4 programmes for one datapoint. This means that you can
specify 4 different time periods for any combination of weekdays and exception periods.
For example, you can specify one profile for normal working days (example profile 1),
another profile just for Saturdays (example profile 2) and a third one for any exception
days or periods (see below).
The valid times are 0000-2359. The switch-off time may precede the switch-on time.
Ex. Outdoor light 2100 0400
Empty field means no action.
Ex. Continuously on 0000
Next, you can specify certain days or periods when these profiles should not be executed:
Inactive
Exception (E)
7010001.003 V2.4.1
040701-040731,041224
040228,040327
125
Hoval DigiNet
5
Remote operation of DigiWeb
Dates are written using the YYMMDD format and intervals use YYMMDD-YYMMDD
Dates and intervals must be separated with a comma.
In the example above, no time profile will be executed during the vacation season (1
July until 31 July 2004) and on Christmas Eve (24 December 2004). On 28 February
2004 and 27 March 2004, the "Exception" time profile will be executed instead of the
normal time profile for this weekday (e.g. instead of the Saturday profile).
5.2.9.4 Command
Auto
Off
On
Depending on the type of command, you can put this address in automatic status,
switch it off or switch it to any given position.
5.2.9.5 Change values
54
°C
To change a value, simply enter the new value and press the Enter key.
5.2.10 Additional links
As well as your installation view, you can obtain additional links such as :[ Functional
description ] [ Schematics ] [ Service ] [ System maintenance ]
Depending on your installation, you will receive further information about your system
via the link to the functional description (an html document) or to the schematic.
For more detailed information, a service list and a system maintenance list are available
to users with appropriate rights.
5.2.10.1 Functional description
Whether or not the functional description is present, and what it contains, will depend on
your installation. It usually contains some information about the how your site functions.
5.2.10.2 Schematic
The Schematic picture usually shows a sketch of your installation with references to
your datapoint list.
126
7010001.003 V2.4.1
Hoval DigiNet
Remote operation of DigiWeb
5
5.2.11 Service view
The Service list is only shown with Service or Maintenance user rights. As well as the
standard installation datapoints, it shows some extra parameters which are not relevant
to the standard user, in a simple list.
Description
Value
Name
0
Command: switch, Pump A
as11ahu01.pumpa.sw
Outside air divergence
50.6 °C
as11ahu01.supaircontr.cs
Limit
0%
as11ahu01.supaircontr.ls
Supply air temp
42.5 °C
as11ahu01.supaircontr.ms
Heating valve
0
as11ahu01.supaircontr.out1
Cooling valve
0%
as11ahu01.supaircontr.out2
Heating valve
0%
as11ahu01.supaircontr.out3
54
Supply air setpoint
°C
as11ahu01.supaircontr.sp
5.2.12 System maintenance view
The system maintenance list is very similar to the service list. As well as the information
in the service list, you obtain more information about datapoints, intended for system
maintenance level users only.
Name
Value
Description
as11ahu01
0
Air Handling Unit 01
as11ahu01.pumpa.al
0
Fault, Pump A
as11ahu01.pumpa.do
0
0
as11ahu01.pumpa.sw
Command: switch, Pump A
as11ahu01.supaircontr.cs
50.6 °C
Outside air divergence
as11ahu01.supaircontr.ls
0%
Limit
42.5 °C
Supply air temp
0
Heating valve
as11ahu01.supaircontr.ms
as11ahu01.supaircontr.out1
7010001.003 V2.4.1
127
Hoval DigiNet
5
Remote operation of DigiWeb
as11ahu01.supaircontr.out2
0%
Cooling valve
as11ahu01.supaircontr.out3
0%
Heating valve
54
°C
as11ahu01.supaircontr.sp
Supply air setpoint
0
as11ahu01.supaircor.sp
1
as11ahu01.time schedule.tc
Time schedule AHU01
5.2.13 Alarms
In the default setting, you can see all the alarms in the alarm list that are not yet acknowledged or are still active.
Alarms
Status
Acknowledge
Text
Frost Protection Alarm
Time
2004-07-21 15:18:02
Name
ahu02.otemp.al
5.2.13.1 View all active or all generated alarms
With the Alarm link at the top of the alarm list, you can switch between the list of active
alarms and the list of all generated alarms.
Status
Text
Time
Name
Acknowledge Frost Protection Alarm
2004-07-21
15:18:02
ahu02.otemp.al
OK
novaNet AS 5 fault
2004-07-21
15:17:01
sys.sauter.as5.al
OK
novaNet AS 10 fault
2004-07-21
15:17:01
sys.sauter.as10.al
OK
novaNet Bus fault
2004-07-21
15:17:00
sys.sauter.busfail.al
OK
Alarm, runtime, return air controller
2004-07-21
15:18:01
reg.rac.rt.al
The list of all generated alarms also shows the alarm datapoints which are currently OK.
5.2.13.2 Alarm priorities
According to the importance of an alarm, its background will be shown in different colours:
Emergency
Alert
Critical
128
7010001.003 V2.4.1
Hoval DigiNet
Remote operation of DigiWeb
5
Error
Warning
Note
5.2.13.3 Acknowledging
If a new alarm appears, the Acknowledge link is shown at the same time to indicate that
the alarm has not yet been acknowledged. After the acknowledgement is completed, the
alarm will remain active if the alarm condition is still met; otherwise, alarm will disappear.
An alarm will only be treated as normal (not active) after the alarm condition has disappeared and (!) the alarm has been acknowledged.
5.2.13.4 System errors
Some alarm datapoints are generated automatically by the system to indicate critical
system errors:
OK novaNet-Bus error
2004-07-20 13:59:25
sys.sauter.busfail.al
A novaNet bus error is shown whenever no communication arrives within a certain time
period.
OK novaNet AS 10 error
2004-07-20 16:55:09
sys.sauter.as10.al
For each AS, an alarm is generated to indicate a communication error to this AS.
5.2.14 Events
The following events can be tracked in the event list:
•
•
•
all user interactions
o
acknowledging alarms
o
changing values (setpoints, commands, buttons, runtime)
o
changing settings (language, etc.)
any (incoming or outgoing) alarms
o
normal alarms
o
system alarms (bus error, AS error, internal system error)
manual user entries
o
according to entry (at least user level required)
If you want to enter any information manually, you can enter a description in the form to
the left, select a domain and press the Add button.
7010001.003 V2.4.1
129
Hoval DigiNet
5
Remote operation of DigiWeb
Time
Text
Domain
Priority
Source
Changed cooling water
2003-11-12
setpoint (as11chb.control.sp) User
10:01:30
from 8 to 9
Info
[email protected]
Changed supply air setpoint
2003-11-12
(as11ahu01.supaircontr.sp)
09:58:21
from 34 to 54
User
Info
[email protected]
2003-11-12 as13ircsfl001hu0002.al ac08:12:34
knowledged
User
Info
[email protected]
2003-11-11 Changed time schedule
16:05:03
as10ahu02.timeschedule.tc
User
Info
[email protected]
2003-11-11 BINARY INPUTALARM
15:55:43
=Alarm
Heating
Debug
as2bacnet.1princbis120
2003-11-11
Changed modem settings
14:33:24
User
Info
[email protected]
2003-11-07
Heating,
NovaNet AS 10 failure =alarm
Error
15:03:38
Ventilation
sys.sauter.as10
Changed supply air setpoint
2003-11-07
(as11ahu01.supaircontr.sp)
14:44:43
from 25 to 27
[email protected]
User
Info
One part of the event list can contain up to 200 entries. As soon as more than 200 entries
exist a new list is created and becomes part 1. The old list becomes part 2 and so on. This
means that up to 800 entries can be tracked. The newest entries are always in part 1
(which is shown by default), and the oldest entries are in part 4.
Part 1
Part 2
Part 3
Part 4
5.2.15 Service
The Service page contains a list of all AS that are handled in your system.
AS1 AS2 AS3 AS4 AS6 AS20505
After selecting one of your AS you will see a list of all the datapoints for this AS.
Name
130
Value
Description
6:0
mfa0
27.9 °C
Office temperature
6:1
mfa1
4.5 °C
Outdoor temperature
6:2
mfa2
2.1 °C
EGT330 room sensor
6:52
bi52
Aus
BI52
6:65
alarmbisoft52
Alarm
ALarmBiSoft52
7010001.003 V2.4.1
Hoval DigiNet
5
Remote operation of DigiWeb
The first column shows the AS address and MFA (datapoint address), followed by the
name, the current value and a description on the same line.
5.2.16 Settings
Access to the settings pages depends on your user rights.
•
Guests cannot access the setting pages at all
•
Users can only access the Data acquisition page to fetch historical data
•
Service users can access and change the alarm, data acquisition, system name
and clock settings
•
System Maintenance users can access and change everything.
5.2.17 Data entry
Hours
30-sec. values
every hour
Days
5-min. values
every day
Weeks
hourly min,mean,max
every week
Year
daily min,mean,max
every quarter
Similarly to data acquisition transfer via e-mail, you can select and view or save the historic values of any of the four time periods (Hours, Days, Weeks and Year). You can use
your browser's context menu (right mouse click) "Save Link Target As..." (Mozilla) or
"Save Target As..." (MS IE) to save the historic data into a csv-format html file, which
you can then import to your favourite spreadsheet programme such as MS Excel (see
also Processing of Data Acquisition Files). Alternatively you can open the relevant web
page to look at the values directly and/or open the source from the context menu
(Mozilla: "This Frame / View Frame Source" or MS IE: "View Source Text").
Typical data acquisition table
#dateTtime±zone gev.om.ms
2004-07-22T09:00:30+0200
2004-07-22T09:01:00+0200
gev.om.out1
gev.om.sp
7.99561 7.99561 7.93457 0
7.99561 7.99561 7.99561 0
You can also save the data from the source page with the 'Save as' command.
5.2.18 E-mail messages
Depending on the configuration of your installation, you can receive e-mail notifications
about alarms or events. The historical data can also be transferred also via e-mail on the
basis of an individual time setting.
5.2.18.1 Alarm and event notification via e-mail
Depending on your installation, alarms and events will be transmitted via e-mail directly
to your e-mail client or forwarded to SMS.
5.2.18.1.1Header
The header can be processed by an automated e-mail client program. It contains the
following information:
7010001.003 V2.4.1
131
Hoval DigiNet
5
Remote operation of DigiWeb
•
Subject
o
•
•
X-Priority
o
the standard e-mail priority (normally indicated via a flag in your e-mail client)
o
from 1 (highest) until 5 (lowest)
X-WDC-DOM
o
•
novaWeb domain
X-WDC-PRI
o
•
Alarm or event, site and datapoint address
novaWeb priority (same as for alarms)
X-WDC-EID
o
site and datapoint address together with current status
As an example, a bus error on the VS Office site could be sent like this:
Subject: Alarm, VS/Office/sys.sauter.busfail
X-Priority: 3 (Normal)
X-WDC-DOM: SYS
X-WDC-PRI: ERR
X-WDC-EID: VS/Office/sys.sauter.busfail=1
5.2.18.1.2Content
The content of the e-mail notification explains the error in a full text message such as:
"NovaNet Bus failure".
5.2.18.2 Data acquisition via e-mail
As a further option, the historic values of your novaWeb can be sent to certain e-mail
clients according to a defined time schedule. Four different type of logs corresponding to
the four historic charts cover either the last four hours, the last four days, the last four
weeks or the whole of the last year.
5.2.18.2.1Header
As well as the alarm and event notification, you will find some additional information in
the data acquisition header which could be processed by an automated e-mail client:
The subject describes the type of log file, WDC-DOM specifies the domain (always
SYS), the WDC-PRI gives you the priority (INFO) and the WDC-EID again specifies the
site (e.g. VS Office), the type of e-mail (data acquisition) and the file name.
Subject: Data acquisition, VS Office/DAQ/K1LOG
WDC-DOM: SYS
WDC-PRI: INFO
WDC-EID: VS/Office/DAQ/K1LOG
5.2.18.2.2Contents and attachment
132
7010001.003 V2.4.1
Hoval DigiNet
5
Remote operation of DigiWeb
The historical values are sent directly in the message, together with a csv file (commaseparated values) as an attachment. Depending on the type of log, it will contain up to
three values (mean, min and max) for a datapoint registered according to a specified recording cycle over a certain time period:
Chart
Time
period
Recording Mean
value
cycle
Min.
value
Max.
File
Saved in
value
e-mail sent
at
Hours
4 hours
30 sec
x
k1log
RAM
every hour
(x:00)
Days
4 days
5 min
x
k2log
RAM
every day
(00:00)
Weeks
4 weeks
1 hour
x
x
x
l1log
CF Card
every week
(Mo 00:00)
Year
1 year
1 day
x
x
x
l2log
CF Card
every quarter (01 Jan,
Apr, Jul and
Oct 00:00)
Type K log
#dateTtime±zone
as15ahu01.supaircontr.ms as15ahu01.supaircontr.cs ...
2004-0127T14:00:30+0100
20.3
0.4
2004-0127T14:01:00+0100
20.4
0.5
2004-0127T14:01:30+0100
20.4
0.5
2004-0127T14:02:00+0100
20.2
0.5
In the K1LOG and the K2LOG, only the mean value is logged.
Type L log
#dateTtime±zone ircsflr01unit01.fc.ms ircsflr01unit01.fc.ms.min ircsflr01unit01.fc.ms.max ...
2004-03-74.0265
01T01:00:00+0100
-74.0439
-73.9297
2004-03-74.0287
01T02:00:00+0100
-74.0439
-73.9868
...
The L1LOG and L2LOG record the minimum and maximum values as well as the mean
value, to give greater accuracy.
5.2.18.2.3
7010001.003 V2.4.1
Saving
133
Hoval DigiNet
5
Remote operation of DigiWeb
If you are processing these e-mail messages manually, you should open the message
and save the attachment at the location you want so that you can carry on working with
them. Depending on your needs, you should rename them to specify the site or the time
period etc.
5.2.18.2.4
Processing data acquisition files
To ensure efficient monitoring and optimization of energy and media consumption, we
recommend the use of a monitoring and optimization tool such as EY3600 novaPro EBal.
A further possibility is to use a standard spreadsheet programme such as MS Excel or
OpenOffice Calc. In this case you have to import and process the data manually. Since
the data are saved as a tab-delimited table you have to open or import the table as appropriate.
5.2.19 Hints
5.2.19.1 Updating HTML pages
The visualising of any values relies entirely on HTML technology. In order make everything available via all standard HTML browsers, including mobile telephones, no Java or
Active-X technology has been used. Therefore, all the values shown on these web
pages correspond to the novaWeb values at the time when the page is loaded. To refresh a page you have to reload it manually.
5.2.19.2 Transferring alarms and historical data
The transfer of alarms, events and historical data to an e-mail account and especially
any further processing (such as forwarding as SMS) relies on the availability of these
providers and services. For example, if a dial-up access point is not available at the time
of an alarm transmission, novaWeb makes several repeat dialling attempts, but will fail
to transfer this message if the access point is not reachable within a reasonable time. If
a mobile phone cannot be reached within 24 hours (depending on the SMS provider), no
SMS message will be delivered.
5.2.19.3 Security
Security requirements can vary tremendously depending on the importance of the monitored site (from simple heating up to danger to life). Please discuss your specific security
needs with an IT professional. He will advice you on password management (regular
changes, etc.), firewalls and further security measures.
5.2.20 Tips and tricks
5.2.20.1 Reload / refresh button after user entries
The "Reload" (Mozilla) or "Refresh" (MS Internet Explorer) button resends the last information. This can lead to errors after changing values, acknowledging alarms, etc. If you
want to refresh your page contents after changing something, it is preferable to use the
appropriate link (installation, alarms, etc.) from the navigation field instead of the reload
or refresh button.
134
7010001.003 V2.4.1
Hoval DigiNet
Remote operation of DigiWeb
5
5.2.20.2 Cache
Especially with mobile telephones, pages are not always loaded freshly each time. Try
to empty the cache and use the reload / refresh button to force loading of the current
page information.
5.2.20.3 Memory settings
Since the short-term historic values are only saved to the RAM memory, please avoid
switching novaWeb off as far as possible. All other settings (configuration, time programmes, etc.) are saved to the flash memory.
5.2.20.4 Cookies
Cookies must be enabled for session management (at least for this site).
5.2.20.4.1
Cookie settings for MS Internet Explorer
If you are using MS Internet Explorer, go to "Tools / Internet Options / Privacy" and
specify your privacy settings for the required zone (e.g. Internet zone) as "Medium High"
or lower.
7010001.003 V2.4.1
135
Hoval DigiNet
5
Remote operation of DigiWeb
You can also specify the Cookies setting for individual web sites to "allow" cookies for
the site:
5.2.20.4.2
Cookie settings for Mozilla:
If you are using Mozilla, go to "Edit / Preferences... / Privacy & Security / Cookies" and
either select 'Enable all cookies' or 'Enable cookies based on privacy settings':
136
7010001.003 V2.4.1
Hoval DigiNet
Remote operation of DigiWeb
5
If you also select 'Ask me before storing a cookie' you can go to the novaWeb site where
you are asked if you want to allow the creation of cookies.
7010001.003 V2.4.1
137
Hoval DigiNet
5
Remote operation of DigiWeb
You can use the Cookie Manager to check whether cookies are allowed for your site:
If cookies are blocked for this site, select "Tools/Cookie Manager / Unblock Cookies from
this site" to allow the site to set cookies again.
5.2.20.4.3
Cookie settings for the SE P900
In the Sony Ericsson P900 Internet Browser, go to "Edit / Preferences / Security" and
then mark "Allow cookies":
138
7010001.003 V2.4.1
Hoval DigiNet
Remote operation of DigiWeb
5
5.2.21 JavaScript
On the start page (index.html), JavaScript is used to forward users with small screens to
the frameless start page (Menu.html). So in this case, JavaScript should be enabled to
make use of this functionality.
5.2.22 Language settings
All novaWeb pages are written so that they will display correctly in countries with western European language settings (Latin 1 Language Page).
User in countries with a different language page (e.g. Turkey, Russia, etc.) have to select the correct character encoding.
5.2.22.1 Language settings for the Internet Explorer
For the Internet Explorer, go to 'View / Encoding / Western European (ISO)'.
5.2.22.2 Language settings for Mozilla
The language settings for Mozilla can be checked at "View / Character Coding"; they
must be "Western (ISO-8859-1)".
5.2.22.3 Language settings for the SE P900
The standard Web browser of the Sony Ericsson P900 only shows the characters of the
selected language correctly. If you want to visualise any web pages which include special characters (e.g. öäüéàè..) you have to select the appropriate language under "Control panel / Other / Language selection".
5.2.23 Connection
In general there are two basic set-ups. Either you are directly connected to your site via
TCP/IP, in which case you only have to enter the corresponding address to reach the
novaWeb sites. Otherwise, the connection has to be established manually or automatically when you try to access the web server. This is called a dial-up connection.
5.2.23.1 Direct TCP/IP connection
To connect to novaWeb you have to enter its URL (Uniform Resource Locater). A URL
is defined as follows:
•
protocol://host name [:tcp-port] [/access path] [/file name] [further options]
•
e.g. http://embweb02.ch.sauter-bc.com:8080/index.html
7010001.003 V2.4.1
139
Hoval DigiNet
5
Remote operation of DigiWeb
Normally it is sufficient to enter the IP address (z. B. 10.1.247.154) or the host name
(e.g. embweb02.ch.sauter-bc.com). All standard web browsers add http by default. The
port only needs to be added if http is not running at the default port 80.
5.2.23.2 Dial-up (PPP) connection
5.2.23.2.1
PC Dial-up connection
If you want to use a dial-up connection, e.g. via an analogue modem, you have to configure the connection. In MS Windows XP, you can do this via Start / Settings / Networks
and Dial-up Connections / Make new Connection:
140
7010001.003 V2.4.1
Hoval DigiNet
Remote operation of DigiWeb
5
You should select "Dial-up to private network" to connect directly from your PC modem
to the modem connected to the novaWeb. If your novaWeb is connected to the Internet
you should select this option.
In the first case (private network) you have to specify the user name and password for
the dial-in server of the novaWeb:
7010001.003 V2.4.1
141
Hoval DigiNet
5
Remote operation of DigiWeb
Depending on your installation (type of connection, Internet Browser, etc.) this dial-up
connection can be established automatically by your browser (MS IE) when you open
the novaWeb site:
When working with other web browsers such as Mozilla, you have to establish the connection manually via the MS Windows Connections.
In some cases, for example if you are using an AVM ISDN card, you have to use the
corresponding proprietary software to establish the connection.
5.2.23.2.2
SE P900 Dial-up Connection
With modern GSM devices, you can transmit data via a CSD, HSCSD or GPRS connection. At the time of writing, UMTS was still not very widespread and therefore it is not
dealt with in the current version of this manual.
CSD (Circuit Switched Data) is the standard continuous data transmission with 14.4
kBit/s, which is traditionally used for voice transmission.
HSCSD (High Speed CSD) bundles several CSD transmission channels together to
allow higher transmission rates (normally up to 56 kBit/s).
GPRS (General Packet Radio Service) is a packet switched data transmission which is
also much faster than CSD (also up to 56 kBit/s). Theoretically, the connection is constantly present, but you only pay for the actual data volume.
Since novaWeb pages are optimised for mobile communication (small data volume), we
generally recommend you to use a GPRS connection.
To verify your connection settings, to create a new connection or modify an existing one
you have to select "Control panel" in the application menu:
142
7010001.003 V2.4.1
Hoval DigiNet
Remote operation of DigiWeb
5
Go to the Connections tab:
And select "Internet accounts".
7010001.003 V2.4.1
143
Hoval DigiNet
5
Remote operation of DigiWeb
Normally you will receive a list of preconfigured connections from your telephone provider:
Two connection types can be generated: GPRS or dial-up. A GPRS connection is normally used to access an Internet provider (such as Swisscom):
144
7010001.003 V2.4.1
Hoval DigiNet
Remote operation of DigiWeb
5
A dial-up connection is used to connect to an analogue modem, a GSM modem or an
ISDN adapter. In this case you have to enter the phone number that you want to connect to, and the user name and password for the dial-in server of your novaWeb device:
If you choose a dial-up connection, you have to enter an IP address which belongs to
the same network as the one configured in the novaWeb (but not the same address):
When connecting via an Internet provider, you will receive an IP address automatically
from this provider (and you should therefore tick the relevant box).
For a dial-up connection, you have to specify whether you have an analogue or ISDN
connection. When calling a GSM modem, you must also select 'Analogue':
7010001.003 V2.4.1
145
Hoval DigiNet
5
Remote operation of DigiWeb
5.2.24 Appearance
5.2.24.1 Links
In general, links which you have not yet visited will be shown in blue, and links you have
already visited will be shown in purple. All links will be underlined. This could vary depending on the settings for your individual Internet browser.
In Microsoft Internet Explorer, the colour settings can be found at "Tools / Internet Options ... / General / Colours", and the underline function is at "Tools / Internet Options ... /
Advanced / Browsing / Underline links":
146
7010001.003 V2.4.1
Hoval DigiNet
Remote operation of DigiWeb
5
For Mozilla, you can find these settings at Edit / Preferences / Appearance / Colours:
7010001.003 V2.4.1
147
Hoval DigiNet
5
148
Remote operation of DigiWeb
7010001.003 V2.4.1
Hoval DigiNet
Service-Termial DigiService
6
6 Service-Termial DigiService
6.1 Operation
Amongst other things, the nova240 enables: values and status to be displayed locally;
switching and positioning commands to be issued; and the time- and date-dependent
switching program to be entered and amended.
The nova240 can be connected to DigiUnit (AS). Since the nova240 itself does not need
parameterising, it can be used as a mobile terminal for a lot of stations.
It gains all its information, i.e. plaintexts, unit of measurement etc., from the data-point
attributes stored in the relevant automation station.
6.2 Operating philosophy
The nova240 is operated via four directional keys – two each for left/right (←
← and →)
and up/down (↑
↑ and ↓) – plus the Esc key and the return key (↵
↵).
Use the ← and → keys to choose the desired function within the menu.
→ = downwards, next function
← = upwards, previous function
The function is then invoked after you have confirmed your choice by pressing the ↵
key.
In the case of purely reading functions (displaying measured values, alarms etc.), the ↑
or ↓ keys allow you to move through the alphanumerically arranged list.
In the case of input functions, the ← and → keys enable you to choose the appropriate
location, while the ↑ and ↓ keys let you change the relevant value, the time and date etc.
If you keep the relevant key pressed, the change is continual instead of in single steps.
Press the ↵ key to confirm.
6.3 Illumination
Each press of a button switched the display's illumination on. The light goes out again if
no key is pressed within the next 7.5 minutes.
This method extends the life of the display.
7010001.003 V2.4.1
149
Hoval DigiNet
6
Service-Termial DigiService
Once the illumination goes out, the password becomes invalid, i.e. it has to be entered
again in order to make further entries.
6.4 Adjustement of the contrast
At the back of the device the contrast of the display can be varied with the help of a
small screwdriver.
6.5 List of functions
The various functions of the nova240 can be attained using three menus:M
→
→
→
→
→
→
→
E
P
A
A
S
M
C
S
N
a
d
l
t
e
o
w
U
s
d
a
a
a
u
i
s
r
r
t
s
n
t
1
w
e
m
u
u
t
c
o
s
s
s
r
e
h
M
→
→
→
→
→
→
→
E
S
A
S
S
A
S
N
e
l
w
e
n
u
U
t
l
i
t
n
m
2
p o
M
t c
c
u a
m e
i
F
h
l
l
r
M E N U
→ P a r
→ G r .
↑ G e r
→ V e r
→
→
→
a
n
m
s
3
m
o
a
i
→
r d
s
r
/ F a
+
e d
r
v
c o
n
A
i
o
-
t
s
n
c
t
/
N e x t
e
u
B
v
a
m
s
l
i
a
l
m
e
t
n
l
u
a
t
s
a
u
e
n
p a g e s
r y
e s
s
d s
→ N e x t
s / P o s .
F B
+
F B
p a g e s
v a l u e s
g
p r o g r
k
a b l e
w i n t e r t
a m
i
m e
p a g e s
→ N e x t
e t e r
s e r v i c e
. / c h a r a c t e r
s e t
n
o n
Go to the next or the previous menu by:• pressing the ESC key repeatedly, or
• pressing the ← key several times until the → symbol is activated at ’Next
pages‘. You can then press either ↑ to select the next menu or ↓ to choose
the previous one.
150
7010001.003 V2.4.1
Hoval DigiNet
Service-Termial DigiService
6
6.6 The menu items explained
6.6.1 MENU 1
6.6.1.1 Password
Switching and positioning commands can be issued – i.e. the ’Switching commands with
FB (feedback signals)‘ (MENU 1) and ’Setpoints/Positioning values‘ (MENU 2) functions
– are possible only after the correct password has been entered.
The same applies to the functions:• Change/delete password
• Set clock
• Annual table
• Summer-/winter time
• Sub-menus for the ’Switching program‘ function
You reach the password function in MENU 1 by pressing the ← and → keys, and then
confirming with ↵.
The following input mask appears:M e n u
→
→
→
P A S S W O R D
0 0 0 0
↑ ↑ ↑ ↑
E n t e r
C h a n g e
D e l e t e
The nova240 is supplied ex works with the password set at 0000.
You can adopt this password unchanged for you system; enter it once as soon as the
manual operating unit has been plugged in. The operations described above are then
possible until the nova240 is taken out of service or until the illumination is switched off.
Using the ← or → keys, position the cursor at the four input places, each of which bears
the figure 0. A further press of the → key leads you to the → ’Input‘ function.
Now confirm the 0000 combination of figures by pressing the ↵ key.
If no-one has changed the password from the factory setting, the word VALID appears in
the display.
If you want to work with your own password in your system, you can enter it via the
Change menu item, on condition that you have entered once before the password that
was valid previously. Now choose the password function again and enter the desired
password. After having entered the ’ones‘, press the → key twice. You then reach the
Change function. Confirm by pressing ↵; the word CHANGED then appears.
The Delete function
This allows you to end the password's period of validity, which normally expires 7.5 minutes after the last button has been pressed, i.e. for the same length of time as the illumination is active.
Use ’Delete‘ to end the authorisation rights immediately.
7010001.003 V2.4.1
151
Hoval DigiNet
6
Service-Termial DigiService
Press → until the → Delete function is activated.
Confirm this by pressing ↵; the word DELETED then appears.
6.6.1.2 Address reset
In the case of the functions described later, measured values, alarms etc. are shown in
alphanumerical order of the house address, i.e. A comes before B, 1 before 2, A5 before
B3 etc.
The automation station saves the last piece of information (that you viewed) with its
alphanumerical house address and, when the function is called up again, continues the
portrayal from there (or, in the case of another type of data point, from the following
’house address‘ of the new category).
If, when choosing a data point, you want to start right from the beginning again, then
choose the menu item Address reset and confirm with ↵.
The entry is confirmed by a jump from → to the following function.
6.6.1.3 Portrayal of data points
Alarms/faults
Status + binary feedback signals
Measured values
Counter values
These four menu items permit you to view all associated data points after you have chosen a data-point category.
Using the ← or → keys, select the preferred type of data point and confirm with ↵.
If you have performed an ’address reset‘ beforehand, the value/status of the alphanumerically lowest house address is shown, otherwise the address at which you left the
menu the last time. Use ↑ and ↓ to leaf through the chosen data-type category.
You exit this function with the Esc key, then return to the menu and can now choose
another type of data point by using the ← and → keys.
Example for ’Measured values‘.
→ M e n u
↑ M E A S .
H o u s e
a d d r e s s
A d d r e s s
t e x t
+ 2 1 .
5 0
V A L U E
° C
6.6.1.4 Switching commands with FB (feedback)
You obtain this function, after choosing MENU1, by pressing the key → (press once or
several times) and confirming with ↵.
152
7010001.003 V2.4.1
Hoval DigiNet
Service-Termial DigiService
6
The following appears (example):→ M e n u
↑ S W .
H o u s e
a d d r e s s
A d d r e s s
t e x t
→ A U T
→
→
0
L O C A L
A U T H O R I
S A T I
C O M M A N D
I
→
O N
N E E D E D
II
First use the ← or → keys to choose the address.
The prevailing switching condition (feedback) is shown by an underscore – in the above
example, it is I (level I) – and, if parameterised accordingly, either AUT or LOCAL is
underlined, which tells you whether the condition was caused by local operation or by
the relevant output on the automation station (AUT).
If you want to change a switching status (which is possible only on those switching levels marked with →), you can use the ← or → keys to choose the switching level (the
symbol → at the relevant level is then marked) and confirm with ↵. If you have entered
the correct password beforehand as per the ’Password‘ function in Menu 1, the command is issued by the automation station, otherwise the message ’AUTHORISATION
NEEDED‘ appears.
6.6.2 MENU 2
6.6.2.1 Setpoints/positioning values
Use the Esc key to obtain MENU 2. Then, using the ← or → keys, choose the relevant
function and confirm with ↵.
The following then appears:→ M e n u
↑ S E T P /
H o u s e
a d d r e s s
A d d r e s s
t e x t
P O S V A
V a l
C h a n g e
v a l
+ / # # # .
↑ ↑ ↑
u e :
# #
↑ ↑
R O
↑
u e
A U T
↑
Using the ↑ or ↓ keys, choose the relevant house address and confirm with ↵.
The last value to be commanded is shown. In the case of setpoints, it is shown as an
absolute value with unit of measurement, e.g. 21.5 °C; in the case of positioning values
(valves, dampers), they are shown in standardised form from 0.000...1.000, equivalent
to 0...100 with % shown as the unit of measurement.
In the case of positioning values, you can see the operating mode, i.e. whether the positioning value is coming from a control module (therefore Automatic) – in which case,
AUT appears – or whether the value shown emanates from the manual operating unit,
and that operating mode still applies. In this field, AUT (without underscore) appears.
If you want to change the value, press the ← or → keys and choose the preferred input
position within # # #.# # in each case.
7010001.003 V2.4.1
153
Hoval DigiNet
6
Service-Termial DigiService
Using the ↑ and ↓ keys, enter the desired figure for every position. This is accepted by
the automation station immediately, without you having to press the ↵ key.
By pressing the → key again, you obtain the functions R0 and AUT, each of which is
activated by the ↵ key.
R0 denotes: Reset 0, i.e. you can set the value entered directly to 0 and, therefore, start
from the beginning again.
For positioning values only:AUT denotes: you allow the station's internal control system to assume control over the
value entered. The displayed value stays at the last value that was issued.
The Automatic condition is indicated by an underscore, i.e. AUT.
If, in Menu 1, you have entered either the wrong password or none at all, the message
AUTHORISATION NEEDED appears.
6.6.2.2 All MFAs
MFA is the abbreviation for machine fine address. Usually, you work not with the system's internal name for the data points, but with the so-called ’house address‘, which
describes the data point from the user's point of view in accordance with mnemonic
aspects using 24 characters.
In the ’All MFAs‘ menu item, the data points appear in alphanumerical order and are
mixed across all types of data point.
To select the address, press the ↑ or ↓ key (↑
↑ = forwards; ↓ = backwards). If a generated house address is found during the search, but it does not have a meaningful
parameterisation, then ’All MFAs‘ instead of the data-point category (↑ ALARM, ↑
MEASURED VALUE,...) appears in the header.
6.6.2.3 Time-based switching program
Normally, the automation station already has a time-based switching program. This has
been loaded either by the DigiCom-Tool or by the DigiMaster user panel.
Using the manual operating unit, you can view the time-based switching program and, if
necessary, change it. There are five masks available for this:•
•
•
Overview
EDIT (protected by password)
HELP 1, HELP 2, HELP 3
HELP 1 explains how to enter annual, monthly and daily codes
HELP 2 provides further explanations on the daily code and notes on the hourly
code.
HELP 3 explains special minute codes.
By repeatedly pressing the ↵ key, you can call up the help texts H1, H2, H3, H1,...
one after the other.
154
7010001.003 V2.4.1
Hoval DigiNet
Service-Termial DigiService
6.6.2.3.1
6
View program
By pressing Esc once or several times, choose MENU 2 and then, by pressing the →
key, choose the time-based switching program. Confirm with ↵.
The switching commands then appear:→ M e n u
↑ A d r
↑ P l
H O U S E
A D D R E S S
A D D R E S S
T E X T
Y Y
M M
D D
h h
S W . C O M M A N D :
→ E D I T
a c e :
m m
M F A
→ H E L P
The shaded fields show where variables – such as memory location, text, date and time
information, the machine fine address etc. – are shown.
The following then appears at Positional commands:→ M e n u
↑ A d r
↑ P l
H O U S E
A D D R E S S
A D R E S S
T E X T
Y Y
M M
-
→ E D I
D D
-
T
h h
-
m m
a c e :
M F A
-
→ H E L P
Content of the penultimate line (depending on the memory location chosen):• AUT in the ’From control module‘ operating mode, the unit of measurement (e.g. °C)
then appears at the far right.
• Abs: or Rel: default value including unit of measurement.
N.B.:
The complete mask does not appear unless you have chosen (at ’Place‘) a memory
location that is linked to the chosen address.
If the ’Adr‘ function is chosen (denoted by the ↑ in bold type), you can, using the ↑ and ↓
keys, view all APC-type – i.e. the switching- and positioning-command addresses generated accordingly – one after the other.
The following are shown:• The house address
• The address text
• The station's internal associated MFA
• Place 000...319 in the program memory, plus
• the date/time information
• the associated switching or positioning command
Within the chosen address you can use the → key to choose the ’Place:‘ function, and
the ↑ and ↓ keys to view all the functions already programmed for this address (date,
7010001.003 V2.4.1
155
Hoval DigiNet
6
Service-Termial DigiService
time, command). If you choose ’Place:‘ and press the ↑ key, the first program place at
which there is an entry for the selected address is chosen immediately.
6.6.2.3.2
Change program
If you wish to change or add commands, choose the ’Edit‘ function by pressing → several times, and then confirm with ↵.
At Switching commands, the following input mask appears:A
→
→
↑
P
O
B
P
Y
C
v w
C m
l . /
Y
↑
↑
S w . c o
E d i t
H e l p
→ D e l
x
→ S P
S p a r e / → R 0 :
M
D D
h h
↑
↑
m m a n d :
→
x
→
M
e t
- -
e
m m
↑
↑
It can be seen in the third line that the address is a binary command address in accordance with the generation (BCm xx). It is not possible to state a setpoint (SP --). If an
MFA ever needs to be able to process both binary commands and setpoints, and to edit
a spare place, the operating mode can also be chosen by the manual operating unit.
To do so, use the → and ← keys to put the input mask to the relevant operating mode
BCm or SP, enter the desired operating mode and confirm with ↵.
At Positioning commands, the following mask appears:A
→
→
↑
↑
P
O
B
P
Y
C
v w
C m
l . /
Y
↑
→
→
M
E d
H i l f e
S p a r e /
M
D D
↑
A U T
↑
→ R e s e t
i
→
→
→
t
D
S
R
h
e l
P
0 :
h
↑
↑ ↑ ↑ .
e t e
x x
m m
↑
↑ ↑
In the penultimate line, UT appears for setpoint/positioning value from control loop
Abs to set an absolute value, e.g., 21.5 °C Rel to set a relative value, e.g. as setpoint
correction +/-.
To do this, you must either have chosen a location in the overview menu that contains a
positioning command for this address or choose such a location in row 4.
To set the value, both absolute and relative, the value entered in row 9 at the input positions ↑↑↑.↑↑ appears to the right in row 8. In AUT mode, only the unit of measurement
(e.g. °C) is there.
When choosing Abs. or Rel, you can set a value after having selected the particular
input position in row 9. This is accepted directly, without you having to confirm with ↵.
This default value is set to 0 by choosing the → Reset function and confirming with the ↵
key.
Position the cursor to Pl. (place in the program memory, or memory location) and use
the ↑ and ↓ keys to choose the already-programmed inputs.
156
7010001.003 V2.4.1
Hoval DigiNet
Service-Termial DigiService
6
The memory location that you have selected is shown at R0:. If, when there are a lot of
locations, you want to return quickly to the first location of the program memory, use the
← and → keys to choose the → R0 (Reset 0) function, and then confirm with the ↵ key.
If you wish to change the shown program step, position the input cursor accordingly and
enter the new item of information directly, without using the ↵ key.
6.6.2.4 Set clock
The automation station (AS) can handle numerous time- and date-based functions.
The menu item described here allows you to set the clock in the automation station
accurate to the second. It then runs with the precision of the automation station's quartz.
Using Esc, choose MENU 2 and then, by pressing → several times, choose the function
’Set clock‘. Confirm with ↵.
The following then appears:→ M E N U
Y Y
9 8 ↑
↑ S E T
M M
1 0 ↑
D D
1 9
↑
C L O C K
h h
1 4 .
↑
m m
5 9 .
↑
s s
2 7
↑
Using the ← or → key, choose the cursor position; using the ↑ and ↓ keys, set the numbers. Each setting is accepted without you having to confirm with ↵.
6.6.2.5 Annual chart
You can assign a ’Special day‘ program (different to the actual weekday) to any day of
the year. On this day, the program defined for the special day runs instead of the normal
program. If, for instance, May 1st is a public holiday and falls on a Wednesday, and you
want to run the same program as for Sunday, choose day code 7 for May 1st.
Input:
Using Esc, choose MENU 2 and, by pressing → several times, the function → ’Annual
chart‘. Confirm with ↵.
The following then appears:→ M
Y
C
D
1 .
8 .
1 6
2 4
e
Y
h
a
-
n
:
a
y
7
1
2
3
u
→ 1
n g e
:
.
5 →
3 →
1 →
A N N U A L
C H A R T
3 5 7 9
/
M M :
↑
d a y
c o d e :
→
→
→
→
→
→
→
→
→
→
→
→
→
→
→
→
→
→
→
→
→
→
→
→
→
→
→
→
Now use → to choose the function YY (year).
7010001.003 V2.4.1
157
Hoval DigiNet
6
Service-Termial DigiService
By pressing ↑ or ↓, you have the choice between even and odd years (13579 or 02468).
This allows you to decide whether the entries should apply for the current or the following year.
By pressing → move on to the month selection MM, and use ↑ or ↓ to choose the month
that you wish to edit (01, 02, ...12).
By pressing → accordingly, select the relevant day in the four lines 1. - 7./8. - 15./16. 23. and 24. - 31., and then use the ↑ and ↓ keys to set the day code 1 ... 7 (denoting
Monday to Sunday).
The additional input options are as follows:0: Daily
8: Special day 1
9:
A:
B:
C:
D:
E:
F: Special day 8
Confirm the entry with ↵. If the password is incorrect, or if no password has been stated,
AUTHORISATION NEEDED appears in the display.
N.B.: This annual chart applies to the whole automation station.
6.6.3 MENU 3
The menu has the following functions:M
→
→
↑
→
E
P
G
L
V
N
a
r
a
e
U
r
.
n
r
3
a
n
g
s
m
o
u
i
e
.
a
o
p a g e s
→ N e x t
t e r
s e r v i c e
/ C h a r a c t e r
s e t
g e
n
6.6.3.1 Gr. no. (group number)/Character set
In MENU 3, called up via the Esc key, choose this function by pressing → several times.
The following then appears:-→ M e
G r .
' "
0 1 2
n
n
#
3
u
o . H e x :
° %
4 5 6 7 8 9
e t c .
u s w
ö ü
158
7010001.003 V2.4.1
Hoval DigiNet
Service-Termial DigiService
6
In the second row, the automation station's group number is shown as a hexadecimal.
Below this are the characters, in accordance with the language chosen.
6.6.3.2 The Language function
In MENU 3, choose the third function by pressing the → key several times and confirming with ↵.
Using the ↑ (forwards) or ↓ (backwards) keys, you can choose the language provided in
the automation station for the menus. Apart form German, French and English, other
languages, such as Italian, Dutch etc., are available. The language chosen is accepted
immediately, without you having to press the ↵ key.
You will also notice that the menu in which you choose the language is itself immediately shown in that language.
6.6.3.3 Version
In MENU 3, choose this function by pressing the → key several times and confirming
with ↵.
Information concerning the microprogram's index and the software's version is then
shown.
7010001.003 V2.4.1
159
Hoval DigiNet
7
Glossary
7 Glossary
Abbreviations and terminology
ActiveX
Microsoft technology for software components
which can be used by other programmes
AS
Automation station
Programmable device that can be used for
control and regulation.
BACnet
Building Automation
Control Network
Interface standardised by ASHRAE (American
Society of Heating, Refrigeration and AirConditioning Engineering) for building automation. Specially geared to the management and
automation levels.
Cache
A local copy of data which have been
downloaded from a remote host to reduce access time
CASE
Computer Aided Sauter Software tools for design engineering, develEngineering
opment and documentation.
CASE FBD
Function Block Diagram Function Block Diagram editor to programme
automation stations.
CGI
Common Gateway Inter- A standard technology for data exchange beface
tween the client's web browser and the programme that is running on the web server.
Client
The client (workstation or application) is provided with data, memory and resources from a
server (computer in a network or application).
Cookie
Cookies transfer information from the web
server to the client, e.g. for identification purposes (session management)
CSD
Circuit Switched Data
CSV
Comma Separated Val- A tabular data format which uses delimiters
ues
(commas, tabs, semicolons, etc.) to separate
fields.
DB9
The 9-pin SubD connection is standard for
RS232 connections. (DB25 with 25 pins is also
very widespread).
DCE
Data Communication
Equipment
DDE
Dynamic Data Exchange Protocol for dynamic data exchange between
independent applications.
Debug
DNS
160
Circuit Switched Data is the standard circuit
switched data transmission for GSM at 14.4
kBit/s, traditionally used for voice transmission.
7010001.003 V2.4.1
Something similar to a modem.
Special operating mode for fault-finding.
Domain Name System
In a 'Domain Name System', the IP addresses
of all hosts and servers are stored and made
available to transmit information from one or
more computers.
Hoval DigiNet
Glossary
DTE
Data Terminal Equipment
ecos
EPROM
Something similar to a PC.
Individual room control system in the EY system family.
Erasable Programmable Non-volatile data memory (Chip). The stored
Read Only Memory
data are preserved even if there is a power
failure.
Remote island
Subnet that is not connected to the rest of the
network directly via novaNet, but via a modem
connection (for example).
Firewall
Facility set up via software and hardware to
protect a LAN against attacks from the Internet.
GMT
Greenwich Mean Time
Greenwich Mean Time is the time at 0 degrees
geographic longitude (at Greenwich near London, UK). International time information is normally stated in relation to GMT.
GPRS
General Packet Radio
Service
General Packet Radio Service is a packet
switched data transmission which is much
faster than CSD (also up to 56 kBit/s). Theoretically, the connection is constantly present,
but you only pay for the actual data volume.
GSM
Global System for Mobile Communication
Worldwide standard for mobile telephony.
House address
Unique designation of an object within the
building management system. The house address can be assigned freely. For engineering
purposes, a system for assigning house addresses is usually specified.
HDB
Historical DataBase
The HDB stores the values of a house address
for later evaluation.
HSCSD
High Speed CSD
Bundles several CSD transmission channels
together to allow higher transmission rates
(normally up to 56 kBit/s).
HTML
HyperText Mark-up
Language
Mark-up language for web pages (used to
mark up links).
HTTP
HyperText Transfer Pro- HyperText Transfer Protocol is the protocol
tocol
used to transfer HTML-based web pages over
a TCP/IP connection.
Internet
The largest computer network in the world,
comprising many interlinked networks. The
most important services are:
electronic post (e-mail), hypertext-based content (WWW), file transfer (FTP) and discussion
forums (Usernet / Newsgroups).
Intranet
An internal company network that draws on
Internet technology and is set up on incompany servers. In most cases, connection to
the Internet is via a 'Firewall' (protective wall),
that protects the Intranet against unauthorised
access from the Internet.
7010001.003 V2.4.1
7
161
Hoval DigiNet
7
162
Glossary
ISDN
Integrated Services Digi- Standard for digital telephone communication.
tal Network
ISO
International Organization for Standardization
International non-governmental standardsetting organization
IT
Information technology
Java / JavaScript
Programming language for hypermedia documents. To run Java programmes, a 'Java Virtual Machine' is needed. These are built into
widespread WEB browsers nowadays. In this
way, Java programmes can be run on any
computer, regardless of its hardware and operating system.
LAN
Local Area Network
Network that is set up locally and connected
via Ethernet. 'Local' refers here to a common
location such as a company site or a room.
LED
Light Emitting Diode
Semiconductor which lights up when the device is operating or when a signal is active.
LON
Local Operating Network Field bus system that is based on a network of
decentral nodes with their own intelligence.
Communication is based on the LonTalk protocol. Compatibility of different manufacturers'
products is certified by LONMARK certification.
MFA
MachineFineAddress
Datapoint address within an automation station.
nova240
Manual user panel for on-the-spot operation of
the EY3600 nova automation station.
novaCom
Interface to integrate non-Sauter bus systems
into the EY3600 system at automation level.
novaNet
EY3600 system bus
Serial bus system with free topology, based on
a twisted two-wire line, used to network AS and
PC. The participants (who have equal rights)
exchange the data in cross-traffic according to
the 'Peer to Peer' principle.
novaNet290
novaNet bus controller
Connection from a PC to the EY3600 novaNet
system bus via ISA bus.
novaNet291
novaNet router
Connection from a PC to the EY3600 novaNet
system bus via RS232 interface.
novaPro Open
Management system for complex installations
and system integration. Drivers for the integration of non-Sauter systems and database connections via ODBC, DDE, SQL and OPC allow
vertical as well as horizontal integration of a
wide variety of sub-processes in a building.
Information is made available locally as well as
globally via the WEB technology it contains.
novaPro32
Visualisation and operating software for the
EY3600 system.
Zero modem cable
A special RS232 cable to connect two DTE
units (as opposed to the usual cable to connect
7010001.003 V2.4.1
Hoval DigiNet
Glossary
7
one DTE and one DCE unit)
OPC
OLE for Process Control Standardised software interface for data exchange between automation systems.
OS
Operator Station
PC used as an operating position.
PDA
Personal Digital Assistant
Hand-held devices which usually include an
organizer, some viewer programmes and further programmes.
PDM
Process Data Manager
PC that contains the connection to the automation level system bus.
Peer-to-Peer
Communication model where each participant
can initiate the communication with equal rights
(as opposed to master-slave).
Proxy
A proxy server supplies the data (usually Web
pages) which the client requests for the cache
memory.
RAM
Random Access Memory
Volatile memory used to store programmes
and data during execution (as long as the device is running).
Routel
Connection between a remote AS island and a
PC via modem
Router
A router connects two networks; it forwards the
data between the networks.
RS232
RS232 is a standard format for exchanging
serial data.
RT
Real Time Clock
Server
SIM
The server (computer in a network or application) provides the clients (workstations or applications) with data, memory and resources.
Subscriber Identity Module
Smart phone
SMS
Real Time Clock
Card on which a code is stored to identify a
mobile phone (GSM) subscriber.
Hand-held devices which combine the functions of PDAs and mobile telephones.
Short Message Service
Symbian
A service available on most mobile phones to
transfer short text messages of up to 140
bytes.
Operating system developed by the Symbian
company, used mainly for small hand-held
devices such as smart phones or PDAs.
TCP/IP
Transmission Control
Protocol / Internet
Protocol
UMTS
Universal Mobile Tele- New (third-generation) mobile phone technolcommunications System ogy.
7010001.003 V2.4.1
The Internet Protocol (IP) is used to fragment
and address data, which it transmits from the
sender to the recipient. The Transmission Control Protocol (TCP) ensures that the packets
are sorted in the correct sequence when they
reach the recipient; it safeguards communication by confirming reception of the packets.
163
Hoval DigiNet
7
Glossary
URL
Uniform Resource Locater
A standardized address for most resources on
the Internet
WAN
Wide Area Network
A WAN is a network that can be set up
throughout the world (but at least, it must go
beyond your own four walls).
WEB
from 'World Wide Web'
Service in the Internet featuring a high level of
user-friendliness and multimedia elements.
WEB browser
164
7010001.003 V2.4.1
Examples: Microsoft Internet Explorer, Mozilla
or Netscape Navigator, etc.
Hoval DigiNet
8
Further documentation
8 Further documentation
You will find the currently available EY3600 manuals here, with their respective manual
numbers:
- XXX=001=German
- XXX=002=French
- XXX=003=English
DigiNet DN5
EY3600
DigiCom
novaPro32
Operating Manual
novaPro32
Configuration
novaPro32
Installation
novaWeb
User Manual
novaWeb
Quick Start Guide
novaWeb
Configuration Manual
novaWeb
Programming Manual
EYT250 Configurator
BACnet AS
Operating Manual
Product and system information
DigiWeb
DigiMaster
DigiBac
Miscellaneous
EY3600 System Description
First Steps
CASE FBD Editor
Operating Instructions
Firmware Modules
Automation Stations
Microprogram Description
nova240
Operating Manual
7010001.003 V2.4.1
Manual no.
7 000 894 - XXX
7 000 904 - XXX
7 000 915 - XXX
7 001 049 - XXX
7 001 057 - XXX
7 001 056 - XXX
7 001 050 - XXX
7 001 020 - XXX
7 001 007 - XXX
7 190 000 - XXX
7 000 937 - XXX
7 000 931 - XXX
7 000 866 - XXX
7 000 877 - XXX
7 000 968 - XXX
7 000 848 - XXX
165
Hoval DigiNet
9
Annexe
9 Annexe
9.1 AS coding
166
7010001.003 V2.4.1
Hoval DigiNet
Annexe
7010001.003 V2.4.1
9
167
Hoval DigiNet
9
168
Annexe
7010001.003 V2.4.1
Hoval DigiNet
Annexe
7010001.003 V2.4.1
9
169
Hoval DigiNet
9
170
Annexe
7010001.003 V2.4.1
Hoval DigiNet
Annexe
7010001.003 V2.4.1
9
171
Hoval DigiNet
9
172
Annexe
7010001.003 V2.4.1
Hoval DigiNet
Annexe
7010001.003 V2.4.1
9
173
Hoval DigiNet
9
174
Annexe
7010001.003 V2.4.1
Hoval DigiNet
Annexe
7010001.003 V2.4.1
9
175
Hoval DigiNet
10
Document history
10 Document history
176
Version
Changed by
Changes made
Date
1.0
J. Sigg (Fr. Sauter AG)
First issue
26.08.2005
1.1
J. Sigg (Fr. Sauter AG)
Print screens English
08.12.2005
2.0
J. Sigg (Fr. Sauter AG)
Actualization chap. 2.1.4.1 corresponding to f
the CD version PES5
07.07.2006
2.1
J. Sigg (Fr. Sauter AG)
System component 'DigiLan' purged
07.07.2006
2.2.1
J. Sigg (Fr. Sauter AG)
Integration of the system component "DigiService
25.07.2006
2.3
J. Sigg (Fr. Sauter AG)
Chapter 4 "DigiEasy" completed
25.07.2006
2.4
J. Sigg (Fr. Sauter AG)
Language-specific download DigiMaster
adapted
25.07.2006
2.4.1
J. Sigg (Fr. Sauter AG)
Print-optimized version regarding
Illustration2-2: Connection with novaNet
25.07.2006
7010001.003 V2.4.1
Hoval DigiNet
Detailed table of contents
11
11 Detailed table of contents
1 Introduction.............................................................................................................. 7
1.1
1.2
DigiNet DN5 system components ..................................................................... 7
Typical system topology.................................................................................... 9
2 DigiCom.................................................................................................................. 10
2.1 Installation ...................................................................................................... 10
2.1.1 PC configuration...................................................................................... 10
2.1.2 novaNet router EYZ 291.......................................................................... 10
2.1.3 Connection with novaNet......................................................................... 11
2.1.3.1 RS232 connection with novaNet Router 291 .................................... 11
2.1.3.2 Connecting the novaNet Router 291 to novaNet .............................. 11
2.1.4 Software installation ................................................................................ 12
2.1.4.1 The DigiCom CD-ROM..................................................................... 12
2.1.4.1.1 Installing the licence ................................................................... 14
2.1.4.1.2 Installing FBD novaPro32 ........................................................... 15
2.1.4.1.3 Installing an update for FBD novaPro32 ..................................... 17
2.1.4.1.4 Installing further components...................................................... 17
2.1.4.2 Deinstalling the licence..................................................................... 17
2.2 Starting and shutting down DigiCom ............................................................... 18
2.2.1 Start ........................................................................................................ 18
2.2.2 Close / shut down .................................................................................... 18
2.3 User login and logout...................................................................................... 19
2.3.1 Login ....................................................................................................... 19
2.3.2 Logout ..................................................................................................... 19
2.3.3 Change password ................................................................................... 19
2.4 Commissioning the DigiNet devices with DigiCom .......................................... 21
2.4.1 System overview ..................................................................................... 21
2.4.2 Downloading data from DigiZone / DigiUnit / DigiEco / DigiPlus control
devices .................................................................................................... 22
2.4.3 DigiZone control ...................................................................................... 25
2.4.4 DigiUnit control ........................................................................................ 26
2.4.4.1 Unit configuration ............................................................................. 26
2.4.4.2 Variotronic........................................................................................ 27
2.4.4.3 Configuration parameters................................................................. 27
2.4.4.4 Control parameters .......................................................................... 28
2.4.4.5 Alarms.............................................................................................. 28
2.4.4.5.1 Alarm details in the alarm list ...................................................... 28
2.4.4.5.2 Alarm reset ................................................................................. 28
2.4.4.6 Plant mode....................................................................................... 29
7010001.003 V2.4.1
177
Hoval DigiNet
11
Detailed table of contents
2.4.4.7 Current values ..................................................................................29
2.4.4.7.1 Override equipment .....................................................................29
2.4.4.7.2 Override control signals...............................................................29
2.4.4.7.3 Apply limit values to measured values .........................................30
2.4.4.8 Close parameterisation .....................................................................30
2.4.4.9 Return to 'DigiZone' view ..................................................................31
2.4.5 DigiEco control .........................................................................................32
2.5 General operating functions.............................................................................33
2.5.1 The screen ...............................................................................................33
2.5.1.1 Calling up a novaPro32 picture .........................................................33
2.5.1.2 Functions in novaPro32 pictures .......................................................34
2.5.1.2.1 Acknowledging alarms.................................................................34
2.5.1.2.2 Changing limit values ..................................................................35
2.5.1.2.3 Changing setpoint values ............................................................35
2.5.1.2.4 Commands..................................................................................36
2.5.1.2.5 Control buttons ............................................................................36
2.5.2 Time profile ..............................................................................................37
2.5.2.1 Create a new time profile ..................................................................37
2.5.2.1.1 Select address.............................................................................38
2.5.2.2 Opening an existing time profile template .........................................39
2.5.2.3 Read a time profile from the AS ........................................................40
2.5.2.4 Edit a time profile ..............................................................................40
2.5.2.4.1 Add a new command...................................................................40
2.5.2.4.2 Change a time command.............................................................40
2.5.2.4.3 Time command selection.............................................................41
2.5.2.4.4 Entry in the list.............................................................................44
2.5.2.4.5 Edit commands............................................................................44
2.5.2.5 House addresses with several time profiles ......................................44
2.5.2.6 Send to AS........................................................................................45
2.5.3 Synchronise AS clocks.............................................................................46
2.5.4 Calendar ..................................................................................................47
2.5.4.1 Create a new calendar ......................................................................48
2.5.4.2 Delete a calendar..............................................................................48
2.5.4.3 Rename a calendar...........................................................................48
2.5.4.4 Assign a substitute day .....................................................................49
2.5.4.5 Deleting a substitute day...................................................................49
2.5.4.6 Assign an AS to a calendar...............................................................49
2.5.4.7 ‘Send after change’ parameter: .........................................................50
2.5.5 Alarms......................................................................................................52
2.5.5.1 Show alarm list .................................................................................52
2.5.5.2 Alarm list display ...............................................................................52
2.5.5.3 Call up alarm list automatically:.........................................................53
178
7010001.003 V2.4.1
Hoval DigiNet
Detailed table of contents
11
2.5.5.4 Call up alarm list manually: .............................................................. 53
2.5.5.5 Working with novaPro32 in the background ..................................... 53
2.5.5.6 Operating the alarm list .................................................................... 54
2.5.5.7 Acoustic alarms................................................................................ 55
2.5.6 Trend / Historical database...................................................................... 57
2.5.6.1 Show new HDB/Trend...................................................................... 57
2.5.6.2 Open HDB/Trend ............................................................................. 60
2.5.6.3 Working with HDB/Trend.................................................................. 61
2.5.6.3.1 Edit graphic zone ........................................................................ 61
2.5.6.3.2 Edit table sector .......................................................................... 61
2.5.6.3.3 Edit title and legend sector.......................................................... 62
2.5.7 Setting up users ...................................................................................... 64
2.5.7.1 Create a new user............................................................................ 67
2.6 Options ........................................................................................................... 69
2.6.1 Access to the novaNet network via modem: ............................................ 69
2.6.2 Setting up an alarm (online messaging)................................................... 71
2.6.2.1
Configuration.................................................................................... 71
2.6.2.2 The 'Assign output medium' tab ....................................................... 72
2.6.2.3 The 'Output medium' tab .................................................................. 73
2.6.2.3.1 Online printer .............................................................................. 73
2.6.2.3.2 E-mail and fax recipients............................................................. 78
2.6.2.3.3 File ............................................................................................. 79
2.6.2.4 The 'Output template' tab ................................................................. 79
2.6.2.5 The 'Output time profile' tab.............................................................. 81
2.6.2.5.1 Creating an EP time profile ......................................................... 81
3 DigiMaster .............................................................................................................. 83
3.1 Configuration .................................................................................................. 83
3.1.1 Connecting EYT 250 to the PC................................................................ 83
3.1.1.1 IP address of the PC ........................................................................ 83
3.1.2 Open a language-specific dataset ........................................................... 85
3.1.3 Write to EYT250 ...................................................................................... 85
3.2 Operation........................................................................................................ 87
3.2.1 Main menu .............................................................................................. 87
3.2.2 Login, logout............................................................................................ 88
3.2.2.1 Enter password ................................................................................ 88
3.2.2.2 Change password ............................................................................ 89
3.2.3 Application list ......................................................................................... 89
3.2.3.1 Choosing an application or installation ............................................. 90
3.2.3.2 Send a command or value ............................................................... 90
3.2.3.3 Visualise alarm list ........................................................................... 91
3.2.3.4 Read or write time programmes ....................................................... 91
3.2.3.4.1 Read or write special day............................................................ 93
7010001.003 V2.4.1
179
Hoval DigiNet
11
Detailed table of contents
3.2.4 Calendar function .....................................................................................95
3.2.5 Historical data ..........................................................................................96
3.3 Settings ...........................................................................................................97
3.3.1 Calibration................................................................................................97
3.3.2 Display parameters ..................................................................................98
3.3.3 System info ..............................................................................................99
3.3.4 More settings ...........................................................................................99
3.3.5 Restart .....................................................................................................99
3.3.6 Time.......................................................................................................100
3.3.7 Profiles...................................................................................................100
3.3.7.1 New ................................................................................................101
3.3.8 Filters .....................................................................................................102
4 DigiEasy ................................................................................................................103
4.1
4.2
Installation .....................................................................................................103
Configuration.................................................................................................105
5 Remote operation of DigiWeb..............................................................................106
5.1 Configuration.................................................................................................106
5.1.1 Introduction ............................................................................................106
5.1.2 Connections ...........................................................................................106
5.1.3 Power Supply.........................................................................................107
5.1.4 Connection to novaNet...........................................................................107
5.1.4.1 RS232 connection to novaNet 291..................................................107
5.1.4.1.1 Connecting the novaNet291 to the automation stations.............107
5.1.5 Ethernet .................................................................................................107
5.1.5.1 PC and Ethernet settings ................................................................108
5.1.5.1.1 novaWeb settings......................................................................108
5.1.5.1.2 Corresponding PC settings........................................................108
5.1.6 Proxy settings ........................................................................................110
5.1.6.1 Internet Explorer .............................................................................110
5.1.6.2 Mozilla ............................................................................................113
5.2 Operation ......................................................................................................115
5.2.1 Introduction ............................................................................................115
5.2.2 Requirements.........................................................................................115
5.2.3 Layout and navigation ............................................................................115
5.2.3.1 Header (top)....................................................................................116
5.2.3.2 Navigation (left)...............................................................................116
5.2.3.3 Main field (right) ..............................................................................117
5.2.3.4 Navigation with smart phones .........................................................117
5.2.4 Login/logout ...........................................................................................118
5.2.4.1.1 Version information....................................................................118
5.2.4.2 Your name: .....................................................................................118
180
7010001.003 V2.4.1
Hoval DigiNet
Detailed table of contents
11
5.2.4.3 User level: ...................................................................................... 118
5.2.4.4 Password ....................................................................................... 119
5.2.5 Control loops ......................................................................................... 119
5.2.6 Installations ........................................................................................... 119
5.2.7 Installation view ..................................................................................... 119
5.2.8 Progression ........................................................................................... 122
5.2.9 User interactions ................................................................................... 124
5.2.9.1 Button commands .......................................................................... 124
5.2.9.2 Reset runtime................................................................................. 125
5.2.9.3 Change time schedules.................................................................. 125
5.2.9.4 Command ...................................................................................... 126
5.2.9.5 Change values ............................................................................... 126
5.2.10 Additional links ...................................................................................... 126
5.2.10.1 Functional description .................................................................... 126
5.2.10.2 Schematic ...................................................................................... 126
5.2.11 Service view .......................................................................................... 127
5.2.12 System maintenance view ..................................................................... 127
5.2.13 Alarms ................................................................................................... 128
5.2.13.1 View all active or all generated alarms ........................................... 128
5.2.13.2 Alarm priorities ............................................................................... 128
5.2.13.3 Acknowledging ............................................................................... 129
5.2.13.4 System errors................................................................................. 129
5.2.14 Events ................................................................................................... 129
5.2.15 Service .................................................................................................. 130
5.2.16 Settings ................................................................................................. 131
5.2.17 Data entry.............................................................................................. 131
5.2.18 E-mail messages................................................................................... 131
5.2.18.1 Alarm and event notification via e-mail ........................................... 131
5.2.18.1.1 Header...................................................................................... 131
5.2.18.1.2 Content..................................................................................... 132
5.2.18.2 Data acquisition via e-mail ............................................................. 132
5.2.18.2.1 Header...................................................................................... 132
5.2.18.2.2 Contents and attachment.......................................................... 132
5.2.18.2.3 Saving ...................................................................................... 133
5.2.18.2.4 Processing data acquisition files ............................................... 134
5.2.19 Hints...................................................................................................... 134
5.2.19.1 Updating HTML pages ................................................................... 134
5.2.19.2 Transferring alarms and historical data .......................................... 134
5.2.19.3 Security.......................................................................................... 134
5.2.20 Tips and tricks ....................................................................................... 134
5.2.20.1 Reload / refresh button after user entries ....................................... 134
5.2.20.2 Cache ............................................................................................ 135
7010001.003 V2.4.1
181
Hoval DigiNet
11
Detailed table of contents
5.2.20.3 Memory settings..............................................................................135
5.2.20.4 Cookies...........................................................................................135
5.2.20.4.1 Cookie settings for MS Internet Explorer ...................................135
5.2.20.4.2 Cookie settings for Mozilla:........................................................136
5.2.20.4.3 Cookie settings for the SE P900 ................................................138
5.2.21 JavaScript ..............................................................................................139
5.2.22 Language settings..................................................................................139
5.2.22.1 Language settings for the Internet Explorer.....................................139
5.2.22.2 Language settings for Mozilla..........................................................139
5.2.22.3 Language settings for the SE P900.................................................139
5.2.23 Connection.............................................................................................139
5.2.23.1 Direct TCP/IP connection................................................................139
5.2.23.2 Dial-up (PPP) connection................................................................140
5.2.23.2.1 PC Dial-up connection...............................................................140
5.2.23.2.2 SE P900 Dial-up Connection .....................................................142
5.2.24 Appearance............................................................................................146
5.2.24.1 Links ...............................................................................................146
6 Service-Termial DigiService.................................................................................149
6.1 Operation ......................................................................................................149
6.2 Operating philosophy.....................................................................................149
6.3 Illumination ....................................................................................................149
6.4 Adjustement of the contrast ...........................................................................150
6.5 List of functions .............................................................................................150
6.6 The menu items explained.............................................................................151
6.6.1 MENU 1 .................................................................................................151
6.6.1.1 Password ........................................................................................151
6.6.1.2 Address reset..................................................................................152
6.6.1.3 Portrayal of data points ...................................................................152
6.6.1.4 Switching commands with FB (feedback)........................................152
6.6.2 MENU 2 .................................................................................................153
6.6.2.1 Setpoints/positioning values............................................................153
6.6.2.2 All MFAs .........................................................................................154
6.6.2.3 Time-based switching program .......................................................154
6.6.2.3.1 View program ............................................................................155
6.6.2.3.2 Change program .......................................................................156
6.6.2.4 Set clock .........................................................................................157
6.6.2.5 Annual chart....................................................................................157
6.6.3 MENU 3 .................................................................................................158
6.6.3.1 Gr. no. (group number)/Character set .............................................158
6.6.3.2 The Language function ...................................................................159
6.6.3.3 Version ...........................................................................................159
182
7010001.003 V2.4.1
Hoval DigiNet
Detailed table of contents
11
7 Glossary ............................................................................................................... 160
8 Further documentation........................................................................................ 165
9 Annexe.................................................................................................................. 166
9.1
AS coding ..................................................................................................... 166
10 Document history ................................................................................................ 176
11 Detailed table of contents ................................................................................... 177
7010001.003 V2.4.1
183