1
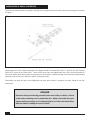
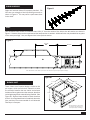
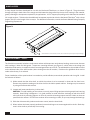
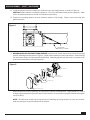
I 712000
HORIZONTAL FLAT BOTTOM DRAG CONVEYORS
MODEL 1012
INSTALLATION
& OPERATING
INSTRUCTION MANUAL
Manufactured in the U.S.A. by
P.O. Box 1086, 2000 E. Leffel Lane • Springfield, Ohio 45501
Toll Free: 1-800-334-7254 (in U.S.A. & Canada) • Phone: 937-325-1511 • Fax: 937-322-1963
www.sweetmfg.com
10/2013
STANDARD CONDITIONS - TERMS OF SALE
Orders are subject to the approval of Sweet Manufacturing Company in writing at Springfield, Ohio, U.S.A., or by shipment
of goods. All orders are considered firm contracts. Shipping dates are only our estimate based upon time required for
production, and we shall not be liable for any claims for delays beyond our control, nor shall we accept cancellations or
suspensions unless agreed upon, at the same time protecting us against loss caused by such cancellation or suspension.
The title and right to possession of the goods covered by order shall remain with Sweet Manufacturing Company until
complete and final payment therefore shall have been paid to Sweet Manufacturing Company in cash, including any
interest or other auxiliary charges provided for. All goods covered by order will be considered as personal property until
completely paid for, regardless of mechanical attachment to real estate.
No material shall be returned without our authorization. Where written consent of Sweet Manufacturing Company is
given for the return of unused goods, the purchaser will pay a minimum handling charge of fifteen percent (15%) of the
original purchase price of the goods returned.
WARRANTY - All items manufactured by Sweet Manufacturing Company are warranted against defects in material or
workmanship for one (1) year from the date of shipment (but not against damage caused by accident, abuse, or faulty
installation). Sweet Manufacturing Company will replace free of charge (F.O.B. point of supply) all such defective parts if
returned to the factory, charges prepaid. All items manufactured by others and resold by Sweet Manufacturing Company
are warranted to the full extent of the warranties furnished by such original manufacturer. No allowances will be made
for repairs, alterations or changes unless specifically authorized by us. There are no other warranties, expressed or
implied, other than title, freedom from liens, and against patent infringement. SELLER MAKES NO WARRANTY OF
MERCHANTABILITY OR FITNESS FOR A PARTICULAR PURPOSE.
LIMITATION OF LIABILITY - Liability of Sweet Manufacturing Company to the purchaser for damages arising out of
the manufacture, sale, delivery, use or resale of the equipment, whether based on warranty, contracts, negligence, or
otherwise, shall be limited to and shall not exceed the cost of the repair or replacement of defective part or parts. Upon
expiration of the warranty, all such liabilities shall terminate. Sweet Manufacturing Company shall not be liable to the
purchaser or user for loss of anticipated profits, loss by reason of plant shutdown, non-operation, increased expenses of
operation of other equipment, or other consequential loss or damage of any nature arising from any cause whatsoever
by reason of the manufacture, sale, delivery, use, or resale of the equipment covered by this order or contract.
A minimum charge of Fifty Dollars ($50.00) net, exclusive of transporation charges, will be made on all orders, unless
otherwise noted on invoice for the value of such material as less than this amount.
All prices are F.O.B. Springfield, Ohio, U.S.A., unless otherwise agreed. Additional charges may be made for special
handling, extra packing, or unusual services. Open account terms will be extended subject to approval of our Credit
Department. Any federal or state taxes, sales, use, or other taxes will be added to invoice when and if assessed. All
prices are subject to change without notice.
Sweet Manufacturing Company
P. O Box 1086
2000 E. Leffel Lane
Springfield, OH 45501
Toll Free: 800-334-7254
(U.S.A. & Canada)
Phone: 937-325-1511
Fax: 937-322-1963
E-mail: [email protected]
HORIZONTAL
TABLE OF CONTENTS
INTRODUCTION ...................................................................................................................................... 1
CHECK & INSPECT YOUR ORDER ......................................................................................................... 1
TYPICAL INSTALLATIONS ....................................................................................................................... 2
SELECTING THE PROPER CONVEYOR ................................................................................................... 3
MODEL DIMENSIONS & CAPACITY......................................................................................................... 4
GENERAL - INSTALLATION & ASSEMBLY OF STANDARD CONVEYORS................................................. 5
OPTIONAL INTERMEDIATE DISCHARGE ................................................................................................ 6
INSTALLATION OF CHAIN......................................................................................................................... 6
CHAIN HANDLING ................................................................................................................................... 8
INLET / BYPASS INLET ........................................................................................................................... 8
DUMP HOPPER ....................................................................................................................................... 9
DRIVE ASSEMBLY - "V-BELT".................................................................................................................. 9
DRIVE ASSEMBLY - "GEARMOTOR" ...................................................................................................... 11
ELECTRICAL EQUIPMENT ..................................................................................................................... 12
TROUGH ASSEMBLY .............................................................................................................................. 12
INLET ASSEMBLIES ............................................................................................................................... 12
MAINTENANCE........................................................................................................................................ 14
SAFETY ................................................................................................................................................... 15
TROUBLESHOOTING .............................................................................................................................. 16
Purchase Date _____________________
Model _____________________
Serial Number___________________________________________________
INTRODUCTION
The purpose of this Owner’s Manual is to advise and instruct owners of the Flite-Veyor® Horizontal Flat Bottom Drag
Conveyors (hereafter referred to as Horizontal Flite-Veyor®) and accessories in the recommended installation, operation,
and maintenance of the equipment.
The instructions and drawings provide a step-by-step method of installation procedures. Even though installation
procedures may vary because of different applications, it is suggested that if there are any questions, you refer to the
instructions in this manual. To ensure long life and trouble-free operation, it is recommended that you perform regular
maintenance as discussed in this manual.
IT IS THE INSTALLER’S RESPONSIBILITY TO BE AWARE OF ALL FEDERAL, STATE AND LOCAL SAFETY AND ELECTRICAL
CODES DURING THE INSTALLATION AND USE OF THE HORIZONTAL FLITE-VEYOR®.
CHECK & INSPECT YOUR ORDER
Each order or shipment is double checked before leaving the factory. All parts, pieces and components are listed
item by item on our packing list, which accompanies each order. The number and description of each item, package,
container, skid, etc. are listed on the bill of lading. IN SIGNING THE BILL OF LADING, THE CARRIER ASSUMES FULL
RESPONSIBILITY FOR SAFE DELIVERY OF ALL GOODS TO DESTINATION IN THE SAME ORDER AS CARRIER WAS
TENDERED BY THE SHIPPER. In the event of damage or shortage, have the transportation company note the same
on the freight bill. You should then file a claim against the carrier for such loss and/or damage.
You will find a packing list attached to one of the items in the shipment. Check each item against the list. Check by
description, specification, quantity, count, etc. Should there be any discrepancies, notify us immediately. If an order
or shipment includes more than one Horizontal Flite-Veyor®, the parts for each conveyor will be keyed or marked on the
packing list for easy identification.
Small parts and items such as bolts, washers, bushings and keys are just as important to an installation as the other
components. Make sure these are located and checked before disposing of any containers or packing. We cannot be
responsible for loss of items that are listed and included on our packing list.
Should there be some delay between the time an order is received and the ensuing installation, store parts in a
protected area so they may be easily located and identified. RETAIN PACKING LISTS FOR THIS REASON, AS WELL AS
FOR FUTURE PARTS REFERENCE.
1
TYPICAL INSTALLATIONS
The typical uses are shown in Figure A.
Conveying materials across the top of bins from a bucket elevator.
By using this method, the overall height requirement for the bucket elevator may be reduced. Separate dropouts can
be used for each of the bins. Material should be allowed to drop out at the end to avoid accumulation causing the
conveyor to plug when using intermediate dropouts (discharges).
Unloading of bins.
Use of multiple openings in the bin floor rather than a single center dropout will reduce the amount of material left in the
bin as it is emptied. CAUTION! Always unload bin from the center dropout first to prevent structural failure of the bin.
With drive-over pit.
Material is unloaded into the hopper mounted directly on the Horizontal Flite-Veyor®. Sweet manufactures dump
hoppers for use in these applications.
Figure A: Typical Installations
BIN LOADING
DUMP HOPPER
DRIVE-OVER PIT
BIN UNLOADING
21
SELECTING THE PROPER CONVEYOR
The following items should be noted to properly select the conveyor: 1) type and volume of material to be conveyed,
usually in bushels per hour; 2) the slope of the conveyor (horizontal to 7-8 degrees standard); and 3) the number and
location of dropouts and type of inlets.
The Horizontal Flite-Veyor® may feed the boot of a bucket elevator by any of three different configurations:
Figure B
The head drive of the Horizontal Flite-Veyor® is butted up against either the up or down trunking
of the elevator. In this case, a discharge transition may be used to match the boot inlet hopper.
Figure C
The boot is placed perpendicular to the Horizontal Flite-Veyor®. The hopper height required will
depend upon the model of the elevator and whether the boot is being fed on the downside or the
upside.
Figure D
Using the Horizontal Flite-Veyor® end discharge transition. The discharge does not require a hopper
on the boot and may reduce the height to the top of the conveyor, reducing the depth of the pit
required for the elevator.
Figure B
3
Figure C
Figure D
MODEL DIMENSIONS & CAPACITY
Use Figure E for capacities and dimensions.
Figure E
TROUGH SECTION
HEAD
LENGTH IN FEET
Note: Dimensions (to the nearest 1/8 inch) are for reference only and may be subject to change.
10
20
30
40
50
60
70
80
90
100
110
120
130
140
150
BUSHELS PER HOUR CAPACITY AND CORRESPONDING HORSEPOWER
1000
1250
1500
1750
2000
2250
2500
2750
3000
3250
3500
3750
4000
(44 FPM) (55 FPM) (66 FPM) (77 FPM) (87 FPM) (98 FPM) (109 FPM) (120 FPM) (131 FPM) (142 FPM) (153 FPM) (164 FPM) (175 FPM)
1.0
1.0
1.0
1.0
1.0
1.0
1.5
1.5
1.5
1.5
1.5
2.0
2.0
1.0
1.0
1.0
1.5
1.5
1.5
2.0
2.0
2.0
2.0
3.0
3.0
3.0
1.0
1.5
1.5
1.5
2.0
2.0
3.0
3.0
3.0
3.0
3.0
5.0
5.0
1.5
1.5
2.0
2.0
3.0
3.0
3.0
3.0
5.0
5.0
5.0
5.0
5.0
1.5
2.0
2.0
3.0
3.0
3.0
5.0
5.0
5.0
5.0
5.0
5.0
5.0
1.5
2.0
3.0
3.0
3.0
5.0
5.0
5.0
5.0
5.0
5.0
7.5
7.5
2.0
3.0
3.0
3.0
5.0
5.0
5.0
5.0
5.0
7.5
7.5
7.5
7.5
2.0
3.0
3.0
5.0
5.0
5.0
5.0
7.5
7.5
7.5
7.5
7.5
7.5
3.0
3.0
5.0
5.0
5.0
5.0
7.5
7.5
7.5
7.5
7.5
10.0
10.0
3.0
3.0
5.0
5.0
5.0
7.5
7.5
7.5
7.5
7.5
10.0
10.0
10.0
3.0
5.0
5.0
5.0
5.0
7.5
7.5
7.5
7.5
10.0
10.0
10.0
10.0
3.0
5.0
5.0
5.0
7.5
7.5
7.5
7.5
10.0
10.0
10.0
10.0
15.0
3.0
5.0
5.0
5.0
7.5
7.5
7.5
10.0
10.0
10.0
10.0
15.0
15.0
5.0
5.0
5.0
7.5
7.5
7.5
10.0
10.0
10.0
10.0
15.0
15.0
15.0
5.0
5.0
5.0
7.5
7.5
7.5
10.0
10.0
10.0
15.0
15.0
15.0
15.0
FPM= FEET PER MINUTE. CHART IS BASED ON 45 POUNDS PER CUBIC FEET.
GAUGES & SPECIFICATIONS
HEAD
10 ga.
TAIL
10 ga.
TROUGH
10 ga.
COVERS
14 ga.
CHAIN
Sides with flange block ball bearings
Sides with flange block ball bearings and take-up
Sides and bottoms
Bolted flat covers
667X, D88K
AR 200 ABRASION RESISTANT LINERS: Available for trough sides and bottoms. Gauge options include 10 ga., 3/16"
and 1/4" and will be quoted upon request.
4
GENERAL
GENERAL
Only proper installation can offer the performance intended by the manufacturer. Therefore, a good installation should
be of prime concern to the customer and to the installer responsible for the same. A MANUFACTURER CANNOT BE
RESPONSIBLE FOR THE INSTALLATION OF A CONVEYOR. The suggestions and information contained herein are
offered solely as a convenience, for we assume no liability as to installation, either expressed or implied.
Unless the location of the equipment has been predetermined by a layout drawing or print, careful consideration should
be given as to the depth of pits, location of inlets, possible obstructions, etc. Plan ahead for the location of supports
and bracing.
8
When the Horizontal Flite-Veyor® is used to feed a bucket elevator or
another conveyor, provision must be made for proper clearances to allow for
drives, discharges, valves, etc. on all equipment. Also, enough clearance
should be provided to allow proper maintenance of equipment after it
has been installed. Proper planning prior to installation can eliminate
flow plan problems.
5
6
7
D
Figure F
C
Supporting the conveyor on a catwalk requires bolting the unit down
to the catwalk every 10 feet, as shown in Figure F. These attachment
brackets are available from Sweet Manufacturing Company.
B
LAST
A
INSTALLATION & ASSEMBLY OF STANDARD CONVEYORS
PROPRIETARY AND CONFIDENTIAL
THE INFORMATION CONTAINED IN THIS
DRAWING IS THE SOLE PROPERTY OF
SWEET MANUFACTURING COMPANY. ANY
REPRODUCTION IN PART OR AS A WHOLE
WITHOUT THE WRITTEN PERMISSION OF
SWEET MANUFACTURING COMPANY IS
PROHIBITED.
Lay out the unit as it is to be used, including the head and tail section. Do not lift trough lengths greater than 40’ with
a maximum of 20’ between lift points. Support should be provided for at least every section, or at a maximum of every
10 feet when installed. (See Figure G for typical bottom splice connections.)
7
7
6
6
5
5
NE
4
XXXXXXX
8
8
D
Apply silicone caulk to flanges prior to assembly of section. Loosely
install the bolts and nuts. Use a taught line to make sure the conveyor
is straight horizontally. Shim, as required, to get correct alignment.
Tighten the connecting hardware, making sure that the bottom of each
section is no higher than the previous section, so that it will not interfere
with the chain flights as they move to convey the material. At the time,
check the tightness of all the hardware in the conveyor to ensure that
all are properly tightened (such as the set screws in the bearings and
sprockets). Conveyor troughs are provided with roller type or angle type
chain returns, as specified at the time of order.
Figure G
C
B
Care should be taken to align the heights of angle returns on adjacent
sections to prevent the chain flights from catching.
UNLESS
DIMENS
TOLERA
FRACTIO
ANGULA
TWO PL
THREE P
A
Holes in the trough are oversized, so adjustment can be made by loosening the nuts on the threaded cross-rods that
hold the angles in place. Be sure to tighten all hardware after alignment is achieved.
PROPRIETARY AND CONFIDENTIAL
INTERPRE
TOLERAN
THE INFORMATION CONTAINED IN THIS
MATERIAL
DRAWING IS THE SOLE PROPERTY OF
SWEET MANUFACTURING COMPANY. ANY
REPRODUCTION IN PART OR AS A WHOLE MATERIAL
WITHOUT THE WRITTEN PERMISSION OF
SWEET MANUFACTURING COMPANY IS
PROHIBITED.
8
5
7
6
5
4
W:\M
INTERMEDIATE
DISCHARGE
OPTIONAL
OPTIONAL
INTERMEDIATE
DISCHARGE
If intermediate discharges are required, the following procedure should be used.
1) Determine the location of the center of the intermediate discharge from the tail or head section. Typical intermediate
discharge gates are shown in Figures H-A and H-B.
2) Locate the discharge flight support plate in the center of the discharge and make a mark at each end of the support
plate onto the trough bottom. The standard bottom can then be removed from the trough and cut so the discharge
flight support can be installed where the piece was removed. If the existing holes in the trough sides cannot be used,
new ones must be drilled to fit the discharge flight support plate and the top flange of the intermediate discharge.
The internal cut edge of the trough bottom should be ground smooth to prevent interference with the chain flighting
as it passes over the opening.
8
7
6
5
4
2
3
1
REVISIONS
3) Bolt the intermediate discharge and the discharge flight support plate to the trough. The rack and pinion side may
extend to either the left or the right side of the conveyor.
ECN#
REV.
DATE
DESCRIPTION
APPROVED
XXXXXXX
ZONE
D
D
Figure H-B
Figure H-A
DISCHARGE FLIGHT SUPPORT PLATE
OPTIONAL SIDE DISCHARGE
RACK & PINION GATE
C
5
6
C
4
B
A
L
E
AV
TLR
VE
IN
INA
AH
CHC
FF
OO
N
ION
CTIO
ET
DEIRC
DIR
XXXXXXX
B
TRA
DRAWN
CHECKED
ENG APPR.
PROPRIETARY AND CONFIDENTIAL
THE INFORMATION CONTAINED IN THIS
DRAWING IS THE SOLE PROPERTY OF
SWEET MANUFACTURING COMPANY. ANY
REPRODUCTION IN PART OR AS A WHOLE
WITHOUT THE WRITTEN PERMISSION OF
SWEET MANUFACTURING COMPANY IS
PROHIBITED.
DATE
NAME
06-17-13
MWS
XXX
XXX
XXX
XXX
MFG APPR.
XXX
XXX
Q.A.
XXX
XXX
UNLESS OTHERWISE SPECIFIED USE
THIRD ANGLE PROJECTION
2
3
SolidWorks
MANUFACTURING CO.
2000 LEFFEL LANE
2010
SPRINGFIELD,OH
TITLE: OPTIONAL SIDE DISCHARGE
RACK & PINION GATE
FOR: 1012 HFV MANUAL
SIZE
B
DWG. NO.
A
ECN#
ZONE
REV.
STANDARD IN-LINE DISCHARGE
RACK & PINION GATE
REV
--
XXXXXXX
Optional brush system available for intermediate discharge. Refer to installation drawing provided when this option
is purchased.
8
7
6
5
4
3
THIRD ANGLE
SHEET 1 OF 1
SCALE: 1:12 WEIGHT: XXX
2
1
W:\Marketing-Tech Pub Images\12 Series HFV\1012 Manual\1012 Optional Side Discharge Gate
INSTALLATION OF CHAIN
The chain is pre-assembled at the factory. When installing the chain, make sure the tail shaft and sprocket are positioned
approximately mid-position to allow for adjustment after the chain is installed. Be careful to install it with the direction
of travel, as shown in Figure I.
Figure I
DIRECTION OF CHAIN TRAVEL
6
INSTALLATION
ASSEMBLYOF
OFCHAIN
CHAIN
(CONTINUED)
(CONTINUED)
The chain should be placed in the bottom and top of the conveyor and then joined with the connecting pin, as shown
in Figure J.
Figure J
Depending on the chain and the application, the flights should be approximately 13-1/2” apart on the 667X chains
and 10-1/2” apart on the D88K chain. There will be some chain and flighting left over, which should be saved for
future use. Adjust shaft and sprocket to snug the chain on sprocket. Install the trough covers and splice plates before
operating. Run for two hours without material. Resnug the chain.
Periodically, the chain will have to be retightened and some links removed. However, the chain should be run with
some slack.
DANGER
Exposed conveyor and moving parts will cause severe injury or death. Lockout
power before removing cover or inspection door. Make sure to add oil to gear
reducer before operating, as it is shipped without oil. Follow the instructions
with the reducer, making sure not to overfill.
7
CHAIN
CHAIN
HANDLING
HANDLING
Figure K
Chain can become twisted if improperly handled. DO
NOT turn over a length of chain by twisting one end, as
shown in Figure K. This may cause a permanent twist
in the chain.
6
7
5
4
2
3
REVISIONS
ECN#
REV.
DESCRIPTION
XXXXXXX
ZONE
INLET
Field installed inlets should be located at least 19 1/2” from the center of the inlet to the tail section, as shown in
Figure L. However, they can be moved toward the head section as needed. Additional inlets may be added at any point
in the conveyor trough. Also, see Bypass Inlet in the Options section.
Figure L
19-1/2”
19 1/2"
MIN.
MIN.
25-1/2”
25 1/2"
6"
5
6
7
4
XXXXXXX
8
Note: Dimensions (to the nearest 1/2 inch) are for reference only and may be subject to change.
D
Figure M
BYPASS INLET
21-1/2”
21 1/2"
LAST SAVED DATE:
These inlets are of special design, similar to the
pit hopper, which permits bulk material to enter
the conveyor between the two chains and relieves
turbulence when grain enters the conveyor, therefore
reducing damage to the material being handled. (See
Figure M.) Bypass inlets should be used whenever
there is an unregulated head of materials above the
inlet, and they are recommended for all Horizontal
6
5
Flite-Veyor® conveyors.
C
17-1/2”
17 1/2"
PROPRIETARY AND CONFIDENTIAL
THE INFORMATION CONTAINED IN THIS
DRAWING IS THE SOLE PROPERTY OF
SWEET MANUFACTURING COMPANY. ANY
REPRODUCTION IN PART OR AS A WHOLE
WITHOUT THE WRITTEN PERMISSION OF
SWEET MANUFACTURING COMPANY IS
B
PROHIBITED.
7
22-1/2”
22
1/2"
18"
18”
19”
19"
Monday, June 17, 2013 1:21:55 PM
UNLESS OTHERWISE SPECIFIED:
DATE
NAME
DRAWN
DIMENSIONS ARE IN INCHES
TOLERANCES:
FRACTIONAL=
1/32" CHECKED
ANGULAR BEND =
1/2
ENG APPR.
TWO PLACE DECIMAL =
.03
THREE PLACE DECIMAL = .015 MFG APPR.
06-17-13
MWS
INTERPRET GEOMETRIC
TOLERANCING PER:
MATERIAL
USED ON
NEXT ASSY
SEE DRAWING
MATERIAL CODE
Q.A.
XXX
XXX
XXX
XXX
XXX
XXX
XXX
XXX
FOR: 1012 HFV MAN
SIZE
THIRD ANGLE
--
B
DWG. NO.
XXXXXXX
SCALE: 1:8
3
2000 LEFFEL
TITLE: INLET INSTALLA
UNLESS OTHERWISE SPECIFIED USE
THIRD ANGLE PROJECTION
APPLICATION
4
MANUFACTURING CO.
WEIGHT: XX
2
W:\Marketing-Tech Pub Images\12 Series HFV\1012 Manual\101
Note: Dimensions (to the nearest
1/2 inch) are for reference only
and may be subject to change.
LAST SAVED DATE:
UN
8
A
DI
TO
FR
AN
TW
TH
INT
TO
PROPRIETARY AND CONFIDENTIAL
THE INFORMATION CONTAINED IN THIS
DRAWING IS THE SOLE PROPERTY OF
SWEET MANUFACTURING COMPANY. ANY
REPRODUCTION IN PART OR AS A WHOLE
WITHOUT THE WRITTEN PERMISSION OF
Wedn
MA
NEXT ASSY
USED ON
MA
DUMP HOPPER
A dump hopper has been developed for use with the Horizontal Flite-Veyor®, as shown in Figure N. The grain enters
5
6
2
8 both sides of the
3
7
through openings in
trough and eliminates
the drag
caused by the4 top chain moving
in the material,
greatly reducing the horsepower required for pit applications. A 120” hopper pit opening unit is fabricated in standard
10’ trough sections. To determine the additional horsepower required to drive the Horizontal Flite-Veyor® with a dump
hopper, add 20’ to the length of the conveyor. For additional information, consult the Sweet Manufacturing Company
D
Engineering
Department.
REVISIONS
ECN#
REV.
DESCRIPTION
XXXXXXX
ZONE
2”
2"
Figure N
44"
44”
120"
120”
C
2"
2”
12-1/2”
12 1/2"
B
10"
10”
17 1/2"
17-1/2”
Note: Dimensions (to the nearest 1/2 inch) are for reference only and may be subject to change.
DRIVE
DRIVE
ASSEMBLY
ASSEMBLY
- “V-BELT”
LAST SAVED DATE:
Wednesday, June 19, 2013 9:52:32 AM
UNLESS OTHERWISE SPECIFIED:
DATE
NAME
DRAWN
DIMENSIONS ARE IN INCHES
TOLERANCES:
FRACTIONAL=
1/32" CHECKED
ANGULAR BEND =
1/2
ENG APPR.
TWO PLACE DECIMAL =
.03
THREE PLACE DECIMAL = .015 MFG APPR.
06-19-13
MWS
The V-beltAdrive assembly includes a shaft-mount reducer with torque-arm and reducer bushing, motor mount, sheaves
TITLE: DUMP H
with bushings, V-belts and belt guard. Torque-arm mounting channel (see Figure O), which bolts to the trough justFOR: 1012 HFV
behind the head section, is supplied on shaft-mounted gear boxes up to 15 HP. The standard drive is provided to mountSIZE DWG. NO.
XX
-on the lefthand side of the head section (when viewing from the tail section). Provisions for righthand
drives can beB
SCALE: 1:18 WEIG
made at the factory,
6
4
8 if so ordered. 7
2
3
5
INTERPRET GEOMETRIC
TOLERANCING PER:
PROPRIETARY AND CONFIDENTIAL
THE INFORMATION CONTAINED IN THIS
DRAWING IS THE SOLE PROPERTY OF
SWEET MANUFACTURING COMPANY. ANY
REPRODUCTION IN PART OR AS A WHOLE
WITHOUT THE WRITTEN PERMISSION OF
SWEET MANUFACTURING COMPANY IS
PROHIBITED.
MATERIAL
USED ON
NEXT ASSY
SEE DRAWING
MATERIAL CODE
Q.A.
XXX
XXX
XXX
XXX
XXX
XXX
XXX
XXX
MANUFACTURING CO.
UNLESS OTHERWISE SPECIFIED USE
THIRD ANGLE PROJECTION
THIRD ANGLE
APPLICATION
W:\Marketing-Tech Pub Images\12 Series HFV\1012 Manual\1012 D
Proper installation of the speed reducer is essential to provide efficient, economical operation and a long life. Install
the reducer as follows:
1) Make certain that the drive shaft, on which the reducer is to be mounted, is clean and free from burrs.
Remove any protective coating on the drive shaft in the hollow speed reducer. Coatings may be removed
by using a non-flammable solvent.
2) Inspect and locate machine key in drive shaft.
CAUTION: For safe handling of the reducer, use only proper lifting equipment having ample load carrying
capacity. Hand lifting is dangerous. It is good practice to avoid excessive overhang on both drive shaft
and input shaft by mounting reducer as close as possible to bearing support and the V-belts as close as
possible to the reducer. DO NOT force reducer when mounting on shaft, as you may damage the bearings.
3) Slide the drive assembly (reducer and motor mount) onto the head shaft.
4) When reducer has been properly positioned, secure bushings or set screws against drive shaft. Stake keyseat in drive shaft to prevent key from moving.
9
8
5
6
7
4
3
ECN#
ZONE
REV
XXXXXXX
DRIVE ASSEMBLY - “V-BELT” (CONTINUED)
5) Install the torque-arm on the torque-arm channel on the first trough section, as shown in Figure O.
D
CAUTION: Speed reducers are shipped without oil. Be sure to lubricate properly before operation. Refer
to the nameplate and service manual for lubrication instructions.
6) Torque-arm mounting channel must be welded to bottom of the trough. Paint or cover weld strip with
galvanized paint.
Figure O
C
B
TORQUE ARM
MOUNTING CHANNEL
7) BEFORE INSTALLING THE V-BELTS AND SHEAVES, install the rear or back side of drive cover and mounting
bracket, following the instructions in Figure P. Install proper sheaves on motor and reducer. Check packing
LAST SAVED DATE:
Monday, June 17, 2013 2:23:57 P
list and sheave carton for markings and identification. Interchanging sheaves will result in improper chain
speed and unsatisfactory conveyor operation.
8
A
5
6
7
4
2
3
UNLESS OTHERWISE SPECIFIED:
1
MOTOR
D
Figure P
DRAWN
DIMENSIONS ARE IN INCHES
TOLERANCES:
FRACTIONAL=
1/32" CHECKED
ANGULAR BEND =
1/2
ENG APPR.
TWO PLACE DECIMAL =
.03
THREE PLACE DECIMAL = .015 MFG APPR.
D
8
C
6
7
Q.A.
INTERPRET GEOMETRIC
TOLERANCING PER:
PROPRIETARY AND CONFIDENTIAL
THE INFORMATION CONTAINED IN THIS
DRAWING IS THE SOLE PROPERTY OF
SWEET MANUFACTURING COMPANY. ANY
REPRODUCTION IN PART OR AS A WHOLE
MOTOR
WITHOUT THE WRITTEN PERMISSION
OF
SWEET MANUFACTURING COMPANY IS
PROHIBITED.
MATERIAL
NEXT ASSY
MOUNT
USED ON
SEE DRAWING
MATERIAL CODE
--
APPLICATION
4
5
C
3
W:\Marketing-Tech Pub Im
SHEAVES
REDUCER
MOUNTING BRACKETS
B
B
BUSHINGS
BACKING PLATE
BELT
A
A
PLASTIC DRIVE COVER
Mount sheaves as close to bearings as possible to minimize overhung loads. Align sheaves by using a
straight edge placed across the outer faces of both sheaves. Be sure keys are properly installed and tighten
set screw firmly.
8
7
6
5
4
3
2
UNLESS OTHERWI
THIRD ANGLE PRO
1
NOTE: The head shaft speed may be improper due to installing the wrong sheaves on motor and reducer.
Refer to packing list for proper placement of sheaves.
10
DRIVE
DRIVE
ASSEMBLY
ASSEMBLY
- “GEARMOTOR”
The gearmotor drive assembly includes a shaft-mount reducer with mounting bracket, vibration pad and antirotation
channel. (See Figure Q.) The standard drive is provided to mount on the lefthand side of the head section (when viewing
from the tail section). Provisions for righthand drives can be made at the factory, if so ordered.
Proper installation of the gearmotor is essential to provide efficient, economical operation and a long life. Install the
reducer as follows:
1) Attach gearmotor (A) to head shaft.
2) Bolt mounting bracket (B) to gearmotor.
3) Bolt vibration pad (D) and antirotation channel (C) to mounting bracket (B) and end of head assembly.
4) Do not overtighten bolts on vibration pad.
Figure Q
B
C
D
11
A
ELECTRICAL EQUIPMENT
Emergency stop switches, shut-off switches, dual set point motion detectors, overload devices and other electrical
controls are all necessary considerations for a safe conveyor installation. (Controls and switches are usually furnished
by conveyor user.)
TROUGH ASSEMBLY
Horizontal Flite-Veyor® troughs are available in up to 10’ sections. The desired length and height of conveyor is achieved
through a combination of sections. The trough is assembled by bolting splices together using 3/8” bolts and nuts.
The bottom is joined using a bottom splice channel. To attach the bottom splice channel, remove the end bolts in the
bottom of two adjacent trough assemblies and match splice channel to holes in the two trough sections.
Care should be taken to align the heights of angle returns on adjacent sections to prevent the chain flights from catching.
Holes in the trough are oversized, so adjustment can be made by loosening the nuts on the threaded cross-rods that
hold the angles in place. Be sure to tighten all hardware after alignment is achieved.
The head and tail assemblies can be attached to the trough in a similar manner. The bottom splice channel for the
head is already bolted to the head assembly.
INLET ASSEMBLIES
DUMP HOPPER
The bypass dump hopper provides a regulated flow of material onto the chain paddles. This reduces material damage,
chain shock and horsepower requirements.
BYPASS INLET HOPPER
The bypass inlet hopper is 18” long, 17-1/2” tall and 12” wider than the basic conveyor trough. It provides a regular
flow of material onto the chain and paddles. Bypass inlet hoppers are field installed, as shown in Figure R.
STANDARD SQUARE FRAME INLET
The standard (square frame) inlet is mounted directly on top of the conveyor trough. This should only be used where
some other means of controlling the flow is above the inlet (e.g., rack and pinion valve).
AR 200 STEEL TROUGH BOTTOM (OPTIONAL)
Optional AR (abrasion resistant) steel bottoms are available in 10 ga., 3/16” or 1/4” thickness for the Horizontal FliteVeyors®. AR steel wears less, as it is much harder than standard steel. This option is installed before units are shipped.
AR 200 SIDE LINERS (OPTIONAL)
Optional AR sides are available and will be quoted on request.
12
A
B
C
D
E
F
8
8
7
7
CUT OUT & REMOVE TOP FLANGE
OF TROUGH ON BOTH SIDES FOR BYPASS INLET
(SEE DIMENSIONS ON SIDE VIEW BELOW)
5
18"
18”
2-1/2”
2 1/2"
4
13
6
5
4
3
ECN#
ZONE
REV.
DESCRIPTION
1
DATE
BOTH
SIDES
3/16"
(WELDING OPTIONAL)
3
PROPRIETARY AND CONFIDENTIAL
THE INFORMATION CONTAINED IN THIS
DRAWING IS THE SOLE PROPERTY OF
SWEET MANUFACTURING COMPANY. ANY
REPRODUCTION IN PART OR AS A WHOLE
WITHOUT THE WRITTEN PERMISSION OF
SWEET MANUFACTURING COMPANY IS
PROHIBITED.
NEXT ASSY
2
APPLICATION
USED ON
----
----
----
----
----
----
THIRD ANGLE
UNLESS OTHERWISE SPECIFIED USE
THIRD ANGLE PROJECTION
Q.A.
MWS
NAME
-------
DATE
06-18-13
2000 E. LEFFEL LANE
2010
D
1
--
XXXXXXX
WEIGHT:
DWG. NO.
SCALE: 1:8
SIZE
FOR: 1012 HFV CONVEYOR
-
SHEET 1 OF 1
REV
SPRINGFIELD,OH
SolidWorks
TITLE: BYPASS INLET INSTALLATION
MANFACTURING CO
W:\Marketing-Tech Pub Images\12 Series HFV\1012 Manual\1012 Bypass Inlet Installation
DO NOT SCALE DRAWING
--
SEE DRAWING
MATERIAL CODE
MATERIAL
INTERPRET GEOMETRIC
TOLERANCING PER:
DIMENSIONS ARE IN INCHES
DRAWN
TOLERANCES:
FRACTIONAL =
1/32" CHECKED
ANGULAR BEND =
1/2
ENG APPR.
TWO PLACE DECIMAL =
.03
THREE PLACE DECIMAL = .015
MFG APPR.
UNLESS OTHERWISE SPECIFIED:
LAST SAVED DATE: Tuesday, June 18, 2013 11:20:23 AM
APPROVED
XXXXXXX
REVISIONS
REMOVE TROUGH BOTTOM BOLTS & NUTS, THEN
RESECURE AFTER INSTALLATION OF BYPASS INLET.
2
AFTER CUTTING & REMOVING SECTIONS FROM BOTH SIDES,
PLACE THE BYPASS INLET. LOCATE & DRILL (4) 17/32" HOLES ON EACH
SIDE OF THE TROUGH FOR 3/8" CARRIAGE BOLTS (SUPPLIED BY OTHERS)
OR WELD ALONG THE EDGES OF THE BYPASS INLET ON BOTH SIDES OF THE TROUGH.
Note: Dimensions (to the nearest 1/8 inch) are for reference only and may be subject to change.
SIDE VIEW SHOWING CUTOUT DIMENSIONS
5 1/8"
5-1/8”
21
3/4"
21-3/4”
COVERS NOT SHOWN FOR CLARITY.
CUT OUT & REMOVE SECTION ON BOTH TROUGH
SIDES & LINERS, IF APPLICABLE, FOR BYPASS INLET
(SEE DIMENSIONS ON SIDE VIEW BELOW)
6
Figure R Horizontal Flite-Veyor® Bypass Inlet Installation
A
B
C
D
E
F
MAINTENANCE
MAINTENANCE
After approximatley ten (10) hours of use, retighten all set screws on the bearings for the head and tail shafts, as well
as the bushings on the sprockets and reducer. Check the chain slack in the conveyor and the V-belt tension in the
drive. This should be repeated after every fifty (50) hours of operation.
CAUTION: CORRECT LUBRICATION
DO NOT START UNIT WITHOUT FIRST FILLING REDUCER WITH OIL!
SPEED REDUCER
The shaft-mounted speed reducer is lubricated by an oil reservoir in the housing. The correct amount of oil is important to
the proper operation of the reducer. Too much oil may cause leakage or overheating. Too little oil may cause overheating
or damage to internal parts. Refer to reducer manufacturer’s specific guidelines for a list of recommended lubricants,
capacities and oil change periods.
WARNING!!
DO NOT USE lubricants of the EP (extreme pressure) type, those containing slippery additives or heavy weight (90-140
wt.) gear lube. It is recommended that oil be drained and housing flushed after the first 150 hours of operation and
that the oil be changed every 2,500 hours thereafter. Check the oil level occasionally when the unit is not operating
and add as required.
CAUTION!!
Keep breather holes clear at all times to prevent pressure buildup in reducer. For dusty, corrosive environments,
reducer manufacturer offers different breathers for more protection. If different breathers are needed, contact Sweet
Manufacturing Company’s Sales Department at 800-334-7254 or [email protected] to reorder.
WARNING!!
NEVER remove breather plug or oil level plug while the drive is in operation, or personal injury may result! Check these
only when drive is not operating.
INSPECTION
An inspection schedule should be established in order to ensure that the equipment is in good operating condition at
all times. Regular inspections will help to reveal little things such as loose bolts, damaged paddles, etc. before they
become serious and damaging problems. Here are some of the things that should be inspected and maintained regularly:
1) Inspect chain and paddles for loose bolts, damaged flights and chain condition.
2) Check chain tension. Remove necessary links if it cannot be adjusted further.
3) Inspect V-belts for tension and condition. V-belts should be replaced with a MATCHED SET OR A BANDED BELT.
4) Check speed reducers regularly for sufficient oil and signs of leakage. KEEP BREATHERS CLEAN.
5) Check bearings for sufficient lubrication and evidence of overheating.
6) Check all sheave and drive attaching parts for sufficient tightness.
7) Check all hardware and tighten as required.
8) Check all safety labels regularly. When they become illegible, contact Sweet Manufacturing Company’s Sales
Department at 800-334-7254 or [email protected] to reorder.
14
SAFETY
SAFETY
WARNING!
Make inspections when all operations are stopped and lockout and tagout procedures are completed. The importance
of exercising EXTREME CARE when erecting and maintaining a Horizontal Flite-Veyor® cannot be overemphasized.
Working at heights reached by even the smallest installations can be hazardous, unless safety precautions are taken.
In any case, BE CAREFUL - DO NOT HURRY - AND REMEMBER WHERE YOU ARE AT ALL TIMES.
Your conveyor has been designed to comply with CEMA safety standards. These safety standards can be obtained
through the American Society of Mechanical Engineers as ASME B20 (1993).
Operating and maintenance personnel should be thoroughly trained in safe operating procedures, recognition of possible
hazards and maintenance of a safe area around the conveyor.
WARNING
Shown at right is an example
of the warning sign attached to conveyor covers.
(Refer to #8 under Inspection on Page 13 for
instructions to reorder safety labels.)
The following safety guidelines should be followed:
AVOID SERIOUS
INJURY OR DEATH.
This machine must be
locked out in
accordance with
current OSHA
requirements before
any maintenance or
service is performed.
THESE ARE GUIDELINES ONLY, AND COMPLIANCE WITH SAFETY STANDARDS - FEDERAL, STATE AND LOCAL,
INCLUDING OSHA - IS THE RESPONSIBILITY OF THE USER.
1)
2)
3)
4)
5)
6)
7)
8)
9)
10)
15
Maintain a safety program for all operating personnel.
All operating personnel should be advised of the location of all emergency controls and devices.
Good lighting, housekeeping and maintenance contribute to a safe work area.
Frequent inspections should be made of all conveyor equipment, and all safety devices should be in position
and in proper working order.
Conduct a pre-startup safety check of all conveyor equipment to determine that the machinery and area
are safe for operation and that guards and warning devices are in place.
There should be absolutely NO reckless actions or horseplay in the vicinity of conveyors. Most accidents
are caused by lack of proper safety training, carelessness, horseplay or lack of awareness of possible
hazards.
Conveyors should not be operated unless the conveyor housing completely encloses the moving elements
and power transmission guards are in place. If the conveyor cover or housing is to be opened, the motor
must be locked out/tagged out electrically in such a way that it cannot be restarted by anyone in the vicinity
or remotely from the conveyor. Overflow cover sections or doors should not be opened while the conveyor
is operating.
If, because of its application, the conveyor must have open housing, then the entire conveyor must be
separated from personnel areas by a fence, and warning signs must be posted.
Open feed hoppers or spouts for shovel, front end loaders or their manual or mechanical loading must
incorporate a grating. If the characteristics of the material being handled are such that a grating cannot
be used, then the exposed portion of the conveyor must be guarded by a fence and warning signs must
be posted.
DO NOT walk or stand on the conveyor cover, grating or power transmission guards.
TROUBLESHOOTING
Problem
Cause
Remedy
Conveyor not running at full capacity
Verify that inlet is not backed up or that
the equipment feeding conveyor is not
plugged.
Incorrect chain speed
Verify that the head shaft speed is
what was ordered. If within one to
two RPM of what was sold, this is not
the problem. If the head shaft RPM is
drastically different, the causes could
be improper sheaves, V-belts slipping,
improper gear reduction on reducer
or an electrical problem. Correct
situations as required.
Improper inlet installation
Verify that the standard inlet is installed
as shown in this manual. Too much
material being carried to the tail affects
the overall HP requirements and
efficiency of the conveyor. If using a
standard bypass or dump hopper, verify
that the material is feeding into the
conveyor areas.
Bent or missing flights
Replace and/or straighten as needed.
Conveyor plugged with product
Verify that the discharge is not clogged
or backing up. Conveyor may be running
too fast to discharge, allowing material
to return on the return side. Slow
conveyor down as required to prevent
plugging. Also, you may need to regulate
feed into conveyor.
Flights banging on bottoms
Improper alignment of conveyor
sections.
Flights hitting trough covers
Chain too tight. Chain should not be
rubbing covers over entire length of
conveyor. Ideally, the chain should ride
just below the covers on the trough.
Conveyor making squeeling noise
Some noise is acceptable. The sound of
the flights and bottoms makes this type
of noise. However, if the noise doesn’t
quiet down when running the conveyor
with product, there may be other issues.
Readjust tension on chain and run
again.
Damaged flights
Replace damaged flights as required.
Loose flights
Tighten as required.
Chain and/or sprockets worn
Replace as required.
Incorrect capacity
Noisy conveyor
16
TROUBLESHOOTING (CONTINUED)
Cause
Problem
Excessive UHMW flight wear
Sprockets showing uneven wear
Remedy
Conveyor sections misaligned
Align conveyor sections as required to
realign sections.
Sprockets not aligned and/or centered
Center sprockets and realign as
necessary. Check set screws on
bushings to make sure the sprockets do
not move from alignment.
Worn chain
Replace chain as required.
Improper sprocket alignment
Center sprockets and realign as
necessary. Check set screws on
bushings to make sure the sprockets do
not move from alignment.
CAUTION: As chain and/or sprockets wear and need replacement, the chain manufacturer recommends
replacing both for longer life of the replacement parts.
17
Our Mission
To provide innovative quality solutions that create
an extraordinary customer experience.