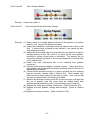
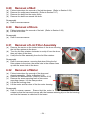
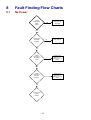
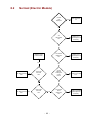
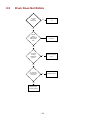
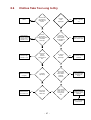
1
DRYER Models DEGX1 & DGGX1 517760 MANUAL 517760 - DATE OF ISSUE JULY 2004 The specifications and servicing procedures outlined in this manual are subject to change without notice. The latest version is indicated by the reprint date and replaces any earlier editions. Fisher & Paykel Appliances Ltd Technical Publications PO Box 58-732, Greenmount, Auckland 78 Springs Road, East Tamaki New Zealand Telephone: 09 273 0600 Facsimile: 09 273 0656 Fisher & Paykel Appliances Inc 27 Hubble, Irvine California, CA92618 USA Telephone: 949 790 8900 Facsimile: 949 790 8911 COPYRIGHT FISHER & PAYKEL APPLIANCES LTD 2004 - 3 - CONTENTS 1 Servicing Requirements .................................................................................................................. 7 1.1 Health & Safety....................................................................................................................................7 1.1.1 Electrical Safety ...........................................................................................................................7 1.1.2 Electrostatic Discharge................................................................................................................7 1.1.3 Good Working Practices..............................................................................................................7 1.1.4 Safety Test...................................................................................................................................7 1.1.5 Sheet Metal Edges ......................................................................................................................7 1.1.6 Gas Leakage Test .......................................................................................................................7 1.2 Specialized Tools ................................................................................................................................7 1.2.1 Fisher & Paykel Smart Tool.........................................................................................................7 2 Model Information .......................................................................................................................... 8 2.1 2.2 Model Number.....................................................................................................................................8 Serial Number .....................................................................................................................................8 3 Technical Overview ........................................................................................................................ 9 3.1 3.2 3.3 3.4 3.5 Finish ...................................................................................................................................................9 Electrical Supply..................................................................................................................................9 Dimensions..........................................................................................................................................9 Maximum Capacity (Full Load) ...........................................................................................................9 Principles of Operation ......................................................................................................................10 3.5.1 Electronic Control ......................................................................................................................10 3.5.2 Loading ......................................................................................................................................10 3.5.3 Lid Lock Control.........................................................................................................................10 3.5.4 Lint Filter ....................................................................................................................................11 3.5.5 Airflow ........................................................................................................................................12 3.5.6 Temperature Control .................................................................................................................13 3.5.7 Cool Down .................................................................................................................................13 3.5.8 Drum Parts.................................................................................................................................13 3.5.9 Drum Control. ............................................................................................................................15 3.5.10 Drum Door Control ....................................................................................................................15 3.5.11 Heater Control. ..........................................................................................................................18 3.5.12 Auto Sensing .............................................................................................................................19 3.5.13 Regulator Valve .........................................................................................................................20 3.5.14 Gas Flame Detector ..................................................................................................................21 3.6 Gas Igniter .........................................................................................................................................22 3.7 Gas Regulator Valve .........................................................................................................................22 3.8 Gas Flame Detector ..........................................................................................................................22 3.9 Thermostat Cutout – Automatic Reset (Gas)....................................................................................22 3.10 Thermostat Cutout – Manual Reset (Gas) ........................................................................................23 3.11 Element Assembly 240V 3.6 KW ......................................................................................................23 3.12 Element Assembly 240V 1.4KW .......................................................................................................23 3.13 Thermostat Cutout – Automatic Reset (Electrical)............................................................................23 3.14 Thermostat Cutout – Manual Reset (Electrical) ................................................................................24 3.15 Motor – 3 Phase 240W......................................................................................................................24 3.16 Exhaust Temperature Sensor Loom .................................................................................................24 3.17 Lid Lock .............................................................................................................................................24 3.18 Motor Control Module........................................................................................................................25 3.19 Sensor Module ..................................................................................................................................25 3.20 Display Module..................................................................................................................................25 - 4 - 4 Diagnostics ....................................................................................................................................26 4.1 4.2 4.3 Overview ...........................................................................................................................................26 Fault Code Summary ........................................................................................................................27 Diagnostic Mode ...............................................................................................................................34 4.3.1 Entering the Diagnostic Mode ...................................................................................................34 4.3.2 Entering the Data Download Mode ...........................................................................................34 4.3.3 Entering the Showroom Mode...................................................................................................34 5 Fault Diagnostics ...........................................................................................................................35 5.1 Problem - No Power..........................................................................................................................35 5.1.1 Check the Continuity of the Power Cord (Electric)....................................................................35 5.1.2 Check the Continuity of the Main Harness (Electric) ................................................................35 5.1.3 Check the Continuity of the Power Cord (Gas).........................................................................36 5.1.4 Check the Continuity of the Main Harness (Gas)......................................................................36 5.2 Problem - No Heat ............................................................................................................................36 5.2.1 Check All Thermostats (Gas and Electric) ................................................................................36 5.2.2 Check the Elements (Electric Only) ..........................................................................................36 5.2.3 Check Voltage Across Elements (Electric Only) .......................................................................37 5.2.4 Measure the Current Draw for Each Element (Electric Only) ...................................................37 5.2.5 Check the Gas Valve/Regulator (Gas Only) .............................................................................37 5.2.6 Check the Flame Detector (Gas Only) ......................................................................................38 5.2.7 Check the Igniter (Gas Only).....................................................................................................38 5.2.8 Check the Exhaust Sensor (Gas and Electric)..........................................................................38 5.2.9 Check Inlet and Outlet Duct Seals ............................................................................................38 5.3 Problem – Drum Does Not Rotate ....................................................................................................38 5.3.1 Check for Fault Code. ...............................................................................................................38 5.3.2 Check the Integrity of the Belt. ..................................................................................................38 5.3.3 Check the Motor Windings. .......................................................................................................39 5.4 Problem - Under Drying/Damp..........................................................................................................39 5.4.1 Possible User Faults .................................................................................................................39 5.4.2 Possible Installation Faults........................................................................................................39 5.4.3 Possible Maintenance Problems...............................................................................................39 5.4.4 Check the Inlet and Outlet Duct Seals ......................................................................................39 5.4.5 Check the Heating Circuits........................................................................................................39 5.4.6 Check the Moisture Sensing Circuit ..........................................................................................39 5.5 Problem - Over Drying ......................................................................................................................40 5.5.1 Check the Moisture Sensing Circuit ..........................................................................................40 6 Service Procedures ........................................................................................................................41 6.1 6.2 6.3 6.4 Removal of Lid ..................................................................................................................................41 Components in Console Area ...........................................................................................................41 Removal of Display Module ..............................................................................................................41 Removal of Top Deck .......................................................................................................................42 6.4.1 If the top deck is to be removed for replacement:.....................................................................42 6.4.2 If the top deck is to be removed to gain access to other components:.....................................42 6.5 Removal of Lid Lock..........................................................................................................................43 6.6 Components Within Cabinet .............................................................................................................43 6.7 Removal of Front Cabinet Brackets ..................................................................................................43 6.8 Removal of Door Grabber Assembly ................................................................................................44 6.9 Removal of Door Grabber Actuator ..................................................................................................44 9.10 Removal of Door Grabber.................................................................................................................45 6.11 Removal of Door Bracket..................................................................................................................46 6.12 Removal of Drum Door .....................................................................................................................46 6.13 Removal of Drum Door Buffers.........................................................................................................47 6.14 Removal of Drum Door Key Bracket.................................................................................................47 - 5 - 6.15 6.16 6.17 6.18 6.19 6.20 6.21 6.22 6.23 6.24 6.25 6.26 6.27 6.28 6.29 6.30 6.31 6.32 6.33 6.34 6.35 6.36 6.37 6.38 6.39 6.40 6.41 6.42 6.43 Removal of Drum Door Scraper........................................................................................................47 Removal of Drum and Chassis Assembly.........................................................................................48 Removal of Outlet Panel Assembly...................................................................................................48 Removal of Outlet Duct Assembly ....................................................................................................49 Removal of Outlet Duct Bearings......................................................................................................49 Removal of Outlet Duct Seal .............................................................................................................49 Removal of Exhaust Sensor..............................................................................................................50 Removal of Lint Collector Housing....................................................................................................50 Removal of Conductivity Contacts ....................................................................................................50 Removal of Belt Tensioner ................................................................................................................51 Removal of Inlet Panel Assembly .....................................................................................................52 Removal of Inlet Duct Seal................................................................................................................52 Removal of Inlet Bearing Shaft..........................................................................................................53 Removal of Drum Inlet Bearing .........................................................................................................53 Removal of Belt .................................................................................................................................54 Removal of Drum ..............................................................................................................................54 Removal of Lint Filter Assembly........................................................................................................54 Removal of Motor ..............................................................................................................................54 Removal of Fan .................................................................................................................................55 Removal of Fan Motor Housing ........................................................................................................55 Removal of Motor Control Module ....................................................................................................56 Removal of Sensor Module ...............................................................................................................56 Removal of Gas Igniter (Gas Models)...............................................................................................56 Removal of Flame Detector (Gas Models)........................................................................................56 Removal of Thermostats ...................................................................................................................57 Removal of Gas Regulator Valve, Pipe and Burner Tube (Gas Models) .........................................57 Removal of Elements (Electric Models) ............................................................................................57 Removal of Front Foot Bracket Assembly.........................................................................................58 Removal of Rear Foot Bracket Assembly .........................................................................................58 7 Wiring Diagrams........................................................................................................................... 60 7.1 7.2 U.S.A. Model (Electric) ......................................................................................................................60 U.S.A. Model (Gas) ...........................................................................................................................61 8 Fault Finding Flow Charts ............................................................................................................ 62 8.1 8.2 8.3 8.4 8.5 8.6 8.7 No Power...........................................................................................................................................62 No Heat (Electric Models) .................................................................................................................63 No Heat (Gas Models).......................................................................................................................64 Drum Door Not Opening/Closing ......................................................................................................65 Drum Does Not Rotate ......................................................................................................................66 Clothes Take Too Long to Dry ..........................................................................................................67 Noisy..................................................................................................................................................68 - 6 - 1 Servicing Requirements 1.1 Health & Safety Note: When servicing the SmartLoad™ electronic dryer, health and safety issues must be considered at all times. Specific safety issues are listed below to remind service people of the health and safety issues. 1.1.1 Electrical Safety WARNING! TO AVOID ELECTRIC SHOCK! Do not attempt to service this dryer without suitable training and qualifications. Ensure the mains power has been disconnected before servicing any part of the dryer. If the power is required to be on for electrical fault finding, or observing gas flame or checking operation, then extreme care should be taken not to make contact with electrical components other than with testing probes. Ensure the dryer is turned off when removing any electrical component or connection. 1.1.2 Electrostatic Discharge Electronic components are prone to damage from electrostatic discharges. The electronic modules in this product contain no user serviceable components and breaking seals to access internal components of an electronic module may void the product warranty. Avoid contact with PCB edge connectors when handling electronic modules. 1.1.3 Good Working Practices Ensure the work areas are kept tidy and free of hazards while servicing the dryer. On completion of the servicing, ensure the dryer and work areas are left clean and tidy. 1.1.4 Safety Test On completion of any service carried out to the dryer, all safety tests as required by law must be carried out. 1.1.5 Sheet Metal Edges When working around cut sheet metal edges use appropriate gloves or protection to eliminate the chance of receiving a laceration. 1.1.6 Gas Leakage Test On completion of any service carried out on a gas dryer, all safety tests as required by law must be carried out. 1.2 Specialized Tools 1.2.1 Fisher & Paykel Smart Tool Fisher & Paykel have developed diagnostics software for use in a laptop computer or a handheld palm computer. With this software, diagnostic data may be downloaded from the appliance to assist in servicing. Authorised service centres may download this software from the Fisher & Paykel web site. - 7 - 2 Model Information The product serial plate is located on the upper rear of the cabinet and contains the following information: 2.1 Model Number The model number contains the following information: D E G X 1 Series Size Feature Level Heating Type (E = Electric, G = Gas) Product Type (Dryer) 2.2 Serial Number The serial number consists of three letters and six digits and contains the following information: Example: B E N 123456 Sequential Serial Number Manufacturing Plant Code FISHERPAYKUL Code indicates month of manufacture CUMBERLAND Code indicates year of manufacture Cumberland Code Letter C U M Year 1 2 3 B 4 E 5 R 6 L 7 A 8 N 9 D 0 Fisherpaykul Code Letter F I S Month 1 2 3 H 4 E 5 R 6 P 7 A 8 Y 9 K 10 U 11 L 12 Manufacturing Plant Code A Laundry – Australia F Refrigeration – New Zealand M Range & Dishwasher N Laundry – New Zealand Q Refrigeration - Australia In the example above, the appliance was manufactured in the fifth month of the fourth year (2004) at the New Zealand Laundry plant. - 8 - 3 Technical Overview 3.1 Finish Cabinet: Touch-Up Paint: Lid: Console: Drum: Top Deck: 3.2 Electrical Supply USA Electric USA Gas 3.3 Pre-paint (Polyester) White #503086 ABS Co-injected, one piece ABS with Polycarbonate insert for control panel Stainless steel grade 430T Polypropylene Operating Voltage Maximum Current 220/240V AC 60Hz 24 amps 110/120V AC 60Hz 6 amps Dimensions Height to lid Open Closed Height to console Width Depth 55½ in - 56¾ in 37½ in - 38½ in 40¼ in - 41½ in 27 in 27½ in 1410mm – 1440 mm 950 mm – 980 mm 1020 mm – 1050 mm 685 mm 700 mm Note: Exact height of the SmartLoad™ dryer is dependent on how far the feet are inserted into the base of the dryer. Weight Packed Unpacked 3.4 152 lbs (69kg) 134 lbs (61kg) Maximum Capacity (Full Load) Drum Volume 6.5 cubic feet (.184 cubic metres) - 9 - 3.5 Principles of Operation 1.1.1 Electronic Control The 120V or 220/240V power supply is connected to the motor control module which rectifies to DC for use by its own controller and peripherals, and also for the sensor module. The motor control module has an optically isolated serial communications port to the sensor module from which it receives commands for operating the drum motor and the heater(s). The motor control module does the actual control of those devices. The sensor module is responsible for the overall control of the dryer, including the input and output of all other peripherals. The sensor module controls the lid lock and the drum door actuator, senses the drum position and speed, measures. the exhaust duct temperature through the exhaust sensor and measures the dampness of the clothes load via the sensor bars. Sensor Module Display Module Motor Control Module The algorithm for when the heaters are turned on and off, and also for the speed and direction of the motor, is implemented within the sensor module, but the switching of the elements or gas heater, and control of the motor, is done by the motor control module in response to the commands from the sensor module. When the mains power is first applied to or restored to the sensor module, the dryer will endeavour to continue operating from when the power was lost. If mains power was lost during a drying cycle, it will continue to dry to the same set dryness level, otherwise the machine will return to have the drum door open and the lid unlocked. The display module is a “Dumb” module and user interface that passes user settings to the sensor module and displays information in the form of LED displays transmitted from the sensor module. 3.5.2 Loading The dryer always stops with the drum door open. The user places the drying load into the drum, closes the lid, pushes the Power button, selects the required cycle and presses the Start/Pause button. The lid will lock, the drum will rotate and the door grabber will slide the drum door closed. The door grabber will then move clear of the drum. 3.5.3 Lid Lock Control ™ SmartLoad has a lock installed in the lid to provide added safety while the dryer is operating. It ensures that the lid cannot be opened while the drum is rotating. The lid lock is a mechanism driven by a DC solenoid and prevents the lid being opened when the drum is rotating. If the lid lock mechanism is not engaged for any reason, including open circuit or short circuit, a “Locked” is not assumed. If unable to lock after the user has requested a start, a User Warning will be given. - 10 - The LID LOCKED LED (above the Start/Pause button) comes on when the lid is locked to tell the user when they cannot open the lid. • When the LID LOCKED LED is illuminated, the lid is locked and the lid cannot be opened. • When the LID LOCKED LED is not illuminated, the lid is not locked and the lid can be opened. • If the LID LOCKED LED is flashing, the lidlock is in the process of locking or unlocking, (i.e. while the dryer coasts down or Start/Pause has been pressed). During this stage the lid cannot be opened. The lid must be closed before the drying cycle can start. If Start/Pause is pressed with the lid open, the dryer will beep, signalling the lid needs to be closed. Once the lid has been closed and Start/Pause is pressed, the lidlock will be activated and the cycle begins. If the power fails, either from a power cut or having been switched off at the wall, the lid may be opened. In some circumstances the drum door may not be in the open position. When the power is restored the dryer will automatically recommence the drying cycle as long as the lid is shut. If it is absolutely necessary to remove the load before the power is restored, follow the steps below: 1. Ensure the dryer is disconnected from the power supply. 2. Open the lid (this will already be unlocked). 3. On the left hand side of the dryer there is a thumb tab that appears when the drum is not open. Press the thumb tab and rotate the drum by hand towards the back of the machine. 4. Hold the thumb tab down until the drum door starts opening. 5. Keep rotating the drum until the door is fully open and the drum comes to a stop. 6. The clothes can now be removed. 7. Close the lid once the clothes have been removed. 8. Re-connect the power supply to the dryer. The drum door will automatically close and the dryer will resume normal operation when power is restored. 3.5.4 Lint Filter Lint laden air passes through the small holes in the outlet end of the drum (the small holes around the lint bucket). The lint removal system is directly behind these holes. As this air moves through the holes it is forced through the lint filter. The fan then sucks the air down through the duct and out the back of the dryer. Lint Filter Lint Filter - 11 - The lint filter in the SmartLoad™ dryer is circular and is positioned next to the drum. When the drum rotates the lint filter rotates with it. The filter is made of very fine 200-micron mesh. All clothes dryers produce potentially flammable lint. Use of a fine mesh enables a lint filter to catch more lint from the air before it reaches the exhaust ducting. That reduces the possibility of any blockages or hazards caused by the accumulation of lint. There is a scraper situated on the top of the lint collecting housing which the filter moves past. Where the lint on the filter builds up, the lint begins to touch the scraper, and is automatically scraped off. Because the scraper is directly above the lint bucket it falls straight in. The scraper helps achieve consistent airflow throughout the drying cycle by continuously removing any accumulated lint from the mesh of the filter. Scraper The dryer user manual and lid label instruct the user to empty the lint bucket before the lint reaches the top of the transparent part of the bucket. If the lint bucket overflows due to the user not emptying it, the SmartLoad™ dryer can clear itself. The user just needs to empty the bucket and run the dryer on a cycle for approximately 20 minutes. The dryer will free all the trapped lint and will re-deposit it back into the lint bucket. Lint Lint 3.5.5 Airflow An intake grill at the bottom rear of the cabinet provides an entry point for the airflow through the dryer via four large louvred slots. Additional air is drawn in at the front of the cabinet under the front panel. A fan on the exhaust side of the drum draws the air over the heating elements/gas burner located in a combustion chamber, through an inlet duct and into the drum. The air exits the drum through a self-cleaning lint filter in the drum outlet duct, then passes through the fan housing and out the rear exhaust vent situated at the bottom rear of the cabinet. Air Intake Grill Rear Exhaust Vent Lower Rear Cabinet Panel - 12 - Belt Lint Removal System Hot Air Drum Belt Tensioner System Fan Outlet Motor Cold Air Heater 3.5.6 Temperature Control The user can select either a dryness level that they require or a timed drying period. Auto sensing of the clothes load dryness level is achieved by touch sensors that sense the moisture content of the load. An exhaust temperature sensor is used to monitor the exhaust temperature. The controller limits the temperature to what is required for the various cycles. An auto reset thermostat located on the burner housing also limits the heat into the dryer, but if it fails to operate, them a manually resetable thermostat also situated on the burner housing will trip at 318oF (150oC), turning off the heat to protect the clothes. 3.5.7 Cool Down The dryer enters a cool down period at the end of the cycle. During this period the dryer continues to run with the heating elements/burner turned off, blowing cool air through the load to help prevent creasing. If an Auto Sensing cycle has been selected, the cool down period will continue until the exhaust temperature drops to 95oF (35oC). If a Timed Dry cycle has been selected, the cool down period will run for the last 5 to10 minutes of the timed dry period. 3.5.8 Drum Parts. 1. Drum Inlet End: Allows inlet air to pass through. This is how air enters the drum. It also houses the inlet central bearing assembly, about which the drum rotates. 2. Drum End Outlet: Provides the route for air to exit the drum as well as securing the lint filter. The outer face has dimples which are collectively referred to as “the drum tachometer”. The central flange of the drum end outlet is supported and guided by seven bearing pads which are mounted in the outlet duct. 3. Vanes: Encourage clothes to tumble during the drying cycle. - 13 - 4. Drum Door: Slides back along grooves in the bridge to provide access into the drum. 4 2 1 3 5. Door Bracket: Secures and seals the drum in the closed position and houses components for latching the door. 6. Hinge Arm: Part of the door assembly, which is contacted by the door grabber for opening and closing the door. It also latches the door closed over the end of the track. 7. Locking Bar: Attached to its ends are the hinge arms. Its function is to hold these hinges in the correct orientation. 8. Hinge Spring: Springs the hinge arm down to ensure latching when the door is closed. 5 8 7 6 There is also a Drum Door Scraper that prevents clothes from being drawn into the gap between the drum and the door when the door is opening, and a Key Bracket that prevents the door from closing when the clothes are protruding. - 14 - 3.5.9 Drum Control. The drum is coupled to a three phase induction motor by way of a pulley on the motor shaft, which drives via a “V” belt and belt tensioner system. The motor control module controls the motor by generating the three phases from a high voltage rectified DC rail. When tumble drying, the drum is tumbled at 47 RPM, during opening and closing at 5 RPM, and at other speeds as required and requested from the sensor module. Feedback on speed is via the drum tachometer signal, which comes via the sensor module. When drying, the drum rotates in the door closing direction for 4 minutes, after which it coasts to stop Tensioner and reverses for 40 seconds, then coasts to stop BeltSystem before repeating the reversing throughout the drying and cooling cycle. The reversing of the drum direction reduces tangling. Belt Three Phase Motor During Wrinkle Guard the drum rotates in one direction for 30 seconds, then stops for 5 minutes without opening the drum door, after which it goes in the opposite direction for 30 seconds, then pauses again before turning off. If the user does not remove the clothes load, the cycle is repeated 255 times, which take approximately 23 hours. The drum tachometer uses pressed “dimples”, formed directly into the drum end outlet, spaced every 2 degrees to provide positioning information while also providing speed data. There is a 15 degree “gap” to provide the reference for absolute position. An infrared diode and optical receiving transistor provide the reading of the “dimples.” The digital signal is output to the motor control module, which uses the signal for speed controlling the drum. The drum position is monitored by the sensor module, which uses the position for both speed commands and drum door actuator control. 3.5.10 Drum Door Control The drum door is opened and closed by the door grabber, which is positioned by an actuator driven by a small DC brush motor. A mechanical interlock prohibits the drum door from latching closed if garments get caught in the door opening. With the door unable to close, the drum will stall, which will be sensed by the motor control module and corrective action will occur. Reference Point Dimples After Start/Pause is pressed when the dryer is waiting with the drum door open: 1. The lid will lock. 2. The sensor module assumes the drum door is open at “Home” and rotates the drum at 5 RPM in the drum door close direction. If it is “Home” and the grabber lowered, the door will close at 78 degrees away from “Home”. Note: If the door is closed and the grabber lowered, the drum will simply rotate with a slight rubbing noise of the grabber on the drum. - 15 - 3. If the motor stalls after the drum has moved at least 42 degrees, a “Clothes Jammed” fault will be internally flagged and the drum will reverse and the door will open before trying to close again. After three unsuccessful attempts, the drum door will open, the lid will be unlocked and the relevant User Warning will occur. 4. At the “Retract Grabber Position”, 142 degrees from “Home”, the sensor module begins moving away the grabber. • If a fault is detected during the actuator movement, the operation of the actuator will be checked. The drum will stop and an attempt will be made at moving the actuator back to lower the door grabber. • If a fault is again detected, a maximum of five attempts are made at moving the grabber, alternating the direction with each attempt, until finally the dryer will display the relevant fault code and remain in the stationary position with the lid unlocked. If however the actuator is operated correctly, the grabber is left in the retracted position. 5. When the grabber is confirmed to have retracted, the drum motor is sped up to 47 RPM and the sensor module will begin or continue the normal drying operation. When Pause is pressed or the drying is completed: 1. If the drum is rotating in the Close direction, then it will be reversed and the drum speed will be set at 20 RPM, at which speed the position of the drum is verified using the tacho “Gap” as its reference. If however the drum was moving in the open direction, its position may have already being verified at the higher speed, but if not, will be set to slow down to 20 RPM until the position is verified. If within 40 seconds the sensor module is unable to verify its position, either because no “Gap” of sufficient arc has been detected or a correct count for a complete revolution of the drum cannot be obtained, then a fault code will be displayed. 2. Once the position is known, the drum speed begins to slow to 5 RPM. Provided the drum speed has reduced to at least 18 RPM when the drum position is 132 degrees from the extended door grabber position (210 degrees from “Home”), the lowering of the grabber begins. Door Grabber is lowered against the Wrapper 3. As the bridges approach the lowered door grabber, wings on each side of the grabber enter the bridge channels. If the wings do not enter the channels, the grabber will be unable to open the drum door (refer to the diagram below). As the drum continues to rotate, the engagement ribs attached to the door grabber unlatch the drum door hinge arms, lifting them out of the channel slots. The hinge arms are raised by details on the door grabber to the top face of the bridge channels. The drum continues to rotate in the opening direction, while the drum door is held stationary by the door grabber. - 16 - Bridge Channels Hinge Arm and Locking Bar are unlatched by the Door Grabber Engagement Ribs contacting Hinge Arm As the drum reaches the fully opened position, details on the drum bridges hit the door grabber, causing the motor to stall and the drum to stop. The drum is now in a fully opened position, where the user can load or unload garments from the dryer. Drum is stopped by the Door Grabber Door Partially Opened The dryer electronics can determine whether the drum has reached the correct position by way of the optical sensor attached to the Sensor board, which uses the dimples on the drum end outlet to determine the drum position. 4. Provided there is no failure in extending the grabber, the drum door will be opened. However, if a failure is detected in the actuator’s movement, the drum will immediately stop. The dryer will then attempt to retract the grabber. If the grabber is successfully retracted, the sequence will repeat from step 1 of this opening sequence. However, if the actuator fails to successfully move the grabber after repeated attempts, the sensor module will stop the drum in its closed state and a fault code will be displayed. Five attempts are made to open the drum door before flagging the fault. 5. The lid lock will be released. When the power is first switched on or restored after interruption: In normal circumstances where the previous cycle was completed successfully, when power is reapplied to the product, the sensor module will assume the door is open and the machine is at rest. In all other cases it will either continue operating or return to the “home” position so that the drum door is open and the lid is unlocked. If for some reason the drum door is not open, then the operator will need to first start, then pause the machine to return it to its drum open position. When the dryer recommences operation, the sensor module must allow for the situation where the drum door may be part way through an opening or closing sequence. In order to do this without the risk of damaging any of the mechanical parts, the sensor module executes the following sequence: - 17 - 1. Moves the drum in the open direction to check if the user has manually opened the drum door, and if found so, will stop and assume the normal off position. 2. If not “Home”, moves the drum so as to close the door, moving as far as would normally be required to close the door from the “Home” (fully open) position. 3. The sensor module then operates the grabber and leaves it in the retracted position. 4. Provided the grabber was successfully retracted, the drum will continue rotating in the Close direction; ramp up to full speed, and the dryer will continue its cycle. 3.5.11 Heater Control. The heaters are controlled in response to the selected drying cycle chosen and also according to other technical requirements such as reversing and over heating. In the electric heater models, the heater housing is fitted with two elements that supply about 5 kW of heat when both are on. There is a 3.6kW and a 1.4kW element that are used at various times depending on the cycle chosen and the drum/fan direction. For the gas model, a gas burner is used to provide the heat, and this is turned on for lower duty times for the Permanent Press and Delicate cycles to apply similar heating as the electric model. When drying, the heater is only switched on when the drum is up to speed. Because of the time it takes for the element to cool down after switching off, the larger element in the electric model is switched off a few seconds before stopping to reverse, to prevent excessive heat entering the drum. The software in the motor control module responds to the switching on and off of the heater as requested by the sensor module. It also monitors the automatic thermostat on the heater housing for excessive restriction of airflow, and if detected, will set a User Warning but continue the drying cycle until the end of the cycle when the warning will reset. If the User Warning occurs, the drying will take a longer time to complete and the load will possibly end up a little damp. Each cycle, Denim through to Delicate, has a temperature limit, as defined in the table below, as measured in the exhaust air. After switching off at the limit, the temperature has a hysteresis of 5 degrees below these temperatures when the heat source switches back on. Denim Regular 149oF (65oC) 149oF (65oC) Permanent Press 140oF (60oC) Delicate 127oF (53oC) When tumbling the heat source is turned on as shown in the table below: Electric Door Close Direction Door Open Direction 4 minutes 40 seconds Element 2/3 Element 1/3 Heat Element 2/3 Element 1/3 Heat Heat Heat Denim ON ON OFF ON Regular ON ON OFF ON P.Press ON OFF OFF ON Delicate ON OFF OFF ON Air Dry OFF OFF OFF OFF - 18 - Gas Door Close Direction Door Open Direction 4 minutes 40 seconds Gas Ignition Gas Heating delay Denim 30 seconds 3 minutes 30 seconds No Heat Regular 30 seconds 2 minutes 30 seconds P.Press 30 seconds 2 minutes 30 seconds Delicate 30 seconds 2 minutes 30 seconds Air Dry No Heat No Heat Note: During heating, if the temperature exceeds the limits for the particular cycle, the heat is turned off and can significantly reduce the heating time. This is particularly true for gas dryers which require the 30 second ignition time. Cycle times can be affected by a number of factors including: • The cycle chosen • Load size • Size of items • Type of fabric • Load wetness • Venting method • Location of dryer • Condition of exhaust ducts • Heat used (electric, natural gas or LPG gas) • Environmental conditions (temperature, humidity) The table below shows approximate cycle times (in minutes) for an 8 pound (3.6 kg) load dried using the regular cycle. Smartload™ Electric Smartload™ Gas Damp 26 29 Damp/Dry 36 38 Dry 47 47 Dry/Extra Dry 50 49 Extra Dry 50 51 3.5.12 Auto Sensing When wet or damp clothes are loaded into a dryer they are partially saturated with water which is a relatively good conductor of electricity. In the SmartLoad™ dryer, sensor bars are used to measure the conductivity. When moisture in the clothes touches across the sensor bars (located beneath the lint bucket) their conduction is measured. As the clothes dry they become less conductive and it is this measurement that is used to calculate the dryness of the clothes load. Large loads will brush against these moisture sensor bars more frequently than small loads, and this strike count is used to help determine the dryness of different sized loads. Different fabrics retain moisture differently; a thick towel containing a lot of moisture will often conduct the same as a light synthetic garment containing very little. It is this difference in fabric characteristics plus the initial unknown moisture content that makes the calculation of dryness reasonably complex. - 19 - 3.5.13 Regulator Valve In a gas dryer, the regulator valve forms part of the gas control system and performs the function of regulating the gas pressure into the burner venturi and turning the gas flow on and off. The regulator valve consists of two solenoid shut-off valves, a gas pressure regulator and a gas orifice assembled into a single cast body. The pressure regulator is factory set to maintain 3½ inches of water column (WC) gas pressure at the orifice (0.87kPa). The regulator is service adjustable. The two solenoid valves are in series such that the gas flowing through the pressure regulator must pass through both valves to get to the orifice and burner. At dryer start up, the gas igniter is energised and the first valve is opened. Once the gas igniter has reached ignition temperature, the gas flame detector operates the second valve, allowing gas to flow through the orifice and into the burner venturi, and ignition takes place. The second valve is held open only when a flame or hot ignition is detected by the gas flame detector. The orifice is a precisely drilled brass plug screwed into the outlet port of the regulator valve. The orifice extends into the burner venturi. The combination of regulated pressure and orifice size provides the proper volume of gas for the heat rating of the burner. The regulator valve comes from the factory sized and adjusted to deliver heat at the rate of 20,000 BTUs per hour, using natural gas. Information fed back to gas flow regulator and valves from Flame Detector Gas Pipe Gas Flow Regulator and Valves Orifice Igniter Combustion Chamber Gas Pipe Gas Flow Regulator and Valves Orifice Burner Venturi Igniter Igniter Bracket Gas Burner Assembly While natural gas is most commonly used, the regulator valve is also able to accommodate the use of LPG. In this case, a LPG conversion kit (part number 395489) is used to modify the regulator valve to achieve the correct volume of gas flow for LPG. - 20 - 3.5.14 Gas Flame Detector The gas flame detector is an essential safety device that forms part of the control system for the gas burner. It consists of a thermostatically operated single-pole, single-throw, normally closed bimetallic switch that is sensitive to radiant energy. The function of the gas flame detector is to detect when the gas igniter has reached an appropriate temperature to ignite the incoming gas/air mixture, and then energise the secondary valve in the regulator assembly, releasing the gas into the burner venturi. The gas flame detector also detects the radiant heat from the flame once ignition is achieved and keeps the secondary valve open as long as it detects a flame present. If for any reason the flame is extinguished, the flame detector contacts will close in approximately 30 to 50 seconds, causing the secondary valve to close, thereby turning off the gas supply to the burner venturi. The system takes approximately 20 to 30 seconds to operate the regulator valve once the gas ignitor has been energised. This length of time is a function of the thermal inertia of both the gas ignitor and the gas flame detector. The gas flame detector is attached to the side of the combustion housing with a tabthrough-slot and one screw. A rectangular hole in the combustion housing adjacent to the “window” in the gas flame detector allows the radiant energy to reach the gas flame detector. - 21 - 3.6 Gas Igniter Part Number Cold Resistance Typical Temperature Minimum Temperature Maximum Temperature 3.7 395188 40 - 200 Ohms 2399°F (1315°C) @ 120V 1805°F (985°C) @ 80V 3092°F (1700°C) @ 132V Gas Regulator Valve Combination gas pressure regulator and dual automatic gas valve. Part Number 395369 Voltage Rated 120 Volts AC 60 Hz Resistance Across Terminals 1&2 1.4 kOhms 1&3 560 Ohms 3&4 1.3 kOhms Orifice #43 Regulated pressure 3.5” H2O 3.8 Gas Flame Detector Part Number 395194 Voltage Rated 120 Volts AC 60 Hz Contacts normally closed, open with heat. 3.9 Thermostat Cutout – Automatic Reset (Gas) Part Number Type Trip Temperature Reset Temperature 395192 SPST 230oF ± 5o (110°C ± 3o) 203oF ± 8o (95°C ± 4.5o) - 22 - 3.10 Thermostat Cutout – Manual Reset (Gas) Part Number Type Trip Temperature 3.11 395191 SPST 293oF (145oC) Element Assembly 240V 3.6 KW Two sets of Nichrome wire elements linked in parallel between Mica plates. A ceramic insulator is used to support the element assembly in the housing. Part Number 395274 Cold Resistance 13.5 Ohms Current 15 Amps Power 3.6 KW Voltage 240 Volts (between two phases) 3.12 Element Assembly 240V 1.4KW Part Number Cold Resistance Current Power Voltage 3.13 395275 37 Ohms 5.8 Amps 1.4 KW 240 Volts (between two phases) Thermostat Cutout – Automatic Reset (Electrical) Part Number Type Trip Temperature Reset Temperature 395455 SPST 158oF ± 6o (70°C ± 3o) 131oF ± 7o (55°C ± 4o) - 23 - 3.14 Thermostat Cutout – Manual Reset (Electrical) Part Number Type Trip Temperature 3.15 Motor – 3 Phase 240W Part Number Voltage Rated Power Current Speed Resistance Across Any Two Terminals of Plug 3.16 395155 SPST 30 Amps/240 Volts AC 212oF ± 11o (100oC ± 6o) 395378 190 Volts AC 85 Hz 240 Watts 1.6 Amps 2340 RPM 9.6 Ohms Exhaust Temperature Sensor Loom Part Number 395381 Resistance (+10%) at Various Ambients 32oF (0oC) 33 kOhms 50oF (10oC) 20 kOhms o o 68 F (20 C) 12 kOhms 86oF (30oC) 8 kOhms 5 kOhms 104oF (40oC) 3.17 Lid Lock Part Number Resistance range 420036P 63 Ohms +/- 10 Ohms @ 68oF (20oC) Safety extra low voltage. - 24 - 3.18 Motor Control Module Part Number 3.19 Sensor Module Part Number 3.20 395400 (Electric models) 395401 (Gas models) 395394 Display Module Part Number 395124 - 25 - 4 Diagnostics 4.1 Overview If a fault occurs that prevents correct operation of the dryer, and is detected by the controllers, the dryer is stopped, the display shows a fault code and the beeper is continuously turned on and off. Pressing the Power button will stop the beeper but leave the fault code displayed to help the service technician diagnose the problem. Pressing the Power button again will remove the fault display and cause the dryer to try to start again. If a fault occurs on a dryer, the user should be encouraged to turn the sound off (by pressing the Power button once) but leave the displayed fault code on for easy diagnostics. The fault code is displayed in the LEDs of the Drying Progress display portion of the display panel as shown below. Each LED illuminated represents a binary code. By adding up the binary code value of the LEDs that are illuminated, the fault code number can be determined. In the example above the fault code is 8+2+1 = 11 Note: If the dryer has faulted and displayed a fault but the fault is currently not displayed, most faults will manifest when the user attempts to run the dryer again. However, at any time the “Last Fault” can be recalled from memory. Refer to Section 4.3.1 for method of entry. User Warnings In the case of user warnings, the dryer may either pause, or “limp on”, and flash an LED (see list below) at the same time as sounding a user warning. Pressing any button will stop the sound, and pressing the Start or Power buttons, or the completion of the cycle, will stop the display of the warning. The warnings are stored as “faults” in memory with their warning or fault numbers, and can be recalled as “last fault” on the display, or by downloading the information using the Fisher & Paykel Smart Tool diagnostic software. - 26 - 4.2 Fault Code Summary The following are the fault codes that may be displayed. The remedy section of each fault is the suggested sequence of repair or replacement. If the first suggestion does not remedy the fault, check the next on the list. Fault Code 1 Communications Error. Communications failure between the sensor module and motor control module. Remedy: (1) Check the continuity of the module interconnecting harness. (2) Replace the sensor module. (Refer to Section 6.36) (3) Replace the motor control module. (Refer to Section 6.35) Fault Code 2 Drum Gap Cannot be Located. Remedy: (1) (2) (3) (4) Ensure the sensor module is correctly located and clipped into place. Replace the lens on the sensor module. Replace the sensor module. (Refer to Section 6.36) Remove the top deck and clean the drum sensing “bumps” on the outside of the drum end. (5) Replace the drum. (Refer to Section 6.30) Fault Code 3 Drum Stalled. Remedy: (1) If there is mechanical movement of the drum, but this fault code is appearing, follow the procedures for fault code 2. (2) If there is no mechanical movement of the drum, check drum movement mechanisms: belt, motor and motor harness. (3) Replace the motor control module. (Refer to Section 6.35) (4) Replace the motor. (Refer to Section 6.32) - 27 - Fault Code 4 Invalid Option Link Read. The motor control module heat source option link read is invalid. Remedy: Replace the motor control module. (Refer to Section 6.35) Fault Code 6 Door Jammed - User Warning. The door is unable to close due to either clothes catching or an excessive closing load. Remedy: (1) Remove the obstruction. (2) Reposition or remove some of the load. (3) Fix the cause of binding in the door closing mechanism. (4) Replace the motor. Fault Code 7 Motor Current Excessive. Remedy: (1) Free up the dryer. Remove overload or cause of jamming. (2) Replace the motor control module. (Refer to Section 6.35) (3) Replace the motor. (Refer to Section 6.32) - 28 - Fault Code 8 Exhaust Sensor Over Temperature. The exhaust sensor measures over temperature (fire detection, element short circuit or low resistance). Remedy: (1) Check the integrity of the sensor circuit checking particularly for short circuits. Approximate resistances (+ 10%) at various temperatures are; 32oF (0oC) = 33 KOhms, 72oF (22oC) = 11 KOhms, 104oF (40oC) = 5 KOhms. Replace thermistor and harness if out of range. (2) Check the element integrity in that it switches off when the dryer is stopped. (3) Replace the motor control module. (Refer to Section 6.35) (4) Replace the sensor module. (Refer to Section 6.36) Fault Code 9 Exhaust Sensor Under Temperature. The exhaust sensor measures under temperature (open circuit or not plugged in). Remedy: Refer to steps for over temperature fault (fault code 8) above, but open circuit likely. Fault Code 10 24 Volt Supply Measurement Error. The sensor module measures low voltage on actuator power supply. Remedy: Replace the sensor module. (Refer to Section 6.36) Fault Code 11 Lid Lock Open Circuit. Remedy: Check the lid lock harness and coil. If there is continuity through these, replace the sensor module. (Refer to Section 6.36) - 29 - Fault Code 12 Lid Lock Switching Device Failure. Remedy: Check that there are no short circuits in the lid lock circuit which may have caused the failure in the sensor module. The resistance of the lid lock should be between 50 and 100 ohms. If the circuit is correct, replace the sensor module. (Refer to Section 6.36) Fault Code 14 Sensor Module Fault. Remedy: Replace the sensor module. (Refer to Section 6.36) Fault Code 15 Sensor Module Fault. Remedy: Replace the sensor module. (Refer to Section 6.36) Fault Code 16 Airflow Restriction - User Warning. Airflow restriction. Remedy: (1) Check that the lint bucket is empty and the filter is clear. (2) Ensure that the exhaust duct is not restricted, blocked or kinked, preventing good airflow. (3) Ensure that there is nothing inhibiting unrestricted airflow through the heater housing, through the drum, lint filter, lint collector and through the exhaust duct, and that the element has not shorted. (4) Check that the voltage is not too high. (5) Check for element shorts or low resistance, or that gas burner is operating correctly. (6) Replace the automatic thermostat. (Refer to Section 6.39) (7) Replace the motor control module. (Refer to Section 6.35) - 30 - Fault Code 20 Door Actuator Stalled. Remedy: As per fault code 21. Fault Code 21 Door Actuator Required Excess Voltage. Remedy: (1) Ensure there is no weight placed on the lid of the product (e.g. clothes basket). If so, remove the weight and retest. (2) Inspect the installation, making sure that the cabinet sits evenly on the floor. If excess load is placed on the cabinet, it can cause the subdeck assembly to twist. (3) Inspect the front inside edge of the top deck for any signs of excessive inwards bowing as this can cause it to catch on the door grabber, resulting in excess current draw on activation. The bowing can be caused by a bowed top deck or by incorrect assembly of the top deck to the cabinet front. (4) Ensure the user intervention tab is not inhibiting door grabber movement. (5) Check that the actuator linkage is located correctly. There must be no gap between the linkage and the plastic moulding (refer to Section 6.9 reassembly procedure). (6) Check that the actuator housing is in place, and that the four retaining lugs are correctly located (refer to Section 6.9). Early models may have aluminium tape holding the housing in place. If so, ensure that the tape is replaced when the housing is refitted. (7) Remove the actuator housing and look for obvious signs of things that are out of position (can the worm drive be rotated freely both backwards and forwards by hand, is the actuator motor in place?) (8) Replace the faulty door actuator mechanism. (Refer to Section 6.9). (9) Replace the door grabber, linkage and housings. (Refer to Section 6.10) (10) Replace the sensor module. (Refer to Section 6.36) - 31 - Fault Code 22 Door Actuator Open Circuit. Remedy: (1) Check that the actuator wiring is plugged into the sensor module and is not open circuit. If faulty, replace. (2) Replace the sensor module. (Refer to Section 6.36) Fault Code 23 Door Actuator Movement Interrupted By Low Voltage. The door actuator movement was interrupted by low voltage (brown out). Remedy: (1) Ensure mains voltage is within +10% and –15% of nominal. (2) Replace the sensor module, as voltage measurement circuit may be reading incorrectly. (Refer to Section 6.36) (3) Replace the motor control module, as it may not be supplying sufficient power to the sensor module. When display is off, approximately 24V DC is supplied. (Refer to Section 6.35) Fault Code 24 Door Actuator Movement Took Too Long. Remedy: As per fault code 21. Fault Code 28 Data Retrieval Error Following Loss of Power Remedy: (1) Switch off the mains power supply to the dryer for at least 10 seconds and confirm error. (2) Replace the motor control module. (Refer to Section 6.35) - 32 - Fault Code 29 Brown-Out Data Retrieval Error. Remedy: (1) If the fault occurs every time the dryer is turned on, replace the sensor module. (Refer to Section 6.36) (2) Replace the motor control module. (Refer to Section 6.35) Fault Code 30 Reason: Lid Lock unable to Lock - User Warning. The lid lock failed to lock. (Not user displayed.) Remedy: (1) (2) (3) (4) Ensure the lid is closed and the tongue engaged. Replace the lid lock harness. (Refer to Section 6.5) Replace the lid lock. (Refer to Section 6.5) Replace the sensor module. (Refer to Section 6.36) Note: The blue Cool Down LED illuminated without the fault “beeps” indicates the dryer is in a low mains voltage (brown out) state, and is momentarily displayed whenever the supply power is turned off. - 33 - 4.3 Diagnostic Mode 4.3.1 Entering the Diagnostic Mode (a) Turn the power supply to the dryer on. (b) Press and hold the Auto Dry down button, then press the Power button. The dryer is now in level 0 of the diagnostic mode. After initial entry into the diagnostic mode, the Start/Pause button operates the dryer as normal. Press the Auto Dry up or down buttons to scroll through the fault levels. There are several levels of diagnostics, most of which are used in development and production. These levels may bring on various LEDs, but the level of use for the service technician is that of the last fault. 4.3.1.1 Last Fault To enter the last fault diagnostics, enter the diagnostic mode as described above, then press the Auto Dry up button three times. The last fault will be displayed on the drying progress LEDs as described in Section 4.1. 4.3.1.2 Conductivity Contact Impedance To enter the conductivity contact impedance check, enter the diagnostic mode as described above, then press the Auto Dry up button five times. In this mode, touching damp clothes or fingers across the conductivity contacts will cause the LED display to change. If the contacts, or the harness to them, have gone open circuit, no change will occur in the LED display. This is a useful method of checking the integrity of the sensor circuits. To exit the diagnostic mode, press any cycle button. 4.3.2 Entering the Data Download Mode (a) Turn the power supply to the dryer on. (b) Press and hold the Auto Dry down button, then press the Power button. This enters the diagnostic mode. (c) Press the Regular button. Encoded data is transmitted serially out the red Auto LED, and is captured by an optical download pen attached to a PC where “Smart Tool” software interprets the data to aid servicing. To exit, press the Regular button. 4.3.3 Entering the Showroom Mode (a) Turn the power supply to the dryer on. (b) Press and hold the Air Dry button, then press the Power button. The LEDs will flash in a random sequence. To exit, turn off the power supply to the dryer at the wall. - 34 - 5 Fault Diagnostics 5.1 Problem - No Power The following checks are based on there being the correct supply voltage at the outlet and the power cord is fastened securely to the dryer’s terminal block. WARNING: The power must be turned off and the dryer disconnected from the supply outlet to carry out the following checks. 5.1.1 (a) (b) (c) 5.1.2 (a) (b) (c) (d) (e) (f) (g) (h) Check the Continuity of the Power Cord (Electric) Remove the cover plate from the bottom right corner at the back of the machine and check that the wiring connections are secure. With an ohmmeter, check for continuity between the neutral (N) terminal of the plug and the centre connection on the terminal block in the dryer, and between the appropriate pin on the plug and the upper most terminal on the terminal block of the dryer (L1 - red wire). Also check between the appropriate pin on the plug and the lower most terminal on the terminal block (L2 - black wire). If there is continuity in these wires, go to Section 5.1.2. If there is no continuity, replace the power cord and retest the dryer. Check the Continuity of the Main Harness (Electric) Follow instructions for removal of components within the cabinet. (Refer to Section 6.6) Disconnect the main harness from the motor control module, manual resetable thermostat and automatic reset thermostats. Follow instructions for removal of the drum and chassis assembly. (Refer to Section 6.16) Pass the wiring loom out through exhaust duct. Remove the cover plate from the bottom right corner at the back of the machine. Check the continuity from L1 on the terminal block to the heater relay and the mains connections on the motor control module (red wires), and the continuity from L2 (black wires) on the terminal block to the mains connector on the motor control module and the manual resetable thermostat on the element carrier. If there is no continuity, check that the terminal connections are secure. If so, replace the mains harness. If there is continuity in the harness, replace the motor control module and retest the dryer. - 35 - 5.1.3 (a) (b) (c) (d) (d) 5.1.4 (a) (b) (c) (d) (e) 5.2 Check the Continuity of the Power Cord (Gas) Follow instructions for removal of the drum and chassis assembly. (Refer to Section 6.16) Pass the main power cord through the exhaust duct. Disconnect the 3 way in-line connector that is clipped to the motor controller. With an ohmmeter, check for continuity between the neutral (N) terminal of the plug and the outside connection on the in-line plug in the dryer (white wire), and between the line/phase pin on the plug and the centre connection on the terminal block of the dryer (black wire). If there is no continuity, replace the power cord and retest the dryer. If there is continuity, go to Section 5.1.4. Check the Continuity of the Main Harness (Gas) Follow instructions for removal of the drum and chassis assembly. (Refer to Section 6.16) Disconnect the in-line connector that is clipped to the motor controller. Check the continuity from the centre terminal on the in-line plug to the mains connector on the motor control module (red wire), and from the outside terminal on the in-line plug to the mains connector on the motor control module and the gas valve (white wires). If there is continuity, replace the motor control module and retest the dryer. If there is no continuity, replace the mains harness and retest the dryer. Problem - No Heat 5.2.1 Check All Thermostats (Gas and Electric) WARNING: The power must be disconnected to perform the following checks. (a) Check that the manual reset thermostat has not tripped. If it has, reset it. (b) Disconnect each thermostat one by one and check the continuity of each. (c) If any of the thermostats have no continuity, replace the offending thermostat. If all thermostats have continuity, go to Section 5.2.2 (electric) or 5.2.5 (gas). 5.2.2 (a) (b) (c) Check the Elements (Electric Only) Follow instructions for removal of components within the cabinet. (Refer to Section 6.6) With an ohmmeter, measure the resistance across both elements. (i) Measure the resistance of the 1.4kw element between the violet wire on the front element connection and the violet wire on the mains relay on the motor control module. The cold resistance should be between 38 and 45 ohms. (ii) Measure the resistance of the 3.6kw element between the yellow wire on the front element connection and the yellow wire on the relay on the motor control module. The cold resistance should be between 13 and 19 ohms. If there is an open circuit replace the element, otherwise go to Section 5.2.3. - 36 - 5.2.3 Check Voltage Across Elements (Electric Only) WARNING: Because the power must be on to carry out the following checks extreme care must be taken as death or electrical shock can occur. (a) Refit the top deck and reconnect the machine to power supply. Start the dryer (Note: If there is no wet load in the dryer, the controller will turn the heat off after a short space of time.) (b) With the dryer running on a regular cycle in the closing direction, and with the drum up to speed, use a voltmeter and measure the voltage of the 1.4kw element, between the violet wire on the front element connection and the violet wire on the mains relay on the motor control module. The voltage should be equal to mains voltage of approximately 240V AC. Measure the voltage of the 3.6kw element between the yellow wire on the front element connection and the yellow wire on the relay on the motor control module. The voltage should be equal to mains voltage of approximately 240V AC. (c) If there is no voltage, replace the motor control module and retest the dryer. If there is voltage, go back to Section 5.2.1 and recheck. 5.2.4 Measure the Current Draw for Each Element (Electric Only) This is an alternative to measuring the voltage. (a) With a clamp amp meter, measure the current draw of each element. Approximate current draws are: The Yellow lead = 5.8 amps. The Orange lead = 15 amps. Total current = 20.8 amps. Note: The current draw will decrease as the elements get hot. 5.2.5 5.2.5.1 (a) (b) (c) 5.2.5.2 (a) (b) Check the Gas Valve/Regulator (Gas Only) Primary Coil Disconnect the primary valve connector and measure the resistance between terminals 1 and 2. Resistance should be 1.4 kOhms. Measure the resistance between terminals 1 and 3. Resistance should be 560 ohms. If the resistance is incorrect, replace the valve/regulator. If the resistance is correct, go to Section 5.2.5.2. 3 2 1 5 4 Connections Secondary Coil Disconnect the secondary valve connector and measure the resistance between terminals 4 and 5. Resistance should be 1.3 kOhms. If the resistance is incorrect, replace the valve/regulator. If the resistance is correct, go to Section 5.2.6. - 37 - 5.2.6 Check the Flame Detector (Gas Only) The flame detector is much like a thermostat, although it is sensitive to radiant heat whereas a thermostat relies more on conduction/convection to get hot. However they are both essentially just switches. Therefore when it is cold the sensor should be closed circuit (near zero resistance) and when the sensor is sufficiently hot the switch will open (open circuit). Because it senses radiant heat, a temperature for switching is not specified. To test it, run the dryer and see if the flame detector goes open circuit after the igniter has been on for a while (40-60 seconds depending on the voltage and air flow). It should stay open circuit while the gas is burning and then cool down and close after the gas flame goes out (about 30 seconds depending on the airflow and air temp). 5.2.7 Check the Igniter (Gas Only) Disconnect the igniter and measure the resistance. Resistance should be between 40 and 200 ohms when cold. (a) 5.2.8 Check the Exhaust Sensor (Gas and Electric) This check will need to be performed if the dryer has stopped functioning and fault codes 8 or 9 have been displayed. (a) Disconnect the temperature sensor from the sensor module and measure the resistance. Resistance at various ambient temperatures should be (+/- 10%): 32ºF 50ºF 68ºF 86ºF 104ºF (b) (0ºC) (10ºC) (20ºC) (30ºC) (40ºC) = 33 kOhm (+10%) = 20 kOhm (+10%) = 12 kOhm (+10%) = 8 kOhm (+10%) = 5 kOhm (+10%) If the sensor resistance checks out correct, refer to Fault Codes in Section 4.2. 5.2.9 Check Inlet and Outlet Duct Seals If the seals are faulty, replace. (Refer to Sections 6.26 and 6.20) 5.3 Problem – Drum Does Not Rotate The following checks are based on the control panel LEDs lighting up when the Power button is pressed, but no drum rotation when Start/Pause is pressed. Note: The lid must be closed or else a warning sound will be given. 5.3.1 Check for Fault Code. If a fault code is present, follow the instructions in Section 4.2. 5.3.2 (a) (b) Check the Integrity of the Belt. Follow instructions for removal of components within cabinet. (Refer to Section 6.6) Check that the belt is intact and in place. If not, follow instructions for removal and replacement of the belt. (Refer to Section 6.29) - 38 - 5.3.3 (a) (b) (c) (d) Check the Motor Windings. Remove the cover of the motor control module. (Refer to Section6.35) Unplug the motor harness from the motor control module. Check the resistance of the motor windings at the plug end of the motor harness. Resistance should be 9.6 ohms across any two terminals of the plug. If the motor resistances are correct, replace the motor control module. 5.4 Problem - Under Drying/Damp 5.4.1 Possible User Faults Ensure that the customer has chosen the correct cycle for the type of clothes being dried. Ensure that the customer has chosen the correct spin speed on the washing machine. If the clothes are spun at a slow spin speed, they will be wetter and will therefore take longer to dry. (a) (b) 5.4.2 (a) (b) 5.4.3 (a) (b) (c) Possible Installation Faults Is the cabinet externally vented? If vented into the room, the damp air is being recirculated through the dryer and will increase drying times. Is the venting configuration within those specified in the installation instructions? Excessive length or number of bends will restrict the airflow and decrease drying performance. Possible Maintenance Problems Is all venting clear of lint, kinks, etc? Lint build up or kinks within the venting system will restrict the airflow and decrease drying performance. Check the inlet grill, burner inlet grill, venting and vent outlet grill/shutters to ensure that they are clear. Has the lint bucket been emptied? Are the lint filter and exhaust sensor free of lint? 5.4.4 Check the Inlet and Outlet Duct Seals A leak in either the inlet duct seal or the outlet duct seal can cause the hot air to bypass the clothes load in the drum. 5.4.5 Check the Heating Circuits Check the thermostats. (Refer to Section 5.2.1) Electric models, check the elements. (Refer to Section 5.2.2). Gas models, check the igniter, valve and flame detector. (Refer to Sections 5.2.5, 5.2.6 and 5.2.7. (a) (b) (c) 5.4.6 Check the Moisture Sensing Circuit (a) Check that the machine is correctly earthed. (b) Check that the conductivity contacts are connected correctly. (c) With the power disconnected from the dryer, use a suitable high impedance meter on a high ohms range to measure the resistance between the conductivity contacts. It should be 6.4 megohms (+1 megohm). Between either contact and the drum it should be 4.3 megohms (+1 megohm). (d) Check that the conductivity contacts circuit is registering the dryness levels of the clothes. (Refer to Section 4.3.1.2) - 39 - 5.5 5.5.1 (e) (f) Problem - Over Drying Check the Moisture Sensing Circuit (a) Check that the machine is correctly earthed. (b) Check that the conductivity contacts are connected correctly. With the power disconnected from the dryer, use a suitable high impedance meter on a high ohms range to measure the resistance between the conductivity contacts. It should be 6.4 megohms (+1 megohm). Between either contact and the drum it should be 4.3 megohms (+1 megohm). Check that the conductivity contacts circuit is registering the dryness levels of the clothes. (Refer to Section 4.3.1.2) - 40 - 6 Service Procedures In order to service components of the SmartLoad™ dryer, certain procedures must be followed. These procedures are set out below. Servicing Note (a) To avoid stripping screws, do not overtighten when re-assembling parts. If using a power screw driver have the torque setting on low. (b) Take extra care not to damage wire terminals on removal as some of these have release clips. (c) On completion of any service carried out to the dryer, all safety tests as required by law must be carried out. 6.1 (a) Removal of Lid Open the lid fully, then lift off vertically. Reassembly (a) Refit in reverse manner, ensuring that the hinge lugs on the lid are vertical. Lift 6.2 (a) (b) (c) (d) Components in Console Area Disconnect the unit from the power supply. Remove the lid. (Refer to Section 6.1) Remove the two screws at the rear of the console securing the console to the top deck. Tilt the console forward. Reassembly (a) Refit in reverse manner. 6.3 (a) (b) (c) (d) Screws Removal of Display Module Follow instructions for removal of the console. (Refer to Section 6.2) Disconnect the wiring harness from the display module. Push the tab clear and slide the module. Lift the display module clear of the console. Reassembly (a) Refit in reverse manner. Push tab - 41 - Slide module 6.4 Removal of Top Deck 6.4.1 If the top deck is to be removed for replacement: (a) Follow instructions for removal of the console. (Refer to Section 6.2) (b) Disconnect the wiring harness from the display module. (c) Carefully remove the two lid buffers from the front side top of the deck by levering upwards, taking care not to damage the top deck. (d) Remove two screws under the buffers securing the top deck to the cabinet. (e) Tilt the top deck upwards towards the rear. (f) Disconnect the wiring harness from the sensor module and lift the top deck clear. (g) Remove the top deck harness from the top deck. (h) Remove the lid lock, complete with harness, from the top deck. (Refer to Section 6.5) (i) Remove the stiffener brackets from under each side of the top deck. 6.4.2 If the top deck is to be removed to gain access to other components: (a) Follow instructions for removal of the lid. (Refer to Section 6.1) (b) Carefully remove the two lid buffers from front side top of the deck by levering upwards, taking care not to damage the top deck. (c) Remove two screws under the buffers securing the top deck to the cabinet. (d) Tilt the top deck upwards towards the rear. (e) Disconnect the wiring harness from the sensor module and lift the top deck clear. Reassembly (a) Refit in reverse manner ensuring that the user intervention lever is in its correct position and that the cabinet top fits between the lugs on the inside front of the top deck and the inside front edge of the top deck. - 42 - 6.5 (a) (b) Removal of Lid Lock Follow instructions for removal of the top deck. (Refer to Section 6.4.2) Remove the screw securing the lid lock to the underside of the top deck, move the front downwards and slide out. Reassembly (a) Refit in reverse manner. 6.6 (a) (b) (c) Components Within Cabinet Follow instructions for removal of the top deck. (Refer to Section 6.4.2) Remove the two screws securing the top of the front panel. Spread the top sides of the front panel to clear the tabs on the door grabber assembly. (d) Pull the cabinet front forward and lift the base clear of the feet. (e) Disconnect the cabinet front earth wire from the chassis and lift the cabinet front clear. Reassembly (a) Refit in reverse manner. 6.7 (a) (b) (c) (d) (e) Removal of Front Cabinet Brackets Follow general servicing instructions for components within the cabinet. (Refer to Section 6.6) Invert the cabinet front. Remove the screw securing the bracket to the cabinet front. Prise the retaining clip upwards. Slide the bracket inwards then to the rear to clear the cabinet front. Reassembly (a) Refit in reverse manner. - 43 - 6.8 (a) (b) (c) (d) Removal of Door Grabber Assembly Follow general servicing instructions for components within the cabinet. (Refer to Section 6.6) Close the drum door completely. Disconnect the wiring from the door grabber actuator at the sensor module. Push the tabs in on the rear of the left and right hand grabber housings and lift the Push Tabs assembly upwards and outwards. Reassembly (a) Refit in reverse manner. 6.9 (a) (b) (c) (d) Removal of Door Grabber Actuator Follow instructions for removal of the door grabber assembly. (Refer to Section 6.8) Unclip the wiring from the grabber housing. While applying outward pressure to the actuator, push in the four retaining lugs (in the order shown on the photo below) securing the actuator to the housing and lift the actuator clear. Slide the door grabber linkage out of the gear swivel. 2 3 1 Apply pressure 4 Push lugs - 44 - Linkage Reassembly (a) Refit in reverse manner. (b) Ensure that the wiring to the actuator motor is clipped under the hooks and is in the slots in the cover. (c) With the actuator clipped into the grabber housing, ensure that the actuator linkage is located correctly. There must be no gap between the linkage and the plastic moulding of the housing. Wiring in slot Motor in place Worm drive can rotate freely Clipped under hooks No gap between linkage and moulding at this point 6.10 (a) (b) (c) Removal of Door Grabber Follow instructions for removal of the door grabber actuator assembly. (Refer to Section 6.9) Remove the four screws securing the chassis beam to the grabber housings. Lift the door grabber clear. Reassembly (a) Refit in reverse manner. Ensure that the linkage is correctly located in the slot of the door grabber. - 45 - 6.11 (a) (b) Removal of Door Bracket Follow general servicing instructions for components within the cabinet. (Refer to Section 6.6) If the drum door is closed, push down on the tabs on each side of the drum and slide the drum door partially open. (c) Remove the centre clip by squeezing the tabs together and pushing downwards. (d) Lift the loop of the hinge springs, slide the springs out of the door brackets and remove the clips. Remove the hinge arms and locking bar. Slide the door bracket away from the door. Slide one side forwards and the other backwards to disengage it from the tracks in the drum bridge. (e) (f) Hinge Arm Lift Spring Door Bracket Locking Bar Reassembly (a) Refit in reverse manner. When refitting the hinge springs, ensure that they are not reversed or they will not sit flat. Locate the longer (right hand) leg into the door bracket clips first, then the left hand leg. Push home. 6.12 (a) (b) Removal of Drum Door Follow instructions for removal of the door bracket. (Refer to Section 6.11) Slide the door out of the tracks and lift clear. Reassembly (a) Refit in reverse manner. - 46 - 6.13 (a) (b) (c) (d) Removal of Drum Door Buffers Follow general servicing instructions for components within the cabinet. (Refer to Section 6.6) Remove the door grabber assembly. (Refer to Section 6.8) Slide the drum door open. Unclip the drum door buffer and remove from underneath the drum door by pushing on the tab. Reassembly (a) Refit in reverse manner. Note: It is absolutely necessary that the drum door buffer is installed, as it provides static discharge protection for the controllers. 6.14 (a) (b) (c) (d) Removal of Drum Door Key Bracket Follow general servicing instructions for components within the cabinet. (Refer to Section 6.6) Slide the drum door partially open. Push a small screwdriver blade through the holes in the drum (4) to release the clips on the drum door key bracket. Lift the drum door key bracket clear. Reassembly (a) Refit in reverse manner. 6.15 (a) (b) Removal of Drum Door Scraper Follow instructions for removal of the drum door. (Refer to Section 6.12) Lift up the drum door scraper to unclip it from the drum. Reassembly (a) Refit in reverse manner. - 47 - 6.16 (a) (b) (c) (d) (e) (f) (g) (h) (i) (j) Removal of Drum and Chassis Assembly Follow general servicing instructions for components within the cabinet. (Refer to Section 6.6) Follow instructions for removal of the door grabber assembly. (Refer to Section 6.8) Remove the lid from the motor control module by pushing the clip on lid, lifting the front of the lid and sliding forward. Disconnect the earth wire from the outlet panel chassis to the base panel. Disconnect the earth wire from the motor harness to the base panel. Unplug the motor harness from the motor control module. Unplug the 6 wire communication harness from the motor control module. Lay a protective mat on the floor in front of the dryer. Pull on the front of the panel chassis to pivot the assembly out of the cabinet. Roll the assembly clear of the cabinet. Reassembly (a) Refit in reverse manner. 6.17 (a) (b) (c) (d) (e) Removal of Outlet Panel Assembly Follow instructions for removal of the drum and chassis assembly. (Refer to Section 6.16) Lay the assembly on its right hand side. Remove the chassis panel bracket. Remove the screws holding the chassis beams to the outlet panel, 2 from the front of the outlet panel assembly (photo 1), 2 from the rear of the outlet panel assembly (photo 2) and 2 from underneath the outlet panel assembly (photo 3). Lift the outlet panel assembly clear. Chassis panel bracket Screws Photo 1 Screws Photo 2 Screws Photo 3 Reassembly (a) Refit in reverse manner. Ensure that the earth wire ring terminal is refastened to the outlet panel assembly. - 48 - 6.18 (a) (b) (c) (d) (e) (f) Removal of Outlet Duct Assembly Follow instructions for removal of the outlet panel assembly. (Refer to Section 6.17) Remove the wiring loom plugs from the sensor module assembly. Remove the sensor module assembly from the outlet chassis panel. (Refer to Section 6.36) Lay the outlet panel assembly down with the outlet chassis panel uppermost. Remove the eight screws from the panel. Lift the panel clear of the duct assembly. Reassembly (a) Refit in reverse manner. 6.19 (a) (b) (c) Removal of Outlet Duct Bearings Follow instructions for removal of the outlet panel assembly. (Refer to Section 6.17) Lift the collector housing bracket clear of the outlet duct assembly. With a screwdriver, push the tab on the back of the bearing assembly to push it out of the outlet duct assembly. Reassembly (a) Refit in reverse manner. 6.20 (a) (b) (c) Bearing assembly Removal of Outlet Duct Seal Follow instructions for removal of the outlet duct assembly. (Refer to Section 6.18) Remove the outlet duct bearings. (Refer to Section 6.19 Grasp the seal and pull it out of the groove in the outlet duct assembly, being careful not to tear the seal away from the plastic strip that it is welded to. Reassembly (a) Refit in reverse manner. - 49 - 6.21 (a) (b) (c) Removal of Exhaust Sensor Follow instructions for removal of the outlet duct assembly. (Refer to Section 6.18) Unclip the wiring loom and exhaust sensor harness from the collector housing bracket. Unclip the exhaust sensor from the pocket in the collector housing bracket by pushing it forward, then down. Sensor Pocket Harness Clip Reassembly (a) Refit in reverse manner. Ensure that the exhaust sensor is correctly located in the pocket in the collector housing bracket and that the exhaust sensor harness is pulled tight and clipped into place. 6.22 (a) (b) Removal of Lint Collector Housing Remove the lint bucket. Remove the screw securing the lint collector housing and lift the housing clear. Reassembly (a) Refit in reverse manner. Put the top in first and ensure that the tab at the top of the housing slots in at the top. Check that the top is secure when it is assembled. 6.23 (a) (b) (c) (d) Removal of Conductivity Contacts Follow instructions for removal of the lint collector housing. (Refer to Section 6.22) Push the tabs on the conductivity contact bracket to release the bracket from the collector housing. Remove the harness wires from the conductivity contacts. Unclip the contacts from the bracket. Reassembly (a) Refit in reverse manner, ensuring that one harness wire is connected to each conductivity contact, and that the contacts are not touching each other. - 50 - 6.24 (a) (b) Removal of Belt Tensioner Follow instructions for removal of the drum and chassis assembly. (Refer to Section 6.16) Remove the belt tensioner assembly by pushing against the spring tension and unclipping from the rear chassis beam. Push Belt Tensioner A screwdriver can be used to unclip it by putting the blade through the slot and levering against the beam. (c) Lift the top of the belt tensioner assembly clear and unclip it from the centre chassis beam. Lift clear. Reassembly (a) Refit in reverse manner. - 51 - 6.25 (a) (b) (c) (d) (e) (f) (g) Removal of Inlet Panel Assembly Follow instructions for removal of the drum and chassis assembly. (Refer to Section 6.16) Manually open the drum door. Remove the drum inlet bearing. (Refer to Section 6.28) Lay the assembly on its left hand side. Remove the belt tensioner. (Refer to Section 6.24) Remove the chassis panel bracket. Remove the screws holding the chassis beams to the inlet panel, 2 from the front of the inlet panel assembly (photo 1), 2 from the rear of the inlet panel assembly (photo 2) and 2 from underneath the inlet panel assembly (photo 3). Chassis panel bracket Screws Photo 1 (h) Screws Photo 2 Screws Photo 3 Lift the inlet panel assembly clear. Reassembly (a) Refit in reverse manner. Do not overtighten the screw securing the drum inlet cap. Tighten to 7 newton metres (1.5 foot pounds). 6.26 (a) (b) Removal of Inlet Duct Seal Follow instructions for removal of the inlet panel assembly. (Refer to Section 6.25) Unclip the lugs on the inlet duct seal from the front inlet duct and lift the seal clear. Reassembly (a) Refit in reverse manner. Lugs - 52 - 6.27 (a) (b) Removal of Inlet Bearing Shaft Follow instructions for removal of the inlet panel assembly. (Refer to Section 6.25) With a deep bore 22mm (7/8”) socket, unscrew the inlet bearing shaft and remove. Reassembly (a) Refit in reverse manner. Before refitting the inlet bearing shaft, ensure that the inlet bearing spacer is in position on the bolt between the inlet duct front panel and the inlet duct back panel. Tighten to a torque of 20 newton metres (15 foot pounds). 6.28 (a) (b) (c) (d) Removal of Drum Inlet Bearing Lift the lid./ Remove the drum inlet bearing cap by unscrewing with a M5 or 3/16” Allen key. Remove the 5 screws securing the bearing retainer to the drum and remove the retainer. While lifting the drum slightly, slide the bearing and housing off the shaft. Reassembly (a) Refit in reverse manner. Ensure that the bearing housing is orientated so that the rivet heads sit in the clearance holes. Lift the drum upwards while sliding the bearing onto the shaft. Do not overtighten the screw securing the drum inlet cap. Tighten to 10 newton metres (7 foot pounds). - 53 - 6.29 (a) (b) (c) (d) Removal of Belt Follow instructions for removal of the belt tensioner. (Refer to Section 6.24) Remove the outlet panel assembly. (Refer to Section 6.17) Remove the belt from the motor pulley. Remove the belt from around the drum. Reassembly (a) Refit in reverse manner. 6.30 (a) (b) Removal of Drum Follow instructions for removal of the belt. (Refer to Section 6.29) Lift the drum clear. Reassembly (a) Refit in reverse manner. 6.31 (a) (b) (c) Removal of Lint Filter Assembly Remove the screw on the inside bottom of the drum securing the lint filter retainer to the drum. Turn the lint filter retainer clockwise to unclip it from the drum, then pull clear of the drum. Unclip the lint filter assembly from the lint filter retainer. Reassembly (a) Refit in reverse manner, ensuring that when fitting the lint filter retainer to the drum, the screw hole in the retainer lines up with the screw hole in the drum. 6.32 (a) (b) (c) (d) (e) Removal of Motor Follow instructions for removal of the drum and chassis assembly. (Refer to Section 6.16) Remove the belt tensioner. (Refer to Section 6.24) Remove the screw securing each of two motor mounting clamps. Lift the clamps clear. Lift the fan housing clear. Lift the motor and fan clear of the fan motor housing. Reassembly (a) Refit in reverse manner. Ensure that the motor is rotated so that the harness lines up with the harness retaining clip on the fan housing and that the harness is cable tied to the beam. - 54 - 6.33 (a) (b) (c) Removal of Fan Follow instructions for removal of the motor. (Refer to Section 6.32) Remove the circlip securing the fan to the motor shaft. While sitting in a chair, place feet on top of the base of the fan and pull upwards on the motor. This will pull the motor shaft out of the spline in the fan. Reassembly (a) Refit in reverse manner, lining up the spline on the motor shaft with the spline in the fan and pushing the motor shaft into the fan boss sufficiently to refit the fan retaining circlip. Do not hit the motor shaft. (b) Refit the circlip to the motor shaft. 6.34 (a) (b) Removal of Fan Motor Housing Follow instructions for removal of the motor. (Refer to Section 6.32) Use fingers to unclip the three clips from the centre beam. Spring the housing off over the centre beam, tilt horizontally and unhook from the rear beam. Reassembly (a) With the housing horizontal, hook it over the rear beam and tilt it down to rest on the centre beam. (b) Slide the housing on the beam to allow the spring clip to engage the slot in the rear beam. (c) (d) Spring clip in slot Press on the housing to spring it over the centre beam (check that the locating spike is engaged in the locating slot in the centre beam). Press on the housing at three lug locations to snap the three clips over the centre beam. Spike Locating slot - 55 - 6.35 (a) (b) (c) (d) (e) Removal of Motor Control Module Follow general servicing instructions for components within the cabinet. (Refer to Section 6.6) Remove the screw securing the front of the module to the base panel. Push in the tab below this screw and lift the front of the module upwards. Unplug the wiring connectors from the module. Slide the module forward to disengage the tab at the rear from the base panel. Reassembly (a) Refit in reverse manner. 6.36 (a) (b) (c) Removal of Sensor Module Follow instructions for removal of the top deck. (Refer to Section 6.4.2) Unplug the wiring connectors from the module. Push in the tabs on the sides of the sensor module and slide it upwards. Tabs Reassembly (a) Refit in reverse manner. 6.37 (a) (b) (c) (d) (e) Removal of Gas Igniter (Gas Models) Follow general servicing instructions for components within the cabinet. (Refer to Section 6.6) Using a small screwdriver, prise the connector apart. Remove the screw securing the igniter bracket to the gas burner bracket and lift the igniter bracket tabs clear of the slots in the burner bracket. Carefully extract the igniter from the chamber. Bend the tabs on the igniter bracket clear and remove the igniter. Reassembly (a) Refit in reverse manner. Ensure that the igniter is positioned about ¼” (6mm) away from the burner. 6.38 (f) (g) (h) Removal of Flame Detector (Gas Models) Follow general servicing instructions for components within the cabinet. (Refer to Section 6.6) Remove the push on connectors from the flame detector terminals. Remove the screw securing the flame detector to the bottom combustion housing and lift clear. Reassembly (a) Refit in reverse manner. Flame detector - 56 - 6.39 (a) (b) (c) Removal of Thermostats Follow general servicing instructions for components within the cabinet. (Refer to Section 6.6) Remove the push on connectors from the appropriate thermostat terminal. Remove the screw securing the thermostat to the combustion housing and lift the thermostat clear. Reassembly (a) Refit in reverse manner. 6.40 (a) (b) (c) (d) (e) (f) (g) (h) (i) (j) Thermostats Removal of Gas Regulator Valve, Pipe and Burner Tube (Gas Models) Disconnect the dryer from the gas supply. Follow instructions for removal of the drum and chassis assembly. (Refer to Section 6.16) Remove the push on connectors from the thermostat attached to the top combustion housing. Remove the screw securing the top combustion housing to the bottom combustion housing, hinge up and lift clear. Remove the push on connectors from the gas Gas regulator valve regulator valve. Remove the screw securing the gas igniter bracket and lift the bracket clear. Slide the gas burner bracket to the left and lift clear of the slots in the base panel. Lift the gas regulator valve and pipe assembly forward and out. Remove the two screws securing the gas burner venturi. Remove the three screws securing the gas regulator valve to the bracket. Unscrew the gas pipe from the gas regulator valve. Reassembly (a) Refit in reverse manner. Ensure that the regulator/valve is screwed onto the gas pipe to the correct angle so that the gas burner bracket sits flat on the base panel when assembled. Ensure that the gas pipe bracket tabs go through the slots in the back of the base panel. 6.41 (a) (b) (c) (d) (e) (f) Removal of Elements (Electric Models) Follow instructions for removal of the drum and chassis assembly. (Refer to Section 6.16) Remove the push on connectors from the thermostat attached to the top combustion housing. Remove the screw securing the top element housing to the bottom element housing. Lift the top housing clear. Remove the push on connectors from the element. Lift the element clear. Reassembly (a) Refit in reverse manner. - 57 - 6.42 (a) (b) (c) (d) (e) Removal of Front Foot Bracket Assembly Follow instructions for removal of the drum and chassis assembly. (Refer to Section 6.16) Lay the cabinet on its side on a protective surface, with the foot bracket to be removed uppermost. With a screwdriver, push inwards on the rear tab of the foot bracket. When this tab is clear of the base panel, slide it towards the rear about ¾” (18mm). The foot bracket assembly can now be hinged outwards and removed from the cabinet. Reassembly (a) Refit in reverse manner. 6.43 (a) (b) (c) (d) (e) (f) Removal of Rear Foot Bracket Assembly Follow instructions for removal of the drum and chassis assembly. (Refer to Section 6.16) Remove the rear intake grill by levering the four tabs downwards with the fingers. Pull the top of the intake grill outwards and disengage the bottom lugs from the base panel. Lift clear. Lay the cabinet on its side on a protective surface, with the foot bracket to be removed uppermost. With a screwdriver, push inwards on the front tab of the foot bracket. When this tab is clear of the base panel, slide it towards the front about ½” (12mm). The foot bracket assembly can now be hinged outwards and removed from the cabinet. - 58 - (g) Push the tab on the foot adjusting guide. (h) Push the rear of the guide through the base panel and lift clear. (i) (j) Push the foot upwards to clear the top of the foot adjusting guide. Slide the foot sideways to remove it from the strap. (k) Draw the strap back through the housing. Push upwards on the strap to disengage it from the hooks on the guide. Pull the strap clear. Reassembly (a) Refit in reverse manner. - 59 - 7 Wiring Diagrams 7.1 U.S.A. Model (Electric) - 60 - 7.2 U.S.A. Model (Gas) - 61 - 8 Fault Finding Flow Charts 8.1 No Power Is there power to the supply outlet? No Arrange repair of supply etc. as necessary Yes Is the power cord fitted correctly? No Refit correctly Yes Is there continuity of the power cord? Check as per Section 5.1.1 (Electric) or 5.1.3 (Gas) Yes Is there continuity of the main harness? Check as per Section 5.1.2 (Electric) or 5.1.4 (Gas) Yes Fit new motor control module - 62 - 8.2 No Heat (Electric Models) Is a fault code displayed? Yes Refer to Section 4.2 No Are thermostats OK? Check as per Section 5.2.1 Repair/replace as necessary Yes Are element resistances OK? Replace motor control module Check as per Section 5.2.2 Repair/replace as necessary Yes Yes Fit new inlet duct seal. Refer Section 6.26 No Are the elements drawing the correct current? Is the inlet duct seal OK? Yes Yes Fit new outlet duct seal. Refer Section 6.20 No Is the outlet duct seal OK? Check as per Sections 5.2.3 and 5.2.4 Yes - 63 - Are exhaust sensor resistances OK? Check as per Sections 5.2.8 and repair/replace as necessary 8.3 No Heat (Gas Models) Is a fault code displayed? Replace sensor module Yes Refer to Section 4.2 No Reinstate supply Yes Reset thermostat. Replace if necessary Yes No Fit new inlet duct seal. Refer Section 6.26 No Is the inlet duct seal OK? Is the gas supply OK? Yes Yes Fit new outlet duct seal. Refer Section 6.20 No Has the overheat thermostat tripped? Is the outlet duct seal OK? No Yes Check as per Sections 5.2.8 and repair/replace as necessary Are exhaust sensor resistances OK? Are gas valve resistances OK? Yes Yes Check as per Section 5.2.6 Is the flame detector operating correctly? Check as per Section 5.2.5 Repair/replace as necessary Yes - 64 - Are gas igniter resistances OK? Check as per Section 5.2.7 Repair/replace as necessary 8.4 Drum Door Not Opening/Closing Is a fault code displayed? Yes Refer to Section 4.2 No Rectify fault No Rectify fault No Repair as necessary No Are jockey pulleys free & belt aligned OK? Yes Check manual operation of drum door for jamming etc. OK? Yes Is actuator operating OK? Yes Replace bearing. Refer Section 6.28 Yes Is drum inlet bearing tight? No - 65 - Is cabinet racked? Yes Level cabinet 8.5 Drum Does Not Rotate Is a fault code displayed? Yes Refer to Section 4.2 No Are the jockey pulleys free & belt aligned OK? Refit/repair as necessary Yes Are motor winding resistances correct? No Refer to Section 5.3.3 No Repair/replace Yes Is continuity of harness to motor OK? Yes Replace motor control module - 66 - 8.6 Clothes Take Too Long to Dry Clean No Are the inlet grill & burner inlet grill free of lint? Is a fault code displayed? No Are the conductivity contacts clean and connected correctly? Has the correct cycle been chosen for the type of clothes? No Are the lint filter & exhaust sensor free of lint? Is cabinet vented externally? No Has correct spin speed been used in washing machine? Is heater operating? No No Advise customer on correct venting methods No Advise customer to use correct spin speeds to aid drying No Clear restrictions. Advise customer on correct venting methods. Yes Yes Fit new seals. Refer Sections 6.20 and 6.26 Advise customer to use correct cycle Yes Yes Refer Section 8.2 (electric) or Section 8.3 (gas) No Yes Yes Clean & check sensor as per Section 5.2.8 Refer to Section 4.2 No Yes Clean and/or reconnect correctly. Check as per Section 5.4.5 Yes Are inlet & outlet duct seals OK? Yes Is the venting clear, not too long, not too many bends etc? Refer to installation instructions - 67 - 8.7 Noisy Repair Yes Are jockey pulleys free & belt aligned OK? Is ducting damaged? No Are drum vanes tight? Are motor or fan loose? No Is there excessive lint build up on the fan blades? Is the inlet duct seal OK? No Are outlet duct bearings OK? Is outlet duct seal OK? No Is the drum inlet bearing free? Yes Clean No Fit new outlet duct seal. Refer Section 6.20 Yes Yes Fit new bearing Refer Section 6.28 Rectify fault No Yes Fit new bearings. Refer Section 6.19 Yes No Yes Fit new inlet duct seal. Refer Section 6.26 Rectify fault Yes Yes Tighten vanes No Yes - 68 - Check manual operation of drum door for distortion etc. O.K? No Rectify fault Notes - 69 -