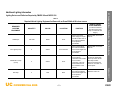
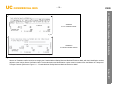
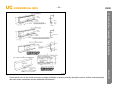
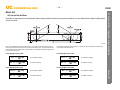
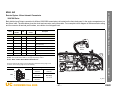
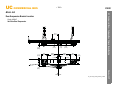
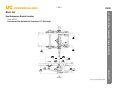
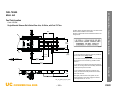
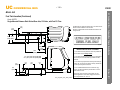
1
2011 BODY BUILDER
PBB-39100
(October, 2011 Edition)
57.8 (1468)
TO MIRROR
CF
BBC
107
(2717.9)
87.0 (2210)
FENDER WIDTH
CA
AF
FRONT
AXLE
59.4
(1509.3)
61.8 (1570)
TO
HEADLAMPS
85.0 (2158)
BUMPER WIDTH
BA
32.6
(828.4)
REAR
AXLE
74.4
(1889.5)
WB
OAL
UC Commercial Bus
Cutaway Bus Chassis Body Builder
TABLE OF CONTENTS
Preface .................................................................................................................. i
Additional Requirements: EPA
Certification of Incomplete Vehicles Manufactured by IC Bus™ .................. 10
Alterations To Completed Vehicles.............................................................. 15
Exterior Noise Certification Label ................................................................ 17
Additional Certification Label Information and Instructions.......................... 17
4x2 Specifications/Chassis Diagrams
Weight Distribution/Dimensions/Turning Radius Chart ........................... 19
Standard Features ....................................................................................... 20
UC COMMERCIAL BUS
Front Suspensions
Front Suspension Brackets.......................................................................... 79
Brakes
Brake Restrictions........................................................................................ 81
Hydraulic Control Unit Plumbing .................................................................. 82
Hydraulic Brake System With 3-Channel ABSc........................................... 83
Routing Guidelines....................................................................................... 84
Steering
Steering Gear Location/Dimensions............................................................ 85
Electrical
Battery Box Location.................................................................................... 95
Engine
Cooling Obstruction Guidelines.................................................................... 99
Engine Location ......................................................................................... 100
Engine Port Location.................................................................................. 101
Rear Axles & Rear Suspensions
Rear Axle Tread......................................................................................... 103
Rear Suspension Bracket Location............................................................ 104
Fuel Tanks
Fuel Tank Location..................................................................................... 109
-i-
October, 2011
Frames
General Frame Information.......................................................................... 27
General Frame Recommendations.............................................................. 27
Identification of Frame Rail Material ............................................................ 28
Frame Damage............................................................................................ 29
Welding and Reinforcement ........................................................................ 30
Corrosion ..................................................................................................... 32
Frame Alignment ......................................................................................... 32
Repair and Reinforcement Recommended Procedures .............................. 34
Bolt and Torque Information ........................................................................ 46
Special Service Tools .................................................................................. 55
After-Market Modifications ........................................................................... 58
Wheelbase Alterations................................................................................. 60
Frame Rail Specifications/Cross-Section.................................................... 61
Crossmembers ............................................................................................ 62
Front Axles
Front Axle Tread .......................................................................................... 77
UC Commercial Bus — Cutaway Bus Chassis Body Builder
Government Requirements
Your Obligations Under The Law................................................................... 1
Federal Motor Vehicle Standards (FMVSS) and Canadian Motor Vehicle Safety
Standards (CMVSS) ............................................................................... 3
Additional Lighting Information ...................................................................... 5
Frame Drilling Guidelines............................................................................. 67
Frame Drilling Restrictions -- Tapered Rails ................................................ 68
Frame Height Calculations........................................................................... 69
IC BUS
TM
UC COMMERCIAL BUS
Cab
Air Conditioning System Modifications ...................................................... 113
Cab Dimensions ........................................................................................ 114
- ii -
IC BUS
Door Swing Clearance ............................................................................... 116
Instrument Panel........................................................................................ 117
TM
UC Commercial Bus — Cutaway Bus Chassis Body Builder
October, 2011
PREFACE
Engineering Contacts:
Application Engineers
The UC Commercial Bus – Cutaway Bus Chassis Body Builder
contains information related to the features and specifications for the
UC Commercial Bus product line.
Curt Studebaker
(Manager)
331-332-2718
[email protected]
DuraStar
TerraStar
Melissa Gauger
(Manager)
331-332-3010
[email protected]
WorkStar
PayStar
Abhi Pamulaparthy
331-332-3463
abhilash.pamulaparthy@
navistar.com
Disclaimer
The Body Builder Book provides product information to assist those
who wish to modify these products for individual applications.
Navistar, Inc. does not recommend or approve any firm or party nor
make any judgements on the quality of the work performed by a
particular firm or party. Individuals who use the services of a Body
Builder must satisfy themselves as to the quality of the work.
The party installing a body, any other equipment, or making any
modifications to complete the vehicle for delivery and make it roadready is responsible to see that the completed vehicle complies with
all applicable certification procedures and safety standards, as may
be set forth in Federal, State, and local statues, rules and regulations.
Specifications, descriptions and illustrative material in this literature
are as accurate as known at time of publication but are subject to
change without notice. Navistar, Inc.cannot accept responsibility for
typographical errors which may have occurred. Illustrations are not
always to scale and may include optional equipment and accessories
but may not include all standard equipment.
IC Bus™ is a trademark of International Truck and Engine
Corporation.
Mark Netzly
331-332-6415
[email protected]
Steve Hartman
331-332-3695
[email protected]
Scott Laman
331-332-3997
[email protected]
Jon Wild
331-332-3462
[email protected]
Mike Marini
630-753-2016
[email protected]
Allen Scott
630-753-2018
allen.scott@navistar. com
Long Haul/
Regional Haul
Paul Nieuwlandt
260-450-4639
[email protected]
Vocational
Brent Bott
331-332-4290
[email protected]
Vocational
Paul Schunke
260-446-9004
[email protected]
Vocational
DuraStar, WorkStar,
TerraStar, PayStar
Vocational Engineers
Truck Body Integration
Brian Hicks
[email protected]
Jay Bissontz
[email protected]
Luis Leon
[email protected]
Lonny Lipp
[email protected]
Bill Pawelko
[email protected]
Chris Ripco
[email protected]
UC Commercial Bus — Cutaway Bus Chassis Body Builder
FOREWORD
Diamond Logic®
July 2012
UC COMMERCIAL BUS
- iii -
IC BUS
TM
UC COMMERCIAL BUS
- iv -
IC BUS
TM
PUBLICATION ORDERING INFORMATION
Revisions to the following product publications are available automatically
by subscribing to the Product Information Revision Service. Also, additional
copies of product publications can be ordered individually on a one-time
basis. When ordering, include the publication number, description and
quantity required.
UC Commercial Bus: Cutaway Bus Chassis Body
Builder Diagrams ................................................................... PBB-39100
Diamond Logic® Control Systems ..................................... PBB-71000
UC Commercial Bus — Cutaway Bus Chassis Body Builder
You can easily order UC Commercial Bus – Cutaway Bus Chassis Body
Builder or Diamond Logic® Control Systems books by accessing the
Marketing Resource Center and clicking the “Order Literature” link, using
your regular User ID and password.
July 2012
Your Obligations Under The Law
The important information in this section will acquaint you with U.S. and Canadian safety and emission standards that apply to Navistar, Inc.
vehicles sold in the two countries, of those laws that established these standards, and the identity of the parties responsible for certification
of compliance for both Complete Vehicles and Incomplete Vehicles. To the best of International's knowledge, it is correct as of the date of
this printing. International, however cannot accept responsibility for it's completeness and currency. User must ascertain this on his own.
The National Traffic and Motor Vehicle Safety Act of 1966, in the U.S., gave rise to the Federal Motor Vehicle Safety Standards (FMVSS). In
addition, The Environmental Protection Agency, through the Environmental Policy Act of 1969, set forth environmental protection standards.
In Canada, the Motor Vehicle Safety Act of 1970 established the Canadian Motor Vehicle Safety Standards (CMVSS) Act.
These standards place the responsibility for compliance of a Complete Vehicle on the vehicle and engine manufacturers. Any vehicle
purchased from International, as a Complete Vehicle as defined by section 568.3 of Title 49 of the Code of Federal Regulations (CFR) is
certified by International to comply with all applicable safety standards provided modifications or additions to the vehicle do not result in
non-compliance with applicable U.S. and Canadian standards to which Navistar, Inc. has certified compliance. Also, it is the responsibility of
every International dealer to assure that the service work or modifications that can affect compliance, performed on a new vehicle prior to
delivery to the customer, meets the requirements specified by all mandated standards.
It is the responsibility of the Final-Stage Manufacturer who typically installs a body or other equipment, or makes any modifications to an
Incomplete Vehicle supplied by International to certify compliance with the applicable standards for the vehicle when completed. Further, it
is the responsibility of the Final-Stage Manufacturer to determine, and fully comply with, any additional requirements of the several States
and Provinces. In addition, the Final-Stage Manufacturer must certify compliance with any other standards set forth in U.S. and Canadian
regulations, statutes and ordinances.
UC Commercial Bus — Cutaway Bus Chassis Body Builder
GOVERNMENT REQUIREMENTS
Penalties For Violations
1.
Any manufacturer who knowingly or unknowingly produces for sale a motor vehicle subject to the law, but which does not meet
all the applicable provisions of the law.
UC COMMERCIAL BUS
–1–
October, 2011
Violation of the provisions contained within the U.S. Federal Motor Vehicle Safety Standards is subject to fines of up to $5,000 per vehicle or
up to a maximum of $15,000,000. The following violations are subject to these penalties:
IC BUS
TM
UC COMMERCIAL BUS
–2–
Any party who sells or offers for sale a motor vehicle built after the effective date of a standard, which in the knowledge of the
selling party does not comply with the standard.
3.
Any party (manufacturer, dealer, body builder or other) who completes a vehicle for sale in compliance with the law but fails to
certify the completed vehicle in the prescribed manner.
4.
Any party who knowingly certifies a vehicle as complying, which does not in fact meet the requirements of the law.
Situations where the government was intentionally misled in regards to safety related defects are criminal violations and are punishable by a
maximum of 15 years in prison.
The U.S. Department of Transportation has declared its intent to institute procedures periodically to inspect vehicles subject to the law, and
to implement enforcement procedures that will permit detection of violations.
The requirements of the law are stringent and the penalties for violation are severe. It is therefore mandatory that all personnel involved in
any of the following aspects of motor vehicles become familiar with the provisions of the law as they relate to their responsibilities.
•
Installation of equipment sub-assemblies and/or bodies (Intermediate and Final Stage Manufacturer)
•
Sales
•
Preparation for delivery
•
Modification or conversion (Alterer)
•
Maintenance and repair
Violation of the Canada Motor Vehicle Safety Standards law carries similar penalties.
NOTE:
UC Commercial Bus — Cutaway Bus Chassis Body Builder
2.
IC BUS
The Canadian, Mexican, and U.S. vehicle standards, which regulate the manufacture of vehicles for sale in their
respective countries, may at any time exceed all or a portion of the mandated requirements of one or both of the other
two countries. This situation exists due to established standards or regulatory revisions in one country, which have not
yet been incorporated by the other(s).
October, 2011
Each of these countries require that any vehicle crossing its border(s) in commerce must comply with all applicable
standards of their country and comply with the standards that were in effect as of the date of manufacture of that
vehicle.
TM
Federal Motor Vehicle Standards (FMVSS) and Canadian Motor Vehicle Safety Standards (CMVSS)
For any vehicle manufactured by and purchased from International and defined by section 567.3 of Title 49 of the CFR as an Incomplete
Vehicle, consult the Incomplete Vehicle Document (IVD) provided with each Incomplete Vehicle to determine those particular safety
standards with which the vehicle complies. Any standards, with which International cannot certify compliance because of the level of
completion of that vehicle, become the responsibility of the Intermediate Manufacturer or Final-Stage Manufacture or both.
Table 1.1
FMVSS/CMVSS
NUMBER
TYPE OF CONFORMANCE*
SUBJECT
TYPE 1
TYPE 2
TYPE 3
Controls, Telltales, and Indicators
X
-
-
102
Transmission Shift Lever Sequence, Starter Interlock, and Transmission Braking
Effect
X
-
-
103
Windshield Defrosting and Defogging Systems
X
-
-
104
Windshield Wiping and Washing Systems
X
-
-
105
Hydraulic and Electric Brake Systems
-
X
-
106
Brake Hoses
X
-
-
108
Lamps, Reflective Devices, and Associated Equipment
-
X
-
111
Rearview Mirrors
-
X
-
113
Hood Latch System
X
-
-
115
Vehicle Identification Number
X
-
-
116
Motor Vehicle Brake Fluids
X
-
-
119
New Pneumatic Tires for Vehicles Other Than Passenger Cars
X
-
-
120
Tire Selection and Rims for Motor Vehicles with a GVWR of more than 4,536 kg
(10,000 lbs.)
X
-
-
121
Air Brake Systems
-
X
-
124
Accelerator Control Systems
X
-
-
UC COMMERCIAL BUS
–3–
October, 2011
101
UC Commercial Bus — Cutaway Bus Chassis Body Builder
The following standards of Title 49 of the CFR apply to all liquid fueled vehicles having a GVWR greater than 10,000 pounds. Presently, all
IC Bus™ trucks and buses are powered with diesel engines and have been designed to have a GVWR of greater than 10,000 pounds.
IC BUS
TM
UC COMMERCIAL BUS
–4–
IC BUS
Table 1.1
SUBJECT
TYPE OF CONFORMANCE*
TYPE 1
TYPE 2
TYPE 3
205
Glazing Materials
X
-
-
207
Seating Systems
-
-
X
208
Occupant Crash Protection
X
-
-
209
Seat Belt Assemblies
X
-
-
210
Seat Belt Assembly Anchorages
-
-
X
217
Bus Emergency Exits and Window Retention and Release
-
-
X
302
Flammability of Interior Materials
X
-
-
404
Platform Lift Installations in Motor Vehicles
-
-
X
1106
Noise Emmissions
-
-
X
*Type of Conformance:
Type 1: The vehicle, when completed, will conform to the standard if no alterations are made to the identified components.
Type 2: The vehicle, when completed, will conform to the standard if the specific conditions of final manufacture are met.
Type 3: Conformance with the standard cannot be determined based upon the components supplied on the vehicle therefore Navistar, Inc. makes no representation as the
conformity of the vehicle to the standard.
UC Commercial Bus — Cutaway Bus Chassis Body Builder
FMVSS/CMVSS
NUMBER
TM
October, 2011
Additional Lighting Information
Table 1.2
Required Vehicle Lighting Equipment for Buses with an Overall Width of 80 inches or more
REQUIRED
LIGHTING
EQUIPMENT
Headlamps
Turn signal (Front)
Identification Lamp
(Front)
QUANTITY
2 at least
2
3
2
UC COMMERCIAL BUS
COLOR
LOCATION
POSITION
(In inches measured
from the center of the
lamp on vehicle at curb
height.)
Not less than 22 or more
than 54.
Front
On the front at the
same height, an equal
number at each side of
the vertical centerline
as far apart as
practicable.
Not less than 15 or more
than 83.
At or near front
One on each side of
the vertical centerline
at the same height and
as far apart as
practicable.
Front
As close as practicable
to the vertical
centerline of the vehicle
or the vertical
centerline of the cab
where different from
the centerline of the
vehicle.
All three on same level
as close as practicable
to the top of the vehicle
with lamp centers
spaced not less than 6
inches or more than 12
inches apart.
Both on the same level
between 15 and 72.
Rear
One lamp each side of
the vertical centerline
at the same height and
as far apart as
practicable.
White
Amber
Amber
Red
–5–
October, 2011
Tail Lamp
HEIGHT ABOVE
ROAD SURFACE
UC Commercial Bus — Cutaway Bus Chassis Body Builder
Lighting Devices and Reflectors Required by FMVSS 108 and CMVSS 108
IC BUS
TM
UC COMMERCIAL BUS
–6–
IC BUS
Required Vehicle Lighting Equipment for Buses with an Overall Width of 80 inches or more
REQUIRED
LIGHTING
EQUIPMENT
HEIGHT ABOVE
ROAD SURFACE
QUANTITY
COLOR
(In inches measured
from the center of the
lamp on vehicle at curb
height.)
LOCATION
POSITION
One lamp each side of
the vertical centerline
at the same height and
as far apart as
practicable.
Both on the same level
between 15 and 72.
Stop Lamp
2
Red
Rear
Front Clearance Lamps
2
Amber
One on each side of
front
One on each side of
the vertical centerline
to indicate width.
Both on the same level
as high as practicable.
Red
One on each side of
rear
One on each side of
the vertical centerline
to indicate overall
width.
Both on the same level
as high as practicable.
Not less than 15.
One on each side
At or near midpoint
between front and rear
side marker lamps, if
vehicle over 30' in
length.
Between 15 and 60.
Rear Clearance Lamps
Side Marker Lamp,
Intermediate
2
2
Amber
2
Amber
One on each side
At or near midpoint
between front and rear
side reflectors if over
30' in length.
Reflex Reflector (Rear)
2
Red
Rear
One on each side of
vertical centerline, as
far apart as practicable.
Both on the same level,
between 15 and 60.
Reflex Reflector (Rear
Side)
2
Red
One on each side (rear)
As far to the rear as
practicable.
Between 15 and 60.
Reflex Reflector (Front
Side)
2
Amber
One on each side
(front)
As far to the front as
practicable.
Between 15 and 60.
October, 2011
Reflex Reflector
Intermediate (Side)
UC Commercial Bus — Cutaway Bus Chassis Body Builder
Table 1.2
TM
Required Vehicle Lighting Equipment for Buses with an Overall Width of 80 inches or more
HEIGHT ABOVE
ROAD SURFACE
QUANTITY
COLOR
LOCATION
License Plate Lamp
Rear
White
At rear license plate
To illuminate the
license plate from the
top or sides.
No requirements.
1
Side Marker Lamp
(Front)
2
Amber
One on each side
As far to the front as
practicable.
Not less than 15.
Side Marker Lamp
(Rear)
2
Red
One on each side
As far to the rear as
practicable.
Not less than 15.
One lamp on each side
of the vertical
centerline as far apart
as practicable.
Both on the same level,
between 15 and 83.
One as close as
practicable to vertical
centerline. One on
each side.
All three on the same
level as close as
practicable to the top of
the vehicles with lamp
centers spaced not less
than 6" or more than 12"
apart.
Both on the same level,
between 15 and 83.
No requirement.
Turn Signal (Rear)
Identification Lamp
(Rear)
2
Amber or Red
Rear
3
Red
Rear
POSITION
Vehicular Hazard
Warning Flashing
Lamps
2
Amber
Front
2
Amber or Red
Rear
One lamp on each side
of vertical centerline as
far apart as practicable.
Backup Lamp
1
White
Rear
Rear
UC COMMERCIAL BUS
–7–
(In inches measured
from the center of the
lamp on vehicle at curb
height.)
October, 2011
REQUIRED
LIGHTING
EQUIPMENT
UC Commercial Bus — Cutaway Bus Chassis Body Builder
Table 1.2
IC BUS
TM
UC COMMERCIAL BUS
6
7
15
2
6
IC BUS
LEGEND
8
1.
Headlamps (2) – White (4 optional)
2.
Side marker lamps. Front (2) – Amber
3.
Side reflectors. Front (2) – Amber
4.
Turn signal lamps. Front (2) – Amber
4a.
Turn signal lamps. Front (2) – Amber (Optional
location)
5.
Identification lamps. Front (3) – Amber
5a.
Identification lamps. Front (3) – Amber
(Optional location)
6.
Clearance lamps. Front (2) – Amber
7.
Side marker lamps. Rear (2) – Red
8.
Side reflectors. Rear (2) – Red
9.
Identification lamps. Rear (3) – Red
10.
Clearance lamps. Rear (2) – Red
11.
Reflectors Rear (2) – Red
12.
Stop lamps. Rear (2) – Red
13.
License plate lamp. Rear (1) – White
14.
Backup lamp. Rear (1) – White (location
optional provided optional requirements are
met)
16
1
2, 3, 4
10
(may be combined)
9
10
14
17
17
15.
Side marker lamps. Intermediate (2) – Amber
(if vehicle is 30' or more overall length)
12 & 18
16.
Side reflectors. Intermediate (2) – Amber (if
vehicle is 30' or more overall length)
17.
Turn signal lamps. Rear (2) – Amber or Red
18.
Tail lamps. Rear (2) – Red
12 & 18
11
11
13
Figure 1.1
0_0005
October, 2011
14
UC Commercial Bus — Cutaway Bus Chassis Body Builder
5
–8–
TM
EPA Part 205 Subpart B, CMVSS 1106 – Noise Emission For Medium And Heavy Trucks
Incomplete Vehicles identified as a Chassis Cab by Navistar, Inc., and all Complete Vehicles will comply with the requirements
specified by EPA PART 205 SUBPART B and CMVSS 1106 provided that no changes are made to the noise generating and/or
suppression equipment installed by IC Bus™.
EPA Part 86, CMVSS 1100 – Emission Control
Engines provided with IC Bus™ vehicles will comply with all applicable exhaust emission standards. Modifications to the vehicle and/or
engine, which will cause noncompliance, are prohibited by the regulations. For further information see the vehicle owner's manual and
the engine manual.
Replacement or Service Parts
The Motor Vehicle Safety Standards primarily specify the requirements and/or performance standards that a Complete Vehicle must comply
with. However, certain specific components of the vehicle, when sold by a dealer or distributor as replacement or service parts, are required
to comply with the requirements and/or performance standards specified by the standards. Certification of compliance must also be
provided for these components and those items that are subject to these procedures are as follows:
Windshield and window glass – FMVSS/CMVSS 205
•
Seat belts – FMVSS/CMVSS 209
•
Hydraulic brake hose – FMVSS/CMVSS 106
•
Hydraulic brake fluids – FMVSS/CMVSS 116
•
Lamps and reflective devices – FMVSS/CMVSS 108
•
Warning devices – FMVSS 125 (Reflective Triangle)
•
Tires and Wheels – FMVSS/CMVSS 119/120
•
Platform Lift System – FMVSS 403
The standards require that all of the above items manufactured for sale, whether for use in the manufacture of a vehicle or for sale as parts,
must comply with applicable provisions of the safety standards. Such items when sold by dealers or distributors must be labeled to certify
compliance. Such labeling may be placed on the part itself or on the container in which the part is shipped.
October, 2011
•
UC Commercial Bus — Cutaway Bus Chassis Body Builder
ADDITIONAL REQUIREMENTS: EPA
The items listed above that are manufactured by or for Navistar, Inc. as service parts will comply with all applicable standards as required.
UC COMMERCIAL BUS
–9–
IC BUS
TM
UC COMMERCIAL BUS
– 10 –
In accordance with the laws of the United States and Canada all vehicles manufactured for sale and sold for use in these countries must
comply with the applicable federal safety standards and certification of compliance must be provided with the vehicle.
Section 567.3 of Title 49 of the CFR defines an Incomplete Vehicle as an assemblage consisting, at a minimum, of chassis (including the
frame) structure, power train, steering system, suspension system, and braking system, in the state that those systems are to be part of the
completed vehicle, but requires further manufacturing operations, to become a completed vehicle. For an Incomplete Vehicle
manufactured by Navistar, Inc. to be classified as a Complete Vehicle, subsequent manufactures must mount a body or other load carrying
equipment on the chassis prior to delivery to the end user so that it can perform its intended function.
Incomplete Vehicle Manufacturer
Definition
Section 567.3 of Title 49 of the CFR defines an Incomplete Vehicle Manufacturer as a person who manufactures an incomplete vehicle by
assembling components none of which, taken separately, constitute an incomplete vehicle.
Compliance Responsibility
As manufactured by Navistar, Inc., an Incomplete Vehicle is built with all appropriate safety items that comply with the applicable regulatory
requirements to the extent that the vehicle's state of completion will permit. To obtain a Complete Vehicle status under section 567.3 of Title 49 of the
CFR, an Intermediate or Final-Stage Manufacturer must mount a body or other similar load carrying equipment on the chassis prior to delivery to the
end user.
Navistar, Inc. identifies an Incomplete Vehicle with one of the following designations depending on the vehicle's state of completion:
•
•
•
•
•
UC Commercial Bus — Cutaway Bus Chassis Body Builder
Certification of Incomplete Vehicles Manufactured by IC Bus™
IC BUS
Chassis Cab
Flat Back Cowl (FBC) Chassis Bus or School Bus
Partial Cab Bus or School Bus
Partial Cab Truck
Stripped Chassis
•
Name and mailing address of the Incomplete Vehicle manufacturer
•
Date of manufacture
•
Vehicle Identification Number
•
GAWR (Gross Axle Weight Rating) for each axle of the intended Complete Vehicle
•
GVWR (Gross Vehicle Weight Rating) of the intended Complete Vehicle
October, 2011
In accordance with section 568.4 of Title 49 of the CFR, Navistar, Inc. furnishes an Incomplete Vehicle Document (IVD) with each Incomplete
Vehicle. This document provides the following information:
TM
Vehicle Type into which the Incomplete Vehicle may appropriately be manufactured
•
Suitable tire and rim choice with inflation pressure
•
List of all Federal U.S. or Canadian safety standards applicable to the type of vehicle.
(Those standards to which the vehicle complies as produced by Navistar, Inc. will be identified.)
For all Incomplete Vehicles except those without a cab, the IVD is placed in the left hand door dispatch compartment. For Incomplete
Vehicles without a cab, the IVD is placed in a clear plastic envelope and strap locked to the radiator stay rod.
In accordance with section 567.5 of Title 49 of the CFR, IC Bus™ will also affix an Incomplete Vehicle Information Label to the hinge
pillar, door latch post, or door edge that meets the door latch post, next to the driver's seating position (reference Figure 1.3).
Manufactured in the U.S. or Mexico
O_0008
UC Commercial Bus — Cutaway Bus Chassis Body Builder
•
Manufactured in Canada
O_0008, O_0009
Figure 1.3 Incomplete Vehicle Information Labels
UC COMMERCIAL BUS
– 11 –
October, 2011
O_0009
IC BUS
TM
UC COMMERCIAL BUS
– 12 –
IC BUS
Canada
Figure 1.4 Canada National Safety Mark
and National Emissions Mark
O_0010
Intermediate Manufacturer
UC Commercial Bus — Cutaway Bus Chassis Body Builder
All IC Bus™ Incomplete Vehicles manufactured and sold in Canada must also have a Canada National Safety Mark and National Emissions Mark
affixed to the vehicle (reference Figure 1.4).
Definition
Section 567.3 of Title 49 of the CFR defines an INTERMEDIATE MANUFACTURER as a person, other than the Incomplete Vehicle Manufacturer or
Final Stage Manufacturer, who performs manufacturing operations on a vehicle manufactured in two or more stages.
Compliance Responsibility
In accordance with section 568.5 of Title 49 of the CFR each intermediate manufacturer is required to provide an addendum to the IVD for any
modification made by them to the incomplete vehicle that affects the validity of the compliance statements that appear in the IVD. The addendum
must provide the name and mailing address of the intermediate manufacturer and specify the changes that must be made to the IVD to reflect the
modifications that they made to the vehicle.
October, 2011
In accordance with section 568.4 of Title 49 of the CFR, Navistar, Inc. furnishes an Incomplete Vehicle Document (IVD) with each incomplete
vehicle. Navistar, Inc. will also affix an information label to the hinge pillar, door latch post, or door edge that meets the door latch post, next to the
drivers seating position as specified in part 567.5 of Title 49 of the CFR.
TM
Final Stage Manufacturer
As defined by section 567.3 of Title 49 of the CFR, a FINAL – STAGE MANUFACTURER is a person who performs such manufacturing operations
on an incomplete vehicle that it becomes a complete vehicle.
Compliance Responsibility
Section 568.6 of Title 49 of the CFR requires that the final – stage manufacturer shall complete the vehicle in such manner that it meets all applicable
safety standards in effect on the date of manufacture of the incomplete vehicle, the date of final completion, or a date between these dates. When
completed, the tractor must comply with all applicable Federal Motor Vehicle Safety Standards. Section 567.5 of Title 49 of the CFR stipulates that
the Final Stage Manufacturer is responsible for installing an appropriate certification label that must be securely and permanently affixed to the
completed vehicle.
For those situations when an entity other than an International facility certifies a completed vehicle, that entity becomes the Final – Stage
Manufacturer and has the option to create its own label or purchase a label from IC Bus™ service parts. Labels purchased from service parts do not
have the name of the Final - Stage Manufacturer and information about the vehicle. This information has been left blank. Final – Stage Manufacturers
that utilize the appropriate label and protective cover (435654C2) and provide the required information comply with the requirements specified by
part 567 of Title 49 of the CFR. The label (see Figure 1.4) is referred to as a “Final Stage Manufacturer Certification Label” and is identified with
International part number 436076C4 for a vehicle sold in the U.S. or 1698980C2 for a vehicle sold in Canada.
UC Commercial Bus — Cutaway Bus Chassis Body Builder
Definition
October, 2011
UC COMMERCIAL BUS
– 13 –
IC BUS
TM
UC COMMERCIAL BUS
– 14 –
IC BUS
O_0011
1698980C2 – Canada>
O_0012
UC Commercial Bus — Cutaway Bus Chassis Body Builder
436076C4 – U.S>
Figure 1.5 Final Stage Manufacturer Certification Label
Canada
Certified Final – Stage Manufacturers of Canadian vehicles must affix the Canada National Safety Mark and National Emissions Mark with their
identification number installed on it next to the final certification label shown above. Such authorization and identification number must be obtained
from the Minister of Transport at Transport Canada. [Reference: Figure 1.4 – "Canada National Safety Mark and National Emissions Mark".]
TM
October, 2011
Alterations To Completed Vehicles
Section 567.3 of Title 49 of the CFR defines an Altered Vehicle as a completed vehicle previously certified in accordance with section 567.4 or 567.5
that has been altered other than by the addition, substitution, or removal of readily attachable components or by minor finishing operations, before
the first purchase of the vehicle other than for resale, in such a manner as may affect the conformity of the vehicle with one or more FMVSS or the
validity of the vehicle's stated weight ratings or vehicle type classification.
Compliance Responsibility
In accordance with section 567.7 of Title 49 of the CFR, if a person alters a certified vehicle before the first purchase of the vehicle other than for
resale, the responsibility for compliance of the modified vehicle rests with the Alterer. The vehicle manufacturer's Certification Label and any
Information Labels shall remain affixed to the vehicle and the alterer shall affix an additional certification label that will supplement the certification
label originally furnished with the vehicle by Navistar, Inc. or the Final – Stage Manufacturer. This certification label must state the following:
“This vehicle was altered by (name of Alterer) in (month and year in which alterations were completed) and as altered it
conforms to all applicable Federal Motor Vehicle Safety Bumper and Theft Prevention Standards affected by the alteration and in
effect on the date of (no earlier than the date of manufacture of the certified vehicle as specified on the certification label and no
later than the date alterations were completed).”
This label (Reference Figure 1.6) is available from International service parts under Part No. 449893C5 for U.S. Certified Vehicles and Part
No.1676840C3 for Canada Certified Vehicles. Protective cover 435654C2 should be installed over this label.
UC Commercial Bus — Cutaway Bus Chassis Body Builder
Definition
October, 2011
UC COMMERCIAL BUS
– 15 –
IC BUS
TM
UC COMMERCIAL BUS
– 16 –
O_0013
1676840C3
for Canada Certified Vehicles
O_0014
UC Commercial Bus — Cutaway Bus Chassis Body Builder
449893C5
for U.S. Certified Vehicles
IC BUS
Figure 1.6 Vehicle Alterer Certification Label
Alterers of Canadian certified vehicles must apply the Canada National Safety Mark and National Emissions Mark, with their identification number,
adjacent to the Vehicle Alterer Certification label. Such authorization and identification number must be obtained from the Minister of Transport at
Transport Canada. [Reference Figure 1.4 – "Canada National Safety Mark and National Emissions Mark".
TM
October, 2011
Exterior Noise Certification Label
For Vehicles Built in the U.S.
O_00015
For Vehicles Built in Canada
UC Commercial Bus — Cutaway Bus Chassis Body Builder
Incomplete vehicles identified as a chassis cab by Navistar, Inc. have the vehicle exterior noise label (Reference Figure 1.7) permanently
attached in a readily visible position in the operators compartment. For incomplete vehicles other than a chassis cab, the final stage
manufacturer must assume responsibility and comply with EPA PART 205 SUBPART B, CMVSS 1106 – NOISE EMISSION FOR MEDIUM
AND HEAVY TRUCKS.
O_00016
Figure 1.7 Vehicle Exterior Noise Label
Additional Certification Label Information and Instructions
All labels must be fully filled out.
2.
All labels must be affixed to the vehicle in accordance with Sections 567 of Title 49 of the CFR or Canadian Motor Vehicle Safety
Regulations, Sections 6 and 7.
3.
No label shall be installed over another label.
4.
It is unlawful to affix an incorrect certification label to a vehicle.
UC COMMERCIAL BUS
– 17 –
October, 2011
1.
IC BUS
TM
UC COMMERCIAL BUS
– 18 –
UC Commercial Bus — Cutaway Bus Chassis Body Builder
THIS PAGE INTENTIONALLY LEFT BLANK
IC BUS
TM
October, 2011
Weight Distribution/Dimensions/Turning Radius Chart
Wheelbase
(in.)
Chassis Weight (lbs.) **
Cab
Dimensions (in.)
Front
Rear
Total
CA
CF
AF
OAL
4,659
3,308
7,967
Turning Radius
w/Bumper
To Curb
Clearance
158*
16035
83.6
183.6
100.0
290.6
25 ft. 10 in.
26 ft. 9 in.
169
16035
94.6
194.6
100.0
301.6
27 ft. 5 in.
28 ft. 4 in.
195
16035
120.6
218.6
98.0
325.6
31 ft. 2 in.
32 ft. 1 in.
Chart data based on vehicle with standard equipment. Artwork may show some optional equipment.
*
Dimension data and optional add-on weights for this model are based on the 158" wheelbase with 100” after frame unless otherwise noted.
**
Weight includes standard chassis, standard tires, oil and water, but less fuel.
UC Commercial Bus — Cutaway Bus Chassis Body Builder
4X2 SPECIFICATIONS/CHASSIS DIAGRAMS
4X2 SPECIFICATIONS/CHASSIS DIAGRAMS
July 2012
UC COMMERCIAL BUS
– 19 –
IC BUS
TM
UC COMMERCIAL BUS
– 20 –
IC BUS
MODEL 4X2
All ground dimensions on this chassis diagram are based on a bus with the following equipment and a loaded chassis
Item
Specification
Frame
FRAME RAILS High Strength Low Alloy Steel (80,000 PSI Yield); 7.375” x 3.079” x .312” (187.45mm x 78.2mm x 8.0mm) With Transition to 9.125”
x 3.079” x .312” (231.8mm x 78.2mm x 8.0mm); Includes 1.2” (30mm) Drop Under Cab; 335.2” (8512.2mm) Maximum OAL (Code 01CDN)
Front Axle
AXLE, FRONT NON-DRIVING (Dana Spicer D600-N) I-Beam Type, 6,000-lb Capacity (Code 02AGN)
Front Suspension
SUSPENSION, FRONT, SPRING Taper Leaf, Shackle Type; 6,000-lb Capacity; With Shock Absorbers (Code 03AGP)
Rear Axle
AXLE, REAR, SINGLE {Dana Spicer S110} Single B10 Reduction, With Offset Housing; 13,500-lb Capacity, 160 Wheel Ends (Code 14ACN)
Rear Suspension
SUSPENSION, RR, SPRING, SINGLE Vari-Rate; 13,500-lb Capacity (Code 14SAC)
Tires – Front & Rear
Goodyear, 225/70R, 19.5/LR-F (Code 7709440101)
UC Commercial Bus — Cutaway Bus Chassis Body Builder
Standard Features
TM
July 2012
Chassis Diagram – Plan View – Standard Cab
Maintain a 3" mininum clearance
fore and aft of tire; in area over
the truck axle (between the rails),
body crossmembers cannot
extend beyond the outside
dimension of the frame rail.
EXHAUST
SYSTEM
33.5*
(850.9)
* To inside of frame rail
EHCU HYD
BRAKE UNIT
BTR
FUEL TANK
2 BATTERY BOX
SYSTEM
FRONT
AXLE
UC Commercial Bus — Cutaway Bus Chassis Body Builder
MODEL 4X2
REAR
AXLE
UC_std_cab_plan_view
NOTE:
UC COMMERCIAL BUS
– 21 –
July 2012
This drawing should not be used to determine crossmember locations — that information can be found beginning on
page 62 in this book.
IC BUS
TM
UC COMMERCIAL BUS
– 22 –
IC BUS
MODEL 4X2
Maintain a 3" mininum clearance
fore and aft of tire; in area over
the truck axle (between the rails),
Body crossmember cannot
extend beyond the outside
dimension of the frame rail.
07WBE - TAIL PIPE LONG
HORIZ EXIT RIGHT
UNDER BUMPER
RIGHT SIDE MTD
FUEL TANK
EXHAUST
SYSTEM
BACK OF
STD CAB
33.6*
(852.8)
EHCU HYD
BRAKE UNIT
07WBG - TAIL PIPE LONG
HORIZ EXIT LEFT
UNDER BUMPER
2 BATTERY
BOX SYSTEM
FRONT
AXLE
REAR
AXLE
UC Commercial Bus — Cutaway Bus Chassis Body Builder
Chassis Diagram – Plan View – Standard Cab with Optional Right Side Mounted 55 Gallon Fuel Tank
* To inside of frame rail
UC_std_cab_plan_view_opt_rsm
NOTE:
This drawing should not be used to determine crossmember locations — that information can be found beginning on
page 62 in this book..
TM
July 2012
Chassis Diagram – Side View – Standard Cab
CF
BBC
107
(2717.9)
CA
AF
FRONT
AXLE
59.4
(1509.3)
REAR
AXLE
[3]
[2]
BA
32.6
(828.4)
GROUND LINE
74.4
(1889.5)
UC Commercial Bus — Cutaway Bus Chassis Body Builder
MODEL 4X2
WB
OAL
UC_side_view
Frame height values represent standard equipment and are intended for reference only. To compute actual frame height, refer to the frame height calculation section beginning on
page 69
Frame Height at centerline of front axle: unloaded – 26.23", loaded – 25.79"
[3]
Frame Height at centerline of rear axle: unloaded – 32.14", loaded – 29.30"
NOTE: Due to internal spring friction and manufacturing tolerances, these values may vary up to 0.5 inches. To achieve these nominal values directly after loading or unloading a vehicle, it may
be necessary to drive the vehicle for a short period.
UC COMMERCIAL BUS
– 23 –
July 2012
[2]
IC BUS
TM
UC COMMERCIAL BUS
– 24 –
IC BUS
MODEL 4X2
UC Commercial Bus — Cutaway Bus Chassis Body Builder
Chassis Diagram – Side View – Hood Tilt Dimensions
70
63.6
(1616)
MAX. HOOD
SWING HEIGHT
HOOD TILT
ANGLE 70
FRONT
AXLE
REAR
AXLE
TOP OF FRAME
GROUND LINE
UC_side_hood_tilt
TM
July 2012
UC Commercial Bus — Cutaway Bus Chassis Body Builder
MODEL 4X2
Chassis Diagram – Front and Rear View
57.8 (1468)
TO MIRROR
87.0 (2210)
FENDER WIDTH
61.8 (1570)
TO
HEADLAMPS
85.0 (2158)
BUMPER WIDTH
UC_front_rear_view
July 2012
UC COMMERCIAL BUS
– 25 –
IC BUS
TM
TM
IC BUS
– 26 –
UC COMMERCIAL BUS
UC Commercial Bus — Cutaway Bus Chassis Body Builder
July 2012
General Frame Information
Introduction
The frame is the structure that carries and supports the rated load under anticipated driving conditions and secures the major components
of a vehicle in their relative positions. The frame assembly consists of two sidemembers and depending upon the length of the frame, five
or more crossmembers.
General Frame Recommendations
It is very important that the frame be inspected periodically for cracks, buckling, crossmember loosening or other damage that may cause
eventual failure of the frame. Additional inspections should be made whenever the chassis has been overloaded or involved in an
accident. An alignment check IS NOT SUFFICIENT since local cracks, crossmember loosening or sidemember buckling will not
necessarily cause misalignment.
On reinforced sidemember sections, when cracks exist in either of the sidemember sections, the members must be separated for repair.
After separation follow the procedures for non-reinforced sections. The two sidemember sections MUST NOT be welded together. After
the weld repairs, the sections should be reinforced with the appropriate section and re-assembled with mounting bolts tightened to SAE
Grade 8 torque levels.
UC Commercial Bus — Cutaway Bus Chassis Body Builder
FRAMES
ALL MODELS
Drilling or Notching
Sidemembers should not be drilled or notched without approval from IC Bus™ Engineering. Do not exceed the maximum allowable
sidemember hole size in the unrestricted zones. See model specific books for illustrations.
Welding or flame cutting of the frame components is unacceptable because of the associated loss of fatigue strength. This restriction
applies not only to the heat-treated components, but also the high strength low alloy (HSLA) and low carbon steel components.
Exceptions to this are cases with IC Bus™ Engineering approval or for repair operations as described in this service manual section.
UC COMMERCIAL BUS
– 27 –
October, 2011
Welding or Flame Cutting
IC BUS
TM
UC COMMERCIAL BUS
– 28 –
Reinforcement to Increase Capacity
Reinforcement of the chassis frame to support either additional loading or concentrated loading does not increase vehicle load carrying
capacity unless it has been fully verified that all other vehicle components, such as the brake system, steering system, suspension
system, etc. can properly and safely support the increased loading.
Increase in Local Stress
In any modification of the chassis frame, the addition of holes, reinforcements, welds, clamps, splices, etc., may cause an increase in
the local stress in the frame at the point of the modification, therefore causing a stress concentration in the frame sidemember(s).
These local stress concentrations can significantly affect the life of the chassis frame. The specific effect which the stress concentrator
will have on the life of the chassis frame is influenced by the location of the stress concentration, the frequency and severity of the
loading, and the magnitude of stress concentration.
Deviation from the repair procedures in this section may void manufacturer's warranty.
Identification of Frame Rail Material
IC Bus™ chassis are manufactured with frame rails of different alloy steels and some are heat-treated. Each material must be handled in a
specific manner to assure maximum service life; therefore, the frame material must be determined before attempting repair or
modification.
UC Commercial Bus — Cutaway Bus Chassis Body Builder
To avoid serious personal injury, death or possible engine damage, when welding or using an acetylene torch always wear welding goggles and gloves.
Insure that acetylene and oxygen tanks are separated by a metal shield and are chained to a cart. Do not weld or heat areas near fuel tanks or fuel lines.
Utilize proper shielding around hydraulic lines.
IC BUS
IC Bus™ chassis are presently manufactured with frame rails of:
• High strength low alloy (HSLA) steel (50,000, 60,000 and 80,000 PSI yield strength)
• Heat treated steel (110,000 and 120,000 psi yield strength).
Heat-treated rails are marked on the inside of the section with a decal which cautions against welding, flame cutting or the addition of
holes in critical zones. These practices are restricted for all frame rails, however, heat-treated rails are much more sensitive to these
alterations.
October, 2011
Each type has different repair procedures. The frame rail material can be determined by inspecting the frame and consulting the dealer
vehicle lineset ticket and the sales data book.
TM
Frame Damage
• Straightening and reinforcing the frame.
• Repairing the damaged area and reinforcing the frame sidemember.
• Replacing the frame sidemembers and crossmembers.
Damage to the chassis frame, such as a crack in the frame sidemember or crossmember, which is not associated with impact damage,
may be an indication of overloading the vehicle. Damage to the chassis frame may also be an indication of the creation of locally high
stresses due to operating conditions or equipment mounting practices. Examples of overloading are:
1. Exceeding either the gross vehicle weight rating (GVWR) or the gross axle weight rating (GAWR) (loading the frame beyond its
design capacity).
2. Uneven load distribution.
3. Using the vehicle in operating conditions or with equipment it was not designed for.
Examples of creation of locally high stresses are:
1. Mounting bodies or equipment in a manner that causes stress concentrations and/or abrasive wear in either the flange or web
portion of the sidemember.
UC Commercial Bus — Cutaway Bus Chassis Body Builder
The major sources of frame damage are accidents, overloading the vehicle, and local overstressing due to a variety of causes. In accident
cases, the reasons for the damage are readily apparent. Such damage may often be repaired by:
2. Improper modification or repair of frame components.
3. Equipment which is susceptible to resonant vibration due to excess flexibility of its mounting.
Frame damage may also be caused by corrosion resulting from the contact between dissimilar metals.
UC COMMERCIAL BUS
– 29 –
October, 2011
Damage to the chassis frame, which is not associated with impact damage, should not be repaired until the cause of the damage has
been determined and corrective actions taken to prevent re-occurrence of the non-impact damage.
IC BUS
TM
UC COMMERCIAL BUS
– 30 –
IC BUS
Welding and Reinforcement
The essential elements of repairing the sidemembers are the restoring of BOTH the shape and local strength so that the load capacity is
at least as good as before the damage occurred. The sidemembers may look like new, but may have local strength reduction due to small
cracks or material strength reduction. Even if the frame has acceptable alignment and there is no gross deformation, local deformations
may reduce the strength in the area to be weld repaired. Examples of this are local bulges in the web (vertical portion) of the section and
buckling of the flanges. These local deformations must be repaired by straightening before proceeding with the weld repair.
Welding Precautions
When welding on any vehicle, care must be taken to prevent damage to the electronic components. Vehicles with ELECTRONIC
ENGINE CONTROL SYSTEMS require additional precautions.
CAUTION: On any vehicle, disconnect both the positive and negative battery cables from the battery before
welding on the vehicle. Attach the welder ground cable as close as possible to the part being welded.
To avoid serious personal injury, death or possible engine damage, when welding or using an acetylene torch always wear welding goggles and gloves.
Insure that acetylene and oxygen tanks are separated by a metal shield and are chained to a cart. Do not weld or heat areas near fuel tanks or fuel lines.
Utilize proper shielding around hydraulic lines.
UC Commercial Bus — Cutaway Bus Chassis Body Builder
The guidelines below deal with the general procedures for weld repair and reinforcement. Because of the many variables associated with
these repairs, it is recommended that your field service representative be consulted prior to undertaking the repair. This will also help to
determine whether a specific set of recommendations has already been developed for the case in question.
With an electronic engine controller (such as Celect), do not connect the ground cable to the control module(s) or the cooling plate. To
protect the control module(s), it is mandatory to remove all connectors going to the control modules.
The following is a general guideline for the steel frames:
To restore the strength of the frame rails after welding, the welded area must be reinforced using reinforcements as indicated in “Repair
and Reinforcement Recommended Procedures”.
October, 2011
Welding of the HSLA (50,000, 60,000 and 80,000 PSI yield strength) steel side member and the heat-treated (110,000 and 120,000
PSI yield strength) steel sidemember involves a significant reduction in the strength of the frame in the heat affected zones of the
weldment. This means that the frame in the welded region is no longer capable of carrying the same load or stress as the original
section.
TM
Reinforcement
Reinforcements (Figure 2.1) to increase load capacity are generally “full length”. The actual length of the reinforcement varies with the
model. Shorter, (approximately 7') rear suspension tandem liner reinforcements are available for some tractor models. Inverted “L” and
“C” channel reinforcements are available for most models. For models which do not have reinforcements necessary to contact Sales
Engineering to obtain reinforcement recommendations.
STANDARD
SIDEMEMBER SECTION
HEAVY DUTY
SIDEMEMBER SECTION
L-REINFORCEMENT
SIDEMEMBER SECTION
C-REINFORCEMENT
SIDEMEMBER SECTION
UC Commercial Bus — Cutaway Bus Chassis Body Builder
Welding must be done properly to make an effective repair. Therefore, only those who are properly trained and qualified should perform
the welding repairs in this section.
01_0011
Figure 2.1 Frame Rails and Reinforcements (Typical)
These reinforcements are generally installed on the outside of the sidemember, although certain models require “C” channel
reinforcements installed to the inside of the sidemember. Contact your IC Bus™ dealer regarding the required type of reinforcement.
NOTE:When an inside reinforcement is added, the lengths of the crossmembers will be affected.
UC COMMERCIAL BUS
– 31 –
October, 2011
Depending on model application, there will be other parts affected, such as spring brackets for example, which are bolted to the flange
as well as the web of the sidemember. To maintain proper alignment of the springs, these brackets may require replacement with new
brackets designed to accept the reinforcements. These brackets are available through your IC Bus™ parts department.
IC BUS
TM
UC COMMERCIAL BUS
– 32 –
IC BUS
Reinforcement Attachment
NOTE:The reinforcements should be bolted to the chassis frame using high strength SAE Grade 8 bolts not less than 0.5 inch (13 mm)
in diameter (refer to “Bolt and Torque Information”).
Corrosion
If aluminum and steel are allowed to come into direct contact with each other, a galvanic cell can be formed. In order for the cell to form,
the dissimilar metals must be in direct contact and an electrolyte, such as moisture, must be present. Aluminum is anodic with respect to
steel and will corrode when in the presence of steel. Corrosion of aluminum frame crossmembers will reduce the load carrying capacity of
the frame member and may eventually lead to the failure of the frame.
To prevent the formation of a galvanic cell, isolation techniques such as non-conductive or barrier type spacers or sealers must be used
so that the steel and aluminum are not in direct contact.
It is recommended that a sealer, such as Tectyl 400C or equivalent, be painted onto the surface of both the aluminum and steel, as well as
on the washers under the head of the bolts and nuts.
Frame Alignment
UC Commercial Bus — Cutaway Bus Chassis Body Builder
The reinforcements must never be welded to the original chassis sidemembers. High strength SAE Grade 8 bolts are to be used
to fasten the reinforcement to the sidemember. Existing bolt holes in the sidemembers should be used whenever possible.
The frame must be properly aligned as this affects body, axle and suspension mounting. If the vehicle has been involved in an accident or
has been overloaded, it is recommended that the frame be checked for proper alignment.
Pre-Alignment Inspection
Before checking alignment, park vehicle on level ground and set parking brake. Inspect frame assembly for loose parts, welds, cracks
and bends. Be sure to make all necessary repairs before attempting to check frame alignment.
A satisfactory method of checking the frame and axle alignment, particularly when a body and cab is on a chassis, is to:
1. Place a plumb bob against the point of measurement. All measurements must be taken with the plumb bob positioned against bare
metal.
2. Tack or tape pieces of paper to the floor directly under each point of measurement on the chassis as indicated by the letter “K” in
Figure 2.2.
October, 2011
Method of Checking Frame Alignment
TM
Method of Checking
After each measurement point has been carefully marked on the floor, proceed as follows:
1.
UC Commercial Bus — Cutaway Bus Chassis Body Builder
01_0012
Figure 2.2 Centerline of Chassis
Locate centerline of chassis by measuring front and rear end widths, using marks on floor.
If frame widths are within specification, draw centerline on floor, the full length of the chassis and continue with step 2.
If frame widths are out of specification, lay out centerline as follows:
2. Measure distance from centerline to opposite points marked over entire length of frame. Measurements should not vary more
than 0.12 inch (3.0 mm) at any point.
3. Measuring diagonals (A-A, B-B, C-C, D-D) will indicate point where misalignment occurs. If diagonals in each pair are within 0.12
inch (3.0 mm), that part of the frame included between points of measurement may be considered in satisfactory alignment. These
diagonals should intersect within 0.12 inch (3.0 mm) of the centerline.
UC COMMERCIAL BUS
– 33 –
October, 2011
Centerline can be drawn through the intersection of any one pair of equal diagonals (A-A, B-B, C-C, D-D) and center point of one end
of frame or through points of intersection of any two pairs of equal diagonals.
IC BUS
TM
UC COMMERCIAL BUS
– 34 –
Side Elevation Dimensions
Dimensions for side elevation of the frame should be checked at the points indicated and should not vary more than 0.12 inch (3.0
mm) from side to side. (They will differ fore and aft due to typical frame rake.)
Axle Alignment With Frame
After determining that the frame is properly aligned, the axle alignment with the frame should be checked by comparing diagonals.
If necessary, adjust axle-to-frame alignment.
Frame Straightening
NOTE:
Frame straightening should only be performed by a qualified frame alignment facility. Under no circumstance should frame
alignment be performed by inexperienced or unqualified service personnel.
Do not use heat to straighten.
Use of heat is not recommended when straightening heat-treated frame sidemembers. Heat will weaken these frame members,
consequently, all straightening should be done at room temperature. Add reinforcement per section if heat straightening is done.
Frame members which are bent or buckled sufficiently to show cracks or weakness after straightening should be replaced or
reinforced. Heat-treated frame members must not be intermixed with non-heat-treated members.
UC Commercial Bus — Cutaway Bus Chassis Body Builder
If the diagonals are not within specification, try loosening and re-tightening all cross-members. Then re-check alignment. Refer to the
“Bolt Torque Chart (Phosphate and Oil Coated)”. If frame is still out of alignment, the vehicle must be taken to a suitable frame
alignment establishment to confirm frame misalignment. If misalignment is confirmed, suitable measures must be taken to repair the
damage.
IC BUS
If one sidemember is to be replaced, the new member must match the former frame member in both cross-section and material
strength.
Repair and Reinforcement Recommended Procedures
1. When sidemember cracks caused complete separation or a visible deformation of the section.
2. When the sidemembers are extensively deformed. Consult with your field service representative and frame repair specialists if in
doubt.
October, 2011
In some cases of frame damage, the sidemembers must be replaced rather than repaired. Examples of this are:
TM
Preparation of Frame for Repair
To assure complete weld penetration, bevel the crack from one side when welding from one side. Bevel the crack from both sides
when welding from both sides. The existing crack in the sidemember must be entirely removed (FIgure 2.3). Widen the crack its full
length to 1/8 inch (3 mm). If required, a rubber backed disc grinder or high speed steel burr may be used.
Clean Surface to Weld
Surfaces to be welded and surfaces adjacent to the weld must be free of loose scale, slag, rust, grease, moisture, paint or other
material that could contribute to poor quality welds.
1. FRAME RAIL
2. WIDEN CRACK
3. BEVEL EDGES
Figure 2.3 Preparing For Weld Repair
UC Commercial Bus — Cutaway Bus Chassis Body Builder
Bevel Crack to Weld
01_0013
Welding
UC COMMERCIAL BUS
– 35 –
October, 2011
Electric arc-welding is recommended for repair of steel frames. The shielded arc method should be used because the heat generated
during welding is localized and burning of material is minimized using this method. Additional advantages are that the finished weld can
be ground flush and drilled as necessary.
IC BUS
TM
UC COMMERCIAL BUS
– 36 –
To avoid serious personal injury, death or possible engine damage, when welding or using an acetylene torch always wear welding goggles and gloves.
Insure that acetylene and oxygen tanks are separated by a metal shield and are chained to a cart. Do not weld or heat areas near fuel tanks or fuel lines.
Utilize proper shielding around hydraulic lines.
General Recommendations
IMPORTANT: To properly perform the repair procedure, the following rules must be observed:
All Steel Sidemembers
1. Welding should not be performed when surfaces are wet or exposed to rain, snow, high wind or when repair personnel are
exposed to inclement conditions. Frames exposed to inclement weather must be thoroughly cleaned and dried before the repair is
made.
2. Surface areas and edges to be joined must be clean and free of oil, grease, loose scale, rust, moisture, paint or other material
that could contribute to poor quality welds.
3.
Always avoid craters, notching and undercutting.
4.
Peen new welds prior to grinding to relieve stresses caused by shrinkage.
5. Grind all welds flush with the surrounding surfaces. Use a coarse grinder followed by smooth grind at 90° to the crack direction
to remove all of the coarse grind marks.
UC Commercial Bus — Cutaway Bus Chassis Body Builder
Shielded metal arc welding (SMAW); gas metal arc welding (GMAW), also known as metal inert gas (MIG) welding; gas tungsten arc
welding (GTAW), also known as tungsten inert gas (TIG) welding; or flux cored arc welding (FCAW) are recommended methods for
repair of steel frame members.
IC BUS
6. Inspect the weld repaired area carefully after grinding. Grind out any remaining cracks, notches or undercuts and repeat the
finishing and inspections.
7. For welding cracks to the edge of the sidemember flange, locate a run-off block at the edge as in to obtain a continuous weld
without undercuts. After welding, the run-off block should be cut off and the weld should be ground and inspected as in steps 5 and 6
above.
Invisible ultraviolet and infrared rays emitted in welding can injure unprotected eyes and skin. Protection such as welder's helmet with dark colored filter
lenses of the proper density must be used. GTAW or TIG welding will produce intense radiation, therefore, filter plate lenses of the deepest shade
providing adequate visibility are recommended. It is strongly recommended that persons working in the weld area wear flash safety goggles. Also wear
protective clothing.
October, 2011
8. Weld to the edges of the holes: The weld should continue into the hole to form a plug weld with a copper chill block on the
opposite side to help form the plug. The weld should then be finished as in steps 5 and 6 above and redrilled. Chamfer the hole
edges. If the hole was open and unused, install a Grade 8 bolt to help attach the weld repair reinforcement.
TM
After drying, the electrodes should be stored in an oven at a temperature of at least 250° F (121° C). If exposed to the atmosphere for
more than four (4) hours, the electrodes should be dried before use. Any moisture introduced into the weld could develop
porosity or embrittlement, leading to further cracking. Welding procedures will vary among different frame materials. Outlined
below are recommendations for welding of the various types of frames.
1. Preheat the frame member along the prepared weld joint to 500 to 600° F (260 to 316° C). Insure the area is clean and any
moisture present is eliminated.
2. Permit heated area to cool to 200° F (93° C) or below before welding is started. The weld repair area must be clean before
welding.
3. Either alternating current or direct current reversed polarity, combined with a short arc and beading or narrow weave technique,
may be used. Direct current reversed polarity is recommended.
4.
Slag should be removed after each pass and an interpass temperature of 200° F (93° C) should be maintained.
5. Grind smooth and flush with surrounding sidemember material. Grind the weld in a direction that is 90° to crack direction (Figure
2.4).
6.
Add reinforcement.
UC Commercial Bus — Cutaway Bus Chassis Body Builder
9. Electrodes: Only low hydrogen electrodes should be used. These should be purchased in hermetically sealed containers or
dried for two hours at a temperature between 450° F (232° C) and 500° F (260° C).
October, 2011
UC COMMERCIAL BUS
– 37 –
IC BUS
TM
UC COMMERCIAL BUS
– 38 –
IC BUS
UC Commercial Bus — Cutaway Bus Chassis Body Builder
1.V-GROOVE INTO SOUND METAL
2.COPPER CHILL STRIP
3.FRAME RAIL
4.V-GROOVE
5.CRACK
6.WELD-GROUND FLUSH WITH FRAME, GRIND IN
LONGITUDINAL DIRECTION OF SIDEMEMBER
Figure 2.4 Use of Chill Strip
01_0014
High Strength Low Alloy Steel Frames (50,000, 60,000 and 80,000 PSI Yield Strength
Any of the electric arc methods previously described may be used. The choice of a suitable electrode or wire depends somewhat
upon the equipment available for welding and the method selected.
October, 2011
The SMAW and the GMAW methods are preferred for welding the HSLA frames. The use of low hydrogen electrodes is
recommended. Refer to Table 1.8 for selection of recommended electrodes and wires, or refer to A.W.S. A.5 standard available from
www.aws.org for equivalent strength electrodes, wires or rods and power leads to be used in the welding methods. The double Vnotch weld preparation using the weld procedure shown in Figure 2.4 is the preferred welding method.
TM
Table 1.8 Recommended Electrodes and Wires
SMAW
GMAW
50,000
E7018
E70S-3
60,000
–
E70S-1B
80,000
E8018
E80S-D2
Amperage and voltage recommendations for welding are shown in Table 1.10 and 1.11.
Table 1.9 SMAW Method (HSLA Frames)
Position
Electrode Sizes Inch
Flat
Horizontal and Vertical
Welding Current
Speed
(inch/min.)
Amperes
Volts
.125
–
–
–
.125
110/140
20/14
24
Table 1.10 GMAW Method (HSLA Frames)
Position
Electrode Sizes Inch
Flat
Horizontal and Vertical
Welding Current
Speed
(Inch/Min.)
Amperes
Volts
.035
–
–
350/400
.035
190/220
20/30
350/400
UC Commercial Bus — Cutaway Bus Chassis Body Builder
Recommended Electrode and Wire
Material Strength PSI
7. Preheat frame rail along the weld joint to 500 to 600° F (260 to 316° C) to insure any moisture present is eliminated and to
prevent too rapid cooling of weld metal.
Direct current, reversed polarity is preferred. Weld using a short arc and a beading or narrow weave technique.
9.
Slag should be removed after each pass and an interpass temperature of 200° F (93° C) should be maintained.
10. Grind smooth and flush with surrounding sidemember material. Grind the weld in a direction that is at 90° to crack direction
(Figure 2.4).
October, 2011
8.
11. Add reinforcement.
UC COMMERCIAL BUS
– 39 –
IC BUS
TM
UC COMMERCIAL BUS
– 40 –
IC BUS
Amperage and voltage recommendations for welding are shown in Table 1.11.
Table 1.11 SMAW Method (Heat-treated Frames)
Position
Amperes
Voltage
Downhand
130/140
21/23
Overhead
130/140
21/23
Vertical Up
110/120
22/24
A heavy copper “chill” strip should be clamped to the rail side away from the groove to help control the temperature and cooling rate
during welding (Figure 2.4). Short lengths of discarded heavy copper electrical bus bars make suitable chill strips.
Preheat the frame rail along the crack area to 500-600° F (260-316° C). Either alternating current or direct current reversed polarity,
combined with a short arc and a beading or narrow weave technique may be used. Direct current reversed polarity is recommended.
Slag should be removed after each pass and an interpass temperature of 200° F (93° C) should be maintained. Grind smooth and
flush with surrounding sidemember material, in a direction that is parallel to the longitudinal axis of the sidemember (Figure 2.4).
A V-groove is ground from the side opposite the repair and the procedure outlined above repeated. “Chill” strips should be used
whenever possible. The V-groove ground on the opposite side of the repair should be deep enough to enter the sound metal of the
first weld repair as shown in Figure 2.4.
UC Commercial Bus — Cutaway Bus Chassis Body Builder
Heat Treated Frames (if equipped; 110,000 and 120,000 PSI Yield Strength)
When welding Heat Treated Frames (110,000 PSI and 120,000 Yield Strength), use low hydrogen electrodes which have superior
crack resistance and notch toughness similar to AWS-E-11018. This type electrode should be stored in a moisture-free container to
avoid porosity during welding.
TM
October, 2011
Reinforcement
The type, length, material and attachment techniques for reinforcements vary with the type and location of the crack and with
the loading conditions associated with the crack. It is not practical to give specific recommendations for all cases of frame cracking,
therefore the various types of reinforcements are identified with general descriptions of their applications and installation procedures.
To aid in making the distinctions between the more critical flange area and the less critical web area, critical zones are defined as
shown (2.4).
UC Commercial Bus — Cutaway Bus Chassis Body Builder
The strength of the sidemember in the weld joint repair region has been reduced by welding and this region must be reinforced
sufficiently to insure that the service life of the frame is not shortened. Reinforcement of the frame after welding is intended to reduce
the stresses in the weld repair region to a lower level than was previously permitted. Improper drilling will also reduce the strength of
the sidemembers. Refer to “Drilling or Notching”.
October, 2011
UC COMMERCIAL BUS
– 41 –
IC BUS
TM
UC COMMERCIAL BUS
– 42 –
UC Commercial Bus — Cutaway Bus Chassis Body Builder
SEE FRAME DRILLING DIAGRAMS
IN SPECIFIC MODEL BOOKS FOR
MINIMAL VA
VALUE
LUE FOR A AND B
01_0015
Cracks which occur in the critical zones have a greater probability of growing vertically through the section, and the reduced strength
after weld repair necessitates a more substantial reinforcement.
October, 2011
SEE FRAME DRILLING DIAGRAMS
IN SPECIFIC MODEL BOOKS FOR
MINIMAL VA
VALUE
LUE FOR A AND B
Figure 2.5 Reinforcement Application
IC BUS
TM
General Weld Repair Reinforcement Procedures
1. The thickness and material strength of the local plate, “L” and channel reinforcements should match the section being reinforced.
2. The corners of the reinforcements which will be in contact with the sidemember along the reinforcement edges must be chamfered
to prevent damage to the sidemember.
3. All sidemember reinforcements must be bolted to the web section within the zone shown in the frame drilling guidelines in the
specific model body builder book. The bolts must be of SAE Grade 8 or better, with integral flanges or with hardened flat washers and
must be tightened to Grade 8 levels.
4. Crossmember modification or replacement may be required if the reinforcement is on the same side as the crossmember.
5. Consider the potential effects of the reinforcements on the various components mounted to the frame. Check clearances for
suspension, wiring, plumbing and other controls.
6. For attachment of reinforcements, use existing bolts wherever this is practical.
7. The weld repaired area of the sidemember and all of the reinforcement should be primed and painted before reinforcement
installation. For corrosive environments, additional treatment of the interface may be needed.
Full Length Channel Weld Repair Reinforcements
UC Commercial Bus — Cutaway Bus Chassis Body Builder
These guidelines potentially affect the structural integrity of the frame assembly and are intended for those who have the equipment
and experience required to qualify as frame repair specialists.
“Full length” channel reinforcements are available through IC Bus™ dealers for most models. The actual length, starting location and
ending location vary from model to model. Different length reinforcements may also be available.
When applied as a repair reinforcement, these reinforcements DO NOT increase the load capacity of the vehicle. Their advantage in
this case is their availability. A disadvantage of this type is that it is likely to affect more of the components which mount to the frame. In
some cases this disadvantage may be offset by cutting the full length reinforcement to create a local reinforcement.
2.
Cases in which the weld repair is accompanied by extensive straightening of heat treated sidemembers.
UC COMMERCIAL BUS
– 43 –
October, 2011
Recommended Applications
1. Cases of repair of vertical cracks in either the top or bottom flanges at very low mileage.
IC BUS
TM
UC COMMERCIAL BUS
– 44 –
IC BUS
Full Length “L” Weld Repair Reinforcements
Recommended Applications
This type of reinforcement is recommended for cases of cracking at very low mileage where a web crack has extended beyond the
range for a flat plate reinforcement but ends short of the bend radius. It is also applicable to cases in which the cracking is
accompanied by flange buckling.
Application Procedures
1. For custom-fabricated full length “L” reinforcements, the section should be oriented up or down so that the flange is on the same
side as the damaged area.
2.
For maximum strength the flange should be on the outside of the section.
3.
Follow the general recommendations above for attachment of the reinforcement.
Local Channel Weld Repair Reinforcements
This type of reinforcement must be custom-fabricated either by cutting lengths from “full length” reinforcements or by forming from flat
stock (Figure 2.5).
Recommended Applications
1. Cases in which the weld repair extends into the sidemember flange after substantial service life.
2. Cases accompanied by extensive abrasive wear of the sidemember section. In these cases the length of the wear area should
be added to the length recommendations below.
UC Commercial Bus — Cutaway Bus Chassis Body Builder
Steps 1 and 2 above also apply to the full length “L” reinforcements available from IC Bus™. All of these are the inverted “L” type and
are designed for installation on the outside of the sidemember section (except 9000 Series) (Figure 2.5).
Application Procedures
1. The channel should be installed on the outside of the section for greater strength.
2. Figure 2.5 gives recommended dimensional data and attachment specifications for a typical installation. Holes drilled for the
attachment must be within the frame drilling guidelines in the specific model body builder book.
This type of reinforcement is also generally custom-fabricated. It has a greater tendency to loosen than a channel reinforcement
because, for vertical deflections of the frame assembly, it tends to bend about an axis different from that of the main sidemember
section. Because of this its length and/or attachment specifications are typically greater than for the channel type.
Recommended Applications
This type of reinforcement is recommended for cases in which the weld repair is confined to the web of the section but extends
beyond the application zone of the flat plate reinforcements shown in Figure 2.5.
October, 2011
Local “L” or Inverted “L” Weld Repair Reinforcements
TM
2.
The flange of the reinforcement should be oriented up or down so that flange is on the same side as the damaged area.
3.
For maximum strength the reinforcement should be installed on the outside of the sidemember section.
Flat Plate Weld Repair Reinforcements
This reinforcement is intended for the less critical, web portion of the sidemember section where typical cracking is due to local
stresses which tend to “diaphragm” or “dish” the web without creating appreciable stresses for overall bending of the section. Typical
crack patterns radiate out from the edge of a mounting bracket or crossmember or from a hole in the web. Cracks which radiate from a
web hole occupied by a fastener are frequently an indication of a defective joint, whether by the loosening of the fastener or poor joint
design (Figure 2.5).
Recommended Applications
The flat plate reinforcements are recommended for weld repairs in which the weld does not extend beyond the zone defined in
(Figure 2.5).
Application Procedures
1. A typical installation is shown in Figure 2.5. The length and height of the plate will vary with the size of the weld repair area. In
general it should be such that it will accommodate an array of reinforcement attachment bolts at a typical 3 to 5 inch (76 to 127 mm)
spacing all around the weld repair area.
UC Commercial Bus — Cutaway Bus Chassis Body Builder
Application Procedures
1. Figure 2.5 shows a typical installation for an “L” reinforcement on the inside of a sidemember section along with minimum
recommended dimensions.
2. The plate should generally be installed on the side opposite the component which transferred the local bending load into the
web.
3. The edges of the plate should be staggered with respect to the edges of other relatively stiff web mounted components to avoid
the creation of stress concentrations.
October, 2011
UC COMMERCIAL BUS
– 45 –
IC BUS
TM
UC COMMERCIAL BUS
– 46 –
IC BUS
Bolt and Torque Information
In bolted joints, the majority of the load is transferred by frictional force or clamping force between the members of the joint. The bolts must
be properly tightened to develop and maintain the desired clamping force. Operation of the joint with loose or improperly tightened bolts
can lead to failure of the joint. The bolts and nuts should be inspected periodically to insure that proper torque is maintained.
Bolts of high strength material conforming to SAE Grade 8 bolts should be used on all frames. For installation of reinforcements, 0.5 inch
(13 mm) diameter flange head bolts are recommended. The SAE Grade 8 bolt is identified by six radial line markings on the head of the
bolt (Figure 2.6). Nuts must be Grade 8 flange type.
1.SAE GRADE 5 BOLTS ARE IDENTIFIED
BY 3 RADIAL LINES
2.SAE GRADE 8 BOLTS ARE IDENTIFIED
BY 6 RADIAL LINES
Figure 2.6 Bolt Identification
01_0016
These bolts, 0.5 inch (13 mm) diameter flange head type, should be tightened to 110 to 120 ft-lbs. (149 to 163 Nm) based on new bolts
and nuts lubricated with engine oil. Whenever possible, hold the bolt and tighten the nut.
UC Commercial Bus — Cutaway Bus Chassis Body Builder
Most frames are assembled with bolts and nuts. Others are riveted. Bolts must always be used when attaching a reinforcement.
Rivets should be replaced by bolts as required when the frame is repaired and reinforced.
If frame components are aluminum, flange head bolts and nuts, or bolts with hardened flat washers must be used. If modification or repair
requires replacement of existing bolts with new bolts or bolts of a greater length, the old flange head nuts should not be used with new
standard bolts.
October, 2011
Careful consideration is given to the number, location and sizes of frame bolt holes in the design of a vehicle. The number, location and
sizes of additional bolt holes put in the frame subsequent to manufacture of the vehicle can adversely affect frame strength. The adverse
effect of additional bolt holes can be minimized by following the guidelines.
TM
Huckbolt Fasteners (HP 8)
Figure 2.7 Huckbolt Fasteners
01_0017
Removal
The swaged collar cannot be unscrewed due to the locking grooves on the HP 8 fastener. Removal requires a Huck Collar Cutter or
the collar can be split with an air chisel while supporting the opposite side of the collar. When the collar is split, the fastener can be
driven out with a punch.
UC COMMERCIAL BUS
October, 2011
Figure 2.8 Collar Can Be Split With an
Air Chisel
UC Commercial Bus — Cutaway Bus Chassis Body Builder
Huckbolt HP 8 fasteners are used in various positions in frame rail construction. Advantages to this style fastener are consistent clamp
load and a high resistance to loosening due to vibration. The need to recheck fastener torque is eliminated.
01_0018
– 47 –
IC BUS
TM
UC COMMERCIAL BUS
– 48 –
CAUTION: In the event that Huck fasteners are removed, in order to retain the same joint integrity, it is
strongly recommended that new Huck fasteners be used for attachment/reattachment of components.
Installation
NOTE: Huckbolt HP 8 fasteners cannot be installed without Huck installation equipment.
1.
Install the HP 8 fastener into the component and frame hole.
2.
Place the collar over the fastener pintail (See Figure 2.9)
Figure 2.9 Place Collar Over Fastener Pintail
UC Commercial Bus — Cutaway Bus Chassis Body Builder
CAUTION: The HP 8 fastener is not intended for re-use. To do so can result in damage to the vehicle
frame or components attached to the frame.
IC BUS
01_0019
TM
October, 2011
3.
Place the Huck installation tool over the HP 8 fastener pintail (See Figure 2.10).
4.
01_0020
Activate the Huck installation tool.
NOTE:The Huck installation tool creates a pulling force on the fastener, seating the bolt head and closing the gap between the
mating surfaces. The collar is swaged into the pintail locking grooves developing clamping force (See Figure 2.11). As pulling forces
further increase, the body of the fastener separates at the breakneck (See Figure 2.12), completing installation.
UC COMMERCIAL BUS
01_0021
Figure 2.12 Body of Fastener Separates at Breakneck
– 49 –
01_0022
October, 2011
Figure 2.11 Clamping Force is Developed
UC Commercial Bus — Cutaway Bus Chassis Body Builder
Figure 2.10 Place Installation Tool Over Fastener Pintail
IC BUS
TM
UC COMMERCIAL BUS
– 50 –
Figure 1.13
Figure 2.13 Huck-Spin Collar
01_0023
UC Commercial Bus — Cutaway Bus Chassis Body Builder
Huck-Spin Fasteners
Description
Huck-Spin fasteners are used in various positions in frame rail construction. The installed fastener has a collar that is cold-worked or
swaged over the grooved pin Figure 2.13. Advantages to this style fastener are consistent clamp load and a high resistance to
loosening due to vibration. The need to recheck fastener torque is eliminated.
IC BUS
TM
October, 2011
Figure 2.14 Cutting Collar with Wheel Grinder
01_0024
Drilling on opposite sides of the collar may also be used (Figure 2.15).
UC COMMERCIAL BUS
October, 2011
Figure 2.15 Drilling the Collar
UC Commercial Bus — Cutaway Bus Chassis Body Builder
Remove
The collar cannot be removed by twisting or hammering. The collar must be cut longitudinally to the extent of the swaged section.
This can be accomplished with a small wheel grinder (Figure 2.14).
01_0025
– 51 –
IC BUS
TM
UC COMMERCIAL BUS
– 52 –
IC BUS
Another method of splitting the collar is to chisel the walls of the collar (Figure 2.16).
01_0026
When the collar has been opened over the length of the swaged portion on two opposite sides (Figure 2.17), the fastener can be
removed. The fastener may need to be hammered to remove the collar.
01_0027
October, 2011
Figure 2.17 Collar with Reliefs for Removal
UC Commercial Bus — Cutaway Bus Chassis Body Builder
Figure 2.16 Using a Chisel to Split the Collar
TM
In the event the collar doesn't come loose, use a chisel or suitable tool to peel the collar sections back (Figure 2.18).
01_0028
The fastener will come free when sufficient collar material has been pulled away (Figure 2.19).
UC COMMERCIAL BUS
October, 2011
Figure 2.19 Fastener Removed
UC Commercial Bus — Cutaway Bus Chassis Body Builder
Figure 2.18 Collar Peeled Back to Assist Removal
01_0029
– 53 –
IC BUS
TM
UC COMMERCIAL BUS
– 54 –
IC BUS
Figure 2.20 Huck-Spin Installation
01_0030
UC Commercial Bus — Cutaway Bus Chassis Body Builder
Install
The Huck-Spin is installed by spinning the collar onto the fastener. The pulling action of the Huck-Spin installation tool swages the
collar into the grooves of the fastener and then automatically disengages from the fastener (Figure 2.20).
TM
October, 2011
Special Service Tools
UC Commercial Bus — Cutaway Bus Chassis Body Builder
Hydraulic Unit – Model No. 940
Used for removal and installation of the Huck Bolt.
Figure 2.21 Hydraulic Unit
01_0031
October, 2011
UC COMMERCIAL BUS
– 55 –
IC BUS
TM
UC COMMERCIAL BUS
– 56 –
IC BUS
Nose Assembly Tool
01_0032
7Hydr
Table 1.12 Nose Assembly Tool
Description
Tool Number
For 1/2 Dia. Fastener
99-1484
For 5/8 Dia. Fastener
99-1481
UC Commercial Bus — Cutaway Bus Chassis Body Builder
Figure 2.22 Nose Assembly Tool
TM
October, 2011
Hydraulic Installation Tool
01_0033
Table 1.13 Hydraulic Installation Tool
Description
Tool Number
For 1/2 Dia. Fasteners
557
For 5/8 Dia. Fasteners
585
Collar Removal Tool
Table 1.14 Collar Removal Tool
Description
Tool Number
For 1/2 Dia. Fasteners
516
For 5/8 Dia. Fasteners
520
UC Commercial Bus — Cutaway Bus Chassis Body Builder
Figure 2.23 Hydraulic Installation Tool
Order tools from:
Phone: (914) 331-7300
P.O. Box 2270, One Corporate Drive
Fax: (914) 334-7333
Kingston, NY 12401
UC COMMERCIAL BUS
– 57 –
October, 2011
Huck International, Inc.
IC BUS
TM
UC COMMERCIAL BUS
– 58 –
IC BUS
After-Market Modifications
For information on cutting of the frames to lengthen the frames or modify the wheelbase, refer to “Wheelbase Alterations”.
The addition or installation of this special equipment on the vehicle can significantly affect the loading of the chassis frame. In some cases,
it may be necessary to reinforce the frame. Care must be exercised to insure that the gross vehicle weight rating (GVWR) and/or the
gross axle weight ratings (GAWR) are not exceeded.
Installation of this special equipment may involve State and Federal requirements which affect vehicle certification for noise emissions,
exhaust emissions, brake requirements, lighting system requirements, etc. The specialized equipment installer is responsible for the
safety and durability of their product and, in addition, is responsible to insure that the equipment and its installation comply with all
applicable State and Federal Department of Transportation requirements and OSHA regulations.
Addition of specialized equipment may have a significant effect on other vehicle components, such as the brake system, steering system,
suspension system, etc. Simple reinforcement of the chassis frame may not be adequate to provide safe operation of the vehicle.
In any modification of the chassis frame, the addition of holes, reinforcements, welds, clamps, splices, etc. may cause an increase in the
local stress in the frame at the point of the modification. These local stress concentrations can significantly affect the life of the chassis
frame. The specific effect which the stress concentrator will have on the life of the chassis frame is influenced by the location of the stress
concentration, the frequency and severity of the loading, and the type of stress concentration. Any modification of the frame may void the
manufacturer's warranty.
UC Commercial Bus — Cutaway Bus Chassis Body Builder
Cutting the frame behind the rear axle to shorten the frame is acceptable. Mechanical cutting or sawing is preferred to torch cutting.
Whenever it is necessary to cut the frame, the sidemember should be cut at an angle of 90° to the longitudinal axis.
Refer to “Welding and Reinforcement” information on page 30.
45°
Figure 2.24 Frames – Preparation of Joint for Welding Extension
Weld as Shown
01_0034
October, 2011
Cut at 45° Angle
TM
Correct Grind Direction, Correct Grind Depth
Correct Grind Direction, Incorrect Grind Depth
Length
of Frame
Length
of Frame
Incorrect Grind Direction, Correct Grind Depth
Incorrect Grind Direction, Incorrect Grind Depth
Figure 2.25 Cross-sectional Views Showing Correct and Incorrect Methods of Finishing the Joint
01_0035
UC Commercial Bus — Cutaway Bus Chassis Body Builder
Length
of Frame
Length
of Frame
October, 2011
UC COMMERCIAL BUS
– 59 –
IC BUS
TM
UC COMMERCIAL BUS
– 60 –
IC BUS
Wheelbase Alterations
The preferred method for altering the wheelbase is to slide the rear axle forward or rearward as required. Invariably, this requires the
lengthening or shortening of air lines, brake lines, electrical lines, and driveline. Extreme care should be taken in the modification of the air
lines, brake lines, electrical lines and driveline to insure that they operate as reliably as those with which the vehicle was manufactured.
If the wheelbase is lengthened, a reinforcement may be required. Consult your IC Bus™ dealer before lengthening the wheelbase.
In those instances when it is necessary to cut and weld the frame to alter the wheelbase, the frame must be reinforced with a channel-type
reinforcement of the same strength as the original frame material in the area where the frame has been cut, extending at least two feet on
either side of the cut and bolted as specified in Figure 2.5 shown earlier in this section.
If the frame was built with both a main frame and a reinforcement, the reinforcement should be removed before cutting the main frame. It
is essential that a new one-piece outer channel reinforcement be obtained rather than cutting and re-using the original
reinforcement. The original frame should also be reinforced with an inner channel reinforcement, extending at least two feet beyond the
cut(s) on either side of the cut(s). The reinforcement must be of the same material as the original frame. Blank and pre-punched chassis
channel reinforcements are available through your dealer parts department.
On both medium and high strength aluminum frames, re-welding to lengthen the frame is not recommended. Refer to “Reinforcement”
and “Reinforcement Attachment” for additional information.
UC Commercial Bus — Cutaway Bus Chassis Body Builder
Shortening or lengthening a wheelbase is an added expense for the customer. Therefore, it is often to the customer's benefit to order a
chassis from the factory with the desired wheelbase rather than to alter the wheelbase of the chassis on-site.
TM
October, 2011
Frame Rail Specifications/Cross-Section
FRONT
OF FRAME
1.2
(30)
A
B
A
B
C
1.2
(30)
BACK
OF FRAME
C
3.08
.25
3.08
11.30
3.08
10.306
7.375
.312
9.125
.312
.312
3.33
SECTION A-A
SECTION B-B
SECTION C-C
01_0240
Side Rail Descriptions & Reinforcement Description[2]
Section
Dimensions (inches)
Depth
Width
Thickness
Yield Strength
Nominal (psi)
[1]
Section Modulus
(inches3)
Material #
Maximum
Resisting Bending Moment
(In.-Lbs.)
Nominal
Maximum
Design
8.68
8.08
694,700
646,000
26.05
24.17
2,084,000
1,933,000
11.70
10.93
935,800
874,000
UC Commercial Bus — Cutaway Bus Chassis Body Builder
MODEL 4X2
Drop Center Side Rail — Kick-Up at Rear Suspension Rearward
A-A
3.08
0.312
80,000
B
10.306
3.08
0.312
80,000
B
11.30
3.33
0.25
80,000
B
9.125
3.08
0.312
80,000
B
B-B
C-C
B=
High Strength Low Alloy Steel
[1] =
Section Modulus:
Maximum Tolerance: All frame dimensions are at maximum tolerance; used by some competitors as advertised values.
Nominal: Calculated using design dimensions – indicates the design load capacity of the frame.
[2] =
Reinforcement dimensions and specifications are shown in italicsl
UC COMMERCIAL BUS
– 61 –
October, 2011
7.375
IC BUS
TM
UC COMMERCIAL BUS
– 62 –
IC BUS
MODEL 4X2
UC Commercial Bus — Cutaway Bus Chassis Body Builder
Crossmembers
Crossmember Location - 158” Wheelbase (WB)
CENTERLINE OF
FRONT AXLE
158” WB
CENTERLINE OF
REAR AXLE
157.5
(4000)
102.5
(2603)
100” AF
94.3
(2394)
100.4
(2550)
79
(2006)
A
B
C
D
A CENTER BEARING CROSSMEMBER
C DOUBLE STAMPED CROSSMEMBER WITH FLAT FLANGE UP
D AF FUEL TANK CROSSMEMBERS
UC_crossmembers_158wb
October, 2011
B SINGLE STAMPED CROSSMEMBER WITH FLAT FLANGE UP
TM
UC Commercial Bus — Cutaway Bus Chassis Body Builder
MODEL 4X2
Crossmembers
Crossmember Location - 169” Wheelbase (WB)
CENTERLINE OF
FRONT AXLE
CENTERLINE OF
REAR AXLE
169.3
169” WB
(4300)
100” AF
102.5
(2603)
100.4
(2551)
79
(2006)
A
B
C
W/AF FUEL TANK
64.7
(1645)
D
N/AF FUEL TANK
October, 2011
A SINGLE STAMPED CROSSMEMBER WITH FLAT FLANGE UP
B DOUBLE STAMPED CROSSMEMBER WITH FLAT FLANGE UP
C
AF FUEL TANK CROSSMEMBERS
D SINGLE STAMPED CROSSMEMBERS WITH FLAT FLANGE DOWN
UC_crossmembers_169wb
UC COMMERCIAL BUS
– 63 –
IC BUS
TM
UC COMMERCIAL BUS
– 64 –
IC BUS
MODEL 4X2
UC Commercial Bus — Cutaway Bus Chassis Body Builder
Crossmembers
Crossmember Location - 195” Wheelbase (WB)
CENTERLINE OF
REAR AXLE
CENTERLINE OF
FRONT AXLE
195” WB
194.9
(4950)
128.9
(3275)
98” AF
104.3
(2648)
79
(2006)
93.7
(2379)
A
98.4
(2501)
B
A
C
D
W/AF FUEL TANK
64.7
(1645)
E
N/AF FUEL TANK
B CENTER BEARING CROSSMEMBER
C DOUBLE STAMPED CROSSMEMBER WITH FLAT FLANGE UP
D AF FUEL TANK CROSSMEMBERS
E SINGLE STAMPED CROSSMEMBERS WITH FLAT FLANGE DOWN
UC_crossmembers_195wb
October, 2011
A SINGLE STAMPED CROSSMEMBER WITH FLAT FLANGE UP
TM
MODEL 4X2
1.9
(48)
5.8
(147)
33.5
(851)
UC Commercial Bus — Cutaway Bus Chassis Body Builder
Crossmember Diagrams
5.8
(147)
8.4
(214)
ENGINE CROSSMEMBER
3.0
(76)
4.1
(103)
6.5
(166)
4.0
(102)
SINGLE CROSSMEMBER
01_0246
8.2
(208)
33.5
(851)
12.1
(307)
3.2
(81)
01_0247
UC COMMERCIAL BUS
– 65 –
October, 2011
4.0
(102)
IC BUS
TM
UC COMMERCIAL BUS
– 66 –
IC BUS
MODEL 4X2
UC Commercial Bus — Cutaway Bus Chassis Body Builder
Crossmember Diagrams (continued)
3.8
(97)
3.2
(81)
1.9
(48)
11.6
(295)
5.8
(147)
33.5
(851)
8.1
(206)
"C" CHANNEL AF AND BTR
FUEL TANK CROSSMEMBER
4.6
(117)
4.0
(102)
3.0
(76)
6.6
(167)
DOUBLE STAMPED CROSSMEMBER
01_249
33.5
(850.8)
26.8
(680)
10.7
(270.8)
2.4
(61)
10.2
(260)
10.2
(260)
1.5
(37.8)
0.8
(20.3)
5
(126.2)
5.3
(133.4)
5.3
(133.4)
UC_btr_crossmember
October, 2011
2
(51)
1.8
(46.3)
TM
MODEL 4X2
The drilling of the frame sidemember presents no unusual difficulty. Standard high speed steel drills of good quality will serve provided they
are sharpened properly and not overheated during sharpening or use.
Hole Location Guidelines
1.
Never drill holes into the restricted areas of the frame rails. Refer to diagrams on the following pages.
2.
Use existing holes whenever possible.
3.
Maintain a minimum of 0.75 inch (19 mm) of material between holes.
4.
There should not be more than three holes located on a vertical line.
5.
Bolt holes should be no larger than is required for the size of bolts being used, in no instance larger than 11/16 (.688 inch).
6.
If reinforcements are used, avoid drilling holes closer than 2.0 inches (51 mm) from the ends of the reinforcement.
7.
Bolts must be periodically checked to insure that the proper torque and clamping force is maintained.
8.
Never drill any holes in the flanges of the frame rail.
UC Commercial Bus — Cutaway Bus Chassis Body Builder
Frame Drilling Guidelines
October, 2011
UC COMMERCIAL BUS
– 67 –
IC BUS
TM
UC COMMERCIAL BUS
– 68 –
IC BUS
MODEL 4X2
25.3
(643)
1.5
(38)
A
1.5
(38)
10.0
(254)
2.0
(50)
A
CENTERLINE
REAR SUSPENSION
NO DRILL ZONE
CENTER
OF DRILLED
HOLES
1.5
(38)
AS SHOWN
SECTION A-A
01_0245
DO NOT leave less than 0.75" (19mm) of material between holes
DO NOT drill holes in the following areas:
•
Distance from top of top flange to centerline of hole
•
Distance from bottom of bottom flange to centerline of hole
UC Commercial Bus — Cutaway Bus Chassis Body Builder
Frame Drilling Restrictions -- Tapered Rails
TM
October, 2011
Frame Height Calculations
At Centerline of Front Axle
The front frame height (at the centerline of the front axle) may be calculated using the following equations. Refer to the illustration for a
visual explanation of the symbols used in these calculations
Df =
′
′
Wheel axis to bottom of frame in unladen position. Refer to tabulated
data.
Df′ = Wheel axis to bottom of frame in loaded position. Refer to tabulated
data.
F=
Frame rail height. Refer to tabulated data.
SLR = Static Loaded Radius. The distance from the wheel axis to the
ground for a properly inflated, fully loaded (loaded to its maximum
capacity) tire. To obtain tire dimensions, contact the tire
manufacturer.
R1 =
Tire Radius (one half of tire outside diameter) not mounted on the
vehicle. To obtain tire dimensions, contact the tire manufacturer.
R2 =
Calculated Tire Radius on an unloaded chassis. The value of R2 is
calculated using the following method.
R 2 = R 1 – .2 ( R 1 – SLR )
01_0045
Y=
Y′=
Front Frame Height at the front axle centerline in unloaded
condition.
Front Frame Height at the front axle centerline in loaded condition.
Y = Df + R2 + F
(for unloaded condition)
(for loaded condition)
NOTE: Values calculated for Y and Y′ are strictly for the frame height at the
front axle centerline. For frame heights at the front of the frame rail,
refer to “Model 4x2” on page 74 in this book.
– 69 –
October, 2011
Y′ = D f ′ + SLR + F
UC COMMERCIAL BUS
UC Commercial Bus — Cutaway Bus Chassis Body Builder
MODEL 4X2
IC BUS
TM
UC COMMERCIAL BUS
– 70 –
IC BUS
MODEL 4X2
Front Suspension
Type
Spindle to Bottom of Frame
Capacity
Code
6,000-lb
03AGP
Parabolic
Unloaded – Df
Loaded – Df′
3.92"
5.42"
7,000-lb
03AGN
3.42”
UC Commercial Bus — Cutaway Bus Chassis Body Builder
Frame Height Data – Front
TM
October, 2011
MODEL 4X2
The rear frame height (at the centerline of the rear axle) may be calculated using the following equations. Refer to the illustration for a visual
explanation of the symbols used in these calculations.
Dr =
′
′
01_0046
Wheel axis to bottom of frame in unladen position.
Refer to tabulated data.
Dr′ =
Wheel axis to bottom of frame in loaded position. Refer
to tabulated data.
F=
Frame rail height. Refer to tabulated data.
SLR = Static Loaded Radius. The distance from the wheel
axis to the ground for a properly inflated, fully loaded
(loaded to its maximum capacity) tire. To obtain tire
dimensions, contact the tire manufacturer.
R1 =
Tire Radius (one half of tire outside diameter) not
mounted on the vehicle. To obtain tire dimensions,
contact the tire manufacturer.
R2 =
Calculated Tire Radius on an unloaded chassis. The
value of R2 is calculated using the following method.
R 2 = R 1 – .2 ( R 1 – SLR )
Z=
Z′=
Rear Frame Height at the rear axle centerline in
unloaded condition.
Rear Frame Height at the rear axle centerline in loaded
condition.
Z = Dr + R2 + F
Z′ = D r ′ + SLR + F
UC COMMERCIAL BUS
– 71 –
(for unloaded condition)
(for loaded condition)
Values calculated for Z and Z′ are strictly for the
frame height at the rear axle centerline. For
frame heights at the rear of the frame rail, refer
to “Model 4x2” on page 74 in this book.
October, 2011
NOTE:
UC Commercial Bus — Cutaway Bus Chassis Body Builder
At Centerline of Rear Axle
IC BUS
TM
UC COMMERCIAL BUS
– 72 –
IC BUS
MODEL 4X2
“Bump Height” refers to the maximum distance of the tires above the side rails as the rear axle of the bus travels over an object. Bump
Heights are important in the selection of bus bodies since it may be necessary to incorporate wheelwells into the body floor to allow
adequate clearance for tire travel.
Straight Bump Height is used when both sets of wheels travel over an object at the same
time, such as a parking lot speed bump.
01_0047
01_0048
Wheel Axis to bottom of frame in straight bump position. Refer to tabulated data.
Tire radius (one-half of tire outside diameter) not mounted on the vehicle. To obtain tire dimensions, contact the tire manufacturer.
Frame Rail Height. Refer to tabulated data.
Straight Bump Height = R1 - Dr″ - F
Cocked Bump Height = Straight Bump Height + 3.5 In.
October, 2011
Dr″=
R1 =
F=
Cocked Bump Height refers to the condition that exists when only one set of rear wheels
travels over an object — an example of this would be climbing over a curb when turning a
corner. The Cocked Bump Height Charts presented here assume a 7° deflection from
horizontal.
UC Commercial Bus — Cutaway Bus Chassis Body Builder
Bump Heights – Rear
TM
Frame and Bump Height Data – Rear
Frame Code
Frame Rail Height (F)
01CDN
9.125"
Rear Suspension
Spindle to Bottom of Sidemember
Type
Capacity
Unloaded – Dr
Loaded – Dr′
Bump – Dr″
Vari-Rate
13,500-lb
7.95"
5.55"
3.70"
IROS
12,000-lb
8.00”
8.00:
3.00”
UC Commercial Bus — Cutaway Bus Chassis Body Builder
MODEL 4X2
October, 2011
UC COMMERCIAL BUS
– 73 –
IC BUS
TM
UC COMMERCIAL BUS
– 74 –
IC BUS
MODEL 4X2
Now that we have learned to calculate the frame height at both the front and rear axle centerlines, we can determine the frame height values
at both rail ends.
´
´
´
´
01_0049
First we must determine the rake of the frame (i.e., the slope of the frame from front end to
rear end). If the front end of the frame is higher than the rear end (i.e., Y>Z or Y′>Z′) then the
truck is said to have a negative rake. In this situation, the equations for determining the frame
height at the rail ends are:
For situations where the rake is positive (i.e., Y<Z or Y′<Z′) the equations for determining
frame height at the rail ends are:
Frame Height @ Front End of Rail:
Frame Height @ Front End of Rail:
Y–Z
FG = Y + ⎛ --------------- x BA⎞
⎝ WB
⎠
Y′ – Z′
FG′ = Y′ + ⎛ ------------------- x BA⎞
⎝ WB
⎠
(for unloaded condition)
(for loaded condition)
Frame Height @ Rear End of Rail:
Y′ – Z′
RG′ = Z′ – ⎛ ------------------- x AF⎞
⎝ WB
⎠
Z′ – Y′
FG′ = Y′ – ⎛ ------------------- x BA⎞
⎝ WB
⎠
(for unloaded condition)
(for loaded condition)
Frame Height @ Rear End of Rail:
(for unloaded condition)
(for loaded condition)
Z–Y
RG = Z + ⎛ --------------- x AF⎞
⎝ WB
⎠
Z′ – Y′
RG′ = Z′ + ⎛ ------------------- x AF⎞
⎝ WB
⎠
(for unloaded condition)
(for loaded condition)
October, 2011
Y–Z
RG = Z – ⎛ --------------- x AF⎞
⎝ WB
⎠
Z–Y
FG = Y – ⎛ --------------- x BA⎞
⎝ WB
⎠
UC Commercial Bus — Cutaway Bus Chassis Body Builder
At Front and Rear Rail Ends
TM
UC Commercial Bus — Cutaway Bus Chassis Body Builder
MODEL 4X2
Bumpers
Standard Frame Rails and Standard Steel Bumper (01LRR)
23.5
(597)
2.7
(69)
6.2
(158)
21.4
(543)
42.5
(1079)
34.6
(880)
26.8
(681)
21.7
(552)
3.5
(89)
3.0
(75)
2.9
(74)
4.0
(101)
5.7
(144)
4 BUMPER
MOUNTING
HOLE LOCATIONS
MEGA-BRACKETS
BUMPER MTG
BRACKETS
01_0241
October, 2011
85
(2158)
For license plate mounting, use a tapping self-drilling hex head 1/4-14 x 5/8 screw.
UC COMMERCIAL BUS
– 75 –
IC BUS
TM
UC COMMERCIAL BUS
– 76 –
UC Commercial Bus — Cutaway Bus Chassis Body Builder
THIS PAGE INTENTIONALLY LEFT BLANK
IC BUS
TM
October, 2011
MODEL 4X2
Front Axle Tread
TREAD
= Distance (width) between vertical centerlines of single tires at opposite ends of axle,
or between vertical centerlines of dual spacing (D.S.) at opposite ends of axle.
TIRE SECT
= Overall width of new tire at top of tire under maximum load, including 24-hour inflation
growth, and including protective side ribs, bars and decorations recommended by tire
manufacturer.
(Tire Section)
TREAD + TIRE SECT
(Tread plus Tire Section)
= Overall Width of axle, rim, and tire assembly at top of tires under maximum load
recommended by tire manufacturer.
TREAD - TIRE SECT
(Tread minus Tire Section)
= Distance (width) between near sides of tires at opposite ends of axle at top of tire
under maximum load recommended by the tire manufacturer.
SLR
(Static Loaded Radius)
= Distance from ground to centerline of hub when tires are correctly inflated and under
maximum load recommended by tire manufacturer.
02_0003
UC Commercial Bus — Cutaway Bus Chassis Body Builder
FRONT AXLES
The table shown here lists tread information for various wheel/axle combinations. Tread dimensions are not dependent on tire size. Other
dimensions explained here are related to tread and require tire dimensions. Please contact your tire supplier (or consult the International
Sales Data Component Book (PDB-70000) for tire dimensions.
Wheel/Rim
Size
Disc
19.5 x 6.00
UC COMMERCIAL BUS
Material
– 77 –
02ADZ
02AGN
Hydraulic Brake
Steel
73.36
73.36
Aluminum
73.80
73.80
October, 2011
Type
Axle Code
IC BUS
TM
UC COMMERCIAL BUS
– 78 –
UC Commercial Bus — Cutaway Bus Chassis Body Builder
THIS PAGE INTENTIONALLY LEFT BLANK
IC BUS
TM
October, 2011
UC Commercial Bus — Cutaway Bus Chassis Body Builder
FRONT SUSPENSIONS
MODEL 4X2
Front Suspension Brackets
- with 6,000-lb – 7,000-lb Front Suspension
41.0
(1042.2)
8.4
(213)
29.1
(738.0)
5.1
(129)
7.1
(179.5)
3.7
(92.9)
.7
(18.7)
TRANSITION
OF FRAME
2.2
(56.1)
MEGA
BRACKET
6.2
(156.2)
9.5
(241.6)
03_0026
October, 2011
UC COMMERCIAL BUS
– 79 –
IC BUS
TM
UC COMMERCIAL BUS
– 80 –
UC Commercial Bus — Cutaway Bus Chassis Body Builder
THIS PAGE INTENTIONALLY LEFT BLANK
IC BUS
TM
October, 2011
MODEL 4X2
Brake Restrictions
Safety Measures
Should it be necessary to modify the braking system, for example in connection with a wheelbase alteration, the following must always be
observed:
•
Make sure that the brake circuits are not altered. Before any part of the braking system is dismantled, mark the brake pipes and connections
concerned, or make a sketch showing the original routing.
•
Avoid joints, preferably change the entire brake pipe.
•
Preferably, use bent brake pipes instead of elbow unions so as not to affect the brake application/release times.
•
Install the brake pipes in positions where they are protected against damage and heat.
•
Install the air tanks so that the drain valves still function well and are easy to reach.
CAUTION: When a brake pipe is replaced or jointed, use only genuine IC Bus™ parts of the correct type.
NOTE:
On vehicles with ABS brakes, the sensor cable must not be jointed. If necessary, it must be completely replaced.
UC Commercial Bus — Cutaway Bus Chassis Body Builder
BRAKES
October, 2011
UC COMMERCIAL BUS
– 81 –
IC BUS
TM
UC COMMERCIAL BUS
– 82 –
IC BUS
MODEL 4X2
Hydraulic Control Unit Plumbing
1/4” TUBE TO PRIMARY
MASTER CYLINDER
1/4" TUBE TO
LEFT FRONT
NT
FRO
REAR CAB
CROSSMEMBER
1/4" TUBE TO
REAR CIRCUIT
1/4" TUBE TO
SECONDARY
MASTER CYLINDER
1/4" TUBE TO
RIGHT FRONT
October, 2011
04_0108
UC Commercial Bus — Cutaway Bus Chassis Body Builder
Hydraulic Control Unit Plumbing
TM
Hydraulic Brake System With 3-Channel ABSc
UC Commercial Bus — Cutaway Bus Chassis Body Builder
(with Brake System Code 04087)
UC COMMERCIAL BUS
– 83 –
October, 2011
04_0079
IC BUS
TM
UC COMMERCIAL BUS
– 84 –
IC BUS
ALL MODELS
If modifications are made to International vehicles with the addition or re-routing of tubing the following guidelines found in the Federal Motor
Carrier Safety Regulations Pocketbook, section 393.45, should be followed:
•
Be designed and constructed in a manner that insures proper, adequate, and continued functioning of the tubing or hose.
•
Be installed in a manner that insures proper continued functioning of the tubing or hose.
•
Be long and flexible enough to accommodate without damage all normal motions of the part to which it is attached.
•
Be suitably secured against chafing, kinking, or other mechanical damage.
•
Be installed in a manner that prevents it from contacting the vehicle's exhaust system or any other source of high temperatures.
UC Commercial Bus — Cutaway Bus Chassis Body Builder
Routing Guidelines
TM
October, 2011
MODEL 4X2
Steering Gear Location/Dimensions
Code 05PSN
3.1
(77.7)
1.7
(42.7)
7.7
(195.6)
13.4
(339.7)
12.6
(320.7)
12.5
(317.7)
5.4
(137.2)
.5
(11.9)
8.5
(215.9)
2.1
(52.7)
UC Commercial Bus — Cutaway Bus Chassis Body Builder
STEERING
.5
(13.6)
2.9
(73.3)
14.7
(372.9)
05_0039
x
UC COMMERCIAL BUS
– 85 –
October, 2011
3.6
(91.9)
IC BUS
TM
UC COMMERCIAL BUS
– 86 –
UC Commercial Bus — Cutaway Bus Chassis Body Builder
THIS PAGE INTENTIONALLY LEFT BLANK
IC BUS
TM
October, 2011
EXHAUST SYSTEM
Navistar, Inc. has a responsibility to supply, install and ensure that the engines and aftertreatment emission control devices comply with the
certification requirements of the U.S. Environmental Protection Agency (EPA) and the California Air Resources Board (ARB). The
aftertreatment devices may include a combination of particulate filters, catalysts, catalytic converter, and temperature and pressure sensors,
along with other components.
Proper long-term operation of these components requires controlling exhaust stream temperatures and the exhaust flow pattern throughout
the system. This controls the required location of the components as well as the insulation of the various parts of the system.
For this reason, application guidelines for aftertreatment and tailpipe installations are much more complex and restrictive than in the past.
Navistar, Inc. will ensure correct factory installation of aftertreatment devices to assure compliance with the certification requirements.
Modified systems could damage the engine, aftertreatment system and other truck systems and void the warranty coverage. In that regard,
Navistar, Inc. will make it a policy to procure and correctly install the appropriate aftertreatment devices pursuant to applicable specifications
and application guidelines. That brings with it the benefit of certified systems that will be fully covered under warranty provided the vehicle is
properly maintained and not modified beyond the extent allowed by the Body Builder book.
Meeting Legal Requirements
It is the responsibility of the person performing modifications to the vehicle to ensure that the vehicle, in its final configuration,
conforms to any applicable law regarding emission control, noise level and applicable safety standards.
UC COMMERCIAL BUS
– 87 –
October, 2011
The following guidelines are meant to clarify the allowable modifications for aftertreatment systems. Please consult applicable federal, state
and local laws and requirements in conjunction with this document to ensure compliance to those requirements. Also, refer to applicable
vehicle warranty information before performing any modifications to the vehicle. Non-compliance to the requirements of the warranty may
nullify it in its entirety.
•
Where possible, buses first and foremost should be ordered directly from the factory that meets the body installation requirements
so that the minimum, or no modification of the exhaust system will be required.
•
Where this is not possible, if another exhaust configuration is available from the factory that closer meets the need of the body
installation, it is permissible to completely replace one exhaust configuration with the better choice exhaust system provided that
would have been available with the same engine, and the clearance guidelines in this reference are followed.
•
Exhaust Gas Temperatures may be as high as 800× C during vehicle operation. Precautions should be taken to ensure that
materials used in the vicinity of the exhaust system and exhaust gas stream can withstand these temperatures or are safely
shielded.
UC Commercial Bus — Cutaway Bus Chassis Body Builder
GUIDELINES FOR AFTERTREATMENT MODIFICATIONS
IC BUS
TM
UC COMMERCIAL BUS
– 88 –
IC BUS
TURBO PIPE
All Modifications to Turbo Pipe Location, Geometry and Materials MUST be approved by Navistar, Inc.
If so equipped, heat shields and protective wraps must be maintained on the vehicle to ensure the proper performance of the Aftertreatment
Module and for the protection of the installed truck systems.
Never mount any additional harnesses or other equipment to the Aftertreatment Module.
AFTERTREATMENT MODULE
The function of the Aftertreatment Module is to catch soot exhausted from the engine and convert it to ash. It is critical that the temperature
and pressure sensors’ wiring remain intact for the Aftertreatment Module to perform as designed. It is critical to maintain the location of the
Aftertreatment Module as installed from the factory to ensure its proper operation. Any modifications to the Aftertreatment Module without
the written approval of Navistar, Inc. may significantly reduce the performance of the Aftertreatment Module and VOID any applicable
warranty.
All Modifications to Aftertreatment Module Location, Geometry, Materials, Wiring, Sensors or Tubing MUST be approved by Navistar, Inc..
UC Commercial Bus — Cutaway Bus Chassis Body Builder
The function of the Turbo Pipe is to deliver exhaust gases from the engine to the Aftertreatment Module so that temperature losses are
minimized and so that the flow pattern of the exhaust gases maximizes the efficiency of the Aftertreatment Module. Any modifications to this
piping without written approval of Navistar, Inc. may significantly reduce the performance of the Aftertreatment Module and VOID any
applicable warranty.
If so equipped, heat shields and protective wraps must be maintained on the vehicle to ensure the proper performance of the Aftertreatment
Module and for the protection of the installed truck systems.
Never mount any additional harnesses or other equipment to the Aftertreatment Module.
The function of the Temperature Control Device (if so equipped) is to reduce the exit exhaust gas temperature emitted from the
Aftertreatment Device. This device has been specifically designed to draw in cooler air to mix with the hotter exhaust gases. It is critical that
the openings in the device that draw in cooler air remain unblocked of debris or other equipment. This device is critical to ensure that the
emitted temperatures of the exhaust are minimized. Any modifications to the Temperature Control Device without the written approval of
Navistar, Inc. may significantly reduce the efficiency of the Temperature Control Device and significantly increase the emitted gas
temperatures, and VOID any applicable warranty.
If so equipped, any installed Temperature Control Device MUST remain as part of the exhaust piping.
October, 2011
TEMPERATURE CONTROL DEVICE
TM
If changing the location, special attention must be given to maintaining clearances around the exhaust piping, as well as maintaining the
structural integrity and exhaust backpressure of the system. Tables included in this document provide recommended clearances and back
pressure estimation procedures.
EXHAUST PIPING MODIFICATIONS
Never modify the internal structure of the Turbo Pipe, the Aftertreatment Module or the Temperature Control Device.
When lengthening or shortening tailpipes beyond the Aftertreatment Module, observe the following precautions:
1. Use the same size and material to extend or shorten the original pipe.
•
Refer to Table 3.1 for proper material and sizing of pipes when extending or shortening tailpipe sections.
2. Adding additional extensions and bends will change internal exhaust gas pressure, which could result in damage to the Aftertreatment
Module or other engine components as well as a reduction in fuel economy.
•
Use the worksheets provided to compute the change in backpressure of the modified exhaust piping. Ensure that the limits within
the worksheet are met to avoid performance issues and to maintain warranty of the engine and aftertreatment system.
3. Support additional piping using rubber mounts approved by International Truck and Engine Corporation (P/N 3533072C1 Isolator and P/
N 3561980C1 Metal Sleeve). Add one additional support for every 4 linear feet of exhaust piping added, evenly spaced along the length of
the chassis.
UC Commercial Bus — Cutaway Bus Chassis Body Builder
Changes to the location of the Temperature Control Device relative to the Aftertreatment Module must meet federal emissions, noise and
safety requirements. The responsibility for demonstrating that legal requirements are met when modifications have been made belongs to
the modifier of the system.
The exhaust piping should be routed so that the Temperature Control Device, if so equipped, is at the end of the exhaust pipe and oriented
in the same manner as received from the factory.
UC COMMERCIAL BUS
– 89 –
October, 2011
Route all piping with minimum clearances to other chassis components as shown in Table 3.2.
IC BUS
TM
UC COMMERCIAL BUS
– 90 –
IC BUS
MOUNTING OF BODY EQUIPMENT
As a result of the increased temperatures, clearances to exhaust components will need to be increased compared to pre-2007 model year
clearances.
Typical installation clearances used for pre-2007 model year engines and exhaust systems should be increased by 40% to ensure that body
equipment is not damaged by the increased heat of these systems.
Do not mount any Body Equipment within 8 inches (200mm) of the exhaust pipe outlet to avoid damage from hot exhaust gases.
When modifying other chassis systems, maintain clearances shown in Table 3.2.
UC Commercial Bus — Cutaway Bus Chassis Body Builder
In comparison to vehicles produced prior to 2007, exhaust components surface temperatures and exhaust gas temperatures will typically be
higher.
TM
October, 2011
TABLE 3.2 – MINIMUM CLEARANCES BETWEEN EXHAUST SYSTEM
COMPONENTS AND OTHER CHASSIS COMPONENTS
MaxxForce® 7
Component
Minimum Clearance,
in (mm)
4”
Electric Harness
6.0 (150)
0.065”
Electric Harness (w. heat guard)
4.0 (100)
Mechanical Cable
2.0 (50)
Fuel Tube, metal
6.0 (150)
Fuel Tube, rubber or plastic
6.0 (150)
Brake Tube, metal
4.0 (100)
Brake Tube, rubber or plastic
4.0 (100)
Tire
4.0 (100)
Fuel Tank
4.0 (100)
Pipe Material
409 Stainless Steel
Pipe Diameter
Wall Thickness
UC Commercial Bus — Cutaway Bus Chassis Body Builder
TABLE 3.1 – TAILPIPE EXTENSION, MATERIAL AND PIPE SIZING
October, 2011
UC COMMERCIAL BUS
– 91 –
IC BUS
TM
UC COMMERCIAL BUS
– 92 –
IC BUS
Allowable backpressure tailpipe modification worksheet
MaxxForce® 7
Exhaust Configuration:
Horizontal - Horizontal
a
Qty of 90× elbows added
____ x
0.11 =
______________
b
Qty of 60× elbows added
____ x
0.09 =
______________
c
Qty of 45× elbows added
____ x
0.08 =
______________
d
Qty of 30× elbows added
____ x
0.06 =
______________
e
Feet of straight pipe added
____ x
0.02 =
______________
f
Temperature Control Device Pressure
0.70
g
Pipe Exit Pressure
0.31
UC Commercial Bus — Cutaway Bus Chassis Body Builder
Engine:
Total Modification Backpressure (Add a-g)
Allowable Backpressure Limit
3.3
Is allowable Backpressure Limit GREATER than Total Modification Backpressure?
October, 2011
If YES, Modifications MEET Engine Manufacturer’s Guidelines and CAN be performed.
If NO, Modifications will NOT MEET Engine Manufacturer’s Guidelines and CANNOT be performed.
TM
Horizontal Aftertreatment
Code 07BDV – Right Side Mounted
10.1
(255.9)
26.6
(675.4)
81.5
(2069)
23.9
(608.3)
12.6
(320.1)
7.7
(196.6)
10.8
(273.8)
BACK OF
STD CAB
14.1
(358.2)
13.7
(349)
9.7
(246.9)
FRONT
SPRING-EYE
35.7
(906.9)
19.4
(493.6)
FRONT
SPRING-EYE
6.1
(153.9)
9
(228.8)
79.4
(2016.5)
UC_07bdv_right_side_mount
UC COMMERCIAL BUS
– 93 –
October, 2011
9.9
(252)
UC Commercial Bus — Cutaway Bus Chassis Body Builder
MODEL 4X2
IC BUS
TM
UC COMMERCIAL BUS
– 94 –
UC Commercial Bus — Cutaway Bus Chassis Body Builder
THIS PAGE INTENTIONALLY LEFT BLANK
IC BUS
TM
October, 2011
UC Commercial Bus — Cutaway Bus Chassis Body Builder
ELECTRICAL
MODEL 4X2
Battery Box Location
REAR CAB XMBR
FRONT
BACK OF
STD CAB
Left Side Mounted, Under Cab, 2 Batteries
2.9
(72.5)
6.6
(167)
SLIDER 2 BATTERY BOX
SYSTEM
1.9
(48.2)
28.1
(713.4)
35.3
(896)
28.1
(713.7)
3.8
(96)
0.6
(14.3)
2.2
(55.8)
TO BOTTOM
OF REINFORCEMENT
UC_slider_2_battery_box
UC COMMERCIAL BUS
– 95 –
October, 2011
7.8
(198.4)
TO BOTTOM
OF RAIL
29
(736)
17.8
(452.3)
IC BUS
TM
UC COMMERCIAL BUS
– 96 –
IC BUS
MODEL 4X2
UC Commercial Bus — Cutaway Bus Chassis Body Builder
17.9
(455)
26.0
(660)
12.3
(312)
3 BATTERY BOX
SYSTEM
25.1
(638)
21.4
(544) 7.6
(193)
35.3
(896)
28.7
(728)
5.7
(145)
3.8
(96)
7.0
2.7 (178)
(68)
08_0134
October, 2011
26.2
(666)
20.3
(517)
BACK OF
CREW CAB
REAR CAB XMBR
FRONT
BACK OF
EXT CAB
BACK OF
STD CAB
Battery Box Location (Continued)
Left Side Mounted, Under Cab, 3 Batteries
TM
MODEL 4X2
1000/2000 Series
Body builder Input/Output connection for Allison 1000/2000 transmissions is located on the front dash panel, in the engine compartment, on
the drivers' side. The table below gives the circuit and connector cavity information. For a complete circuit diagram of the transmission wiring
and for connector & terminal part numbers, see vehicle circuit diagram book.
Cavity
Circuit
Number
Maximum
Current
I/O
Description
Connector Number 7205
A
92C103
–
–
Signal Ground
B
92#143
Input
–
PTO Enable
C
92#150
Output
500 mAmp
D
47C125
Output
–
Non-Zero Crossing Speedo
(16 Pulses/Rev)
E
92#101
Input
–
Auxiliary Function Range Inhibit
F
92#123
Input
–
G
92#145
Output
500 mAmp
H
92#105
Output
PTO Enable 2
Body
Builder
Wires
Auto Neutral for PTO
Range Indicator
Output Speed Indicator
NOTE 1: See Allison technical manual for suggested circuit design.
UC Commercial Bus — Cutaway Bus Chassis Body Builder
Electrical System - Allison Automatic Transmission
NOTE 2: See special features table on next page for package content.
NOTE 3: MUST COMPLY WITH FMVSS STANDARD #102.
Connector 7205 has its mating connector attached and filled with cavity plugs.To use
connector, remove cavity plugs and use the following:
D
7205
E
F
Mating Connector
Connector
Connector Lock
352874C1
352875C1
C
Terminals
B
1667742C1
Wire Gauge
Cable Seal
16, 18, 20
A
G
H
08_0021
October, 2011
Harness Connectors (Viewed from Mating End)
08_0220
1661872C1
UC COMMERCIAL BUS
– 97 –
IC BUS
TM
UC COMMERCIAL BUS
– 98 –
UC Commercial Bus — Cutaway Bus Chassis Body Builder
THIS PAGE INTENTIONALLY LEFT BLANK
IC BUS
TM
October, 2011
UC Commercial BusCutaway Bus Chassis Body Builder
ENGINE
MODEL 4X2
Cooling Obstruction Guidelines
D
57.8 (1468)
TO MIRROR
87.0 (2210)
FENDER WIDTH
61.8 (1570)
TO
HEADLAMPS
85.0 (2158)
BUMPER WIDTH
UC_front_view
UC COMMERCIAL BUS
– 99 –
October, 2011
NOTE: DO NOT OBSTRUCT AIR FLOW IN FRONT OF GRILLE OR BELOW BUMPER
IC BUS
TM
UC COMMERCIAL BUS
– 100 –
IC BUS
MODEL 4X2
UC Commercial Bus — Cutaway Bus Chassis Body Builder
Engine Location
FRONT VIEW
E
CENTER-LINE
OF CRANKSHAFT
D
OFFSET TO
RIGHT SIDE
A
C/L
CHASSIS
C/L
ENGINE
C
FRONT
SPRING-EYE
REAR FACE OF
FLYWHEEL HOUSING
B
12_0213
®
International MaxxForce® 7
A
B
C
D
E
3.5°
43.7" (1109.3 mm)
3.5" (88.4 mm)
0°
0°
October, 2011
Engine
TM
MODEL 4X2
International® MaxxForce® 7
A2
A3
Type
W3
NPTF
Usage
Water
W2
A4
W6
W4
W1
M18
Air Compressor Water Supply
W2
M18
Air Compressor Water Return
W3
M18
Deaeration Supply
W4
M18
Heater Supply
W5
–
Block Heater
W6
–
Engine Water Inlet
W7
–
Engine Water Outlet
W8
–
Heater Return
Air
A1
A1
–
Turbo Outlet Exhaust
A2
–
Turbo Air Outlet to Inter-Cooler
A3
–
Engine Air Inlet from Inter-Cooler
A4
–
Engine Air Inlet from Air Cleaner
L1
M14
Supply Air Compressor
L2
M18
Return Air Compressor
L3
–
Engine Oil Fill
L4
–
Oil Level Gauge
L5
–
Oil Filter
F1
–
Fuel Supply
F2
–
Fuel Return
H1
7/8"– 14
H2
–
W7
Oil
W8
L3
L4
W1
F2
F1
W5
H1
H2
UC Commercial BusCutaway Bus Chassis Body Builder
Engine Port Location
Fuel
L1
Hydraulic
L2
Power Steering Pump Supply Line
October, 2011
L5
12_0214
UC COMMERCIAL BUS
Power Steering Hydraulic Line
– 101 –
IC BUS
TM
UC COMMERCIAL BUS
– 102 –
UC Commercial Bus — Cutaway Bus Chassis Body Builder
THIS PAGE INTENTIONALLY LEFT BLANK
IC BUS
TM
October, 2011
Rear Axle Tread
TREAD
= Distance (width) between vertical centerlines of single tires at opposite ends of axle,
or between vertical centerlines of dual spacing (D.S.) at opposite ends of axle.
TIRE SECT
= Overall width of new tire at top of tire under maximum load, including 24-hour inflation
growth, and including protective side ribs, bars and decorations recommended by tire
manufacturer.
(Tire Section)
D.S.
= Dimension (width) between vertical centerlines of two tires (duals) assembled at one
end of an axle.
(Dual Spacing)
TREAD + D.S. + TIRE SECT
(Tread plus Dual Spacing
plus Tire Section)
TREAD - D.S. - TIRE SECT
(Tread minus Dual Spacing
minus Tire Section)
SLR
= Overall width of axle, dual rims, and tire assembly at top of tires under load.
= Distance (width) between near sides of inner tires of dual assembly at top of tires
under load.
= Distance from ground to centerline of hub when tires are correctly inflated and under
maximum load recommended by tire manufacturer.
(Static Loaded Radius)
UC Commercial Bus — Cutaway Bus Chassis Body Builder
REAR AXLES & REAR SUSPENSIONS
MODEL 4X2
14_0005
Dual Tires
The table shown here list tread information for various wheel/axle combinations. Tread dimensions are not dependent on tire size. Other
dimensions explained here are related to tread and require tire dimensions. Please contact your tire supplier or consult the International
Sales Data Component Book (PDB-70000) for tire dimensions.
Type
Size
Disc
19.5 x 6.00
Axle Code 14ACN
Material
Dual Spacing
Hydraulic Brake
10.70
74.0
Steel
October, 2011
Wheel/Rim
Aluminum
UC COMMERCIAL BUS
– 103 –
IC BUS
TM
UC COMMERCIAL BUS
– 104 –
IC BUS
MODEL 4X2
UC Commercial Bus — Cutaway Bus Chassis Body Builder
Rear Suspension Bracket Location
Code 14SAC
Vari-Rate Steel Suspension
22.74
(577.5)
4.62
(117.4)
5.90
(149.5)
1.17
(29.8)
48.7
(270)
38.95
(989.3)
4.52
(114.8)
5.0
(127)
5.58
(141.7)
39.69
4.9 (1008.1)
0.32
(125)
(18.2)
10.4
(264.2)
1.4
(34.6)
6.9
(175.5)
10.2
(264)
UC_vari-rate_14sac_bracket_location
October, 2011
REAR AXLE
TM
Rear Suspension Drilling
Code 14SAC
Vari-Rate Steel Suspension
2.94
(74.7)
8.8
(223.5)
2.2
(54.8)
6.25
(158.9)
5.1
(140)
2.4
(61)
51.6
(1310.9)
7.44
(188.9)
2.75
(70)
1.86
(47.3)
2.2
(54.8)
2.4
(61)
8.8
(223.5)
1.66
(42.1)
3.0
(76.2)
2.4
(61)
3.12
(79.2)
2.4
(61)
UC Commercial Bus — Cutaway Bus Chassis Body Builder
MODEL 4X2
REAR AXLE
UC COMMERCIAL BUS
– 105 –
October, 2011
UC_vari-rate_14sac_suspension_drilling
IC BUS
TM
UC COMMERCIAL BUS
– 106 –
IC BUS
MODEL 4X2
UC Commercial Bus — Cutaway Bus Chassis Body Builder
Rear Suspension Bracket Location
Code 14TCP
International® Ride Optimized Air Suspension, 8.0” Ride Height
7.18
(182.3)
4.03
(102.3)
6.78
(172.1)
34.95
(887.7)
(517.7)
33.9
(861)
4.58
(116.4)
8.06
(204.9)
4.38
(111.3)
3.95
(100.3)
14.58
16.86
(370.4)
(428.3)
REAR AXLE
UC_iros_14tcp_bracket_location
October, 2011
17.9
(455.5)
2.94
(174.6)
11.13
(282.7)
21.33
(541.8)
TM
UC Commercial Bus — Cutaway Bus Chassis Body Builder
MODEL 4X2
Rear Suspension Drilling
Code 14TCP
International® Ride Optimized Air Suspension, 8.0” Ride Height
36.55
(928.3)
31.88
(809.7)
2.4
(61)
2.4
(61)
2.2
(56)
8.82
(224)
2.2
(56)
2.2
(56)
20.41
(518.3)
2.16
(54.9)
31.18
(791.9)
2.29
(58.2)
2.38
(60.5)
20.41
(518.3)
5.1
(129.2)
1.75
(44.6)
5.51
(140)
3.0
(76.2)
2.93
(74.3)
3.01
(75.9)
2.2
(56)
REAR AXLE
UC_iros_14tcp_suspension_drilling
October, 2011
UC COMMERCIAL BUS
– 107 –
IC BUS
TM
UC COMMERCIAL BUS
– 108 –
UC Commercial Bus — Cutaway Bus Chassis Body Builder
THIS PAGE INTENTIONALLY LEFT BLANK
IC BUS
TM
October, 2011
MODEL 4X2
Fuel Tank Location
Code 15SSW
Single Mounted Between Rails Behind Rear Axle, 40 Gallon, with Fuel Fill Tube
Per EPA Title 40, Part 86, 86:007-35(c), the decal shown
below must be installed on the vehicle.
Decal is included with Owner's Guide Kit located in the
cab glove box.
29.6
(751)
25.1
(638)
15_0005
INSTRUCTIONS FOR DECAL PLACEMENT:
8.2
(208)
13.8
(351)
FRONT
36.5
(927)
2. The decal should be placed above or to the side of
the fuel cap to avoid corrosion by possible contact
with fuel.
61.7
(1567)
UC_40_gallon_btr_fuel_tank
– 109 –
4. For installed bodies that have a fuel door (e.g.
buses), the decal should be placed above or to the
side of the fuel door.
Thoroughly clean the area of all grease, dirt, etc.
before application of the decal. Apply the decal at
room temperature, 65° to 75° F.
October, 2011
3. The decal may be placed on aerodynamic fairings,
bodies, etc. as long as the decal is clearly visible and
in close proximity to the fuel inlet.
18.5
(470)
UC COMMERCIAL BUS
1. The decal must be placed as close as possible to
the fuel inlet and be clearly visible.
UC Commercial Bus — Cutaway Bus Chassis Body Builder
FUEL TANKS
IC BUS
TM
UC COMMERCIAL BUS
– 110 –
IC BUS
MODEL 4X2
Code 15STD
Single Mounted Between Rails Behind Rear Axle, 55 Gallon, with Fuel Fill Tube
Per EPA Title 40, Part 86, 86:007-35(c), the decal shown
below must be installed on the vehicle.
Decal is included with Owner's Guide Kit located in the
cab glove box.
3.5
(90)
13.9
(352)
25.2 23.7
(639) (603)
15_0005
4.1
(105)
19.8
(502)
INSTRUCTIONS FOR DECAL PLACEMENT:
56.2
(1426)
1. The decal must be placed as close as possible to
the fuel inlet and be clearly visible.
2. The decal should be placed above or to the side of
the fuel cap to avoid corrosion by possible contact
with fuel.
6.1 (155) with 169” (4300) WB
21.7 (551) with 195” (4950) WB
6.3
(159)
2.3
(57)
0.8
(20)
UC Commercial Bus — Cutaway Bus Chassis Body Builder
Fuel Tank Location (Continued)
3. The decal may be placed on aerodynamic fairings,
bodies, etc. as long as the decal is clearly visible and
in close proximity to the fuel inlet.
0.3
(7)
UC_fuel_tank_rsm_4300_4950
Thoroughly clean the area of all grease, dirt, etc.
before application of the decal. Apply the decal at
room temperature, 65° to 75° F.
October, 2011
4. For installed bodies that have a fuel door (e.g.
buses), the decal should be placed above or to the
side of the fuel door.
8.5
(217)
TM
Fuel Tank Location (Continued)
Single Mounted Between Rails Behind Rear Axle, 55 Gallon, with Fuel Fill Tube
Per EPA Title 40, Part 86, 86:007-35(c), the decal
shown below must be installed on the vehicle.
Decal is included with Owner's Guide Kit located in the
cab glove box.
47.8
(1215)
26.4
(670)
15_0005
10
(254)
4.9
(123)
FRONT
26.5
(674)
17.7
(448)
60
(1524)
6.3
(159)
INSTRUCTIONS FOR DECAL PLACEMENT:
29.7
(756)
1. The decal must be placed as close as possible to
the fuel inlet and be clearly visible.
2. The decal should be placed above or to the side of
the fuel cap to avoid corrosion by possible contact
with fuel.
8.4
(214)
3. The decal may be placed on aerodynamic fairings,
9
(228) bodies, etc. as long as the decal is clearly visible and
in close proximity to the fuel inlet.
UC_55_gallon_btr_fuel_tank
– 111 –
4. For installed bodies that have a fuel door (e.g.
buses), the decal should be placed above or to the
side of the fuel door.
Thoroughly clean the area of all grease, dirt, etc.
before application of the decal. Apply the decal at
room temperature, 65° to 75° F.
October, 2011
18.5
(470)
UC COMMERCIAL BUS
UC Commercial Bus — Cutaway Bus Chassis Body Builder
Code 15STY
IC BUS
TM
UC COMMERCIAL BUS
– 112 –
UC Commercial Bus — Cutaway Bus Chassis Body Builder
THIS PAGE INTENTIONALLY LEFT BLANK
IC BUS
TM
October, 2011
Air Conditioning System Modifications
The HVAC system provided with IC Bus™ Series should not be modified. NO additional components should be added to the factory installed
HVAC system as it is delivered from the manufacturer. If additional air conditioning capacity is needed, a completely independent system
should be added to handle the additional load requirements of the Body Builder. There are additional costs for a second system; it would
however, provide for optimal performance from both HVAC systems.
The factory installed system cannot be modified in any manner. Modification of the HVAC system will void the IC Bus™ Warranty
on that system.
There are several reasons why HVAC system modifications are not permitted.
•
The factory installed HVAC system is optimized for the evaporator, condenser and compressor combination on the vehicle. To introduce an
additional evaporator (or other components) into the system will create an imbalance and unsatisfactory performance.
•
The Refrigerant Control and Diagnostics (RCD) software that resides in the vehicle's body computer is designed to monitor the factory installed AC
system only. Adding any additional equipment or components to the original air conditioning system will introduce conditions that the RCD software
will interpret as out-of-specification conditions and cause faults to be logged.
•
The factory compressor clutch is cycled by the RCD software residing in the ESC of the vehicle. Modification of this control system to add an
auxiliary system could result in damage to other vehicle components.
•
Since the HVAC system has been optimized for the factory components, there is no extra condenser capacity available for an auxiliary evaporator.
UC Commercial Bus — Cutaway Bus Chassis Body Builder
CAB
October, 2011
UC COMMERCIAL BUS
– 113 –
IC BUS
TM
UC COMMERCIAL BUS
– 114 –
IC BUS
MODEL 4X2
UC Commercial Bus — Cutaway Bus Chassis Body Builder
Cab Dimensions
A
D
C
L
E
F
M
H
J
K
Front View
G
KA
Side View
October, 2011
16_0266
TM
Cab Dimensions (Continued)
Key
Description
Dimension – Inches
A
Shoulder Room
70.6
C
Inside Height
56.8
D
Steering Wheel Diameter
18.0
E
Steering Wheel to Seat Back (Maximum)
18.2
F
Bottom of Instrument Panel to Dash
13.9
G
Engine Cover Width
H
Lateral Foot Room - Driver
20.2
J
Lateral Foot Room - Passenger
18.8
K
Outside Cab Width
82.2
M
Top of Front Seat Cushion to Floor
19.6
–
Driver Seat Track Travel
KA
MaxxForce® 7 = 11.2
UC Commercial Bus — Cutaway Bus Chassis Body Builder
MODEL 4X2
Fixed Seat: 7.9" fore/aft
Air Suspension Seat: 7.4" mm fore/aft
Inside Length
52.4
October, 2011
UC COMMERCIAL BUS
– 115 –
IC BUS
TM
UC COMMERCIAL BUS
– 116 –
IC BUS
MODEL 4X2
UC Commercial Bus — Cutaway Bus Chassis Body Builder
Door Swing Clearance
1933.1
(76.1)
738.5
(29.1)
60°
16_0010
TM
October, 2011
UC Commercial Bus — Cutaway Bus Chassis Body Builder
MODEL 4X2
Instrument Panel
Do not drill into surface of instrument
panel. HVAC ducts lie under the surface
and will be damaged.
Cross-cab tie bar and flat panel mounting
October, 2011
Wing Panel Mounting
16_0011
NOTE: It is not recommended to add any accessory to the instrument panel. If an accessory must be added, it must be attached to the tie bar and framework.
UC COMMERCIAL BUS
– 117 –
IC BUS
TM
UC COMMERCIAL BUS
– 118 –
UC Commercial Bus — Cutaway Bus Chassis Body Builder
THIS PAGE INTENTIONALLY LEFT BLANK
IC BUS
TM
October, 2011
2011 BODY BUILDER
UC Commercial Bus – Cutaway Bus Chassis Body Builder
PBB-39100
(October, 2011 Edition)
Order Number: PBB-39100
Navistar, Inc.
2701 Navistar Drive
Lisle, Illinois 60532