1
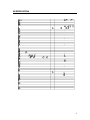
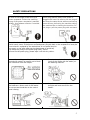
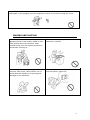
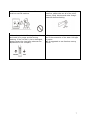
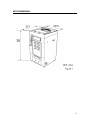
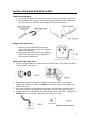
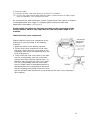
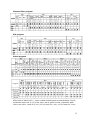
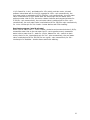
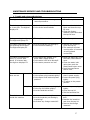
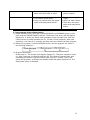
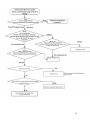
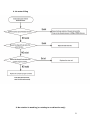
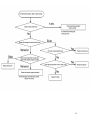
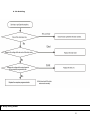
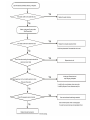
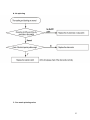
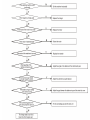
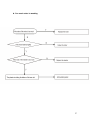
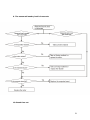
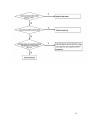
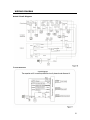
HAIER
Fuzzy Computerized
Automatic Washing Machine
Service Manual
PART #
WD-8888-71
HAIER AMERICA TRADING, LLC
www.haieramerica.com
1
Table Of Contents
Contents
2
Features
3
Specifications
4
Safety Precaution
5
Warning And Caution
6
Net Dimension
8
Installation And Accessory Parts
9
Parts And Functions
13
Program Diagram
14
Maintenance And Troubleshooting
17
Wiring Diagram
30
2
FEATURES
Brand new appearance
It adopts full streamline arc model with compact structure, novel and unique.
Dual power
The unique drive system of "Dual Power" washing machine has applied for the
international patent. Basin-shape large pulsator drive system, and the inner wash
tub power drive system, make the inner tub rotating with low speed like drum
washing machine to reduce the abrasion, and rotating with small angle like agitator
washing machine to reduce tangling. Therefore it realizes even anti-tangling
washing, and produces powerful "boiling" current to acquire more powerful, even and
cleaner washing effect.
Dual half saving half water, saving half time
It adopts the new technology of synchronized rinse and spin. It only costs 16.5(gal)
water for 11(Ib) laundries, which is about a half of the common washing machine.
Saving half time
The Dual Power series automatic washing machine costs 25 minutes for standard
program with cleaning ratio of 1.05,50% higher than the national standard; it costs
15 minutes for the quick program with cleaning ratio reaching the national standard;
it costs 6 minutes for super quick program, suitable for washing small quantity light
soil laundries. The full set of washing programs can shorten the wash time
significantly.
Boiling current
It produces "boiling" current under the powerful driving of the pulsator and inner tub
with dual power drive system. The water current is even and powerful.
Basin-shape large pulsator
The large pulsator can produce stronger drive strength on the water. Meanwhile the
concave basin shape reduces the direct contact between laundries and pulsator, and
decreases the abrasion ratio.
Child lock function
It can prevent the children from operating the washing machine improperly and
causing poor washing effect causing harm to the children during washing procedure,
and can guarantee the normal operation of the washing machine.
Music reminding function
It offers different music for each buttons on the computer board. You cannot only get
corresponding operation hint, but also enjoy the wonderful music.
Fuzzy control function
It can detect the cloth character and weight of the laundries, and set the best
washing method, the best water level, the best washing speed and the best wash
time, and realizes the best washing effect automatically.
Automatic power-off protection function
It will switch off the power automatically 5 minutes after the washing is finished.
3
SPECIFICATION
4
SAFETY PRECAUTIONS
Please plug the plug on receptacle.
Be sure to use single-phase three pins
power receptacle. Ensure the earthling
prong of the power receptacle is earthed
reliably. Use leakage protector if possible.
In normal usage of the washing machine, the
power plug shall be ready to be pulled or
plugged with hand. Be sure to pull the plug off
and close the water faucet when encountering
power failures, delivering the machine setting,
the machine idle or cleaning the machine. Do
not plug or pull the power plug with wet hand.
Do not bend, stretch, twist, bind the power cord by force, or reform it. Do not press or clamp
it with heavy items. If the power cord and power plug are bad, or the receptacle is loose, be
sure to have it replaced by the technicians of our special shop or
our agent, or the after-sales service department to avoid any
risk. Keep the prong of the power plug clean. If dust
is found on the power plug, please wipe it off with dry clothe.
In case the washing machine is installed on
ground with carpet, be careful not to block
the ventilation hole with carpet.
•
Do not put any hot or heavy items
(such as the kettle with hot water) on
the washing machine.
Do not put the machine at damp place like
the bathroom. Never wash it with water.
Do not put wet laundries on the control
panel coating.
•
Keep the machine away from direct
sunlight and heat source like the
heater.
5
Do not let the machine share one receptacle with other electric appliances. If the power plug
is damaged, or the plugging into the receptacle is loose, do not use the plug any more.
WARING AND CAUTION
Do not put hand into the rotating tub. It is
dangerous even if the rotation speed is slow.
Take special care of the children. Keep
children away from the washing machine to
avoid them climbing on.
Do not decompose, repair or alter the
machine by yourself.
Do not wash waterproof laundry like the
raincoat, bike covers, down textiles, etc. to
avoid abnormal vibrations in spinning and
damages to the laundries.
Do not wash laundry with volatile materials
(such as thinner, petrol etc.)
6
The handicapped or children without care
shall not use the machine.
To protect your laundries and washing
machine, please take out all of the coins,
buttons, sand, hairpins and other foreign
materials before washing.
Please keep the lint filter in good condition,
and install it to proper position during
washing. If the lint filter is lost or damaged,
please contact the local after-sales service
department of our company.
Please check if the water faucet is open,
and if the connection of the water inlet pipe
is proper.
It is suggested to use foamless washing
powder.
7
NET DIMENSION
8
INSTALLATION AND ACCESSORY PARTS
Install the drain hose
• First install the drain hose hook on the parts of outer drain hose component.
• Put the drain hose clamp on the outer drain hose, insert the outer drain hose
into the joint for it, and then clutch tightly with drain hose clamp.
Usage of the drain hose
•
•
Hang the outer drain hose at the proper
place before washing (do not use it toppled
down on the ground).
Attend that the outlet of drain hose shall be
higher than the water level in washtub to
avoid siphon phenomenon.
Install the water inlet hose
1. Insert a new flat washer into each end of the inlet hoses. Firmly seat the washer
in the coupling. (As figure 1)
2. Respectively attach the water inlet hoses to the water faucet. Using pliers,
tighten the coupling. (As figure 2) NOTE: Do not over tighten. Damage to the
valves can result.
3. Run water through the faucets and inlet hoses, into a bucket or laundry tub, to
get rid of particles in the water lines that might clog the inlet valves screens.
4. Attach the hose connected with the water faucet to the water valve. (As figure 3)
NOTE: Do not over tighten. Damage to the valves can result.
9
5. Check for leaks
(1). Swing the water inlet hose gently to confirm if it's suitable.
(2). Turn on the water faucets and check for leaks. A small amount of water might
enter the washers. You will drain this later.
Do not take off the water absorption cushion. Please check if the cushion is dropped
or damaged before each usage. If it happens please contact our after-sale
department immediately. (As Figure 4)
Please install and adjust the machine according to the requirement of the
service manual, which is very important for safe and proper usage of the
machine.
Install the inner cover component
Please install the inner cover component as per
followings in your first usage of the washing
machine:
1. Open the top lid of the washing machine.
2. Put the inner cover component on the outer
tub cover, aiming the inner cover shaft to the
installation hole of the corresponding outer tub
cover shaft groove.
3. Firstly insert the inner cover shaft of one side
into the corresponding outer tub cover shaft
groove, then push the point marked with * on
the other side, and push the inner cover shaft
into the corresponding outer tub cover shaft
groove. Please install in designated position to
guarantee there are no droppings or abnormal
sound in opening and closing of the inner cover,
and the operation shall be smooth. Do not dismount the inner cover component
after washing.
10
Install the bottom plate
After opening the package, please lean the washing machine gently down on
soft items like (towel cloth, blanket, etc.). Install the bottom plate to the bottom
of the machine with eight screws by a cross screwdriver, then lift the machine
up gently. See to the figure:
Adjust the installation position
The largest allowed slope of the base of the machine is 2˚. The slanting or rough
ground will result in unstable running or stoppage of the machine. Please adjust it
with the following methods:
• Confirm it's horizontal:
Hang the lead line to confirm if it is
horizontal.
• Adjust the adjustable foot:
1.To twist the adjustable foot, please,
first lift up the side of the foot slightly,
loosen the adjustable nut, and twist the foot.
2. Fasten the nut after adjustment.
11
12
PARTS AND FUNCTIONS
13
PROGRAM DIAGRAM
Detail description of the normal program (rinse/spin 2-in-1)
* Indicates that the laundries quantity and cloth character influences the wash time.
The soak and wash time do not include the time needed by cloth character detection.
The wash time during wash/rinse procedure includes the 30 seconds of balance.
Jean program
** The water current relates to the water level.
14
Chemical fiber program
** The water current relates to the water level.
Silk program
Cotton program
Detail description of the woolen program
High efficiency program (total 15 minutes)
Water inlet to water level 1-- motor rotates clockwise and counterclockwise 0.3s/5s,
meanwhile water inlet to 1/2 of set value--set to gentle current, meanwhile water
inlet to set value-- wash for 5 min (1.0/1.0 wash for 1 min; 1.3/0.6 wash for 3 min;
15
1.0/0.6 wash for 1 min), and balance for 15s--switch on drain motor, tub and
pulsator intermittent act for 10s/15s, operate for 135s-- spin consecutively, the
cool water valve is switched on/off for 35s/30s-- spin consecutively, the cool water
valve is switched on for 35s--brake after 30s inertia spin the cool water valve
performs water inlet for 35s, the motor rotates clockwise and counterclockwise for
0.35s/5s-- spin consecutively, the cool water valve is switched off for 30s-- spin
consecutively, the cool water valve is switched on/off for 35s/30s—spin consecutively
for 1 min--inertia spin for 20s--brake-- buzzer alarms and finish washing.
Past haste program (total 6 minutes)
Water inlet to water level 1-- motor rotates, clockwise and counterclockwise 0.3s/5s,
meanwhile water inlet to the set water level 2--set to gentle current, meanwhile
water inlet to water level 3-- wash for 1.5min, balance for 10s-- switch on drain
motor, drain for 10s, intermittent spin for 20s-- spin consecutively, the cool water
valve is switched on/off for 35s/30s for two cycles-- spin consecutively for 30s-inertia spin for 20sbrake-- buzzer alarms and finish washing.
16
MAINTENACE SERVICE AND TROUBLESHOOTING
1. Trouble and solve method alarm
Phenomena
The reason
The digitron displays E0.
• The top lid is opened during
reserve procedure.
How to settle
• Close the top lid.
The drainage cannot work,
or is too slow. The digitron
displays E1.
• Is the drain hose put down?
• Is the drain hose blocked?
• Put down the drain hose.
Open and close the top
lid once.
• Clean the foreign
material. Open and close
the top lid once.
It stops running in midway.
The digitron displays E2.
• The top lid is not closed.
• Close the top lid
The safety switch acts, and
the spinning cannot work.
The digitron display E3.
• Are the laundries put slantingly?
• Is the machine slanting?
• Reorder the laundries.
Close the top lid.
• The machine will start
running after 10 seconds
of being placed
horizontally.
The water filling does not
work, or is slow. After
about 15 minutes later,
the digitron displays E4.
• Is the water tap opened, or is
there water supply failure?
• Is the water inlet valve blocked?
• Is the water pressure too low?
• Open the water tap. Push
the Start/ Pause button
once.
• Clean the water inlet
valve then push the
Start/Pause button once.
• Push the start/Pause
button once.
The machine
does not act
Not wash
• Is there power failure?
• Is the power plug inserted tightly?
• Is the water level reached preset
position?
• Please use it when
there's power supply.
• Insert the power plug
tightly.
• Fill water to the preset
position.
Not spin
• Is the power plug inserted tightly?
• Is the top lid closed reliably?
• Are the laundries set flat?
• Insert the power plug
tightly.
• Close the top lid.
• Set the laundries flat.
• Is the machine slanting?
• Are the laundries put slantingly
in spinning?
• Are there any foreign materials?
• Adjust the machine to be
even
• Reorder the laundries
and close the top lid.
• Remove the foreign
materials.
There's abnormal sound
inside the machine
17
The water tap leaks
• Is the screw of the jointer of
water inlet hose loose or awry?
• Fasten the screw of the
jointer properly.
No water inlet
• Is the power plug tightly plugged?
• Is the water faucet open?
• Have you pushed down the power
switch and start/pause button?
• Plug the power plug
tightly.
• Open the water faucet.
• Push down the power
switch and start/pause
button.
2. Test program (test without water)
(1) Under standby mode, push and hold the RESERVE and PROGRAM buttons, then
push down the POWER ON/OFF buttons. The buzzer rings once, and the digitron
displays C1. It enters the finish check procedure of the no-water test. Push the
reserve button to switch between the C1, C2 and C3 test programs. After each
switching, it will wait for 3 seconds, and then enter the relative self-test program;
(2) Switch the program. Push the RESERVE button, and the program will switch in
the following sequence:
(3) Program description:
Buzzer test C1: The remain time digitron displays C1. The other indicators are all
on. After 3 seconds, the digitron displays 88. The indicator lights all flash, and
meanwhile the buzzer rings three times, each time for 1 second. Then it will
switch off the power, and enter the standby mode with power switched on. The
start/pause button is disabled.
18
MAINTENANCE SERVICE AND TROUBLESHOOTING
Wash test C2: The remain time digitron displays C2. The medium water level, wash
and normal indicator lights are on. After 3 seconds the wash digitron displays 20.
The wash digitron flashes. It will execute wash current, and switch off the power
automatically after 20 minutes. Push the program button to switch. See to the
following table for the current. Switching will influence the time. During this
procedure, only the reserve, program and start/pause buttons are enabled. It will
not detect the top lid opening.
Normal
0.7/0.5
l fiber
0.6/0.5
Quick
0.8/0.5
Cotton
0.4/0.5
Posthaste
1.0/0.5
Woolen
0.2/0.5
Jean
1.2/0.5
Silk
0.3/0.5
Spin test C3: The remain time digitron displays C3. The spin and normal indicator
lights are on. After 3 seconds the spin digitron displays C5. The spin digitron flashes.
After 5 minutes of spinning, it will switch off the power automatically.
Check the top lid opening and tub bumping during spinning, and test the breakdown
alarm. During this procedure, only the reserve and start/pause buttons are enabled.
In the moment while it just enters spinning procedure, opening of top lid will activate
alarm. Manually create one imbalance situation, and confirm that it activates
imbalance alarm.
3. Troubleshooting charts
If you replace the computer program controller without checking the other
components carefully, the computer program controller may be damaged again.
Therefore, please first check if the other components are working normally before
replacing the computer program controller in maintenance.
1. No action. (The indicator is off)
19
20
2. No water filling
3. No rotation in washing (or rotating to one direction only)
21
22
4. No draining
5. Keep filling water
23
24
6. No spinning
7. Too much spinning noise
25
26
8. Too much noise in washing
27
9. The measured laundry load is inaccurate
10. Break time out
28
29
WIRING DIAGRAM
Actual Circuit Diagram
Circuit Diagram
30