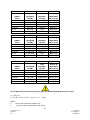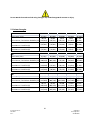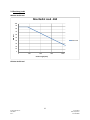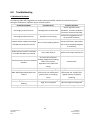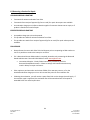
1
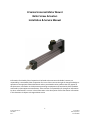
K‐Series Universal Motor Mount Roller Screw Actuators Installation & Service Manual Information furnished by Exlar Corporation is believed to be accurate and reliable; however, no responsibility is assumed by Exlar Corporation for its use. Exlar reserves the right to change the design or operation of the equipment described herein and any associated motion products that may appear in this document. Information in this document pertaining to equipment not furnished by Exlar should be confirmed by that equipment manufacturer. Exlar assumes no responsibility for changes to information by other manufacturers or errors in that information or the description of that information. Information in this document is subject to change without notice. 1 K Series Manual.doc PN: 49269 Rev. J 07/21/2013 Exlar Corporation 952‐500‐6200 Table of Contents 1.0 Introduction 1.1 Warranty and Limitations of Liability . . . . . . . . . . . . . . . . . . . . . . . . . . . . . . . . . 1.2 Safety Considerations . . . . . . . . . . . . . . . . . . . . . . . . . . . . . . . . . . . . . . . . . . . . . 1.3 K Series Linear Actuators Overview . . . . . . . . . . . . . . . . . . . . . . . . . . . . . . . . . . 1.4 Actuator Configurations . . . . . . . . . . . . . . . . . . . . . . . . . . . . . . . . . . . . . . . . . . . 2.0 Installation 2.1 Mounting Configurations . . . . . . . . . . . . . . . . . . . . . . . . . . . . . . . . . . . . . . . . . . 2.2 Mounting Hardware Installation . . . . . . . . . . . . . . . . . . . . . . . . . . . . . . . . . . . . 2.3 Mounting Considerations . . . . . . . . . . . . . . . . . . . . . . . . . . . . . . . . . . . . . . . . . . 3 4 5 5 6 8 9 3.0 Maintenance & Service 3.1 Roller Screw and Lubrication . . . . . . . . . . . . . . . . . . . . . . . . . . . . . . . . . . . . . . . . 9 3.2 Anti‐Rotate Bearings . . . . . . . . . . . . . . . . . . . . . . . . . . . . . . . . . . . . . . . . . . . . . . . 11 3.3 Seals . . . . . . . . . . . . . . . . . . . . . . . . . . . . . . . . . . . . . . . . . . . . . . . . . . . . . . . . . . . . 12 3.4 Thrust Bearings . . . . . . . . . . . . . . . . . . . . . . . . . . . . . . . . . . . . . . . . . . . . . . . . . . . 14 3.5 Drive Train . . . . . . . . . . . . . . . . . . . . . . . . . . . . . . . . . . . . . . . . . . . . . . . . . . . . . . . 16 3.6 End of Stroke Cushions . . . . . . . . . . . . . . . . . . . . . . . . . . . . . . . . . . . . . . . . . . . . . 18 3.7 Linear Bearing . . . . . . . . . . . . . . . . . . . . . . . . . . . . . . . . . . . . . . . . . . . . . . . . . . . . 21 3.8 Disassembly & Reassembly Procedure . . . . . . . . . . . . . . . . . . . . . . . . . . . . . . . 21 3.9 Fastener Torque Values . . . . . . . . . . . . . . . . . . . . . . . . . . . . . . . . . . . . . . . . . . . 49 4.0 Optional Equipment 4.1 Mounting Options . . . . . . . . . . . . . . . . . . . . . . . . . . . . . . . . . . . . . . . . . . . . . . . . . 52 4.2 Standard Motor Mounting Configurations . . . . . . . . . . . . . . . . . . . . . . . . . . . . . 52 4.3 Limit Switches . . . . . . . . . . . . . . . . . . . . . . . . . . . . . . . . . . . . . . . . . . . . . . . . . . . . 52 4.4 Rod Ends . . . . . . . . . . . . . . . . . . . . . . . . . . . . . . . . . . . . . . . . . . . . . . . . . . . . . . . . 53 5.0 Specifications 5.1 Travel Life Calculations . . . . . . . . . . . . . . . . . . . . . . . . . . . . . . . . . . . . . . . . . . . . . 53 5.2 Load, Torque, and Linear Speed Calculations . . . . . . . . . . . . . . . . . . . . . . . . . . . 55 5.3 Column Strengths . . . . . . . . . . . . . . . . . . . . . . . . . . . . . . . . . . . . . . . . . . . . . . . . . 56 5.4 Overhung Loads . . . . . . . . . . . . . . . . . . . . . . . . . . . . . . . . . . . . . . . . . . . . . . . . . . 57 5.5 Critical Speeds . . . . . . . . . . . . . . . . . . . . . . . . . . . . . . . . . . . . . . . . . . . . . . . . . . . 59 5.6 Inertias . . . . . . . . . . . . . . . . . . . . . . . . . . . . . . . . . . . . . . . . . . . . . . . . . . . . . . . . . 59 5.7 Weights . . . . . . . . . . . . . . . . . . . . . . . . . . . . . . . . . . . . . . . . . . . . . . . . . . . . . . . . . 61 6.0 Troubleshooting 6.1 Mechanical Problems . . . . . . . . . . . . . . . . . . . . . . . . . . . . . . . . . . . . . . . . . . . . . 63 6.2 Returning a Product for Repair . . . . . . . . . . . . . . . . . . . . . . . . . . . . . . . . . . . . . 64 2 K Series Manual.doc PN: 49269 Rev. J 07/21/2013 Exlar Corporation 952‐500‐6200 1.0 Introduction 1.1 Warranty and Limitations of Liability Products are warranted for two years from date of manufacture as determined by the serial number on the product label. Labels are generated and applied to the product at the time of shipment. The first and second digits are the year and the third and fourth digits represent the manufacturing week. Product repairs are warranted for 90 days from the date of the repair. The date of repair is recorded within Exlar Corporation’s database tracked by individual product serial number. Exlar warrants its product(s) to the original purchaser and in the case of original equipment manufacturers, to their original customer to be free from defects in material and workmanship and to be made only in accordance with Exlar's standard published catalog specifications for the product(s) as published at the time of purchase. Warranty or performance to any other specifications is not covered by this warranty unless otherwise agreed to in writing by Exlar and documented as part of any and all contracts, including but not limited to purchase orders, sales orders, order confirmations, purchase contracts and purchase agreements. In no event shall Exlar be liable or have any responsibility under such warranty if the product(s) has been improperly stored, installed, used or maintained, or if Buyer has permitted any unauthorized modifications, adjustments and/or repairs to such product(s). Seller's obligation hereunder is limited solely to repairing or replacing (at its opinion), at the factory any product(s), or parts thereof, which prove to Seller's satisfaction to be defective as a result of defective materials, or workmanship and within the period of time, in accordance with the Seller's stated product warranty (see Terms and Conditions above), provided, however, that written notice of claimed defects shall have been given to Exlar within thirty (30) days from the date of any such defect is first discovered. The product(s) claimed to be defective must be returned to Exlar, transportation prepaid by Buyer, with written specification of the claimed defect. Evidence acceptable to Exlar must be furnished that the claimed defects were not caused by misuse, abuse, or neglect by anyone other than Exlar. Components such as seals, wipers, bearings, brakes, bushings, gears, splines, and roller screw parts are considered wear parts and must be inspected and serviced on a regular basis. Any damage caused by failure to properly lubricate Exlar products and/or to replace wear parts at appropriate times, is not covered by this warranty. Any damage due to excessive loading is not covered by this warranty. The use of products or components under load such that they reach the end of their expected life is a normal characteristic of the application of mechanical products. Reaching the end of a product’s expected life does not indicate any defect in material or workmanship and is not covered by this warranty. Costs for shipment of units returned to the factory for warranty repairs are the responsibility of the owner of the product. Exlar will return ship all warranty repairs or replacements via UPS Ground at no cost to the customer. For international customers, Exlar will return ship warranty repairs or replacements via UPS Expedited Service and cover the associated shipping costs. Any VAT or local country taxes are the responsibility of the owner of the product. The foregoing warranty is in lieu of all other warranties (except as Title), whether expressed or implied, including without limitation, any warranty of merchantability, or of fitness for any particular purpose, other than as expressly set forth and to the extent specified herein, and is in lieu of all other obligations or liabilities on the part of Exlar. Seller's maximum liability with respect to these terms and conditions and any resulting sale, arising from any cause whatsoever, including without limitation, breach of contract or negligence, shall not exceed the price specified herein of the product(s) giving rise to the claim, and in no event shall Exlar be liable under this warranty otherwise for special, incidental or consequential damages, whether similar or dissimilar, of any nature arising or resulting from the purchase, installation, removal, repair, operation, use or breakdown of the product(s) or any other cause whatsoever, including negligence. The foregoing warranty shall also apply to products or parts which have been repaired or replaced pursuant to such warranty, and within the period of time, in accordance with Seller's stated warranty. NO PERSON INCLUDING ANY AGENT OR REPRESENTATIVE OF EXLAR, IS AUTHORIZED TO MAKE ANY REPRESENTATION OR WARRANTY ON BEHALF OF EXLAR CONCERNING ANY PRODUCTS MANUFACTURED BY EXLAR, EXCEPT TO REFER PURCHASERS TO THIS WARRANTY. 3 K Series Manual.doc PN: 49269 Rev. J 07/21/2013 Exlar Corporation 952‐500‐6200 1.2 Safetty Considera
ations As with an
ny electro‐me
echanical devvice, safety sh
hould be conssidered duringg installation and operatio
on of your K Series actuator.. Throughout this manual yyou will see pparagraphs m
marked with a CAUTION siggn as shown be
elow. CAUTION
N Pay particcular attention to these paaragraphs. They are intendded to providee you with heelpful informaation to ensure a safe and trrouble free installation and
d operation.
Care shou
uld be taken n
not to exceed
d the physicaal travel limitss of K Series aactuators. Do
oing so will caause the actuator to impactt its end travel bumpers. R
Repeated en d travel crash
hes can physically damage the roller scre
ew and the in
nternal comp
ponents of the
e actuator. uld be taken tto avoid high
h speed impacct with objeccts of high riggidity that immediately sto
op Care shou
the travel of the actua
ator with no d
deceleration or energy ab
bsorption. An
n example wo
ould be a high
h speed imp
pact of two ssolid steel parrts. The resullting impact w
will create a vvery short efffective decelerattion time. Kin
netic energy ccontained in tthe rotating iinertia of thee actuator and motor can possibly ggenerate extrremely high impact forcess that exceed
d the mechanical capacitiees of the actu
uator and cause
e physical dam
mage to the aactuator. Forr applicationss requiring th
his type of impact, contactt Exlar application engin
neering to inssure that the
e actuator is p
properly sized
d or provision
ns are made to absorb th
he induced en
nergy. 4 K Series Manual.doc PN: 49269 Rev. J 07/221/2013 Exlar Corp
poration
952‐5000‐6200 1.3 K Series Linear Actuators Overview Exlar K Series actuators are offered in three standard nominal frame sizes of 60, 75 and 90 millimeters. Continuous duty thrust load rating for the K Series product range from 1,350 lbf to 3,500 lbf (6,000‐
15,569 N). Intermittent load ratings for each actuator are twice the respective continuous duty load rating. Exlar KM and KX Series actuators utilize a planetary roller screw mechanism to convert rotary to linear motion. KA Series actuators use an acme screw. 1.4 Actuator Configurations The K Series base unit actuator includes a high performance planetary roller screw assembly or acme screw, bearing support, anodized extruded aluminum housing, precision internal anti‐rotate sliders, extending rod, and an input shaft for attachment to your drive system. A K Series base unit is shown below. Figure: K Series Base Model Actuator The K Series actuators are also available with provisions for mounting various motors. Standard motor mountings include parallel with belt drive and inline drive. Parallel Drive K Series Actuator Parallel drives use a timing belt and pulleys, come in ratios of 1:1 and 2:1 for the K60, K75, and K90 actuators. A parallel unit is shown below. Figure: K Series with Parallel Motor Mount 5 K Series Manual.doc PN: 49269 Rev. J 07/21/2013 Exlar Corporation 952‐500‐6200 Inline Drive K Series Actuator The inline motor mounting configuration uses a coupling, attaching the motors output shaft to the actuators input shaft. An inline unit is shown below. Figure: K Series with Inline Motor Mount The inline option with a gear motor offers planetary gear reduction. The planetary gearing is integral to the gear motor. An inline unit with a gear motor is shown below. Figure: K Series with Inline Gear Motor Mount 2.0 Installation 2.1 Mounting Configurations The K Series actuators offer a variety of mounting accessories. The standard mounting accessories are foot plate mounts or side mounted trunnions. Each of these mounting components utilizes the T‐Slot tracks on the sides of the case for attachment. Also available are flange plate mounts. Flange plates can be bolted to the front and rear of the actuator depending on whether an inline motor mount actuator or a parallel motor mount actuator is used. Also available are angle plate mounts for both inline and parallel motor mount actuators. Also available, for the parallel and inline motor mount actuators, are eye plates and clevis plates. See figures next page. 6 K Series Manual.doc PN: 49269 Rev. J 07/21/2013 Exlar Corporation 952‐500‐6200 Mounting Configurations: Eye Plate Mount Trunnion Mount Angle Plate Mount Rear Flange Plate Mount Foot Plate Mount Front Flange Plate Mount Clevis Plate Mount 7 K Series Manual.doc PN: 49269 Rev. J 07/21/2013 Exlar Corporation 952‐500‐6200 2.2 Mounting Hardware Installation T‐Nut
Step 1: Insert T‐nuts at an angle into the t‐nut rail slot. Step 2: Line up T‐nut tapped holes with the trunnion mounting holes and insert and tighten screws. See Section 3.9 Fastener Torque Values. 8 K Series Manual.doc PN: 49269 Rev. J 07/21/2013 Exlar Corporation 952‐500‐6200 2.3 Moun
nting Consid
derations Care shou
uld be taken tto mount the K Series actu
uator such thaat its linear trravel is aligned with the traavel of its load
d. Misalignme
ent imparts diirect side load
d on the actu ator’s extend
ding rod. Sidee loading of th
he actuator’ss extending ro
od leads to acccelerated seal wear, bearring wear and
d roller screw
w wear, and sh
hould be avoide
ed. Also, whe
en using the A
Angle Mount Option the load needs to
o be restricted to the maxx load indicateed in the table below. Standard
d K Series
Ma
ax Load lbf (kN)
K60
1350 lbf (6.00
1
0)
2000 lbf (8.90
2
0)
K75
2100 lbf (9.34
2
4)
K90
Excessive side load on
n the output rrod of the acttuator may reeduce the traavel and seal life of the actuator. T slot mounting hardw
ware should b
be attached p
perpendicula r to the axis o
of linear mottion. All T‐Nuts and assocciated flathea
ad cap screwss should be tightened to tthe appropriaate torque level indicated
d in Section 3.9 Fastener T
Torque Valuess. 3.0 Maintena
M
nce & Se
ervice 3.1 Rolle
er Screw and
d Lubrication
n The plane
etary roller screw used within the K Series actuators is a precision
n mechanism. Shock load aand radial load
d should be aavoided to pro
ovide maximu
um life from tthe actuator. Extendingg or retracting the roller screw into the
e ends of travvel may causee damage to the actuatorr or the otherr componentss of the application. See SSection 3.6 En
nd Of Stroke C
Cushions and
d Section 4.3 Limit Switches.. For roller screw life callculations and
d specification
ns see sectionn 5.0. 9 K Series Manual.doc PN: 49269 Rev. J 07/221/2013 Exlar Corp
poration
952‐5000‐6200 Degreasing ‐ Extend the roller screw nut assembly to the end of the screw shaft. Using a brush and degreasing agent, remove all old grease from the roller screw shaft. See figure below. See Section 3.8 Disassembly & Reassembly Procedure. Degrease
Roller Screw Nut Assembly Screw Shaft Lubrication ‐ The planetary roller screw shaft or acme screw shaft and nut assembly, anti‐rotates, linear bearing, and rotary seal are factory lubricated. The anti‐rotate and linear bearing does not need re‐
lubrication. If the roller screw shaft or acme screw shaft need re‐lubrication, follow the disassembly process for the actuator in Section 3.8 Disassembly & Reassembly Procedure. Re‐greasing ‐ Extend the roller screw nut assembly to the end of the screw shaft. Apply a line of grease SHC220 Mobile Grease on the roller screw and spread it into the threads and wipe away the extra grease. Move the roller screw nut assembly back to the retract impact bumper plate in order to apply the new grease into the rollers of the roller screw nut assembly. Once the roller screw nut assembly has been re‐greased, follow the assembly process for the actuator in Section 3.8 Disassembly & Reassembly Procedure. See figure following. In applications that require continuous use within a short stroke distance, grease lubrication should be checked more often. The roller screw assembly does not have the distance needed to circulate viable grease to the rotating components when traveling under 1 inch of stroke. Heavy loads and high speed will further degrade the small amount of grease left within the short stroke path. In these conditions, it is best to run the actuator for the full length of stroke from back to front a minimum of two to three times at slow speed to regather grease that has migrated during operation. The frequency of this operation will depend upon the severity of the applied load and temperature. Higher temperatures will require more frequent “short stroke refreshing”. 10 K Series Manual.doc PN: 49269 Rev. J 07/21/2013 Exlar Corporation 952‐500‐6200 Re‐ggrease Roller Screw Nut A
Assembly Screw Shaft Take care
e to prevent fforeign objectts from enterring the actuaator or contaaminating thee grease. Excessive grease is unnecessary an
nd will increasse the torquee required to rotate the actuators rolleer screw. 3.2 Anti‐Rotate Bearrings K Series actuators have
e internal antti‐rotate bearrings. The antti‐rotate bearings travel in channels inteegral to the acttuator case. C
Care should be
e taken when
n loading rod end attachm
ments to not apply unnecesssary torque to the anti‐rotaate bearings. TThe wrench fflats on the ennd of the maiin rod should be used wheen attaching rod end acce
essories or loaad attachmen
nts. Below thee anti‐rotate bearings mayy be shims. Th
here will be 2, 1, or none. The anti‐rotate
e bearings alsso contain thee magnets that are sensed
d by the limit switches. See Section 4
4.3 Limit Swittches for morre informationn on Limit Sw
witches. 11 K Series Manual.doc PN: 49269 Rev. J 07/221/2013 Exlar Corp
poration
952‐5000‐6200 Anti‐Rotate Groove Anti‐Rotate Bearing Magnet Figure: Anti‐Rotate Bearings can be placed into the anti‐rotate grooves using any orientation. See Actuator Reassembly in Section 3.8 Disassembly & Reassembly Procedure to see how shims play a role in orientating the Anti‐Rotate Bearings into the anti‐rotate grooves. 3.3 Seals K Series actuators are all IP65 sealed using gaskets at the joints of the actuator housing components and a Buna o‐ring at the end cap joint between the end cap and impact washer plate. The extending rod is sealed with a wiper. The input shaft is sealed with a rotary shaft seal that is contained within the back end cap of the actuator. These seals are lubricated on initial assembly and do not need to be lubricated again. See Section 3.8 Disassembly & Reassembly Procedure for replacement of rod wipers, rotary shaft seals, O‐rings or gaskets. 12 K Series Manual.doc PN: 49269 Rev. J 07/21/2013 Exlar Corporation 952‐500‐6200 Gasket Gasket O‐ring Rod Wiper Rotary Shaft Seal Figure: Base Unit Sealing Details Gasket O‐ring Gasket Gasket Rod Wiper Rotary Shaft Seal Gasket Figure: Inline Motor Mount Unit Sealing Details 13 K Series Manual.doc PN: 49269 Rev. J Gasket 07/21/2013 Exlar Corporation 952‐500‐6200 Gasket O‐ring Gasket Gasket Rod Wiper Gasket Gasket Rotary Shaft Seal Figure: Parallel Motor Mount Unit Sealing Details 3.4 Thrust Bearings KM and KA Series actuators use two deep groove ball bearings shown in Figure 8. KX Series actuators provide two angular contact bearings mounted in duplex arrangement shown in Figure 9. These bearings support the drive shaft within the K Series actuator. The inner races of the angular contact bearings are pre‐loaded using a bearing jam nut and lock washer. The outer races are pre‐loaded by the end cap and the impact washer plate. Bearing Replacement – see Section 3.8 Disassembly & Reassembly Procedure. 14 K Series Manual.doc PN: 49269 Rev. J 07/21/2013 Exlar Corporation 952‐500‐6200 Deep Groove Ball Bearing Deep Groove Ball Bearing Rotary Shaft Seal Figure: Roller Screw Support Using Deep Groove Ball Bearings Angular Contact Bearing Angular Contact Bearing Rotary Shaft Seal Figure: Roller Screw Support Using Angular Contact Bearings 15 K Series Manual.doc PN: 49269 Rev. J 07/21/2013 Exlar Corporation 952‐500‐6200 3.5 Drive
e Train Parallel D
Drive or the K Seriess actuators prrovides a fibeerglass reinforced timing b
belt The parallel motor mount option fo
and pulleyy drive train tto transmit th
he motors rottation and torrque to the actuator’s roller screw mechanism. The drive train does no
ot require lub
brication. The belt and pullley transmission is in a protective
e housing to h
help prevent contaminatio
on by dirt andd debris. The belt housing and cover should be kept in
n place at all ttimes during o
operation and
d should onlyy be removed
d for motor m
mounting and drive train inspection. The belt and pulleyy system shou
uld be inspeccted periodicaally for wear aand proper tensioningg. Removingg the protective housing ffrom the belt and pulley d
drive train during operatio
on of the actu
uator may cause damage to the actuatorr componentss or severe in
njury. Power should be removed and locked ou
ut from the acctuators mottor at any tim
me the protec tive drive traain cover is reemoved. Failu
ure to do so ccan result in d
damage to th
he actuator or cause serio us injury. Improper belt tension can cause pre
emature belt wear and faiilure, belt noiise and slippaage. The follow
wing picture is an example o
of a typical be
elt and pulleyy drive train inn a K Series acctuator. Actu
ual drive train
ns will vary in configuration d
depending on exact actuato
or and motorr configuratio
on. Contact EExlar application engineerss with any que
estions regarding the instaallation or maaintenance off the belt and
d pulley drive train on your K Series Actuator. Timing Be
elt Replaceme
ent ‐ see Secttion 3.8 Disasssembly & Re assembly Pro
ocedure. 3.8 Disassemb
bly & Reassem
mbly Procedu
ure. Pulley Replacement – see Section 3
16 K Series Manual.doc PN: 49269 Rev. J 07/221/2013 Exlar Corp
poration
952‐5000‐6200 Motor Motor Pulley Motor Pulley Timing Belt Actuator Actuator Pulley Pulley Box Cover Figure: Parallel Motor Mount Drive Train Assembly Inline Drive The inline motor mounting configuration uses a coupling, attaching the motors output shaft to the actuators input shaft. Spider Coupling and Components Replacement ‐ see Section 3.8 Disassembly & Reassembly Procedure. 17 K Series Manual.doc PN: 49269 Rev. J 07/21/2013 Exlar Corporation 952‐500‐6200 Inline Housing
I
g Moto
or Adapter Plaate Actuaator C
Coupling Motor Coup
pling Spider Coup
pling Figure: Inline Motor Mount Drivee Train Assem
mbly 3.6 End O
Of Stroke Cu
ushions Every stan
ndard K Series actuator is equipped witth rubber imppact bumperss, which are d
designed to protect th
he actuator frrom accidentaal over extenssion or retracction. End of strroke cushionss are provide
ed for fail safe
e only and sh
hould not be u
used as an ap
pplication lim
mit of stroke. K Series actuators are designed with
h an additional 10mm of leength over no
ominal strokee. This is to alllow users to u
utilize the full nominal stro
oke without caausing damagge by end craashing. See figgures on pagees 22‐
24 for infformation on stroke limits and how to p
position limit switches. Seee Section 4.3 Limit Switchees. Extend Im
mpact Bumpe
er Replaceme
ent – see Section 3.8 Disasssembly & Reaassembly Procedure. 18 K Series Manual.doc PN: 49269 Rev. J 07/221/2013 Exlar Corp
poration
952‐5000‐6200 Retract Impact Bumper Plate Replacement – see Section 3.8 Disassembly & Reassembly Procedure. Figure: Actuator Shown in fully retracted “crash” position, with contact on the Retraction Bumper 19 K Series Manual.doc PN: 49269 Rev. J 07/21/2013 Exlar Corporation 952‐500‐6200 Figure: Actuator Shown in maximum recommended retract position, with 5mm of clearance on retract impact bumper. 20 K Series Manual.doc PN: 49269 Rev. J 07/21/2013 Exlar Corporation 952‐500‐6200 Figure: Actuator shown in maximum recommended extension position, with 5mm of clearance on extend impact bumper. 3.7 Linear Bearing Every standard K Series actuator is equipped with a linear bearing, which is designed to guide the main rod in a linear motion. The linear bearing will not need to be replaced on a regular basis, but if it should become damaged or excessively worn, it can be replaced. See figure below. Linear Bearing Replacement – see Section 3.8 Disassembly & Reassembly Procedure. Face Plate Linear Bearing 3.8 Disassembly & Reassembly Procedure The general disassembly and reassembly procedures are general guidelines. Individual designs may differ from these procedures and any questions should be verified with Exlar before reassembling and 21 K Series Manual.doc PN: 49269 Rev. J 07/21/2013 Exlar Corporation 952‐500‐6200 reinstalling the actuator into your machine or application. For both procedures refer to the drawings included in the disassembly procedure for reference only. For torque values see chart in Section 3.9. Parallel Motor and Actuator Dismounting Motor Motor Plate Motor Pulley Timing Belt Pulley Box Cover Gasket Pulley Box Cover Actuator Sealing Washers Actuator Pulley Figure: Parallel Motor Mount Drive Train Assembly 1.) Remove power. 2.) Dismount the actuator from the application if necessary. 3.) Remove pulley box cover by removing cover screws and sealing washers and pulling cover away from the motor plate. 4.) Remove pulley box cover gasket. 22 K Series Manual.doc PN: 49269 Rev. J 07/21/2013 Exlar Corporation 952‐500‐6200 5.) Loosen the idler pulley adjuster plate bolt and slide idler pulley assembly to the left and remove the belt. See figure below. Idler Pulley Assembly Timing Belt Idler Pulley Adjuster Plate Bolt 6.) Loosen the set screws on motor pulley and slide the pulley off the shaft. Clamp the actuator shaft pulley and loosen actuator shaft pulley nut and remove. Slide the pulley off the actuator shaft. Take care not to lose the keys for each shaft. See figure below. Motor Pulley Set Screw Motor Pulley Set Screw Motor Pulley Actuator Pulley Actuator Shaft Pulley Nut 23 K Series Manual.doc PN: 49269 Rev. J 07/21/2013 Exlar Corporation 952‐500‐6200 7.) Remove the motor mounting screws and washers and remove motor and gasket. See figure below. Motor Mounting Screws Motor Motor Mounting Washers Motor Mounting Gasket Motor Plate 8.) Remove the actuator mounting screws and remove actuator and gasket. See figure below. Motor Plate Actuator Mounting Screws Actuator 9.) Proceed to the section on Actuator Disassembly. Actuator Mounting Gasket Parallel Motor and Actuator Mounting 1.) Place the actuator gasket over the pilot diameter of the actuator face plate so it is flush with the face of the end cap. See figure below. 24 K Series Manual.doc PN: 49269 Rev. J 07/21/2013 Exlar Corporation 952‐500‐6200 Actuator Mounting Gasket 2.) Place the actuator input shaft through the actuator hole on the motor plate until the actuator gasket and actuator face plate are flush against the motor plate pilot face. See figure below. Motor Plate 3.) Insert actuator screws and tighten to the designated torque value. See Section 3.9 Fastener Torque Values. See figure below. Actuator Mounting Screws 25 K Series Manual.doc PN: 49269 Rev. J 07/21/2013 Exlar Corporation 952‐500‐6200 4.) Place the key in the actuator shaft keyway. Clamp the actuator shaft pulley and tighten the actuator shaft pulley nut. See Section 3.9 Fastener Torque Values. See figure below. Actuator Shaft Pulley Nut Actuator Pulley 5.) Place the motor gasket over the pilot diameter of the motor face plate so it is flush with the face of the end cap. See figure below. Motor Mounting Gasket 6.) Place the motor output shaft through the output shaft hole on the motor plate until the motor gasket and motor face plate face are flush against the motor plate pilot face. See figure next page. 26 K Series Manual.doc PN: 49269 Rev. J 07/21/2013 Exlar Corporation 952‐500‐6200 Motor Plate 7.) Insert motor washers and screws and tighten to the designated torque value. See Section 3.9 Fastener Torque Values. See figure below. Motor Mounting Screws Motor Mounting Washers 8.) Place the key in the motor shaft keyway. Slide the pulley on and align it with the screw shaft pulley. Once aligned, torque the pulley set screws. See Section 3.9 Torque Values. See figure below. Motor Pulley Actuator Pulley 27 K Series Manual.doc PN: 49269 Rev. J 07/21/2013 Exlar Corporation 952‐500‐6200 9.) Install and tension timing belt. See Belt Tensioning below. Belt Tensioning Proper Belt Tension See Tension Table (Force on Idler) The idler pulley plate slot allows moving the idler pulley so the belt can be placed, followed by placing a force directly over the idler pulley to obtain the proper tension to tighten the belt (See table next page). The standard K Series timing belt is a GT2, 5mm pitch that comes in various lengths depending on the configuration (See table next page). 28 K Series Manual.doc PN: 49269 Rev. J 07/21/2013 Exlar Corporation 952‐500‐6200 Belt Tension Table K60
Motor
Ratio
Max Cont. Torque
Max Speed
Tension Required Force on Idler
SLM 60*
1:1
15 in-lbs
5000 RPM
14.1 lb
18 lb (80N)
SLG 60*
1:1
53 in-lbs
1000 RPM
28.7 lb
36 lb (160N)
NEMA 23
1:1
6 in-lbs
5000 RPM
8.4 lb
10 lb (53N)
SLM 90*
1:1
53 in-lbs
4000 RPM
20.6 lb
20 lb (89N)
NEMA 34
1:1
15 in-lbs
4000 RPM
14.1 lb
14 lb (62N)
SLM 60*
2:1
15 in-lbs
5000 RPM
14.1 lb
18 lb (80N)
NEMA 23
2:1
6 in-lbs
5000 RPM
8.4 lb
11 lb (58N)
NEMA 34
2:1
15 in-lbs
4000 RPM
14.1 lb
18 lb (80N)
* Same tension is required for Tritex motors and gearmotors of equivalent size
K75
Motor
Ratio
Max Cont. Torque
Max Speed
Tension Required Force on Idler
SLM 60*
1:1
15 in-lbs
5000 RPM
23.4 lb
39 lb (104N)
SLG 60 10:1*
1:1
98 in-lbs
500 RPM
39.7 lb
66 lb (293N)
SLG 60 5:1*
1:1
75 in-lbs
1000 RPM
30.5 lb
50 lb (225N)
SLM 75*
1:1
30 in-lbs
3000 RPM
23.4 lb
39 lb (104N)
SLM 90*
1:1
53 in-lbs
4000 RPM
23.4 lb
31 lb (138N)
NEMA 34
1:1
15 in-lbs
4000 RPM
14.1 lb
16 lb (71N)
SLM115*
1:1
98 in-lbs
3000 RPM
31.1 lb
39 lb (173N)
SLM 60*
2:1
15 in-lbs
5000 RPM
23.4 lb
26 lb (115N)
SLM 75*
2:1
30 in-lbs
3000 RPM
23.4 lb
26 lb (115N)
NEMA 34
2:1
15 in-lbs
4000 RPM
14.1 lb
15 lb (70N)
* Same tension is required for Tritex motors and gearmotors of equivalent size
29 K Series Manual.doc PN: 49269 Rev. J 07/21/2013 Exlar Corporation 952‐500‐6200 K90
Motor
Ratio
Max Cont. Torque
Max Speed
SLM 90*
1:1
53 in-lbs
4000 RPM
Tension Required Force on Idler
32.2 lb
38 lb (169N)
NEMA 34
1:1
15 in-lbs
4000 RPM
14.1 lb
17 lb (76N)
SLG 90*
1:1
137 in-lbs
1000 RPM
73.8 lb
99 lb (440N)
SLG 60 10:1*
1:1
137 in-lbs
500 RPM
82.9 lb
109 lb (485N)
SLG 60 5:1*
1:1
75 in-lbs
1000 RPM
45.4 lb
60 lb (267N)
SLM 115*
1:1
137 in-lbs
3000 RPM
62.5 lb
79 lb (351N)
NEMA 34
2:1
15 in-lbs
4000 RPM
14.1 lb
16 lb (71N)
SLM 90*
2:1
53 in-lbs
4000 RPM
35.0 lb
39 lb (174N)
SLG 90*
2:1
70 in-lbs
1000 RPM
43.8 lb
49 lb (218N)
* Same tension is required for Tritex motors and gearmotors of equivalent size
Belt Size Table K60
Motor
Ratio
Belt Length
Width
M60*
1:1
(60 T) 47053
15mm
N23
1:1
(60 T) 50980
9mm
N34
1:1
(83 T) 52280
15mm
M90*
1:1
(83 T) 52280
15mm
N23
2:1
(85 T) 51044
9mm
N34
2:1
(85 T) 49052
15mm
M60*
2:1
(85 T) 49052
15mm
M90*
2:1
(85 T) 49052
15mm
* Same belt is required for Tritex motors and gearmotors of equivalent size
K75
Motor
Ratio
Belt Length
Width
M60*
1:1
(75 T) 57933
25mm
M75*
1:1
(75 T) 57933
25mm
M90*
1:1
(85 T) 51475
25mm
N34
1:1
(85 T) 49052
15mm
M115*
1:1
(108 T) 52047
25mm
M75*
2:1
(110 T) 52048
25mm
M90*
2:1
(110 T) 52048
25mm
N34
2:1
(110 T) 52140
15mm
* Same belt is required for Tritex motors and gearmotors of equivalent size
30 K Series Manual.doc PN: 49269 Rev. J 07/21/2013 Exlar Corporation 952‐500‐6200 K90
Motor
Ratio
Belt Length
Width
M60*
1:1
(81 T) 51686
25mm
M90*
1:1
(85 T) 51475
25mm
N34
1:1
(85 T) 49205
15mm
M115*
1:1
(108 T) 52047
25mm
M60*
2:1
(110 T) 52048
25mm
M90*
2:1
(110 T) 52048
25mm
N34
2:1
(110 T) 52140
15mm
* Same belt is required for Tritex motors and gearmotors of equivalent size
31 K Series Manual.doc PN: 49269 Rev. J 07/21/2013 Exlar Corporation 952‐500‐6200 Inline Motor and Actuator Dismounting Inline Housing Motor Adapter Plate Actuator Coupling Coupling Spider Coupling Motor Figure 12: Inline Motor Mount Disassembly 1.) Remove power. 2.) Dismount the actuator from the application if necessary. 3.) Loosen and remove motor screws. Remove motor from actuator by pulling motor in the opposite direction of actuator until the coupling separates. See figure next page. 32 K Series Manual.doc PN: 49269 Rev. J 07/21/2013 Exlar Corporation 952‐500‐6200 Motor Mounting Gasket Motor Motor Mounting Screws 4.) Loosen and remove screws from the motor adapter plate and inline housing. See figure below. Inline Housing Motor Adapter Plate Actuator Coupling Coupling Motor 5.) Loosen clamping screw for each coupling and slide coupling off the shafts. It is not required to remove the couplings from the shafts unless further work will be done with the motor or actuator. Take care not to lose the keys for each shaft. 6.) Proceed to the section on Actuator Disassembly. Inline Motor and Actuator Mounting 1.) Place the key in the keyway of the roller screw at the input end. 33 K Series Manual.doc PN: 49269 Rev. J 07/21/2013 Exlar Corporation 952‐500‐6200 2.) Slide the coupling onto the input shaft of the roller screw shaft until the end of the shaft touches the red spider. See figure below. Red Spider End of shaft meets Red Spider 3.) Torque the coupling clamp screw. See Section 3.9 Torque Values. 4.) Place an inline gasket over the pilot feature of the end cap so it is flush with the end cap. Ensure that the correct face of the gasket is mated with the face of the end cap, otherwise the mounting holes will not line up. See figure below. Gasket 5.) Place the inline housing over the pilot feature of the end cap. Take care to make sure that the correct end of the inline housing is mated with the inline gasket and end cap otherwise the mounting holes will not line up. See figure next page. 34 K Series Manual.doc PN: 49269 Rev. J 07/21/2013 Exlar Corporation 952‐500‐6200 End Cap Inline Housing 6.) Place an inline gasket so its face is flush with the inline housing end. Ensure that the correct face of the gasket is mated with the face of the inline housing, otherwise the mounting holes will not line up. See figure below. Gasket 7.) Place the inline motor adapter plate so it pilots into the inline housing. See figure below. End Cap Inline Housing Motor Adapter Plate 8.) Insert the 4 inline housing screws and tighten to the designated torque value. (see table in Section 3.9). See figure next page. 35 K Series Manual.doc PN: 49269 Rev. J 07/21/2013 Exlar Corporation 952‐500‐6200 Inline Housing Screws 9.) Slide the coupling for the output motor shaft onto the motor output shaft until the inside surface of the coupling is flush with the end of the motor output shaft. See figure below. Coupling End of shaft is flush with inside surface of coupling 10.) Torque the coupling clamp screw. See Section 3.9 Fastener Torque Values. 11.) Place a motor gasket over the pilot feature of the motor face plate so it is flush with the face of the end cap. See figure next page. 36 K Series Manual.doc PN: 49269 Rev. J 07/21/2013 Exlar Corporation 952‐500‐6200 Gasket 12.) Insert the shaft of the motor into the inline housing with the motor coupling aligned to mate with the actuator coupling. Slide the motor in so the motor gasket and face plate flange is flush with the inline motor adapter plate pilot face. See figure below. Actuator Inline Motor Adapter Plate Motor Inline Housing 13.) Torque the motor screws to the designated torque value. See Section 3.9 Fastener Torque Values. 37 K Series Manual.doc PN: 49269 Rev. J 07/21/2013 Exlar Corporation 952‐500‐6200 Actuator Disassembly End Cap O‐ring Anti‐Rotate
Roller Screw Assembly
Shim Gasket
Extend Impact Bumper Magnet Case
Main Rod Linear Bearing
Gasket
Retaining Ring
Face Plate
Rod Wiper Figure: Actuator Disassembly 1.) Remove the face plate screws and slide face plate and face plate gasket off the main rod. Note to remove or replace rod wiper use a thin‐bladed screw driver on the outer edge of the wiper seal where it seats into the face plate and pry it out. Also, at this time, you may remove the linear bearing. To remove the linear bearing, the retaining ring must be removed first using a thin‐bladed screw driver. Note that not all K series actuators have a retaining ring to remove. It is not necessary to remove the rod wiper or the linear bearing unless they need to be replaced. See figures below. 38 K Series Manual.doc PN: 49269 Rev. J 07/21/2013 Exlar Corporation 952‐500‐6200 Face Plate Screws Face Plate
Retaining Ring Rod Wiper
Face Plate Gasket Linear Bearing Face Plate 2.) Loosen and remove the end cap screws and slide the end cap off the bearings. You will then be able to remove the o‐ring from the end cap. Note: A shaft seal is used on KT actuators and can then be removed from the end cap if it needs to be replaced. See figure below. End Cap
O‐ring
End Cap Screws 3.) Remove the key from the input shaft. 4.) Slide roller screw assembly out of case. See figure below. Case Roller Screw Assembly 39 K Series Manual.doc PN: 49269 Rev. J 07/21/2013 Exlar Corporation 952‐500‐6200 5.) Remove the extend impact bumper by sliding it off the main rod. See figure below. Front Bumper 6.) Remove both the anti‐rotates from the roller screw nut assembly by using a flat bladed screwdriver to pry between the anti‐rotates until they separate from the roller screw nut assembly. Remove shim/shims from the roller screw nut assembly. Note that your actuator may have two, one, or no shims. Remove the magnets by sliding them out of the magnet retaining slots. Note that your K series actuator may use more than one magnet per magnet retaining slot. See figure below. Anti‐Rotate
Shim
Magnet 7.) Remove the gasket that is located by the bearing pack and slide it over the roller screw assembly. See figure next page. 40 K Series Manual.doc PN: 49269 Rev. J 07/21/2013 Exlar Corporation 952‐500‐6200 8.) Remove the bearings using a bearing puller in order to replace the bearings and/or the rear impact bumper plate if necessary. See figure below. Shoulder Washer
Bearing Locking Washer Impact Bumper Plate Bearing
Bearing Lock Nut
Actuator Reassembly 1.) Place the shoulder washer onto the screw shaft. See figure bellow. Shoulder Washer
41 K Series Manual.doc PN: 49269 Rev. J 07/21/2013 Exlar Corporation 952‐500‐6200 2.) Place the retract bumper plate onto the screw shaft. See figure below. Impact Bumper Plate 3.) Press the bearings onto the screw shaft. Be sure to press only on the inner race of each bearing or press on both the inner and outer races of each bearing equally using a tool that can accommodate these pressing requirements. DO NOT PRESS on the outer race of each bearing alone. See figures below. Bearings
4.) Place the locking washer onto the screw shaft. Make sure that the inner tang on the locking washer is placed into the keyway. See figure below. 42 K Series Manual.doc PN: 49269 Rev. J 07/21/2013 Exlar Corporation 952‐500‐6200 Locking Washer
5.) Torque the bearing lock nut onto the screw shaft and lock down a tang on the locking washer into the closest aligning notch on the bearing lock nut. See Section 3.9 Fastener Torque Values. See figure below. Bearing Lock Nut 6.) Place the retract bumper plate gasket over the main rod and place it against the bumper plate. See figure below. Gasket
43 K Series Manual.doc PN: 49269 Rev. J 07/21/2013 Exlar Corporation 952‐500‐6200 7.) Insert the four limit switch magnets into the anti‐rotates magnets holes. Insert the 2 or 1 shims onto the roller screw nut assembly. Note that there may be no shims used on your actuator. Insert both anti‐rotates onto the roller screw nut assembly. See figure next page. Anti‐Rotates Magnets 8.) Slide the extend impact bumper over the main rod. See figure below. Extend Impact Bumper
9.) Insert the main rod assembly into the case, rod end first, until the anti‐rotate mechanism touches the case end. The case ends are identical in diameter, mounting hole, anti‐rotate, t‐slot, and limit switch size and orientation; therefore, there isn’t a wrong orientation to inserting the main rod assembly into the case. Rotate the anti‐rotate mechanism until it aligns with an anti‐
rotate groove that allows the main rod assembly to slide in with ease. Keep rotating until the easiest sliding groove is found and slide it the rest of the way into the case until the main rod assembly reaches the retract bumper plate. See figure next page. 44 K Series Manual.doc PN: 49269 Rev. J 07/21/2013 Exlar Corporation 952‐500‐6200 Case
Main Rod Assembly
10.) Insert the shaft seal into the end cap with the open side of the shaft seal facing toward the retract impact bumper plate using a press or pressing tools. See figure below. Shaft Seal O‐ring End Cap 11.) Insert the o‐ring into the end cap o‐ring groove. Use some lube to help retain the o‐ring so it doesn’t fall out of the groove. See figure above. 12.) Slide the end cap over the shaft and bearings until it contacts the bumper plate and case. See figure next page. 45 K Series Manual.doc PN: 49269 Rev. J 07/21/2013 Exlar Corporation 952‐500‐6200 Case
Bumper Plate End Cap 13.) Torque the four end cap screws and use the torque values provided in Section 3.9 Fastener Torque Values. 14.) Insert the linear bearing into the face plate bushing groove by folding in one end under the other and squeezing down the diameter of the bushing and placing it into the face plate until it snaps into place and is retained on both ends of the linear bushing in the face plate. Note some K series actuators use a retaining ring. Once the linear bearing is in place insert the retaining ring. Insert the wiper seal into the wiper seal groove with the closed end facing toward the rod output end. Lubricate the wiper seal. See figure below. Retaining Ring Rod Wiper Linear Bearing End Cap
15.) Place the face plate gasket onto the main rod and move it toward the case until the gasket is flush against the case. See figure next page. 46 K Series Manual.doc PN: 49269 Rev. J 07/21/2013 Exlar Corporation 952‐500‐6200 Gasket
16.) Slide the face plate over the main rod and gently tap the face plate until the rod wiper rides onto the main rod. Once the wiper seal is over the main rod continue to slide toward the case until it is flush with the case and gasket. See figure below. Face Plate Face Plate Screws
17.) Torque the four face plate screws and use the torque values provided in Section 3.9 Fastener Torque Values. 18.) Place the key in the keyway and take care that the key does not fall out. 47 K Series Manual.doc PN: 49269 Rev. J 07/21/2013 Exlar Corporation 952‐500‐6200 Key 19.) The drive train can now be reassembled. On K Series that are parallel motor mount, check the belt for wear. If the belt has excessive wear it may be necessary to replace it. See Parallel Motor and Actuator Mounting and Inline Motor and Actuator Mounting in Section 3.8 Disassembly and Reassembly Procedure. 48 K Series Manual.doc PN: 49269 Rev. J 07/21/2013 Exlar Corporation 952‐500‐6200 3.9 Fastener Torque Values K60 Fastener Torque Values
Torque
in‐lbs
Torque
ft‐lbs
Torque
N‐m
Base Unit
Screw, M6 x 1.0x40mm, SHCS, SS (8X)‐‐‐‐‐Face Plate and End Cap
Bearing Lock Nut
Nut, M6 x 1 Hex Nylon Insert‐‐‐‐‐Rod End Bushing
96
216
96
8
18
8
11
24
11
Inline Motor Mount Unit
Screw, M6 x 1.0x40mm, SHCS, SS (8X)‐‐‐‐‐Face Plate and End Cap
Bearing Lock Nut
Nut, M6 x 1 Hex Nylon Insert‐‐‐‐‐Rod End Bushing
Screw, M5 x 0.8 x 18mm, SHCS‐SS (4X)‐‐‐‐‐Motor Mount
Screw, M6 x 1.0x25mm, SHCS, SS (4X)‐‐‐‐‐Motor Mount
Screw, 10‐24 x .625", SHCS, SS (4X)‐‐‐‐‐Motor Mount
Screw, 10‐24 x .75", SHCS, SS (4X)‐‐‐‐‐Motor Mount
Screw, M6 x 1.0x90mm, SHCS, SS (4X)‐‐‐‐‐Inline Housing
Coupling Clamp Screw, 25.4mm OD Coupling, M3 Alloy
Coupling Clamp Screw, 33.3mm OD Coupling, M3 Alloy
Coupling Clamp Screw, 41.3mm OD Coupling, M4 Alloy
Screw, M6 x 1.0 x 10mm, SHCS, SS‐‐‐‐‐T‐Slot Screws
Screw, M6 x 1.0 x 14mm, SHCS, SS (4X)‐‐‐‐‐Front Mounts
96
216
96
56
96
80
80
96
18
18
41
120
96
8
18
8
4.7
8
6.7
6.7
8
1.5
1.5
3.4
10
8
11
24
11
6.4
11
9
9
11
2
2
4.6
13.5
11
Parallel Motor Mount Unit
Screw, M6 x 1.0x40mm, SHCS, SS (8X)‐‐‐‐‐Face Plate and End Cap
Bearing Lock Nut
Nut, M6 x 1 Hex Nylon Insert‐‐‐‐‐Rod End Bushing
Screw, M5 x 0.8 x 18mm, SHCS‐SS (4X)‐‐‐‐‐Motor Mount
Screw, M6 x 1.0x25mm, SHCS, SS (4X)‐‐‐‐‐Motor Mount
Screw, 10‐24 x .625", SHCS, SS (4X)‐‐‐‐‐Motor Mount
Screw, M6 x 1.0 x 40mm, SHCS, SS (4X)‐‐‐‐‐Motor Mount
Screw, M6 x 1.0 x 50mm, SHCS‐SS (6X)‐‐‐‐‐Pulley Cover
Screw, M8 x 1.25 x 55mm, SHCS‐SS (6X)‐‐‐‐‐Pulley Cover
Screw, M10 x 1.5 x 65mm, SHCS‐SS (6X)‐‐‐‐‐Pulley Cover
Screw, M5 x 0.8 x 8 SHSS cup pt.‐‐‐‐‐Pulley Set screw
Screw, 10‐24 x .375" SHSS cup pt.‐‐‐‐‐Pulley Set Screw
Nut, M10 x 1.5, Flange, Serrated‐‐‐‐‐Pulley Nut
Screw, M6 x 1.0 x 14mm, SHCS, SS (8X)‐‐Rear & Frt Mnts and Motor Pla
Screw, 6mm x 20mm Shoulder Bolt‐‐‐‐‐Idler Pulley screw
Screw, M6 x1 .0 x 10mm, SBHCS, SS‐‐‐‐‐Idler Adj screw
Screw, M6 X 1.0 x 10mm, SHCS, SS‐‐‐‐‐T‐Slot Screws
96
216
96
56
96
80
80
96
228
456
56
40
180
96
56
96
120
8
18
8
4.7
8
6.7
6.7
8
19
38
4.7
3.3
15
8
4.7
8
10
11
24
11
6.4
11
9
9
11
25.8
51.5
6.4
4.5
20
11
6.4
11
13.5
49 K Series Manual.doc PN: 49269 Rev. J 07/21/2013 Exlar Corporation 952‐500‐6200 K75 Fastener Torque Values
Torque
in‐lbs
Torque
ft‐lbs
Torque
N‐m
Base Unit
Screw, M8 x 1.25x45mm, SHCS, SS (8X)‐‐‐‐‐Face Plate and End Cap
Bearing Lock Nut
Nut, M8 x 1.25 Hex Nylon Insert‐‐‐‐‐Rod End Bushing
228
660
120
19
55
10
25.8
74.5
13.5
Inline Motor Mount Unit
Screw, M8 x 1.25x45mm, SHCS, SS (8X)‐‐‐‐‐Face Plate and End Cap
Bearing Lock Nut
Nut, M8 x 1.25 Hex Nylon Insert‐‐‐‐‐Rod End Bushing
Screw, M5 x 0.8 x 22mm, SHCS‐SS (4X)‐‐‐‐‐Motor Mount
Screw, M6 x 1.0 x 25mm, SHCS, SS (4X)‐‐‐‐‐Motor Mount
Screw, M8 x 1.25 x 30mm, SHCS, SS (4X)‐‐‐‐‐Motor Mount
Screw, 10‐24 x .75", SHCS, SS (4X)‐‐‐‐‐Motor Mount
Screw, M8 x 1.25 x 100mm, SHCS, SS (4X)‐‐‐‐‐Inline Housing
Coupling Clamp Screw, 41.3mm OD Coupling, M4 Alloy
Coupling Clamp Screw, 50.8mm OD Coupling, M5 Alloy
Screw, M8 x 1.25, SHCS‐‐‐‐‐T‐Slot Screws
Screw, M8 x 1.25 x 20mm, SHCS, SS (4X)‐‐‐‐‐Front Mounts
228
660
120
56
96
228
80
228
40.7
84
264
228
19
55
10
4.7
8
19
6.7
19
3.4
7
22
19
25.8
74.5
13.5
6.4
11
25.8
9
25.8
4.6
9.5
30
25.8
Parallel Motor Mount Unit
Screw, M8 x 1.25 x 45mm, SHCS, SS (8X)‐‐‐‐‐Face Plate and End Cap
Bearing Lock Nut
Nut, M8 x 1.25 Hex Nylon Insert‐‐‐‐‐Rod End Bushing
Screw, M5 x 0.8 x 22mm, SHCS‐SS (4X)‐‐‐‐‐Motor Mount
Screw, M6 x 1.0 x 25mm, SHCS, SS (4X)‐‐‐‐‐Motor Mount
Screw, M8 x 1.25 x 30mm, SHCS, SS (4X)‐‐‐‐‐Motor Mount
Screw, 10‐24 x .75", SHCS, SS (4X)‐‐‐‐‐Motor Mount
Screw, M8 x 1.25 x 55mm, SHCS, SS (6X)‐‐‐‐‐Pulley Cover
Screw, M10 x 1.5 x 60mm, SHCS‐SS (6X)‐‐‐‐‐Pulley Cover
Screw, M5 x 0.8 x 8 SHSS cup pt.‐‐‐‐‐Pulley Set screw
Screw, M6 x 1.0 x 10 SHSS cup pt.‐‐‐‐‐Pulley Set screw
Screw, 10‐24 x .375" SHSS cup pt.‐‐‐‐‐Pulley Set Screw
Nut, M12 x 1.75, Flange, Serrated‐‐‐‐‐Pulley Nut
Screw, M8 x 1.25 x 25mm, SHCS, SS (8X)‐‐Rear & Frt Mnts and Motor Pl
Screw, 6mm x 20mm Shoulder Bolt‐‐‐‐‐Idler Pulley screw, 15mm Wide
Screw, 8mm x 20mm Shoulder Bolt‐‐‐‐‐Idler Pulley screw, 25mm Wide
Screw, M6 X 1.0 x 10mm, SBHCS, SS‐‐‐‐‐Idler Adj Screw
Screw, M8 x 1.25, SHCS‐‐‐‐‐T‐Slot Screws
228
660
120
56
96
228
80
228
456
56
96
40
228
228
56
96
96
264
19
55
10
4.7
8
19
6.7
19
38
4.7
8
3.3
19
19
4.7
8
8
22
25.8
74.5
13.5
6.4
11
25.8
9
25.8
51.5
6.4
11
4.5
25.8
25.8
6.4
11
11
30
50 K Series Manual.doc PN: 49269 Rev. J 07/21/2013 Exlar Corporation 952‐500‐6200 K90 Fastener Torque Values
Torque
in‐lbs
Torque
ft‐lbs
Torque
N‐m
Base Unit
Screw, M10 x 1.5x60mm, SHCS, SS (8X)‐‐‐‐‐Face Plate and End Cap
Bearing Lock Nut
Nut, M10 x 1.5 Hex Nylon Insert‐‐‐‐‐Rod End Bushing
456
840
180
38
70
15
51.5
95
20
Inline Motor Mount Unit
Screw, M10 x 1.5 x 60mm, SHCS, SS (8X)‐‐‐‐‐Face Plate and End Cap
Bearing Lock Nut
Nut, M10 x 1.5 Hex Nylon Insert‐‐‐‐‐Rod End Bushing
Screw, M5 x 0.8 x 18mm, SHCS‐SS (4X)‐‐‐‐‐Motor Mount
Screw, M6 x 1.0 x 25mm, SHCS, SS (4X)‐‐‐‐‐Motor Mount
Screw, M8 x 1.25 x 30mm, SHCS, SS (4X)‐‐‐‐‐Motor Mount
Screw, 10‐24 x .75", SHCS, SS (4X)‐‐‐‐‐Motor Mount
Screw, M10 x 1.5 x 60mm, SHCS, SS (4X)‐‐‐‐‐Inline Housing
Coupling Clamp Screw, 41.3mm OD Coupling, M4 Alloy
Coupling Clamp Screw, 50.8mm OD Coupling, M5 Alloy
Screw, M8 x 1.25, SHCS‐‐‐‐‐T‐Slot Screws
Screw, M10 x 1.5 x 25mm, SHCS, SS (4X)‐‐‐‐‐Front Mounts
456
840
180
56
96
228
80
456
40.7
84
264
456
38
70
15
4.7
8
19
6.7
38
3.4
7
22
38
51.5
95
20
6.4
11
25.8
9
51.5
4.6
9.5
30
51.5
Parallel Motor Mount Unit
Screw, M10 x 1.5 x 60mm, SHCS, SS (8X)‐‐‐‐‐Face Plate and End Cap
Bearing Lock Nut
Nut, M10 x 1.5 Hex Nylon Insert‐‐‐‐‐Rod End Bushing
Screw, M5 x 0.8 x 18mm SHCS‐SS (4X)‐‐‐‐‐Motor Mount
Screw, M6 x 1.0 x 25mm SHCS‐SS (4X)‐‐‐‐‐Motor Mount
Screw, M8x1.25 x 30mm SHCS‐SS (4X)‐‐‐‐‐Motor Mount
Screw, 10‐24 x .75" SHCS‐SS (4X)‐‐‐‐‐Motor Mount
Screw, M10 x 1.5 x 60mm, SHCS‐SS (6X)‐‐‐‐‐Pulley Cover
Screw, M5 x 0.8 x 8 SHSS cup pt.‐‐‐‐‐Pulley Set screw
Screw, M6 x 1.0 x 10 SHSS cup pt.‐‐‐‐‐Pulley Set screw
Screw, 10‐24 x .375" SHSS cup pt.‐‐‐‐‐Pulley Set screw
Nut, M16 x 2.0, Flange, Serrated‐‐‐‐‐Pulley Nut
Screw, M10x1.5x25mm, SHCS, SS (8X)‐‐Rear & Frt Mnts and Motor Plat
Screw, 6mmx20mm Shoulder Bolt‐‐Idler Pulley screw, 15mm Wide Be
Screw, 8mmx20mm Shoulder Bolt‐‐Idler Pulley screw, 25mm Wide Be
Screw, M6x1.0x10mm, SBHCS, SS‐‐‐‐‐Idler Adj screw
Screw, M8X1.25, SHCS‐‐‐‐‐T‐Slot Screws
456
840
180
56
96
228
80
456
56
96
40
456
456
56
96
96
264
38
70
15
4.7
8
19
6.7
38
4.7
8
3.3
38
38
4.7
8
8
22
51.5
95
20.3
6.4
11
25.8
9
51.5
6.4
11
4.5
51.5
51.5
6.4
11
11
30
51 K Series Manual.doc PN: 49269 Rev. J 07/21/2013 Exlar Corporation 952‐500‐6200 4.0 Optional Equipment 4.1 Mounting Options Standard mounting configurations are adjustable foot plates and trunnions, angle plates, front and rear flange mounts, eye plates and clevis plates. See Section 2.0 Installation for more details. 4.2 Standard Motor Mounting Configurations The K Series actuators are offered in two standard motor mounting configurations, parallel and inline. Each standard motor mounting is designed to accommodate Exlar SLM/SLG Servo motors, Nema 23 and 34 motors, and Exlar Tritex motors. Custom motors can be accommodated with custom mounting, although due to custom motor size, torque, and speed, not all custom motors or reducers can be mounted to each standard actuator. Contact Exlar Corporation application engineers for custom mounting considerations. See section 5.0 Specifications for torque specifications required to drive application load levels. 4.3 Limit Switches The K Series actuator is equipped for adjustable externally mounted limit switches. Exlar offers magnetic inductive proximity switches that are triggered by a target magnet that is located in the anti‐rotate mechanisms inside of the actuator housing. The location of the four target magnets allow switches to be mounted on any side of the actuator. See figure 15. Target Magnet 52 K Series Manual.doc PN: 49269 Rev. J 07/21/2013 Exlar Corporation 952‐500‐6200 The limit switches are available with normally open and normally closed output, channel mount magnetic sensing prox. L# options: External Limit Switches, channel mount magnetic sensing prox, please specify. Configuration of Logic of Standard Switch Option Selections Option SW1 SW2 SW3 L1 Not Supplied Normally Open Not Supplied L2 Normally Closed Not Supplied Normally Closed L3 Normally Closed Normally Open Normally Closed Switch Type Exlar Part Number Normally Closed Switch 43404 Turck PN BIM‐UNT‐RP6X Normally Open Switch 43403 Turck PN BIM‐UNT‐AP6X For custom logic combinations, contact Exlar applications engineering. The magnetic inductive switch power is 10‐30 VDC with a no‐load operating current of <10mA and a load current of less than or equal to 200 mA. 4.4 Rod Ends Standard K Series Rod End Thread Specifications US Male US Female Metric Male Metric Female
K60
1/2‐20
1/2‐20
M12 X 1.25
M12 X 1.25
K75
3/4‐16
3/4‐16
M16 X 1.5
M16 X 1.5
K90
3/4‐16
3/4‐16
M20 X 1.5
M20 X 1.5
Please Contact Exlar for rod end drawings. 5.0 Specifications 5.1 Travel Life Calculations Travel life estimates of a roller screw in a linear application, cubic mean load should be used. The mathematical formulas that define these values follow the chart below. 53 K Series Manual.doc PN: 49269 Rev. J 07/21/2013 Exlar Corporation 952‐500‐6200 K60
ad of
Lea
Scrrew
KM 5mm
m
KM 10mm
KX 5mm
KX 10mm
m
KA .1 in
KA .2 in
K75
Load (Max)
lbf (kN)
1,350 (6.0))
675 (3.0)
1,350 (6.0))
675 (3.0)
830 (3.7)
697 (3.1)
Load (Dyna
amic)
lbf ((kN)
1,723
3 (7.7)
1,526
6 (6.8)
2,360 (10.5)
2,091
1 (9.3)
N//A
N//A
T
Torque @
Lo
oad (Max)
lb
bf‐in (N‐m)
5
52.6 (5.9)
5
52.6 (5.9)
5
52.6 (5.9)
5
52.6 (5.9)
5
52.6 (5.9)
5
52.6 (5.9)
ad of
Lea
Scrrew
KM 5mm
m
KM 10mm
KX 5mm
KX 10mm
m
KA .1 in
KA .2 in
K90
Load (Max
x)
lbf (kN)
2,500 (11.1
1)
1,250 (5.6))
2,500 (11.1
1)
1,250 (5.6))
1,355 (6.0))
1,139 (5.1))
Load (Dyna
amic)
lbf ((kN)
3,620 (16.1)
3,036 (13.5)
5,746 (25.6)
4,820 (21.4)
N//A
N//A
T
Torque @
Lo
Load (Max)
lb
bf‐in (N‐m)
9
98.0 (11.0)
9
98.0 (11.0)
9
98.0 (11.0)
9
98.0 (11.0)
9
98.0 (11.0)
9
98.0 (11.0) ad of
Lea
Scrrew
KM 5mm
m
KM 10mm
KX 5mm
KX 10mm
m
KA .1 in
KA .2 in
Load (Max
x)
lbf (kN)
3500 (15.6)
1750 (7.8)
3500 (15.6)
1750 (7.8)
1549 (6.9)
1291 (5.7)
Load (Dyna
amic)
lbf ((kN)
7800 ((34.7)
7000 ((31.1)
11000 0 (48.9)
11000 0 (48.9)
N//A
N//A
T
Torque @
Lo
Load (Max)
lb
bf‐in (N‐m)
13
37.07 (15.5)
13
37.07 (15.5)
13
37.07 (15.5)
13
37.07 (15.5)
13
37.07 (15.5)
13
37.07 (15.5) Do not exxceed the maximum load rating. Doingg so may causse damage to
o the actuator or injury. L10 = (C/F)^3 S F = [(F1^3ss1 + F2^3s2 + FF3^3s3 + …)/(s1 + s2 + s3 + …))^]1/3 Where: L10 = TTravel life in m
millions of incches (mm) C =
= Dynamic loaad rating of ro
oller screw, lb
bf (N) 54 K Series Manual.doc PN: 49269 Rev. J 07/221/2013 Exlar Corp
poration
952‐5000‐6200 F =
= Cubic mean load applied,, lbf (N) S =
= Roller screw
w lead, inches (mm) F1,2,3… = Force applied for correspon
nding S1,2,3… llength of travvel distance, llbf (N) or correspond
ding F1,2,3… appplied force, iin (mm) S1,2,3… = Length of travvel distance fo
5.2 Load,, Torque, an
nd Linear Spe
eed Calculattions Do not exxceed the maximum load rating. Doingg so may causse damage to
o the actuator or injury. The thrust load applied
d by the K Serries actuator is dependentt on the torqu
ue applied to the roller scrrew input shafft and the leaad of the rolle
er screw. Any belt and pull ey or gear reduction that increases mo
otor torque should be facto
ored into the calculation below. The equattion below de
efines the am
mount of torqu
ue required foor a correspo
onding thrust force. F = T 2(6
6.2831) N S Where: T = Torque applied to rroller screw shaft, in‐lbf (N
N‐m) S = Roller screw lead, inches (mm) F = Thrustt for required
d, lbf (N) N = Efficie
ency of system
m (0.8 for standard K Serie
es actuator asssemblies, un
nitless) Motor torrque will be required to acccelerate the inertial compponents of the system in aaddition to the thrust. Co
onsult Exlar’s sizing guidelines for furthe
er details. on of rotation
nal speed of tthe The resulttant linear speed of the K SSeries actuator’s output rood is a functio
roller scre
ew input shafft and roller sccrew lead. An
ny gearbox reeduction or beelt and pulleyy speed reducction should be
e factored into
o the equatio
on below. The
e equation beelow defines tthe linear speeed produced
d by a K Series actuator. V = nS Where: V = Linearr speed, in/s ((mm/s) n = Rotatiional speed of roller screw
w shaft, rev/s
S = Roller screw Lead, in (mm) 55 K Series Manual.doc PN: 49269 Rev. J 07/221/2013 Exlar Corp
poration
952‐5000‐6200 Do not exxceed the maximum load rating. Doingg so may causse damage to
o the actuator or injury. 5.3 Colum
mn Strength
hs K60
Stroke in
nch (mm)
6 (150)
6
29,618
2
Roller Sccrew, 5 and 10mm leadss lbs (N) (120,911)
1
18,848
(7
76,944)
Acme Sccrew .1 lead lbs (N)
1
18,848
(7
76,944)
Acme Sccrew .2 lead lbs (N)
K75
Stroke in
nch (mm)
6
6 (150)
54,672
5
43,193)
Roller Sccrew, 5 and 10mm leadss lbs (N) (24
31,097
3
(138,326)
Acme Sccrew .1 lead lbs (N)
29,064
2
(129,283)
Acme Sccrew .2 lead lbs (N)
K90
Stroke in
nch (mm)
6
6 (150)
02,734
10
Roller Sccrew, 5 and 10mm leadss lbs (N) (456,983)
65,477
6
(29
91,256)
Acme Sccrew .1 lead lbs (N)
49,271
4
19,168)
(2
Acme Sccrew .2 lead lbs (N)
56 K Series Manual.doc PN: 49269 Rev. J 1
12 (300)
20,888
( 85,272)
10,272
( 41,934)
10272
( 41,934)
24 (600)
5,879
(26,151)
2,655
(11,810)
2,655
(11,810)
35 (900)
2,802
(12,463)
1,262
(5,613)
1,262
(5,613)
48 (1225)
1,502
(6,681)
675
(3,002)
675
(3,002)
1
12 (300)
45,489
(2
202,345)
21,929
( 97,545)
19,897
( 88,506)
24 (600)
17,854
(79,418)
6,356
(28,272)
5,636
(25,070)
35 (900)
8,614
(38,316)
3,065
(13,633)
2,718
(12,090)
48 (1225)
4,651
(20,688)
1,654
(7,357)
1,467
(6,525)
1
12 (300)
93,551
(4
416,136)
56,310
(2
250,479)
40,104
(1
178,392)
24 (600)
58,684
((261,039)
25,088
((111,597)
14,716
(65,460)
35 (900)
28,611
(127,268)
12,099
(53,819)
7,097
(31,569)
48 (1225)
15,447
(68,711)
6,531
(29,051)
3,831
(17,041)
07/221/2013 Exlar Corp
poration
952‐5000‐6200 5.4 Overhung Loads K60 Max Radial Load Max Radial Load ‐ K60
100
90
80
Newtons
70
60
50
Max Load
40
30
20
10
0
0
300
600
900
1200
Stroke Length (mm)
K75 Max Radial Load 57 K Series Manual.doc PN: 49269 Rev. J 07/21/2013 Exlar Corporation 952‐500‐6200 Max Radial Load ‐ K75
200
180
160
Newtons
140
120
100
Max Load
80
60
40
20
0
0
200
400
600
800
1000
1200
Stroke Length (mm)
K90 Max Radial Load Max Radial Load ‐ K90
600
500
Newtons
400
300
Max Load
200
100
0
0
300
600
900
1200
Stroke Length (mm)
58 K Series Manual.doc PN: 49269 Rev. J 07/21/2013 Exlar Corporation 952‐500‐6200 5.5 Critical Speed K60
Stroke inch (mm)
Roller Screw, 5 and 10mm leads (rpm)
Acme Screw .1 lead (rpm)
Acme Screw .2 lead (rpm)
K75
Stroke inch (mm)
Roller Screw, 5 and 10mm leads (rpm)
Acme Screw .1 lead (rpm)
Acme Screw .2 lead (rpm)
K90
Stroke inch (mm)
Roller Screw, 5 and 10mm leads (rpm)
Acme Screw .1 lead (rpm)
Acme Screw .2 lead (rpm)
Critical Speeds
6 (150)
12 (300) 24 (600)
7400
7400
5178
61979
16535
4274
61979
16535
4274
35 (900) 48 (1225)
2467
1322
2031
1087
2031
1087 Critical Speeds
6 (150)
12 (300) 24 (600)
7,000
7,000
6,633
65,421
18,968
5,129
63,484
18,407
4,977
35 (900) 48 (1225)
3,200
1,728
2,473
1,335
2,400
1,296 Critical Speeds
6 (150)
12 (300) 24 (600)
5,180
5,180
5,180
92,214
26,737
7,230
80,701
23,398
6,327
35 (900) 48 (1225)
4,320
2,333
3,486
1,882
3,051
1,647 5.6 Inertias K60 5 mm Lead lbf‐in‐sec2 (kg‐m2)
Base Unit – Input Drive Shaft Only Inline Unit w/Motor Coupling 1:1 Reduction Belt Drive (66 mm) 1:1 Reduction Belt Drive (86 mm) 1:1 Reduction Belt Drive (96 mm) 2:1 Reduction Belt Drive (96 mm) 1.31 x 10‐4 (1.480 x 10‐5) 2.39 x 10‐4 (2.702 x 10‐5)
3.84 x 10‐4 (4.339 x 10‐5)
6.53 x 10‐4 (7.378 x 10‐5)
7.58 x 10‐4 (8.564 x 10‐5)
6.28 x 10‐4 (7.095 x 10‐5)
10 mm Lead lbf‐in‐sec2 (kg‐m2)
Base Unit – Input Drive Shaft Only 1.43 x 10‐4 (1.616 x 10‐5) Inline Unit w/Motor Coupling 2.51 x 10‐4 (2.837 x 10‐5)
1:1 Reduction Belt Drive (66 mm) 3.96 x 10‐4 (4.474 x 10‐5)
1:1 Reduction Belt Drive (86 mm) 6.65 x 10‐4 (7.514 x 10‐5)
1:1 Reduction Belt Drive (96 mm) 7.70 x 10‐4 (8.704 x 10‐5)
2:1 Reduction Belt Drive (96 mm) 1.74 x 10‐4 (1.966 x 10‐5)
See drawings for drive dimension reference
Adder per 25 mm, 5 mm Lead lbf‐in‐sec2 (kg‐m2) 9.045 x 10‐6 (1.022 x 10‐6) 9.045 x 10‐6 (1.022 x 10‐6) 9.045 x 10‐6 (1.022 x 10‐6) 9.045 x 10‐6 (1.022 x 10‐6) 9.045 x 10‐6 (1.022 x 10‐6) 2.261 x 10‐6 (2.555 x 10‐7) Adder per 25 mm, 10 mm Lead lbf‐in‐sec2 (kg‐m2) 1.038 x 10‐5 (1.173 x 10‐6) 1.038 x 10‐5 (1.173 x 10‐6) 1.038 x 10‐5 (1.173 x 10‐6) 1.038 x 10‐5 (1.173 x 10‐6) 1.038 x 10‐5 (1.173 x 10‐6) 2.595 x 10‐6 (2.931 x 10‐7) 59 K Series Manual.doc PN: 49269 Rev. J 07/21/2013 Exlar Corporation 952‐500‐6200 K75 5 mm Lead lbf‐in‐sec2 (kg‐m2)
Base Unit – Input Drive Shaft Only Inline Unit w/Motor Coupling 1:1 Reduction Belt Drive (86 mm) 1:1 Reduction Belt Drive (96 mm) 1:1 Reduction Belt Drive (130 mm) 2:1 Reduction Belt Drive (130 mm) 8.20 x 10‐4 (9.265 x 10‐5) 1.11 x 10‐3 (1.252 x 10‐4)
2.03 x 10‐3 (2.292 x 10‐4)
2.82 x 10‐3 (3.186 x 10‐4)
5.28 x 10‐3 (5.962 x 10‐4)
6.80 x 10‐3 (7.686 x 10‐4)
10 mm Lead lbf‐in‐sec2 (kg‐m2)
Base Unit – Input Drive Shaft Only 8.39 x 10‐4 (9.482 x 10‐5) Inline Unit w/Motor Coupling 1.28 x 10‐3 (1.441 x 10‐4)
1:1 Reduction Belt Drive (86 mm) 2.05 x 10‐3 (2.313 x 10‐4)
1:1 Reduction Belt Drive (96 mm) 2.84 x 10‐3 (3.207 x 10‐4)
1:1 Reduction Belt Drive (130 mm) 5.30 x 10‐3 (5.984 x 10‐4)
2:1 Reduction Belt Drive (130 mm) 6.81 x 10‐3 (7.692 x 10‐4)
See drawings for drive dimension reference
Adder per 25 mm, 5 mm Lead lbf‐in‐sec2 (kg‐m2) 2.77 x 10‐5 (3.132 x 10‐6) 2.77 x 10‐5 (3.132 x 10‐6) 2.77 x 10‐5 (3.132 x 10‐6) 2.77 x 10‐5 (3.132 x 10‐6) 2.77 x 10‐5 (3.132 x 10‐6) 6.93 x 10‐6 (7.831 x 10‐7) Adder per 25 mm, 10 mm Lead lbf‐in‐sec2 (kg‐m2) 2.94 x 10‐5 (3.320 x 10‐6) 2.94 x 10‐5 (3.320 x 10‐6) 2.94 x 10‐5 (3.320 x 10‐6) 2.94 x 10‐5 (3.320 x 10‐6) 2.94 x 10‐5 (3.320 x 10‐6) 7.35 x 10‐6 (8.301 x 10‐7) K90 5 mm Lead lbf‐in‐sec2 (kg‐m2)
Base Unit – Input Drive Shaft Only Inline Unit w/Motor Coupling 1:1 Reduction Belt Drive (96 mm) 1:1 Reduction Belt Drive (130 mm) 2:1 Reduction Belt Drive (130 mm) 2.63 x 10‐3 (2.97 x 10‐4) 3.40 x 10‐3 (3.84 x 10‐4)
4.53 x 10‐3 (5.12 x 10‐4)
7.07 x 10‐3 (7.99 x 10‐4)
3.02 x 10‐3 (3.42 x 10‐4)
10 mm Lead lbf‐in‐sec2 (kg‐m2)
Base Unit – Input Drive Shaft Only 2.66 x 10‐3 (3.00 x 10‐4) Inline Unit w/Motor Coupling 3.43 x 10‐3 (3.87 x 10‐4)
1:1 Reduction Belt Drive (96 mm) 4.56 x 10‐3 (5.15 x 10‐4)
1:1 Reduction Belt Drive (130 mm) 7.10 x 10‐3 (8.02 x 10‐4)
2:1 Reduction Belt Drive (130 mm) 3.03 x 10‐3 (3.42 x 10‐4)
See drawings for drive dimension reference
Adder per 25 mm, 5 mm Lead lbf‐in‐sec2 (kg‐m2) 9.80 x 10‐5 (1.11 x 10‐5) 9.80 x 10‐5 (1.11 x 10‐5) 9.80 x 10‐5 (1.11 x 10‐5) 9.80 x 10‐5 (1.11 x 10‐5) 2.45 x 10‐5 (2.77 x 10‐6) Adder per 25 mm, 10 mm Lead lbf‐in‐sec2 (kg‐m2) 1.00 x 10‐4 (1.13 x 10‐5) 1.00 x 10‐4 (1.1 3 x 10‐5) 1.00 x 10‐4 (1.13 x 10‐5) 1.00 x 10‐4 (1.13 x 10‐5) 2.50 x 10‐5 (2.82 x 10‐6) 60 K Series Manual.doc PN: 49269 Rev. J 07/21/2013 Exlar Corporation 952‐500‐6200 5.7 Weights K60
Base Unit ‐ zero stroke
Adder per inch of stroke
Adder for inline (excluding motor)
Adder for parallel drive (excluding motor and pulleys)
Adder for 2 foot plate mounts
Adder for 2 trunnions
Adder for a front flange plate
Adder for a rear flange plate
Adder for 2 angle plates
Adder for an eye plate
Adder for a clevis plate
K75
Base Unit ‐ zero stroke
Adder per inch of stroke
Adder for inline (excluding motor)
Adder for parallel drive (excluding motor and pulleys)
Adder for 2 foot plate mounts
Adder for 2 trunnions
Adder for a front flange plate
Adder for a rear flange plate
Adder for 2 angle plates
Adder for an eye plate
Adder for a clevis plate
Weight
lb
3.84
0.46
1.53
1.97
1.15
1.15
0.91
1.19
0.57
0.65
0.62
kg
1.74
0.21
0.70
0.89
0.52
0.52
0.41
0.54
0.26
0.30
0.28
Weight
lb
6.75
0.60
2.46
4.06
2.47
1.56
1.91
2.49
1.37
1.85
1.84
kg
3.06
0.27
1.12
1.84
1.12
0.71
0.87
1.13
0.62
0.84
0.84
61 K Series Manual.doc PN: 49269 Rev. J 07/21/2013 Exlar Corporation 952‐500‐6200 K90
Base Unit ‐ zero stroke
Adder per inch of stroke
Adder for inline (excluding motor)
Adder for parallel drive (excluding motor and pulleys)
Adder for 2 foot plate mounts
Adder for 2 trunnions
Adder for a front flange plate
Adder for a rear flange plate
Adder for 2 angle plates
Adder for an eye plate
Adder for a clevis plate
Weight
lb
11.96
0.93
3.35
5.8
3.78
1.77
3.4
4.79
1.97
2.49
3.21
kg
5.42
0.42
1.51
2.62
1.71
0.8
1.54
2.2
0.9
1.13
1.46
62 K Series Manual.doc PN: 49269 Rev. J 07/21/2013 Exlar Corporation 952‐500‐6200 6.0 Troubleshooting 6.1 Mechanical Problems The following table offers suggestions to answer questions and offer solutions to issues that may arise during the installation or operation of your K Series actuator. Symptom/Problem
Possible Cause
Problem Solution
Seemingly excessive noise.
Misalignment or Side Load.
Check alignment with application, remount actuator if necessary. Remove side load.
Consult tuning guidelines for servo motor and drive.
Disconnect power to motor,
remove belt cover and inspect Actuator motor rotates but output Belt or inline coupling failure.
belt or inline coupling. Replace rod does not extend or retract.
if necessary.
Motor does not operate.
Motor electrical problem.
Consult motor manufacturer.
Seemingly excessive noise.
Improper servo tuning.
Output rod has excessive rotation,
or rotates but does not extend.
Anti‐rotate failure.
Replace anti‐rotate mechanism.
An internal mechanism
binding, application binding,
Excessive motor current to operate
roller screw failure.
Consult Exlar.
actuator.
Operation over peak load rating.
Rapid Belt Wear
Belt too loose or too tight
Tighten or Loosen Belt
Replace anti‐rotates, replace
Broken anti‐rotate, jammed
Main Rod (Output Rod) does not rollerscrew nut, broken belt, rollerscrew nut, replace belt,
tighten pulley, or tighten
pulley loose, or coupling extend
coupling
loose
Seemingly excessive noise.
Bad roller screw or bearings Replace roller screw or bearings
Rapid wear of anti‐rotate or linear High over‐hung load
Remove high overhung load
bearing
Mounting accessories slip on t‐nuts
Too much load
Reduce load and tighten screws
63 K Series Manual.doc PN: 49269 Rev. J 07/21/2013 Exlar Corporation 952‐500‐6200 6.2 Returning a Product for Repair STANDARD REPAIR LEADTIME:
•
Two weeks for written evaluation from Exlar •
Two weeks from receipt of approval (by fax or email) for repair where parts are available. •
An evaluation charge per unit after evaluation applies if customer chooses not to repair; or if product is found not in need of repair. EXPEDITED REPAIR LEADTIME:
•
An expedite charge per unit can be quoted. •
This provides one week for written evaluation from Exlar •
This provides one week from receipt of approval (by fax or email) for repair where parts are available. PROCEDURE:
•
Please discuss the return with Exlar Technical Support prior to requesting an RGA number to see if it is possible to resolve the issue prior to return. •
If it is determined that an RGA number is required, please do so by contacting the Returned Goods Administrator. Phone 952‐500‐6200 or email [email protected]. •
International Repairs: Closely follow instructions provided by the Exlar Returned Goods Administrator. Failure to comply with issued instructions may result in delays for repair and return. •
Exlar requires a purchase order at the time of RGA; $0 on warranty returns, or for the standard evaluation charge per unit on all non‐warranty units for the evaluation fee. •
Following the evaluation, you will receive a quote from Exlar on the charges that will apply. If the actuator repair is approved, the evaluation fee will be waived and we will request an amended PO for the actual repair value. 64 K Series Manual.doc PN: 49269 Rev. J 07/21/2013 Exlar Corporation 952‐500‐6200