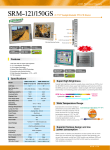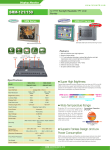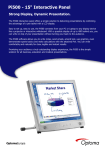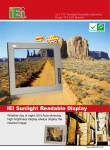
1
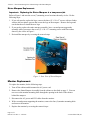
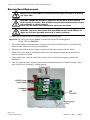
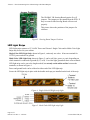
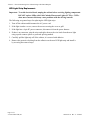
Twisted — Nitro Stunt Racing
New Cabinet Design with Sintra Marquee
Supplement to Operation & Service Manual
Document Part #: 040-0271-01 Rev. C
Your cabinet has a new design with a Sintra Marquee, stand-alone TV monitor, GLOBAL VR
Steering Board, and LED strip lights.
This document supplements the information in your service manual.
Please refer to this document for information about the marquee, monitor, cabinet lighting, steering
board, and changes to the audio system. Disregard the corresponding sections in your Operation
and Service Manual that describe the old-style cabinet.
Table of Contents
Software Restoration....................................................... 1
Sintra Marquee................................................................ 1
Sintra Marquee Replacement...................................... 2
Monitor Replacement...................................................... 2
Steering Board Replacement........................................... 3
LED Light Strips......................................................... 4
LED Light Strip Replacement..................................... 5
Software Restoration
If you need to restore software on your game, run the Steering Patch Disk after you run the System
Recovery Disk (SRD). Reboot the game and then run the Game Install Disk. Refer to your
Software Restore Guide (document part # 040-0272-01) for detailed instructions.
Sintra Marquee
The Sintra Marquee assembly is made up of two pieces, the Marquee/Bezel and the Logo. The
marquee is lit by LED Light Strips mounted to the cabinet. See LED Light Strips on page 4 for
detailed information on the light strips.
The Marquee/Bezel (part # NSR-AW-14-01) is secured to the cabinet by five (5) ¼-20 x ¾”
screws with flat washers. The screws mate with T-nuts in the cabinet.
The Logo (part # NSR-AW-14-02) is secured to the Marquee with three (3) ¼-20 x 2” screws with
two fender washers and two plastic spacers.
Page 1 of 5
© 2014 Global VR, Inc. All Rights Reserved. GLOBAL VR and the GLOBAL VR logo are registered trademarks of Global VR, Inc. Nitro Stunt
Racing © 2010 Game Seed. All other trademarks are the properties of their respective owners.
10/8/2014
Twisted — Nitro Stunt Racing New Cabinet Design with Sintra Marquee
Sintra Marquee Replacement
Important: Replacing the Sintra Marquee is a two-person job.
Refer to Figure 1 and note the seven (7) mounting screw locations shown by circles. Do the
following steps:
1. If you only need to replace the logo, remove the three (3) ¼-20 x 2” screws with two fender
washers and two plastic spacers that secure the logo to the marquee. Remove the logo and
use the hardware to install the new logo.
2. If you need to replace the entire marquee assembly, have a second person support the
assembly while you remove the seven (7) ¼-20 x ¾” mounting screws with flat washers
shown by the circles in Figure 1.
3. Re-install the marquee by reversing the removal steps.
Figure 1. Rear View of Sintra Marquee
Monitor Replacement
To replace the monitor, do the following steps:
1. Turn off the cabinet and disconnect the AC power cord.
2. Remove the Sintra Marquee Assembly from the cabinet as described on page 2. You can
now access the monitor mounting bolts through the opening in the back of the cabinet
behind the marquee.
3. Disconnect the AC power and DVI cables from the monitor.
4. With a second person supporting the monitor, remove the four (4) monitor mounting bolts
and remove the monitor.
5. Replace the monitor by reversing the removal steps.
Page 2 of 5
040-0271-01 Rev. C 3/4/2015
© 2015 Global VR, Inc.
Twisted — Nitro Stunt Racing New Cabinet Design with Sintra Marquee
Steering Board Replacement
Always turn the cabinet OFF and disconnect the AC power cord before performing
any repair work.
CAUTION: GLOBAL VR assumes no liability for any damage or injuries incurred
while servicing the cabinet. Only qualified service personnel should perform service
and installation of cabinet hardware.
Please read the service instructions before working on the cabinet.
CAUTION: To prevent electrostatic discharge (ESD) damage, handle PCBs by the
edges only and use a grounding wrist strap or similar precaution.
To replace the steering board refer to Figure 2 and do the following steps:
Important: Be sure to use only the Classic version of the Global VR Steering Board,
Global VR Part # 90633-01.
1. Turn off the cabinet and disconnect the AC power cord. Remove the Electronics Access Panel from
the back of the cabinet to access the Steering Board.
2. Disconnect the cables from the existing steering board and connect them to the new board.
3. Remove the screws from the mounting feet that secure the existing steering board in place and use
them to secure the new board.
4. Power on the game. Once the Attract Movie starts, power cycle the game again to complete the
installation.
5. After you reboot the game, open the Operator Menu and calibrate the force feedback steering. Play a
game to make sure everything is working properly.
Figure 2. GLOBAL VR Steering Board Connections
Page 3 of 5
© 2015 Global VR, Inc.
040-0271-01 Rev. C 3/4/2015
Twisted — Nitro Stunt Racing New Cabinet Design with Sintra Marquee
The GLOBAL VR Steering Board requires five (5)
jumpers. The jumpers are pre-installed on the PCB. If
they are removed the Steering Board will not work
properly.
This picture shows the positions of the jumpers for
reference.
Figure 3. Steering Board Jumper Positions
LED Light Strips
LED Light strips connect to 12 Volt DC Power and Ground. Single-Color and/or Multi-Color Light
Strips may be used in your cabinet.
Single-Color LED Light Strip, shown in Figure 4, emits only one color. It has one terminal for
12 VDC power and one for ground.
Multi-Color LED Light Strip, shown in Figure 5, can be red, blue, green, or a mix, depending on
which terminal is connected to ground (R, G, or B). For white light, ground all three color terminals.
LED light strips can be cut to the length needed, but cut only on the white cut line between the
terminals, as shown in Figure 4.
Power and ground leads can be soldered to either end of the LED light strip.
Secure the LED light strip in place with the double-stick tape pre-installed on the back of the strip.
Figure 4. Single-Color LED light strip Light
Figure 5. Multi-Color LED light strip Light
Page 4 of 5
040-0271-01 Rev. C 3/4/2015
© 2015 Global VR, Inc.
Twisted — Nitro Stunt Racing New Cabinet Design with Sintra Marquee
LED Light Strip Replacement
Important: To avoid electrical shock, unplug the cabinet before servicing lighting components.
DO NOT replace LEDs with Cold-Cathode Fluorescent Lights (CCFLs). CCFLs
draw more current which may cause problems with the driving controls.
The following are general steps for replacing the LED light strips.
1. Turn off the cabinet and disconnect the AC power cord.
2. If the light is under a cover, remove the screws securing the cover or grill.
3. If the light has a 4-pin PC power connector, disconnect it from the power harness.
4. If there is no connector, snip the wires and splice them to the wire leads from the new light
using a quick-connect splicer or preferred splicing method.
5. Carefully pull the light strip off of the cabinet; it is secured with adhesive.
6. Remove the protective backing from the adhesive on the new LED light strip and install it
by reversing the removal steps.
Page 5 of 5
© 2015 Global VR, Inc.
040-0271-01 Rev. C 3/4/2015