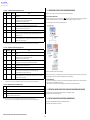
1
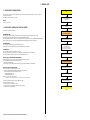
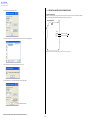
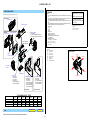
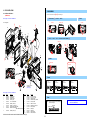
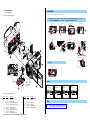
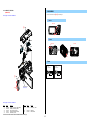
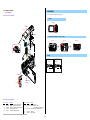
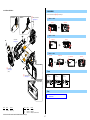
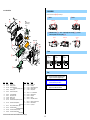
HDR-PJ260/PJ260E/PJ260V/PJ260VE/
XR260E/XR260V/XR260VE
SERVICE MANUAL
LEVEL
Ver. 1.3 2012.06
Revised-3
Replace the previously issued
SERVICE MANUAL 9-834-636-33
with this Manual.
Photo: HDR-PJ260V
2
US Model
Canadian Model
AEP Model
UK Model
North European Model
E Model
Australian Model
Hong Kong Model
Chinese Model
Korea Model
Brazilian Model
Tourist Model
983463634.pdf
Revision History
History
Contents
S.M. Rev.
issued
—
—
Ver.
Date
1.0
2011.12
Official Release
1.1
2012.01
Revised-1
(A1 11-344)
• Change of SERVICE NOTE.
Page 1-2, 1-3, 1-4, 1-5, 1-6, 1-7
Yes
1.2
2012.05
Revised-2
(A2 12-019)
• Addition of North European Model (PJ260E).
Page 3
• Change of EXPLODED VIEWS.
Page 2-10
Yes
1.3
2012.06
Revised-3
(A3 12-146)
• Correction of REPAIR PARTS LIST.
Page 2-13, 2-14
• Correction of ACCESSORIES.
Page 2-15
Yes
SERVICE NOTE (Check the following note before the service.)
1-1.
1-2.
1-3.
1-4.
1-5.
1-6.
1-7.
1-8.
1-9.
1-10.
1-11.
POWER SUPPLY DURING REPAIRS
PRECAUTION ON REPLACING THE VC-653 BOARD
ADDITION OF DESTINATION DATA FILE
PRECAUTION ON REPLACING THE MS-478 BOARD
PRECAUTION ON REPLACING THE LENS
SELF-DIAGNOSIS FUNCTION
METHOD OF COPING WITH SHIFT LENS ERROR
GPS RECEIVING CHECK (PJ260V/PJ260VE/XR260V/XR260VE)
PRECAUTION ON REPLACING THE LD-279 BOARD (PJ260/PJ260E/PJ260V/PJ260VE)
PRECAUTION ON REPLACING THE HDD (XR260V/XR260VE)
NOTE ON REPLACING PROJECTOR UNIT (PJ260/PJ260E/PJ260V/PJ260VE)
Digital HD Video Camera Recorder
The components identified by mark
0 or dotted line with mark 0 are
critical for safety.
Replace only with part number
specified.
Les composants identifiés par une
marque 0 sont critiques pour la
sécurité.
Ne les remplacer que par une
pièce portant le numéro spécifié.
HDR-PJ260/PJ260E/PJ260V/PJ260VE/XR260E/XR260V/XR260VE_L2
9-834-636-34
Sony Corporation
2012F08-1
© 2012.06
Published by Sony Techno Create Corporation
These specifications are extracted from instruction manual of
HDR-PJ260E/PJ260VE/XR260E/XR260VE.
These specifications are extracted from instruction manual of
HDR-PJ260/PJ260V/XR260V.
SPECIFICATIONS
SPECIFICATIONS
System
Input/Output connectors
AC Adaptor AC-L200C/AC-L200D
System
Input/Output connectors
AC Adaptor AC-L200C/AC-L200D
Signal format: PAL color, CCIR standards
HDTV 1080/50i, 1080/50p specification
Movie recording format:
HD: MPEG-4 AVC/H.264 AVCHD format
Ver.2.0 compatible
STD: MPEG2-PS
Audio recording system:
HDR-PJ260E/PJ260VE/XR260E/XR260VE
Dolby Digital 2ch/5.1ch
Dolby Digital 5.1 Creator
Photo file format:
DCF Ver.2.0 Compatible
Exif Ver.2.3 Compatible
MPF Baseline Compatible
Recording media (Movie/Photo):
Internal memory
HDR-PJ260E/PJ260VE: 16 GB
Hard disk
HDR-XR260E/XR260VE: 160 GB
“Memory Stick PRO Duo” media
SD card (Class 4 or faster)
The capacity that a user can use
HDR-PJ260VE: Approx. 12.8 GB*1
HDR-PJ260E: Approx. 15.8 GB*2
HDR-XR260VE: Approx. 156 GB*1
HDR-XR260E: Approx. 159 GB*2
*1
1 GB equals 1 billion bytes, 2.8 GB is used
for pre-installed map and another portion is
used for data management functions. Only
pre-installed demonstration movie may be
deleted.
*2
1 GB equals 1 billion bytes, a portion of
which is used for system management and/
or application files. Only preinstalled demonstration movie may be deleted.
Image device:
HDR-PJ260E/PJ260VE/XR260E/XR260VE:
4.6 mm (1/3.91 type) CMOS sensor
Recording pixels (photo, 16:9):
Max. 8.9 mega (3 984 × 2 240) pixels*1
Gross: Approx. 5 430 000 pixels
Effective (movie, 16:9)*2:
Approx. 2 230 000 pixels
Effective (photo, 16:9):
Approx. 2 230 000 pixels
Effective (photo, 4:3):
Approx. 1 670 000 pixels
Lens: G lens
HDR-PJ260E/PJ260VE/XR260E/XR260VE:
30 × (Optical)*2, 55 × (Extended)*3, 350 ×
(Digital)
Filter diameter (HDR-PJ260E/PJ260VE/
XR260E/XR260VE): 37 mm (1 1/2 in.)
F1.8 ~ 3.4
Focal length:
f=2.1 mm ~ 63.0 mm (3/32 in. ~ 2 1/2 in.)
When converted to a 35 mm still camera
For movies*2: 29.8 mm ~ 894 mm (1 3/16 in.
~ 35 1/4 in.) (16:9)
For photos: 29.8 mm ~ 894 mm (1 3/16 in.
~ 35 1/4 in.) (16:9)
Minimum illumination:
6 lx (lux) (in default setting, shutter speed
1/50 second)
3 lx (lux) ([Low Lux] is set to [On], shutter
speed 1/25 second)
*1
The unique pixel array of Sony’s ClearVid
and the image processing system (BIONZ)
allow still image resolution equivalent to
the sizes described.
*2
[ SteadyShot] is set to [Standard] or [Off].
*3
[ SteadyShot] is set to [Active].
A/V Remote Connector: Video and audio output
jack
HDMI OUT jack: HDMI mini connector
USB jack: mini-AB/Type A (Built-in USB)
(output only)
Headphone jack (HDR-PJ260E/PJ260VE/
XR260E/XR260VE):
Stereo minijack (φ 3.5 mm)
MIC input jack: Stereo minijack (φ 3.5 mm)
Power requirements: AC 100 V - 240 V,
50 Hz/60 Hz
Current consumption: 0.35 A - 0.18 A
Power consumption: 18 W
Output voltage: DC 8.4 V*
Operating temperature: 0 °C to 40 °C (32 °F to
104 °F)
Storage temperature: –20 °C to +60 °C (–4 °F to
+140 °F)
Dimensions (approx.): 48 mm × 29 mm ×
81 mm (1 15/16 in. × 1 3/16 in. × 3 1/4 in.)
(w/h/d) excluding the projecting parts
Mass (approx.): 170 g (6.0 oz) excluding the
power cord (mains lead)
* See the label on the AC Adaptor for other
specifications.
Signal format: NTSC color, EIA standards
HDTV 1080/60i, 1080/60p specification
Movie recording format:
HD: MPEG-4 AVC/H.264 AVCHD format
Ver.2.0 compatible
STD: MPEG2-PS
Audio recording system:
HDR-PJ260/PJ260V/XR260V
Dolby Digital 2ch/5.1ch
Dolby Digital 5.1 Creator
Photo file format:
DCF Ver.2.0 Compatible
Exif Ver.2.3 Compatible
MPF Baseline Compatible
Recording media (Movie/Photo):
Internal memory
HDR-PJ260/PJ260V: 16 GB
Hard disk
HDR-XR260V: 160 GB
“Memory Stick PRO Duo” media
SD card (Class 4 or faster)
The capacity that a user can use
HDR-PJ260: Approx. 15.8 GB*2
HDR-XR260V: Approx. 156 GB*1
*1
1 GB equals 1 billion bytes, 2.8 GB is used
for pre-installed map and another portion is
used for data management functions. Only
pre-installed demonstration movie may be
deleted.
*2
1 GB equals 1 billion bytes, a portion of
which is used for system management and/
or application files. Only preinstalled demonstration movie may be deleted.
Image device:
HDR-PJ260/PJ260V/XR260V:
4.6 mm (1/3.91 type) CMOS sensor
Recording pixels (photo, 16:9):
Max. 8.9 mega (3 984 × 2 240) pixels*1
Gross: Approx. 5 430 000 pixels
Effective (movie, 16:9)*2:
Approx. 2 230 000 pixels
Effective (photo, 16:9):
Approx. 2 230 000 pixels
Effective (photo, 4:3):
Approx. 1 670 000 pixels
Lens: G lens
HDR-PJ260/PJ260V/XR260V:
30 × (Optical)*2, 55 × (Extended)*3, 350 ×
(Digital)
Filter diameter (HDR-PJ260/PJ260V/
XR260V): 37 mm (1 1/2 in.)
F1.8 ~ 3.4
Focal length:
f=2.1 mm ~ 63.0 mm (3/32 in. ~ 2 1/2 in.)
When converted to a 35 mm still camera
For movies*2: 29.8 mm ~ 894 mm (1 3/16 in.
~ 35 1/4 in.) (16:9)
For photos: 29.8 mm ~ 894 mm (1 3/16 in.
~ 35 1/4 in.) (16:9)
Color temperature: [Auto], [One Push], [Indoor]
(3 200 K), [Outdoor] (5 800 K)
Minimum illumination:
6 lx (lux) (in default setting, shutter speed
1/60 second)
3 lx (lux) ([Low Lux] is set to [On], shutter
speed 1/30 second)
*1
The unique pixel array of Sony’s ClearVid
and the image processing system (BIONZ)
allow still image resolution equivalent to the
sizes described.
*2
[ SteadyShot] is set to [Standard] or [Off].
*3
[ SteadyShot] is set to [Active].
A/V Remote Connector: Video and audio output
jack
HDMI OUT jack: HDMI mini connector
USB jack: mini-AB/Type A (Built-in USB)
Headphone jack (HDR-PJ260/PJ260V/XR260V):
Stereo minijack (φ 3.5 mm)
MIC input jack: Stereo minijack (φ 3.5 mm)
Power requirements: AC 100 V - 240 V,
50 Hz/60 Hz
Current consumption: 0.35 A - 0.18 A
Power consumption: 18 W
Output voltage: DC 8.4 V*
Operating temperature: 0 °C to 40 °C (32 °F to
104 °F)
Storage temperature: –20 °C to +60 °C (–4 °F to
+140 °F)
Dimensions (approx.): 48 mm × 29 mm ×
81 mm (1 15/16 in. × 1 3/16 in. × 3 1/4 in.)
(w/h/d) excluding the projecting parts
Mass (approx.): 170 g (6.0 oz) excluding the
power cord (mains lead)
* See the label on the AC Adaptor for other
specifications.
LCD screen
Picture: 7.5 cm (3.0 type, aspect ratio 16:9)
Total number of pixels:
HDR-PJ260E/PJ260VE/XR260E/XR260VE:
230 400 (960 × 240)
Projector (HDR-PJ260E/PJ260VE)
Projection type: DLP
Light source: LED (R/G/B)
Focus: Manual
Throw Distance: 0.5 m (1.6 feet) or over
Contrast ratio: 1500:1
Resolution (output): nHD (640 × 360)
Continuous projection time (when using the
supplied battery pack):
HDR-PJ260E/PJ260VE: Approx. 1 h 30 min
General
Power requirements: DC 6.8 V/7.2 V (battery
pack) DC 8.4 V (AC Adaptor)
USB Charging: DC 5 V 500 mA/1.5 A
Average power consumption:
During camera recording using LCD screen
at normal brightness:
HDR-PJ260E/PJ260VE:
HD: 2.7 W STD: 2.5 W
HDR-XR260E/XR260VE:
HD: 3.5 W STD: 3.2 W
Operating temperature: 0 °C to 40 °C (32 °F to
104 °F)
Storage temperature: –20 °C to +60 °C (–4 °F to
+140 °F)
Dimensions (approx.):
HDR-XR260E/XR260VE:
59.5 mm × 66 mm × 117.5 mm (2 3/8 in. ×
2 5/8 in. × 4 5/8 in.) (w/h/d) including the
projecting parts
59.5 mm × 66 mm × 128 mm (2 3/8 in.
× 2 5/8 in. × 5 1/8 in.) (w/h/d) including
the projecting parts, and the supplied
rechargeable battery pack attached
HDR-PJ260E/PJ260VE:
58.5 mm × 64.5 mm × 116.5 mm (2 3/8 in.
× 2 5/8 in. × 4 5/8 in.) (w/h/d) including the
projecting parts
58.5 mm × 64.5 mm × 128 mm (2 3/8 in.
× 2 5/8 in. × 5 1/8 in.) (w/h/d) including
the projecting parts, and the supplied
rechargeable battery pack attached
Mass (approx.)
HDR-XR260E/XR260VE:
355 g (12 oz) main unit only
405 g (14 oz) including the supplied
rechargeable battery pack
HDR-PJ260E/PJ260VE:
320 g (11 oz) main unit only
370 g (13 oz) including the supplied
rechargeable battery pack
HDR-PJ260/PJ260E/PJ260V/PJ260VE/XR260E/XR260V/XR260VE_L2
Rechargeable battery pack NP-FV50
Maximum output voltage: DC 8.4 V
Output voltage: DC 6.8 V
Maximum charge voltage: DC 8.4 V
Maximum charge current: 2.1 A
Capacity
Typical: 7.0 Wh (1 030 mAh)
Minimum: 6.6 Wh (980 mAh)
Type: Li-ion
Design and specifications of your camcorder and
accessories are subject to change without notice.
• Manufactured under license from Dolby
Laboratories.
–2–
LCD screen
Picture: 7.5 cm (3.0 type, aspect ratio 16:9)
Total number of pixels:
HDR-PJ260/PJ260V/XR260V:
230 400 (960 × 240)
Projector (HDR-PJ260/PJ260V)
Projection type: DLP
Light source: LED (R/G/B)
Focus: Manual
Throw Distance: 0.5 m (1.6 feet) or over
Contrast ratio: 1500:1
Resolution (output): nHD (640 × 360)
Continuous projection time (when using the
supplied battery pack):
HDR-PJ260/PJ260V: Approx. 1 h 30 min
General
Power requirements: DC 6.8 V/7.2 V (battery
pack) DC 8.4 V (AC Adaptor)
USB Charging: DC 5 V 500 mA/1.5 A
Average power consumption:
During camera recording using LCD screen
at normal brightness:
HDR-PJ260/PJ260V:
HD: 2.7 W STD: 2.5 W
HDR-XR260V:
HD: 3.5 W STD: 3.2 W
Operating temperature: 0 °C to 40 °C (32 °F to
104 °F)
Storage temperature: –20 °C to +60 °C (–4 °F to
+140 °F)
Dimensions (approx.):
HDR-XR260V:
59.5 mm × 66 mm × 117.5 mm (2 3/8 in. ×
2 5/8 in. × 4 5/8 in.) (w/h/d) including the
projecting parts
59.5 mm × 66 mm × 128 mm (2 3/8 in.
× 2 5/8 in. × 5 1/8 in.) (w/h/d) including
the projecting parts, and the supplied
rechargeable battery pack attached
HDR-PJ260/PJ260V:
58.5 mm × 64.5 mm × 116.5 mm (2 3/8 in.
× 2 5/8 in. × 4 5/8 in.) (w/h/d) including the
projecting parts
58.5 mm × 64.5 mm × 128 mm (2 3/8 in.
× 2 5/8 in. × 5 1/8 in.) (w/h/d) including
the projecting parts, and the supplied
rechargeable battery pack attached
Mass (approx.)
HDR-XR260V:
355 g (12 oz) main unit only
405 g (14 oz) including the supplied
rechargeable battery pack
HDR-PJ260/PJ260V:
320 g (11 oz) main unit only
370 g (13 oz) including the supplied
rechargeable battery pack
Rechargeable battery pack NP-FV50
Maximum output voltage: DC 8.4 V
Output voltage: DC 6.8 V
Maximum charge voltage: DC 8.4 V
Maximum charge current: 2.1 A
Capacity
Typical: 7.0 Wh (1 030 mAh)
Minimum: 6.6 Wh (980 mAh)
Type: Li-ion
Design and specifications of your camcorder and
accessories are subject to change without notice.
• Manufactured under license from Dolby
Laboratories.
Ver. 1.2 2012.05
The changed portions from
Ver. 1.1 are shown in blue.
Model information table
Model
Destination
COLOR system
Recording media
LENS
Projector
GPS
Hot shoe
Charging capacitor
(for flash)
HDR-PJ260
HDR-PJ260E
HDR-PJ260V
HDR-PJ260VE HDR-XR260E HDR-XR260V HDR-XR260VE
AEP,UK,NE,
E,
E,
KR
NE, E, CH, JE
US, CND, E
E, CH
US, CND, E, BR AEP,UK,NE,
AUS
AUS, HK
NTSC
PAL
NTSC
PAL
PAL
NTSC
PAL
Hard
Disk
Hard
Disk
Hard
Disk
Internal memory Internal memory Internal memory Internal memory
Drive
Drive
Drive
16 GB
16 GB
16 GB
16 GB
160 GB
160 GB
160 GB
LSV-1450A
LSV-1450A
LSV-1450A
LSV-1450A
LSV-1450A
LSV-1450A
LSV-1450A
●
●
●
●
─
─
─
─
─
●
●
─
●
●
─
─
─
─
─
─
─
─
─
─
─
─
─
─
MODEL GROUP
Projector Model:
PJ260/PJ260E/PJ260V/PJ260VE
Non Projector Model: XR260E/XR260V/XR260VE
HDD Model:
XR260E/XR260V/XR260VE
IM Model (Internal Memory Model): PJ260/PJ260E/PJ260V/PJ260VE
Caution
Danger of explosion if battery is incorrectly replaced.
Replace only with the same or equivalent type.
Dispose of used batteries according to the instructions.
GPS Model:
PJ260V/PJ260VE/XR260V/XR260VE
Non GPS Model: PJ260/PJ260E/XR260E
• Abbreviation
AUS: Australian model
BR: Brazilian model
CH: Chinese model
CND: Canadian model
HK: Hong Kong model
JE:
Tourist model
KR: Korea model
NE: North European model
SAFETY-RELATED COMPONENT WARNING!!
COMPONENTS IDENTIFIED BY MARK 0 OR DOTTED LINE WITH
MARK 0 ON THE SCHEMATIC DIAGRAMS AND IN THE PARTS LIST
ARE CRITICAL TO SAFE OPERATION. REPLACE THESE COMPONENTS WITH SONY PARTS WHOSE PART NUMBERS APPEAR AS
SHOWN IN THIS MANUAL OR IN SUPPLEMENTS PUBLISHED BY
SONY.
ATTENTION AU COMPOSANT AYANT RAPPORT
À LA SÉCURITÉ!
LES COMPOSANTS IDENTIFIÉS PAR UNE MARQUE 0 SUR LES
DIAGRAMMES SCHÉMATIQUES ET LA LISTE DES PIÈCES SONT
CRITIQUES POUR LA SÉCURITÉ DE FONCTIONNEMENT. NE REMPLACER CES COMPOSANTS QUE PAR DES PIÈCES SONY DONT
LES NUMÉROS SONT DONNÉS DANS CE MANUEL OU DANS LES
SUPPLÉMENTS PUBLIÉS PAR SONY.
SAFETY CHECK-OUT
After correcting the original service problem, perform the following
safety checks before releasing the set to the customer.
1. Check the area of your repair for unsoldered or poorly-soldered
connections. Check the entire board surface for solder splashes and
bridges.
2. Check the interboard wiring to ensure that no wires are “pinched”
or contact high-wattage resistors.
3. Look for unauthorized replacement parts, particularly transistors,
that were installed during a previous repair. Point them out to the
customer and recommend their replacement.
4. Look for parts which, through functioning, show obvious signs of
deterioration. Point them out to the customer and recommend their
replacement.
5. Check the B+ voltage to see it is at the values specified.
6. Flexible Circuit Board Repairing
• Set the soldering iron tip temperature to 350 °C approximately.
• Do not touch the soldering iron on the same conductor of the circuit
board (within 3 times).
• Be careful not to apply force on the conductor when soldering or
unsoldering.
HDR-PJ260/PJ260E/PJ260V/PJ260VE/XR260E/XR260V/XR260VE_L2
–3–
UNLEADED SOLDER
This unit uses unleaded solder.
Boards requiring use of unleaded solder are printed with the lead free
mark (LF) indicating the solder contains no lead.
(Caution: Some printed circuit boards may not come printed with the
lead free mark due to their particular size.)
: LEAD FREE MARK
Be careful to the following points to solder or unsolder.
• Set the soldering iron tip temperature to 350 °C approximately.
If cannot control temperature, solder/unsolder at high temperature
for a short time.
Caution: The printed pattern (copper foil) may peel away if the
heated tip is applied for too long, so be careful!
Unleaded solder is more viscous (sticky, less prone to
flow) than ordinary solder so use caution not to let solder
bridges occur such as on IC pins, etc.
• Be sure to control soldering iron tips used for unleaded solder and
those for leaded solder so they are managed separately. Mixing unleaded solder and leaded solder will cause detachment phenomenon.
1. SERVICE NOTE
1-1. POWER SUPPLY DURING REPAIRS
START
In this unit, about 10 seconds after power is supplied to the battery terminal using the regulated power supply (8.4 V), the power is shut off
so that the unit cannot operate.
These following method is available to prevent this.
Connect to the PC with a USB cable,
and turn on the power switch.
* by SEUS driver
Method:
Use the AC power adaptor.
Select the "USB CONNECT" to establish
the connection
1-2. PRECAUTION ON REPLACING THE VC-653 BOARD
Note the following when replacing the board.
Execute
the "DdmMmcReadTestMINI.vbe"
DESTINATION DATA
When you replace to the repairing board, the written destination data of repairing board also might be changed to original setting.
Start the Adjust Manual in the Adjust Station and execute the “DESTINATON DATA WRITE”.
After the board replacement, the error of the built-in recording media may be displayed. In this case, execute the [DESTINATION DATA WRITE]
then the error will be cleared. If it is not cleared with [DESTINATION DATA WRITE], format the built-in recording media.
(several second)
Wait until "SetOverallReadMINI OK" display
USB SERIAL SAVE
When you replace to the repairing board, get the data from the former one.
Start the Adjust Manual in the Adjust Station and perform “USB SERIAL SAVE” to get the data.
During the power is turning-on,
pull-out the AC-adapter.
Then connect the AC-adapter Again
(It's running with blue color monitor.)
USB SERIAL No.
The set is shipped with a unique ID (USB Serial No.) written in it.
This ID has not been written in a new board for service, and therefore it must be entered after the board replacement.
Start the Adjust Manual in the Adjust Station and execute the “USB SERIAL No. INPUT”.
Reactive the camcorder automatically
Data for projector (PJ260/PJ260E/PJ260V/PJ260VE)
Before replacing the board with a spare board, acquire the following data from the current board.
• Fixed value (that shows irradiation performance of the projector).
• Serial number of the projector unit.
To acquire the data, start Adjust Manual from Adjust Station and select [Projector Data Reference] on the [DATA] tab.
Execute
the "11DdmMMCMakePartition.vbe"
(several second)
Wait until "MakePartition OK" display
About unit with Internal Memory Model
After the board replacement, execute the procedure below first.
1. Execute the [DESTINATION DATA WRITE] of ADJUST tab in the Adjust Manual.
2. Execute the script files below. (Refer to the flowchart in Fig. 1)
• 11DdmMmcReadTestMINI_v4.vbe
• 11DdmMmcMakePartition_v4.vbe
Reactive the camcorder automatically
Note: Download the script files from TISS Homepage.
When searching in the TISS Homepage, enter “IM_VC_TOOL” for keyword in the Part Number field.
Disconnect the USB cable,
and turnoff the power switch.
Unless these script files are executed, the following symptoms may appear.
Make sure execute the above script files.
• The internal memory is not recognized as a media.
• The management file saved in the internal memory model cannot be repaired.
• The internal memory cannot be formatted.
END
Fig.1
HDR-PJ260/PJ260E/PJ260V/PJ260VE/XR260E/XR260V/XR260VE_L2
1-1
Ver. 1.1 2012.01
1-3. ADDITION OF DESTINATION DATA FILE
3) Search the model whose new Destination Data file you want to get on the TISS homepage.
When the Destination Data file has been updated, a file with a name “Destination File For ‘model name’.zip” is registered.
If the Destination Data file included in the Adjust manual is old, “DESTINATION DATA WRITE” cannot be executed in some cases.
In that case, download a new Destination Data file from the TISS homepage according to the following procedure.
(Example) Destination File For DSC-WX50.zip
Furthermore, the version supported by the Destination Data file is shown in the Remarks column.
Note 1: To perform Destination Data Write for this model, the Adjust manual of the DSC-WX50 series must have been installed.
Install the Adjust manual of the DSC-WX50 series in advance.
Note 2: The actual image may differ from the image shown above.
Note : If the Destination Data file has not been updated, contact the Service Headquarters.
1) If the Destination Data file in the Adjust manual in use is old, the window shown in Fig. 1 is displayed.
Click the [OK] button.
Fig. 1
2) The Destination Data Write window opens.
Check the version of the Destination Data file retained in the Adjust manual.
4) Download the Destination Data file of the relevant model and unzip the file.
Destination Ver. window
5) Execute “DESTINATION DATA WRITE” in the Adjust tab of the Adjust manual.
Click the [START] button.
HDR-PJ260/PJ260E/PJ260V/PJ260VE/XR260E/XR260V/XR260VE_L2
1-2
Ver. 1.1 2012.01
The changed portions from
Ver. 1.0 are shown in blue.
1-4. PRECAUTION ON REPLACING THE MS-478 BOARD
6) Click the [File Update] button in the window.
Angular Velocity Sensor
When you replace to the repairing board, write down the sensitivity displayed on the angular velocity sensor SE7501 (PITCH/YAW).
Start the Adjust Manual in the Adjust Station and execute the “GYRO sensor sensitivity adj”.
MS-478 BOARD (SIDE B)
SE7501
PP
YY
PP: PITCH sensor sensitivity G1
YY: YAW sensor sensitivity G2
7) A file selection screen opens. Select the Destination Data file to be added and click the [Open] button.
Note: The sensor sensitivity of SE7501 (PITCH/YAW) on MS-478 board is written only repair parts.
8) When the file has been successfully added, the following window opens.
9) Check the Destination Ver. window and confirm that the version has been updated.
Destination Ver. window
HDR-PJ260/PJ260E/PJ260V/PJ260VE/XR260E/XR260V/XR260VE_L2
1-3
Ver. 1.1 2012.01
The changed portions from
Ver. 1.0 are shown in blue.
1-5. PRECAUTION ON REPLACING THE LENS
1-6-3. Self-diagnosis Code Table
Self-diagnosis Code
Repaired by:
When replacing the lens, write down the PITCH/YAW data given on the data sheet of the replacement lens for service.
Start the Adjust Manual in the Adjust Station and execute the “GYRO sensor sensitivity Adj”.
Block
Function
Symptom/State
Detailed
Code
Correction
C
0
4
0
0
Non-standard battery is used.
Use the InfoLITHIUM battery.
C
0
6
0
0
The battery pack temperature is high.
Change the battery pack or place it in a cool place.
C
1
3
0
1
Memory card is unformatted.
Memory card is broken.
C
1
3
0
2*
Access error
Format the memory card.
Insert a new memory card.
Remove the power source. Reconnect it again and operate your camcorder again.
C
1
3
0
3*
Access error (External mdedia)
Turn power off and turn power on again.
C
1
3
0
4*
Drive fault (External mdedia)
Turn power off and turn power on again.
C
(E
3
6
2
1
6
0
0
0)
Difficult to adjust focus
(Cannot initialize focus)
Retry turn the power on by the power switch. If it does not recover, check
the focus sensor of lens block (pin 7 of CN4002 on the LD-279 board).
If it is OK, check the focus motor drive IC (IC5501 on the VC-653 board).
E
2
0
0
0
Flash memory data are rewritten.
Make flash memory data correct value. (Note 1)
E
3
1
0
0
Drive fault
Turn power off and turn power on again.
Inspect the lens block zoom sensor signal (pin 9 of CN4002 on the LD279 board) when zooming is performed when the zoom lever is operated,
and the zoom motor drive circuit (IC5501 on the VC-653 board) when
zooming is not performed.
P.PP/Y.YY
P.PP/Y.YY
L2 YAW data
L1 PITCH data
1-6. SELF-DIAGNOSIS FUNCTION
1-6-2. Self-diagnosis Display
1-6-1. Self-diagnosis Function
When problems occur while the unit is operating, the self-diagnosis
function starts working, and displays on the LCD screen what to do.
This function consists of two display; self-diagnosis display and service
mode display.Details of the self-diagnosis functions are provided in the
Instruction manual.
When problems occur while the unit is operating, the counter of the LCD
screen shows a 4-digit display consisting of an alphabet and numbers,
which blinks at 3.2 Hz. This 5-character display indicates the “repaired
by:”, “block” in which the problem occurred, and “detailed code”of the
problem.
E
6
1
1
0
Zoom operations fault
(Cannot initialize zoom lens.)
E
6
1
1
1
The abnormalities in initialization of
the focus lens and the abnormalities in
initialization of the zoom lens occurred
simultaneously.
Check both C: 32: 60 and E: 61: 10 of the self-diagnosis code.
Reset position detection error on the stepper iris initializing
Turn the power on to open lens barrier. Disconnect the battery or power
cord, and then connect again.
Confirm that the iris blades in lens are working.
If iris blades do not working, check the iris motor drive IC in lens drive
block (CN4002 pin qj, qk on LD-279 board).
If iris blades work normally, confirm that they are closing completely
and confirm following item.
・ Case of the iris blades do not close normally Replace the lens block).
・ Case of “E: 61: 30” is appeared and iris blades closed completely.
Confirm that communication with lens block is normal.
・ Case of LCD is not displayed normally Check that connection between
CN6702 on CM-123 board and CN4002 on VC-653 board by FP-1488
flexible board.
・ Case of LCD is displayed normally Replace the lens block.
LCD screen
Blinks at 3.2 Hz
C
Repaired by:
32
Block
E
6
1
3
0
E
6
2
0
0
E
6
2
0
1
E
6
2
0
2
E
6
2
0
3
E
6
2
0
4
E
6
2
1
0
Shift lens initializing failure.
E
6
2
1
1
Shift lens overheating (Pitch)
Refer to [1-7-2. E : 62 : 11 (Shift Lens Overheating (Pitch)) Occurred].
E
6
2
1
2
Shift lens overheating (Yaw)
Refer to [1-7-3. E : 62 : 12 (Shift Lens Overheating (Yaw)) Occurred].
00
Detailed Code
Refer to “1-6-3. Self-diagnosis Code Tabl e”.
C : Corrected by customer Indicates the appropriate
E : Corrected by service
step to be taken.
engineer
E.g.
13 .... Format the “memory card”.
32 ....Turn on power again.
Handshake correction function does not
work well. (With PITCH angular velocity
sensor output stopped.)
Handshake correction function does not
work well. (With YAW angular velocity
sensor output stopped.)
Abnormality of IC for steadyshot.
IC for steadyshot and micro controller
communication abnormality among.
Image vibration correction during
handshake function does not work.
Inspect PITCH angular velocity sensors (SE7501 on the MS-478 board)
peripheral circuits.
Inspect YAW angular velocity sensors (SE7501 on the MS-478 board)
peripheral circuits.
Refer to [1-7-1. E : 62 : 02 (Abnormality of IC for Steadyshot) Occurred].
Inspect the steadyshot circuit (IC5501 on the VC-653 board).
Inspect the image vibration angular velocity sensors (SE7701 on the
LD-279 board) peripheral circuits.
Replacement of lens block. (Note 3) If an error occurs again, replace
the VC-653 board.
Note 1: Start the Adjust Manual in the Adjust Station and refer to the “DESTINATON DATA WRITE”.
Note 2: Functions of codes with * mark are not provided in this unit.
HDR-PJ260/PJ260E/PJ260V/PJ260VE/XR260E/XR260V/XR260VE_L2
1-4
Ver. 1.1 2012.01
The changed portions from
Ver. 1.0 are shown in blue.
1-7. METHOD OF COPING WITH SHIFT LENS ERROR
LD-279 BOARD (SIDE A)
Symptom/State
Correction
E
6
2
2
0
Abnormality of thermistor.
Refer to [1-7-4. E : 62 : 20 (Abnormality of Thermistor) Occurred].
E
9
1
0
1*
Abnormality when flash is beingcharged.
Turn power off and turn power on again.
E
9
1
0
2*
Abnormality of LED Video light.
Turn power off and turn power on again.
E
9
1
0
3*
Abnormality of LED Video light Temperature detection.
Turn power off and turn power on again.
E
9
2
0
1
Battery current value goes over the max
discharge current
Check the remaining battery power because this symptom maybe
depended on the remaining battery level, and confirm whether or
not the symptom is occurred after replacing the battery. If the symptom is still occurred, overhaul inspection is needed. Check each
output of DC/DC converter (IC4301 on the VC-653 board) with
connected the DC JACK (J901) on the VC-653 board.
(The minimum connection to periphery)
E
9
4
0
0
Fault of writing or erasing the flash memory
IM Model:
Inspect the flash memory (IC8101 on the LD-279 board).
E
9
4
0
1
Internal flash memory fault
IM Model:
Inspect the flash memory (IC8101 on the LD-279 board).
E
9
4
0
2
BGM data error
Check the CPU (IC1301 on the VC-652 board).
GPS hardware error
GPS Model:
Check whether the FFC-254 flexible flat cable is broken,and check
whether it is inserted imperfectly.
If there is no problem the flexible board, inspect or replacement of
the GP-037 board.
E
9
5
0
0
E
9
6
0
0
Map area mount error
HDD Model:
Inspect or replacement of the HDD.
IM Model:
Inspect or replacement of the LD-279 board.
E
9
7
0
0
Projector hardware error
Turn power off and turn power on again.
C5528
Detailed
Code
C5527
Block
Function
C5526
C5529
Repaired by:
Self-diagnosis Code
IC5501
R5505
Fig. 1
Measurement points on the VC-652 board
about 330 msec
Note: The length of low section will vary a little depending on the conditions.
Fig. 2
Change in output voltage of R5505 on the LD-279 board
Note 3: When the lens block was replaced, start the Adjust Manual in the Adjust Station and execute the necessary adjustment items.
After the adjustment, make sure with the STEADYSHOT turned ON that the steadyshot functions appropriately in the handheld operation.
1-7-1. E : 62 : 02 [Abnormality of IC for Steadyshot] Occurred
Order
Procedure
1
Turn the power OFF.
2
While measuring with an oscilloscope the output voltage of R5505 in the periphery of IC5501 on the LD-279 board, turn the power ON
to check that the output voltage immediately after the power on change as shown in Fig. 2.
3
If the output voltage change as shown in Fig. 2, replace the lens block (Note). If it does not change as shown in Fig. 2, inspect the camera
control circuit (IC1301 of VC-653 board) periphery.
Note: When the lens block was replaced, start the Adjust Manual in the Adjust Station and execute the necessary adjustment items.
After the adjustment, make sure with the STEADYSHOT turned ON that the steadyshot functions appropriately in the handheld operation.
HDR-PJ260/PJ260E/PJ260V/PJ260VE/XR260E/XR260V/XR260VE_L2
1-5
Ver. 1.1 2012.01
The changed portions from
Ver. 1.0 are shown in blue.
1-7-2. E : 62 : 11 [Shift Lens Overheating (Pitch)] Occurred
Order
AdjustBlock
AdjustCode
1-8. GPS RECEIVING CHECK (PJ260V/PJ260VE/XR260V/XR260VE)
Order
After a part of set was replaced or after the set was assembled, check the reception of GPS signal.
Start the Adjust Manual in the Adjust Station and execute the [Measure to E:62:11/12] on the
[SERVICE] tab.
Check if the shift lens moves while setting the order 1.
If the shift lens does not move, replace the lens block (Note).
When the shift lens moved, proceed to the order 3.
While setting the order 1, measure with an oscilloscope the output voltage of C5526 and C5527 in
the periphery of IC5501 on the LD-279 board to check the output voltage varies.
If the output voltage does not vary, replace the lens block (Note).
When the output voltage varied, proceed to the order 5.
Turn the power OFF.
While measuring with an oscilloscope the output voltage of R5505 in the periphery of IC5501 on the
LD-279 board, turn the power ON to check that the output voltage immediately after the power on
change as shown in Fig. 2.
If the output voltage change as shown in Fig. 2, replace the lens block(Note).
If it does not change as shown in Fig. 2, inspect the camera control circuit (IC1301 of VC-653 board
and IC5501 of LD-279 board) periphery.
1
2
3
4
5
6
7
How to check the GPS function
Bring your camcorder to an open area, and set the GPS to ON (
appears on the LCD screen). Your camcorder starts trying to triangulate. When
your camcorder triangulates successfully, it will record the location information at the time movies and photos were recorded.
• The indicator changes according to the strength of GPS signal reception.
Note: When the lens block was replaced, start the Adjust Manual in the Adjust Station and execute the necessary adjustment items.
After the adjustment, make sure with the STEADYSHOT turned ON that the steadyshot functions appropriately in the handheld operation.
1-7-3. E : 62 : 12 [Shift Lens Overheating (Yaw)] Occurred
Order
AdjustBlock
AdjustCode
Order
Start the Adjust Manual in the Adjust Station and execute the [Measure to E:62:11/12] on the [SERVICE] tab.
Check if the shift lens moves while setting the order 1.
If the shift lens does not move, replace the lens block (Note).
When the shift lens moved, proceed to the order 3.
While setting the order 1, measure with an oscilloscope the output voltage of C5528 and C5529 in
the periphery of IC5501 on the LD-279 board to check the output voltage varies.
If the output voltage does not vary, replace the lens block (Note).
When the output voltage varied, proceed to the order 5.
Turn the power OFF.
While measuring with an oscilloscope the output voltage of R5505 in the periphery
of IC5501 on the LD-279 board, turn the power ON to check that the output voltage
immediately after the power on change as shown in Fig. 2.
If the output voltage change as shown in Fig. 2, replace the lens block(Note).
If it does not change as shown in Fig. 2, inspect the camera control circuit (IC1301 of VC-653 board
and IC5501 of LD-279 board) periphery.
1
2
3
4
5
6
7
• It may take a while before the camcorder starts triangulating.
To return the display of the unit to “A message appears asking you to confirm whether you agree with the terms of the license agreement of the map
data,” make settings according to the instructions on the SERVICE tab in the Adjustment Manual.
Use GPS Assist Data
Note: When the lens block was replaced, start the Adjust Manual in the Adjust Station and execute the necessary adjustment items.
After the adjustment, make sure with the STEADYSHOT turned ON that the steadyshot functions appropriately in the handheld operation.
If you import GPS Assist Data from your computer to your camcorder using the supplied software “PlayMemories Home,” the time it takes the camcorder to acquire your location information can be shortened.
Connect the camcorder to a computer that is connected to the Internet. The GPS Assist Data will be updated automatically.
1-7-4. E : 62 : 20 [Abnormality of Thermistor] Occurred
Order
Procedure
1
Turn the power ON.
2
Confirm the connections of flexible flat cables and connectors between the lens block and LD-279 board.
3
In case of no malfunction of connections, replace the lens block with new one (Note) . When the error has occurred in spite of the lens
replacement, replace LD-279 board with new one.
1-9. PRECAUTION ON REPLACING THE LD-279 BOARD (PJ260/PJ260E/PJ260V/PJ260VE)
Do not factory check LD-279 board (PJ260/PJ260E/PJ260V/PJ260VE) in which Map Data is installed.
The Map data is erased when the factory check is done.
Note: When the lens block was replaced, start the Adjust Manual in the Adjust Station and execute the necessary adjustment items.
After the adjustment, make sure with the STEADYSHOT turned ON that the steadyshot functions appropriately in the handheld operation.
1-10. PRECAUTION ON REPLACING THE HDD (XR260V/XR260VE)
Do not factory check the HDD (XR260V/XR260VE) in which Map Data is installed.
The Map Data is erased when the factory check is done.
HDR-PJ260/PJ260E/PJ260V/PJ260VE/XR260E/XR260V/XR260VE_L2
1-6
Ver. 1.1 2012.01
The changed portions from
Ver. 1.0 are shown in blue.
1-11. NOTE ON REPLACING PROJECTOR UNIT (PJ260/PJ260E/PJ260V/PJ260VE)
Projector problem checking procedure (indication on brightness)
Refer to the following flowchart when repairing or inspecting the projector’s projection function.
Indicated defective
projector received
If you have received an indication on the projector’s projection function from the customer, check defective part according to the following flowchart.
When a defective part has been clarified, repair the projector according to the check result.
Indication on
brightness
Note 1: The projector unit (copper plate in particular) becomes hot after it is used.
When replacing a part of the projector unit, wait until it is cooled down.
Wipe the lens gently with a soft cloth such as a cleaning cloth or glass cleaning cloth.
Measure brightness.
- Replace projector unit (light emitting block). (*1)
- Replace PJ board. (*1)
- Replace both projector unit (light emitting block)
and PJ board. (*1)
1 Refer to the ADJUST tab of Adjust Manual.
2 Refer to the SERVICE tab of Adjust Manual.
No
Projector Data Input
- Fixed value input
Enter the number on the label attached to the unit.
- Serial number input
LD40Syywwnnnnn Enter the red part.
B
Yes
( 2)
OK
NG
A
OK
Indicated defective
projector received
NG
B
( 2)
Projector problem checking procedure (other than indication on brightness)
Measure brightness.
No
Yes
Note 2: Stubborn stains may be removed with a soft cloth such as a cleaning cloth or glass cleaning cloth lightly dampened with water.
Never use a solvent such as alcohol, benzene or thinner; acid, alkaline or abrasive detergent; or a chemical cleaning cloth, as they will damage the lens surface.
Indication on
brightness
1 Refer to the ADJUST tab of Adjust Manual.
2 Refer to the SERVICE tab of Adjust Manual.
A
Inspect projector
LED. ( 1)
OK
NG
Inspect projector
LED. ( 1)
- Replace projector unit (light emitting block). (*1)
- Replace PJ board. (*1)
- Replace both projector unit (light emitting block)
and PJ board. (*1)
OK
Measure brightness.
Projector Data Input
( 2)
- Fixed value input
Enter the number on the label attached to the unit.
- Serial number input
LD40Syywwnnnnn Enter the red part.
OK
END
Inspect projector
LED. ( 1)
NG
OK
END
HDR-PJ260/PJ260E/PJ260V/PJ260VE/XR260E/XR260V/XR260VE_L2
NG
1-7E
NG
2. REPAIR PARTS LIST
IDENTIFYING PARTS
(ENGLISH)
NOTE:
• -XX, -X mean standardized parts, so they may have some differences from the original
one.
• Items marked “*” are not stocked since they are seldom required for routine service.
Some delay should be anticipated when ordering these items.
• The mechanical parts with no reference number in the exploded views are not supplied.
• Due to standardization, replacements in the parts list may be different from the parts
specified in the diagrams or the components used on the set.
• CAPACITORS:
uF: μF
• COILS
uH: μH
• RESISTORS
All resistors are in ohms.
METAL: metal-film resistor
METAL OXIDE: Metal Oxide-film resistor
F: nonflammable
• SEMICONDUCTORS
In each case, u: μ, for example:
uA...: μA... , uPA... , μPA... ,
uPB... , μPB... , μPC... , μPC... ,
uPD..., μPD...
Follow the disassembly in the numerical order given.
Non HDD Model
1 Cabinet (L) Assy
6 Cabinet (Top) Assy
7 Battery Panel Section
• MS-478 Board
• FP-1321 Flexible Board (HDD model)
• FP-1323 Flexible Board (Non HDD model)
4 Cabinet (GR (389))
HDD Model
1 Cabinet (G) Assy
Control Switch Block
(PS38100/PS38900)
• Abbreviation
AUS : Australian model
BR
: Brazilian model
CH : Chinese model
CND : Canadian model
HK : Hong Kong model
JE
: Tourist model
KR : Korea model
NE
: North European model
2 HDD
3 Cabinet (L) Assy
The components identified by mark 0
or dotted line with mark 0 are critical for
safety.
Replace only with part number specified.
Les composants identifiés par une marque
0 sont critiques pour la sécurité.
Ne les remplacer que par une pièce portant
le numéro spécifié.
•
Color Indication of Appearance Parts
Example:
(SILVER) : Cabinet’s Color
(Silver) : Parts Color
View Position
Top View
Back View
Left View
8 Front Panel
Section
Front View
Right View
5 Cabinet (BM)
q; Lens Section
• CM-123 Board
• LD-279 Board
• VC-653 Board
• ST-248 Board
• FP-1313 Flexible Board
• FP-1488 Flexible Board
9 Cabinet (R) Section
• GP-037 Board
• PD-459 Board
• PJ-104 Board
• FP-1319 Flexible Board
• FP-1320 Flexible Board
• FP-1326 Flexible Board
• FP-1352 Flexible Board
Bottom View
9 Cabinet (R) Section
• GP-037 Board
• PD-459 Board
• FP-1320 Flexible Board
• FP-1325 Flexible Board
• FP-1352 Flexible Board
Non Projector Model
Projector Model
THE COMBINATION OF TYPES
PJ260
PJ260E
PJ260V
PJ260VE
XR260E
XR260V
XR260VE
Non HDD Model
HDD Model
Projector Type
Non Projector Type
Link
HDR-PJ260/PJ260E/PJ260V/PJ260VE/XR260E/XR260V/XR260VE_L2
ACCESSORIES
ASSEMBLY
2-1
NOTE FOR REPAIR
• Make sure that the flat cable and flexible board are not cracked of
bent at the terminal.
Do not insert the cable insufficiently nor crookedly.
Cut and remove the part of gilt
which comes off at the point.
(Be careful or some
pieces of gilt may be left inside)
• When remove a connector, don’t pull at wire of connector. It is possible
that a wire is snapped.
• When installing a connector, don’t press down at wire of connector.
It is possible that a wire is snapped.
• Do not apply excessive load to the gilded flexible board.
HDR-PJ260/PJ260E/PJ260V/PJ260VE/XR260E/XR260V/XR260VE_L2
2-2
2-1. EXPLODED VIEWS
DISASSEMBLY
2-1-1. OVERALL SECTION-1
(HDD Model)
1. Remove to numerical order (1 to 5) in the left figure.
3 #2 X 3
1 Disconnect (1) → #12 X 1 → #2 X 3
Refer to page 2-4 about Non HDD Model.
ns : not supplied
Left View
4
Bottom View
Left View
#12
4
4 12
11
1
#1
A
13
#12
ns
15
#2
#11
ns
4 #1 X 1 → #2 X 1 → #1 X 1 → Remove the Jack Holder (4)
#1
7
(Note 2)
14 16
(Note 1)
A
#2
#2
#2
Back View
#2
36
17
Jack
Holder
4
#1
#1
4
28
10
19
#2
5 #2 X 4
#2
Bottom View
5
7
(Note 1)
Disconnect to the direction
of the arrow.
#2
4
#2
3
2
Screw
(Claws)
#1: M1.7 X 2.5
(Black)
2-635-562-11
51
Cabinet (T) Section
(HDD Model)
(See page 2-5)
#2
1.7
#2
Refer to page 2-4 about Non HDD Model.
Ref. No.
2.5
#2
Part No.
Description
1
2
3
4
5
4-271-963-01
3-283-643-01
4-265-542-01
4-271-955-01
1-885-090-21
CABINET (BM (381))
SCREW, TRIPOD
RETAINER, TRIPOD
GASKET (G (389))
FP-1517 FLEXIBLE BOARD
6
7
8
8
A-1856-555-A
4-194-556-01
1-840-610-11
A-1860-944-A
9
A-1856-564-A
CABINET (L) ASSY (378)
DAMPER (1), 11STYLE (Note 1)
HDD (MK1639GSL-160GB) (XR260E)
SERVICE, HDD (MK1639GSL)
(XR260V/XR260VE) (SERVICE)
CABINET (G) ASSY (378)
#2: M1.7 X 4.0
(Black)
2-635-562-31
Ref. No.
Part No.
Description
10
11
12
13
14
2-589-376-01
4-414-595-01
4-271-949-01
4-271-954-01
4-271-953-01
FOOT (395), RUBBER
BELT (K), 12 TYPE GRIP
CABINET (GR (389))
SHEET METAL (389), CONNECT
GUARD (389), BELT
15
16
17
1-838-712-21
4-271-952-01
4-271-961-01
CABLE, BUILT-IN USB
SHEET METAL (R (389)), BELT
GASKET (UA (389))
#1
#2
#11
#12
2-635-562-11
2-635-562-31
3-078-890-11
3-080-204-21
SCREW (M1.7)
SCREW (M1.7)
SCREW, TAPPING
SCREW, TAPPING, P2
HDR-PJ260/PJ260E/PJ260V/PJ260VE/XR260E/XR260V/XR260VE_L2
#11: M1.7 X 4.0 (Tapping)
(Silver)
3-078-890-11
1.7
4.0
#12: M1.7 X 5.0 (Tapping)
(Black)
3-080-204-21
1.7
1.7
4.0
5.0
Note
Note 1: Direction of installation of 11 Style Damper (1)
as shown in the figure.
Main body
Shape of waves
Flat
2-3
Note 2: Refer to "Assembly-1: Installation Cautions of the DC
Jack Harness (HDD Model).".
2-1-2. OVERALL SECTION-1
(Non HDD Model)
DISASSEMBLY
1. Remove to numerical order (1 to 2) in the left figure.
Refer to page 2-3 about HDD Model.
1 Disconnect (1-1) → #12 X 1 → #2 X 5 → #1 X 1 → Remove the Cabinet (L) Assy (1-2) → #2 X 1
→ Remove the Holder DC (1-3) → #1 X 1 → Remove the Jack Holder (1-4)
1-1
Left View
55
Right View
Bottom View
Left View
1-1
56
1 (Claws)
#12
#12
Disconnect
1 (Claws)
#2
#2
#2
Back View
57
Left View
#2
1-4
#11
#2
Jack 1-4
Holder
#1
58
#1
#2
(Note)
1 54
59
#2
#2
#1
1-3
#1
1-2
#2
Disconnect to the direction
of the arrow.
61
1-3
60
(Note)
2 #2 X 4
Bottom View
#2
#2
53
#2
52
2 (Claws)
2 51
Screw
Cabinet (T) Section
(Non HDD Model)
(See page 2-6)
#2
#1: M1.7 X 2.5
(Black)
2-635-562-11
#2
#2
1.7
Refer to page 2-3 about HDD Model.
Ref. No.
Part No.
Description
51
52
53
54
54
4-271-963-01
3-283-643-01
4-265-542-01
A-1856-557-A
A-1856-733-A
CABINET (BM (381))
SCREW, TRIPOD
RETAINER, TRIPOD
CABINET (L) ASSY (376B) (BLACK)
CABINET (L) ASSY (376R) (RED)
55
56
57
58
59
4-414-595-01
1-838-712-21
4-265-545-01
4-271-959-01
4-265-546-01
BELT (K), 12 TYPE GRIP
CABLE, BUILT-IN USB
SHEET METAL (365), CONNECT
GUARD (381), BELT
SHEET METAL (R (365)), BELT
2.5
Ref. No.
Part No.
Description
60
61
4-298-878-01
4-415-289-01
DC (385), HOLDER (Note)
RETAINER (386), USB
#1
#2
#11
#12
2-635-562-11
2-635-562-31
3-078-890-11
3-080-204-21
SCREW (M1.7)
SCREW (M1.7)
SCREW, TAPPING
SCREW, TAPPING, P2
HDR-PJ260/PJ260E/PJ260V/PJ260VE/XR260E/XR260V/XR260VE_L2
#11: M1.7 X 4.0 (Tapping)
(Silver)
3-078-890-11
#2: M1.7 X 4.0
(Black)
2-635-562-31
1.7
4.0
Note
Note:
2-4
Refer to "Assembly-2: Installation Cautions of the USB
Harness and the DC Jack Harness (Non HDD Model)".
#12: M1.7 X 5.0 (Tapping)
(Black)
3-080-204-21
1.7
1.7
4.0
5.0
2-1-3. CABINET (T) SECTION
(HDD Model)
DISASSEMBLY
1. Remove to numerical order (1 to 2) in the left figure.
Refer to page 2-6 about Non HDD Model.
1 #2 X 2
Back View
2 101
#2
2 #2 X 3
102
Left View
Right View
#2
#2
#2
104
103
#11
#2
#2
Screw
#2: M1.7 X 4.0
(Black)
2-635-562-31
#2
1.7
4.0
1 105
#2
(Claws)
Overall Section-2
(See page 2-7)
Refer to page 2-6 about Non HDD Model.
Ref. No.
101
101
102
103
104
Part No.
Description
A-1856-530-A
A-1856-531-A
4-271-692-01
1-489-300-11
4-271-694-01
CABINET (TOP) ASSY (378) (XR260V/XR260VE)
CABINET (TOP) ASSY (378) (XR260E)
PLATE, CHG LED LIGHT GUIDE
SWITCH BLOCK, CONTROL (PS38900)
SHEET METAL (389), TOP
Ref. No.
Part No.
Description
105
4-271-960-11
COVER (R (381)), HINGE
#2
#11
2-635-562-31
3-078-890-11
SCREW (M1.7)
SCREW, TAPPING
HDR-PJ260/PJ260E/PJ260V/PJ260VE/XR260E/XR260V/XR260VE_L2
#11: M1.7 X 4.0 (Tapping)
(Silver)
3-078-890-11
2-5
1.7
4.0
2-1-4. CABINET (T) SECTION
(Non HDD Model)
DISASSEMBLY
1. Remove to numerical order (1 to 2) in the left figure.
Refer to page 2-5 about HDD Model.
1 #2 X 2
Back View
#2
2 151
2 (Boss)
152
2 Remove the Jack Holder → #2 X 3 → #2 X 1
#2
154
Left View
Right View
#2
#2
2 (Boss)
Bottom View
153
#2
#11
#2
Screw
#2: M1.7 X 4.0
(Black)
2-635-562-31
#11: M1.7 X 4.0 (Tapping)
(Silver)
3-078-890-11
1.7
1.7
#2
4.0
1 155
#2
1
Overall Section-2
(See page 2-7)
(Claws)
Refer to page 2-5 about HDD Model.
Ref. No.
151
151
151
152
153
Part No.
Description
A-1856-533-A
A-1856-731-A
A-1856-753-A
4-271-692-01
1-489-301-11
CABINET (TOP) ASSY (376B) (PJ260V/PJ260VE)
CABINET (TOP) ASSY (376R) (PJ260E (RED))
CABINET (TOP) ASSY (376B) (PJ260/PJ260E (BLACK))
PLATE, CHG LED LIGHT GUIDE
SWITCH BLOCK, CONTROL (PS38100)
Ref. No.
Part No.
Description
154
155
4-271-693-01
A-1854-396-A
155
A-1856-741-A
SHEET METAL (381), TOP
COVER (R (PJ BK)) ASSY, HINGE
(PJ260/PJ260E (BLACK)/PJ260V/PJ260VE)
COVER (R) ASSY (PJ R), HINGE (PJ260E (RED))
#2
#11
2-635-562-31
3-078-890-11
SCREW (M1.7)
SCREW, TAPPING
HDR-PJ260/PJ260E/PJ260V/PJ260VE/XR260E/XR260V/XR260VE_L2
2-6
4.0
2-1-5. OVERALL SECTION-2
DISASSEMBLY
1. Remove to numerical order (1 to 3) in the left figure.
Non HDD Model
1 Battery Panel Section
HDD Model
1 #3 X 3 → #2 X 2
(See page 2-10)
Top View
Right View
#2
#3
2 #2 X 1 → #1 X 2
#3
201
#2
#3
Lens Section
(See page 2-8)
Right View
Top View
#1
#1
3 #3 X 3 → #2 X 1
Bottom View
Front View
#3
#3
Right View
Right View
#2
#2
#2
#2
Non Projector Model
2 Front Section
(See page 2-9)
(Note)
#3
#3
#3
Screw
#1: M1.7 X 2.5
(Black)
2-635-562-11
3 Cabinet (R) Section
(See page 2-11)
#3
#2: M1.7 X 4.0
(Black)
2-635-562-31
1.7
Projector Model
2.5
#3: M1.7 X 2.5
(Red)
2-660-401-01
1.7
4.0
Note
Note:
Ref. No.
201
Part No.
Description
4-274-987-01
TAPE (AS 1/2) (C)
Ref. No.
#1
#2
#3
Part No.
Description
2-635-562-11
2-635-562-31
2-660-401-01
SCREW (M1.7)
SCREW (M1.7)
SCREW (M1.7), NEW TRU-STAR, P2
HDR-PJ260/PJ260E/PJ260V/PJ260VE/XR260E/XR260V/XR260VE_L2
2-7
Refer to "Assembly-2: Installation Cautions of the Front
Panel Section.".
1.7
2.5
2-1-6. LENS SECTION
DISASSEMBLY
1. Remove to numerical order (1 to 3) in the left figure.
1 #3 X 2
270
251
3-3
#3
#12
Bottom View
253
252
3-3
2 #3 X 2
254
255
(Note 2)
#172
3 CM Radiation Sheet (3-1) → #3 X 3 → Heat Sink (R)/ Lens Frame (R) (3-2) → #12 X 2 →
Heat Sink (L)(380)/ Lens Frame (L)(380) (3-3)
256
257
Bottom View
Top View
#3
268
271
Bottom View
#3
#3
(including CP001
(CMOS imager))
(Note 1)
269
3 258
263 272
3-2
264
3-2
#3
265
(Note 3)
3-1
259
Screw
261
V
C
-6
53
2 260
(Note 3)
#172: M1.4 X 4.0 (Tapping)
(Black)
2-178-410-01
#12: M1.7 X 5.0 (Tapping)
(Black)
3-080-204-21
#3: M1.7 X 2.5
(Red)
2-660-401-01
HDD Model
#3
#3
1.4
1.7
1.7
LD
-2
79
266
1 262
2.5
267
5.0
#3
Note
Note 1: Be sure to read "Precautions for Replacement of Imager"
on page 6-1 of Level 3 when changing the imager.
Ref. No.
Left View
#12
Part No.
Description
251
252
253
4-271-726-01
4-271-725-01
A-1851-196-A
254
255
4-268-482-01
1-856-163-21
HEAT SINK (L) (380)
FRAME (L) (380), LENS
CM-123 BOARD, COMPLETE
(including CP001 (CMOS Imager)) (Note 1)
RUBBER (1450), SEAL
OPTICAL FILTER BLOCK (Note 2)
256
257
258
259
260
1-884-929-21
4-408-191-01
A-1781-268-A
4-276-408-01
A-1861-124-A
FP-1488 FLEXIBLE BOARD
SHEET (CM (385)), SHIELD
SERVICE, LSV-1450A
SHEET (FPC (LENS))
VC-653 BOARD, COMPLETE (SERVICE) (HDD Model)
260
A-1861-125-A
261
262
4-286-711-01
A-1851-201-A
262
262
A-1851-202-A
A-1862-433-A
VC-653 BOARD, COMPLETE (SERVICE)
(Non HDD Model)
SHEET (AV), RADIATION (HDD Model) (Note 3)
LD-279 BOARD, COMPLETE
(XR260E/XR260V/XR260VE)
LD-279 BOARD, COMPLETE (PJ260/PJ260E)
LD-279 BOARD, COMPLETE (SERVICE)
(PJ260V/PJ260VE)
Ref. No.
Part No.
Description
263
264
265
266
267
4-271-964-01
4-271-965-01
4-271-967-01
4-271-968-01
4-271-969-01
FRAME (R), LENS
HEAT SINK (R)
SHEET, CM RADIATION (Note 3)
SHEET (HEAT SINK R)
SHEET (FRAME R)
268
269
270
271
272
1-882-736-21
4-272-050-01
4-279-796-01
4-282-564-01
4-279-575-01
FP-1313 FLEXIBLE BOARD
SHEET (MM), SHIELD
GASKET (TOP)
SHEET (KZ)
PLATE (FRAME R), GROUND
#3
#12
#172
2-660-401-01
3-080-204-21
2-178-410-01
SCREW (M1.7), NEW TRU-STAR, P2
SCREW, TAPPING, P2
TITE (UB TITE) 1.4
HDR-PJ260/PJ260E/PJ260V/PJ260VE/XR260E/XR260V/XR260VE_L2
Note 2: Refer to "Assembly-3: How to distinguish the side of
Optical Filter Block facing to Lens Device".
Note 3: The CM Radiation Sheet and Radiation Sheet (AV) when
peeling off once, so that it cannot be reused.
2-8
4.0
2-1-7. FRONT PANEL SECTION
Screw
ns : not supplied
#1: M1.7 X 2.5
(Black)
2-635-562-11
#11: M1.7 X 4.0 (Tapping)
(Silver)
3-078-890-11
1.7
303
2.5
#12: M1.7 X 5.0 (Tapping)
(Black)
3-080-204-21
4.0
#11
ns
#1
Note
305
301
Note 1: Refer to "Assembly-8: The Method of attachment of Cover
(A), Cover (B).".
307
Note 2: Refer to "Assembly-9: The Method of attachment of
Barrier Motor.".
#12
MIC901
306
304
314
310
309
(Note 1)
316
308
315
(Note 1)
(Note 2)
311
308
(Note 2)
309
(Note 1)
(Note 2)
313
(Note 2)
(Note 1)
Part No.
Description
Part No.
Description
301
303
304
305
306
4-271-656-01
4-271-657-01
4-271-948-01
4-271-649-01
4-275-996-01
RING (380), LENS
PLATE (UPPER), LENS RING GROUND
EMBLEM (4.4), G
CUSHION, MICROPHONE
CUSHION (BM), MICROPHONE
312
313
314
315
316
4-269-135-01
1-457-901-12
4-269-132-01
4-269-227-01
4-271-659-01
YOKE, COIL (Note 2)
COIL (Note 2)
RING
YOKE (Note 2)
RETAINER (380), BARRIER
307
308
309
310
311
4-271-643-01
4-269-133-01
4-269-134-01
4-269-131-01
1-471-579-11
RETAINER, MICROPHONE
COVER (A) (Note 1)
COVER (B) (Note 1)
BASE
MAGNET (Note 2)
MIC901
1-542-856-11
MICROPHONE UNIT
#1
#11
#12
2-635-562-11
3-078-890-11
3-080-204-21
SCREW (M1.7)
SCREW, TAPPING
SCREW, TAPPING, P2
Ref. No.
Ref. No.
312
HDR-PJ260/PJ260E/PJ260V/PJ260VE/XR260E/XR260V/XR260VE_L2
2-9
1.7
1.7
5.0
Ver. 1.2 2012.05
The changed portions from
Ver. 1.1 are shown in blue.
2-1-8. BATTERY PANEL SECTION
Screw
ns : not supplied
#1: M1.7 X 2.5
(Black)
2-635-562-11
#3: M1.7 X 2.5
(Red)
2-660-401-01
Non HDD Model
351
1.7
361
2.5
J901
360
#12
356
353
354
(Note 2)
352
357
BH8001
(Note 1)
Non HDD
Model
MS
-47
8
365
364
ns
HDD Model
Note 1: Replace the battery holder (BH8001) together when
replacing the lithium storage battery (BT8001) on the
MS-478 board. (The battery holder removed once
cannot be usedagain.)
When mounting these parts, mount new battery holder
first and attach new lithium storage battery next.
358
BT8001
(Note 1)
362
363
Note 2: Refer to "Assembly-5: Installation Cautions of the DC
Jack Harness".
370
#11
J901
368
366
369
356
#11
367
371 372 (Note 2)
Ref. No.
2.5
Caution:
Danger of explosion if battery is incorrectly replaced.
Replace only with the same or equivalent type.
Dispose of used batteries according to the instructions.
359
#3
1.7
Note
#1
Part No.
Description
351
352
353
4-271-957-01
4-277-792-01
A-1810-661-A
354
356
4-271-958-01
4-274-130-01
HOLDER (O (381)), JACK (Non HDD Model)
SHEET (AVR (381)), SHIELD (Non HDD Model)
FP-1323 FLEXIBLE BOARD, COMPLETE
(Non HDD Model)
HOLDER (U (381)), JACK (Non HDD Model) (Note 2)
SHEET (BT), SHIELD
357
358
359
360
361
A-1852-720-A
4-265-547-01
4-271-962-01
4-265-602-01
4-265-603-01
MS-478 BOARD, COMPLETE (SERVICE)
GASKET UA (Non HDD Model)
GASKET (MS)
FRAME, BT
PANEL, BT
362
363
364
365
366
4-265-606-01
4-265-605-01
4-265-609-01
4-265-610-01
4-265-604-01
SPRING, BT LOCK
LOCK, BT
CLAW, BT RETAINER
TALLY, MS
SLOT, MS
Ref. No.
Part No.
Description
367
368
369
370
371
4-265-611-01
4-298-888-01
4-265-607-02
4-271-950-01
A-1810-660-A
PLATE (MS), GROUND
COVER (378), MS
LID, MS
HOLDER (O (389)), JACK (HDD Model) (Note 2)
FP-1321 BOARD, COMPLETE (HDD Model)
372
4-271-951-01
HOLDER (U (389)), JACK (HDD Model)
BH8001
BT8001
J901
J901
1-251-928-21
1-756-135-31
1-842-658-31
1-842-658-41
HOLDER, BATTERY (Note 1)
BATTERY LITHIUM SECONDARY (Note 1)
JACK, DC (Non HDD Model)
JACK, DC (HDD Model)
#1
#3
#11
#12
2-635-562-11
2-660-401-01
3-078-890-11
3-080-204-21
SCREW (M1.7)
SCREW (M1.7), NEW TRU-STAR, P2
SCREW, TAPPING
SCREW, TAPPING, P2
HDR-PJ260/PJ260E/PJ260V/PJ260VE/XR260E/XR260V/XR260VE_L2
2-10
#12: M1.7 X 5.0 (Tapping)
(Black)
3-080-204-21
#11: M1.7 X 4.0 (Tapping)
(Silver)
3-078-890-11
1.7
1.7
4.0
5.0
2-1-9. CABINET (R) SECTION
Screw
#3: M1.7 X 2.5
(Red)
2-660-401-01
406
Projector Model
1.7
2.5
LCD Section-1
(See page 2-12)
405
#11: M1.7 X 4.0 (Tapping)
(Silver)
3-078-890-11
#211: M1.7 X 2.5
(Black)
2-187-345-01
1.7
4.0
Note
J0302
Note 1: This screw cannot be re-used. discard the screw
removed once in servicing.
In-stead, use a new screw.
J0301
Note 2: Cut SHEET, ADHESIVE (2-649-300-01) into
the desired length and use it.
#3
404
#11
403
402
#11
401
Ref. No.
FP-1326/FP-1325
Flexible Board
#211
(Note 1)
Adhesive Sheet
Non Projector Model
44mm
407
LCD Section
(See page 2-14)
(Size: 4.4mm X 27.55mm)
(Note 2)
27.55mm
Part No.
Description
401
402
403
404
405
4-272-281-01
4-276-816-01
1-882-875-21
A-1864-823-A
A-1854-646-A
HOLDER (381), HP_MIC
SHEET (HP), SHIELD
FP-1320 FLEXIBLE BOARD
FP-1352 FLEXIBLE BOARD, COMPLETE
CABINET (R) ASSY (378) (XR260E/XR260V/XR260VE)
405
A-1854-647-A
406
406
1-489-381-21
1-489-381-31
407
2-649-300-01
CABINET (R) ASSY (376)
(PJ260/PJ260E/PJ260V/PJ260VE)
SWITCH BLOCK, CONTROL (SK37000) (HDD Model)
SWITCH BLOCK, CONTROL (SK38010)
(Non HDD MODEL)
SHEET, ADHESIVE (Note2)
Ref. No.
Part No.
Description
J0301
J0302
1-691-737-42
1-569-950-41
JACK (SMALL TYPE) (HEAD PHONE)
JACK (SMALL TYPE) (EXTERNAL MICROPHONE)
#3
#11
#211
2-660-401-01
3-078-890-11
2-187-345-01
SCREW (M1.7), NEW TRU-STAR, P2
SCREW, TAPPING
SCREW (M1.7), P2 (Note 1)
HDR-PJ260/PJ260E/PJ260V/PJ260VE/XR260E/XR260V/XR260VE_L2
2-11
1.7
2.5
2-1-10. LCD SECTION-1
(Projector Model)
Screw
#2: M1.7 X 4.0
(Black)
2-635-562-31
Refer to page 2-14 about Non Projector Model.
#3: M1.7 X 2.5
(Red)
2-660-401-01
1.7
LCD Section-2
(See page 2-13)
4.0
#12: M1.7 X 5.0 (Tapping)
(Black)
3-080-204-21
#11: M1.7 X 4.0 (Tapping)
(Silver)
3-078-890-11
1.7
4.0
Note
461
(Note)
PJ
-10
4
457
Note :
PRECAUTIONS WHEN HOLDING THE PROJECTOR UNIT
466
463
Very weak
(Don't hold)
470
Weak
(Handling attention)
Have to wear
fingerstall
462
465
464
#12
Lens RCTV
469
ns
Copper Plate
Lever
Contact area of
Flexible Board
GPS Model
458
Adjust the position.
459
#11
452
#2
456
454
Sheet
460
455
#30
468
453
GPS Model
#3
451
Non GPS Model
Refer to page 2-14 about Non Projector Model.
Ref. No.
Part No.
Description
451
451
452
453
454
A-1854-467-A
A-1856-737-A
4-272-357-01
A-1861-092-A
1-838-558-11
CABINET (C) ASSY (376B), P (BLACK)
CABINET (C) ASSY (376R), P (RED)
GASKET (P (389))
GP386 ASSY (GPS Model)
CABLE, FLEXIBLE FLAT (FFC-254) (GPS Model)
455
456
457
458
459
4-298-883-01
4-272-354-01
4-272-356-01
4-272-358-01
4-271-688-01
HEAT SINK (376), P
SHEET, P RADIATION
INSULATING SHEET (P (389))
CUSHION, P (GPS Model)
CUSHION (M) (GPS Model)
460
461
462
463
464
A-1810-716-A
A-1861-014-A
4-298-764-01
4-298-761-01
4-298-774-01
FP-1319 FLEXIBLE BOARD, COMPLETE
1580A COMPLETE ASSY (Note)
COVER GLASS FRAME (1580)
COVER GLASS (1580)
F LEVER (1580)
Ref. No.
Part No.
Description
465
466
468
469
470
4-414-148-01
A-1853-345-A
4-415-054-01
4-415-051-01
4-415-052-01
+Z TAPPING B1.2
PJ-104 BOARD, COMPLETE
SHEET (GPS (385)), CONDUCTIVE (GPS Model)
SHEET (385), LCD230 RADIATION (GPS Model)
SHEET (376), PJ RADIATION
(PJ260/PJ260E/PJ260V/PJ260VE)
#2
#3
#11
#12
#30
2-635-562-31
2-660-401-01
3-078-890-11
3-080-204-21
3-086-156-11
SCREW (M1.7)
SCREW (M1.7), NEW TRU-STAR, P2
SCREW, TAPPING
SCREW, TAPPING, P2
SCREW B1.2
HDR-PJ260/PJ260E/PJ260V/PJ260VE/XR260E/XR260V/XR260VE_L2
Copper Plate
Terminal of
Connector
The projector unit (copper plate in particular) becomes hot after it is used.
When replacing a part of the projector unit, wait until it is cooled down.
#3
2-12
1.7
1.7
2.5
#30: M1.2 X 3.5 (Tapping)
(White)
3-086-156-11
5.0
1.2
3.5
Ver. 1.3 2012.06
The changed portions from
Ver. 1.2 are shown in blue.
2-1-11. LCD SECTION-2
(Projector Model)
Screw
#1: M1.7 X 2.5
(Black)
2-635-562-11
Refer to page 2-14 about Non Projector Model.
1.7
2.5
#1
504
511
(Note 2)
512
Note
508
513
Note 1: Put the marking side
together on the position
of figure when
you install the magnet.
(Note 3)
514
(Note 1)
515
516
507
506
520
505
509
510
LCD901
519
Marking
PD
-45
9
Note 2: Refer to "Assembly-6: The Method of attachment of
FP-1325/FP-1326 Flexible Board.".
518
503
Note 3: Refer to "Assembly-7: Installation Cautions of LCD
Cushion.".
GPS Model
517
503
SP902
501
502
SP901
519
Refer to page 2-14 about Non Projector Model.
Part No.
Description
Part No.
Description
501
502
503
504
505
4-271-688-01
4-271-686-01
4-271-689-01
1-882-881-11
A-1852-429-A
CUSHION (M)
HOLDER, SP
CUSHION, SP HOLDER
FP-1326 FLEXIBLE BOARD (Note 2)
PD-459 BOARD, COMPLETE (PJ260V/PJ260VE)
515
516
516
517
518
X-2582-799-1
4-272-351-01
4-272-351-41
4-415-053-01
4-415-050-01
HINGE Y (P) ASSY, T STYLE
COVER (O (389)), HINGE (BLACK)
COVER (O (389)), HINGE (RED)
SHEET (386), PJ RADIATION
SHEET (365), LCD921 RADIATION (GPS Model)
505
506
507
508
509
A-1852-430-A
4-271-687-01
4-272-360-01
4-265-598-01
4-298-884-01
PD-459 BOARD, COMPLETE (PJ260/PJ260E)
INSULATING SHEET (PD (381))
RETAINER (389), LCD
CUSHION, LCD (Note 3)
PLATE (P (376)), GROUND
519
520
4-281-443-01
4-274-987-01
TAPE (GP)
TAPE (AS 1/2) (C)
510
511
512
513
514
4-270-132-21
4-272-353-01
4-272-355-01
4-272-352-01
1-471-583-21
CABINET (M (389)), P
KNOB, FOCUS
SHEET (389), PANEL
COVER (U (389)), HINGE
MAGNET (Note 1)
Ref. No.
Ref. No.
LCD901 A-1854-122-A
SP901 1-858-528-31
SP902 1-858-528-31
LCD BLOCK ASSY (SZ814C)
SPEAKER (2-1CM)
SPEAKER (2-1CM)
#1
SCREW (M1.7)
2-635-562-11
HDR-PJ260/PJ260E/PJ260V/PJ260VE/XR260E/XR260V/XR260VE_L2
2-13
Ver. 1.3 2012.06
The changed portions from
Ver. 1.2 are shown in blue.
2-1-12. LCD SECTION
(Non Projector Model)
Screw
#1: M1.7 X 2.5
(Black)
2-635-562-11
Refer to page 2-12 to 2-13 about Projector Model.
565 (Note 2)
#2: M1.7 X 4.0
(Black)
2-635-562-31
1.7
560
#1
2.5
558
561
#11: M1.7 X 4.0 (Tapping)
(Silver)
3-078-890-11
1.7
4.0
(Note 3)
Note
562
(Note 1)
#11
555
HDD
Model
571
#11
HDD Model
LCD901
PD
572
-45
9
#2
Note 1: Put the marking side
together on the position
of figure when
you install the magnet.
559
563
564
557
566
556
Marking
Note 2: Refer to "Assembly-6: The Method of attachment of
FP-1325/FP-1326 Flexible Board.".
554
551
Note 3: Refer to "Assembly-7: Installation Cautions of LCD
Cushion.".
568
554
#124
SP902
567
570
552
SP901
553
569
GPS Model
570
Refer to page 2-12 to 2-13 about Projector Model.
Ref. No.
Part No.
Description
551
552
553
554
555
A-1854-445-A
4-271-688-01
4-271-686-01
4-271-689-01
A-1852-431-A
CABINET (C) ASSY (378), P
CUSHION (M)
HOLDER, SP
CUSHION, SP HOLDER
PD-459 BOARD, COMPLETE (XR260V/XR260VE)
555
556
557
558
559
A-1852-432-A
4-271-687-01
4-271-685-01
4-265-598-01
4-271-684-01
PD-459 BOARD, COMPLETE (XR260E)
INSULATING SHEET (PD (381))
RETAINER (381), LCD
CUSHION, LCD (Note 3)
PLATE (P (381)), GROUND
560
561
562
563
564
4-271-683-01
4-271-691-01
1-471-583-21
X-2549-615-1
4-271-690-11
CABINET (M (381)), P
COVER (U (381)), HINGE
MAGNET (Note 1)
HINGE Y (A) ASSY, T STYLE
COVER (O (381)), HINGE
Ref. No.
Part No.
Description
565
566
567
568
569
1-882-880-11
4-274-987-01
A-1861-092-A
1-838-558-11
4-415-054-01
FP-1325 FLEXIBLE BOARD (Note 2)
TAPE (AS 1/2) (C)
GP386 ASSY (GPS Model)
CABLE, FLEXIBLE FLAT (FFC-254) (GPS Model)
SHEET (GPS (385)), CONDUCTIVE (GPS Model)
570
571
572
4-281-443-01
4-415-051-01
4-415-049-01
TAPE (GP)
SHEET (385), LCD230 RADIATION
SHEET (378), PD RADIATION (HDD Model)
LCD901 A-1854-122-A
SP901 1-858-528-31
SP902 1-858-528-31
LCD BLOCK ASSY (SZ814C)
SPEAKER (2-1CM)
SPEAKER (2-1CM)
#1
#2
#11
#124
SCREW (M1.7)
SCREW (M1.7)
SCREW, TAPPING
SCREW (M1.7)
2-635-562-11
2-635-562-31
3-078-890-11
2-599-475-01
HDR-PJ260/PJ260E/PJ260V/PJ260VE/XR260E/XR260V/XR260VE_L2
2-14
#124: M1.7 X 2.0
(Silver)
2-599-475-01
1.7
4.0
1.7
2.0
Ver. 1.3 2012.06
ACCESSORIES
901
902
903
904
905
This Item is not supplied with the unit as an accessory, but it is prepared as a service part.
When the customer requests printed one, ask Head Quarter.
941
906
907
908
Ref. No.
Ref. No.
Part No.
Description
Ref. No.
Part No.
Description
901
1-487-150-71
* 908
4-416-299-21
902
902
902
902
1-832-121-31
1-832-169-41
1-834-482-31
1-834-852-11
AC Adaptor (AC-L200C/L200D)
* Compatible in L200C and L200D
Power cord (mains lead) (CH)
Power cord (mains lead) (UK, E (Saudi), HK)
Power cord (mains lead) (AEP, NE, E: PAL)
Power cord (mains lead) (E: NTSC)
* 908
4-416-299-31
* 908
4-416-299-41
* 908
4-416-299-51
902
902
902
902
903
1-835-983-11
1-836-251-11
1-837-428-51
1-838-955-11
1-569-007-12
Power cord (mains lead) (AUS)
Power cord (mains lead) (JE)
Power cord (mains lead) (KR)
Power cord (mains lead) (US, CND)
Conversion (2P) Adaptor (E: NTSC, JE)
* 908
4-416-299-61
Operating Guide
(FRENCH, GERMAN, DUTCH, ITALIAN)
Operating Guide
(SPANISH, PORTUGUESE, GREEK, TURKISH)
Operating Guide
(POLISH, CZECH, HUNGARIAN, SLOVAK)
Operating Guide
(SWEDISH, DANISH, FINNISH, ROMANIAN)
Operating Guide (RUSSIAN, UKRAINIAN) (NE)
* 908
908
4-416-299-71
4-416-299-81
904
905
906
907
* 908
1-839-080-21
1-838-205-11
1-838-714-31
1-479-275-51
4-416-298-11
HDMI cable
A/V connecting cable
USB connection support cable
Wireless Remote Commander (Projector Model)
Operating Guide (ENGLISH, SPANISH)
* 908
* 908
* 908
4-416-299-91
4-416-300-11
4-416-300-21
Operating Guide (TRADITIONAL CHINESE)
Operating Guide (SIMPLIFIED CHINESE)
(E (PAL), JE)
Operating Guide (ARABIC, PERSIAN)
Operating Guide (MALAY)
Operating Guide (INDONESIAN)
* 908
* 908
* 908
908
908
4-416-298-21
4-416-298-31
4-416-298-41
4-416-298-51
4-416-299-11
Operating Guide (ENGLISH, FRENCH)
Operating Guide (PORTUGUESE)
Operating Guide (TRADITIONAL CHINESE)
Operating Guide (KOREAN)
Operating Guide (ENGLISH)
* 908
908
* 908
4-416-300-31
4-416-301-11
4-417-077-11
Operating Guide (THAI)
Operating Guide (SIMPLIFIED CHINESE) (CH)
Operating Guide (RUSSIAN, UKRAINIAN) (JE)
Note : This unit has no bundled CD-ROM.
Contents included in the CD-ROM will be supplied to customers as
follows.
• User Guide (HTML)
- You can access to the URL of support site described in the Instruction Manual.
• Application Software
- By connecting this unit and Windows PC with the USB cable, the
application software [PlayMemories Home Lite version] can be
installed on the PC from the unit.
- In case of using the extended version, install “Expanded Feature”
via Internet.
- If a customer requests the printed matter, consult with each Head
Quarters.
This item is supplied with the unit as an accessory, but is not prepared as a service part.
931
Ref. No.
Part No.
Description
931
(Not supplied)
Rechargeable battery pack (NP-FV50)
HDR-PJ260/PJ260E/PJ260V/PJ260VE/XR260E/XR260V/XR260VE_L2
2-15E
Description
Ref. No.
PJ260/PJ260V/XR260V
* 941
4-416-293-11
* 941
4-416-293-21
* 941
4-416-293-31
* 941
4-416-293-41
* 941
4-416-293-51
Part No.
User Guide (ENGLISH)
User Guide (FRENCH)
User Guide (SPANISH)
User Guide (PORTUGUESE)
User Guide (TRADITIONAL CHINESE)
PJ260E/PJ260VE/XR260E/XR260VE
* 941
4-416-294-11
User Guide (ENGLISH)
* 941
4-416-294-21 User Guide (FRENCH)
* 941
4-416-294-31 User Guide (GERMAN)
* 941
4-416-294-41 User Guide (ITALIAN)
* 941
4-416-294-51 User Guide (DUTCH)
* 941
User Guide (KOREAN)
4-416-293-61
Part No.
Description
*
*
*
*
*
941
941
941
941
941
4-416-294-61
4-416-294-71
4-416-294-81
4-416-294-91
4-416-295-11
User Guide (SPANISH)
User Guide (PORTUGUESE)
User Guide (TURKISH)
User Guide (GREEK)
User Guide (CZECH)
*
*
*
*
*
941
941
941
941
941
4-416-295-21
4-416-295-31
4-416-295-41
4-416-295-51
4-416-295-61
User Guide (HUNGARIAN)
User Guide (SLOVAK)
User Guide (POLISH)
User Guide (SWEDISH)
User Guide (DANISH)
*
*
*
*
*
941
941
941
941
941
4-416-295-71
4-416-295-81
4-416-295-91
4-416-296-11
4-416-296-21
User Guide (FINNISH)
User Guide (ROMANIAN)
User Guide (RUSSIAN)
User Guide (UKRAINIAN)
User Guide (TRADITIONAL CHINESE)
*
*
*
*
*
941
941
941
941
941
4-416-296-31
4-416-296-41
4-416-296-51
4-416-296-61
4-416-296-71
User Guide (SIMPLIFIED CHINESE)
User Guide (ARABIC)
User Guide (PERSIAN)
User Guide (MALAY)
User Guide (INDONESIAN)
* 941
4-416-296-81
User Guide (THAI)
3. ASSEMBLY
Assembly-1: Installation Cautions of the DC Jack Harness.
(HDD Model)
1
Assembly-2: Installation Cautions of the DC Jack Harness.
(Non HDD Model)
Assembly-3: Installation Cautions of the Front Panel Section.
Don't crossover the USB harness and the VC-653 board.
Pass the DC Jack harness (Black, Blue, Red) in the five libs.
Pass the mic harness the lib.
(Pull the mic harness in the direction of the arrow.)
Lib
VC-653 Board
Lib
DC Jack Harness
(Blue, Red, Black)
This IR coated optical filter block has side A and side B.
When the optical filter block is exposed to fluorescent light at
a place where environmental light is blocked, side A glow red
and side B glow white at certain angles.
Install the optical filter block with side B facing toward the lens.
Optical
Filter
Block
Libs
Hold it with tweezers
or the like.
USB Harness
2
Assembly-4: How to distinguish the side of Optical Filter Block
facing to Lens Device.
Hold it with tweezers
or the like.
MIC Harness
Pass the DC Jack harness (White, Purple, Brown) in the five libs.
[IR Cut Coated Side A]
[IR Cut Coated Side B]
Lens Device side
MIC Harness
1
Optical
Filter
Block
Pass the DC Jack harness (White, Purple, Brown) in the five libs.
VC-653 Board
Glow red at certain angles.
Lib
DC Jack Harness
(White, Purple, Brown)
Libs
DC Jack Harness
(Blue, Red, Black)
2
Libs
Pass the DC Jack harness (Black, Blue, Red) in the five libs.
VC-653 Board
DC Jack Harness
(White, Purple, Brown)
HDR-PJ260/PJ260E/PJ260V/PJ260VE/XR260E/XR260V/XR260VE_L2
Libs
3-1
Glow white at certain angles.
Assembly-5: Installation Cautions of the DC Jack Harness.
HDD Model
Route the DC jack harness and the FP-1323 flexible board.
Assembly-6: The Method of attachment of FP-1325/FP-1326
Flexible Board.
2 Insert the FP-1325 / FP-1326 Flexible Board to
the T Style Hinge (P) Assy / T Style Hinge M (A)
Assy and the Hinge Cover (U (381/389)) as
shown in figure.
1 Fold dotted line parts of the FP-1325/FP1326 flexible
board as shown in figure.
As for the figure below, the FP-1325 flexible board and the
shape of the FP-1326 flexible board are different.
DC Jack Harness
Mountain
fold
Jack Holder
(O (381))
Jack Holder
(U (381))
As for the figure below, the T Style Hinge (P) Assy / Hinge
Cover (U (381)) / Hinge Cover (U (389)) and the shape
of the T Style Hinge M (A) Assy / Hinge Cover (U (389)) /
Hinge Cover (U (389)) are slightly different.
5 Attach the FP-1308 flexible board to the Cabinet
(R) assy as shown in figure.
FP-1325 / FP1326
Flexible Board
Hinge Cover
(U (381/389))
Valley fold
T Style Hinge (P) Assy/
T Style Hinge M (A) Assy
Adhesive tape
FP-1323 Flexible
Board
Adhesive tape
Lib
FP-1325/FP-1326
Flexible Board
6 Attach the FP-1325 / FP1326 flexible board and
the Control Switch Block (SK38010 / SK38100 /
SK38110) as shown in figure.
Adhesive tape
Non HDD Model
FP-1325 / FP-1326
Flexible Board
Route the DC jack harness.
3 Roll the FP-1325 / FP-1326 flexible board 2 times
in the hinge assy as shown in figure.
Valley fold
Control Switch Block
(SK38010 / SK38100 / SK38110)
Jack Holder (U (389))
Hole
FP-1325 / FP-1326
Flexible Board
2 times
Libs
4 Insert the FP-1325 / FP-1326 Flexible Board to
the Hinge Cover (O (381/389)) as shown in figure.
DC Jack Harness
Hinge Cover
(O (381/389))
Hole
HDR-PJ260/PJ260E/PJ260V/PJ260VE/XR260E/XR260V/XR260VE_L2
3-2
FP-1325 / FP-1326
Flexible Board
Adhesive parts
Assembly-7: Installation Cautions of LCD Cushion.
Apply LCD cushion.
And have the Tab of the Release Paper and peel it off.
Assembly-8: The Method of attachment of Cover (A), Cover (B).
Assembly-9: The Method of attachment of Barrier Motor.
1 Install the two covers (B) and slide its.
1 Install the magnet, coil yoke, coil, and the yoke.
Release Paper
Cover (B)
Cutout
Lever
Long hole
LCD cushion
Magnet
Shaft
Hole
Magnet
Shaft
Cover (B)
Coil Yoke
LCD
Cover (B)
Align corner of
LCD cushion
with corner of LCD.
Claw
Coil
Yoke
Align shape of
LCD unit.
Coil
Magnet
Claw
Cover (B)
LCD cushion
2 Install the two covers (A) and slide its.
Yoke
Coil Yoke
Cover (A)
White frame
0.1 mm
Cover (A)
Cover (A)
Claw
Claw
Cover (A)
HDR-PJ260/PJ260E/PJ260V/PJ260VE/XR260E/XR260V/XR260VE_L2
3-3E