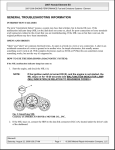
1
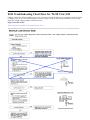
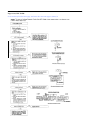
July 98 Passport ABS Fix: Install the Correct Module Use Correction Page for ’96-98 Civic S/M Fix When you do the ’98 Passport Product Update (S/B 98-015, Product Update: ABS Indicator Light Comes On While Driving), make sure you install the correct coil integrated module. There are two modules: one for 2WD Passports and one for 4WD Passports. Instead of hand writing a lengthy correction in the ’96-98 Civic S/M, use the correction page inside this issue of S/N. Just read the correction page, cross out the incorrect info in the S/M, and insert the page in the S/M. So why might this be a problem? Because each module has two P/Ns: one on the box (the correct P/N), and a different one on the module’s label (the manufacturer’s P/N). Since the labeling error can’t be corrected, use this info to identify which module to install: 2WD Passports The P/N on the module’s box is 8-97192-549-0. The P/N on the module’s label is 897192547. Check both P/Ns to make sure you have the correct module. If a 4WD module is installed in a 2WD Passport, the ABS indicator will come on, and you’ll see DTCs such as C0265 (35), open in relay circuit, C0274 (18), excessive isolation time, or C0282 (24), open or shorted 4WD input signal. 4WD Passports The P/N on the module’s box is 8-97192-548-0. The P/N on the module’s label is 897192546. Check both P/Ns to make sure you have the correct module. If a 2WD module is installed in a 4WD Passport, the ABS indicator will come on and you may see DTC C0285 (13), 2WD controller in 4WD vehicle controller or DTC C1999. DTC C1999 is set when the PGM Tester doesn’t recognize the info it gets from the ABS module. This will be corrected in a future PGM Tester software update. Until the update’s available, here’s how to retrieve ABS code(s) indicated by DTC C1999: 1. Run a jumper wire between terminals 4 and 12 of the data link connector. To do this, follow steps 1 thru 4 in S/B 97-084, Service Manual Update: Erasing ABS Diagnostic Trouble Codes (DTCs), filed under Brakes in your S/B binder. 2. Read the flash code(s) on the ABS indicator. A list of the ABS DTCs is on pages 5A-35 and 5A-36 of the ’98 Passport S/M. 3. To clear the codes when you’re finished, do steps 5 thru 7 from S/B 97-084. Do A/C Performance Test An A/C performance test is the only way to find out if the A/C is working properly. The test is described in S/B 96-012, Air Conditioning Performance Test, filed under HVAC in your S/B binder. When you do the test, set the idle speed to 1,100 or 900 rpm, not 1,000 rpm. On some vehicles, setting the idle to 1,000 rpm may cause the compressor to cycle off while the condenser fan continues to run. This can give you erroneous pressure and temperature readings. Remember: Make sure you have the results of the performance test whenever you call Tech Line about an A/C problem. They can’t be of much help unless you’ve got the readings. Make Sure It’s the Correct Fuel Cap Before you diagnose the cause of DTC P1456, evaporative emission control system leak detected (fuel tank system), make sure the fuel fill cap is gray. A black cap is for older vehicles with non-enhanced evaporative emissions systems. And most locking caps, regardless of the color, aren’t designed for newer vehicles with enhanced emissions systems, nor are any approved by Honda. Hum or Moan Near Fuel Tank On any Honda except a Passport, if the outside air temperature is high, and there’s not much fuel in the tank, you may hear a hum or moan near the tank or in the engine compartment, especially when the vehicle is parked with the engine off. More than likely, this noise is the EVAP two-way valve doing it’s job. Located in front of the fuel tank, the valve vents excess fuel tank pressure to the EVAP canister. To verify the cause, take off the fuel fill cap when you hear the noise; if it goes away when you release tank pressure, the noise is coming from the two-way valve. Don’t replace the valve because of the noise; it’s a normal characteristic. How to Troubleshoot DTCs P1456 and P1457 NOTE: To troubleshoot ’98 Accords, don’t use this article; use S/B 98-045. To locate the various parts described in this article, refer to the appropriate S/M. For further reduction of evaporative emissions, most late-model Hondas (all ’98s, some ’97s, and a few ’96s) have “enhanced” evaporative (EVAP) systems. Numerous solenoids, valves, and sensors were added, and of course, the OBD system was also “enhanced” to monitor these new parts. As you might imagine, this has made EVAP system troubleshooting more difficult. Some of the more challenging EVAP problems cause these DTCs: • P1456, evaporative emission control system leak detected (fuel tank system) • P1457, evaporative emission control system leak detected (EVAP control canister system) Part of the problem is the complexity of the new system, and part of it is that S/M troubleshooting procedures could be improved (it’s in the works for next year). In the meantime, here’s a better way to diagnose these DTCs. Before you troubleshoot: • Make sure the fuel fill cap is correct (indicated by its gray color), and that it’s tight. (For more info, refer to this S/N, and to the May ’98 issue.) • Check for obvious air leaks and loose electrical connections in the EVAP system. Repair any problems you find. 1. Prepare the car for troubleshooting. • If DTC P1456 was set, make sure the fuel tank is at least half full. • If DTC P1457 was set, pinch off the hose between the two-way valve and the fuel tank. 2. Hook up the PGM Tester, turn the ignition switch ON (II), remove the fuel fill cap, and monitor the fuel tank pressure (FTP) sensor voltage with the engine off. The voltage should hold steady at 2.5 + 0.05 V. • If the voltage is OK, reinstall the cap and go to step 3. • If the voltage isn’t steady or if it’s not within the spec, replace the FTP sensor and/or repair its circuit; then repeat step 2. 3. With the ignition switch ON (II) and the engine off, ground the ECM/PCM terminals (one at a time) for the canister vent shut valve, purge control solenoid, and EVAP bypass solenoid. (Use the table below to identify the terminals.) When you ground each terminal, the solenoid for that circuit should click. • If all the solenoids click, go to step 4. • If any solenoid does not click, replace it and/or repair its circuit; then repeat step 3. 4. Again, with the ignition switch ON (II) and the engine off, ground the canister vent shut valve and the EVAP bypass solenoid terminals at the ECM/PCM, then go to step 5. 5. Disconnect the hose between the purge control solenoid and the canister, then attach a hand vacuum pump to the hose. 6. Apply vacuum, and watch the FTP sensor voltage. When the voltage reaches 1.5 V, stop applying vacuum, and monitor the voltage for 20 seconds. • If the voltage stays at 1.5 V, go to step 9. • If it doesn’t stay at 1.5 V, go to step 7. 7. Pinch off the hose for the canister vent shut valve, and repeat step 6. • If the FTP sensor voltage stays at 1.5 V, replace the canister vent shut valve, and repeat step 6. • If it doesn’t stay at 1.5 V, go to step 8. 8. Disconnect the hose between the canister and the two-way valve, then attach the vacuum pump to the hose, and apply vacuum until the FTP sensor voltage reads 1.5 V. • If the FTP sensor stays at 1.5 V for 20 seconds, replace the canister. • If it doesn’t stay at 1.5 V, replace the two-way valve and the bypass solenoid, then go back to step 4. 9. Remove the ground at the canister vent shut valve while you watch the FTP sensor voltage. It should return to 2.5 V within 10 seconds. • If it does, the DTC was probably caused by an intermittent bad connection. Make sure all connectors in the EVAP system are tight and making good contact. • If it doesn’t, check for an obstruction between the canister vent shut valve and the three-way valve. EVAP Terminals and Wire Colors at ECM/PCM Connectors Part ’97-98 Prelude ’96-97 Accord ’96-97 Civic ’98 Odyssey ’98 CR-V Fuel Tank Pressure Sensor Terminal: D15 Color: WHT/BLU Terminal: D15 Color: GRN/RED Terminal: D15 Color: LT GRN Terminal: A29 Color: WHT/BLU Terminal: A29 Color: LT GRN Purge Control Solenoid Terminal: A15 Color: RED/YEL Terminal: A15 Color: RED/YEL Terminal: A15 Color: RED/YEL Terminal: A6 Color: RED/YEL Terminal: A6 Color: RED/YEL Canister Vent Shut Valve Terminal: A29 Color: ORN/GRN Terminal: A29 Color: ORN/GRN Terminal: A29 Color: LT GRN/WHT Terminal: A4 Color: BLU/GRN Terminal: A4 Color: LT GRN/WHT EVAP Bypass Solenoid Terminal: A28 Color: GRN/WHT Terminal: A28 Color: GRN/WHT Terminal: A28 Color: BLU Terminal: A3 Color: GRN/ORN Terminal: A3 Color: BLU ELD Troubleshooting Chart Fixes for ’96-98 Civic S/M Until the ’96-99 Civic S/M is available, here are two corrections you need to make if you’re using the ’96-98 Civic S/M to diagnose DTC P1297, electrical load detector circuit low input, or DTC P1298, electrical load detector circuit high input (low or high voltage problems in the ELD circuit). Page 11-115, DTC P1297: Delete the info in the middle of the troubleshooting chart. Page 11-116, DTC P1298: Cross out the info on the entire page, and insert this correction page in front of it. On-Board Computers Are OK With Year 2000 Doors Lock/Unlock Themselves: ’97 CR-V Some customers may ask you what will happen to the computers in their vehicles when we reach the year 2000. Since none of the computer-controlled systems on current Hondas are date-dependent, there’s no problem. Let your customers know that the only car-related concern they may have on New Year’s Eve 1999 is who will be the designated driver. If the power door locks on a ’97 CR-V cycle (lock and unlock) after you lock or unlock the doors, the most likely cause is a faulty driver’s door lock actuator. To fix the problem, replace the actuator; it’s P/N 72155-S03-J11, H/C 5196159. Fix the ’98 Passport ETM Index Here are two corrections for the ’98 Passport ETM index. Make them on the indexes in front of the book, and on the back cover. Delete Timing Reference: ’98 Accord/Odyssey S/Ms Page 4-19 of the ’98 Accord S/M and page 23-83 of the ’98 Odyssey S/M incorrectly show an ignition timing adjustment. There’s no way to change the timing on these vehicles; it’s determined by the ECM/PCM, so cross out the steps and illustrations related to timing adjustment. S/M Fix: Torquing Accord Head Bolts VSS Troubleshooting Fix for ’98 Odyssey S/M On page 23-118 of the ’98 Odyssey S/M, one of the “Yes” “No” responses in the VSS troubleshooting chart is reversed. Correct your S/M like this: If you’ve ever torqued cylinder head bolts on a ’98 Accord, you may have found the procedure on page 6-53 of the S/M to be a little confusing. Until we revise the procedure in the ’98-99 Accord S/M, cross out steps 2, 3, and 4, and use these revised steps instead. (Or you could copy this page of S/N, cut out the steps, and tape them onto page 6-53.) 1. Make one mark on each bolt head (A) and three more at 905 intervals on the cylinder head boss (B) as shown. Correct the ATF Article In the May ’98 Issue of S/N, the article titled Fix the ATF Quantities in ’98 S/Ms has a page reference error. At the bottom of the left column, change the Accord Coupe L4/V6 S/M Supplement reference to page 3-7. Our thanks to Leonard Benoit of Team Honda for pointing out this error. 2. Tighten each cylinder head bolt 905 (a quarter turn) in numbered sequence, then tighten them another 905 in sequence. 3. If you’re using new bolts, tighten them an additional 905 in sequence. Reduce Your Tech Line Wait Time Voltage Drop and Continuity Testing To avoid a long wait when you call Tech Line, try not to call between 11:00 A.M. and 1:00 P.M., Pacific Time (PT). The Tech Line staff takes lunch breaks in two staggered shifts, from 10:45 A.M. to 12:45 P.M. During these hours, only half the staff is available to take calls. Whenever possible, do a voltage drop test instead of a continuity test when you’re checking a circuit. A voltage drop test is safer because it measures voltage without adding any to power the circuit. Continuity tests, on the other hand, can damage circuits because they require an outside voltage source to power the ohmmeter. For a good “how to” on voltage drop testing, dust off your August ’89 issue of S/N. Tech Line Needs Your Feedback Tech Line Specialists answer hundreds of calls a day, and they rely on your feedback to keep vehicle repair info up-to-date. To give your feedback, call Tech Line, choose option 3 (Message Center), and then leave your name, the reference number of your call, and a brief description of how you fixed the problem. By doing this, you help out in two ways: If the info Tech Line gave you fixed the vehicle, it means that the repair is valid, and it can be used by other technicians. If the info didn’t fix the problem, your feedback will help Tech Line change it into a valid repair. Hot CDs and Tapes No, not your latest collection of pop tunes, we’re talking about how CDs and cassette tapes get warm (or even hot) when you play them for extended periods, especially at high volumes in a stationary vehicle. This is a normal phenomenon that doesn’t require a fix. Can’t Program Immobilizer Keys? If you’re having trouble programming immobilizer keys on a ’97-98 Prelude, ’98 Accord, or ’98 Odyssey make sure that all the keys you’re using are immobilizer keys. Trying to program a non-immobilizer key will give you an “Immobi Failure” error message on the PGM Tester. No Courtesy Lights on ’98 Accord DX The ’98 Accord DX comes with courtesy light lenses in the doors, but no bulbs or wiring for them. So even though you see the lenses, don’t expect the lights to work. Courtesy lights are only available on LX and EX models. If you have to test the continuity of a circuit (it’s usually only needed on circuits with a diode in series), use a diode checker or an analog ohmmeter. A digital ohmmeter won’t always work because some of them operate at less than 0.7 V, and this is less than the operating voltage of many diodes. And remember: Don’t use analog ohmmeters, continuity checkers, or diode checkers to test solid state components. The high current and voltage requirements of these meters can damage sensitive circuits and circuit boards. Fog Lights Won’t Go Off: ’98 Accord If the fog lights on a ’98 Accord won’t go off after they’re installed, make sure the two fog light relays are installed on the correct harnesses. Relay A, the one with a rubber cover, should be connected to fog light harness B near the battery. Relay B, the one without a rubber cover, should be installed on fog light harness A under the driver’s side of the dash. For complete info on installing fog lights, refer to the fog light installation instructions for the model you’re working on. Don’t Install Security Options on Accord EX The factory-installed security system on a ’98 Accord EX is not compatible with add-ons such as the security siren and the hood switch. These optional feature are only for LX models. 1998 American Honda Motor Co., Inc. - All Rights Reserved. Published by AHM Service Publications, 1919 Torrance Blvd., Torrance, CA 90501-2746. All suggestions become the property of American Honda Motor Co., Inc.; sending a suggestion gives American Honda permission to publish it without further consideration. ASN 19750 (9807)