1
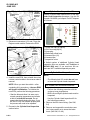
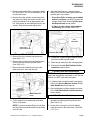
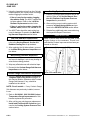
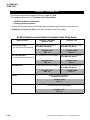
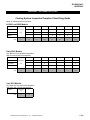
GL1800/A #13
JUNE 2003
Service Bulletin
A m e r i c a n
H o n d a
M o t o r
C o . ,
I n c .
2001-2003 GL1800/A
ECM Replacement/Cooling System
Product Improvement Campaign
American Honda's Motorcycle Division is conducting a Product Improvement Campaign to
replace Engine Control Modules (ECMs) that
may affect engine coolant temperature during
certain riding conditions.
A small number of 2001-2003 GL1800/A customers may experience high engine coolant temperature readings. This condition may occur during
prolonged low speed/low gear/high-ambient temperature conditions.
To decrease the possibility of high engine coolant
temperature readings during these conditions, an
ECM Replacement/Cooling System Product
Improvement Campaign has been initiated.
AFFECTED UNITS
All 2001-2003 GL1800/A models.
Repair procedures are very specific. Please follow the INSPECTION, REPAIR, and IDENTIFICATION procedures in this bulletin closely.
CUSTOMER NOTIFICATION
American Honda is sending a letter to owners of
all 2001-2003 model year GL1800/As, informing
them that they are entitled to receive this inspection and repair at no cost. They will be instructed
to call and make an appointment to have the
inspection and update performed. For your reference, the text of the customer letter is reproduced on page 8 of this Service Bulletin.
INSPECTION
Before you begin the repair, check for a punch
mark below the first letter of the engine number
on the crankcase. (see IDENTIFICATION section
on page 4 for more information).
• If there is a punch mark, the unit has been
inspected and repaired and no further action
is necessary.
• If there is no punch mark, follow the
REPAIR procedures below.
REPAIR PROCEDURES
This campaign consists of the following steps:
1. Replace ECM
2. Inspect Cylinder Head coolant capacity (some
2003 units excluded, see section for details).
3. Inspect Left Side Radiator
4. Inspect/install Coolant Gauge Sub-Harness
5. Pressure test cooling system
6. File two (2) warranty claims
ECM Replacement
1. Remove the top shelter (See Service Manual,
page 2-10).
2. Remove connectors A and B from the cruise/
reverse control module. Remove the cruise/
reverse control module.
1 of 8
©2003 American Honda Motor Co., Inc. - All Rights Reserved
MTB 10173 (0306)
CUSTOMER INFORMATION: The information in this bulletin is intended for use only by skilled technicians who have the proper tools, equipment, and training to correctly and safely maintain your Honda. These procedures should not be attempted by ìdo-it yourselfers,î and you should not assume this bulletin applies to your Honda, or that your Honda has the condition described. To determine whether this information applies, contact an authorized Honda dealer.
GL1800/A #13
JUNE 2003
CRUISE/
REVERSE
CONTROL
MODULE
CONNECTOR A
(26-BLK)
Cylinder Head Inspection Kit
Use the Cylinder Head Inspection Kit for the Cylinder Head Inspection procedure. Use the kit
for each GL1800/A you inspect. Do NOT dispose
of kit items.
5
3
1
4
CONNECTOR B
(26-BLK/GRY)
2
6
3. Disconnect connectors A, B, and C from the
Engine control module. Remove the ECM.
CONNECTOR B
(22-GRY)
ECM
(ENGINE
CONTROL
MODULE)
CONNECTOR C
(6-BLK)
CONNECTOR A
(22-BLK)
7
1) 19X20 mm cap (2) (cap B)
2) 8X15 mm cap (cap A)
3) Hose plug
4) Bottle/cap w/feed hose
5) Harness clips (10)
6) Harness tape
7) Inspection mirror
A limited number of additional Cylinder Head
Inspection Kits are available: call TechLine at
800-421-1900, ext. 1 if you need one. Kit contents are NOT available separately as parts.
Cylinder Head Inspection
NOTE:
4. Install the new ECM, then reinstall the cruise/
reverse control module in the reverse order of
removal.
NOTE: When you start the vehicle – after
completing ALL procedures – the new ECM
will require initialization. To initialize the
new ECM, perform the following procedure:
• Start the bike and allow it to warm up to
normal operating temperature and remain
at idle for at least 90 seconds. Do not
operate the throttle during this time; if you
do, the ECU will not initialize properly and
the process will need to be repeated.
5. Proceed to the Cylinder Head Inspection
section below.
2 of 8
• The following late ‘03 models do not have
to have their cylinder heads inspected:
Late ‘03 (Non-ABS): after VIN 1HFSC470*3A204632
Late ‘03 (ABS): after VIN 1HFSC474*3A201020
• Perform the following procedure with the
engine at room temperature.
• Both Left and Right cylinder heads must be
inspected.
• Use the Cylinder Head Inspection Kit for
the following procedure.
1. Remove the front lower fairing. (See S/M,
2-6)
2. Remove and suspend the rear brake reservoir, being careful not to stress the brake
hose. (See S/M, 15-A-8)
©2003 American Honda Motor Co., Inc. - All Rights Reserved
GL1800/A #13
JUNE 2003
3. Remove and suspend the evaporative cannister. (See S/M, 5-72) It is not necessary to disconnect the hoses.
4. Remove the right cylinder coolant hose from
the drain joint. Allow the coolant to drain completely and discard it in an appropriate manner. Use caution to avoid being burned by hot
coolant. Plug the hose and cap the joint.
9. Insert the feed hose (or a funnel) approximately 5mm into the head bypass outlet and
carefully pour in the water:
• If less than 560cc of water can be added
before it overflows, you MUST replace the
cylinder head. Refer to the Cylinder Head
Set Replacement section below.
• If 560cc of water can be added without
overflowing, the cylinder head is OK.
560cc
TAP WATER
DRAIN JOINT
W/CAP INSTALLED
HEAD BYPASS OUTLET
5. Remove the front exhaust pipe protectors.
(See S/M, 2-17)
6. Remove the joint pipe from the head bypass
outlet at the rear of each cylinder head.
(See S/M, 8-12)
7. Remove the rear coolant hose from each
water hose joint, then cap the joint.
10. Repeat the Cylinder Head Inspection procedure for the other cylinder head.
11. Drain the tap water from the cooling system.
12. Proceed to the Left Side Radiator Outlet
Inspection section below.
Cylinder Head Set Replacement
NOTE: Use only the indicated L or R cylinder
head sets and gasket sets listed in this Service
Bulletin. Do NOT order individual parts.
1. If cylinder head set replacement is necessary,
refer to the Service Manual, Section 8: Cylinder Head/Valve for procedures.
2. After replacing the cylinder head(s), proceed
to the Left Side Radiator Outlet Inspection
section below.
WATER HOSE JOINT
W/CAP
8. Fill the inspection kit measuring bottle with
560cc of tap water.
NOTE: to ensure accurate filling, do not allow
the feed hose to protrude down into the bottle
from the cap.
©2003 American Honda Motor Co., Inc. - All Rights Reserved
Left Side Radiator Outlet Inspection
1. Remove two trim clips, carefully push out the
left side front fairing and lift up the air duct.
(See S/M, 6-10)
2. Loosen the hose band on the left radiator
outlet and remove the water hose. (See S/M,
1-37, 6-11)
3 of 8
GL1800/A #13
JUNE 2003
3. Using the inspection mirror from the Cylinder
Head Inspection Kit, visually check for foreign
matter clogging the radiator outlet:
• If there is any foreign matter clogging
the radiator outlet, you MUST replace the
left side radiator. Refer to the Left Side
Radiator Replacement section below.
• If there is no foreign matter clogging the
radiator outlet, the left side radiator is OK.
4. You MUST also check the main wiring harness for damage. Proceed to the Main Wiring Harness Inspection section below.
Left Side Radiator Replacement
1. If left side radiator replacement is necessary,
refer to the Service Manual, Section 6-8:
Radiator/Cooling Fan for procedures.
Cooling System Pressure Test
1. Perform a cooling system pressure test on the
vehicle. Refer to the Service Manual, Section 6-6: Radiator Cap/System Pressure
Inspection for procedures.
2. After verifying correct cooling system relief
pressure, reinstall the top shelter and proceed to the IDENTIFICATION section below.
3. Reinstall any additional parts removed during
the Inspection/Repair Procedures.
IDENTIFICATION
Make a punch mark below the first letter of the
engine number on the crankcase. This will indicate that the Product Improvement has been performed on this unit.
2. After replacing the left side radiator, proceed
to the Main Wiring Harness Inspection section below.
Main Wiring Harness Inspection
1. Inspect the wiring harness in the left side radiator area for damage. Look for any chafing or
wires that are being pinched.
2. Wrap any affected areas with electrical tape.
3. Proceed to the Coolant Gauge Sub-Harness
Inspection section below.
Coolant Gauge Sub-Harness Inspection
MAKE A PUNCH MARK HERE
1. Using the ECM & Sub-Harness Installation/
Template Claim Filing Guide on page 6 of
this Service Bulletin, determine what Coolant
Gauge Sub-Harness, if any, should be
installed on the vehicle.
NOTE: For all models – If any Coolant Gauge
Sub-Harness was previously installed, remove
it now.
2. Refer to GL1800 #1, 2001 GL1800 Coolant
Temperature Gauge Improvement for Subharness replacement procedure.
3. After verifying any sub-harness replacement,
install new ProHonda HP Coolant and proceed to the Cooling System Pressure Test
section below.
4 of 8
©2003 American Honda Motor Co., Inc. - All Rights Reserved
GL1800/A #13
JUNE 2003
PARTS INFORMATION
Do not order ECMs or Sub-harnesses at this
time. Initial parts will be automatically allocated
by American Honda based on the number of
units invoiced to your dealership. You will be notified when these parts are available for open
ordering.
Order any other parts listed below as needed,
based on inspection.
Engine control module (ECM):
P/N: 38770-MCA-305
H/C: 7534654
HP Coolant (Pre-mix) 1Qt:
P/N: 08C50-C321S01
H/C: 3922614
Radiator, L:
P/N: 19060-MCA-003
H/C: 6538326
Gasket Set, Cylinder Head Inspection:
P/N: 12013-MCA-305
H/C: 7530728
Left Cylinder:
Head Set, L:
P/N: 12020-MCA-305
H/C: 7450216
Gasket Set, L:
P/N: 12022-MCA-305
H/C: 7530736
Sub-harnesses:
Sub-harness A (White):
P/N: 32112-MCA-305
H/C: 7498546
Sub-harness B (Blue):
P/N: 32112-MCA-306
H/C: 7498553
Sub-harness D (Green):
P/N: 32112-MCA-307
H/C: 7498561
Sub-harness E (Brown):
P/N: 32112-MCA-309
H/C: 7498579
Right Cylinder:
Head Set, R:
P/N: 12010-MCA-305
H/C: 7450208
Gasket Set, R:
P/N: 12012-MCA-305
H/C: 7530710
©2003 American Honda Motor Co., Inc. - All Rights Reserved
5 of 8
GL1800/A #13
JUNE 2003
WARRANTY INFORMATION
This Product Improvement Campaign will end on June 19, 2006.
This campaign features two (2) Template Claim Filing Guides:
1) ECM & Sub-Harness Installation
2) Cooling System Inspection
• Choose the Template numbers below that best describe the repair/inspection you performed.
• Submit two (2) claims per VIN (one for each Template Claim Filing Guide).
ECM & Sub-Harness Installation/Template Claim Filing Guide
Model Year/VIN
2001 Early (Non-ABS)
– thru VIN 1HFSC470*1A001672
Left Head – NO GOOD
(Replaced Head)
Order and install sub-harness A
32112-MCA-305 (White).
Left Head – OK
Order and install sub-harness B
32112-MCA-306 (Blue).
Template: L93A
FRT: 1.2
2001 Late (Non-ABS)
– after VIN 1HFSC470*1A001672
Template: L93B
FRT: 1.2
No sub-harness should be installed.
Order and install sub-harness D
32112-MCA-307 (Green).
Template: L93C
FRT: 1.0
2001 ABS Model
Template L93D
FRT: 1.2
No sub-harness should be installed.
Order and install sub-harness D
32112-MCA-307 (Green).
Template: L93C
FRT: 1.0
2002 All
Template: L93D
FRT: 1.2
Order and install sub-harness E
32112-MCA-309 (Brown).
Template: L93E
FRT: 1.2
2003 All
No sub-harness should be installed.
Template: L93F
FRT: 1.0
6 of 8
©2003 American Honda Motor Co., Inc. - All Rights Reserved
GL1800/A #13
JUNE 2003
WARRANTY INFORMATION (Cont.)
Cooling System Inspection/Template Claim Filing Guide
NOTE: “X” indicates parts that you replaced.
All 2001 and 2002 Models
L Head
R Head
Both Heads
X
Inspection
X
X
only
X
X
Radiator
Template:
FRT:
L92A
1.7
L92B
5.1
L92C
5.1
L92D
10.6
X
X
X
X
X
L92E
1.7
L92F
5.1
L92G
5.1
L92H
10.6
Early 2003 Models
Non-ABS: thru VIN 1HFSC470*3A204632
ABS: thru VIN 1HFSC474*3A201020
L Head
R Head
Both Heads
X
Inspection
X
X
only
X
X
Radiator
Template:
FRT:
L92J
1.7
L92K
5.1
L92L
5.1
L92M
10.6
X
X
X
X
X
L92N
1.7
L92P
5.1
L92Q
5.1
L92R
10.6
Late 2003 Models
Non-ABS: after VIN 1HFSC470*3A204632
ABS: after VIN 1HFSC474*3A201020
Radiator
Template:
FRT:
Inspection
only
X
L92T
1.7
L92U
1.7
©2003 American Honda Motor Co., Inc. - All Rights Reserved
7 of 8
GL1800/A #13
JUNE 2003
TEXT OF CUSTOMER LETTER
June 2003
Dear 2001-2003 GL1800/A Owner:
RE: Product Improvement Campaign
American Honda's Motorcycle Division is conducting a Product Improvement Campaign to replace
2001-2003 GL1800/A Engine Control Modules (ECMs) that may cause high engine coolant temperature during prolonged low speed/low gear/high-ambient temperature operation, such as
parade riding.
If you want to have this campaign applied to your Gold Wing, please contact your nearest authorized Honda motorcycle dealer and make an appointment to have the ECM replaced and your
GL1800/A’s cooling system inspected. The dealer will replace any necessary parts at no cost to
you. Please plan to leave your motorcycle at the dealer for at least one day to allow for dealer
scheduling.
This Product Improvement Campaign ends June 19, 2006. After this date your motorcycle will
no longer be eligible to have this campaign performed free of charge.
As this campaign also applies to subsequent owners, please keep this letter with the Owner’s Manual. If you have moved or no longer own your 2001-2003 GL1800/A, please take a moment to complete and mail the enclosed Information Change Card so we can update our records.
You may visit our website at www.hondamotorcycles.com and click on “locate a dealer” to find a
dealer who can assist you. Should you need assistance locating a dealer or have questions about
this campaign, please call Motorcycle Customer Support at (866) 784-1870.
We apologize for any inconvenience this may cause you.
Thank you for your GL1800/A purchase.
Sincerely,
American Honda Motor Co., Inc.
Motorcycle Division
©2003 American Honda Motor Co., Inc. - All Rights Reserved
8 of 8