1
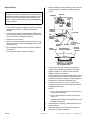
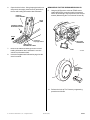
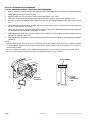
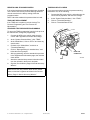
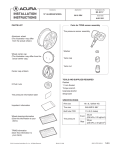
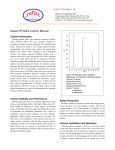
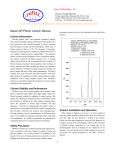
INSTALLATION
INSTRUCTIONS
Accessory
Application
17” ALUMINUM WHEEL
P/N 08W17-SZT-100
2011 CR-Z
AII 43550
Issue Date
AUG 2010
PARTS LIST
Aluminum wheel
(The illustration may differ from the actual wheel.)
Publications No.
Parts for TPMS sensor assembly
Tire pressure sensor assembly
Washer
Wheel center cap
Valve nut
Tire and loading information label
TOOLS AND SUPPLIES REQUIRED
Ratchet
TPMS Information
(Give this to your customer.)
11 mm Socket
Torque wrench
Isopropyl alcohol
Shop towel
HDS
Universal TPMS sensor reader (AEQVT55)
(Available through the Honda Tool and Equipment
program. On the iN, click on: Service/Service Bay/Tool
and Equipment Program, then enter the number under
“Search.” Or call 888-424-6857.)
Supplemental information
SPECIFICATIONS
Rim size
17 x 6 1/2 J (inset 45)
Tire size
205/45R17 88Y
Bolt hole PCD
114.3 (5 holes)
Front
230kPa
(2.3 kgf/cm2, 33 psi)
Rear
230kPa
(2.3 kgf/cm2, 33 psi)
Tire pressure
© 2010 American Honda Motor Co., Inc. – All Rights Reserved.
AII 43550 (1008)
08W17-SZT-1000-91
1 of 5
INSTALLATION
1.
Customer Information: The information in this
installation instruction is intended for use only by skilled
technicians who have the proper tools, equipment, and
training to correctly and safely add equipment to your
vehicle. These procedures should not be attempted by
“do-it-yourselfers.”
Before installing the tire pressure sensor, clean the
mating surface on the sensor and the aluminum
wheel.
WASHER
GROMMET
VALVE
NUT
NOTE:
VALVE
STEM
• This aluminum wheel is designed for use on a vehicle
equipped with TPMS (Tire Pressure Monitoring
System).
SENSOR
HOUSING
SURFACE
• This aluminum wheel is equipped with a TPMS sensor.
See the service manual for tire replacement procedure
and TPMS sensor installation procedure.
OUTSIDE
TIRE
PRESSURE
SENSOR
ASSEMBLY
• Install the correct size tire.
WHEEL
CENTER
• Use a tire changer to install and remove the tire. Do not
use a tire lever, as it may cause damage to the tire and
aluminum wheel.
ALUMINUM
WHEEL
• Do not damage the wheel center cap when installing
the emblem.
WHEEL
PROTRUSION
WASHER
VALVE NUT
Torque to: 4 N·m
(3.0 lbf·ft)
TIRE PRESSURE
SENSOR ASSEMBLY
• The wheel nut torque is 108 N·m (80 lbf·ft).
VIEW FROM THE INSIDE OF
THE ALUMINUM WHEEL
SENSOR
HOUSING
SURFACE
871601AR
2.
Remove the valve cap. Install the tire pressure
sensor and the washer to the wheel, and fingertighten the valve nut. Make sure the pressure
sensor is resting on the wheel.
NOTE: Make sure the sensor housing surface does
not protrude into the bead area of the wheel. This
prevents the sensor housing from being caught on
the bead of the tire when installing the tire.
3.
Torque the valve nut to: 4 N·m (3.0 lbf·ft) while
holding the tire pressure sensor against the wheel.
Reinstall the valve cap.
NOTE:
• Do not reuse torqued grommets; otherwise, the
valve system may leak.
• Do not use pneumatic or electric tools on the
valve nut.
• Tightening the nut above the specified torque can
damage the grommet.
2 of 5
4.
Install the tires according to the instructions in the
service manual.
5.
Install the wheels on the vehicle and torque the
wheel nuts to 108 N·m (80 lbf·ft).
AII 43550 (1008)
© 2010 American Honda Motor Co., Inc. – All Rights Reserved.
6.
Open the driver’s door. Using isopropyl alcohol on a
shop towel, thoroughly clean the door jamb where
the tire and loading information label will attach.
MEMORIZING THE TIRE PRESSURE SENSOR ID
9.
DRIVER’S
DOOR OPENING
Using the HDS and the universal TPMS sensor
reader (AEQVT55), memorize each tire pressure
sensor ID according to the instructions in the service
manual (Memorizing the Tire Pressure Sensor ID).
DOOR
JAMB
TIRE AND LOADING
INFORMATION LABEL
FRONT
Clean with
isopropyl alcohol.
VEHICLE TIRE
INFORMATION LABEL
7.
8.
DATA LINK
CONNECTOR
022502AB
Remove the adhesive backing from the tire and
loading information label, and attach it over the
vehicle tire information label.
HDS
9N2418BB
Insert the Supplemental Information page into the
owner’s manual.
UNIVERSAL
TPMS SENSOR
READER
(AEQVT55)
6912020B
10. Perform the Inch-up Tire Pressure programming
procedure as follows.
© 2010 American Honda Motor Co., Inc. – All Rights Reserved.
AII 43550 (1008)
3 of 5
INCH-UP TIRE PRESSURE PROGRAMMING
(LOW AIR PRESSURE WARNING THRESHOLD REPROGRAMMING)
1.
After the sensor ID learning using the HDS, back up to the “TPMS Mode Menu,” and click on “Threshold Rewriting.”
2.
Select “Reprogramming for accessory tires.”
3.
When the HDS says, “Do you want to rewrite the threshold data?” click “YES.”
4.
Check that “Please enter the tire information code of new tires” is shown, and click the “Keyboard” icon.
5.
Enter the 10-digit tire information code printed on the new tire and loading information label, then click the check
icon.
6.
Check that the tire pressure shown on HDS, and the new tire pressure on the tire and loading information label are
the same, then click the “YES” button.
7.
Check that the current air pressure setting shown on HDS is correct and “Reprogramming the threshold data for
non-standard tires has completed successfully” is shown.
8.
After programming, write the tire pressure indicated on the HDS in the “Service History Page for Honda Accessory
Wheels,” then click the check icon.
9.
After programming, complete the “Service History Page for Honda Accessory Wheels,” according to the procedure
on page 5.
NOTE:
• After finishing the work, write the tire size, tire pressure, HDS version, dealer name, technician’s signature, and date
in “Service History Page for Honda Accessory Alloy Wheels” page included in this kit, and attach it to the vehicle’s
service history booklet.
• Be sure to explain the contents of the “Supplemental Information” to your customer before delivering the vehicle.
• Be sure to give the wheel cleaning information and TPMS information to your customer.
10-DIGIT NUMBER
DATA LINK
CONNECTOR
HDS
4 of 5
9N2418BB
AII 43550 (1008)
TIRE AND
LOADING
INFORMATION
LABEL
7125550B
© 2010 American Honda Motor Co., Inc. – All Rights Reserved.
REINSTALLING STANDARD WHEELS
THRESHOLD DATA CHECK
If the original equipment (standard) wheels are reinstalled
on the vehicle, the low tire pressure warning threshold
must be restored to the factory setting, follow the
procedure below.
If you are unsure where the low tire pressure warning
threshold is set, do the following:
1.
Connect the HDS to the vehicle, and make sure the
correct VIN is populated, and enter the mileage.
NOTE: Have the standard tire pressure label on hand.
2.
At the “System Selection Menu,” click “TPMS.”
TPMS UNIT REPLACEMENT
3.
Click on “Threshold Rewriting.”
If the TPMS unit is replaced, redo the Inch-up Tire
Pressure Programming and Tire Pressure ID
Memorization.
4.
Click on “Threshold Data Check.”
STANDARD TIRE PRESSURE PROGRAMMING
To return the TPMS programming from the inch-up tire to
the standard tire, change the programming:
1.
Connect the HDS to the vehicle, make sure the
correct VIN is populated, and enter the mileage.
2.
At the “System Selection Menu,” click “TPMS.”
3.
At the “Mode Menu,” click on “DTCs” and clear any
stored codes.
4.
Go back to the “Mode Menu,” and click on
“Threshold Rewriting.”
5.
Click on “Reprogramming for standard tires,” and
follow the screen prompts.
6.
After programming, write the standard tire pressure
in the Supplemental Information page, then click the
check button.
7.
Attach the standard tire pressure information label
over the old label in the driver’s doorjamb.
8.
Sign the “Service History Page for Honda Accessory
Wheels.”
DATA LINK
CONNECTOR
HDS
9N2418BB
Write the tire size, tire pressure, HDS version, dealer
name, technician’s signature and date in the “Service
History Page for Honda Accessory Wheels.”
© 2010 American Honda Motor Co., Inc. – All Rights Reserved.
AII 43550 (1008)
5 of 5