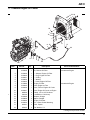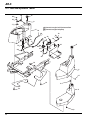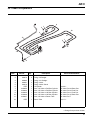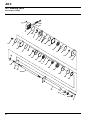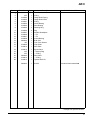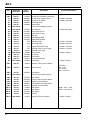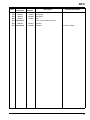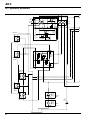
1
4133106 Rev C
6
5
9
11
16
15
13
7
8
18
1 - INCLUDES ITEMS 3 - 16
17
19
3
4
Parts & Maintenance
Manual
AR-5
68080 – AR-5™, Kubota V2003, 5 Gang, 4WD
GB
10
To Order Parts
1. Write your full name and complete address on the
order.
5. Send or bring the order to an authorized Jacobsen
Dealer.
2. Explain where and how to make shipment.
6. Inspect all shipments on receipt. If any parts are damaged or missing, file a claim with the carrier before
accepting.
3. Give product number, name and serial number that is
stamped on the name plate or serial plate of your product.
4. Order by the quantity desired, the part number, paint
code, and description of the part as given in the parts
list.
7. Do not return material without a letter of explanation,
listing the parts being returned. Transportation charges
must be prepaid.
Use of other than authorized parts will void the warranty.
Table of Contents
Safety
1.1 Operating Safety ........................................... 4
1.2 Important Safety Notes ................................. 5
Specifications
2.1 Product Identification ..................................... 6
2.2 V2003-M-T Engine ........................................ 6
2.3 Tractor ........................................................... 6
2.4 Weights and Dimensions .............................. 6
2.5 Cutting Units .................................................. 7
2.6 Accessories ................................................... 7
2.7 Support Literature ......................................... 7
Adjustments
3.1 General ......................................................... 8
3.2 Mow Speed ................................................... 8
3.3 Belt ................................................................ 8
3.4
Brakes .......................................................... 9
3.5 Neutral Adjustment ........................................ 9
3.6 Forward / Reverse Speed ........................... 10
3.7 Steering Toe-In ........................................... 10
3.8 Cutting Height ............................................. 11
3.9 Traction Control System Calibration ........... 12
3.10 Torque Specification ................................... 13
Maintenance
4.1 General ........................................................14
4.2 Engine ..........................................................14
4.3 Engine Oil ....................................................14
4.4 Air filter .........................................................15
4.5 Fuel ..............................................................15
4.6 Fuel System .................................................15
4.7 Battery .........................................................16
4.8 Jump Starting ...............................................16
4.9 Charging Battery ..........................................16
4.10 Muffler and Exhaust .....................................17
4.11 Hydraulic Hoses ...........................................17
4.12 Hydraulic Oil ................................................17
4.13 Hydraulic Filter .............................................18
4.14 Electrical System .........................................18
4.15 Radiator .......................................................19
4.16 Rollover Protection Structure (ROPS) .........19
4.17 Tires .............................................................19
4.18 Wheel Mounting Procedure .........................20
4.19 Inspecting Blades ........................................20
4.20 Sharpening Blades ......................................21
4.21 Care and Cleaning .......................................21
4.22 Storage ........................................................22
Troubleshooting
5.1 General ........................................................23
5.2 Controller Lamps .........................................24
5.3
Electrical Circuits ........................................25
Maintenance & Lubrication charts
6.1 General ........................................................26
6.2 Maintenance Chart ......................................26
6.3 Lubrication Chart .........................................27
Parts Catalog
7.1 Table of Contents ........................................28
This manual is designed for the Maintenance and Adjustment of this equipment.
Use the maintenance and adjustment instructions included in this manual and the operating
instructions included in the Safety and Operation Manual to service the machine.
The Safety and Operation Manual must be kept in the pouch on the back of the seat at all times
for reference by the operator.
Copyright 2004 Textron Inc.
“All rights reserved, including the right to reproduce this material or portions thereof in any form.”
All information in this publication is based on information available at time of approval for printing. Jacobsen reserves
the right to make changes at any time without notice and without incurring any obligation.
Litho In U.S.A 1-2006
Suggested Stocking Guide
To Keep your Equipment fully operational and productive, maintain a stock of the more commonly used maintenance
items. We have included part numbers for additional support materials and training aids. A more complete listing of
accessories and attachments can be found in the Specifications Section
Service Parts
Qty. Part No.
Description
4113986
557619
4131618
4133820
4133821
555771
Engine Oil Filter
Engine Fuel Filter Element
Ignition Key
Primary Air Cleaner Filter
Safety Air Cleaner Filter
Hydraulic Filter Element
Qty. Part No.
Description
4134323 Engine Fan Belt
4123183 Headlight Bulb
Service Support Material
Qty. Part No.
Description
Qty.
4133107 Safety & Operation Manual
4133106 Parts & Maintenance Manual
4133109 Engine Parts Catalog
Description
Service Manual
How To Use This Manual
Abbreviations
N/S - Not serviced seperately, can only be obtained by ordering main component or kit.
AR -Variable quantity or measurement is required to obtain correct adjustment.
Symbols such as ▲, next to the item number, indicate that a note exists which contain additional information
important in ordering that part.
Indented Items
Bulleted items indicate component parts that are included as part of an assembly or another component. These parts
can be ordered separetely or as part of the main component.
Item
▲
Part No.
1
2
3
4
5
123456
789012
345678
N/S
901234
Qty
1
1
1
1
1
Description
Mount, Valve
Valve, Lift
• Handle
• Seal Kit
Screw, 1/4-20 x 2” Hex Head
Serial Numbers/Notes
Indicates a piece part with note
Includes Items 3 and 4
Serviced part included with Item 2
Non serviced part included with Item 2
Indicates Piece Part
3
1
1
SAFETY
1.1
SAFETY
OPERATING SAFETY ______________________________________________________
! WARNING
EQUIPMENT OPERATED IMPROPERLY OR BY UNTRAINED PERSONNEL CAN BE DANGEROUS.
Familiarize yourself with the location and proper use of all controls. Inexperienced operator’s should receive instruction
from someone familiar with the equipment before being allowed to operate the machine.
1.
Safety is dependent upon the awareness, concern and
prudence of those who operate or service the equipment. Never allow minors to operate any equipment.
2.
It is your responsibility to read this manual and all
publications associated with this equipment (Safety
and operation manual, engine manual, accessories
and attachments). If the operator can not read English
it is the owner’s responsibility to explain the material
contained in this manual to them.
3.
4.
5.
6.
Learn the proper use of the machine, the location and
purpose of all the controls and gauges before you
operate the equipment. Working with unfamiliar
equipment can lead to accidents.
Never allow anyone to operate or service the machine
or its attachments without proper training and
instructions; or while under the influence of alcohol or
drugs.
Wear all the necessary protective clothing and
personal safety devices to protect your head, eyes,
ears hands and feet. Operate the machine only in
daylight or in good artificial light.
Evaluate the terrain to determine what accessories and
attachments are needed to properly and safely perform
the job. Only use accessories and attachments
approved by Jacobsen.
7.
Stay alert for holes in the terrain and other hidden
hazards.
8.
Inspect the area where the equipment will be used.
Pick up all the debris you can find before operating.
Beware of overhead obstructions (low tree limbs,
electrical wires, etc.) and also underground obstacles
(sprinklers, pipes, tree roots, etc.) Enter a new area
cautiously. Stay alert for hidden hazards.
9.
Never direct discharge of material toward bystanders,
nor allow anyone near the machine while in operation.
The owner/operator can prevent and is responsible for
injuries inflicted to themselves, to bystanders and
damage to property.
10. Do not carry passengers. Keep bystanders and pets a
safe distance away.
11. Never operate equipment that is not in perfect working
order or is without decals, guards, shields, discharge
deflectors or other protective devices securely fastened
in place.
12. Never disconnect or bypass any switch.
13. Do not change the engine governor setting or
overspeed the engine
14. Carbon monoxide in the exhaust fumes can be fatal
when inhaled. Never operate the engine without proper
ventilation or in an enclosed area.
15. Fuel is highly flammable, handle with care.
16. Keep the engine clean. Allow the engine to cool before
storing and always remove the ignition key.
17. Disengage all drives and engage parking brake before
starting the engine (motor). Start the engine only when
sitting in operator’s seat, never while standing beside
the unit.
18. Equipment must comply with the latest federal, state,
and local requirements when driven or transported on
public roads. Watch out for traffic when crossing or
operating on or near roads.
19. Local regulations may restrict the age of the operator.
20. Never use your hands to search for oil leaks. Hydraulic
fluid under pressure can penetrate the skin and cause
serious injury.
21. Operate the machine up and down the face of the
slopes (vertically), not across the face (horizontally).
22. To prevent tipping or loss of control, do not start or
stop suddenly on slopes. Reduce speed when making
sharp turns. Use caution when changing directions.
23. Always use the seat belt when operating tractors
equipped with a ROPS.
Never use a seat belt when operating tractors
without a ROPS.
24. Keep legs, arms and body inside the seating
compartment while the vehicle is in motion.
This machine is to be operated and maintained as specified in this manual and is intended for the professional
maintenance of specialized turf grasses. It is not intended for use on rough terrain or long grasses.
4
SAFETY
1.2
1
IMPORTANT SAFETY NOTES ________________________________________________
!
This safety alert symbol is used to alert you to potential hazards.
DANGER - Indicates an imminently hazardous situation which, if not avoided, WILL result in death or serious injury.
WARNING - Indicates a potentially hazardous situation which, if not avoided, COULD result in death or serious injury.
CAUTION - Indicates a potentially hazardous situation which, if not avoided, MAY result in minor or moderate injury and
property damage. It may also be used to alert against unsafe practices.
For pictorial clarity, some illustrations in this manual may show shields, guards or plates open or removed. Under no
circumstances should this equipment be operated without these devices securely fastened in place
! WARNING
The interlock system on this tractor prevents the tractor from starting unless the
brake pedal is engaged, mower switch is off and traction pedal is in neutral. The
system will stop the engine if the operator leaves the seat without the traction
pedal in neutral, engaging the parking brake and setting the mower switch off.
NEVER operate tractor unless the interlock system is working.
! WARNING
1.
Before leaving the operator’s position for any reason:
a.
b.
c.
d.
e.
Return traction pedal to neutral.
Disengage all drives.
Lower all implements to the ground.
Engage parking brake.
Stop engine and remove the ignition key.
2.
Keep hands, feet, and clothing away from moving parts. Wait for all
movement to stop before you clean, adjust or service the machine.
3.
Keep the area of operation clear of all bystanders and pets.
4.
Never carry passengers, unless a seat is provided for them.
5.
Never operate mowing equipment without the discharge deflector securely
fastened in place.
By following all instructions in this manual, you will prolong the life of your machine and maintain its maximum efficiency.
Adjustments and maintenance should always be performed by a qualified technician.
If additional information or service is needed, contact your Authorized Jacobsen Dealer who is kept informed of the latest
methods to service this equipment and can provide prompt and efficient service. Use of other than original or authorized
Jacobsen parts and Accessories will void the warranty.
5
2
2
2.1
SPECIFICATIONS
SPECIFICATIONS
PRODUCT IDENTIFICATION_________________________________________________
68080.............................. AR-5, 5 Gang 4WD
Serial Number ................ An identification plate, like the one
shown, listing the serial number, is
attached to the frame of the
tractor and is located on the
operator’s right just over the rear
axle.
Always provide the serial number of the unit when ordering
replacement parts or requesting service information.
Product
EEC Sound
Power
Sound Pressure
Level Operator Ear
68080
105 dba
84.5 dba
Vibration M/S2
Arms
Body
7.31
0.28
®
A Textron Company
CHARLOTTE, NC
68080
2.2
MADE IN U.S.A.
1601
V2003-M-T ENGINE ________________________________________________________
Make ............................... Kubota
Model .............................. V2003-M-T Diesel, 4 cycle, Liquid
Cooled
Horsepower .................... 56 Hp (41.8 kW) @ 2800 rpm
Displacement .................. 112 in3 (1835 cm3)
Torque ............................ 115 ft. lbs. (155 Nm) @ 2500 rpm
Fuel:
Type .......................... No. 2 Diesel
Rating ....................... Min. cetane rating 45
Capacity .................... 12 U.S. gal. (46 liters)
2.3
TRACTOR________________________________________________________________
Tires:
Front ........................ 26.5 x 14 - 12: (6 ply)
Rear ......................... 20 x 10 - 8: (4 ply)
Tire Pressure:
Front ......................... 16 psi (111 kPa)
Rear .......................... 12 psi (83 kPa)
Battery:
Type .......................... 12V, 600 Cold Cranking Amps
Group ........................ BCI 24
Brakes:
Service ..................... Dynamic braking through traction
circuit.
2.4
Parking ..................... 9.25 in. (235 mm) front disc
Speed:
Mow ......................... 0 - 7 mph (0 - 11 kph)
Transport .................. 0 - 12 mph (0 -19.3 kph)
Reverse ................... 0 - 5 mph (0 - 8.1 kph)
Production ...................... 6.8 acres/hr. @ 7 mph
Hydraulic System:
Capacity.......................... 14 U.S. gal. (37.85 liter)
Fluid Type....................... 10W30 or Greens Care 68
Cooling ........................... Oil Cooler
Return Line Filter ............ 10 micron
Steering ......................... Hydrostatic power steering
WEIGHTS AND DIMENSIONS ________________________________________________
Dimensions:
Inches
Length............................................................130
Height - Top of Steering Wheel ...................58.7
Width - Mow.....................................................98
Width - Transport.............................................98
6
Governor Setting:
High Idle ................... 2850 rpm
Low Idle .................... 1050 rpm
Lubrication:
Capacity.................... 10 U.S. qts.(9.5 liter)
Type.......................... SAE 10W30
API Classification ..... CD/CE
Air Filter .......................... Donaldson, dry type with
evacuator valve and service
indicator.
Alternator ........................ 40 Amp
(mm)
(3302)
(1491)
(2486)
(2489)
Weight:
Lbs.
(kg)
Overall (less operator)................................. 3576 (1622)
SPECIFICATIONS
2.5
CUTTING UNITS ___________________________________________________________
Overall cutting Width .......90 in. (2.54 m)
Number of cutting units: ..Five - three front, two rear.
2.6
2
Height of Cut ................... .3/4 to 5-1/4 in. (19 to 133 mm) in
1/4 in. (6 mm) increments
ACCESSORIES____________________________________________________________
Refer to the Parts Catalog and contact your area Jacobsen Dealer for a complete listing of accessories and attachments.
Air Blow Gun ................... .................................JAC5098
Orange Touch-up Paint (12 oz. spray) ..............554598
2-Post ROPS with Seat Belt..............................68091
Canopy / Sunshade......... .................................67857
Hood Locking Latch......... .................................1004049
2.7
Cruise Control ................. ................................. 67846
Wheel Kit......................... ................................. 68090
High Lift Blade................. ................................. 4137186
SUPPORT LITERATURE ____________________________________________________
Contact your Jacobsen Dealer for a complete listing of literature.
Safety & Operation Manual ...............................4133107
Parts & Maintenance ....... .................................4133106
Engine Parts Catalog ...... .................................4133109
Service & Repair Manual
7
3
3
3.1
ADJUSTMENTS
ADJUSTMENTS
GENERAL________________________________________________________________
cannot be made, contact an authorized Jacobsen
Dealer.
! WARNING
To prevent injury, lower implements to the ground,
disengage all drives, engage parking brake, stop engine
and remove key from ignition switch before making any
adjustments or performing maintenance.
2.
Replace, do not adjust, worn or damaged components.
3.
Do not wear jewelry or loose fitting clothing when
making adjustments or repairs.
! CAUTION
Make sure the tractor is parked on a solid and level
surface. Never work on a tractor that is supported only by
the jack. Always use jack stands.
If only the front or rear of the tractor is raised, place
chocks in front of and behind the wheels that are not
raised.
1.
3.2
Adjustments and maintenance should always be performed by a qualified technician. If proper adjustment
Be careful to prevent entrapment of the hands and
fingers between moving and fixed components of the
machine.
4.
Do not change governor settings or overspeed the
engine.
MOW SPEED _____________________________________________________________
Cutting quality is better at speeds well below the transport
speed of the tractor. An initial mow speed of five to six mph
is set at the factory and should be satisfactory for most
cutting conditions. Local turf conditions however may
respond better to a different speed.
A
To set mow speed, loosen jam nut (A) and adjust stop screw
up to reduce speed, down to increase speed. Tighten nut to
hold adjustment in place.
LF002
Figure 3A
3.3
BELT ____________________________________________________________________
Inspect and adjust new belt after first ten hours of operation.
Adjust every 100 hours thereafter.
B
Adjust alternator pulley so belt deflects 1/4” to 5/16” (6 -8
mm) with a 20 lb. push at midpoint between pulleys. See
engine manual.
If tension is incorrect, loosen alternator mounting bolts (B)
and adjust alternator until proper belt tension is achieved.
1/4” TO 5/16”
(6 TO 8 MM)
LF012
Figure 3B
8
ADJUSTMENTS
3.4
BRAKES _________________________________________________________________
Adjust brakes after replacing or servicing brake assembly,
or if pedal travel becomes excessive.
1.
When installing new brake pads, burnish pads by driving tractor at mowing speed while applying a slight pressure on brake pedal for about 5 seconds. Release and
repeat five times before making the final adjustment.
2.
Fully loosen adjusting nut (E).
3.
Disconnect brake return
Illustration 7.1) at caliper.
4.
By hand, pull cable behind adjusting nut (C) away from
pedal until brake pads just contact brake disk. Thread
adjusting nut (C) up until it contacts the mounting plate.
Tighten nut (E) to lock adjustment in place. Torque nut
(E) to 20 ft lb (27 Nm). Do not over torque or turn
cable.
spring
(See
Item
7.
Start tractor and check operation of brakes. Park
tractor on an incline (approx. 16.7° slope) and engage
parking brake. Brake must prevent tractor from rolling.
Adjust nut (C) as required.
14,
5.
Connect brake return spring. Repeat for second cable.
6.
If brakes wear beyond point where they can be
adjusted by the cable, move brake bracket into second
set of holes provided (D) and complete adjustment
procedure.
3.5
3
D
D
C
E
Figure 3C
NEUTRAL ADJUSTMENT ___________________________________________________
Neutral adjustment can only be made at the drive pump.
The neutral adjustment is preset at the factory on all new
tractors and replacement pumps. Further adjustment is not
required unless the pump has been disassembled for repair
or service.
7.
Start engine and check operation of traction pedal.
Wheels must not turn when pedal returns to neutral
and lamp 5 on controller should light, see Section 5.2.
F
To adjust neutral:
1.
Disconnect traction pedal linkage from pump.
2.
Place tractor securely on jack stands so All wheels are
raised off ground.
3.
Check that tow valve (H) is closed
4.
Engage parking brake and set mow switch to neutral.
Make sure neutral switch at traction pedal is closed.
(Figure 3E - M). Distance between the switch and
metal pointer “M” must be between 0.060” and 0.120”.
5.
Loosen screws (G) holding pump lever bracket just
enough so it can be moved. Start engine and observe
wheels. Adjust bracket (F) in slotted holes until wheels
do not turn. Turn off engine and tighten bracket in
place.
6.
Connect traction linkage. When connecting linkage at
traction pedal make sure pointer on traction pedal
bracket is centered over neutral switch (M -Figure 3E).
G
H
LF014
Figure 3D
9
3
ADJUSTMENTS
3.6
FORWARD / REVERSE SPEED ______________________________________________
Forward and reverse speeds are adjusted at the traction
pedal. Set forward speed before adjusting reverse.
2.
Start engine and check reverse travel speed with
engine at full throttle. Reverse speed should measure
3.5 mph (5.6 kph)
3.
Stop engine. To adjust speed, loosen nut on reverse
travel stop bolt (L). Slide bolt forward in slotted hole to
increase speed, back to reduce speed. Tighten nut to
hold adjustment in place.
4.
Start engine and check speed. Repeat procedure until
3.5 mph (5.6 kph) reverse speed is attained.
To adjust forward speed:
1.
Make sure drive pump has been set to neutral and
engine throttle is adjusted correctly.
2.
Start engine and check forward travel speed with
engine at full throttle and tractor in two wheel drive
(2WD). Forward transport speed should measure 10
mph (16 kph)
3.
Stop engine. To adjust speed, disconnect eye bolt (K)
from pedal and loosen jam nut. Turn eye bolt in to
reduce speed, out to increase speed. Tighten jam nut
to hold adjustment in place and connect eye bolt.
4.
With traction pedal in neutral, check position of neutral
switch (J). Adjust switch up or down so pointer (M) on
traction pedal bracket is centered over it. When
adjusted correctly lamp 5 on controller will light when
ignition switch is turned to on.
5.
Start engine and check speed. Repeat procedure until
10 mph (16 kph) forward transport speed is attained.
J
K
To adjust reverse speed:
1.
M
L
Set forward speed.
Figure 3E
3.7
STEERING TOE-IN _________________________________________________________
1.
Turn wheels to straight ahead position.
2.
Loosen jam nuts (J) on both sides of tie rod (M).
3.
Turn tie rod (M) to provide proper toe-in. Toe-in must
not exceed +1/16” (1.5 mm) (K). Retighten jam nuts.
4.
After adjusting tie rod, adjust steering cylinder by
threading the rod (N in or out of ball joint so spindle
arm (L) clears the stop on the axle by 3/4 ± 1/16 in.
(19 ± 1.5 mm) (O) when cylinder is fully extended.
K
J
M
N
K +0 to1/16”
L
(+0 to 1.5 mm)
O 3/4 ± 1/16 in.
(19 ± 1.5 mm)
LF016
Figure 3F
10
ADJUSTMENTS
3.8
3
CUTTING HEIGHT _________________________________________________________
Cutting height for decks can be adjusted from 3/4 to 5-1/4
in. (19-133 mm) in 1/4 in. (6 mm) increments. Actual
cutting height may vary somewhat from the heights given
depending on turf conditions and other factors.
C
G
F
D
Note: When cutting undulating areas, lower cutting
heights may cause scalping. Adjust height accordingly to
prevent turf damage.
1. Park the tractor on a flat, level surface. fully lower
cutting units. Place blocks under deck housings so
they are supported on all sides.
H
! WARNING
D
E
To prevent serious injury, lower deck until it is
resting completely on the front casters and rear
roller. This will prevent it from accidentally
lowering while making adjustments. Disengage all
drives, engage parking brake, stop engine and
remove ignition key.
2. Refer to the chart provided for desired cutting
height.
! CAUTION
Use proper lifting techniques when lifting or lowering
deck housings. The deck housing assemblies weigh
approximately 50 lbs (23 kg).
3. To lower height of cut, remove all three snap lock
pins (A). Lift outer spindle shaft (B) slightly and
remove 1/2 in. (13 mm) spacers (D) and / or 1/4 in
(6 mm) spacer (E) from bottom one at a time until
desired height is obtained. Carefully remove blocks
and lower deck housings (C). Place remaining
spacers on top of spindle and insert snap lock pins.
Washer (F) is always on top, under snap lock pin.
4. To raise height of cut, remove all three snap lock
pins (A). Carefully lift deck housing (C) above
desired cutting height and support with blocks. Add
1/2 in. (13 mm) spacers (D) and / or 1/4 in. (6 mm)
spacer (E) as required until desired height is
obtained. Lower deck housing. Place remaining
spacers on top of spindle and insert snap lock pins.
Washer (F) is always on top, under snap lock pin.
CAUTION
Figure 3G
Height 1/2” Spacers
of
Below Mower
Cut
Housing
3/4
0
1
0
1-1/4
1
1-1/2
1
1-3/4
2
2
2
2-1/4
3
2-1/2
3
2-3/4
4
3
4
3-1/4
5
3-1/2
5
3-3/4
6
4
6
4-1/4
7
4-1/2
7
4-3/4
8
5
8
5-1/4
9
1/2” Spacers
Above Mower
Housing
9
9
8
8
7
7
6
6
5
5
4
4
3
3
2
2
1
1
0
1/4” Spacer
Location
Above Housing
Below Housing
Above Housing
Below Housing
Above Housing
Below Housing
Above Housing
Below Housing
Above Housing
Below Housing
Above Housing
Below Housing
Above Housing
Below Housing
Above Housing
Below Housing
Above Housing
Below Housing
Above Housing
For best quality of cut, always place the same number
of spacers under deck housing on all three spindles.
Adjust all decks to same cutting height.
11
3
ADJUSTMENTS
3.9
TRACTION CONTROL SYSTEM CALIBRATION _________________________________
The Traction Control System (TCS) will need to be
calibrated when a system component has been replaced, or
the system is not working correctly. System components
include controller, lift valve, lift cylinders or hoses.
1.
Allow hydraulic system to become properly warmed up.
An operator must be in the seat during the calibration
procedure.
! WARNING
Never operate the engine without proper ventilation;
exhaust fumes can be fatal when inhaled.
While warming up the hydraulic system for the calibration
procedure, the cutting unit blades will be turning. Make
certain that the area under and around the cutting units is
clean any and debris that can be thrown from the
machine is cleared away. Keep bystanders away from
unit.
a.
Start engine and move throttle to full position.
b.
Release the parking brake.
c.
Turn PTO switch on.
d.
Fully lower cutting units to the ground.
e.
Engage traction control system.
f.
Allow unit to run for 5 minutes with these settings.
2.
System must be calibrated with the engine running,
operator in seat, PTO switch in OFF position, parking
brake engaged and traction pedal in neutral.
3.
Fully lower cutting units. Verify all five decks are all the
way down.
4.
Press and hold TCS switch for 5 seconds. Horn will
beep when controller enters calibration mode.
NOTE: Do not release switch until horn stops for both
starting and finishing the calibration procedure.
5.
Tap the lift lever to raise position and wait for 3 to 5
seconds. Repeat if required until cutting units just
begin to raise.
6.
Tap the lift lever to lower position and wait until decks
stop moving. Repeat tapping joystick if required until
front decks are on the ground.
NOTE: Do not rush through steps 5 and 6. System will not
be properly calibrated if decks do not start to raise in step 5
and not fully lowered during step 6.
7.
Press and hold TCS switch until horn beeps. System is
now calibrated.
NOTE: To cancel calibration mode, turn keyswitch to the off
position.
12
ADJUSTMENTS
3
3.10 TORQUE SPECIFICATION___________________________________________________
CAUTION
All torque values included in these charts are approximate and are for reference only. Use of these torque values is
at your sole risk. Jacobsen is not responsible for any loss, claim, or damage arising from the use of these charts.
Extreme caution should always be used when using any torque value.
Jacobsen uses Grade 5 Plated bolts as standard, unless otherwise noted. For tightening plated bolts, use the value
given for lubricated.
AMERICAN NATIONAL STANDARD FASTENERS
SIZE
UNITS
GRADE 5
Lubricated
GRADE 8
Dry
Lubricated
SIZE
UNITS
GRADE 5
Dry
Lubri-
GRADE 8
Dry
Lubri-
cated
Dry
cated
#6-32
in-lb (Nm)
–
20 (2.3)
–
–
7/16-14
ft-lb (Nm)
37 (50.1)
50 (67.8)
53 (71.8)
70 (94.9)
#8-32
in-lb (Nm)
–
24 (2.7)
–
30 (3.4)
7/16-20
ft-lb (Nm)
42 (56.9)
55 (74.6)
59 (80.0)
78 (105)
#10-24
in-lb (Nm)
–
35 (4.0)
–
45 (5.1)
1/2-13
ft-lb (Nm)
57 (77.2)
75 (101)
80 (108)
107 (145)
#10-32
in-lb (Nm)
–
40 (4.5)
–
50 (5.7)
1/2-20
ft-lb (Nm)
64 (86.7)
85 (115)
90 (122)
120 (162)
#12-24
in-lb (Nm)
–
50 (5.7)
–
65 (7.3)
9/16-12
ft-lb (Nm)
82 (111)
109 (148)
115 (156)
154 (209)
1/4-20
in-lb (Nm)
75 (8.4)
100 (11.3)
107 (12.1)
143 (16.1)
9/16-18
ft-lb (Nm)
92 (124)
122 (165)
129 (174)
172 (233)
1/4-28
in-lb (Nm)
85 (9.6)
115 (13.0)
120 (13.5)
163 (18.4)
5/8-11
ft-lb (Nm)
113 (153)
151 (204)
159 (215)
211 (286)
5/16-18
in-lb (Nm)
157 (17.7)
210 (23.7)
220 (24.8)
305 (34.4)
5/8-18
ft-lb (Nm)
128 (173)
170 (230)
180 (244)
240 (325)
5/16-24
in-lb (Nm)
173 (19.5)
230 (26.0)
245 (27.6)
325 (36.7)
3/4-10
ft-lb (Nm)
200 (271)
266 (360)
282 (382)
376 (509)
3/8-16
ft-lb (Nm)
23 (31.1)
31 (42.0)
32 (43.3)
44 (59.6)
3/4-16
ft-lb (Nm)
223 (302)
298 404
315 (427)
420 (569)
3/8-24
ft-lb (Nm)
26 (35.2)
35 (47.4)
37 (50.1)
50 (67.8)
7/8-14
ft-lb (Nm)
355 (481)
473 (641)
500 (678)
668 (905)
METRIC FASTENERS
4.6
SIZE
8.8
10.9
Non Critical
Fasteners
into
Aluminum
12.9
UNITS
Lubricated
Dry
Lubricated
Dry
Lubricated
Dry
Lubricated
Dry
–
–
3.83 (34)
5.11 (45)
2.0 (18)
M4
Nm (in-lb)
–
–
–
–
M5
Nm (in-lb)
1.80 (16)
2.40 (21)
4.63 (41)
6.18 (54)
6.63 (59)
8.84 (78)
7.75 (68)
10.3 (910
4.0 (35)
M6
Nm (in-lb)
3.05 (27)
4.07 (36)
7.87 (69)
10.5 (93)
11.3 (102)
15.0 (133)
13.2 (117)
17.6 (156)
6.8 (60)
M8
Nm (in-lb)
7.41 (65)
9.98 (88)
19.1 (69)
25.5 (226)
27.3 (241)
36.5 (323)
32.0 (283)
42.6 (377)
17.0 (150)
M10
Nm (ft-lb)
14.7 (11)
19.6 (14)
37.8 (29)
50.5 (37)
54.1 (40)
72.2 (53)
63.3 (46)
84.4 (62)
33.9 (25)
M12
Nm (ft-lb)
25.6 (19)
34.1 (25)
66.0 (48)
88.0 (65)
94.5 (70)
125 (92)
110 (81)
147 (108)
61.0 (45)
M14
Nm (ft-lb)
40.8 (30)
54.3 (40)
105 (77)
140 (103)
150 (110)
200 (147)
175 (129)
234 (172)
94.9 (70)
13
4
MAINTENANCE
4
MAINTENANCE
4.1
GENERAL________________________________________________________________
! WARNING
Before you clean, adjust, or repair this equipment,
disengage all drives, lower implements to the ground,
engage parking brake, stop engine and remove key from
ignition switch to prevent injuries
Make sure the tractor is parked on a solid and level
surface. Never work on a tractor that is supported only by
the jack. Always use jack stands.
1.
2.
Adjustment and maintenance should always be performed by a qualified technician. If proper adjustments
cannot be made, contact an Authorized Jacobsen
Dealer.
Inspect the equipment on a regular basis, establish a
maintenance schedule and keep detailed records.
a.
4.2
During the break-in period, Jacobsen recommends the
following:
During the first 50 hours of operation, a new engine
should be allowed to reach an operating temperature of
at least 140°F (60°C) prior to operation at full load.
Replace worn or damaged parts before operating
the machine.
d.
Keep all fluids at their proper levels.
e.
Keep shields in place and all hardware securely
fastened.
f.
Keep tires properly inflated.
3.
Do not wear jewelry or loose fitting clothing when
making adjustments or repairs.
4.
Use the illustrations in the Parts Catalog as reference
for the disassembly and reassembly of components.
5.
Recycle or dispose of all hazardous materials
(batteries, fuel, lubricants, anti-freeze, etc.) according
to local, state or federal regulations.
2.
Check the engine oil level twice daily during the first 50
hours of operation. Higher than normal oil consumption
is not uncommon during the initial break-in period.
3.
Change engine oil and oil filter element after first 50
hours of operation.
4.
Check and adjust fan and alternator belts.
5.
Refer to Section 6.2 and Engine Manual for specific
maintenance intervals.
If the injection pump, injectors or the fuel system require
service, contact an authorized Jacobsen Dealer.
Note: The tractor is designed to operate and cut most
efficiently at the preset governor setting. Do not change the
engine governor settings or overspeed the engine.
ENGINE OIL ______________________________________________________________
Check the engine oil at the start of each day, before starting
the engine. If the oil level is low, remove oil filler cap and add
oil as required.
Perform initial oil change after first 50 hours of operation and
every 100 hours thereafter. See Engine Manual.
14
c.
ENGINE _________________________________________________________________
The proper break-in of a new engine can make a
considerable difference to the performance and life of the
engine.
4.3
Keep all moving parts properly adjusted and lubricated.
Keep the equipment clean.
IMPORTANT: A separate Engine Manual, prepared by
the engine manufacturer, is supplied with this
tractor. Read the engine manual carefully until you are
familiar with the operation and maintenance of the
engine. Proper attention to the engine manufacturer’s
directions will assure maximum service life of the
engine. To order replacement engine manuals contact
the engine manufacturer.
1.
b.
Use only engine oils with API classification CD/CE.
Above 77°F (25°C)
SAE 30W or SAE10W30/10W40
32 to 77°F (0 to 25°C)
SAE 20W or SAE 10W30/10W40
Below 32° (0°C)
SAE10W or SAE 10W30/10W40
MAINTENANCE
4.4
AIR FILTER _______________________________________________________________
Check the service indicator daily. If red band appears in the
window (B) replace the element.
Do not remove the element for inspection or cleaning.
Unnecessary removal of the filter increases the risk of
injecting dust and other impurities into the engine.
4.
Reassemble cap making sure it seals completely
around the filter housing. Dust evacuator must be
facing down.
5.
Check all hoses and air ducts. Tighten hose clamps.
A
When service is required, first clean the outside of the filter
housing; then remove the old element as gently as possible
and discard.
1.
Carefully clean the inside of the filter housing without
allowing dust into the air intake.
2.
Inspect the new element. Do not use a damaged
element and never use an incorrect element.
3.
Assemble the new element and make sure it seats
properly. Reset the indicator by depressing button (A).
4.5
4
B
LF017
Figure 4A
FUEL ____________________________________________________________________
Handle fuel with care - it is highly flammable. Use an
approved container, the spout must fit inside the fuel filler
neck. Avoid using cans and funnels to transfer fuel.
! WARNING
Never remove the fuel cap from the fuel tank, or add fuel,
when the engine is running or while the engine is hot.
Do not smoke when handling fuel. Never fill or drain the
fuel tank indoors.
Do not spill fuel and clean spilled fuel immediately.
• Fill the fuel tank to within 1 in. (25 mm) below the filler
neck.
• Use clean, fresh, #2 Diesel fuel. Minimum Cetane Rating
45. Refer to Engine Manual for additional information.
• Check fuel lines and clamps every 50 hours. Replace fuel
lines and clamps at the first sign of damage.
• Store fuel according to local, state or federal ordinances
and recommendations from your fuel supplier.
• Never overfill or allow the tank to become empty.
Never handle or store fuel containers near an open flame
or any device that may create sparks and ignite the fuel
or fuel vapors.
Be sure to reinstall and tighten fuel cap securely.
4.6
FUEL SYSTEM ____________________________________________________________
Refer to Section 6.2 for specific maintenance intervals.
To change fuel filter:
Before replacing any filter, thoroughly clean the filter
housing and the area around the filter. Dirt must not be
allowed to enter into fuel system.
1.
Close fuel valve on tank; then remove and discard the
existing filter.
2.
Apply a light coat of oil to the gasket and hand tighten
new filter.
3.
Fill fuel tank. Open fuel valve on tank and bleed the
filter. See Engine Manual.
Bleed the fuel system after the fuel filter and lines have been
removed, or the fuel tank has become empty. See Engine
Manual.
15
4
4.7
MAINTENANCE
BATTERY ________________________________________________________________
Make absolutely certain the ignition switch is “Off” and the
key has been removed before servicing the battery.
! CAUTION
Always use insulated tools, wear protective glasses or
goggles and protective clothing when working with
batteries. You must read and obey all battery
manufacturer’s instructions.
Tighten cables securely to battery terminals and apply a
light coat of silicone dielectric grease to terminals and cable
ends to prevent corrosion. Keep vent caps and terminal
covers in place
Check the electrolyte level every 100 hours. Keep the cable
ends, battery and battery posts clean.
1.
When installing the battery, always assemble the RED,
positive (+) battery cable first and the ground, BLACK,
negative (-) cable last.
2.
When removing the battery, always remove the
ground, BLACK, negative (-) cable first and the RED,
positive (+) cable last.
3.
Make sure battery is properly installed and secured to
the battery tray.
! WARNING
Battery posts, terminals and related accessories
contain lead and lead compounds, chemicals known
to the State of California to cause cancer and
reproductive harm. Wash your hands after
handling.
Verify battery polarity before connecting or disconnecting
the battery cables.
4.8
JUMP STARTING __________________________________________________________
Before attempting to “jump start” the tractor, check the
condition of the discharged battery. Section 4.7
! WARNING
Batteries generate explosive hydrogen gas. To reduce
the chance of an explosion, avoid creating sparks near
battery. Always connect the negative jumper cable to the
frame of the tractor with the discharged battery, away
from the battery.
4.9
1.
Stop the engine on vehicle with good battery.
2.
Connect RED jumper cable to the positive (+) terminal
on the good battery and to the positive (+) terminal on
the “discharged” battery.
3.
Connect the BLACK jumper cable from the negative
(-) terminal on the good battery to the frame of tractor
with discharged battery.
After cables have been connected, start the engine on the
vehicle with the good battery then start the tractor.
CHARGING BATTERY _____________________________________________________
! WARNING
Charge battery in a well ventilated area. Batteries
generate explosive gases. To prevent an explosion, keep
any device that may create sparks or flames away from
the battery.
To prevent injury, stand away from battery when the
charger is turned on. A damaged battery could explode.
1.
Refer to Section 4.7. Read the Battery and Charger’s
manual for specific instructions.
2.
Whenever possible, remove the battery from the tractor
before charging. If battery is not sealed, check that the
electrolyte covers the plates in all the cells.
16
When connecting jumper cables:
3.
Make sure the charger is “Off”, then connect the
charger to the battery terminals as specified in the
charger’s manual.
4.
Always turn the charger “Off” before disconnecting
charger from the battery terminals.
MAINTENANCE
4
4.10 MUFFLER AND EXHAUST___________________________________________________
! WARNING
Exhaust fumes contain carbon monoxide that is toxic and
can be fatal when inhaled.
NEVER operate an engine without proper ventilation.
To protect from carbon monoxide poisoning, inspect the
complete exhaust system regularly and always replace a
defective muffler.
If you notice a change in the color or sound of the exhaust,
stop the engine immediately. Identify the problem and have
the system repaired.
Torque all exhaust manifold hardware evenly. Tighten or
replace exhaust clamps.
4.11 HYDRAULIC HOSES _______________________________________________________
IMPORTANT: The hydraulic system can be
permanently damaged if the oil becomes
contaminated. Before disconnecting any hydraulic
component, clean the area around the fittings and the
hose ends to keep impurities out of the system.
! WARNING
To prevent serious injury from hot, high pressure oil,
never use your hands to check for oil leaks, use paper or
cardboard.
Hydraulic fluid escaping under pressure can have
sufficient force to penetrate skin. If fluid is injected into
the skin it must be surgically removed within a few hours
by a doctor familiar with this form of injury or gangrene
may result.
1.
Always lower implements to ground, disengage all
drives, engage parking brake, stop engine and remove
key before inspecting or disconnecting hydraulic lines or
hoses.
2.
Check visible hoses and tubes daily. Look for wet
hoses or oil spots. Replace worn or damaged hoses
and tubes before operating the machine.
3.
The replacement tube or hoses must be routed in the
same path as the existing hose, do not move clamps,
brackets and ties to a new location.
4.
Thoroughly inspect all tubes, hoses and connections
every 250 hours.
a.
Before disconnecting any hydraulic component, tag
or mark the location of each hose then clean the
area around the fittings.
b.
As you disconnect the component, be prepared to
assemble plugs or caps to the hose ends and open
ports. This will keep impurities out of the hydraulic
system and also prevent oil spills.
c.
Make sure “O” rings are clean and hose fittings are
properly seated before tightening.
d.
Keep the hose from twisting. Twisted hoses can
cause couplers to loosen as the hose flexes during
operation resulting in oil leaks.
e.
Kinked or twisted hoses can restrict the oil flow
causing the system to malfunction and the oil to
overheat and also lead to hose failure.
4.12 HYDRAULIC OIL___________________________________________________________
Refer to Section 6.2 for specific maintenance intervals.
3.
Drain and replace the hydraulic oil after a major component
failure, or if you notice the presence of water or foam in the
oil, or a rancid odor (indicating excessive heat).
After oil has drained install drain plug and fill with
Jacobsen Hydraulic oil.
4.
Purge air from system.
Always replace both hydraulic filters when oil filter light stays
on or when changing oil.
a.
To prevent reels from overheating, disconnect
motors from reels.
b.
Operate all tractor functions for about 5 minutes to
purge air out of the system and stabilize the oil
level. During this time, the oil level alarm may
sound.
c.
Once the level has stabilized and the air is purged,
fill the tank to the full mark on dipstick. Start engine
and check that oil alarm remains off.
To change hydraulic oil:
1.
Clean the area around the oil cap to prevent impurities
from entering and contaminating the system.
2.
Remove drain plug from bottom of tank.
17
4
MAINTENANCE
4.13 HYDRAULIC FILTER _______________________________________________________
The hydraulic system is protected by a 10 micron return line
filter. Flow though the filters is monitored during operation.
When pressure drop across the filters is too high the
hydraulic oil filter warning light will come on. To ensure
continued protection to the hydraulic system, replace filter
as soon as possible after light comes on.
Note: During cold weather the warning light may come on
until oil has warmed up to operating temperature. Wait until
oil has warmed up and light goes out before operating
tractor.
To replace hydraulic filter:
1.
Remove the old filter.
2.
Install new filter. Hand tighten only.
3.
Operate engine at idle speed with hydraulic system in
neutral for five minutes. The oil level alarm may sound
during this time.
4.
Check hydraulic oil level in reservoir and fill to full mark
on dipstick.
4.14 ELECTRICAL SYSTEM _____________________________________________________
! CAUTION
Always turn the ignition switch off and remove the
negative battery cable (Black) before inspecting or
working on the electrical system.
F1
F2
C
General precautions that can be taken to reduce electrical
problems are listed below.
1.
Make certain all terminals and connections are clean
and properly secured.
2.
Check the interlock system, fuses and circuit breakers
regularly.
If the interlock does not function properly and the
problem cannot be corrected, contact an authorized
Jacobsen Dealer.
3.
Keep the wire harness and all individual wires away
from moving parts to prevent damage.
4.
Make sure the seat switch harness is connected to the
main wire harness.
5.
Check the battery and battery charging circuit.
6.
Do not wash or pressure spray around electrical
connections and components.
The electrical system is monitored and controlled by the
electronic controller (C) located behind the operator’s area.
The controller is equipped with two banks of LED’s which
can be used when troubleshooting the electrical system, see
Section 5.2.
NOTE: For factory assistance with troubleshooting
controller problems, please note the controller hardware
revision and software version located on the lower right
corner of the controller. Controllers with equal or greater
revision levels will be backward compatible.
CIrcuits are protected by a circuit breaker, fuses and relays
mounted on or near the controller.
18
K1 K2
Software Version
Hardware Revision
CB1
CIRCUIT BREAKER
CB1 50 A CIRCUIT BREAKER
FUSES
F1 20 A ALTERNATOR, GAUGES, SWITCHES
F2 20 A LIGHTS
RELAYS
K1 GLOW PLUG
K2 STARTER
MAINTENANCE
4
4.15 RADIATOR _______________________________________________________________
! WARNING
To prevent serious bodily injury from hot coolant or
steam blow-out, never attempt to remove the radiator
cap while the engine is running. Stop the engine and
wait until it is cool. Even then, use extreme care when
removing the cap.
! CAUTION
Mix clean water with ethylene glycol based anti-freeze for
the coldest ambient temperature. Read and follow the
instructions on the anti-freeze container and engine manual.
Keep radiator and hydraulic oil cooler air passages clean.
Use compressed air (30 psi maximum) to clean the fins.
To clean radiator:
1.
Use a blow gun to clean the radiator and oil cooler fins.
Note: A sliding panel located under the frame can be
loosened and pulled back to allow dirt and debris to fall
though frame.
Do not pour cold water into a hot radiator. Do not operate
engine without a proper coolant mixture. Install cap and
tighten securely.
2.
Check coolant level daily. Radiator should be full and
recovery bottle should be up to the cold mark.
Check and tighten the fan belt. Replace clamps and
hoses every two years.
3.
If you have to add coolant more than once a month, or
add more than one quart at a time, have a Jacobsen
Dealer check the cooling system.
Drain and refill annually. Remove the radiator cap, open the
engine block drain and the radiator drain. Empty and clean
the recovery bottle.
4.16 ROLLOVER PROTECTION STRUCTURE (ROPS) ________________________________
A Rollover Protection System (ROPS), designed for this
tractor, is available as an optional accessory. If your tractor
is equipped with this device, inspect it periodically and follow
operating procedures described in the Safety & Operation
Manual
! CAUTION
Do not loosen or remove bolts, do not weld, drill, modify,
bend or straighten a damaged structure.
1.
The seat, the seat belt, mounting hardware and any
accessories within the ROPS, should be inspected regularly and all damaged parts replaced immediately.
2.
Once the ROPS has been subjected to any form of
impact it should be replaced.
3.
Check and retorque all hardware. All replacement
components used for the ROPS must be as specified
in the Parts Catalog.
4.17 TIRES ___________________________________________________________________
1.
Keep tires properly inflated to prolong tire life. Check
inflation pressure while the tires are cool. Inspect tread
wear.
2.
Check pressure every 50 hours or once a month. Use
an accurate, low pressure tire gauge.
3.
Keep tires inflated to:
Front - 16 psi (111 kPa)
Rear - 12 psi (86 kPa)
! CAUTION
Unless you have the proper training, tools and
experience, DO NOT attempt to mount a tire on a rim.
Improper mounting can produce an explosion which
may result in serious injury.
19
4
MAINTENANCE
4.18 WHEEL MOUNTING PROCEDURE ____________________________________________
! WARNING
Make sure the tractor is parked on a solid and level
surface. Never work on a tractor that is supported only by
the jack. Always use jack stands.
If only the front or rear of the tractor is raised, place
chocks in front of and behind the wheels that are not
raised.
1.
Remove dirt, grease and oil from stud thread. Do not
lubricate threads.
2.
Position wheel on hub and inspect to insure full contact
between mounting surface of wheel and hub or brake
drum.
3.
Finger tighten all hardware then torque hardware in
criss-cross order; always tighten nuts in the top
position.
4.
Check and retorque daily until torque is maintained,
85-95 ft.lbs. (115-128 Nm)
4.19 INSPECTING BLADES ______________________________________________________
1. Every 50 hours of operation or whenever mower is
removed from tractor, carefully examine the blades
to make sure they are in good operating condition.
Blades showing any bends (G), grooves (H) or
cracks (J) must be replaced.
! CAUTION
Use care when checking blades to avoid pinching
hands and fingers between blade ends.
! WARNING
Never attempt to straighten, weld or repair a damaged
blade. Always replace a damaged blade.
2. Any of the above conditions can cause a piece of
the blade to break away and be hurled from the
mower; causing very serious injury to bystanders or
property damage.
3. A bent blade could have a microscopic crack (G)
that can grow and allow a piece of the blade to
break. Bent blades will also create vibration and
other stress on the machinery.
4. Dust or sand particles can wear a dangerous groove
in the blade (H) between the air vanes and the flat
portion of the blade that will rapidly grow and
produce a crack (J), permitting a piece of the vane
to break off.
G
H
J
HR025
Figure 4C
20
MAINTENANCE
4
4.20 SHARPENING BLADES _____________________________________________________
1. Place a wooden block between the blade and mower
housing to stop the blade from moving.
! WARNING
The mower blades can develop sharp edges. Use
caution whenever servicing and handling.
2. When dressing or sharpening the blade, do not
follow the original pattern of grind as shown in (A).
Grind new cutting edges at an angle as shown in
(B).
3. Make sure an equal amount of material is removed
from both sides of blade to prevent having an
unbalanced blade. An unbalanced blade will cause
excessive vibration and may damage the mower.
4. Use a blade balancer to check the blade after
sharpening.
5. Torque center mounting screw holding blade to 75
to 90 ft. lb. (100 to 120 Nm).
A
If the maximum total loss of the blade reaches 1/2 in.,
(13 mm.), do not sharpen further, replace blade.
! WARNING
Maximum
1/2” (13 mm)
B
Re sharpening the blade beyond the allowable
1/2 in., (13 mm) may allow blade tip break off and
be thrown from the mower. Such an incident can
cause very serious injury to bystanders and/or
property damage.
HR024
Figure 4D
4.21 CARE AND CLEANING _____________________________________________________
Wash the tractor and implements after each use. Keep the
equipment clean.
Note: Do not wash any portion of the equipment while it is
hot. Do not use high pressure spray or steam. Use cold
water and automotive cleaners.
1.
Use compressed air to clean engine and radiator fins. A
special blow gun is available through Jacobsen Dealer.
2. Use only fresh water for cleaning your equipment.
Note: Use of salt water or effluent water has been known
to encourage rust and corrosion of metal parts resulting
in premature deterioration or failure. Damage of this
nature is not covered by the factory warranty.
3.
Do not spray water directly at the instrument panel,
ignition switch, controller or any other electrical
components, or at bearing housings and seals.
4.
Clean all plastic or rubber trim with a mild soap
solution or use commercially available vinyl/rubber
cleaners.
5.
To maintain the original high luster of the fiberglass,
periodically wax with a good grade of One-Step
cleaner wax.
Repair damaged metal surfaces and use Jacobsen touch-up
paint. Wax the equipment for maximum paint protection.
! CAUTION
Clean grass and debris from cutting units, drives,
muffler and engine to prevent fires.
! WARNING
NEVER use your hands to clean cutting units. Use a
brush to remove grass clippings from blades. Blades are
extremely sharp and can cause serious injuries.
21
4
MAINTENANCE
4.22 STORAGE________________________________________________________________
General
1.
Wash the tractor thoroughly and lubricate. Repair and
paint damaged or exposed metal.
2.
Inspect the tractor, tighten all hardware, replace worn
or damaged components.
3.
4.
5.
1.
Check and reinstall battery
2.
Check or service fuel filter and air cleaner.
Drain and refill radiator.
3.
Check the radiator coolant level.
Clean the tires thoroughly and store the tractor so the
load is off the tires. If tractor is not on jack stands,
check tires at regular intervals and reinflate as
necessary.
4.
Check oil level in the engine crankcase and hydraulic
system.
5.
Fill the fuel tank with fresh fuel. Bleed the fuel system.
6.
Make certain that the tires are properly inflated.
7.
Remove all oil from the blades. Adjust cutting height.
8.
Start and operate the engine at 1/2 throttle. Allow
enough time for the engine to become properly
warmed and lubricated.
Keep the machine and all its accessories clean, dry
and protected from the elements during storage. Never
store equipment near an open flame or spark which
could ignite fuel or fuel vapors.
Battery
1.
Remove, clean and store battery in upright position on a
non-conductive surface (wood) in a cool, dry place. To
prevent accelerated discharge, do not store battery on
concrete or steel surface.
2.
Check and recharge battery every 60 to 90 days while
in storage.
3.
Store batteries in a cool, dry place. To reduce the self
discharge rate, room temperature should not be above
80°F (27°C) or fall below 20°F (-7°C) to prevent
electrolyte from freezing.
Engine
1.
While the engine is warm, remove drain plug, drain the
oil from the crankcase and change oil filter. Install drain
plug and refill with fresh oil. Torque drain plug to 22 ft.
lb. (30 Nm).
2.
Clean exterior of engine. Paint exposed metal or apply
a light coat of rust preventative oil.
3.
Add a fuel conditioner or biocide to prevent gelling or
bacterial growth in fuel. See your local fuel supplier.
Cutting Units
1.
Wash the cutting units thoroughly, then repair and paint
any damaged or exposed metal.
2.
Lubricate all fittings and friction points.
3.
Apply a light coat of rust preventative oil to the
sharpened edges of the blades.
! CAUTION
To prevent personal injury and damage to the cutting
edges, handle the blades with extreme care
22
After Storage
! WARNING
Never operate the engine without proper ventilation;
exhaust fumes can be fatal when inhaled.
TROUBLESHOOTING
5
5.1
5
TROUBLESHOOTING
GENERAL ________________________________________________________________
The troubleshooting chart below lists basic problems that may occur during start-up and operation. For more detailed
information regarding the hydraulic and electrical systems contact your area Jacobsen Dealer.
Symptoms
Engine will not start.
Possible Causes
Action
1.
Parking brake disengaged, traction
pedal not in neutral or mow switch on.
1.
Check interlock system and start-up procedure.
2.
Glow plug has not timed out.
2.
Reset ignition switch and allow glow plug to time out
before cranking engine.
3.
Battery low on charge or defective.
3.
Inspect condition of battery and battery connections.
4.
Fuel tank empty or dirty.
4.
Fill with fresh fuel. Change fuel filter. Bleed fuel
lines.
5.
Fuse blown.
5.
Replace fuse.
6.
Relay defective
6.
Test and replace relay.
7.
Neutral switch on traction pedal out of
adjustment or defective.
7.
Adjust or replace switch.
1.
Fuel level low, fuel or fuel filter dirty.
1.
Fill with fresh fuel. Change fuel filter. Bleed fuel lines.
2.
Air cleaner dirty.
2.
Inspect and replace air filter.
3.
Injectors, fuel pump
3.
Consult engine manual.
4.
Engine problem.
4.
Consult engine manual
1.
Fuel tank empty.
1.
Fill with fresh fuel and bleed fuel lines.
2.
Interlocks not set before leaving
operator’s seat.
2.
Engage parking brake and set mow switch to OFF.
1.
Coolant level low.
1.
Inspect and add coolant.
2.
Air intake restricted.
2.
Clean air intake at radiator.
3.
Water pump belt broken or loose.
3.
Tighten or replace belt.
Battery not holding
charge.
1.
Loose or corroded battery terminals.
1.
Inspect and clean terminals
Battery light on.
2.
Low electrolyte.
2.
Refill to correct level.
3.
Alternator belt loose or broken.
3.
Tighten or replace belt
4.
Charging system defective.
4.
See engine manual
1.
Height of Cut not adjusted correctly.
Inspect height of cut adjustment. Same number of
spacers below deck housing on all spindles.
2.
Engine speed too low.
Check engine speed. Run engine at full throttle.
3.
Mow speed not adjusted for turf
conditions.
Adjust mow speed for best cut.
Engine stops.
Engine overheating
Decks cut unevenly
Lamp
1
2
3
4
5
6
7
8
9
10
11
12
13
14
15
16
17
18
INPUTS
OUTPUTS
19
20
21
22
23
24
25
26
27
28
29
30
31
32
33
Engine hard to start
or runs poorly.
23
5
TROUBLESHOOTING
5.2
CONTROLLER LAMPS _____________________________________________________
The controller is a solid state device that monitors and
controls electrical functions. The controller receives input
signals from various switches and sensors throughout the
machine and transmits output signals to operate relays,
solenoids and warning lights. It controls and resets timers
and contains built in logic to control certain machine
functions.
Each input and output signal is displayed through lamps
located on top of the controller. A closed input switch
indicates an active circuit and will turn an input lamp on, an
open switch an inactive circuit and will turn a lamp off.
Outputs are active when their lights are on.
It is important to note that in some cases a lamp or group of
lamps must be on or off for a condition to be true. For
example, to start the tractor the Mow Switch must be off
(lamp 8 off) while the Neutral Start Switch (lamp 12), Brake
Switch (lamp 6) and Fuel Valve Hold coil (lamp 27) must be
on.
NOTE: For factory assistance with troubleshooting
controller problems, please note the controller hardware
revision and software version located on the lower right
corner of the controller. [SEE 4.14] Controllers with equal or
greater revision levels will be backward compatible.
Controller Functions by Lamp Number
Lamp On - Circuit is active
Lamp Off - Circuit is inactive
INPUTS
Lamp
Lamp
Circuit
Program Select (1, 3 and 4 are not used)
19
Hydraulic Filter Light
5
Brake Switch
20
Hydraulic Oil Level Light
6
Seat Switch
21
Not Used
7
Traction Control Switch
22
Glowplug Light
8
Mow Switch
23
Lower Solenoid
1,2,3,4
24
Circuit
OUTPUTS
9
Joystick - Lower
24
Raise Solenoid
10
Joystick - Raise
25
Glowplug Relay
11
Hydraulic Oil Level Switch
26
Start Relay
12
Neutral Switch
27
Fuel Solenoid - Hold
13
Not Used
28
Not Used
14
Keyswitch - Glowplug
29
Audible Alarm
15
Keyswitch - Start
30
Mow Solenoid
16
Joystick Active
31
Fuel Solenoid - Pull
17
Hydraulic Filter Switch
32
Power-Ignition
18
Engine Oil Pressure Switch
33
Power-Lights
TROUBLESHOOTING
5.3
5
ELECTRICAL CIRCUITS ____________________________________________________
When troubleshooting the machine using the controller
always check that Program Active lamps (1, 2 and 3 - 5
Gang)(2 and 3 - 7 Gang) are on. These indicate that the
controller has power and the program is active.
Note: The controller requires a minimum of six volts to
operate.
Individual circuits can be tested by operating an input
switch, checking for the required input signal and looking for
a corresponding output. Keep in mind that not all switches
are located on the instrument panel. The traction pedal, reel
lift limit and brakes are controlled by small proximity
switches mounted on the frame of the tractor.
If an input lamp does not light an inactive condition is
indicated. This could be caused by a fuse, faulty switch or
poor connection.
The electrical connections to the solenoids on the hydraulic
valves are also equipped with small indicator lamps. When
lit these lamps indicate that the output signal has reached
the connection. If lamps do not come on, check wires to and
from connector.
25
6
MAINTENANCE & LUBRICATION CHARTS
6
MAINTENANCE & LUBRICATION CHARTS
6.1
GENERAL________________________________________________________________
! WARNING
Before you clean, adjust, or repair this equipment,
disengage all drives, lower implements to the ground,
engage parking brake, stop engine and remove key from
ignition switch to prevent injuries.
1.
Always clean grease fittings before and after lubrication.
6.2
2.
Lubricate with grease that meets or exceeds NLGI
Grade 2 LB specifications. Apply grease with a manual
grease gun and fill slowly until grease begins to seep
out. Do not use compressed air.
3.
For smooth operation of pivot points and other friction
points, apply several drops of SAE 30 oil every 50
hours or as required.
4.
Remove wheels and repack bearings once a year.
MAINTENANCE CHART ____________________________________________________
Recommended Service and Lubrication Intervals
Every
8-10
Hours
Every
50
Hours
Air Cleaner
Every
250
Hours
Brake
Yearly
See
Section
R
4.4
I-A
R
I
Fuel Lines and Clamps
3.3
A
3.4
I-C-A
Engine Oil Filter
R
4.15
R*
R
4.2
R*
R
4.3
R
Grease Fittings - F1
4.6
L
Grease Fittings - F2
L
I***
I
6.3
II
6.3
II
4.11
Hydraulic Oil
I-A
R**
4.12
Hydraulic Oil FIlters
R*
R-AR
4.13
Muffler and Exhaust
Radiator Screens
I
4.15
I-A
Steering System
I*
4.17
I-A
Wheel Bearings
L
Wiring
I*
C - Clean
I
I - Inspect
* Indicates initial service for new machines.
** Or Yearly whichever comes first.
I
II
III
IV
26
IV
4.10
I-C/AR
Tires
A - Add or Adjust
III
I
Fuel Filter
Hydraulic Hoses and Tubes
Lubricant
Type
4.9
I-A*
Engine Oil
Every
1000
Hours
I
I-A*
Cooling System
Every
500
Hours
Every
400
Hours
AR
Battery Charge
Belt
Every
100
Hours
Pack bearings with NLGI Grade 2 (Service Class GB)
Manual grease gun with NLGI Grade 2 (Service Class LB).
Engine Oil - See Section 4.3
Jacobsen Hydraulic Oil - SAE 10W30 or Greens Care 68
I
4.14
L- Lubricate
R - Replace
AR - As Required
*** Inspect visible hoses and tubes for leaks or oil marks.
MAINTENANCE & LUBRICATION CHARTS
6.3
6
LUBRICATION CHART______________________________________________________
4
4
4
3
3
3
1
4
3
1
2
3
4
2
1
2
1
3
3
3
2
5
2
6
Grease Fittings
F1 - 50 Hours (Every Week)
1
2
3
4
5
6
7
8
9
10
11
11
Mower Pivot (5)
Lift Arm Pivot (5)
Lift Cylinders (10)
Caster Pivot and Wheels (10)
Brake Pedal Pivot
Traction Pedal Pivot
Ball Joint (2)
Steering Pivot (2)
Steering Cylinder (2)
Axle Pivot
F2 - 100 Hours
11
11 U-joint Driveshaft (3)
7
7
9
8
8
9
10
27
7
7
7.1
PARTS CATALOG
PARTS CATALOG
TABLE OF CONTENTS _____________________________________________________
1.1 ........ Decals ..................................................................... 30
2.1 ........ Hood ....................................................................... 32
3.1 ........ Seat Pan ................................................................. 34
3.2 ........ Seat Pan ................................................................. 36
4.1 ........ Control Panel ......................................................... 38
5.1 ........ Traction Pedal ........................................................ 40
6.1 ........ Brake Pedal ............................................................ 42
7.1 ........ Frame and Front Axle............................................ 44
8.1 ........ Tilt Steering ............................................................ 46
9.1 ........ Rear Axle ................................................................ 48
10.1 ...... Tie Rod ................................................................... 50
11.1 ...... Remote Engine Oil Cooler .................................... 51
12.1 ...... Radiator and Air Cleaner....................................... 52
13.1 ...... Engine Mounting.................................................... 54
14.1 ...... Pump Mounting and Engine Exhaust .................. 56
15.1 ...... Fuel and Hydraulic Tanks ..................................... 58
16.1 ...... Pump Suction Hydraulics ..................................... 60
17.1 ...... Oil Cooler Hydraulics ............................................ 61
18.1 ...... Hydraulic Valves and Filter................................... 62
19.1 ...... Deck Hydraulics..................................................... 63
20.1 ...... Traction Hydraulics ............................................... 64
21.1 ...... Front Lift Hydraulics.............................................. 66
22.1 ...... Rear Lift Hydraulics............................................... 67
23.1 ...... Wheel Motor Case Drains ..................................... 68
24.1 ...... Deck Motor Case Drain ......................................... 69
25.1 ...... Steering Hydraulics ............................................... 70
26.1 ...... Hydraulic Clamps .................................................. 71
27.1 ...... Front Lift Arms....................................................... 72
28.1 ...... Rear Lift Arms ........................................................ 74
29.1 ...... Electrical Harness ................................................. 76
30.1 ...... Deck Housing and Caster Wheels........................ 78
31.1 ...... Deck Frame ............................................................ 80
32.1 ...... Brake Assemblies.................................................. 82
33.1 ...... Deck Valve.............................................................. 83
34.1 ...... Front Wheel Motor ................................................. 84
35.1 ...... Rear Wheel Motor .................................................. 85
36.1 ...... Lift Valve................................................................. 86
37.1 ...... 4WD Valve .............................................................. 87
38.1 ...... Steering Valve ........................................................ 88
39.1 ...... Traction Pump (Front Half) ................................... 90
40.1 ...... Traction Pump (Rear Half) .................................... 92
41.1 ...... Electrical Schematic.............................................. 94
42.1 ...... Hydraulic Schematic ............................................. 98
43.1 ...... O-Ring Chart ........................................................ 100
28
PARTS CATALOG
7
29
AR-5
Serial No. All
1.1 Decals
!
CUT
HEIGHT
W/ 1/2
SPACERS
WARNING
1. Read operators manual.
Do not allow untrained
operators to use machine.
2. Keep shields in place and
hardware securely
fastened.
3. Before you clean, adjust
or repair this equiptment,
disengage all drives,
engage parking brake
and stop engine.
4. Keep hands, feet and
clothing away from
moving parts.
5. Never carry passengers.
6. Keep bystanders away.
7. Inspect hoses and fabric
covers daily. If worn or
damage, replace with
original quality parts.
8. Do not use on slopes
greater than 22 .
5-1/4
5
4-3/4
DANGER
4-1/2
4-1/4
!
4
3-3/4
KEEP HANDS AND FEET AWAY
3-1/2
WARNING
TO PREVENT POSSIBLE INJURY TO YOU OR OTHERS,
DO NOT OPERATE THIS UNIT WITH GUARD REMOVED.
3-1/4
3
2-3/4
2-1/2
21
2-1/4
2
1-3/4
1-1/2
1-1/4
3/4
1
19
11
17
CUT
HEIGHT
W/ 1/4
SPACER
20
20
21
TC - 0 / I
19
25
26
2
19
WARNING
!
2
To prevent serious injury
never disconnect or tamper
with the seat switch.
Read the manual for more information.
21
22
24
10
11
25
18
20
12
26
24
7
4
5
6
8
!
9
WARNING
Fit roll over protective
structure before using
this machine on slopes
greater than 14 .
Do not use on slopes
greater than 21 .
Keep bystanders away
23
1
14 / 15
!
WARNING
22
DO NOT INSTALL CAB UNLESS
UNIT OUTFITTED WITH BRAKE
UPDATE KIT, P/N 4118909
22
IMPORTANT
This machine uses GreensCare 68,
a biodegradable hydraulic fluid.
(Order 5003103 for 5 gal. pail)
17
Use of 10W30 is an approved
alternate fluid.
Use will compromise all
biodegradable properties of
GreensCare 68 hydraulic fluid.
13
4108880
13
30
16
3
AR-5
!
WARNING
!
ADVERTENCIA
4
To avoid injury when jumping battery
1. Connect positive (+) terminal to
positive (+) terminal.
2. Connect negative (–) terminal on good
battery to frame of vehicle that
has dead battery.
7
RA
DABLE FL
9
10
6
5
EG
1. Leer el manual del operador. No permitir que
personas no capacitadas para ello usen la maquina
2. Mantener los escudos en su lugar y la tornilleria
debidamente fijada.
3. Antes de limpiar, ajustar o reparar este equipo,
desengranar todas los mandos, aplicar el freno de
estacionamiento y apagar el motor.
4. Mantener las manos, los pies y la ropa alejados de
las piezas en movimiento.
5. No viajar como pasajeros ni llevar pasajeros en
maquinas sin asiento para ellos.
6. Mantener a las demas personas alejadas
7. Si no sabe leer ingles, solicitarle a otra persona que
le lea y explique el contenido de las etiquetas y del
manual de la maquina.
BIOD
Radiator is under pressure. Remove
cap slowly to avoid personal injury
8
UI
D
!
DANGER
To avoid injury when working with battery
1. Always connect the black ground (–)
cable last and remove it first.
2. Keep sparks and flames away, and
avoid contatc with acid.
1
Manufactured under one or more
of the following U.S. Patents:
5309699
6336311
L WA
6047530
6336312
105 dB
12
18
Item
>
>
>
>
>
1
2
3
4
5
6
7
8
9
10
11
12
13
14
15
16
17
18
19
20
21
22
23
24
25
26
Part No.
Qty.
4111408
2
4134631
4132372
365956
4124759
340830
3008521
3008522
3001435
3008682
4131828
4134633
4108880
4124866
4124867
4124791
4124445
4117468
835892
4133609
521720
4121657
3002529
365339
4134870
4131772
1
2
1
1
1
1
1
1
1
1
1
1
1
1
2
1
1
10
10
5
2
1
1
1
1
Description
Serial Numbers/Notes
Decal, Bio Fluid
Decal, Service
Decal, AR-5
Decal, Radiator Warning
Decal, Jacobsen Emblem
Decal, Spanish Caution
Decal, Traction Pedal
Decal, Brake
Decal, Battery Danger
Decal, Tow Valve
Decal, Warning
Decal, Patent
Decal, Hydraulic Fluid
Decal, Left Side Stripe
Decal, Right Side Stripe
Decal, Jacobsen
Decal, Operating Instructions
Decal, Noise 105 dB
Decal, Danger
Decal, Height of Cut
Decal, Guard Warning
Decal, ROPS Warning
Decal, Warning
Decal, Warning
Decal, TC-O/I
Decal, Blank
Included with hood
Included with hood
Included with hood
Included with hood
Included with hood
2 on each cutting unit
2 on each cutting unit
> Change from previous revision
31
AR-5
Serial No. All
2.1 Hood
15
21
6
1
2
17
22
5
4
3
18
7
17
19
9
15
20
16
22
10
10
24
23
16
11
14
12
8
16
LF34-1
32
AR-5
Item
1
2
3
4
5
6
7
8
9
10
11
12
13
14
15
16
17
18
19
20
21
22
23
24
Part No.
Qty.
Description
4139087
1
4124443
4124437
4124436
4124442
557620
4138441
4129680
3007548
800794
400408
444758
800907
453017
366883
402056
444306
3006873
3008195
3009210
403741
446110
4138359
4129679
1
1
1
1
4
1
1
1
4
4
2
4
6
1
2
4
1
1
1
2
4
AR
1
Hood
• Foam, Front
• Foam, Right Side
• Foam, Left Side
• Foam, Top
• Molding
• Foam, Hood Mount
Seal, Right Side Air
Foam, Control Module
Screw, 5/16-18 x 3/4 Hex Flange
Screw, 1/2-13 x 1-1/2” Hex Head
Locknut, 1/2-13 Center
Nut, 5/16-18 Hex Flange
Flat Washer, 1/2
Over Center Latch
Screw, #8-32 x 3/8” Slotted Head
Nut, #8-32 Hex
Cover, Front Mount
Wing Nut, 1/4-20 Steel
Foam (Cut To Length)
Screw, #8-32 x 5/8” Hex Head
Lockwasher, #8
Foam, Sealing
Seal, Left Side Air
Serial Numbers/Notes
Includes Decals
Cut two 5-1/2” pieces
> Change from previous revision
33
AR-5
Serial No. 1651-2156
3.1 Seat Pan
Milsco Seat
5
19
17
10
27
3
19
29
4
30
6
16
24/25
26
9
19
8
6
2
9
6
31
9
13
10
20
7
32
15
14
22
23
21
28
12
1
18
11
38
32
39
36
8
37
35
34
33
8
34
AR-5
Item
1
2
3
4
5
6
7
8
9
10
11
12
13
14
15
16
17
18
19
20
21
22
23
24
25
26
27
28
29
30
31
32
33
34
35
36
37
38
39
Part No.
Qty.
1004279
1
3009292
4129685
4131137
4130641
400258
441602
445795
446142
452008
5003162
3007609
3007610
3007611
3007612
315387
3003928
4123723
3001328
4133119
4123725
3008218
404016
198059
198066
66170
66172
434011
446130
554390
163583
445245
403751
403785
64246-02
440078
400112
453023
4133121
4132917
4132913
444708
446128
1
1
1
1
9
4
17
9
9
1
1
1
1
1
1
1
1
12
1
1
1
2
1
1
1
1
2
2
1
1
2
4
4
4
4
4
4
2
1
1
4
4
Description
Serial Numbers/Notes
Floorpan
Seat Pan
Support, Seat
Adjuster, Double Latching
Base, Seat
Screw, 3/8-16 x 3/4” Hex Head
Carriage Bolt, 5/16-18 x 3/4”
Nut, 5/16-18 Spiralock Flange
Lockwasher, 3/8 Heavy
Flat Washer, 3/8
Platform
• Pad, Left Floorboard
• Pad, Right Floorboard
• Pad, Left Foot
• Pad, Right Foot
Grommet
Pouch, Literature
Latch, Panel
Screw, 5/16-18 x 5/8” Hex Washer
Floorboard
Pad, Center Floorboard
Cover, Hydro
Screw, 1/4-20 x 5/8” Truss Head
Arm Rest, L.H.
Arm Rest, R.H.
Suspension, Heavy Duty Seat
Seat, One Piece 21”
• Screw, 1/4-20 x 5/8” Socket Head
• Lockwasher, 1/4 Heavy
• Switch, Seat
• Wire Harness, Seat Switch
Tinnerman Nut
Screw, 5/16-18 X 3/4” Serr Washer
Screw, 5/16-18 x 1” Serr Washer
Nut, M8-1.25 Whizlock Flange
Carriage Bolt, 5/16-18 x 1/2”
Screw, 1/4-20 x 1” Hex Head
Flat Washer, 1/4
Stop, Deck
Bracket, Right Side Deck Stop
Bracket, Left Side Deck Stop
Locknut, 1/4-20 Center
Lockwasher, 1/4
REFERENCE SW-10, See 41.1
> Change from previous revision
35
AR-5
Serial No. 2157 and Up
3.2 Seat Pan
Michigan Seat
5
30
24
10
41
17
26
3
19
4
29
42
25
6
16
27
9
40
6
2
9
6
31
9
13
10
20
7
32
15
14
22
23
21
28
12
1
18
11
38
32
39
36
8
37
35
34
33
8
36
AR-5
Item
1
2
3
4
5
6
7
8
9
10
11
12
13
14
15
16
17
18
19
20
21
22
23
24
25
26
27
28
29
30
31
32
33
34
35
36
37
38
39
40
41
42
Part No.
Qty.
1004279
1
3009292
4139241
4131137
4139237
400258
441602
445795
446142
452008
5003162
3007609
3007610
3007611
3007612
315387
3003928
4123723
409812
4133119
4123725
3008218
404016
4139433
4139436
4139434
4139435
64123-68
4139450
445245
403751
800943
64246-02
440078
400112
453023
4133121
4132917
4132913
444708
446128
5003769
452004
831053
1
1
1
1
9
4
17
9
9
1
1
1
1
1
1
1
1
4
1
1
1
2
1
1
1
1
4
1
2
4
2
4
4
4
4
2
1
1
4
4
1
2
4
Description
Serial Numbers/Notes
Floorpan
Seat Pan
Support, Seat
Adjuster, Double Latching
Base, Seat
Screw, 3/8-16 x 3/4” Hex Head
Carriage Bolt, 5/16-18 x 3/4”
Nut, 5/16-18 Spiralock Flange
Lockwasher, 3/8 Heavy
Flat Washer, 3/8
Platform
• Pad, Left Floorboard
• Pad, Right Floorboard
• Pad, Left Foot
• Pad, Right Foot
Grommet
Pouch, Literature
Latch, Panel
Screw, 5/16-18 x 3/4” Thread Cutting
Floorboard
Pad, Center Floorboard
Cover, Hydro
Screw, 1/4-20 x 5/8” Truss Head
Suspension Seat Assembly
• Arm Rest Kit
• • Arm Rest, L.H.
• • Arm Rest, R.H.
• • Bolt, 5/16-18 Hex
• Switch, Seat
Tinnerman Nut
Screw, 5/16-18 X 3/4” Serr Washer
TScrew, #10-16 x 3/4” Plastic
Nut, M8-1.25 Whizlock Flange
Carriage Bolt, 5/16-18 x 1/2”
Screw, 1/4-20 x 1” Hex Head
Flat Washer, 1/4
Stop, Deck
Bracket, Right Side Deck Stop
Bracket, Left Side Deck Stop
Locknut, 1/4-20 Center
Lockwasher, 1/4
Seat Switch Harness
Flat Washer, 1/4
Spacer, Seat
REFERENCE SW-10, See 41.1
> Change from previous revision
37
AR-5
Serial No. All
4.1 Control Panel
3
4
10
24
33
8
25
26
6
34
28
33
27
21
22
32
29
1
23
7
30
9
31
7 Ref
5
2
20
16
13
18
17
17
15
19
12
11
38
14
AR-5
Item
1
2
3
4
5
6
7
8
9
10
11
12
13
14
15
16
17
18
19
20
21
22
23
24
25
26
27
28
29
30
31
32
33
34
Part No.
Qty.
Description
Serial Numbers/Notes
4130114
1
Instrument Panel
Includes silk screen decals
4129683
365943
3005121
1004290
366751
366670
4130132
4130133
4130134
1002810
4135758
366768
452008
351956
3006035
360885
400272
444762
444310
403912
404016
4128888
4131618
N/S
2721505
4130148
4130149
402006
446106
444304
403908
3001376
4137524
1
1
1
1
1
1
1
2
1
1
1
1
1
1
1
2
1
1
4
4
2
1
1
1
1
1
1
2
2
2
6
2
1
Hour Meter, Quartz
Fuel Gauge
Water Temperature Gauge
Joystick, 1 Axis
Indicator Light, Yellow
Horn
Switch, Light
Switch, Horn
Hole Plug
Bracket, Throttle
Lever, Throttle
Knob
Flat Washer, 3/8”
Spring, Compression
Plate, Friction
Washer, Friction
Screw, 3/8-16 x 2-1/4” Hex Head
Locknut, 3/8-16 Center
Nut, #10-24 Hex
Screw, #10-24 x 5/8” Truss Head
Screw, 1/4-20 x 5/8” Truss Head
Switch Assembly, Key
• Key
• Nut
Switch, PTO
Light, Indicator Fluids
Light, Indicator Electric
Screw, #6-32 x 1/2 SL RD HD
Lockwasher, #6 Heavy
Nut, #6-32 Hex
Screw, #10-24 x 3/8” Truss Head
Bulb, Lamp
Switch, Traction Control
REFERENCE U-3, See 41.1
REFERENCE U-2, See 41.1
REFERENCE U-1, See 41.1
REFERENCE SW-12, See 41.1
REFERENCE L-7, See 41.1
REFERENCE U-4, See 41.1
REFERENCE SW-3, See 41.1
REFERENCE SW-5
REFERENCE SW-2, See 41.1
REFERENCE SW-11, See 41.1
REFERENCE L3 & L4, See 41.1
REFERENCE L5 & L6, See 41.1
REFERENCE SW-5
> Change from previous revision
39
AR-5
Serial No. All
5.1 Traction Pedal
25
26
3
18
4
5
12
27
20
9
27
26
20
8
1
2
2
13
21
14
16
28
11
26
14
7
21
29
32
33
31 15
23
22
27
30
27
19
24 17
27 23
10
27
22
6
40
6
28
AR-5
Item
>
>
Part No.
Qty.
Description
1
2
3
4
5
6
7
8
9
10
11
12
13
14
15
16
17
18
19
20
21
22
23
24
25
26
27
28
29
1003288.7
1
Treadle Pivot
352726
3007230
3003474
3003475
366974
4125831
3006327
333542
3006998
3006999.7
4132912
471214
446136
453004
403860
444306
444718
400272
445795
400182
443112
452008
446110
3002695
400188
445796
400264
3008383
2
1
1
1
2
1
1
1
1
1
1
1
2
2
2
2
1
1
6
4
2
2
2
1
7
6
2
1
• Bushing
Stop, Mow Speed
Grip, Pedal
Grip, Pedal
Rod End
Switch, Proximity
Shaft, Turn Assist
Tie Stud
Rod, Hydro
Bracket, Hydro Mount
Pedal, Hydro
Fitting, Grease
Lockwasher, 5/16 Heavy
Flat Washer, #8
Screw, #8-32 x 5/8” Truss Head
Nut, #8-32 Hex
Locknut, 5/16-18 Center
Screw, 3/8-16 x 2-1/4” Hex Head
Nut, 5/16-18 Spiralock Flange
Screw, 5/16-18 x 5/8” Hex Head
Nut, 3/8-24 Hex
Flat Washer, 3/8
Lockwasher, #8
Washer
Screw, 5/16-18 x 1” Hex Head
Nut, 3/8-16 Spiralock Flange
Screw, 3/8-16 x 1-1/4” Hex Head
Clip, Wire Harness
30
3009193
AR
31
32
33
4130951
4131768
446102
1
2
2
Shim, Switch
Serial Numbers/Notes
REFERENCE SW-7, See 41.1
Add or remove shims as required to
obtain 1/16 to 1/8” air gap between
sensor and treadle arm.
Bracket, Neutral Switch
Screw, M3-0.5 x 8 mm Pan Head
Lockwasher, #4
> Change from previous revision
41
AR-5
Serial No. All
6.1 Brake Pedal
13
12
13
18
4
18
15
16
5
9
1
14
15
24
17
26
28
10
11
2
9
25
16
20
14
6
3
7
8
27
7
21
22
23
19
42
AR-5
Item
>
>
Part No.
Qty.
Description
1
2
3
4
5
6
7
8
9
10
11
12
13
14
15
16
17
18
19
20
21
22
23
4142455
1
Bracket, Brake
4125831
3006327
3007606
3006997
1003616
352726
471214
446136
446110
403860
1003872
444718
445795
441602
400182
444306
400188
4108161
3008383
443812
461451
460014
1
1
1
1
1
2
1
2
2
2
1
2
8
8
2
2
2
2
1
2
2
2
Switch, Proximity
Shaft, Turn Assist
Lever, Parking Brake
Mount, Brake
Brake Arm
• Bushing
Grease Fitting
Lockwasher, 5/16 Heavy
Lockwasher, #4
Screw, #8-32 x 5/8” Truss Head
Pedal
Locknut, 5/16-18 Center
Nut, 5/16-18 Spiralock Flange
Carriage Bolt, 5/16-18 x 3/4”
Screw, 5/16-18 x 5/8” Hex Head
Nut, #8-32 Hex
Screw, 5/16-18 x 1” Hex Head
Brake Spring Assembly
Clip, Wire Harness
Nut, 3/8-24 Hex Jam
Clevis Pin, 5/16 x 15/16”
Cotter Pin, 3/32 x 3/4”
24
3009193
AR
25
26
27
28
4131768
4130950
REF
446102
2
1
2
Shim, Switch
Screw, M3-0.5 x 8 mm Pan Head
Bracket, Proximity Switch
Brake Cable
Lockwasher, #4
Serial Numbers/Notes
REFERENCE SW-8, See 41.1
Add or remove shims as required to
obtain 1/16 to 1/8” air gap between
sensor and brake arm.
See 7.1
> Change from previous revision
43
AR-5
Serial No. All
7.1 Frame and Front Axle
7
20
23
20
23
8
34
22
37
31
32
36
23
40
10
34
33
38
33
35
30
39
21
30
40
33
10
33
41
32
22
41
31
38
27
21
22
9
4
28
25/26
41
29
20
11/12
13
14
16
24
17 19
15
5
3
1
18
2
44
6
AR-5
Item
>
>
>
>
1
2
3
4
5
6
7
8
9
10
11
12
13
14
15
16
17
18
19
20
21
22
23
24
25
26
27
28
29
30
31
32
33
34
35
36
37
38
39
40
41
Part No.
Qty.
4133033
2
5002574
360111
4118254
557623
557624
4118092
366871
4118134
4133054
–
–
2000141
3007862
340486
446154
400410
353914
400108
4113047
523126
443128
452016
460093
1003047
1003048
557771
461493
460014
400114
443102
446128
453023
445795
441602
4120961
2810553
443806
400188
445781
4140094
2
2
2
2
2
1
2
1
2
1
1
2
2
2
8
8
12
20
6
2
6
6
2
1
1
2
2
2
4
4
4
8
2
1
1
1
2
1
2
6
Description
Serial Numbers/Notes
Tire
Rim
Valve, Inflation
Wheel Motor
• Key
• Nut, Hex
Frame
• Bushing
Front Axle
Bracket, Angle Upstop
Brake Assembly
Brake Assembly
Hub, Wheel
Spring, Extension
Disk Brake
Lockwasher, 1/2 Heavy
Screw, 1/2-13 x 1-3/4” Hex Head
Wheel Bolt
Screw, 1/4-20 x 3/4” Hex Head
Screw, 5/8-18 x 1-1/2” Hex Head
Bumper, Rubber
Nut, 5/8-18 Hex
Flat Washer, 5/8
Cotter Pin, 1/8 x 2-1/2”
Cable, Right Brake
Cable, Left Brake
• Clip, Brake Cable
Clevis Pin, 5/16 x 3/4”
Cotter Pin, 3/32 x 3/4”
Screw, 1/4-20 x 1-1/4” Hex Head
Nut, 1/4-20 Hex
Lockwasher, 1/4
Flat Washer, 1/4
Nut, 5/16-18 Spiralock Flange
Bolt, 5/16-18 x 3/4” Carriage
Battery Tray
Clamp, Battery
Nut, 5/16-18 Hex Jam
Screw, 5/16-18 x 1” Hex Head
Nut, 5/16-18 Whizlock Flange
Flat Washer, 5/8
See 34.1
See 32.1
See 32.1
Grade 8 Bolt
> Change from previous revision
45
AR-5
Serial No. All
8.1 Tilt Steering
17
19
2
20
15
23
5
3
22
14
24
13
9
21
10
11
18
11
8
7
1
6
12
11
4
16
46
AR-5
Item
>
Part No.
1
2
3
4
5
6
7
8
9
10
11
12
13
14
15
16
17
18
19
20
21
22
23
24
Qty.
Description
5002918
1
Actuator, Gas Spring
5002919
2811346
4138567
339979
339974
443828
3010651
3005934
3005981
2811547
400192
444718
444849
444754
447224
400216
445795
416911
404016
446142
400258
441614
2811364
2811365
445245
1
1
1
3
2
1
1
2
1
1
1
3
2
4
1
1
4
2
6
2
2
4
1
1
6
Cable, Actuator
Tower, Steering
Valve, Steering
• Adapter, Straight
• Adapter, Straight
• Nut, 5/8-18 Hex Jam
Cover, Steering Tower
Bolt, Shoulder
Bracket, Steering Pump
Washer
Screw, 5/16-18 x 1-1/2” Hex Head
Locknut, 5/16-18 Center
Locknut, 3/4-10 Center Jam
Locknut, 5/16-24 Center
Lockwasher, 5/8 Internal
Screw, 5/16-18 x 2-3/4” Hex Head
Nut, 5/16-18 Spiralock Flange
Screw, #10-24 x 1/2” Thread Cutting
Screw, 1/4-20 x 5/8” Truss Head
Lockwasher, 3/8 Heavy
Screw, 3/8-16 x 3/4” Hex Head
Carriage Bolt, 5/16-18 x 1”
Steering Wheel
• Cap, Steering Wheel
Tinnerman Nut
Serial Numbers/Notes
See 38.1
> Change from previous revision
47
AR-5
Serial No. All
9.1 Rear Axle
14
11
12
9
13
15
8
17
9
23
22
4 7
9
16
6
9
4
29
17
15
5
10
16
23
4
27
31
30
28
18
30
19
20
33
25
1
32
2
21
34
24
26
3
48
AR-5
Item
>
>
>
>
>
1
2
3
4
5
6
7
8
9
10
11
12
13
14
15
16
17
18
19
20
21
22
23
24
25
26
27
28
29
30
31
32
33
34
Part No.
Qty.
178032-01
2
1003638
360111
361648
361647
471214
461393
4141885
363562
4137137
4137139
443840
452022
366789
460064
460026
4141925
400194
444718
445666
4132688
2000057
400410
361451
471227
460028
460032
2000012
353914
367350
4132699
4141934
446154
400406
4118255
554780
554779
2
2
6
2
2
2
1
4
1
1
2
1
1
1
2
2
2
2
2
1
2
8
2
1
2
2
2
8
2
1
1
14
6
2
2
2
Description
Serial Numbers/Notes
Tire
Rim
Inflation Valve
Washer, Thrust
Bearing, Thrust
Fitting, Grease
Pin, Spring 1/4 x 2”
Steering Axle
• Bushing
Cylinder, Steering
• Seal Kit
Nut, 1-12 Hex Jam
Flat Washer, 1
Spacer, Axle
Cotter Pin, 1/4 x 1-1/2”
Cotter Pin, 1/8 x 3/4”
Ball Joint
• Screw, 5/16-18 x 1-3/4”
• Locknut, 5/16-18 Hex
• Nut, 1/2-20 Slotted Hex
Tie Rod
Motor Mount
Screw, 1/2-13 x 1-3/4” Hex Head
Washer, Thrust
45° Grease Fitting
Cotter Pin, 1/8 x 1”
Cotter Pin, 1/8 x 1-1/2”
Hub, Wheel
Wheel Bolt
Washer, Thrust
Arm, Left Steering
Arm, Right Steering
Lockwasher, 1/2 Heavy
Screw, 1/2-13 x 1-1/4” Hex Head
Wheel Motor, Disk Valve
• Key
• Nut
See 10.1
See 35.1
> Change from previous revision
49
AR-5
Serial No. All
10.1 Tie Rod
Part Number 4132688
10
11
6
5
8
7
9
1
12
11
10
3
12
9
8
2
4
Item
1
2
3
4
5
6
7
8
9
10
11
12
Part No.
Qty.
Description
4118210
1
Tie Rod
4121828
4121986
471214
4121829
4121986
471214
322847
446136
4124204
443106
400192
1
1
1
1
1
1
2
2
2
2
2
Ball Joint, Left Hand Thread
• Dust Cover
• Straight Grease Fitting, 1/4-28
Ball Joint, Right Hand Thread
• Dust Cover
• Straight Grease Fitting, 1/4-28
Clamp, Tie Rod
Lockwasher, 5/16 Heavy
Nut, 9/16-18 Slotted Hex
Nut, 5/16-18 Hex
Screw, 5/16-18 x 1-1/2” Hex Head
Serial Numbers/Notes
> Change from previous revision
50
AR-5
Serial No. All
11.1 Remote Engine Oil Cooler
17
18
16
15 16
16
1
12
11
9
8 13
6
2
10
7
4
14
11
5
3
14
Item
>
Part No.
1
450190
2
3
4
5
6
7
8
9
10
11
12
13
14
15
16
17
18
4133238
4133239
4133240
4133241
4133242
4133243
4113986
4133305
4133306
4133307
366526
446136
4134468
4133808
4133296
4133252
361831
452004
Qty.
2
Description
Serial Numbers/Notes
Screw, M8-1.25 x 16 mm Hex Head
1 Kit, Remote Oil Filter
1 • Adapter, Engine Oil Filter
1 • Plug, Engine Oil FIlter
1 • O-Ring
1 • Washer
1 • Head, Engine Oil FIlter
1 Engine Oil Filter
1 Hose, Engine to Filter
1 Hose, Filter to Engine Oil Cooler
1 Hose, Engine Oil Cooler to Engine
2 Clamp, 1/4” to 5/8” Dia Hose
2 Lockwasher, 5/16 Heavy
1 Adapter, Straight
2 Adapter, Straight
1 Engine Oil Cooler
4 Tie, 3 Piece Cooler Mounting
4 Tube, Spacer
4 Flat Washer, 1/4
Included with Engine
Included with Engine
> Change from previous revision
51
AR-5
Serial No. All
12.1 Radiator and Air Cleaner
6
14
13 8
1
17
5
4
4
30
18
12
29
24
19
23
21
25
22
2
27
7
2
10
5
8
2
3
28 31
26
16
2
32
15
11
2
28
24
31
33
35
9
34
20
52
AR-5
Item
>
1
2
3
4
5
6
7
8
9
10
11
12
13
14
15
16
17
18
19
20
21
22
23
24
25
26
27
28
29
30
31
32
33
34
35
Part No.
Qty.
3002195
1
326112
345666
337229
5003447
365398
366526
400188
4138381
4120925
4120932
4120976
4120977
4121020
4134775
4128079
4128083
4133818
4133820
4133821
5003373
4128084
444718
445640
445795
445796
452006
452008
557367
557374
358794
400264
400262
4136164
550863
446140
4133244
366618
452010
4138380
5
1
2
AR
1
2
3
1
1
1
1
1
1
1
1
1
1
1
1
1
1
1
2
2
4
1
7
1
1
4
6
2
1
1
8
1
2
2
AR
Description
Serial Numbers/Notes
Elbow, 1/8 NPF 90°
Clamp, 1-5/16 to 2-1/4” Dia Hose
Clamp, 1/2” P Hose
Clamp, Hose
Tube, Neoprene
Indicator, Air Cleaner
Clamp, 1/4” to 5/8” Dia Hose
Screw, 5/16-18 x 1” Hex Head
Shroud, Rear Frame
Hose, Radiator Inlet
Hose, Radiator Outlet
Hose, Air Cleaner to Engine
Hose, Shroud to Air Cleaner
Bracket, Air Cleaner
Shroud, Fan
Seal, Trim
Air Cleaner
• Cover, Air Cleaner
• Filter, Primary Air Cleaner
• Filter, Safety Air Cleaner
• Vactuator Valve
Bracket, Air Cleaner Mount
Locknut, 5/16-18 Center
Nut, 3/8-16 Steel Wing
Nut, 5/16-18 Spiralock Flange
Nut, 3/8-16 Spiralock Flange
Flat Washer, 5/16
Flat Washer, 3/8
Reserve Tank
Stay, Tank
Flat Washer, 3/8
Screw, 3/8-16 x 1-1/4” Hex Head
Screw, 3/8-16 x 1” Hex Head
Radiator / Hydraulic Oil Cooler
• Radiator Cap
Lockwasher, 3/8
Bracket, Remote Oil Filter
Grommet
Flat Washer, 1/4
Seal, Bulk
Cut to 33”
Cut two 2-1/4” and one 25”
> Change from previous revision
53
AR-5
Serial No. All
13.1 Engine Mounting
10
2
5
6
19
1
22
14
15
17
28
26
27
2
25
10
8
18
2
16
23
10
7
20
9
15
2
11
2
22
10
8
2
18
6
20
13
7
23
9
12
8
18
23
15
23
24
54
4
8
18
2
24
21
2
15
9
19
24
3
AR-5
Item
Part No.
1
>
2
3
4
5
6
7
8
9
10
11
12
13
14
15
16
17
18
19
20
21
22
23
24
25
26
27
28
4118253
4113986
310711
362263
363485
364501
365979
365981
367031
400190
400276
4120309
4120311
4120313
4120315
4133840
4132628
5003460
403740
452006
444718
446142
446154
446160
453013
453017
443110
445795
554988
4135765
453023
444708
Qty.
1
Description
Serial Numbers/Notes
Engine, V2003 MT
1 • Filter, Engine Oil
12 Washer, Isolator
1 Screw, M10-1.25 x 25mm Hex Head
1 Lockwasher, M10 Heavy
1 Temperature Sender
7 Screw, M12-1.25 x 25mm Hex Head
4 Screw, M14-1.5 x 25mm Hex Head
4 Washer, Isolator
8 Screw, 5/16-18 x 1-1/4” Hex Head
4 Screw, 3/8-16 x 3” Hex Head
1 Engine Mount, Right Side Front
1 Engine Mount, Left Side Front
1 Engine Mount, Left Side Rear
1 Engine Mount, Right Side Rear
4 Isolator, Engine
1 Cable, Throttle
1 • Wire Stop
1 • • Screw, #8-32 x 1/2” Sl Hex Hd
1 • • Flat Washer, 5/16
1 • • Locknut, 5/16-18 Center
4 Lockwasher, 3/8 Heavy
7 Lockwasher, 1/2 Heavy
4 Lockwasher, 9/16 Heavy
1 Flatwasher, 7/16
7 Flatwasher, 1/2
4 Nut, 3/8-16 Hex
8 Nut, 5/16-18 Spiralock Flange
1 Pivot, Throttle Cable
1 Stud, M8-1.25
2 Flat Washer, 1/4
1 Locknut, 1/4-20 Center
See 11.1
> Change from previous revision
55
AR-5
Serial No. All
14.1 Pump Mounting and Engine Exhaust
View Rotated 180°
For Clarity
27
25
24
19
31
20
20
23
15 11
21
28
29
30
14
24
25
18
27
13
10
22
26
12
9
8
16
8
7
17
10
2
3
1
6
5
2
56
9
4
AR-5
Item
Part No.
>
>
>
Description
362743
1
O-Ring Seal
7
8
9
10
400264
400286
400410
4118252
4131571
4134634
443118
444762
446142
446154
5
2
2
1
1
1
2
5
5
4
Screw, 3/8-16 x 1-1/4” Hex Head
Screw, 3/8-16 x 2-3/4” Hex Head
Screw, 1/2-13 x 1-3/4” Hex Head
Pump, Traction
Pump, 3 Section Gear
• Seal Kit
Nut, 1/2-13 Hex
Locknut, 3/8-16 Center
Lockwasher, 3/8-16 Heavy
Lockwasher, 1/2 Heavy
11
348856
1
Clamp, Exhaust
12
13
14
15
16
17
362263
363485
445795
4133447
4136522
4119888
4134587
4134583
4134584
4134585
4134586
4128930
4143148
4129251
4129250
4134484
441614
450390
450411
453017
A1103051
3007889
452006
444718
362539
6
6
2
1
1
1
2
1
1
1
1
1
1
2
1
2
2
6
6
2
6
1
4
4
4
Screw, M10-1.25 x 25mm Hex Head
Lockwasher, M10 Heavy
Nut, 5/16-18 Spiralock Flange
Bracket, Upper Tail Pipe
Flange, Pump Drive
Driveshaft
• Cross and Bearing
• Joint and Tube Half
• Joint and Shaft Half
• Plate and Yoke
• Clamp and Yoke
Tail Pipe
Muffler
Spring, Tail Pipe
Bracket, Lower Tail Pipe
Screw, M12-1.25 x 50 mm Hex Head
Carriage Bolt, 5/16-18 x 1”
Washer, M8
Lockwasher, M8
Flat Washer, 1/2
Screw, M8-1.25 x 25mm Hex Head
Sleeve, Insulating
Flat Washer, 5/16
Locknut, 5/16-18 Center
Nut, M8-1.25 Hex
1
2
3
4
5
6
>
Qty.
18
19
20
21
22
23
24
25
26
27
28
29
30
31
Serial Numbers/Notes
See 39.1 and 40.1
Discard hardware included with
clamp, use Items 29 and 30
Traction Pump Side
Engine Side
Engine Side
Traction Pump Side
> Change from previous revision
57
AR-5
Serial No. All
15.1 Fuel and Hydraulic Tanks
10
20
12
24
8
11
A Connect to engine fuel injector overflow.
B Connect to engine fuel pump
4
18
A
16
28
18
15
15
23
14
18
18
17
9
26
1
22
13
30
18
B
27
18
18
18
29
25
19
6
21
19
2
7
19
5
3
58
AR-5
Item
Part No.
1
2
3
4
5
6
7
8
9
10
11
12
13
14
15
16
17
18
19
20
21
22
23
24
25
26
27
28
29
30
Qty.
132647
1
3001279
3002397
339899
3009204
3005871
3005872
3006243
3009347
3006332
3006337
5003374
2721806
554748
554748
361117
361748
554752
366526
403769
403910
404016
445794
445796
446118
400108
800709
4132489
503626
557619
554748
2810702
1
1
1
1
1
1
2
1
1
1
1
1
1
1
3
1
1
6
14
5
5
2
3
5
2
2
1
1
1
1
1
Description
Serial Numbers/Notes
Valve, Shut Off
Switch, Float
Plug, Magnetic
• O-Ring
Fuel Tank
Hydraulic Tank
Shell, Tank Cover
Plate, Tank Mounting
Strainer, Fuel Filler
Breather Filter
Fuel Sender
• Gasket
Cap, Fuel Tank
Fuel Line, 5/16” I.D. Cut to 72 Inches
Fuel Line, 5/16” I.D. Cut to 8 Inches
Bushing, Fuel Tank
Valve, Overflow
Fuel Line, 3/16 I.D. Cut to 70 Inches
Clamp, Hose
Screw, 1/4-20 x 1/2” Hex Flange
Screw, #10-24 x 1/2” Truss Head
Screw, 1/4-20 x 5/8” Truss Head
Nut, 1/4-20 Spiralock Flange
Nut, 3/8-16 Spiralock Flange
Lockwasher, #10 Heavy
Screw, 1/4-20 x 3/4” Hex Head
Screw, 3/8-16 x 1” Hex Flange
Fuel Pump
Engine Fuel Filter
• Element, Fuel Filter
Fuel Line, 5/16” I.D. Cut to 12 Inches
Valve, Inlet
REFERENCE SW-9, See 41.1
REFERENCE R-1, See 41.1
Tank to Fuel Pump
Fuel Filter to Engine
Engine to Tank
REFERENCE M-2, See 41.1
Included wih Engine
Fuel Pump to Fuel Filter
> Change from previous revision
59
AR-5
Serial No. All
16.1 Pump Suction Hydraulics
4
3
1
8
9
5
7
1
2
7
2
1
Item
Part No.
1
2
3
4
5
6
7
8
9
6
Qty.
Description
3008673
5
Clamp, Constant Torque Hose
3008745
340090
4122538
4123066
4130823
339913
3001296
339999
365959
2
1
1
1
1
1
2
1
1
Hose, Gear Pump Suction
Fitting, 24-24 90°
Hose, Charge Pump Suction
Tube, Charge Pump Suction
Tube, Pump Suction
• O-Ring -16
Adapter, Straight Beaded
Fitting, 16-16 Straight
Strainer, Tank Mounted
Serial Numbers/Notes
> Change from previous revision
60
AR-5
Serial No. All
17.1 Oil Cooler Hydraulics
8
5
6
11
1
4
2
9
10
7
3
1
Item
Part No.
1
2
3
4
5
6
7
8
9
10
11
Qty.
Description
339999
2
Fitting, 16-16 Straight
4129037
340077
340123
340039
4123166
4128322
339909
339911
4129042
4129043
4129044
339979
1
1
1
1
1
1
3
1
1
1
1
1
Hose, 4WD Return
Fitting, 16-16 90°
Fitting, 16-16-16 Swivel Run Tee
Fitting, 16-16 45°
Fitting, Check Valve Tee
Tube, Return Hoses to Oil Filter
• O-Ring -6
• O-Ring -10
Hose, Filter to Oil Cooler
Hose, Oil Cooler to Tee
Hose, Oil Cooler to Tank
Fitting, 6-6 Straight
Serial Numbers/Notes
> Change from previous revision
61
AR-5
Serial No. All
18.1 Hydraulic Valves and Filter
1
5
6
4
2
10
3
5
1
6
7
6
5
1
9
1
8
Item
6 5
Part No.
1
2
3
4
5
6
7
8
9
10
Qty.
Description
400258
8
Screw, 3/8-16 x 3/4” Hex Head
409811
4121554
4121552
555771
556419
4124755
4121852
446140
453011
445795
4129069
4129070
4129071
4
1
1
1
1
1
1
8
8
4
1
1
1
Screw, 5/16-18 x 5/8” Thread Cutting
Hydraulic Filter Assembly
• Filter Head
• Filter Element
• Oil Switch
• Visual Indicator
Filter Bracket
Lockwasher, 3/8
Flat Washer, 3/8
Nut, 5/16-18 Spiralock Flange
Lift Valve
Deck Valve
4WD Valve
Serial Numbers/Notes
REFERENCE SW-1, See 41.1
See 36.1
See 33.1
See 37.1
> Change from previous revision
62
AR-5
Serial No. All
19.1 Deck Hydraulics
4
10
6
13
10
4
11
4
1
4
4
2
2
11
5
9
5
4
12
4
3
4
4
Item
1
2
3
4
5
6
7
8
9
10
11
12
13
Part No.
339985
339989
340009
340070
340030
4129015
4137588
4137382
4137589
4129595
4137383
4129597
REF
7
8
4
Qty.
2
4
Description
Serial Numbers/Notes
Fitting, 8-10 Straight
3 Fitting, 10-10 Straight
1 Fitting, 10-10 Straight
11 Fitting, 10-10 90°
2 Fitting, 8-10 45°
2 Hose, Gear Pump to Deck Valve
1 Hose, LH Front Motor to Deck Valve
1 Hose, Front Motor to Front Motor
1 Hose, RH Front Motor to Deck Valve
2 Hose, Rear Motor to Deck Valve
2 Hose, Center Motor to Rear Motor
1 Hose, Deck Valve to Return Tube
1 Return Tube
See 17.1
> Change from previous revision
63
AR-5
Serial No. All
20.1 Traction Hydraulics
20
3
7
14
1
21
4
3
23
1
1
6
19
15
2
13
19
11
5
4
8
18
21
1
10
24
12
1
22
26
25
9
28
29
27
16
29
29
17
29
22
28
9
27
64
AR-5
Item
1
2
3
4
5
6
7
8
9
10
11
12
13
14
15
16
17
18
19
20
21
22
23
24
25
26
27
28
29
Part No.
Qty.
Description
339994
5
Adapter, 12-12 Straight Fitting
4129035
339993
4128977
4134921
4129036
339979
340122
339989
4128320
4128318
4128317
4128319
4128324
4128325
4137625
4137607
4137608
4128967
339996
REF
REF
REF
REF
340338
4137623
4137607
4137608
340377
340070
340033
1
2
2
1
1
2
1
2
1
1
1
1
1
1
1
1
1
1
2
1
2
2
1
1
1
1
1
2
2
4
Hose, 4WD Valve to Traction Pump
Adapter, 12-10 Straight Fitting
Hose, Front Tube to Rear Tube
Tube, Drive Retur
Hose, 4WD Valve to Traction Pump
Adapter, 6-6 Straight Fitting
Adapter, 12-12-12 Swivel Run Tee
Adapter, 10-10 Straight FItting
Tube, Upper LH Front Wheel Motor
Tube, Lower RH Front Wheel Motor
Tube, Lower LH Front Wheel Motor
Tube, Upper RH Front Wheel Motor
Tube, Rear RH 4WD Tube
Tube, Rear LH 4WD Tube
Hose Bundle, Left Rear Motor
• Hose, 4WD Valve to Wheel Motor
• Hose, 4WD Valve to Wheel Motor
Adapter, 12-6 Reducer
Adapter, 12-16 Straight Fitting
4WD Valve
Front Wheel Motor
Rear Wheel Motor
Pump, Traction
Adapter, 12-12-12 Union Tee
Hose Bundle, Right Rear Motor
• Hose, 4WD Valve to Wheel Motor
• Hose, 4WD Valve to Wheel Motor
Adapter, 10-10 90° Swivel Fitting
Adapter, 10-10 90° Fitting
Adapter, 10-10 45° Fitting
Serial Numbers/Notes
4WD Valve Port I
4WD Valve Port G
4WD Valve Port A
4WD Valve Port C
Includes drain hose, See 23.1
4WD Valve Port D, Motor Port B
4WD Valve Port E, Motor Port A
See 18.1
See 7.1
See 9.1
See 14.1
Includes drain hose, See 23.1
4WD Valve Port F, Motor Port B
4WD Valve Port B, Motor Port A
> Change from previous revision
65
AR-5
Serial No. All
21.1 Front Lift Hydraulics
7
4
1
2
6
2
2
3
5
2
4
11
4
9
8
1
5
4
1
10
3
5
Item
1
2
3
4
5
6
7
8
9
10
11
Part No.
Qty.
Description
3000953
3
Disk, Orifice
339979
340026
340061
REF
4129017
4129018
4129019
4129020
4129021
4129022
6
2
4
3
1
1
1
1
1
1
Fitting, 6-6 Straight
Fitting, 6-6 45°
Fitting, 6-6 90°
Lift Cylinder
Hose, Lift Valve to RH Front Cylinder
Hose, Lift Valve to RH Front Cylinder
Hose, Lift Valve to Center Cylinder
Hose, Lift Valve to Center Cylinder
Hose, Lift Valve to LH Front Cylinder
Hose, Lift Valve to LH Front Cylinder
Serial Numbers/Notes
See 28.1
Lift Valve Port #10, Base Port
Lift Valve Port #4, Rod Port
Lift Valve Port #9, Base Port
Lift Valve Port #3, Rod Port
Lift Valve Port #6, Base Port
Lift Valve Port #5, Rod Port
> Change from previous revision
66
AR-5
Serial No. All
22.1 Rear Lift Hydraulics
4
8
1
4
7
10
6
9
12
4
1
4
2
6
11
2
5
Item
1
2
3
4
5
6
7
8
9
10
11
12
3
Part No.
Qty.
Description
3000953
2
Disk, Orifice
339979
339985
340061
340376
REF
4129023
4129024
4129025
4129026
4129027
REF
4
1
4
1
2
1
1
1
1
1
1
Fitting, 6-6 Straight
Fitting, 8-10 Straight
Fitting, 6-6 90°
Fitting, 8-8 90° Swivel
Lift Cylinder
Hose, Lift Valve to RH Rear Cylinder
Hose, Lift Valve to RH Rear Cylinder
Hose, Lift Valve to LH Rear Cylinder
Hose, Lift Valve to LH Rear Cylinder
Hose, Lift Valve to Return Tube
Return Tube
Serial Numbers/Notes
See 29.1
Lift Valve Port #8, Base Port
Lift Valve Port #2, Rod Port
Lift Valve Port #1, Rod Port
Lift Valve Port #7, Base Port
Lift Valve Port T
See 17.1
> Change from previous revision
67
AR-5
Serial No. All
23.1 Wheel Motor Case Drains
8
8
2
12
8
13
1
13
10
11
10
9
5
14
3
7
4
6
Item
1
2
3
4
5
6
7
8
9
10
11
12
13
14
Part No.
Qty.
Description
Serial Numbers/Notes
4137634
1
Hose, LH Rear Motor to Drain Tube
Included in hose bundle 4137625
4137624
4129040
4129041
3008745
339972
340007
340059
340119
340375
361689
4113601
339909
3008673
339998
1
1
1
1
1
1
2
1
2
1
1
5
2
1
Hose, RH Rear Motor to Drain Tube
Hose, RH Front Motor to Drain Tube
Hose, LH Front Motor to Drain Tube
Hose, Drain Tube
Fitting, 4-4 Staight
Fitting, 6-4 Straight
Fitting, 6-4 90°
Fitting, 6-6-6 Swivel Run Tee
Fitting, 6-6 90° Swivel
Fitting, Straight Barb
Tube, Drain
• O-Ring -6
Clamp, Constant Torque Hose
Fitting, 16-12 Straight
Included in hose bundle 4137623
> Change from previous revision
68
AR-5
Serial No. All
24.1 Deck Motor Case Drain
5
3
10
4
6
2
5
7
10
5
10
9
1
10
5
5
1
8
10
Item
1
2
3
4
5
6
7
8
9
10
Part No.
Qty.
Description
4137561
2
Hose, Front Motor to Front Motor
4137562
4129600
4129603
339977
REF
340119
340143
340375
REF
1
1
1
5
1
2
1
1
5
Hose, Front Motors to Drain Tube
Hose, Rear Motors to Drain Tube
Hose, Rear Motor to Rear Motor
Fitting, 6-4 Staight
Tube, Drain
Fitting, 6-6-6 Swivel Run Tee
Fitting, 6-6-6 Swivel Branch Tee
Fitting, 6-6 90° Swivel
Deck Motor
Serial Numbers/Notes
See 23.1
See 30.1
> Change from previous revision
69
AR-5
Serial No. All
25.1 Steering Hydraulics
To Return Tube
(3)
From Pump
To Lift Valve
Out
(2)
(1)
Aux
To Steering Cylinder
(4)
In
LT
RT
To Steering Cylinder
(5)
6
2
7
3
1
4
5
7
Item
Part No.
1
2
3
4
5
6
7
Qty.
Description
Serial Numbers/Notes
4129028
1
Hose, Lift Valve to Steering Valve
Lift Valve Port T, Steering Valve Aux
4129029
4129030
4129031
4129032
REF
339985
1
1
1
1
1
2
Hose, Gear Pump to Steering Valve
Hose, Steering Valve to Return Tube
Hose, Steering Valve to Cylinder
Hose, Steering Valve to Cylinder
Return Tube
Fitting, 8-10 Straight
Steering Valve IN
Steering Valve Out
Steering Valve LH, Base Port
Steering Valve RH, Rod Port
> Change from previous revision
70
AR-5
Serial No. All
26.1 Hydraulic Clamps
7
6
6
9
10
5
4
2
1
3
Steering Hoses
Item
1
2
3
4
5
6
7
8
9
10
Part No.
Qty.
Description
1004541
1
Bracket, Hose Retaining
403770
445795
4131862
4131864
400196
364016
445796
446136
452006
2
2
2
2
2
2
2
2
2
Screw, 5/16-18 x 3/4” Flange Head
Nut, 5/16-18 Spiralock Flange
Clamp, Two Hose
Plate, Clamp
Screw, 5/16-18 x 2” Hex Head
Clamp, 1-1/4” Dia. Hose
Nut, 3/8-16 Spiralock Flange
Lockwasher, 5/16 Heavy
Flat Washer, 5/16
Serial Numbers/Notes
> Change from previous revision
71
AR-5
Serial No. All
27.1 Electrical Harness
20
19
15
17
7
Part of
14
18
10
16
10
1
12
9
16
5
8
13
6
4
14
H
3
J
C
11
F
K
L
G
D
M
E
2
A
B
72
A - Headlight
B - Lift Arm Limit Switch
C - Fuel Level Sender/ Instrument Panel
D - Seat Switch
E - Oil Float Switch
F - Glow Plugs
G - Fuel Solenoid
H - Charge Filter Switch
J - Engine Oil Pressure Switch
K - Temperature Sender
L - 4WD Valve (4WD Only)
M - Reel Valve
AR-5
Item
Part No.
1
2
3
4
5
6
7
8
9
10
11
12
13
14
15
16
17
18
19
20
Qty.
Description
Serial Numbers/Notes
2810424
1
Cable, Engine Ground
Engine Mount to Frame
4122840
4123183
4122841
5003282
367631
366931
441668
444708
445796
444310
473142
2810213
3007777
4128262
4126082
446118
403910
361439
3009251
400258
2
1
1
2
4
1
4
4
2
4
1
1
1
1
2
4
4
1
1
2
Headlight
• Bulb
Controller
• Fuse, 20 Amp
Spacer
Battery
Carriage Bolt, 1/4-20 x 1-1/4”
Locknut, 1/4-20 Center
Nut, 3/8-16 Spiralock Flange
Nut, #10-24 Hex
Cable Tie
Cable, Negative Battery
Cable, Positive Battery
Body Wire Harness
• Relay-SPDT With Diode
Lockwasher, #10
Screw, #10-24 x 1/2” Truss Head
Circuit Breaker, 12V 50A
Tab, Harness
Screw, 3/8-16 x 3/4” Hex Head
REFERENCE L-1 & L-2, See 41.1
REFERENCE U-6, See 41.1
REFERENCE F-1 & F-2, See 41.1
REFERENCE B-1, See 41.1
Battery to Muffler Bracket
Battery to Starter
REFERENCE K-1 & K-2, See 41.1
REFERENCE CB-1, See 41.1
> Change from previous revision
73
AR-5
Serial No. All
28.1 Front Lift Arms
27
18
25
26
18
29
21 9
20
4
5
11
18
20
3
28
19
4
10
11
12
9
27
25
18
7
4
4
11
9
18
6
10
9
3
11
12
28
7
5
17
9
8
1 26
17
27
1
26
25 18
23
9
13
24
16
10
23
29
2
22
5
15
4
14
4
11
12
74
17
11
3
AR-5
Item
1
2
3
4
5
6
7
8
9
10
11
12
13
14
15
16
17
18
19
20
21
22
23
24
25
26
27
28
29
Part No.
Qty.
Description
548905
9
Screw, 3/8-16 x 1” Serrated Flange
REF
4125547
4127480
471214
4125919
3010489
471214
4126447
4126450
4127192
4127556
4131849
444752
452016
310452
460068
4131963
4139613
3010489
471221
4139612
3010489
471221
4137128
4137138
471214
471221
445783
4134575
3
3
2
1
1
2
1
6
3
6
3
6
6
6
6
3
6
1
2
1
1
2
1
3
1
3
3
9
2
Deck Assembly
Front Deck Pivot
• Bushing
• Straight Grease Fitting
Center Lift Arm
• Bushing
• Straight Grease Fitting
Pin, Arm
Pin, Cylinder
Plastic Washer
Nut, 1-1/4-7 Slotted Hex
Shoulder Bolt, 3/4 x 5/8-11 x 2-1/8”
Locknut, 5/8-11 Center
Flat Washer, 5/8
Flat Washer
Cotter Pin, 1/4 x 2”
Spacer, Cylinder
Right Front Lift Arm
• Bushing
• 90° Grease Fitting
Left Front Lift Arm
• Bushing
• 90° Grease Fitting
Cylinder, Lift
• Seal Kit
Straight Grease Fitting
90° Grease Fitting
Nut, 3/8-16 Whizlock Flange
Pad, Step
Serial Numbers/Notes
See 30.1
> Change from previous revision
75
AR-5
Serial No. All
29.1 Rear Lift Arms
16
1
23
25
2 24
17
19
7
19
3
27
15
18
4
14
8 14
21
20
8
13
26
22
28
4
17
23
25
16
1
24
19
20
19
4
4
18
15
2 5
14
8
27
8 14
21
22
13
11
10
6
9
12
76
3
7
AR-5
Item
Part No.
Qty.
Description
4131422
2
Pin, Rear Cylinder
24
25
4131420
4126450
445783
548905
4123167
548907
4127192
452016
310452
4131849
444752
4125180
4127480
471214
4131965
4131964
4132846
3010489
471221
4127556
460076
4137128
4137138
471214
471221
2
2
6
4
2
2
4
4
4
4
4
2
2
1
2
2
2
2
1
2
3
3
1
2
2
Pin, Rear Lift Arm
Pin, Cylinder
Nut, 3/8-16 Whizlock Flange
Screw, 3/8-16 x 1” Serrated Flange
Deck Assembly
Screw, 3/8-16 x 1/1/4” Ser Flange
Washer, Plastic
Flat Washer, 5/8”
Flat Washer, 3/4”
Shoulder Bolt, 3/4 x 5/8-11 x 2-1/8
Locknut, 5/8-11 Center
Rear Deck Pivot
• Bushing
• Straight Grease Fitting
Spacer, Cylinder
Spacer, Cylinder
Rear Lift Arm
• Bushing
• 90° Grease Fitting
Nut, 1-1/4-7 Slotted Hex
Cotter Pin, 1/4 x 3”
Cylinder, Lift
• Seal Kit
Straight Grease Fitting
90° Grease Fitting
26
4134626
AR
27
4136022
2
Deck Stop
28
4137716
AR
Deck Stop
1
2
3
4
5
6
7
8
9
10
11
12
13
14
15
16
17
18
19
20
21
22
23
Pad, Deck Stop
Serial Numbers/Notes
See 30.1
Add pads as required to prevent
deck contacting engine oil pan.
Add as required to prevent deck
contacting engine oil pan.
> Change from previous revision
77
AR-5
Serial No. All
30.1 Deck Housing and Caster Wheels
27
14
16
29
18
23
30
22
21
25
7
26
9
13
20
28
1
6
9
9
5
17
8
3
19
10
17
24
15
2
4
12
78
11
AR-5
Item
1
2
3
4
5
6
7
8
9
10
10
11
12
13
14
15
16
17
18
19
20
21
22
23
24
25
26
27
28
29
30
Part No.
Qty.
3004894
2
3007764
3008388
400410
400426
4117807
4123171
4124066
4124076
4124087
4137186
4127296
4131904
440124
443110
443118
446142
452012
453011
557523
PJH1054
4137659
4132329
445783
446154
365948
4133007
4118247
4136829
REF
455043
4139787
1
1
1
2
3
1
2
7
1
1
2
2
6
6
2
6
4
6
1
27
1
1
3
2
3
3
1
1
1
3
6
Description
Serial Numbers/Notes
Pin, 7/16 x 1-3/4” Snap Ring
Washer, Blade
Adapter, Blade
Screw, 1/2-13 x 1-3/4” Hex Head
Screw, 1/2-13 x 5” Hex Head
Spacer
Deck Housing
Caster Wheel Yoke
Flat Washer, 1”
Blade, 22-3/8” Mulching
Blade, 22” High Lift
Spacer, Yoke
Caster Wheel, 6-1/4 x 3
Carriage Bolt, 3/8-16 x 1-3/4”
Nut, 3/8-16 Hex
Nut, 1/2-13 Hex
Lockwasher, 3/8 Heavy
Flat Washer, 1/2
Flat Washer, 3/8
Key, 1/4 Square x 1”
Spacer, Cutting Height
Chute, Rear Discharge
Cover, Mulching
Nut, 3/8-16 Whizlock Flange
Lockwasher, 1/2 Heavy
Pin, 1/4 x1-3/4” Snap Ring
Sleeve, Cutting Height
Motor, Deck
• Seal Kit
Deck Frame
Washer, Special
Nut, Push On
Standard Blade
Optional High Lift Blade
See 31.1
> Change from previous revision
79
AR-5
Serial No. All
31.1 Deck Frame
3
27 11
30
12
13
2
29
28
9
24
10
23
28
26
5
8
5
23
14
23
6
7
12
5
11
24
25
4
2
3
31
6
1
5
16
28
15
26
28
10
29
18
20
19
17 / 21
22
18
15
19
20
16
80
27
AR-5
Item
1
2
3
4
4
5
6
7
8
9
10
11
12
13
14
15
16
17
18
19
20
21
22
23
24
25
26
27
28
29
30
31
Part No.
Qty.
400404
4
400408
400418
4137665
4137674
4127478
471214
4124423
4124425
4130647
4137534
445771
446152
4129614
4129615
412017
316938
4123031
503378
367029
3010210
4122993
4124015
800379
4124129
4124395
400422
444758
452012
2198153
4137520
4137521
4
4
1
1
4
2
1
1
1
2
2
2
1
1
2
2
1
2
1
2
1
1
12
2
1
2
2
2
2
1
1
Description
Serial Numbers/Notes
Screw, 1/2-13 x 1” Hex Head
Screw, 1/2-13 x 1-1/2” Hex Head
Screw, 1/2-13 x 3” Hex Head
Deck Frame
Deck Frame
• Flanged Bushing
• Straight Grease FItting
LH Rear Cutting Height Bracket
RH Rear Cutting Height Bracket
Scraper, Roller
Sleeve, Roller
Nut, 1/2-13 Hex Nylon Insert
Lockwasher, 1/2
RH Roller Bracket
LH Roller Bracket
Screw, 5/16-18 x 3/4” Square Head
Roll Pin, 3/16 x 1”
Roller
• Bearing Cup and Cone
• Locknut, 3/4-16 Hex Jam
• Seal
• Tube, Roller
• Shaft, Roller
Nut, 1/2-13 Spiralock Flange
Spacer
Front Cutting Height Bracket
Screw, 1/2-13 x 4” Hex Head
Locknut, 1/2-13 Center
Flat Washer, 1/2
Roller, 3”
Bracket, Right Side Skid Roller
Bracket, Left Side Skid Roller
Front Decks
Rear Decks
> Change from previous revision
81
AR-5
Serial No. All
32.1 Brake Assemblies
9
6
7
8
6
7
5
4
1
2
3
Item
Part No.
Qty.
Description
1
340603
2
Bracket, Brake Mounting
2
3
4
5
6
7
8
9
503308
2500722
590259
549441
502517
503296
549443
554579
503295
590260
1
1
4
2
1
2
4
4
2
4
Disk Brake, R.H.
Disk Brake, L.H.
• Nut, 3/8-24
• V-Plate
• Cam Lever
• Stud Plate with Lining
• Spring
• Spacer, Brake
• Rib Plate with Lining
• Screw, 3/8-24 x 2-1/4”
Serial Numbers/Notes
> Change from previous revision
82
AR-5
Serial No. All
33.1 Deck Valve
Part Number 4129070
5
5
6
4
3
2
1
Item
Part No.
1
2
3
4
5
6
Qty.
Description
4134537
2
Vented Logic Element Valve
5003579
4134538
5003578
4134539
5003578
4134532
4134541
5003579
4134542
4134543
1
1
1
1
1
2
2
1
1
1
• Seal Kit
Relief Valve
• Seal Kit
Solenoid Valve
• Seal Kit
Coil
Check Valve
• Seal Kit
Load Shuttle Valve
Seal Kit
Serial Numbers/Notes
Reference K-7, See 41.1
> Change from previous revision
83
AR-5
Serial No. All
34.1 Front Wheel Motor
Part Number 4118254
21
17
19
14
18
13
20
10
16
15 12
8
11
3
5
6
7
9
2
4
◆ Included In Seal Kit 557651
❍ Included In Seal Kit 5002111
1
Item
◆
◆
1
2
3
4
5
6
7
8
9
10
11
12
13
14
15
16
17
18
19
20
21
Part No.
Qty.
Description
558066
8
Screw, Torx
5002110
558063
557624
557623
558064
4134516
4134517
557632
557631
557633
557637
557634
557635
557636
557650
4134522
557639
557642
557640
5000318
1
1
1
1
1
1
1
1
1
1
1
1
1
2
3
1
2
2
2
1
Front Retainer
Shaft and Bearing Kit
Nut, Hex
Key
Bearing Housing
Drive
Geroler
Drive, Valve
Plate, Valve
Valve
Balance Ring and Pins
Seal, Inner Face
Seal, Outer Face
Spring
Bolt, 5-3/4”
Housing, Valve
• Check Plug Assembly
• Spring
• Ball, Steel
Bolt
Serial Numbers/Notes
> Change from previous revision
84
AR-5
Serial No. All
35.1 Rear Wheel Motor
Part Number 4118255
2
5
6
3
8
1
4
11
2
2
2
9
7
Item
1
2
3
4
5
6
7
8
9
10
11
Part No.
Qty.
Description
A
1
Seal Exclusion
A
A
A
4134525
554780
554779
A
A
A
4134526
4
1
1
1
1
1
1
1
1
4
Seal, 3” I.D.
Back Up Ring
Shaft Seal
Shaft and Bearing Kit
Key
Hex Nut
Shaft Face Seal
Inner Face Seal
Outer Face Seal
Bolt
4134527
1
Seal Kit
10
Serial Numbers/Notes
Includes Items Marked A
> Change from previous revision
85
AR-5
Serial No. All
36.1 Lift Valve
Part Number 4129069
2
3
4
5
1
Item
Part No.
1
2
3
4
5
Qty.
Description
4134528
1
Check Valve
5003579
4134529
5003579
4136067
5003578
4134530
4142009
1
1
1
1
4
1
1
• Seal Kit
Solenoid Valve
• Seal Kit
Solenoid Valve
• Seal Kit
Coil
Coil
Serial Numbers/Notes
REFERENCE K-5, See 41.1
REFERENCE K-6, See 41.1
> Change from previous revision
86
AR-5
Serial No. All
37.1 4WD Valve
Part Number 4129071
1
1
2
Item
Part No.
Qty.
Description
1
4134541
2
Check Valve
2
5003579
4134535
5003579
1
1
1
• Seal Kit
Pilot Operated Internal Vent Valve
• Seal Kit
Serial Numbers/Notes
> Change from previous revision
87
AR-5
Serial No. All
38.1 Steering Valve
Part Number 4138567
1
38
39
2
30
3
5
8
11
16
9
4
4
12
17
4
29
13
18
14
4
19
10
20
15
21
11
22
31
32
11
23
24
34
25
33
26
27
28
37
35
36
6
7
88
AR-5
Item
Part No.
1
2
3
4
5
6
7
8
9
10
11
12
13
14
15
16
17
18
19
20
21
22
23
24
25
26
27
28
29
30
31
32
33
34
35
36
37
38
39
Qty.
Description
443108
4
N/S
C
C
C
443828
N/S
N/S
B
N/S
A and E
503398
503398
B
N/S
N/S
N/S
A
C
A
A
A
A
A
A
A
554855
554856
C
N/S
554857
N/S
D
D
D
D
D
4139094
557734
1
1
4
4
1
4
1
3
1
9
1
1
3
1
1
1
11
1
1
1
1
1
1
1
1
1
1
1
1
1
1
1
1
1
1
1
1
1
Serial Numbers/Notes
Locknut, 5/16-18 Center
Port Cover
Seal, O-Ring
Seal, O-Ring
Seal, O-Ring
Nut, 5/8-18 Hex Jam
Special Bolt
Port Manifold
Spring, Port Side
Hex Drive
Needle Roller
Valve Ring
Valve Plate
Spring, Shaft Side
Isolation Manifold
Drive Link
Metering Ring
Screw, Socket Head
Seal, Commutator
Commutator Cover
Commutator Ring
Commutator
Spacer
Rotor
Stator
Drive Plate
Spacer
Thrust Bearing
Face Seal
Ball, 9/32”
Seal, Spacer
Upper Cover Plate
Shaft
Retaining Ring
Bushing
Seal
Jacket
Relief Valve Cartridge
Dampening Cap
Service Kits
A
B
C
D
E
5003220
502924
557738
5003219
502925
1
1
1
1
1
Metering Assembly Kit
Spring Kit
Seal Kit
Jacket Tube Kit
Needle Roller Kit
> Change from previous revision
89
AR-5
Serial No. All
39.1 Traction Pump (Front Half)
Part Number 4118252
21
22
2
1
3
18
19
20
4
5
15
6
17
21
22
23
16
10
13
12
11
9
13
7
9
14
163
8
8
90
AR-5
Item
●
●
●
●
●
●
1
2
3
4
5
6
7
8
9
10
11
12
13
14
15
16
17
18
19
20
21
22
23
Part No.
Qty.
Description
4134588
1
Shim Kit
N/S
4134589
4134590
4134591
4134592
4134594
4134595
4134596
4134597
4134606
4134607
4134608
5003433
NS
4134609
4134610
4134612
N/S
N/S
5003434
4134613
4134614
1
1
1
2
1
1
2
2
1
1
1
2
1
1
1
1
1
1
1
2
1
1
O-Ring
Charge Relief Spring
Charge Relief Valve
O-Ring
Needle Bearing
Roller Bearing
Retaining Ring
Ring
Variable Swashplate
• Pin
• Pin
Journal Bearing
Shaft Seal
Front Cover Gasket
Pump Shaft
Valve Plate
Bypass Valve
• Backup Ring
• O-Ring
Relief Valve
• O-Ring
Cylinder Block Kit
5003034
1
Seal Kit
Serial Numbers/Notes
Includes all Items marked ●
> Change from previous revision
91
AR-5
Serial No. All
40.1 Traction Pump (Rear Half)
Part Number 4118252 (Cont)
11
10
4
3
6
1
7
2
8
6
15
17
9
12
1
16
14
10
13
5
92
11
AR-5
Item
●
●
●
●
●
●
●
●
●
●
1
2
3
4
5
6
7
8
9
10
11
12
13
14
15
16
17
Part No.
Qty.
Description
4134615
1
O-Ring
4134616
NS
NS
4134617
4134618
4134619
NS
4134620
NS
4134621
4134622
NS
NS
4134623
NS
NS
1
1
1
1
1
1
1
1
2
2
1
1
1
1
1
1
O-Ring
O-Ring
Temper Load Ring
Neutral Return Spring
Piston Ring Kit
Gerotor
Suction FIlter Adapter Seal
O-Ring
Servo Cover Gasket
O-Ring
Spool Assembly
• O-Ring
• Backup Ring
Sleeve Assembly
• O-Ring
• Backup Ring
5003034
1
Seal Kit
Serial Numbers/Notes
Includes all Items marked ●
> Change from previous revision
93
AR-5
Serial No. All
41.1 Electrical Schematic
R
R-2
S
DG
DG
Og
LB/wh
Bn/Ye
DB
Gy/Rd
Tn/Bk
Pu/Gn
Og/Bk
Pk/Bu
Og/Wh
Ye/Bu
Og/Ye
Rd
A B C DE F G H J K LM N P
U-1
G
B
Bk
L
LB/Tn
DG
+
–
U-3
Og/Wh
Bk
L-6
LB/Tn
L
DB
R-3
S
SW-13
L-5
L-3
Bk
G
Og/Wh
I
Og/Wh
U-2
L-4
Tn/Bk
Pu/Gn
Og/Wh
Bk
Tn
Bk
LB/Tn
Ye
DB
L-1
LB/Tn
Og/Bk
L-2
Bk
LB/Tn
2 3
SW-3
Og
Og/Wh
2
3
SW-6
Lb/Bk
K-1
Og/Bu
87A
LB/wh
30
87
86
Lb/Bk
85
CB-1
Gy/Rd
Og/Bu
K-2
Og/Wh
Ye
Rd
A
Og/Bu 30
I
L
B
U-7
87A
87
Rd
Rd
Bn/Ye
Pu/Wh F
S
RD B
M-1
Rd
Rd
Og/Ye
B
Rd
85
Wh
Rd
SW-2
86
D Ye/Bu
B-1
C Pk/Bu
+
94
–
Bk
R-3
A B C DE F G H J K LM N P
A
Og/Pk
Og/Pk C
NC
NC
NO
DG/Rd
DB/Ye
2-4
2-3
Glow Plug Light
Hyd Filter Pressure Light
Start Relay
Glow Plug Relay
LB/wh
Gy/Rd
Pu/Gn
Tn/Bk
2-5
2-8
2-11
Gy/Og
Tn/Gn
Tn/Bu
2-6
3-9
Hyd Filter Pressure
3-11
Mow Solenoid
Joystick Active
3-8
SW-1
DB/Rd
1-3
1-6
Bk
Grd-1
SW-9
Gy/Wh
Lower
Raise
NO
2-2
DB/Ye
Hyd Level
1-1
Gy/Wh
Lower Solenoid
Raise Solenoid
P
G
Bk
Tn/Bu 1
Tn/Gn 1
Gy/Og
1
K-6
Og/Pk C
SW-11
Gy/Ye
1-11 Raise
1-12 Lower
DG/Rd
DB/Rd
1-10 Mow SW
TCS
1-9
Seat SW
Brake SW
Gy/Ye
1-8
Og
Pu
H
Wh
LG/Ye
3-1
L-7
2-7
Wh
Pk/Bk
SW-4
Gy/Bk
K-5
Og/Pk
SW-10
1-7
Bn/Rd
Fuel Pull
Fuel Hold
Pk/Bk
Horn 3-10
Og/Wh
Neutral SW
1-2
Bn/Wh
Pu
A
SW-8
Engine Oil
Select 4
Select 3
Select 2
DG
B
3-12 Starter
2-12 Water Temp
2-1
4-4
4-3
4-2
U-6
Bn/Ye
Bn/Rd
DB
Og/Ye
Pu/Ye
M-2
Og/Pk
B
SW-7
Bn/Wh
Hyd Level Light 2-9
3-4
SW-5
U-4
Og/Pk
Og/Pk
Select 1
Key-S
Lights
Og/Wh
Og/Wh
2 Bk
2 Bk
2 Bk
3
U-5
Bk
Og
1-5
Pk/Bu
Key-GP
Key-I
Switches
4-1
1-4
Ye/Bu
3-5
Og/Bk
LB/wh
3-2
Og/Ye
F1
3-3
Og/Wh
DG
3-7
Rd
F2
Pk/Bk
Bn/Ye
3-6
Rd
Battery
Gy/Rd
DB
Pu/Gn
Tn/Bk
Og/Bk
Og/Wh
Pk/Bu
Ye/Bu
Og/Ye
+
Rd
Gauges
–
1
4
2
1
K-3
2
AR-5
K-7
Bk
Bk
K-4
Bk
R
95
AR-5
Item
Reference
Illustration
B-1
CB-1
F-1
F-2
K-1
K-2
K-3
K-4
K-5
K-6
K-7
L-1
L-2
L-3
L-4
L-5
L-6
L-7
M1
M2
R-1
R-2
R-3
SW-1
See 27.1
See 27.1
See 27.1
See 27.1
See 27.1
See 27.1
Not Shown
Not Shown
See 36.1
See 36.1
See 33.1
See 27.1
See 27.1
See 4.1
See 4.1
See 4.1
See 4.1
See 4.1
Not Shown
See 15.1
See 15.1
See 13.1
Not Shown
See 18.1
Part
Number
366931
361439
5003282
5003282
4126082
4126082
4134270
4134530
4142009
4134532
4123183
4123183
N/S
N/S
N/S
N/S
366751
556988
4132489
3006337
364501
556996
556419
Description
Battery
50 Amp Circuit Breaker (Alternator)
20 Amp Fuse (Ignition Circuit)
20 Amp Fuse (Lights)
Glow Plug Relay
Starter Relay
Cruise Control Magnet (Option)
Fuel Solenoid
Raise Solenoid Coil
Lower Solenoid Coil
Mow Coil
Left Headlight Bulb
Right Headlight Bulb
Alternator Light
Glow Plug Light
Engine Oil Pressure Light
Hydraulic Filter Pressure Light
Hydraulic Level Light
Starter Motor
Fuel Pump
Fuel Sender
Temperature Sender
Glow Plugs
Hydraulic Filter Pressure Switch
SW-2
See 4.1
4128888
Ignition Switch
SW-3
SW-4
SW-5
SW-6
SW-7
SW-8
SW-9
SW-10
SW-10
SW-11
SW-12
SW-13
See 4.1
Not Shown
See 4.1
See 4.1
See 5.1
See 6.1
See 15.1
See 3.1
See 3.2
See 4.1
See 4.1
Not Shown
4130132
Light Switch
Cruise Control Switch (Option)
Horn Switch
Traction Control System Switch
Neutral Proximity Switch
Parking Brake Proximity Switch
Hydraulic Oil Level Switch
Seat Switch
Seat Switch
Mow Switch
Joystick
Engine Oil Pressure Switch
96
4130133
4137524
4125831
4125831
3001279
554390
4139450
2721505
1004290
554018
Serial Numbers/Notes
Included in Controller
Included in Controller
Included with Engine
Included in 4130148
Included in 4130148
Included in 4130149
Included in 4130149
Included in Engine
Included in Engine
OFF-None
Run - A+B
GP - A+B+D
Start - A+B+C+D
68080 - 1601 ~ 2156
68080 - 2157 and Up
Included in Engine
AR-5
Item
U-1
U-2
U-3
U-4
U-5
U-6
U-7
Reference
Illustration
See 4.1
See 4.1
See 4.1
See 4.1
Not Shown
See 27.1
Not Shown
Part
Number
3005121
365943
4129683
366670
4122841
5000938
Description
Temperature Gauge
Fuel Gauge
Hour Meter
Horn
Cruise Control Module (Option)
Controller
Alternator
Serial Numbers/Notes
Included in Engine
97
AR-5
Serial No. All
42.1 Hydraulic Schematic
B
Tow
Valve
3000
RPM
A
B
3625 psi
2.81 ci
.88 ci
5.47 ci
.88 ci
.5 ci
3625 psi
A
Drain
.031
RR Deck
Motor
Gear
Pump
C
D
E
Supply
.028
Traction
Pump
.87ci
285 psi
Displacement
Control
R1
M1
G1
P1
.87ci
2600 psi
Deck
Valve
LR Deck
Motor
P2
R2
T
M2
G2
LF Deck
Motor
.87ci
F
.87ci
G
C Deck
Motor
.87ci
10
Micron
25 psi
Crack
Bypass
Return
Filter
RF Deck
Motor
100
Mesh
Screen
30 psi
Crack
Bypass
98
Oil
Cooler
AR-5
A
B
A
H
D
I
24.0 ci
Rear
Wheel
Motors
Front
Wheel
Motors
30.0 ci
E
.050
G
C
D
E
F
24.0 ci
30.0 ci
B
4WD Valve
C
Lift
Valve
C1
C2
C3
C4
C5
P
.040
Left
Front
Cylinder
.040
C6
C10
C9
C8
C7
T
Right
Front
Cylinder
.040
Center
Front
Cylinder
.040
Right
Rear
Cylinder
.040
Left
Rear
Cylinder
Steering
Unit
LT
Out
G
Aux
In
1740 psi
F
4.13 ci
RT
99
AR-5
Serial No. All
43.1 O-Ring Chart
W
X
W-X
O-Ring Face
Seal Size
W-X
W
O-Ring Boss
Dash Size
O-Ring Face
Seal Size
Straight Adapter
W
X
O-Ring Face
Seal Size
X
Y
O-Ring Not
O-Ring Face Needed
Seal Size
O-Ring Not
O-Ring Face Needed
Seal Size
Swivel Branch Tee
W
X
X
W-X-Y
O-Ring Face
Seal Size
Swivel Run Tee
Straight Thread Branch Tee
O-Ring Boss
Dash Size
W
W-X-Y
O-Ring Face
Seal Size
O-Ring Boss
Dash Size
O-Ring Face
Seal Size
W
90° Adapter
Y
W
W-X-Y
O-Ring Face
Seal Size
W-X
O-Ring Boss
Dash Size
45° Adapter
X
Y
X
X
X
W
W
W-X
O-Ring Face
Seal Size
W-X
O-Ring Face
Seal Size
90° Bulkhead Adapter
Y
O-Ring Face
Seal Size
O-Ring Face
Seal Size
Union Bulkhead Adapter
W
W-X
O-Ring Face
Seal Size
W
O-Ring Face
Seal Size
Union Adapter
Straight Thread Run Tee
X
X
W-X-Y
O-Ring Face
O-Ring Boss Seal Size
Dash Size
O-Ring Face
O-Ring Face Seal Size
Seal Size
Bulkhead Run Tee
X
W
W-X
O-Ring Face
Seal Size
O-Ring Face
Seal Size
45° Bulkhead Adapter
X
W
W-X-Y
O-Ring Face
Seal Size
O-Ring Face
Seal Size
X
W
W-X
W
O-Ring Face
Seal Size
W-X
Y
O-Ring Face
Seal Size
O-Ring Face
Seal Size
90° Union Adapter
W-X-Y
O-Ring Face
O-Ring Face Seal Size
Seal Size
X
O-Ring Face
Seal Size
90° Swivel Adapter
Union Tee
X
W-X-Y-Z
W
Y
Z
100
O-Ring Face
Seal Size
O-Ring Face
Seal Size
O-Ring Face
Seal Size
O-Ring Face
Seal Size
Cross Adapter
O-Ring Not
Needed
W
Plug
AR-5
Adapter Part
Number.
Dash
Size
339974
4-6
339977
6-4
339979
6-6
339985
8-10
339989
10-10
339993
12-10
339994
12-12
339996
12-16
339998
16-12
339999
16-16
340002
16-20
340007
6-4
340009
10-10
340026
6-6
340030
8-10
340059
6-4
340061
6-6
340070
10-10
340077
16-16
340090
24-24
340119
6-6-6
340122 12-12-12
340123 16-16-16
340143
6-6-6
340375
6-6
340376
8-8
340377
16-16
Adapter Type
(W) O-Ring
(X) O-Ring
Straight Adapter
Straight Adapter
Straight Adapter
Straight Adapter
Straight Adapter
Straight Adapter
Straight Adapter
Straight Adapter
Straight Adapter
Straight Adapter
Straight Adapter
Straight Adapter
Straight Adapter
45° Adapter
45° Adapter
90° Adapter
90° Adapter
90° Adapter
90° Adapter
90° Adapter
Swivel Run Tee
Swivel Run Tee
Swivel Run Tee
Swivel Branch Tee
90° Swivel Adapter
90° Swivel Adapter
90° Swivel Adapter
339908
339909
339909
339910
339911
339912
339912
339912
339913
339913
339913
339906
339911
339909
339910
339909
339909
339911
339913
339915
339909
339912
339913
339909
339909
339910
339913
339897
339896
339897
339899
339899
339899
339900
339901
339900
339901
339902
339896
339899
339897
339899
339896
339897
339899
339901
339903
339909
339912
339913
339909
SAE Boss O-Rings
(Y) O-Ring
(Z) O-Ring
ORS Face Seal O-Rings
Dash Size
Thread Size
O-Ring
Tube Size
Thread Size
O-Ring
2
3
4
5
6
8
10
12
14
16
20
24
32
5/16-24
3/8-24
7/16-20
1/2-20
9/16-18
3/4-16
7/8-14
1 1/16-12
1 3/16-12
1 5/16-12
1 5/8-12
1 7/8-12
2 1/2-12
459290
459291
339896
459293
339897
339898
339899
339900
459296
339901
339902
339903
339904
4
6
8
10
12
16
20
24
9/16-18
11/16-16
13/16-16
1-14
1 3/16-12
1 7/16-12
1 11/16-12
2-12
339908
339909
339910
339911
339912
339913
339914
339915
> Change from previous revision
101
Fluids and Compounds
Hydraulic Fluid*
5001405
5001404
2500548
2500546
503409
503407
Two 2-1/2 Gallon Container of ISO VG68 Oil
One 5 Gallon Pail of ISO VG68 Oil
Two 2-1/2 Gallon Container of 10W30 Oil
One 5 Gallon Pail of 10W30 Oil
Two 2-1/2 Gallon Container of ATF Fluid
One 5 Gallon Pail of ATF Fluid
2-Cycle Oil
554600
Twenty Four 16 Ounce Plastic Container
554599
Twenty Four 8 Ounce Plastic Container
Grease
5000067
One 5 Gallon Pail OO-Grease
5000068
Twenty Four 8 Ounce Tube OO-Grease
Paint
5003469
554598
2500789
546409
16 Ounce Gray Aerosol
Six 12 Ounce Orange Aerosol
Twelve 1 Quart Can Orange
Two 1 Gallon Can Orange
Lapping Compound
5002488
5002490
5002489
5002491
One 10 Pound Pail of 80 Grit
One 25 Pound Pail of 80 Grit
One 10 Pound Pail of 120 Grit
One 25 Pound Pail of 120 Grit
Specialty Compound
365422
5001581
5.3 Ounce Tube of Electrical Insulating Gel
14 Ounce Can of Lubriplate Multi Lube A
Biodegradable Hydraulic Fluid*
5003102
5003103
5003105
5003104
4115976
4115977
5003106
One 55 Gallon Drum Jacobsen GreensCare 68
One 5 Gallon Pail Jacobsen GreensCare 68
One 55 Gallon Drum Jacobsen GreensCare 46
One 5 Gallon Pail Jacobsen GreensCare 46
One 55 Gallon Drum Jacobsen GreensCare 32
One 5 Gallon Pail Jacobsen Greens Care 32
Twenty Four 14 Ounce Tube Greens Care Grease
O-Ring Kit
5002452
5002453
5002454
SAE O-Ring Boss (3/32 ~ 2” Tube O.D.)
Common O-Ring Kit
O-Ring Face Seal ORFS (-4 ~ -24 ORS Tube Size)
Right Start Kit for New Machines
See your local Jacobsen Dealer
On-Time Maintenance Kit
See your local Jacobsen Dealer
* Refer to the Parts & Maintenance manual for the correct hydraulic oil requirements for your machine.
Jacobsen offers a High Usage Parts Catalog illustrating commonly used Parts through easy to read line Drawings. See your local
Jacobsen Dealer for a copy.
INDEX
1002657...................... 47
1002810...................... 39
1003047...................... 45
1003048...................... 45
1003288...................... 41
1003616...................... 43
1003638...................... 49
1003872...................... 43
1004279................ 35, 37
1004290...................... 39
1004541...................... 71
123096........................ 47
132647........................ 59
163583........................ 35
178032-01................... 49
198059........................ 35
198066........................ 35
2000012...................... 49
2000057...................... 49
2000141...................... 45
2198153...................... 81
2500722...................... 82
2721505...................... 39
2721806...................... 59
2810424...................... 73
2810553...................... 45
2810702...................... 59
2811365...................... 47
2811547...................... 47
3000953................ 66, 67
3001279...................... 59
3001296...................... 60
3001328...................... 35
3001376...................... 39
3001435...................... 31
3002195...................... 53
3002397...................... 59
3002529...................... 31
3002695...................... 41
3003474...................... 41
3003475...................... 41
3003928................ 35, 37
3004894...................... 79
3005121...................... 39
3005673...................... 47
3005871...................... 59
3005872...................... 59
3005934...................... 47
3005981...................... 47
3006035...................... 39
3006243...................... 59
3006327................ 41, 43
3006332...................... 59
3006337...................... 59
3006873...................... 33
3006997...................... 43
3006998 ...................... 41
3006999.7 ................... 41
3007230 ...................... 41
3007548 ...................... 33
3007606 ...................... 43
3007609 ................ 35, 37
3007610 ................ 35, 37
3007611 ................ 35, 37
3007612 ................ 35, 37
3007764 ...................... 79
3007776 ...................... 73
3007777 ...................... 73
3007862 ...................... 45
3007889 ...................... 57
3008195 ...................... 33
3008218 ................ 35, 37
3008383 ................ 41, 43
3008388 ...................... 79
3008521 ...................... 31
3008522 ...................... 31
3008673 ................ 60, 68
3008682 ...................... 31
3008745 ................ 60, 68
3009193 ................ 41, 43
3009204 ...................... 59
3009210 ...................... 33
3009251 ...................... 73
3009292 ................ 35, 37
3009347 ...................... 59
3010210 ...................... 81
3010489 ................ 75, 77
310452 .................. 75, 77
310711 ........................ 55
315387 .................. 35, 37
316938 ........................ 81
322847 ........................ 50
326112 ........................ 53
333542 ........................ 41
337229 ........................ 53
339899 ........................ 59
339909 .................. 61, 68
339911 ........................ 61
339913 ........................ 60
339972 ........................ 68
339974 ........................ 47
339977 ........................ 69
339979 47, 61, 65, 66, 67
339985 ............ 63, 67, 70
339989 .................. 63, 65
339993 ........................ 65
339994 ........................ 65
339996 ........................ 65
339998 ........................ 68
339999 .................. 60, 61
340007 ........................ 68
340009 ........................ 63
340026 ........................ 66
340030 ........................ 63
340033 ........................ 65
340039 ........................ 61
340059 ........................ 68
340061 .................. 66, 67
340070 .................. 63, 65
340077 ........................ 61
340090 ........................ 60
340119 .................. 68, 69
340122 ........................ 65
340123 ........................ 61
340143 ........................ 69
340338 ........................ 65
340375 .................. 68, 69
340376 ........................ 67
340377 ........................ 65
340486 ........................ 45
340603 ........................ 82
340830 ........................ 31
345666 ........................ 53
348856 ........................ 57
351956 ........................ 39
352726 .................. 41, 43
353914 .................. 45, 49
358794 ........................ 53
360111 .................. 45, 49
360885 ........................ 39
361117 ........................ 59
361439 ........................ 73
361451 ........................ 49
361647 ........................ 49
361648 ........................ 49
361689 ........................ 68
361748 ........................ 59
361831 ........................ 51
362263 .................. 55, 57
362539 ........................ 57
362743 ........................ 57
363485 .................. 55, 57
363562 ........................ 49
364016 ........................ 71
364501 ........................ 55
365339 ........................ 31
365398 ........................ 53
365943 ........................ 39
365948 ........................ 79
365956 ........................ 31
365959 ........................ 60
365979 ........................ 55
365981 ........................ 55
366526 ............51, 53, 59
366618 ........................ 53
366670 ........................ 39
366751 ........................ 39
366768 ........................ 39
366789 ........................49
366870 ........................45
366883 ........................33
366931 ........................73
366974 ........................41
367029 ........................81
367031 ........................55
367350 ........................49
367631 ........................73
4108161 ......................43
4108880 ......................31
4111408 ......................31
4113047 ......................45
4113601 ......................68
4113986 ......................51
4117468 ......................31
4117807 ......................79
4118092 ......................45
4118134 ......................45
4118210 ......................50
4118247 ......................79
4118252 ......................57
4118253 ......................55
4118254 ......................45
4118255 ......................49
4119888 ......................57
4120309 ......................55
4120311 ......................55
4120313 ......................55
4120315 ......................55
4120925 ......................53
4120932 ......................53
4120961 ......................45
4120976 ......................53
4120977 ......................53
4121020 ......................53
4121552 ......................62
4121554 ......................62
4121657 ......................31
4121828 ......................50
4121829 ......................50
4121852 ......................62
4121986 ......................50
4122538 ......................60
4122840 ......................73
4122841 ......................73
4122993 ......................81
4123031 ......................81
4123066 ......................60
4123166 ......................61
4123167 ......................77
4123171 ......................79
4123183 ......................73
4123723 ................35, 37
4123725 ................35, 37
4124015 ......................81
103
INDEX
4124066.......................79
4124076.......................79
4124087.......................79
4124129.......................81
4124204.......................50
4124395.......................81
4124423.......................81
4124425.......................81
4124436.......................33
4124437.......................33
4124442.......................33
4124443.......................33
4124445.......................31
4124755.......................62
4124759.......................31
4124791.......................31
4124866.......................31
4124867.......................31
4125180.......................77
4125547.......................75
4125831.................41, 43
4125919.......................75
4126082.......................73
4126447.......................75
4126450.................75, 77
4127192.................75, 77
4127296.......................79
4127478.......................81
4127480.................75, 77
4127556.................75, 77
4128079.......................53
4128083.......................53
4128084.......................53
4128262.......................73
4128317.......................65
4128318.......................65
4128319.......................65
4128320.......................65
4128322.......................61
4128324.......................65
4128325.......................65
4128888.......................39
4128930.......................57
4128967.......................65
4128977.......................65
4129015.......................63
4129017.......................66
4129018.......................66
4129019.......................66
4129020.......................66
4129021.......................66
4129022.......................66
4129023.......................67
4129024.......................67
4129025.......................67
4129026.......................67
104
4129027.......................67
4129028.......................70
4129029.......................70
4129030.......................70
4129031.......................70
4129032.......................70
4129035.......................65
4129036.......................65
4129037.......................61
4129040.......................68
4129041.......................68
4129042.......................61
4129043.......................61
4129044.......................61
4129069.......................62
4129070.......................62
4129071.......................62
4129250.......................57
4129251.......................57
4129595.......................63
4129597.......................63
4129600.......................69
4129603.......................69
4129614.......................81
4129615.......................81
4129679.......................33
4129680.......................33
4129683.......................39
4129685.......................35
4130114.......................39
4130132.......................39
4130133.......................39
4130134.......................39
4130148.......................39
4130149.......................39
4130641.......................35
4130647.......................81
4130823.......................60
4130950.......................43
4130951.......................41
4131137................ 35, 37
4131420.......................77
4131422.......................77
4131571.......................57
4131618.......................39
4131768................ 41, 43
4131772.......................31
4131828.......................31
4131849................ 75, 77
4131862.......................71
4131864.......................71
4131904.......................79
4131963.......................75
4131964.......................77
4131965.......................77
4132329.......................79
4132372 ...................... 31
4132489 ...................... 59
4132628 ...................... 55
4132688 ...................... 49
4132699 ...................... 49
4132846 ...................... 77
4132912 ...................... 41
4132913 ................ 35, 37
4132917 ................ 35, 37
4133007 ...................... 79
4133033 ...................... 45
4133054 ...................... 45
4133119 ................ 35, 37
4133121 ................ 35, 37
4133238 ...................... 51
4133239 ...................... 51
4133240 ...................... 51
4133241 ...................... 51
4133242 ...................... 51
4133243 ...................... 51
4133244 ...................... 53
4133252 ...................... 51
4133296 ...................... 51
4133305 ...................... 51
4133306 ...................... 51
4133307 ...................... 51
4133447 ...................... 57
4133609 ...................... 31
4133808 ...................... 51
4133818 ...................... 53
4133820 ...................... 53
4133821 ...................... 53
4133840 ...................... 55
4134468 ...................... 51
4134484 ...................... 57
4134516 ...................... 84
4134517 ...................... 84
4134522 ...................... 84
4134525 ...................... 85
4134526 ...................... 85
4134527 ...................... 85
4134528 ...................... 86
4134529 ...................... 86
4134530 ...................... 86
4134532 ...................... 83
4134535 ...................... 87
4134537 ...................... 83
4134538 ...................... 83
4134539 ...................... 83
4134541 ................ 83, 87
4134542 ...................... 83
4134543 ...................... 83
4134575 ...................... 75
4134583 ...................... 57
4134584 ...................... 57
4134585 ...................... 57
4134586 ...................... 57
4134587 ...................... 57
4134588 ...................... 91
4134589 ...................... 91
4134590 ...................... 91
4134591 ...................... 91
4134592 ...................... 91
4134594 ...................... 91
4134595 ...................... 91
4134596 ...................... 91
4134597 ...................... 91
4134606 ...................... 91
4134607 ...................... 91
4134608 ...................... 91
4134609 ...................... 91
4134610 ...................... 91
4134612 ...................... 91
4134613 ...................... 91
4134614 ...................... 91
4134615 ...................... 93
4134616 ...................... 93
4134617 ...................... 93
4134618 ...................... 93
4134619 ...................... 93
4134620 ...................... 93
4134621 ...................... 93
4134622 ...................... 93
4134623 ...................... 93
4134626 ...................... 77
4134631 ...................... 31
4134633 ...................... 31
4134634 ...................... 57
4134775 ...................... 53
4134870 ...................... 31
4134921 ...................... 65
4135758 ...................... 39
4135765 ...................... 55
4136022 ...................... 77
4136067 ...................... 86
4136164 ...................... 53
4136522 ...................... 57
4136829 ...................... 79
4137128 ................ 75, 77
4137137 ...................... 49
4137138 ................ 75, 77
4137139 ...................... 49
4137186 ...................... 79
4137382 ...................... 63
4137383 ...................... 63
4137520 ...................... 81
4137521 ...................... 81
4137524 ...................... 39
4137534 ...................... 81
4137561 ...................... 69
4137562 ...................... 69
4137588 ...................... 63
INDEX
4137589...................... 63
4137607...................... 65
4137608...................... 65
4137623...................... 65
4137624...................... 68
4137634...................... 68
4137659...................... 79
4137665...................... 81
4137674...................... 81
4137716...................... 77
4138359...................... 33
4138380...................... 53
4138381...................... 53
4138567...................... 47
4139087...................... 33
4139094...................... 89
4139237...................... 37
4139241...................... 37
4139433...................... 37
4139434...................... 37
4139435...................... 37
4139436...................... 37
4139450...................... 37
4139612...................... 75
4139613...................... 75
4139787...................... 79
4140094...................... 45
4141885...................... 49
4141925...................... 49
4141934...................... 49
4142009...................... 86
4142455...................... 43
4143148...................... 57
5000318...................... 84
5002110...................... 84
5002574...................... 45
5002918...................... 47
5002919...................... 47
5003034................ 91, 93
5003076................ 35, 37
5003219...................... 89
5003220...................... 89
5003282...................... 73
5003373...................... 53
5003374...................... 59
5003433...................... 91
5003434...................... 91
5003447...................... 53
5003460...................... 55
5003578................ 83, 86
5003579.......... 83, 86, 87
5003769...................... 37
502517........................ 82
502924........................ 89
502925........................ 89
503295........................ 82
503296 ........................ 82
503308 ........................ 82
503378 ........................ 81
503398 ........................ 89
503626 ........................ 59
521720 ........................ 31
523126 ........................ 45
549441 ........................ 82
549443 ........................ 82
550863 ........................ 53
554390 ........................ 35
554579 ........................ 82
554748 ........................ 59
554752 ........................ 59
554779 .................. 49, 85
554780 .................. 49, 85
554855 ........................ 89
554856 ........................ 89
554857 ........................ 89
554988 ........................ 55
555771 ........................ 62
556419 ........................ 62
557367 ........................ 53
557374 ........................ 53
557523 ........................ 79
557619 ........................ 59
557620 ........................ 33
557623 .................. 45, 84
557624 .................. 45, 84
557631 ........................ 84
557632 ........................ 84
557633 ........................ 84
557634 ........................ 84
557635 ........................ 84
557636 ........................ 84
557637 ........................ 84
557639 ........................ 84
557640 ........................ 84
557642 ........................ 84
557650 ........................ 84
557734 ........................ 89
557738 ........................ 89
557771 ........................ 45
558063 ........................ 84
558064 ........................ 84
558066 ........................ 84
590259 ........................ 82
590260 ........................ 82
66171 .......................... 35
66172 .......................... 35
831053 ........................ 37
835892 ........................ 31
A1103051.................... 57
PJH1054 ..................... 79
105
Equipment from Jacobsen is built to exacting
standards ensured by ISO 9001 and ISO 14001
registration at all of our manufacturing locations.
A worldwide dealer network and factory trained
technicians backed by Textron Parts Xpress
provide reliable, high-quality product support.
Textron Golf, Turf & Specialty Products
PO Box 7708, Charlotte, NC 28241-7708
www.ttcsp.com