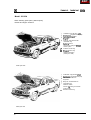
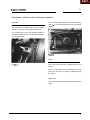
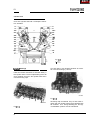
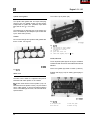
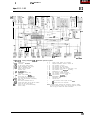
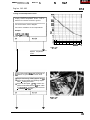
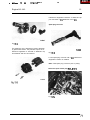
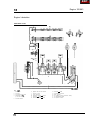
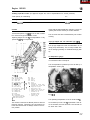
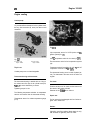
1
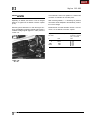
EXIT
Mercedes-Benz
Mercedes-Benz of North America, Inc.
S-2347-SUP
EXIT
@ Mercedes-Benz of North America, Inc., 1988, Reprinted 1993.
All rights reserved. Reproduction by any means, electronic or mechanical, including photocopying, recording, or by any information storage and retrieval system
or translation in whole or part is not permitted without
written authorization from the publisher.
Published by Mercedes-Benz of North America, Inc.
Printed in U.S.A.
Order No. S-2347-SUP
EXIT
Intro
tion
This supplementary manual is the product of existing technical publications. It is intended to
supplement Service Manual Engine 102 and covers those areas where the 16-valve engine differs
from the standard 8-valve engine. In Group 07.3, additional information covers fuel system
changes for 1987.
The material in this manual is divided according to the Mercedes-Benz Component Group System
as outlined on the GROUP INDEX page. This page will quickly direct the reader to the Major
Component Group.
Mercedes-Benz of North America, Inc. recommends that repairs to, and maintenance of
Mercedes-Benz automobiles be performed by trained Mercedes-Benz personnel at authorized
Mercedes-Benz dealerships.
The information contained in this special publication is ordinarily issued by Mercedes-Benz of
North America, Inc., in conjunction with supplementary service literature and special tools supplied
only to its authorized dealers. The information outlined herein is intended for use by trained
Mercedes-Benz service and dealership personnel. This manual can also be useful for
Mercedes-Benz owners in diagnosing vehicle systems and performing repairs.
Special tools required in performing certain service jobs are identified in the manual and are
recommended for use. Any part numbers given are only used for identification and easier
differentiation between individual components, and are not intended for ordering purposes.
All procedures, illustratiqns and specifications contained in this manual were based on the latest
information available at the time of publication. All rights are reserved to make production, design
and specification changes at any time, without notice and without obligation to give notice. Any
such changes will not be contained in this manual.
The proper performance of service and repair procedures is essential for both the safety of the
mechanic and the safe and efficient operation of the vehicle. The use of incorrect service
procedures and tools may greatly increase the risk of personal injury and render the vehicle
unsafe. The procedures in this manual are described in such a manner that the service may be
performed safely and accurately.
Wowever, it is a general assumption that the reader is familiar with basic automotive repair
procedures and Mercedes-Benz vehicles. You should not attempt to use this manual if this is not
the case.
Mercedes-Benz of North America, Inc. assumes no liability for any damage to person or property
caused by the utilization of this publication to effect maintenance or repair work on Mercedes-Benz
automobiles.
MERCEDES-BENZ OF NORTH AMERICA, INC.
Service and Parts Literature
EXIT
Engine 102.983
07.3 Mechanically/electronically controlled
gasoline injection system (CIS-E)
Views of engine 102.983
. . . . . . . . . . . . .
7
Longitudinal and cross sectional views
of engine 102.983 . . . . . . . . . . . . . . . . . .
8
00
01
General, technical data
. . . . . . . . . .
09
Air
67
13
Belt drive
Crankcase, cylinder head, crankcase
ventilation
.
.
.
.
.
.
.
.
. . . . . .
. . . . . .
. . . . . .
. . . . . . .
.
.
.
.
.
.
.
.
.
.
.
.
27
27
28
28
30
31
31
32
32
32
33
33
34
34
35
35
36
. . . . . . . . . . . . . . . . . . . . .
. . . . . . . . . . . . . . .
37
39
40
40
68
14
Intake manifold, exhaust manifold . 69
15
Electrical system, engine
Electronic ignition system with
electronic timing adjustment (EZL) . . 70
Components of ignition system . . . . .
70
Removal and installation of
high voltage distributor . . . . . . . . . . .
73
Testing EPL electronic ignition system
74
Spark plugs . . . . . . . . . . . . _ . . . . .
75
18
Engine lubrication
Lubrication circuit diagram . . . . . . . .
Oil filling capacities . . . . . . . . . . . . .
Cup-type tappet and cam lubrication .
Oil temperature gauge . . . . . . . . . . .
Engine timing, valve train
Camshaft ....................
Testing and adjusting values .......
Valve arrangement ..............
Intake and exhaust valves .........
Valve spring, valve keepers .......
Valve stem seals ...............
Checking and adjusting
valve clearance ................
Chain drive ...................
Camshaft sprockets .............
Single roller chain ..............
Guide rail, tensioning rail .........
Intermediate sprocket ............
Hydraulic oil pump drive ..........
filter
Single-belt drive
Crankshaft assembly
Crankshaft . . . . . . . .
Vibration damper . . . .
Flywheel, flex plate . .
Pistons
. . . . . . . . . .
05
47
60
61
9
Cylinder crankcase ............. 13
Oil pan ...................... 13
Cylinder head ................. 14
Camshaft bearings .............. 14
Valve guides .................. 15
Valve seat rings ................ 16
Spark plug locations ............. 16
Core plugs ................... 17
Connections .................. 17
Cylinder head gasket ............ 18
Valve cover ................... 18
Positive crankcase ventilation (PCV) . 20
Removal and installation of
cylinder head .................. 21
03
General . . . . . . . . . . . . . . . . . . . . .
Components and function . . . , . . . . .
Mixture
preparation
.............
Component locations and
electrical
functions
.,............
Checking electrical components
of CIS-E injection system . . . . . . . . .
Test and adjustment data . . . . . . . . .
Model year 1987changes . . . . . . . . .
20
76
77
77
77
Engine cooling
Coolant
pump
.......
Thermostat housing and
thermostat . . . . . . . . . . .
Fan clutch . . . . . . . . . . .
Radiator
. . . . . . . . . . . .
..,.......
78
. . . . . . . .
. . . . . . . .
. . . . . . . . .
78
78
78
22
Engine mounts , . . . . . . . . . . . . . .
79
30
Throttle
80
control
...........,...
5
EXIT
..:.&
. .%
100-30923
EXIT
8
EXIT
General,
technical
00
d
This manual applies to the following passenger cars, model years 1986 - 1987.
Gasoline engines
Model Year
1 Model
1 Sales Designation
IE ng ine
1986 - 1987
I 201.034
I 190 E 2.3-16
I 102.983
9
EXIT
General, technical
60
data
Model 201.034
When ordering spare parts, please specify
chassis and engine numbers.
Certification Tag (left door ptllar)
ldentrfication Tag (left window post)
Vehtcle ldentrficatlon No.
Engine No.
Body No. and Paintwork No.
Information Tag
California version
Vacuum line routing for emissron
control system
7
8
Emission Control Tag
Emrsslon Control Tag
Catalyst Information
(model year 1986)
Model year 1986
Certification Tag (left door pillar)
ldentlfication Tag (left window post)
Vehicle ldentrficatlon No.
Engine No.
Body No. and Paintwork No.
Information Tag
California version
Vacuum line routing for emission
control system
7
Model year 1987
10
Emission Control Tag
EXIT
chnical
dat
Gasoline engine
Sales designation
Operation
4-stroke spark ignition, mechanicaily/electronically controlled
Number of cylinders
Cylinder arrangement
I In-line 15 O inclination
Firing order
I l-3-4-2
Maximum speed rpm
Engine output (SAE)
Oil cooling
Oil-to-air-cooler
Cooling
Coolant circulation pump, thermostat with bypass line, fan
with visco clutch, finned tube radiator
Air cleaner
I Dry air filter with paper cartridge
11
EXIT
Filling capacities
Model
Sales designation
I 201.034
190 E 2.3-16
(Model Years 1986 - 87)
Engine
I 102.983
Fuel tank/reserve approx. I
I 7018.5
During initial oil filling
approx. I
Cooling system with heater
approx. I
8.0
Electrical system
Model
I 201.034
Sales designation
I 190 E 2.3-16
Engine
I 102.983
Battery
Voltage
Capacity
Starter Bosch
Alternator
12
12v
62 Ah
12 v
1.5 kW
I 14V70A
EXIT
01
Crankcase, cylinder head, crankcase ventilation
Crankcase
The crankcase corresponds with that of the engine
102.985, except for the following modifications.
The oil deflector plate fastened to crankshaft bearing
caps 1 - 3 prevents splashing of oil at high engine
speeds.
The mounting bore for the TDC position indicator of
the ignition system (arrow) is located above the starter mounting flange.
Fig. 01/2
Oil pan
Fig. 01/l
The oil pan was reinforced by additional ribs on the
bottom.
The low oil level switch was moved higher on the oil
pan due to the lower oil quantity circulated through
the engine.
Repair note
The oil pan can be removed without removing the
engine.
13
EXIT
01
Engine 102.983
Cylinder head
Cross flow cylinder head with roof-shaped combustion chambers.
73
73
72
72
160
160 E
219
219
220
220
yx
200
199
199
203
202
198
198
58
196
56
Fig. 01/3
1013-121em2
Camshaft bearings
E - Intake
A - Exhaust
The shaft ends of the camshaft sprockets are mounted in the two bearings (1 and 6).
Intake and exhaust camshafts are mounted directly in
the cylinder head. The four split bearing bores for
each camshaft are half in the cylinder head and in
mounted bearing caps.
Fig. 01/5
101-30914
Fig. 01/4
14
All bearing caps are identical. They are line bored together with the cylinder head and are identified with
the numbers 1 to 10. During assembly jobs, the original installation position must be maintained.
EXIT
01
ngine 102.983
Valve guides
The valve guides are located at an angle of 45O in relation to each other (Fig. 01/8) and arefitted in the cylinder head with an interference fit of 0.012 - 0.041 mm.
The OD (13 mm) is 1 mm smaller than on the other
engines 102. They are also shorter.
Repair note
The finished valve guides are available in four repair
sizes.
Fig. 01/6
-ID,’ t-
----ID1 I----
Installation position of bearing caps
59a
58a
Bearing cap 1 = bearing of exhaust camshaft
sprocket (Fig. 01/5).
Bearing caps 2 - 5 = bearings of exhaust camshaft
(Fig. 01/6).
Bearing cap 6 = bearing of intake camshaft sprocket
(Fig. 01/5).
Bearing caps 7 - lo- bearings of intake camshaft
(Fig. 01/6).
The bearing caps are fastened to the cylinder head
with M 8 studs, wave washers and nuts.
Tightening torque of nuts 21 Nm.
Repair notes
In case of seizing or excessive scoring on camshaft
bearings, replace cylinder head and camshaft.
Replace only one bearing cap per camshaft since
during simultaneous replacement of several bearing
caps the camshaft may bind.
The bearing caps are correctly installed, if the
stamped in code numbers are closest to the inner
studs (Figs. 01/5 and 01/6).
58
!-
k=-- D-----PI
1014- 12374
Fig. 01/7
58 Intake valve guide
(copper colored)
59 Exhaust valve guide
(brass colored)
D
Dl
L
58a
D
Dl
L
59a
- 13.023 - 13.041 mm
- 7.000 - 7.015 mm
- 45.5 mm
Retaining ring
- 13.023 - 13.041 mm
- 8.000 - 8.015 mm
- 42.9 mm
Retaining ring
EXIT
Engine 102.983
01
Valve seat rings
The valve seat rings are press fitted in the cylinder
head with an interference of 0.075 - 0.120 mm.
5 9 a 59
5 8 58a
Fig. 01/8
56 Intake valve seat ring
0
Dl
02
t-l
- 39.100-39.120 mm
-33mm
- 39.000 - 39.025 mm
- 5.8 mm
57 Exhaust valve seat ring
0
Dl
D2
H
Repair note
One repair size valve seat ring with a larger OD is
available for intake and exhaust respectively.
Spark plug location
The spark plug with threads M 14 x 1.25 and tapered
sealing seat is centrally located in the combustion
chamber.
Repair note
Before unscrewing spark plugs clean out recesses
with compressed air. This will help prevent dirt from
entering the combustion chambers when removing
the spark plugs.
a
Fig. 0119
a
16
Tapered sealing seat
- 34.100 - 34.120 mm
-28mm
= 34.000 - 34.025 mm
- 5.4 mm
EXIT
01
Engine 102.983
Core plugs
The core holes in cylinder head are closed with
18.2 mm dia. sheet metal plugs (59), the front and
lateral oil ducts with 5.2 mm dia. sheet metal plugs
(57) and the bottom oil duct with a 5 mm dia. dowel
pin (58).
Repair note
Leaking plugs can be replaced similar to the other
engines 102. Refer to special tools section.
Fig. 01/l 2
Cylinder head front
57 Sheet metal plug 5.2 mm dia
58 Dowel pin, 5 mm dia.
Connections
A coolant return pipe (23) is inserted at the front of
the cylinder head, leading through the timing chain
housing to a coolant chamber.
Sealing
705 - 38836
Fig. 01/l 0 Cylinder head right side
57
59
In the coolant passage with O-ring (24)
At the mounting flange with gasket (26)
Sheet metal plug 5.2 mm dia
Sheet metal plug 18 2 mm dia
Fig. 01/13
Fig. 01/l 1
47
57
59
81
Cylinder head left side
Threaded pipe connector for coolant to heater core
Sheet metal plug 5.2 mm dia.
Sheet metal plug 18 2 mm dia.
Threaded pipe connector for crankcase ventilation coolant heating
A threaded connection for coolant to the heater core
(47) and one for the crankcase ventilation heating
(81) are screwed into the cylinder head left rear corner (Fig. 01/l 1).
EXIT
Engine 102.983
01
Cylinder head gasket
The oil filler cap is plastic (90).
The cylinder head gasket does not require retorquing.
There is only one gasket version for this engine,
independent of cylinder dia. (standard, repair sizes
+ 0.5 mm dia. and f 1 .O mm dia.).
The gasket has an adhesive strip on the sealing surface. It is identified by the stamped in part number and
by the relief holes (arrows).
Caution:
Do not interchange this cylinder head gasket with
those of other 102 engines.
Fig 01/15
82
83
90
113
114
Hose connection for engine ventilation
Hose connection for engine ventilation
with bypass bore 1.6 mm dia.
Oil filler cap
Ignition cable channel cover
Plastic screws (Tightening torque 1.5 - 2 Nm)
Inside/underside
The oil separator plate (85) for the engine ventilation
is fastened with 8 screws and sealed with silicone
adhesive.
?Ol- 3Qw3
Fig. 0104
Valve cover
Valve cover gasket (93) made of rubber (U section).
Rubber seal rings (112) for sealing spark plug recesses.
The valve cover is made of a magnesium alloy and is
laminated with black plastic on the outside.
The
ignition cable channel cover is plastic (113). It is
fastened with three plastic screws (114) and sealed
with a rubber gasket. To prevent excessive tightening
which could damage the cover, each screw has a
special washer.
Fig. 01/16
85 Oil separator plate
85a Oil drain tube
18
93 Valve cover gasket
112 Rubber seal rings
EXIT
Engine 102.983
To make sure that the spark plug recesses and the
ignition cable channels are not filled with water, e. g.
during an engine wash, the valve cover has a drain
hole at the rear (arrow, Fig. 01/l 5).
Assembly notes
The valve cover M6 cap nuts should be tightened
crosswise and in several steps.
Tightening torque 9 Nm.
The ignition cable channel has guide ribs and symbols for correct installation of ignition cables.
fig. 01/17
19
EXIT
Engine 102.983
01
Simultaneously, additional clean air is drawn in from
air cleaner (111) via hose line (103a - 103~) and fed
to the combustion chambers via the oil separator
together with the blow-by gases.
Positive crankcase ventilation (PCV)
Operation
The engine blow-by gases flow from cylinder crankcase to oil separator (90) in the valve cover. The oil
separated here flows back to the cylinder head
through a drain pipe.
From the oil separator the engine blow-by gases flow
into the combustion chambers depending on load
condition (intake manifold vacuum) as follows:
Idle/decel
(high intake manifold vacuum)
Through bypass bore 1.6 mm dia. in hose connection
(83) on the valve cover to idle speed air distributor
(108) and through the insulating sleeve of the injection valves to combustion chambers.
Partial and full load operation
(low intake manifold vacuum)
Mainly via hose line (103a - 103~) to air cleanerclean
side and with intake air to the combustion chambers.
To make sure that the vent line (103a - 103~) does
not freeze at low outside temperatures, it is heated
with coolant. The coolant line (106) is integrated in the
vent line and is connected to the cylinder head via the
supply line (104). The coolant is returned to the coolant pump (1) via return line (109).
10” ly5
h
Fig. 01/18
1
Coolant pump
Hose connection with 1.6 mm throttle
83
103a - 103c Vent lines
Coolant supply line for crankcase vent line
104
Idle speed air line
105
Heating water line (copper tubing)
106
20
107 Coolant connection line
108 Idle speed air distributor
109 Coolant return line
110 Crankcase vent line
1 1 1 Air filter
EXIT
Engine 102.983
rid ins
01
tion of cylinder head
Note: Only repair instructions not described in microfiche Engine 102, Mechanical I, will be discussed in the following pages.
Tightening torques
Nm
Chain tensioner in crankcase
40
Camshaft sprockets
12
Camshaft bearing caps
Exhaust manifold to cylinder head
Thermostat housing to cylinder head
21
Coolant connecting pipe (cylinder head thermostat housing) to cylinder head
Support (exhaust manifold - transmission) to exhaust manifold
27
Exhaust system to exhaust manifold
Valve cover
9
Removal
Air filter housing
Disconnect plug from intake air temperature sensor
(124) and crankcase ventilation hose (103~) on air
cleaner (121).
Remove nuts (122), lift housing at the rear until it is
released from studs, slide back slightly (direction of
arrow) and lift from air flow sensor.
Fig. 01/19
Oil dipstick guide tube
Remove screw (46) and rotate clamp (47) away from
bracket (45). Pull out oil dipstick (42).
21
EXIT
Engine 102.983
01
Poly-V-belt drive
Loosen screw (25) by 114 - YZ turn, slacken poly-V-belt
(27) by turning tensioning nut (24) counterclockwise.
Remove poly-V-belt (27).
Fig. 01/21
Exhaust manifold
Remove screw (119) from support bracket (118) and
loosen screws (120) on transmission.
22
EXIT
Engine 102.983
01
Valve cover
Remove screws (114) of ignition cable channel cover
(113), remove cover, pull off spark plug connectors
and put ignition cables aside.
Loosen hose clamp (128) and pull hose (103) from
valve cover (81).
Pull hose (110) from valve cover, remove nuts (96)
and remove valve cover.
Caution!
if the valve cover is stuck, do not strike with a hammer to loosen it, the valve cover may crack
Fig. 01/24
Try to loosen the valve cover by pushing at one side
with your hands; if necessary, carefully tap corners
with a rubber mallet.
Camshaft sprockets
Set engine to ignition TDC of 1st cylinder.
For this purpose, turn crankshaft until the bores in the
camshaft sprockets (2 mm dia., arrows) are aligned
opposite each other.
Mark camshaft sprockets (4A and 4E) and timing
chain (21) in relation to each other.
Fig. 01/25
23
EXIT
Engine 102.983
Remove alternator air duct. Disconnect wires to alternator at terminal block. Pull harness through component compartment wall and put aside with air duct.
Remove screw (722), loosen screw (723) and rotate
alternator (724) away from engine.
Fig. 01/26
Unscrew (chain tensioner (40) at hex. head (32 mm).
Pig. 01/27
Remove screws (241) and flange (239).
Fig. 01/28
24
EXIT
........................
Engine 102.983
61
Remove nuts (65) and remove bracket (27) together
with slide rail (31).
Mote: If installed, remove the sheetmetal bracket
which is attached at the two front cylinder head bolts
and two eyes at timing chain housing cover.
Fig. 01/29
Remove screws (10) (four, each sprocket), knock
back camshaft (1A and 1 E) with a plastic hammer,
remove nuts (65) remove bearing caps (61/l and
61/6) and then remove camshaft sprockets (4A and
4E).
Fig. 01/30
Coolant return pipe between cylinder head and thermostat housing
Loosen hose clamp (38), remove screws (39), remove
thermostat housing (29) and put aside.
Fig. 01/31
25
EXIT
ngine 102.983
01
Remove screws (402) and pull return pipe (399) out of
cylinder head.
Note: If the pipe cannot be pulled out by hand, slightly
rotate (direction of arrow) and force off with two
screwdrivers, also refer to Fig. 01113.
Fig. 01/32
Installation
Priorto installation, measure shaft length (L) of double
hex. socket head stretch bolts.
Double hex. socket head stretch bolt
Threads
New
Ml2
110 mm
Shaft length
Max. length
(replace)
H
113 mm
Fig. 01/33
Torque specifications and tightening diagram for
cylinder head bolts are identical to other engines 102.
Replace O-rings and flange gasket on coolant return
pipe (cylinder head-thermostat housing).
Install intake camshaft sprocket first, then exhaust
camshaft sprocket. Note markings on timing chain
and camshaft sprockets.
Check marking of camshaft sprockets in ignition TDC
position of 1st cylinder.
For mounting and tensioning of poly-V-belt refer to
maintenance jobs section.
26
EXIT
Engine 102.983
Crankshaft assembly
Crankshaft
A dowel pin (147) for locating the flywheel or the flex
plate is inserted in the rear flange.
The crankshaft is similar to the other engines 102 with
respect to material and dimensions.
All crankpin fillet radii are hardened. On the other
engines 102 only crankpins 3 and 4, as well as pin 1,
at front end are hardened.
113 116
111 49 48 319
1
104
110
109108-107-
Fig. 03/2
Repair sizes are identical to the other engines 102.
Vibration damper (111)
116
27
Fig. 03/l
1 Crankcase
27 Oil pan
48 Timing chain housing cover
49 Seal ring
104 Crankshaft
105
106
107
108
Crankshaft sprocket
Dowel pin 3 x 5 mm
Spacer
Screw.Ml8x1.5~75
109 Woodruff key
1 10 Belleville washer
11 1 Vibration damper
113 Pulley
116 Screws,M8x16
301 Internal gear, oil pump
302 External gear, oil pump
319 Driving sleeve, oil pump
Due to the higher engine speeds and the resulting
higher load the adhesive surfaces between rubber
and metal were designed larger than on the vibration
damper of engine 102.985.
The TDC markings are located on the rubber surface.
27
EXIT
Engine 102.983
03
Rywheel (manual transmission)
Due to higher engine speeds the material for the flywheel is of increased strength.
It is also lighter in weight than that of engine 102.985.
The two So segments (A) on the back are located at
an angle of 1800 (Fig 0313 and 03/4) in relation to each
other. The installation position is fixed by a dowel pin
(for bore refer to arrow).
Together with the position indicator in crankcase the
segments are transmitting a signal to the control module of the ignition system.
Fig. 03/4
A
Arrow
Segments
Locating bore
Pistons
The light-alloy pistons are manufactured by a hot
forging process to provide higher strength.
Four valve recesses are located on the flat piston top.
The piston play is 0.051 - 0.075 mm (on engine
102.985 = 0.016 - 0.040 mm).
Fig. 03/3
A
Arrow
Segments
Locating bore
Designation and repair sizes are identical to other
engines 102.
Flex plate (automatic transmission)
Due to the higher loads, the flex-plate is reinforced
with 2 mm thick steel rings riveted to the ring gear
(engine 102.985 has one 2.4 mm thick steel ring).
The two 55O segments (A), spaced 1800 apart (Fig.
03/3 and 03/4), produce together with the ignition position sensor in the engine block an alternating current signal which is transmitted to the ignition control
module. Due to the segments, the flywheel or the flex
plate must be assembled to the crankshaft in a specific fixed position. This position is determined by a
dowel pin in the crankshaft flange.
28
Fig. 03/5 Piston top
EXIT
Engine 102.983
Compared with rings of engine 102.985 the rectangular and baffle taper compression rings are lower in
height by 0.25 mm. Ring height 1.5 or 1.75 mm. The
chamfered oil control ring is made of a higher
strength material.
The piston wrist pin has been reinforced.
ID 14 mm
Length 65 mm.
1033-12240
Fig. 03/6
Contrary to engine 102.985 the connecting rods on
this engine are guided at the crank pins.
141
142
143
Rectangular ring, contact surface molybdenum-laminated, 1 5 mm high
Baffle taper compression ring, with precision turned contact surface
(not laminated), 1.75 mm high
Chamfered oil control ring with expander, contact surfaces chromed
29
EXIT
Engine 102.983
05
ngine timing,
Fig. 05/l
Camshaft
The hollow-bored camshafts are made of chilled cast
iron and are left and right of identical design.
The bearings are supplied with oil through the longitudinal bore. At the rear end, the camshaft is closed
by a sheet metal cap.
Each camshaft is mounted in four bearings (28 mm
dia.).
With the camshaft sprocket removed, the camshaft
can be rotated or counterheld at the 24 mm hex.
(arrows).
If the timing is correct, the bores (2 mm dia.) in the
camshaft sprockets (arrows, Fig. 05/g) are opposite
to each other in ignition TDC position of 1st cylinder.
Repair notes
When replacing camshafts, also replace vatve tappets.
When removing and installing camshafts, note installation position of bearing caps. (Refer to Group 01,
page 33).
Carefully and uniformly tighten fastening nuts of bearing caps.
$
Tightening torque 21 Nm.
.,
TOP-309?4
Fig. 05/2
30
EXIT
Engine 102.983
05
Checking valve timing
Slip gauge blade on intake camshaft in from outside
and on exhaust camshaft from inside. Hold down
cup-type tappet with suitable tool which has no sharp
edges.
Check valve timing on 1. cylinder:
Check intake camshaft - begin of opening
Check exhaust camshaft - end of closing
The test procedure is the same as on engine 110 (see
repair instructions on microfiche, Engine 110, Mechanical II).
Minor deviations (approx. 4 - 59 are within tolerance
and cannot be corrected. If deviations are higher, e. g.
due to timing chain elongation, install new chain.
Timing in crank angle degrees at 2 mm valve lift
Camshafts
Code number’)
Intake valve
opens after TDC
closes after BDC
Exhaust valve
opens before BDC
closes before TIX
32O
13O
with new timing chain
Left
Right
7O
-
26”
with used timing chain (approx. 20 000 km, 12 500 mi)
Left
Right
8”
-
27”
31°
12O
1) Installed are selectively: 102 050 24 01 without code no. or
102 050 28 01 with code no. 25.
Vatve arrangement
72
72
160E
219
220
220
200
Fig. 05/3
55
56
57
58
59
160E
160A
196
197
198
199
200
201
202
203
219
220
E
A
Cylinder head
Valve seat ring, intake
Valve seat ring, exhaust
Valve guide, intake
Valve guide, exhaust
Camshaft, intake
Camshaft, exhaust
Intake valve
Exhaust valve
Valve spring
Valve keeper
Valve spring retainer
Thrust ring
Valve stem seal, intake valve
Valve stem seal, exhaust valve
Valve tappet
Thrust plate
199
199
203
202
198
198
59
58
196
56
Intake
Exhaust
31
EXIT
Engine 102.983
05
The intake and exhaust valves (two each per cylinder)
are mounted overhead at an angle of 45O in relation to
each other. They are actuated by the intake or exhaust camshaft and case-hardened cup type valve
tappets (219).
Valve keepers (199)
Intake and exhaust valves
Valve seat angle 45O
1054-12255
lnta ke valve
Fig. 0515
Valve seat and valve stem bath nitrited.
lExhausP valve
Valve seat is high quality sintered metal
Valve stem induction hardened and filled with sodium.
9.2 - 9.8
H (mm)
----a-
Caution
The valve keepers must not be interchanged with
those of the other 102 engines.
197
196
A
-I
\
Valve stem seals (202 and 203)
Valve stem
seal
Material Wire ring ID
Color
“D”
Intake
Viton
black
6.3 mm
Exhaust
Viton
yellow
7.2 mm
D---i 2 0 2
-D -/ 203
Fig. 0514
196
Intake valve
D - 38
mm 0
Dl 6.97 mm 0
L - 111 65 mm
197
Exhaust valve
D - 33 mm 0
Dl 7.96 mm 0
L - 111.5 mm
Fig. 05/6
Valve spring (198)
Each valve has a double progressive valve spring. The
spring can be installed in either direction.
Color code: yellow-black.
Refer to special tool section for removal and installation tools.
32
202 Intake valve stem seal
203 Exhaust valve stem seal
Due to the different ID they are not interchangeable.
A..
.
.
EXIT
.
05
Engine 102.983
Checking and adjusting valve clearance
Chain drive
A 31
The valve clearance is measured between cam base
27
A
circle and cup-type tappet (arrows, Fig. 05/3).
Valve clearance (in mm)
Valve
Coolant temperature
60-80°C
up to 5o”c
(engine warm)
(engine cold)
Intake
0.10 - 0.20
0.15-0.25
Exhaust
0.25 - 0.35
0.30 - 0.40
If the valve clearance is too large or too small install a
thicker or a thinner thrust plate (220, Rg. 05/3).
- - 4 E
4A-
- 1 2
- 3 3
- 3 2
35-
-18b
- 2 1
22-
--25
There are 23 thrust plates of varying thickness
(0.025 mm increments). 15 thrust plates are available
for repair sector (0.05 mm increments). The thickness
dimension is stamped into thrust plate.
-5
l-
A storage box is available for storing thrust plates (refer to special tools). For checking and adjusting refer
to maintenance jobs.
The valve clearance must be checked during maintenance service every 24 000 km (15,000 miles) and
adjusted, if required.
Fig. 05/7
1
4A
4E
5
12
18b
21
Crankshaft
Camshaft sprocket exhaust
Camshaft sprocket intake
Crankshaft sprocket
Intermediate sprocket
Idler sprocket
Single roller chain
22
Tensioning rail
25
27
Guide rail
Holder
31
Guide rail
32 Guide rail
Holder
33
Chain tensioner
35
Check bores
A
33
EXIT
Camshaft sprockets (4 A and 4 E)
The camshaft sprockets have a shaft end by which
they are mounted in the cylinder head.
Bearing dia. 28 mm, same as camshaft bearing.
Each camshaft is fastened to a camshaft sprocket by
four screws M 6 x 25 mm (10). The hole pattern of the
four screws is non-symmetrical. Therefore, they can
only be screwed on in one position.
The camshaft assembly with camshaft sprocket is
axially fixed by a collar on the shaft end of the respective camshaft sprocket running in a groove in the
cylinder head.
When the two bores (2 mm dia.) in the camshaft
sprockets are opposite each other (arrows) the piston of the 1st cylinder is in TDC position of the compression stroke.
Gghtening torque 12 Nm.
The bearings are supplied with oil via the hollow
camshaft sprockets.
The front bore on the intake camshaft sprocket is
closed with a sheet metal plug.
On the exhaust camshaft sprocket the bore is closed
by the hex. socket head screw for mounting the driver
for the hydraulic oil pump of the level control system.
The camshaft sprockets are of a different design due
to the shaft ends.
Fig. 05/9
Repair note
The camshaft sprockets need not be removed for removal and installation of camshafts.
Single roller chain (21)
The single roller chain has 134 links. For repairs, a
timing chain with a connecting link is available. The
connecting link is riveted with the riveting tool
000 589 58 43 00 (as on diesel engines) and the rivet
set 103 589 01 63 00.
Fig. 05/8
34
EXIT
.. . . . . . . . . . . . . . . . . . . . . . . . . . .
Engine 102.983
Guide rail (32)
Tensioning rail (22)
Due to the longer timing chain drive, the guide rail (32)
prevents vibrations between intermediate sprocket
and idler sprocket. The guide rail is snapped into
bracket (33). This bracket is fastened with a pin in a
bore at the bottom and at the top with a timing chain
housing cover screw at the boss (arrow) of the cylinder block.
Fig. 05/12
Version A
Version B
Engines 102.92/93/96/980
Engine 102.983
The tensioning rail differs in shape and length from
that of the other engines 102. They are not interchangeable.
Fig. OWlO
Guide pail (31)
Guides the timing chain between the sprockets and
floats on the two pins (27a) of bracket (27) and is secured by the lockrings (34). The axial clearance of the
guide rail (31) is limited through the use of two spring
washers (28).
Fig. 05/l 1
The intermediate sprocket floats on the shaft. The
shaft is pressed into the cylinder head and closed by
a plug M 18 x 1.5 mm (14) and a sealing ring (15)
towards the outside.
Fig. 05/13
Repair note
In case of noise complaints from the area of the cylinder head front, check if spring washers (28) are installed.
35
EXIT
Engine 102.983
05
Repair note
The intake camshaft sprocket, the chain tensioner
and the radiator shroud must be removed for removal
and installation of the intermediate sprocket.
97
71
73
Hydraulic oil pump drive
The hydraulic oil pump for level control is mounted to
the cylinder head with a separate flange. It is driven by
the camshaft sprocket of the exhaust camshaft. For
layout, refer to Fig. OS15
242 235 243 235a
Fig. 05/15
55 Cylinder
36
241
head
Bearing cap
236
237
85
97
163 a
Valve cover
Valve cover gasket
Camshaft sprocket, exhaust
Drive sleeve
Mounting screw,
drive sleeve
238
241
Flange
O-ring
235 a
Driver
66 a
Fig. 05/14
isa
163a
237
-55
236
245
238
EXIT
07.3
Engine 102.983
Mechanically/electronically controlled gasoline injection system (CIS-E)
The construction and function of the gasoline injection system is similar to engine 102.985 except for the
following modifications:
For this reason, the following description covers only
the modifications and not the complete system.
Modifications:
Maximum engine speed cut-out is controlled by
the fuel pump relay
CIS-E electronic control unit with air/fuel mixture
adaptation by microprocessor and logic circuit
Fuel pump (same as models 107 and 126) with
integrated suction damper
Intake air temperature sensor on air filter
Altitude correction capsule
Fuel pump package suspended on rubber rings
System pressure increased to 5.8 bar
Electronic idle speed control by a single coil rotary
air valve. The bypass adjusting screw was eliminated
Fuel distributor and airflow sensor adapted to
engine
Throttle valve switch with idle and full load contact
Air enveloped injection valves
Deceleration shutoff microswitch
Location of injection valves and cold-start valve
modified
02-sensor replacement indicator was replaced by
an 02-sensor malfunction indicator.
37
EXIT
Engine 102.983
Q7.3
Input signals affecting the electronically controlled
mixture correction
Full load contact
system pressure
Engine speed
lower chamber
pressure
Lambda signal
sure (altitude cor-
-
controls
idle speed
- __I
Cruise control
t
Start enrichment
After-start enrichment
Warm-up enrichment
Acceleration enrichment
Full load enrichment
Decel shutoff
Lambda control
Altitude correction
EXIT
. ,. . ,. . . . . . . . . . . . . . . . . . . . . . . . . . . . . . . . . . .
Engine 102.983
07.3
Components and function
Fuel pump package
Fuel pump relay (N16/3 or N16/4)
The fuel pump package is located at the left in front
of the rear axle on the frame floor, seen in driving direction. The fuel pump package is suspended on rubber rings (35).
The relay is located on the right side in the component compartment.
N16/3 is used on manual transmissions and N16/4 on
automatic transmissions with the following functions:
cold start valve activation
rpm limitation
kickdown shutoff (N16/4 only)
Fig. 07.312
14 Fuel accumulator
21 Fuel filter
M 3 Fuel pump
35 Rubber rings
Diaphragm pressure regulator (40)
Fig. 07.3/l
The system pressure was increased to approx. 5.8
bar. The pressure is set by manufacturer and cannot
be adjusted.
Cold start valve activation
Its function depends on coolant temperature and
cranking speed signal. Voltage supply is via the fuel
pump relay. The length of time during which the coldstart valve injects fuel is dependent on the coolant
temperature. For example, at - 20 Oc the valve opens
for 10 seconds. Above 15% the valve remains
closed.
If the engine starts before the cold-start valve completes its cycle, cold-start injection is canceled immediately.
Maximum engine speed cut-out
If the fuel pump relay receives a certain frequency
signal corresponding to the maximum engine rpm,
the contact between circuit 30 and 87 is interrupted
and the fuel pump is turned off.
Fig. 07.3/3
40 Diaphragm pressure regulator
50 Supply system pressure
50a Line to fuel cooler
51
Fuel return flow
39
EXIT
Engine 102.983
Mixture preparation
Ovewoltage protection relay (Kl)
The fuel requirement is adapted to the various engine
load conditions by wider metering slots (29) in the
metering sleeve (28). The air funnel in the air flow sensor is designed for an air-fuel mixture ratio of /z = 1.
The relay is located in the component compartment in
driving direction on the right side (Kl). The wiring was
correspondingly changed.
For better mixture preparation at idle air is injected
around the injection valves similar to engines 1161
117.
Note: Due to the limited space, fuel line 117 070 28 32
must be used for measuring lower chamber pressure
at the pressure connection.
Fig. 07.3/6
Intake air temperature sensor (B17/2)
Fig. 07.3/4
27
27 Control plunger
28 Metering sleeve
29 Metering slot
The temperature signal is transmitted to the CIS-E
control unit. The resistance values are identical to the
coolant temperature sensor. At low ambient temperatures a correction of the acceleration enrichment
takes place.
Fig. 07.3/5
40
2 Insulating sleeve
Fig. 07.3/7
3 Plastic supporting ring
a Fuel
b Air
c Fuel-air mixture
B 17/l
B 17/2
Intake air temperature sensor (EZL)
Intake air temperature sensor (CIS-E)
EXIT
ngine 102.983
Coolant temperature sensor (NE)
The coolant temperature is picked-up by a dual temperature sensor (arrow). One temperature is transmitted to the US-E control unit and the other to the
electronic ignition control module (EZL). The nominal
test values are the same for both temperature signals.
Their test values correspond with the coolant temperature sensor of model 201.024.
07.3
The basic control functions of start enrichment, afterstart enrichment, warm-up, acceleration and full load
enrichment, as well as deceleration shutoff are the
same as previously, however the control values are
adapted to this engine.
Cranking enrichment/after-start enrichment
During cranking, the microprocessor in the control
unit recognizes the cranking speed (start of cranking
above 30 rpm, end of cranking approx. 500 rpm) from
rpm impulses. When the cranking speed is attained,
the control unit releases the start enrichment and the
after-start enrichment. Extent and duration of enrichment (current on EHA) depend on coolant temperature.
The input of the cranking signal (terminal 50) into the
CIS-E control unit is eliminated.
Acceleration enrichment
Fig. 07.3/8
It becomes effective in the warm-up stage and with
the engine at operating temperature. The current to
the EHA is dependent on acceleration.
61S-E control unit
Full load enrichment
It is located in the component compartment in driving direction on the right side (arrow).
Effective with throttle valve fully opened. Depending
on the engine speed, the current at the EHA can vary
between 5 mA (-) to 10 mA (+). Lambda control is set
by the control unit (no regulation).
An idle speed contact is additionally integrated in the
switch. The idle speed signal is required by the electronic ignition switching unit.
Deceleration shutoff
Changes to the deceleration shutoff are as follows:
Restart of fuel injection begins at an engine speed of
1500 rpm.
Fig. 07.3/9
Deceleration shutoff occurs only if the engine speed
exceeds 2500 rpm.
Current to the electrohydraulic actuator (EHA) is
approx. 45 mA (-).
New routing of wiring harness.
(For complete wiring diagram, refer to Fig. 07.3/13).
41
EXIT
Engine 102.983
07.3
Logic circuit
Input signals from the various sensors and switches
are continuously monitored by the electronic control
unit. If, for example, with the engine at operating temperature, a rapid temperature change is simulated by
unplugging the coolant temperature sensor - the
microprocessor in the control unit will compare this
momentary temperature with the temperature in its
memory. The control unit will recognize the abrupt
temperature change as a short circuit, and is programmed to the fixed operating mode.
The function of the idle speed control system is extended by the air flow sensor voltage signal. As a result, the control unit recognizes the momentary air
flow rate. In combination with the engine speed, the
position of the microswitch and the coolant temperature, the activation of the idle speed air valve and
thereby the idle speed will be determined.
Note: At deviating idle speed (too high or too low) the
voltage signal must be checked on the air flow sensor.
Idle speed air valve
The control unit does not recognize gradual changes
as malfunctions, and will continue to operate normally.
Rxed operating mode
In the event of an illogical signal received by the control unit (i. e. system malfunction, open or short circuit) the control unit will automatically revert to a
Fixed Operating Mode (FOM). This means that the
engine will continue to run but not at its optimum,
electronically controlled performance level.
Designed as a single coil rotary actuator with a twopin connection.
The adjusting screw for bypass air was eliminated.
The idle speed air valve has the following functions:
The electronic control unit supplies a specific voltage to the air valve which determines the respective valve opening and thereby the engine speed.
The nominal idle speed is controlled depending
on temperature, between 1200 rpm at - 30 OC to
890 1- 50 rpm at -I- 70 OC.
C&-sensor
With the ignition switched on (engine not running)
the idle speed air valve is activated by a specific
voltage. The port for the fixed operating mode is
closed and the control port is opened.
The 02-sensor replacement indicator is now an 02sensor malfunction indicator. The 02-sensor malfunction light will come on only if a malfunction is
present in the 02-sensor circuit. The O,-sensor malfunction indicator lamp receives voltage from the CISE control unit. The indicator lamp lights up briefly
when ignition is turned on.
If the voltage supply fails, the port for the fixed
operating mode is opened automatically.
Electronic idle speed control
The function of the electronic idle speed control is essentially the same as previously.
The
control unit processes the following information:
Engine speed (ignition terminal TD)
Coolant temperature
Idle speed signal (microswitch)
Air flow sensor, voltage
Voltage, altitude correction sensor
Automatic transmission, shift lever position
A/C compressor, cut-in signal
85
89
91
87
86
90
84
Fig. 07.30 0
84
85
86
87
Spiral spring
Shafl
Magnetic coil
Coil Jacket
89
90
91
Aperture valve
Coil cap washer
Hollow shaft
c..........^ _
................
.,
_
EXIT
.
ngine 102.983
07.3
Rpm stabilization on engines with A/C compressor
engaged
Idle speed stabilization on engines with automatic
transmission
When the air conditioning system is switched on, the
CIS-E control unit (terminal 19) is connected to voltage. This signal goes over a time delay relay (350 ms)
to the A/C compressor control unit. The CIS-E control
unit processes the signal and gives a specific signal
to the idle speed air valve. The control opening in the
air valve becomes larger before the A/C compressor
is engaged and the idle speed deviates only slightly.
With the selector lever in a driving position, the
ground connection to the starter is interrupted at terminal 50 of the starter lockout switch.
Y
Wll
=F
Ground is present in position P and N. The control unit
processes the signal change and transmits a defined
voltage signal to the idle speed air valve, so that a
specific idle speed will result.
l---W
Fig. 07.3/l 1
1
12
92
93
f3 1 l/2
N
3
S 2712
Function diagram of electronic idle speed control
Fuel distributor
Intake manifold
Injection valve
Insulating sleeve
Coolant temperature sensor (2-pin)
CIS-E control unit (25pin connector)
Micro switch, deceleration shut off
W
w
10
11
Ground, battery
Ground, engine (electric wire connection)
bl
br
- blue
- brown
Y
Y
X
6
8
48
Idle speed air valve
Cold start valve
Solder terminal in wiring harness
to overvoltage protection relay (pin 2) circuit 87
to ignition control module connector (teminal 1)
ge
gn
gr
rt
SW
ws
- yellow
- green
V
Y
-
grey
red
black
white
43
EXIT
Engine 102.983
cu.3
Idle speeds depending on transmission are shown in
the following table.
Idle speeds above 70 OC coolant temperature
Idle speed rpm
Manual
transmission
890 3~ 50
shift lever position ‘V”or “N”
Automatic
transmission
driving position engaged
670 + 50
X60/1
X60/2
X48
y - 0,75gn/sw + 0,75gn/sw
N3
1
G 312
ad---o,75 dc
1
q75rt/ge
I
1072-1237112
Fig. 07.3/12
B
B
B
G
K
N
s
s
w
w
X
44
2
11/2
18
3/2
1
3
2712
2912
10
11
48
Function diagram, CIS-E gasoline injection system
Air flow sensor position indicator
Coolant temperature sensor (2-pin)
Altitude correction capsule
OS-sensor, heated
Overvoltage protection relay
CIS-E control unit (25pin connector)
Micro switch, deceleration shut off
Throttle valve switch, idle and full load contacts
Ground, battery
Ground, engine (electric wire connection)
Solder terminal in wiring harness
X 56
Plug connection, throttle valve switch
X 60/l
Plug connection, On-sensor heating coil
X 6012 Plug connection, On-sensor signal
Y
1
Electrohydraulic actuator (EHA)
Y
6
Idle speed air valve
a
t
to Indicator lamp, 02-sensor malfunction
to Fuel pump relay, circuit 87 connector
(terminal 2)
Y
to ignition control module connector
(terminal 1)
f
to ignition control module (EZL) connector
(terminal 2)
bl
br
ge
gn
gr
rt
SW
ws
-
blue
brown
yellow
green
-
grey
red
black
white
__,____ _ . .
,
EXIT
..I......
yy ./._______
Engine 102.983
07.3
Al FelOf
M3
r-- ^-?
-_ ,,- _,*.. . . . . . . .
N112
1071- 13 271/l
Fig. 07.3/13
Wiring diagram, US-E gasoline injection system
A
A
B
le10
1~5
2
Indicator lamp, On-sensor
Tachometer
Air flow sensor position indicator
w
x
x
11
11
14
B
B
B
F
Ill2
1712
Coolant temperature sensor (2-pin)
Intake air temperature sensor
Altitude correction capsule
X
x
18
24
x
x
33
35
G
K
M
N
N
N
N
R
S
s
w
372
1
3
l/2
3
6
1614
1771
2712
2912
3
X
X
X
X
Y
Y
Y
48
56
60/l
6012
1
6
8
W
w
6
10
18
1
Electrical center
02-sensor, heated
Overvoltage protection relay
Fuel pump
Ignition control module (EZL)
CIS-E control unit (25-pin connector)
A/C compressor cut-out control unit
Fuel pump relay (automatic transmission)
Bridge, CIS-E
Micro switch, deceleration shut off
Throttle valve switch, idle and full load contacts
Ground, left front wheel housing
Ground, in trunk on left wheel housing
Ground, battery
e
X
Ground, engine (electric wire connection)
Diagnostic socket/wire connector, terminal TD
Plug connection, circuit 50
Plug connection, tail lamp harness
Plug connection, head lamp harness
Plug connection, CIS-E system to cruise control (1 -pin)
Plug connection, circuit 30/circuit 61 (battery)
Solder-terminal in wiring harness
Plug connection, throttle valve switch
Plug connection, On-sensor heating coil
Plug connection, On-sensor signal
Electrohydraulic actuator
Idle speed air valve
Cold start valve
to wire connector, circuit
to pressure switch, A/C
(EHA)
30 (fuse and relay
compressor
Note: Unmarked ground connections are grounded on engine or chassis.
The wire on terminal 6 (circuit 87 K) on the fuel pump relay connector
does not apply to vehicles with manual transmission.
45
EXIT
Engine 102.983
07.3
Altitude cormction
If the electronic control unit operates in a fixed mode,
correction for altitude will not take place.
Depending on altitude, the amount of fuel is changed
based on a signal from the altitude correction capsule
(B 18).
With increasing altitude, i. e. decreasing air pressure,
the mixture will be adapted to the altitude by a reduction of the voltage.
With the ignition switched on or with the engine running, the altitude correction capsule will receive a
constant voltage signal (approx. 5 volts) from the
control unit.
Measurements are made between terminal 1 and terminal 3 of the altitude correction capsule.
Fig. 07.3/l 4
____
46
_
Height above
sea level
Barometric pressure Voltage at altitude
correction capsule,
plug connected
m
mbar
volts
0
1000
2000
1013
899
795
4&l
3t1
2+1
.............................
_
..y -_ .,....... -._.
.
EXIT
.
Engine 102.983
electric
Q7.3
components of Cl
injection system
(after checking fuel pressures and for internal leaks)
Sp@&l boss
Adapter plugs
for test cable
102 589 04 63 00
903589036300
102 589 05 63 00
201 589 00 99 00
On-off
ratio tester
(e. g. Bosch
KDJE-P 600)
103589006300
909 589 00 21 00
1
Conventional testers
Multimeter’)
e.g. SUN DMM-5
‘) Available through the MBNA Standard Equipment Program
Testing ovenroltage protection relay (K 1)
Switchan ignition, test voltage from control unit
plug (terminal 1) to ground.
I
I
Battery voltage
OK
End of test
I
I
Not OK
1074- 11132
I
EXIT
Engine 102.983
07.3
I
I
Test fuse of overvoltage protection relay.
Fuse OK
I
Fuse not OK
I
I
Switch-off ignition.
Replace fuse.
Switch-on ignition.
Fuse OK
I
Fuse blows
Repair short circuit
Unplug overvoltage protection relay.
Jump connector terminals 1 and 2.
Battery voltage present at terminal 1 of control
unit plug.
OK
I
Not OK
Repair circuit
Test voltage at terminals 6 and 5 on plug of
overvoltage protection relay.
Battery voltage
Replace overvoltage
protection relay
End of test
48
Repair circuit
Fig. 07.3/l 6
. . . . . . . . . . . . L _______.. . . . . . . . . . . . . . . . . . . . . . . . . . . . . . .
,_
~ . . . . . . . . . . . . . ______.. . . .
___
.
.
_
EXIT
,
Engine 102.983
07.3
Testing coolant temperature sensor
Unplug coolant temperature sensor. Test resistance from sensor terminal to ground.
5omo
4oooo
30000
'0
z
I
20000
s
10000
6000
6000
4000
3000
For nominal value, refer to diagram.
2000
1000
800
Test sensor resistance at two temperatures.
600
Example:
400
300
2
K
+20°C-2.2-2.8 kQ
-l- 80 OC = 290-370 0
200
10
-30-20
0
20
40
60
80 IO0
120 T
Fig. 07.3/l 7
Replace temperature
sensor.
Connect test cable to EHA. Set multimeter to
mA. Switch on ignition. Read current value.
Engine not running, reading approx. 50 mA.
Engine at idle speed and operating temperature - reading fluctuates.
Engine at idle speed, -I- 20 “c coolant temperature simulated with 2.5 kO tost cable
(Fig. 07.3/20). 02-sensor plug disconnected
- Reading 5 - 15 mA.
Ftg. 07.3/l 8
49
EXIT
Engine 102.983
07.3
Unplug EHA. Test resistance of EHA.
I
Resistance 19.5 _+ 1.5 Q
End of test
Replace EHA.
Test green/red wire from terminal 21 CIS-E
control unit to temperature sensor plug for
continuity (see wiring diagram).
Resistance approx. 0 0
Repair
interruption.
Test brown/black wire (terminal 10) and black
wire (terminal 12) between control unit and EHA
for continuity.
Resistance approx. 0 R
Replace control unit.
End of test
50
Repair
interruption.
EXIT
Engine 102.983
07.3
Testing acceleration enrichment and
air flow sensor position indicator
Connect test cable to EHA. Set multimeter to
mA. Simulate i- 20 OC with 2.5 kQ test cable (Fig.
07.3/20). Disconnect O,-sensor plug. Start engine (increased idle speed).
Nominal value 5-l 5 mA. Increase engine speed
quickly, current value should increase.
Fig. 07.3119
End of test
Stop engine. Deflect air flow sensor plate with
adjusting device from fuel quantity comparison
tester until the upper edge of the air flow sensor
plate is in alignment with lower edge of the
cylindrical part of the air funnel. Loosen plug of
air flow sensor position indicator so that the
voltage can be measured at the pins (do not
disconnect plug). Switch on ignition.
(Refer to Fig. 07.3/22)
Terminal 3 and terminal 1 : approx. 5 V
Terminal 2 and terminal 1 : 0.2-0.5 V
Fig. 07.3/20
I
I
Voltage increases continuously to
approx. 5 Volts.
OK
I
Not OK
Replace air flow
sensor position
indicator.
Fig. 07.3121
51
EXIT
Engine 102.983
07.3
continuity (see wiring diagram for
wire colors and terminal numbers).
Fig. 07.3/22
interruption
E control unit plug ter-
Repair
interruption
Test wires between CIS-E control unit plug and
EHA plug for continuity (see wiring diagram for
wire colors and terminal numbers).
I
I
Resistance approx. 0 0
OK
Replace CIS-E control
End of test
52
I
I
Not OK
Repair
I
. . . . . _._________.________ . . ~.
._
. ,. c . . . . . . . . _ ._ _ 2...
Engine 102.983
EXIT
07.3
Testing throttle valve switch
Disconnect plug between throttle valve switch
and CIS-E control unit. Test resistance of
throttle valve switch.
Idle contact: Idle position approx. 0 Q
Full-load position approx. 00 C
Full-load
Idle position approx. 00 R
contact:
Full-load position approx. 0 Q
Partial-load position approx. 00 0
Fig. 07.3/23
Adjust or replace
throttle valve switch
Fig. 07.3/24
S 29/2 Throttle valve switch plug (idle and full load contacts)
full load/idle speed stabilization
Throttle valve switch plug
X 56
1 Idle contact (LL)
2 Common
3 Full-load contact (VL)
End of test
Note: Without an idle speed signal, idle speed will be
irregular.
53
EXIT
ngine 102.983
07.3
Testing cold start vahfe activation
ignition turned off. Pull plug off coolant temperature sensor. Unplug green cable on ignition
control module. Crank engine and check voltage at plug of cold start valve.
Minimum voltage 10 V for 10 to 15 seconds
OK
I
Not OK
Check wire from cold start valve to
fuel pump relay, terminal 4 (circuit
87 V) and ground wire to engine
ground for continuity.
I
Fig. 07.3/25
Resistance approx. 0 Q
Repair interruption
Check voltage between fuel pump
relay plug terminal 12 as well as terminal 2 and engine ground. Crank
engine.
Minimum voltage at terminal 12 =
10 V. Voltage at terminal 2 = 3 to 5 V
(coolant temperature sensor plug
disconnected).
Replace fuel pump
relay
End of test
54
Repair
interruption
Fig. 07.3/26
EXIT
Engine 102.983
07.3
Testing intake air temperature sensor
Unplug intake air temperature sensor. Test
resistance from sensor terminal to ground.
50 000
40 000
30000
‘D
z
,
f
0
20000
10000
For nominal value, refer to diagram.
1000
I300
Example
600
+ 20 OC = 2.2 - 2.8 kQ
OOC-5.5-6.1 kn
OK
Not OK
Replace intake air
temperature sensor
“
I
10
-30-20
Fig. 07.3/27
Check wire between intake air temperature
sensor and ground as well as wire to CIS-E
control unit terminal 11 for continuity.
Resistance approx. 0 Q
Repair interruption
Fig. 07.3/28
End of test
0
I
20
I
40
60
I
80
100
1
120%
EXIT
Engine 102.983
07.3
Testing electronic idle speed control
Connect test cable to idle speed air valve and to
lambda control tester 909 589 00 21 00 (Bosch
KDJE-P600). Push IR 100 % button.
Engine at idle (operating temperature).
Nominal value: 35 to 45 % at 890 t_ 50/min.
OK
I
Not OK
Perform idle speed stabilization test
on page 75.
Readout 0 % or 100 %.
Disconnect plug from idle speed air valve. Connect battery voltage to idle speed air valve.
The idle speed air valve switches audibly. This
can also be felt.
OK
Not OK
Replace idle speed
air valve
Test voltage supply according to wiring diagram.
Test red/white wire for continuity between terminal 1 of idle speed air valve plug and terminal
3 of CIS-E control unit plug.
Test input signals:
Coolant temperature
sensor, Air flow sensor
position indicator,
Idle speed contact on
throttle valve switch
56
Repair
interruption
.
.
.. . .
. , .., . . . . . . . . . . . . . . . . _ . . . . . . . . . . _ . _
Engine 102.983
EXIT
Q7.3
Engine idle speed stabilization test
Perform tests in both columns
Automatic transmission in gear
Engine at idle
speed and operating temperature,
place selector
lever in a driving
position
AK cormpressor
engaged
Engine at idle
speed and operating temperature.
Turn on A/C compressor, automatic
transmission
in “P” or “N”.
Nominal value
620 to 720 rpm
Nominal value
End of test
Test input signal
on control unit.
Measure voltage
between terminal
16 and battery (-#-).
Test input signal
on control unit.
Measure voltage
between terminal
19 and ground.
Position P and N:
battery voltage.
With driving position engaged:
voltage drops.
Compressor On:
approx. 12 Volts.
Compressor Off:
approx. 0 Volt
Repair interruption according to
wiring diagram.
Repair
interruption.
P
End of test.
57
EXIT
Engine 102.983
07.3
Testing lamkxla control
Engine at idle.
Engine oil temperature 75 to 85°C.
Connect lambda tester to diagnostic socket.
Press 100 % IR button.
Readout 50 f: 10 Oh.
OK
End of test
End of test.
58
Not OK
_. , , . . . . . . .
. . . . . _.l . . . . . . . . . . _ . . _
_
Engine 102.983
. ,
EXIT
07.3
Testing @-sensor
Note: The 02-sensor must be tested with the engine
at operating temperature.
Function test: With the engine running, deflect airflow
sensor plate slightly by hand. The needle on the
lambda tester must move to the lean mixture stop. If
not, perform the following test:
Disconnect 02-sensor plug and connect male
part of plug to ground.
age between fe-
Sensor voltage above 450 mV
Replace 02-sensor
End of test.
Testing 02-sensor heater (engine shut off)
circuit). Pull off fuel pump relay and jump connector terminals 7 and 8.
Reading approx. 12 volts (battery voltage)
Repair interruption
cable (102 589 04 63 00) with adapter plugs
903 589 03 63 00. Test current draw.
Nominal value above 0.5 A
Replace 02-sensor
End of test.
59
EXIT
Engine 102.983
07.3
Test and adjustment data
Static current at EHA Engine not running, ignition “ON”
Coolant tempefature
sensor
Coolant temperature
-I- 20 OC (basic warm-up value)
Coolant temperature
-I-80°C
Lambda control
Engine at idle
Mm
Resistance
Current on El-IA
Resistance
Current on EliA
2.2-2.8 kn
5-15 mA
290-370 n
value fluctuating
50 * 10 %
Current on EHA
Deceleration shutoff
and control range
approx. 50 mA
approx. 45 mA (-)
890 t- 50 rpm
6800 -t 50 rpm
Idle speed
Max. engine speed
Fuel pressures
System pressure at idle with
engine cold or at operating temperature
5.7 - 5.9 bar
Lower chamber pressure with engine at operating temp.
0.4 bar below previously measured
system pressure
Lower chamber pressure
at ==I- 20 OC coolant temperature
with the vehicle at
standstill, at idle speed
0.5 bar below previously
measured system pressure
Acceleration enrichment
above 3.8 bar
Decel shutoff
lower chamber pressure
equal to system pressure
Return flow quantity at orifice in fuel distributor
130 - 150 cc/minute
Fuel pump
Bosch No.
0 580 254 974
Measuring instruction
with engine stopped and a voltage of min.
11.5 volts at fuel pump
Measuring
point
Fuel line
after diaphragm
pressure regulator
min. 1 liter
in 40 seconds
Delivery capacity’)
~__
Current draw
1) For measurmg
60
delivery capacity the fuel tank should be at least half full
approx. 7.5 amps
,
I..
^___
.._
EXIT
. . .
07.3
Model Year 1987 cha
asoline injection sy
to Mechanically/electronically controlled
61
EXIT
62
EXIT
iwe 102.983
07.3
Mechanically/electronically controlled gasoline injection system (CIS-E)
Fuel pump package
The two fuel pumps are arranged in series. A diaphragm damper is integrated in the fuel pumps on the
suction side.
The fuel pump package is located as before on the left
side in front of the rear axle on the frame floor.
Fig. 07.3/l
55 Fuel filter
57 Fuel accumulator
M 3/l Fuel pump
M 312 Fuel pump
63
EXIT
Engine 102.983
07.3
e10
-Al-.-
1071-13 27114
Fig. 07.312
A
A
0
f3
B
lel0
lp7
2
11/2
1712
B
F
18
1
G
K
M
M
N
N
N
N
312
l/l
3/l
312
l/2
3
6
1614
R
S
s
s
W
W
w
17/l
2772
2972
30/l
3
6
10
W iring diagram, CIS-E gasoline injection system
On-sensor. indicator lamp
Electronrc clock/tachometer
Air flow sensor position Indicator
Coolant temperature sensor
Intake air temperature sensor
Altitude correction capsule
Electrical center
Heated 02-sensor
Overvoltage protection relay
Fuel pump
Fuel pump
Electromc Ignition control unit
CIS-E control unit
A/C compressor control unrt
Fuel pump relay (with starting valve control, kick-down cut-out
and rpm limiting)
Reference resrstor, (CIS-E)
Deceleration shut-off, microswitch
Throttle valve switch, full load/idle
Kick-down switch
Ground, left front wheel housing (at ignition coil)
Ground, left rear wheel housing (in trunk)
Ground, battery
w
x
x
X
X
X
X
x
11
11
14
18
24
26/l
2613
33
x
X
x
X
X
X
X
X
Y
Y
Y
Y
35
3612
48
56
48/l
48/2
60/l
60/2
1
3
6
a
e
t
X
Ground, engine (connectron point for ground wires)
Diagnostic socket/terminal block (circuit TD)
Connector,
Connector,
Connector,
Connector,
Connector,
Connector,
circuit 50
tail lamp harness
head lamp harness
engine/headlamp harness (1 -pole, diagnosttc)
engine/stop lamp harness (2-pole)
CIS-E system to cruise control
-pole)
Terminal block, circuits 30761 (battery)
Connector, fuel pump wiring harness/tarllamp wiring harness
Connector sleeve (sholder joint in harness)
Plug connection, throttle valve switch
Connector sleeve, circuit TD (solder joint In harness)
Connector sleeve, circuit 15 (solder joint in harness)
Connector, On-sensor heater
Connector, On-sensor signal
Electra-hydraulic actuator (EHA)
Kick-down solenoid (automatic transmrssron)
Idle speed air valve
Starting valve
(1
to
wire connector, circuit 30 (fuse and relay box)
to cruise control amplifier pin socket 5
to pressure switch, A/C compressor
Note: Unmarked ground connections are grounded on engine or chassis.
The wire on terminal 6 (circuit 87 K) on the fuel pump relay connector
does not apply to vehicles with manual transmission
64
EXIT
QT.3
Engine 102.983
Testing fuel pump delivery
Special tools
103 589 00 21 00
103 589 02 63 00
Testing fuel pump delivery
(see Service Microfiche, Job No. 07.3-130)
Nominal value: 1 liter minimum in 40 seconds. lf this
delivery quantity is not obtained determine cause by
performing a pressure test.
Testing fuel pressure
1
Remove fuel pump package cover (Fig. 07.3/3)
2 Unscrew cap nut on fuel pump M 3/l. Attach connection fitting and pressure gauge 0 to 10 bar
(Fig. 07.3/4)
Fig. 07.3/3
3 Unplug fuel pump relay and bridge terminals 7 and
8 (circuit 30 and 87).
4 Reading on pressure gauge must be between 2
and 4 bar. lf the pressure is below 2 bar, fuel pump
M 3/l is defective. lf the pressure is above 4 bar, fuel
pump M 312 is defective.
5 Disconnect pressure gauge, unscrew connection
fitting and install cap nut.
6 Install fuel pump package cover.
Note:
This test can also be used on engines 103,116 and
117 equipped with two fuel pumps.
Fig. 07.3/4
65
. . . . . . ._ _ _ _ . . . . . . . . _ . . . . . . . . . . . y . . . . . . . . ._ _ _ _ _ _ _ _
._ _.. . . ________
_ .____ .._
-
._
A.2. . . . . . . . . . . . . . . . .._
EXIT
Engine 102.983
Air filter
The air filter housing is adapted to the installation
conditions. It is fastened by one clip and two nuts.
The air is drawn in form outside the engine compartment via plastic scoop (arrow) and air hose (1).
The filter element is a plate-type filter.
Note: Two temperature sensors are installed in the air
cleaner housing.
Repair note
To prevent damage to the air filter housing, disengage
carefully rearward out of clip fastener after the two
mounting nuts have been removed.
Fig. 09/l
Fig. 0912
B 17/l
Intake air temperature sensor (EZL)
B 1712 Intake air temperature sensor (CIS-E)
67
EXIT
Engine 102.983
13
Belt drive
Single-belt drive
Similar to engine 102.985, all the accessories are
driven by a poly-V-belt.
Shock absorber (28) for the tensioning device (1) of
the poly-V-belt (27) and bracket (29) were changed.
The modified shock absorber can be recognized by
its circular grooves.
Length of belt = 1885 mm
Repair note:
In case of repairs, the shock absorber must be fastened in bore (B) of the bracket (29).
68
Fig. 13/l
_ _
. . . . . . . . . . . . L ._ _ _ _._ _ _ _ . . . . . . . . . . . . . . . . . . . . . . .
__
_.
.
,
EXIT
II
,
Engine 102.983
Intake manifold, exhaust manifold
Intake manifold
The intake manifold is adapted to installation conditions and to engine. The diameter of the intake ducts
(per intake valve) is approx. 26 mm. The intake ducts
are fork-shaped prior to cylinder head. As a result,
each intake valve has one intake duct.
Repair note
For removal and installation of exhaust manifold remove screw (arrow) from heater return flow pipe and
pull return flow pipe in direction of engine.
Fig 14/3
During assembly proceed as follows:
Fig 14/l
1 Insert screw for holder (on transmission bell) hand
tight.
Exhaust manifold
2 Tighten nuts for exhaust manifold on cylinder
head.
The exhaust manifold is designed as a steel pipe manifold and enters a dual pipe exhaust system. The
pipes of cylinder 1 and 4, as well as of cylinder 2 and 3
are joined. The pipe diameter is approx. 42 mm.
A sheet metal gasket per cylinder is installed as an
exhaust manifold seal.
3 Tighten screw for holder.
The exhaust system is equipped with two primary catalysts (Fig., 14/4) and one under floor catalyst.
114- 28137
Fig. 1412
Fig. 14/4
69
EXIT
_______________.. . . . . . , _ . . . . . _________________.. . . . .
Engine 102.983
15
Electrical system, engine
EIectronic ignitiin system with electronic timing
Temperature sensor intake air with electronic control 25OC
The ignition system corresponts to that of model
124.030 except for the following modifications:
The ignition control module was adapted to engine 102.983.
Position indicator with longer cable.
Fiywheel or flex plate with two segments.
An additional intake air temperature sensor is installed in the air filter.
High voltage distributor with modified internal
construction.
Fig. 15/2
New spark plug connectors.
Components of ignition system-i
The intake air temperature sensor has an electronic
device, which retards the full load characteristic at
temperatures above 25 “c.
flywheel or flex plate with segments
High voltage distributor (ignition distributor)
Two segments offset by 180° on the ring of the flex
plate or flywheel are used for controlling ignition timing.
Fig. 1513
Pig. 15/l
A
Segment
arrow Locating bore
70
The high voltage distributor is now only serving the
purpose of high voltage distribution. Flyweights,
vacuum control unit and inductance transmitter system are no longer installed.
.
.............................
...I
-
EXIT
.._.
_....._.....___
_ __..................
_ _. . . . . . . . . . . . . . .
Engine 102.983
15
Interference suppression resistors: on distributor cap
per connection 1 kQ, distributor rotor 1 kC2.
Spark plug connector
Fig. 15/4
The distributor cap is attached to ignition distributor
by special M 6 screws. The protective cap for the interference suppression is mounted on distributor cap
and fastened with two star washers.
Plcb=28401
Fig. 15/6
A new spark plug connector with 1 kO interference
suppression resistor is installed.
Note: Twist spark plug connector prior to pulling.
Reference input resistor plug (
Fig. 15/6a
R 16/l)
EXIT
Engine 102.983
15
J
a
-
0,75
0,75br/ge
-
I-
br/gc
I A
Wll
O,% brlrt -+=- 0,75 br/rt
lr-----
d
d
0,75 gn/sw + 0,75 gnlsw
- 975 swtgo
l----- 0J75sw5e
1
I31611
1153-13 32411
Fig. 15/T
B
B
L
N
R
s
s
T
w
11/2
17/l
5
l/2
16/l
513
29/2
1
3
Wiring diagram, electronic ignition system with electronic timing adjustment (EZL)
Coolant temperature sensor
Intake air temperature sensor (EZL)
Position indicator, flywheel/flex plate
Ignition control module
w
x
a
Reference input resistor plug (EZL)
High voltage distributor
Throttle valve switch, full load/idle speed contacts
C
to electrical center, connector S, terminal
(circuit 30)
to electrical center, connector S, terminal 4 (circuit 15)
d
e
f
to CIS-E control unit plug (terminal 5)
to CIS-E control unit plug (terminal 21)
to electrical center, connector U, terminal 6 (circuit 15 R)
Ignition coil
Ground, front left wheelhousing (ignition coil)
b
11
11
Ground, engine (electric wire connection)
Diagnostic socket, terminal block, terminal TD
to CIS-E control unit plug (terminal 13)
11
.72
EXIT
Engine 102.983
emoval and iris
15
h voltage distributor
Removal/installation is as before. Pay attention to the
following items:
1
Ignition distributor cap is fastened with screws.
2
Adjustment of ignition timing is no longer required.
The ignition timing is determined by the switching
unit.
Note
Clean ignition cable cover, loosen the 3 screws and
remove.
Fig. 1518
Loosen spark plug connectors by twisting to the right
and left and pulling off.
Fig. 15/9
73
EXIT
Testin
L electronic i wition system
Test values
Voltages
Ignition on
(engine off)
Coil terminal 15 (terminal 5 diagnostic socket)
Battery voltage
between coil terminal 15 and 1
(terminal 5 and 4 diagnostic socket)
o v
4-pole round plug
(ignition control module)
Terminal 15 and terminal 31
Battery voltage
Terminal 16 and terminal 31
Battery voltage
Resistances (test data at 0 OC to 100 “C)
Primary (terminal 1 and 15)
0.3-0.6 n
Secondary (terminal 1 and 4)
7-13 kQ
Ignition coil
Position sensor
680-l 200 0
Reference input resistor (EZL)
750 R
Dwell angle
at cranking speed
1 O-54 % or 9-49 O
at 4000 rpm
30-60
O/O
or 27-54 O
Ignition timing (firing point)
at cranking speed
TDC3-2’
at idle
below 20 O
at 4000 rpm
without vacuum, intake air temperature
sensor plug pulled off
18-22 O
at 4000 rpm
with vacuum, intake air temperature
sensor plug pulled off
29-33 O
Conventional testers
Multimeter’)
SUN DMM-5
Engine tester’)
SUN EMT-l 019,
Master 3, MCM-2110
Tachometer’)
All-Test 361 O-MB
I) Available through the MBNA Standard Equlpment
74
Program
EXIT
Engine 102.983
15
For test procedure see engine 103 with the following
exception.
Disconnect intake air temperature sensor plug
(arrow) when checking ignition timing at 4000 rpm.
Fig. 15/10
I3 17/l Intake
air temperature sensor (EZL)
Spark plugs (with conical seat)
BERU
BOSCW
CHAMPION
Designation
Electrode gap
Part number
Designation
Electrode gap
Part number
Designation
Electrode gap
Part number
14 K-GIN
0.8
102 159 1203
NGDC
0.8
102 159 1203
s7 YC
0.8
102 159 1203
75
EXIT
Engine 102.983
1%
Engine lubrication
Lubrication circuit
17
16
1162 -1230211
Fig. 18/l
1
2
3
4
5
Oil strainer
Oil pump
Oil pressure relief valve
Thermostat 110 OC
(in oil filter housing)
Oil filter element
6
7
9
10
11
12
Bypass valve oil filter element
Oil-to-air cooler
Chain tensioner
Camshaft sprocket - exhaust
Camshaft - exhaust
Camshaft sprocket - intake
13
14
Camshaft - intake
Intermediate sprocket
15
16
17
18
Idler sprocket
Oil pressure gauge (instrument cluster)
Oil temperature gauge
Oil pressure sensor
EXIT
Engine 102.983
Oil filling capacities in liters (for approved engine oils, refer to Specifications for service products)
Total quantity for initial filling
5.5
Quantity at oil and filter change
5.0
Oil pan max./min
4.812.8
Oil filter
Even with the thermostat fully opened, a given oil
quantity will still flow directly to oil filter element.
A thermostat (332 b, Fig. 18/2) in the oil filter controls
the oil flow through the oil-to-air cooler.
Opening begins at 110 “C oil temperature. Fully
opened at 125OC oil temperature.
The oil cooler lines are screwed directly into oil filter
housing.
Cup-type tappet and cam lubrication (Fig. WI)
324
323 320a
The cup-type tappet and cams are lubricated in an oil
sump (sump lubrication). The oil sump is filled with
the oil emerging laterally on camshaft bearings (leak
oil).
Oil temperature gauge
For instrument refer to Group 54.
The oil temperature is picked up on the oil filter by a
temperature sensor (67).
327 328 329 333
i
Fig. 18/2
320
Oil filter housing
320a Threaded bushing
321
Return tube
323
Valve cone
324
Compression spring
325
Sprmg retainer
326 Retaining ring
327
Valve cone
328 Valve seat ring
329 Compression spring I
331 Oil filter element
331 a Rubber seal
331 b Rubber seal
332 a Slide
332 b Thermostat
333
Compression spring
‘)
*)
334
335
336
337
338
339
A
B
a
b
C
d
f
g
Plug
Seal ring
Cover
Seal ring
O-ring
Center bolt
Connection to oil-to-air cooler
Connection from oil-to-air cooler
Supply from oil pump
Return flow to oil pan
Uncleaned oil to main oil duct
Cleaned oil to main oil duct
Connection for oil
temperature gauge
Connection for oil
pressure gauge
Fig. 18/3
1) Filter element bypass valve
2) Return flow check valve
Note:
The oil filter is sectioned in different planes to show its
function properly. Therefore, the connections for
hoses and sensors are not always shown in the correct position.
The operating temperature of the oil is 80-l 20 OC.
An increase up to max. 150 OC is permitted. If this value is exceeded, check oil level first. Level should not
be above max. mark.
Engine 102.983
26
Engine cooling
Coolant pump
To provide sufficient clearance for the cylinder head,
the long feed connection (B, arrow) has been moved
downward.
Fig. 20/2
2-pin temperature sensor for CIS-E injection and EZL
ignition system (B 1 l/2).
100 “c temperature switch for fan clutch (S 25/l).
Fig. 20/l
A Coolant pump
Engine 102.985
B Coolant pump
Engine 102.983
Repair note
Coolant pumps are not interchangeable.
Thermostat housing and thermostat
The thermostat housing is sealed with an O-ring to
the coolant return flow pipe in the cylinder head (109,
$19. 01/l 8) and is fastened by 4 screws.
Tightening torque 21 Nm.
The following temperature switches or temperature
sensors are screwed into the thermostat housing:
Temperature sensor for coolant temperature gauge
(B 13).
Thermovacuum valve for fuel evaporation system
(38).
Temperature switch for auxiliary fan 105 OC and A/C
compressor cutout at 115 Oc (S 25/5).
The thermostat housing cover is made of plastic (arrow). The thermostat is the same as for the other 102
engines.
Fan clutch
Function and layout of fan clutch are the same as for
fan clutch of the engine 102.985.
Diameter of the 5-blade fan is 430 mm.
Repair note
The fan cannot be interchanged with fan of other engines 102 in model 201.
Radiator
Light-alloy cross flow radiator (block depth 42 mm),
with screwed on light-alloy oil-to-air cooler.
EXIT
Engine 102.983
Engine mounts
All components of engine mounts are maintenancefree.
The right and left front engine mounts are the same
(engine 102.985 has right and left different mounts).
The rear engine mount is identical with model
201.024 with engine 102.985.
79
EXIT
Engine 102.983
Throttle control
The throttle position is controlled by a Bowden cable
(30) connecting the accelerator pedal to the engine.
The length of the connecting rod to the throttle valve
housing is 82 I!I 2 mm (measured from center of ball
joint to center of ball joint).
Fig. 30/l
30
33
Bowden cable
Accelerator pedal
Fig. 30/2
80
34 Bearing
35 Return spring
Fig. 30/3