1
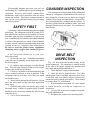
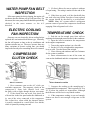
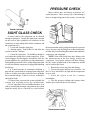
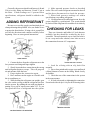
HOW - TO A / C SERVICE Tool And Material Checklist Safety Glasses or Goggles Insulated Gloves Paint Brush Soap and Water Belt Tension Gauge Assorted Wrenches Screwdriver Pressure Tester Fender Covers Jumper Cables Thermometer Do-it-yourself refrigerant kit Ohmmeter * This How-To Guide is designed as a general overview of a vehicle repair procedure. You should always refer to a service manual designed for your vehicle for detailed instructions. incorrect procedure. Parts Plus assumes no liability for an To thoroughly diagnose and repair your car’s air conditioning (A/C) system requires special training and equipment. However, this booklet contains basic maintenance and service procedures that just about anyone can perform. They take a minimum amount of time, yet can save a good deal of money, by preventing unnecessary repairs. SAFETY FIRST CONSIDER INSPECTION The condenser is located in front of the radiator and consists of a refrigerant coil tube mounted in a series of thin cooling fins. Check to be sure that it isn’t clogged with dirt, leaves, bugs, and other debris. Air must flow freely through both the condenser and the radiator. If necessary, gently clean the condenser with a water and detergent solution and a soft brush. Be careful not to bend the fins. Certain parts of the air conditioning system are highly pressurized. The refrigerant used in the system (R-12, also called Freon) can cause severe frostbite if it comes in contact with your skin or blindness if it gets in your eyes. In addition, if Freon contacts a hot exhaust manifold it will turn into phosgene gas, which is fatal if inhaled. For these reasons, extreme caution should be used when working on the A/C, especially when recharging it. Be sure to wear the proper safety equipment, including safety goggles and insulated gloves. If the refrigerant should get in your eyes, follow these steps: 1. Do not rub your eyes. Flush them thoroughly with cold water to gradually get the temperature above the freezing point. 2. If available, apply antiseptic oil to the affected area. This will form a protective film over the eyeball to reduce the possibility of infection. 3. Call an eye specialist or doctor immediately and receive medical treatment as soon as possible. If the refrigerant contacts your skin, treat it like you would any frostbite injury: 4. Do not rub or massage the affected area. Do not put a hot water bottle or any other heat application on the injury. 2. Gradually and gently rewarm the injury using lukewarm water. Contrary to popular belief, frostbite should never be treated by rubbing the affected area with snow or ice. 3. Call a doctor mmediately. DRIVE BELT INSPECTION The A/C drive belt rides around a pulley on the system compressor. The compressor is usually located on the side of the engine opposite the alternator and has a large and small tube attached to it. 1. Check the belt for signs of deterioration. 2. Check the belt for proper tension. Use a belt tension gauge if one is available; otherwise, press down on the belt with your thumb, halfway between the compressor pulley and the drive pulley. There should be no more than 3/4" of deflection. 3. If the belt deflects more than 3/4", use a wrench to loosen the bolts securing the compressor to its brackets. 4. Use a pry bar to mover the compressor outward. This will tighten the belt. 5. Retighten the compressor mounting bolts. WATER PUMP FAN BELT INSPECTION If the water pump fan belt is slipping, the engine will run hotter, thus the radiator will give off more heat. For this reason, the water pump fan belt should be periodically checked in the same manner as the A/C drive belt. ELECTRIC COOLING FAN INSPECTION 3. If a fuse is blown, be sure to replace it with one of equal rating. The rating is marked on the end of the fuse. 4. If the fuses are good, or if the clutch still does not work after any blown fuses have been replaced the system should be checked by a professional. NOTE: Many A/C systems utilize a refrigerant pressure sensor to prevent the compressor clutch from engaging if the refrigerant level is low. TEMPERATURE CHECK 1. Park the car far enough away from walls or On many cars, an electrically driven cooling fan has anything else that might restrict airflow to the condenser. replaced the conventional belt-driven type. Basically, 2. Open the hood to minimize the temperature the fan will operate as long as the air conditioner and in the engine compartment. ignition switches are on. However, because there are 3. Turn on the engine and run it at a fast idle. many variations of electric cooling fans, you should 4. Set the A/C lever on high and the temperature inspect the fan only after consulting the service manual. lever on cold. Turn the blower fan on high. 5. Close al doors and windows and wait 5 minutes for the system to stabilize. 6. Insert a thermometer in one of the center air vents on the dashboard and take a temperature reading. COMPRESSOR CLUTCH CHECK 1. Have someone turn on the A/C while you watchthe compressor. The magnetic clutch on the compressor ’s front hub should lock onto the pulley with a slight, though obvious, movement. 2. If the clutch does not work, first check for a blown fuse in the fuse panel under the dashboard, or in one of the wires connected to the compressor. The in-line fuse, often called the thermal limiter, is usually contained in a small black fuse holder, which is opened by rotating one end. 7. Compare the reading to the manufacturer’s recommended air temperature. This is typically 28° F to 30° F below the outside air temperature, although the difference will be less in very humid weather. 8. If the temperature reading is not cool enough, chances are there is not enough refrigerant in the system. PRESSURE CHECK Many vehicles have test fittings to measure A/C system pressures. This is an easy way of determining if there is enough refrigerant in the system; you can take SIGHT GLASS CHECK In some vehicles, the refrigerant can be checked through a sight glass. Usually the sight glass is located on the receiver (the cylindrical can connected to the condenser) or in the tubing between the condenser and the expansion valve. 1. Locate and clean the sight glass. 2. Start the engine. Turn on the A/C and allow the system to run for 5 minutes. 3. Check the sight glass. No bubbling should be seen, unless the system has a cycling compressor. (If the clutch engages and disengages periodically after the system stabilizes, the system has a cycling compressor.) Some bubbling is normal with a cycling compressor when it is off, but when the compressor is engaged the bubbling should stop. 4. If a small amount of continuous bubbling is detected, the system must be recharged with refrigerant. If the car is three years old or older, the loss is probably due to normal leakage. If the car is newer, it should be checked for leaks. 5. If dense foam is present, the system probably has a major leak requiring service by a professional. 6. If the sight glass is free of bubbles but there is no cold air entering the passenger compartment, the system might be empty; have it checked by a professional. the measurements quickly using an inexpensive pressure tester. On some cars, the fittings are on the accumulator; on other, they’re in the tubing that connects the condenser, compressor, and evaporator. NOTE: Some older Fords have three fittings; take the measurements at the two fittings nearest the compressor. On Chrysler vehicles with three fittings, the one on the cylinder head of the compressor should not be used for this check. 1. Remove the screw caps from the fittings. 2. Turn on the engine and run it at a fast idle. Set the A/C lever and blower on high and the temperature lever on cold. 3. Allow the system to run for 5 minutes and stabilize. 4. Take the pressure readings and compare them with the specs found in the service manual. Generally, the pressure should read between 140 and 6. Make repeated pressure checks as described 250 psi at one fitting and between 24 and 35 psi at earlier. The valve on the refrigerant can must be shut off the other. If both readings are 15 percent below and the hose disconnected to check the pressure. specifications, refrigerant should be added to the 7. When both pressure readings are within system. specifications, stop adding refrigerant. 8. If refrigerant must be added again soon, have the system checked by a professional. The system should be checked if the refrigerant is low and the car is relatively Be sure to wear safety goggles and insulated gloves new. when performing this operation. Also, use fender covers to protect the front fenders. If using a do-it-yourself kit, read all the directions and cautions carefully before There are electronic and halide A/C leak detectors beginning. Here are some general instructions: available, but they should be avoided by the do-ityourselfer. The most practical way to check for leaks is to use a soap and water solution, since leaks occur at the connections between A/C components. ADDING REFRIGERANT CHECKING FOR LEAKS 1. Connect the hose from the refrigerant can to the low-pressure test fitting and finger tighten. 2. Slowly loosen the hose connection at the can tap until refrigerant begins to escape. This will purge all air and moisture from the hose. 3. Finger tighten the connection again. 4. Have someone run the engine at a fast idle with the air conditioner on. 5. While holding the refrigerant can upright, open the valve on the can top so that the refrigerant can flow into the system. By rubbing the can with your hands or putting it in a pail of warm water (under 125° F), you can speed the flow of refrigerant into the system. 1. Look for a fitting with an oily, dark film around it. 2. Dip a clean paintbrush in soapy water and brush a liberal amount of water on the fitting. Watch closely for bubbles. 3. Check the rest of the connections in the system in the same manner. 4. If a leak is detected, try tightening the connection. Freon laced with red dye is very useful in locating leaks. DUCTWORK CHECKS If all of the proceeding checks have been made, but warm air is coming out of the registers, check the ductwork as follows: 1. Move the temperature control lever to see if any change occurs. 2. If it doesn’t, shut off the air conditioner and turn on the heater. 3. Move the temperature control arm again to see if any change occurs. 4. If not, check the cable and the flap door connected to the temperature control lever. You might be able to reach under the dash to reconnect the cable or free a stuck flap. If no substantial airflow is coming out of the registers, do the following: 1. Check the fuses in the blower circuit. Your service manual will show where these fuses can be found. 2. Remove the fan switch and have it tested. (Or test it yourself using an ohmmeter.) 3. Check the blower motor by hot-wiring it directly to the battery with jumper cables.