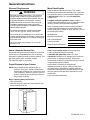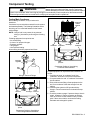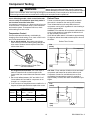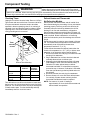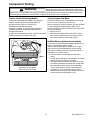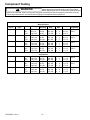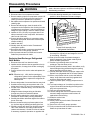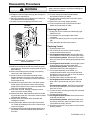
1
Models and manufacturing numbers in this manual Service Upright Freezers ESU12JW ESU15JW ESU17JW ESU20JW ESUF15JW ESUF17JW ESUF20JW ESU12JW ESU15JW ESU17JW ESU20JW ESUF15JW ESUF17JW ESUF20JW AU120KW AU120KW AU150KW AU150KW AU170KW AU170KW AU200KW AU200KW AUF150KW AUF150KW AUF170KW AUF170KW AUF200KW AUF200KW P1311101W P1311102W P1311103W P1311104W P1311105W P1311106W P1311107W P1179615W P1179616W P1179617W P1179618W P1179619W P1179620W P1179621W P1317701WW P1317714WW P1317702WW P1317715WW P1317703WW P1317716WW P1317704WW P1317717WW P1317705WW P1317718WW P1317706WW P1317719WW P1317707WW P1317720WW This manual is to be used by qualified appliance technicians only. Amana does not assume any responsibility for property damage or personal injury for improper service procedures done by an unqualified person. RS1500000 Revision 2 November 1999 Important Information Pride and workmanship go into every product to provide our customers with quality products. It is possible, however, that during its lifetime a product may require service. Products should be serviced only by a qualified Important Information service technician who is familiar with the safety procedures required in the repair and who is equipped with the proper tools, parts, testing instruments and the appropriate service manual. REVIEW ALL SERVICE INFORMATION IN THE APPROPRIATE SERVICE MANUAL BEFORE BEGINNING REPAIRS. Important Notices for Consumers and Servicers ! WARNING To avoid risk of serious injury or death, repairs should not be attempted by an unauthorized personal, dangerous conditions (such as exposure to electrical shock) may result. ! CAUTION Amana will not be responsible for any injury or property damage from improper service procedures. If performing service on your own product, assume responsibility for any personal injury or property damage which may result. To locate an authorized servicer, consult your telephone book or the dealer from whom you purchased this product. For further assistance, contact: 1 (800) 628-5782 first, if no answer call number listed below. CONSUMER AFFAIRS DEPT. AMANA APPLIANCES AMANA, IOWA 52204 OR CALL 1 (800) 843-0304 If outside the United States contact: AMANA ATTN: CONSUMER AFFAIRS DEPT AMANA, IOWA 52204, USA Telephone: (319) 622-5511 Facsimile: (319) 622-2180 TELEX: 4330076 AMANA CABLE: "AMANA", AMANA, IOWA, USA Recognize Safety Symbols, Words, and Labels ! DANGER DANGER - Immediate hazards which WILL result in severe personal injury or death. ! WARNING WARNING - Hazards or unsafe practices which COULD result in severe personal injury or death. ! CAUTION CAUTION - Hazards or unsafe practices which COULD result in minor personal injury or product or property damage. RS1500000 Rev 2 2 Table of Contents Important Information ................................................. 2 Model Identification .................................................... 4 Installation Instructions Unpacking ............................................................... 5 General ................................................................... 5 Location ................................................................... 5 Electrical Connection ............................................... 5 Door Handle ............................................................ 6 Leveling ................................................................... 6 Test After Installation ............................................... 6 General Instructions Electrical Requirements .......................................... 7 Asure Extended Service Plan .............................. 7 Proper Disposal of your Freezer .............................. 7 Model Identification ................................................. 7 Operating Instructions Setting Controls ....................................................... 8 Temperature Control ............................................... 8 Audible Alarm (Some models) ................................. 8 Features .................................................................. 9 Reversible Rack (some models) ............................. 9 Freezing Guide ........................................................ 9 Care and Cleaning General ................................................................. 10 Adhesives .............................................................. 10 Door Gaskets ........................................................ 10 Odor Removal ....................................................... 10 Defrosting .............................................................. 11 Light Bulb (some models) ...................................... 11 General Tips Energy Tips ........................................................... 12 Vacation Tips ......................................................... 12 Normal Operating Sounds ..................................... 12 Before Calling For Service ..................................... 12 Operating Sounds ................................................. 13 Component Testing Refrigeration System Test Procedures .................. 14 Testing Main Condenser ........................................ 15 Testing for Leaks ................................................... 16 Electrical System ................................................... 16 Compressor Electrical Tests .................................. 16 Testing Compressor Direct .................................... 16 Capacitor ............................................................... 17 Overload Protector ................................................ 17 Testing Overload Protector .................................... 17 PTC Relay ............................................................. 18 Testing PTC Relay ................................................. 18 Interior Light and Switch ........................................ 18 Checking Control Operation .................................. 18 Temperature Control ............................................. 19 Defrost Timer ........................................................ 19 Checking Timer ..................................................... 20 Defrost Heater and Thermostat No Defrosting Models ............................................ 20 Freezer Fan No-Defrosting Models ....................... 21 Testing Freezer Fan Motor .................................... 21 Troubleshooting ................................................... 23-25 Disassembly Procedures Replacing Dryer ..................................................... 26 Replacing Compressor .......................................... 26 Replacing Heat Exchanger Refrigerated Shelf Model ....................................... 27 Replacing Heat Exchanger No-Defrosting Models ............................................ 28 Replacing Freezer Shelving Refrigerated Shelf Models ..................................... 29 Replacing Freezer Coil No-Defrosting Models ....... 30 Replacing Light Switch .......................................... 31 Replacing Control .................................................. 31 Replacing Heater ................................................... 32 Replacing Freezer Fan Motor ................................ 32 Cabinet Door Assembly ......................................... 33 Door Handle .......................................................... 34 Door Lock Assembly ............................................. 34 Removing Door Lock Assembly ............................ 35 Cabinet Door Alignment ........................................ 35 Checking Gasket Seal ........................................... 35 Improving Gasket Seal .......................................... 35 Hinge Adjustments ................................................ 35 Cabinet Assembly ................................................. 36 Service Information System Operation .................................................. 37 Checking Operational Pressures ........................... 38 Operational Testing ............................................... 39 Service Hints ......................................................... 39 Refrigeration System Complaints .......................... 40 Refrigerant Leaks .................................................. 41 Evacuation and Charging Procedures ................... 42 HFC134a Service Information ............................... 43 Health, Safety, and Handling ................................. 44 Drier Replacement ................................................ 44 Replacement HFC134a Service Compressor ........ 45 Refrigerant Charge ................................................ 45 Leak Testing .......................................................... 45 Evacuation and Charging ...................................... 45 Dehydrating Sealed Refrigeration System ............. 47 Brazing .................................................................. 47 Refrigerant Precautions ......................................... 47 Open Lines ............................................................ 47 Line Piercing Valves .............................................. 48 Altitude Adjustment ............................................... 48 Cabinet Shell ......................................................... 49 Cabinet Liner (Food) ............................................. 49 Drain System ......................................................... 49 Wiring Diagram and Schematic ........................... 50-52 3 RS1500000 Rev. 2 Model Identification Upright freezer models vary in trim and accessories, but all models have the same basic construction. "Operating Instructions" and "Service Instructions" apply to all cabinets unless stated otherwise. For positive identifications of individual units, state complete serial number, model, and type. This information is found on the serial plate located on front upper right hand corner of foodliner or on some models, exterior back of the outer casing. An explanation of coding contained in Type position is shown below. 1998 and 1999 Model Identification 1997 Model Identification ESU F 15 J W A U F 7 0 K W Color W White Color W White Series H J Series K Feature Level Storage Capacity 12 Cubic Foot 15 Cubic Foot 17 Cubic Foot 20 Cubic Foot 0 Good Storage Capacity 7 Cubic Foot 10 Cubic Foot 15 Cubic Foot 22 Cubic Foot Defrost Type Blank Manual F Free-O-Frost Defrost Type Blank Manual F Free-O-Frost Product ESU Energy Saving Upright Freezer Product U Upright Freezer Amana RS1500000 Rev. 2 4 Installation Instructions Unpacking Remove all protective packaging. Cardboard shipping braces and/or protective tape used to prevent damage to baskets, shelves, speciality racks, and compartment dividers during shipment. Use soapy water to remove any adhesive residue. Do not use alcohol or nail polish remover. Door/Lid, handles, and hinges: Support and secure door lid before transporting or moving the freezer. Install freezer handle if applicable Do not use door or handle for leverage to lift or push unit. Defrost drain plug and drain pan: Verify drain plug is installed on non-frost-free freezers Before operating frost-free freezer verify frost drain pan is installed behind toe grille located at bottom front of freezer with drain hose placed in the pan. Toe grille: Toe grille at bottom front of freezer can be removed to locate drain tube and levelling gliders. Remove toe grille by grasping both ends and pulling straight outward. Replace by pressing ends of toe grille into slots on cabinet and snapping into place. Location These recommendations and explanations may help customer receive maximum efficiency from freezer and avoid service calls. ! CAUTION To avoid personal injury, wear gloves when installing freezer. To avoid property damage, protect soft vinyl or other flooring with cardboard, rugs or other protective material during installation or servicing. If freezer is to be placed in basement, back porch, etc., place freezer on wooden slats up off floor. 1. Freezer is designed for installation as a "freestanding" (not "built-in") unit. 2. Locate freezer with at least 3 inches of clearance on both ends and back to provide adequate air circulation to dissipate condenser heat. 3. Avoid locations near stoves, radiators, hot air ducts, or where sun may cause excessive heat. 4. Do not locate where surrounding temperature could drop below 32°F (0°C). Temperatures below 32°F (0°C) cause compressor oil to thicken delaying lubrication of sensitive components at compressor start-up. 5. Avoid placing freezer on plush carpet which may retard air flow over bottom, causing bottom sweating. Electrical Connection 1. Electrical supply should be checked for proper voltage and ground. ! WARNING Do not, under any circumstances, cut or remove the round grounding prong from the plug. Freezer must be grounded at all times. Do not remove warning tag from power cord. Toe grille General 2. Avoid extension cords. If absolutely necessary, use an Appliance Extension cord (at least 16 AWG) of less than 10 feet. If possible, have freezer on separate circuit. Secure door before moving freezer. Do not use door or handle to lift or push freezer. If hinges must be removed, check instruction label on rear of freezer cabinet. Amana freezers are currently rated for domestic use, not designed for commercial application. Confirm the following items are installed. Free-O-Frost Upright Freezer Models Defrost drain pan behind toe grille. Standard Upright Freezer Models Drain plug in bottom front of freezer liner. (some models) 5 RS1500000 Rev. 2 Installation Instructions Door Handle Leveling 1. If handle trim has not been factory installed, slide right edge of handle trim under right edge of trim retainer. Verify rib on right inside edge of handle trim fits into trim retainer notch. Snap outside edge of handle trim over outside edge of trim retainer. 2. Install handle on freezer door as shown. Verify freezer handle is angled inward towards opposite side of freezer. Secure handle to freezer door with screws provided. Verify screws are secure. 3. Slide end caps over ends of handle until end caps snap in place. End cap marked L goes on top end of handle. End cap marked R goes on bottom end of handle. End caps Handle 1. Install leveling legs under front corners behind toe grille. 2. Level freezer side to side and tilt freezer 1/4" from front to back. Turn legs clockwise to raise freezer and counterclockwise to lower freezer. If freezer cannot be level due to flooring, use shims under rear of freezer cabinet to level freezer. Leveling foot Trim retainer Trim retainer notch Handle trim 3. Check freezer 2 or 3 weeks after loading with food and confirm freezer is level. Test After Installation 1. For proper compressor operation, voltage must be measured at the compressor terminals at the moment of starting. Voltage must be in the range shown on Freezer Wiring Diagram. 2. Check freezer is reasonably level. 3. Check lid gasket seal. 4. Be sure light(s) work. 5. Check lock. 6. Wipe off any dirt and smudges. RS1500000 Rev. 2 6 RS1500000 Rev. 0 General Instructions Electrical Requirements ! WARNING Electrical Grounding InstructionsThis freezer is equipped with a three-prong (grounding) plug for protection against possible shock hazards. If a twoprong wall receptacle is encountered, contact a qualified electrician and have the two-prong wall receptacle replaced with a properly grounded three-prong wall receptacle in accordance with the National Electrical Code. Freezers are designed to operate on a separate 103 to 126 VAC, @ 15 A., with a 60 Hz cycle. Do not under any circumstances cut or remove the round grounding prong from the plug. Freezers must be grounded at all times. Do not remove warning tag from power cord. Do not use a two-prong adapter. Do not use an extension cord. Model Identification Read the Owner's Manual thoroughly. This manual provides proper maintenance information for consumers. Any questions, call the Consumer Affairs Department at 1-800-843-0304 inside U.S.A. and 1-319-622-5511 outside U.S.A. Complete enclosed registration card provided in owners manual and promptly return. If registration card is missing, call the Consumer Affairs Department. When contacting Amana, provide product information. Locate product information on the serial plate. Chest freezer serial plate is located on upper right wall. Record the following information: Model Number: Manufacturing Number: S/N or Serial Number: Date of purchase: Dealers name and address: Asure Extended Service Plan Keep a copy of sales receipt for future reference. Amana offers long-term service protection for this new freezer. Asure Extended Service Plan is specially designed to supplement Amanas strong warranty. This plan covers parts, labor, and travel charges. Call 1-800-528-2682 for information. Locate an authorized servicer by calling 1-800-NATLSVC (628-5782) inside U.S.A. and 319-622-5511 outside U.S.A. Warranty service must be performed by an authorized servicer. Amana also recommends contacting an authorized servicer if service is required after warranty expires. Proper Disposal of your Freezer Amana offers a complete line of appliances, refrigerators, freezers, ranges, cooktops, wall ovens, microwave ovens, dishwashers, washers and dryers. Amana also manufactures a complete selection of high efficiency gas furnaces plus both central and room air conditioners. NOTE: Child entrapment and suffocation are not problems of the past. Junked or abandoned freezers are still dangerouseven if they sit for "just a few days". When you get rid of your old freezer, please follow the instructions below to help prevent accidents. Enjoy this new Amana freezer. Before Throwing Away Old Freezers: Take off the doors. Leave the shelves in place to prevent children from easily climbing inside unit. 7 RS1500000 Rev. 2 Operating Instructions Setting Controls Audible Alarm (Some models) This freezer operates most efficiently in normal household temperatures of 65° to 90°F. Locate audible alarm on right side of freezer cabinet near bottom right corner. Alarm sounds if temperature in freezer rises 10°F or more above normal for selected setting. Alarm may sound if temperature control dial is turned to a much lower/colder setting or if a large amount of unfrozen food is added at one time. Temperature Control Alarm is controlled by a three-position switch. 0 prevents alarm from sounding when freezer is warm, such as during initial start-up or defrosting. 7 1 Ö sounds alarm regardless of temperature. Alarm system should be tested at least once a month. 1 is proper setting for normal freezer use. Return switch to 1 after defrosting. 0 Locate temperature control on right side of interior freezer cabinet wall. OFF W AR 1 ME ST CO 7 LD ES T 2 6 5 3 4 When control is set to OFF, freezer will not cool. Initially, set control to 4. Wait 3 hours after connecting power for freezer to reach desired temperatures, then add food. After 24 hours, adjust control as desired. 1 is warmest setting and 7 is coldest. Set temperatures precisely using a household thermometer that includes temperatures between -5° to 50°F. Put thermometer snugly between frozen packages in freezer. Wait 58 hours. If freezer temperature is not 0° to 2°F, adjust control, one number at a time. Check again after 58 hours. RS1500000 Rev. 2 8 1 Operating Instructions Features Freezing Guide Door Lock Lock freezer door by completing the following: Wrapping Use moisture-vapor-proof materials and seal tightly. When lids are furnished, follow manufacturer's directions for best results. 1. Insert key into lock approximately 1/4". 2. Turn key clockwise to lock door and counterclockwise to unlock door. ! WARNING To help prevent child entrapment keep key out of reach of children and away from cabinet. Choose materials which are labeled for freezer use. Ordinary waxed paper or butcher paper does not provide proper protection for frozen food. Materials not designed for freezer use may give off odors. Freezing Guidelines Item Reversible Rack (some models) Meat Beef roast or steak (fresh) Meat casserole (cooked) Hamburger Pork (cured) Pork chop or roast (fresh) Roast (fresh) Sausage Veal Lamb Poultry Chicken (fresh) Chicken (cooked) Duck Goose Turkey (fresh) Turkey (cooked) Fish Vegetables Fruits Bread and Pastries Bread Yeast Rolls Layer Cake Fruit Pie (unbaked) Ice Cream, Sherbert Racks separates food for more storage space. Remove rack by releasing rack from shelf wires. Pull down if located under shelf or lift up if located above shelf. Replace rack by positioning on top or underneath shelf wires. Slide rack until rack locks in place. 9 Recommended storage times at 0° F. (Months) 9–12 3–6 3–4 1–3 4–8 4–8 1–3 8–9 9–12 9–12 1–3 6 6 6–12 1–3 3–6 8 12 1–3 1–3 2–4 8 1–2 RS1500000 Rev. 2 Care and Cleaning ! Odor Removal WARNING 1. Remove all food. To avoid electrical shock which can cause severe personal injury or death, disconnect power to freezer before cleaning. After cleaning, restore power. ! 2. Wash all interior surfaces including door, floor and walls according to "General" instructions. Pay special attention to corners, crevices and grooves. Include all accessories, shelves and gaskets. 3. Rinse and dry thoroughly. CAUTION 4. Wrap foods in tightly sealed wrap or containers to prevent further odor. After 24 hours, check if odor was eliminated. To avoid personal injury or property damage, read and follow all cleaning product manufacturer's directions. If odor was not eliminated, do the following: 1. Complete procedures in steps 13 above. General 2. Pack freezer with crumpled sheets of black and white newspaper. 1. Wash surfaces with four tablespoons baking soda dissolved in one quart warm water and a soft, clean cloth. 3. Place charcoal briquettes randomly throughout newspaper. 2. Rinse surfaces with warm water. Dry surfaces with a soft, clean cloth. 4. Close door and let stand 2448 hours. 5. Remove charcoal briquettes and newspapers. Wash all interior surfaces including door, floor and walls according to "General" instructions. Pay special attention to corners, crevices and grooves. Include all accessories, shelves and gaskets. NOTE: Do not use the following items: abrasive or harsh cleaners, ammonia, chlorine bleach, etc. concentrated detergents or solvents metal scouring pads These items can scratch, crack and discolor surfaces. Do not place shelves or accessories in dishwasher. 6. Wrap foods in tightly sealed wrap or containers to prevent further odor. After 24 hours, check if odor was eliminated. If odor was still not eliminated, contact Consumer Affairs Department at 1-800-843-0304. Adhesives Remove glue residue by dabbing toothpaste over adhesive. Rub toothpaste into adhesive with fingers until adhesive loosens. Rinse surface with warm water. Dry surface with a soft, clean cloth. Door Gaskets 1. Clean door gaskets every three months or more frequently if necessary. 2. Rinse and dry gaskets thoroughly. 3. Apply a light film of petroleum jelly on cabinet hinge side to keep gaskets pliable. RS1500000 Rev. 2 10 Care and Cleaning Defrosting Light Bulb (some models) ! ! WARNING To avoid electrical shock which can cause severe personal injury or death, disconnect power to freezer before defrosting. After defrosting, restore power. To avoid electrical shock which can cause severe personal injury or death, disconnect power to freezer before replacing light bulb. After replacing light bulb, restore power. Defrost freezer when frost has accumulated to 1/4". Upper section of freezer will normally have more frost than lower section. ! 1. Transfer food to an alternate cooling source. Allow light bulb to cool. Wear gloves when replacing light bulb. 3. Remove interior drain plug from freezer. 4. Verify drain pan is beneath drain opening to catch defrost water. 6. Wash all interior surfaces including door, floor and walls. CAUTION To avoid personal injury or property damage, observe the following: 2. Remove toe grille by pulling forward. 5. Place pans of hot water in freezer. WARNING Remove light bulb cover by pressing front and back of light bulb cover together. Replace light bulb with 15-watt appliance bulb, Amana part # A3073101. 7. Replace inside drain plug. Drain plug must be properly installed for efficient operation. 11 RS1500000 Rev. 2 General Tips Energy Tips Before Calling For Service This freezer is designed to be one of the most energy efficient freezers available. Reduce energy use by doing the following: Operate in normal room temperatures away from heat sources and direct sunlight. Freezer does not operate. Confirm temperature control is on. Confirm freezer is plugged in. Check fuse or circuit breaker. Plug in another item at that wall outlet. Set controls no colder than necessary. Wait 20 minutes to see if freezer restarts. If freezer control is on, freezer may be in defrost cycle. Keep freezer full. Keep door gaskets clean and pliable. Replace gaskets if worn. Freezer still wont operate. Unplug freezer. Transfer food to another unit or place dry ice in freezer to preserve food. Vacation Tips For long vacations, do the following: Call 1-800-NATLSVC (628-5782) inside U.S.A. and 319-622-5511 outside U.S.A. to locate an authorized servicer. 1. Empty freezer. 2. Unplug freezer. Food temperature appears too warm. See above sections. 3. Clean freezer including door gaskets. 4. Prop doors open, so air can circulate inside. Allow time for recently added food to reach freezer temperature. Normal Operating Sounds Check gasket for proper seal. Todays freezers have new features and are more energy efficient. As a result, certain sounds may be unfamiliar. These sounds are normal and will soon become familiar. These sounds also indicate freezer is operating and performing as designed. Adjust temperature control. Freezer runs too frequently. It may be normal to maintain an even temperature. Doors may have been opened frequently or for an extended period of time. 1. Temperature Control Temperature control clicks when starting or stopping compressor. Adjust temperature control. Check gaskets for proper seal. 2. Evaporator Confirm freezer has proper clearance on each side. Evaporator refrigerant flow gurgles, pops or sounds like boiling water. Water droplets form on outside of freezer. Check door gaskets for proper seal. 3. Evaporator Fan Motor Makes a whirring noise or sounds like rushing air. Water is on floor beneath freezer. Confirm drain plugs are properly positioned. 4. Compressor Compressor has a high pitched hum or pulsating sound. Empty drain pan . Freezer has an odor. See "Odor Removal" instructions in "Care and Cleaning" section. 5. Defrost Heater Sizzling, hissing, or popping sounds are caused by water dropping on the defrost heater during the defrost cycle. Freezer makes unfamiliar sounds or seems too loud. It may be normal. See "Normal Operating Sounds" section, this page. 6. Defrost Drain Pan Dripping sounds is defrost water falling onto drain pan. 7. Defrost Timer Automatic timer sounds like an electronic clock that snaps in and out of the defrost cycle. 8. Insulation Foam insulation is very energy efficient and has excellent insulating capabilities. However, foam insulation is not as sound absorbent as previously used fiberglass insulation. RS1500000 Rev. 2 12 General Tips Operating Sounds Todays freezers are designed for economical operation and energy efficiency. New features and designs may create sounds which are different. Following is normal operating sounds which may be encountered, no service call is required. Defrost heater:* Sizzling, hissing, or popping sounds are caused by water dropping on the defrost heater during the defrost cycle. Temperature control: Clicks when the compressor starts or stops. Evaporator: Gurgling sound, like boiling water, when refrigerent flows through the freezer cooling coil. Defrost timer:* Automatic timer sounds like an electric clock that snaps in and out of the defrost cycle. Freezer fan:* Makes a whirring noise or sounds like rushing air as cold air ciculates in the freezer compartment. Insulation: High-efficiency foam is used for its excellent energy insulation capacity, even though it does not offer the same level of sound insulation as less energy-efficient fiberglass insulation once found in freezers. Compressor: Runs faster for higher efficiency and has a higher pitched hum or pulsating sound. Defrost drain pan:* Dripping sound is defrost water falling onto drain pan. * Frost-free models only 13 RS1500000 Rev. 2 Component Testing To avoid risk electrical shock, personal injury, or death, always disconnect electrical power source to the freezer before attempting to service, unless test procedures require power to be connected. When removing any wiring from terminals they must be replaced on the same terminals. Ensure all ground wires are connected before certifying unit as repaired and/or operational. ! WARNING Refrigeration System Test Procedures Careful testing of the refrigeration system is essential in determining if a malfunction is present. Temperature testing is accomplished by using a three lead thermocouple temperature tester in specific locations. 1. Test point 1, is attached to inlet on the evaporator coil 2. Test point 2, is attached to outlet on the evaporator coil. 3. Test point 3, is approximately 68 inches from suction port of compressor on the suction line. 4. Thermocouple tips should be attached securely to the locations specified. 5. Do not test during initial pull down, Allow one complete OFF cycle or a balanced temperature condition to occur before proceeding. 6. Unit must operate a minimum of 20 minutes after thermocouples are installed. NOTE: It may be necessary to turn control colder to maintain required operating time. 7. Wattage reading must be recorded with temperature test to confirm proper operation. 8. Suction and Head pressures are listed in the specification chart. Condenser Condenser Evaporator Heat exchanger Heat exchanger Suction line Dryer Drier Compressor Discharge line Suction line Discharge line Compressor Evaporator Refrigerant Flow Diagram Manual Defrost RS1500000 Rev. 2 Refrigerant Flow Diagram Automatic Defrost 14 Component Testing To avoid risk electrical shock, personal injury, or death, always disconnect electrical power source to the freezer before attempting to service, unless test procedures require power to be connected. When removing any wiring from terminals they must be replaced on the same terminals. Ensure all ground wires are connected before certifying unit as repaired and/or operational. ! WARNING Testing Main Condenser Before testing condenser, verify no leaks exist elsewhere. Condenser loop must be disconnected from the system and tested separately. The following illustration shows the tubing as it is routed and fastened in the freezer cabinet flange. Condensor bottom external Suction NOTE: Verify a leak is not present in any external tubing or joints before performing the following test. Following equipment is required to test. An access fitting A drum of oil pumped nitrogen. Pressure regulator. Two gauges. Line valve and tubing. Access fitting should be prepared as follows: To To condensor evaporater Discharge From condensor Gauges Pressure regulator Tube process Compressor Cutting or Unsoldering Points No Defrost Models Line valve Prepare equipment as required and test condenser as follows: 1. Cut tubing at arrow to condenser and from condenser as shown in the previous illustration. 2. Crimp and solder the end to condenser that enters into the cabinet. 3. Silver solder access fitting of test equipment to the end from condenser tube that emerges from the cabinet. 4. Pressurize the system to 250 pounds with dry nitrogen. Test all connections for leaks with a soap solution. 5. Check the pressure gauge. If pressure drops, there is a leak. However, it may be necessary to allow as much as 24 hours for test results to verify no leaks exist. If there are no leaks, reconnect the tubing. Evacuate and recharge the system. Nitrogen Tank and Fittings Suction To Process From Discharge condensor condensor Tube process Compressor Cutting or Unsoldering Points Refrigerated Shelf Models 15 RS1500000 Rev. 2 Component Testing To avoid risk electrical shock, personal injury, or death, always disconnect electrical power source to the freezer before attempting to service, unless test procedures require power to be connected. When removing any wiring from terminals they must be replaced on the same terminals. Ensure all ground wires are connected before certifying unit as repaired and/or operational. ! WARNING Testing for Leaks ! Compressor Electrical Tests Compressor terminals on all models can be reached only from the rear of the cabinet. If freezer does not operate, do not assume compressor has failed until all other possibilities are eliminated. Is current entering the compressor through the power cord? Check for low voltage at the compressor terminals, a minimum of 100 volts is required for compressor to start. If the necessary voltage is available, check for failures in: Over load protector Starting relay Temperature control, Cabinet wiring harness. DANGER Free oxygen will explode on contact with oil. Acetylene will explode spontaneously when put under pressure. To prevent violent explosions that may result in serious injury or death to persons in or near the immediate vicinity, NEVER use oxygen or acetylene for pressure testing or cleanout of refrigeration systems. ! WARNING To avoid severe personal injury or death from fire, keep system free from contamination due to presence of air. Follow instructions exactly. Testing Compressor Direct To test compressor with no other wiring in the circuit is called DIRECT TEST. Safest way to check the compressor is by using a compressor tester. Electrical System ! Run Common Start WARNING To avoid possible electric shock, personal injury or death disconnect power before servicing. Follow specific steps listed in this manual for testing or replacement of a suspected failed component. Switch All electrical components are grounded to the cabinet. The green center conductor of three wire lead cord is also attached to the cabinet to provide a grounding circuit when the lead cord is plugged into a properly grounded electrical outlet. After replacing an electrical component, always verify the ground wire is reconnected. The electrical outlet from which the appliance is to receive its power should always be checked to verify it is properly wired. RS1500000 Rev. 2 16 Power cord Capacitor connections Compressor Tester Component Testing To avoid risk electrical shock, personal injury, or death, always disconnect electrical power source to the freezer before attempting to service, unless test procedures require power to be connected. When removing any wiring from terminals they must be replaced on the same terminals. Ensure all ground wires are connected before certifying unit as repaired and/or operational. ! WARNING Tester leads are marked RUN, START and COMMON. Connect common lead to common terminal, start lead to start terminal and run lead to run terminal of the compressor. Overload Protector Overload protector is located under the terminal cover on the compressor. If compressor becomes overheated and/or draws too much current, overload trips open and shuts compressor off. If overload does this repeatedly, the compressor is cycling on the overload. Cycling on the overload may be caused by: Insufficient air circulation around the compressor and condenser Pull down overload (caused by a large quantity of warm food placed in the freezer) Compressor stalling due to lack of pressure unloading Low line voltage Failed starting relay. Common Start Run Compressor Terminals The other two leads are for the start capacitor. When not in use, connect the two leads together in the OFF position. Verify there are no bare leads touching the cabinet. Plug in the tester cord and flip the switch to START position. As soon as the compressor starts, release the switch to RUN position. If compressor starts, trouble is in another electrical component (overload protector, starting relay, temperature control or wiring harness). If compressor fails to start (or run) compressor has failed and must be replaced. Perform continuity check on compressor. 1. Check resistance of compressor windings: a. Attach ohmmeter between winding C and S, Ohmmeter indicates <10 W but > 0 W. b. Attach ohmmeter between winding C and M, Ohmmeter indicates <10 W but > 0 W. 2. Check compressor for grounds: Attach one ohmmeter lead to compressor case. Attach second ohmmeter lead to C, then S, then M terminals on compressor. Ohmmeter indicates open on each terminal. Testing Overload Protector To test the overload protector, remove compressor terminal cover. Examine bottom of the overload for possible signs of arcing. If there are no signs of arcing, check for continuity across the terminals, there should be a reading of approximately 0.7 ohms. If continuity is not indicated replace overload protector. Overload protector Overload Protector Terminals When examining the overload protector, evidence of arcing is present, replace overload protector. Capacitor Capacitor can be tested by an analog meter. Attach one meter lead to one terminal and once the other meter lead touches the second terminal meter will indicate a reading but will discharge through the meter and indicate no reading. Reverse the meter leads and indication will be the same. If testing with a digital meter, the only indication will be, capacitor has a direct short. 17 RS1500000 Rev. 2 Component Testing To avoid risk electrical shock, personal injury, or death, always disconnect electrical power source to the freezer before attempting to service, unless test procedures require power to be connected. When removing any wiring from terminals they must be replaced on the same terminals. Ensure all ground wires are connected before certifying unit as repaired and/or operational. ! WARNING PTC Relay PTC relay is a push-on type that mounts to the start and run terminals of the compressor. It is a magnetic switch with starting contacts. Its magnetic coil is in series with the run winding of the compressor. When current is applied to the compressor, the magnetic coil raises the relay plunger and closes the starting contacts, connecting the start winding in parallel with the run winding. As the compressor motor approaches running speed, current in the run winding and in the relay coil decreases and plunger drops out opening the start winding circuit. Compressor motor continues to operate on the run winding. Testing PTC Relay Disconnect relay from compressor terminals. Place meter leads on relay terminals 2 and 3, or 5 and 6, a reading of approximately 4.7 ohms should be indicated. 8 3 7 2 5 6 Interior Light and Switch If the light does not operate and bulb is good, place the blade of a putty knife or similar object under the flange of the switch and carefully remove. Short across the light switch terminals. If light operates, switch has failed. If light fails to operate, either the lamp socket or wiring has failed. The lamp socket in the cabinet can be removed in the following manner: 1. Disconnect power cord from electrical outlet. 2. On refrigerated shelf models, remove screws securing top freezer plate and pull the plate down slightly. On no defrosting models, remove the light housing from food liner top. 3. Unplug light leads and disconnect grounding wire. Check the socket with an ohmmeter or test cord to verify it has failed. 4. Place new light socket into opening of the housing. If necessary, wet for lubricating purposes. 5. Replace light housing in reverse order of removal, verify green grounding wire is securely attached. Checking Control Operation 4 1 Front Back Testing PTC Relay With An Ohmmeter Connect one meter lead to terminal 8 and the other meter lead to terminal 2 on the relay. There should be no continuity (open circuit). Connect one meter lead to terminal 8 and the other meter lead to terminal 3 on the relay. There should be no continuity (open circuit). If not, PTC relay has failed and must be replaced. A failed control (contact points stuck open or closed, a leak in the bellows) may cause compressor to run continuously or not at all. Should one of these conditions exist, check the control as follows: 1. Remove control knob and control mounting screws. 2. Work control out of opening far enough to reach the terminals (on no-defrosting models, it may be necessary to remove feeler tube cover and straighten feeler tube enough to allow control to be pulled out far enough). 3. Look for faulty wiring connections. 4. Check for control points stuck or closed as follows: If compressor will not run, short across the control terminals. If compressor starts, control has failed and must be replaced. If compressor does not start, check cabinet wiring and compressor components for failures. On no defrosting models verify timer is not in the defrost cycle. If compressor runs all the time, even though freezer temperature is below the control cut-out point, make the following applicable check On refrigerated shelf models, check control feeler tube attachment to underside of shelf front for a positive thermal contact. RS1500000 Rev. 2 18 Component Testing To avoid risk electrical shock, personal injury, or death, always disconnect electrical power source to the freezer before attempting to service, unless test procedures require power to be connected. When removing any wiring from terminals they must be replaced on the same terminals. Ensure all ground wires are connected before certifying unit as repaired and/or operational. ! WARNING On no defrosting models, check control feeler tube cover to verify air is allowed to pass freely under it and circulate around the feeler tube. If compressor continues to run, disconnect wire from one control terminal. If compressor stops, control has failed and must be replace. If compressor still runs, check cabinet wiring for a short circuit. Temperature Control Freezer temperature should vary considerably by changing control knob setting. If not, check control cut-in and cut-out temperatures as follows: 1. On no defrost models, disconnect control feeler tube cover from food liner side by pulling straight out at its center. Fasten a thermocouple to feeler tube with a rubber band. Defrost Timer Freezer coil defrost system is actuated by an electric timer which is located on the rear leg of the cabinet. Timer initiates defrost cycle every twelve hours of compressor running time, regardless of control setting or of interior temperatures. 1st ClickTimer switches off compressor and freezer fan circuit. At the same time it energizes the defrost circuit for approximately 30 minutes. Once defrost heater warms coil header to approximately 52 degrees, defrost thermostat contacts open to shut off the heater. Defrost Timer Circuits Line (white) To compressor 3 2 Timer 4 1 Attaching Thermocouple to Feeler Tube No Defrost Models Line (red) On refrigerated shelf models, use a few drops of water to freeze the bulb on thermocouple to the freezer shelf near control feeler tube thermal contact point. 2. Set control halfway between Off and MAX.-Cool. Close cabinet door and wait for compressor to run through 2 or 3 complete cycles. 3. If cut-in and cut-out temperatures are not within 2 or 3 degrees of those specified below replace the control. Control 2nd ClickTimer switches off defrost circuit and starts compressor and freezer fan to end the defrost cycle. Compressor, freezer fan, and defrost timer are now controlled by the temperature control for a period of approximately 12 hours, after which a new defrost cycle begins. Line (white) To compressor Auto Defrost Yes No Temperature Control Warm Calibration Pt. Cut-in Cut-out 45° cut-in 135° 15 ± 3 −6.8 ± 2 −18.4 ± 2 14 ± 3 +8 ± 2 −8 ± 2 MID 180° Cold cut-out 3 315° −29.2 ± 2 −22 or below 2 Timer 1 Line (red) 19 4 Control RS1500000 Rev. 2 Component Testing To avoid risk electrical shock, personal injury, or death, always disconnect electrical power source to the freezer before attempting to service, unless test procedures require power to be connected. When removing any wiring from terminals they must be replaced on the same terminals. Ensure all ground wires are connected before certifying unit as repaired and/or operational. ! WARNING Checking Timer Defrost Heater and Thermostat No-Defrosting Models Unplug line cord from electrical outlet. Remove 1/4 Spin Tight screws and remove the timer. Disconnect all wires from timer and attach ohmmeter leads to terminals specified in the accompanying chart. If no continuity is indicated, timer has failed and must be replaced. When replacing timer, connect wire leads to timer terminals. Verify grounding wire is connected. Defrost heater is a radiant heater and will melt all frost that collected during the proceeding 12 hour period when operating properly. Failure to perform this function will eventually cause an ice build-up between the coil fins, blockage in air flow and unsatisfactory refrigeration. Defrost heater extends across the bottom of freezer coil above the built-in-drain trough. Heater is clamped at both ends to a shield. Shield is attached to coil mounting panel and is slotted to permit free drainage into the drain trough. Defrost thermostat is located on upper header of freezer coil. Thermostat senses temperature of the header and automatically shuts off the defrost heater when temperature reaches 51°F (11°C). To test defrost thermostat and defrost heater when the freezer coil temperature is + 15°F (-9°C) or below, use a wattmeter or an ohmmeter and proceed as follows: 1. Disconnect freezer line cord plug from electrical outlet and plug it into wattmeter. 2. Plug-in wattmeter line cord into electrical outlet and manually advance timer to defrost cycle. 3. Wattmeter should indicate approximately 430 watts (total wattage of timer motor and defrost heater). If indication is 3 watts, defrost heater or defrost thermostat has failed. To isolate failed component, proceed to step 4. However, if indication is 430 watts, timer has (not advancing to defrost) failed and must be replaced. 4. Disconnect freezer line cord plug from wattmeter. 5. Remove freezer coil cover and check defrost heater for continuity. If heater shows continuity, defrost thermostat has failed and must be replaced. Ground wire Timer mounting screws Timer Ground wire Defrost Timer Mounting To test Timer motor circuit Defrost circuit Compressor circuit Turn timer knob to Leave as is st 1 click nd 2 click Check between terminals 1 and 3 1 and 2 1 and 4 NOTE: Set meter to X1 scale. If reading is approximately 35 ohms, defrost thermostat and defrost heater are operative. Turn defrost timer one full turn clockwise to locate start defrost cycle (1st click) and end defrost cycle (2nd click) positions. The 1st and 2nd clicks are only a few degrees of shaft rotation apart. Turn the shaft slowly and stop immediately when the 1st click is heard. RS1500000 Rev. 2 20 Component Testing To avoid risk electrical shock, personal injury, or death, always disconnect electrical power source to the freezer before attempting to service, unless test procedures require power to be connected. When removing any wiring from terminals they must be replaced on the same terminals. Ensure all ground wires are connected before certifying unit as repaired and/or operational. ! WARNING Freezer Fan No-Defrosting Models Freezer fan is designed and located in the cabinet to create movement of uniform low temperature air throughout freezer interior. It is wired to run simultaneously with the compressor. If fan fails to operate, or runs erratically, reduced air circulation will cause unsatisfactory temperatures throughout the freezer. Freezer fan is located above freezer coil and is mounted inside an opening in the freezer liner back. Green Testing Freezer Fan Motor Remove screws from coil cover and disconnect ground wire from cover. Remove freezer coil cover. Before checking fan circuit for failures, spin the fan blade to verify nothing has lodged against it which could prevent normal fan operation. If blade spins freely, check fan motor as follows: 1. Unplug line cord. 2. Attach test cord leads to fan motor leads. If motor runs, check all cabinet wiring for an open circuit. If motor fails to operate, remove and replace. Audible Warning System (some models) This system is also know as line voltage operated (LVO) system or temperature monitor system. Alarm sounds if temperature in freezer is 10°F higher than normal for selected temperature control setting. The alarm is located in the unit compartment, which is controlled by a 3-position switch. 0 Prevents alarm from sounding when freezer is warm. Ö Sounds alarm regardless of temperature. Test alarm system regularly; at least once a month. 1 Sets alarm for normal freezer use. Be sure to return the switch to ON when the freezer has cooled down after defrosting. Alarm may sound if temperature control dial is turned to a much colder setting, for example from 2 to 5. Alarm may also sound if a large amount of unfrozen food is added at one time causing the freezer temperature to rise. White Red Orange White Circulating Fan and Wiring With Coil Cover Removed 21 RS1500000 Rev. 2 Component Testing To avoid risk electrical shock, personal injury, or death, always disconnect electrical power source to the freezer before attempting to service, unless test procedures require power to be connected. When removing any wiring from terminals they must be replaced on the same terminals. Ensure all ground wires are connected before certifying unit as repaired and/or operational. ! WARNING Capacity Cu. Ft. 11.7 Insulation Type Foam 15.2 Foam 16.9 Foam 19.7 Foam 15.0 Foam 16.7 Foam 19.6 Foam RS1500000 Rev. 2 Performance Data at Control Setting # 4 Manual Defrost Amb Wattage % High Low Running Side Side 70° 90−110 35−45 95−115 −5 −3 90° 95−115 50−60 125−145 −4 −2 110° 100−120 80−90 170−190 −2 0 70° 95−115 35−45 95−115 −4 −2 90° 100−120 55−65 125−145 −3 −1 110° 105−125 90−100 165−185 −3 −1 70° 105−125 40−50 95−115 −4 −2 90° 110−130 55−65 130−150 −3 −1 110° 115−135 90−100 165−185 −2 1 70° 120−140 40−50 100−120 −4 −2 90° 125−145 55−65 135−155 −3 −1 110° 130−150 90−100 175−195 −1 −1 Performance Data at Control Setting # 4 Auto Defrost 70° 125−145 45−55 105−125 −3 −1 90° 130−150 60−70 140−160 −3 −1 110° 135−155 90−100 185−205 −1 1 70° 135−155 35−45 100−120 −3 −1 90° 140−160 45−55 135−155 −2 0 110° 145−165 90−100 175−195 −2 0 70° 135−155 40−50 95−115 −4 −2 90° 140−160 60−70 130−150 −4 −2 110° 145−165 90−100 175−195 −2 0 22 Amps 0.7−1.0 0.8−1.1 0.8−1.1 0.9−1.2 0.9−1.2 1.0−1.3 0.9−1.2 0.9−1.2 1.0−1.3 1.0−1.3 1.0−1.3 1.2−1.5 1.0−1.3 1.1−1.4 1.2−1.5 1.2−1.5 1.2−1.5 1.2−1.6 1.2−1.5 1.2−1.5 1.3−1.6 Running Capacitor 12 uF 210 V 12 uF 210 V 12 uF 210 V 12 uF 210 V 12 uF 210 V 12 uF 210 V 12 uF 210 V Troubleshooting To avoid risk electrical shock, personal injury, or death, always disconnect electrical power source to the freezer before attempting to service, unless test procedures require power to be connected. When removing any wiring from terminals they must be replaced on the same terminals. Ensure all ground wires are connected before certifying unit as repaired and/or operational. ! WARNING Problems Frost build-up on freezer coil Compressor does not run Possible Causes Timer (no-frost models only) Stuck in freeze cycle Motor not running Replace Replace Defrost heater (no-frost models only) AC circuit to heater open Failed See wiring diagram and check circuit Replace Bi-metal AC circuit to bi-metal open Failed See wiring diagram and check circuit Replace Door Seal Poor door seal Failed Temperature control AC circuit to control open Failed Adjust door Replace See wiring diagram and check circuit Replace Starting relay AC circuit to relay open Failed See wiring diagram and check circuit Replace Overload protector AC circuit to overload open Failed See wiring diagram and check circuit Replace Low voltage Check voltage-must be at least 110 volts at moment of Start Time, with all loads on the line. Timer (no-frost models only) AC circuit to timer open Failed Excessively noisy but works Correction Compressor AC circuit to compressor open Failed Freezer not level or firmly setting on all four corners See wiring diagram and check circuit Replace See wiring diagram and check circuit Replace Level unit by lowering the levelling legs to make sure unit is firmly on the floor Structural weakness in floor Advise customer Compressor mounts fail Replace Defrost water pan rattles (no-frost models only) Adjust defrost pan or install foam pad if necessary Freezer fan motor noisy rattles (nofrost models only) Replace 23 RS1500000 Rev.0 Troubleshooting To avoid risk electrical shock, personal injury, or death, always disconnect electrical power source to the freezer before attempting to service, unless test procedures require power to be connected. When removing any wiring from terminals they must be replaced on the same terminals. Ensure all ground wires are connected before certifying unit as repaired and/or operational. ! WARNING Problems Compressor runs but freezer temperature is higher than necessary Possible Causes Temperature control Misadjusted or out of calibration Failed Adjust control Replace Freezer fan motor (no-frost only) AC circuit to fan motor open Failed See wiring diagram and check circuit Replace Excessive load of unfrozen food Door Seal Poor seal Correction Advise customer to freeze no more than 10% of freezer capacity at one time Adjust door & gasket as instructed under improving gasket seal Replace Failed Loss of sealed system charge Locate and repair leak. Evacuate undercharge system proper amount of refrigerant Replace Timer stuck in defrost Locate and repair restriction. Evacuate and recharge system with proper amount of refrigerant Partial restriction Compressor does not run and no light Sweating but freezer is working normally otherwise RS1500000 Rev. 0 Frost build-up on freezer coil (over 1/2 inch thick (12.7 mm)) Check door seal. If not Frost Free model, advise customer to defrost every time frost builds up to almost 1” thick (25 mm) Separation of heat exchanger No power at AC outlet Failed fuse Failed outlet Install heat exchanger repair kit. Replace Advise customer to replace Line cord Disconnect Failed Plug-in line cord to AC outlet Replace Open machine compartment wiring harness See wiring diagram and check circuit Two simultaneous problems-light bulb out and open AC circuit to compressor Exterior sweating Void in insulation Replace light bulb. See wiring diagram and check circuit Add insulation inside the affected area, if possible Overcharged Evacuate and recharge system with right amount of refrigerant. See specification chart Defective door seal Replace 24 Troubleshooting To avoid risk electrical shock, personal injury, or death, always disconnect electrical power source to the freezer before attempting to service, unless test procedures require power to be connected. When removing any wiring from terminals they must be replaced on the same terminals. Ensure all ground wires are connected before certifying unit as repaired and/or operational. ! WARNING Problems Compressor runs, but short cycles Compressor runs but does not freeze Compressor runs excessively Freezer too cold Defrost water disposal problem Possible Causes Temperature control Improper setting of temperature control for prevailing environmental and usage conditions Failed Correction Refer to ”CHECKING OPERATING TEMPERATURES and reset for proper setting Low Voltage Check voltage-must be at least 100 of moment of start time, with all other loads on the line Overload protector failed Replace Excessive load of unfrozen food at one time Advise customer to freeze no more than 10% of freezer capacity at one time Loose electrical connections Complete loss of sealed system charge(Low Wattage Readings) Locate and fix loose connections Locate and repair leaks before recharging with refrigerant Restricted capillary or drier (Low wattage readings while running). Will cycle on overload when unit tries to come on after having been shut off and restriction still present Refer to operating pressure and wattage’s replace failed parts Compressor defective Temperature control Misadjusted Feeler tube not touching freezer shelf Failed Water frozen in drain trough (Failed defrost timer, radiant heater or thermostat on No Frost Models Only) Replace Restriction in drain system Clean drain system 25 Replace Adjust control for normal operation Install control feeler tube to sense proper temperature Replace Check and replace defective part or parts RS1500000 Rev.0 Disassembly Procedures ! To avoid risk of electrical shock, personal injury, or death, disconnect power to unit before following any disassembly procedures. WARNING Replacing Dryer Condenser end inlet end NOTE: A new drier must be installed whenever any system component is replaced, or whenever the system is opened. The replacement drier is sealed at both ends to prevent entrance of moisture. Do not break these seals until all preparations for the installation have been completed. 1. Disconnect line cord from electrical outlet. 2. Clean the process tube using steel wool or fine emery cloth. 3. Install service valve as close as possible to the tip of the process tube, for easy pinch-off after recharging the system. 4. Connect a hose to the service valve and capture the charge. Flow direction Form offset Capillary Tube Insertion 9. Cut the inlet tube on the new drier. 10.Snap off the scored end of replacement drier with your fingers. 11. Install new drier and solder all joints. Use silfos on all copper to copper joints. On copper to steel joints, silver solder with proper flux must be used. Excess flux must be wiped off after soldering. 12.Visually check all soldered joints, evacuate and recharge the system. 13.Test run the unit to verify proper operation. 14.Pinch process tube and cut off the service valve. Solder the joint and test for leaks. NOTE: Effective July 1, 1992, before opening any refrigeration system it is the responsibility of the service technician to capture the refrigerant for safe disposal. 5. Remove all paint and scale from the capillary tube for a distance of approximately three inches from the original joint, (use steel wool or emery cloth). 6. Cut the capillary tube approximately one inch from the old joint. Verify the cut is uniform around the tubing, then break it with the fingers Replacing Compressor Replacement compressors are charged with the correct amount of oil and contain a holding charge of either dry nitrogen or a refrigerant. The replacement compressor will be similar to the type of compressor originally used and may or may not have an oil cooler. If the sealed system does not use the oil cooler, do not disturb the oil cooler plugs. Simply disregard the oil cooler. The holding charge assures compressor is dry. A compressor which shows no evidence of internal pressure when cutting the line or pulling the plugs, should be returned for replacement. When replacing a compressor, cut as close to the soldered joints as possible. If tubes are not long enough, it may be necessary to unsolder the joints to allow connections to the replacement compressor. When replacing compressor, proceed as follows: 1. Disconnect line cord from electrical outlet. 2. Install a service valve on the process tube. 3. Connect a hose to the service valve and capture the charge. 1" Score here then snap tube Cutting Capillary Tube 7. Cut the drier from condenser outlet and thoroughly clean the end of the tube. 8. Make an offset 1/2 inch (13 mm) from the end of the capillary tube to prevent its penetrating too far into drier tubing. When forming the offset, use a radius large enough so the inside diameter of the tubing is not reduced. RS1500000 Rev. 0 Capillary end outlet end NOTE: Effective July 1, 1992, before opening any refrigeration system it is the responsibility of the service technician to capture the refrigerant for safe disposal. 4. Clean the tubing approximately three inches (76 mm) at the point of intended cut. Before cutting the tube, verify it will be long enough to reconnect to the replacement compressor. If not, unsolder the joints. 26 Disassembly Procedures ! To avoid risk of electrical shock, personal injury, or death, disconnect power to unit before following any disassembly procedures. WARNING 12.Pull entire shelving assembly out of cabinet and position to allow detachment of heat exchanger. 5. Disconnect wire from compressor terminals 6. Remove retaining clips from compressor mounts. Lift compressor from mounting rails and transfer the rubber grommets to replacement compressor. 7. Set replacement compressor into position and install retaining clips. 8. Remove all rubber plugs, clean the stubs of the compressor and compare the size of tubing to stubs of replacement compressor. It may be necessary to swage the copper tubing in order to make the joints. 9. Install a six inch (152 mm) long copper tube to low side process tube on the compressor. Add service valve to end of this tube. 10.Connect all tubing, apply flux to compressor stubs and solder all the joints. Excess flux must be wiped off after soldering. 11. Install a new drier. 12.Visually check all joints for leaks. Evacuate and recharge the system. 13.Reconnect wire leads to compressor terminals and test run the unit to verify proper operation. 14.Pinch process tube and cut off the service valve. Solder the joint and test for leaks. Freezer Shelf Assembly Joints Refrigerated Shelf Model 13.Unsolder capillary tube and suction line (cut suction line away from original joint and swage the end of it for new tubing, if desired). 14.Clean joints and solder new heat exchanger to shelving assembly. Clean & paint soldered joints before reinstalling evaporator. 15.Transfer vinyl insulating sleeve to new heat exchanger. Tape the same points. 16.Carefully position assembly back in the cabinet, verify heat exchanger tubing passes through the opening without damaging the vinyl sleeve. 17.Carefully work each shelf into its proper support rails. Replace non-refrigerated shelf in the same manner. 18.Secure control feeler tube to correct shelf with the clamp. Verify feeler tube rests firmly against shelf surface to obtain thermal contact. 19.Fasten top freezer plate, verifying all spacers are in place. 20.Form heat exchange so it is similar in position to the original. Be careful when bending the tubing at the entry hole to prevent kinks. 21.Pack entry hole with butyl sealer. 22.If suction tubing was cut from compressor when removed, swage compressor suction tube to fit replacement suction tubing. 23.Solder the suction lines. 24.Install new drier. 25.Visually check all joints for leaks. Evacuate and recharge the system. 26.Test run the unit to verify proper operation. 27.Pinch process tube and cut off the service valve. Solder the joint and test for leaks. Replacing Heat Exchanger Refrigerated Shelf Models 1. Disconnect line cord from electrical outlet. 2. Install a service valve as close as possible to the tip of process tube, for easy pinch-off after recharging the system. 3. Connect a hose to the service valve and capture the charge. NOTE: Effective July 1, 1992, before opening any refrigeration system it is the responsibility of the service technician to capture the refrigerant for safe disposal. 4. Remove butyl sealer from around the tube entry hole. 5. Unsolder suction tubing at compressor stub or cut tubing three inches (76 mm) from compressor stub. 6. Cut drier from condenser tubing. Then cut drier from capillary tube. 7. Straighten heat exchanger tubing to slide tube through entry hole from inside the cabinet. 8. Remove clamp retaining the control feeler tube to underside of second shelf (counting downward). 9. Carefully bend feeler tube down against liner side to be out of the way. 10.Remove screws securing top freezer plate to liner top. As front edge of plate drops clearing the liner. 11. Carefully remove each shelf from food liner support rails. Push outward on liner side just above front retainer embossment. Lift shelf front free of retainer. If necessary, repeat this operation on opposite side. 27 RS1500000 Rev. 0 Disassembly Procedures ! To avoid risk of electrical shock, personal injury, or death, disconnect power to unit before following any disassembly procedures. WARNING Replacing Heat Exchanger No-Defrosting Models 1. Disconnect line cord from electrical outlet. 2. Install service valve as close as possible to the tip of process tube for easy pinch-off after recharging the system. 3. Connect a hose to the service valve and capture the charge. NOTE: Effective July 1, 1992, before opening any refrigeration system it is the responsibility of the service technician to capture the refrigerant for safe disposal. 4. Remove butyl sealer from around tube entry hole. 5. Unsolder suction tubing at compressor stub or cut tubing three inches (76 mm) from compressor stub. 6. Cut drier from condenser tubing. Then cut drier from capillary tube. 7. Remove screws securing freezer coil cover and detach green grounding wire. Removing Defrost Thermostat No Defrost Models Green 13.Detach green grounding wire from freezer coil header. 14.Remove screws securing freezer coil to coil mounting panel. Coil is now free to be removed. 15.Straighten heat exchanger tubing to pass through the opening in the cabinet back. 16.Pull entire assembly out of the cabinet. 17.Unsolder cap tube and suction line from freezer coil, careful not to overheat the epoxy joints. White Red Orange White Unsolder these joints Circulating Fan and Wiring With Coil Cover Removed 8. Remove styrofoam air block from each end of the coil. 9. Disconnect defrost heater lead from spade terminal on fan motor. 10.Spade connector is used to join the defrost heater lead to the lead-in wire. Separate these two wires at the spade connector. Release lead from the two clips on coil mounting panel. 11. Disconnect heater lead from defrost thermostat. 12.Remove defrost thermostat from coil header to release the front tang. See following illustration. Protect these joints Heat Exchanger To Freezer Coil Joints No-Defrost Models RS1500000 Rev. 0 28 Disassembly Procedures ! To avoid risk of electrical shock, personal injury, or death, disconnect power to unit before following any disassembly procedures. WARNING 18.Transfer rubber insulating sleeve to replacement heat exchanger assembly and tape the same points. 19.Clean tubing and silver solder new heat exchanger to coil with proper flux. Excess flux must be wiped off after soldering. 20.Clean tubing and silver solder new heat exchanger to the coil. 21.Work new tubing through rear opening, careful not to tear rubber sleeve. 22.Position freezer coil and install mounting screws. Replace styrofoam air blocks at the upper ends of the coil. This is necessary to channel the air flow properly through the coil. 23.Carefully form tubing and route it in the same manner as the original. Use extreme care when bending the tubing at entrance hole to prevent kinking. Pack entry with butyl sealer. 24.Clean the suction line and silver solder the joint with proper flux. Excess flux must be wiped off after soldering. 25.Install new drier. 26.Visually check all joints for leaks. Evacuate and recharge the system. 27.Lace the defrost heater leads to both ends of the freezer coil. Fasten wire leading to fan motor to the two clips on the mounting panel. 28.Connect white defrost heater lead to white lead-in wire with spade connector, attach other wire to spade terminal on fan motor. 29.Secure defrost thermostat to coil and connect lead wire. 30.Connect green grounding wire to fan motor and to freezer coil cover. 31.Reinstall coil cover and secure with screws. 32.Test run the unit to verify proper operation. 33.Pinch process tube and cut off the service valve. Solder the joint and test for leaks. Replacing Freezer Shelving Refrigerated Shelf Models Current freezer models are equipped with steel shelves and can be individually repaired or replaced as follows: 1. Disconnect line cord from electrical outlet. 2. Install service valve as close as possible to the tip of process tube, for easy pinch-off after recharging the system. 3. Connect a hose to service valve and capture the charge. NOTE: Effective July 1, 1992, before opening any refrigeration system it is the responsibility of the service technician to capture the refrigerant for safe disposal. 29 4. Remove butyl sealer from tube entry hole in the cabinet back. 5. Cut the end off of compressor process tube after the refrigerant has been captured. Attach a service valve to it, and leave the valve open. 6. Cut drier from condenser tubing. Cut drier from capillary tube. To cut capillary tube, score the walls with a knife or file. Cut around entire tube uniformly, then break it with your fingers. 1" Score here then snap tube Cutting Capillary Tube 7. Straighten heat exchanger tubing to slide tube through entry hole from inside the cabinet. 8. Remove clamp securing control feeler tube to underside of second shelf (counting downward). 9. Carefully bend feeler tube down against liner side to be out of the way. 10.Remove screws securing top freezer plate to liner top. Front edge of the plate, drops clear of the liner, disconnect lead wires from interior light, if equipped. 11. Carefully remove each shelf from the food liner support rails. Push out on liner side just above front retainer embossment. Lift the shelf front free of the retainer. If necessary, repeat this operation on the opposite side. 12.Carefully pull entire shelving assembly out of cabinet and position to allow detachment of failed shelf. 13.Cut or unsolder failed shelf and remove. 14.Clean joints and solder new shelf to assembly and paint new joints. 15.Carefully position assembly back in the cabinet, verifying heat exchanger tubing passes through rear opening without damaging the rubber sleeve. 16.Carefully work each shelf into its proper support rails. Replace non-refrigerant shelf in the same manner. 17.Connect wiring to freezer light, if equipped, and fasten top freezer plate, verifying all spacers are in place. RS1500000 Rev. 0 Disassembly Procedures ! To avoid risk of electrical shock, personal injury, or death, disconnect power to unit before following any disassembly procedures. WARNING 18.Secure control feeler tube to correct shelf with the clamp. Verify feeler tube rests firmly against shelf surface to obtain thermal contact. 19.Form heat exchanger tubing so it is similar in position to the original. Be careful when bending tubing at the entry hole to prevent kinks. 20.Pack tube entry hole with butyl sealer. 21.If cut when remove, swedge compressor suction tubing to fit replacement tubing 22.Install new drier and connect all tubing. Silver solder the joints with proper flux. Excess flux must be wiped off tubing after soldering. 23.Visually check all joints for leaks. Evacuate and recharge the system. 24.Test run the unit to verify proper operation. 25.Pinch process tube and cut off the service valve. Solder the joint and test for leaks. Replacing Freezer Coil No-Defrosting Models Green White Red Orange White Circulating Fan and Wiring With Coil Cover Removed 10.Spade connector is used to join the white defrost heater lead to the white lead-in wire. Separate these wires at the spade connector. Release heater lead from the two clips on the coil mounting panel and unlace it from the coil. 11. Disconnect white defrost heater lead from defrost thermostat and unlace it from freezer coil. 12.Remove defrost thermostat from coil header to release the front tang. Because of freezer coil location, do not attempt replacement without first removing coil and heat exchanger from the cabinet. Even though an experienced silver brazer can control a torch flame, possibility of overheating and distorting plastic is high. 1. Disconnect line cord from electrical outlet. 2. Install service valve as close as possible to tip of process tube for easy pinch-off after recharging the system. 3. Connect a hose to service valve and capture the charge. NOTE: Effective July 1, 1992, before opening any refrigeration system it is the responsibility of the service technician to capture the refrigerant for safe disposal. 4. Remove butyl sealer from tube entry hole in the cabinet back. 5. Clean approximately three inches (76 mm) of the heat exchanger tubing at the compressor stub. Unsolder at the joint or cut three inches (76 mm) from the stub. 6. Unsolder drier from condenser outlet tube and clean the outlet. Remove drier from capillary tube so tubing assembly can be pulled through the tube entry opening. 7. Remove screws securing freezer coil cover. Lift cover out and detach green grounding wire. 8. Remove styrofoam air block from each end of the coil. 9. Disconnect defrost heater lead from spade terminal on fan motor. RS1500000 Rev. 0 Removing Defrost Thermostat No Defrost Models 13.Detach green grounding wire from freezer coil header. 14.Remove screws securing freezer coil to coil mounting panel. The coil is now free to be removed. 30 Disassembly Procedures ! To avoid risk of electrical shock, personal injury, or death, disconnect power to unit before following any disassembly procedures. WARNING 28.Connect defrost thermostat lead and fasten thermostat to freezer coil header. 29.Connect green grounding wire to fan motor and to freezer coil cover. 30.Test run the unit to verify proper operation. 31.Pinch process tube and cut off the service valve. Solder the joint and test for leaks. 15.Straighten heat exchanger tubing to pass through the opening in the cabinet back. 16.Pull entire assembly out through the front. Position to allow detachment of heat exchanger. 17.Unsolder suction and capillary tube from the coil. Unsolder these joints Replacing Light Switch 1. Unplug line cord from electrical outlet and pry light switch from liner. 2. Pull lead wires out far enough to disconnect connectors. 3. Connect new switch, plug in line cord, and check the light. 4. Push new switch and wiring into position. Protect these joints Replacing Control 1. Unplug the power cord. 2. Pull control knob off, remove control mounting screws, and disconnect all wires. 3. On refrigerated shelf models, remove feeler tube from underside of shelf front by loosening the clamp. On no defrosting models, disconnect control feeler tube cover from the liner side by pulling straight out at its center. 4. On refrigerated shelf models, securely tape a piece of heavy string to the end of the feeler tube. On no defrosting models, observe feeler tube is coiled behind the cover, then straighten it. 5. Pull complete assembly out of cabinet, (on refrigerated shelf models, string end should follow through the hole in the liner side so it can be used to pull replacement back through. 6. Transfer plastic sleeve to new feeler tube. 7. On refrigerated shelf models, tape string to new feeler tube. Pull tube through the hole in the liner side. On no defrosting models, work feeler tube through the opening and reshape it so it will not contact the inner side or cover. 8. Connect all wires, including grounding wire, and push control into position. 9. Reinstall mounting screws. 10.On refrigerated shelf models, secure feeler tube to underside of shelf front. On no defrosting models, attach feeler tube cover by bowing it out at the center until tabs on the cover can be fitted into slots in the liner. 11. Reinstall control knob. Plug in power cord and check freezer operation. Heat Exchanger To Freezer Coil Joints No-Defrost Models 18.Remove freezer coil and replace with new coil. 19.Clean and connect tubes and silver solder the joints with proper flux. Excess flux must be wiped off tubing after soldering. 20.Work heat exchanger tubing through rear opening, careful not to tear rubber sleeve. 21.Position freezer coil and install mounting screws. Replace styrofoam air blocks at the upper ends of freezer coil. This is necessary in order to channel air flow through the coil. 22.Carefully form tubing and route in the same manner as the original. Use extreme caution when bending tubing at the entrance hole to prevent a possible kink. Pack entry hole with butyl sealer. 23.If cut when removed, swedge compressor suction tube to reconnect suction tubing. 24.Clean all the tubes. Install new drier and silver solder the joints with proper flux. Excess flux must be wiped off tubing after soldering. 25.Visually check the joints for leaks. Evacuate and recharge the system. 26.Lace white heater leads to both ends of the freezer coil. Fasten wire leading to fan motor to the two clips on the mount-panel. 27.Join white defrost heater lead and white lead-in wire with spade connector and attach spade terminal on fan motor. 31 RS1500000 Rev. 0 Disassembly Procedures ! To avoid risk of electrical shock, personal injury, or death, disconnect power to unit before following any disassembly procedures. WARNING Replacing Heater Replacing Freezer Fan Motor Remove defrost heater as follows: 1. Remove freezer coil cover. 2. Detach heater leads and unlace from freezer coil. 3. Remove clips at each end of heater. Push downward on heater shield grasping radiant heater at both ends and lifting outward. Remove screws from coil cover and disconnect ground wire from cover. Remove freezer coil cover. Before checking fan circuit for failures, spin the fan blade to verify nothing has lodged against it which could prevent normal fan operation. If blade spins freely, check fan motor as follows: 1. Unplug line cord. 2. Attach test cord leads to fan motor leads. If motor runs, check all cabinet wiring for an open circuit. If motor fails to operate, remove and replace it in the following manner. 3. Disconnect lead and ground wire from fan motor. 4. Remove complete fan motor assembly by removing screws securing fan motor bracket to mounting panel. Remove motor from bracket. Replace assembly in reverse order of removal. 5. Attach ground wire to freezer coil cover and replace the cover. No alignment is necessary when replacing fan blade. Fit blade on the shaft and push. Blade is equipped with a built-in stop. Retaining clip Defrost Heater and Retaining Clips 4. Replace heater in reverse of removal. ! CAUTION When installing radiant heater do not touch the heater glass. Salt and oil on the hands may cause serious damage. Thermostat may be loosened for replacement by merely spreading front tangs of retainer clips. Defrost Thermostat and Mounting Clip RS1500000 Rev. 0 32 Disassembly Procedures ! To avoid risk of electrical shock, personal injury, or death, disconnect power to unit before following any disassembly procedures. WARNING Cabinet Door Assembly Cabinet door assembly consists of outer door panel, bezel and nameplate insert, door handle and insert, door lock assembly (if equipped), hinge bushings, fiberglass insulation, inner door liner, door shelf trim, and door seal gasket. Top door hinge Tapping plate Outer door panel Washer Serial plate Bezel Bushing Door handle Door gasket Lock assembly Insert Door shelf trim Bushing Kickplate Inner door liner Washer Spacer Clip Lower door hinge Bottom hinge nut 33 RS1500000 Rev. 0 Disassembly Procedures ! To avoid risk of electrical shock, personal injury, or death, disconnect power to unit before following any disassembly procedures. WARNING Door Lock Assembly Removing Cabinet Door Assembly 1. Remove screws securing upper hinge to cabinet top. 2. Open door assembly and lift door off lower hinge pin. Door lock assembly (if equipped) is attached to outer door panel and consists of the cam and bolt (lock bolt). Illustration below indicates movement of the lock bolt as the key is turned clockwise to locked position. An ejector spring in the lock forces the key out. Key will not remain in the lock once it is released, regardless of position the lock is in. Install Cabinet Door Assembly 1. Hold door assembly in open position and place on lower hinge with hinge pin entering the hinge bushing at the door bottom. 2. Close door and install upper hinge mounting screws. Check gasket seal. Install Door Liner And Gasket The DURA-LAST inner door liner and gasket are mounted to outer door panel by screws place every 4 inches (102 mm) around the door flange perimeter. Locked Removing Inner Liner and Gasket. 1. Remove cabinet door assembly as previously described. 2. Lay door assembly on a flat, padded surface. 3. Remove all mounting screws and lift off inner liner and gasket. Installing Inner Liner and Gasket 1. Position gasket around inner panel so gasket lip will be sandwiched between inner liner and outer door panel flange. 2. Replace and tighten all inner liner mounting screws until snug. Unlocked NOTE: Do not over tighten screws, this could crack liner or cause screw head to pull through the hole. Lock design is simple and no major operating difficulties should be encountered. If the lock is not locking in a positive enough manner, position the door to verify it is high enough for the bolt to catch firmly. Side way movement to the door may also improve lock operation. Sometimes levelling the freezer will eliminate need for cabinet door adjustments. Verify freezer is level from side to side, and from front to back, with a carpenters level. Adjust levelling glide until freezer is in a true vertical position. 3. Always align door. Door Handle Door handle and insert are attached to outer door panel by mounting screws which are located under the insert. Removing the Door Handle 1. Bow insert slightly and unhook top and bottom from door handle. 2. Remove mounting screws which secure the handle. NOTE: Longer mounting screw must be used to attach the bottom of door handle. RS1500000 Rev. 0 34 Disassembly Procedures ! To avoid risk of electrical shock, personal injury, or death, disconnect power to unit before following any disassembly procedures. WARNING Removing Door Lock Assembly Improving Gasket Seal 1. Remove all inner door liner mounting screws on door lock side, and four from the top and bottom, working in from the lock side. 2. Pull inner door liner out far enough to reach the lock bolt. 3. Using a screw driver pushed through foam block. Remove screw securing lock cam. Lock cam then can be removed. In order for gasket to compress evenly around the entire door, it must make contact at the top and bottom at the same time. For this reason the door, should not toe-in or toe-out. To correct a toe-in or toe-out condition verify hinge side of door is parallel to the cabinet. 1. Check cabinet levellers. Turning leveller in or out may correct a toe-in or toe-out condition. 2. Loosen all inner door panel mounting screws along the top, bottom, and latch side of the door. NOTE: Do not loosen screws along hinge side. 4. Remove clip holding lock to outer door panel. Push lock out of door panel. 5. Reassemble in reverse order. 3. Hold the corner that toes-in stationary; push in on the toe-out corner until door is lined up parallel with the cabinet. Tighten a few screws on latch side to hold door in position. 4. Open and close door several times to insure proper fit. If necessary, repeat steps 2 and 3. 5. Tighten all loosened screws until they are snug. Do not tighten screws too much, heads may pull through screw hole. Cabinet Door Alignment Hinge Adjustments Cabinet door on each model is in correct alignment when: Hinge side of door is equidistant from cabinet flange at the top and bottom. Gasket seals smoothly and is compressed no more than 1/16 inch (1.6 mm) along the hinge side with door closed. Handle side of door should be 1/16 inch (1.6 mm) above the handle side of the cabinet (viewed from the front). Upper hinge side corner of door should be 1/16 inch (1.6 mm) above the cabinet top. In many cases, levelling the freezer will eliminate needed for cabinet door adjustments. Verify freezer is level by checking both front edges as well as both sides of the cabinet, with a carpenters level. Adjust levellers until cabinet is in a true vertical position. Checking Gasket Seal Door gasket seals effectively with its normal pull. Visual inspection will usually reveal any point of poor seal. Double check locations which are questionable by closing the door on a narrow strip of paper. Any areas that will not support the weight of the paper are considered areas of poor gasket seal. On areas which cannot be checked visually or with a paper, rub blue carpenters chalk on the gasket, or dampen the gasket, and close door several times. Examine the cabinet flange for transfer of chalk or dampness. Failure of the transfer indicates areas of poor seal. 35 Hinge adjustments are necessary when: Gasket is not sealing sufficiently along hinge side of door. Gasket is compressed more than 1/16 inch (1.6 mm) on hinge side (causing a poor seal elsewhere around the door). Distance between the door and cabinet is greater at the top than it is at the bottom, or vice versa. Handle side of the door does not line up with cabinet side (when viewed from the front), or upper latch side corner is higher or lower than the cabinet top. If one or more of these conditions exist, verify cabinet is level and make necessary hinge adjustments as instructed below. Turning out the hinge side front leveller may correct a door sag. Oversized holes in the cabinet top permit some sideways, or in and out adjustments of the top hinge. Raise top hinge by placing a 1/32 inch (0.8 mm) shim beneath it. Lower hinge can be moved out by adding a 1/32 inch (0.8 mm) shim between it and the cabinet. RS1500000 Rev. 0 Disassembly Procedures ! To avoid risk of electrical shock, personal injury, or death, disconnect power to unit before following any disassembly procedures. WARNING Cabinet Assembly Temperature control knob Cabinet shell Light switch Temperature control plate Temperature control knob Cabinet shell Temperature control plate Light switch Temperature control Temperature control Light assembly Light assembly Shelve Cover gasket Cabinet inner liner Cabinet inner liner Drain tube cap Drain tube and grommet Evaportator cover Drain tube and grommet Gate brackets Gate brackets Wire gate Cabinet leveller Wire gate Cabinet leveller RS1500000 Rev. 0 36 Service Information To avoid risk of electrical shock, personal injury, or death, always disconnect electrical power source to the freezer before attempting to service unless test procedures require power to be connected. When removing any wiring from terminals, replace on the same terminals. Ensure all ground wires are connected before certifying unit as repaired and/or operational. ! WARNING System Operation When first opening the door no refrigerant circulating sound is heard, but after several minutes it is noticeable, there is probably moisture in the system which is freezing at the capillary tube outlet. Install a new drier, evacuate, and recharge. If there is no electrical failure and system does not operate properly, such as long run periods or warmer than normal compartment temperatures, the cause may be one of the following. If no moisture is in the system and no leaks, check for kinked tubing. Sometimes a kink in a large tube will not affect the system operation. Kink in the capillary tube could cause erratic operation. It cannot be straightened without cracking its walls. If freezer is not operating properly and electrical failure is not ruled out, refer to the electrical system and perform the necessary electrical tests before making any test which requires opening the system. Failed Compressor A compressor which is not pumping adequately will produce very little cooling effect. The shelf tubing may be covered with a thin film of frost, but the temperature will not reach control cut-off level, even with continuous running. Incorrect Refrigerant Charge An overcharged system may have a frost back condition appearing outside the insulation sleeve on the suction line at the rear of the cabinet. When the compressor stops, frost melts and drips on the floor. Because these conditions are similar to those for a refrigerant leak, perform leak test. If no leak is found, install gauges and check the operating pressures. If high side pressures are lower than those in the table in the Specification section and low side pressures are higher than specified, the compressor must be replaced. System must be purged, evacuated, and recharged with the correct amount of refrigerant. Restricted Capillary Tube The inner diameter of a capillary tube is about the same size as the period at the end of this sentence. It doesnt take much to restrict this area. Use care when moving or touching the capillary tube, slight kink can cause a restriction. The system must be purged, evacuated, and recharged with the correct amount of refrigerant. Before recharging, test for refrigerant leaks. Restrictions of capillary tube may be caused by moisture freeze-up, foreign particles lodged in the tube, or a kink. If capillary tube is restricted, there will be noticeable lack of frost on the refrigerated shelves or evaporator. The compressor will operate for a short time then cycle on the overload. Moisture in the System Any moisture in the system will usually freeze at the outlet end of the capillary tube, where it enters the evaporator coil. Preventing refrigerant from entering the coil. This results in loss of cooling with the compressor continuously operating. When the evaporator temperature rises above freezing, moisture restriction will melt and refrigerant will circulate through the system. Freezer will operate normally until another freeze-up occurs, which depends upon the amount of moisture in the system. If compressor is operating but evaporator coil or refrigerated shelves are not refrigerated, stop the compressor and listen for refrigerant surging through tubing. If a gurgling sound is heard, capillary tube is not restricted. Check for a leak or check operating pressures. An undercharged system will operate with temperatures above normal and compressor operating time will be increased. The greater the undercharge, higher the temperatures and longer the operating time. Partial Restriction in Low Side Tubing Bent tubing, foreign matter, or moisture in the system, may cause a partial restriction in the low side tubing. This usually results in frost-free tubing between the restriction and capillary tube and frost-covered tubing between the restriction and suction line. This restrictions acts like a second capillary tube, increasing pressure behind it (warming) and decreasing pressure beyond it (cooling). Replace component if there is a partial restriction in the refrigerant tubing. Pressure Unloading in System Compressor may stall and cycle on overload if an attempt is made to restart unit immediately after it has stopped. Compressor is trying to start while refrigerant pressure is high on condenser side and low on evaporator side. When the compressor stops operating, pressure in both sides equalizes as the liquid slowly passes through the capillary tube. When this occurs the pressures are said to be unloaded. Pressure unloading in the system will usually take from 3 to 6 minutes. Pull Down Over Load If cabinet interior is warm when compressor starts, pull down may overheat the compressor and cause cycling on the overload protector. 37 RS1500000 Rev. 0 Service Information To avoid risk of electrical shock, personal injury, or death, always disconnect electrical power source to the freezer before attempting to service unless test procedures require power to be connected. When removing any wiring from terminals, replace on the same terminals. Ensure all ground wires are connected before certifying unit as repaired and/or operational. ! WARNING Checking Operating Pressures High Sidemuch higher pressure If refrigeration system is not operating properly, check operating pressures. Low Sideslightly lower pressure Install a piercing valve on compressor process tube and on high side process tube. Indicates a leak in the low side of the system. High side pressures will continually increase drawing through the leak becoming trapped in the high side tubing. Low side gauge will show a slight pressure being drawn in through the leak. NOTE: Piercing valve should not be left on the tubing after tests are complete. Remove the valve from discharge line and repair the opening. Evacuate and recharge the system. Wattagehigher than normal When using gauges to verify operating pressures, observe the following precautions. High Sidelower pressure 1. Verify gauges are accurately calibrated. When not connected into a system, gauge pointers should indicate 0 pressure. If necessary, turn the recalibrating screw on the dial until the pointer indicates 0. 2. Verify temperature control is set to normally maintain a 0°F (-17°C) temperature. 3. Remove all unfrozen food from the freezer. 4. Before taking final gauge readings, allow freezer to run through several cycles with the door closed. This will allow the temperature and pressures to stabilize. 5. Compare the final gauge readings for the model being serviced, see the category which applies to the readings indicated. Wattagelower than normal High Sidenear normal pressure Low Sidelower pressure (possible vacuum) Wattagelower than normal Freezer shelf tubing or other low side tubing is probably restricted (kinked or blocked with foreign particle). This condition is usually accompanied with a frost build-up on the low side of the restriction. High side pressures will not unload and balance with the low side within the prescribed seven to ten minutes after the compressor is stopped. High Sidelow pressure Low Sidelower pressure (possible vacuum) Wattagelower than normal Indicates a leak in the high side of the system. Both gauges will show progressively less pressure. RS1500000 Rev. 0 Low Sidelower pressure (possible vacuum) Indicates restriction at the entrance of the capillary tube. High side pressures will take much longer than the prescribed seven to ten minutes to unload and balance with the low side after compressor has stopped. High Sidehigher pressure Low Sidehigher pressure Wattagehigher than normal Indicates an overcharge of refrigerant. Pressure increasing depends on the amount of overcharge and room temperature. A slight overcharge may not cause trouble in 70°F (21°C) temperatures, where as in 90°F (32°C) temperatures a considerable rise in pressure will result. An overcharge may also cause the suction line under the cabinet to be frosted during the run cycle. This condition will confirm the existence of an overcharge. High Sidehigher pressure Low Sidenear normal pressure Wattagehigher than normal Indicates air in the system. Resulting from a low side leak being repaired without the system being thoroughly evacuated and purged before recharging. In most cases, you will find that the freezer is not as cold as it should be, because the efficiency of the system is greatly reduced by the presence of air. Simply purging air from the system is not practical. The system being undercharged due to the loss of refrigerant. Evacuate, purge, and recharge the system 38 Service Information To avoid risk of electrical shock, personal injury, or death, always disconnect electrical power source to the freezer before attempting to service unless test procedures require power to be connected. When removing any wiring from terminals, replace on the same terminals. Ensure all ground wires are connected before certifying unit as repaired and/or operational. ! WARNING Operational Testing Thorough operational checking of freezer will minimize future service calls. 1. Set control to No. 4 position. 2. Place thermometer in the center of the freezer. Operating temperatures should cycle between +3°F (cut in) to -2°F (cut out) in an empty cabinet. 3. Check thoroughly with reliable leak detector for leaks. 4. Attach a cycle recorder and plug into outlet. Verify power source is not overloaded with other appliances. Compare test results with "Performance Data" table, see "Component Testing" section, page 12. Running time will vary according to design characteristics of the system and will be influenced by conditions listed below: Temperature control setting Room temperature Length of time and number of lid openings Quantity and temperature of food placed in freezer Service Hints Owner's Manual If you find customer is not familiar with "Owner's Manual", acquaint customer with manual. Usage Common types of abnormal usage that may lead to service calls include the following: 1. Excessive unfrozen food load: Amount of unfrozen food to be placed in freezer should not exceed approximately 3 pounds per cubic foot in 24 hours, unless otherwise noted. Recommend to customer that larger quantities of food be frozen commercially before placing in freezer. Larger unfrozen food loads may cause customer complaints of "continuous running" or may raise temperature of frozen food. Larger unfrozen food loads may also result in longer freezing times. 2. Excessive Lid Opening: Freezer is not designed to be operated as a refrigerator. Length of time and number of lid openings should be kept to minimum. Compressor "On" And "Off" Periods Variations in compressor cycles per hour are affected by factors such as usage, ambient conditions, electric power supply and others. Compressor off period is at least 8 minutes. Tripping on overload may occur. Noise Some noise, especially during starting and stopping of compressor, is normal. In some cases noise, described by customer as "gurgling," is experienced. This "gurgling" noise is caused by liquid entering evaporator. Voids In Urethane Foam Insulation Some condensation occurs on outer casing of freezer, when humidity is 85% or higher, which is considered normal. If condensation occurs at lower humidity level or persistently causes dripping water, there may be a void in the foam insulation where condensation occurs. Theoretically, voids can occur in any part of the freezer insulation. 1. Diagnosing presence of a void: a. Freezer should be operating and food-liner temperature should be close to 0°F. b. Disconnect power supply to freezer and wait 10 minutes. This will allow condenser and skin of outer casing to cool down to room temperature. c. Move your palm around skin of outer casing, searching for cold spots. If a void exists, area will feel colder than neighboring area. To access that "cold spot" is a void, try to flex sheet metal with your thumb. Metal over a void will be more flexible than metal backed with foam. If no void is found, observed condensation or dripping, which is caused by insulation void on the food-liner side of the foam insulation. 2. Action to be taken: If void is in an area which can be repaired in the field (bottom or back) using the "foam kit", proceed with the repair. If void is found in an area which is exposed to view, then freezer should be returned to source. 39 RS1500000 Rev. 0 Service Information To avoid risk of electrical shock, personal injury, or death, always disconnect electrical power source to the freezer before attempting to service unless test procedures require power to be connected. When removing any wiring from terminals, replace on the same terminals. Ensure all ground wires are connected before certifying unit as repaired and/or operational. ! WARNING Refrigeration System Complaints Common occasions for customer requesting service are listed below with possible reasons and tests to diagnose problem before replacements are made. 1. Cabinet temperature does not come down: a. Refrigerant charge is low. Examine frost line at tail end of the evaporator. b. Compressor is inoperative (see compressor sections). c. Control has been turned to "OFF" position. d. Freeze-up 2. Compressor will not start: a. Lack of power. Verify power availability at compressor terminals. b. Starting relay has failed. Connecting starting relay contacts L & S for 1 second should result in a normal start. Replace starting relay. c. Overload protector has failed in open position. Replace overload. d. One of compressor windings is open. Check winding resistances. Resistance between CDS and CDR should be less than 100 ohms. e. Compressor is locked (seized). If voltage is normal, there is no failure in the relay protector or any connections leading to the compressor terminals, and the amperage drawn is high. Compressor has failed. 3. Compressor overload thermostat is operating frequently but cabinet temperature has not risen noticeably. a. Voltage under 10 VAC. b. Voltage over 127 VAC. c. Lid is being opened frequently so compressor "OFF" time is too short for pressure equalization. d. Installation condition is causing compressor to run hotter than usual (for example, lack of air circulation around freezer shell). e. Overload thermostat has failed. RS1500000 Rev. 0 4. Continuous running: a. Freezer has been filled with unfrozen or warm food. b. Room temperature exceeds recommended maximum. c. Cabinet is placed near radiator or other heat source, such as strong sunlight. d. Temperature control is incorrectly adjusted or has failed. e. Refrigerant charge is low f. Freeze-up 5. Compressor runs too long: This is usually a statement of opinion by customer. For a normal storage temperature at 0°F, expected running times are shown in "Performance Data" table, see "Component Testing" section, page 12. Running times can vary substantially depending on usage and conditions. 6. Freeze-up: Moisture freezing in the sealed system is extremely rare; however, it may be encountered when sealed system is opened for service. a. Moisture freeze-up is indicated by continuous running and high cabinet temperatures. Use a suction pressure gauge to diagnose problem. As freezer pulls down, back pressure drops to a vacuum. By pulling freezer plug and warming cabinet until evaporate exceeds 0°C the ice will melt and cause a rapid rise in pressure. This can be duplicated any number of times. b. Freeze-up can only be corrected by evacuating system with a vacuum pump, and by installing a new, oversized, high side drier. NOTE: Effective July 1, 1992, it is responsibility of service technician to capture refrigerant for safe disposal. c. In case of freeze-ups, the unit's current draw (amperage) will usually be low, about 70 percent of serial plate. 40 Service Information To avoid risk of electrical shock, personal injury, or death, always disconnect electrical power source to the freezer before attempting to service unless test procedures require power to be connected. When removing any wiring from terminals, replace on the same terminals. Ensure all ground wires are connected before certifying unit as repaired and/or operational. ! WARNING Refrigerant Leaks ! DANGER Free oxygen will explode on contact with oil. Acetylene will explode spontaneously when put under pressure. To prevent violent explosions that may result in serious injury or death to persons in or near the immediate vicinity, NEVER use oxygen or acetylene for pressure testing or cleanout of refrigeration systems. Before attempting to locate a leak, study the diagrams showing the route of refrigeration tubing and serviceable joints. NOTE: Urethane foam cells are filled with trapped gas and if cells are broken (by removing a piece of foam, etc.) a leak detector will indicate a strong leak. When foam cells are broken, liberated gas should be blown off surface or allow unit to stand for at least 5 minutes before testing. Symptoms of refrigerant leaks 1. Frost-line, visible inside food-liner, does not extend to tail-end of evaporator. In properly refrigerated system frost-line, on the food-liner back wall of the chest freezer, will extend down to 56 inches from the foodliner bottom. In slow leaks, this frost-line gradually recedes upward. When an internal refrigerant leak is suspected, recharge freezer with proper amount of refrigerant and mark end of the frost-line (nearest spot to the bottom) with a crayon. Leave freezer running (sometimes for months) and observe mark periodically. If frost-line moves away from mark, a leak (external or internal) is certain. 2. Feeler bulb of thermostat, is located toward tail-end of evaporator. In case of shortage in refrigerant, tail-end of evaporator will not be refrigerated and thermostat will not cut out causing freezer to run continuously. (This can be confused with a faulty thermostat.) 3. Although compressor is running continuously, foodliner temperature will rise. 4. Low suction pressures. External Or Internal Leak "Internal leaks" are refrigerant leaks inside foam insulation. All other leaks are considered "external". Once presence of a leak has been determined (from symptoms described above), locate leak. First, test all joints in compressor compartment. Hold nozzle of detector on every joint for at least 1 minute. If no leak can be found at these joints, check for internal leak. Finding Internal Leak Confirm existence of an internal leak by pressure testing. NOTE: For this test, evaporator and condenser must be disconnected and individually pressure tested with dry air or dry nitrogen at pressures between 200300 psi. Leave the components under pressure for a minimum of 3 days. If after 3 days, pressure drop is more than 10 psig, at approximately same room temperature, presence of an internal leak can be assumed. Be sure there are no leaks in connections between pressurizing device and gauge or between gauge and cabinet. A leak at these joints could be misinterpreted as an internal leak. Apply soap solution to all joints and connections to check for leaks (bubbles). If pressure drop after 3 days is not more than 10 psig, there is no internal leak. Pressure test described above will indicate: leaking condenser; or leaking evaporator; or no leak. Condenser Leak (Internal) If indications are that internal leak is in condenser, leak is considered to be nonrepairable. If unit is under warranty, contact factory for permission to replace unit. Evaporator Leak (Internal) If pressure test indicates leak in the evaporator, the leak could be: at the evaporator/suction line; or at the evaporator inlet joints, or at an unknown location. Joint is located approximately 24 inches below breaker strip at back left corner. After breaker strip has been removed, carefully search for capillary by gradually removing foam insulation. Evaporator inlet can be lifted above cabinet flange for examination and repair. After leak has been repaired, repack void with fiberglass insulation. NOTE: Removal of breaker strip will destroy it. Replace breaker strip with new one. If evaporator leak is at unknown location, contact factory for permission to replace unit if product is under warranty. 41 RS1500000 Rev. 0 Service Information To avoid risk of electrical shock, personal injury, or death, always disconnect electrical power source to the freezer before attempting to service unless test procedures require power to be connected. When removing any wiring from terminals, replace on the same terminals. Ensure all ground wires are connected before certifying unit as repaired and/or operational. ! WARNING Evacuation and Charging Procedures ! WARNING Sealed system on these freezer models use R134a refrigerant. If sealed system work on these models is required, used approved equipment and follow service procedures. See HFC134a Service Information section of this manual or Service Letter F842 for service procedures. ! CAUTION To minimize contamination, exercise extreme care when servicing HFC134a sealed systems. No trace of other refrigerants is allowed in HFC134a systems. Chlorinated molecules in other refrigerants such as CFC12, etc. lead to capillary tube plugging. Ester oil is used in HFC134a systems. Do not use mineral oil. HFC134a and mineral oils cannot be mixed. If mineral oils are used in HFC134a systems, lubricant would not return to compressor and would cause early compressor failure. If significant amount of oil has been lost from compressor, replace oil rather than adding oil. Low-side leak repairs of HFC134a systems are different from those of CFC-12 systems. Ester oils used in HFC134a systems are so hydroscopic that by the time an inadequate system performance is detected, oil will be saturated with moisture. CFC12 has much higher tolerance to system processing materials, such as drawing compounds, rust inhibitors, and cleaning compounds, than HFC134a. Such materials are not soluble in HFC134a systems. If materials were to be washed from system surfaces by ester oils, they could accumulate and eventually plug capillary tube. Care must be taken to minimize moisture from entering HFC134a system. Do not leave compressor or system open to atmosphere for more than 10 minutes. Excessive moisture in HFC134a system will react with compressor oil and generate acid. Compressor must always be replaced when performing low side leak repair. Drier filter must be replaced whenever seal system is opened. Important: Unbrazing drier filter from tubing will drive moisture from desiccant and into system, causing acids to form. Do not unbraze filter drier from tubing. If CFC12 service drier was installed in HFC134a system, drier could overload due to excessive moisture. Clean, dry HFC134a compatible copper tubing must be used when replacing tubing. Avoid system contamination by using Towerdraw E610 evaporating oil, part # R0157532, when flaring, swaging, or cutting refrigeration tubing. RS1500000 Rev. 0 42 Service Information To avoid risk of electrical shock, personal injury, or death, always disconnect electrical power source to the freezer before attempting to service unless test procedures require power to be connected. When removing any wiring from terminals, replace on the same terminals. Ensure all ground wires are connected before certifying unit as repaired and/or operational. ! WARNING HFC134a Service Information Comparison of CFC12 and HFC134a: HFC134a Refrigerant HFC134a is alternative refrigerant for CFC12. HFC134a has an ozone depletion potential (ODP) factor of 0.0 and a global warming potential (GWP) factor of 0.27. HFC134a is not flammable and has acceptable toxicity levels. HFC134a is not interchangeable with CFC12. There are significant differences between HFC134a and CFC12 which must be considered when handling and processing refrigeration system. Health, Safety, and Handling Health, safety and handling considerations for HFC134a are virtually no different than those for CFC12. Health, Safety, and Handling Allowable overall exposure limit Vapor exposure to skin Liquid exposure to skin Vapor exposure to eye Liquid exposure to eye Above minimum exposure limit Safety and handling Spill management Fire and explosion hazards Storage conditions Disposal procedures Properties/Characteristics Ozone Depletion Potential (ODP) Global Warming Potential (GPW) Molecular weight Boiling point at 1 atmosphere Vapor pressure at 77°F (25°C) Liquid density at 77°F (25°C) Flammability High-side system operating Pressure at 65°F (18°C) ambient Low-side system operating Pressure at 65°F (18°C) ambient * Compared to CFC 11 = 1 CFC12 1,000 ppm No effect Can cause frostbite Very slight irritant Can cause frostbite Can cause Asphyxiation, Tachycardis, and Cardia Arrhythmias Wear appropriate skin and eye protection. Use with adequate ventilation. Remove or extinguish ignition or combustion sources. Evacuate or ventilate area. May decompose if contact with flames and heating elements. Container may explode if heated due to resulting pressure rise. Combustion products are toxic. Procedures/rules for CFC12 also apply for HFC134a. Recycle or reclaim 43 CFC12 HFC134a 1.0* 0.0* 3.2* 0.27* 121 102 -22°F (-30°C) -15°F (-26°C) 80 psig 82 psig 82 lb/ft3 75 lb/ft3 No No HFC134a approximately 3 psig higher than CFC12 HFC134a approximately 2 psig lower than CFC12 HFC134a Same Same Same Same Same Same Same Same Same Same RS1500000 Rev. 0 Service Information To avoid risk of electrical shock, personal injury, or death, always disconnect electrical power source to the freezer before attempting to service unless test procedures require power to be connected. When removing any wiring from terminals, replace on the same terminals. Ensure all ground wires are connected before certifying unit as repaired and/or operational. ! WARNING Service Equipment ! CAUTION Service equipment for HFC134a systems must be used exclusively with HFC134a refrigerant. Do not use this equipment to service devices using other types of refrigerant (for example, CFC12 or CFC22 refrigerants). Listed below are the tools and equipment needed for proper servicing of HFC134a systems. NOTE: Once equipment is designated for HFC134a use, it must be exclusively use for HFC134a only. An * will identify the following equipment. * Evacuation pump Check with vacuum pump supplier to verify equipment is compatible for HFC134a. Robinair, Model 15600, 2 stage, 170 liters (6 cubic feet) per minute pump is recommended. * Four-way manifold gauge set with low loss quick couplers Leak detector * Charging cylinder * Line piercing saddle valve Seals must be HFC134a and ester oil compatible. Line piercing valves may be used for diagnosis but are not suitable for evacuation or charging, due to minute holes pierced in tubing. Do not leave mechanical access valves on system. Valves eventually will leak. Molecules of HFC134a are smaller than other refrigerants and will leak where other refrigerants would not. * Swaging tools * Flaring tools * Tubing cutter Flux Sil-Fos Silver solder * Oil for swaging and flaring * Copper tubing Dry nitrogen 99.5% minimum purity, with -40°C (-40°F) or lower dew point Crimp tool Tube bender Micron vacuum gauge * Process tube adaptor kit Heat trap paste * Appliance grade HFC134a RS1500000 Rev. 0 Drier Replacement Before opening sealed system, recover HFC134a refrigerant for safe disposal. Every time sealed HFC134a system is repaired, drier filter must be replaced. Cut drier out of system by completing the following steps. Do not unbraze drier filter. Applying heat to remove drier will allow moisture into system. 1. Score capillary tube close to drier and break. 2. Reform inlet tube to drier allowing enough space for large tube cutter. 3. Cut circumference of drier 1-1/4" (3.175 cm), below condenser inlet tube joint to drier. 4. Remove drier. 5. Unbraze remaining part of drier. Remove drier from system. 6. Discard drier in safe place. Do not leave drier with customer. 44 Service Information To avoid risk of electrical shock, personal injury, or death, always disconnect electrical power source to the freezer before attempting to service unless test procedures require power to be connected. When removing any wiring from terminals, replace on the same terminals. Ensure all ground wires are connected before certifying unit as repaired and/or operational. ! WARNING ! WARNING To avoid death or severe personal injury, cut drier at correct location. Cutting drier at incorrect location will allow desiccant beads to scatter. Completely clean area of beads, if spilled. 12.Visually check all joints for leaks. Evacuate and recharge the system. 13.Reconnect wire leads to compressor terminals and test unit to make sure it is operating properly. 14.Pinch the process tube and cut off service valve. Braze joint and test for leaks. Refrigerant Charge Replacement HFC134a Service Compressor HFC134a service compressors are charged with ester oil and pressurized with dry nitrogen. Before replacement compressor is installed, pull out one rubber plug. A pop from pressure release should be heard. If a pop sound is not heard, do not use compressor. Positive pressure in compressor is vital to keep moisture out of ester oil. Do not leave compressor open to atmosphere for more than 10 minutes. The holding charge assures the compressor is dry. A compressor, it is recommended that the tubes be cut close to the soldered joints where they are connected to the compressor tube. If the tubes are not long enough, it may be necessary to unsolder the joints to allow connections to the replacement compressor. When replacing compressor, proceed as follows: Refrigerant charge in all capillary tube systems is critical and exact amount is required for proper performance. Factory charges are shown on serial plate. Do not use refrigerant other than shown on serial plate. Leak Testing Undetected leaks lead to repeated service calls and eventually result in system contaminations, restrictions, and burned out compressors. After recharging, sealed system must be thoroughly tested for leaks. If a very small leak is difficult to isolate, coat area with soap suds and observe. Bubbles will form in location of leak. Evacuation and Charging ! 1. 2. 3. 4. Disconnect power cord from electrical outlet. Install a service valve on process tube. Connect a hose to service valve and capture charge. Clean the tubing for about 3 inches (76 mm) at the points to be cut. Before cutting tube, be sure it will be long enough to reconnect to replacement compressor. If not, unbraze joints. 5. Disconnect wires from compressor terminals. 6. Remove retaining clips from compressor mounts. Lift compressor from mounting rails and transfer rubber grommets to replacement compressor. 7. Set replacement compressor into position and install retaining clips. 8. Remove all rubber plugs. Clean stubs of compressor and compare the size of tubing to stubs of replacement compressor. It may be necessary to swag copper tubing to make the joints. 9. Install a 6 inch (152 mm) copper tube to low side process tube on compressor. Add a service valve to end of this tube. 10.Connect all tubing. Apply flux to compressor stubs and braze all the joints. Flux must be wiped off after brazing. 11. Install a new drier. DANGER Free oxygen will explode on contact with oil. Acetylene will explode spontaneously when put under pressure. To prevent violent explosions that may result in serious injury or death to persons in or near the immediate vicinity, NEVER use oxygen or acetylene for pressure testing or cleanout of refrigeration systems. ! WARNING To avoid severe personal injury or death from fire keep system free from contamination due to presence of air. Follow instructions exactly. ! WARNING To reduce risk of fire, sealed refrigeration system must be air free. To reduce risk of air contamination follow evacuation procedures exactly. 45 RS1500000 Rev. 0 Service Information To avoid risk of electrical shock, personal injury, or death, always disconnect electrical power source to the freezer before attempting to service unless test procedures require power to be connected. When removing any wiring from terminals, replace on the same terminals. Ensure all ground wires are connected before certifying unit as repaired and/or operational. ! WARNING Thermistor Vacuum Gauge Low Side Gauge E Valve High Side Gauge D Valve C Compressor Charging Hose Compressor Process Tube Drier/Process Tube Charging Hose B A .6 cm Copper Tubing F Valve Vacuum Pump Charging Cylinder Evacuation and Charging Typical Setup Before opening system, evaporator coil must be at ambient temperature to minimize moisture infiltration into system. NOTE: It is the responsibility of the service technician to capture refrigerant in system for safe disposal, before opening any refrigeration system. 1. After capturing refrigerant, replacing drier and making any repairs, evacuate system from high side through drier/process tube and low side through compressor process tube simultaneously. Evacuation should not be done through line piercing valve but through I.D. opening of tubes. 2. With valves C and F closed to thermistor vacuum gauge and charging cylinder, open all other valves and start vacuum pump. 3. At approximately 77.66 cm (29") of vacuum, open valve C to thermistor vacuum gauge and take micron reading. 4. Continue evacuating system until thermistor vacuum gauge registers 600 microns. 5. At 600 microns close valve A to vacuum pump to allow micron reading in system to balance. Micron level will rise. If in 2 minutes, micron level stabilizes at 1000 microns or below, system is ready for charging. If micron rises above 1000 micron level and stabilizes, open valve A to vacuum pump and continue evacuating. RS1500000 Rev. 0 If micron reading rises rapidly and does not stabilize, a leak still exists in system. Close valve A to vacuum pump and C to thermistor vacuum gauge. Invert charging cylinder and open charging cylinder valve F to add partial charge for leak checking. With leak detector, check manifold connections and system for leaks. After locating leak, capture refrigerant charge, repair leak, and begin at step 1. 6. Once system is ready to charge, close valve A (vacuum pump), C (thermistor vacuum gauge), and E (low side manifold gauge). 7. Check serial plate for correct charge and set scale on dial-a-charge cylinder for corresponding HFC134a pressure reading. NOTE: Do not use captured or recycled refrigerant in Amana units. Captured or recycled refrigerant voids any Amana and/or compressor manufacture's warranty. 8. Open valve F to charging cylinder and let exact amount of refrigerant out of cylinder. Close valve. Low side gauge pressure should rise shortly after opening charging cylinder valve as system pressure equalizes through capillary tube. If pressure does not equalize, a restriction typically exists at capillary/drier braze joint. 9. If no restriction exists, open valve E (low side manifold gauge) and pinch off high side drier process tube. 10.Start compressor and draw remaining refrigerant in charging hoses and manifold into compressor through compressor process tube. To check high side pinch-off drier process tube, close valve D (high side gauge). If pinch-off is not leaking, high side pressure will not rise. If high side pressure gauge shows an increase, repeat high side pinch-off and open valve D. Repeat until high side pinch-off no longer leaks. 11. Pinch-off compressor process tube and remove charging hose. Braze stub closed while compressor is operating. 12.Unplug dehumidifier from electrical outlet. Remove charging hose and braze high side drier process tube closed. 46 Service Information To avoid risk of electrical shock, personal injury, or death, always disconnect electrical power source to the freezer before attempting to service unless test procedures require power to be connected. When removing any wiring from terminals, replace on the same terminals. Ensure all ground wires are connected before certifying unit as repaired and/or operational. ! WARNING Dehydrating Sealed Refrigeration System It is a misconception that moisture in a sealed refrigerant system is harmless. Moisture in a sealed refrigerant system, when exposed to heat generated by the compressor and motor, reacts chemically with refrigerant and oil in the system and forms corrosive hydrochloric and hydrofluoric acids. These acids contribute to the breakdown of motor winding insulation and corrosion of compressor working parts, causing compressor failure. In addition, sludge, a residue of the chemical reaction, coats all surfaces in the sealed system, and will eventually restrict refrigerant flow through the capillary tube. Copper to steel joints: SILVER SOLDER (alloy of 30% silver, 38% copper, 32% zinc). Use with fluoride based flux. Recommended brazing temperature is approximately 1200°F. Steel to steel joints: SILVER SOLDER (see above). Brass to copper joints: SILVER SOLDER (see copper to steel connections). Brass to steel joints: SILVER SOLDER (see copper to steel connections). Refrigerant Precautions ! To dehydrate the sealed system: 1. Perform the leak test. 2. Capture refrigerant in system. NOTE: It is the responsibility of the service technician to capture refrigerant in system for safe disposal, before opening any refrigeration system. 3. Repair any leaks in system. 4. Evacuate system. 5. Recharge to specification with new refrigerant. NOTE: Do not use captured or recycled refrigerant in Amana units. Captured or recycled refrigerant voids any Amana and/or compressor manufacturers warranty. WARNING To avoid personal injury do not allow refrigerant to contact eyes or skin. Do not burn refrigerant. ! CAUTION Do not use refrigerant other than that shown on unit serial number identification plate. NOTE: All precautionary measures recommended by refrigerant manufacturers and suppliers apply and should be observed. Open Lines Brazing ! CAUTION Brazing requires high temperatures. Take all necessary precautions to protect against personal injury and property damage. During any processing of refrigeration system, never leave lines open to the atmosphere. Open lines allow water vapor to enter system, making proper evacuation more difficult. Satisfactory results require cleanliness, experience, and use of proper materials and equipment. Connections to be brazed must be properly sized, free of rough edges, and clean. Generally accepted brazing materials are: Copper to copper joints: SIL-FOS (alloy of 15% silver, 80% copper, and 5% phosphorous). Use without flux. Recommended brazing temperature is approximately 1400°F. DO NOT USE FOR COPPER TO STEEL CONNECTION. 47 RS1500000 Rev. 0 Service Information To avoid risk of electrical shock, personal injury, or death, always disconnect electrical power source to the freezer before attempting to service unless test procedures require power to be connected. When removing any wiring from terminals, replace on the same terminals. Ensure all ground wires are connected before certifying unit as repaired and/or operational. ! WARNING Line Piercing Valves Line piercing valves may be used for diagnosis, but are not suitable for evacuating or charging due to the minute holes pierced in the tubing. ! WARNING Line piercing valve should not be left on the system, connection to tubing is not hermetically sealed and eventually a leak will occur. Upright freezers which are insulated with foamed-in polyurethane foam have their condenser tubing embedded in this foamed insulation within the cabinet wall. Liner cannot be removed and there is no access to the tubing to removed, repaired, or replaced. NOTE: Polyurethane insulation contains refrigerant R11/R141B/R22. Care must be taken when testing. Isolate the area as much as possible so that the leak detector will not falsely indicate a leak of R11/R141B/R22 vapor. NOTE: Use soap bubble solution only when the system has a positive pressure. Using it where a vacuum is present could pull moisture or soap bubbles into the system. Brush liquid detergent over testing area and watch for bubbles. This may take a few minutes for a bubble to appear if leaks are extermely small. After replacing a component always evacuate, add refrigerant, and test for leaks on all joints before recharging. Clean excess soldering flux from new joints before testing to prevent pinhole leaks at a later time. Altitude Adjustment All models covered in this manual are equipped with a Cutler Hammer temperature control. It has two adjustment screws, both of which must be turned to compensate for variance in altitude. Screw turns are very critical, use circular scale as a guide. If there is an undercharge of refrigerant and the system has not been recently opened, there is probably a leak in the system. First locate and repair the leak. evacuated and recharged with the proper amount of refrigerant. Replaced the dryer whenever a new charge of refrigerant is added. Cut-out screw Cut-in screw NOTE: Effective July 1, 1992, before opening any refrigeration system it is the responsibility of the service technician to capture the refrigerant for safe disposal. Temperature Control Presence of oil around a tubing joint usually indicates a leak. Always use a leak detector to determine if the joint is leaking. Alititude in feet 2,000 3,000 4,000 5,000 6,000 7,000 8,000 9,000 10,000 Pressurise the system to a minimum of 75 PSIG, by running the compressor for high side testing. To pressurise the low side, allow entire system to warm up to room temperature. If pressure is low enough a leak test will be impossible to perform. Install a service valve to compressor process tube and check pressure. Recover remaining refrigerant. Separate and pressurise high & low side independently, allowing unit to settle.Check gauges for pressure drop. Leak detector can insolate larger leaks and generally locate small ones, but to actually pinpoint extremely small leaks in the high side, soap bubble solution will need to be performed. RS1500000 Rev. 0 Counter Clockwise turns 7 / 60 13 / 60 19 / 60 25 / 60 31 / 60 37 / 60 43 / 60 49 / 60 55 / 60 05 00 55 10 50 45 15 20 40 25 30 35 Altitude Correction Both Cut-In and Cut-Out Screws Must Be Adjusted This scale may be used as a guide for measuring degrees of rotation required for altitude correction. The arrows indicate direction of screw rotation 1/60 of a turn equals 6° of rotation. Turn cut-in or cut-out screws clockwise to obtain colder operating temperatures. 48 Service Information To avoid risk of electrical shock, personal injury, or death, always disconnect electrical power source to the freezer before attempting to service unless test procedures require power to be connected. When removing any wiring from terminals, replace on the same terminals. Ensure all ground wires are connected before certifying unit as repaired and/or operational. ! WARNING Cabinet Shell Cabinet shell is made of steel, with all seams welded and all points of stress adequately braced. Refrigeration system condenser tubes are attached to the inner surfaces of the cabinet shell by means of spot welded clamps. Forming a shell-type condenser which provides quiet operation and efficient heat dissipation. This method of dissipating the condenser heat eliminates the formation of condensation on exterior surfaces of the cabinet. Steel base rails provide a platform on which the cabinet shell is mounted. Two adjustable levelling glides are inserted into the base rails, one at each front corner. Door lock retainer and strike are also attached to the cabinet shell (if equipped). Cabinet Liner (Food) Cabinet liner is made of a tough, flexible, plastic or high impact polystyrene material and is secured to the cabinet shell with retaining clips. Following components are attached to the cabinet liner by utilising special snap nuts, clips and other fasteners; interior light and switch, cold control assembly and cover, evaporator coil and cover (no frost models), shelves and gate mounting hardware, and drain tube and grommet. Drain System Refrigerated Shelf Models On no-defrost models, drain grommet and sleeve are located in the center of drain trough which has been formed in the cabinet liner. During defrost cycle, water is carried through the drain hose and tube into the moisture pan which is located under the cabinet. Heat from the precooler condenser hastens the evaporation process. Once system components and cabinet liner have been assembled to the cabinet shell, polyurethane insulation is foamed in to fill the void between the shell and liner. NOTE: Cabinet (food) liner cannot be removed on the current models with foam insulation. Drain System Freezer drain system consists of a drain grommet and sleeve at the liner and cabinet bottom, and a drain hose and tube that carries the defrost water. NOTE: Refrigerated shelf models are equipped with a drain cap that must be removed before defrosting and replaced securely afterwards. On refrigerated shelf models, defrost water is carried through the front face plate of the cabinet where it can be collected into a container for disposal Drain System No-Defrost Models Drain tube grommets should never need replacing unless it has deteriorated. If drain system becomes clogged, push a length of plastic cloths line completely through and flush with warm water. 49 RS1500000 Rev. 0 Wiring Diagram and Schematic ! WARNING To avoid risk of electrical shock, personal injury, or death, disconnect power to freezer before servicing, unless testing requires it. Wires removed during disassembly must be replaced on proper terminals to insure correct grounding and polarization. ! CAUTION High Voltage To 115 VAC plug Black Light Light switch Light plate White Black Black Light switch 3 1 Yellow Red Green Blue Black Defrost thermostat 4 White Black Blue Red Green Interior light White 2 Control Black Defrost heater Defrost timer Freezer fan Control Fan Defrost thermostat Red Orange White White Green Heater Defrost timer Blue T4 White T3 Yellow T2 Black T1 White Ground Green White Overload protector Compressor R Red Capacitor Black PTC relay C Plug Green S Ground Capacitor 1 Blue Red Green No interior light OPTIONAL ESUF15JW ESUF20JW P1311105W, P1179619W P1311107W, P1179621W RS1500000 Rev. 1 ESUF17JW AUF150KW 50 2 7 3 4 5 6 Ground schematic 1 - Outer case 2 - Compressor 3 - Control 4 - Light plate 5 - Fan motor 6 - Defrost timer 7 - Coil cover P1311106W, P1179620W P1317705W Wiring Diagram and Schematic ! WARNING To avoid risk of electrical shock, personal injury, or death, disconnect power to freezer before servicing, unless testing requires it. Wires removed during disassembly must be replaced on proper terminals to insure correct grounding and polarization. ! CAUTION High Voltage Light plate Black Black Black Light switch Control White Red Black Green White Interior light Control Overload protector Red Compressor R C S PTC relay Capacitor Light switch Ground Light To 115 VAC plug Green White Black Black Plug Green Ground schematic Ground Capacitor 1 - Outer case 2 - Compressor 3 - Control 4 - Light plate Red White Black Red Green No interior light OPTIONAL ESU12JW ESU17JW AU120KW AU170KW P1311101W, P1179615W P1311103W, P1179617W P1317701WW P1317703WW ESU15JW ESU20JW AU150KW AU200KW 51 P1311102W, P1179616W P1311104W, P1179618W P1317702WW P1317704WW RS1500000 Rev. 1 Wiring Diagram and Schematic ! WARNING To avoid risk of electrical shock, personal injury, or death, disconnect power to freezer before servicing, unless testing requires it. Wires removed during disassembly must be replaced on proper terminals to insure correct grounding and polarization. ! CAUTION High Voltage Black Black White Door Switch Black Light Light switch Lamp Defrost Timer Blue 4 2 Yellow Green Light plate Black 3 Cold Control White White Defrost Heater 34.8 / 37.5 ohms Defrost Thermostat 4000 ohms Red Red Red Control Red Green White Black Blue Red Green Defrost thermostat Black Relay R 2 White 3 Capacitor Thermostat Brown Red White Swich Black LN Buzzer Identified Conductor Green Power Supply White Green Compressor C Run Black Yellow Heater Fan 112.4 ohms S LH/LV Black Overload Protector Start Slide switch Fan White Thermostat Plug Defrost timer 1 2 3 4 5 6 Buzzer Capacitor 1 - Outer case 2 - Compressor 3 - Coil Cover 4 - Control 5 - Light Plate 6 - Fan Motor Green AUF170KW P1317706WW RS1500000 Rev. 1 AUF200KW 52 P1317707WW Ó 1998 Amana Appliances Amana, Iowa 52204