1
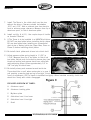
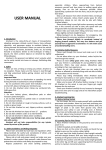
W W W . Z O D I A C . NL
01-01-2003
291266
TAMER KIT INSTALLATION INSTRUCTIONS
For all 1941-1983 Harley Big Twins, 74 and 80 C.U.
models. This new kit is the result of extensive engineering,
design and the highest quality materials on todays market.
The Tamer eliminates clutch jerking syndrome by 100%.
This kit also eliminates all clutch drag and lunging while in
gear and stopped plus it provides easier shifting while greatly reducing gear clash.
BEFORE STARTING INSTALLATION:
Take a few minutes to review the following instructions,
photos and illustrations. This will make your installation
easier and quicker.
TOOLS & MATERIALS REQUIRED:
1 1/2” drive impact wrench
1 9/16” combination wrench
1 Phillips screwdriver
1 Ruler
1
1
1
1 1/16” socket
1 1/2” diam. washer with 3/8” center hole
Set feeler gauges
INSTALLATION:
1. Remove all accessories or pipes covering the primary cover.
2. Remove primary cover, clutch pressure plate and clutch plates as shown in the Harley Davidson
service manual.
3. If necessary, clean and inspect clutch plates for
glazing or oil soaked plates. Adjust primary chain
tension (if necessary).
4. Remove plates from the clutch shell, remove the 3
hold-down springs and discard springs.
5. Remove the left hand threaded center nut and discard
locking washer.
SEE FIGURE C
6. Study figures, to determine sequence and proper
method for adding shims to gain clearance for proper
function.
please turn page over-->
>
PERFORMANCE PRODUCTS FOR HARLEY-DAVIDSON ®
W W W . Z O D I A C . NL
01-01-2003
7. Install The Tamer in the clutch shell over the pins
without the shims. Clearance should be between
.010” and .015”. Add or subtract sims from back to
front to achieve proper clearance. Measure from lip of
aluminum spool, to flat of aluminum plate.
8. Install nut (fig. A, # 11). Use couple drops of Loctite
on threads if desired.
9. If The Tamer is to be installed in a KARATA belt drive,
DO NOT use steel plate before installing clutch plates.
DO use steel plate when installing on conventional
chain drive or Harley belt drive (Super Max, Primo or
Phase-3) before installing clutch plates.
10. Re-install clutch plates and drivers into clutch shell.
11. Adjust pressure plate spring length to 1 1/32” to
1 1/8”. Measure from lip of top plate, to flat of bot
tom plate. Adjust push rod screw to remove play from
throw-out bearing and remove slack from cable with
cable adjusting screw. Allow approximately 1/4” to
1/8” free play at clutch lever.
12. Re-install primary and accessories and test drive.
There should be no pull when motorcycle is in gear. If
pull persists, pressure plate spring is too tight, clutch
is out of adjustment, OR The tamer is installed too tightly. When installed correctly, clutch hub
should turn freely with clutch disengaged.
Figure C
EXPLODED SIDEVIEW OF TAMER:
A.
Aluminum spool
B. Aluminum backing plate
C.
Mylatron plate
D. Add shims here if too loose
E.
Add shims here if too tight
F.
Shaft
PERFORMANCE PRODUCTS FOR HARLEY-DAVIDSON ®