1
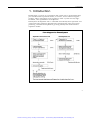
Artisan Technology Group is your source for quality
new and certified-used/pre-owned equipment
• FAST SHIPPING AND
DELIVERY
• TENS OF THOUSANDS OF
IN-STOCK ITEMS
• EQUIPMENT DEMOS
• HUNDREDS OF
MANUFACTURERS
SUPPORTED
• LEASING/MONTHLY
RENTALS
• ITAR CERTIFIED
SECURE ASSET SOLUTIONS
SERVICE CENTER REPAIRS
Experienced engineers and technicians on staff
at our full-service, in-house repair center
WE BUY USED EQUIPMENT
Sell your excess, underutilized, and idle used equipment
We also offer credit for buy-backs and trade-ins
www.artisantg.com/WeBuyEquipment
InstraView REMOTE INSPECTION
LOOKING FOR MORE INFORMATION?
Visit us on the web at www.artisantg.com for more
information on price quotations, drivers, technical
specifications, manuals, and documentation
SM
Remotely inspect equipment before purchasing with
our interactive website at www.instraview.com
Contact us: (888) 88-SOURCE | [email protected] | www.artisantg.com
A M E R S H A M
B I O S C I E N C E S
PhastSystem
Development Unit
TM
User Manual
18-1060-96
Edition AB
Artisan Technology Group - Quality Instrumentation ... Guaranteed | (888) 88-SOURCE | www.artisantg.com
Important user information
Reading this entire manual is
recommended for full
understanding of the use of this
product.
The exclamation mark within an
equilateral triangle is intended to
alert the user to the presence of
important operating and
maintenance instructions in the
literature accompanying the
instrument.
Should you have any comments on this manual,
we will be pleased to receive them at:
Amersham Biosciences AB
S-751 82 Uppsala
Sweden
Amersham Biosciences AB reserves the right to make
changes in the specifications without prior notice.
Warranty and Liability
Amersham Biosciences AB guarantees that the
product delivered has been thoroughly tested to
ensure that it meets its published specifications.
The warranty included in the conditions of
delivery is valid only if the product has been
installed and used according to the instructions
supplied by Amersham Biosciences AB.
Amersham Biosciences AB shall in no event be liable
for incidental or consequential damages,
including without limitation, lost profits, loss of
income, loss of business opportunities, loss of use
and other related exposures, however caused,
arising from the faulty and incorrect use of the
product.
Trade marks
PhastSystem ™ and PhastGel® are the exclusive
trade marks of Amersham Biosciences AB. In view of
the risk of trade mark degeneration, it is respectfully suggested that authors wishing to use these
designations refer to their trade mark status at
least once in each article.
©
Copyright 1995 Amersham
Biosciences AB
All rights reserved. No part of this publication
may be reproduced, stored in a retrieval system
or transmitted in any form or by any means,
without permission in written form from the
company.
Artisan Technology Group - Quality Instrumentation ... Guaranteed | (888) 88-SOURCE | www.artisantg.com
Contents
1. Introduction . . . . . . . . . . . . . . . . . . . . . . . . . . . . . . . . . . . . . . . . . . 3
2. Important Safety Information . . . . . . . . . . . . . . . . . . . . . . . . . 3
2.1 Safety precautions . . . . . . . . . . . . . . . . . . . . . . . . . . . . . . 3
3. Description of PhastSystem Development unit . . . . . . . . . . 4
3.1 Description . . . . . . . . . . . . . . . . . . . . . . . . . . . . . . . . . . . . 4
3.2 Chemical resistence . . . . . . . . . . . . . . . . . . . . . . . . . . . . . 5
4.
Installation . . . . . . . . . . . . . . . . . . . . . . . . . . . . . . . . . . . . . . . . . 7
4.1 Unpacking . . . . . . . . . . . . . . . . . . . . . . . . . . . . . . . . . . . . .7
4.2 Mains connection . . . . . . . . . . . . . . . . . . . . . . . . . . . . . . . 7
4.3 Turning the systems on. . . . . . . . . . . . . . . . . . . . . . . . . . 9
4.4 Before use . . . . . . . . . . . . . . . . . . . . . . . . . . . . . . . . . . . . . 9
5. Operation . . . . . . . . . . . . . . . . . . . . . . . . . . . . . . . . . . . . . . . . . . . 10
5.1 Preparing the development unit . . . . . . . . . . . . . . . . . 10
6. Maintenance . . . . . . . . . . . . . . . . . . . . . . . . . . . . . . . . . . . . . . . . . 12
7. Ordering and technical information . . . . . . . . . . . . . . . . . . . . .15
7.1 Ordering information . . . . . . . . . . . . . . . . . . . . . . . . . . . 15
7.1.1 PhastSystem and accessories . . . . . . . . . . . . . . . . . . . .15
7.1.2 Spare parts . . . . . . . . . . . . . . . . . . . . . . . . . . . . . . . . . . . 16
7.1.3 PhastGel media and accessories . . . . . . . . . . . . . . . . . 17
7.2 Technical information . . . . . . . . . . . . . . . . . . . . . . . . . . 18
7.2.1 Development unit . . . . . . . . . . . . . . . . . . . . . . . . . . . . . 18
7.2.2 Common data . . . . . . . . . . . . . . . . . . . . . . . . . . . . . . . . 18
Artisan Technology Group - Quality Instrumentation ... Guaranteed | (888) 88-SOURCE | www.artisantg.com
1. Introduction
1. Introduction
PhastSystem™ consists of a separation and control unit, a development unit,
pre-cast PhastGel® separation media, accessories, and a technical support
package. These components work together to form a system for fast, highresolution, and reproducible electrophoresis.
PhastSystem development unit is controlled from PhastSystem separation and
control unit. The schematic diagram below illustrates the steps involved in
producing a finished electrophoresis gel using PhastSystem with PhastGel
separation media.
3
Artisan Technology Group - Quality Instrumentation ... Guaranteed | (888) 88-SOURCE | www.artisantg.com
2. Important safety information
2. Important safety information
2.1 Safety
precautions
In keeping with good laboratory practice, we advise you to take the
following precautions when dealing with the instrument.
1.
Regularly check all insulation cables, take care not to damage the
units, especially the separation compartment’s lid.
Note: For full safety it is important that the lid is not tampered
with.
2.
Ensure that the mains cables are plugged into fully grounded mains
outlets.
3.
Check on the rear panel at the instrument that the correct voltage is
printed on the back and that the voltage selector setting is in
accordance with your local electricity supply. (See section 4.2
Mains connection).
4.
Allow only authorised service representatives to service or work on
the electrical circuitry of PhastSystem.
5.
Avoid spilling buffers or other conducting liquids onto the
instrument.
4
Artisan Technology Group - Quality Instrumentation ... Guaranteed | (888) 88-SOURCE | www.artisantg.com
3. Description of the development unit
3. Description of PhastSystem
Development unit
3.1 Description
The visible parts of the development unit are: a stainless steel chamber
(with a heating foil), a rotating gel holder for one or two gels, a
temperature and level sensor on the underside of the lid, and ten ports
through which the development chamber can be filled and emptied.
Ports labelled 1-9 are used to connect development solutions to the
development chamber. The port labelled 0 is reserved for waste, that is,
solutions only exit through this port. The gel holder, liquid level sensor,
and temperature sensor are mounted in the lid of the development
chamber and protrude into the chamber when the lid is closed.
Inside the unit there is a pneumatic pump for filling and emptying the
chamber, a 10-port valve for the selection of ports, and a 3-port valve for
the selection of pump functions i.e., creating vacuum or pressure in the
chamber.
The pneumatic pump is connected to an opening in the lid of the
chamber. A gasket in the lid makes the chamber airtight when the lid is
closed. By creating a vacuum in the chamber, liquid is drawn in through a
hole in the bottom of the chamber. Similarly, by creating excess pressure
in the chamber, liquid is pushed out through the same hole in the bottom.
Fig. 1. Development chamber
5
Artisan Technology Group - Quality Instrumentation ... Guaranteed | (888) 88-SOURCE | www.artisantg.com
3. Description of the development unit
Cap-set
Tube markers
10-Port valve
Fig. 2. 10-port valve
3.2 Chemical
resistance
The parts that come into contact with development solutions in the
development unit are resistant to chemicals typically used in
Coomassie and silver staining, for example acetic acid, methanol,
and silver staining solutions. If you plan to use other chemicals, for
example, to clean the unit, you should first check the resistance of
the wetted parts to the chemical in question.
The chemical resistance of a polymer depends on many factors,
including the temperature and concentration of the solution, the
application (a compound that swells may function well as a static
seal, yet fail in dynamic applications), and the period of exposure.
Table 1 below is intended as a general guide for the chemical
resistance of the wetted parts in the development unit.
If you are in doubt about the resistance of wetted parts to a certain
chemical, test the parts first; order spare sparts for such tests (see
Ordering information, chapter 7.
In general you should avoid using ketones, hot strong acids, and
organic hydrocarbons.
6
Artisan Technology Group - Quality Instrumentation ... Guaranteed | (888) 88-SOURCE | www.artisantg.com
3. Description of the system
Table 1 : A general guide for the chemical resistance of the wetted parts in the
development unit.
Wetted parts1
Material of
construction
Generally
resistant to
Generally
attacked by
Distributor and
distributing plate
PVDF2
PVDF2
strong acids and
bases in moderate
concentration and
alcohols and
hydrocarbons
ketones, esters, and
hot acids
Gasket (10-port
valve)
fluoro rubber
moderate acids,
strong bases,
many solvents,
alcohols, aldehydes
hot stroch acids,
esters, ketones, and
bleach
Tubing (10-port
to chamber)
Teflon
most chemicals
extreme conditions
Tubing (bottles
to 10-port valve
PVC3
hot acids, ketones, and
strong acids and
hydrocarbons
bases in moderate
concentration,
alcohols, aldehydes,
and bleach
Chamber, gel
holder, and temp.
sensor
stainless steel
most chemicals
long exposure to salt
solutions
Chamber lid gasket
EPDM4
stroch acids and
bases, alcohols,
aldehydes, and
ketones
hot acids and aromatic
hydrocarbons
Chamber lid
PP5
hot stroch acids
strong acids in
moderate conaromatic
hydrocarbons, and
centration, stroch
bleach
bases in high
concentration,
alcohols, aldehydes,
and ketones
1
4
2
5
These parts are illustrated in Fig. 1, 2, 6 and 7.
Polyvinylidine fluoride
3
Polyvinyl chloride
Ethylene propylene copolymer and terpolymer
Polypropylene (or polypropene)
7
Artisan Technology Group - Quality Instrumentation ... Guaranteed | (888) 88-SOURCE | www.artisantg.com
4. Installation
4. Installation
Important!
4.1 Unpacking
The following information must be read to install your
PhastSystem instruments correctly.
Unpack the equipment carefully and check the contents of the carton against
the packing list. Save the packing material and the carton in case PhastSystem
must be returned. Check the equipment for any visible signs of damage that
may have occurred during shipment.
Removal of locking screw
Remove the locking screw on the left of the underside of the development unit.
The air pump is mounted on a rubber support and fixed with this screw during
shipment. Save the locking screw in case you should ever need to ship the unit.
(Leaving the screw in place will make the unit noisier but will not affect the
operation.)
4.2 Mains
connection
Voltage selector setting
The instruments are available in two versions: one for 220-230/240 V AC,
referred here to as the 220 V model, and one for 100/120 V AC, referred here
to as the 120 V model, electricity supplies.
Check that the instruments have the correct voltage and code number printed
on their back panel.
Set the voltage selectors on the rear panel of the separation and control unit
and development unit according to your local electricity supply; 100/120 V, or
220-230/240 V. To do this:
●
●
Check the voltage range of the mains electricity supply.
Set the voltage selector to the appropriate setting according to the table
below.
Voltage range
Voltage selector setting
For (120 V model) instruments:
90-110
108-132
100
120
For (220 V model) instruments:
198-244
216-264
220-230
240
8
Artisan Technology Group - Quality Instrumentation ... Guaranteed | (888) 88-SOURCE | www.artisantg.com
4. Installation
Fuses
Each unit has two fuses. Check that the fuses are correctly installed and intact.
Connecting the units
Connect the separation and control unit to the development unit with the
communication cable (code no. 19-6005-02).
The PhastSystem Development Unit is to be used exclusively with the
PhastSystem Separation Unit.
Voltage selector
communication
cable
To
mains
on/off
To
mains
Voltage
selector
Fig. 3. PhastSystem controls rear.
Mains connection
Plug the mains power cords into the input marked MAINS on the rear panel of
the units. Plug the cords into the wall outlet (grounded to earth).
Important! Always disconnect these cords when service
the instruments.
9
Artisan Technology Group - Quality Instrumentation ... Guaranteed | (888) 88-SOURCE | www.artisantg.com
4. Installation
4.3 Turning the
system on
The PhastSystem development unit is controlled from the
PhastSystem separation and control unit. The system is turned on by
pressing in the on/off button on the rear panel of the separation and
control unit. The development unit is automatically activated when a
development method is started.
Temperature sensor
A temperature sensor is placed on the underside of the lid in the
development chamber (enclosed in stainless steel). The temperature
sensor is calibrated before shipment, but you may want to check and
calibrate it before use. See PhastSystem User Manual, the chapter on
Maintenance, for instructions.
4.4 Before use
Before using the development unit we recommend that you run a
cleaning method to remove dust accumulated during storage and
shipment. A cleaning method requires only distilled water and the
level sensor shield (instead of gels). The level sensor shield is in the
gel holder in the development chamber when you receive
PhastSystem. For instructions see PhastSystem Users Manual, the
section on cleaning method.
The level sensor shield must remain in the chamber when running
methods without gels; otherwise, the chamber will not fill.
Warning! The level sensor (on the underside of the development
chamber lid) is enclosed in glass and is quite fragile. Use
extreme care when cleaning this sensor.
10
Artisan Technology Group - Quality Instrumentation ... Guaranteed | (888) 88-SOURCE | www.artisantg.com
5. Operation
5. Operation
The procedure for running development methods comprises four steps:
making up the solutions, connecting the bottles to the correct ports with
the PVC tubing, inserting the gels and pressing the start key. The rest is
automatic.
5.1 Preparing the
development unit
You should always keep a fresh stock of solutions. Filter solutions to keep
the channels in the development unit clear and to avoid precipitation on
the gel(s). We recommend that you label the bottles and the tubing (use
the yellow tubing markers to mark the tubes) with their corresponding
port number.
1.
Remove the caps on the cap set from the ports that you plan to use.
2.
Connect the ports (l-9) as required to the solution bottles with PVC
tubing.
3.
Connect port 0 to waste: Use an empty bottle.
4.
Check for kinks in the tubing. Make sure that tubing is securely
submerged in the solutions.
Important !
The chamber fills with approximately 70 ml of solution.
The bottles should be filled with at least 75 to 80 ml of
solution to allow for the residual solution in the tubing.
5.
Open the lid of the development chamber by pressing on the right
end of the red bar.
6.
Check that the chamber gasket (on the lid) is secure.
Inserting the gels
7.
Remove one gel from the separation bed with a pair of forceps (use
the tab of the gel backing). Be careful not to touch the gel surface
with your fingers since fingerprints stain and cloud the protein
bands.
8.
Slide the gel, gel surface down, into the upper position of the gel
holder.
Remove the other gel and slide it, gel surface up, into the lower position
of the gel holder.
Note!
If you are developing only one gel, slide it into the lower
position, gel surface up.
11
Artisan Technology Group - Quality Instrumentation ... Guaranteed | (888) 88-SOURCE | www.artisantg.com
5. Operation
Fig. 4. Inserting the gel into the gel holder.
9.
Close the lid and lock it by simultaneously pressing down on the top of
the lid and pushing in the red bar.
Fig. 5. Closing the development chamber lid.
12
Artisan Technology Group - Quality Instrumentation ... Guaranteed | (888) 88-SOURCE | www.artisantg.com
6. Maintenance
6. Maintenance
The maintenance required by the operator concerns the gasket in the lid,
the gasket in the 10-port valve, and the tubing between the 10-port valve
and the chamber. The gasket in the lid should be replaced when visibly
damaged, when filling and emptying takes longer than usual or when
filling and emptying does not function properly (the chamber must be airtight for filling and emptying). The other two items should be replaced if
they start to leak.
Replacing the lid gasket
Just pull the gasket off. Be sure to turn the recess in the new gasket
outwards.
Replacing the 10-port valve gasket
Opening the valve
1.
Start the development run (any method) but press “DEV pause/
continue” as soon as EMPTYING P0 appears on the display.
When the 10-port valve is in position P0, the channel (groove) in the
channel plate is always pointing to 12 o’clock.
2.
Disconnect the development unit mains power cable.
3.
Raise the valve end of the unit about 30°. (Do not stand the unit on
end or residual liquid may enter delicate parts in the unit. )
4.
Unscrew the pressure plate, taking a few turns at a time on each
screw.
5.
Remove the distributor and distributing plate, see figure.
Closing the valve
6.
Without touching the surface of the distributing plate, place the
gasket against the smooth side, with the notch in the gasket against
the notch in distributing plate.
7.
Place the two parts into the distributor.
8.
Reassemble the valve. Remember the channel (groove) in the
channel plate should be pointing to 12 o’clock. (The valve will not
connect ports as programmed if the channel plate is turned by
o
180 .)
9.
Make sure the u-shaped metal piece is sitting under the valve and
that the hole for the screw is to the right. Insert the screws in the
pressure plate. Screw in the left and right screws first a few turns,
then the bottom screw and finally the top screw. Tighten the left and
right screws securely and the top and bottom screws just until there
is resistance.
10. Re-connect mains power cable. Press “DEV pause/continue” and
then “DEV start/stop”.
13
Artisan Technology Group - Quality Instrumentation ... Guaranteed | (888) 88-SOURCE | www.artisantg.com
6. Maintenance
If the valve leaks, open and check that all parts are correctly mounted.
Note:
If the valve still leaks, you may have to replace the distributing
and channel plates also.
The 10-port valve
Fig. 6. The 10-port valve.
The 10-port valve to chamber tube
Fig. 7. The 10-port valve to chamber tube.
14
Artisan Technology Group - Quality Instrumentation ... Guaranteed | (888) 88-SOURCE | www.artisantg.com
6. Maintenance
Replacing the valve to chamber tubing
Disconnect the power cable. Let the unit rest on the end opposite to the 10-port
valve.
Remove the clamp at the valve end first and disconnect the tubing from the
valve.
Remove the black cover plate for the tubing using a Philips screwdriver.
Shake the tubing to remove residual liquid. Then remove the clamp at the
chamber end.
(Do not remove this clamp first, residual liquid might then enter the unit.)
Make sure that the new tubing rests in the recession when you put the cover
back.
Cleaning
Wipe the instrument regularly with a damp cloth. Please be extra careful with
the glass level sensor. Let the instrument dry completely before use.
Servicing
All service, except the above described, should be entrusted to qualified
personnel only. Please contact your local Amersham Biosciences representative for
more service information.
15
Artisan Technology Group - Quality Instrumentation ... Guaranteed | (888) 88-SOURCE | www.artisantg.com
7. Ordering information and technical data
7. Ordering and technical
information
7.1 Ordering
information
7.1.1 PhastSystem and accessories
Designation
Quantity
Code no.
18-1018-23
Separation-Control
and Development Unit (120 V)
Separation-Control
and Development Unit (220 V)
18-1018-24
Separation-Controll Unit (120V)
18-1200-00
Separation-Controll Unit (220V)
18-1200-10
Development Unit (120V)
18-1200-20
Development Unit (220V)
18-1200-30
PhastTransfer
Includes gel backing remover
18-1001-23
Accessories
PhastGel Sample Applicators
12/0.3 µl
50
18-1614-01
8/0.5 µl
50
18-1617-01
8/1 µl
50
18-1618-01
6/4 µl
50
18-0012-29
Titration curve
50
18-1657-01
Sample well stamp
1
18-0079-01
200
18-1003-18
PhastTransfer filter
paper (50x50 mm)
16
Artisan Technology Group - Quality Instrumentation ... Guaranteed | (888) 88-SOURCE | www.artisantg.com
7. Ordering information and technical data
7.1.2 Spare parts
This is a list of spare parts that might be required when following the
maintenance outlined in Chapter 6. A complete spare parts list is contained in
the service manual.
Designation
Quantity
Code no.
Gasket (dev. chamber)
1
18-0048-01
Gasket (l0-port valve)
1
18-9482-01
Cap set (l0-port valve)
1
18-0072-01
Valve kit (l0-port valve)
(includes: distributing plate
and channel plate)
1
18-1019-61
Distributor (10-port valve)
1
18-0029-01
Tubing PVC (5 meters)
1
19-0182-01
Tubing kit (10-port valve to chamber)
1
18-0192-01
Level sensor shield
1
18-0206-01
Fuse 175 mA SB (120 V model)
2
18-1627-01
Fuse 80 mA SB (220 V model)
5
19-6236-01
Tube markers 0-9 (5 of each)
50
18-0180-01
Foot
4
18-2341-01
Fuse 1.6 A SB (120 V model)
2
19-3087-01
Fuse 800 mA SB (220 V model)
5
19-3085-01
Mains power cord 120 V
1
19-2447-01
Mains power cord 220 V
1
19-2448-01
Communication cable
1
19-6005-02
Development unit:
17
Artisan Technology Group - Quality Instrumentation ... Guaranteed | (888) 88-SOURCE | www.artisantg.com
7. Ordering information and technical data
7.1.3 PhastGel media and chemicals
This is a list of ordering information for PhastGel media and chemicals.
Designation
Quantity
Code no.
10
10
10
17-0678-01
17-0540-01
17-0542-01
10
10
10
17-0622-01
17-0623-01
17-0624-01
PhastGel
High density
10
17-0679-01
PhastGel SDS
buffer strips
20
17-0516-01
PhastGel Native
buffer strips
20
17-0517-01
PhastGel IEF
IEF 3-9
IEF 4-6.5
IEF 5-8
Dry IEF
10
10
10
10
17-0543-01
17-0544-01
17-0545-01
17-0677-01
PhastGel Cassette
1
18-1001-01
PhastGel Blue R
40 tablets
17-0518-01
PhastGel Silver Kit
1
17-0617-01
BandShift Kit
100 reactions
27-9100-01
HMW-SDS (high molecular weight in SDS)
10
17-0615-01
HMW (High molecular weight)
10
17-0445-01
LMW (Low molecular weight)
10
17-0446-01
PMW (Peptide molecular weight)
1
80-1129-83
Broad pl kit (pH 3-10)
10
17-0471-01
Low pl kit (pH 2,5-6,5)
10
17-0472-01
High pl kit (pH 5-10,5)
10
17-0473-01
PhastGel® separation media:
PhastGel Gradient
4-15
10-15
8-25
PhastGel Homogeneous
7.5
12.5
20
PhastGel chemicals:
Molecular weight calibration kits:
pl calibration kits:
18
Artisan Technology Group - Quality Instrumentation ... Guaranteed | (888) 88-SOURCE | www.artisantg.com
7. Ordering information and technical data
7.2. Technical
information
7.2.1 Development unit
Capacity
1 or 2 gels
Agitation
Gels are rotated in solutions during
development
Development
Solutions are automatically pumped into and
out of the development chamber
Number of ports
9 ports are available for solutions to enter and
exit the chamber through; port 0 is reserved
for waste
Temperature control
range
time
error
Development chamber
material
volume
Up to 50° C; the chamber only heats
<4 min. to heat solutions from 20 to 50° C
±2° C from programmed temperature once the
programmed temperature is reached
Stainless steel
Approximately 70 ml of solution will be
pumped into the chamber
Temperature sensor
Stainless steel
Level sensor
Enclosed in glass
Gel holder
Stainless steel
Dimensions
300 x 300 x 138 mm (W x L x H)
Weight
4.8 kg
7.2.2 Common data
Safety regulations
safety class
regulations
Class 1 apparatus
Built according to UL 1262 and IEC 348
Operating environment
room temp.
humidity
4-40° C
Max. 95%
Electricity requirements
mains voltage
mains frequency
power
100/120 VAC (120 V model)
220-230/240 VAC (220 V model
50-60 Hz
Maximum 200 VA Development unit
130 VA Separation unit
330 VA Together
Power disturbance
The system IS protected against mains
disturbances and static discharges
Mains failure
For power failures lasting less than 5-10
seconds, running methods will automatically
continue when power is returned. For power
failures lasting more than 5-10 seconds,
running methods are set to pause, an alarm
sounds, and a message appears on the display
informing you about the power failure.
19
Artisan Technology Group - Quality Instrumentation ... Guaranteed | (888) 88-SOURCE | www.artisantg.com
Artisan Technology Group - Quality Instrumentation ... Guaranteed | (888) 88-SOURCE | www.artisantg.com
Artisan Technology Group is your source for quality
new and certified-used/pre-owned equipment
• FAST SHIPPING AND
DELIVERY
• TENS OF THOUSANDS OF
IN-STOCK ITEMS
• EQUIPMENT DEMOS
• HUNDREDS OF
MANUFACTURERS
SUPPORTED
• LEASING/MONTHLY
RENTALS
• ITAR CERTIFIED
SECURE ASSET SOLUTIONS
SERVICE CENTER REPAIRS
Experienced engineers and technicians on staff
at our full-service, in-house repair center
WE BUY USED EQUIPMENT
Sell your excess, underutilized, and idle used equipment
We also offer credit for buy-backs and trade-ins
www.artisantg.com/WeBuyEquipment
InstraView REMOTE INSPECTION
LOOKING FOR MORE INFORMATION?
Visit us on the web at www.artisantg.com for more
information on price quotations, drivers, technical
specifications, manuals, and documentation
SM
Remotely inspect equipment before purchasing with
our interactive website at www.instraview.com
Contact us: (888) 88-SOURCE | [email protected] | www.artisantg.com