1
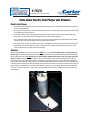
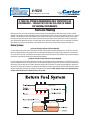
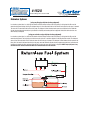
#1620
Federal-Mogul Document #1620
Guide to Proper
Fuel Pump Installation
Diagnostics • Facts About Electric Fuel Pumps and Strainers • Facts About Rust and Dirt
Contamination • Voltage Drop Test • Fuel Tank Cleaning Procedures • Fuel Line Flushing
#1620
Federal-Mogul Document #1620
Correctly Diagnosing a Low Pressure,
Low Volume or No-Fuel Problem
A lack of fuel to the engine may signal a failed fuel pump. But don’t immediately assume that the pump is the problem. Other issues may be
causing the no-fuel situation. The two leading causes of electric fuel pump failure are:
1. Fuel contamination and
2. Low/no voltage to the pump due to overheated connectors, loose connections, poor grounds and other electrical problems.
Fuel system diagnosis and pump replacement and system repair will require special tools and can be a dangerous service to perform if not
properly equipped. If you do not have the proper tools, fuel pump replacement is a service best performed by a professional.
Review these easy-to-diagnose issues before you install a new pump.
Is there fuel in the tank? Faulty fuel gauges or low levels of fuel may lead you to think that the pump is faulty when all you need is to add
some gasoline to allow the pump to charge the fuel line. Put in two gallons of fuel and test it again.
Clogged external fuel filters and bent fuel lines can restrict flow. Obviously, even the best fuel pump can’t overcome restrictions
upstream. Make sure these areas have been inspected, and replace the fuel filter if you suspect it is restricting fuel flow. Restricted fuel filters
will reduce fuel flow volume and cause the pump to work harder, drawing amperage beyond its design limits, causing wiring and connectors
to melt, and the pump to fail prematurely. Fuel filters should be replaced as per the manufacturer’s mileage or time recommendations, but
may require more frequent replacement in dusty conditions. Fuel filters are frequently ignored during vehicle service. If you’re not sure when
the filter was replaced last, do it now; it may save you a lot of time and trouble. Then retest the system. Failure to replace in-line fuel filters
at the time of pump replacement will void your warranty.
Voltage supply issues may lead you to think the pump has
failed. When electrical connections fail, voltage to the pump will be
reduced. The pump will run inefficiently, producing below-required
pressures and noise. The vehicle will perform poorly and the pump
will fail prematurely. So check the vehicle’s harness plugs for black
soot or burned wires. Check the pump module/hanger plug for melted
plastic or loose terminals on the flange. Burned wires, melted plastic,
loose terminals, or connectors showing signs of black soot must be
replaced to supply a consistent voltage supply to the pump. To find the
problem areas, perform a voltage drop test across all electrical
connectors and all electrical components involved with the fuel pump.
(Voltage drop test instructions are shown later in the “Procedures”
sections of this information.) Also check the wires from the pump to the
hanger flange when replacing a pump-only application. You may need
to repair wiring harness damage that, if not serviced, will cause a
premature failure to the pump you are replacing. Depending on your
application, Carter ® replacement parts 888-103, 888-536 (in-tank harness), 888-543, 888-544 or 888-553 (top of pump harness, outside
of tank) can solve this problem. Be sure to ask your parts store!
Clean the tank. The importance of cleaning the fuel tank cannot be overemphasized. Carter Fuel Delivery Systems’ unique gradient-density
electric fuel pump strainers filter to a particle size one-half the size allowed by OEM strainers. But even the smallest particles will still
accumulate inside a pump and eventually cause a failure. Many fuel pumps fail because of sediment in the tank fouling the pump mechanism
or plugging the strainer. Not even the best designed fuel pump and strainer will last very long in a dirty tank. So to avoid a problem down the
road, always have the tank professionally cleaned before replacing the pump, or if desired, clean the tank yourself, carefully following the
instructions in this guide. Always properly dispose of contaminated fuel. Never reuse contaminated fuel or your replacement pump will fail
quickly. Fuel contamination will void your pump warranty.
Install a new strainer. A new strainer must be installed any time a new pump is installed. NEVER reuse a strainer. Failure to install a new
strainer will void your warranty. Most module units come with the strainer already installed on the unit. Replacement hanger assemblies
or pump-only applications will require the strainer be installed during the replacement process. Replacement fuel pumps will fail from
contamination if a new strainer is not installed with them. Strainers should be pushed straight onto the fuel inlet by hand. Do not use a
screw-on motion, hammer on the strainer or press the strainer against hard surfaces to install. Hand pressure should be sufficient.
#1620
Federal-Mogul Document #1620
Facts About Electric Fuel Pumps and Strainers
Electric Fuel Pumps
• Are used with all fuel injection (EFI) systems. Fuel injection systems require pressures well beyond the capabilities of mechanical fuel
pumps on carbureted engines.
• Are usually inside the gas tank and use fuel flow through the electric pump as a coolant. (If two pumps are used, the second is located
in-line between the gas tank and engine.)
• Are precision components built to supply fluid under high pressure to the fuel injectors. Higher pressures require close tolerance
pumps, which are more sensitive to fuel contamination than their mechanical pump counterparts.
• Use an in-tank filter and/or strainer (often referred to as a sock) to restrict large contaminants from getting into the pump’s working
mechanism. Fine particles will pass through strainers and into the pump mechanism.
• Have external in-line fuel filters that should be replaced every 12-20,000 miles to prevent fuel pump overload and failure. Restricted
fuel filters will reduce fuel flow volume and cause the pump to work harder, drawing amperage beyond its design limits, causing
wiring and connectors to melt, and the pump to fail prematurely.
Strainers
Improper strainer installation can also cause a pump to fail. NEVER reuse a strainer. Failure to properly install a new strainer will void
your warranty. The new strainer should always be installed onto the pump by hand and never pounded onto the pump. Strainers should be
pushed straight onto the fuel inlet by hand. Do not use a screw-on motion, hammer on the strainer or press the strainer against hard
surfaces to install. Hand pressure should be sufficient. Using a screw-on motion will cut the pump inlet and deposit pieces of the inlet
housing into the strainer, which will cause pump failure. Pounding the strainer onto the pump can cut a hole in the strainer, allowing large
pieces of debris to enter the pump. Driving a strainer on can also break internal nylon components contained inside the strainer. Hammering
or pounding strainers may break vanes from pump impellers, which fall into the strainer. Once the pump starts running, this debris enters the
pump, and will cause immediate failure. If any of the above situations occur, the pieces can fall from the damaged pump inside the strainer.
If a strainer is reused, the new pump can draw the debris from the previous pump failure from the old strainer, causing immediate failure
of the new pump.
Fuel Pump Strainer
#1620
Federal-Mogul Document #1620
Facts About Rust and Dirt Contamination
Contaminants can destroy a pump by blocking fluid flow and damaging internal components!
Rust
• Can develop in a fuel tank from condensation produced through normal temperature changes.
• Will develop at a faster rate if the tank is habitually kept at low levels.
• Will develop in a tank that was not treated properly during the manufacturing process.
• Will develop in a tank that has been physically damaged (bent, crushed or scraped).
Dirt
• Can get into the vehicle’s tank if the cap is missing, not properly tightened or the wrong cap is used.
• Can get into the vehicle’s tank if the vent tube is damaged.
• Cannot be prevented by “White box” fuel filters with rubber or plastic internal components. Fuels with methanol or ethanol additives
can erode a filter if it is not made with the proper materials.
• Can return to the tank through the return system.
• Can get into the vehicle’s fuel tank through contaminated fuel pumped from service station tanks. These tanks’ pick-up tubes are
located toward the bottom of the tank. Small or light particles tend to float on the surface and heavier particles tend to sink to the
bottom of the tank. If the storage tank fuel level is allowed to drop too low it will increase the possibility of contaminated fuel,
even if a filter is used at the pumping facility.
Testing the Fuel Pump Circuit for Voltage Drop
This test checks for voltage being lost along a wire, or through a connection or switch. Similar results cannot reliably be obtained through the
use of continuity testing with an Ohm meter. Multi-strand wires may test properly for continuity, but due to opens or corrosion in the line,
display a substantial voltage drop when tested under load.
Voltage Drop testing is a method of electrical diagnosis that can quickly locate high-resistance problems in a circuit. Digital Volt/Ohm meters
(DVOM's) can be used to measure the voltage drop across a load device or conductor. Voltage Drop is the loss of voltage caused by the flow
of current through a resistance. Increases in resistance increase the voltage drop. Whenever checking voltage drop, the energized pump
circuit must include a current load, such as the fuel pump, or a substitute load.
If, because of the pump design, accessible test points at the pump are not available, or testing at the pump creates a dangerous situation,
a substitute load must be used. Disconnect the circuit connector closest to the pump and perform circuit tests from that point. A substitute
load such as a HP6545 (Plastic) sealed beam must be wired in series instead of the fuel pump. (Wire both the high and low beam in series
to simulate a 5 amp load.) DO NOT “dry” test a pump or perform any electrical tests with an open fuel tank present.
Note: The battery should be fully charged to operating voltage prior to performing tests to obtain accurate results.
Voltage drop testing is commonly done to check wires, connectors, relays and connections for excessive resistance. Each fuel pump must
receive its rated voltage to operate properly. If not enough voltage is available, the pump will not operate as it should. Normally, the voltage
drop on the power feed side and ground side wires, connectors and connections should not exceed 0.5V or 500mV. If it indicates a higher
reading, a loose connection, corrosion or faulty power source is indicated.
Voltage drop testing is important because high resistance can prevent proper fuel pump circuit operation. Circuits with high current draw
cannot tolerate high resistance. For instance, a loose or corroded connection can easily add several hundred ohms of resistance to a circuit
under a load. This amount of resistance in the fuel pump circuit would severely reduce voltage potential at the pump, not allow sufficient
pump RPM, and possibly result in a no-start condition.
After the fuel pump is removed from the vehicle, carefully inspect all connections that could not be reached during the voltage drop test.
Inspect for melted insulation on wiring close to connectors. Check for melted plastic or black soot where positive and negative terminals enter
the connector. This evidence indicates a faulty connector. Check for loose connections where positive or negative wires attach to the pump
hanger bracket assembly.
#1620
Federal-Mogul Document #1620
To test for a Voltage Drop on the Power side of a circuit (Figure 1),
follow the steps below.
1. Connect the positive test lead of a Digital Volt/Ohm Meter (DVOM) to the power source. Use of an analog meter is not recommended
because damage to the meter could result from improper polarity.
2. Connect the negative test lead to the other end of the wire for the circuit being tested (point A).
3. Operate the circuit and observe the meter voltage.
4. The DVOM will display the difference in voltage between the two points.
Figure 1
To pinpoint the component/connection responsible for the voltage drop, move the negative test lead to the next component/connection in the
circuit and retest at additional points as necessary. Changes in the Voltage Drop Reading indicate where excessive Voltage Drop is located.
To test for a Voltage Drop on the Ground side of a circuit (Figure 2),
follow the steps below.
1. Connect the negative test lead of a Digital Volt/Ohm Meter (DVOM) to the negative battery terminal. Use of an analog meter is not
recommended because damage to the meter could result from improper polarity.
2. Connect the positive test lead to the ground terminal/wire at the unit being tested (point A).
3. Operate the circuit and observe the meter voltage.
4. The DVOM will display the difference in voltage between the two points.
Figure 2
To pinpoint the component/connection responsible for the voltage drop, move the negative test lead to the next component/connection in the
circuit and retest at additional points as necessary. Changes in the Voltage Drop Reading indicate where excessive Voltage Drop is located.
#1620
Federal-Mogul Document #1620
Fuel Tank Cleaning
Before you begin:
IMPORTANT: Failure to clean the fuel tank and install a new strainer may allow contaminants to enter the pump and void
the warranty. Contamination is the leading cause of fuel pump failure.
The purpose for this guide is to provide instructions and procedures for cleaning and removing contaminants from the fuel tank.
A new fuel pump can’t restore quick starting and smooth idling or provide exhilarating performance to an engine with a dirty fuel
tank. Many vehicles with driveability complaints respond well to a clean fuel tank, a new strainer (filter) and new fuel pump.
IMPORTANT SAFETY PRECAUTIONS
WARNING: GASOLINE IS EXTREMELY FLAMMABLE AND ITS VAPORS ARE POTENTIALLY EXPLOSIVE. WORK IN A WELLVENTILATED AREA AWAY FROM SPARKS AND OPEN FLAMES. ALWAYS RELIEVE THE FUEL SYSTEM PRESSURE, USING THE
ORIGINAL EQUIPMENT MANUFACTURER’S RECOMMENDED PROCEDURE, BEFORE SERVICING FUEL SYSTEM COMPONENTS.
FAILURE TO TAKE THESE PRECAUTIONS CAN RESULT IN FIRE, DAMAGE TO PROPERTY AND SERIOUS INJURY OR DEATH.
HIGH-PRESSURE FUEL SYSTEMS SHOULD BE SERVICED BY QUALIFIED TECHNICIANS. LEAKING LIQUID FUEL MAY IGNITE
AND FUEL VAPORS MAY EXPLODE, BOTH RESULTING IN PERSONAL INJURY AND/OR PROPERTY LOSS. READ VEHICLE
REPAIR MANUAL FOR SAFETY PRECAUTIONS AND FOLLOW THIS GUIDE FOR YOUR PROTECTION.
WORK CLOTHING: Wear a long-sleeved shirt, long trousers and safety shoes. Don’t wear a ring or watch that might draw an electric
spark. If fuel spills on your clothing, change clothing right away.
EYE PROTECTION: Wear safety goggles or safety glasses. If fuel splashes into eyes, flush with water first, then go for emergency
medical aid.
FUEL HOSE: Never use standard low-pressure fuel hose in high-pressure fuel injection systems. Use high-pressure hose marked
EFI/EFM, or equivalent.
As with any fuel system repair, to eliminate the potential for electrical arcs during system service, remove the negative battery cable, per
manufacturer’s instructions, before opening the fuel supply system. Work in a well-ventilated area. Be sure there are no open flames or sparks
in the work area.
Fuel tank cleaning begins with determining the basic tank material. Some tanks are metallic and some are plastic. During a vehicle’s life, its
tank can collect contaminants from the fuel distribution network, pipelines, storage tanks, transport vehicles, underground gas station tanks
and even from debris introduced during the vehicle fueling process. Some contaminants may be the result of vandalism.
Plastic Tanks
Plastic tanks can be drained and easily wiped out with a lint-free cloth to remove any sediment and debris. Tanks that show signs of physical
damage or contaminants that cannot be removed completely must be replaced.
Metallic Tanks
Metal tanks are more difficult to clean. Moisture will naturally condense on the inside of fuel tanks during atmospheric temperature changes.
This moisture may over time begin to attack the metallic surfaces, creating not only visible scale and rust, but also very fine particles of rust
that appear as a sludge as they collect in the fuel system. These particles are fine enough to pass through the pump strainer and the fuel
filter. If a tank has visible signs of internal rust it should be replaced. Once the rust has begun, it will only get worse. This condemns any
replacement pump to an early failure. The only practical method of cleaning a metal tank is to send it out to a local radiator repair
shop. This does often add an unexpected cost to the pump replacement service, so the possibility of tank service/replacement should be
communicated to customers during the repair shop’s price quote process. Many shops choose to use their own methods of tank cleaning to
save a buck but they usually include practices that create potentially dangerous conditions. They also rarely achieve the goal of returning a
clean, dry fuel tank to the vehicle. If the shop has the appropriate equipment and they choose to do the job themselves, then they should
follow the steps outlined in the next section.
#1620
Federal-Mogul Document #1620
Important – During the Process, Keep Everything Clean!
Fuel contaminants like dirt, rust and scale are a primary cause of in-tank fuel pump failure, and they can cause the replacement pump to fail
prematurely. For a successful installation, you must keep everything totally clean – from beginning to end.
1. Clean accumulated road dirt from the top of the fuel tank, taking special care around the pump access area. (Cover fuel inlet tubes
first.) Also clean the tank filler pipe.
2. Inspect the fuel strainer for stains from rust, clogging from dirt and slime from water. The tank must be drained and cleaned before
installing the new pump. If the interior is rusted, the tank must be repaired having the inside surface sealed, or it must be replaced.
3. Keep the replacement pump in its package until you’re ready for it, and leave the caps on the inlet and outlet fittings while installing
the pump in the hanger.
4. Place the replacement pump, or the pump to be reinstalled, on a clean worktable or lintless shop towel. Electric fuel pumps are made
to extremely close tolerances, so are easily damaged by the smallest contaminants. Keep your hands clean.
5. Install the new strainer. Make sure its retaining clamp fits snugly on the pump inlet to prevent contaminated fuel from bypassing
the strainer.
6. Protect the filler neck and inlet/outlet openings from dirt when reinstalling the fuel tank in the vehicle. Stuff clean shop towels in tank
openings and tape over fittings until ready to reconnect lines or hoses.
MORE IMPORTANT SAFETY TIPS
• Keep a Class A/B/C fire extinguisher nearby.
• Don’t smoke when servicing fuel systems.
• Ventilate service area; duct exhaust outside.
• Avoid open flames from matches, lighters, torches and appliance pilot lights in or near the service area.
• Use a shielded fluorescent droplight instead of an incandescent bulb; turn off soldering irons.
• Clean up fuel spills immediately; dispose of fuel-soaked rags and absorbent properly.
• Relieve fuel pressure before opening the fuel system. Otherwise, high-pressure spray may cause a fire or other personal injury.
• Check for cracked fuel lines and leaking fittings before and after fuel system service.
• Never use a finger to check fuel injector pattern or pressure. High-pressure fuel can penetrate unbroken skin, causing illness.
• Never energize fuel injectors with fuel line connected except when following a service manual for procedures and precautions.
• Always dispose of surplus fuel responsibly.
#1620
Federal-Mogul Document #1620
Removing the Fuel Tank
1. First, release fuel system pressure. Refer to and follow manufacturer’s recommended procedures for releasing system pressures.
Some vehicles may stop running from low pressure, but retain over 50 psi in the fuel system. It is important to follow the recommended
procedures to avoid potential for property damage and personal injury. Using alternate procedures could result in a release of pressurized
fuel during system service. Some alternate procedures will also set fault codes in an OBDII vehicle, which will turn on the
“Check Engine” light.
NOTE: Some systems have two fuel pumps: low-pressure in-tank and high-pressure in-line. Be sure to disable both fuel pumps
when this applies.
WARNING: Gasoline vapors are explosive! To reduce the possibility of sparking, disable the electrical system by disconnecting
the negative (-) battery cable.
2. Clean accumulated road dirt from the top of the fuel tank, taking special care around the pump access area. (Cover fuel inlet tubes first.)
Also clean the tank filler pipe.
3. Drain fuel to lighten the tank and avoid spilling when removing the pump hanger assembly. Use only an approved container, preferably one
that filters the fuel for reuse in the vehicle.
4. Remove the fasteners for the fuel tank filler neck, noting their different sizes and locations, then raise the vehicle on a hoist. (If working
without a hoist, use an approved floor jack to raise the vehicle and approved jack stands to support it.)
5. Support the tank with an appropriate lift or jack. Note the locations of fuel outlet, fuel return and vapor lines. Remove the lines, using a
clean shop towel to absorb draining fuel, and inspect them for cracking or chafing. When replacing high-pressure lines, use only “EFM/EFI”
hoses or equivalent. Disconnect the pump wiring harness.
6. Remove tank straps and the filler neck tube if necessary. Lower the tank and remove from the vehicle. If the tank is rusted or seriously
damaged, it must be repaired or replaced before proceeding. Also replace hangers that show excessive rust, wear or damage.
7. Once the tank has been removed, drain the remaining fuel completely from the tank. Remove the fuel pump module/hanger assembly to a
designated work area. Swish the fuel tank around in a circular motion to unsettle any debris remaining in the tank. Turn the tank over, then
tap the bottom to remove debris. After debris has been removed, turn the tank on its bottom. Take a lintless shop towel and wipe the inside
of the tank until it is clean. Inspect the inside of the tank for surface rust. If a tank has visible signs of internal rust it should be replaced.
Once the rust has begun, it will only get worse. This condemns any replacement pump to an early failure. The only practical method
of cleaning a metal tank is to send it out to a local radiator repair shop.
Reinstalling the Pump Assembly and Fuel Tank
1. Replace the fuel pump assembly, making sure it’s positioned exactly as before. Take care not to allow dirt or water to enter the tank,
because contaminants will cause premature pump failure.
2. Install the new tank seal and pump assembly. Fasten with screws tightened to the manufacturer specifications, or hand-tighten the lock
ring and snug it down by tapping with a non-ferrous punch. Do not use gasket sealant!
3. All Carter ® manufactured fuel pumps are pre-tested at the factory. If you have performed a proper voltage drop test and corrected any
issues found, and cleaned or replaced the fuel tank, you’re ready to reinstall the tank. Do not attempt to test run in-tank fuel pumps;
the combination of fuel vapors and possible ignition sources during service pose serious hazards.
4. Install the filler neck. If necessary, secure the tank straps; remove the jack stands and lower the vehicle. Refill the tank with fresh fuel
or the filtered clean fuel you drained from the tank.
#1620
Federal-Mogul Document #1620
IF YOUR FUEL SYSTEM IS CONTAMINATED OR IS SUSPECTED TO BE
CONTAMINATED – YOU NEED TO FLUSH THE FUEL LINES TO REMOVE
ANY RESIDUAL CONTAMINANTS.
Fuel Line Flushing
Flushing the fuel lines can best be accomplished by using fuel injector cleaning equipment that allows the technician to attach a remote
detergent source to either a Schrader valve fitting or in-line in the high-pressure fuel lines. The type of fuel system the vehicle uses – return or
returnless – will determine the process for flushing the system. Caution: These systems are pressurized; proper procedure must be used to
prevent personal injury. Refer to your service manual for the procedure to relieve system pressure before service. As with any fuel system
repair, to eliminate the potential for electrical arcs during system service, remove the negative battery cable, per manufacturer’s instructions,
before opening the fuel supply system. Work in a well-ventilated area. Be sure there are no open flames or sparks in the work area.
Return Systems
(using recycling-type injector cleaning equipment)
In a return system there are two fuel lines from the fuel tank to the injector(s) with only one running through an in-line filter. (The return line
does not run through the filter.) In this system the filter must be removed and bypassed. The injector cleaning equipment is connected to the
lines in place of the fuel pump. The detergent is then introduced under pressure and flushes the lines. Follow the injector cleaning equipment
manufacturer’s procedures for installing and removing the flush equipment.
(using pressurized-can-type injector cleaning equipment)
In a return system there are two fuel lines from the fuel tank to the injector(s) with only one running through an in-line filter. (The return line
does not run through the filter.) In this system the filter must be removed and bypassed. The pressure and return line must be disconnected at
the fuel pump. Direct the return line to a suitable container for collecting the flush material. The injector cleaning equipment is connected to
the pressure line in place of the fuel pump. The detergent is then introduced under pressure and flushes the lines. Follow the injector cleaning
equipment manufacturer’s procedures for installing and removing the flush equipment. NOTE: Properly dispose of any contaminated fuels
and flush solvent. Do NOT return contaminated fuel to the fuel tank.
#1620
Federal-Mogul Document #1620
Returnless Systems
(using recycling-type injector cleaning equipment)
In a returnless system there is a single fuel line from the fuel tank, through a filter, to the fuel injector(s). In this system the filter must be
removed and bypassed during cleaning. The detergent source is then connected to the fuel rail Schrader valve after the valve core is removed.
The return line is connected to the fuel line at the pump. The detergent is then introduced under pressure and flushes the line. Follow the
injector cleaning equipment manufacturer’s procedures for installing and removing the flush equipment. Reinstall the Schrader valve core
when flushing is completed.
(using pressurized-can-type injector cleaning equipment)
In a returnless system there is a single fuel line from the fuel tank, through a filter, to the fuel injector(s). In this system the filter must be
removed and bypassed. The fuel pump end of the line must be placed in a container suitable for collecting the flush material. The detergent
source is then connected to the fuel rail Schrader valve after the valve core is removed. The detergent is then introduced under pressure and
forces all in-line material backward to exit at the fuel pump connector. Follow the injector cleaning equipment manufacturer’s procedures for
installing and removing the flush equipment. Reinstall the Schrader valve core when flushing is completed. NOTE: Properly dispose of any
contaminated fuels and flush solvent. Do NOT return contaminated fuel to the fuel tank.
#1620
Federal-Mogul Document #1620
Keeping Your New Fuel Pump and Fuel System Healthy
A fuel pump in a gas tank has to endure a harsh environment. For one thing, it’s sitting in gasoline all of the time. But other factors can
take their toll as well: heat and cold, and especially dirt and sediment. Here are some easy steps for keeping your fuel pump and system
in good working condition:
• Don’t make a habit of driving with a nearly empty gas tank. Running out of gas is not only inconvenient, it can burn up your
fuel pump since the pump relies on the gas flowing through it to cool it.
• Keep the gas cap tight. This helps keep dirt out of the tank and keeps evaporative emissions low.
• Regularly inspect the gas cap’s rubber flange for cracks and breaks. A good gas cap seal keeps gas fumes from leaking
into the atmosphere.
• Always run a good quality fuel.
• Use fuel with the recommended octane level for your vehicle.
• Have your fuel filter checked regularly, and replace it if necessary (typically every two years or 30,000 miles). Follow the
schedule in your vehicle owner’s manual.
• Regularly check your fuel hoses and lines for cracks and leaks.
• The occasional use of a quality fuel additive will help keep your fuel system clean and the injectors from clogging.
• If you ever replace your fuel pump, make sure you have the tank cleaned.