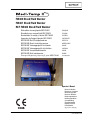
1
Operator's Manual
FW400 Series Blood/Fluid Warmer
®
FW400 Blood/Fluid Warmer
FW401 Blood/Fluid Warmer
REF FW403 Blood/Fluid Warmer
Réchauffeur de sang/liquide REF FW403
Riscaldatore per sangue/fluidi REF FW403
Recalentador de sangre y fluidos REF FW403
Aquecedor de Sangue/Líquidos REF FW403
REF FW403 Blut-/Flüssigkeitswärmer
REF FW403 Bloed-/vloeistofverwarmer
REF FW403 Varmeaggregat til blod/væske
REF FW403 Värmeaggregat för blod/vätska
REF FW403 Veren/nesteenlämmitin
REF FW403 Blod-/væskevarmer
Óýóôçìá ÈÝñìáíóçò Áßìáôïò/Õãñþí REF FW403
FRANÇAIS
ITALIANO
ESPAÑOL
PORTUGUÊS
DEUTSCH
NEDERLANDS
DANSK
SVENSKA
SUOMI
NORSK
ÅËËÇNÉÊÁ
Operator's Manual
Manuel d’utilisation
Manuale per l’operatore
Manual del operador
Manual do Utilizador
Bedienungshandbuch
Bedieningshandboek
Operatøhåndbog
Operatörshandbok
Käyttäjän Käsikirja
Brukerhåndbok
Åã÷åéñßäéï ×ñÞóçò
P/N 11080-000 12/00
Operator's Manual
FW400 Series Blood/Fluid Warmer
Table of Contents
Section
Description
1.0
2.0
3.0
4.0
5.0
6.0
Page
Indications for Use/Safety Precautions .......... 1
Product Description ...................................... 2
Instructions for Use ...................................... 5
Safety Systems ............................................ 7
Troubleshooting and Maintenance ................. 8
Technical Specifications ............................... 9
Before you begin. . .
Important
Before using the Medi-Temp II FW400/FW401/REF FW403
(FW400 Series) Blood/Fluid Warmer, please read and
understand this Operator's Manual and the SAFETY
PRECAUTIONS prior to each application.
If you have any questions, please contact your local dealer
for assistance.
Warranty
The Medi-Temp II FW400 Series Blood/Fluid Warmer is
warranted free of defects in material and workmanship for a
period of one (1) year.
The Disposable Warming Sets are warranted free of defects
in material and workmanship for a single application.
A copy of the warranty is available upon request. Gaymar
disclaims all implied warranties including, but not limited to,
the implied warranties of merchantability and of fitness for a
particular purpose.
Medi-Temp II is a trademark of Gaymar Industries, Inc.
© 2000. Gaymar Industries, Inc. All rights reserved. www.gaymar.com
Operator's Manual
FW400 Series Blood/Fluid Warmer
1.0
Indications for Use
This device is intended to aid in the prevention of inadvertent
hypothermia during administration of blood, blood products,
and other fluids.
1.1
Safety Precautions
DANGER
Risk of electric shock. Refer servicing to
qualified medical service personnel.
WARNING
• All air must be removed from the fluid lines prior to
connection to the patient.
• Monitor the fluid lines to insure they are air free.
Never administer fluids if there are air bubbles in
the line between the bubble trap and the patient
connector.
CAUTION
• U.S. Federal law restricts this device to sale by or
on the order of a physician.
• Do not immerse in cleaning and/or sterilization
solution. Do not submerge or soak unit;
it is fluid-resistant, not fluid-proof.
• For grounding reliability of the Blood/Fluid Warmer,
plug only into a properly grounded outlet.
• Do not attempt to transport the Blood/Fluid Warmer
while mounted to an IV pole. It could tip over.
Remove the Blood/Fluid Warmer for transport.
• Monitor the fluid level in the bubble trap frequently.
Bubbles released during heating are captured in the
trap. To refill the trap, insert a sterile syringe into
the valve and draw air out until the trap is twothirds (2/3) full. Do not allow the bubble trap to go
below one-quarter (1/4) full. See figure 5, page 6.
• The bubble trap must be mounted and kept in a
vertical position at all times.
Failure to follow the above warnings could result in
the introduction of air to the patient. Introduction of
air to the patient could result in death or serious
injury.
WARNING
• Repairs should be performed only by qualified
medical service personnel in accordance with this
product's service manual. Otherwise, damage to
the Blood/Fluid Warmer and improper therapy
may result.
1
Operator's Manual
FW400 Series Blood/Fluid Warmer
2.0
Product Description
2.1
The Medi-Temp II FW400 Series Blood/Fluid Warmer is a
simple, dry heat device designed for safe and rapid in-line
warming of blood, blood products, and other fluids through
the utilization of disposable Blood/Fluid Warming Sets.
The Warmer does not provide fluid flow rate control. Blood,
blood products, and other fluids at temperatures 10ºC and
below will be warmed to temperatures between 36°C and
43°C at flow rates of 10 to 300 ml/min. Room temperature
fluids (20°C) can be warmed at flow rates up to 500 ml/min.
The disposable Blood/Fluid Warming Sets are available in
Standard, Standard with Extensions, Pediatric, and High Flow
models.
Warmer (see figure 1)
The Medi-Temp II FW400 Series Blood/Fluid Warmer is a
sealed, fluid-resistant device. A lighted on/off circuit breaker
is located on the side panel. An LED temperature display is
located on the front panel. Fluid temperature is indicated in
degrees Celsius on the display. Also located on the front of
the unit is a slot for insertion of the Blood/Fluid Warming
Set's flexible cassette. On the side of the unit is a holder for
the bubble trap.
The Blood/Fluid Warmer can be placed in an X-Ray cassette
slot within an operating room table or on horizontal surfaces.
An integral pole clamp also allows the unit to be pole
mounted.
F
H
G
E
A
B
C
D
A
LED Temperature Display
E
Pole Clamp
B
Blue Guide Rail Location
Indicator
F
Lighted On/Off
Circuit Breaker
C
Disposable Flexible Warming
Cassette Slot
G
Test Switch Access Screw Refer to Gaymar Medi-Temp II
FW400 Series Blood/Fluid
Warmer Service Manual
D
Bubble Trap Holder
H
Detachable Power Cord
Figure 1—Medi-Temp II FW400 Series Blood/Fluid Warmer
2
Operator's Manual
FW400 Series Blood/Fluid Warmer
2.2
Disposable Warming Sets
(see figure 2)
The Medi-Temp II FW400 Series Blood/Fluid Warmer is
designed to be used with Gaymar D25000 Series Blood/Fluid
Warming Sets only. The following Blood/Fluid Warming Sets
are available for use at this time. Check with your local dealer
for more details.
Each Warming Set consists of a flexible cassette (for
insertion into the warmer) and a bubble trap with a manual air
eliminator. They are designed for use below 300 mm Hg
pressure with hospital standard intravenous (IV)
administration sets and venipuncture sets utilizing luer type
connectors. Each Warming Set also has input and output
pinch clamps. See figure 2.
The Standard Warming Set is designed for use at 300 ml/min
or lower flow rates. The Standard Warming Set with
Extensions provides the user with added patient lead length.
The priming volume of the Standard Warming Set is 39 ml.
The priming volume of the Standard Warming Set with
Extensions is 48 ml.
G
A
B
D
The Pediatric Warming Set has a lower priming volume of
30 ml. Its patient connection lead utilizes thicker walled
tubing to provide added insulation at the lower pediatric
warming flow rates.
The High Flow Warming Set uses leads having a larger inner
diameter. This reduces restriction during circumstances
requiring rapid infusion. The priming volume of the High Flow
Warming Set is 79 ml.
Description
C
F
D
Catalog N o.
E
Standard
D25340CE
Standard with Extensions
D25310CE
Standard with Extensions (60")
D25315CE
Pediatric
D25320CE
A
Flexible Cassette
E
Male Luer (to Patient)
Hi g h F l o w
D25330CE
B
Manual Air Eliminator
(Relief Valve)
F
Female Luer (to
Blood/Fluid Source)
C
Bubble Trap
D
Clamp
G
Blue Guide Rail
Figure 2—Medi-Temp II FW400 Series Blood/Fluid Warmer—
Standard Warming Set
3
Operator's Manual
FW400 Series Blood/Fluid Warmer
Ê
Ë
Ì
Í
2
3
Î
Ï
Ð
Ñ
Figure 3—Instructions for Use—Setup
4
O
I
Operator's Manual
FW400 Series Blood/Fluid Warmer
3.0
Stretch the flexible cassette slightly and insert the
front end into the front of the Warmer, aligning the
rails to each edge of the slotted opening.
Instructions for Use—Setup
Select a site for placement of the Warmer. If the Warmer is
attached to a pole, ensure the pole clamp is securely
tightened.
Move hands to the rail protrusions and continue to
insert the cassette until the clear guide rail is flush
with the front of the unit. (The blue guide rail will
protrude slightly for easy removal.)
CAUTION
Do not attempt to transport the
Warmer while mounted to an IV pole.
It could tip over. Remove the Warmer
for transport.
Ë
Remove the protector from the male luer of the
Warming Set. To minimize temperature drop and
priming volume, remove unnecessary lead extensions
at this time.
Plug the power cord into a properly grounded electrical outlet.
NOTE: Do not turn unit on without first inserting a
Warming Set. Doing so may activate the Over
Temperature Safety Thermostats. Also, do not prime
the Warming Set prior to inserting it into the Warmer.
Ì
Í
Follow the instructions below (see corresponding
illustrations numbered 1 through 8 on page 4).
NOTE: Warming Sets are designed for use below
300 mm Hg.
Ê
Î
Open Warming Set input clamp. Allow fluid to prime
the Set.
Re-invert the bubble trap and mount it in the bubble
trap holder so it is in a vertical position.
WARNING
WARNING
The bubble trap must be mounted and kept in
the vertical position at all times. Failure to do
so could result in the introduction of air to the
patient. The introduction of air to the patient
could result in death or serious injury.
Do not use the contents of the package if any
part of the contents is damaged, distorted or
contaminated. Contents are sterile and nonpyrogenic in unopened, undamaged package.
Grasp each rail (see figure 4 below) with the blue
guide rail in the left hand.
Invert the bubble trap.
When the bubble trap fills to approximately two-thirds
(2/3) full, close output clamp.
Remove the Warming Set from its sterile packaging.
NOTE: The flexible cassette is designed so it can be
inserted into the Warmer in only one orientation (see
figure 1, page 2). The blue guide rail on the cassette
lines up with the blue guide rail indicator on the front
of the Warmer.
Close Warming Set input clamp. Remove the protector
from the female luer of the Warming Set and connect
it to the male luer on the IV administration set.
Ï
Ð
Ñ
Turn the on/off circuit breaker on. The Warmer will
perform a two-second self-check before turning on
the display.
If required, connect an extension for patient
connection.
Purge air from remaining length of tubing by opening
output clamp and allowing fluid to flow.
WARNING
Air must be removed from the fluid lines prior
to connection to the patient. Failure to do so
could result in the introduction of air to the
patient. The introduction of air to the patient
could result in death or serious injury.
Figure 4—Grasp and stretch flexible cassette
5
Operator's Manual
FW400 Series Blood/Fluid Warmer
3.1
During Use
3.2
WARNING
• Monitor the fluid lines to insure they are air free.
Never administer fluids if there are air bubbles in
the line between the bubble trap and the patient
connector.
• Monitor the fluid level in the bubble trap frequently.
Bubbles released during heating are captured in
the trap. Do not allow the bubble trap to go below
one-quarter (1/4) full. Air can be removed from the
bubble trap by inserting a sterile syringe into the
Manual Air Eliminator (see figure 2, page 3) and
withdrawing air until the trap is two-thirds (2/3)
full. See figure 5 below.
Failure to follow the above warnings could result in
the introduction of air to the patient. Introduction of
air to the patient could result in death or serious
injury.
Figure 5—Monitoring Fluid Level
During normal operation the Warmer will indicate
approximately 43.0°C on its display.
If the audible alarm sounds during operation, the Warmer
may not be heating. Refer to section 4.0.
6
Warming Set Removal
The flexible cassette of the Warming Set cannot be removed
from the Warmer when there is fluid within it.
1.
Drain the Warming Set of fluid.
2.
Remove bubble trap from holder.
3.
Pull blue guide rail to remove flexible cassette from
Warmer.
4.
Dispose of Warming Set per hospital protocol.
Operator's Manual
FW400 Series Blood/Fluid Warmer
4.0
4.1
4.3
Safety Systems
°c
Control Alarm—hI
®
Electronic System Self Check
Each time the Warmer is turned on, it performs a self-check
(about 2 seconds) before lighting the display. If a problem is
detected, an error code will be displayed and the Warmer
must be removed from use.
If a fluid temperature over 45ºC is sensed by the Warmer, it
turns the heaters off and activates an audible alarm. The
display will alternately indicate the word “hI” and the
temperature.
The audible alarm may be silenced during this condition by
turning the unit off then on again.
If the fluid temperature drops below 45ºC, the unit will
resume normal operation.
Refer to section 5.1, page 8.
4.2
Temperature Control
The Medi-Temp II FW400 Series Blood/Fluid Warmer
noninvasively senses fluid temperature on the surface of the
Warming Cassette. At steady state, the Warmer indicates
approximately 43.0°C on its display. Output fluid temperature
will be 36°C–43°C for 10°C input fluid temperature. Fluid
temperature is affected by fluid flow rate as shown in figure 6
below.
Room temperature fluid may be warmed at flow rates up to
500 ml/min.
Over Temperature
Safety Thermostats
°c
®
In the event of Warmer failure, there are two mechanical
thermostats that will interrupt power to the heaters.
The first thermostat will turn off the heaters, activate the
audible alarm and turn the display blank.
The second thermostat will interrupt power to the Warmer if
the first one fails.
Typical Fluid Temperature
(FW400 Series)
50
4.4
Cold fluid through the Warming Set can be used to reset the
thermostats. The unit must be turned off, then back on to
reset the alarm circuits.
48
46
Refer to section 5.1, page 8.
Temperature (°C)
44
42
40
38
4.5
36
°c
Control Alarm—LO
®
34
32
30
0
50
100
150
Flow (ml/min)
200
250
300
If the sensed fluid temperature drops below 34ºC, the
Warmer will activate an audible alarm, and the display will
alternately indicate the word “LO” and the temperature.
Refer to section 5.1, page 8.
Figure 6 - Typical fluid temperature vs. flow values
7
Operator's Manual
FW400 Series Blood/Fluid Warmer
5.0
Troubleshooting and Maintenance
5.1
Troubleshooting and Servicing
Use the following checklist to identify and solve Warmer problems. If after following these guidelines, the problem persists,
have unit serviced by a qualified medical service person in accordance with the Medi-Temp II FW400 Series Blood/Fluid
Warmer Service Manual (contact your local dealer or Gaymar to obtain the Service Manual).
8
Situation
Solution
On/off circuit breaker is not
lighted.
• Check if on/off circuit breaker is on.
• Check if power cord is securely attached and plugged in.
• Ser vice required. Send unit for ser vicing.
Display indicates a flashing
“hI”, and audible alarm is
activated.
OVER TEMPERATURE CONDITION
• An alarm may occur if the Warmer has been turned on prior to
inser ting a Warming Cassette.
1. Turn unit off.
2. Inser t Warming Set and prime the Set.
3. Turn unit back on.
• An alarm may occur if flow rate is stopped abr uptly.
1. Silence the alarm by turning the on/off circuit breaker off then
on again.
2. Restar t flow of fluid to reduce sensor temperature. Proceed with
use when the indicated sensor temperature is under 45°C.
• If an alarm condition persists, remove from use. Send unit for
ser vicing.
Display is off, on/off circuit
breaker is lighted, and audible
alarm is either on or off.
OVER TEMPERATURE CONDITION
• Backup thermostats were activated.
1. Reduce flow rate.
2. Turn power off.
3. Run cold fluid through the Warming Set to reset the thermostat
(with power off).
4. Turn power on.
• If condition reoccurs, remove Warmer from use and send for
ser vicing. If condition doesn't reoccur, it may have occurred due to
excessively high flow rate with ver y cold fluid.
Display indicates a flashing
“LO”, and audible alarm is
activated.
LOWER TEMPERATURE CONDITION
• An alarm may occur if a ver y high flow of cold fluid is present.
The alarm should last no more than 20 seconds.
• If alarm is continuous, heater circuit may be inoperative. Remove from
use. Send unit for ser vicing.
Display indicates “ER2”.
Temperature sensor has failed. Remove from use. Send unit for ser vicing.
Operator's Manual
FW400 Series Blood/Fluid Warmer
5.2
Cleaning
bottom to facilitate cleaning.) Use the thin brush supplied
with the Warmer to clean the inside of slot. Rinse slot with
warm water.
CAUTION
Wipe Warmer dry with a clean, dry cloth.
Do not immerse Warmer in cleaning and/or
sterilization solution. Do not submerge or soak unit;
it is fluid-resistant, not fluid-proof.
Apply a disinfectant such as 10% chlorinated bleach
solution (chlorinated bleach with 5.25% sodium
hypochlorite) to the external surfaces of the Warmer and
allow to dry.
Perform the following care and cleaning between patient use
or per hospital protocol:
Unplug unit prior to cleaning.
To clean the external surfaces of the Warmer, use a
nonabrasive cleaning solution (such as warm soapy water)
and a clean cloth.
5.3
Function Check
A function check should be performed every three (3)
months or as per hospital protocol by qualified medical
service personnel in accordance with the Medi-Temp II
FW400 Series Blood/Fluid Warmer Service Manual (contact
your local dealer or Gaymar to obtain the Service Manual).
To clean the inside of the Warmer, flush the cassette slot
with cleaning solution over a sink. (The slot is open at the
6.0 Technical Specifications
FW400
FW401
FW403
Voltage
~120 V
~100 V
~220 V – 240 V
Current
9A
11 A
4.5 A
Capacity
1200 W
Frequency
50/60 Hz
Ambient Temperature
50 Hz
15.6°C–29.4°C (60°F–85°F)
Power Cord
Detachable, 15 feet long. Use only UL listed type SJT,
16 AWG 3-conductor cord with molded on grounding
type hospital grade attachment plug.
Detachable, 4.6 meters
long. Use only an
international (harmonized)
3-wire cord using cordage
approved to HD-21
conductor size 1.00 mm²
(H05VVF3G1.00).
Classification
Class 1 grounded, splash-proof equipment not suitable for use in the presence of a
flammable anaesthetic mixture with air or with oxygen or nitrous oxide.
IPX4
Weight
Size
4.5 kg (10 pounds)
35 mm x 235 mm x 275 mm (1 3/8" x 9 1/4" x 10 3/4")
9