1
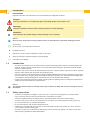
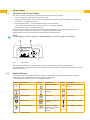
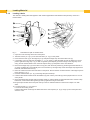
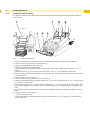
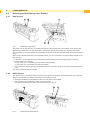
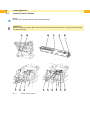
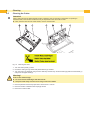
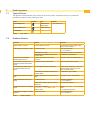
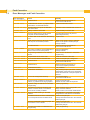
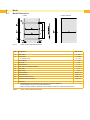
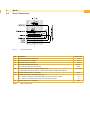
Operator's Manual Label Printer MACH4 Made in Germany 2 Operator's Manual for the following products 2 Part No.. Description Type 5541082 Transfer printer MACH4/200B 5541083 Transfer printer MACH4/300B 5541086 Transfer printer MACH4/600B 5541092 Transfer printer MACH4/200P 5541093 Transfer printer MACH4/300P 5541096 Transfer printer MACH4/600P 5541102 Transfer printer MACH4/200C 5541103 Transfer printer MACH4/300C 5541106 Transfer printer MACH4/600C Edition: 02/2015 - Part No. 9008598 Copyright This documentation as well as translation hereof are property of cab Produkttechnik GmbH & Co. KG. The replication, conversion, duplication or divulgement of the whole manual or parts of it for other intentions than its original intended purpose demand the previous written authorization by cab. Trademark Windows is a registered trademark of the Microsoft Corporation. Editor Regarding questions or comments please contact cab Produkttechnik GmbH & Co. KG. Topicality Due to the constant further development of our products discrepancies between documentation and product can occur. Please check www.cab.de for the latest update. Terms and conditions Deliveries and performances are effected under the General conditions of sale of cab. Germany cab Produkttechnik GmbH & Co KG Postfach 1904 D-76007 Karlsruhe Wilhelm-Schickard-Str. 14 D-76131 Karlsruhe France cab technologies s.a.r.l. F-67350 Niedermodern Téléphone +33 388 722 501 USA cab Technology Inc. Tyngsboro MA, 01879 Phone +1 978 649 0293 www.cab.de/fr [email protected] www.cab.de/us [email protected] Asia cab Technology Co., Ltd. Junghe, Taipei, Taiwan Phone +886 2 8227 3966 www.cab.de/tw [email protected] Telefon +49 721 6626-0 Telefax +49 721 6626-249 China cab (Shanghai)Trading Co., Ltd. www.cab.de [email protected] Phone +86 21 6236-3161 www.cab.de/cn [email protected] Representatives in other countries on request Table of Contents 1Introduction............................................................................................................................................. 4 1.1Instructions................................................................................................................................................ 4 1.2 Intended Use............................................................................................................................................. 4 1.3 Safety Instructions..................................................................................................................................... 4 1.4Environment.............................................................................................................................................. 5 2Installation............................................................................................................................................... 6 2.1 Device Overview....................................................................................................................................... 6 2.2 Unpacking and Installing the Device......................................................................................................... 7 2.3 Connecting the Device.............................................................................................................................. 7 2.4 Switching on the Device............................................................................................................................ 7 3 3.1 3.2 3.3 3.4 Control Panel........................................................................................................................................... 8 Structure of the Control Panel................................................................................................................... 8 Symbol Displays........................................................................................................................................ 8 Printer States............................................................................................................................................ 9 Key Functions......................................................................................................................................... 10 4 4.1 4.2 4.3 4.4 4.5 Loading Material.................................................................................................................................... 11 Loading Label Rolls..................................................................................................................................11 Loading Fanfold Labels........................................................................................................................... 13 Loading Labels for Peel-off Mode........................................................................................................... 14 Selecting and Positioning Label Sensors................................................................................................ 15 Loading Transfer Ribbon......................................................................................................................... 16 5 5.1 5.2 5.3 5.4 Printing Operation................................................................................................................................. 18 Synchronization of the Paper Feed......................................................................................................... 18 Tear-off Mode.......................................................................................................................................... 18 Peel-off Mode.......................................................................................................................................... 18 Cutting Mode........................................................................................................................................... 18 6Cleaning................................................................................................................................................. 19 6.1 Cleaning Information............................................................................................................................... 19 6.2 Cleaning the Print Roller......................................................................................................................... 19 6.3 Cleaning the Printhead............................................................................................................................ 19 6.4 Cleaning the Label Sensors.................................................................................................................... 19 6.5 Cleaning the Cutter................................................................................................................................. 20 7 7.1 7.2 7.3 Fault Correction.................................................................................................................................... 21 Types of Errors........................................................................................................................................ 21 Problem Solution..................................................................................................................................... 21 Error Messages and Fault Correction..................................................................................................... 22 8Media...................................................................................................................................................... 24 8.1 Media Dimensions................................................................................................................................... 24 8.2 Device Dimensions................................................................................................................................. 25 8.3 Reflex Mark Dimensions......................................................................................................................... 26 8.4 Cut-out Mark Dimensions........................................................................................................................ 27 9 Licences................................................................................................................................................. 28 9.1 EC Declaration of Conformity.................................................................................................................. 28 9.2FCC......................................................................................................................................................... 28 10Index....................................................................................................................................................... 29 3 4 1Introduction 1.1Instructions Important information and instructions in this documentation are designated as follows: Danger! Draws your attention to an exceptionally grave, impending danger to your health or life. Warning! ! Indicates a hazardous situation that could lead to injuries or material damage. ! Attention! i Draws attention to possible dangers, material damage or loss of quality. Notice! Gives you tips. They make a working sequence easier or draw attention to important working processes. Environment! Gives you tips on protecting the environment. Handling instruction Reference to section, position, illustration number or document. Option (accessories, peripheral equipment, special fittings). Zeit 1.2 Information in the display. Intended Use • The device is manufactured in accordance with the current technological status and the recognized safety rules. However, danger to the life and limb of the user or third parties and/or damage to the device and other tangible assets can arise during use. • The device may only be used for its intended purpose and if it is in perfect working order, and it must be used with regard to safety and dangers as stated in the operating manual. • The device printer is intended exclusively for printing suitable materials that have been approved by the manufacturer. Any other use or use going beyond this shall be regarded as improper use. The manufacturer/supplier shall not be liable for damage resulting from unauthorized use; the user shall bear the risk alone. • Usage for the intended purpose also includes complying with the operating manual, including the manufacturer‘s maintenance recommendations and specifications. i 1.3 Notice! The complete documentation is included in the scope of delivery on DVD, and can also currently be found in the Internet. Safety Instructions • The device is configured for voltages of 100 to 240 V AC. It only has to be plugged into a grounded socket. • Only connect the device to other devices which have a protective low voltage. • Switch off all affected devices (computer, printer, accessories) before connecting or disconnecting. • The device may only be used in a dry environment, do not expose it to moisture (sprays of water, mists, etc.). • Do not use the device in an explosive atmosphere. • Do not use the device close to high-voltage power lines. • If the device is operated with the cover open, ensure that people‘s clothing, hair, jewelry etc. do not come into contact with the exposed rotating parts. • The device or parts of it can become hot while printing. Do not touch during operation, and allow to cool down before changing material and before disassembly. 4 1Introduction • Perform only those actions described in this operating manual. Work going beyond this may only be performed by trained personnel or service technicians. • Unauthorized interference with electronic modules or their software can cause malfunctions. • Other unauthorized work on or modifications to the device can also endanger operational safety. • Always have service work done in a qualified workshop, where the personnel have the technical knowledge and tools required to do the necessary work. • There are various warning stickers on the device. They draw your attention to dangers. Warning stickers must therefore not be removed, as then you and other people cannot be aware of dangers and may be injured. • The sound pressure level is less than 70 dB(A) during operation. Danger! Danger to life and limb from power supply. XX Do not open the device casing. 1.4 Environment Obsolete devices contain valuable recyclable materials that should be sent for recycling. XX Send to suitable collection points, separately from residual waste. The modular construction of the printer enables it to be easily disassembled into its component parts. XX Send the parts for recycling. The electronic circuit board of the device is equipped with a lithium battery. XX Take old batteries to collection boxes in shops or public waste disposal centers.. 5 6 2Installation 2.1 6 Device Overview View A 1 2 3 4 5 6 7 8 9 10 11 10 13 12 View B 16 15 14 A pause Bereit menu 6 17 18 feed cancel 19 pause menu feed cancel B Fig. 1 Overview 1 RS-232 serial interface 2 USB 2.0 High Speed Slave interface 3 Two USB master interfaces for keyboard and scanner 4 Ethernet 10/100 Base T interface 5CompactFlash card slot 6Power supply socket 7PC card slot, type II 8Power switch 9Cover 10 11 12 13 14 15 16 17 18 19 Roll hub Holder slots Ribbon rewind hub Printhead mounting with printhead Release button of the print module Pressure roller Control panel Graphic display Label outlet in the control panel Navigator pad 2Installation 2.2 7 Unpacking and Installing the Device XX Lift the label printer out of the carton by the straps. XX Check the label printer for any possible transportation damage. XX Check that the delivery is complete. Delivery scope: • Label printer • Power cable • USB cable • Operator's Manual • DVD with label software, Windows driver and documentation i ! Notice! Please keep the original packaging in case the printer must be returned. Attention! The device and printing materials will be damaged by moisture and wetness. XX Set up label printers only in dry locations protected from splash water. XX Place the printer on a flat surface. 2.3 Connecting the Device The standard available interfaces and connectors are shown in figure 1, view A. 2.3.1 Connecting to the Power Supply The printer is equipped with a wide area network unit. The device can be operated with a supply voltage of 230 V~/50 Hz or 115 V~/60 Hz without adjustment. 1. Check that the device is switched off. 2. Plug the power cable into the power connection socket (6). 3. Plug the power cable into a grounded socket. 2.3.2 ! Connecting to a Computer or Computer Network Attention! Inadequate or no grounding can cause malfunctions during operations. Ensure that all computers and cables connected to the label printer are grounded. XX Connect the label printer to a computer or network by a suitable cable. XX For details of the configuration of the individual interfaces the Configuration Manual. 2.4 Switching on the Device When all connections have been made: XX Switch the printer on at the power switch (8). The printer performs a system test, and then shows the system status ready in the display (17). If an error occurs during the system test, the symbol and type of error are displayed. 8 3 Control Panel 3.1 8 Structure of the Control Panel The user can control the operation of the printer with the control panel, for example: • Issuing, interrupting, continuing and canceling print jobs, • Setting printing parameters, e.g. heat level of the printhead, print speed, interface configuration, language and time of day ( Configuration Manual), • Start the test functions ( Configuration Manual and Service Manual), • Control stand-alone operation with a memory module ( Configuration Manual), • Update the firmware ( Configuration Manual). Many functions and settings can also be controlled by software applications or by direct programming with a computer using the printer’s own commands. Programming Manual for details. Settings made on the control panel make the basic settings of the label printer. i Notice! It is advantageous, whenever possible, to make adaptations to various print jobs in the software. 1 2 pause Bereit menu 6 Fig. 2 feed cancel Control Panel The control panel consists of a graphic display (1) and the navigator pad (2) with five integrated keys. The graphic display indicates the current status of the printer and the print job, indicates faults and shows the printer settings in the menu. 3.2 Symbol Displays The symbols shown in the following table may appear in the status line of the display, depending on the printer configuration. They enable the current printer status to be seen quickly. For the configuration of the status line Configuration Manual. Symbol Table 1 Description Symbol Description Symbol Description Clock Ethernet link status User memory in the clock circuit Date sheet Temperature of the printhead Used memory Date/time digital PPP funds Input buffer Ribbon supply Debug window for abc programs Access to memory card Wi-Fi signal strength Control of the lower display line is handed over to an abc program Printer is receiving data Symbol displays 3 Control Panel 3.3 Printer States State Ready 9 Display Description Ready The printer is in the ready state and can receive data. and configured symbol displays, such as time Printing label and date Printing label and the number of the printed label in the print job. The printer is currently processing an active print job. Data can be transmitted for a new print job. The new print job will start when the previous one has finished. Pause Pause and the symbol The printing process has been interrupted by the operator. An error has occurred that can be rectified by the operator without interrupting the print job. Correctable error and the type of error and the number of labels still to be printed. The print job can be continued after the error has been rectified. An error has occurred that cannot be rectified without interrupting the print job. Irrecoverable error and the type of error and the number of labels still to be printed. Critical error An error occurs during the system test. and the type of error XX Switch the printer off and then on again at the power switch or XX Press cancel key. Call Service if the fault occurs persistently. If the printer is not used for a lengthy period, it automatically switches to power save mode. Power Save Mode and the key lighting is switched off Table 2 Printer states XX To exit power save mode: Press any key on the navigator pad. 10 3 3.4 Control Panel 10 Key Functions • The key functions depend on the current printer state: -- Active functions: Labels and symbols on the navigator pad keys light up. -- Active functions light up white in print mode (e. g. menu or feed). -- Active functions light up orange in the offline menu (arrows, key 8 ). Key Display State Function menu lights Ready Ready To the offline menu feed lights Ready Ready Feeds a blank label pause lights Ready Ready After the end of a print job, reprint the last label Printing label Printing label Interrupt print job, printer goes into "Pause" state Pause Pause Continue the print job, printer goes into "Printing label" state Correctable error Continue the print job after rectifying the error, printer goes into "Printing label" state Ready Delete internal memory, the last label can no longer be reprinted. flashes cancel lights Ready Printing label Printing label Short press g Pause Longer press g cancels the current print job and deletes all print jobs Pause Correctable error 8 Table 3 Key flashes Irrecoverable error lights Error cancels the current print job Call Help - Concise information for rectifying the fault will be displayed Key functions in the print mode Menu Parameter setting Parameter choice Numeric value Return from a submenu - Increase of the number at the cursor position Jump into a submenu - Decrease of the number at the cursor position Menu option to the left Sheets to the left Cursor shift to the left Menu option to the right Sheets to the right Cursor shift to the right Start of a selected menu option Confirmation of the selected value Pressing 2 s: Leaving the offline menu Pressing 2 s: Abort without changing the value Table 4 Key functions in the offline menu 4 Loading Material 4.1 Loading Label Rolls 4.1.1 Adapting the Roll Hub 11 Label rolls are supplied with different diameters. The roll hub can hold label rolls with a core diameter of 38 - 75 mm, or 76 mm with the detachable adapters fitted. 1 Fig. 3 2 3 Roll hub with and without adapter Dismounting the adapter XX Open the cover and remove the roll hub (10 - fig. 1) from the printer. XX Remove the edge stop (3), 4.1.2 on page 12, press the adapter (2) in at the three pressure points (1), as shown in the figure, and remove it. Mounting the adapter Push the adapter (2) on until it slots into place. 12 4 4.1.2 Loading Material 12 Loading Labels The method of loading label rolls applies to both thermal paper labels and labels that are printed by means of a transfer ribbon. 1 2 6 3 2 7 4 8 5 9 Fig. 4 Roll holder and path of the label stock 1. Open the cover and hinge down the control panel. 2. Take the roll hub (10 - fig.1) out of the holder slots (11 - fig.1) in the printer. 3. Press down the lever (3) on the edge stop 2 (2) and pull the edge stop off from the label core (4). 4. If necessary, mount or dismount the adapter, 4.1.1 on page 11. Slide the label roll over the label core (4) and place it against the edge stop 1 (1) so that it is guided by the adapter (5) and the flange of the edge stop. In so doing, ensure that the labels on the unwound strip are facing up irrespective of the wind direction. 5. Remount the edge stop 2 (2) on the label core (4) and, with the lever pressed (3), slide it against the label roll. In so doing, the label roll is automatically set in the center line by the edge stops. Place both edge stops against the label roll, and release the lever (3). 6. Place the roll hub back into the holder slots on the printer. Ensure that the rounded surfaces of the edge stops are facing forward, fig. 1. 7. Press the release button (14 - fig.1) and hinge the print module up. 8. Feed the label stock forwards under the deflector (6) and over the print roller (9) until it projects about 15 cm out of the printer. 9. Move the label guides (8) apart with the setting wheel (7) until the labels can pass between them. Press the strip label down, and move the label guides (8) back up against the edges of the label. 10.Hinge the print module down and press evenly on the two marked surfaces so that the unit snaps in on both sides. 11.For peel-off mode 4.3 on page 14. For tear-off and cutting mode: Feed the label stock out through the label outlet in the control panel (18 - fig.1). Hinge up the control panel and close the cover. 4 Loading Material 4.2 Loading Fanfold Labels 13 The method of loading fanfold labels applies to both thermal paper labels and labels that are printed by means of a transfer ribbon. 1 2 1 4 View A 5 6 3 A Fig. 5 Loading fanfold labels 1. Stack the fan-folded labels (1) behind the printer. Ensure that the labels on the strip are facing upwards. 2. Open the cover and hinge down the control panel (5). 3. Feed the fan-folded labels (1) below the cover. 4. Adapting the roll hub (2) to the label width: Take the roll hub (2) out of the holder slots (4) in the printer. Remove the adapter from the roll hub, 4.1.1 on page 11. Push down the lever (3 - fig. 4) and justify the edge stops 1 and 2 (2 - fig. 4) centrically on label width. 5. Place the roll hub back into the holder slots (4) on the printer. Ensure that the rounded surfaces of the edge stops are facing forward. 6. Feed the labels over the roll hub (2). 7. Press the release button (6) and hinge the print module up. 8. Feed the fanfold labels forwards under the deflector, (6 - fig. 4), and over the print roller, (9 - fig. 4), until it projects about 15 cm out of the printer. 9. Move the label guides (8 - fig. 4) outward with the setting wheel (7 - fig. 4) until the labels can pass between them. Press the strip label down with the hand, and move the label guides (8 - fig. 4) back up against the edges of the label. 10.Hinge the print module down and press evenly on the two marked surfaces (3) so that the unit snaps in on both sides. 11.For peel-off mode 4.3 on page 14. For tear-off and cutting mode: Feed the label stock out through the label outlet in the control panel (18 - fig. 1). Hinge up the control panel (5) and close the cover. 14 4 Loading Material 4.3 i 14 Loading Labels for Peel-off Mode Notice! Place the printer in such a position that the liner can run down without hindrance. A label jam can cause malfunctions in printing operations. 1 Fig. 6 2 3 4 5 Setting up the Peel-off Mode 1. Loading the label stock 4.1 on page 11 or 4.2 on page 13, steps 1 to 10. 2. In the control panel, release the pressure roller (3) from the parking position (2). To do this, press on the metal pins at each end of the roller so that the roller is pressed out of the parking position (2) and into the working position (1) by the built-in springs. 3. Remove the labels (5) from about the first 15 cm of the label stock. 4. Feed the media (4) out between the control panel and the printer. 5. Hinge up the control panel and close the cover. 6. Carry out a synchronization 5.1 on page 18. 4 Loading Material 4.4 Selecting and Positioning Label Sensors 4.4.1 Gap Sensors 2a 50 40 30 20 10 0 15 3 1a 10 2b Fig. 7 1b Selecting the gap sensor The printer has two gap sensors (1, 2) to detect the start of a label and the end of the material, which can be used alternatively. The detectors (1a, 2a) are located in the transport module, the emitters (1b, 2b) in the print module. The gap sensor (1) is used as default. This is suitable for use with single and multi-lane labels with an odd number of lanes. When using multi-lane labels with an even number of lanes, e.g. two or four lanes, one has to switch manually to the gap sensor (2). 1. Open the cover and hinge down the control panel. Press the release button and hinge the print module up. 2. Set the switch (3) as required: for gap sensor (1) - move switch (3) to right-hand position (default), for gap sensor (2) - move switch (3) to left-hand position. 3. Slot in the print module by pressing the marked surfaces on both sides, hinge up the control panel and close the cover. This switch cannot be made by software. 4.4.2 Reflex Sensor The reflex sensor (1) can detect marks on the back of the label stock. Move the sensor transversely to the transport direction with the slide (2) to adapt to the position of the reflective marks: 1. Determine the distance of the reflective marks from the center of the material. 2. Move the slide (2) to the desired position with a pointed tool. The distance of the sensor from the center is shown on the scale (3). 1 50 40 30 20 10 0 2 10 A Fig. 8 Positioning the Reflex Sensor 50 40 30 20 10 3 0 10 16 4 Loading Material 4.5 i ! 16 Loading Transfer Ribbon Notice! Do not insert a transfer ribbon for direct thermal printing. Attention! When inserting the transfer ribbon ensure that the coated side faces the labels, as otherwise the printhead can become soiled. 1 6 Fig. 9 2 2 7 Loading Transfer Ribbon 3 8 9 2 7 4 10 5 11 8 4 Loading Material 1. Open the cover and hinge down the control panel. 2. Press the release button and hinge the print module up. 3. Press the ribbon supply hub (2) to the right until there is perceptible resistance, pull it to the left out of the guide slot (1) and remove it. 4. Set the width of the ribbon roll on the ribbon supply hub (2). For that purpose press the lever (4) and move it sidewards. The set roll width is shown on the scale (3) of the ribbon supply hub (2). 5. Slide the ribbon roll onto the ribbon supply hub (2) until the lever (4). Ensure that the coated side of the transfer ribbon (7) is facing to the label stock. 6. To insert the ribbon supply hub (2) again press the rectangular end (5) of the hub against the spring in the righthand holder, and slide the left-hand end into the guide slot (1) as far as it will go. 7. Hinge the print module down (do not slot in). 8. Insert an empty roll (10) for the used transfer ribbon onto the ribbon rewind hub (9) and set the width for the empty roll similarly to steps 3 to 5. 9. To insert the transfer ribbon rewinding unit (9) again press the rectangular end (5) of the hub against the spring in the right-hand holder, and slide the left-hand end into the guide slot (6) as far as it will go. 10.Feed the transfer ribbon (7) over the printhead to the ribbon rewind hub (9), and attach the ribbon to the empty roll with adhesive tape. Ensure that it is wound as shown in the figure and ensure that the ribbon is not twisted. 11.Turn the tension wheel (11) in the winding direction until the ribbon is tightly wound on the roll. 12.Slot in the print module by pressing the marked surfaces (8) on both sides, hinge up the control panel and close the cover. 17 18 5 Printing Operation ! Attention! Printhead damage caused by improper handling! XX Do not touch the underside of the printhead with the fingers or sharp objects. XX Ensure that the labels are clean. XX Ensure that the label surfaces are smooth. Rough labels act like emery paper and reduce the service life of the printhead. Print with the lowest possible printhead temperature. The printer is ready for operation when all connections have been made and labels and, if applicable, the transfer ribbon have been loaded. 5.1 Synchronization of the Paper Feed After the label stock has been inserted, for peel-off or cutting mode a synchronization of the paper feed is required. That way the first label, which is detected by the label sensor, will be transported to the print position and all labels in front will be fed out of the printer. So the synchronization avoids, that blank labels are peeled-off together with the first printed label or that the first cut label would be too long. Both effects can cause useless first labels. XX Press the feed key to start the synchronization. XX Remove the blank labels peeled-off or cut during the synchronization. 5.2 Tear-off Mode After printing, the strip label is detached by hand. The label printer is equipped with a tear bar for this purpose. Optionally, the strip of labels can be wound up externally. Loading label stock 4.1 on page 11 or 4.2 on page 13. 5.3 Peel-off Mode The peel-of mode is available for the printer types MACH4/200P, MACH4/300P and MACH4/600P. In peel-off mode, the labels are automatically detached from the media after printing, and presented for removal. Loading label stock 4.3 on page 14. i i 5.4 Notice! Peel-off mode must be activated in the software. This is done with the "P command" in the direct programming, Programming Manual. Notice! A sensor prevents further printing until the printed label has been removed from the peel-off position. Cutting Mode The cutting mode is available for the printer types MACH4/200C, MACH4/300C and MACH4/600C. The labels or continuous material is cut-off automatically. The relevant cutting position is preferably set in the software. Loading label stock 4.1 on page 11 or 4.2 on page 13. i Notice! Cutting mode must be activated in the software. This is done with the "C command" in the direct programming, Programming Manual. 18 6 Cleaning 6.1 Cleaning Information 19 Danger! Danger to life and limb from electric shock! XX Disconnect the printer from the electricity supply before starting any maintenance work. The label printer requires very little maintenance. It is important to clean the thermal printhead regularly. This guarantees a consistently good printed image and plays a major part in preventing premature wear of the printhead. Otherwise, the maintenance is limited to monthly cleaning of the device. ! Attention! The printer can be damaged by aggressive cleansers. Do not use abrasive cleaners or solvents for cleaning the external surfaces or modules. XX Remove dust and paper fluff from the print area with a soft brush or vacuum cleaner. XX The cover of the printer can be cleaned with a standard cleanser. 6.2 Cleaning the Print Roller Accumulations of dirt on the print roller may impair the media transport and the print quality. In the case of slight soiling, it is not necessary to remove the print roller. The roller can be turned step by step by hand. Use a soft cloth and roller cleaner for cleaning. 6.3 Cleaning the Printhead Cleaning intervals: direct thermal printing - every media roll change thermal transfer printing - every ribbon roll change Dirt can collect on the printhead during printing which affects the printed image, for example by causing different contrasts or longitudinal stripes. ! Attention! Printhead damage! Do not use sharp objects for cleaning the printhead. Do not touch the protective glass layer of the printhead. ! Attention! Risk of injury from the hot printhead line. Ensure that the printhead has cooled down before starting cleaning. XX Clean the printhead with a cleaning pen or with a cotton swab soaked in pure alcohol. XX Allow the printhead to dry for two or three minutes. 6.4 ! Cleaning the Label Sensors Attention! Do not damage the light barrier! Do not use sharp objects or solvents for cleaning the light barrier. The label sensors can be soiled by paper dust. This can impair the detection of the start of the label or the print marks. XX Clean the label sensors with a brush, or with a cotton swab dipped in isopropyl alcohol. 20 6 Cleaning 6.5 ! 20 Cleaning the Cutter Attention! When cutting through the label material remains of adhesive may accumulate on the blades. If operating in backfeed mode, such remains of adhesive may be deposited on the drive roller as well. XX Both, the drive roller and the cutter blades, must be cleaned often. 1 2 3 4 5 6 7 Fig. 10 Cleaning the cutter 1. Turn the control panel (1) down. 2. Unlock the cutting unit (3) at the both plastic latches (2) and lift it. 3. Turn the screw (4) clockwise using a 2.5mm Allen key and that way swivel the clamp (6) with the lower blade (7) away from the upper blade (5). Warning! ! Risk of cuts and bruisings! XX Do not touch the blade edges with bare hands. XX Keep the hands away from the swivel range of the lower blade. 4. Remove particles of dust and paper with a soft brush or a vacuum. 5. Remove remains of adhesive with isopropyl alcohol. 6. Remount in reverse order. 7 Fault Correction 7.1 Types of Errors 21 The diagnostic system indicates on the screen if an error has occurred. The printer is set into one of the three possible error states according to the type of error. State Display Correctable error Key Remark pause flashes 3.4 on page 10 cancel lights Irrecoverable error cancel flashes Critical fault - Table 5 7.2 Error states Problem Solution Problem Cause Remedy Transfer ribbon creases Transfer ribbon too wide Use a transfer ribbon slightly wider than the width of label. Print image has smears or voids Printhead is dirty Clean the printhead 6.3 on page 19. Temperature too high Decrease temperature via software. Unsuitable combination of labels and transfer ribbon Use different type of ribbon. Printer does not stop after transfer ribbon runs out Thermal printing is chosen in the software Change to thermal transfer printing. Printer prints a sequence of characters instead of the label format Printer is in ASCII dump mode Cancel the ASCII dump mode. Printer transports label media, but transfer ribbon does not move Transfer ribbon incorrectly inserted. Check and, if necessary, correct the transfer ribbon web and the orientation of the label side. Unsuitable combination of labels and transfer ribbon Use different type of ribbon. Printer only prints each second label Setting of the size in the software is too large. Change the size in the software. Vertical white lines in the print image Printhead is dirty Clean the printhead 6.3 on page 19. Printhead is defective (failure of heat elements) Change the printhead. Horizontal white lines in the print image Printer is used with the backfeed > smart in the cut or peel-off mode Set the backfeed > always in the setup. Configuration Manual. Print image is irregular, one side is lighter Printhead is dirty Clean the printhead 6.3 on page 19. Table 6 Problem solution 22 7 7.3 Fault Correction 22 Error Messages and Fault Correction Error messages Cause Remedy ADC malfunction Hardware error Switch the printer off and then on. If error recurs call service. Barcode error Invalid barcode content, e.g. alphanumeric characters in a numerical barcode Correct the barcode content. Barcode too big The barcode is too big for the allocated area of the label Reduce the size of the barcode or move it. Battery low Battery of the PC card is flat Replace battery in the PC card. Buffer overflow The input buffer memory is full and the computer is still transmitting data. Use data transmission via protocol (preferably RTS/CTS). Card full No more data can be stored on the memory Replace card. card Cutter blocked Cutter cannot return into its home position and stays in an undefined position Switch off the printer. Remove material. Switch on the printer. Restart print job. Change material No cutter function Switch the printer off and then on. If error recurs call service. Cutter jammed The cutter is unable to cut the labels but is able to return into its home position Press the cancel key. Change material. Device not conn. Programming addresses a non-existent device Either connect this device or correct the programming. File not found Requested file is not on the card Check the contents of the card. Font not found Error with the selected download font Cancel current print job, change font. FPGA malfunction Hardware error Switch the printer off and then on. If error recurs call service. Head error Hardware error Switch the printer off and then on. If error recurs replace printhead. Head open Printhead not locked Lock printhead. Head too hot Printhead is overheated After pausing the print job will be continued automatically. If the fault recurs repeatedly, reduce the heat level or the print speed via software. Invalid setup Error in the configuration memory Re-configure printer. If error recurs call service. Memory overflow Current print job contains too much information, e.g. selected font, large graphics Cancel current print job. Reduce amount of data to be printed. Name exists Duplicate usage of field name in the direct programming Correct programming No DHCP server The printer is configured for DHCP, but there is no DHCP server, or the DHCP server is not currently available. Switch off DHCP in the configuration, and assign a fixed IP address. Please contact your network administrator. No label found There are labels missing on the label material Press pause key repeatedly until printer recognizes the next label on the material. The label format as set in the software does Cancel current print job. not correspond with the real label format Change the label format set in the software. Restart print job. No label size Printer is loaded with continuous paper, but the software is set on labels Cancel current print job. Change the label format set in the software. Restart the print job. The size of the label is not defined in the programming. Check programming. 7 Fault Correction 23 Error messages Cause Remedy No Link No network link Check network cable and connector. Please contact your network administrator. No record found Refers to the optional memory card; database access error Check programming and card contents. No SMTP server The printer is configured for SMTP, but there is no SMTP server, or the SMTP server is not currently available. Switch off SMTP in the configuration. Caution! Then a warning cannot be sent by e-mail (EAlert). Please contact your network administrator. No Timeserver Timeserver is selected in the configuration, but there is no Timeserver, or the Timeserver is not currently available. Switch off Timeserver in the configuration. Please contact your network administrator. Out of paper Out of label roll Load labels 4.1 on page 11 or 4.2 on page 13. Error in the paper feed Check paper feed. Out of transfer ribbon Insert new transfer ribbon. Transfer ribbon melted during printing Cancel current print job. Change the heat level via software. Clean printhead 6.3 on page 19. Load transfer ribbon 4.5 on page 16. Restart print job. The printer is loaded with thermal labels, but the software is set to transfer printing Cancel current print job. Set software to direct thermal printing. Restart print job Protocol error Printer has received an unknown or invalid command from the computer. Press the pause key to skip the command or press the cancel key to cancel the print job. Read error Read error when reading from the memory card Check data of the card. Backup data, reformat card. Remove ribbon Transfer ribbon is loaded although the printer is set to direct thermal printing for direct thermal printing remove ribbon Out of ribbon for thermal transfer printing set the printer in the configuration or in the software to transfer printing Structural err. Error in the file list of the memory card, data Format memory card. access is uncertain. Unknown card Card not formatted, Type of card not supported Format card, use different type of card. USB error Device stalled A USB device has been detected, but it is not working. Do not use the USB device. USB error Too much current The USB device consumes too much current. Do not use the USB device. USB error Unknown device Failure to detect USB device Do not use the USB device. Voltage error Hardware error Switch the printer off and then on. If error recurs call service. It is shown which voltage has failed. Please note. Write error Hardware error Repeat the write process, reformat card. Write protected PC card write protection is activated. Deactivate the write protection. Wrong revision Error when updating the firmware. Firmware not compatible with the hardware version Load the compatible firmware. Table 7 Error Messages and Fault Correction 24 8Media 8.1 24 Media Dimensions LabelsEndless material Fig. 11 Dim. B H Label / endless material dimensions Designation Dim. in mm Label width 6 - 116 Label height 5 - 4500 20 - 200 in peel-off mode - Tear-off length > 30 > 12 - Cut length A Label distance C Width of liner or endless material >2 25 - 120 Dl Left margin ≥0 Dr Right margin ≥0 E Label thickness 0,025 - 0,7 F Liner thickness 0,03 - 0,1 G Thickness label with liner 0,055 - 0,8 Q Thickness endless material 0,03 - 0,8 V Label feed • Small label sizes, thin materials or strong glue can lead to limitations. Critical applications need to be tested and cleared. • Note the bending stiffness ! Material must be flexible to follow the radius of the print roller ! Table 8 Label / endless material dimensions >7 8Media 8.2 25 Device Dimensions Fig. 12 Dim. Device dimensions Designation Dim. in mm IP Distance printhead - peel-off edge 13,2 IC Distance printhead - cut edge 16,0 IT Distance printhead - tear bar 22,7 K Print width with printhead 203 dpi 104,0 Print width with printhead 300, 600 dpi 105,6 RX Distance reflective sensor - middle of paper track -56 - +10 i.e. permissible distance of reflex or cut-out marks from the middle of the material RY Distance reflective sensor - printhead TX Distance gap sensor - middle of paper track TX1 : Sensor for single and multi-lane labels with an odd number of lanes. TX2 : Sensor for multi-lane labels with an even number of lanes. TY Table 9 Distance gap sensor - printhead Device dimensions 22,1 -10 0 62,6 26 8Media 8.3 26 Reflex Mark Dimensions Labels with reflex marks Fig. 13 Dim. Endless material with reflex marks Reflex mark dimensions Designation A Label distance Dim. in mm >2 L Width of reflex mark >5 M Height of reflex mark 3 - 10 X Distance mark - middle of paper track for reflective sensor recognition Z Distance virtual label front edge - actual label front edge XX Adjust software settings • Reflex marks must be on the back side of the material (liner). • Specification is valid for black marks. • Recognition of colored marks may fail. u Preliminary tests are needed. Table 10 Reflex mark dimensions -56 up to +10 0 up to A / recomm. : 0 8Media 8.4 27 Cut-out Mark Dimensions Labels with cut-out marks Endless material with cut-out marks for marginal cut-out marks minimum liner thickness 0,06 mm Fig. 14 Dim. Cut-out mark dimensions Designation Dim. in mm A Label distance >2 N Width of cut-out mark >5 P Height of cut-out mark 2 - 10 X Distance mark - middle of paper track -10 or 0 for gap sensor recognition for reflective sensor recognition -56 up to +10 Sensor recognized virtual label front edge Y1 Y2 with reflective sensor recognition 1) Front edge cut-out with gap sensor recognition Rear edge cut-out Distance recognized front edge - actual label front edge P up to A with reflective sensor recognition Z1 0 up to A-P with gap sensor recognition using transparent labels Z2 XX Adjust software settings 1) Table 11 Backside of the material must be sufficiently reflective. Cut-out mark dimensions Marginal cut-out Fig. 15 Long hole cut-out Samples for cut-out marks Rectangular cut-out Circular cut-out Cut-out between the labels Not recommended ! Not recommended ! 28 9 Licences 9.1 28 EC Declaration of Conformity cab Produkttechnik GmbH & Co KG Wilhelm-Schickard-Str. 14 D-76131 Karlsruhe Germany EC Declaration of Conformity We declare herewith that as a result of the manner in which the device designated below was designed, the type of construction and the devices which, as a result have been brought on to the general market comply with the relevant fundamental regulations of the EC Rules for Safety and Health. In the event of any alteration which has not been approved by us being made to any device as designated below, this statement shall thereby be made invalid. Device: Label Printer Type: MACH4 Applied EC Regulations and Standards: Directive 2006/95/EC relating to electrical equipment designed for use within certain voltage limits • EN 60950-1:2006 +A11:2009+A12:2011+A1:2010+A2:2013 • EN 61558-1:2005+A1:2009 Directive 2004/108/EC relating to electromagnetic compatibility • EN 55022:2010 • EN 55024:2010 • EN 61000-3-2:2006+A1:2009+A2:2009 • EN 61000-3-3:2008 Signed for, and on behalf of the Manufacturer : Sömmerda, 27.02.2015 cab Produkttechnik Sömmerda Gesellschaft für Computerund Automationsbausteine mbH 99610 Sömmerda Erwin Fascher Managing Director 9.2FCC NOTE : This equipment has been tested and found to comply with the limits for a Class A digital device, pursuant to Part 15 of the FCC Rules. These limits are designed to provide reasonable protection against harmful interference when the equipment is operated in a commercial environment. The equipment generates, uses, and can radiate radio frequency and, if not installed and used in accordance with the instruction manual, may cause harmful interference to radio communications. Operation of this equipment in a residential area is likely to cause harmful interference in which case the user may be required to correct the interference at his own expense. 10Index A Adapter dismounting................................. 11 mounting...................................... 11 C Cleaning......................................19, 20 cutter............................................20 label sensors................................19 printhead......................................19 print roller.....................................19 Cleaning information.........................19 29 K Release button of the print module.....6 Key cancel..........................................10 feed..............................................10 menu............................................10 pause...........................................10 Key functions.....................................10 offline menu.................................10 print mode....................................10 Ribbon rewind hub..............................6 Roll hub...............................................6 adapting....................................... 11 S Safety instructions...............................4 Scope of delivery.................................7 Service work........................................5 L Switching on........................................7 Label dimensions..............................24 Symbol displays..................................8 CompactFlash card slot.......................6 Label outlet in the control panel..........6 Synchronization of the paper feed.....18 Connecting..........................................7 T Cutting mode.....................................18 Label rolls loading......................................... 11 Label sensor cleaning.......................................19 positioning....................................15 selecting.......................................15 D N U Device dimensions............................25 Navigator pad..................................6, 8 Unpacking...........................................7 P V PC card slot.........................................6 Voltage................................................4 Peel-off mode....................................18 loading labels...............................14 Power save mode................................9 W Control panel...................................6, 8 Cover...................................................6 Cut-out marks....................................27 Device overview..................................6 E Endless material................................24 Environment....................................4, 5 Errors messages....................................22 types............................................21 EU Conformity Declaration................28 F Fanfold labels loading.........................................13 G Gap sensor positioning....................................15 selecting.......................................15 Graphic display................................6, 8 H Holder slots.........................................6 I Important information..........................4 Power supply socket...........................6 Power switch.......................................6 Pressure roller.....................................6 Printer state correctable error............................9 critical fault.....................................9 irrecoverable error.........................9 pause.............................................9 printing label..................................9 ready..............................................9 Printer states.......................................9 Printhead.............................................6 cleaning.......................................19 damage........................................18 Printhead mounting.............................6 Print roller cleaning.......................................19 Problem solution................................21 Installing..............................................7 R Intended use........................................4 Ready for operation...........................18 Interface ethernet..........................................6 serial..............................................6 USB...............................................6 Reflex marks.....................................26 Reflex sensor positioning....................................15 Tear-off mode....................................18 Transfer ribbon loading.........................................16 winding direction..........................17 Warning stickers..................................5 30 30 This page is intentionally left blank.