1
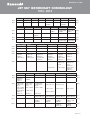
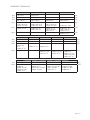
Instructor Lesson Plan 2014
Ultra® Pro Service
Service Training and Communications
Kawasaki Motors Corp., U.S.A.
Ultra® Pro Service
Technical Training
Kawasaki Ultra® Pro Service
Tools and Materials
Lesson
Tool / Item
Part No./Backup
Finding TDC
TDC finder
57001-402
Diagnosing Mis-Timed Cams
Jumper wires
Radio Shack, tackle box
Ultra X Exhaust Filters
Diffusers
Supercharger Belt Tens
Early tensioning tool
57001-1697
Later tensioning tool
13280-0726
Replacement eng mnt
92161-3789
Wrench extension
08-0134
24” long ½” dr extens
WBB993361
Replacing S/C Belt
½” to 3/8” reducer
2x4
Inspecting/Removing Pump
Impeller
Removing Pump Shaft
Impeller vise holder
57001-1695
Impeller wrench
57001-1228
Bearing driver set
Sunex
Later model 3-bear shaft
Pump Reasembly/Reinstall
Old pump shaft
13107-3788
New pump shaft
13107-0764
New pump bearing
92045-3744 x2
New pump bearing
92045-3745
Snap ring
92033-3730
Oil seal
92049-3739 x3
Nut
92015-1512
Oil seal
92093-3749
o-ring
92055-3741
o-ring
92055-3744
1
3
Ultra® Pro Service
Technical Training
Ultra Key Registration
KDS Diagnostics
o-ring
93055-1101
o-ring
92055-0183
o-ring
92055-025
Spare keys
27008-3767, tackle box
Registration tool
57001-1582
2010 and later cable
57001-1746
KDS kit and laptop
PWC relay cable
Lab Activity Fog S/C
Fogging aerosol
General
General supplies
2
57001-1696
See training center assets list
Hands‐On TTraining 2014
4
Technica
al Training
g Sign‐In Sheet On Course:: Kawasaki Hands‐O
n: Location
print clearlly, name/d
dealer num
mber Please p
D
Date: Instructtor: Please copy this sheet for e
each class instructed
d.
Hands-On Training 2014
Technical Training
Instructor Notes
Course objectives
• Demonstrate (throught written assessment) knowledge of MuleTM product,
including service bulletins
• Bleed a MuleTM cooling system
• Time a diesel MuleTM fuel injection pump
• Perform basic maintenance checks on a MuleTM CVT system
• Demonstrate (through written assessment) understanding of operation of MuleTM
CVT system
• Disassemble, inspect and reassemble a MuleTM CVT system
• Demonstrate competency in performing basic engine diagnostics
• Use the MuleTM built-in self-diagnostics to retrieve fault codes
• Use KDS3 to retrieve MuleTM fault codes
Course ethic and thrust
• There is plenty of time to do things in various ways. Draw pictures, talk,
demonstrate – it is up to you.
• Your lecture/discussion should be grounded on K-Dealer and the official service
manual online. Use both, and have both open, during class discussions.
• No service bulletins are included in the student workbook so the student is
encouraged to look the bulletins up in K-Dealer.
Online use
• I recommend you have at least one (loaner?) laptop at the student’s disposal so
they can look up service bulletins. We want to model this for our students.
• We also want to model how the efficient shop uses K-Dealer.
The lesson plan
• This lesson plan is not scripted, it is merely a skeleton framework around the
student objectives. You the instructor put the flesh on the content by bringing
your background, experience and unique perspective to the subject. Focus on
the objectives.
• Pieces of the student workbook are included in the lesson plan for your
convenience.
• The final quiz is also included in the lesson plan.
The student workbook
• The student workbook is half notepages and half resources.
• A workstation check-off sheet is provided for the student also.
Taking attendance
• You have three choices: Do it online, the most efficient way
• Or use the student namecards inside the students’ workbooks
• Or use the traditional one-sheet sign-in sheet – be sure to label with course and
date
Course quiz
• The course is designed to have the students take the quiz in class before they
leave
Day 1
FINDING TRUE TDC 20 MIN
DIAGNOSING MIS‐TIMED CAMS 15 MIN
SPARK PLUG REPL TIPS 15 MIN
LAB 75 MIN
Day 2
REMOVING PUMP IMPELLER 15 MIN
REPL PUMP BEARINGS 15 MIN
REASSEMBLING PUMP 15
LAB 120 MIN
Day 3
TAKING OUT OF STORAGE 15 MIN
LAB 90 MIN
LUNCH BREAK 60 MIN
DEBRIEF 15 MIN
Day 1
INTRO 15 MIN
ULTRA HISTORY 15 MIN
ULTRA SERVICE BULLETINS 30 MIN
AM BREAK 15 MIN
Day 2
DEBRIEF 15 MIN
INSPECT JET PUMP IMPELLER 15 MIN
INSPECT JET PUMP CASE 15 MIN
INPSECT PUMP BEAR & SEALS 15 MIN
Day 3
DEBRIEF 15 MIN
SVCING SUBMERGED PWC 45 MIN
PREP FOR STORAGE 30 MIN
AM BREAK 15 MIN
END OF COURSE
FINAL QUIZ 20 MIN
Day 3
MAKING A SHOP KEY 15 MIN
ULTRA KEY REGSITRATION 30 MIN
DEBRIEF 15 MIN
LUNCH BREAK 60 MIN
Day 2
250/260 S/C BELT TENS 10 MIN
SUPERCHG PWC EXH FILTERS 10 MIN
DEBRIEF 15 MIN
LUNCH BREAK 60 MIN
Day 1
Kawasaki Ultra® Pro Service Course Map
END OF DAY 2
LAB 90 MIN
KDS DIAGNOSTICS 30 MIN
ONBOARD DIAGNOSTICS 30 MIN
Day 2
END OF DAY 1
LAB 120 MIN
REPLACING THE S/C BELT 15 MIN
Day 1
Ultra® Pro Service
Technical Training
Enrolling student(s)
User Browser
Find user(s)
Checkmark user(s)‐‐>select "Actions"
Select "Training Registration"
Find course
Click "Review and Confirm"
Find location, scroll down, click"Perform"
Click "Done"
Marking student(s) attended
Registration browser
Find your section way down at the bottom
Make New Status "Complete"
Click "Perform"
Filter by Course Section
Click "Actions" tab, checkmark students, select "Edit Status"
Choose completion date, click "Review and Confirm"
Click "Done"
Ultra 300 Pro Service
Technical Training
Ultra 300 Pro Service
Introduction
Ref
Lesson Objectives
The student will:
1. Learn and anticipate the direction and scope of the course
2. Be informed of the location of the restrooms and fire extinguisers
Notes
Benefit to the Student
The introduction will “break the ice” and prepare the student to get into the
mood to learn. It sets the tone, perspective, and pace of the course. It also
allows late-comers time to arrive and not miss too much core material.
Lesson
LIVE
OL
DAY 1
A. Introduction
1. Welcome
2. Explain location of restrooms, coffee, fire extinguishers
3. Highlight objectives (found on sequence page)
4. Describe day’s schedule, time of breaks
5. Take attendance online on the K-Tech Learning Center
1
8:30am
Ultra 300 Pro Service
Technical Training
Kawasaki Ultra® 300 Pro Service
Ultra® 300 Service Bulletins
Ref
Lesson Objectives
The student will:
1. Through assessment, demonstrate overall knowledge on the
Kawasaki Ultra 300 product.
2. This will include the general topics of Teryx service bulletins.
Benefit to the Student
This lesson will start the student on his/her way to becoming the dealership
expert in the Ultra 300 product.
Notes
Test VINs
JKAEXMJ198DA00113
JKAEXMJ13ADA60281
Lesson
PPT
OL
OL
A. Brief history of the Kawasaki Ultra supercharged personal watercraft
1. Show Ultra 300X/Lincoln video
2. Quick overview of Kawasaki supercharged pwc change history
3. Quick glance at chronology page re model identification
B. Light overview of Jet Ski® service bulletins since 2007 (not all s/c)
1. Do this online on k-dealer, skip hangtag and emissions cert bulletins
2. Start with WTY 05-04 emphasize dlr responsib, levels of campaigns
3. JS 07-01 Ultra 250X/LX key registration (see also key registr
technical video on the K-Tech Learning Center) INFO
4. JS 07-02 Ultra 250X/LX fuel rail hose RECALL
5. JS 07-03 Ultra 250X/LX throttle lever housing RECALL
6. JS 07-04 Ultra 250X/LX ignition switch replacement FDM
7. JS 07-05 Ultra 250X spark plug replacement FAR
8. JS 07-06 Ultra 250X supercharger water intrusion FDM
9. JS 08-01 Ultra 250, STX15F throttle body replacement FDM
10. JS 08-02 STX12F, 15F, STX DI, Ultra 130 DI fuel hose repl RECALL
11. JS 09-01 STX, STX15F, 800 SX-R fuel tank replacement RECALL
12. JS 09-02 2008 STX15F fuel tank inspection RECALL
13. JS 09-03 900 STX, 1200 STX fuel tap inspection RECALL
14. JS 10-02 Ultra 260X/LX water box muffler fitting inspection FDM
15. JS 10-03 STX, STX 15F fuel pump clamps and holder inspection
RECALL
16. JS 11-01 Ultra 300X/LX system flushing and s/chgr fogging INFO
17. JS 11-02 2011 and 2012 STX15F, Ultra 260X/LX, 300X/LX steering
cable inspection RECALL
18. JS 12-01 All 2007~2010 Supercharger lubrication kit INFO
19. Demonstrate using VIP on k-dealer online
20. Mention Managing the Campaign Process eLearning course – show
location online on Learning Center
21. Open K-Tech News Vol 20, Issue 1 re danger of bolts under engine
22. Answer any questions that come up
2
8:45am
Quick “here is what
and where” – no
more than this,
unless it is to ask
students their
experience with
doing these
campaigns.
Doing on k-dlr
“models” for
students how they
should be using kdealer.
Also see K-Tech
News
Manual says to fog
supercharger 10
seconds daily
Mention retrofit kit
99999-0349
Volume 20, Issue
1, pg 13
Ultra 300 Pro Service
Technical Training
Ultra 300 Pro Service
Ultra 300 Basic Maintenance
Lesson Objectives
The student will:
1. Find true TDC using the output coupler method
2. Remove and inspect exhaust diffuser
3. Remove and install supercharger drive belt
4. Properly tension supercharger drive belt
Notes
Benefit to the Student
This lesson will add competency to the dealer technician and improve his or
her daily confidence.
BRK
OL
OL
LIVE
Lesson
A. 15-minute break 10:00~10:15
B. Finding true TDC after valve adjustment
1. Open and review K-Tech News article Mind the Valve Shims, Volume
24, Issue 2, pg 6
2. Open and review K-Tech News article Simple 4-Stroke Watercraft
Cam Timing, Volume 23, Issue 2, pg 6.
3. Crankshaft rotates counterclockwise facing drive coupler
4, Find approximate TDCC (TDC compression) on the number one
cylinder using an aerosol spray can straw or something similar
5. Install a dial indicator and after getting a more precise TDC location,
felt pen mark the output coupler
6. Then rotate the engine the opposite direction until getting your
indicator high spot again, and mark the coupler again.
7. The exact TDCC is between the two marks
8. Install the camshafts in the usual way
C. Technique for diagnosing mis-timed camshafts
1. If engine is running poor, use jumper wires to swap the crankshaft
position sensor (ignition pulser’s) wires
2. If engine runs better, the cams (usually exhaust cam) are out of time
D. Spark plug replacement tips
1. Open Service Bulletin JS 07-05 (FDM) on k-dealer.
2. Emphasize bulletin concerns factory-installed plugs, but issues can
be encountered with dealer-installed plugs also, if over-tightened.
Note the 113 in-lb recommendation.
3. Discuss contribution supercharged watercraft adds to issue
a. Excess water in cylinder due to moisture in exhaust
b. Later models have exhaust filter (diffuser)
10:00am
10:15am
Method originates
in 2003
JT1200B2 service
manual
(99924-1312-03),
pg 6-20.
While speaking of
couplers, bring up
issue of using
ignition rotor to hold
against coupler
torquing, not
recommended.
See K-Tech News
Volume 20, Issue
1, pg 12
Explain that what
the trick does is
invert the pulser’s
sinewave, which
retards spark,
aligning it better
with a mis-timed
camshaft.
More on the
exhaust diffuser
after lunch
3
Ultra 300 Pro Service
Technical Training
LAB
BRK
LIVE
PPT
PPT
LAB
KNW
E. Practical (lab) activity 10:45~12:00 – students’ assignments:
1. Find exact TDC using the output coupler method
F. Lunch break 12:00~1:15
G. Activity debrief 1:15
H. Supercharged Kawasaki watercraft exhaust filters (diffusers)
1. Introduced in 2011 with the then-new 300X/LX
2. Designed to limit backflow of normal exhaust water into cylinder on
engine shutdown especially, and at idle
3. Retrofit kit part number 99999-0350 includes reducer bushings
4. 25-hour inspection/replace interval (in owner’s manual)
5. Mid-production 2013 and later s/c boats have a diffuser with a hole in
it which makes the diffuser last longer, plus a pin in the exhaust pipe
I. 250 and 300 supercharger belt tensioning
1. Special tool -1697 is req for early, 13280-0726 for later Eaton s/c
2. Line up tool with tensioner plate bolt
3. Make sure it’s straight up and down
4. Then swing upward til touches tensioner pulley (idler wheel)
5. Correct tension is between two marks on tool
6. Remember to loosen tensioner locking bolt (in the pulley) before
attempting to use vertical adjusting bolt
7. After tensioning, disable ignition by unplugging ignition coil primary
wires (or simply remove cam position sensor if this is easier)
8. Crank engine for 5 seconds
9. Recheck belt tension
J. Replacing the supercharger belt
1. Remove seats and rear grip plate
2. Unbolt oil separator
3. Unbolt all four engine mounts (between engine and mount, not
between mount and hull)
4. Remove the belt guard
5. Loosen the intercooler hose clamps
6. Loosen or remove the exhaust upper member (don’t forget the bolts
hidden under the brand plate)
7. Slacken the supercharger belt
8. Use a 2x4 to scoot the engine forward until there is room enough to
slip the belt out – be careful the engine does not fall off its mounts
9. Slide the engine back again, reattach everything, bolt engine down
10. The engine mount bolts need to be torqued, use a wrench adapter
and mount it on an extension at a 90 degree angle
K. Practical (lab) activity – students’ assignments:
1. Look up on K-Dealer service bulletin JS07-06
2. Remove and inspect exhaust diffuser
3. Remove and reinstall supercharger drive belt
4. Properly tension supercharger drive belt
L. Knowledge check 4:00-4:05
M. End of day – 4:05
4
10:45am
12:00pm
1:15pm
1:30pm
Filter with hole in it
goes to 25 hours
(2015 spec)
Highmaintenance
Supercedes
This tip is also
found in K-Tech
News Volume 21,
Issue 2, pg 6, and
Volume 21, Issue
3, pg 9
This tip is also
found in K-Tech
News Volume 20,
Issue 1, pg 16
Refer to manual
2:00pm
4:00pm
Ultra 300 Pro Service
Technical Training
Ultra 300 Pro Service
Ultra 300 Jet Pump Maintenance
Ref
Lesson Objectives
The student will:
1. Visually inspect and measure jet pump clearances and wear
condition
2. Inspect pump bearings and seals
3. Disassemble and reassemble the complete jet pump assembly
Notes
Benefit to the Student
Parallel to a motorcycle’s drive chain or shaft, the personal watercraft drive
pump is an important system requiring its own informed maintenance and
skillful repair. The technician is to gain valuable proficiency in this area.
Lesson
OL
DAY 2
A. Debrief previous day
B. Inspecting pump impeller
1. First 25 hrs/year, then every 50 hrs/year
2. Visually inspect impeller for pitting, cavitation burn, nicks or other
damage
3. If significant, remove the impeller to sand or file edge imperfections,
(not cavitation burn) taking care to leave smooth leading edges to
prevent cavitation
4. Measure impeller outside diameter at 159.5~159.7mm, 1mm less is
the service limit
C. Inspecting pump case
1. Measure impeller-to-pump clearance at 0.15~0.30mm, 0.60mm is
service limit – if out that far determine whether impeller or case
2. Measure pump inside diameter at 160.0~160.1mm, 1mm more is the
service limit
D. Inspecting pump bearings and seals
1. Remove pump
a. Remove steering nozzle, reverse cable, pump cover, pump bolts,
speed sensor, steering cable, coolant hoses
b. Disengage pump from drive shaft and slide out
2. Spin impeller by hand to check bearing smoothness
3. If roughness is felt, replace bearings and seals
E. Removing pump impeller
1. Remove pump outlet, pump cap, impeller seal
2. Clamp tool -1695 in a vise
3. Unscrew impeller using tool -1228
5
8:30am
Periodic maint
table
0.006”~0.012”
In manual
Ultra 300 Pro Service
Technical Training
OL
LAB
BRK
F. Removing pump shaft and replacing shaft bearings
1. With impeller removed, slide out pump shaft with its bearing
2. Press the shaft bearing off in a press
3. Press out the two bearings in the pump case with a bearing driver,
suitably sized socket or piece of pipe, in a press
4. Remove the snap ring and press out the pump case seal
G. Reassembling the pump
1. Blow out case with compressed air
2. Inspect coolant outlet filter, install new o-ring
3. Install new grease seals and snap rings, filling the gap between the
seals with grease
4. Install the bushing, filling its area with grease also
5. Press in the new bearings until they bottom out
6. Press a new bearing onto the pump shaft
7. Put a new o-ring onto the pump shaft
8. Install the impellor all the way, then remove and check threads for
galling – if visible replace both impeller and shaft with new
9. Reinstall impeller and check the impeller distance above the pump
case for less than 10.5mm, if incorrect, disassemble and reassemble.
H. Practical (lab) activity 10:00 – students’ assignments:
1. Remove jet pump, make inspection checks per manual
2. Completely disassemble and reassemble jet pump
I. Lunch break 12:00~1:00
J. Debrief activity 1:00~1:15
6
These are just the
hghlights, see the
manual for each
step
In manual
10:00am
12:00pm
1:00pm
Ultra 300 Pro Service
Technical Training
Ultra 300 Pro Service
Ultra 300 Advanced Maintenance
Ref
Lesson Objectives
The student will:
1. Register one or more Ultra electronic keys
2. Retrieve fault codes using onboard diagnostitcs
3. Retrieve fault codes using KDS3
Notes
Benefit to the Student
These skills are important to the dealer’s ability to properly service the
product, and more importantly, serve the customer. Mastery of these skills
will allow the technician to be more productive.
OL
LIVE
Lesson
A. Ultra key registration
1. Run Ultra Key Registration video on Learning Center online
2. Emphasize difference between 1st key and the subsequent keys
a. 1st key produces a read beep AND a rewrite beep, subsequent
keys produce only write beeps in keeping with their sequence
3. Emphasize hold-down for last key until get long beep
4. Emphasize MUST remove dongle immediately afterward
a. Don’t want to give dongle to customer
b. More importantly, boat will not start with dongle still attached
5. Remind that new Y-cable is needed on 2010 and later boats
6. Discuss how Immobilzer system works, how it is different and how it
is similar to Concours system
a. Both ECUs have six “slots”
b. But Ultra slots can be erased, Concours cannot
c. Both systems use radio waves
d. Both systems require all keys to be present during a registration
episode
e. Both systems require a an already-working key to start the
reregistration process
f. Neither system uses a master key (as does the Euro market
motorcycle Immobilizer)
g. Ultra Immobilizer requires only an inexpensive special dongle, the
Concours requires KDS
7. Discuss what happens when all keys are lost in both systems
a. In both systems, the ECU must be replaced
b. On the Ultra, the ECU comes totally blank and new keys are sold
separately
c. The first two keys will register without needing the dongle
d. On the Concours, a new ECU comes with two keys (fobs) already
pre-registered just like in the bike in a crate
e. KDS is needed to register any additional keys on the Concours
7
1:15pm
Same dongle Euro
Kawasaki sport
bikes use,
57001-1582
Part number
57001-1746
Ultra 300 Pro Service
Technical Training
LIVE
OL
B. Making a “shop” key
1. Why would you want to make a shop key?
a. Number one reason is customer service. More pwc users lose
their keys than users of any other product. Having a shop key
allows you to offer a key replacement service, and it can be
marketed at the time of the service as a customer benefit that is
much less expensive than replacing the ECU.
b. Another benefit is when your customer brings in the boat for
service and forgets to leave you their key. You don’t have to
waste time trying to get a hold of them.
2. How to make a shop key
a. Naturally, the two keys that come with the boat are already
registered from the factory, so key registration is never a required
part of A&P.
b. However, if you add key registration to A&P on every unit you sell,
before it is delivered to the customer, and include the same third
“shop key” every time (paint it black and keep it with your shop
special tools), you will then have access to every boat you have
sold and have reregistered the keys on.
c. Obviously, if the customer should at some time at another shop
have a registration episode redone for any reason (adding another
key for an additional family member?), then your shop key will no
longer work on that customer’s unit because it will have been left
out of that new registration episode. Something to keep in mind.
C. Onboard diagnostics
1. Also called dealer mode and self-diagnostics
2. Recommend resource K-Tech News Volume 22, Issue 2, Volume 22,
Issue 3, and Volume 22, Issue 4 “Kawasaki Fuel Injection Simplified.”
3. Push SET and MODE buttons simultaneously for 3 seconds or more
4. Read the codes on the instrument display, look up in the manual
5. Turn boat off to cancel self-diagnosis
6. Run the boat to at least 18 mph to confirm no issues remaining
7. On this model, DFI fault codes are not erasable, not even using KDS
8
You don’t have to
tell your customer
you were able to do
this because you
made a master key
at the time of sale.
Ultra 300 Pro Service
Technical Training
OL
OL
LAB
D. KDS3 diagnostics
1. Open K-Tech News online, Special Edit 2012, pg 8
2. Also recommend
a. K-Tech News Volume 24, Issue 3 and Volume 24, Issue 4
b. And K-Tech News Volume 20, Issue 4
3. Also recommend the many KDS resources on k-dealer in the special
tool section – show online also
a. Connection guide
b. Installation manual
c. Components list
d. Software download point
4. Don’t forget relay cables (renamed comm cables in 2010)
a. 57001-1535 for small hull (22” long) boats
b. 57001-1696 for large hull (32” long, Ultra series) boats
5. Path to KDS Failure History
a. Start menuÆWithout SmartÆMain menuÆFI menuÆDiagnosis
b. Click Failure History button
c. Codes are not erasable
E. Practical (lab) activity – students’ assignments:
1. Register one or more Ultra keys
2. Retrieve DFI fault codes using dealer mode, look up in service
manual
3. Retrieve DFI fault codes using KDS3, look up in service manual
F. Knowledge check 4:30~4:40
G. End of day 4:40
9
3:00pm
4:30pm
4:40pm
Ultra 300 Pro Service
Technical Training
Ultra 300 Pro Service
Ultra 300 Seasonal Maintenance
Ref
Lesson Objectives
The student will:
1. “Fog” a supercharger per Kawasaki procedure
2. Assemble a storage prep checklist for their and their customers’ use
Notes
Benefit to the Student
With the highly seasonal nature of personal watercraft use, it is important
that the technician be skilled in performing seasonally-specific maintenance.
“Winterization” and preparing for use techniques are invaluable, equipping
the technician to function at a high level at the dealership.
Lesson
DAY 3
A. Debrief of yesterday’s activities
B. Servicing a submerged personal watercraft
1. Remember to educate your customers that a capsized Ultra must
always be rolled to the left to minimize the water that enters engine
2. Remove the seats to gain access to the engine bay
3. Open the stern drain screws
4. Remove the airbox drain cap to drain any water out
5. Disconnect the ignition coil primary leads
6. Remove spark plugs
7. Crank starter to purge water from engine cylinders (wear eye
protection)
8. Reinstall spark plugs and start engine and run for no more than 15
seconds, or hook up water hose to run longer
9. Inspect the fuel tank and engine oil for water
10. Reinstall the stern drain screws and run craft under load for a
minimum of 10 minutes to fully dry out engine and exhaust
10
8:30am
8:45am
From coolig and
bilge chapter,
Fault codes 51 and
52 will be created
by cranking engine
with no coils
attached, the codes
are clear-able but
not erasable.
Ultra 300 Pro Service
Technical Training
C. Preparing the Ultra for storage
1. Be proactive in sending emails or postcards to your Ultra owners
to have their boats winterized just before the season ends
2. Take a photo of the boat to record its condition, especially if you are
offering storage service at the dealership
3. Don’t plan on storing the boat in the water
a. The paint will lift from the hull
b. Electrolytic corrosion will happen
4. Attend to any service needs before storage
a. Perform a walkaround, noting maintenance needs
b. Performance issues
c. Fault codes
d. Check VIP for outstanding service campaigns
5. Best practice is actually to perform a full maintenance service
a. Change oil and filter
b. Check valve clearances
c. Check for fault codes
d. Grease pivots, linkages, cables
e. Check all hoses for condition and their clamps for tightness
f. Inspect air filter and clean if necesary
6. Flush the cooling system per the manual
a. After doing as the manual describes, go a step further and unhook
the coolant output hose at the engine and allow water to drain into
the engine bay
b. Remember to reattach the hose and properly tighten its clamp
7. Flush the bilge system per the manual
8. Completely drain the fuel tank and remove the fuel pump to replace
the fuel pump filter
9. Loosen the fuel filling cap to prevent tank condensation
10. Disconnect the ignition coil primary leads
11. Remove the spark plugs and fog the cylinders, bump the engine over
a few times to distribute oil around the cylinders
12. Apply anti-seize to the spark plugs and reinstall
13. 250/260 models – lube and fog per Service Bulletin 07-06
a. The supercharger must be fogged independently and specifically
apart from the rest of the boat – on the 250X this means
disconnecting the intercooler-to-supercharger tube and back
spraying from this point into the supercharger
b. For the 250X model this bulletin is especially important
c. Also WD40 the supercharger’s outside parts, being careful to
avoid the drive belt
d. This technique must be carried out in normal use also each time
the boat is used in salt water or in rough water
e. Inspect the drive belt for cracks, wear, tension
11
Open this bulletin
on k-dealer.
Ultra 300 Pro Service
Technical Training
14. 300 models fog using the built-in fogging hose
15. Reconnect the ignition coils
16. Charge battery, clean it , disconnect its negative cable, grease both
terminals and charge the battery once per month during the storage
period
a. A fully charged battery will not freeze
17. Clean and inspect the jet pump
a. Weeds, debris
b. Impeller condition
c. Bearing and seal condition
18. Wash out the engine compartment with a spray hose and open the
stern drain screws to drain the water off, wipe up any excess water
19. Wax the boat’s finish
20. WD40 all metal parts inside the engine bay and outside the boat
21. Prop the seat open with blocks of wood to maintain ventilation of the
engine bay during storage
22. Put a cover on the boat and store in a clean dry place
23. There may be pwc trailer needs also, as determined by your
customer
D. 15-minute break 10:00~10:15
E. Taking the Ultra out of storage
1. Check all linkages and cables, especially throttle and steering
2. Clean and gap spark plugs
3. Check all hose clamps
4. Make sure stern drain screws are screwed in
5. Check the fire extinguisher for a full charge
6. Inspect supercharger belt condition
7. Charge the battery if necessary
8. Remove the supercharger belt cover
9. Disconnect the ignition coil primary leads
10. Crank the engine once or twice while watching the supercharger
pulley to ensure supercharger isn’t frozen
11. Fill the fuel tank
12. Check the oil level and condition
13. With the seat still off , start the engine and check
a. Throttle response
b. Fuel leaks
14. After shutting off engine check
a. Oil level again
b. Check for oil leaks, water leaks
15. There may be pwc trailer needs also, as determined by your
customer
16. Point out to your customer the pre-ride checklist in their owner’s
manual when delivering the boat back to the customer
17. Point out factory recommendation to fog supercharger daily
12
Most folks simply
replace the battery
each season I
think.
10:00am
10:15am
Ultra 300 Pro Service
Technical Training
F. Practical (lab) activity – students’ assignments:
1. Fog a supercharger (both old style and new style if available)
2. Construct a concise pre-storage checklist for use by your shop or to
offer to your customer
3. Finish any uncompleted tasks
G. Lunch break 12:00~1:00
H. Debrief activity 1:00~1:15
I. Final quiz 1:15~1:25
J. End of day 1:25
13
10:30am
12:00pm
1:00pm
1:15pm
1:25pm
November 16, 2012
JET SKI® WATERCRAFT CHRONOLOGY
1973 - 2013
1973
400cc
WSAA/AB
1974
1976
WSAA
1977
1978
JS440-A1
1983
1984
JS440-A1A
JS440-A2
1985
JS440-A3
1986
1981
440cc
JS440-A6
JS440-A7
JS440-A8
JS440-A8U
JS440-A9
550cc
JS550-A1
JS550-A2
JS550-A3
JS550-A4
650cc
1990
1991
JS440-A4
JS440-A4A
JS440-A5
1988
JS300-A1:300SX
JS300-B2
JS300-A2:300SX
JS300-B3
300cc
JS300-B1
JS440-A10
JS440-A11
JS440-A12
440cc
JS550-A5
JS550-A6
JS550-A7
550cc
JF650-A1:X-2
JF650-A2:X-2
JS650-A1:650SX
JF650-A3:X-2
JS650-A2:650SX
650cc
1992
1993
1994
300cc
JS300-A3:300SX
JS300-A4:300SX
JS300-A5:300SX
440cc
JS440-A13
JS440-A14
JS440-A15
JS440-A16
550cc
JS550-A8
JS550-B1:550SX
JS550-C1:550SX
JS550-C2:550SX
JS550-C3:550SX
JS550-C4:550SX
650cc
JB650-A1:JET MATE
JF650-A4:X-2
JF650-B1:TS
JS650-A3:650SX
JB650-A2:JET MATE
JF650-A5:X-2
JF650-B2:TS
JS650-A4:650SX
JB650-A3:JET MATE
JF650-A6:X-2
JF650-B3:TS
JS650-B1:650SX
JL650-A1:SC
JB650-A4:JET MATE
JF650-A7:X-2
JF650-B4:TS
JS650-B2:650SX
JL650-A2:SC
JF650-A8:X2
JF650-B5:TS
JS650-B3:650SX
JL650-A3:SC
JF650-A9:X2
JF650-B6:TS
JH750-A1:750SS
JH750-A2:750SS
JH750-B1:Super
Sport Xi
JS750-A1:750SX
JS750-A2:750SX
JH750-A3:750SS
JH750-B2:Super
Sport Xi
JH750-D1:XiR
JS750-A3:750SX
JT750-A1:ST
JT750-A1A:ST
750cc
1995
550cc
JS550-C5:550SX
650cc
JF650-A10:X2
JF650-B7:TS
JL650-A5:SC
750cc
900cc
1100cc
1200cc
1996
1997
440cc
1987
300cc
1989
1980
400cc
440cc
1982
1979
JS400-A3
300cc
1998
440cc
550cc
650cc
1999
JL650-A4:SC
750cc
2000
550cc
650cc
JF650-B8:TS
JH750-A4:750SS
JH750-B3:Super
Sport Xi
JH750-C1:750ZXi
JS750-A4:750SX
JS750-B1:750SXi
JT750-A2:ST
JT750-B1:STS
JH750-E1:750SS
JH750-F1:Super
Sport Xi
JH750-C2:750ZXi
JH750-E2:750SS
JH750-F2:Super
Sport Xi
JH750-C3:750ZXi
JT750-B2:STS
JT750-B3:STS
JH900-A1:900ZXi
JH900-A2:900ZXi
JH900-A3:900ZXi
JT900-A1:900STX®®
JH1100-A1:1100ZXi
JH1100-A2:1100ZXi
JT1100-A1:
1100STX®
JS750-B2:750SXi
750cc
JH750-G1:Xi Sport
JH750-G2:Xi Sport
JS750-C1:SXi Pro
JS750-C2:SXi Pro
JS750-C3:SXi Pro
JT900-A2:900STX®
JT900-B1:900STX®
JT900-B2:900STX®
JH1100-A3:1100ZXi
JT1100-B1:
1100STX®
JH1100-A4:1100ZXi
JT1100-B2:
1100STX®
JH1100-A5:1100ZXi
JT1100-C1: 1100
STX® D.I.
1100cc
JH1200-A1:
Ultra®® 150
JH1200-A2:
Ultra® 150
1200cc
JT750-C1:750STX®
900cc
Page 1 of 2
WATERCRAFT CHRONOLOGY
2001
750cc
JS750-C4:SXi Pro
2002
2003
750cc
800cc
900cc
1100cc
1200cc
2004
JS750-C5:SXi Pro
JS800-A1:800 SX-R™
JS800-A2:800 SX-R™
JT900-E1:900 STX®
JT900-B3:900 STS
JT900-C1:900 STX®
JT900-B4:900 STS
JT900-C2:900 STX®
JT900-D1:900 STX®
JH1100-A6:1100 ZXi
JT1100-F1:1100 STX® D.I.
JH1100-B1:Ultra® 130 D.I.
JH1100-A7:1100 ZXi
JT1100-F2:1100 STX® D.I.
JH1100-B2:Ultra® 130 D.I.
JH1100-A8:1100 ZXi
JT1100-G1:1100 STX® D.I.
JH1100-B3:Ultra® 130 D.I.
JH1100-B4:Ultra® 130 D.I.
JH1200-A3:Ultra® 150
JH1200-A4:Ultra® 150
JT1200-A1:1200 STX®-R
JH1200-B1:Ultra® 150
JT1200-A2:1200 STX®-R
T1200-B1:STX®-12F
JH1200-B2:Ultra® 150
JT1200-C1:1200 STX®-R
JT1200-B2:STX®-12F
1200cc
JT1500-A1:STX®-15F
1500cc
900cc
1500cc
2005
2006
2007
800cc
JS800-A3:800 SX-R™
JS800A6F:800 SX-R™
900cc
JT900-E2:900 STX
JT900E6F:900 STX
1200cc
1500cc
®
JH1200-B3:Ultra 150
JT1200-C2:1200
STX®-R
JT1200-D1:STX®-12F
800cc
1100cc
2008
JS800A7F:800 SX-R™
JS800A8F:800 SX-R™
2009
JS800A9F:800 SX-R™
JT1500-A2:STX®-15F
800cc
900cc
®
1200cc
®
2010
1500cc
800cc
JT1200D6F:STX®-12F
JT1200D7F:STX®-12F
JT1500A6F:STX®-15F
JT1500A7F:STX®-15F
JT1500B7F:Ultra® 250X
JT1500C7F:Ultra® LX
2011
JS800AAF:800 SX-R™
JS800ABF:800 SX-R™
JT1500AAF:STX®-15F
JT1500DAF:STX®
JT1500EAF:Ultra® 260X
JT1500FAF:Ultra® 260LX
JT1500GAF:Ultra® LX
JT1500ABF:STX®-15F
JT1500GBF:Ultra® LX
JT1500HBF/ HBFA:Ultra® 300X
JT1500JBF:Ultra® 300LX
JT1500A8F:STX®-15F
JT1500B8F:Ultra® 250X
JT1500C8F:Ultra® LX
2012
JT1500A9F:STX®-15F
JT1500D9F:STX®
JT1500E9F:Ultra® 260X
JT1500F9F:Ultra® 260LX
JT1500G9F: Ultra® LX
1500cc
2013
800cc
JT1500ACF:STX®-15F
JT1500HCF/ HBFA:Ultra® 300X
JT1500JCF:Ultra® 300LX
JT1500KCF:Ultra® LX
JT1500ADF:STX®-15F
JT1500HDF:Ultra® 300X
JT1500JDF:Ultra® 300LX
JT1500KDF:Ultra® LX
1500cc
Page 2 of 2
Ultra® Pro Service
Technical Training
Ultra® Pro Special Tool List
The non‐factory tools listed here are not endorsed or guaranteed by Kawasaki Motors Corp. as to suitability or durability, but are mentioned as a courtesy only.
Ultra® Pro Service
Technical Training
Student ______________________________
Ultra® Pro Student Workstation Check‐Off
Ultra Familiarization
Ultra service bulletins
Finding True TDC
Find true TDC using coupler
Removing Exhaust Filter
Remove and inspect exh filter
Removing Superchrgr Belt
Remove and replace S/C belt
Properly tension S/C belt
Inspecting Pump Impeller
Remove jet pump and inspect
Rebuilding Jet Pump
Completely disass and reass
Registering Ultra Keys
Register one or more keys
Retrieving fault codes
Retrieve fault codes, onboard
Retrieve fault codes, KDS
Fogging Ultra Superchrgr
Fog the S/C both old and new
Preparing Ultra for Storage
Assemble a storage checklist
Tips for success:
1. Use the manual!
2. Use 90 in‐lbs on all 6mm bolts unless specified otherwise
3. Use your resources, including K‐Dealer
4. Stay busy, look for additional projects
5. Engines will be left in running condition
6. Take time to learn
7. The instructor is also your resource
Ultra® Pro Service
Technical Training
Student Profile
Name ________________________________________
Dealer Number ____________________
Class Location _________________________________
Date ____________________________
Position
Service Manager
Years in the industry
Over 25
-------------------------------------------------------- F O L D
GM/Owner
Technician
__________
10~25
5~10
1~5
AND
^^^^^^^^^^^^^^^^^^^^^^^^^^^^^^^^^^^^^^^^^^^ F O L D
T E A R ------------------------------------------------------
O N L Y ^^^^^^^^^^^^^^^^^^^^^^^^^^^^^^^^^^^^^^^^^
_____________________________________
NAME
Kawasaki Ultra® Pro Service Final Quiz Student name: 1. Kawasaki Ultra® service bulletins are found under which of the following K‐Dealer menus? a. Sales b. Parts c. Training d. Service 2. A special method is recommended for timing Kawasaki Ultra® camshaft because: a. The cams are not marked b. The crankshaft is not marked c. The crankshaft is hard to see inside the boat d. The cam chain tensioner is difficult to work with 3. The benefit of the later Kawasaki Ultra® model’s exhaust filter is: a. The filter helps the engine make more power b. The filter helps the boat produce more thrust c. The filter reduces the amount of water creep‐back in the exhaust d. The filter reduces exhaust temperature to reduce maintenance 4. The service manual recommends which of the following after tensioning the Kawasaki Ultra® supercharger drive belt? a. To fog the supercharger b. To torque the cylinder head c. To crank the engine and recheck belt tension d. To torque the engine mounts 5. A special procedure allows removing and replacing the Kawasaki Ultra® supercharger drive belt without removing the engine. a. True b. False 6. Later Kawasaki Ultra® jet pumps have a _____________ impeller shaft. a. Hardened b. 3‐bearing c. 1‐bearing d. Longer 7. KDS is used to register additional user keys on the Kawasaki Ultra®. a. True b. False 1 8. You may enter self‐diagnostic mode on the Kawasaki Ultra® by: a. Using KDS b. Grounding the correct wire c. Holding the Set and Mode buttons at the same time d. Holding the Set and Odometer buttons at the same time 9. Which of the following is one way a Kawasaki Ultra® must never be stored? a. On sawhorses b. On a trailer c. Under a tarp d. In the water 10. Any time water is drained out of the boat, which of the following must be remembered? a. To rev the engine to dry it out b. To retighten the stern drain screws c. To inspect the exhaust filter d. To inspect the supercharger 2 Hands-On Training 2014
Technical Training
Kawasaki Training Center Assets Checklist
√ ITEM
Adhesive bandages
Bearing driver set Sunex 3910
Brake aerosol Permatex Compression tester Coolant, engine
Corrosion Block aerosol
CVT pulley block for vise
CVT pulley holder
CVT pulley holder (compressor)
CVT pulley removing bolt
CVT rebuild parts (tackle box)
Deflection tool, ATV, RUV
Dial caliper
Diesel compression tester
Diesel comp tester adapter
Diesel timing tool
Diesel timing tool dial indicator
Duct tape
Engine oil
Feeler gauge set
Felt pen for Ultra cam timing
Fogging aerosol, Star Brite
Fuel hose for testing pump
Gasket scraper
Gasket scraper blades
Graduated beaker
Grease
Hand cleaner Fast Orange
Hose clamps (tackle box)
Inspection cap tool 3‐way
Jumper wires (tackle box)
KDS converter
KDS USB cable
KDS pre‐2010 comm cables
KDS Z1000 cable
KDS post‐2010 comm cable
KDS PWC relay cable, small hull
KDS PWC relay cable, large hull
Leakdown tester
Manometers
BX √ ITEM
BX √ ITEM
3
Manometer lanyards
2
Ultra TDC finding wire, 12 ga
2
Mechanics gloves
2
Ultra replacemt engine mount
3
Multimeter batt (tackle box)
2
Ultra impeller holder for vise
2
Multimtr fuse 800mA (tackle bx) 2
Ultra impeller wrench
3
Multimeter fuse 20A (tackle bx)
2
Valve adjust feeler 0.006"
3
Multimeter test leads for Sears
1
Valve adjust feeler 0.010"
1
Multimtr needle probes (tackle bx) 2
Valve adjust tool Teryx late
1
Oil drain pan
3
Vise jaws, aluminum 1
Oil funnel
3
Wipe down Meguires 1
Pilot screw adjusters
2
Wrench extension torque 2
Pressure gauge, oil and fuel
2
Ziplock bags, 1 qt size
2
Pressure gauge adapter
2
2
Safety glasses (15)
3
2
Sealer Kawabond 5
1
2
Sealer Threebond 1211
1
1
Sensor test cable, generic
1
1
Shop towels box of 200
2
1
Socket extens 24" long 1/2" dr 3
3
Socket adapter 1/2" to 3/8"
1
2
Sp plug sock 5/8, 18mm, 13/16
2
1
Straightedge 18"
2
3
Straightedge (pocket ruler) 6"
1
1
Tackle box with hardware
2
1
TDC finder
2
1
Tees plastic 1/8" (tackle box) 2
1
Teryx valve adj o‐ring (tackle)
2
3
Teryx offset long 10mm wrench
2
2
Torque wr 250 ft‐lb Storm 3T425 3
2
Torque wrench, in‐lb
2
1
TPS test cable
1
2
Ultra exhaust filter
1
3
Ultra FPO keys
1
3
Ultra key registration tool
1
3
Ultra key registr tool lanyards
1
3
Ultra key registration Y‐cable
1
3
Ultra s/c belt tens tool early
1
3
Ultra s/c belt tens tool late
1
3
Ultra 3‐bearing shaft late
1
2
Ultra 2‐bearing shaft early
1
2
Ultra pump rebuild parts (bag)
1
"BX" = number on outside of box, not quantity. Quantities vary between 1 and 4, average 2 per training center
BX
3
1
1
1
1
1
1
1
2
1
3